From Wikipedia, the free encyclopedia

Sound Recorder in Windows 11 |
|
| Other names | Voice Recorder |
|---|---|
| Developer(s) | Microsoft |
| Operating system | Microsoft Windows |
| Platform | IA-32, x86-64 and ARM (and historically DEC Alpha, Itanium, MIPS, and PowerPC) |
| Type | Sound recorder |
| Website | support |
Sound Recorder (known as Voice Recorder in Windows 10) is an audio recording program included in most versions of the Microsoft Windows family of operating systems. Its user interface has been replaced twice in the past.
History[edit]

![]()
Sound Recorder has been in most versions and editions of Windows since Windows 3.0, including Windows 9x, Windows Server and the client versions of Windows NT. Even Windows Mobile came with one. Its user interface and feature set saw very little change until Windows Vista, when features that lacked practicality were discontinued and Sound Recorder was simplified. This version of Sound Recorder was included in Windows 7, Windows 8 and Windows 8.1, but did not make it to Windows 10.
A second, different Sound Recorder was introduced in Windows 8.1, thus Windows 8.1 has two distinct apps called Sound Recorder. This second app was a Windows Store app and adhered to the design tenets of the Metro design language.[1] Leaked images of a preview version Windows 10 Mobile showed this app too.[2] When Windows 10 released, however, it was renamed Voice Recorder.[3] The original Sound Recorder was removed from Windows 10.
With the release of Windows 11, Voice Recorder was renamed back to Sound Recorder and included new features, such as changing the playback speed and the input source within the app.[4]
Features[edit]
Sound Recorder can record audio from a microphone or headset. In addition, many modern sound cards allow their output channels to be recorded through a loopback channel, typically called «Wave-Out Mix» or «Stereo Mix».
Before Windows Vista, Sound Recorder was capable of:
- Playing the audio files that it has recorded
- Converting the bit rate, bit depth and sampling rate of the audio file
- Inserting other audio files at the beginning, end or the desired location of the current audio
- Splitting out parts of the current audio clip
- Increasing or decreasing volume in 25% increments
- Increase or decrease playback speed in 100% increments
- Adding an echo (without reverberation)
- Reversing the current audio clip
These features, however, were either removed in Windows Vista or taken over by other applications.[5] The playback and trimming features reappeared in Voice Recorder, although Voice Recorder can only play its own recordings.[3]
Sound Recorder accepts command-line parameters.[6] This was removed in Windows 8, as Windows Store apps cannot be run with a parameter from the command-line.
File format[edit]
Before Windows 7, Sound Recorder could save the recorded audio in waveform audio (.wav) container files. Sound Recorder could also open and play existing .wav files. To successfully open compressed .wav files in Sound Recorder, the audio codec used by the file must be installed in the Audio Compression Manager (ACM); Windows installations dating back to at least Windows 95 came with a selection of standard codecs that included Truespeech, GSM 6.10, G.723.1, IMA ADPCM and CCITT A-law and u-law, with additional codecs being added in later editions.
Starting with Windows Vista, Sound Recorder saves recorded audio in Windows Media Audio (.wma) files instead; the exceptions to this are the Home Basic N and Business N editions, which continue to use .wav.[6] Also, audio metadata such as Artist, Album, Title, and Genre can be added to the sound file directly while saving the file.[5]
Voice Recorder in Windows 10 only records audio in MPEG-4 Part 14 (.m4a) container formats.
Issues[edit]
Versions of Sound Recorder before Windows Vista recorded audio to memory, rather than to the hard disk, and the length of recording was by default limited to 60 seconds. Microsoft recommends recording 60 seconds and pressing the Record button again to record another minute.[7] In addition, it is possible to use the Sound Recorder’s concatenation feature to increase the length of the audio file. For example, saving an initial 1 minute recording as «1min.wav» and then inserting the «1min.wav» file 9 times creates 10 minutes of recording which can then be saved as «10min.wav». This «10min.wav» file can then be suffixed to itself 5 more times (or as many times as there is room in memory) to create a «1hour.wav» file. By recording over any of these longer sound files, Sound Recorder can have an uninterrupted arbitrary recording time (limited only by primary memory).
In 32-bit versions of Windows before Windows Vista, on computers with more than 2 GB of RAM, after recording (but not when playing), Sound Recorder will return an error message indicating that there is not enough memory. This is a design flaw of older versions of Sound Recorder and officially cannot be resolved except by reducing the amount of available physical memory.[8] There does, however, exist an unofficial patch that resolves this problem.[9] Another solution to the ‘not enough memory’ error is to run the program in compatibility mode. This can be achieved by right clicking on the .exe file, then selecting: properties, compatibility tab, ‘run this program in compatibility for’, and selecting the appropriate option, such as ‘Windows XP Service Pack 2’.
The Sound Recorder in Windows Vista and later uses the hard disk for recording audio and can therefore record audio up to any length as long as there is free space on the hard disk drive.[10]
References[edit]
- ^ «Sound Recorder app for Windows: FAQ — Windows Help». Microsoft Support. Microsoft. Retrieved 26 December 2017.
- ^ Bright, Peter (6 February 2015). «Leaked images of Windows 10 for phones show us what to expect». Ars Technica. Condé Nast.
- ^ a b «Windows Voice Recorder». Windows Store. Microsoft. Retrieved 29 July 2015.
- ^ Chin, Monica. «How to record audio on Windows». The Verge. Retrieved 25 March 2023.
- ^ a b Ludington, Jake (January 19, 2009). «Sound Recorder in Windows Vista cannot open existing files». Jakeludington.com. Retrieved 2013-06-07.
- ^ a b «Windows Vista Help: Troubleshoot audio-recording problems». Archived from the original on 2009-11-09. Retrieved 2009-09-07.
- ^ «How to Increase the Maximum Recording Time in the Sound Recorder Utility». Support. Microsoft. 2011-09-24. Archived from the original on 2011-10-06. Retrieved 2013-06-07.
- ^ «You receive a «Not enough memory available to complete this operation» error message when you try to record a .wav file by using Sound Recorder». January 29, 2007. Archived from the original on March 6, 2007. Retrieved April 14, 2008.
- ^ «Devious and terrible sndrec32.exe (in russian)».
- ^ «Record sound». Windows. Microsoft. Archived from the original on October 12, 2009. Retrieved 29 July 2015.
To record audio on Windows 10, you can use the built-in Windows voice recorder. Although it is easy to handle, it lacks some efficient operations and may negatively impact audiences, or the built-in recorder is not working. Thus, finding a dedicated voice recorder for Windows 10 to make high-quality audio tracks is needed.
Here you will find out the most suitable Windows voice recorder that produces extraordinary audio tracks. Let’s look at the top 10 that record high-quality audio tracks within minutes!
| ?Recording tools tested | Inbuilt/third-party tools |
| ?Suitable for | Win/Mac |
| ✂️Related functions tested | Audio editing feature |
| ?Most recommended | EaseUS RecExperts (Win/Mac) |
Quickly jump to:
- Top 1. EaseUS RecExperts
- Top 2. Windows 10 Built-in Voice Recorder
- Top 3. RecordPad
- Top 4. Ardour
- Top 5. Audacity
- Top 6. WavePad
- Top 7. GoldWave
- Top 8. Zynewave Podium Free
- Top 9. Recorder Ones
- Top 10. Lucky Recorder
Top 1. EaseUS RecExperts
EaseUS RecExperts is the software that comes at the top in the list of best voice recorder for Windows 10. It not only produces high-quality audio output but also allows you to choose the audio resource from the system or a microphone, select the output format of audio, trim the recordings, and so on. Besides, it can act as an internal audio recorder, which helps you to record system sound on Windows with no hassle. Apart from that, it is also an excellent Windows screen recorder, which lets you capture any of your screen with a few simple clicks.
Main features of this all-in-one screen and audio recording software:
- In-built audio trimming options are available
- Easy-to-use audio recording software
- Do screen and webcam recordings in seconds
- The game recorder for PC to capture various gameplay
- Choose the output format, bitrate, and sampling rate of an audio
If you like this voice capture, you can download it! In the trial version, you don’t need to register an account.
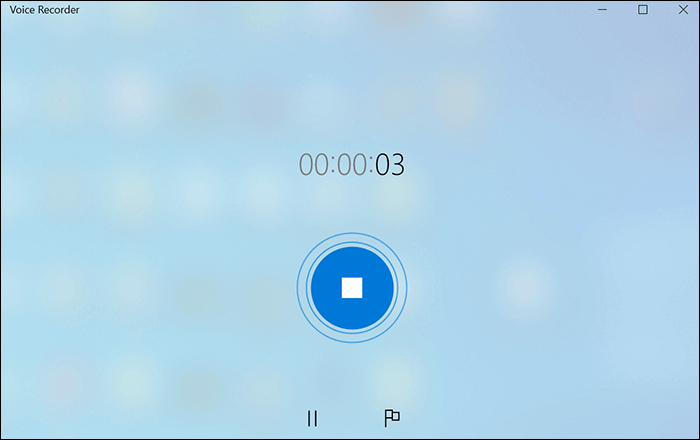
Top 2. Windows 10 Built-in Voice Recorder
If you only need to capture your voice instead of other complex audio-capturing activities, you can use the built-in Windows 10 voice recorder. It is extremely easy, and you don’t need any third-party software on a PC.
To record audio on Windows PC, you need to find the Voice Recorder, then click the Record button to begin your recording. Also, you can capture the external sound by adding a microphone.
Pros:
- Record voice quickly and easily
- Simple interface for beginners
- Capture voice over a long time
Cons:
- Hard to capture the system sound from PC
- Lack of advanced settings for audio
Top 3. RecordPad
RecordPad is a Windows 10 sound recorder. The tool can easily capture audio from notes, sounds, or any form of music. It’s suitable for recording digitized representations and supports MP3 and WAV soundtracks. Compared to the Windows default recorder, it has more sound capturing options. With its aid, you can even save audio from YouTube effortlessly, if needed. To conclude, this Windows voice recorder easily captures audio tracks using a PC, laptop, or other devices.
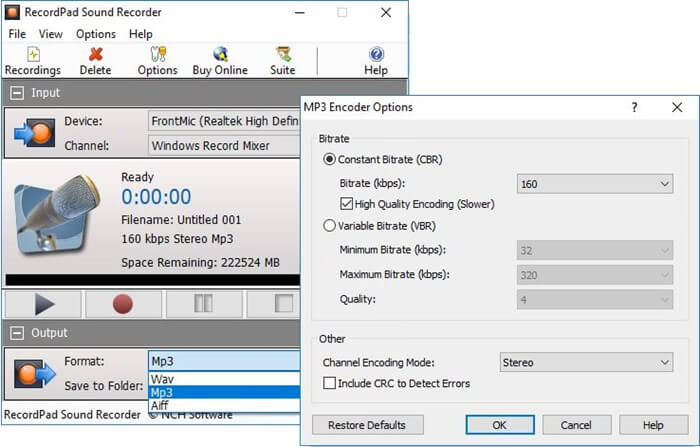
Pros:
- The output file can be saved on hard drives
- Simple and robust recording software allows to record audio tracks for personal and professional use
- Burn the file directly to CD/DVD while operating the recording
Cons:
- Work better for small-size audio files
- The output formats for audio are limited
Top 4. Ardour
To extract audio from video, Ardour can turn out to be quite handy. This software is an easy-to-use audio recorder for Windows 10 that allows the user to record audio tracks through multiple channels.
You can easily record clear audio tracks and save them on your Windows 10 desktop/ laptop or keep it for future editing tasks. The best thing is that the files recorded by this software occupy very little space on your PC and can be deleted anytime when there’s a space issue.
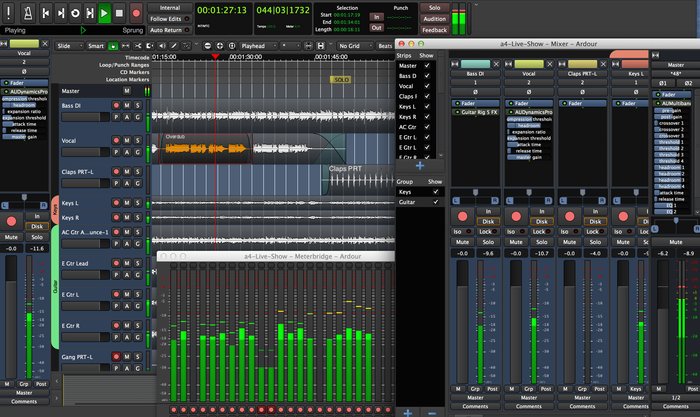
Pros:
- Capture any audio track quickly
- Professional interface to capture audio
- Powerful sound editing features are available
Cons:
- A mobile application is not available
- Difficult to capture audio without a guide
Top 5. Audacity
As one of the best open-source voice recording software for Windows 10, Audacity is available for common users. There is an option of donating funds for this audio recorder to support the development. Otherwise, it is 100% free, and it allows professional audio recordings through any device of your choice.
Besides, you can edit your sound files by cutting, trimming, copying, etc., and saving them in your desired audio formats. Like the Windows 10 default recorder, it captures your voice from an external device like a microphone.
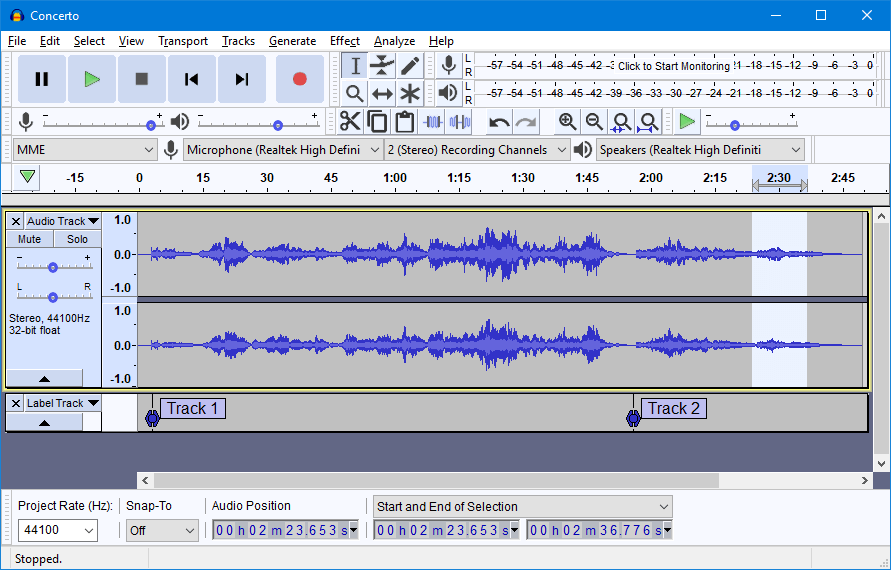
Pros:
- Completely free and open-source audio recording software
- Live recordings can be done through microphones or any other devices
Cons:
- There’s no premium version available for privileged users
Top 6. WavePad
WavePad is a free voice recorder that works perfectly on Windows 10, macOS, and Linux operating systems. Plenty of features make this tool appreciated worldwide, whereas one can get more advanced features integrated with this easy-to-operate audio recorder when purchasing its premium version.
The audio recorder supports types of file conversion and produces high-quality outputs with the most popular audio formats, such as MP3, OGG, WAV, AIFF, GSM, WMA, and a lot more.
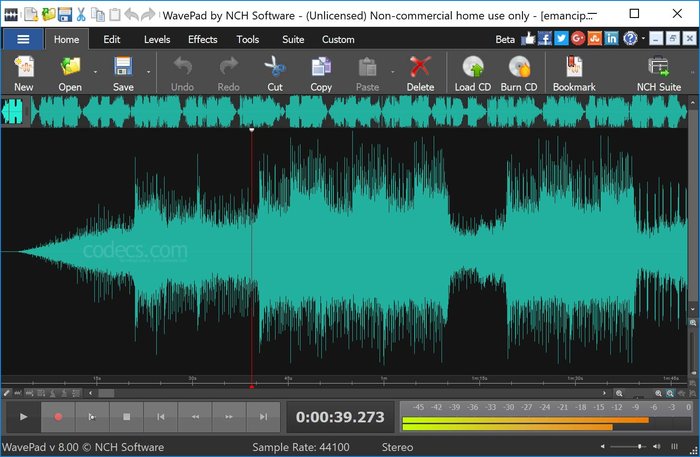
Pros:
- Batch processing is supported
- Satisfy most of your sound recording needs
- Control the track by amplifying, normalizing, or equalizing when recording the audio
Cons:
- The free version of the software has limited functionalities
- Sometimes there are distortions that can be found after applying the noise-cancellation
Top 7. GoldWave
GoldWave is the old and renowned voice-capturing software for Windows PC. This voice recorder application for Windows 10 is dedicated, and there is also a paid version of the software available with many advanced features and functionalities.
Apart from voice recording, you can use it for kinds of audio through different devices and make awesome audio tracks for your social media channels. Then, you can upload the voices to social media platforms like YouTube.
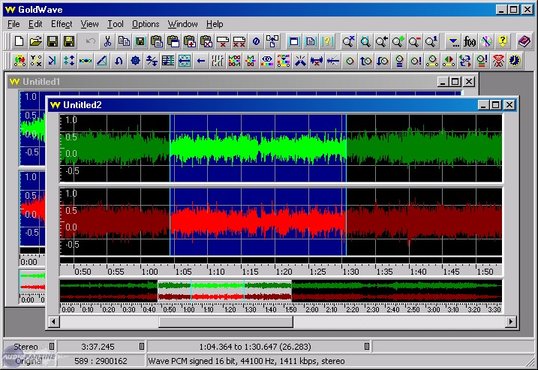
Pros:
- Free solution for simple audio recording
- Plenty of editing options are available with multiple effects
- Support almost all types of file formats and export with common file formats
Cons:
- Limited features and functionalities on the free version
- Lack of directly online support
Top 8. Zynewave Podium Free
Zynewave is a top-class audio recorder and editor that is compatible with many operating systems and works completely on Windows 10. It’s free software with lots of freeware plugins available on its official website.
This Windows 10 voice recorder produces high-quality audio tracks when blended with powerful editing features. In spite of performing all the basic capturing and editing functionalities, this free voice recorder for Windows 10 lacks more professional audio editing features.
Pros:
- Perform basic sound recording and editing features
- Simple interface for users
Cons:
- Basic and limited functionalities in the trial version
- Not very friendly for your total CPU usage while using this software
Top 9. Recorder Ones
To make long audio recordings, you can definitely try Microsoft’s Recorder Ones. This software is available for free and allows creating awesome audio tracks and saving them within the DropBox.
You can get this tool from the Microsoft Store, and it supports formats like WAV, WMA, MP3, FLAC, etc. What’s more, it can export your recorded audio to a phone disk in a music folder.
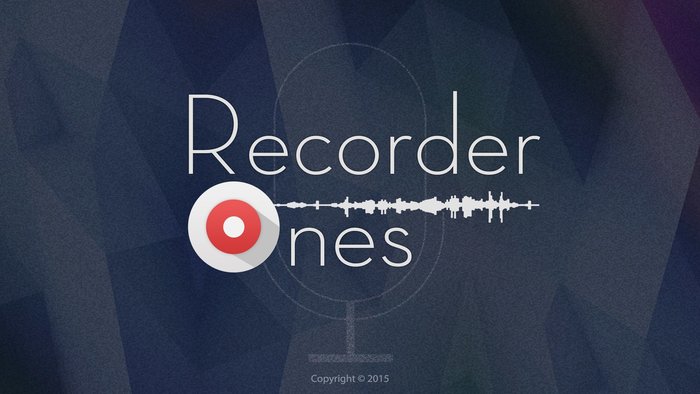
Pros:
- Auto-saving feature for capturing audio
- Work with the OneDrive
- Change the quality of audio from low to high
- The output file can be saved on the PC or mobile phones
Cons:
- Work only on specific system requirements
Top 10. Lucky Recorder
Lucky Recorder is a very simple and powerful audio recorder powered by Microsoft, mainly serving the purposes of making high-quality playbacks, recording long meetings, class lectures, online lessons, and more.
This beneficial voice recorder for Windows 10 supports many types of file formats and allows sharing recorded audio files with your friends through social networking platforms without losing quality.
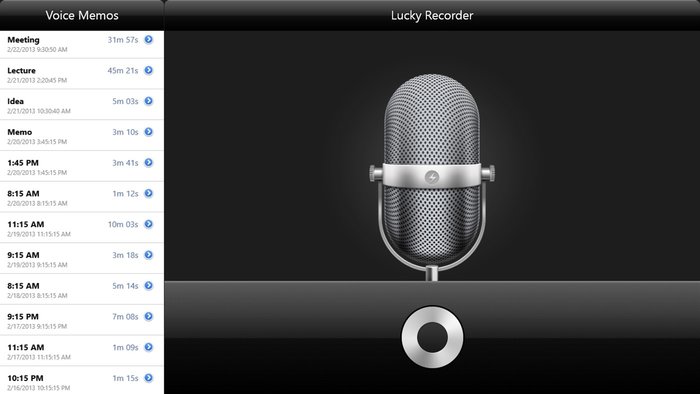
Pros:
- One-click capturing features
- Support very lengthy recordings
Cons:
- Very simple and easy user interface
- Provide limited editing advanced options
- A few functions in the free version
Conclusion
Recording audio is not just about making it noise-free. The audio track should also be pleasing, soothing, making people understand each sound with accuracy and perfection.
There are 10 voice recorder for Windows 10 given in this post. Choose the dedicated one like EaseUS RecExperts (mentioned at number one in the list above). Download it and start capturing audio.
FAQs About Voice Recorder Windows 10
Keep on reading if you have more information about the audio recorder on PC.
1. Does Windows 10 have a voice recorder?
Yes, Windows 10 does have it. It is a default tool on Windows, and you can easily use it to capture your voice. After capturing, you can use it to export, or delete your audio files.
2. How to use Windows 10 Voice recorder?
It is easy and quick to use Windows 10 Voice recorder.
Step 1. Find the Voice Recorder on your Windows PC. By using the Windows searching bar. Type its name.
Step 2. Download it and then perform this tool. Click the Record button to begin your capturing.
Step 3. Once done, you can hit the Stop button to end the recording. It saves in your computer files.
3. Where do I find sound recorder files in Windows 10?
If you use the default Windows 10 voice recorder, you can find all your audio files in the path of the C>Users>YourUserName>Documents>Sound recording.
You can record audio in Windows 10 easily using the Microsoft Voice Recorder app. You can export, trim, or delete your audio file within the app.
Contents
- 1 How do I open Sound Recorder on Windows 10?
- 2 Where is the sound recorder on my computer?
- 3 Can Windows Media Player record audio?
- 4 How do I record audio on Windows?
- 5 How do I record on my laptop Windows 10?
- 6 Can I record audio on my computer?
- 7 What is the best recording software for Windows 10?
- 8 How do I create an audio file in Windows 10?
- 9 Is sound recorder facility available in Windows Media Player folder?
- 10 Can I record my voice on my laptop without a microphone?
- 11 How do I record my voice on Windows 10 with headphones?
- 12 How do I record audio on my laptop?
- 13 How can I record my desktop with audio?
- 14 How do I record my screen with audio?
- 15 How do I record my computer screen with sound?
- 16 How do I record on Windows Media Player?
- 17 What is the best free audio recording software for Windows 10?
- 18 Where are voice recordings saved Windows 10?
- 19 Where is sound recorder facility is available?
- 20 Which came first Vista or Windows 7?
How do I open Sound Recorder on Windows 10?
To open Sound Recorder, click on the “Start Menu” in the lower left hand corner of your screen. In the search bar, type “Sound Recorder.” 2. Click “Start Recording” to begin recording sound.
Where is the sound recorder on my computer?
Voice Recorder is a simple audio recording app that comes with Windows 10. You will find it in the Start menu, or by typing voice recorder into the Windows search bar. Click the microphone to start recording. It’s the large round button at the bottom of the left panel.
Can Windows Media Player record audio?
Windows Media Player enables you to record sounds from a microphone or other audio devices. Your recording saves to a Windows Media Audio file that offers the flexibility to copy to other recording media, such as an audio CD or a data DVD.
How do I record audio on Windows?
To start recording, tap or click the circular button with a microphone in the center. This is your Record button. To pause recording, tap or click Pause. To resume the same recording you paused, tap or click Pause again.
How do I record on my laptop Windows 10?
How to record your screen in Windows 10
- Open the app you want to record.
- Press the Windows key + G at the same time to open the Game Bar dialog.
- Check the “Yes, this is a game” checkbox to load the Game Bar.
- Click on the Start Recording button (or Win + Alt + R) to begin capturing video.
Can I record audio on my computer?
How can I record audio from my computer for free? There are three ways to grab internal sounds for free. You can use Screen Capture (an online grabber), Audacity (a desktop recorder), or Windows Voice Recorder (a built-in Windows app).
What is the best recording software for Windows 10?
10 Best Audio Recording Software for Windows 10, 8, 7 PC
- WavePad. This audio recording software for Windows is one of the top favorites on the list.
- RecordPad.
- PreSonus Studio One 3.
- Mixcraft 9 Pro Studio.
- Audacity.
- i-Sound Recorder 7.
- Streaming Audio Recorder.
- Zynewave Podium.
How do I create an audio file in Windows 10?
Creating an audio file in Windows 8 and 10
- Connect a microphone to the computer.
- In Windows 10, type voice recorder in the search box located next to Start.
- In the search results, select the Voice Recorder application.
- Click the blue microphone button and begin speaking.
Is sound recorder facility available in Windows Media Player folder?
Sound Recorder facility is available in Windows Media Player folder – This statement is True.
Can I record my voice on my laptop without a microphone?
PC users plug microphones into input jacks and speakers or headphones into output jacks. Windows comes with a free utility called Sound Recorder that allows you to create audio recordings.If you don’t have a microphone to plug into your computer’s input jack, you can use headphones to record your voice.
How do I record my voice on Windows 10 with headphones?
Recording your own voice
- Right-click the sound icon in the taskbar.
- Select Open sound settings.
- Choose Sound control panel on the right.
- Select the Recording tab.
- Choose the microphone. Source: Windows Central.
- Hit Set as default.
- Open the Properties window. Source: Windows Central.
- Select the Levels tab.
How do I record audio on my laptop?
Method 1: Use Game Bar to record your laptop screen
- Open the program you’re going to record.
- Press the Windows logo key and G on your keyboard.
- Click the microphone icon to turn your mic on while recording.
- Click the record button to start recording.
- If you want to stop recording, click the stop button.
How can I record my desktop with audio?
Here’s how to record your computer screen and audio with ShareX.
- Step 1: Download and Install ShareX.
- Step 2: Start the app.
- Step 3: Record your computer audio and microphone.
- Step 4: Select video capture area.
- Step 5: Share your screen captures.
- Step 6: Manage your screen captures.
How do I record my screen with audio?
How to Screen Record on Android
- Go to Quick Settings (or search for) “Screen recorder”
- Tap the app to open it.
- Choose your sound and video quality settings and click Done.
How do I record my computer screen with sound?
Navigate to the screen you wish to record and press Win + G to open Game Bar. Several Game Bar widgets appear on the screen with controls for capturing screenshots, recording video and audio, and broadcasting your screen activity.
How do I record on Windows Media Player?
How to record Windows Media Player through the ‘Screen Recording’ mode
- Start Bandicam and choose the ‘Rectangle on a screen’ mode.
- Adjust the rectangle window on the video and play the video.
- Click the ‘ ● REC ‘ button or press the ‘F12’ function key to record.
- To stop recording, click the ‘Stop (◼)’ button (Hotkey F12).
What is the best free audio recording software for Windows 10?
So, without further ado, let’s get onto the list of top 10 best free music recording software for windows 10:
- Ableton Live 10.
- Audacity.
- NCH WavePad Audio.
- Sound Forge Pro 13.
- PreSonus Studio One.
- Ocenaudio.
- Wavosaur.
- Traverso.
Where are voice recordings saved Windows 10?
Default folder Voice Recorder saves files in Windows 10
By default the Voice Recorder app saves all your sound recordings to C:UsersYourUserNameDocumentsSound recordings path in Windows 10.
Where is sound recorder facility is available?
Sound Recorder facility is available in Windows Media Player folder.
Which came first Vista or Windows 7?
Windows 7 was released by Microsoft on October 22, 2009 as the latest in the 25-year-old line of Windows operating systems and as the successor to Windows Vista.

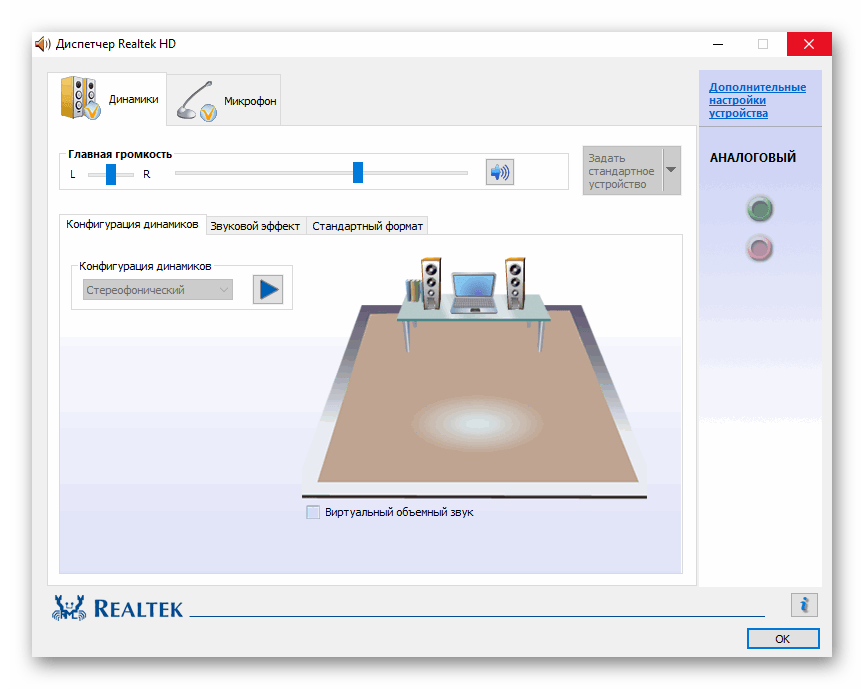
Подавляющее большинство ноутбуков оснащается встроенным микрофоном для записи голоса пользователя. По умолчанию данный элемент ПК отключен. А потому запись звука на операционной системе Windows 10 вызывает у новичка ряд сложностей. Чтобы этого не произошло, рекомендуется ознакомиться со списком всех возможных способов фиксации голоса, которые делятся на встроенные и сторонние методы.
Как записать звук с микрофона на компьютер с Windows 10
Записать окружающий звук на операционной системе Windows 10 можно при помощи встроенных средств. Действие выполняется при помощи встроенного приложения. Однако у некоторых пользователей голос не фиксируется из-за того, что на ПК отключен стереомикшер.

Стереомикшер
Чтобы корректно записать голос на ноутбуке при помощи встроенного микрофона, для начала необходимо включить стереомикшер. По умолчанию он находится в деактивированном состоянии, а для исправления ошибки нужно сделать следующее:
- Присмотритесь к Панели задач Windows На ней располагаются разные значки, в числе которых можно заметить иконку с динамиком. Кликните по ней правой кнопкой мыши.
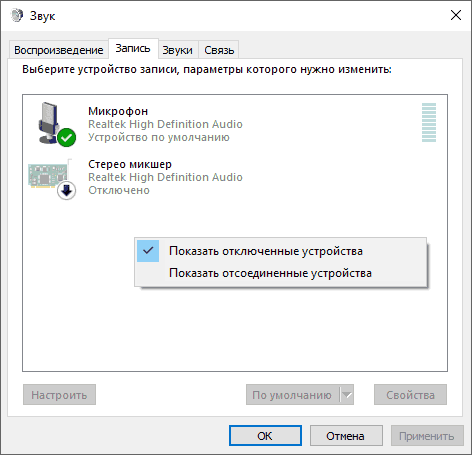
- Из списка доступных действий выберите «Записывающие устройства».
- В открывшемся диалоговом окне перейдите во вкладку «Запись».

- Убедитесь, что, помимо микрофона, отображается стереомикшер. Если его нет – щелкните ПКМ и отметьте галочкой пункт «Показать отключенные устройства».
- Далее кликните по стереомикшеру правой кнопкой мыши и нажмите «Включить».

Как только элемент звуковой карты будет активирован, звук начнет записываться встроенными средствами системы. Разумеется, происходит это не в автоматическом режиме, а с разрешения пользователя в соответствующем приложении.
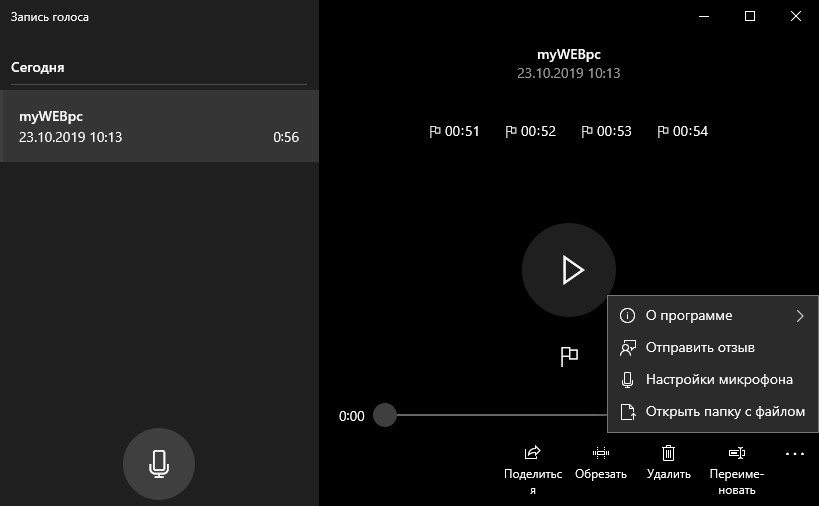
«Запись голоса»
В операционной системе Windows 10 встроенный диктофон получил название «Запись голоса». Именно поэтому его бывает сложно найти новым пользователям. Если у вас возникли проблемы с поиском инструмента фиксации речи, выполните следующее:
- Щелкните по иконке с лупой, которая располагается в Панели задач. Она отвечает за осуществление поиска необходимых программ.
- Введите запрос для поиска соответствующего приложения.
- В открывшемся списке выберите «Запись голоса».

- После запуска приложения нажмите круглую кнопку, которая находится посередине.

- Для остановки рекординга щелкните по кнопке с квадратом в центре.
На заметку. Размер файла, который записывает стандартный инструмент Windows, практически не ограничен. Также вы можете нажать кнопку паузы (две вертикальные полоски) для приостановки записи, а затем кликнуть по ней еще раз, чтобы продолжить фиксацию голоса.
Бывает, что приложение диктофона не отображается в списке доступных программ и не ищется при помощи поиска. Это связано с тем, что оно не установлено на ПК. Чтобы исправить положение, обратитесь к инструкции:
- Откройте Microsoft Store.
- В списке предложенных программ найдите «Запись голоса Windows».
- На странице приложения нажмите кнопку «Получить».
- Дождитесь окончания загрузки и установки утилиты.
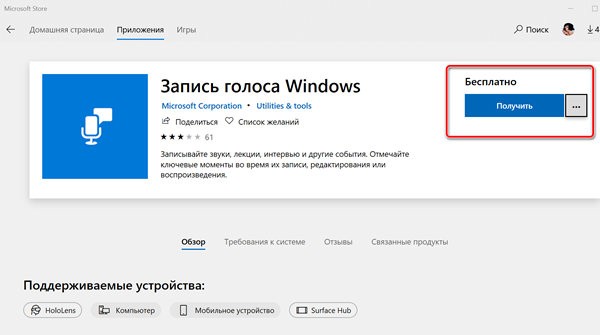
Теперь программа должна отобразиться в общем списке приложений. Если этого не произошло, то стоит попробовать изменить поисковый запрос на «Recoder». Возможно, после установки утилита получит другое название.
С помощью стороннего ПО
Разумеется, встроенный диктофон является не единственным средством фиксации голоса. Также пользователь может обратиться к помощи софта от сторонних разработчиков. Подобный вариант будет работать даже в том случае, если отключен стереомикшер. Соответственно, рекординг будет осуществляться только средствами микрофона.
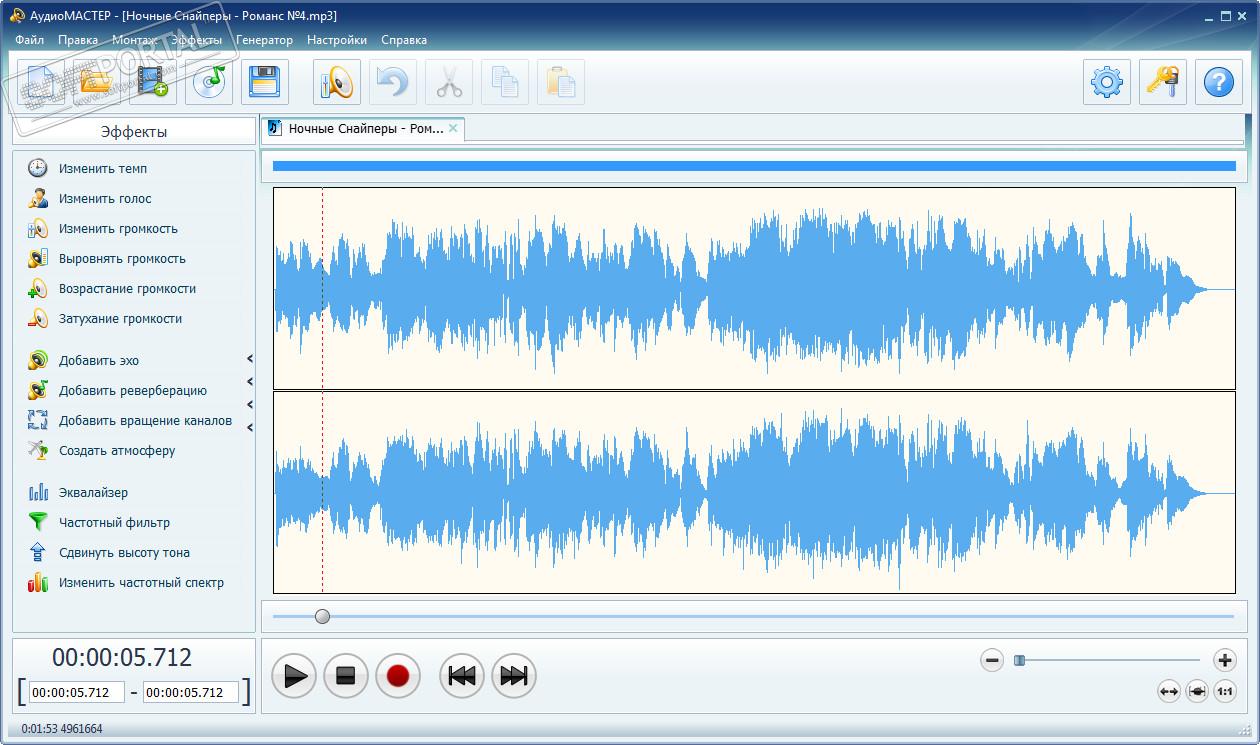
Audio Master
Первая программа, которая заслуживает внимания, – Audio Master. Она доступна для бесплатного скачивания на официальном сайте разработчика. После установки софта пользователю останется сделать несколько простых шагов:
- Откройте приложение.
- В меню программы выберите пункт «Записать звук с микрофона».
- Нажмите кнопку «Начать новую запись».
- Чтобы завершить процесс фиксации голоса, нажмите кнопку «Стоп».
Главным преимуществом программы, в сравнении со стандартным диктофоном, является наличие встроенного редактора. Вы можете изменить голос оратора до неузнаваемости, используя эквалайзер. Также редактор позволяет исправить недостатки микрофона ноутбука, если аудиозапись получится не самого высокого качества.
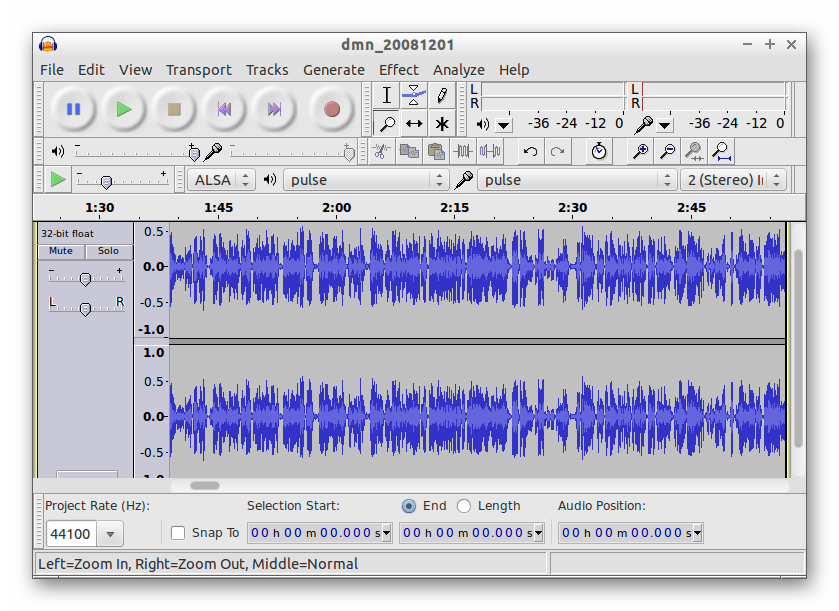
Audacity
Пожалуй, самое известное приложение из категории «Voice Recorder». Как и ранее рассмотренная программа, Audacity доступен для бесплатного скачивания. А после запуска утилиты достаточно просто нажать на кнопку в виде красного кружка. В процессе рекординг можно поставить на паузу или сразу остановить. А по окончании станет доступна функция постобработки аудиозаписи.
Важно. Чтобы Audacity смогла зафиксировать голос, необходимо выбрать в качестве источника звука «Windows WASAPI».
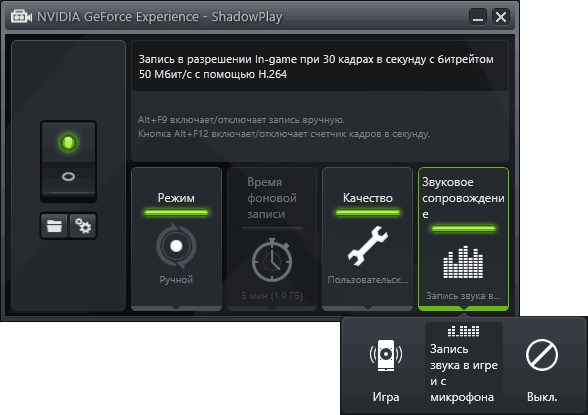
С помощью средств NVidia
Если ваш компьютер использует видеокарту NVidia, то для создания аудиозаписи при помощи микрофона можно использовать фирменную программу NVidia GeForse Enterprience. Ссылка на скачивание находится на официальном сайте разработчика. И, как только приложение будет установлено, владельцу ПК следует перейти в раздел «ShadowPlay» и нажать кнопку записи.
Отличие от обычного диктофона заключается в том, что фиксация голоса происходит только во время игры. Также NVidia GeForse Enterprience позволяет фиксировать не только звуковую составляющую, но и видео с экрана в процессе гейминга.
Возможные проблемы
Главная проблема, которая возникает при попытке зафиксировать голос встроенными средствами – отсутствие соответствующего приложения. Ошибка исправляется путем загрузки программы из Microsoft Store. Также для корректной записи не забудьте включить в настройках стереомикшер.
Если встроенные методы не помогают – обратитесь к помощи программ от сторонних разработчиков. Они порадуют вас не только высоким качеством звука, но и широкими возможностями постобработки аудио.
Иногда проблемы связаны не с настройками, а с микрофоном. В таком случае рекомендуется запустить «Параметры» (комбинация клавиш «Win» + «I»), а затем перейти по пути «Система/Звук.» Во вкладке «Вход» под заголовком «Громкость» вы увидите кнопку «Устранение неполадок», которую нужно нажать для исправления ошибок.
Содержание
- Способ 1: Штатные средства операционной системы
- Что делать, если приложения «Запись голоса Windows» нет в системе
- Способ 2: Стороннее программное обеспечение
- Вариант 1: Audacity
- Вариант 2: UV Sound Recorder
- Вариант 3: Free Audio Recorder
- Вопросы и ответы
Обратите внимание! В этой статье будет рассказываться о том, как записать звук, воспроизводимый непосредственно самой системой, и который вы слышите из динамиков. Если вам необходимо записать звук с подключенного к компьютеру микрофона, тогда обратитесь за помощью к другой тематической статье на нашем сайте, в которой автор подробно рассказывает об этом.
Подробнее: Как записать голос с микрофона на компьютер
Способ 1: Штатные средства операционной системы
Чтобы записать звук с компьютера в Windows 10, не обязательно устанавливать специальное программное обеспечение, можно воспользоваться штатными средствами операционной системы. Правда, предварительно необходимо будет выбрать в качестве основного записывающего устройства звуковую карту ПК. Для этого выполните следующие действия:
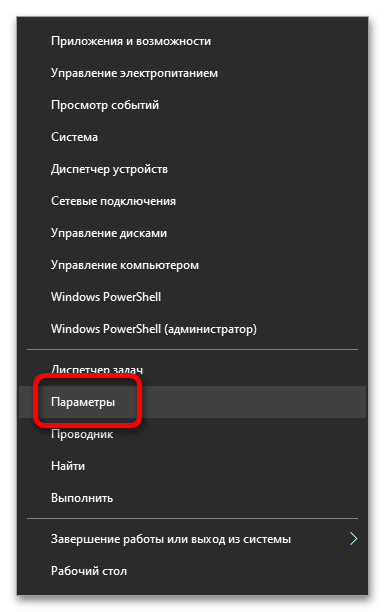
- Откройте окно системных настроек любым доступным способом. Сделать это можно, например, через контекстное меню «Пуска». Щелкните по нему правой кнопкой мыши и выберите пункт «Параметры».

Читайте также: Как открыть «Параметры» в Windows 10
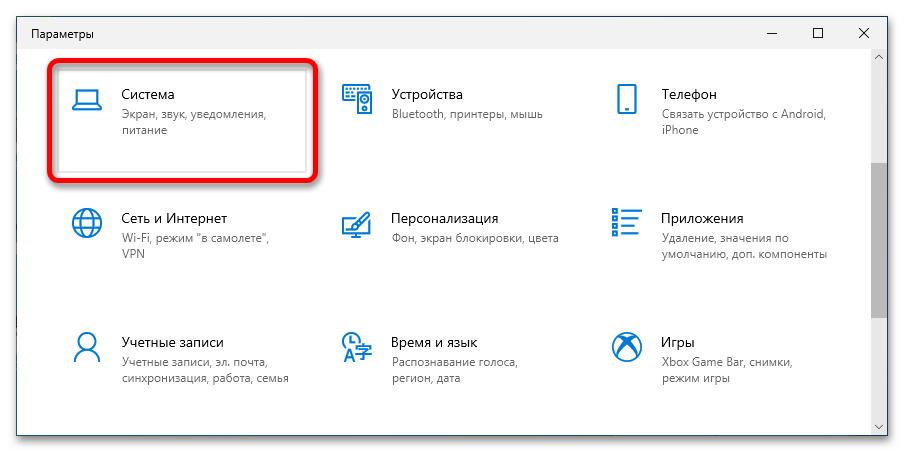
- Проследуйте в раздел «Система», для чего кликните по одноименному элементу интерфейса.
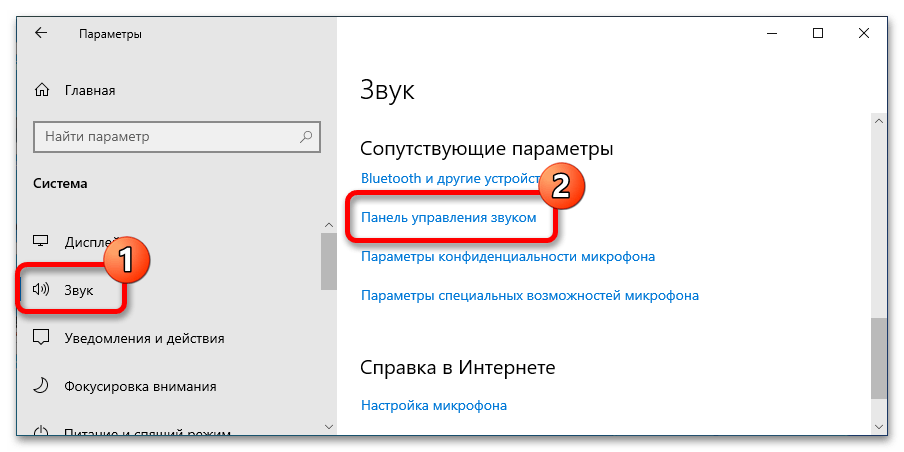
- Воспользовавшись навигационной панелью слева, перейдите на вкладку «Звук», а затем спуститесь вниз по странице и в блоке «Сопутствующие параметры» кликните по ссылке «Панель управления звуком».
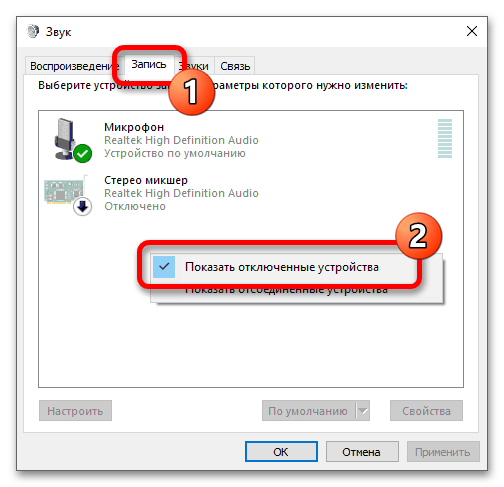
- В появившемся окне «Звук» проследуйте на вкладку «Запись», где включите отображение всех подключенных к ПК устройств. Для этого кликните правой кнопкой мыши по пустому месту и установите в открывшемся контекстном меню галочку напротив пункта «Показать отключенные устройства».
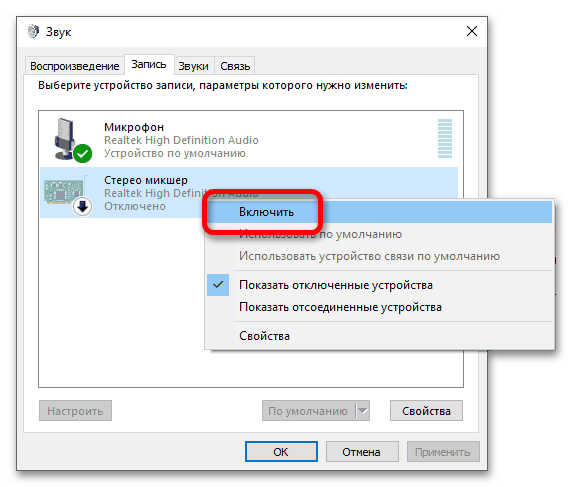
- После этого в списке появится звуковая карта компьютера. Чаще всего она будет иметь название «Стерео микшер», но оно может отличаться и зависит от устройства. Нажмите по ней правой кнопкой мыши и выберите пункт «Включить».
Теперь в качестве звукозаписывающего устройства выбран не микрофон компьютера, а его звуковая карта, через которую и воспроизводятся системный звук. Это позволит записать его с помощью стандартного диктофона, предустановленного в Windows 10:
- Откройте приложение «Запись голоса», отыскав его через поиск по системе или в «Пуске», введя запрос «Запись голоса».
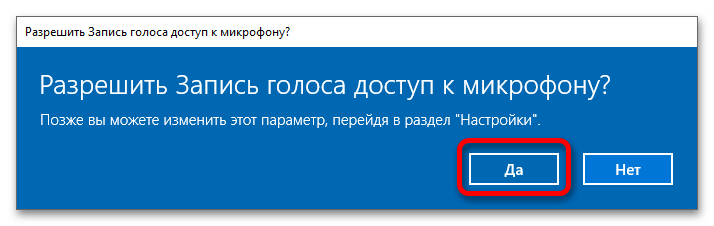
- При первом запуске на экране появится диалоговое окно с просьбой предоставить программе доступ к микрофону. Сделайте этого, кликнув по «Да».
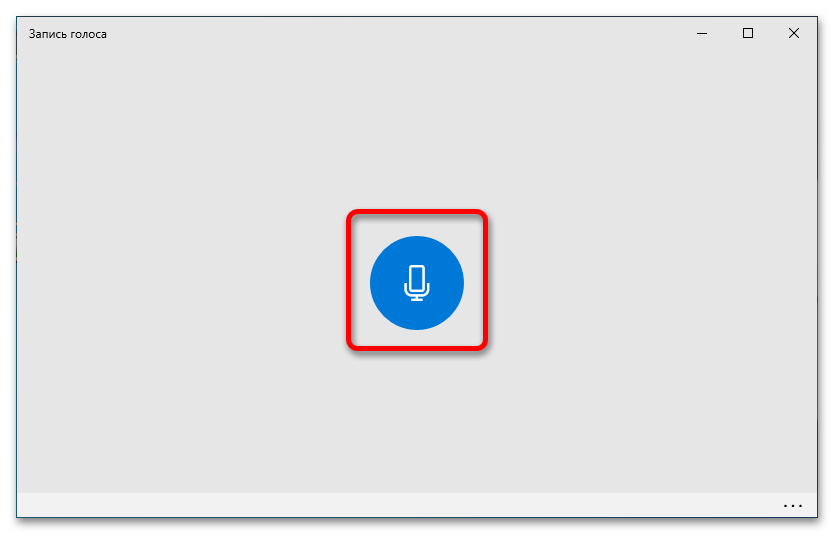
- После запуска приложения нажмите по единственной кнопке, которая имеет иконку микрофона.
- Сразу после этого начнется запись системных звуков. Как только вам потребуется остановить ее, откройте снова программу и кликните по кнопке «Стоп», имеющей иконку белого квадрата.
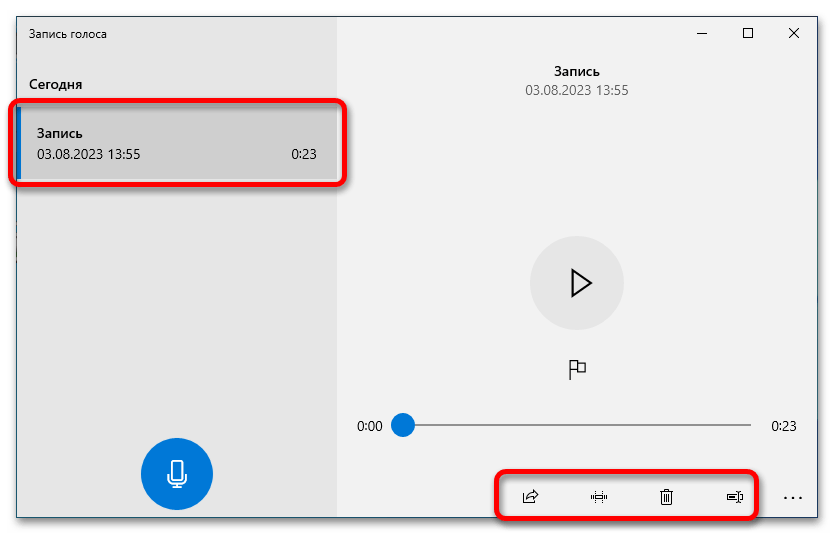
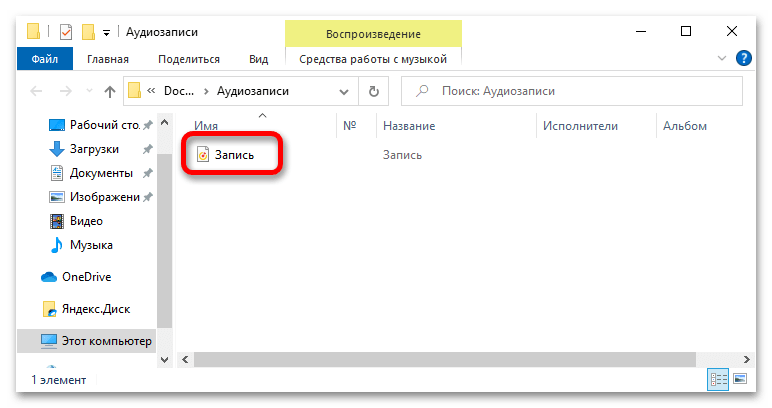
- Как только запись завершится, она будет помещена на боковую панель слева. Кликните по ней, чтобы выбрать. В основной рабочей области приложения вы можете воспроизвести ее, кликнув по кнопке с треугольником, или воспользоваться функциональными кнопками для редактирования, удаления и переименования.

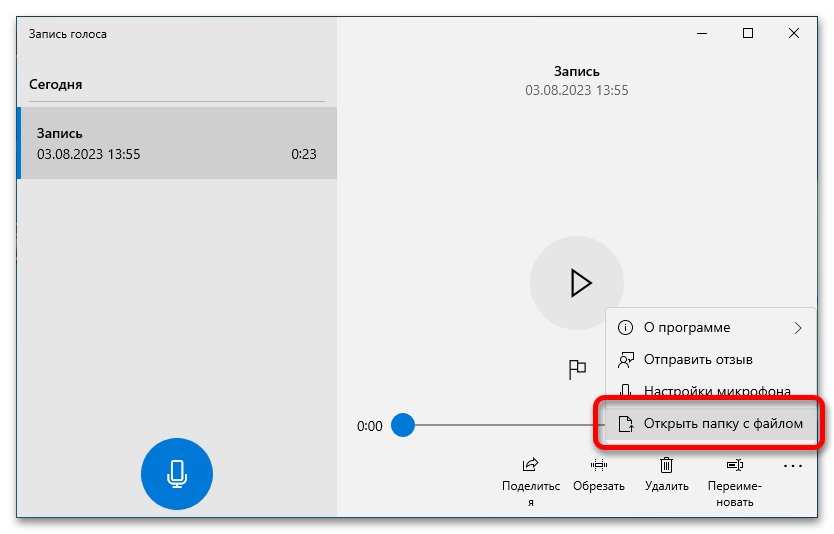
Также вы можете открыть этот файл в «Проводнике». Для этого разверните дополнительное меню, нажав по кнопке с тремя точками, и выберите пункт «Открыть папку с файлом».
По итогу появится окно файлового менеджера, в котором будут находиться все сделанные вами аудиозаписи.


Примечание! Вы также можете поставить запись на паузу, чтобы в будущем продолжить ее. Для этого воспользуйтесь кнопкой в виде двух вертикальных полос, находящейся в нижней части интерфейса окна.
Что делать, если приложения «Запись голоса Windows» нет в системе
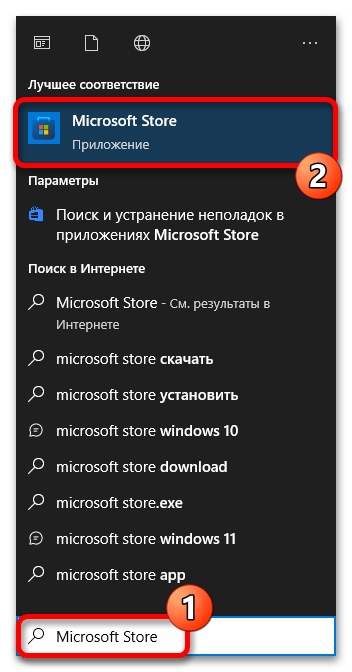
Если посредством поиска у вас не получилось найти приложение «Запись голоса», значит, оно отсутствует у вас на компьютере. Для его установки выполните следующие действия:
- Откройте программу «Microsoft Store», например, посредством соответствующей иконки на панели задач. Если она у вас отсутствует, тогда воспользуйтесь поиском по системе. Введите запрос в специальное поле на панели задач, а затем кликните по одноименному приложению в результатах.
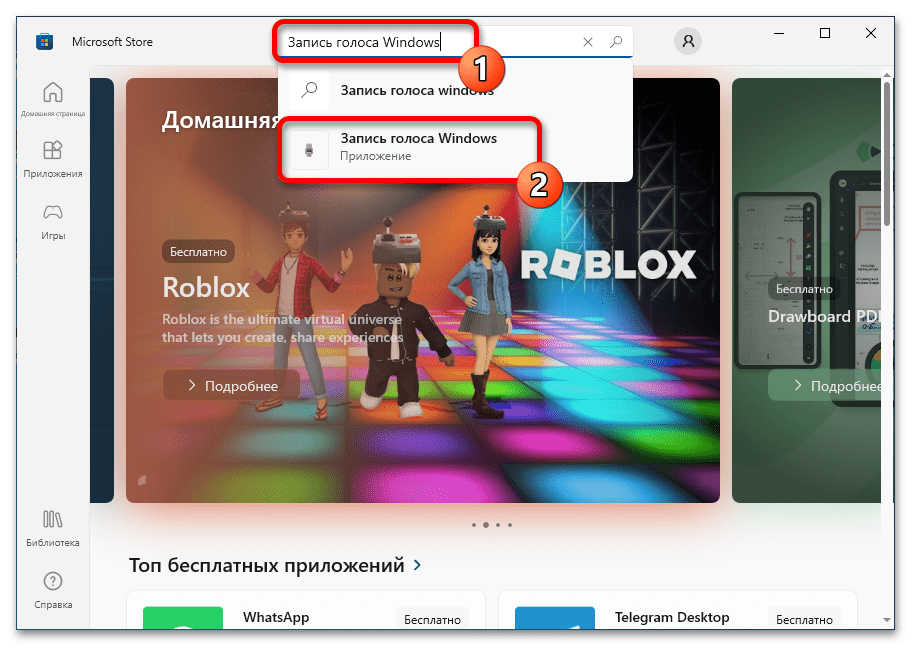
- Отыщите приложение «Запись голоса Windows», для чего воспользуйтесь поисковой строкой в верхней части окна. Как только вы введете свой запрос, появится подсказка с результатами, среди которых выберите искомую программу.
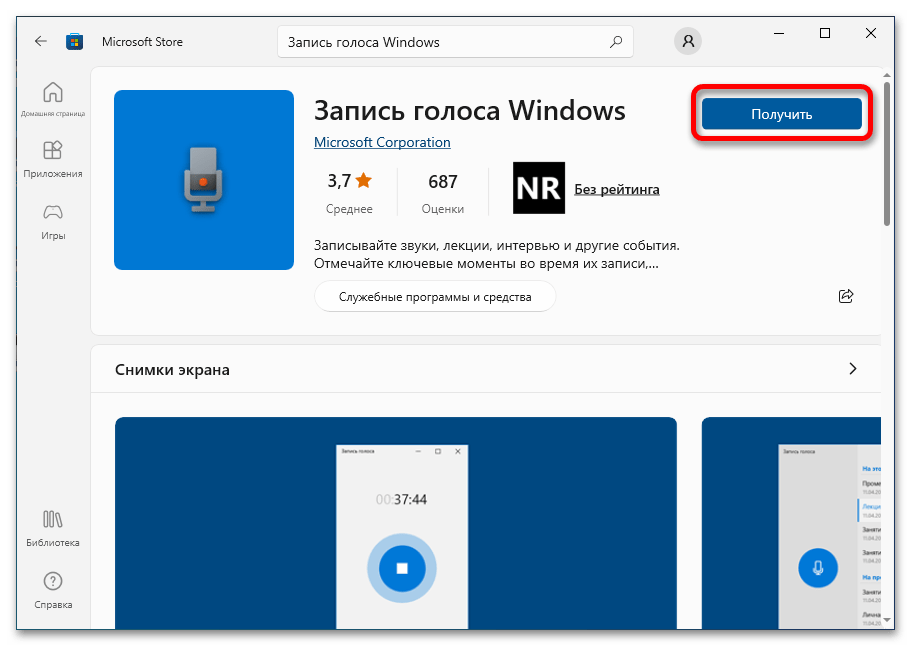
- Находясь на странице приложения, нажмите по «Получить», чтобы запустить процесс загрузки и установки «Запись голоса Windows».
- Дождавшись завершения процедуры инсталляции, откройте приложение при помощи соответствующей кнопки. После этого вы сможете записать системные звуки, воспользовавшись приведенной ранее инструкцией.

Способ 2: Стороннее программное обеспечение
Штатное средство операционной системы многим может показаться неудобным, так как оно требует ручной настройки звуковой карты перед началом записи, а подключенный в это время к компьютеру микрофон перестанет работать. Чтобы исключить эти недостатки, рекомендуется воспользоваться специальным программным обеспечением от сторонних разработчиков.
Вариант 1: Audacity
Audacity — секвенсор с открытым исходным кодом, обладающий множеством функций для редактирования аудиофайлов. С его помощью можно записать звуки из операционной системы, выполнив предварительную настройку каналов. Загрузите инсталлятор приложения с официального сайта разработчика, используя ссылку ниже.
Скачать Audacity
После того как программа будет установлена на компьютер, запустите ее и выполните следующую инструкцию:
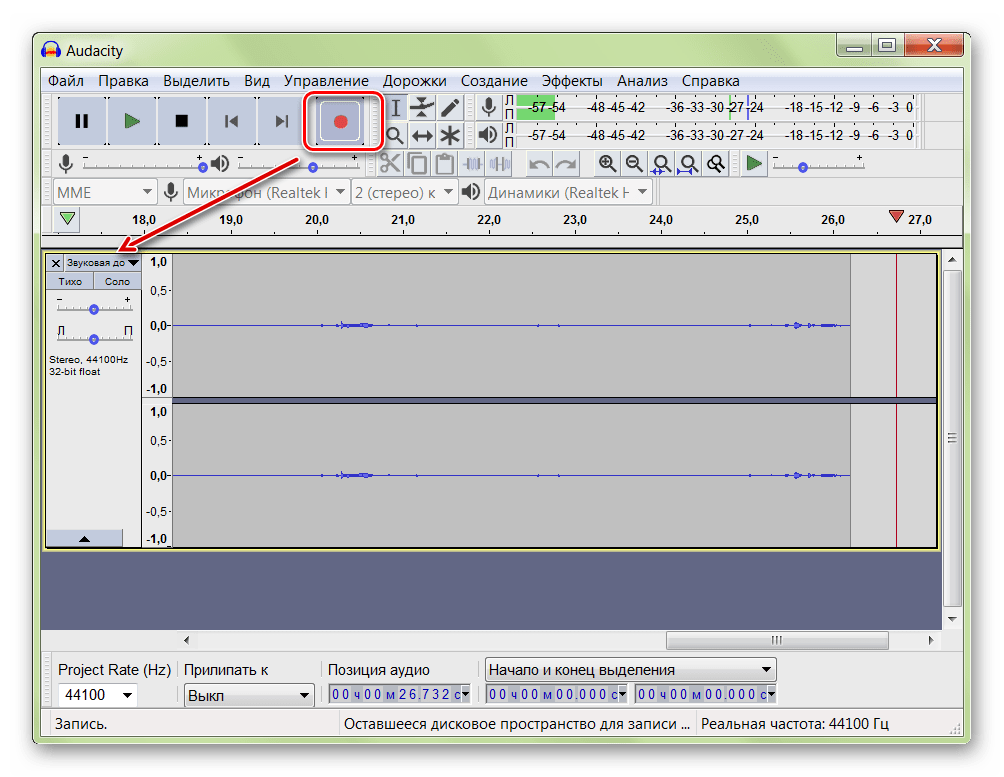
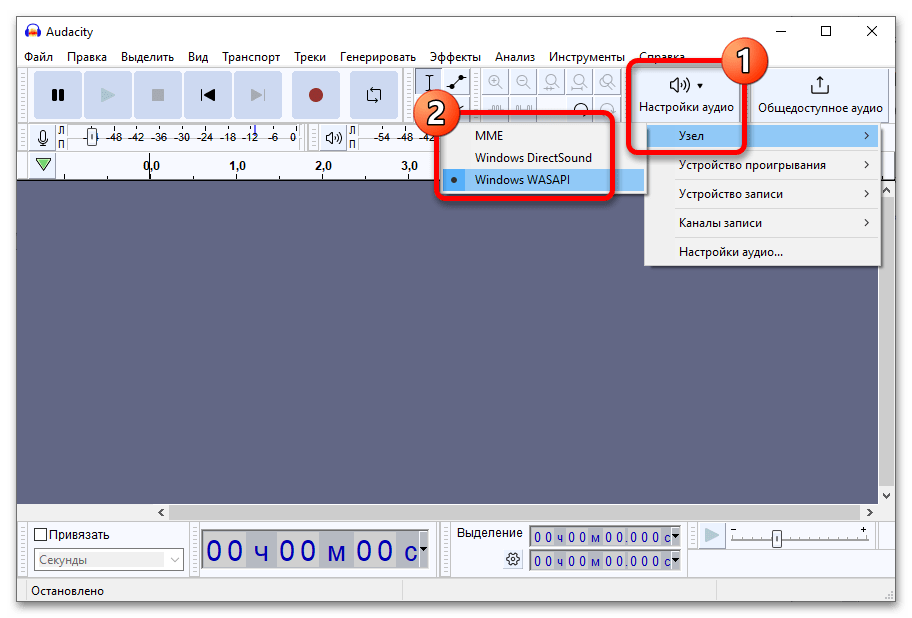
- Кликните по кнопке «Настройки аудио», расположенной на панели инструментов вверху, а затем наведите в появившемся контекстном меню на пункт «Узел». По рекомендациям разработчика через дополнительное меню сделайте основным вариант «Windows WASAPI». Если этот пункт будет отсутствовать, попробуйте другой.
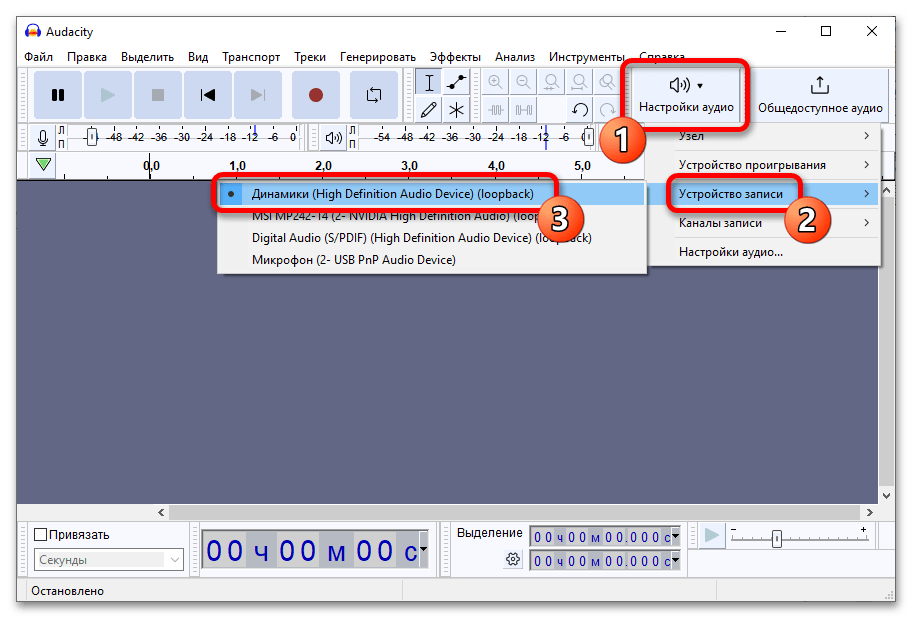
- Снова воспользуйтесь «Настройки аудио», только на этот раз наведите курсор на пункт «Устройство записи». Из появившегося дополнительного меню выберите подключенные к вашему ПК динамики или аудиокарту, которая будет называться «Системный микшер».
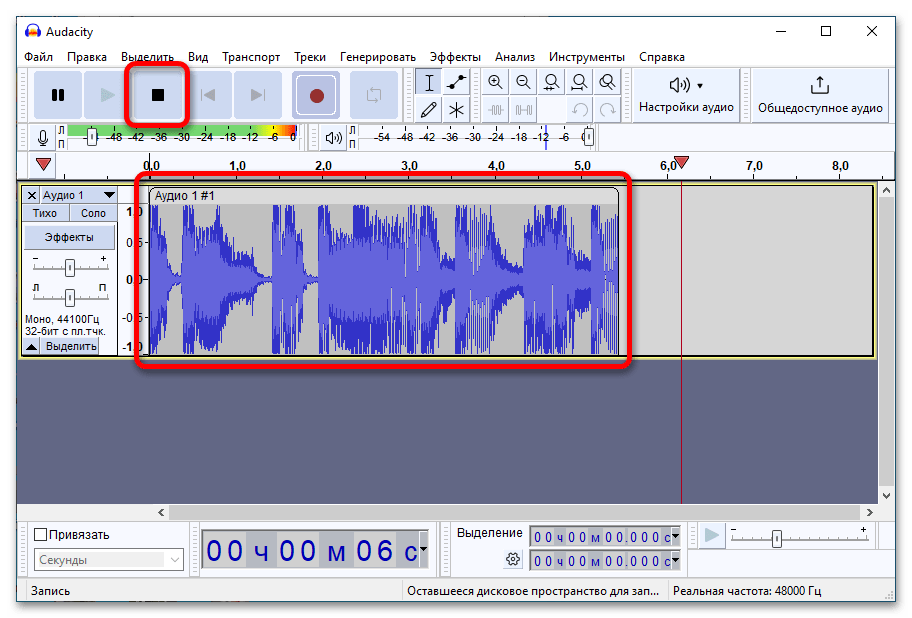
- Когда устройство будет определено, начните запись звука, щелкнув по кнопке «Recording» (красный кружок). Точное ее расположение показано на изображении ниже.
- Начнется процесс записи звука, за которым вы можете следить непосредственно в окне программы Audacity. Как только потребуется остановить запись, щелкните по «Стоп» (черный квадрат).
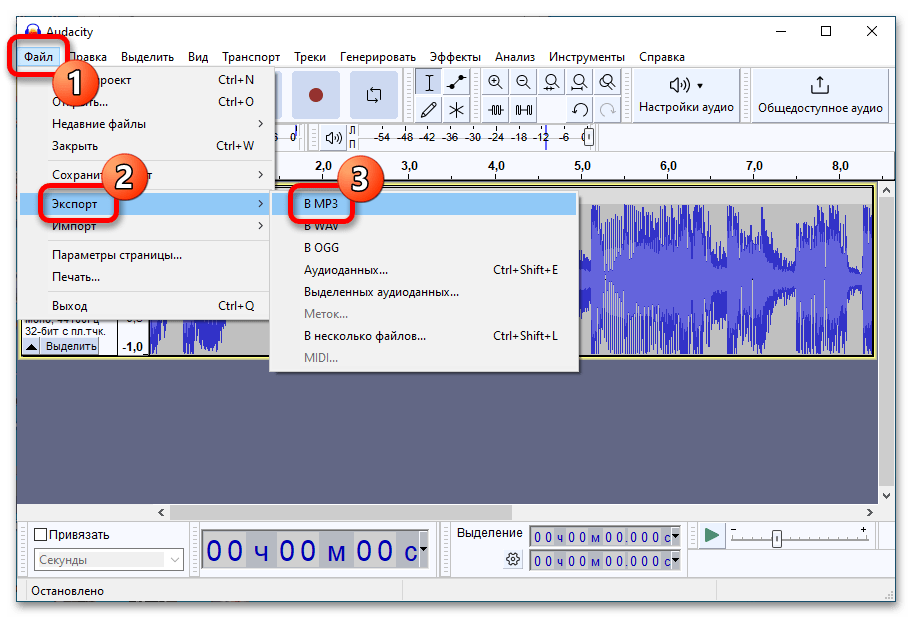
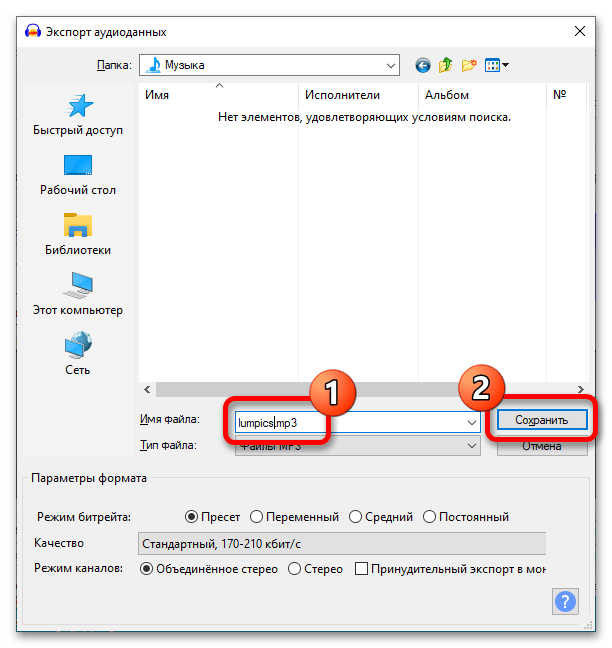
- При необходимости произведите редактирование семпла, воспользовавшись инструментами приложения. Когда все будет готово, сохраните запись на компьютер. Для этого откройте меню «Файл» в верхнем левом углу окна, наведите курсор на пункт «Экспорт», и выберите подходящий аудиоформат, в котором хотите сохранить отрывок. Наиболее распространенным считается MP3.
- Через файловый менеджер перейдите в ту директорию, куда хотите сохранить записанный отрывок. После этого введите имя файла в соответствующее поле и кликните по кнопке «Сохранить».
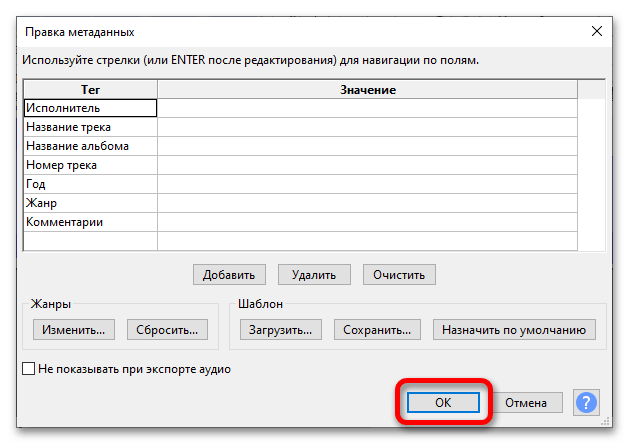
- При необходимости заполните метаданные аудиофайла (делать это не обязательно) и нажмите по кнопке «ОК».
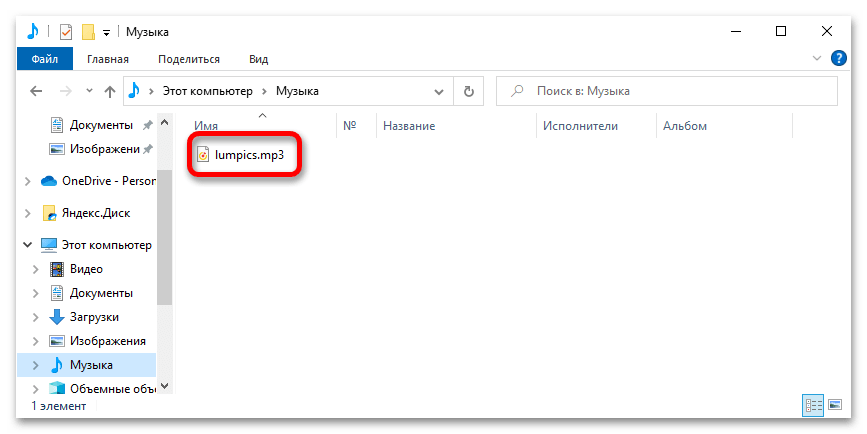
- По итогу сохраненную запись вы сможете найти на своем ПК в той папке, которую выбрали во время экспорта из Audacity.

Вариант 2: UV Sound Recorder
Помочь записать звук с компьютера также может программа UV Sound Recorder, которая разрабатывалась для выполнения именно этой задачи, хоть и имеет некоторые дополнительные функции. Как и в случае с предыдущим рассмотренным софтом, этот тоже рекомендуется загружать с официального сайта.
Скачать UV Sound Recorder
После того как файлы из архива будут извлечены, перейдите в появившуюся директорию и запустите приложение UV Sound Recorder. Далее следуйте инструкции:
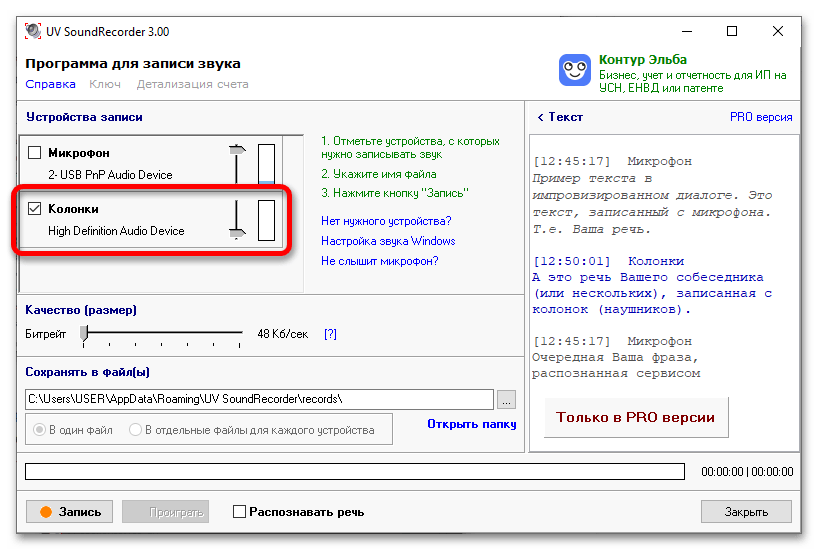
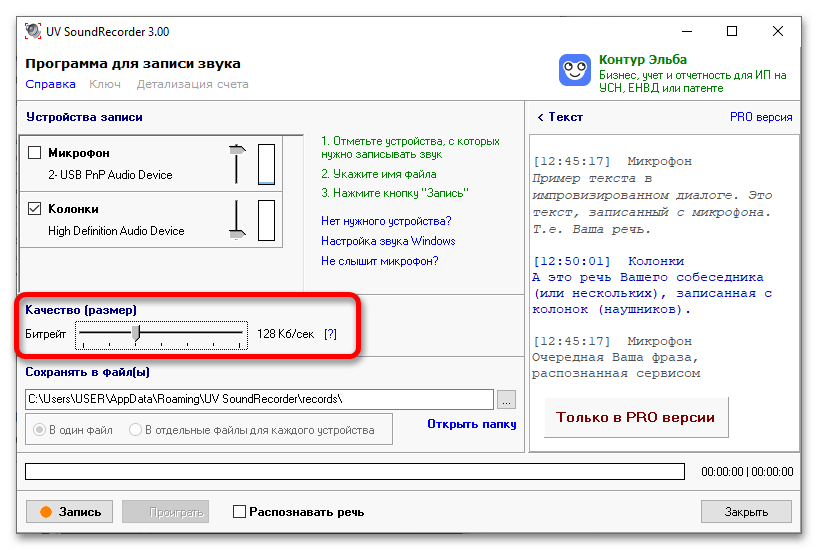
- Первостепенно в окне установите отметку напротив пункта «Колонки». Если рядом со строкой «Микрофон» стоит галочка, уберите ее. Таким образом вы выберете устройство, с которого будет вестись запись звука.
- В блоке «Качество (размер)» воспользуйтесь горизонтальным ползунком, чтобы определить битрейт будущей записи. В конечном итоге этот показатель повлияет на размер файла и качество звука. Приемлемым в большинстве случаев считается битрейт 128 Кбит/с, поэтому выбирать рекомендуется именно его.
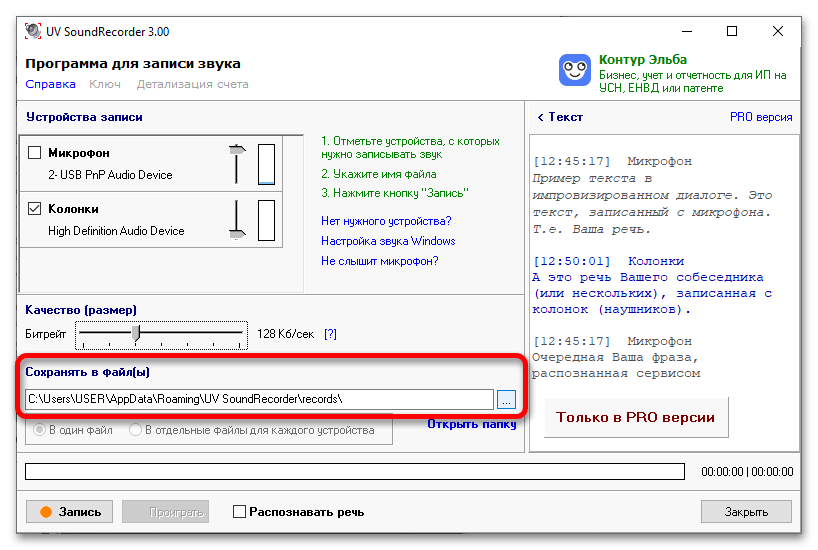
- В блоке «Сохранять в файл(ы)» укажите путь к директории, в которую после окончания записи будет помещен аудиофайл. Сделать это можно вручную, прописав адрес в текстовом поле, или с помощью диалогового окна файлового менеджера. Во втором случае для его открытия щелкните по кнопке с тремя точками.

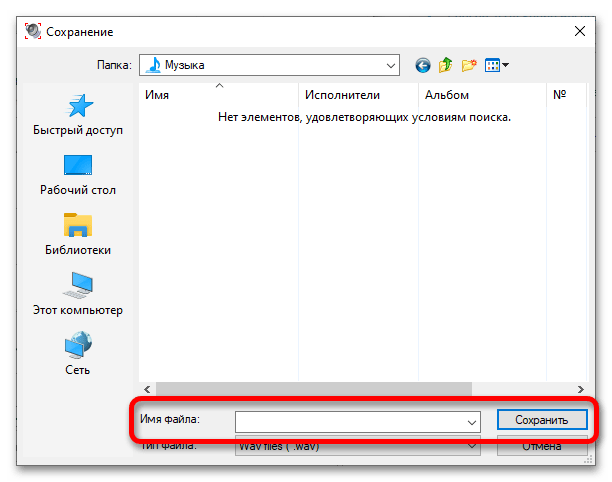
После этого проследуйте в целевую папку, введите любое значение в строку «Имя файла» и щелкните по «Сохранить».
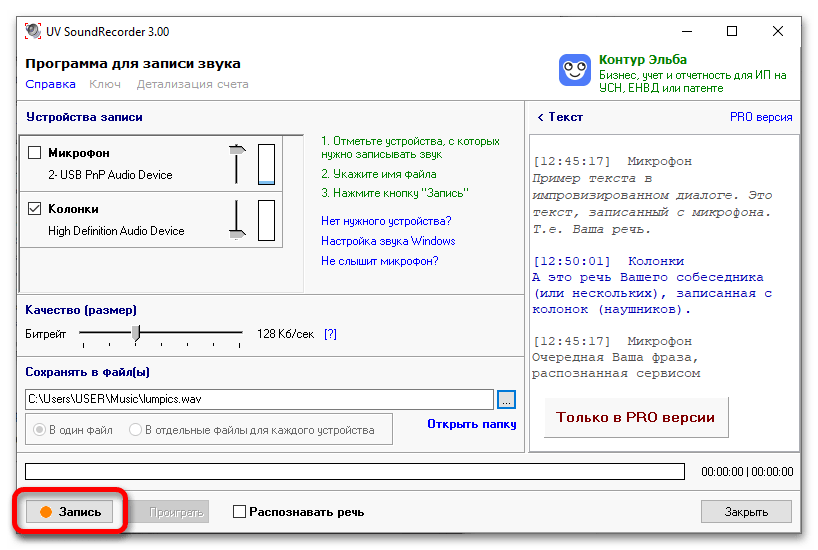
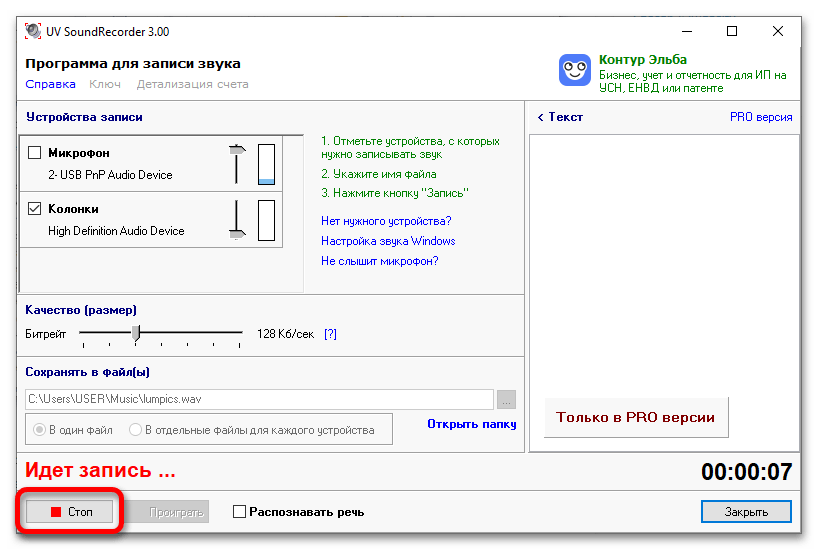
- Начните запись звука с ПК, кликнув по кнопке «Запись», расположенной в нижнем левом углу программы.
- Когда нужный фрагмент будет записан, остановите процесс, нажав по «Стоп».
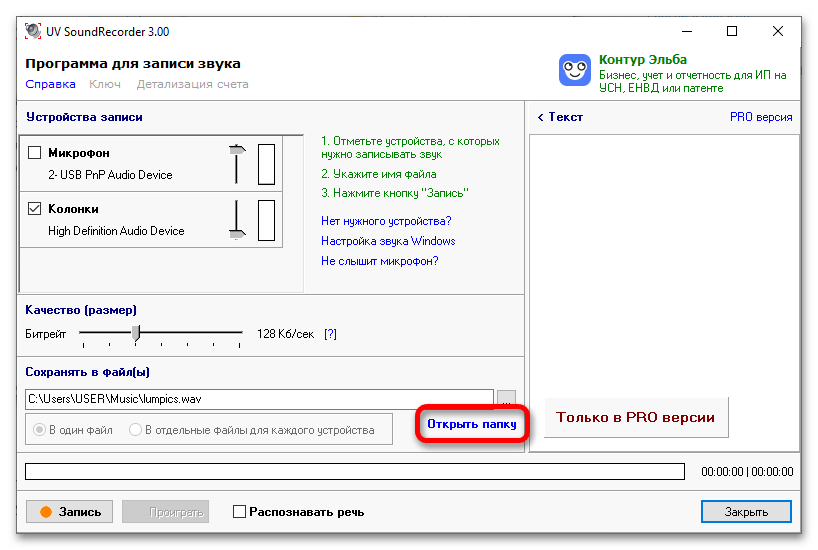
- Как только это будет сделано, останется прослушать отрывок посредством проигрывателя, используемого в вашей ОС по умолчанию. Находится аудиозапись в указанной ранее директории, и чтобы ее открыть, кликните по строке «Открыть папку».
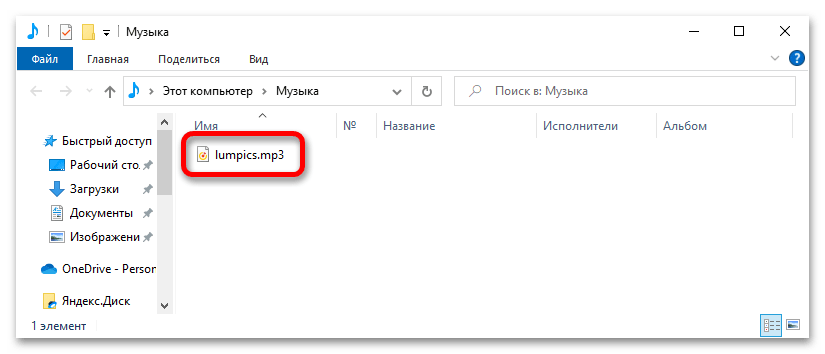
После этого откроется «Проводник», в котором вы сможете найти записанный вами отрывок.
Вариант 3: Free Audio Recorder
Free Audio Recorder — это маловесная утилита, предназначенная для записи звука как с микрофона, так и непосредственно со звуковой карты компьютера. Распространяется она в виде архива. Скачать его вы можете с официального сайта разработчика, воспользовавшись кнопкой ниже.
Скачать Free Audio Recorder
Разархивируйте программу, перейдите в папку и запустите ее исполняемый файл. Далее выполните следующие действия:
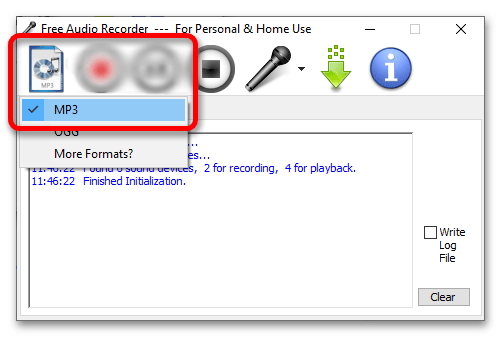
- Выберите аудиоформат, в котором будет сохранена итоговая запись звука. Для этого щелкните по первой иконке на панели инструментов и в появившемся списке нажмите по предпочитаемому варианту. Рекомендуется выбирать «MP3», так как именно он является наиболее распространенным форматом аудио.
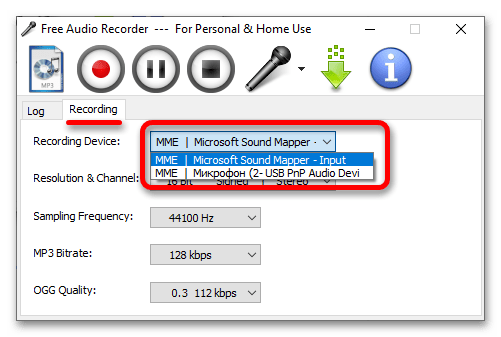
- Последуйте на вкладку «Recording» и из выпадающего списка «Recording Device» выберите название своей звуковой карты или динамиков.
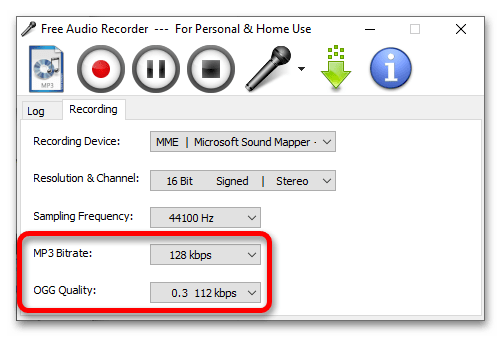
- Через выпадающий список «Sampling Frequency» задайте частоту. При необходимости этот параметр вы можете оставить по умолчанию.
- Определите битрейт ранее выбранного формата аудио. Как уже упоминалось ранее, для MP3 достаточно «128 kbps», но если размер конечного файла не имеет значения, выставляйте максимальное значение.
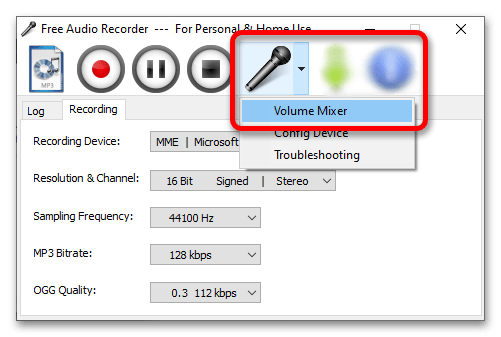
- Настройте выходной звук каждого системного приложения. Сделать это можно с помощью стандартного микшера, который открывается через контекстное меню иконки микрофона, расположенного на верхней панели инструментов. Щелкните по ней левой и выберите пункт «Volume Mixer».

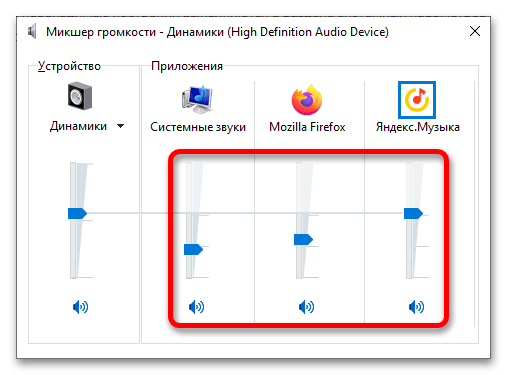
В системном микшере громкости воспользуйтесь вертикальными ползунками, чтобы понизить или повысить громкость определенного приложения. Но делать это не обязательно.
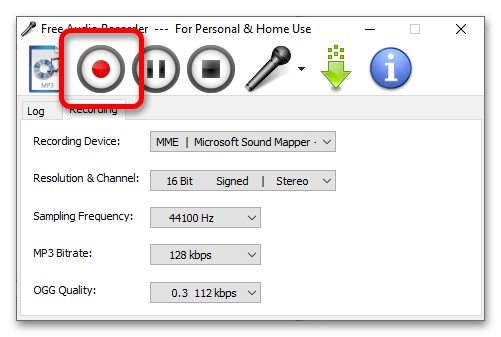
- Начните запись звука с ПК, нажав по соответствующей кнопке в верхней части окна. Ее внешний вид и расположение вы видите на скриншоте ниже.
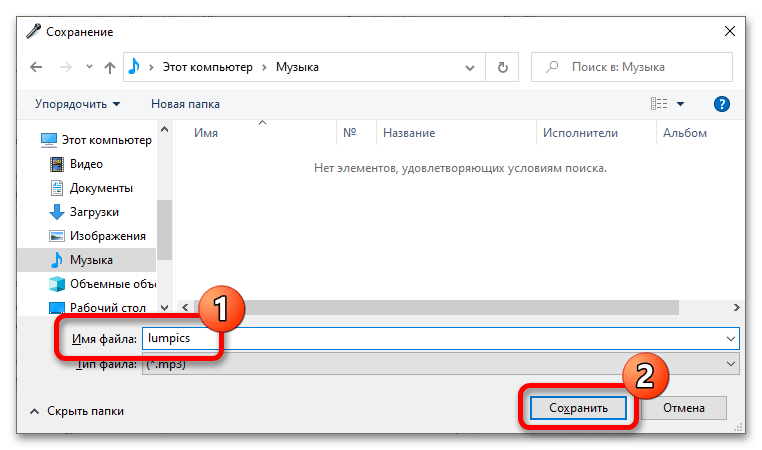
Через «Проводник» перейдите в папку, в которую хотите сохранить готовый аудиофайл. Укажите его название, введя в поле «Имя файла», после чего щелкните по «Сохранить».
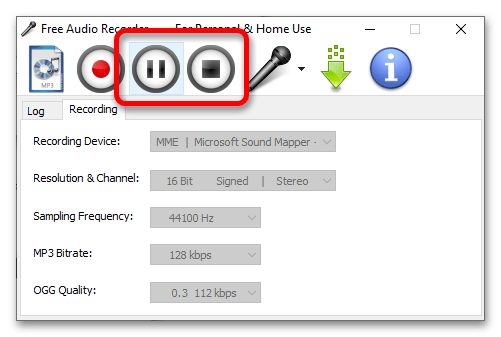
- После начала записи основные элементы интерфейса станут неактивными, о чем будет свидетельствовать их серый оттенок. При необходимости вы можете поставить запись на паузу, щелкнув по соответствующей кнопке. Для завершения процедуры воспользуйтесь кнопкой «Стоп».
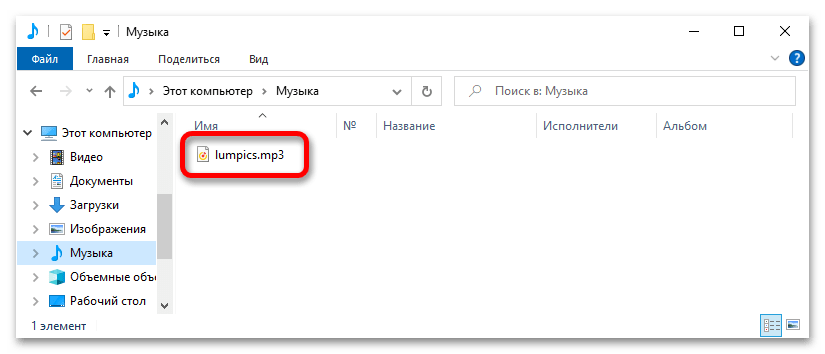
- По итогу аудиофайл с записью звуков компьютера вы сможете найти в папке, выбранной в начале этой процедуры.

Еще статьи по данной теме: