Время на прочтение
12 мин
Количество просмотров 22K
Достаточно часто встречается необходимость связать вместе несколько разнородных систем, либо обеспечить их синхронизацию. Конечно, случаи бывают разные и уникальные, однако, написание собственного решения, как правило, достаточно затратно, как по времени, так и по ресурсам.
Среди серьезных компании, пожалуй, можно выделить облачные решения от Amazon (SQS) и Microsoft (Service Bus). Однако, несмотря на бурное развитие Public Cloud, такие решения не всегда применимы, что называется On-Premises. Иными словами, есть потребность в таких решениях, но на собственных закрытых площадках. В связи с этим, Microsoft сделали грамотный шаг, сделав доступным Service Bus в Private Cloud, или как минимум на одной машине с установленной Windows 7 и выше. В версии Service Bus 1.0 было доступно управление через PowerShell, а с релизом 1.1 появилась возможность интеграции в консоль Azure Pack.
В этой статье я постараюсь описать процесс настройки Service Bus for Windows Server максимально подробно, в картинках. Так как лучше один раз увидеть процесс полностью, чем несколько раз прочитать по частям в разных источниках.
Осторожно трафик! Под катом много картинок.
Итак, Azure Service Bus — это облачная универсальная система обмена сообщениями.
Для того, чтобы понять каким функционалом она обладает, вспомним несколько паттернов из разряда Обмен сообщениями.
Одна из лучших книг на эту тему, по моему субъективному мнению — Enterprise Integration Patterns: Designing, Building, and Deploying Messaging Solutions (перевод: Шаблоны интеграции корпоративных приложений) приводит в соответствие следующие паттерны:
Канал «точка-точка» (Point-to-Point Channel)
Канал «точка-точка» гарантирует, что каждое отдельное сообщение будет потреблено только одним получателем. У канала может быть много получателей, одновременно обрабатывающих сообщения, но только один из них сможет успешно принять конкретное сообщение. Если несколько получателей попытаются одновременно потребить некоторое сообщение, канал сам позаботится о том, чтобы эта операция удалась только одному из них. Координировать свои действия получателем не придется.
Если у канала «точка-точка» только один получатель, то сообщение будет потреблено только один раз. Если же канал прослушивается несколькими получателями, они становятся конкурирующими потребителями (Competing Consumers), и канал гарантирует, что сообщение будет получено только одним из них. Такая схема потребления и обработки сообщений прекрасно масштабируется, поскольку рабочая нагрузка на канал может быть распределена между несколькими потребителями, запущенными в рамках нескольких приложений на нескольких компьютерах.
Если сообщение должно быть получено не одним, а всеми получателями, которые прослушивают канал, используйте канал «публикация-подписка».

Канал «публикация-подписка» (Publish-Subscribe Channel)
Канал «публикация-подписка» функционирует следующим образом: у него есть один входной канал, который разбивается на несколько выходных каналов, по одному на каждого подписчика. Когда сообщение публикуется в канале, канал «публикация-подписка» доставляет копию сообщения в каждый из выходных каналов. На каждом «выходе» канала есть только один подписчик, которому разрешается потреблять сообщение только один раз. Благодаря этому каждый подписчик получит сообщение только единажды, после чего потребленные копии сообщения исчезнут из соответствующих выходных каналов.
Канал недопустимых сообщений (Invalid Message Channel)
Сообщения, имеющие неправильный формат, либо, не содержащие обязательные для этого канала поля, не могут быть обработаны корректно, однако, формально, являются доставленными. В этом случае, получатель может переместить эти сообщения в канал недопустимых сообщений для последующей диагностики проблемы.
В случае отсутствия средств работы с недопустимыми сообщениями:

В случае наличия канала недопустимых сообщений:

Во многих системах обмена сообщениями реализована похожая концепция под названием канал недоставленных сообщений. В отличие от канала недопустимых сообщений, содержащего сообщения, которые были успешно доставлены и получены но не обработаны, канал недоставленных сообщений предназначен для сообщений, которые не смогли быть доставлены системой обмена сообщениями.
Канал недоставленных сообщений (Dead Letter Channel)
Как только система обмена сообщениями определит, что не может доставить сообщение, она должна решить, что с ним делать. Сообщение можно либо удалить, либо перенаправить в канал недоставленных сообщений.
Гарантированная доставка (Guaranteed Delivery)
Под гарантированной доставкой понимают возможность отправить сообщение получателю в асинхронном режиме с гарантией либо только успешного получения, либо корректном уведомлении о невозможности доставки.
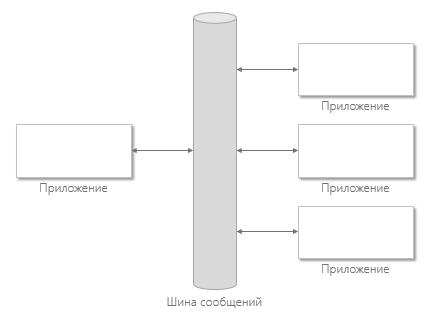
Шина сообщений (Message Bus)
Шина сообщений представляет собой комбинацию канонической модели данных, стандартного набора команд и инфраструктуры обмена сообщениями, позволяющей разным системам взаимодействовать друг с другом через общий набор интерфейсов.
В Azure Service Bus реализованы все перечисленные выше паттерны:
- Очереди (Queue)
- Разделы (Topic)
- Очередь недоставленных сообщений (Dead-letter queue)
Теперь мы поняли о чем речь. Логичный вопрос «а можно мне все тоже самое, но
у себя под столом
на моей территории?».

Да, можно, и абсолютно бесплатно. Для того, чтобы завести Service Bus вам потребуется только Windows 7+ и MS SQL Server 2012 Express+.
Если вы хотите управлять Service Bus через удобный графический интерфейс Azure Pack — вам понадобится Windows Server 2012+.
Скачать Service Bus for Windows Server 1.1 можно через установщика веб-платформ Microsoft.
Скачать Azure Pack можно отсюда (Установка Windows Azure Pack: портал и API Express), или по прямой ссылке.
Как это работает?
Service Bus в своей работе использует БД для хранения инфраструктурных данных и контейнеров сообщений (сообщения распределяются между ними равномерно). Сервер БД и Service Bus могут находится на разных машинах.
Для управления Service Bus через веб-интерфейс можно использовать Azure Pack. Azure Pack может находиться на другой машине, но для работы ему также нужна БД, где он будет хранить данные о пользователях и т.п.
В своем примере я разверну три виртуальные машины, которые будут висеть в интернете:
- На первой я разверну БД, где Service Bus будет хранить сообщения.
- На второй Service Bus.
- На третьей Azure Pack и БД для него.
Все тоже самое можно развернуть на одной машине.
Сами виртуальные машины я создам в Microsoft Azure, используя обновленный портал управления.
Перед тем, как вы начнете читать о настройках Service Bus и Azure Pack настоятельно рекомендую ознакомиться с терминологией на официальных ресурсах.
Настройка виртуальной машины с базой данных
Настройка виртуальной машины с базой данных
Укажем имя хоста и данные учетной записи администратора
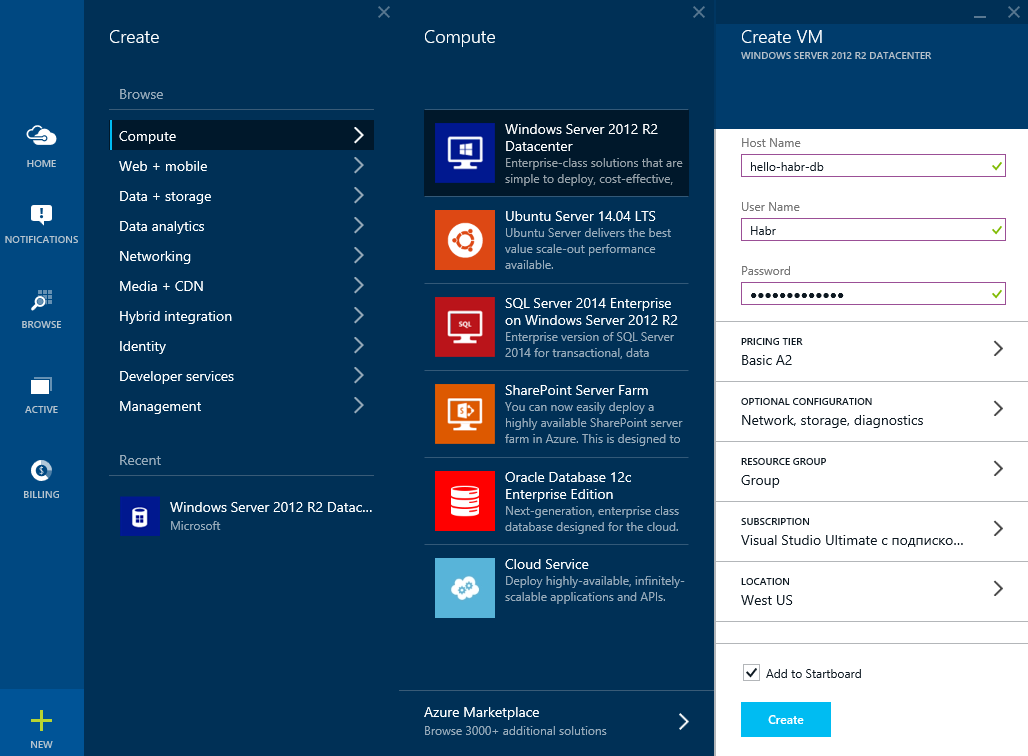
Настроим время и автоматические обновления
Создадим виртуальную сеть: hello-habr-db
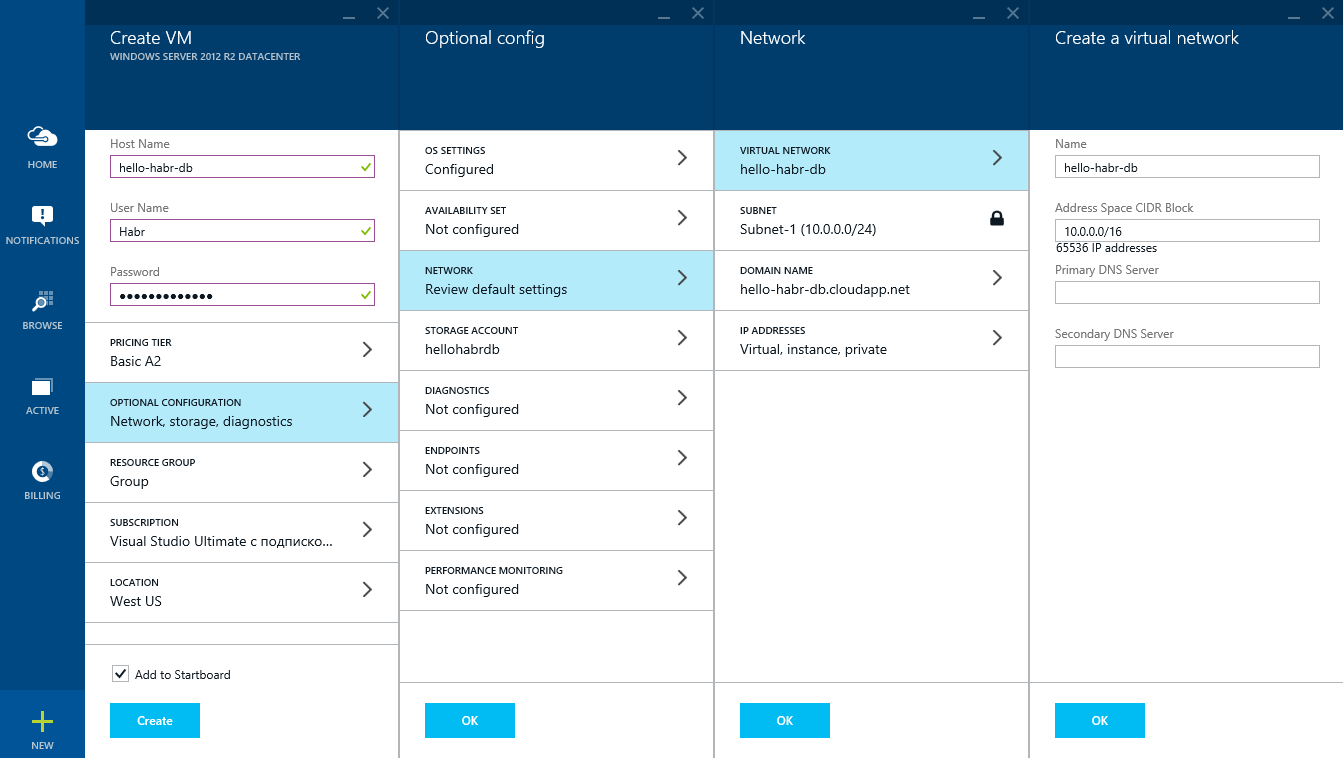
Зарезервируем внешний IP адрес: hello-habr-db

Откроем порты для работы базы данных на внешку
Укажем географическое расположение поближе к России

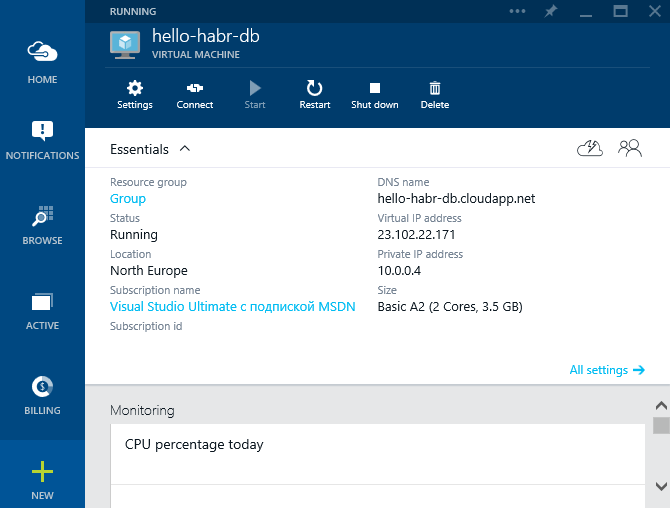
Подождем некоторое время, пока Azure создаст виртуальную машину. После чего получим о ней детальную информацию.
Теперь можно приступать к установке необходимого ПО:
1) Microsoft SQL Server 2014 Express English(!) (который, к слову, предоставляет уже 10 Гб)
2) Management Studio 2014
Перед тем как это сделать выполним следующие действия:
1) Установим .NET Framework 3.5

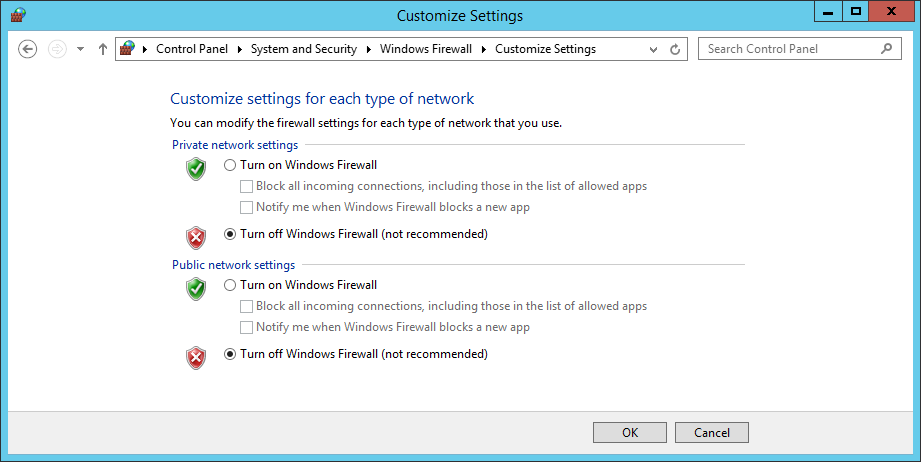
2) Выключим брандмауэр (
не повторяйте это самостоятельно
для полноты эксперимента)
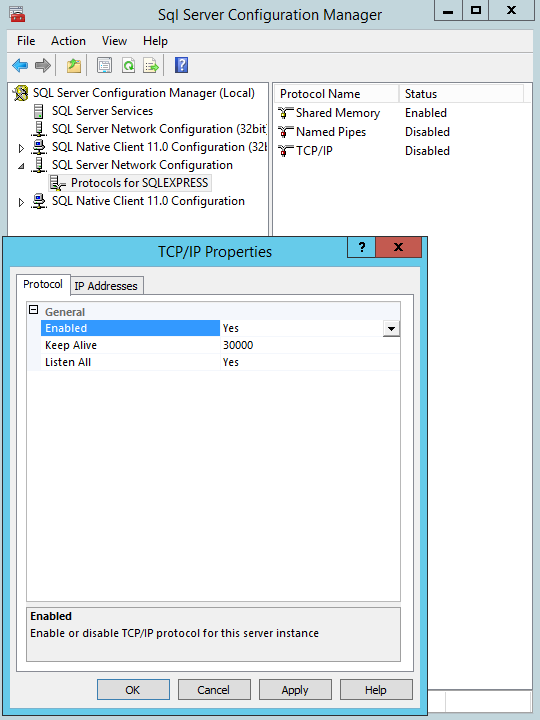
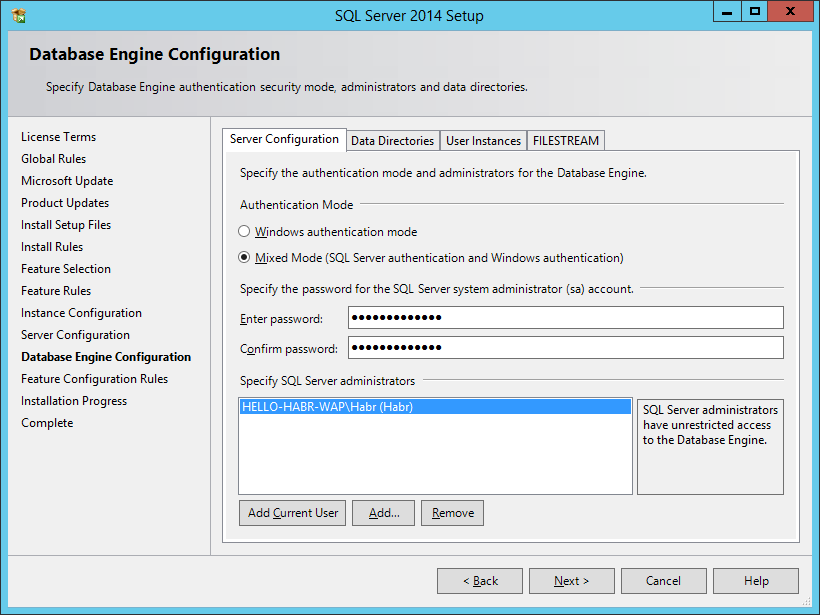
При установке MS SQL Server нужно выбрать смешанный режим аутентификации (это важно)

После установки настроим MS SQL Server для работы на внешку
Эта виртуальная машина готова. Не забудьте перезагрузить.
Настройка виртуальной машины с Service Bus for Windows Server
Настройка виртуальной машины с Service Bus for Windows Server
Укажем имя хоста и данные учетной записи администратора

Создадим виртуальную сеть: hello-habr-sb
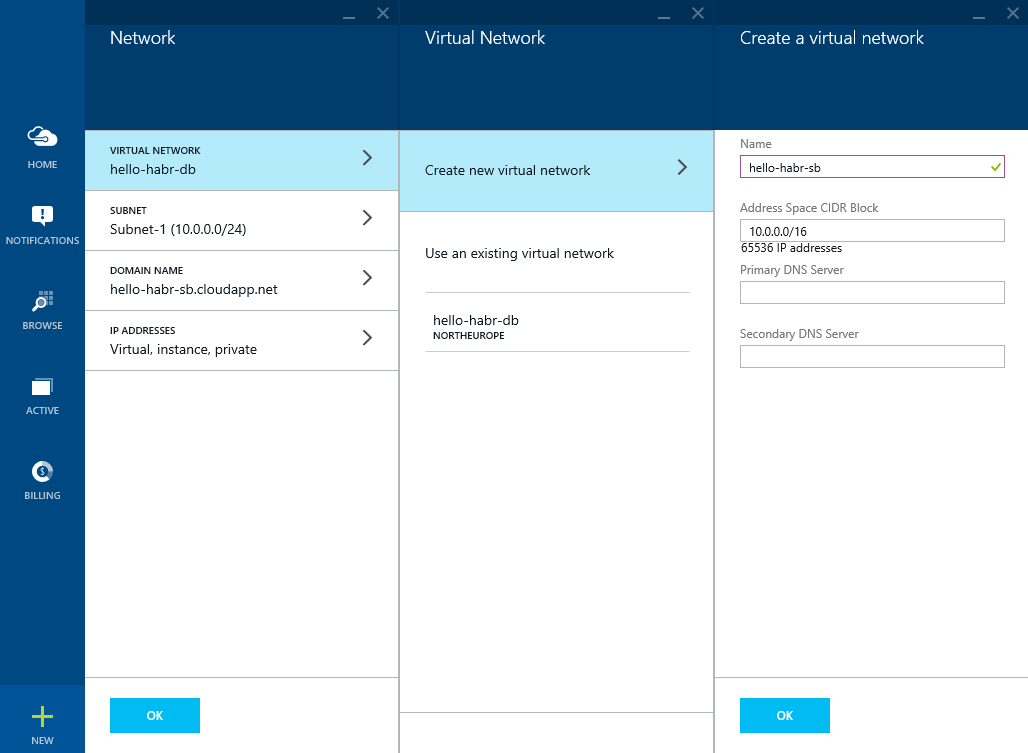
Зарезервируем внешний IP адрес: hello-habr-sb

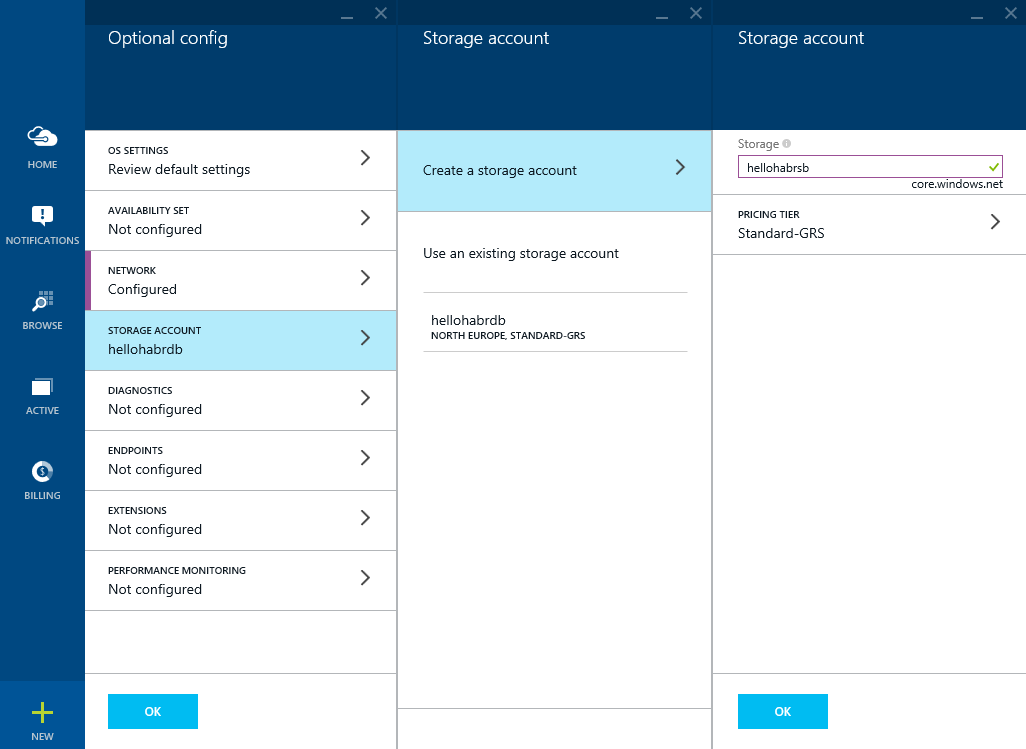
Создадим другой Storage account (хотя это не критично): hellohabrsb
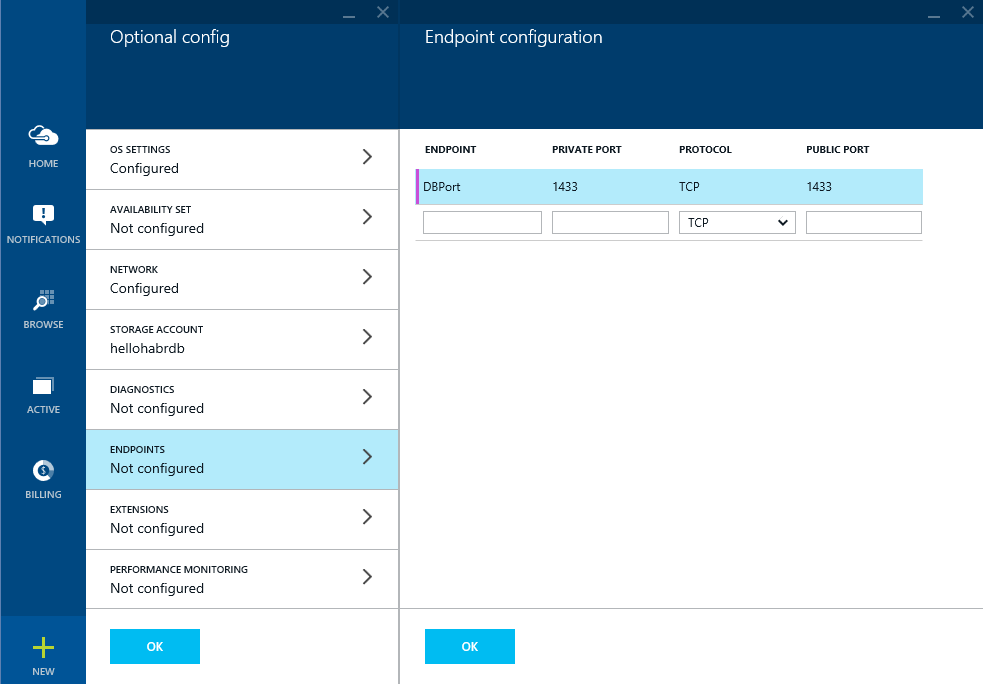
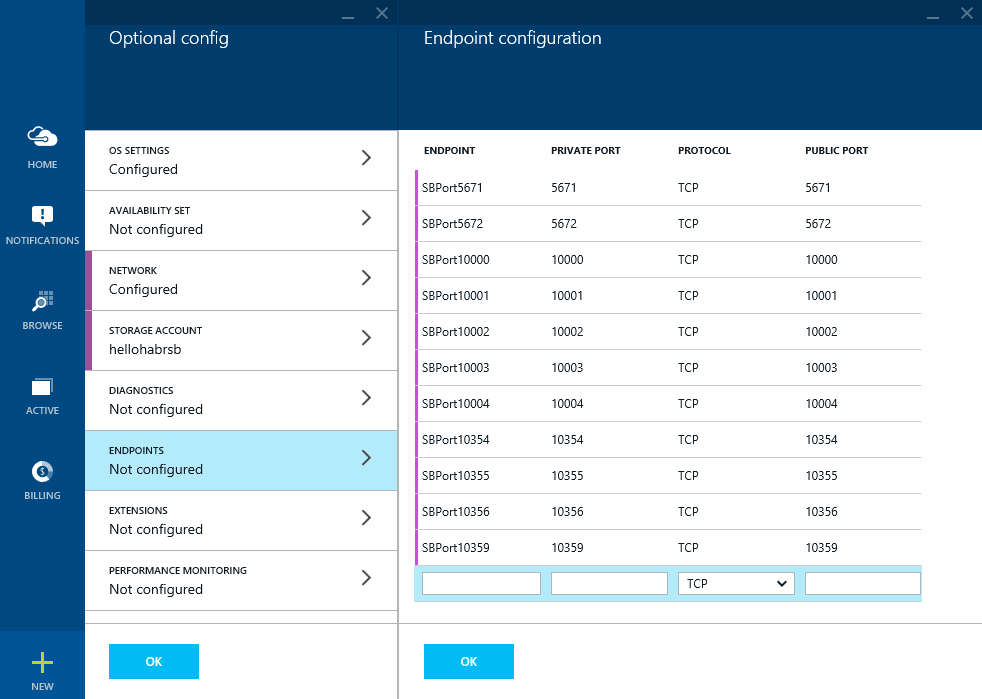
Откроем внушительный список портов для функционирования Service Bus, и для доступа к ней Azure Pack
Получим виртуальную машину

Выключим брандмауэр (
не повторяйте это самостоятельно
для полноты эксперимента)
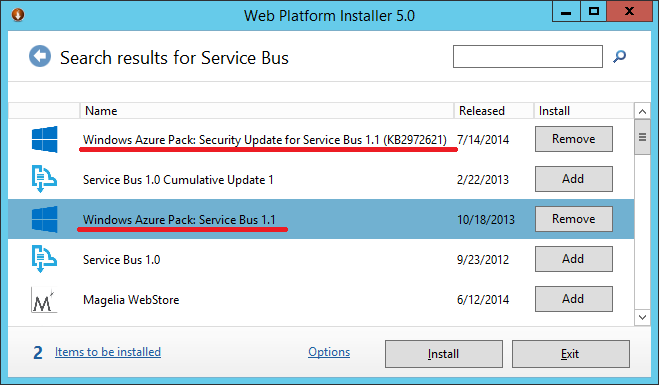
Запустим установщик веб-платформ Microsoft и через поиск найдем Service Bus 1.1
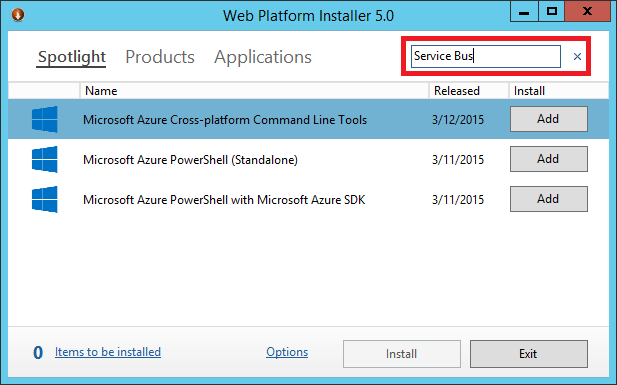
Выберем два пункта и нажмем установить
Далее сгенерируем сертификат доступа к Service Bus for Windows Server (с клиента на другой машине в сети интернет) при помощи утилиты makecert.exe через командную строку. В Windows 8.1 она обычно лежит в директории:
C:\Program Files (x86)\Microsoft SDKs\Windows\v7.1A\Bin
makecert.exe -r -pe -n "CN=hello-habr-sb.cloudapp.net, CN=hello-habr-sb" -e 11/11/2022 -eku 1.3.6.1.5.5.7.3.2 -ss My -sr "LocalMachine" -sky Exchange -a sha256 -sy 24 -len 2048 "hello-habr-sb.cloudapp.net.cer"
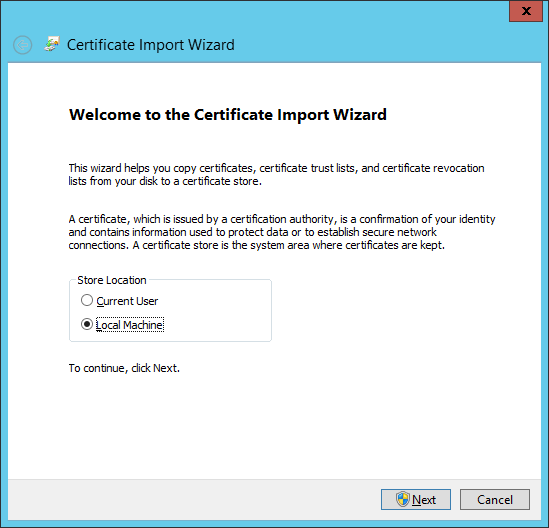
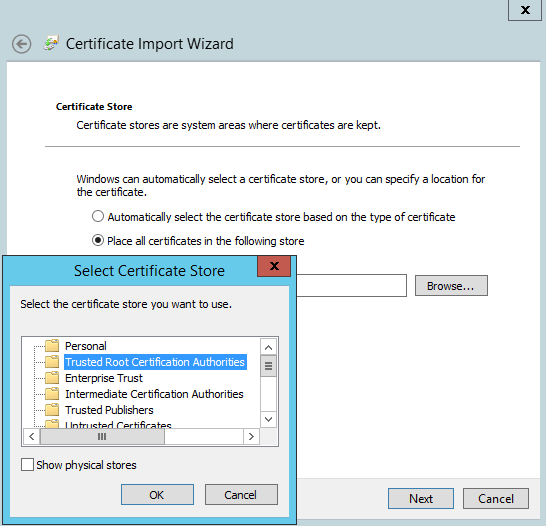
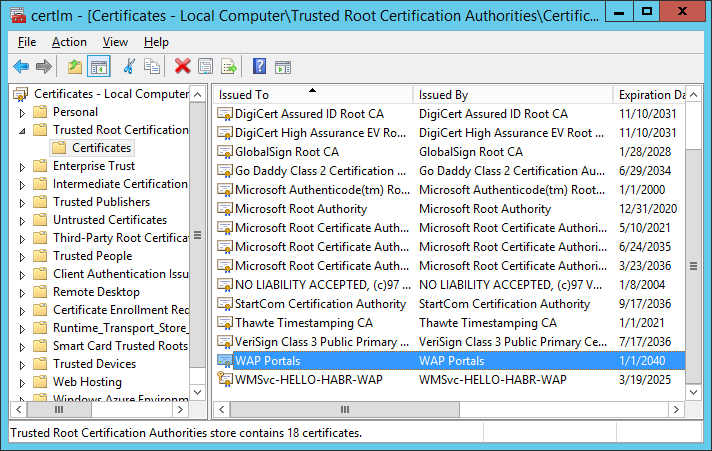
Получим файл hello-habr-sb.cloudapp.net.cer. Установим его в Certificates – Local Computer (Trusted Root CA) на сервере и клиентах к Service Bus.
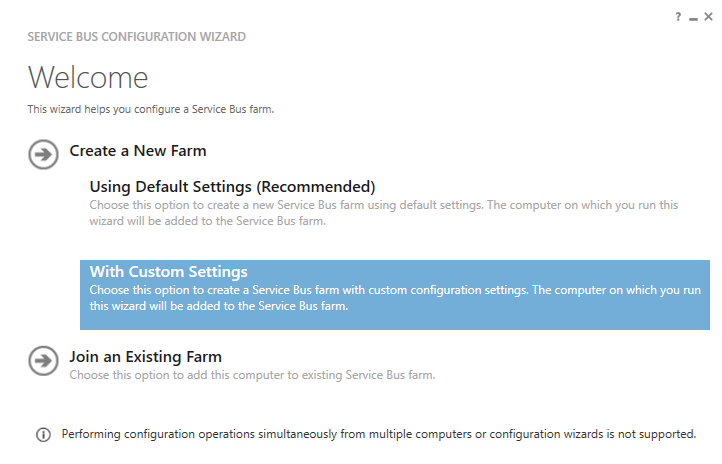
Отлично, теперь все готово для конфигурирования Service Bus. Запустим Service Bus Configuration.
Нас интересуют Custom Settings
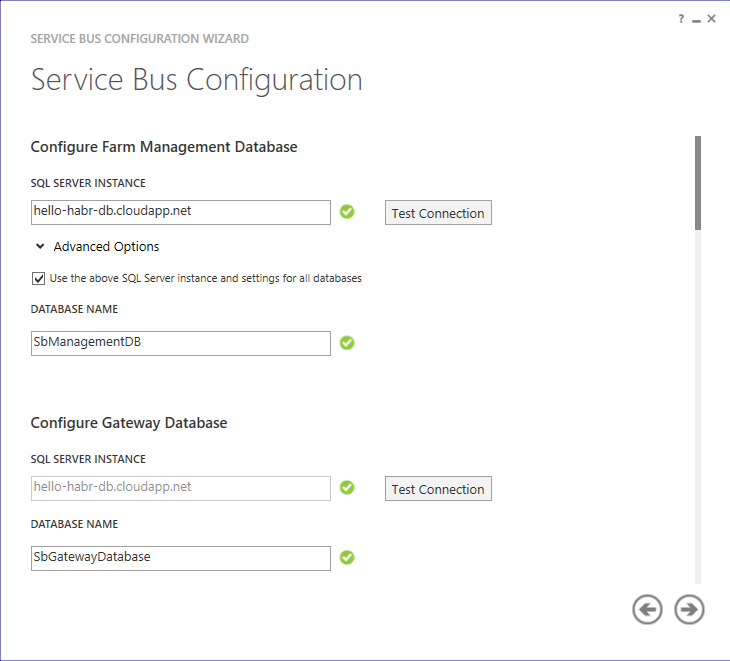
Укажем DNS имя нашей виртуальной машины с БД: hello-habr-db.cloudapp.net. Проверим соединение.
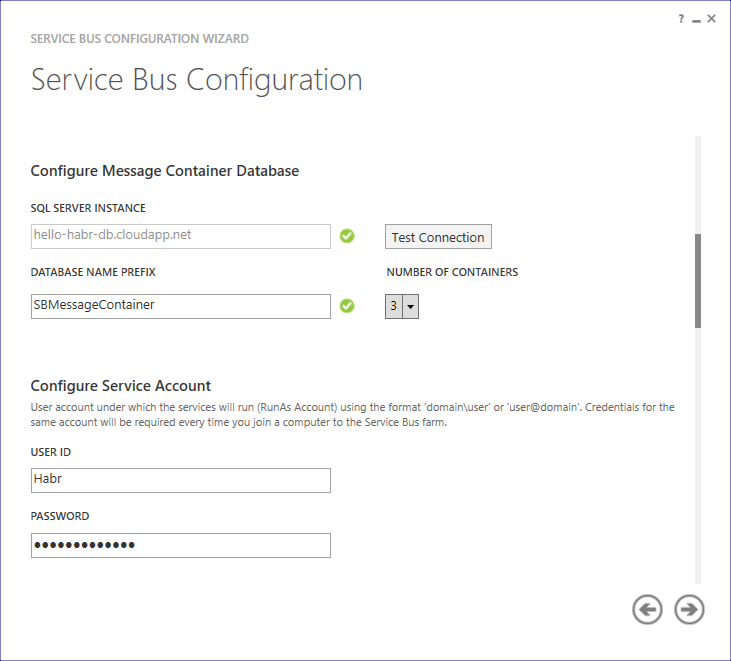
Зададим количество контейнеров для обработки сообщений и введем пароль
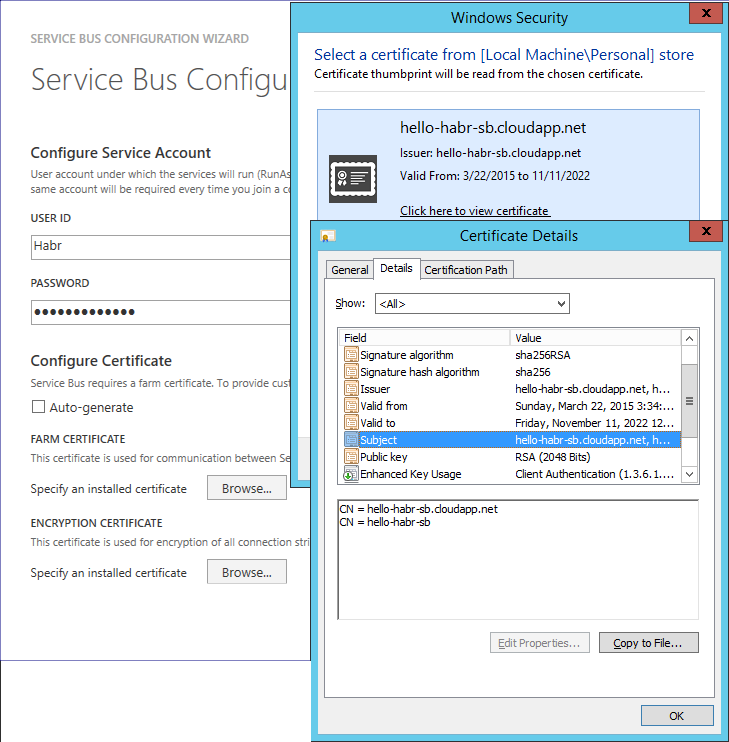
В качестве сертификата выберем ранее сгенерированный hello-habr-sb.cloudapp.net.cer
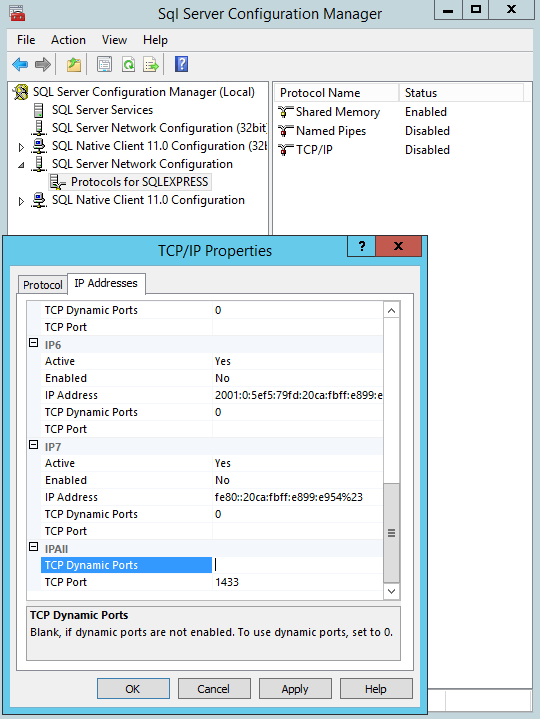
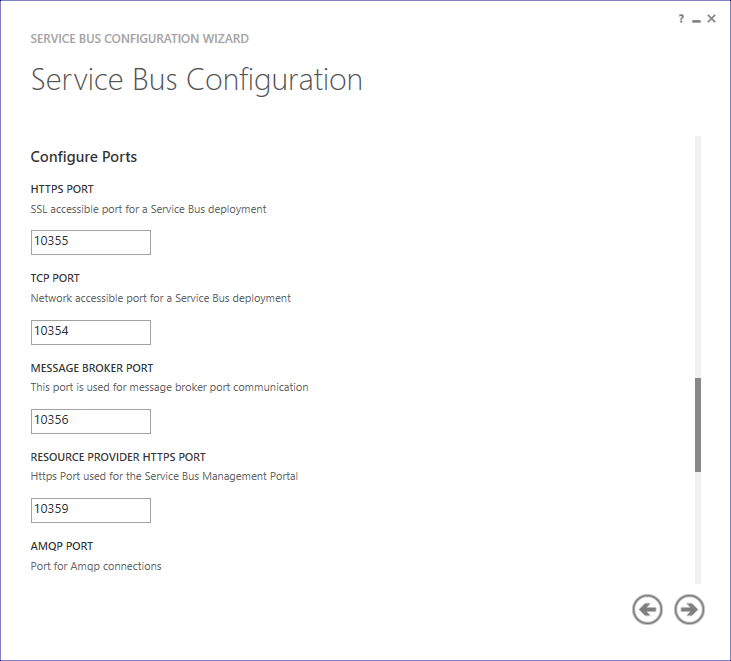
Изменим порты с 9000 на 10000
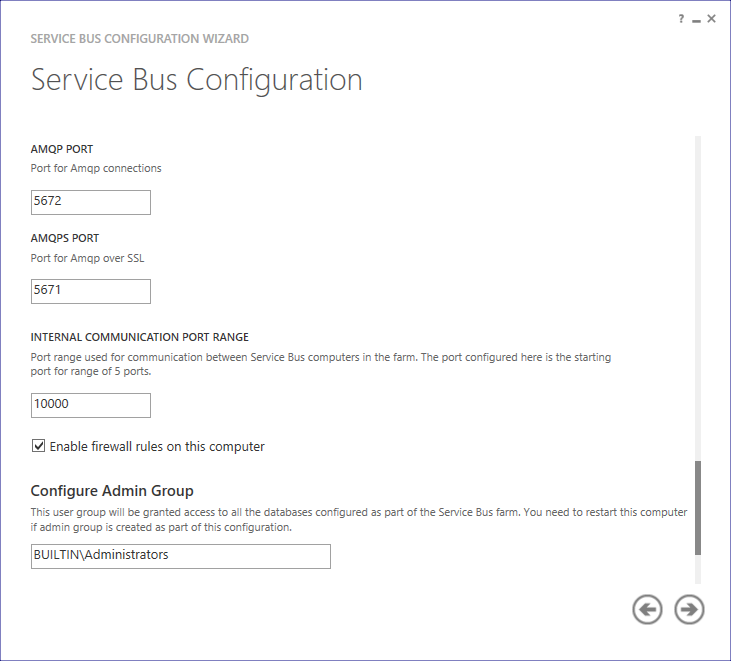
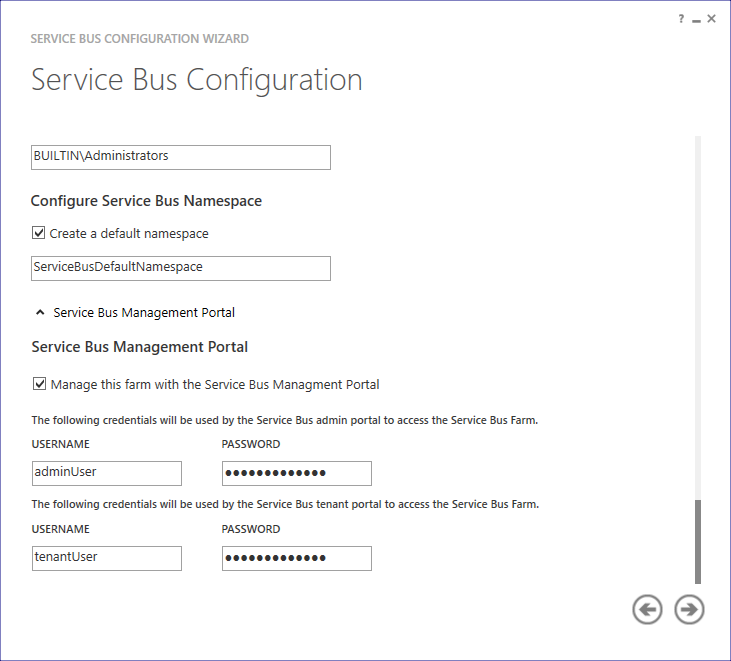
Установим галочку, что мы хотим управлять этой фермой через портал Azure Pack. Укажем пароли для порталов admin- и tenant-
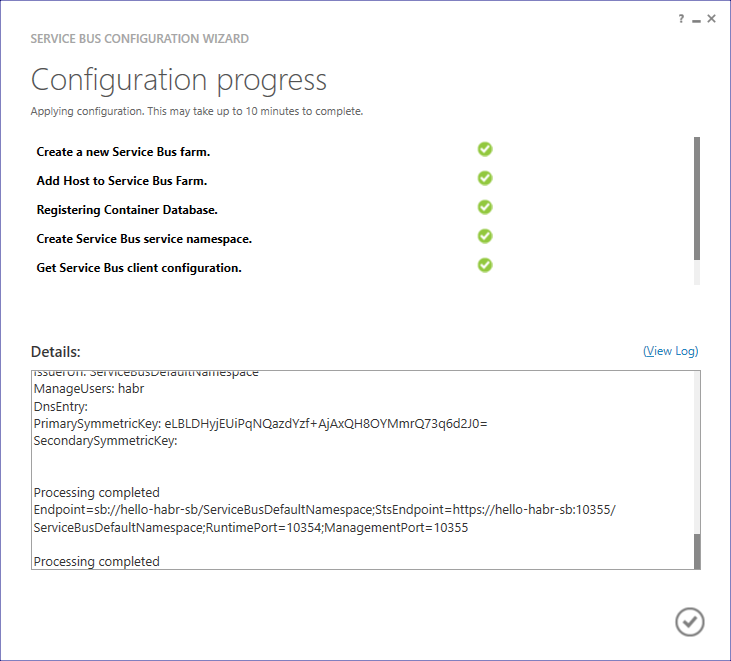
Если все действия были проделаны правильно, то нам скажут что все хорошо
Теперь нам нужно изменить DNS имя Service Bus Farm (SBFarm) (это нужно, чтобы была возможность доступа клиента с другой машины в сети интернет). Сделать это можно при помощи Service Bus PowerShell (с правами администратора). Выполним последовательность команд:
Get-SBFarm

Stop-SBFarm –Verbose

Set-SBFarm -FarmDns 'hello-habr-sb.cloudapp.net'

Update-SBHost –Verbose

Start-SBFarm –Verbose
(Start-SBFarm выполняется весьма долго, это нормально)
Для последующей проверки работоспособности через .NET-клиент назначим SAS-ключ для ранее созданного ServiceBusDefaultNamespace:
New-SBAuthorizationRule -NamespaceName ServiceBusDefaultNamespace -Name MainRule -Rights Manage, Send, Listen
В ответ получим:
KeyName             : MainRule
PrimaryKey          : ylF6GWmH6rlZg1ekQMQrLQnht4kwVFWHAfyB8HkrZvM=
SecondaryKey        : ZYBpdiCYgZNfwOC37x6DEDLxhv+qan6CJZT0vG3GvTk=
Rights              : {Manage, Send, Listen}
CreatedTime         : 3/22/2015 12:53:23 AM
ModifiedTime        : 3/22/2015 12:53:23 AM
ConnectionString    : Endpoint=sb://hello-habr-sb.cloudapp.net/ServiceBusDefaultNamespace;
                      StsEndpoint=https://hello-habr-sb.cloudapp.net:10355/ServiceBusDefaultNamespace;
                      RuntimePort=10354;
                      ManagementPort=10355;
                      SharedAccessKeyName=MainRule;
                      SharedAccessKey=ylF6GWmH6rlZg1ekQMQrLQnht4kwVFWHAfyB8HkrZvM=
Последнее действие на данной машине: добавить запись в файл hosts
(C:\Windows\System32\drivers\etc)
127.0.0.1 hello-habr-sb.cloudapp.net
Отлично, переходим к настройке Azure Pack на третьей машине.
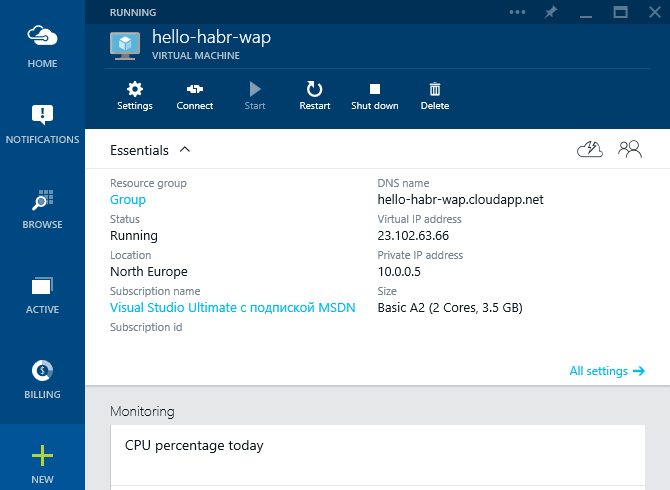
Настройка виртуальной машины с Azure Pack
Настройка виртуальной машины с Azure Pack
Укажем имя хоста и данные учетной записи администратора

Создадим виртуальную сеть: hello-habr-wap
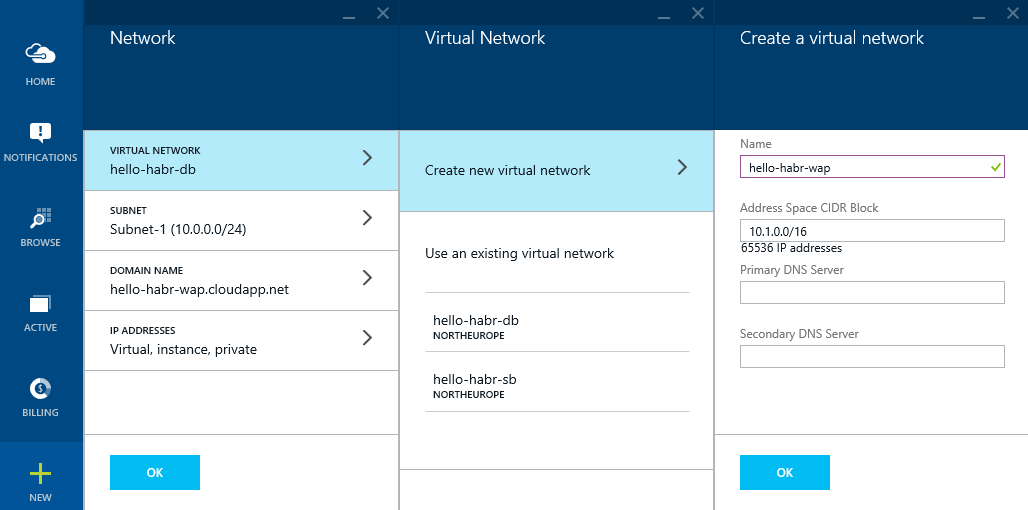
Зарезервируем внешний IP адрес: hello-habr-wap
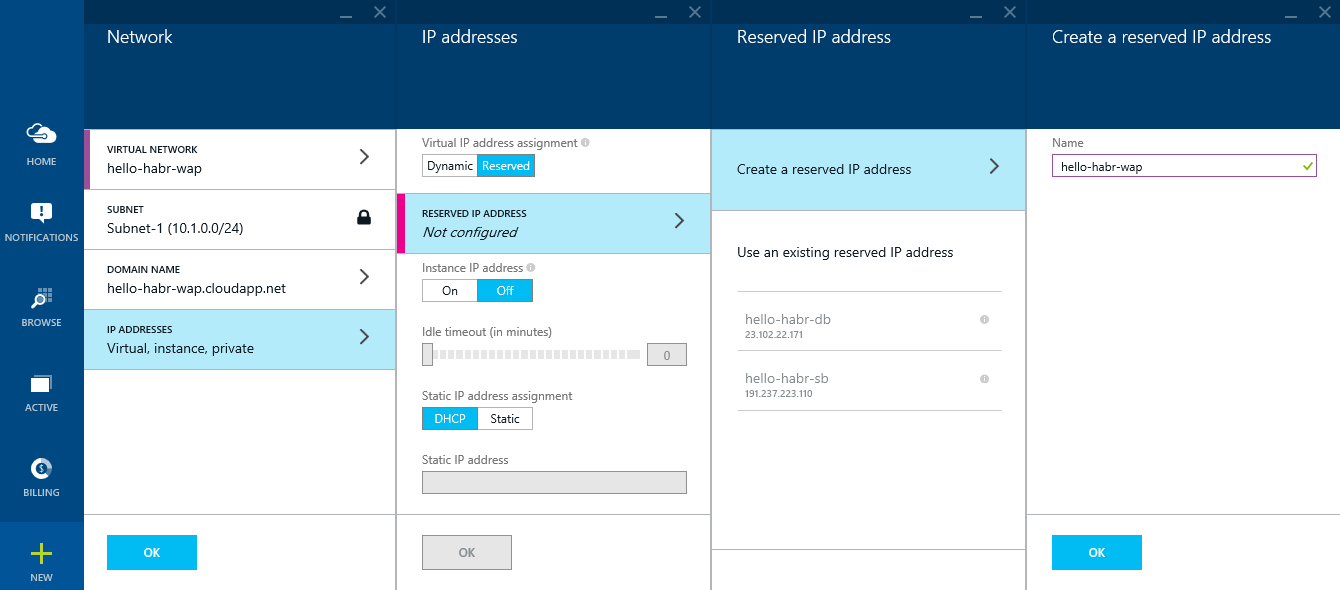
Создадим другой Storage account (хотя это не критично): hellohabrwap
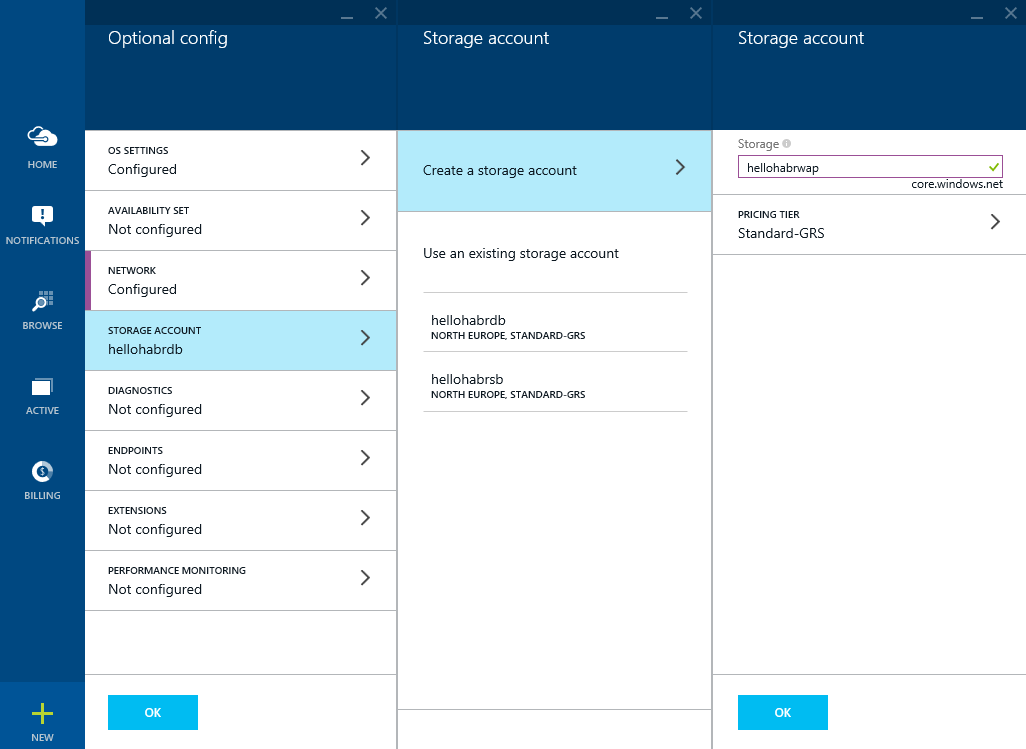
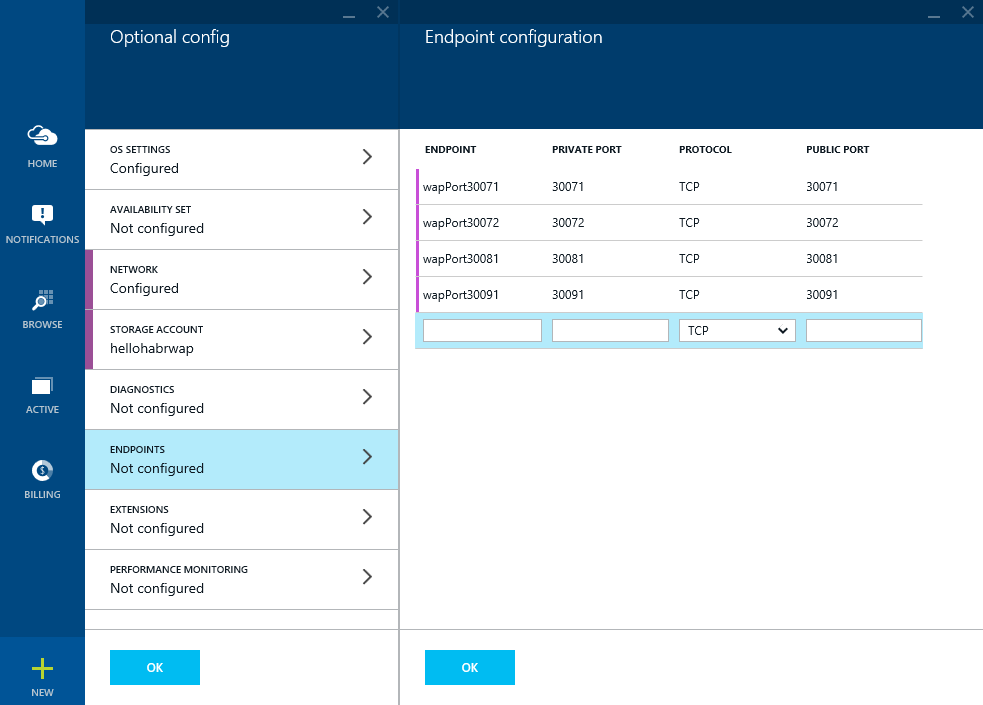
Откроем порты для доступа к порталам управления Azure Pack
Получим виртуальную машину
Azure Pack также хранит свои данные в БД, и для того чтобы отделить его логику от логики Service Bus поднимем еще один сервер БД, но уже на этой машине. Для этого нам снова понадобится:
1) Microsoft SQL Server 2014 Express English(!)
2) Management Studio 2014
Перед тем как начать установку выполним следующие действия:
1) Установим .NET Framework 3.5
2) Выключим брандмауэр (
не повторяйте это самостоятельно
для полноты эксперимента)
При установке MS SQL Server нужно выбрать смешанный режим аутентификации (это важно)
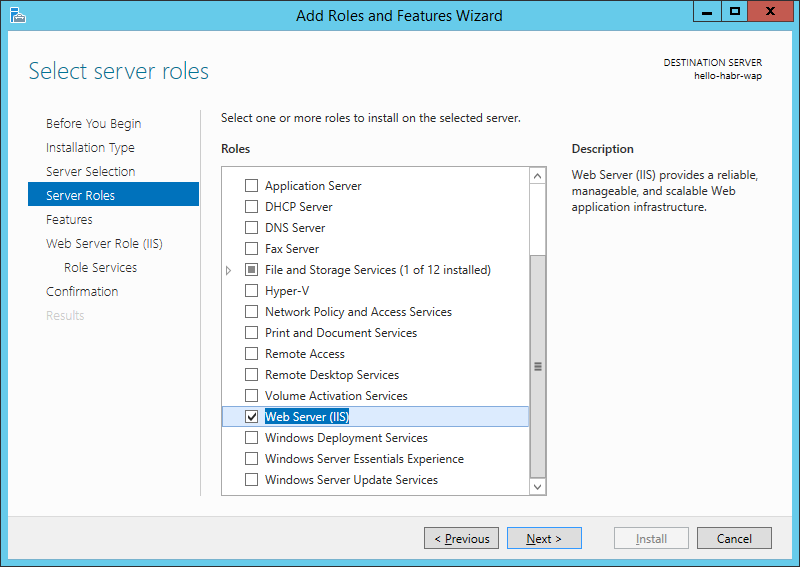
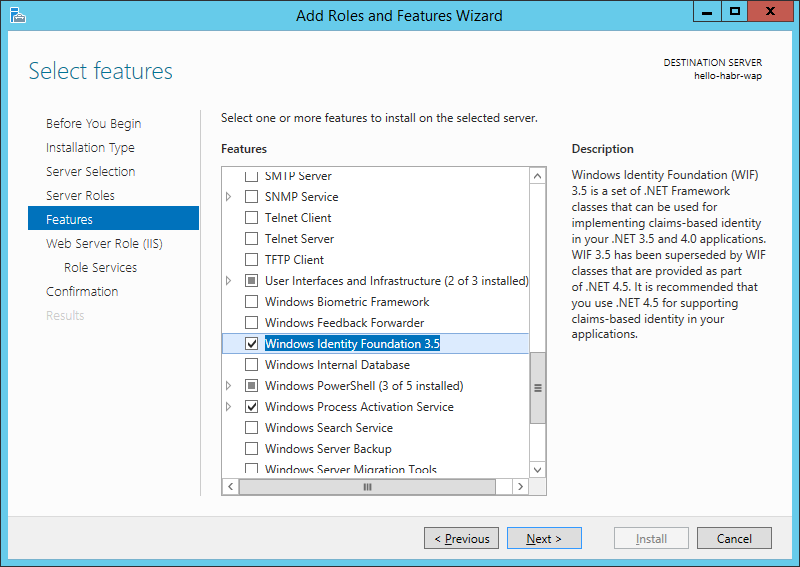
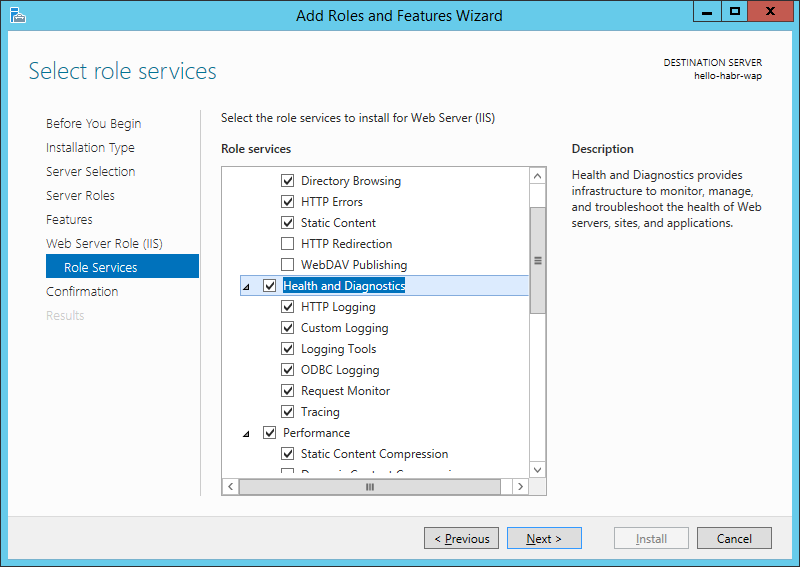
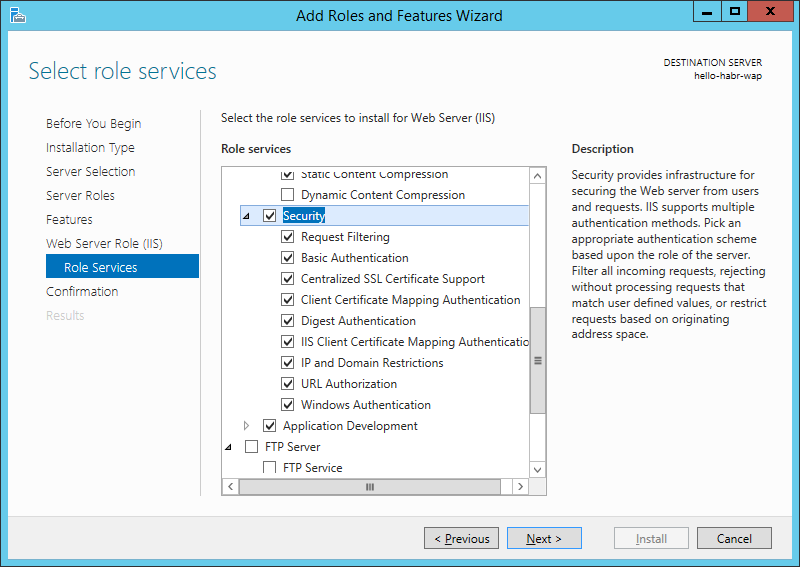
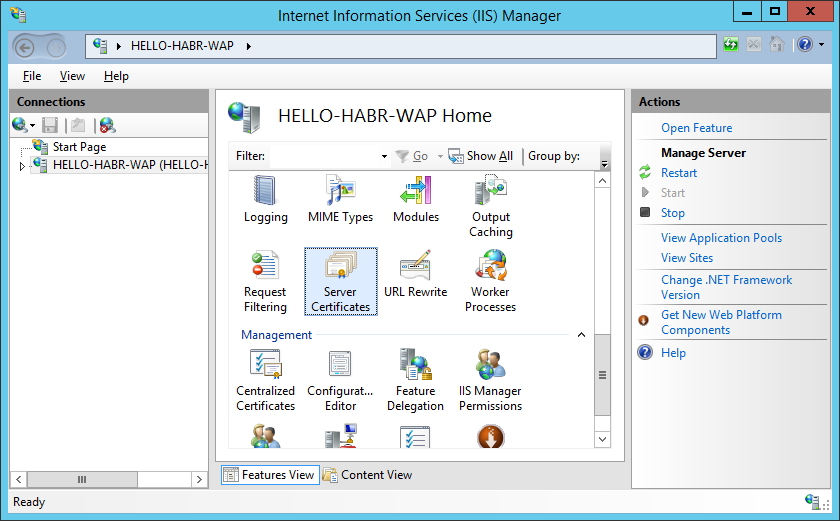
После этого нужно поднять IIS для работы порталов управления Azure Pack
Также я установлю несколько компонентов, связанных с управлением IIS и безопасностью


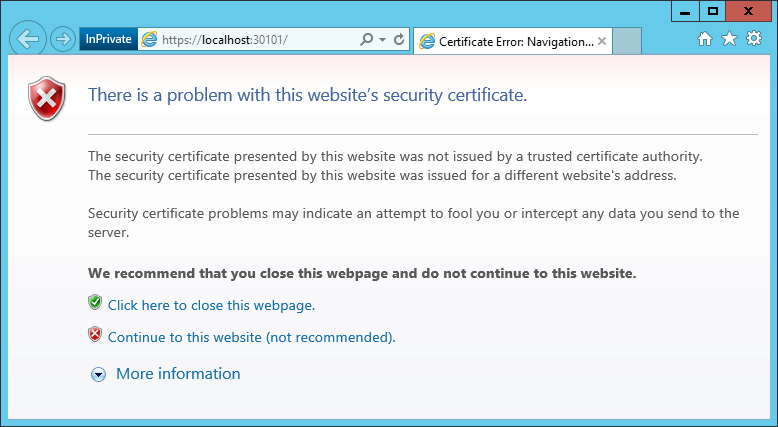
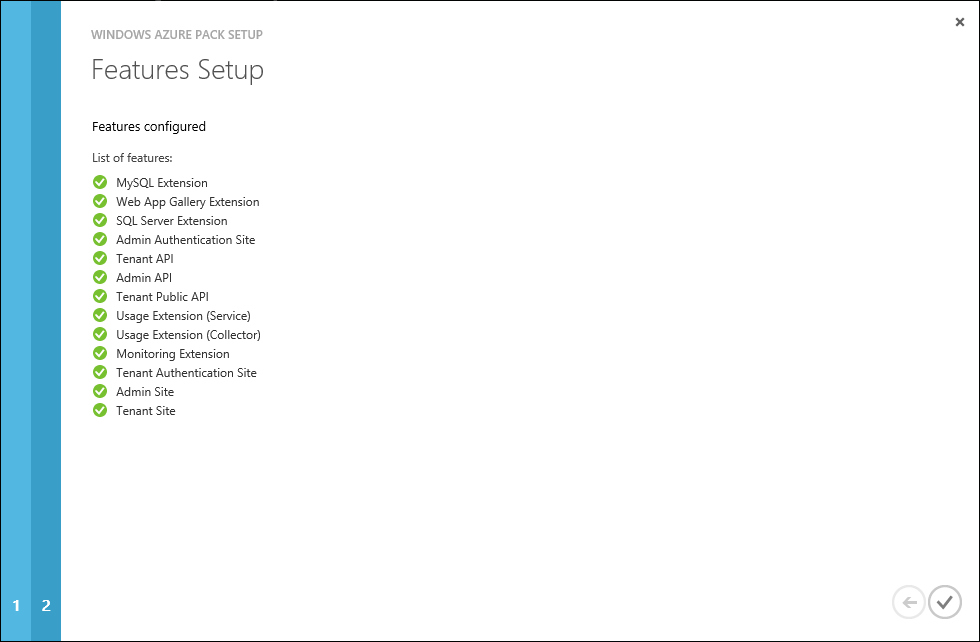
Теперь установим Azure Pack с параметрами по умолчанию.
Сразу после установки откроется портал конфигурирования:
https://localhost:30101/
Нажмем продолжить.
Укажем БД в которой будут хранится данные Azure Pack

Если с IIS и БД все хорошо, нас проинформируют о успешном выполнении
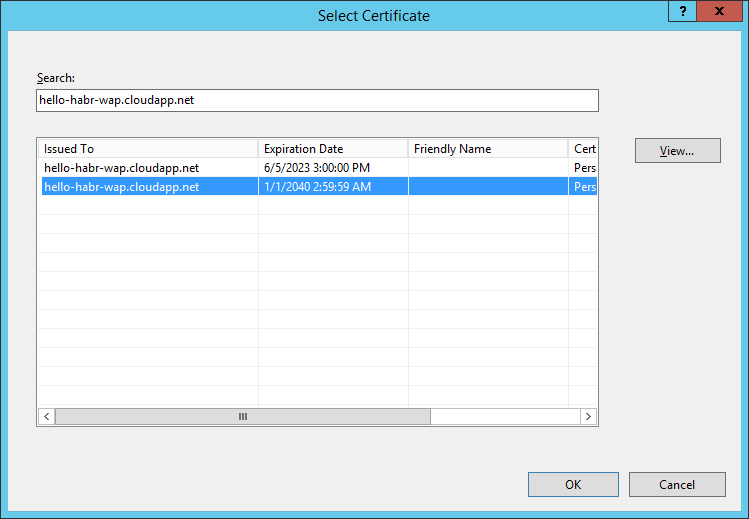
Теперь нам нужно сгенерировать сертификат доступа к сайтам Azure Pack (чтобы доступ к сайтам имели только те, кто имеют сертификат) при помощи уже знакомых утилит makecert.exe и pvk2pfx.exe.
C:\Program Files (x86)\Microsoft SDKs\Windows\v7.1A\Bin
Для сервера:
makecert -r -pe -n "CN=WAP Portals" -ss CA -a sha1 -sky signature -cy authority -sv WAPPortals.pvk WAPPortals.cer

makecert -pe -n "CN=hello-habr-wap.cloudapp.net" -a sha1 -sky exchange -eku 1.3.6.1.5.5.7.3.1 -ic WAPPortals.cer -iv WAPPortals.pvk -sp "Microsoft RSA SChannel Cryptographic Provider"  -sy 12 -sv WAPLocalServer.pvk WAPLocalServer.cer

pvk2pfx -pvk WAPLocalServer.pvk -spc WAPLocalServer.cer -pfx WAPLocalServer.pfx
Для клиента:
makecert -pe -n "CN=WAPMainDeveloper" -a sha1 -sky exchange -eku 1.3.6.1.5.5.7.3.2 -ic WAPPortals.cer -iv WAPPortals.pvk -sv WAPClient.pvk WAPClient.cer

pvk2pfx -pvk WAPClient.pvk -spc WAPClient.cer -pfx WAPClient.pfx -po HelloHabr2015
Импортируем WAPPortals.cer в Certificates – Local Computer (Trusted Root CA) на сервере.
Импортируем WAPLocalServer.pfx в IIS на сервере.
В моем случае — я пароль не задавал.
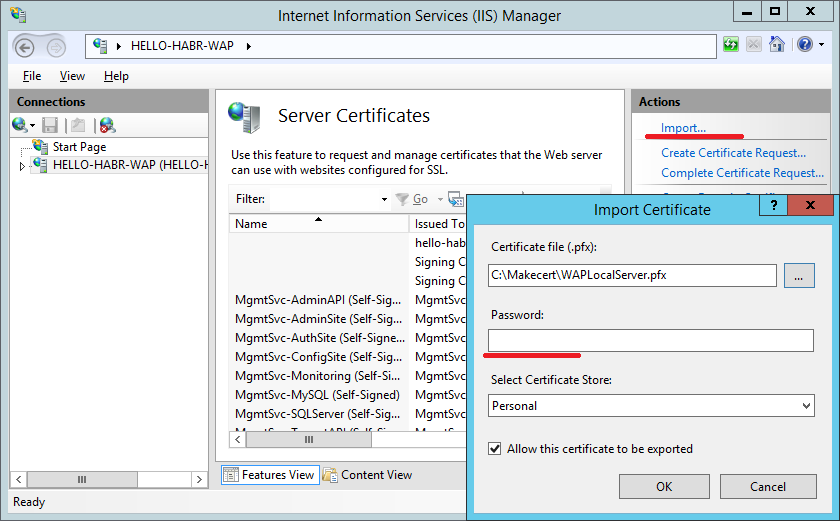
Установим WAPClient.pfx на сервере и на клиентах в Certificates – Local Computer и Current User (Personal).
Добавим запись в файл hosts
(C:\Windows\System32\drivers\etc)
127.0.0.1 hello-habr-wap.cloudapp.net
Теперь мы можем изменить FQDN имя для сайтов управления Azure Pack (это нужно для доступа к сайтам из сети интернет) при помощи PowerShell (с правами администратора)
Для TenantSite
Import-Module -Name MgmtSvcConfig

Set-MgmtSvcFqdn -Namespace "TenantSite" -FullyQualifiedDomainName "hello-habr-wap.cloudapp.net" -Port 30081 -Server "hello-habr-wap\SQLEXPRESS"

Set-MgmtSvcFqdn -Namespace "AuthSite" -FullyQualifiedDomainName "hello-habr-wap.cloudapp.net" -Port 30071 -Server "hello-habr-wap\SQLEXPRESS"

Set-MgmtSvcRelyingPartySettings -Target Tenant -MetadataEndpoint "https://hello-habr-wap.cloudapp.net:30071/FederationMetadata/2007-06/FederationMetadata.xml" -ConnectionString "Data Source=hello-habr-wap\SQLEXPRESS;User ID=sa;Password=HelloHabr2015" –DisableCertificateValidation

Set-MgmtSvcIdentityProviderSettings -Target Membership -MetadataEndpoint "https://hello-habr-wap.cloudapp.net:30081/FederationMetadata/2007-06/FederationMetadata.xml" -ConnectionString "Data Source=hello-habr-wap\SQLEXPRESS;User ID=sa;Password=HelloHabr2015" –DisableCertificateValidation
Для AdminSite
Import-Module -Name MgmtSvcConfig

Set-MgmtSvcFqdn -Namespace "AdminSite" -FullyQualifiedDomainName "hello-habr-wap.cloudapp.net" -Port 30091 -Server "hello-habr-wap\SQLEXPRESS"

Set-MgmtSvcFqdn -Namespace "WindowsAuthSite" -FullyQualifiedDomainName "hello-habr-wap.cloudapp.net" -Port 30072 -Server "hello-habr-wap\SQLEXPRESS"

Set-MgmtSvcRelyingPartySettings -Target Admin -MetadataEndpoint "https://hello-habr-wap.cloudapp.net:30072/FederationMetadata/2007-06/FederationMetadata.xml" -ConnectionString "Data Source=hello-habr-wap\SQLEXPRESS;User ID=sa;Password=HelloHabr2015" –DisableCertificateValidation

Set-MgmtSvcIdentityProviderSettings -Target Windows -MetadataEndpoint "https://hello-habr-wap.cloudapp.net:30091/FederationMetadata/2007-06/FederationMetadata.xml" -ConnectionString "Data Source=hello-habr-wap\SQLEXPRESS;User ID=sa;Password=HelloHabr2015" –DisableCertificateValidation
В настройках сайтов Azure Pack в IIS изменим Bindings
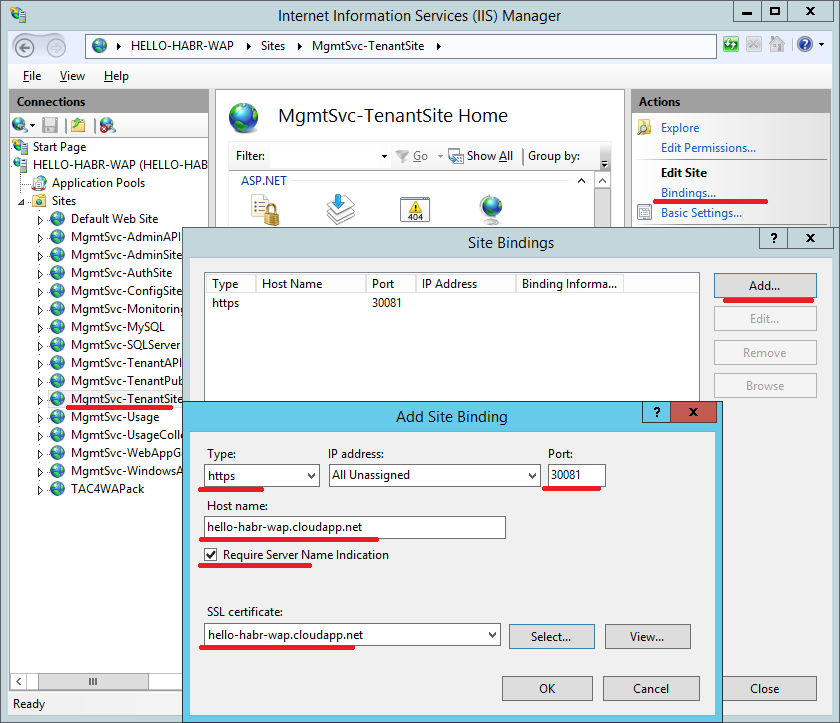
В качестве сертификата выбрать hello-habr-wap.cloudapp.net — WAP Portals

В настройках SSL для сайта — установим Require SSL
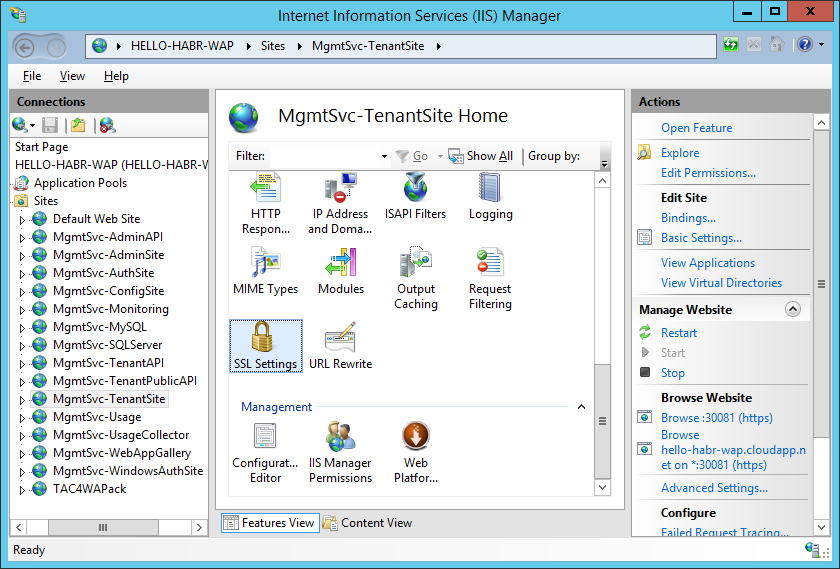
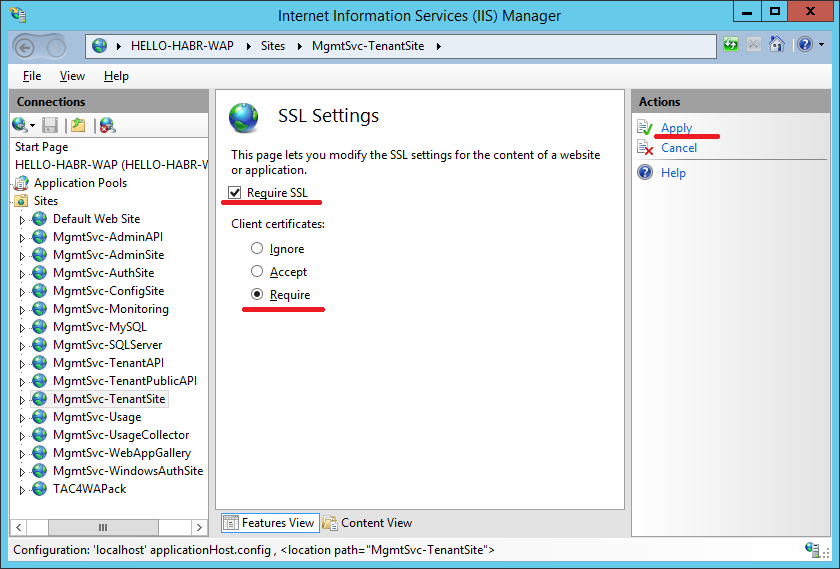
Данную процедуру повторить для сайтов:
— TenantSite
— AuthSite
— AdminSite
— WindowsAuthSite
Для создания user-friendly DNS-имен можно использовать способы, описанные в статьях: раз, два и три.
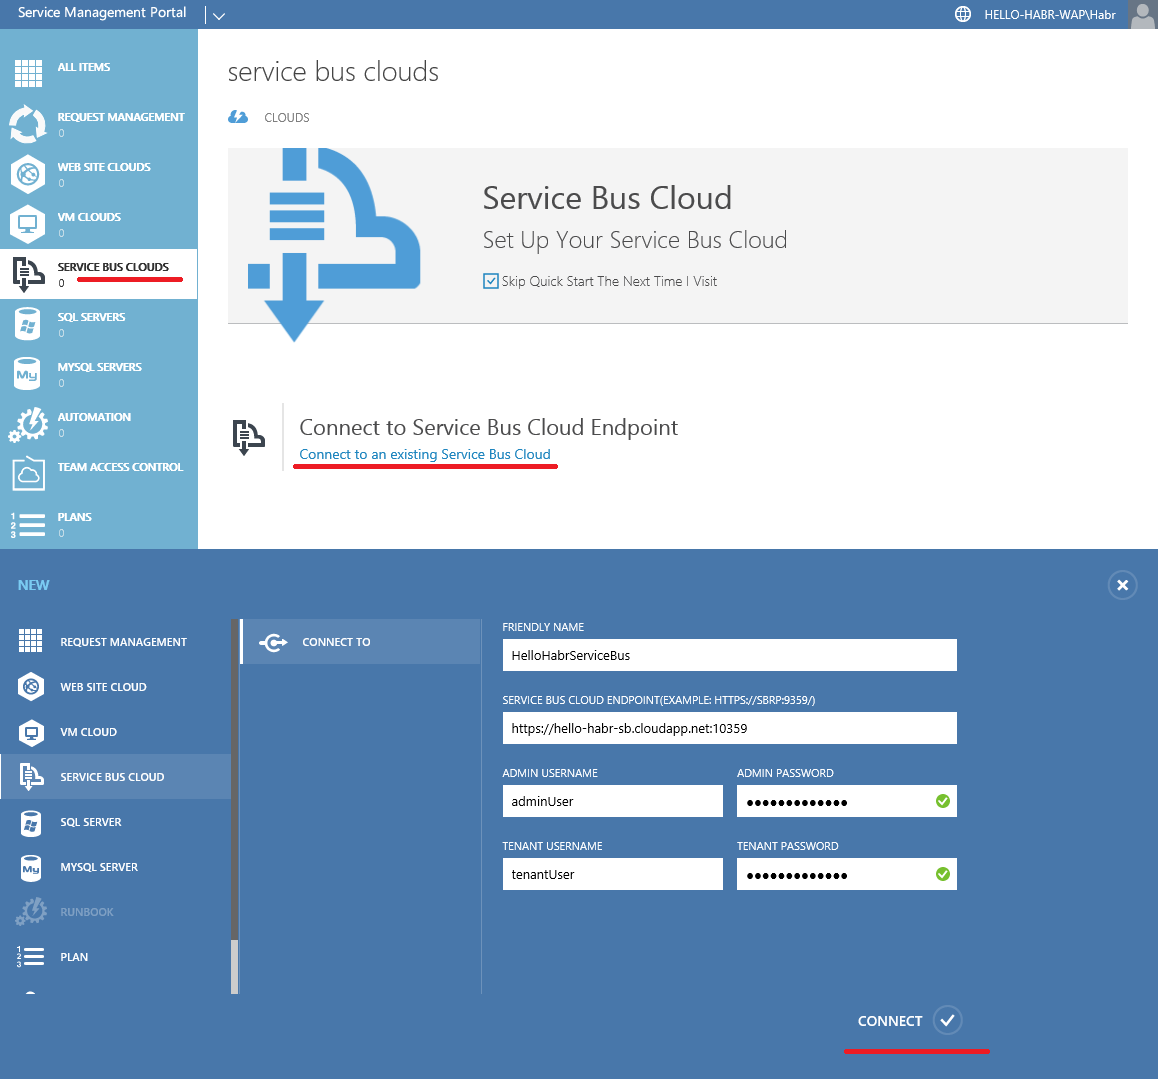
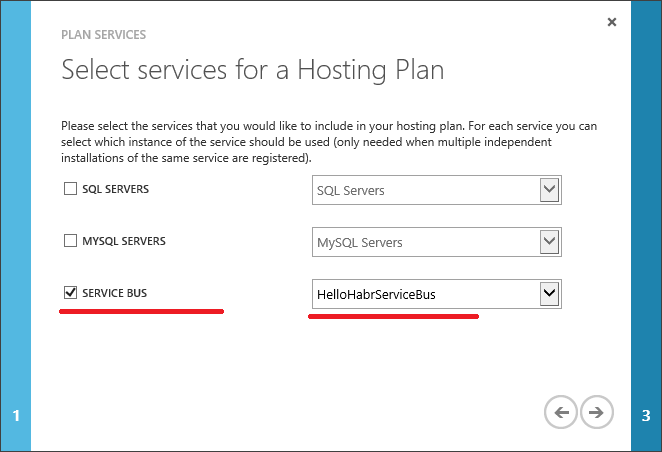
Отлично, мы вышли на финишную прямую. Теперь нужно настроить доступ к Service Bus, которая находится на hello-habr-sb.cloudapp.net

Зайдем на AdminSite:
https://hello-habr-wap.cloudapp.net:30091
Подключимся к виртуальной машине с Service Bus
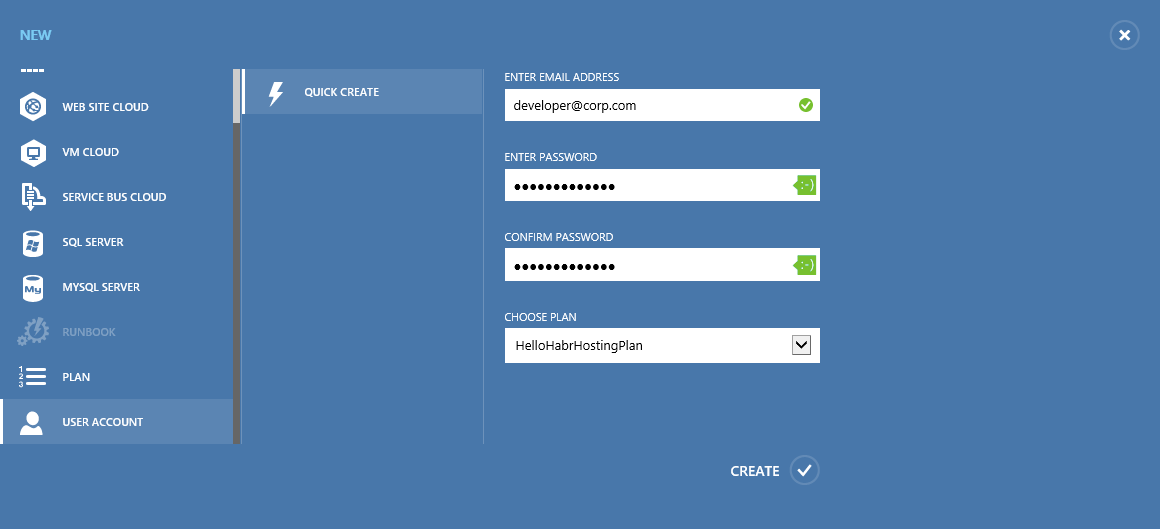
Создадим Plan
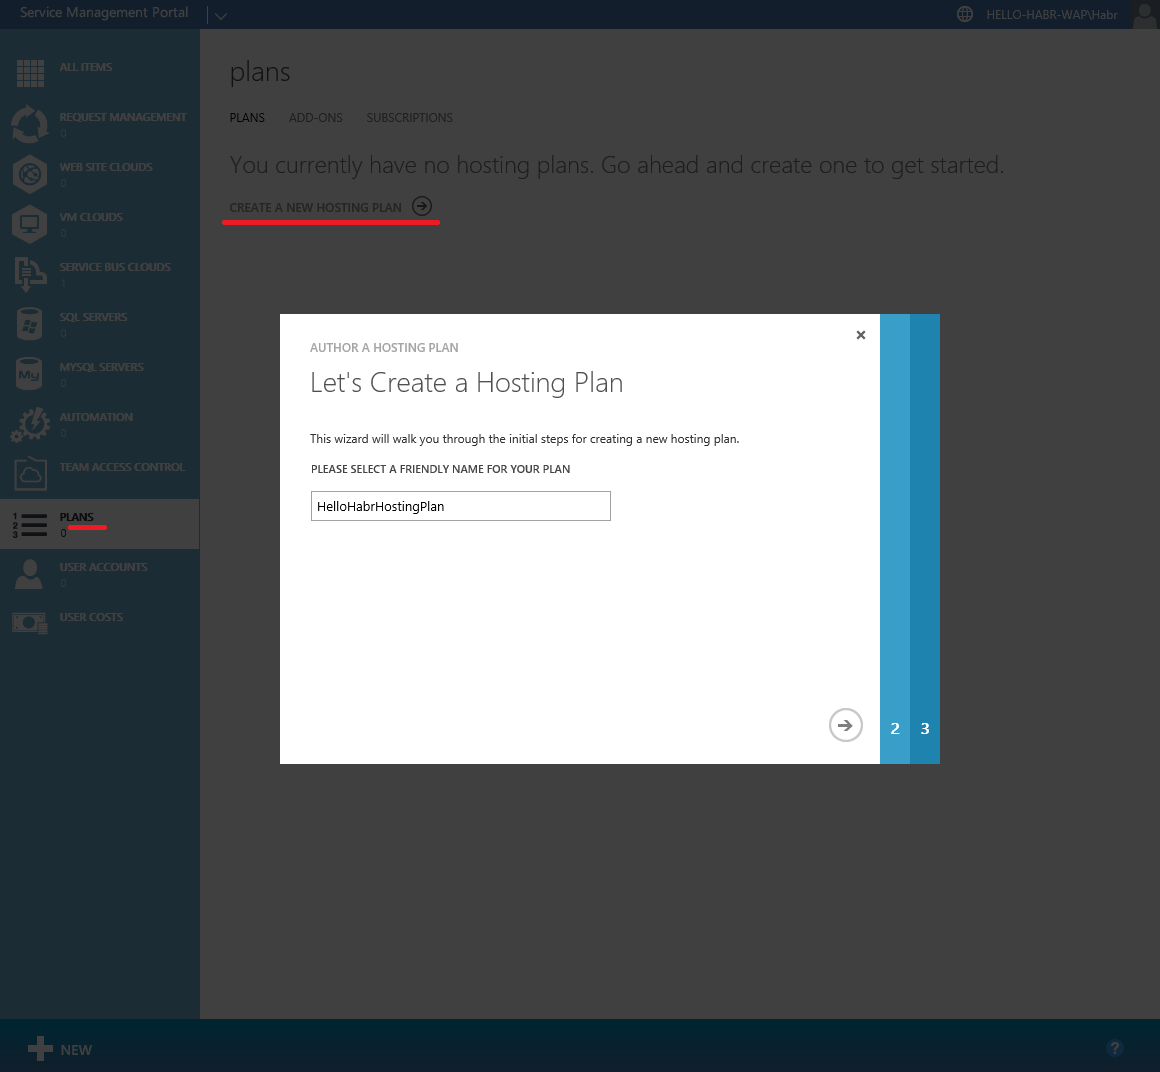

И наконец создадим пользователя

Проверка работы Service Bus
Проверка работы Service Bus
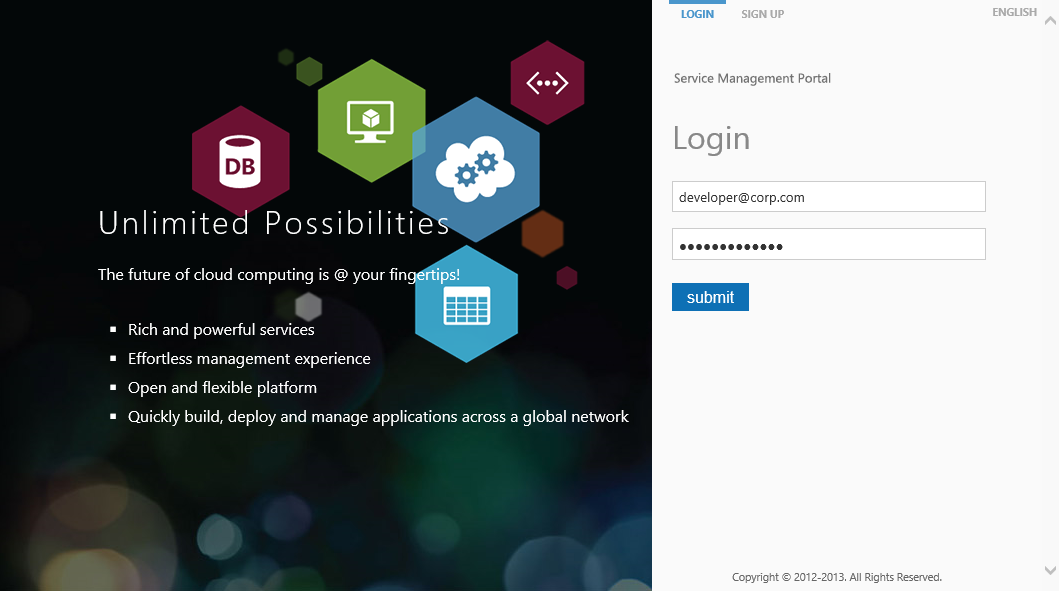
Перейдем на TenantSite и введем учетные данные созданного пользователя
https://hello-habr-wap.cloudapp.net:30081/
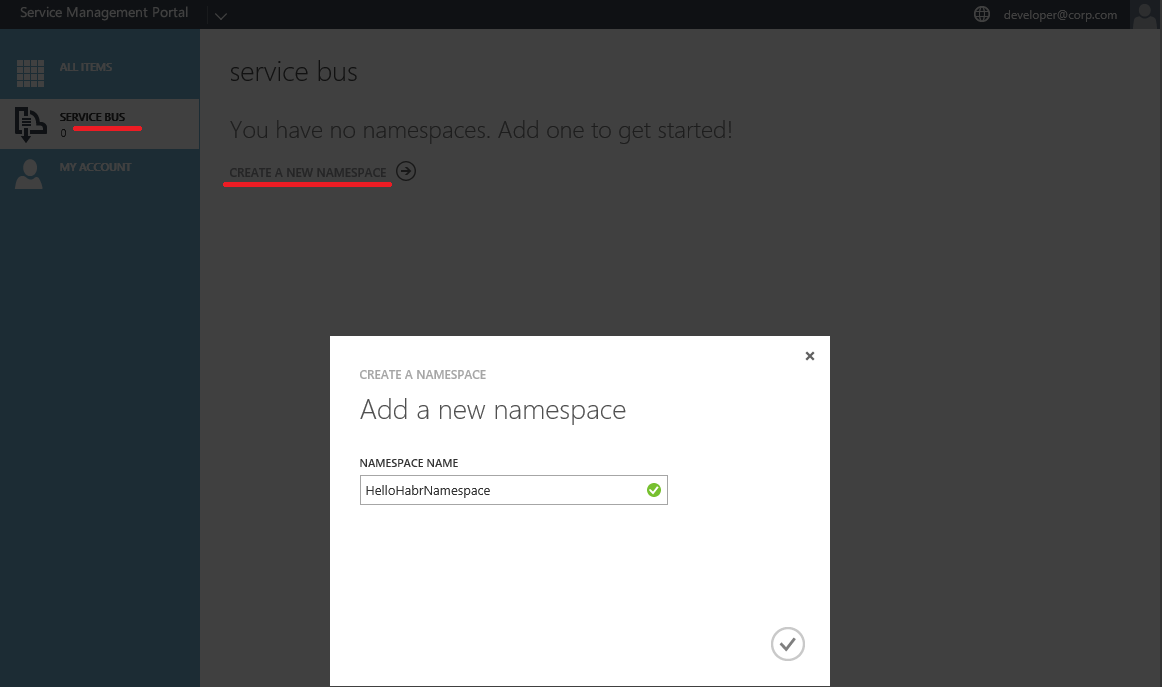
Создадим Namespace
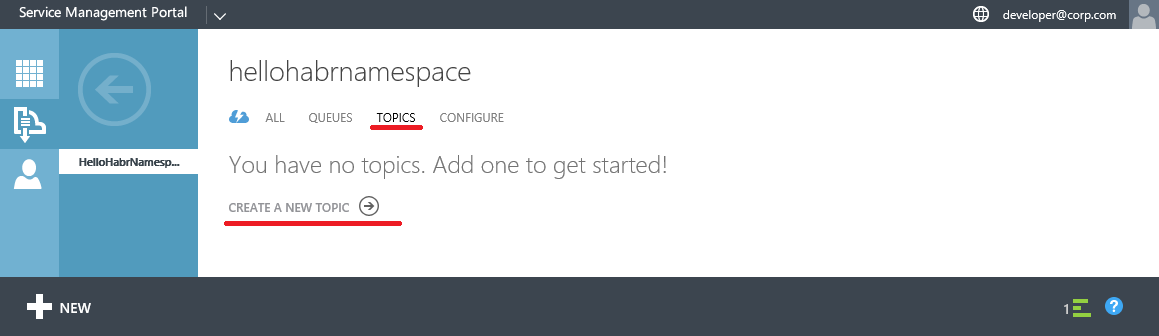
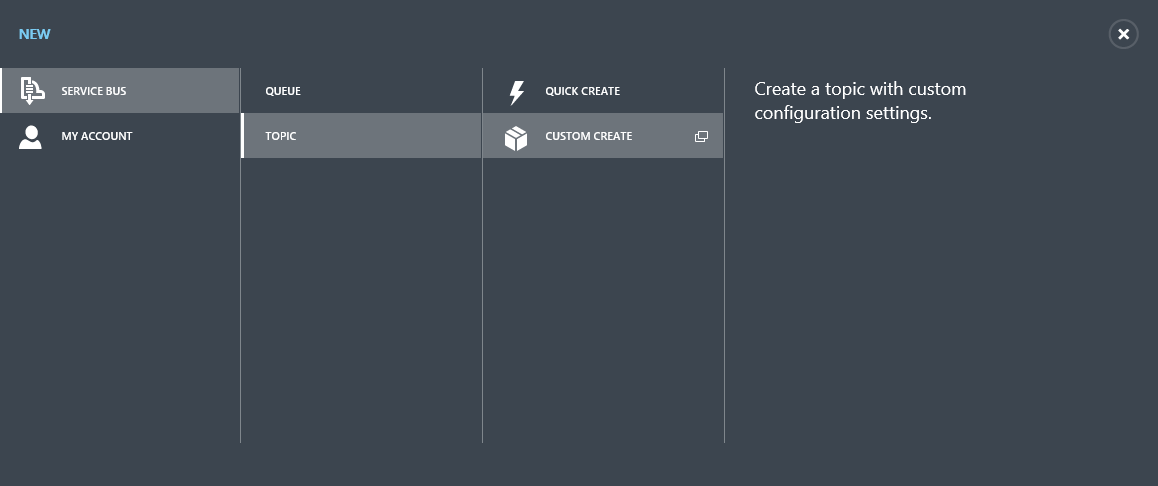
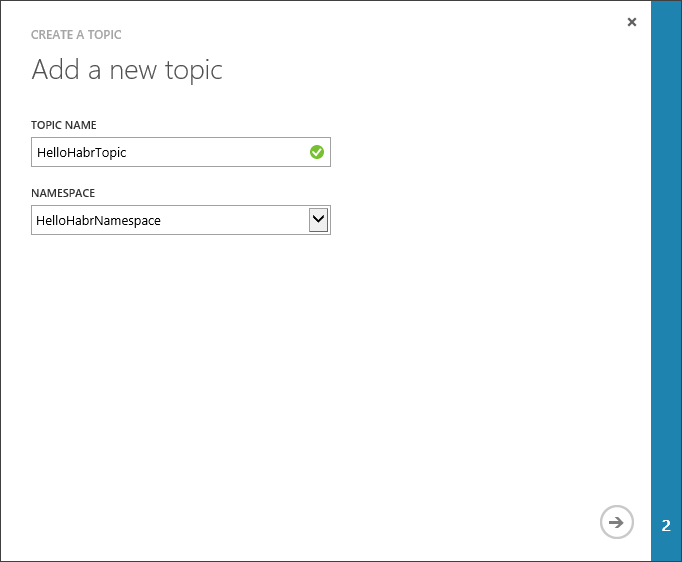
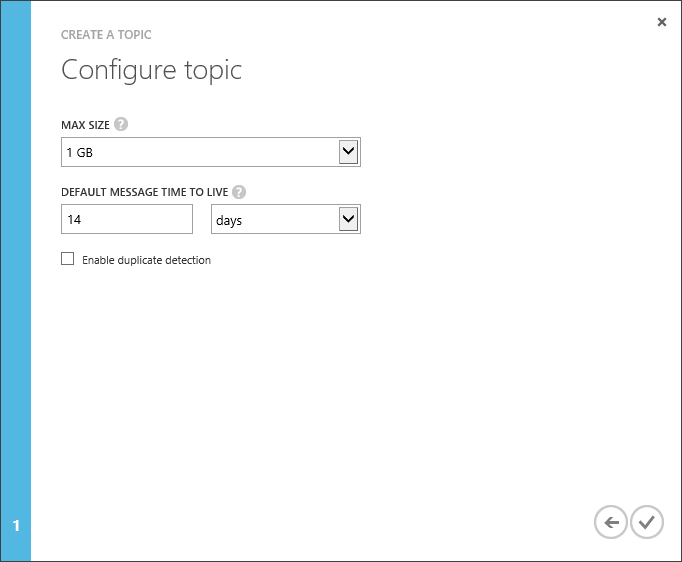
Создадим Topic
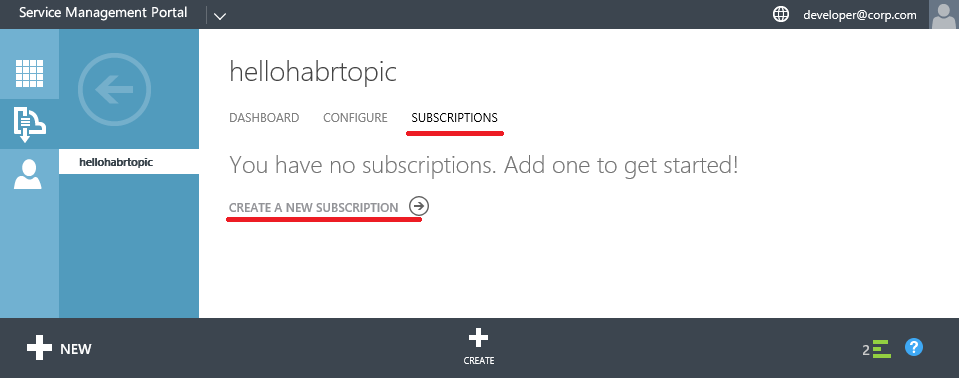
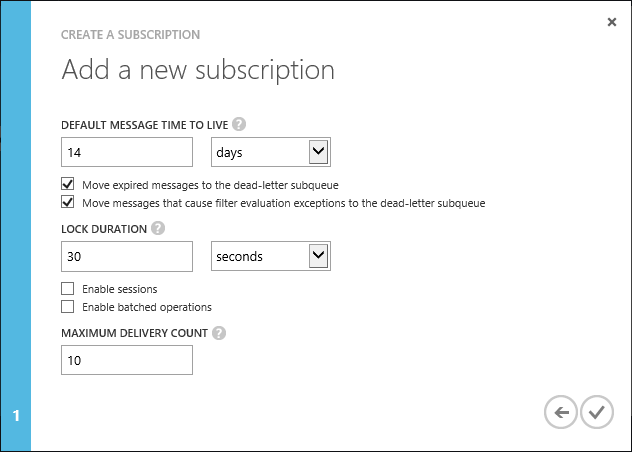
Создадим Subscription

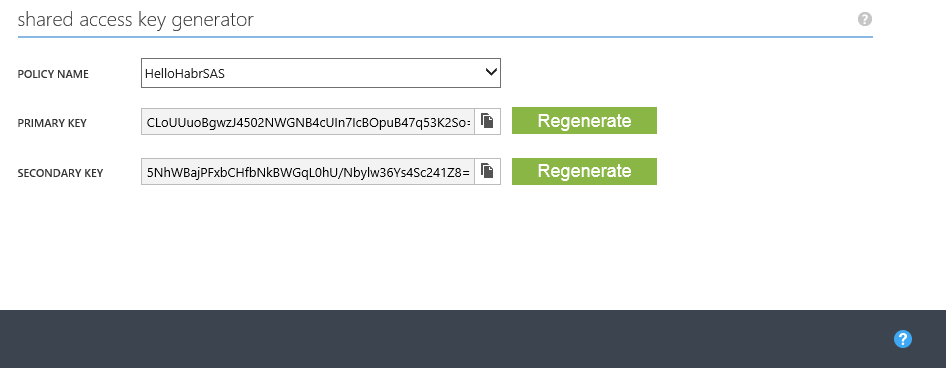
Создадим Shared Access Policies для Topic
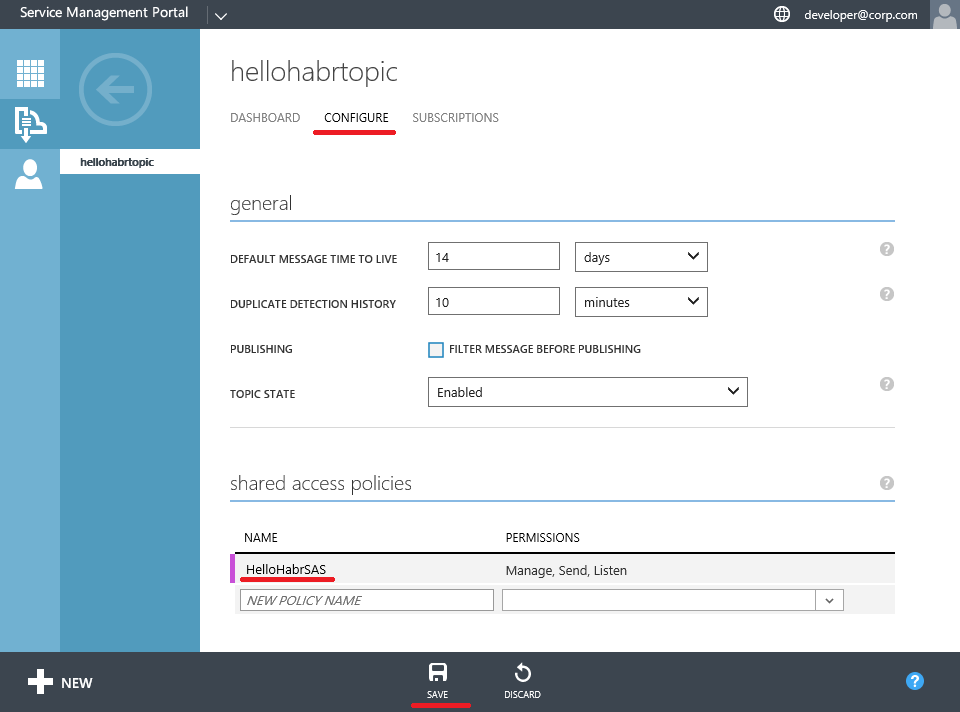
Получим ключи для доступа
Теперь все готово для проверки
Создадим простое консольное приложение. Я использую для этого Visual Studio 2013.
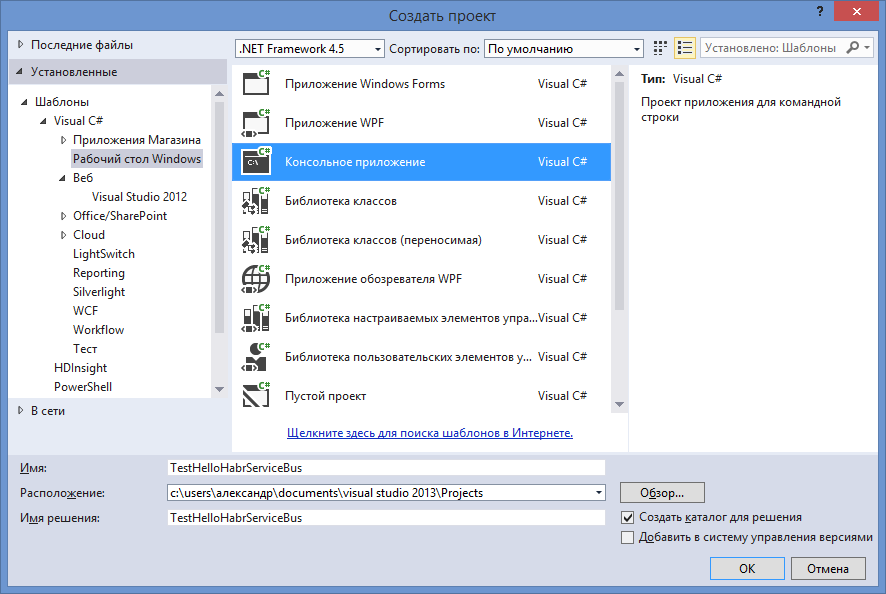
Добавим необходимые References используя консоль диспетчера пакетов NuGet
Install-Package ServiceBus.v1_1
И напишем небольшой проверочный код
using Microsoft.ServiceBus;
using System;
using System.Collections.Generic;
using System.Linq;
using System.Text;
using System.Threading.Tasks;
using Microsoft.ServiceBus.Messaging;
namespace TestHelloHabrServiceBus
{
class Program
{
static string ServerFQDN;
static int HttpPort = 10355;
static int TcpPort = 10354;
static string ServiceNamespace = "HelloHabrNamespace";
static void Main(string[] args)
{
ServerFQDN = "hello-habr-sb.cloudapp.net";
ServiceBusConnectionStringBuilder connBuilder = new ServiceBusConnectionStringBuilder();
connBuilder.ManagementPort = HttpPort;
connBuilder.RuntimePort = TcpPort;
connBuilder.Endpoints.Add(new UriBuilder() { Scheme = "sb", Host = ServerFQDN, Path = ServiceNamespace }.Uri);
connBuilder.StsEndpoints.Add(new UriBuilder() { Scheme = "https", Host = ServerFQDN, Port = HttpPort, Path = ServiceNamespace }.Uri);
connBuilder.SharedAccessKeyName = "HelloHabrSAS";
connBuilder.SharedAccessKey = "CLoUUuoBgwzJ4502NWGNB4cUIn7IcBOpuB47q53K2So=";
NamespaceManager namespaceManager = NamespaceManager.CreateFromConnectionString(connBuilder.ToString());
TopicClient topicClient = TopicClient.CreateFromConnectionString(connBuilder.ToString(), "HelloHabrTopic");
SubscriptionClient subscriptionClient = SubscriptionClient.CreateFromConnectionString(
connBuilder.ToString(), "HelloHabrTopic", "HelloHabrSubscription", ReceiveMode.PeekLock);
BrokeredMessage message = new BrokeredMessage("My Message");
// Отправка сообщения
try
{
topicClient.Send(new BrokeredMessage("My Message"));
}
catch (Exception ex)
{
Console.WriteLine(ex.Message);
}
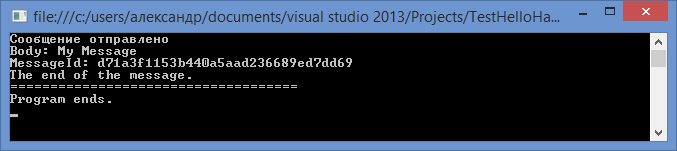
Console.WriteLine("Сообщение отправлено");
// Получение сообщения
message = subscriptionClient.Receive(TimeSpan.FromSeconds(10));
if (message != null)
{
Console.WriteLine("Body: " + message.GetBody<string>());
Console.WriteLine("MessageId: " + message.MessageId);
message.Complete();
Console.WriteLine("The end of the message.");
}
Console.WriteLine("====================================");
Console.WriteLine("Program ends.");
Console.ReadLine();
}
}
}
Запустим и убедимся, что сообщения отправляются и доставляются.
Надеюсь, мой опыт настройки этих решений вам пригодится и сэкономит немного времени.
I talked a lot on this blog about the fallacies of distributed computing and how messaging addresses some of the fallacies. But messaging does more, it helps to decouple (temporal, spatial and platform coupling vice) your components which build up a system. Service Bus for Windows Server provides messaging capabilities of Windows Azure Service Bus on Windows for On-Premise purposes (self-managed environments and on developer computers). It contains a rich feature set such as reliable queues, a variety of protocols and APIs to interact with it, and a rich publish/subscribe model that allows multiple, concurrent subscribers to independently retrieve filtered or unfiltered views of the published messages.
Despite its name it is not a bus architectural style but a broker (mediator / hub and spoke). Therefore the Service Bus for Windows Server is not a lightweight store-and-forward queuing system like MSMQ. On the other hand it offers rich message exchange semantics such as topic based routing via publish-subscribe. MSMQ only supports point-to-point one way messaging. NServiceBus builds publish-subscribe on top of MSMQ by leveraging persistent storage on the publisher side to store routing information (where are the subscribers, what are their interests). I usually prefer store-and-forward transports over broker based transports because in my opinion they incorporate better the true nature of distributed systems than centralized brokers. But of course brokers have the advantage of a centralized administration and connection point. In the end both have their advantages and disadvantages, you need to choose according to your non-functional requirements or in the most extreme case have both styles in place.
Let us look at the underlying architecture of Service Bus for Windows Server and how easily it can be installed on-premise.
Service Bus for Windows Server is based upon the .NET 4.0 framework (namely PU3) and uses SQL Server 2008 R2 or Azure SQL Database as the backing store and can be administrated with Windows PowerShell 3.0. The platform stack consists out of 5 different services which need to run on each computing node.
- Service Bus Resource Provider
- Service Bus VSS Writer
- Service Bus Gateway
- Service Bus Message Broker
- Windows Fabric 1.0 CU1
The installation package ships a few administrative commandlets for each computing node which allows you to command & conquer the service bus services with PowerShell. The storage tier should be run separately from the computing nodes and should be at least SQL Server 2008 R2 SP1 or higher (or SQL Azure). So let’s visualize a computing node for better clarity (leaving out the resource provider and the VSS writer).
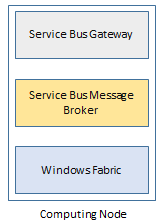
The Service Bus gateway is a stateless service which receives all incoming requests from clients first and performs the necessary authentication, authorization and address resolution. The request is then forwarded to the Service Bus Message Broker service. Once that process is done subsequent requests from clients are directly routed to the Service Bus Message Broker service (redirect). The Windows Fabric services establish a highly available ring for Service Bus farm operation mode which we will cover later. The Service Bus Gateway offers a variety of protocol heads such as REST, TCP and AMQP. Depending on the chosen protocol head the above described message redirect doesn’t work (for example with the REST protocol). The Service Bus message brokers “hosts” queues, topics and subscriptions. Inside the Service Bus Message broker the queues, topics and subscriptions are logically grouped together into collection of so called message containers. All state related to those message containers is persisted to the storage layer.

The next installment will cover high availability and why it is important for a broker based transport
 An Enterprise Service Bus (ESB) is a shared messaging layer that gives you a consistent, scalable and flexible means of coordinating across disparate, loosely-connected services to execute business processes. Over the years, Microsoft has developed several service bus technologies:
BizTalk: A messaging and workflow orchestration platform to build ESB behaviors and capabilities. The BizTalk ESB toolkit provides a set of guidelines, patterns and tools.
Windows Azure Service Bus (ASB): This provides the messaging infrastructure for applications that live in the cloud, in your data center, and crosses all devices and PCs.
Service Bus for Windows Server (SBWS): SBWS is based on ASB and shares many of the same capabilities, such as queue, topic and subscription support. A distinct design goal is to ensure symmetry between SBWS and ASB and allow for a single set of code to be leveraged across both deployment environments.
Installation
Unlike ASB, which runs in the cloud and requires no local software installation, SBWS runs on-premises and must be installed and configured on a Windows Server 2013 or Server 2008 R2 machine. (It can also be installed on Win7 or Win8 for individual developer usage.) For message persistence, it requires SQL Server 2012 or 2008, which is different from file-based Microsoft Message Queues.
To install, you may start from a contextual link or from Web Platform Installer. The contextual link is here. Here’s how to install with Web Platform Installer:
- Launch Web Platform Installer, and search for “Service Bus 1.0”
- Click Add for Service Bus 1.0. We’ll install the Cumulative Update after this.

- Follow the steps. You may be prompted to install .NET 4.5 if it’s not already installed. Reboot the machine if directed to.
- Install the latest Service Bus 1.0 Cumulative Update. (As of 4/16/2013, Update 1 is available.)


Configuration
- In Windows All Programs, select “Service Bus Configuration”

- Under Create a New Farm, select “Using Default Settings”

- Follow the steps to enter SQL Server Name and Test Connection, Service Account UserID and Password, and Certificate Generation Key. Leave “Enable firewall rules on this computer” checked.

- Click the “Next” arrow to continue, and a installation summary page should be displayed. Click the button with a check icon to commit the configuration.
- Verify installation was successful and save a copy of the installation log using the “View Log” feature. This includes the Primary Symmetric Key and endpoint connection strings.

- In addition, go to the SQL instance you have chosen and verify that three databases have been created:
- SbGatewayDatabase
- SbManagementDB
- SBMessageContainer01


Administration
PowerShell Cmdlets
PowerShell Cmdlets are used to manage SBWS and ASB. Developers and system administrators should get familiar with these commands. The complete command reference is here.
Service Bus Explorer
To make it easy to manage the messages and namespaces via GUI, Microsoft created a desktop application called Service Bus Explorer. This is a very convenient tool for developers and system administrators alike. It works for both ASB and SBWS. I use it on a daily basis when developing service bus code.
Setup for Working with Service Bus Remotely
Client Certificate
Developers can work with a local service bus without certificates. However, to connect to a service bus hosted remotely, the client machine should have the proper client certificates. The certificates must be exported from host machine. Follow the steps here.
In the Local Computer Certificate console, simply import these two files into the Personal and Trusted Root Certification Authorities, respectively.
ManageUsers Setting
To create a queue or send messages hosted remotely, a client that accesses the service bus should also be part of the ManageUsers group in the farm namespace. To get the current ManageUsers, run this cmdlet:
Get-SBNamespace -Name ServiceBusDefaultNamespace
To add users to the namespace, run this cmdlet:
Set-SBNamespace –Name ServiceBusDefaultNamespace –ManageUsers mydomain\username1,mydomain\username2
In my next post, we are going to dive into coding.
Search code, repositories, users, issues, pull requests…
Provide feedback
Saved searches
Use saved searches to filter your results more quickly
Sign up
This page will contain information regarding resources for Service Bus for Windows Server.
Main Official Documentation
- Overview of Service Bus for Windows Server — MSDN
Architecture Resources
These resources will be helpful to understand the architecture aspects of Service Bus for Windows Server
- Product Introductions
- First Look at Windows Server Service Bus — Bill Chestnut
- Testing & Installing the New Service Bus for Windows Server — Richard Seroter
- Introducing the New Service Bus for Windows Server — Neudesic
- Product Comparisons
- Comparing Service Bus for Windows Server & RabbitMQ — Mike Stephenson
- Patterns
Development Resources
These resources will be helpful to understand the development aspects of Service Bus for Windows Server
- Samples
- Walkthroughs
Operations Resources
These resources will be helpful to understand the operational aspects of Service Bus for Windows Server
- Samples
- Walkthroughs
- Tools
- SCOM Management Pack