What is an Image Backup
An image backup, also known as a system image backup, is a type of backup that creates a complete copy of a computer system or server. This type of backup captures not only the files and folders on the system but also the operating system, applications, settings, and configuration. Unlike file-level backups that only copy individual files or folders, an image backup captures the entire system’s state at a specific point in time. It creates a snapshot of the entire hard drive or partition, including the system files, installed software, user data, and even the boot sector. Image backups can be created using specialized backup software or built-in backup tools provided by operating systems like Windows Server Backup in Windows Server 2022 or EaseUS Todo Backup Server.
How to Create an Image Backup with EaseUS Todo Backup
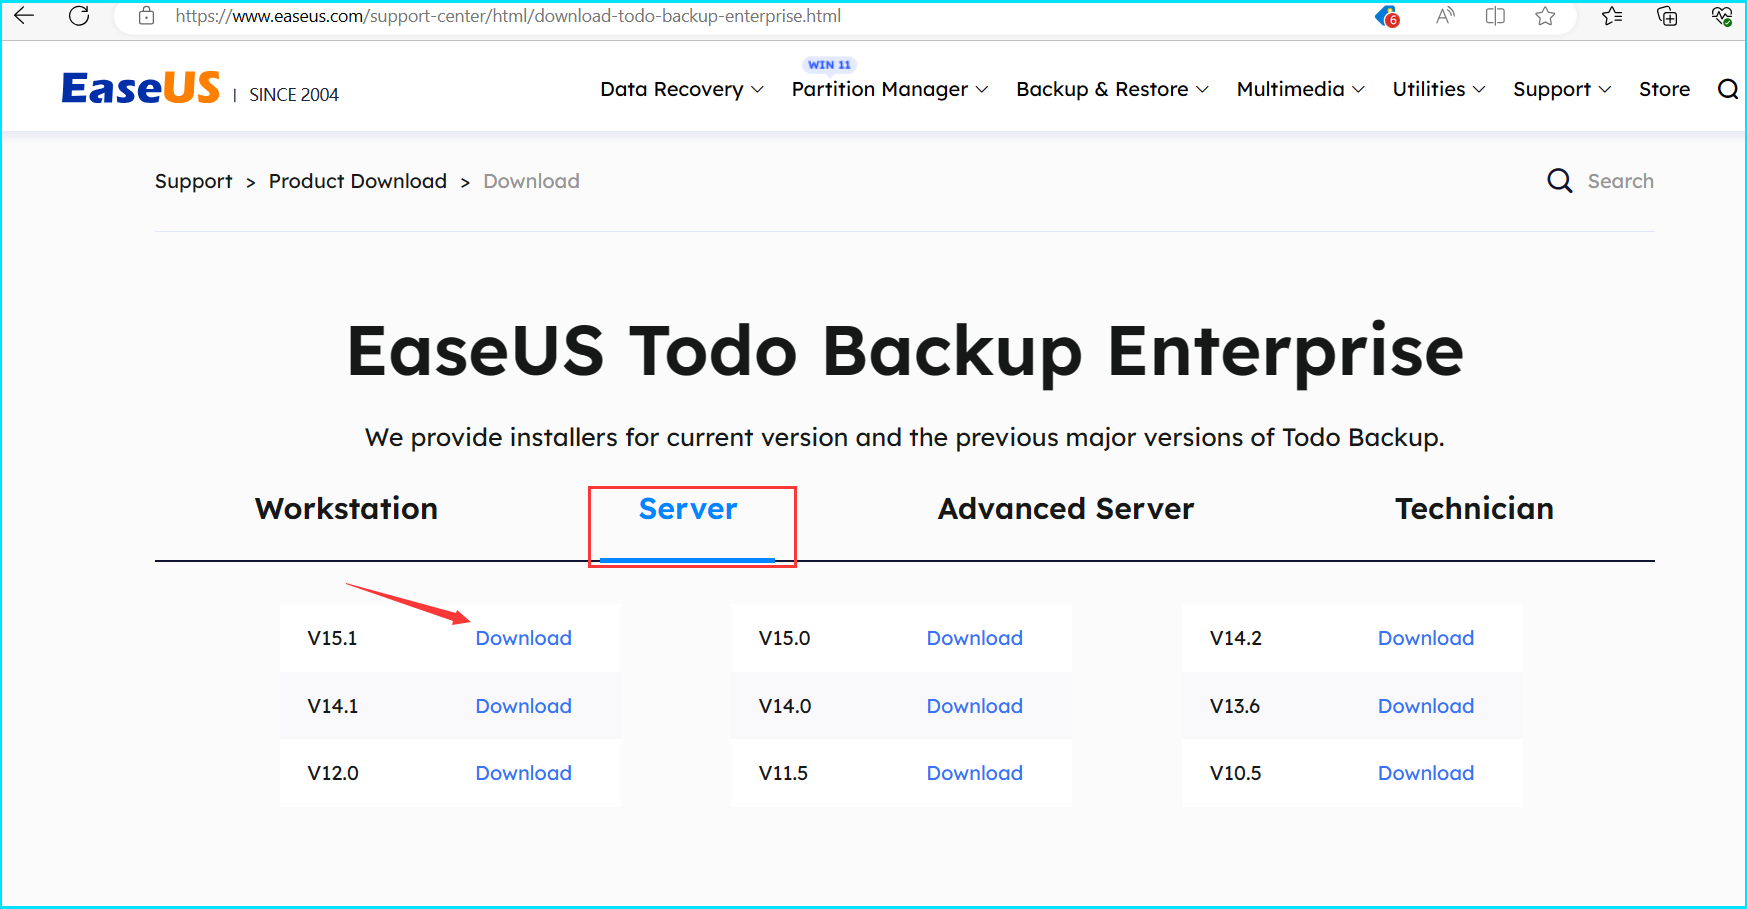
Step 1: Download and Install EaseUS Todo Backup Server
Visit the official EaseUS website and download the Todo Backup Server software. Once the download is complete, run the installer and follow the on-screen instructions to install it on your Windows Server 2022.
Step 2: Launch EaseUS Todo Backup Server
After installation, launch EaseUS Todo Backup Server from the desktop or Start menu.

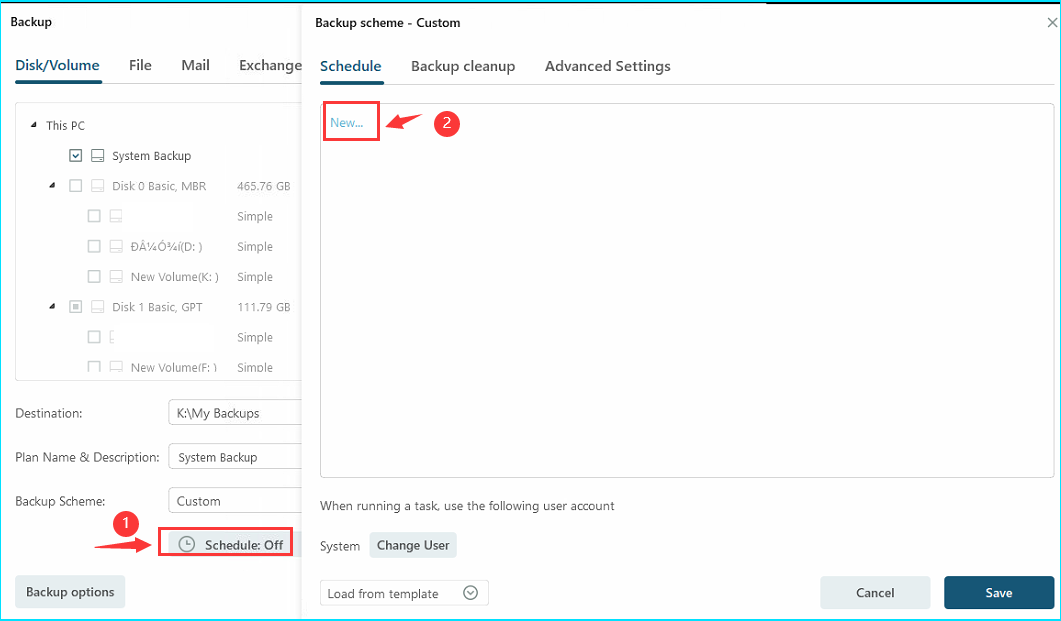
Step 3: Choose Tasks and create a new task. Select Disk/Partition Backup and check System Backup
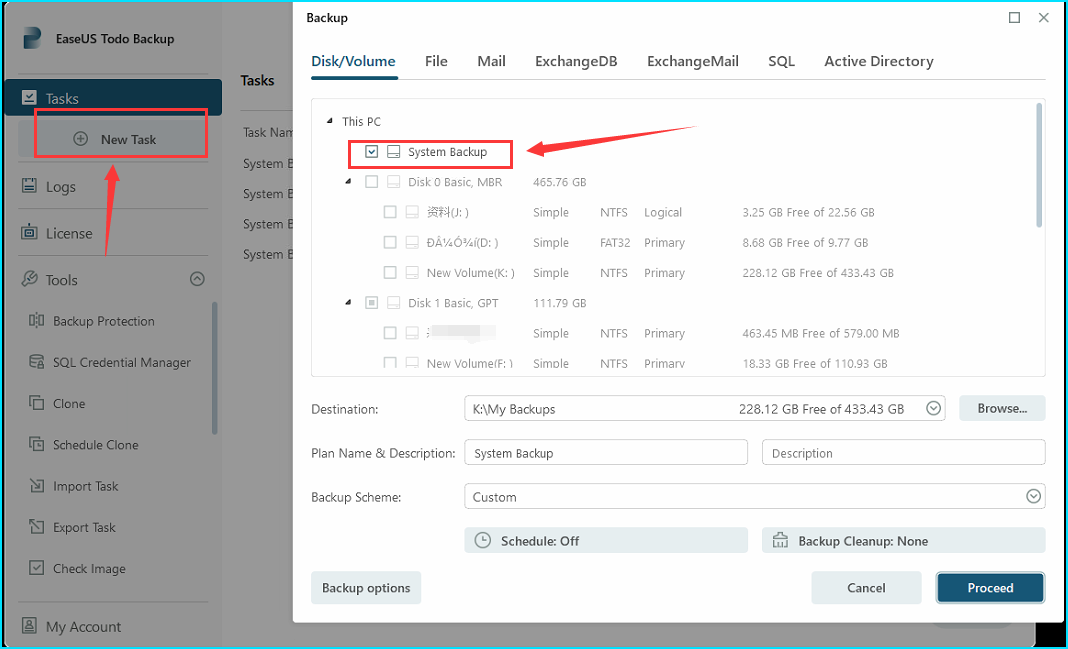
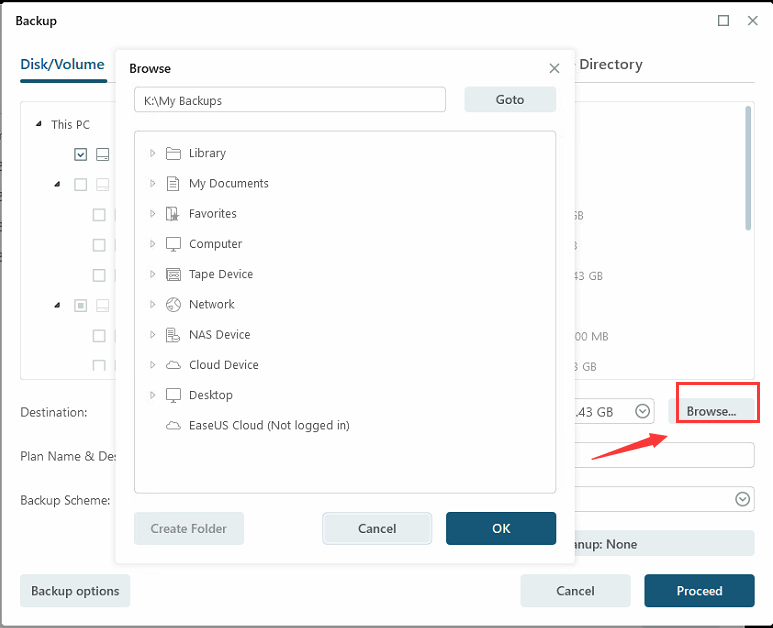
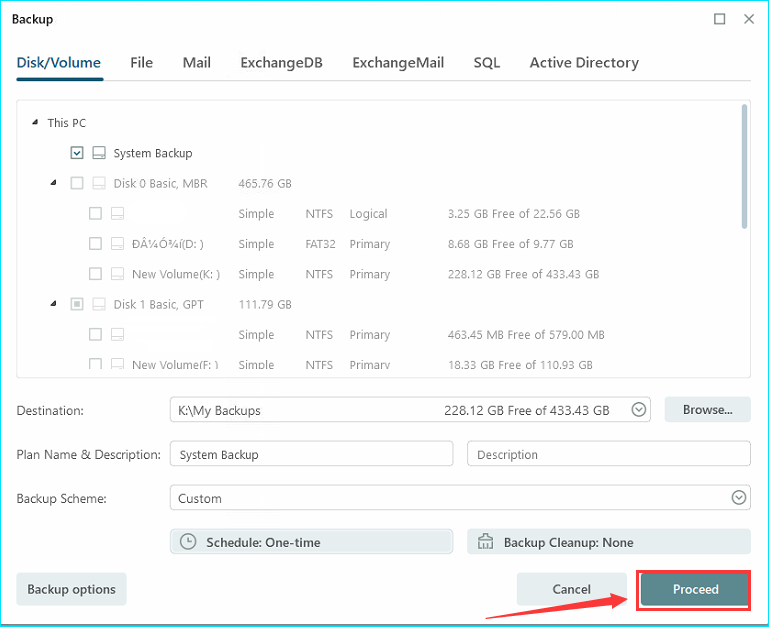
Step 4: Click Browse to choose a backup destination where you want to store the image backup. Cloud storage is an available option here.
Step 5: Configure Backup Settings
In the Backup options section, you can compress the image file according to your preferences, enable encryption to secure your backup data, send email notifications to monitor the backup status, etc.
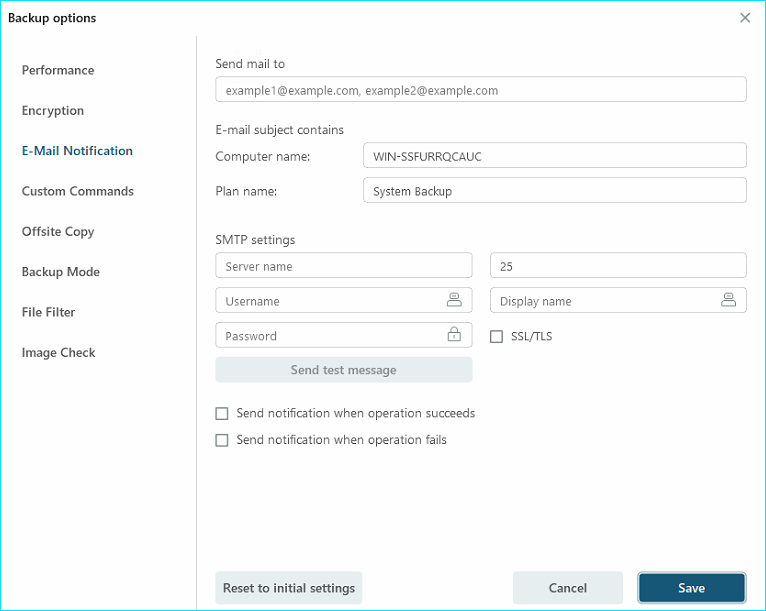
Click Schedule off if you want to set up an automatic backup schedule.
Step 6: Start the Image Backup Process
- Double-check all the settings and configurations.
- Once you are ready, click Proceed to start the image backup process.
How to Create an Image Backup in Windows Built-in Backup
Windows Server 2022 offers robust backup and recovery features, including image backups, which enable you to restore your entire system in the event of a disaster. It is easy to follow the following step-by-step guide on how to create an image backup in Windows Server 2022.
Step 1: Launch the Windows Server Backup Utility
- Open the Start menu and search for Windows Server Backup.
- Click on the Windows Server Backup utility to launch it.

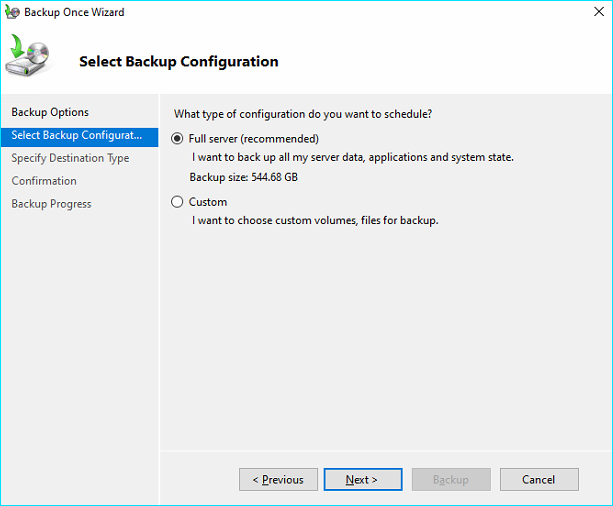
Step 2: Select the Backup Type
In the Windows Server Backup utility, click on Backup Once on the right-hand side.

Click on Next and select Full server as the backup type and click Next.
Step 3: Choose the Backup Destination
- Select the backup destination where you want to store the image backup.
- Options include local drives, external drives, or network locations.
- Click Next once you have chosen the destination.

Step 4: Configure the Backup Schedule
- You can choose to create a one-time backup or set up a backup schedule.
- If you opt for a schedule, select the desired frequency and timing.
- Click Next to proceed.
Step 5: Confirm Backup Configuration
- Review the backup configuration summary to ensure all settings are correct.
- If you need to make any changes, click on the corresponding step to modify the settings.
- Once you’re satisfied, click Backup to initiate the process.
Conclusion
EaseUS Todo Backup Server simplifies the process of creating image backups for Windows Server 2022. By following the above steps, you can easily configure and initiate the backup process using this reliable software. Regularly schedule backups to ensure your server and data are consistently protected. With EaseUS Todo Backup Server, you can have peace of mind knowing that your system can be fully restored in case of any unforeseen incidents.
1. Why should I create an image backup of my Windows Server?
Image backups offer several advantages over traditional file-level backups. They provide a faster and more comprehensive restore process, minimizing downtime in case of data loss or system failure. Additionally, image backups capture the entire server configuration, ensuring easy recovery of user settings, installed software, and system preferences.
2. What tools can I use to create an image backup of my Windows Server?
Windows Server includes built-in backup tools such as Windows Server Backup or the newer Windows Admin Center. Third-party backup software, such as EaseUS Todo Backup, or Veeam Backup & Replication, also offer advanced features and options for creating image backups.
3. How often should I perform image backups?
The frequency of image backups depends on your specific needs and the criticality of the data. Best practices suggest performing regular backups, with the frequency varying from daily to weekly, depending on the rate of data change and the importance of the system.
4. Where should I store the image backups?
It is crucial to store image backups in a separate location from the server being backed up. This can be an external hard drive, network-attached storage (NAS), a cloud storage service, or even an offsite location. Storing backups offsite ensures their safety in case of physical damage or theft.
5. Can I restore an image backup to different hardware?
While it is possible to restore an image backup to different hardware, it may require additional steps and configurations. Windows Server provides tools such as the System Preparation (Sysprep) tool to generalize the operating system before creating the backup, making it more compatible with different hardware configurations.
A windows server image backup is a copy of all the data on a server, including the operating system, applications, and user data. It is a great way to protect your data in case of a disaster.
There are several ways to create a windows server image backup. The most common way is to use a third-party backup software. There are many good backup software programs available, such as Acronis, Carbonite, and Symantec. These programs can create a server image backup of your entire computer, including the operating system, applications, and user data.
Another way to create a server image backup is to use the built-in Windows backup utility. To do this, open the Control Panel and click on System and Security. Then, click on Backup and Restore (Windows 7). On the left side of the window, click on Create a system image. This will create a server image backup of your entire computer, including the operating system, applications, and user data.
A windows server image backup is a great way to protect your data in case of a disaster. It is also a great way to migrate your data to a new server.
Contents
- 1 How do I create a backup image for Windows Server 2019?
- 2 What is server image backup?
- 3 Is Windows image backup necessary?
- 4 What is the difference between system image and Windows Backup?
- 5 How do I create a Windows image backup?
- 6 How do I create a Windows server backup?
- 7 What are the differences between a system image backup and a file backup?
How do I create a backup image for Windows Server 2019?
Creating a backup image for Windows Server 2019 is an important task that every system administrator should know how to do. This article will walk you through the process of creating a backup image for Windows Server 2019.
First, you will need to download and install the Windows Server Backup feature. To do this, open Server Manager and select the Add Roles and Features option.
From the list of features, select the Windows Server Backup feature and click on the Next button.
On the Confirmation screen, click on the Install button.
Once the installation is complete, open the Windows Server Backup console by selecting the Windows Server Backup option from the Administrative Tools menu.
The Windows Server Backup console will open and you will see the following screen:
To create a backup image, click on the Backup tab and then select the Backup Once option.
The Backup Once wizard will open and you will be asked to choose the server that you want to backup.
Select the server that you want to backup and then click on the Next button.
The next step is to choose the type of backup that you want to create.
Select the Full Server option and then click on the Next button.
The next step is to choose the backup location.
Select the location where you want to store the backup image and then click on the Next button.
The next step is to choose the backup type.
Select the Custom option and then click on the Next button.
The next step is to choose the files and folders that you want to backup.
To backup all the files and folders on the server, click on the Include All System Files and Folders option and then click on the Next button.
The next step is to choose the backup schedule.
Select the Daily option and then click on the Next button.
The next step is to choose the start time for the backup.
Select the start time and then click on the Next button.
The next step is to review the backup settings.
Review the settings and then click on the Backup button.
The backup process will start and will take a few minutes to complete.
Once the backup is complete, you will see the following message:
You can now close the Windows Server Backup console.
To restore a backup image, you can use the Windows Server Backup console or the Windows Recovery Environment.
To learn more about how to use the Windows Recovery Environment, please visit the Microsoft website:
https://docs.microsoft.com/en-us/windows-server/administration/windows-recovery-environment/windows-recovery-environment-overview
What is server image backup?
A server image backup is a process of creating a copy of a server’s hard drive contents, including the operating system, installed applications, and data. The backup can be used to restore the server to its original state in the event that it is lost or damaged. Server image backups are typically created using a backup software program, and can be stored on a local drive or network server.
There are several reasons why you might want to create a server image backup. One of the most common reasons is to ensure that you have a recent copy of your server’s data in the event that the original data is lost or corrupted. server image backups can also be used to restore a server to a previous state in the event that it is damaged or has been infected with a virus.
In order to create a server image backup, you will need to have a backup software program installed on your server. The program will allow you to create a copy of the server’s hard drive contents, including the operating system, installed applications, and data. The backup can then be stored on a local drive or network server.
It is important to note that server image backups can be quite large, and can take a significant amount of time to create. It is therefore important to plan ahead and ensure that you have enough disk space to store the backup.
Is Windows image backup necessary?
Windows image backup is a feature in Windows that allows you to create an image of your entire hard drive, including your operating system, applications, and data. This image can then be used to restore your computer to its previous state in the event of a hard drive failure or other disaster.
Is Windows image backup necessary? That depends on your needs. If you have a lot of data that you don’t want to lose, or if you need to be able to quickly restore your computer to its previous state, then yes, image backup is definitely necessary. If you’re not worried about losing data or you’re not particularly concerned about having a quick and easy way to restore your computer, then you may not need image backup.
There are a few things to consider before deciding whether or not to use Windows image backup. First, it’s important to note that creating an image of your hard drive can take a lot of time and space. If you have a large hard drive, it may take a few hours to create an image, and the image itself may take up several gigabytes of space. Second, image backup is not a substitute for regular backups. It’s a good idea to still back up your data regularly, even if you use image backup.
If you decide that Windows image backup is right for you, there are a few things you can do to make sure you get the most out of it. First, make sure you create a recovery disk. This disk will allow you to restore your computer even if you can’t boot into Windows. Second, create a backup of your image file. This will ensure that you have a copy of your image in case something happens to the original.
Windows image backup is a valuable tool, but it’s not right for everyone. If you think it might be right for you, take some time to evaluate your needs and decide whether or not it’s the right solution.
What is the difference between system image and Windows Backup?
System image and Windows Backup are two different features in Windows that serve different purposes. System image is used to create a copy of your entire system, including your operating system, applications, settings, and files. Windows Backup, on the other hand, is used to create backups of your files and folders.
System image is a more comprehensive backup than Windows Backup, as it includes your entire system. If your computer crashes or fails, you can use the system image to restore your computer to its previous state. Windows Backup, on the other hand, only backs up your files and folders, so it won’t be as useful if your computer crashes or fails.
System image is also useful for creating backups of your system. If you want to create a backup of your system that you can use to restore your computer if it fails, you can use the system image. Windows Backup can’t be used for this purpose, as it only backs up your files and folders.
Overall, the main difference between system image and Windows Backup is that system image is a more comprehensive backup that includes your entire system, while Windows Backup only backs up your files and folders.
How do I create a Windows image backup?
Creating a Windows image backup is an important task for any PC user. If your computer ever crashes or becomes infected with a virus, you can use a Windows image backup to restore it to its previous state. In this article, we will show you how to create a Windows image backup using the built-in Windows tools.
Windows includes a tool called System Image Recovery that you can use to create a Windows image backup. To start, open the Control Panel and click on the System and Security category. Then, click on the Backup and Restore (Windows 7) option.
In the Backup and Restore window, click on the Create a system image option.
The Create a system image wizard will start. Click on the Next button.
The wizard will ask you where you want to save the image. You can choose to save it to a local hard drive or to a network location. Click on the Next button.
The next step is to choose what to include in the image. You can choose to include everything on your computer or just selected folders. Click on the Next button.
The next step is to choose a backup option. You can choose to create a full backup or a incremental backup. A full backup will back up everything on your computer, while an incremental backup will only back up files that have changed since the last backup. Click on the Next button.
The next step is to choose a schedule for your backup. You can choose to back up your computer daily, weekly, or monthly. Click on the Next button.
The next step is to choose a start time for your backup. Click on the Next button.
The next step is to review your settings. Make sure that everything is correct and click on the Create button.
Windows will start creating the image. This process may take a while, so be patient. When the image is finished, you will be prompted to create a recovery disk.
Creating a Windows image backup is a great way to protect your data in the event of a computer crash. If you ever need to restore your computer, you can use the Windows image backup to do so.
How do I create a Windows server backup?
Creating a Windows server backup can be a daunting task, but with the proper instructions it can be an easy process. In this article, we will walk you through the steps necessary to create a backup of your Windows server.
The first step is to create a backup plan. This plan should include a schedule for creating backups, as well as a list of files and folders that you would like to include in the backup.
Once you have created a backup plan, you will need to install a backup program on your server. There are a number of backup programs available, both free and paid. Once you have installed a backup program, you will need to configure it to create backups of your server.
The next step is to create a system image. A system image is a snapshot of your server that can be used to restore your server in the event of a disaster. To create a system image, you will need to open the backup program and create a new image. The image can be saved to a local drive or to a network share.
The final step is to create a backup of your server’s configuration. This backup can be used to restore your server to its previous configuration in the event of a disaster. To create a backup of your server’s configuration, you will need to open the backup program and create a new backup. The backup can be saved to a local drive or to a network share.
By following these steps, you can create a backup of your Windows server that will help protect your data in the event of a disaster.
What are the differences between a system image backup and a file backup?
System image backups and file backups are two different ways of backing up your computer. A system image backup will create an image of your entire hard drive, while a file backup will only back up specific files and folders.
System image backups are more comprehensive, backing up not only your files but also your system settings and programs. This makes them a good choice for restoring your computer in the event of a crash or other disaster. File backups are less comprehensive, but they are faster and can be used to back up specific files or folders rather than your entire computer.
If you only need to back up a few files or folders, a file backup is a good option. If you need to back up your entire computer, a system image backup is the better choice.
Tags: create backup yourcreate server imagerestore your computerserver image backupWindows image backup
How to Create a Windows Server System Image Backup with MSP360
Windows Server, like any other server, requires regular backups. Manual backups are not an option, as they take up too much time and human resources. What is even more important, they put your data at risk of loss due to human error. In this article, we’ll describe how to automate Windows Server system backups with MSP360 Managed Backup.
Essentials of Windows Server Image-Based Backup
When you back up a server, it is not enough to save just files and folders. You need to make a full copy of all the partitions that contain your system files, as well as applications, services, permissions, configuration, and user data. This system image backup can also be used for bare-metal restore or recovery to a virtual machine, so it should be a complete copy of your server in a working state.
With MSP360 Managed Backup, you can create such a copy. The solution takes a server snapshot and saves the actual server state. After recovery, the work can be continued with minor data and time losses, and you won’t need to reconfigure the server or reinstall any software. MSP360 Managed Backup will automatically restore your Windows server to its previous state; you just need to choose what version to restore and where to.
Further reading Image-Based Backup with MSP360
Further reading Windows Server Backup with MSP360
Why You Need to Back Up Windows Server and How MSP360 Helps
Discover the ins and outs of a server backup strategy using MSP360 Backup.

Managing a System Image Backup for Windows Server with MSP360
In this guide, we’ll cover all the nitty-gritty of using MSP360 Managed Backup to protect your Windows Server environment.
How to Create an Image-Based Backup for Windows Server
We assume that you already have MSP360 Managed Backup installed on your server. If not, install it and let’s begin.
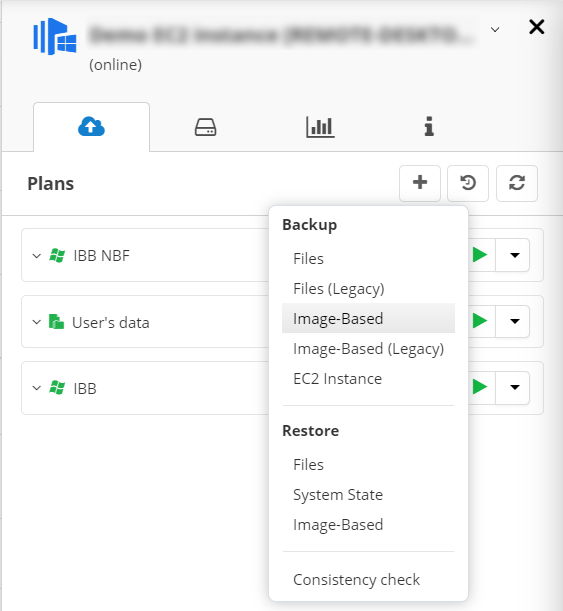
In the MSP360 Managed Backup web control panel, proceed to the Computers tab, Remote Management section. Find your server in the list.

Click the gear icon on the right and then Show Plans.
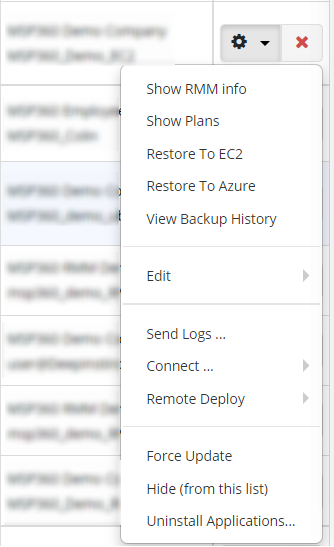
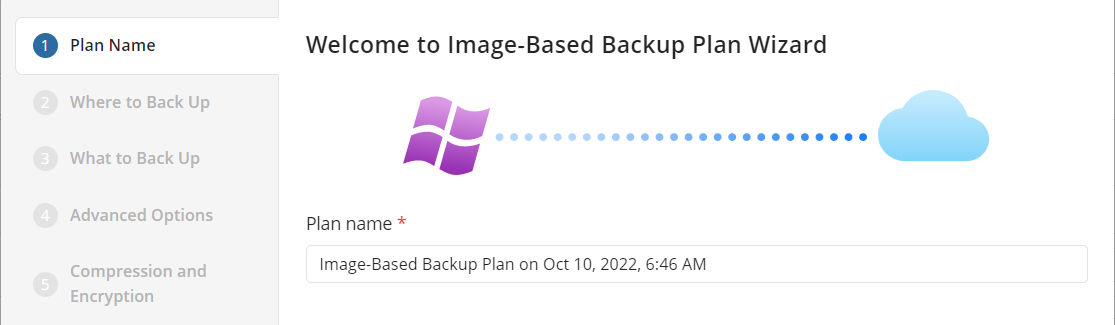
Click the plus icon and choose Image-Based from the list to create the new backup plan or find the required plan on the list, click it and find the Edit button to make changes to it.
Give your plan a name.
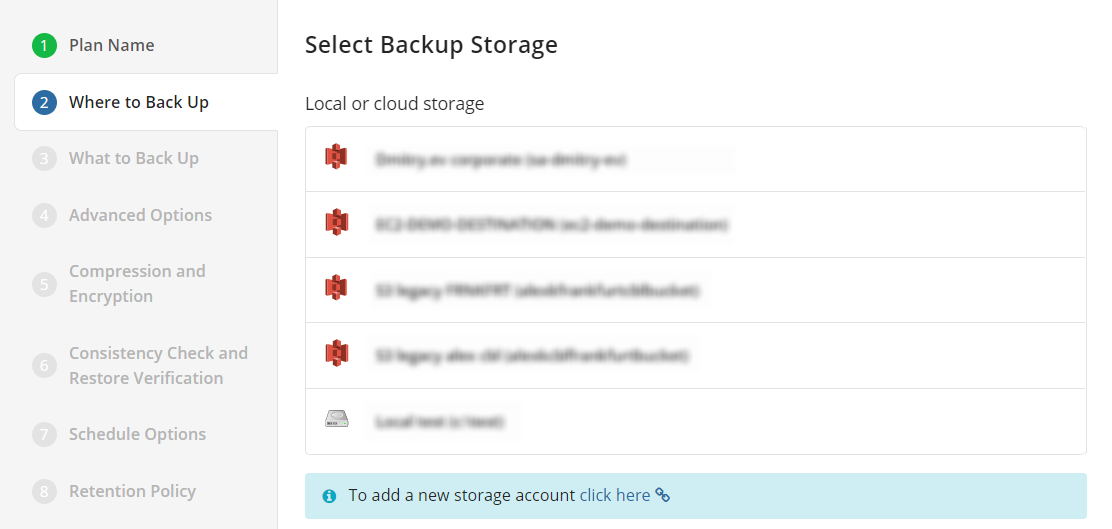
Select the backup destination. You can use local or cloud storage, depending on your needs.
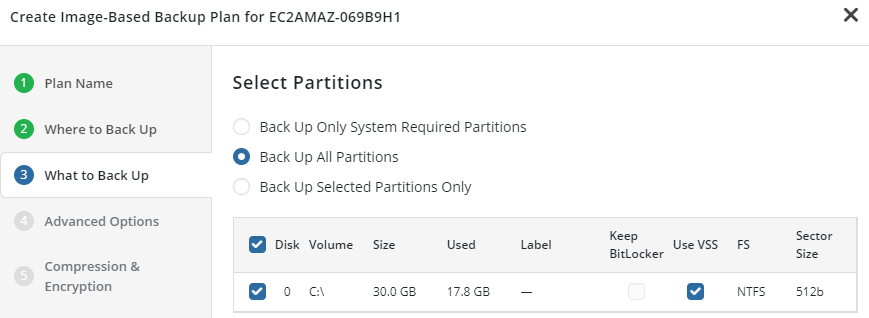
Select the partitions you require to back up.
In the Advanced Options section, you can exclude files or folders from the backup, change VSS options, and modify the prefetch block count.
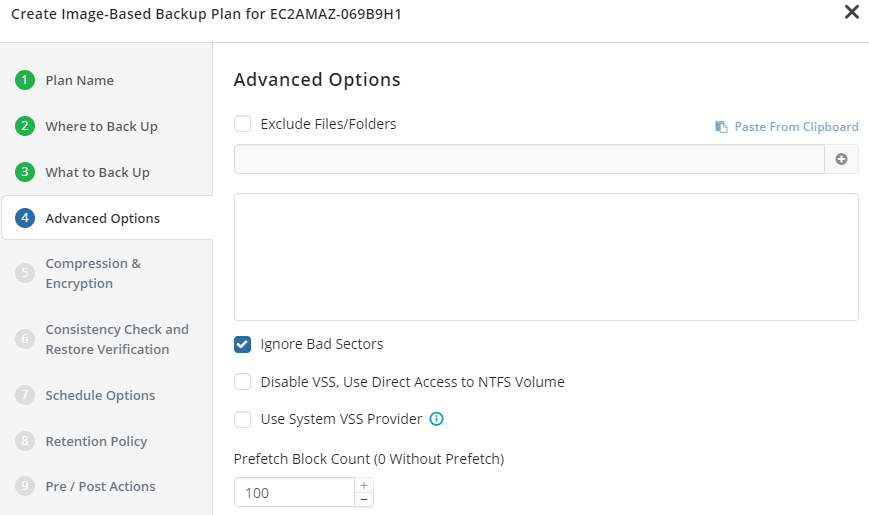
Configure the compression and encryption options. It is highly recommended to use encryption, so that no one will be able to access your server without a password. Add a hint in case you lose or forget your password.

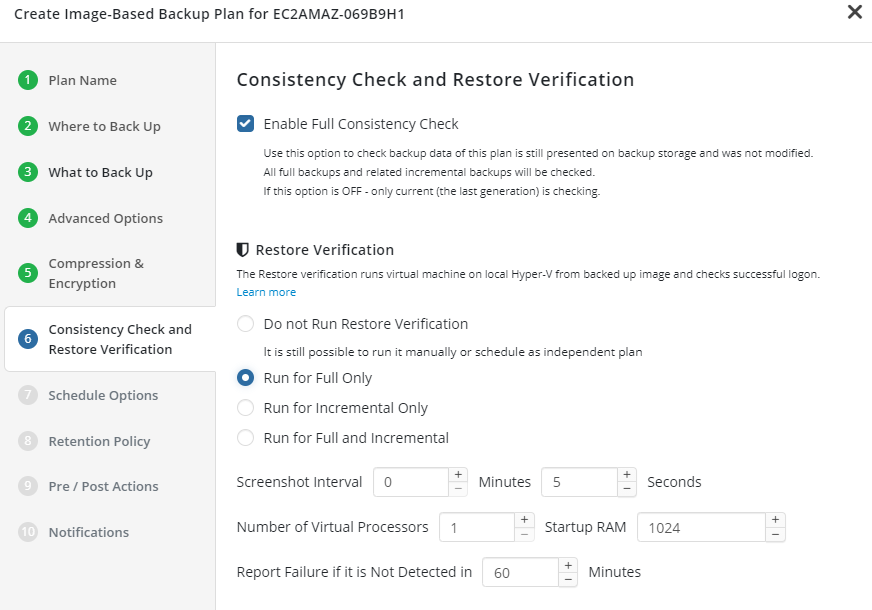
Consistency check and restore verification are used to ensure that your backups are recoverable. The consistency check feature reviews data in storage and notifies you if the data does not exist or has been modified, for example if it has been damaged. Restore verification does a quick restore of your server backup using a temporary Hyper-V environment to ensure that your server’s copy is recoverable.
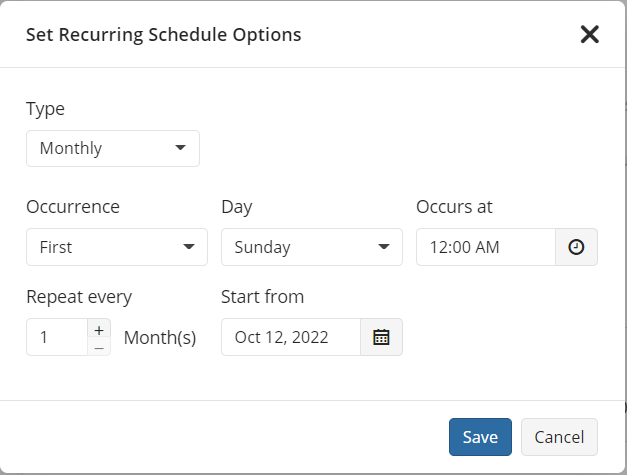
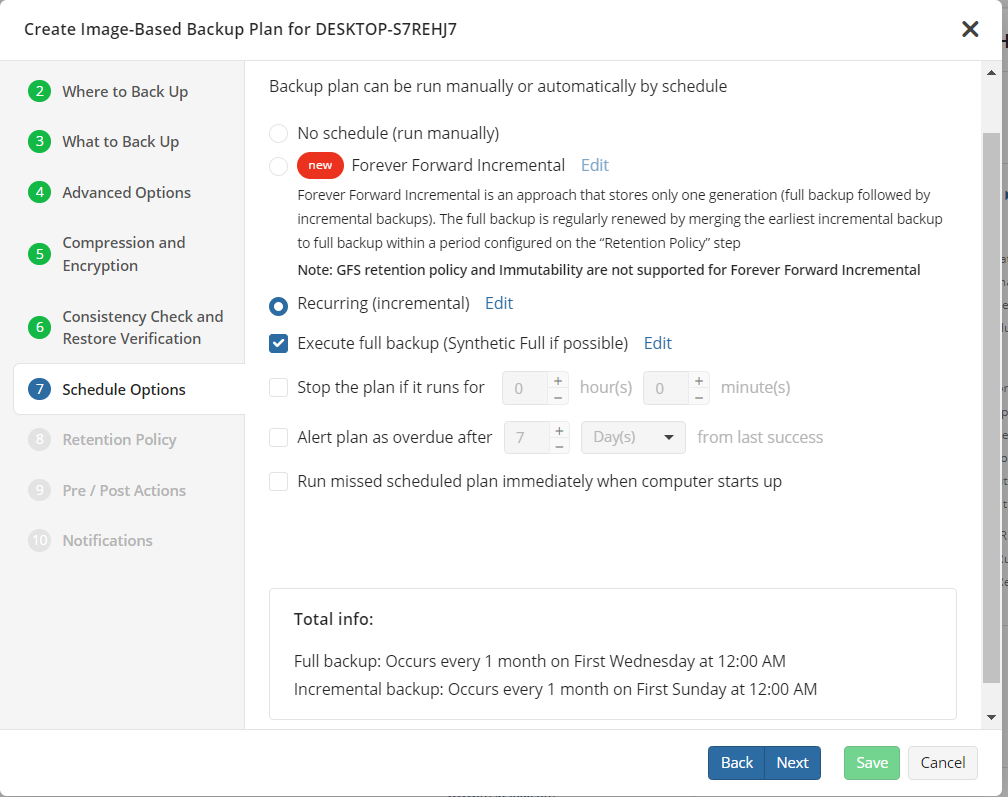
In the next step, define the schedule options. Click Recurring Incremental and set up the incremental backup frequency. The Daily type refers to weekly backups, as well, if you choose to run backups only once a week.
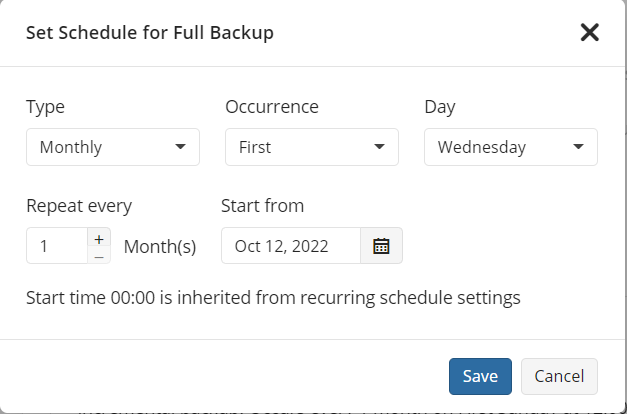
Click Execute Full Backup to schedule full backups. The Daily type works in a similar way to that in the previous step.
You can find your backup plan configuration summary at the bottom of the dialog. Also, you can specify the maximum time the backup plan can run for. If you want the plan to be launched at system start-up in case of a missed previous scheduled backup, mark the appropriate checkbox.
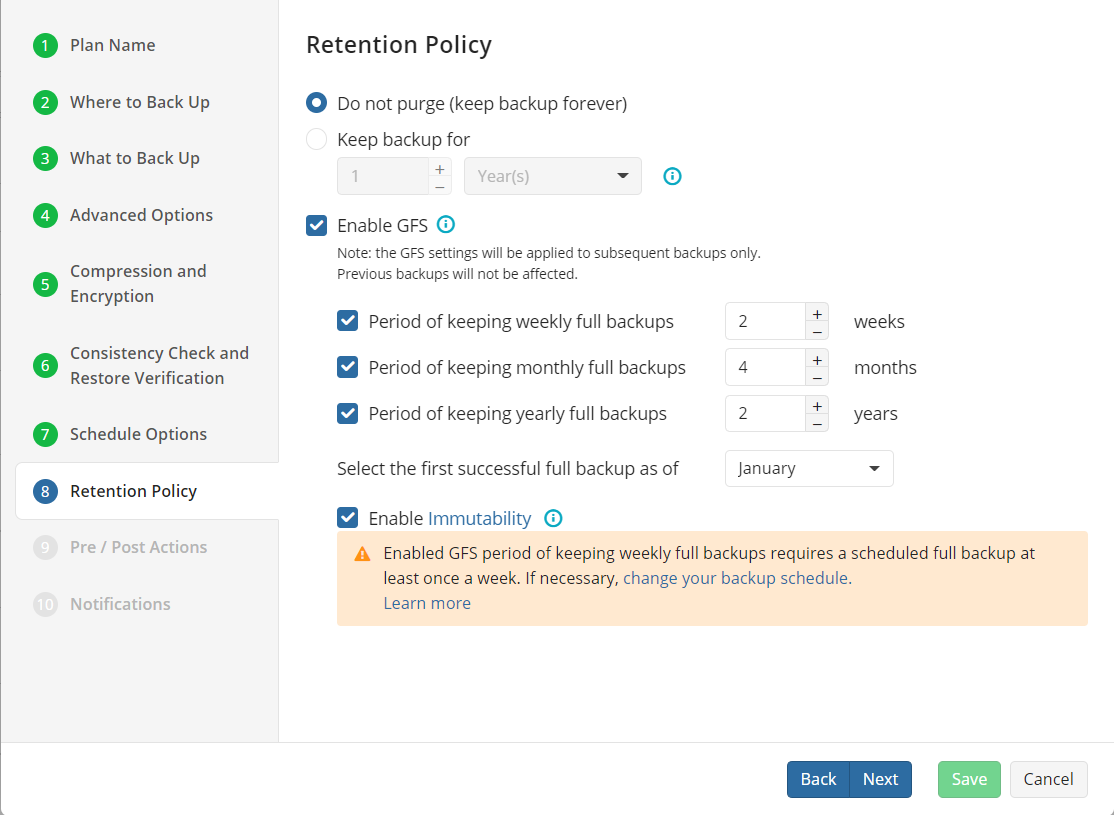
In the Retention Policy step, select how long your backups should be stored. Here, you can also enable the GFS option; GFS backups are additional full backup copies that are kept using their own retentions. On this step, you can also enable object lock to prevent a dataset from being modified or deleted within a given period of time. Please note that immutability can be enabled if it was enabled for the storage account you chose.
Further reading Immutable Data Backups Explained and How It Works in MSP360
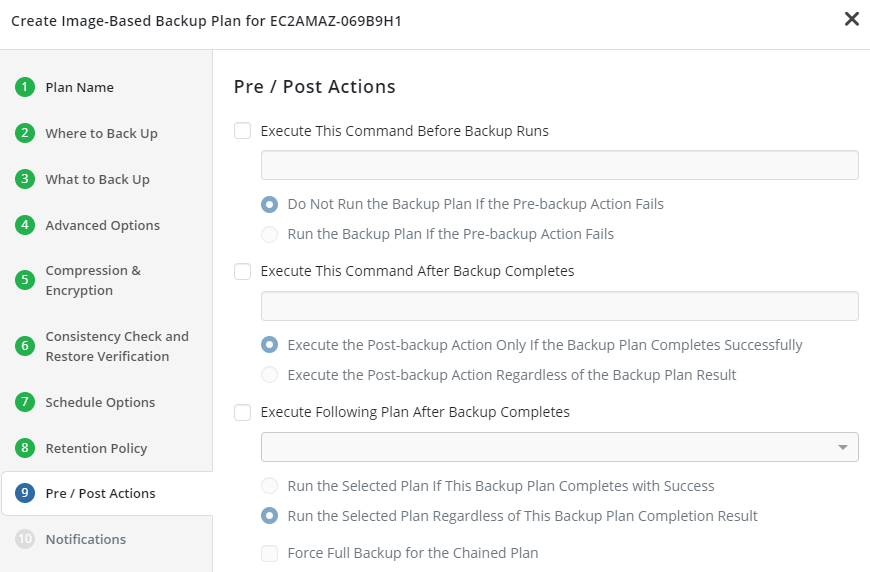
In the Pre / Post Actions section, you can add scripts that will be executed before backup starts or when it finishes. You can also embed your server backup into a backup chain.
Change the notification options if needed. Click Save. If you have specified the schedule, MSP360 Managed Backup will automatically launch your plan at the defined time. Otherwise, you’ll need to run it manually from the Show Plans slide-in.
When the backup plan finishes, you’ll see the result in the Plans slide-in.
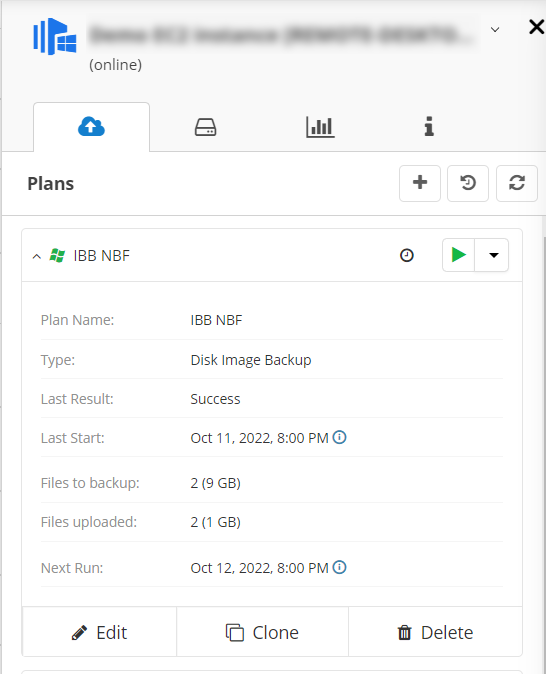
Here, everything went fine. If any issues occur, you will be able to see the details of what happened in the Last Result field.
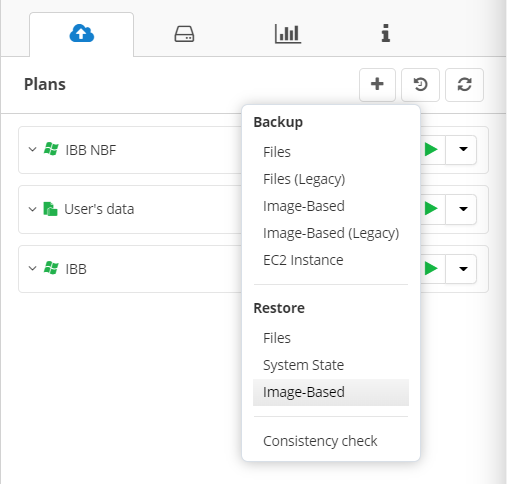
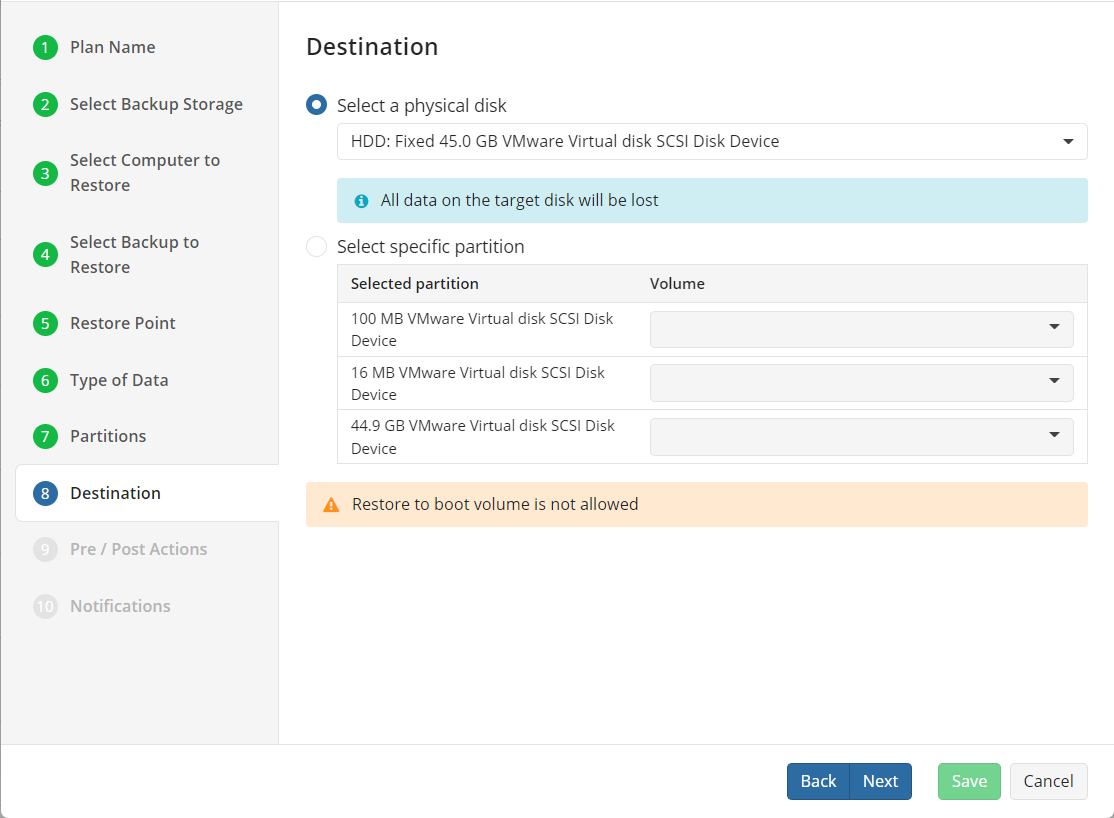
How to Recover an Image Backup of Windows Server
To recover a backup of Windows Server with MSP360 Managed Backup, open the Plans slide-in and click the plus button. Choose Image-Based to open the restore wizard.
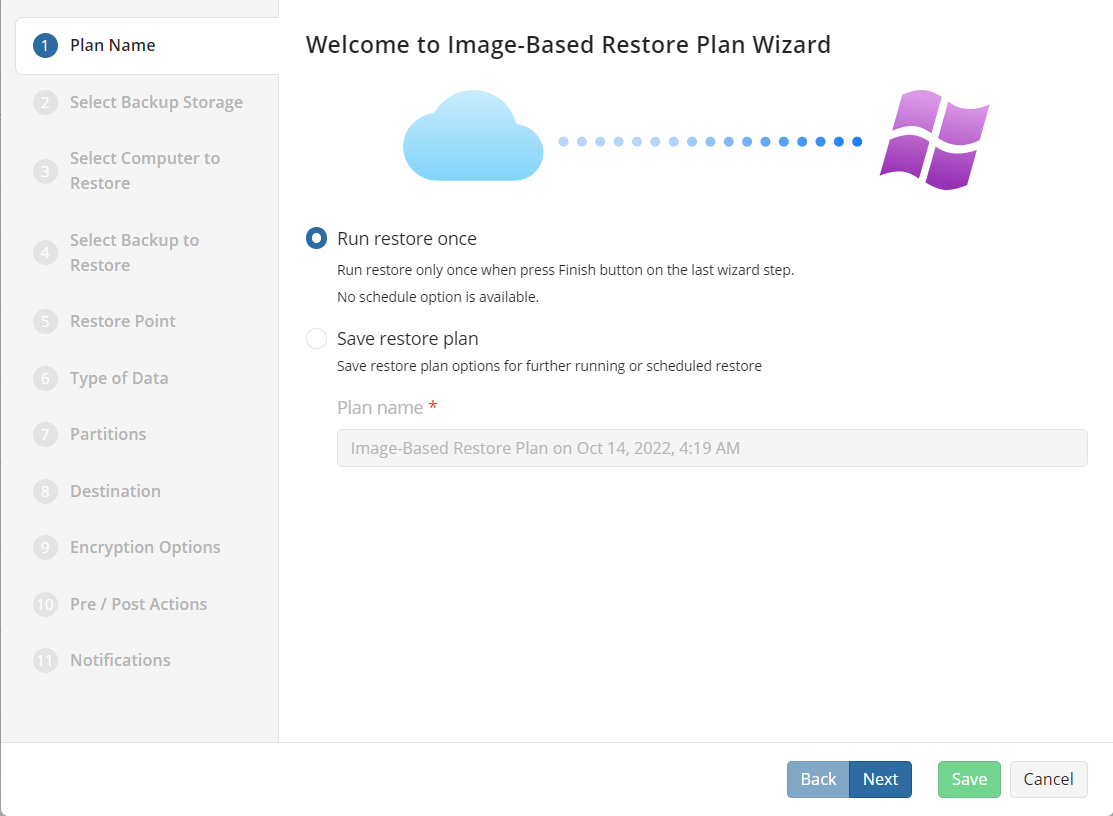
If you choose Run restore once, the plan will start automatically after you fill in all the required information.The Save restore plan option allows you to run the plan manually or create a schedule for it.

Select which dataset you want to restore. By default, the latest version is set up for recovery, but if you need to retrieve an earlier version, select the point in time when it was available.
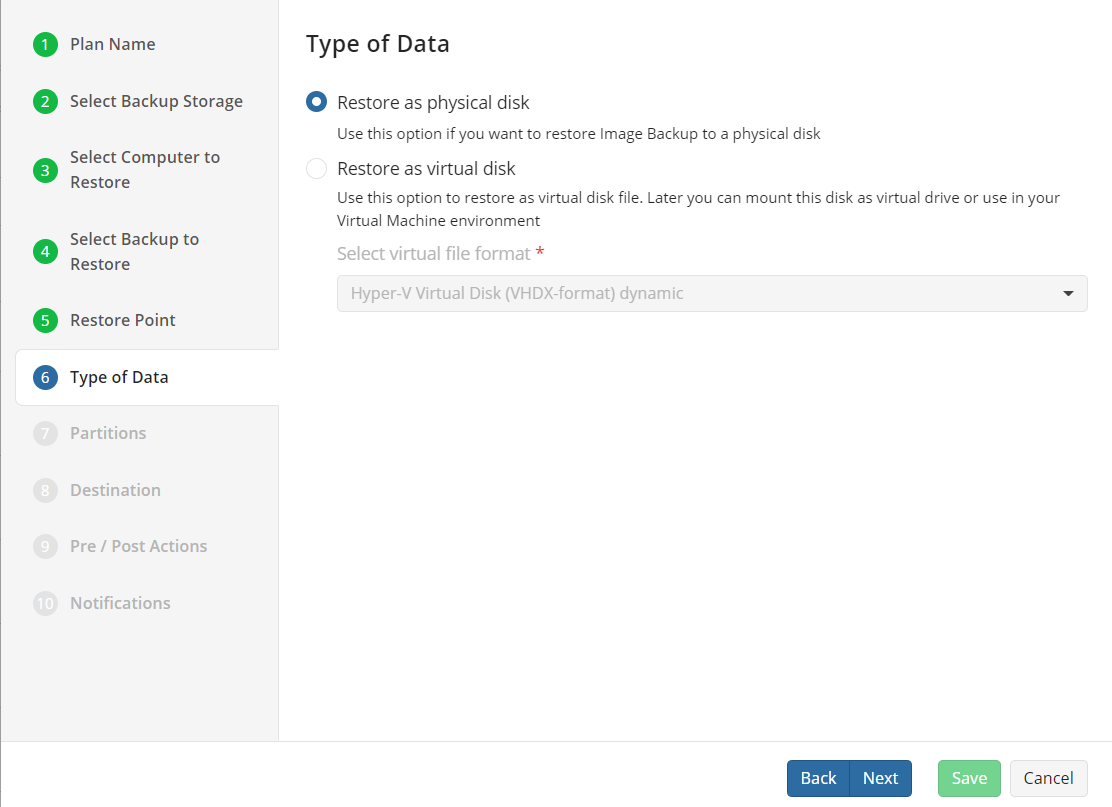
On the next step, you are required to select the type of data. There are two options available:
- Restore as physical disk (use this option if you want to restore Image Backup to a physical disk)
- Restore as virtual disk (use this option to restore as virtual disk file. Later you can mount this disk as virtual drive or use in your Virtual Machine environment)
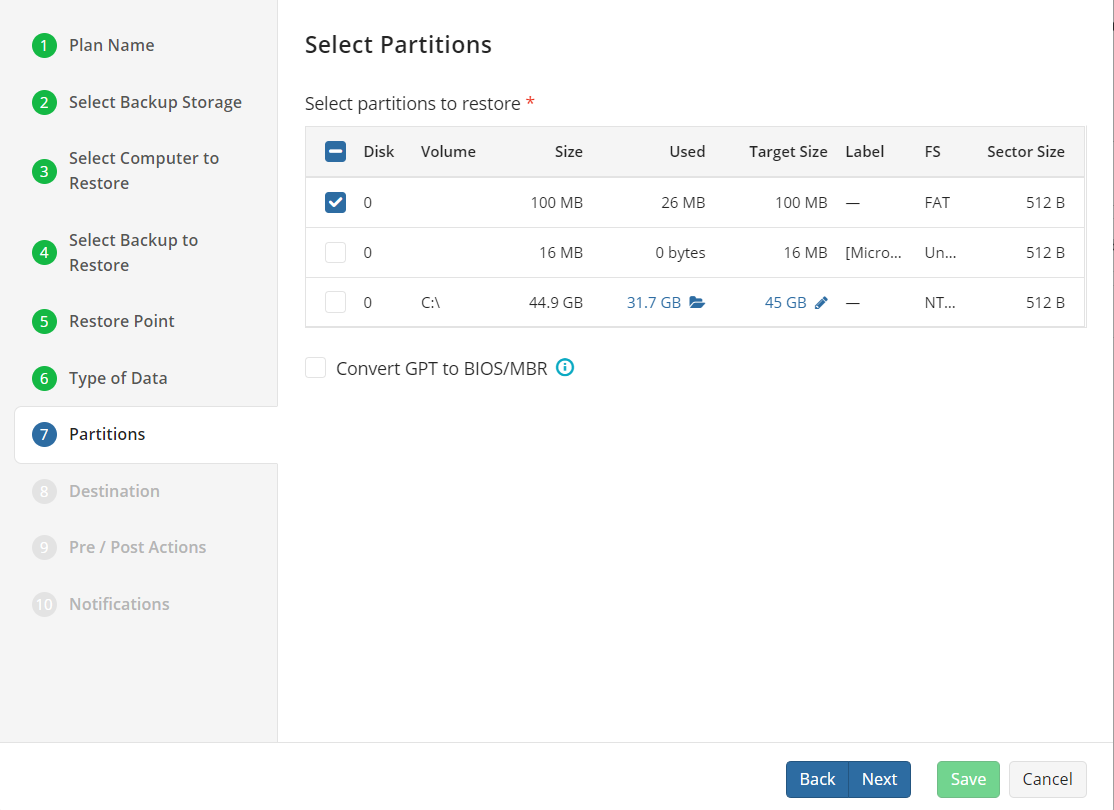
Choose the partitions to restore.
In the Destination section, you need to provide the path where your Windows Server is to be recovered to.
That’s it. Now you know how to create and recover Windows Server backups with MSP360. Our number-one backup helps keep your data safe, providing you with all the necessary tools for the purpose. Should you have any questions, please contact us.
MSP360 Managed Backup.
Simple. Reliable.
Powerful cross-platform backup and disaster recovery that leverages the public cloud to enable a comprehensive data protection strategy.


Резервное копирование windows server систем
Резервное копирование windows server систем
Добрый день уважаемые читатели блога, я вам уже много раз показывал, как ремонтируется и восстанавливается операционная система Windows, но почти все эти статьи были про клиентские версии, сегодня я хочу исправиться и наконец осветить вопрос, как производится резервное копирование windows server систем, так как выход из стоя сервера, чревато для бизнеса денежными потерями, в отличии от простоя обычного офисного компьютера. Я вам расскажу свои примеры из жизни, в которых мне бы очень помогла архивация windows server 2012 r2.
Архивация windows server 2012 r2
Как вы уже наверно догадались, резервное копирование windows server систем, осуществляется с помощью встроенного компонента система архивации данных windows server 2012 r2. Хочу сразу отметить, что она есть и в 2008 R2, но я буду рассказывать на примере более современной версии, хотя все изложенное подойдет и для предыдущей версии. Если вы еще застали времена Windows Server 2003, то наверняка знакомы с компонентом NTBackup, именно им все делали бэкап системы, и она даже умела писать на ленты. Затем пришел на смену 2008, без R2 и показал убогий и переработанный компонент архивация windows, у которого убрали кучу функционала, до сих пор мне не понятна логика людей, выпустивших тогда этот компонент в таком виде. Прошел год и вышел R2, который уже вернул большую часть функций, которые были в NTBackup и сделал резервное копирование windows server, очень простым и удобным. Если кто не в курсе, то в отличии от клиентских версий виндоус, у серверных нет по умолчанию механизма защиты системы и в случае повреждения загрузчика или еще каких, то системных файлов, быстро восстановиться из предыдущей версии не получиться, а все дело в архитектуре серверной ОС, так как в ней по умолчанию идет всего по минимуму, для большей защиты и уменьшения нагрузки. Системный администратор сам решит, что ему нужно и это правильно, но вот защиту могли бы и включить. Расскажу пример из жизни, как и у всех администраторов большая часть серверного парка уже давно это виртуальные машины, хотя есть небольшая часть серверов, которая не виртуализована, просто потому, что не рационально и не даст выхлопа, я говорю про сервера с 300 гб оперативной памяти и MS SQL сервером. В один прекрасный день был сбой по электричеству и UPS все не выдержал. В итоге сервера выключились, не совсем правильно. Восстанавливая сервисы один из серверов не загружался и у него была ошибка an error occurred while attempting при загрузке Windows. Ее получилось победить, но через 5-6 часов, что согласитесь не очень быстро, а вот если бы была резервная копия системы и средство восстановления, то все прошло бы за пару минут.
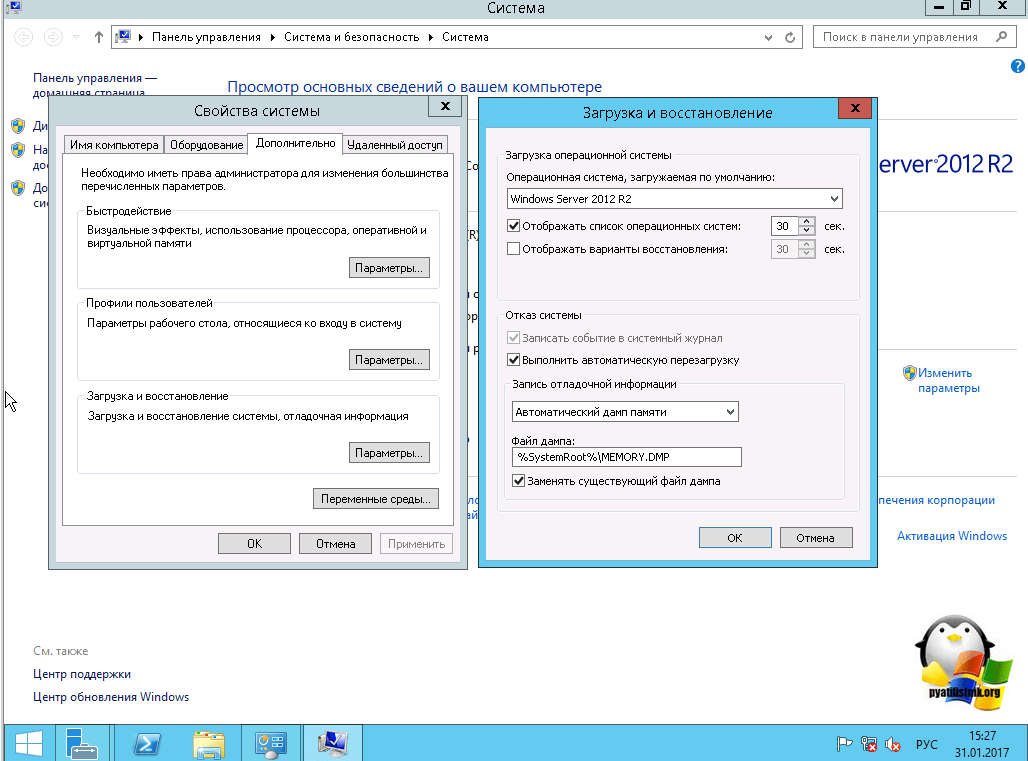
Если вы зайдете в Свойства системы, то вкладку Защита системы, вы не найдете на Windows Server 2012 R2.
Почему именно система архивации данных windows server 2012 r2
Но система архивации данных windows server 2012 r2, уже идет под капотом в самой системе и самый большой шок, то что большинство системных администраторов, просто о нем не знают, поэтому вынуждены использовать сторонние продукты. Кто-то мне говорил, что он не понимает, как это все работает, что натолкнуло меня на написание данной статьи, чтобы люди, увидели все это на практике.
Куда можно делать резервную копию
- В идеале для системы должен быть отдельный диск, который размечает система архивации и скрывает от пользователя, для дальнейшего создания точек восстановления. Сама Microsoft рекомендует именно этот вариант. Кстати, если кто-то знаком с Microsoft System Center Data Protection Manager, то там так и работала система резервного копирования.
- Можно использовать уже размеченные разделы
- Сетевые папки
- ISCSI диски
Система архивации данных windows server 2012 R2 умеет создавать полную копию и дифференциальную (добавочную), сама управляет сроком хранения. У нее принцип работы очень простой, она будет записывать и хранить столько копий, сколько ей позволяет дисковое пространство, затем будет циклическое перезаписывание, более нового на более старое, очень похоже на видео наблюдение.
Так что после настройки хранилища резервных копий, служба архивации Windows Server, сама все сделает и организует пространство хранения данных. В этом кроется огромный плюс для начинающих системных администраторов, так как не все сразу способны оценить нужный объем хранилища и объем данных, многие не знают, что данные в резервных копиях сжимаются, а если вы знаете еще такое слово как дедупликация Windows, то сможете выжать из дискового пространства максимум.
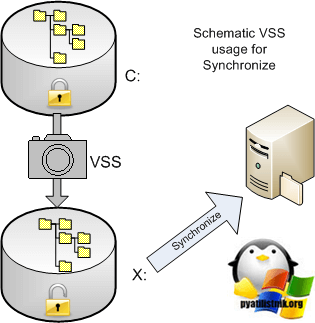
Давайте немного поговорим про сам механизм работы системы архивации windows server, тут нового ничего нету, она использует службу теневого копирования тома (VSS), ее задачей является дать средству архивирования работать с открытыми и системными файлами, и не просто работать, а еще и не мешать системе работать, служба просто делает некий слепок состояния, это очень похоже на снапшот у виртуальных машин. На движке Windows Server 2012 R2, вы можете таким образом архивировать виртуальные машины на Hyper-V 3.0, не прекращая их работы.

Возможности VSS так же распространяются и на базы данных, могу со сто процентной уверенностью сказать, что проблем с Exchange или MS SQL у вас не возникнет, а вот PostgreSQL может создать определенные трудности. Если мы говорим про MS SQL, то она прекрасно понимает службу VSS и переводит БД перед моментом создания теневой копии к непротиворечивому состоянию, сама VSS не думает даже проверять логическую целостность данных, ей это не нужно, так как ее задача — это сделать снимок. Если, например, таким образом сделать резервную копию PostgreSQL, то при восстановлении мы получим срез базы на определенное состояние времени в противоречивом состоянии и в ней не будет всех незавершенных транзакций на момент создания бэкапа. Так, что есть некая такая проприетарность к своим продуктам.
Куда лучше копировать
Ответить на этот вопрос не просто, так как у всех ситуации по резервному копированию разные и инфраструктура разная. Давайте рассмотрим плюсы и минусы разных хранилищ. Напоминаю их у нас их несколько. Во-первых, если вы кладете резервную копию локально на сервер, то вы быстрее ее сделаете и быстрее сможете восстановиться при необходимости, а с другой стороны сервер может сломаться локально, а еще хуже если это будет RAID, то тут все будет печально. Второй пример вы делаете бэкап на ISCSI диски, хорошо, что хранится удаленно от сервера, можно быстро пере подключить к другому серверу при необходимости, но медленней скорость создания бэкапа и скорость восстановления, и так же могут выйти из строя сервера и диски с которых вы делаете ISCSI диски. Подведя итог, у вас в идеале должны быть копии в нескольких местах, понятно что не всегда это возможно, но стремиться к этому нужно, тут надо понять критичность данных и реализовать систему исходя из этого.

Установка системы архивации windows server
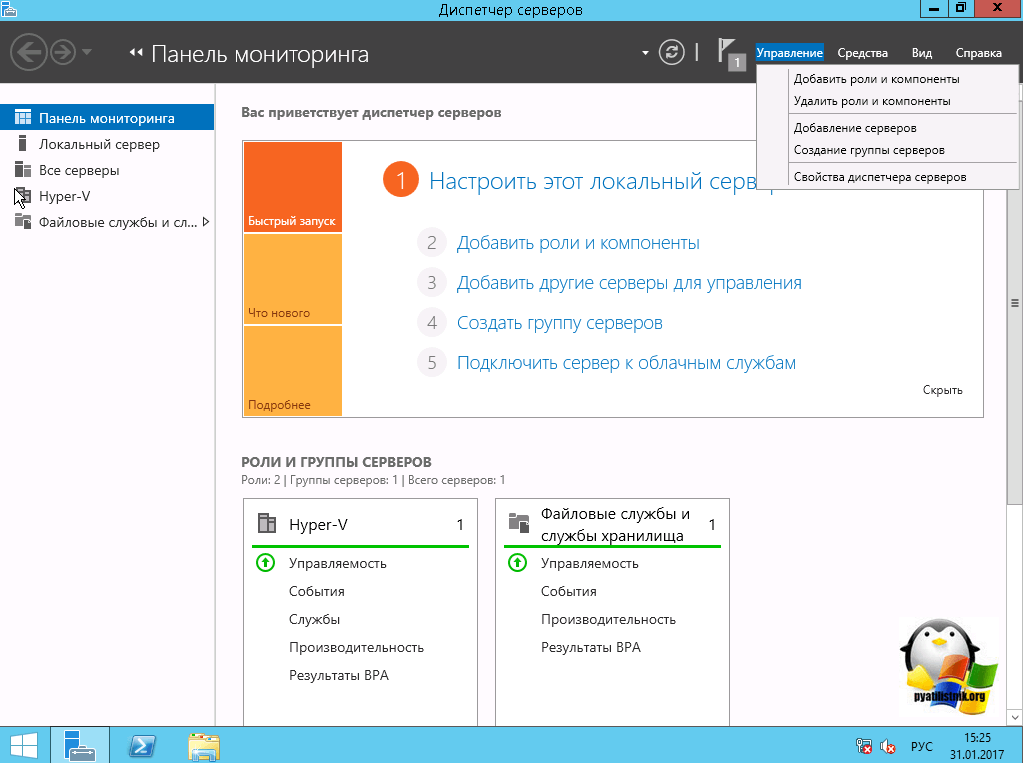
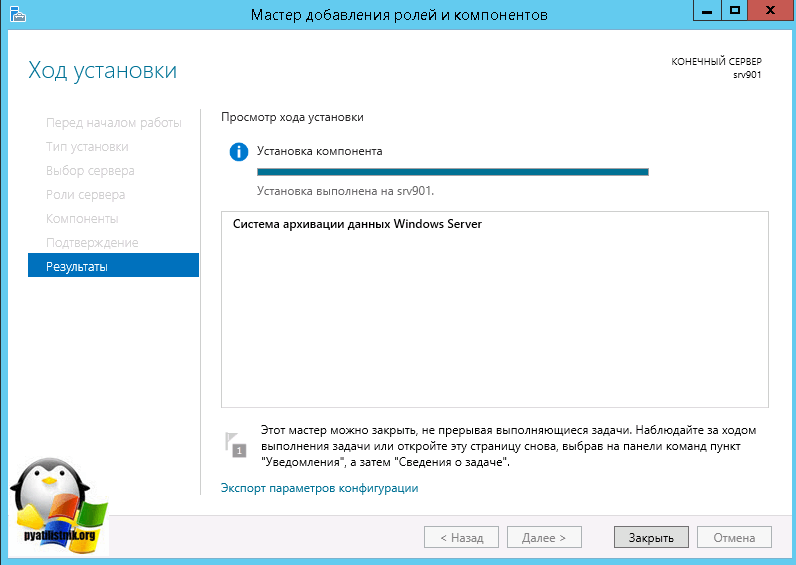
Давайте смотреть как устанавливается система архивации данных windows server 2012 r2, еще начиная с 2008 это компонент системы и логично, что его нужно искать в диспетчере сервера. Выбираем пункт Управление > Добавить роли и компоненты
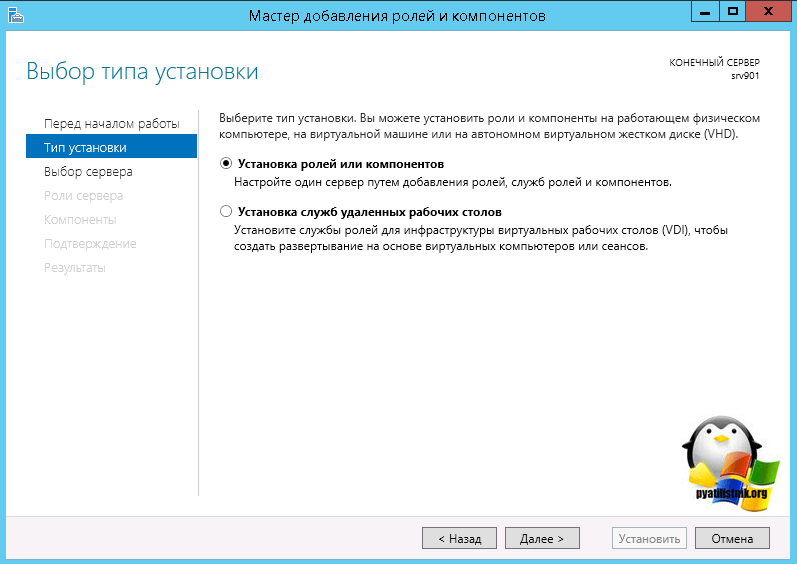
оставляем пункт установка ролей и компонентов
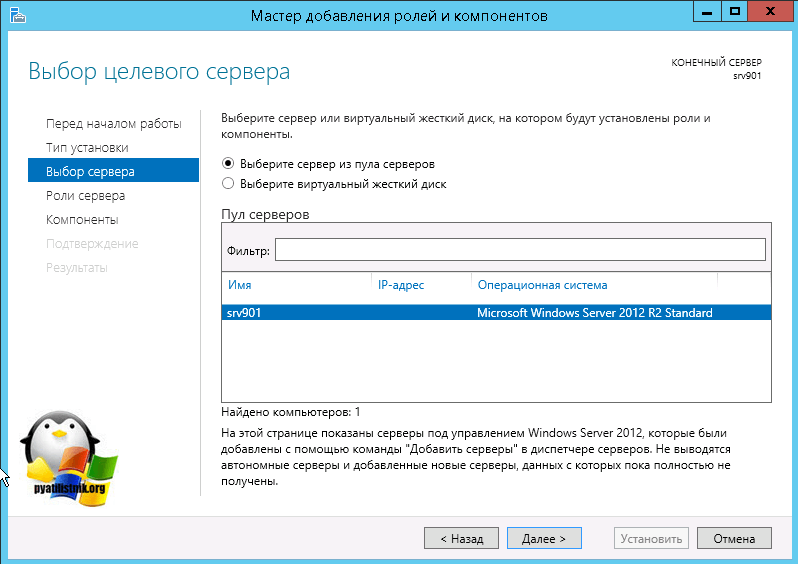
Пропускаем роли и жмем далее.
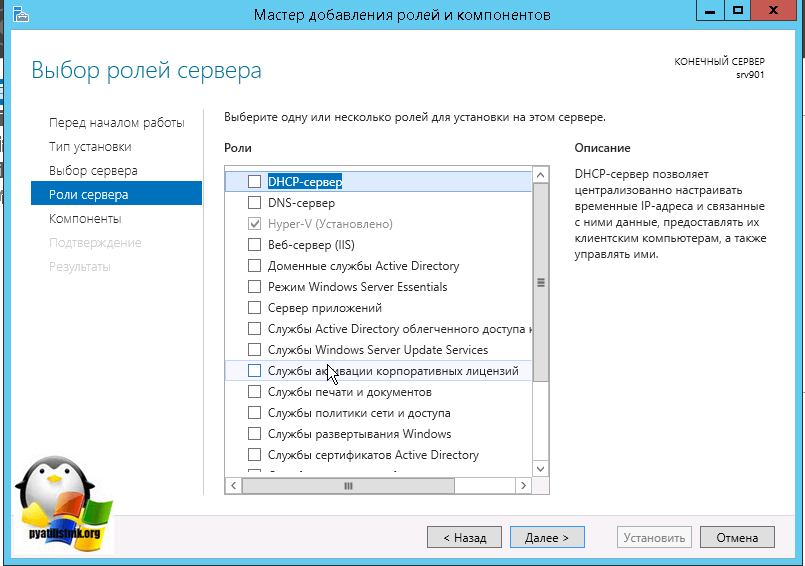
Выбираем пункт Система архивации Windows Server
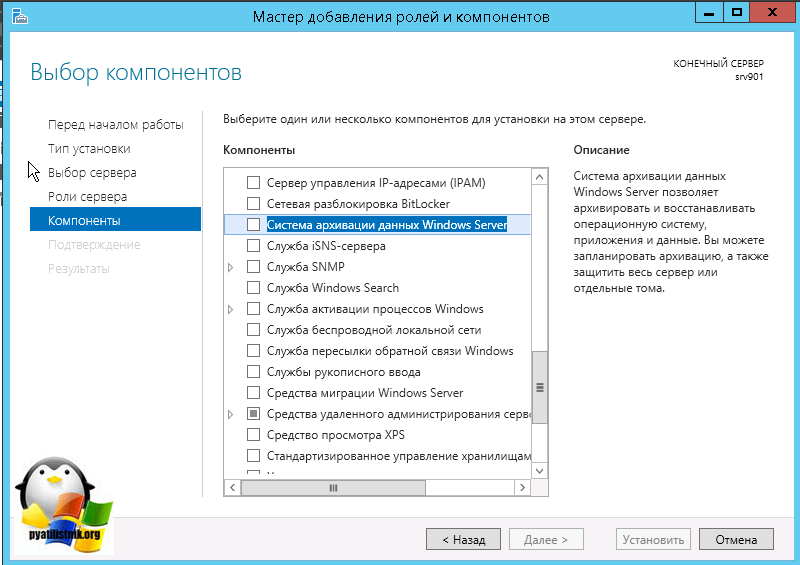
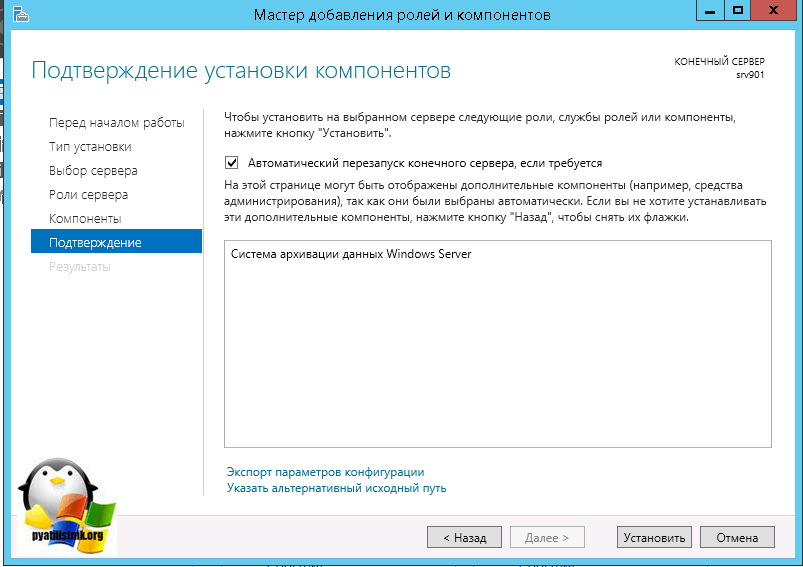
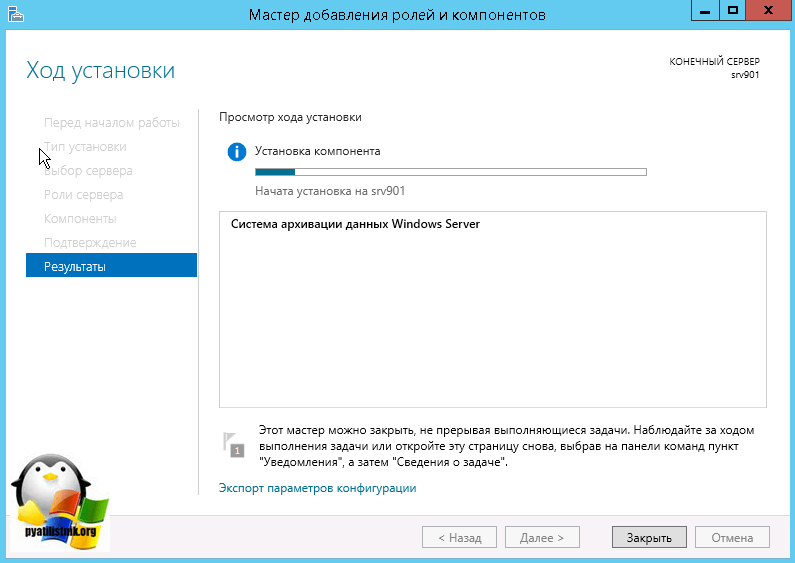
Через пару мгновений, у вас установится нужный компонент.
Настройка системы архивации windows server
После установки компонента архивации, его нужно настроить, давайте приступать. Открываем диспетчер сервера > Средства и находим пункт система архивации данных Windows Server.
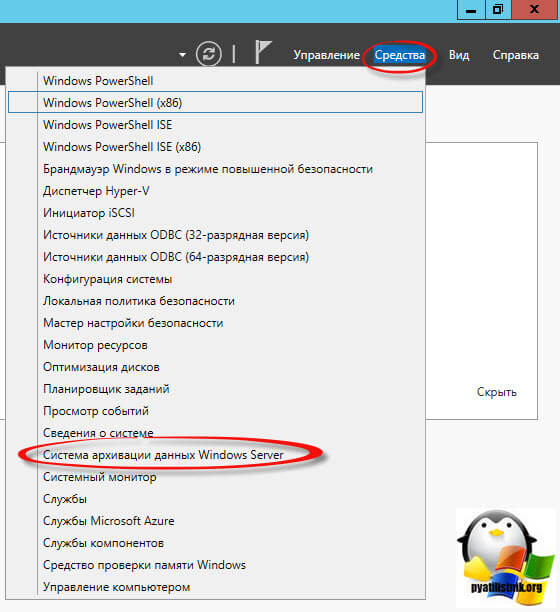
Так же данную оснастку можно вызвать, нажав WIN+R и введя wbadmin.msc, полный список сокращений mmc смотрите по ссылке. Открыв оснастку, вы сразу увидите, что вам настоятельно рекомендуют настроить первое расписание. Сделать это можно через меню действий:
- Расписание архивации
- Однократная архивация
- Восстановление

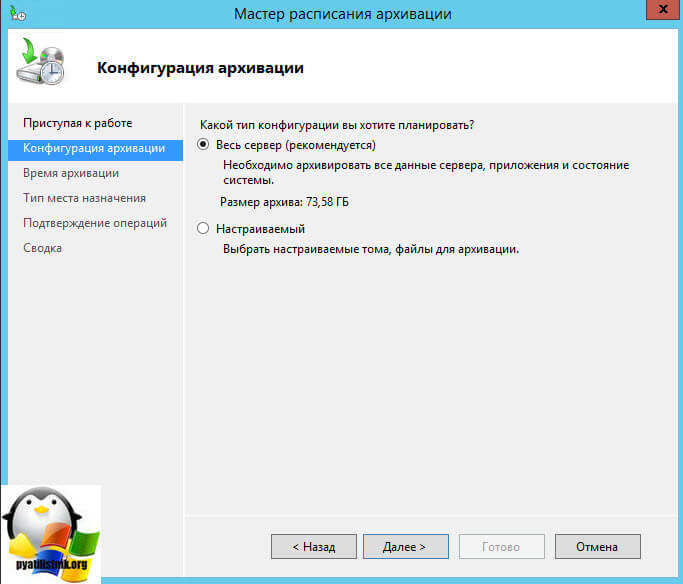
Нажимаю расписание архивации, у вас появится окно мастера настройки, на первом шаге у вас будет выбор, забэкапить весь сервер или настраиваемый бэкап. Я всегда советую делать Настраиваемый вариант, так как вы явно укажете, что нужно резервировать, а что нет.
в окне объекты архивации, система архивации данных windows server попросит вас добавить элементы с помощью соответствующей кнопки.
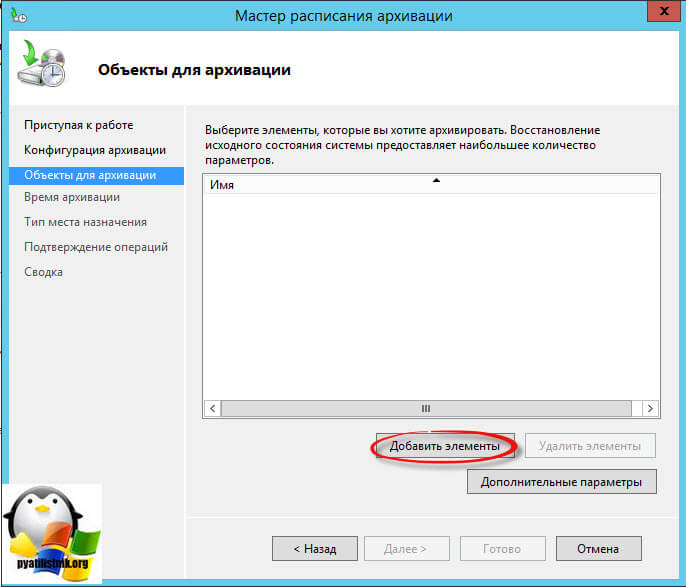
Среди элементов у вас будет:
- Восстановление исходного состояния системы
- Состояние системы
- Локальные диски
- Роль Hyper-V, если установлена.
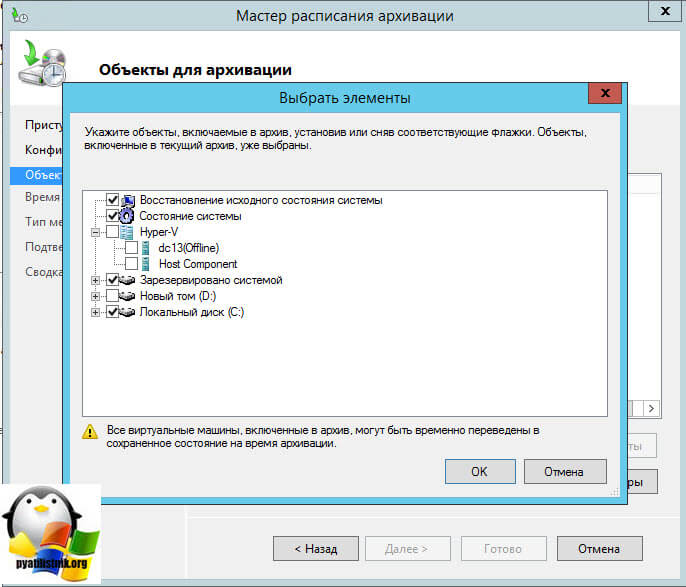
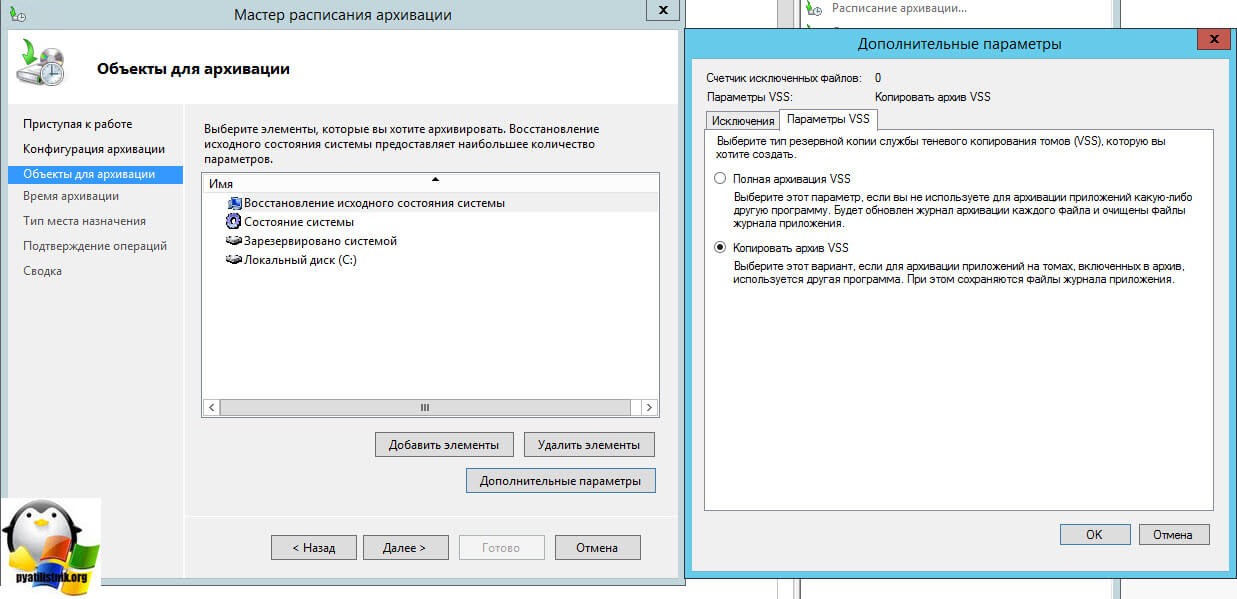
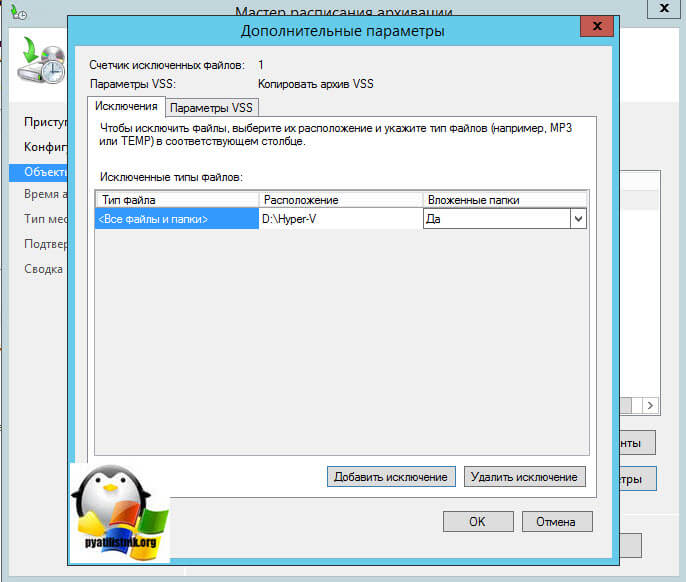
В итоге объекты для архивации будут добавлены в список, хочу отметить, что если нажать кнопку Дополнительные параметры, то можно задать параметры VSS:
- Полная архивация VSS > подойдет если вы не используете сторонние приложения для бэкапа.
- Копировать архив VSS > если для архивации приложений на томах, включенных в архив, используется другая программа.
Так же на вкладке исключения, вы сможете добавить папки, которые не нужно копировать, в них например могут быть временные файлы, удобно когда вы до этого добавили полное копирование диска С:.
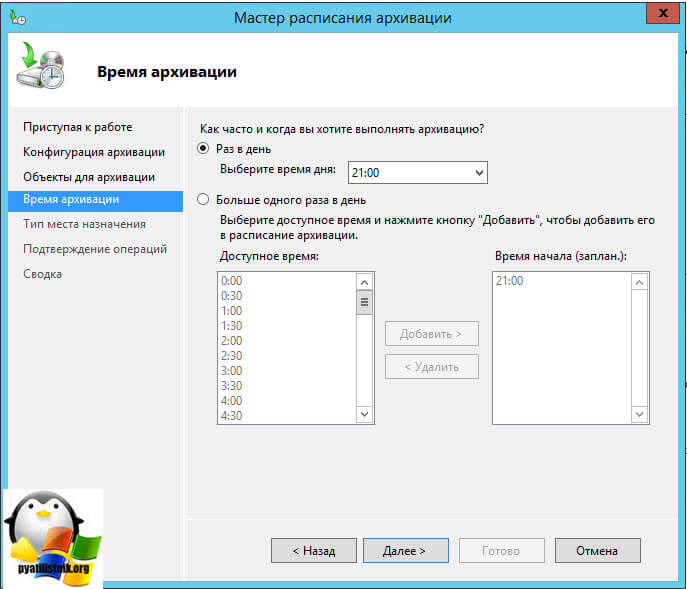
Теперь, чтобы осуществить резервное копирование windows server, нужно задать расписание, тут либо раз в день, либо чаще, задаем на свое усмотрение.
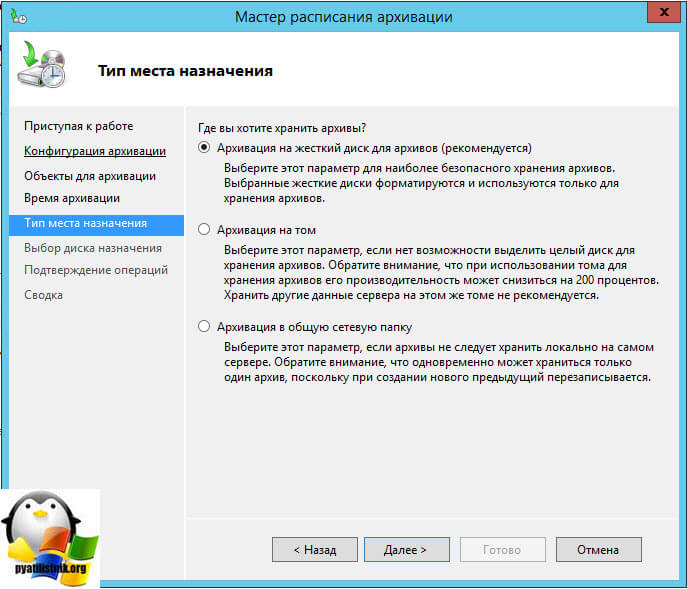
Далее нужно задать место назначения, как я и писал выше тут три варианта:
- Архивация на жесткий диск для архивов > тут полностью отдается физический HDD, форматируется и скрывается от пользователя, такая защита от дурака, чтобы шаловливые ручки все не попортили.
- Архивация на том > то же очень распространено, берете существующий том (он может быть частью RAID или же другой физический диск) и льете туда, под это же дело попадает и ISCSI диск, который в системе видится как локальный.
- Ну и общая шара, очень удобно, все находится вне физического сервера.
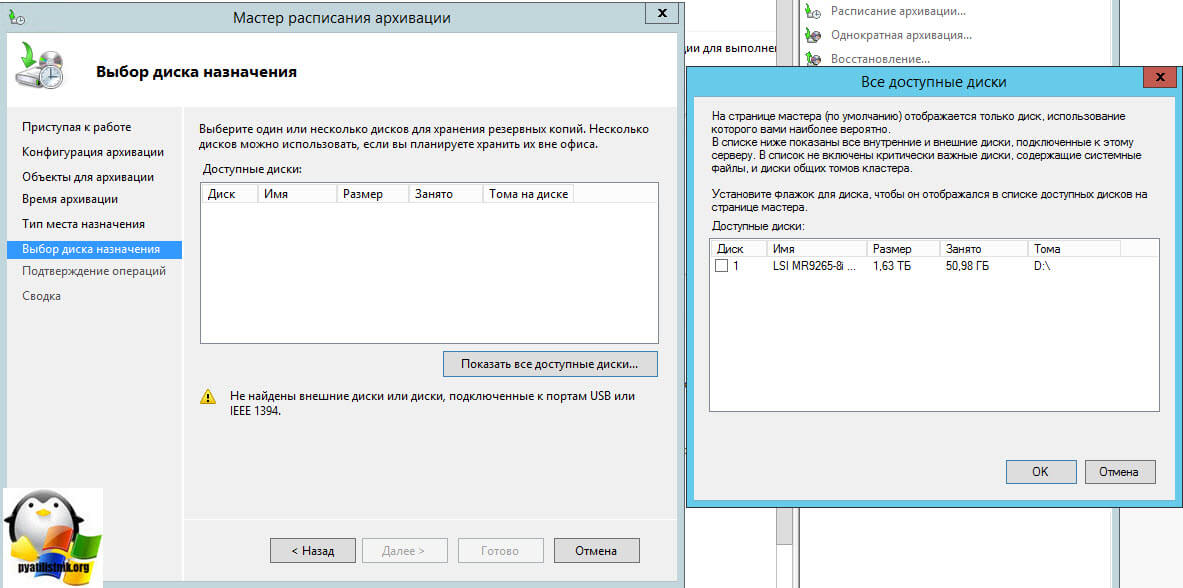
Если выбрать Архивация на жесткий диск для архивов, то на следующем шаге от вас потребуют указать диск, который будет отдан под резервное копирование windows server.
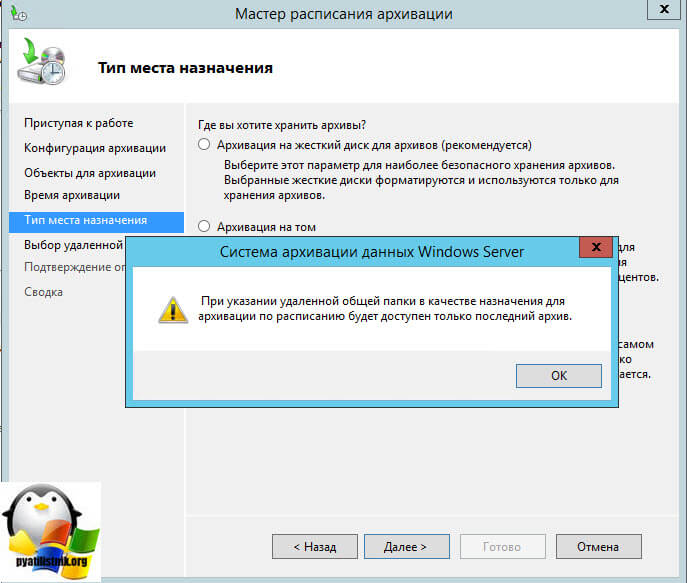
Если выбрать архивация в общую сетевую папку, то у вас появится окно с предупреждением, что при указании удаленной общей папки в качестве назначения для архивации по расписанию будет доступен только последний архив, если простым языком, то будет просто постоянная перезапись, удобно для быстрого бэкапа, чтобы был на удаленном хранилище.
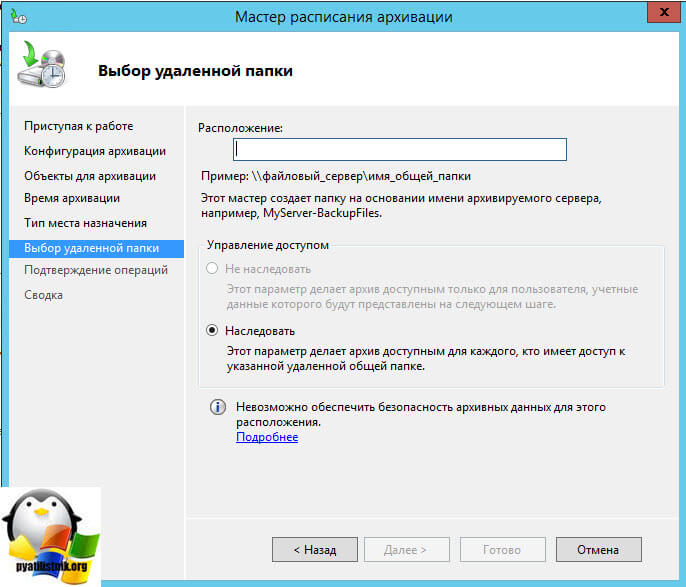
Далее задаем UNC путь к папке в формате \\папка
Если выбрать Архивация на том, то вам нужно указать том назначения, на который будет выполнено резервное копирование windows server.

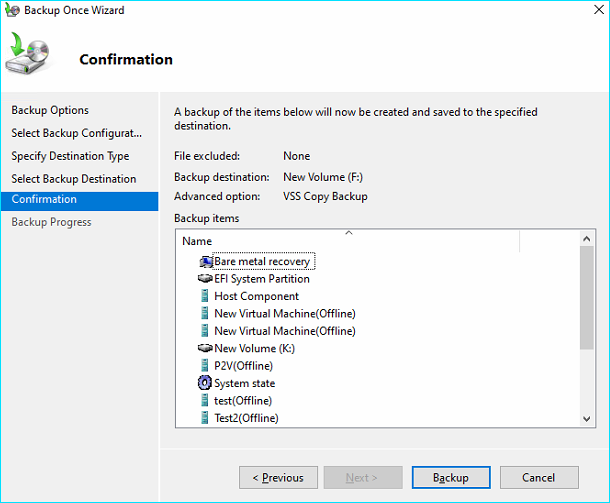
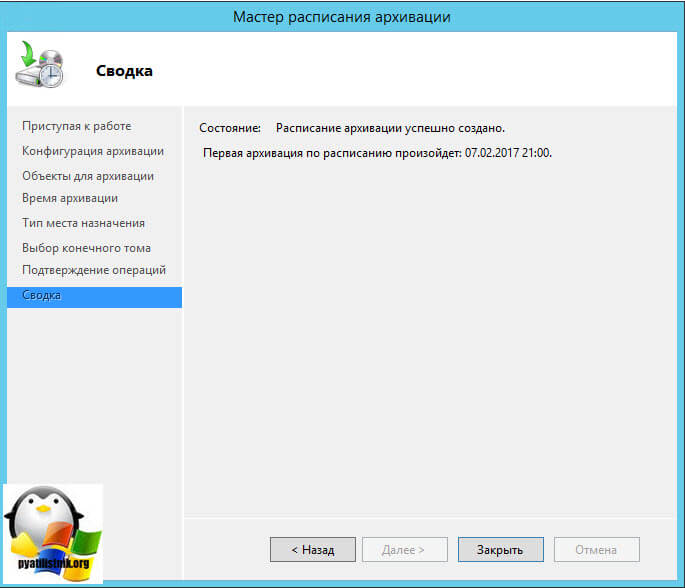
Смотрим сводную информацию и подтверждаем расписание.
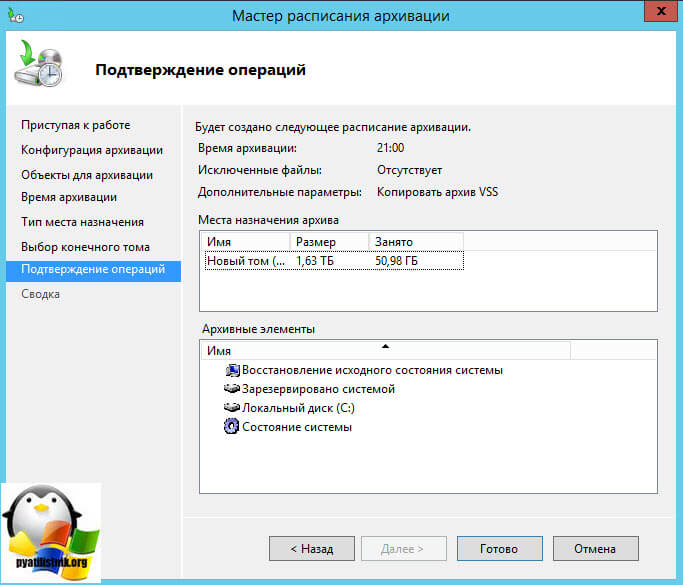
Видим, что система архивации windows server успешно создала расписание.
Восстановление Windows Server 2012 R2
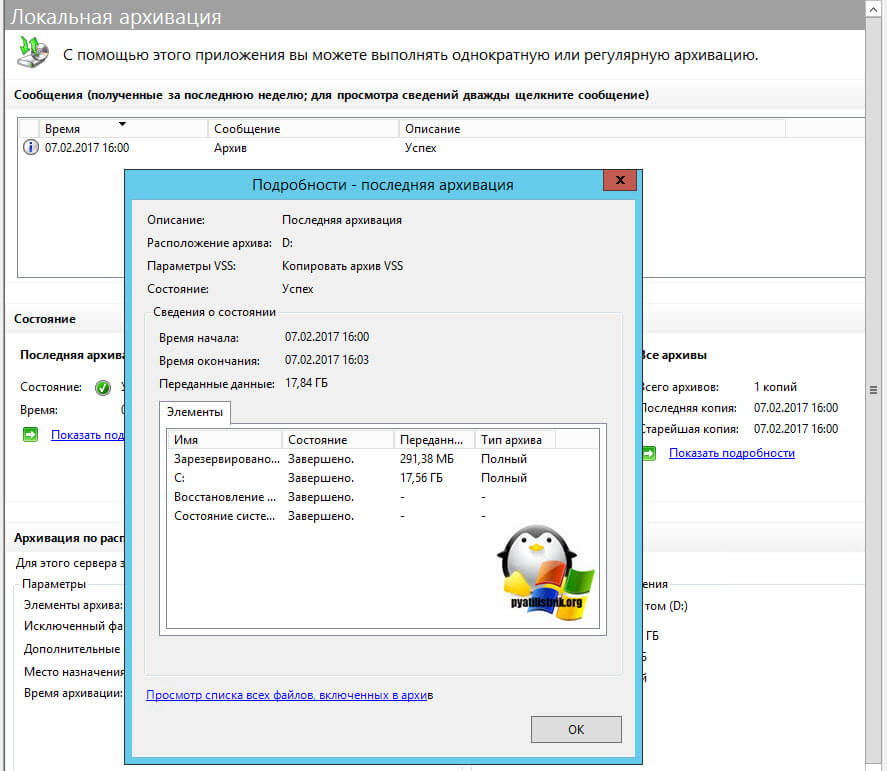
После того, как у вас появилась резервная копия, давайте рассмотрим ситуацию при которой вам нужно будет произвести процедуру восстановления Windows Server 2012 R2. Во первых вы можете посмотреть детали резервного копирования Windows Server (размер, дату)
Как восстановить отдельный файл или папку
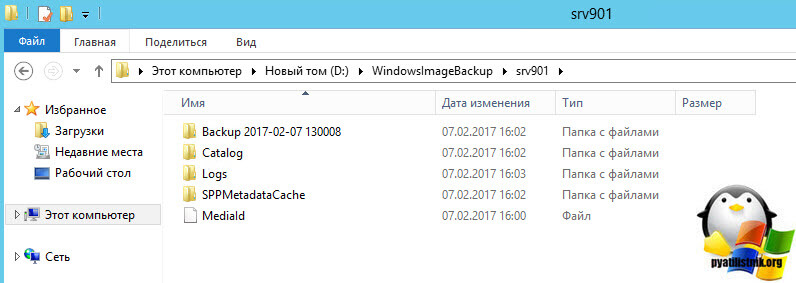
Если вам нужно восстановить, например, отдельный файл, то нет смысла восстанавливать его через оснастку, так как резервная копия это виртуальный диск, который можно подцепить к системе. Давайте посмотрим, саму структуру файлов, лежат они в папке WindowsImageBackup.
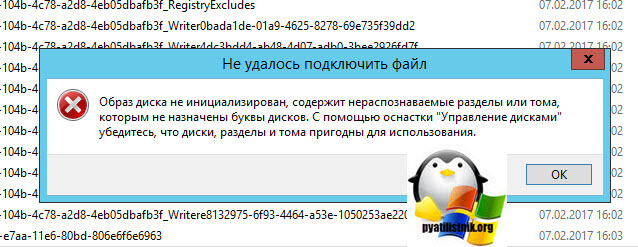
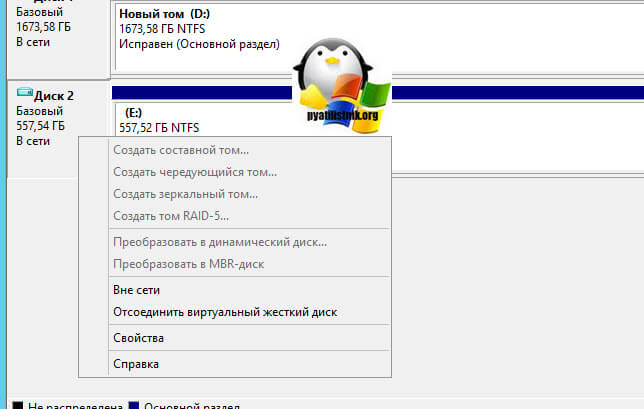
Пот пример моего виртуального диска, кликнув по нему правым кликом, вы можете нажать Подключить.

Вас предупредят, что образ диска не инициализирован, содержит нераспознаваемые разделы или тома, которым не назначены буквы дисков. С помощью оснастки «Управление дисками» убедитесь, что диски, разделы и тома пригодны для использования.
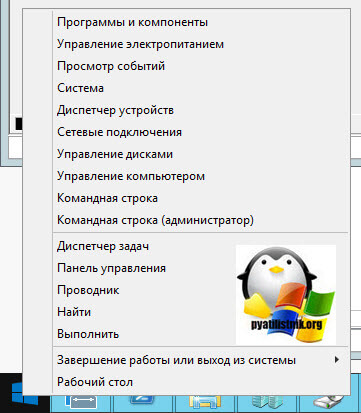
Тут все просто идем в оснастку Управление дисками, через правый клик мыши по кнопке пуск.
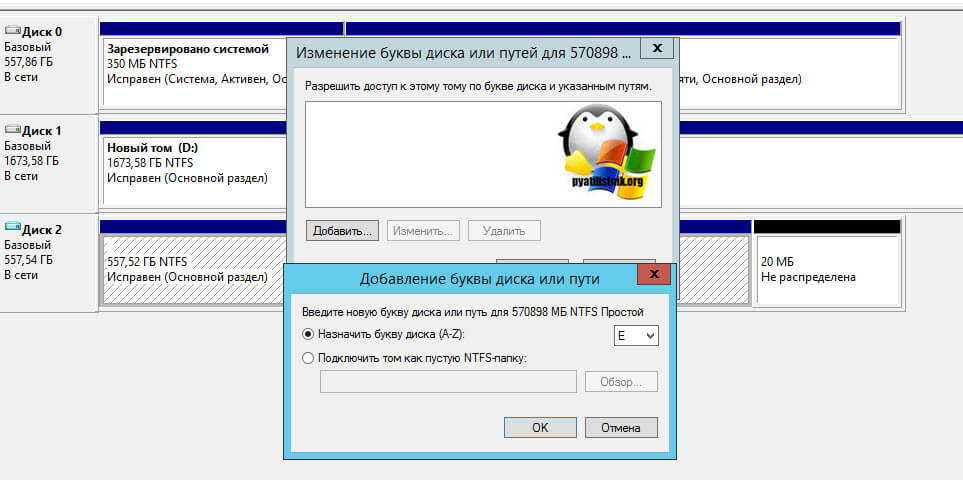
Видим наш под монтированный диск, щелкаем по нему правым кликом и выбираем изменить букву диска или путь к диску.

Назначаем нужную букву, у меня это буква Е.
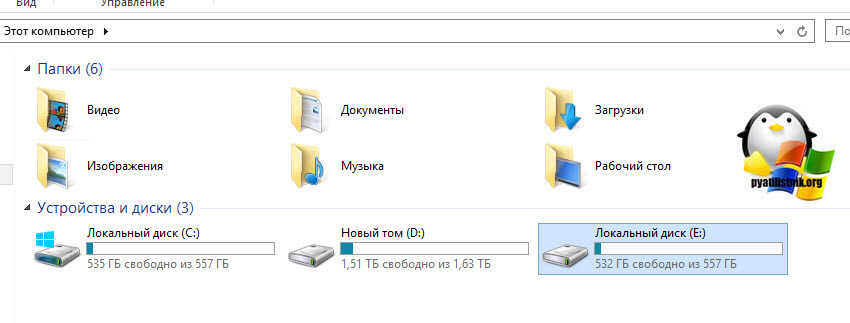
Все открываем мой компьютер и видим, новый локальный диск.
Когда закончите работу с диском, через оснастку управление дисками, от монтируйте его. Как видите виртуальные диски очень полезная вещь.
Восстановление в случае поломки операционной системы
Никто не застрахован от такого, я много раз встречал в своей практике, что система Windows Server выходила из строя, и для ее восстановления без наличия бэкапа, уходило куда больше времени, чем просто переустановка системы и дальнейшая перенастройка, примером может быть служить ошибка an error occurred while attempting to read the boot configuration data. Поэтому пару раз, когда вы обожжетесь, вы поймете, что система архивации данных windows server 2012 r2 шикарная вещь, позволяющая в считанные минуты сделать резервное копирование windows server и в нужный момент восстановиться из него.
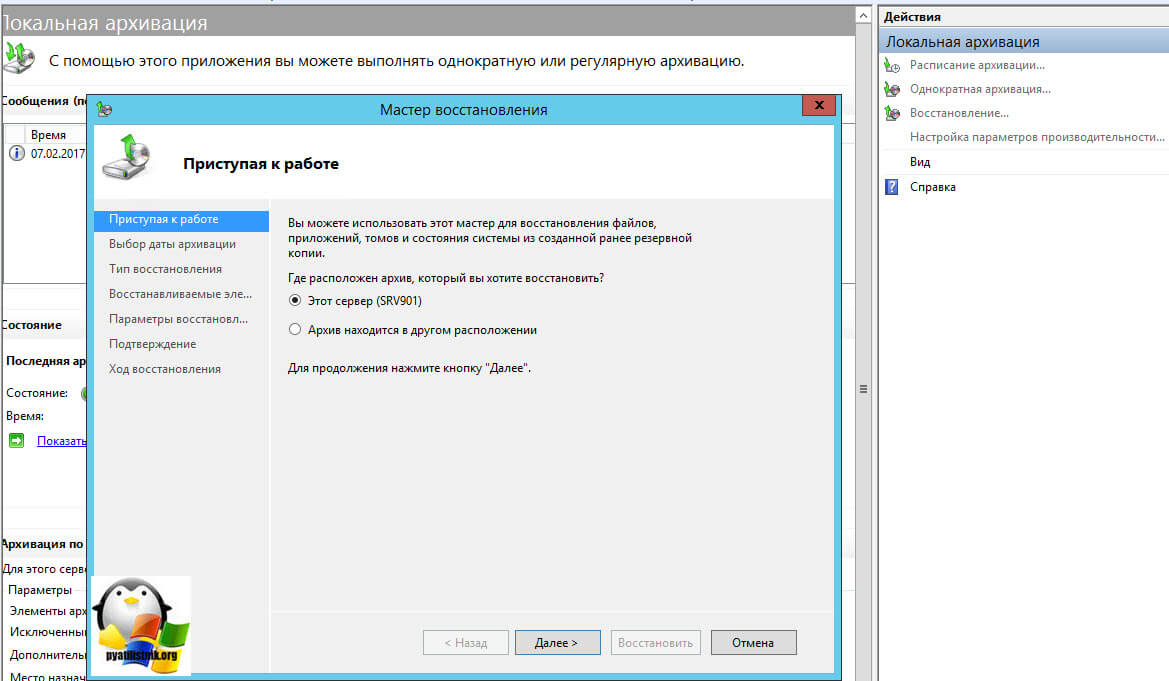
Заходим в систему архивации windows server и в правом углу выбираем пункт Восстановление. У вас на выбор будет два пункта:
- Этот сервер > имеется ввиду, что бэкап лежит локально
- Архив находится в другом расположении.
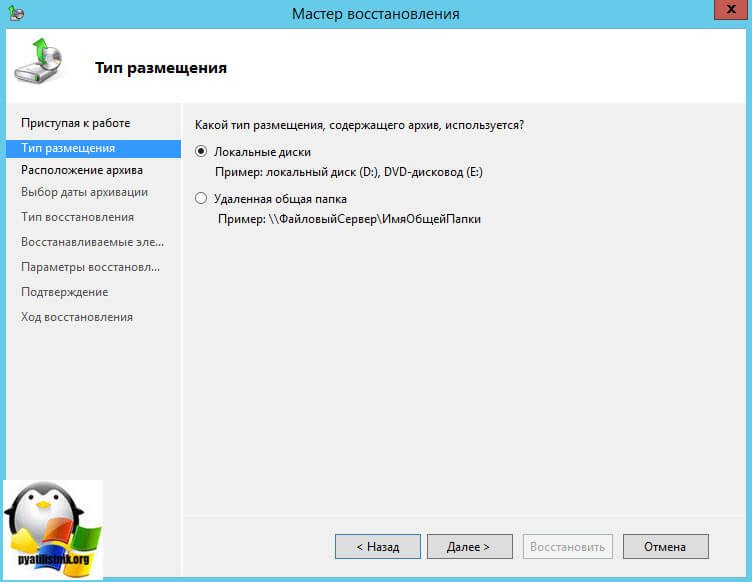
Для начала давайте выберем второй пункт «Архив находится в другом расположении»
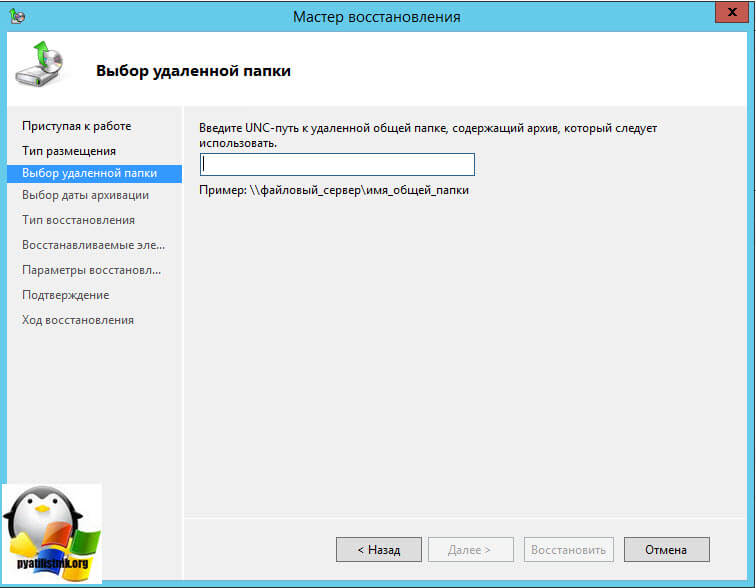
Тут два варианта, либо вы подсовываете cd-rom или внешний диск, либо указываете UNC путь в формате \\папка
Главное, чтобы у системы были права на ее чтение.
Если в начале выбрать пункт Этот сервер, то у вас покажется список доступных резервных копий Windows Server, вам лишь нужно выбрать дату отката.
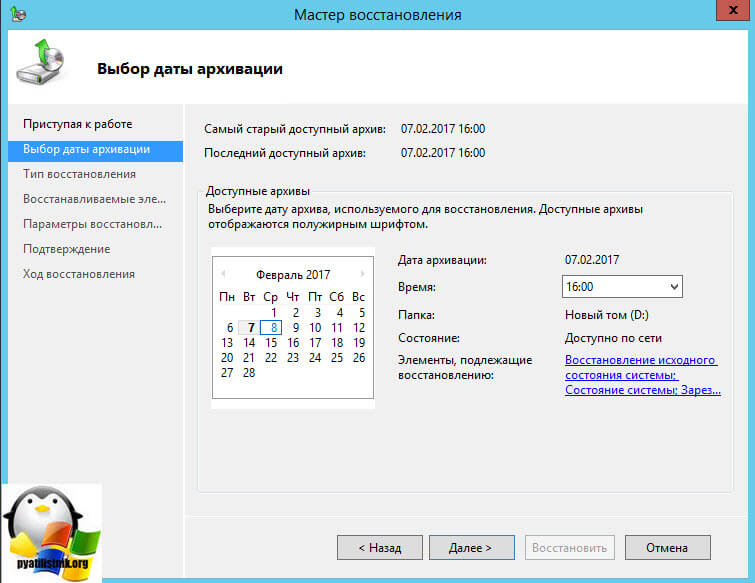
Далее мастер восстановления Windows Server 2012 r2 даст вам вот такой выбор:
- Файлы и папки
- Hyper-V
- Тома
- Приложения
- Состояние системы
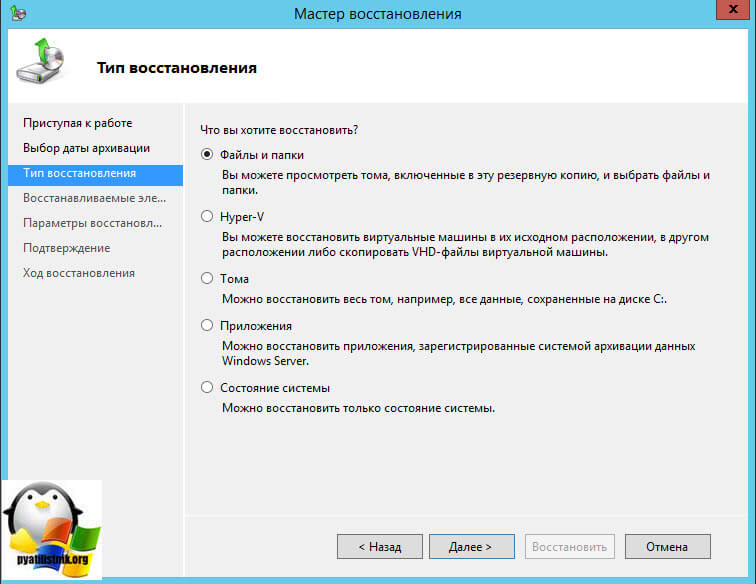
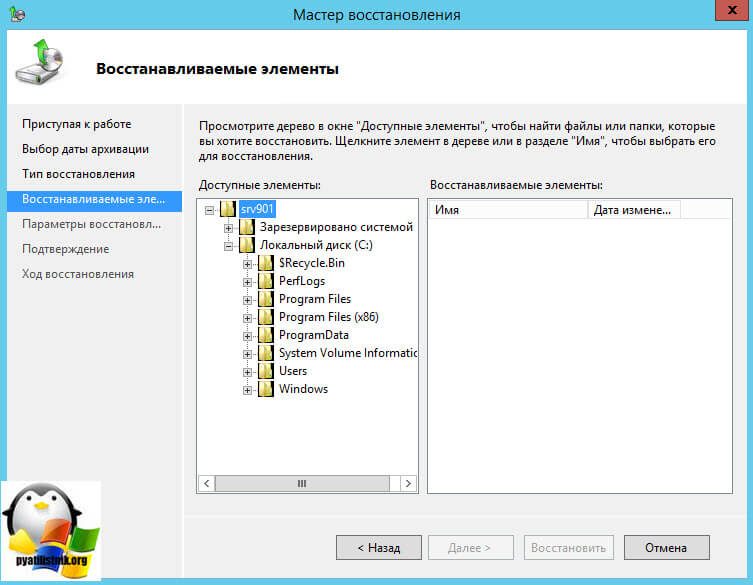
Выбрав первый вариант «Файлы и папки» вы можете восстановить отдельные файлы или папки из бэкапа.
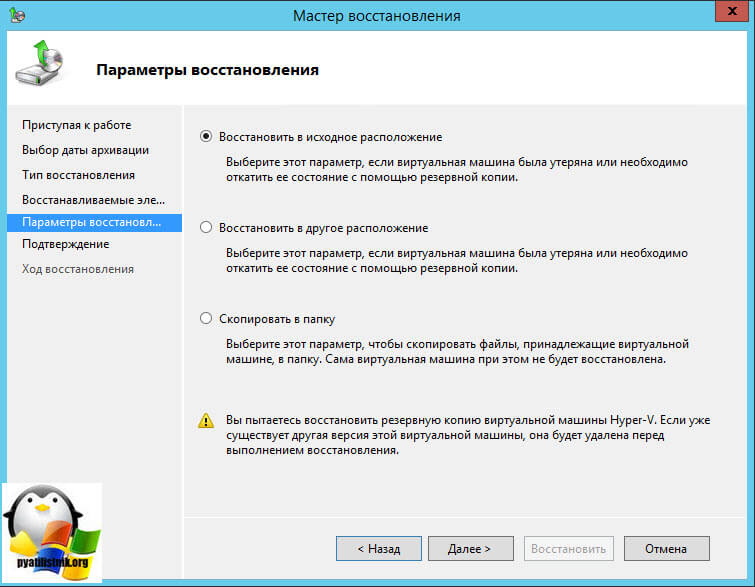
Если выбрать Hyper-V, то вам предложат:
- Восстановить в исходное расположение > по сути это перезапись
- Восстановить в другое расположение
- Скопировать в папку
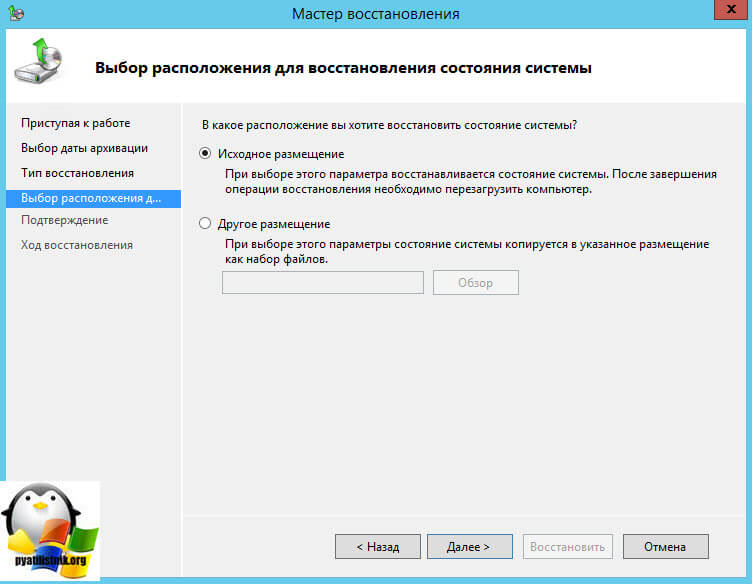
Пункт приложения, немного специфичный, так как он работает не для всех приложений, а для тех, кто умеет работать с API службы архивации и поддерживать VSS. Ну и восстановление системы:
- Исходное размещение > будет откат на то состояние, которое было в момент резервного копирования Windows Server
- Другое размещение > по сути создастся папка с набором файлов.

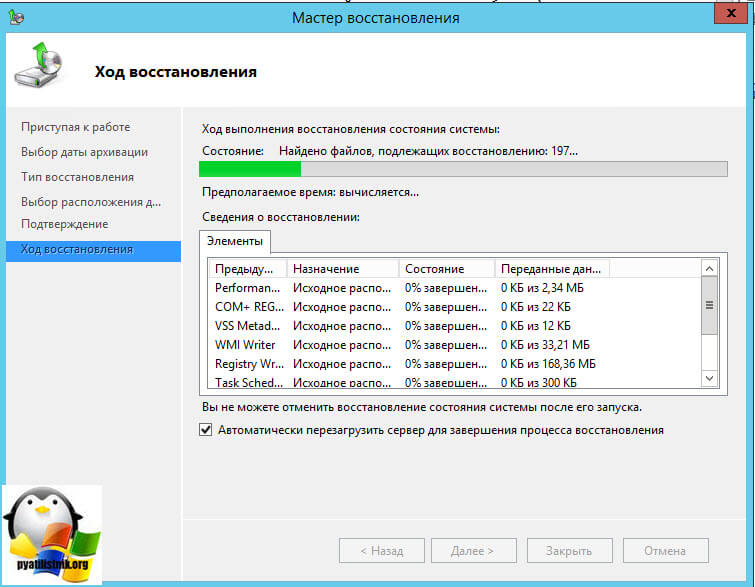
Будет подсчитано, сколько файлов подлежат восстановлению и начнется сам процесс.
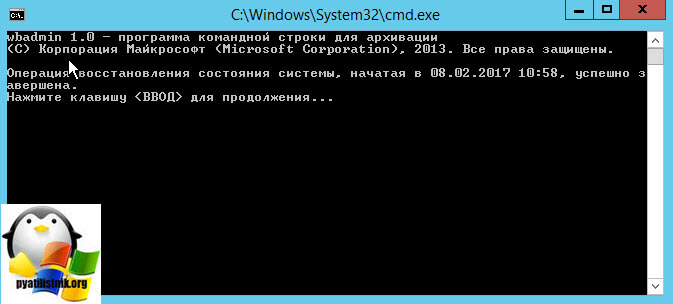
После перезагрузки вы увидите сообщение:
Альтернативой восстановления состояния системы может служить восстановление на уровне тома, при этом все данные будут уничтожены и том будет приведен в состояние, в котором он находился на указанную дату. Это может оказаться полезным в случае вирусного инцидента, когда вы хотите быть уверенным, что в системе не осталось закладок вредоносного ПО, а также в случаях, когда исходный том был поврежден. Вообще сам инструмент очень хороший и не уступает конкурентам, тот же Acronis, так что используйте и упрощайте себе жизнь.

Hyper-V is a hypervisor developed by Microsoft that is used to create a virtual environment. This software helps to run and manage different operating systems on a single physical server. It does not just virtualize the operating system but the whole physical servers components like hard disk and memory. It works just like Virtualbox and VMware. A virtual Machine (VM) is an image of a physical system. It is like an actual physical system and can quickly be set up to run programs and deploy applications. This VM can come in different operating systems which can be Windows, Linux, Ubuntu etc. Kindly refer to some of these related guides: Hyper-V Server Core Mode: How to install free Hyper-V Server on a VMware Workstation, and how to delete Virtual Switches from Hyper-V. In this article, you will learn how to perform Windows Server backup with Nakivo or Windows Server backup utility.
Spinning Up Windows Server ISO Image
1: Open Hyper-V manager and on the Actions section click on New and select Virtual Machine. Follow through with the wizard.
Here are some guides that may also interest you. Why does the legacy PXE not does work on Generation 2 VM, how to create a HyperV checkpoint, and how to set up a VM via PXE boot on a Generation 1 VM, how to install and Configure Hyper-V on Windows Server on Windows Server 2019, and 2022 via the Server Manager, PowerShell or DISM, and how to install and configure Hyper-V Cluster On Windows Server via PowerShell and Server Manager

2. Specify the name of the Virtual Machine and select where you want the location of the VM whether default or changing it to your preferred location.

3. Specify the generation you want to configure whether Generation 1 that supports both 32-bit and 64-bit operating system and also support previous versions of Hyper-V or Generation 2 that only support 64-bit operating system and newer versions of Hyper-V.

4. Specify the size of memory you want for the virtual machine. The default memory is usually 1024MB, it is recommended to have enough memory for an improved VM performance. You can either set up a static memory or dynamic memory for the VM.

Configure the VM Network
5. You can go to the Virtual Switch Manager to create a virtual switch and you link your system network adapter to it.

After creating the Virtual switch then you can select it from the connection drop down

6. Connect your Virtual Hard Disk. You can either create a virtual hard disk, Use an existing virtual hard disk or Attach a virtual hard disk later.
In our case, we will be adding ISO Image at the installations option. So we will be creating a virtual hard disk first.

7. At the installation options select the image file (.iso) that you want to attach.

8. At the summary page you get to see the details of the VM you are configuring. Now click finish.

9. Finally, our VM has been created and it is now time to start it and install the ISO image (Windows Server 2016 Datacenter). Right-click the VM and start.

10. Follow through with the OS installation wizard.

Congratulations!!! The Windows Server 2016 Datacenter is up and running after being spun up from an ISO Image.

Follow through now as we will be backing up Hyper-V Windows Server VM.
1: Now go to Hyper-V Manager and confirm where the Window Server VM files is located by right-clicking on the VM and selecting settings

2. Under Hardware click on Hard Drive and by your right you can confirm where the VM files that you want to backup is located.

Select Windows Server Backup
3. Now on the Server Manager at the top right click on Tools and select Windows Server Backup

4. When you click the Windows Server Backup you will notice that no backup is already set up. You may also have noticed that Windows Server Backup is not installed on the computer and you will need to install it from Server Manager by selecting “Add roles and features” and follow through with the wizard and select Windows Server Backup features for installation. After installation, you will see the below image.

5. Click on Backup Schedule at the top right and follow the wizard.

6. Even though Full server backup is recommended but for this guide, we are selecting Custom. This will allow us to select exact things we want to backup. Remember we are doing backup for VM’s. Expand the Hyper-V box and select the VM you want to backup. You know we earlier mentioned that Hyper-V is the engine that powers virtual machines.

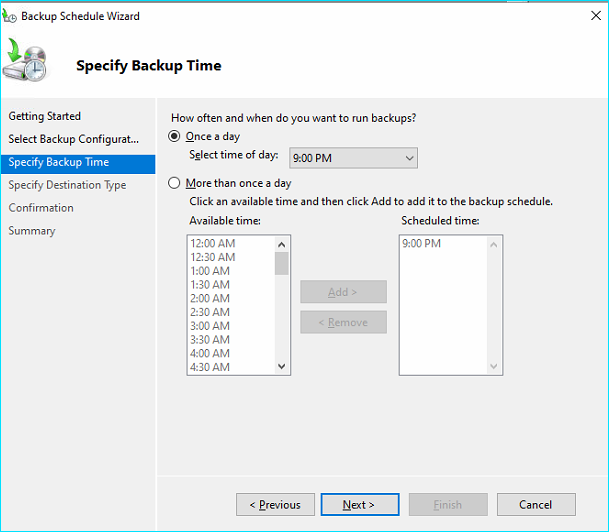
7. Specify the Backup time that is appropriate for your environment.

Specify Backup Destination
8. It is necessary you know the destination of your VM backup, in case of any disaster recovery incident. You can back up to a dedicated hard disk, to a volume or to a shared network folder. For the purpose of this guide, we will be backing up to a dedicated hard disk.

9. But note that an appropriate disk that has system files or a critical disk will not display for the backup process and also any selected disks will be reformatted and any data on it will be lost.

10. Follow the wizard to the confirmation point and you get to see the summary of the schedule. You can decide to wait for the scheduled time or you can manually run the initial backup by clicking Backup Once at the top right corner. The Backup process will take some time even though as it depends on how heavy your VM is.

11. After the backup is successful you will get the overview page below

12. In the Windows task scheduler. Under backup, you will see the Windows backup schedule you created for your VMs.
Please refer to these related guides: An error occurred while attempting to connect to the server: Check if the virtual machine management is running, “how to Enable HyperV on Windows: How to install Windows 11 on HyperV“, how to back up an Azure VM from the VM settings, and How to enable Hyper-V on a VMware Workstation.

If you do not want to use Windows Server Backup, another Backup software you can use is NAKIVO.
Backup your Hyper-V VM with Nakivo
Download a free edition of NAKIVO Backup & Replication from the following link.
Kindly refer to these interesting articles: Map a Network Drive: How to mount a Network Drive, how to add or remove email addresses from a mailbox, how to increase Email Size Limits for your High Profile Users in Exchange 2010, and how to update Cisco ASA software from Cisco Website.

Create the Microsoft Hyper-V backup job
13. After downloading and installing NAKIVO, create a Microsoft Hyper-V backup job by clicking Create on the Dashboard and then clicking Microsoft Hyper-V backup job from the drop-down list.
Then the New Backup Job Wizard for Microsoft Hyper-V opens.

14. The next page which is the New Backup Job Wizard for Microsoft Hyper-V is where the Hyper-V VMs that you want to back up (Source) are located.
Also in the (Destination), you will need to select where you want the backup to be, select the checkboxes of the desired destination and click Next.

15. You can also set different backup repositories for your VM’s

16. If you decide to run the backup job manually, you will select the Do not schedule, run on demand checkbox on the Schedule page.

17. Next you need to configure the Job Schedule. Make use of the Schedule drop-down list. In the drop-down list, you will find the Run daily/weekly, Run monthly/yearly, Run periodically, and Run after another job. Considering your environment, you can select the kind of job schedule that fits you.

You are the one to make the decision on the kind of backup system you want to configure between the Windows Server Backup and Nakivo.
I hope you found this blog post on how to perform Windows Server backup with Nakivo or Windows Server backup utility very interesting and helpful. In case you have any questions do not hesitate to ask in the comment section.