How to Configure SSTP VPN on Windows Server 2019
-
View Larger Image
In this blog article we are going to discuss about How to configure SSTP VPN on Windows Server 2019 using Routing and Remote Access Service server role. A VPN is short form of virtual private network, which gives us a privacy, anonymity and security over public internet. A VPN service masks our ISP IP so your online actions are virtually untraceable. A VPN can also be used to connect computers to isolated remote computer networks that is usually inaccessible, by using the Internet or another intermediate network.
Microsoft servers provided with RRAS server roles for implementing such remote access services. The full form of RRAS is Routing and Remote Access Service. It is a suite of network services in the Windows Server family that enables a server to perform the services of a conventional router.It is also a Windows proprietary server role, that supports remote user or site to site connectivity by using virtual private network or dial-up connections. So using RRAS we can convert a regular Windows Server as VPN server. Microsoft RRAS server and VPN client supports PPTP, L2TP, IPSec, SSTP and IKEv2 based VPN connections. Using RRAS as VPN remote users can connect to their company organisation networks internally and securely over public internet.
Now what’s awesome about Secure Socket Tunnelling Protocol ( SSTP) SSL VPNs is they allow connecting client machines in to VPN server over TCP port 443. Which means SSTP protocol has some mechanism to tunnelling VPN PPP traffic over HTTPS protocol. The TCP port 443 is a commonly used port which is often enabled on firewalls of client ISPs. So by using SSTP VPN we have extra SSL/TLS security over VPN traffic.
System Configuration We Used.
Used Windows server 2019 which is covert as a VPN SSTP server.
Used Windows 10 client PC for connecting to Windows VPN server 2019.
Another thing is we are settings up this SSTP VPN on windows server 2019 which only have one Network interface. So this blog article can be implemented on Most of VPS ( Virtual Private Server) provided by Hosting Providers or with the Cloud Windows VMs.
Additionally, SSTP VPN setup needed SSL certificate. In this testing we are using self signed certificate generated for VPS host-name. We can also use Let’s Encrypt SSL certificate or SSL certificate purchased for our Server Domain name through SSL vendors.
Here I have divided the whole steps in to different parts. Lets get started. Even though we are performing the install on Windows server 2019, you can refer this article for Windows server 2016 and windows server 2012.
Part:1 Install Remote Access Server role on Windows Server 2019
Log into the Windows Server 2019 > Click Windows Start Icon >> Click Server Manager.
Click Add Roles And Features
Click Next
Choose the Installation Type as ” Role based or feature based installation and click Next.
From Server selection, choose “select a server from the server pool” and click Next.
From Server Role choose ” Remote Access” and click Next.
Leave Features section as it is and click Next.
Click Next on Remote Access section.
Under Role Services choose “Direct Access and VPN (RAS) and Routing and click Next. A popup window will appear for confirming the features that need to be installed for Direct Access and VPN. Confirm it by clicking “Add Features”.
Under Web Server Role (IIS) Section click Next.
Under IIS Role services section leave the default one and Click Next.
Under Final Confirmation section click Install.
The Remote Access server role install will start automatically and normally it will get completed with in few Minutes. Once the installation succeeded click close.
Part:2 Create Additional Loopback Network Adaptor On Windows Server 2019
Its for skipping the error while running Configuring Remote Access Wizard and the error will be like below.
Less than two network interfaces were detected on this machine. For standard VPN server configuration at least two network interfaces need to be installed. Please use custom configuration path instead.
Under Server Manager click Tools >> Computer Management.
From Computer Management window Click Device Manager >> Click VM name from Right side.
Under Actions tab >> Click “Add legacy Hardware”
A add Hardware wizard will open and click Next.
Choose option ” Install the hardware that I manually select from a list ” and click Next.
Choose “Network Adaptors” and click Next.
Choose “Microsoft” as Manufacturer and ” Microsoft KM-TEST Loopback Adaptor ” as Model. Click Next.
Confirm the Install by clicking Next.
Once the install got completed close the install wizard by clicking Finish.
Now, we can confirm the new network adaptor install from the Computer Management panel itself. For that click Device Manager >> Click VM name >> Expand Network Adaptors, there we can see the newly added LoopBack Network adaptor available.
Part:3 Create a Self-signed Certificate using the IIS manager.
We are creating the self signed certificate for Server Hostname and its using for Remote Access service role. If you already have SSL certificate purchased from SSL vendor for your domain or have Lets-encrypt SSL and its imported through IIS manager, we can skip this part.
From Server Manager choose IIS > Right click the Server Name and choose ” Internet Information Services (IIS) Manager ”
Choose VM name and double click on “Server Certificates”
From Actions box choose ” create self signed certificate”
Give any name in the “specify a friendly name for the certificate ” field and Choose “personal” under select a certificate store for the new certificate section. In our case I gave the name as “vpnsslcertificate” and click ok.
Now in the IIS server certificate section, we can see our self signed certificate for hostname got generated.
Part:4 Export a self-signed certificate.
Now we need to Export this self signed certificate to a file and later need to import it on remote Windows 10 Client PC for successful SSTP VPN connection.
Click Windows Start button >> search run and open it.
Type “certlm.msc” and click ok.
In the Certificates section expand “Trusted Root Certification Authorities” >> choose Certificates >> In the right side we can see our created self signed certificate with friendly name as “vpnsslcertificate”.
Right click our self signed certificate >> Under All tasks >> Click Export.
A certificate Export wizard will open and click Next.
Choose ” Yes, export the Private key” option and click next.
Choose “Personal Information Exchange PKCS 12 (.PFX) ” and click next.
In security section, click password option and give a secure password. Click Next. By doing this we are password protecting the exported ssl certificate file.
Leave the encryption type as default one which is TrippleDES-SHA1.
In File to Export Section, click Browse and choose where we want to save the exported ssl file. I choose to save it in Desktop itself. Also give a file name for exporting file. Click Save and Click Next.
Complete the Export by clicking Finish.
We will see a Export was successful message , click Ok.
Now if we go the desktop, we will see a new file named “vpnsslcertificate ” with .pfx extension and which contains our certificate information.
Part:5 Configuring Remote Access Service and SSTP VPN.
From Server Manager Choose Remote Access >> Right click the Server name >> Choose Remote Access Management.
Under “Direct Access And VPN” Click “Run the Remote Access Setup Wizard”
The Configure remote Access wizard will open Click “Deploy VPN only”
In the Routing and Remote Access Console , right click server name and choose ” configure and Enable routing and remote access ” option.
Click Next on Routing and Remote access server setup wizard.
Choose Virtual private network( VPN) access and NAT option. Click Next.
In the select Network Interface section, choose the network adaptor where our public IP configured and click Next.
In the IP address Assigned section, choose ” from a specified range of address” and Click Next. Here we are trying to define the private IP address that server give to remote VPN click PC after successful connection.
Click New button.
Give the starting and ending private IP range in the corresponding fields. Click Ok. We are giving IPs starting from 192.168.3.150 to 192.168.3.160.
Now we will see the assigned range and click Next.
In the Do you want to setup this server to work with a radius server question section, select “No, use Routing and Remote Access to authenticate connection requests” and Click next.
Click Finish on Completing the Routing and Remote Access server setup wizard.
Click Ok.
This completes the configuration of Routing and Remote Access Server. Now we can see a green up arrow next to server hostname and which shows the Routing and Remote access server service started successfully.
Part:6 Allow Remote Access to our VPN server through Public Network Adaptor.
For maintain the access to the VPN server over remote desktop we need to allow the remote access port over our public network adaptor itself through routing and remote access properties section. Otherwise we will loss the access to the server through remote desktop because we only have one Network interface available on server for both VPN traffic and for the remote access.
In the Routing and Remote Access Manager , Expand Server name >> Expand IPv4 >> Choose NAT >> Right Click Our Public Network Adaptor and choose Properties.
Select ” Remote Access” , A pop up window will appear, in the Private Address filed give our server public IP address and click OK. After that click Apply and OK.
If you have different RDP port, you need to create a new allow rule by clicking add option.
Part:7 Allow VPN remote access for the Users.
In this part we are giving a existing user on VPN server for remote access. Then only if we give the logins of these server users to remote VPN clients, they can successfully connect to server through VPN.
Go to the Computer Management Section >> Expand Local users and Groups >> Choose Users >> Right click a user where we wish to give VPN access and choose properties.
Under “Dial- In” tab >> Choose “Allow Access”. Click Apply and Ok.
part:8 Define the SSL certificate for Routing and Remote Access service.
In this section we attach the self signed certificate we created at part Part 3 to the routing and Remote Access service, then only the remote vpn clients can communicate over SSTP.
In Routing and Remote Access Manager >> right click Server name and choose Properties.
Under Security Tab , choose our self signed certificate and click OK.
Confirm the restart of routing and remote access service by clicking Yes.
Part:9 Allow VPN ports on Windows Firewall.
In this part we are allowing the ports used by the VPN server for communication on windows firewall. Otherwise the remote VPN clients won’t be able to communicate with the VPN server.
Now issue below power shell commands to allow ports in windows firewall.
Now if we look at the windows firewall inbound section , we can see the ports are allowed.
This Completes the SSTP VPN server setup on Windows server 2019. Now Lets Proceed with the Remote VPN Client Windows 10 PC setup and Try to Establish a VPN server connection.
Step:10 Import a self-signed certificate on Windows 10 PC.
First Download the Exported self signed certificate file at Part 4 from the server into Windows 10 remote PC. For that you can use any download options like, use ftp service or attach the SSL export file to your email and download it from your client PC etc.
Once successfully Downloaded, Double click the exported SSL certificate file. In our case its vpnsslcertificate.pfx file from Windows 10.
Double click the ssl export pfx file.
In the Certificate Import Wizard choose “Local machine ” and click next.
Confirm the file name by clicking Next.
Give password of importing file and click next. Its the same password we give at the part 4
Choose “Please all certificates in the following store” and click Browse. Select the certificate store as ” Trusted root certification authorities ” . Click Ok.
Confirm the store by clicking Next.
Complete the certificate import by clicking finish.
We will get the message as import successful.
Step:11 Test SSTP VPN configuration.
In our case the server hostname is VPNSERVER2019 which is a dummy server name and doesn’t have any proper DNS A records. So before try to connect to VPN server, we define a DNS host entry in the Windows 10 hosts file C:\Windows\System32\drivers\etc\hosts
For that open notepad as administrator. Search notepad in windows search and click run as administrator.
Go to folder location C:\Windows\System32\drivers\etc and Choose Show all files. It will list file named hosts. Select it and Click Open.
Add entry like in the screenshot and save it.
Now, lets add VPN connection. For that open Network and Internet settings.
Under VPN >> Click Add a VPN connection.
Choose VPN Provider as Windows built in
In Connection Name field , give any Name
In Server name or Address field give Our server Hostname
Select VPN type as secure socket Tunnelling Protocol (SSTP)
Type of sign in info as Username and Password
Gave our VPN username and password. Click Save.
Click connect for our saved VPN client settings.
Now we will see the VPN status as connected.
Two other ways to confirm the VPN connection is successful is go back to VPN server 2019 and Open Routing and Remote Access Manager >> From there Expand our server name >> Choose Remote Access client, and in the right side we can see a active connection.
Another option to confirm the successful VPN connection is , open a browser in Windows 10 PC and search the what is my IP and it will show the public ISP IP as VPN server IP. Which means all the internet traffic from client side is routing through our VPN server.
This Concludes the settings up SSTP VPN on Windows server 2019. I hope this blog article is informative. Leave your thoughts in the comment box.
Share This Story, Choose Your Platform!
Related Posts
2 Comments
-
Mehdi
November 8, 2022 at 12:37 am — ReplyIt is a great tutorial I’ve found for setting up a sstp vpn on windows server. Thank you so much.
Is there any way to use this vpn on android phone? -
RAUL
April 11, 2023 at 5:24 pm — ReplyHi, thanks for this nice post. I’ve configured RRAS but it doesn’t work for me. On client i’ve installed certificate and receive the message “A certificate chain processed, but terminated in a root certificate which is not trusted by the trust provider”,
Page load link
Go to Top
I had already created an L2TP VPN server in Windows Server 2016 which worked great with my IOS devices but I found did not work so well with Windows 10. Therefore I created an SSTP VPN Server to access my devices via my home broadband connection (Sky Fibre). I found that this works perfectly with all my Windows 10 machines. The main difference between L2TP and SSTP is that for SSTP we need to use certificates. We will cover everything you need to get this up and running below.
Firstly build a Windows 2016 server, VM or physical it doesn’t really matter. I used a VM as I can spin it up/down and snapshot as needed. For notes on installing Windows 2016 Server please see here.
You then need to setup a Certificate Authority (Can be on the same server). Please follow this guide for step by step instructions on setting up a CA to use with your SSTP VPN.
You then need to install the Remote Access role. To do this open Server Manager and start the Add Roles and Features wizard. Select the Remote Access Role and click Next.
Click Next again
Click Next again
Click Add Features and click Next
Click Next
Accept the Web Server Role service selections and click Next
Click Install
Wait for the installation to finish
Once the role has installed click the Open he Getting Started Wizard option from the server manager
Select Deploy VPN Only
You now have access to the Routing and Remote Access console
Right click on your server name and select Configure and Enable Routing and Remote Access
Click Next
If you only have one network interface select Custom configuration and click Next
Select VPN Access and click Next

Click Finish
Click Start service
Wait for the service to start
Right click on your server name and click Properties. Leave the general tab as it is and click on Security
Ensure that you only have EAP and MS-CHAP v2 selected
We now need to issue a certificate to the VPN server to enable it to trust incoming SSTP connections. To do this (on the VPN server) click Start>Type certlm.msc to open the local machine certificate mmc.
Right click on Certificates under Personal and click All Tasks>Advanced Operations>Create Custom Request
Click Next and Next again
Accept the defaults and click Next
Expand Details> Click Properties and enter the Friendly name as the VPN server’s external DNS name. If you do not have one you can setup DuckDNS which is a free service as i did. Then click the Subject tab
Add both the Common Name and DNS names as the VPN server’s external DNS name. Then click the Extensions tab
Expand Extended Key Usage and add Client Authentication and Server Authentication, then click Ok and Next
Choose somewhere to save the certificate request and click Finish
Open the Certificate Authority mmc and right click on the server name. Then go to All Tasks> Submit new request. Open the request file that you just saved.
Click Pending Requests and you should see your certificate request in there. Right click on it and click Issue
You can now go to issued certificates and double click on your issued certificate. Click on the details tab and then click Copy to File
Accept the defaults and click Next. Then save the certificate and click Finish
Open the certlm.msc snap-in again and right click on Certificates under personal. Click import and import the certificate you just exported from the Certificate Authority console
Then go back to the Routing and Remote Access console properties and click the security tab. Under SSL Certificate Binding select the certificate that you just created
Click the IPv4 tab and select Static address pool. Enter a range of addresses to use for DHCP when on the VPN.
Select the Logging tab and check the Log additional Routing and Remote Access information box
Click OK and you will be prompted to restart the Routing and Remote Access Service, do this now.
Next we need to create a secure user account to access the VPN. Click Start>Run and type compmgmt.msc to access computer management. Right click on Users and click New User. Give the user a name and a strong password.
Right click on the user account and click Properties. Click the Dial-in tab and select Allow access, then click OK. If you want to use NPS to control access at this point select Control access through NPS Network Policy.
As I do not have a fixed external IP address for this server and am sitting behind a NAT firewall (Provided by my broadband supplier Sky – which I can’t change) I will need to forward ports from my router to the RRAS VPN server. To do this you will need to set up something like the below:
If you are forwarding all port 443 traffic to this server you may want to restrict access to IIS. You can do this by opening IIS Manager and selecting the default website. You can then click on IP Address and Domain Restrictions.
You can then add a Deny rule. I added 0.0.0.0 (0.0.0.0) as I wanted to restrict all access to IIS.
Next, export the root certificate from your certificate authority by opening the CA console, right clicking on the server name and going to Properties. Click the General tab and View Certificate. Then click details and export the certificate to a file.
Import this to Windows 10 machine in the certlm.msc snap-in but add it to Certifiates under Trusted Root Certification Authorities.
Next you need to create a certificate request on your Windows 10 machine.
To do this (on the Windows 10 client) click Start>Type certlm.msc to open the local machine certificate mmc.
Right click on Certificates under Personal and click All Tasks>Advanced Operations>Create Custom Request
Click Next and Next again
Accept the defaults and click Next
Expand Details> Click Properties and enter the Friendly name as the Windows 10 machine’s name. Then click the Subject tab
Add both the Common Name and DNS names as the VPN server’s external DNS name. Then click the Extensions tab
Expand Extended Key Usage and add Client Authentication then click Ok and Next
Choose somewhere to save the certificate request and click Finish
Open the Certificate Authority mmc and right click on the server name. Then go to All Tasks> Submit new request. Open the request file that you just saved.
Click Pending Requests and you should see your certificate request in there. Right click on it and click Issue
You can now go to issued certificates and double click on your issued certificate. Click on the details tab and then click Copy to File
Accept the defaults and click Next. Then save the certificate and click Finish
Open the certlm.msc snap-in again on the Windows 10 client and right click on Certificates under personal. Click import and import the certificate you just exported from the Certificate Authority console
In Windows 10 click Settings> Network & Internet> VPN and click add a VPN connection. Select Windows (built-in) as the VPN provider and give the connection a name of your choosing. Enter the external DNS name of your VPN server and choose the VPN type as SSTP.
You can then enter the credentials of the VPN user account that we created earlier, then save the connection.
Next open the regedit and go to the below key:
HKEY_LOCAL_MACHINE\System\CurrentControlSet\Services\Sstpsvc\Parameters
Add a DWORD called NoCertRevocationCheck and set it to a value of 1
It should now connect without any issues.
In this post, we will learn the steps to configure SSTP VPN on Windows Server 2019 using a Self-signed certificate.
Secure Socket Tunneling Protocol (SSTP):
Secure Socket Tunneling Protocol (SSTP) is a tunneling protocol developed by Microsoft. SSTP uses a TCP connection (port 443) for tunnel management.
SSTP provides a mechanism to encapsulate PPP traffic over the SSL channel of the HTTPS protocol. The use of PPP allows support for strong authentication methods such as EAP-TLS. SSL or TLS provides transport-level security with enhanced key negotiation, encryption, and integrity checking.
Note: You should use a certificate from public CA in the production environment. As we are just testing the SSTP configuration, so we will use a self-signed certificate in this guide.
Understanding the SSTP Test Lab:
- WS2K19-DC01: Domain Controller and DNS.
- WS2K19-VPN01: Member Server.
- WS10-CLI01: Windows 10 Client Machine.
Step:1 Install Remote Access Server role on Windows Server 2019:
1. The first step is the installation of the Remote Access Server role. Open Server Manager Console and start role and feature installation wizard. Select the Remote Access Server role.
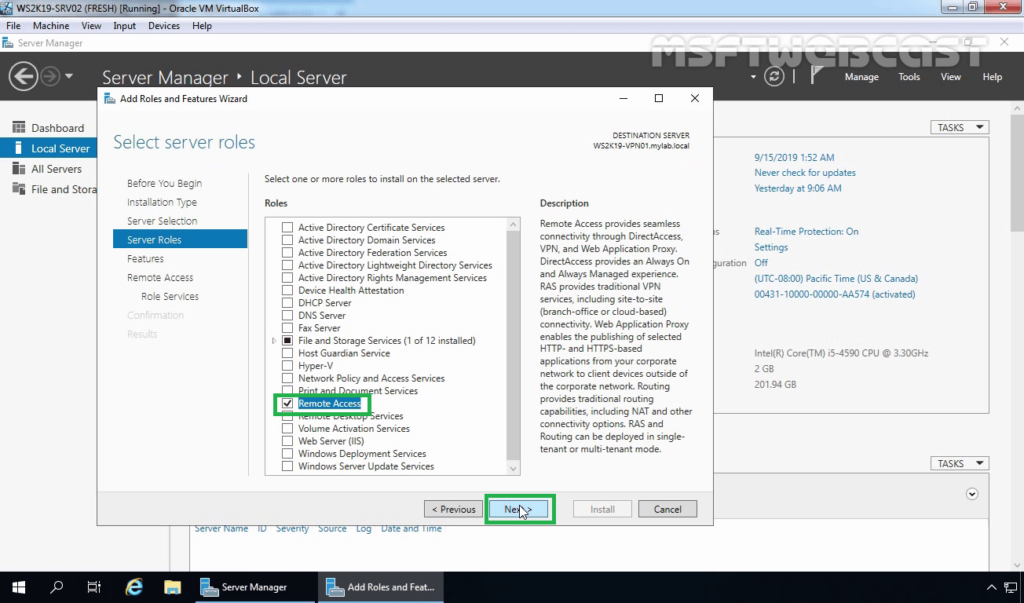
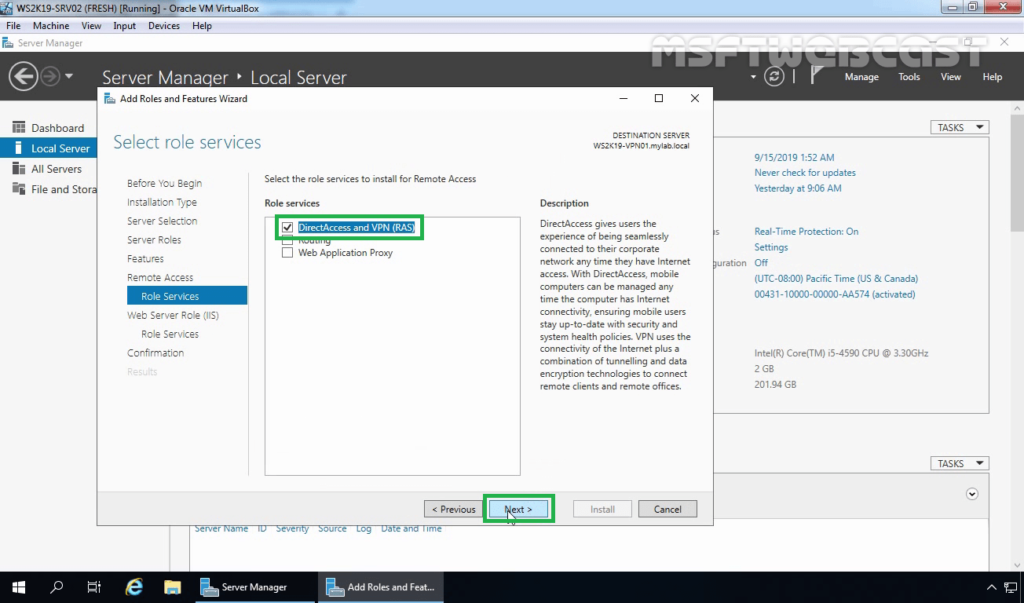
2. On select role services, select DirectAccess and VPN (RAS) role service. Click Next and finish the installation.
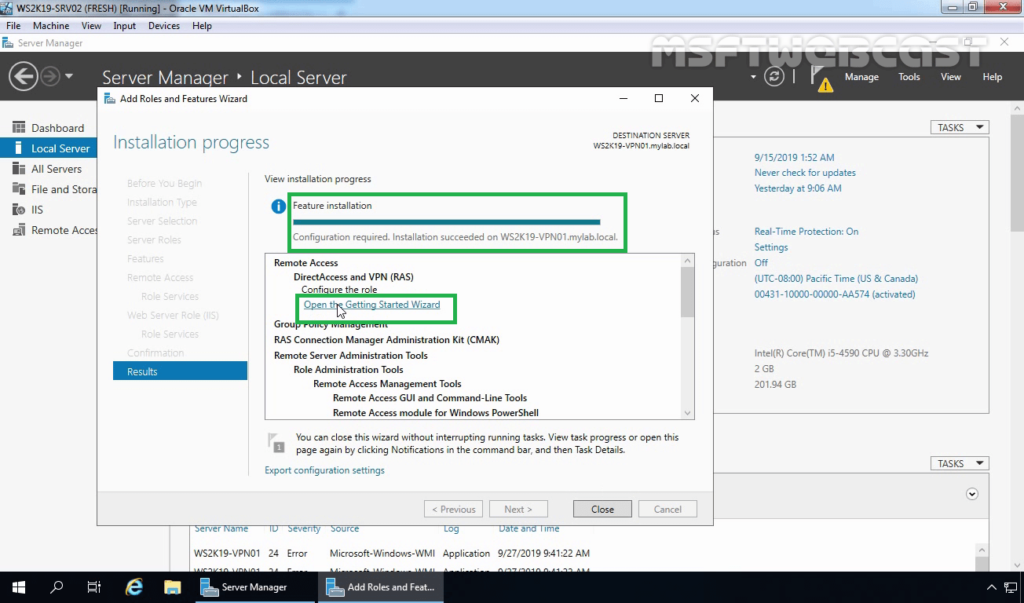
3. When the installation finished, click on Open the Getting Started Wizard. Leave the console open, and move to the next step to create a self-signed certificate.
Step:2 Create a Self-signed Certificate using the IIS manager.
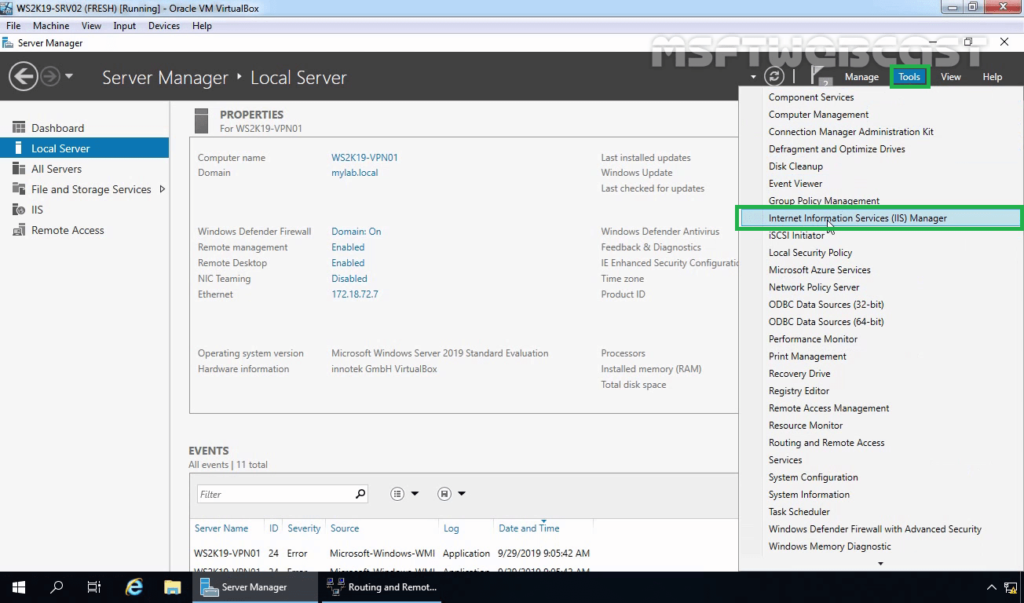
4. On the member server, open the Server Manager console. Click on Tools and select Internet Information Services (IIS) Manager.
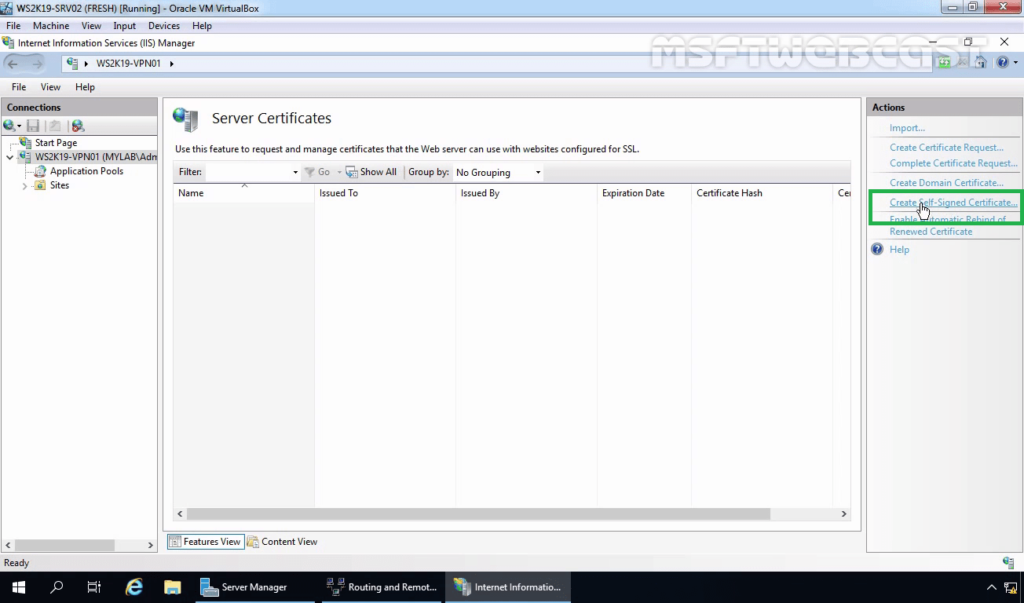
5. Click on the server name (WS2K19-VPN01) in the connections column on the left and double-click on Server Certificates.

6. Click on Create Self-Signed Certificate in the Actions column on the right.
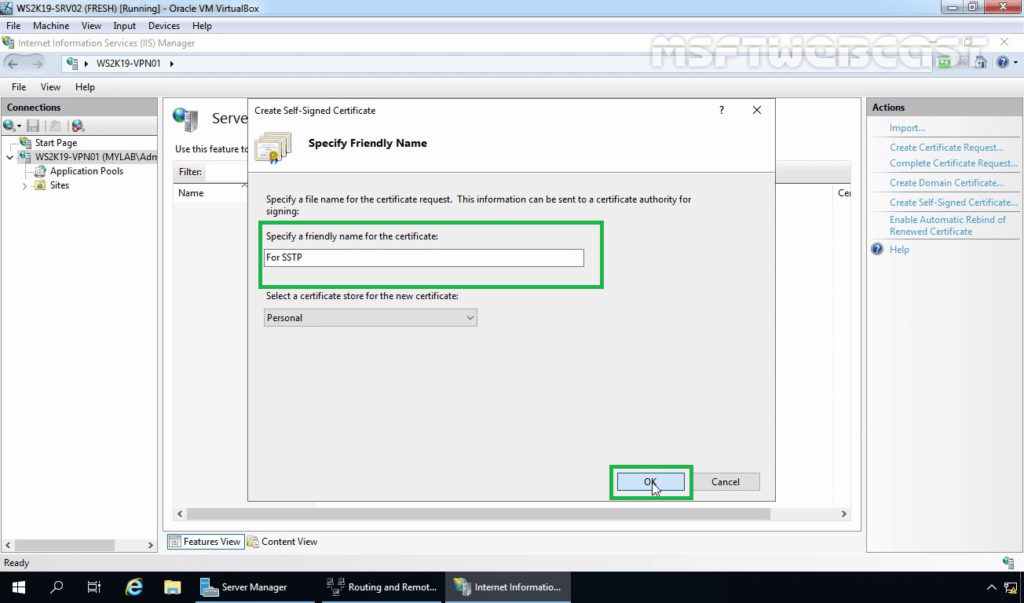
7. Enter the friendly name you wish to use to identify the self-signed certificate, and then click OK to complete the process.
8. You now have an IIS Self Signed Certificate listed under Server Certificates. Double-click on Certificate. The validity of the Self Signed Certificate is one year.
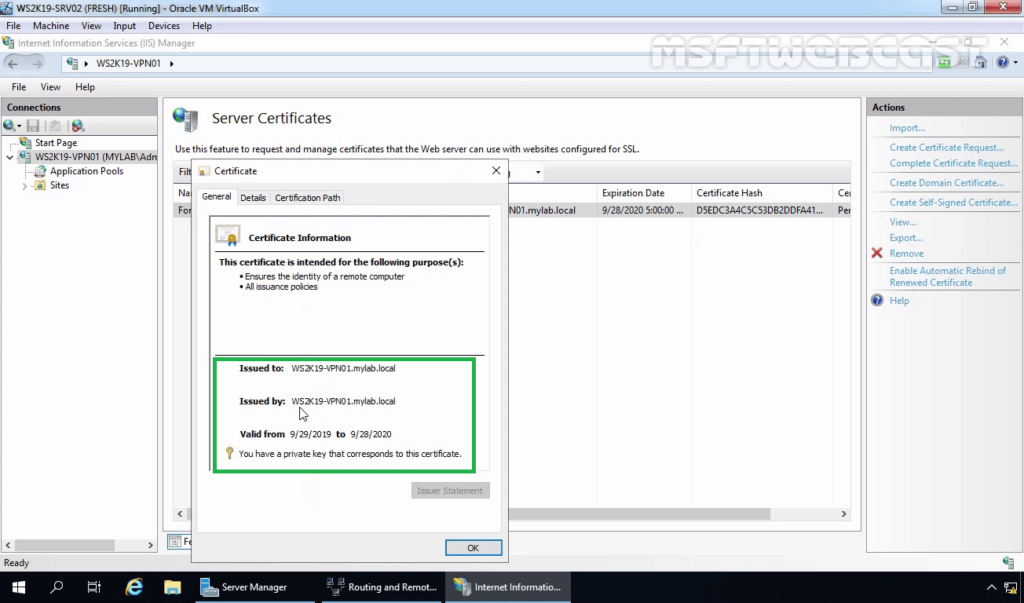
Step:3 Export a self-signed certificate:
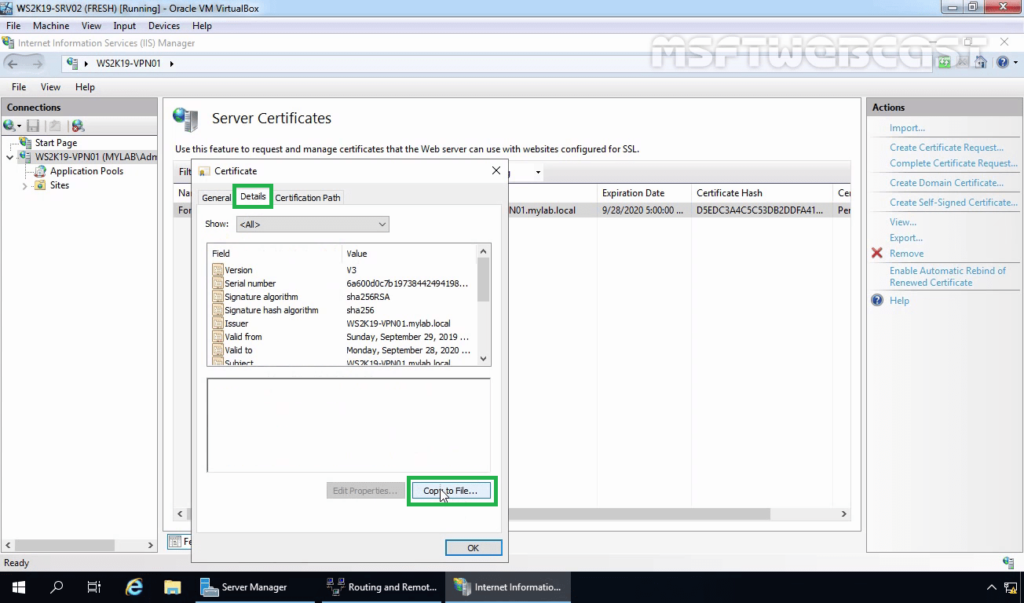
9. Click on the Details tab. Click on Copy to File.
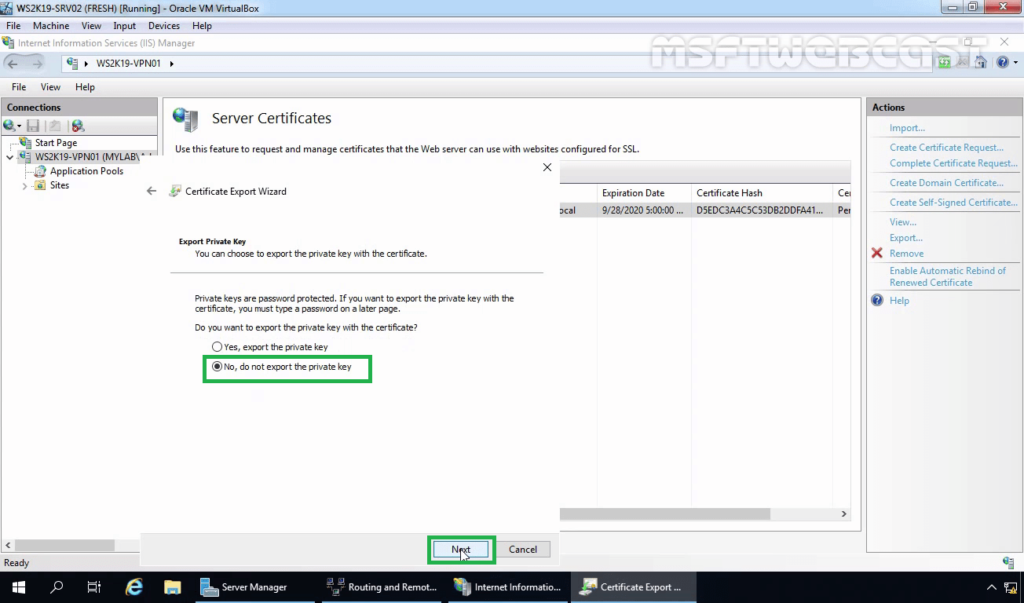
10. Select No, do not export the private key. Click Next.
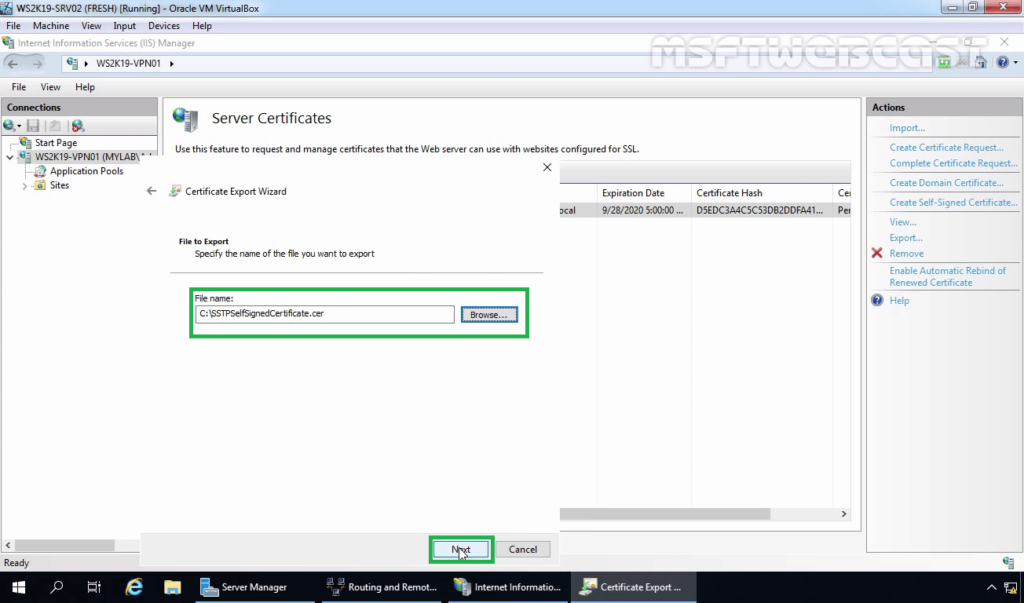
11. Specify the location to save the file. Click Next.
12. Click on Finish. Click on OK on the confirmation message console.
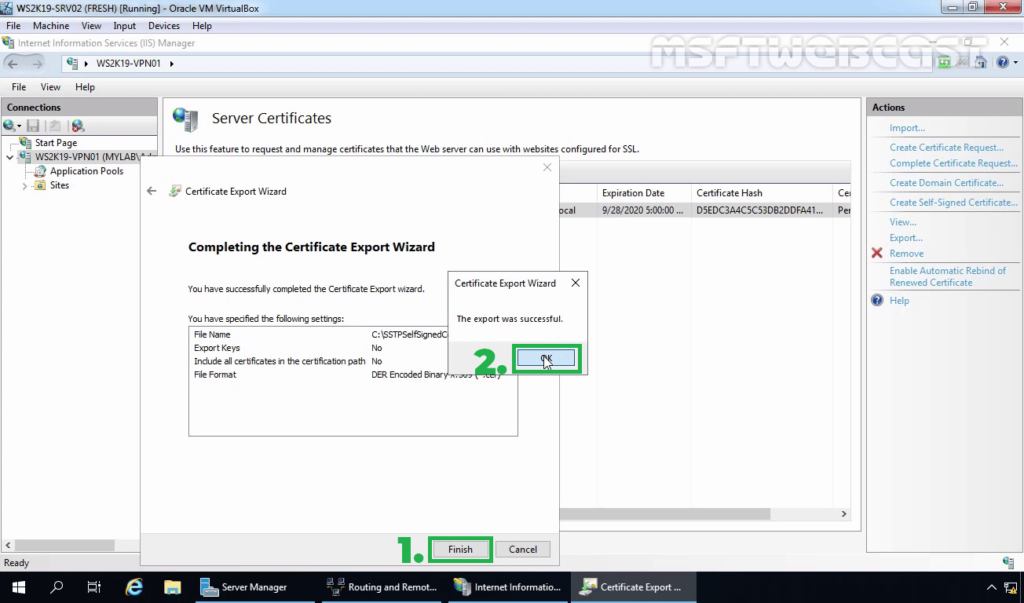
Note: You need to copy this .cer certificate file to Windows 10 machine. The simple way to do this is by sending this .cer file using an email.
Step:4 Configuring Remote Access Service and SSTP VPN:
13. On configure Remote Access page, click on Deploy VPN only.
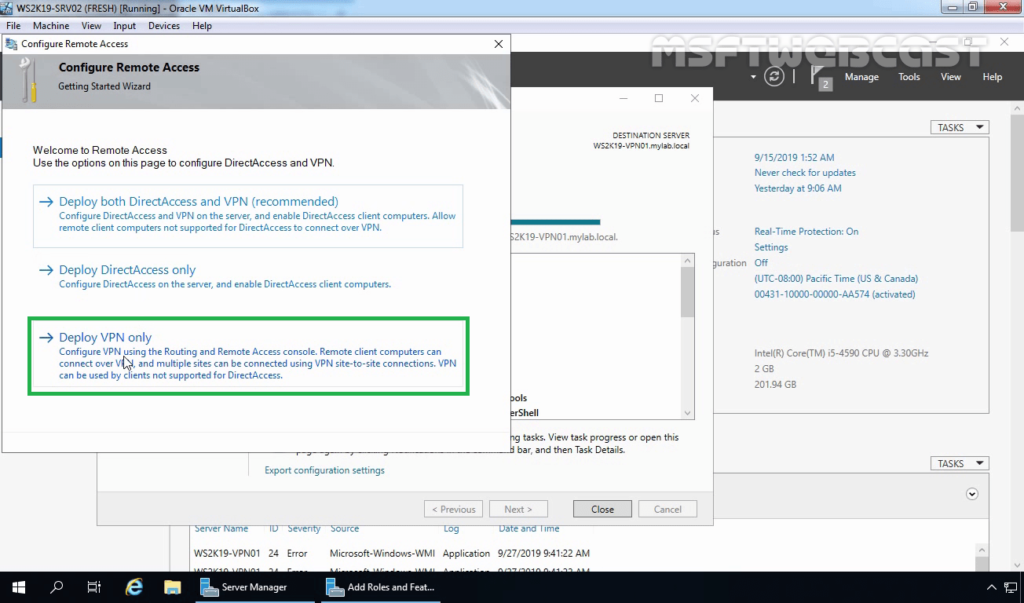
14. That will open the Routing and Remote Access Management Console. You can also open the management console from the Tools menu.
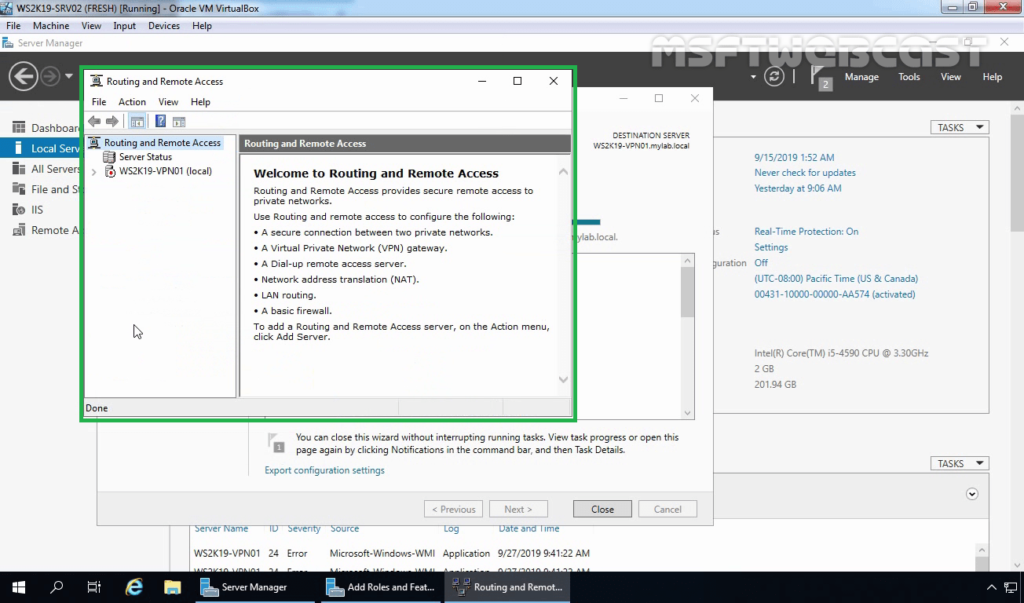
15. Right-click on the Server name and select Configure and Enable Routing and Remote Access.

16. On Welcome screen, click Next.
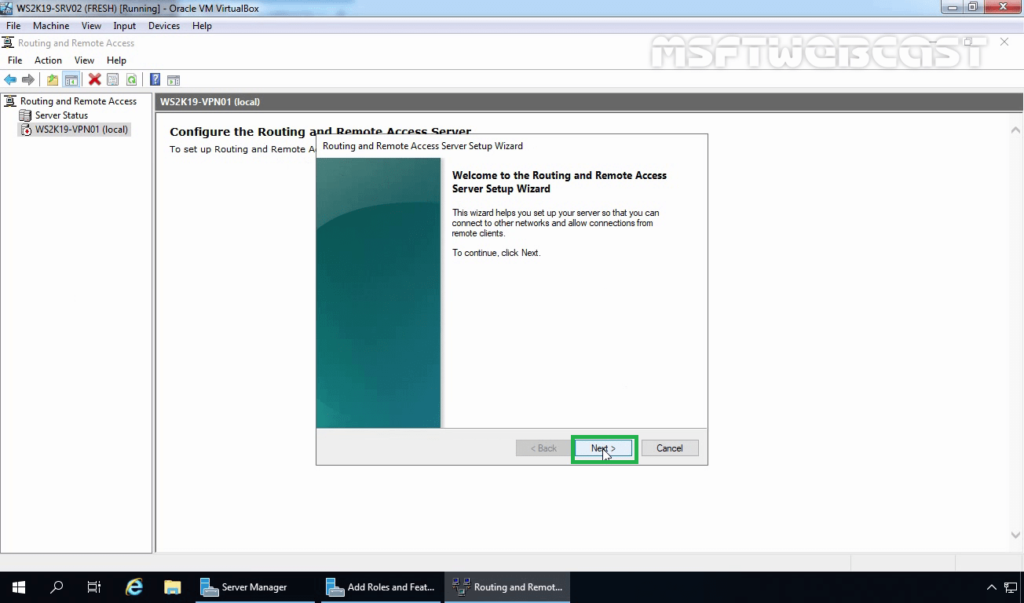
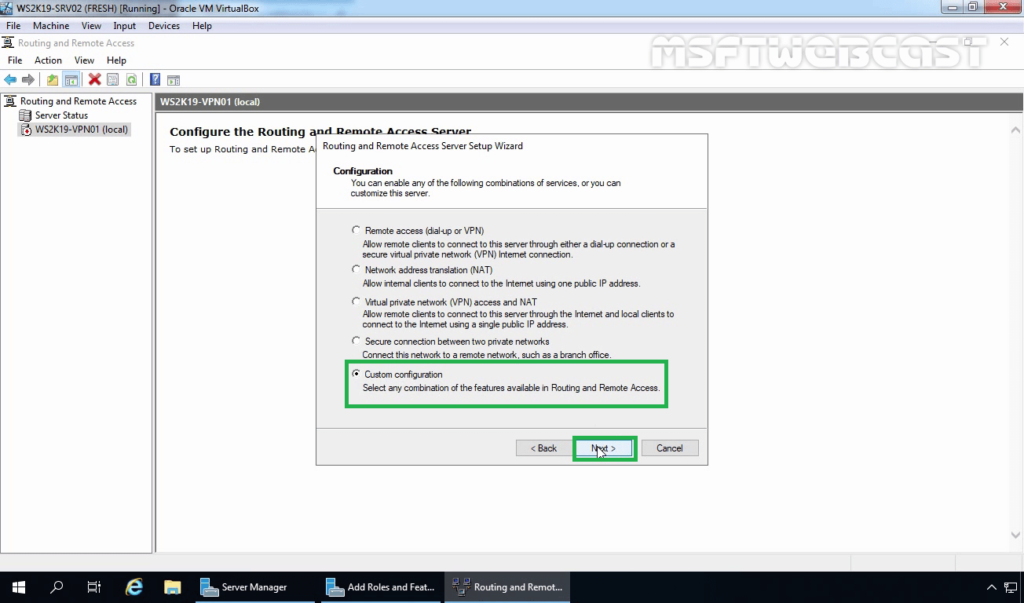
17. On the Configuration page, select the Custom configuration radio button. Click Next.
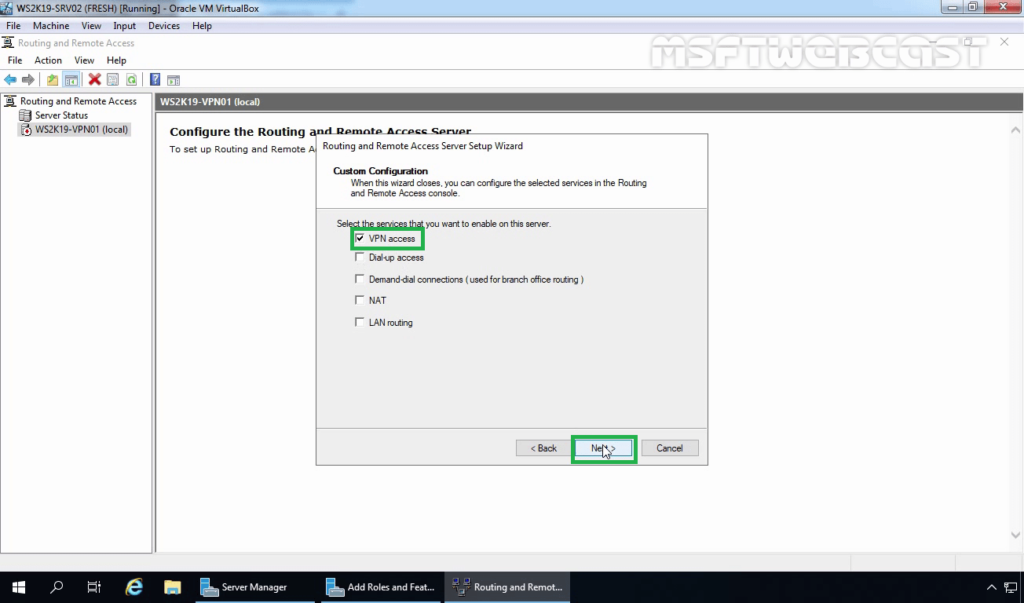
18. On select the service page, select VPN Access. Click Next.
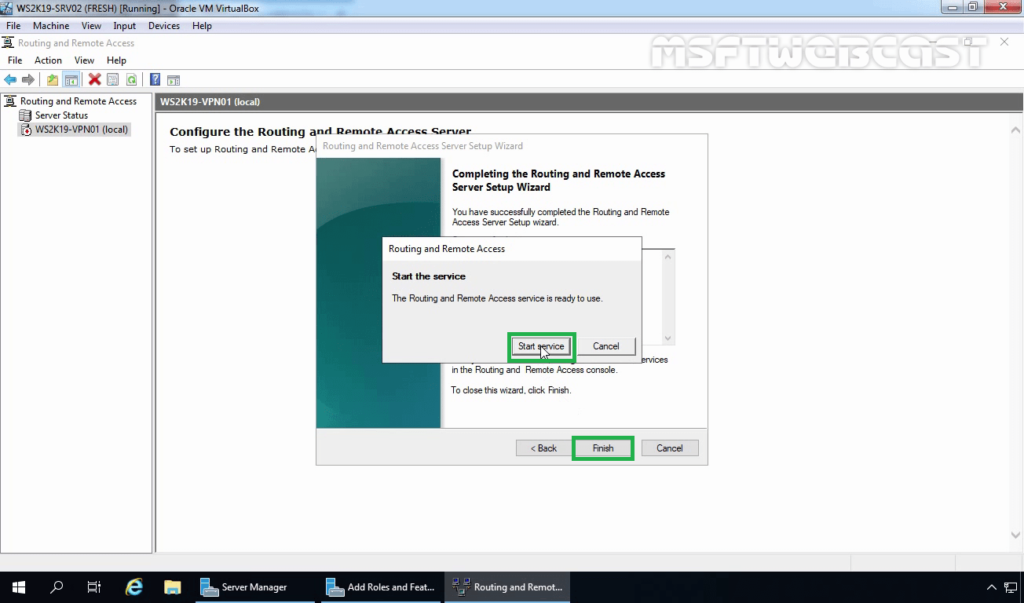
19. After clicking on the Finish, it will ask you to start the service. Click on Start service.
20. Now you will see a green up arrow beside your server name.
Step:5 Configure SSTP settings and specify the IP Address range:
To configure SSTP VPN, we need to set up specific settings in the VPN server’s properties section.
21. Right-click on the server name and click on Properties.
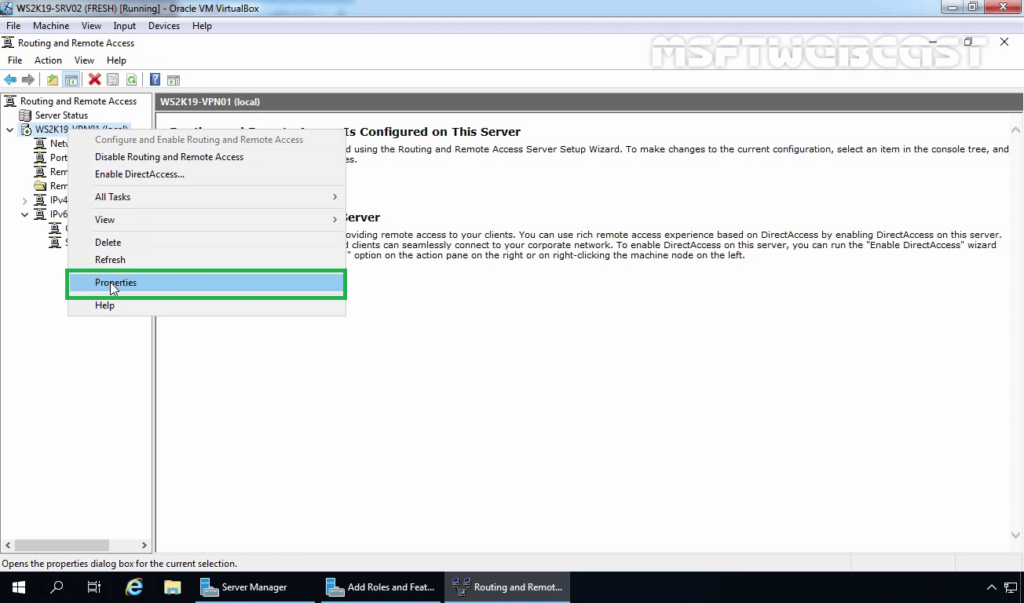
22. Click on the Security tab. Under SSL Certificate Binding, select the self-signed certificate that you just created earlier.
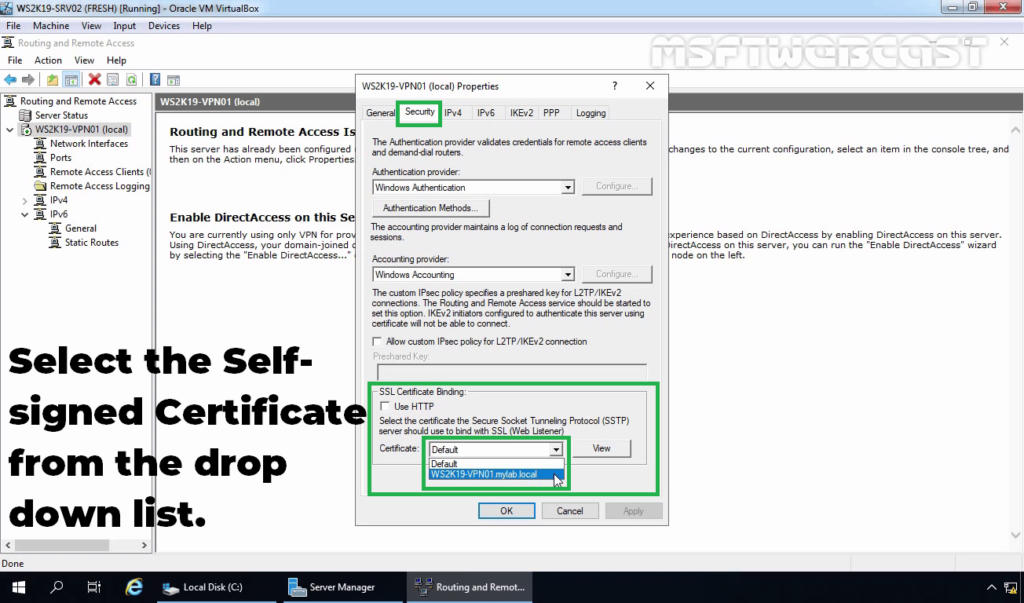
23. Click on IPv4 Tab. Select the Static Address Pool radio button.
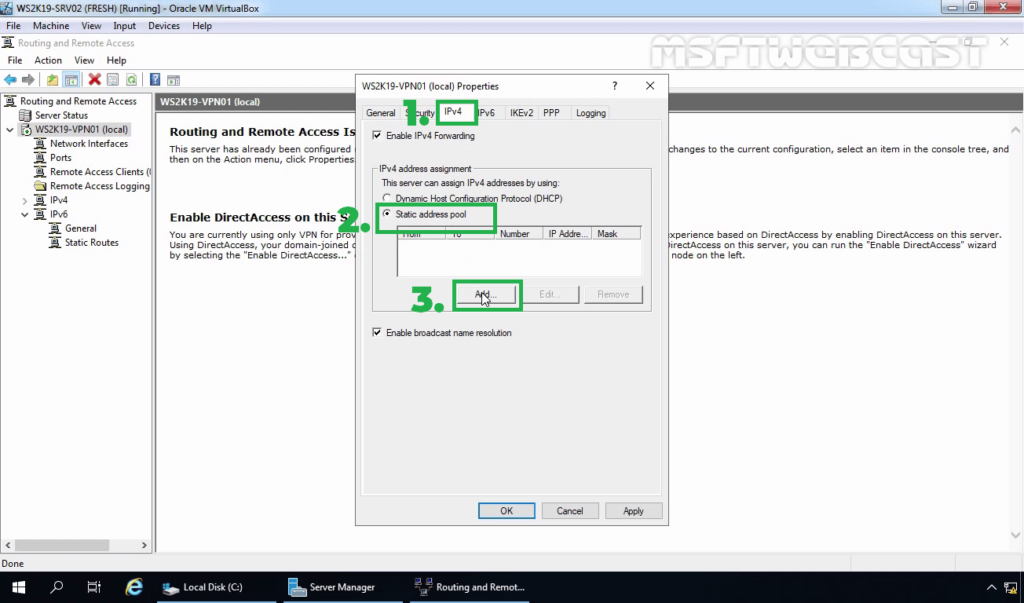
24. Click on Add and specify the IP address range. Click on OK.
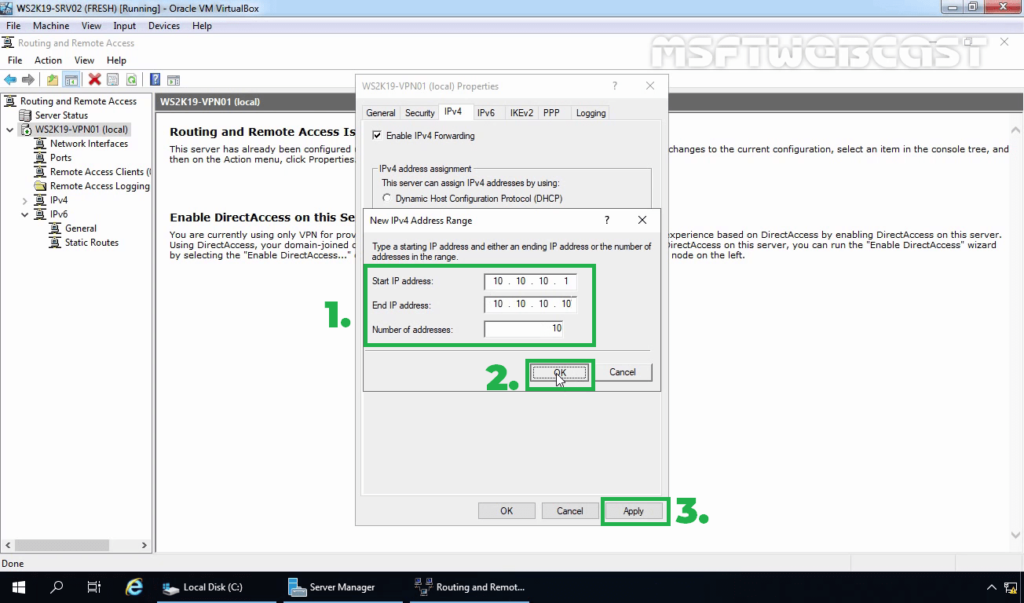
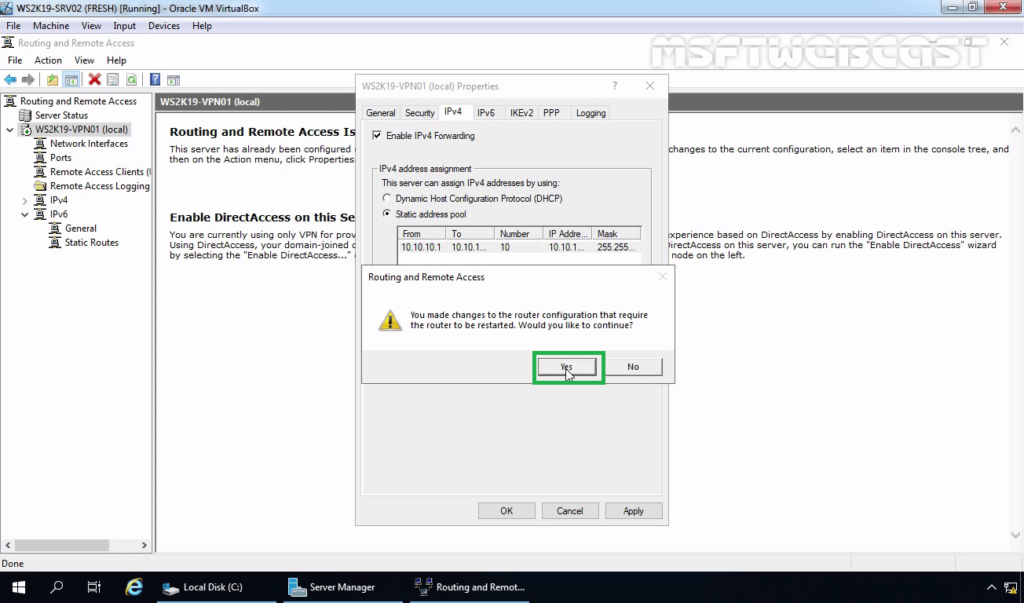
25. Click on Apply to save the changes to the VPN server. It will ask to restart the Routing and Remote Access service. Click on yes to do so.
Step:6 Create AD User and allow dial-in access:
26. On Domain Controller, Open Active Directory Users and Computers snap-ins. Create AD users name Test User1 and Test User2.
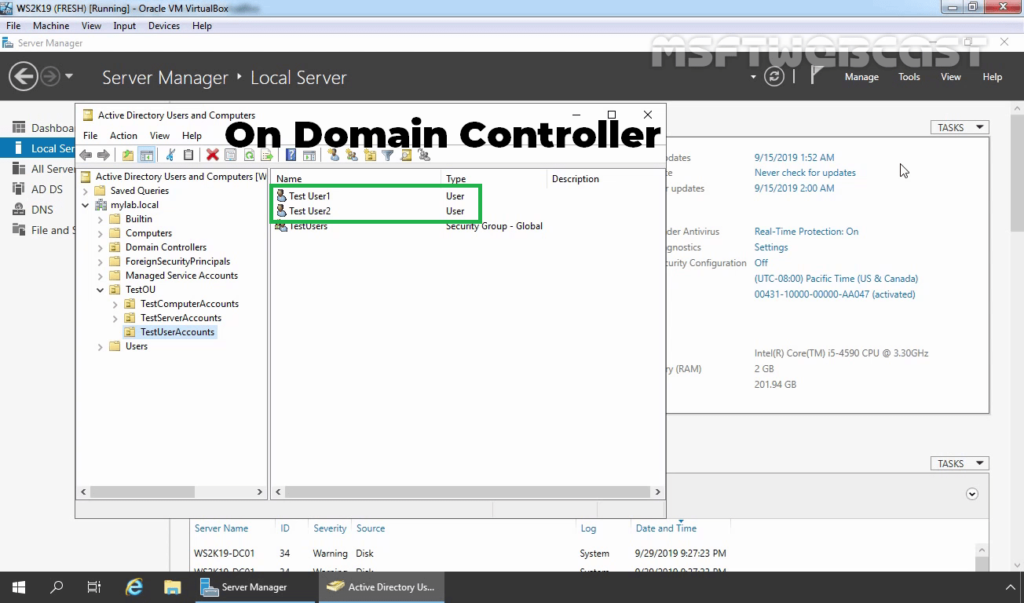
27. Enable dial-in access for selected VPN users by opening the user properties and selecting Allow access on the tab Dial-in.
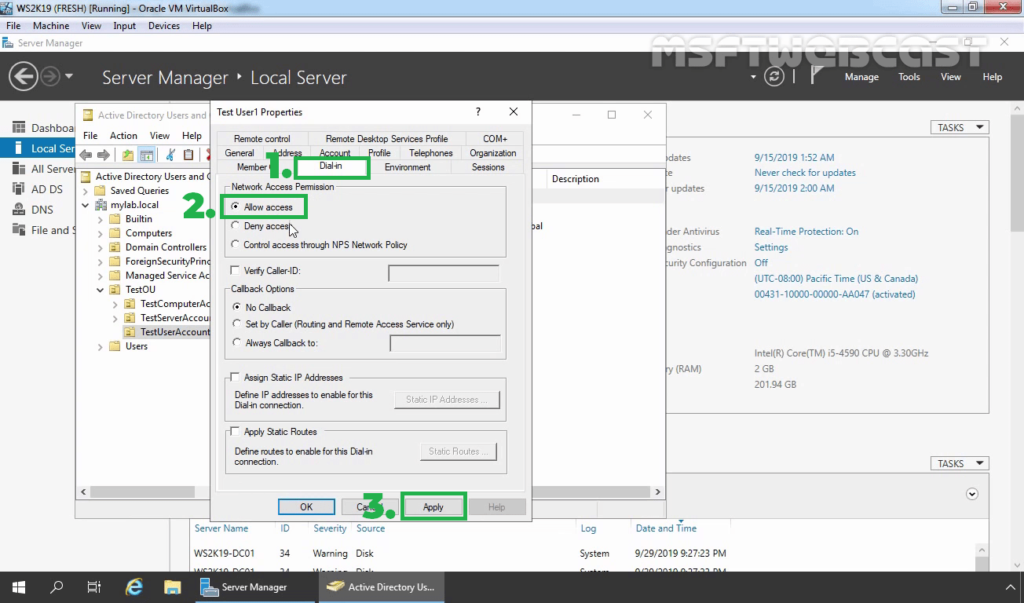
Note: If you want, you can configure Network Policy Server to allow VPN users to connect to the VPN server running on Windows Server 2019.
Step:7 Import a self-signed certificate on Windows 10 machine:
Once you get a .cer certificate file, you need to import the certificate on the local computer. You need to store the certificate under the Trusted Root Certification Authorities store.
28. Double-click on SSTPselfsigned.cer file. Click on the Install certificate.
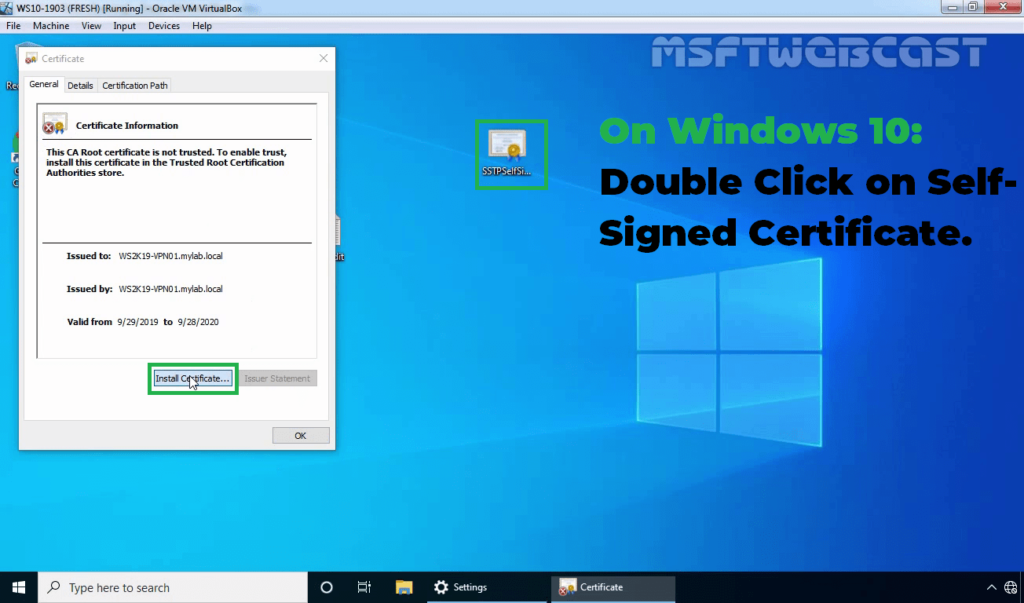
29. Select Local Machine and click Next.

30. Select Place certificates in the following store radio button and click on Browse.
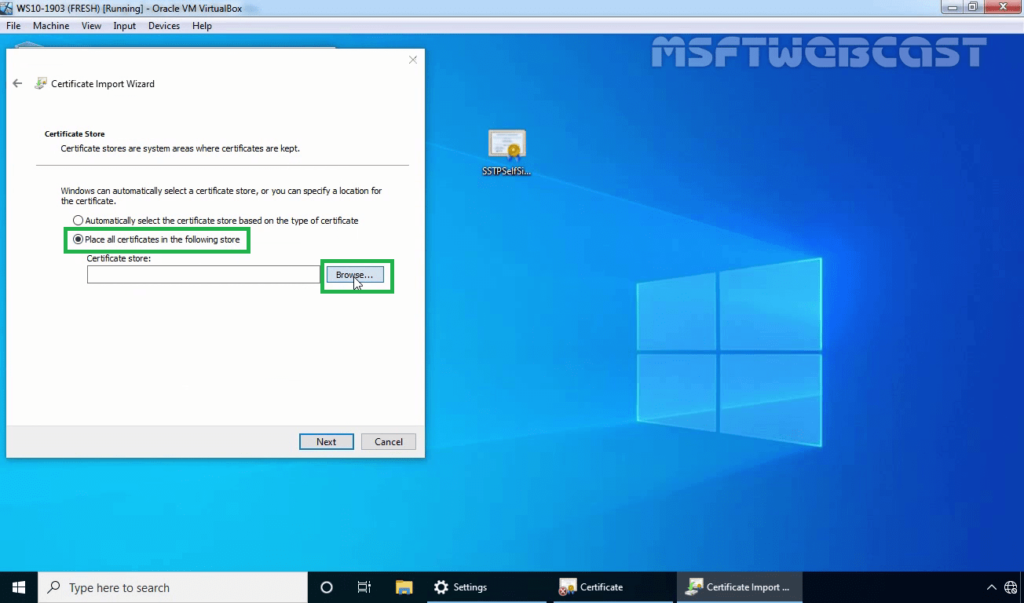
31. Select the Trusted Root Certification Authorities store and click OK. Click Next.
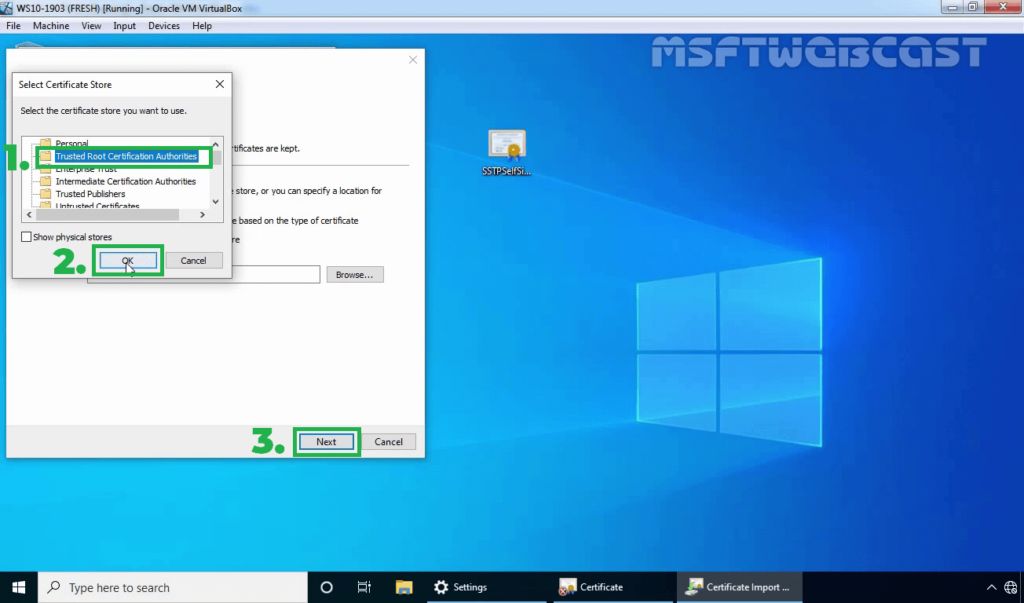
32. Click on Finish to complete the import process.
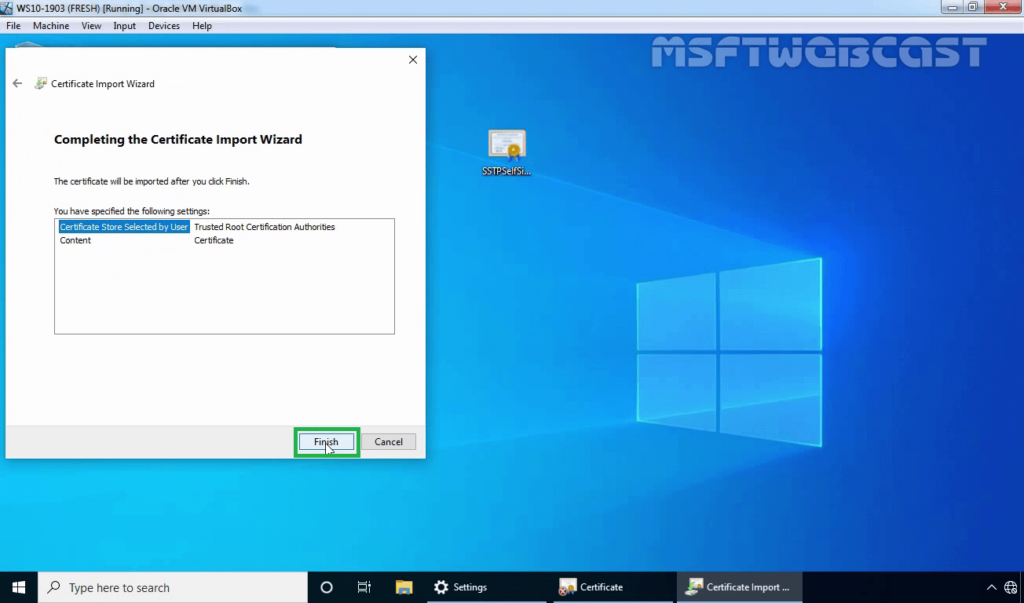
Step:8 Test SSTP VPN configuration:
On Windows 10 client machine, we need to create a new VPN connection.
33. Right-click on the Start button and select Network Connections.

34. On left-pane, click on VPN.
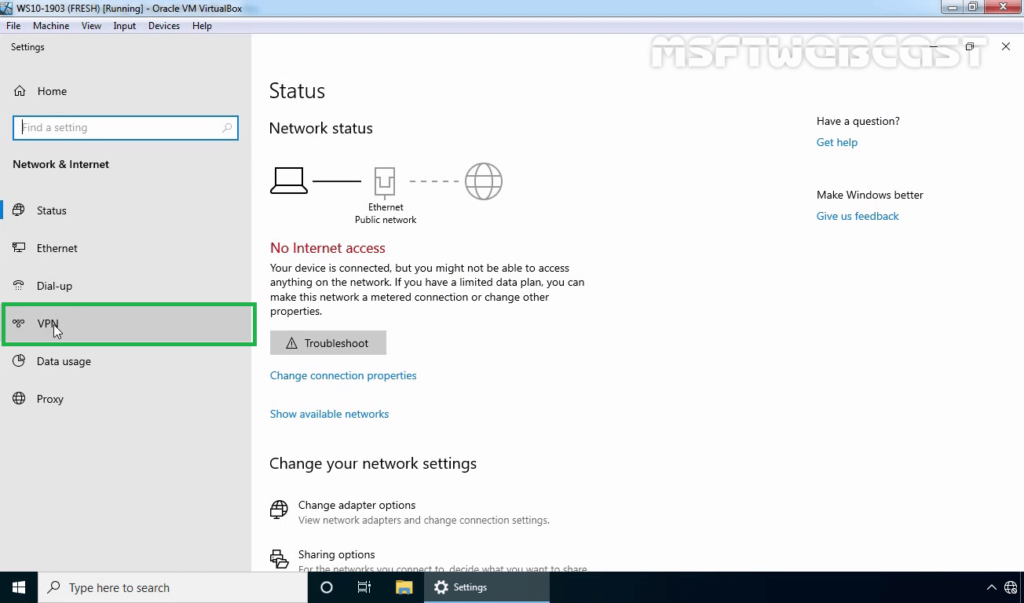
35. Click on add a new VPN connection.
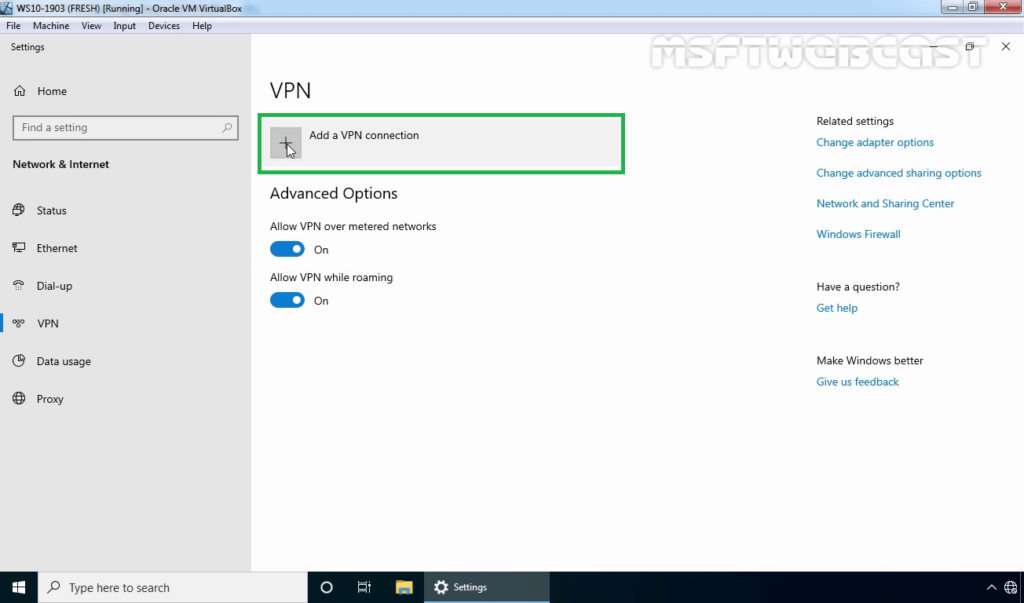
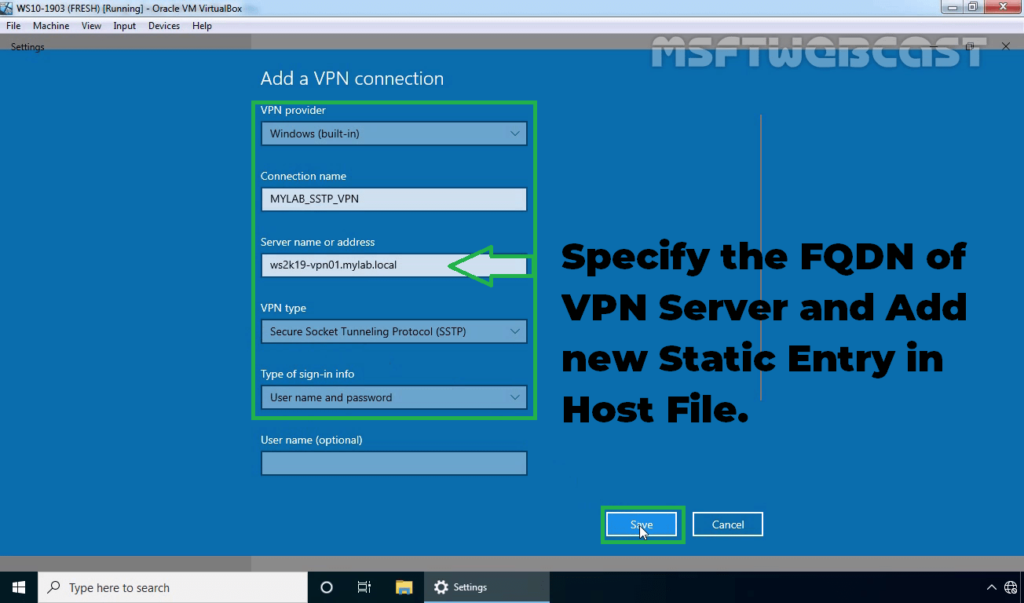
36. Specify the required information for the VPN connection.
- VPN Provider: Windows (Built-in)
- Connection Name: Name of your choice
- Server Name or IP Address: FQDN of VPN server
- VPN Type: SSTP (Secure Socket Tunneling Protocol)
Click on Save.
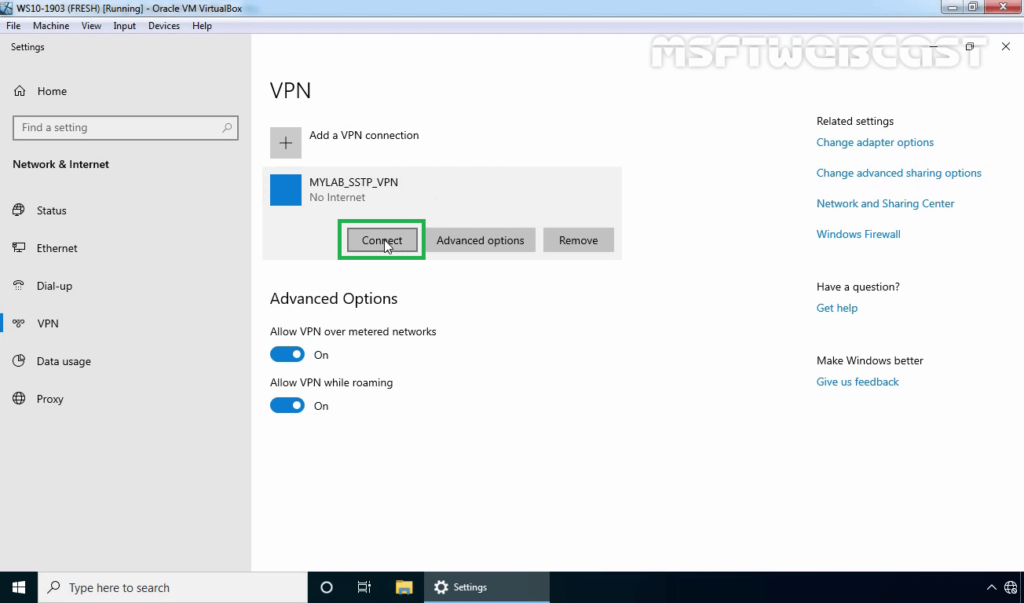
37. Select VPN connection and click on Connect.
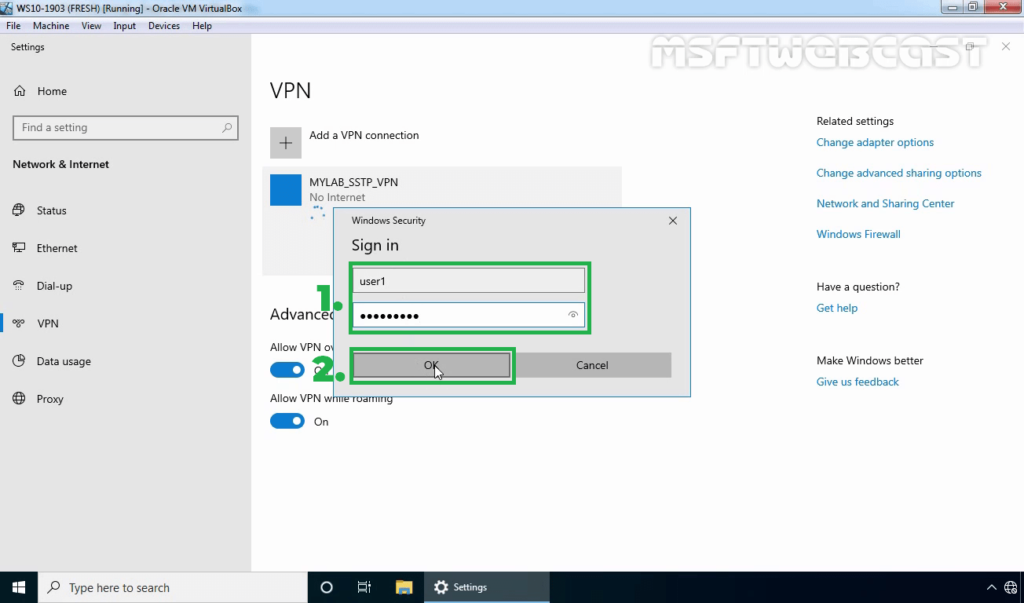
38. Specify a username and password to connect the VPN server. Click OK to connect.
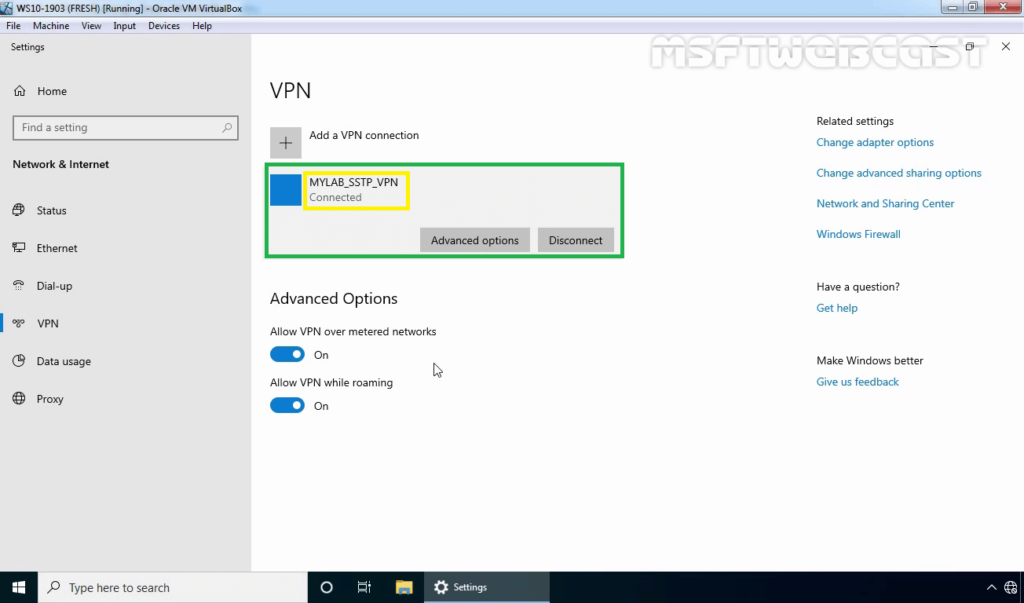
39. Verify the VPN connection is successfully connected with the VPN server using SSTP protocol.
On Windows 10 Client Machine:
40. Press Windows Key and R key together. At Run menu type ncpa.cpl and press enter to open Network Connection console.
41. Right-click on VPN connection and click on the Status button.
42. Click on details to see information about VPN connection like Authentication Method etc.
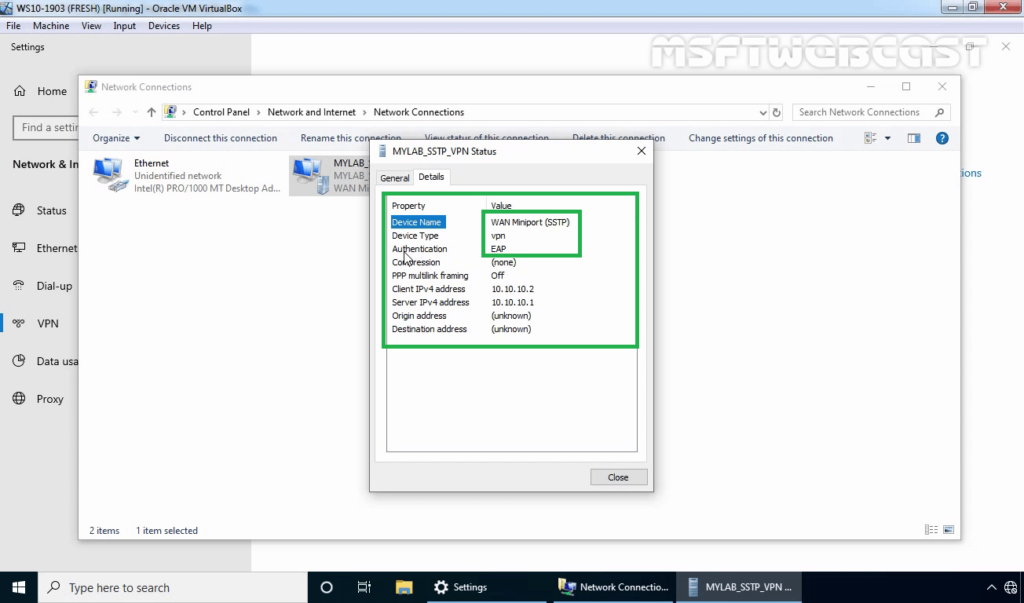
In this article, we have seen the steps to Install and Configure SSTP VPN using Self-signed Certificate on Windows Server 2019 and Windows 10.
Thank you for reading.
Related Articles:
- PART-1 How to Install Remote Access Service on Windows Server 2019
- PART-2 How to Install and Configure VPN in Windows Server 2019
- PART-3 Configure Network Policy Server (NPS) for VPN in Windows Server 2019
- PART-4 Configure Port Forwarding and Test VPN Connection on Windows 10
Post Views: 4,928
In this two part series I will explain how to install an SSTP VPN server and how to deploy the VPN connection to Windows clients.
Contents
- Installing the required roles
- Generating & installing the SSL certificate
- Setting up the VPN
- Connecting a client
- Author
- Recent Posts
Geoff Kendal is a Windows/Linux systems administrator, scripter and problem solver, with over 12 years experience, based in Leeds, UK.
I’m sure most network administrators will know how useful a VPN can be, although we have probably all encountered issues with firewalls not always letting the required traffic through which can prevent them from working. For example for PPTP VPN’s require your router to handle GRE protocol traffic, similarly L2TP requires ESP protocol traffic. The whole point of VPNs is to allow access to your network form anywhere, which is why SSTP VPNs are so great.
SSTP (Secure Socket Tunnelling Protocol) transports your VPN traffic by encapsulating the traffic via an SSL link, all over the standard HTTPS port (TCP 443), which is rarely blocked (most web browsing wouldn’t work without it!). So not only does SSTP get through 99% of firewalls, but it also ensures that your VPN traffic is encrypted.
SSTP is supported on Windows Vista SP1 and later versions of Windows. If you’re also a Mac shop, it isn’t integrated into the OS yet, but there are open source SSTP clients that may help you.
If you’re running Windows 2008/2008R2/2012, you’ve already got everything you need to get started, as it is powered by the Routing and Remote Access Services in Windows server. I’ll be going through setting it up on Windows Server 2012, although the steps on 2008 are essentially the same.
Installing the required roles
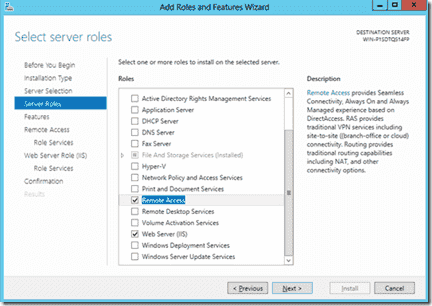
Start the ‘Add roles & features’ wizard from server manager, and add the ‘Remote Access’ to the server of your choice. You’ll be prompted to add some other requested roles/features, such as IIS – you will need to add these too.
Adding the IIS & RAS roles
As part of the wizard, we’ll be asked which role services we wish to install, for this go with the default ‘Direct Access & RAS’. Continue through the wizard, and allow the server to restart if required.
Generating & installing the SSL certificate
Once the server has restarted, we will want to obtain a SSL certificate for use by the VPN. For my internal domain, I use a .local extension, so will be generating a certificate signing request (CSR) for my external domain name, then sending it to a certification authority (StartSSL.com in this instance, as they offer free SSL certificates.)
From Server Manager, select ‘Internet Information Services (IIS) manager’ from the tools menu. Once the IIS console has started select the server name in the tree on the left. Once selected, click the ‘Server certificates’ icon in the main area, and select the ‘Create new certificate request’ option from the actions pane on the right.
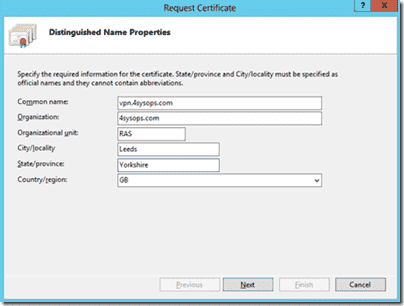
When creating the CSR, it is critical that the common name is set to the hostname that clients will use to connect to the VPN. For instance, your server may be internally called RAS02.4sysops.local – this obviously won’t resolve externally, so we point vpn.4sysops.com at the server for external clients to use. Further to this, you may need to setup port-forwarding and firewall rules, so that traffic connecting to this external address on port 443 gets directed to your VPN server.
Creating the certificate signing request
In this example we must enter vpn.4sysops.com as the common name. On the next screen in the CSR wizard, ensure that the bit-length is set to 2048 if you are using StartSSL – they won’t accept 1024 bit CSRs.
Finally save the CSR to a file, then open the file in notepad and copy all of the contents to your clipboard.
We will now need to get a certification authority to sign a certificate for us. Provide your certification authority of choice the CSR we just generated via the wizard. Once they have verified your details, they should provide you with a certificate file that we can load into IIS to complete the SSL steps.
Once you have the certificate file, select ‘complete certificate request’ from the IIS actions pane on the right, and browse to the certificate file. You should now see the certificate listed in IIS.
Setting up the VPN
We now need to configure the RAS service. Select ‘Routing and Remote Access’ from the tools menu of server manager. Once the MMC has loaded, right click the server name on the left, and select the configure option. From the wizard, choose the ‘custom’ option at the end of the list. On the following page, tick the VPN checkbox. The wizard will complete, and start the service.
The RRAS configuration wizard
All being well, clients should now be able to connect to the VPN via SSTP, as long as they can make a HTTPS connection to the server name you specified when creating the certificate. You can double check that things are OK by testing with a web browser (i.e. https://vpn.4sysops.com) – You’ll probably just see a 404 error, but as long as there are no certificate errors and you can see the padlock icon, then all is well.
The final stage before we make the connection is to make sure that any users requiring access have dial-in/VPN rights. Find your users in ‘Active Directory Users & Computers’, under the dial-in tab select allow (We’re not using NPS in this basic setup, so that option won’t work).
Connecting a client
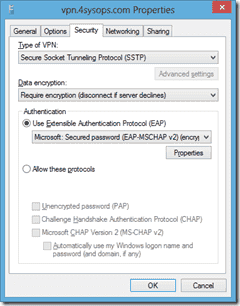
From a client system, create a new VPN connection (Via the Network & Sharing Center ). When creating the connection, ensure that the internet address is the same one as used in the certificate. Once the connection has been created, click the ‘Change adapter settings’ link on the left side of the Network and Sharing Center, and edit the properties of the new VPN connection. On the security tab, change the type to SSTP.
The VPN connection properties
Once this change has been made, we should be able to connect to our SSTP VPN successfully from practically anywhere!
Subscribe to 4sysops newsletter!
In my next article, we’ll look at how we can deploy our SSTP VPN connection to all of our client systems.
So here’s what’s awesome about Secure Socket Tunneling Protocol SSL VPNs: they give your connecting client an IP and make it a full-on part of the network. And this is all done over port 443, a commonly used port which is often enabled on firewalls. SSTP SSL VPNs are not like some fake «SSL VPNs» that just give users a webpage and some sort of RDP.
It’s also relatively easy setup. While there are a lot of tutorials that show how to setup SSTP SSL VPNs using AD CA generated certificates, I strongly suggest you forego that, and just use a globally recognized certificate. This prevents outside users from having to install your CA’s root cert. It also prevents them from having to make a registry change if your CRL is not published and available online. All around, a $5.99 cert that can be obtained in 12 steps is well-worth the time and money invested.
This tutorial will cover how to easily setup an SSTP SSL VPN in Windows 2012 R2 using a legit cert. If you want to use your own domain’s cert, there are other websites that provide step-by-steps. advancedhomeserver.com is my preferred tutorial.
Overall, there are four major steps to this:
- Install the appropriate certificate
- Setup Routing and Remote Access
- Configure NPS (Optional)
- Setup your client.
Install the SSL Certificate
Step 1
First, follow my tutorial for getting a legit $5.99 cert, down to creating the .pfx file.
Step 2
Import your PFX to the local machine’s Certificate store. To do this, certlm -> Personal -> Certificates -> Right-click, All Tasks -> Import -> Next -> Select your Cert -> Enter your password -> Next -> Finish.
Install and configure the RRAS role
Step 1
Add the Remote Access role. Server Manager -> Manage -> Add Roles and Features -> Remote Access.
Step 2
Click Next a couple times, then just click DirectAccess and VPN. DirectAccess seems cool, but it’s only intended for mobile domain-joined computers, which I’m not looking to support.
Step 3
Next a couple times. It will force you to install IIS, which is odd, because RRAS can work independently of IIS (you can even stop and disable IIS and RRAS will still work). I would think just the IIS Hostable Web Core would be enough, but whatever. It’s required. Go ahead and accept that it will be installed.
Step 4
Once the Role has been installed, click the flag thing at the top, and then Open the Getting Started Wizard.
Step 5
Select Deploy VPN Only.
Step 6
Once the new window pops up, right click your server name (mine is VPN (local)) then Configure and Enable Routing and Remote Access.
Step 7
We’re trying to keep our surface area as small as possible, so click on Custom Configuration.
Step 8
Next, only check VPN Access.
Step 9
The RRAS Sericve will configure itself, and start the service. You will then be returned to the RRAS config window. Right click your server name, then Properties.
Step 10
Check that your SSL Certificate binding is the newly installed certificate.
Step 11
Next, click on IPv4. Here, you can either do a DHCP forwarding or just give RRAS a few IP addresses to hand out. Click Apply then Okay. You’ll be returned again to the RRAS window.
At this point, your RRAS server is setup! But I recommend a few more steps.
If you don’t want to add any additional security (IP restrictions, Group Access to VPN), then you can skip the next section and jump to setting up the client. I find it super interesting, though. I’d give it at least a glance.
Setup Network Policy Server (Optional)
Step 1
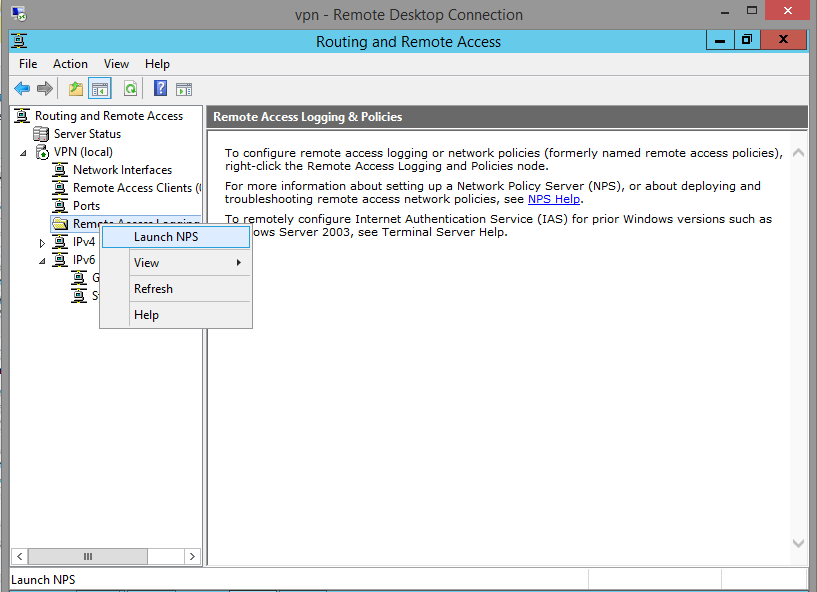
Once you’ve returned to the RRAS window, *left-click* Remote Access Logging and Policies. Then right-click and Launch NPS.
Step 2
A new Network Policy Server window will pop-up. Here, we can set which users can access the VPN, set the type of authentication encryption, and restrict network access.
Step 3
We’ll start by creating a new Network Policy. Right click Network Policy and click New.
Step 4
Name your Policy, and select Remote Access Server (VPN/Dial-up).
Step 5
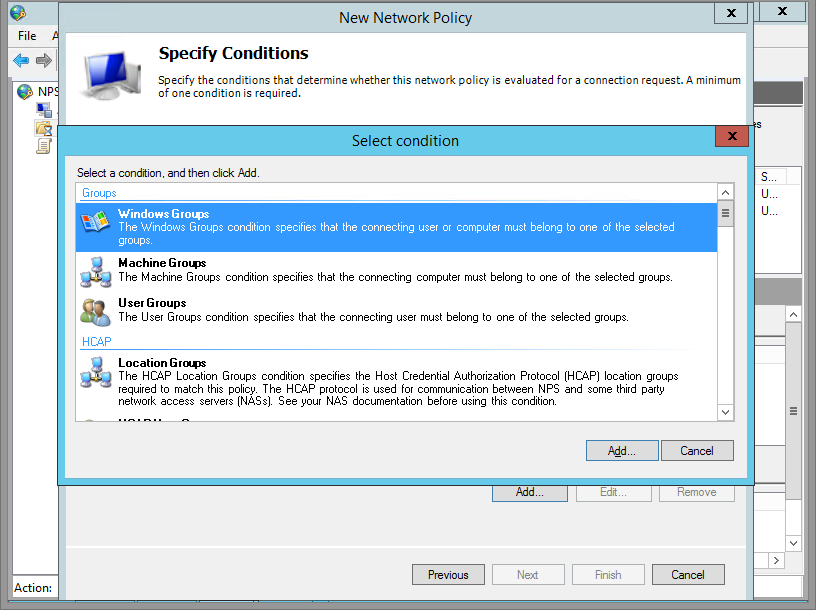
Leave this window for a moment, go into AD, create a Group and name it VPN Access or whatever you wish, and add some users. Come back, and add that Windows Group by clicking Add -> Windows Group.
Step 6
Confirm and click Next
Step 7
Grant this group access.
Step 8
Here, you can choose your Authentication Encryption. I disabled all the weaker ones, and only enabled the stronger Microsoft: Secured Password (EAP-MSCHAP v2).
Step 9
Here you can set some restrictions if you like. Click Next.
Step 10
Click on IP Filter.
Step 11
Specify a Filter. I set mine to only allow access to my lab’s subnet.
Step 12
Click OK, next, and you’re done setting up NPS!
There’s more, but I’ll likely cover that later. You can also configure the Network Policy Server which can lock down your network so that only clients with Firewalls enabled and AVs installed will be allowed to connect.
Setup a Client to Connect
Step 1
Log into a Windows machine. SSTP was introduced in Windows Vista, so the OS must be Vista or Greater (or Server 2008 and greater). Go to Network and Sharing Center. Click Setup New Connection or Network.
Step 2
Click Connect to a workplace.
Step 3
Click Use Internet Connection (VPN).
Step 4
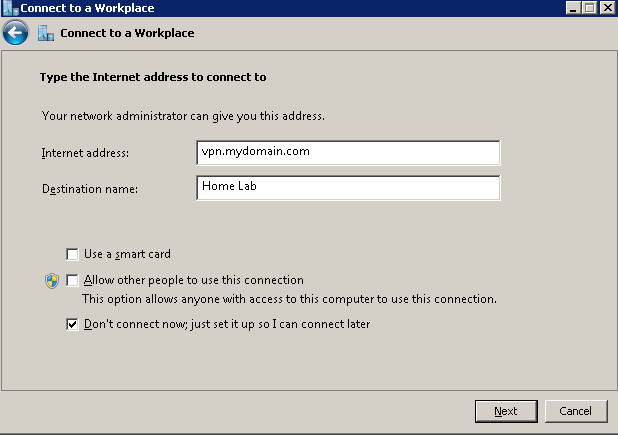
Fill in your info, and click Don’t connect now; just setup so I can connect later.
Step 5
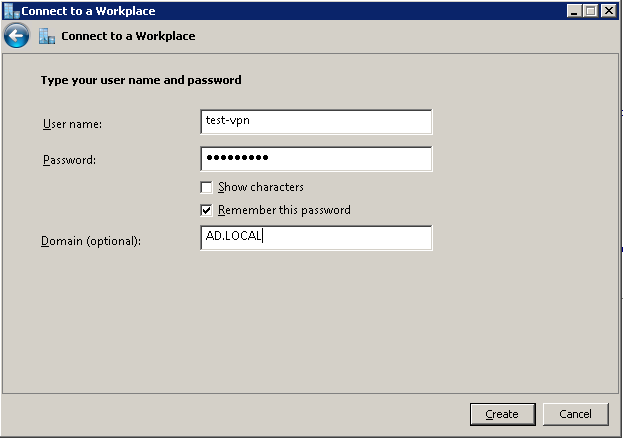
Enter your user information. Don’t forget that if you didn’t setup a Group to access the VPN using NAP, you’ll need to enable Dial-In access within Active Directory Users and Computers for that user.
Step 6
We still need to configure a couple more things. Click on your connection -> Properties.
Step 7
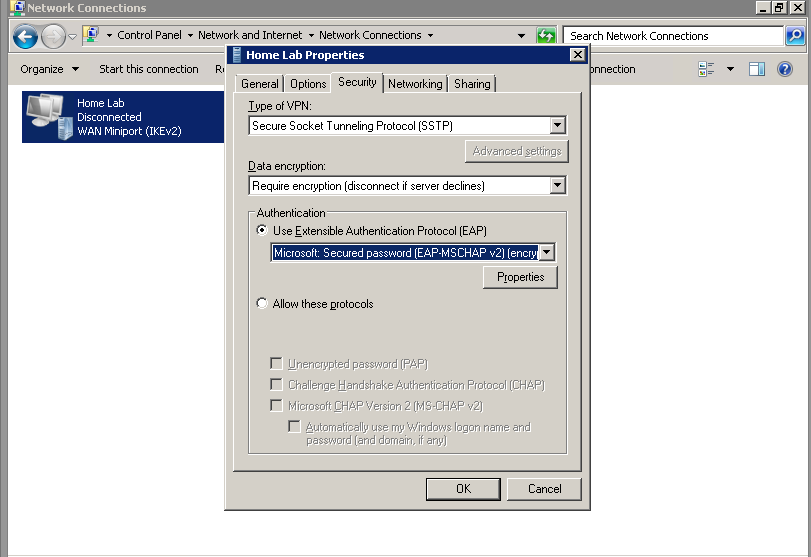
Click the Security Tab -> Change type of VPN to SSTP. By default, it detects the type of VPN automatically, but slightly slows down the process.
Also change your authentication as seen below. That’s all you need. Note that, by default, Windows VPNS will use the remote gateway. If you want to modify that, go to Properties -> Networking -> IPv4 -> Advanced -> Uncheck Use Default Gateway on Remote Network.
Step 8
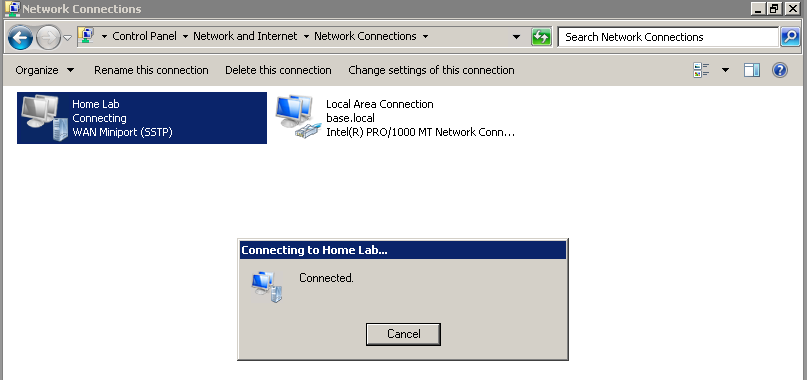
Right-click -> Connect.
Step 9
Awesome. Poke around ipconfig if you’re interested in seeing your assigned IP, gateway and DNS servers.
Some final notes
Don’t forget that you have to expose your VPN’s port 443 at the router. To ensure that things are working, you can also try hitting your VPN server via a browser at https://yourvpn.server.ext. It should return a 404.
In addition, IIS is not necessary. You can actually stop it, disable the service, and you will still be able to connect to your VPN.
Enjoy!


