This article is a step-by-step Windows Server 2022 installation guide.
In it, you’ll learn:
- An Overview of Windows Server 2022 Installation
- Who should install Windows Server 2022
- Windows Server 2022 new features
- How to install Windows Server 2022
- How to install Server 2022 Updates
- And many more!
Let’s dive in!
Windows Server 2022 Installation Overview
Windows Server 2022 is based on Windows Server 2019 and was announced in 2021 with a ten-year support cycle. It’s designed for small-to-medium-sized businesses and offers increased stability and performance.
If you’re looking to upgrade your IT infrastructure to be more reliable and efficient, then the time has never been better!
Some of the new features in Windows Server 2022 include the following:
- AMD CPUs now support nested virtualization.
- As the default web browser, Microsoft Edge is bundled with the system.
- Improved security features to increase protection against all sorts of attacks, such as malware, privacy, and network attacks.
- Enhancements to UDP/TCP performance.
- Hybrid capabilities in Azure.
You can find more information on the product page.
Who should install Windows Server 2022?
The latest version of Microsoft Windows Server is the perfect fit for businesses and professionals who want to take their job more seriously, or educational institutions can benefit from Windows Server 2022.
It also works well with other professionals like engineers and educational organizations, giving them more uses than before! Windows Server 2022 offers peace of mind for safety-conscious employers in charge of running a business where you want people’s data secure.
Specifically, there has been an increased focus on the cloud, a foundation for data centers that provide our increasingly mobile world with technology-based communications. If you need support for cloud functionality, Windows Server 2022 is the perfect server OS to get invested in.
In conclusion, with the recent release of Windows Server 2022, businesses and organizations can now take their jobs seriously. This new version is tailored more specifically towards professionals in data centers who provide cloud services worldwide!
Why Install Windows Server 2022?
Answer: Windows Server 2022 has New, better, more efficient features
Windows Server 2022 New Features
Let’s look at the new features included in Windows Server 2022 release. Refer to the official Microsoft documentation for complete details on new features and enhancements.
- Advanced multi-layer security in Server 2022 security module provides the comprehensive protection that servers need in today’s modern tech world.
- Server 2022 is built on three key pillars: Advanced protection, simplified security, and preventative defense.
- TLS 1.3 and HTTPS are enabled by default on Windows Server 2022. Typically, this protects clients’ data connecting to the server and eliminates obsolete cryptographic algorithms. It also enhances security over older versions and aims to encrypt as much of the handshake as possible.
- DNS Client in Server 2022 now supports DNS-over-HTTPS (DoH) which encrypts DNS queries using the HTTPS protocol.
- New improvements to Windows Admin Center to manage Server 2022 include capabilities to both reports on the current state of the Secured-core features.
- HotPatching – A new way to install updates on new Windows Server Azure Edition virtual machines (VMs) that doesn’t require a reboot after installation
- Several platform improvements for Windows Containers, including application compatibility and the Windows Container experience with Kubernetes.
- Microsoft Edge is included with Windows Server 2022, replacing Internet Explorer.
How to install Windows Server 2022
Installing Windows Server 2022 can be a major change for your organization.
Note: To ensure you have the necessary tools and resources, carefully read through this guide. You’ll learn how installing a new Windows Server operating system can affect all areas of IT in an effective way that’ll meet current needs while preparing for future innovations.
Let’s discuss it in detail here below!
Part 1: Windows Server 2022 Hardware Requirements
Before we dive into the installation, let’s look at the minimum hardware/system requirements for installing Windows Server 2022 operating system.
- Processor: 1.4 GHz 64-bit processor Compatible with x64 instruction set. Supports NX and DEP, CMPXCHG16b, LAHF/SAHF, and prefetch.
- Memory/RAM: 512 MB (2GB for Server with Desktop Experience installation option). ECC (Error Correcting Code) type or similar technology, for physical host deployments
- Disk Space: Minimum 32 GB (Windows Server 2022 using the Server Core installation option).
- Network Requirements: An Ethernet adapter capable of at least 1 gigabit per second throughput. Compliant with the PCI Express architecture specification
- Additional requirements: UEFI 2.3.1c-based system and firmware that supports secure boot; Trusted Platform Module; Graphics device and monitor capable of Super VGA (1024 x 768) or higher-resolution.
Part 2: Windows Server 2022 Installation Options
Again, when you install Windows Server 2022, what options do you have?
Answer: You get two installation options to install Windows Server 2022.
Choose the install option that servers you need based on the information provided below.
- Server Core – In many cases, this is the recommended installation option. Server Core is a smaller installation that includes the core components of Windows Server and supports all server roles. However, it doesn’t include a local graphical user interface (GUI). It’s mostly used for remotely managed deployments usually through PowerShell, Windows Admin Center, or other server management tools.
- Server with Desktop Experience – If you want a complete installation, including a full GUI, this is your option. This option has a larger footprint than server core. It is the most preferred option by organizations.
Part 3: Step-By-Step Guide to Windows Server 2022 Installation
Let’s dive right in!
Step 1. Download the Windows Server 2022 ISO
The first and most crucial step in installing the new Windows Server 2022 is acquiring the installer file. This file is an ISO that contains the identical content of an optical disc. This file will allow you to create a boot media and then install your new server operating system.
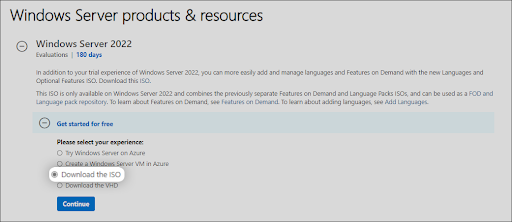
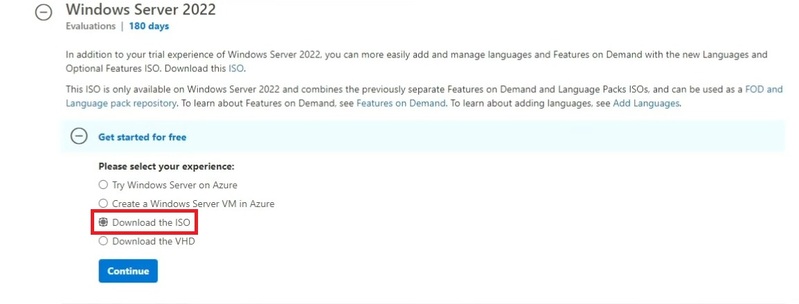
- To get the Windows Server 2022 ISO image, you first need to sign up at Microsoft’s official Windows Insider page. Navigate to this webpage in any browser of your choice.
- Click on Windows Server 2022, and then select Download the ISO from the available options. Click Continue.

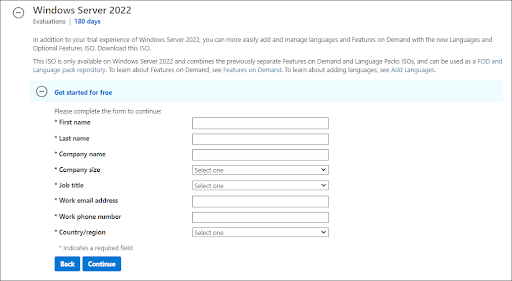
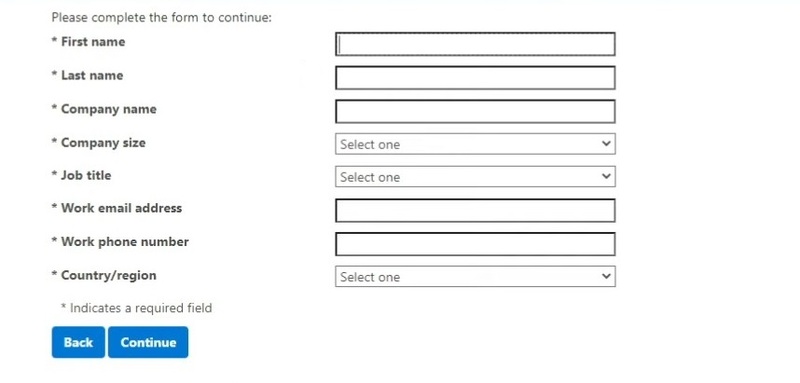
- You’ll be required to fill in your information to be eligible for downloading the Windows Server 2022 ISO image. Make sure to enter your information accurately, as verification may be required later. When done, click Continue.

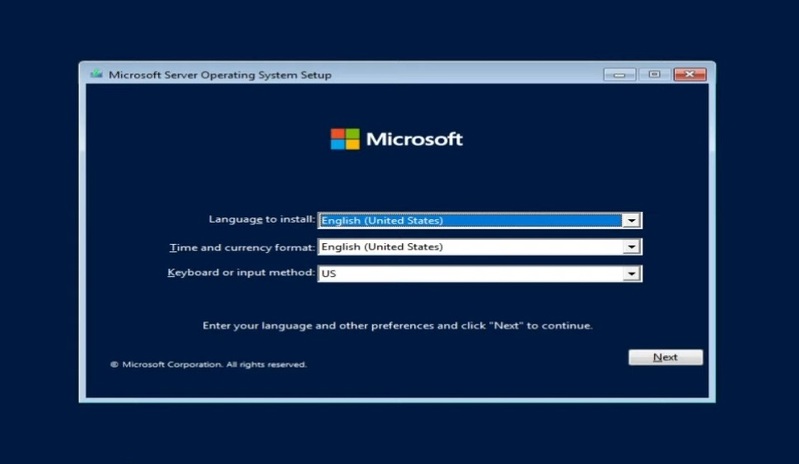
- Choose the language you want to use when installing Windows Server 2022. You can currently choose from 8 different languages, including English, Spanish and Japanese. Once selected, click on the Download button.

- The download may take up to a couple of hours to complete. Ensure you don’t disconnect your computer from power or the internet while the process is happening, or else it may be lost!

Step 2. Make the bootable ISO image for Windows Server 2022
After successfully downloading the Windows Server 2022 ISO file, it’s time to prepare your boot environment. You can either install Windows Server 2022 on a physical host or virtual machine using an ISO image.
Follow one of the relevant guides by Microsoft to create your bootable media:
- Create a Bootable USB Flash Drive
- Create Windows Server bootable USB (Rufus)
If you have access to MSDN (via Visual Studio Subscriptions and Benefits), you have the option to download Windows Server 2022 ISO from there. All you have to do is generate a new key by clicking Get Key and using this for activation of your installation of Windows Server 2022.
Step 3. Install Windows Server 2022
With the boot media ready, you can now proceed to install Windows Server 2022. As it is an extensive operating system with many editions available for purchase or download, your company may want to choose which edition to install before beginning the process and installing the desired edition properly!
You can pick from the following editions when using the latest Windows Server 2022:
- Windows Server 2022 Standard
- Windows Server 2022 Essential
- Windows Server 2022 Datacenter
As you may know, each version has different strengths, features, and prices. When thinking about licensing, keep in mind that all editions of Windows Server 2022 require a legal license in order to use. Now, let’s get on with the installation process. Continue with the approach you prefer between Server Core and Desktop Experience.
Step 3.1 Installing Windows Server 2022 (Server Core)
If you want to install Windows Server 2022 using Server Core, follow the instructions in this section. Server Core is a minimal installation method that uses a Command Prompt to handle commands on the server. It’s suitable for smaller businesses that need to save space and resources.
- Power on your physical or virtual machine using the boot media you created. You’ll be asked to press any key when it asks for an input, which is used as a launching point for installing Microsoft’s newest server operating system.

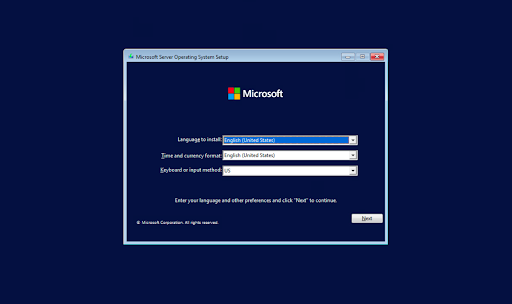
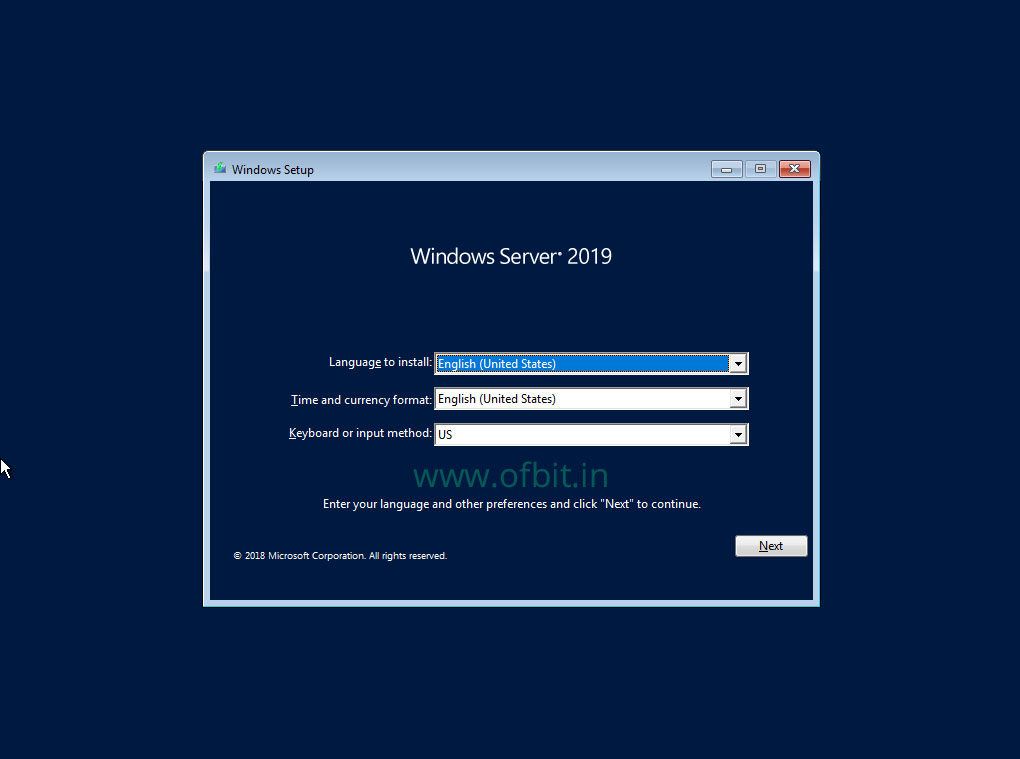
- Next, you’ll need to select a language of your choice, as well as keyboard layout preference and your time/currency settings. Click «Next» in the window that pops up, and let’s get started!

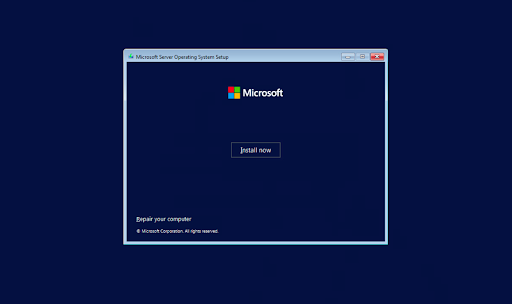
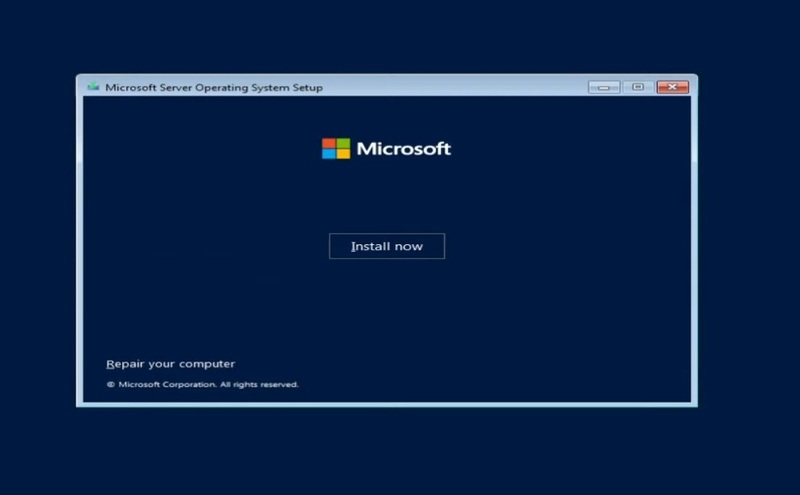
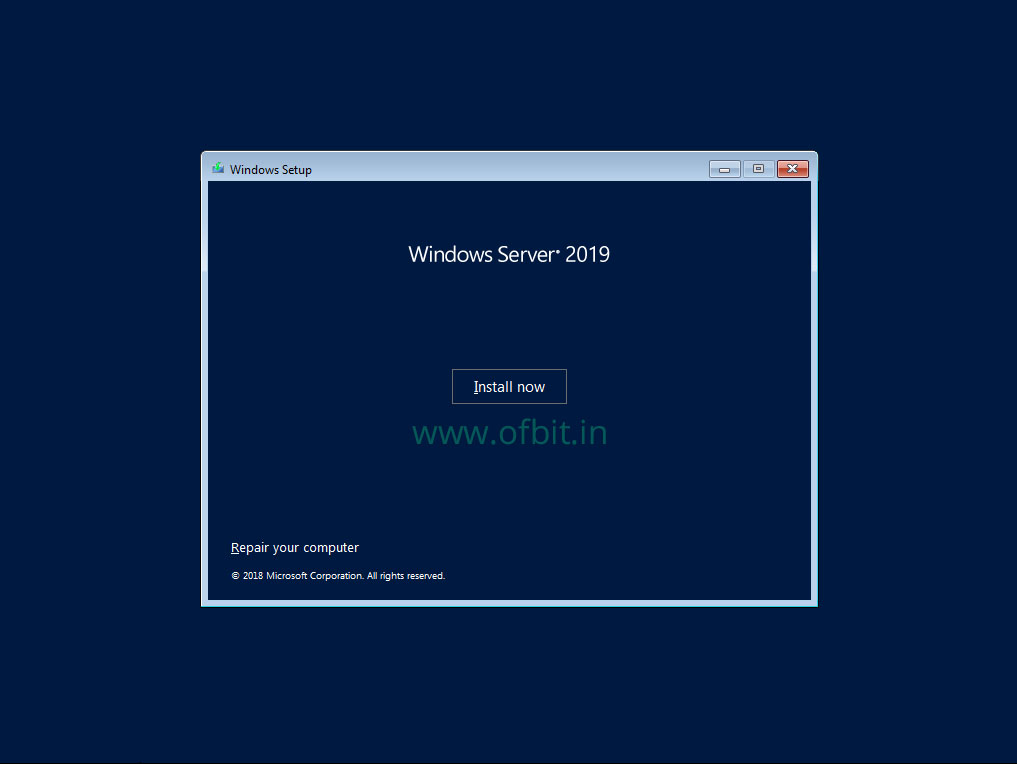
- Click on the Install now button to initiate the installation process for Windows Server 2022. This will begin the installation of the Server Core edition of Microsoft’s server platform.
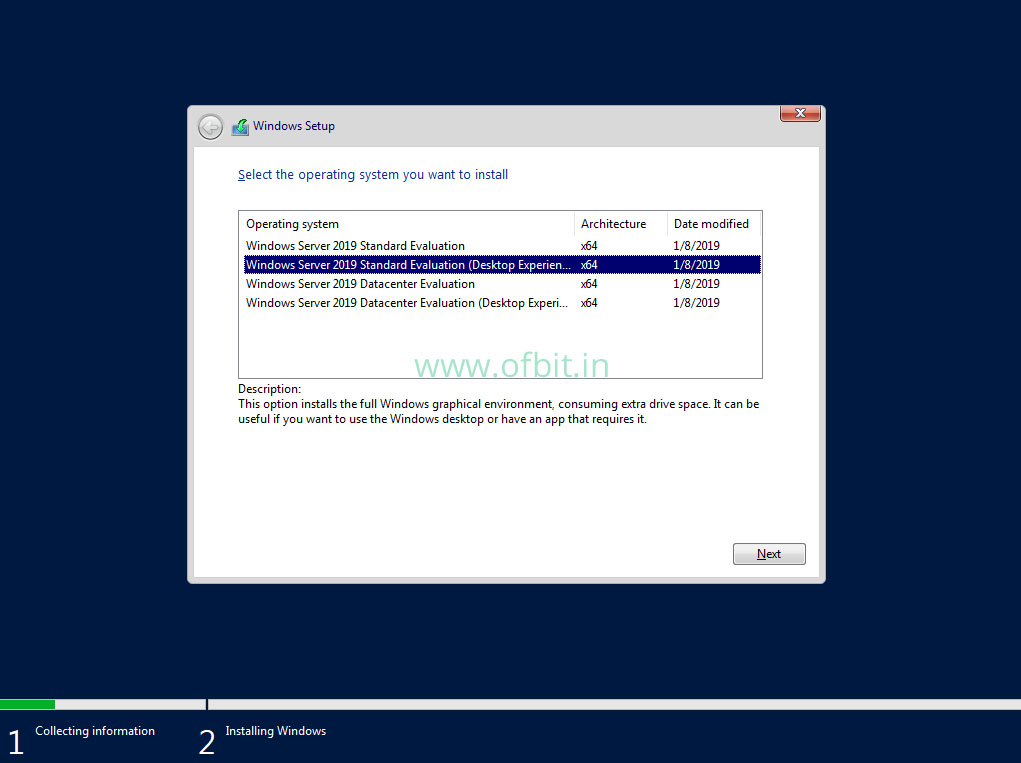
- In the next window, choose the Windows Server 2022 server option you want to install with Server Core that gives you access and use for some of Microsoft’s powerful command-line tools. Click Next to proceed.

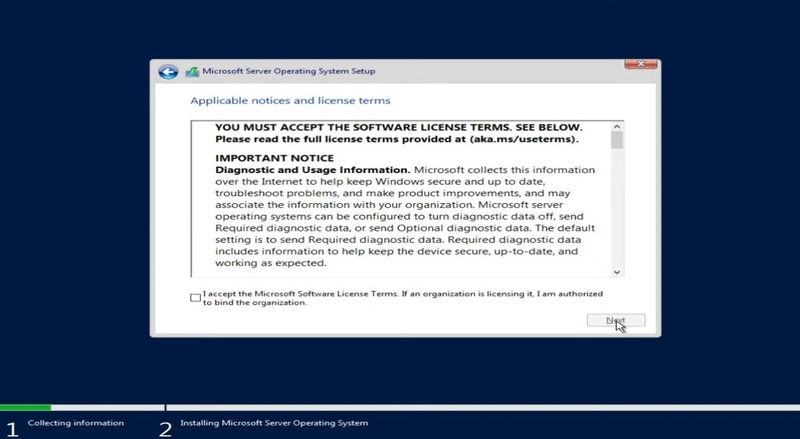
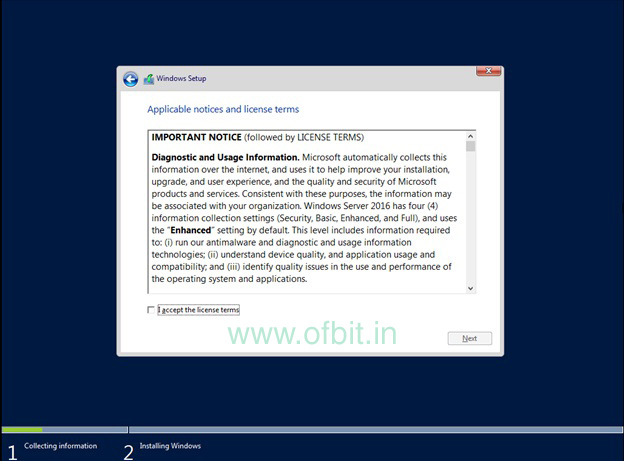
- Next, you need to read the License terms and agree to them for the installation process to continue by checking the “I accept all license agreements” box.
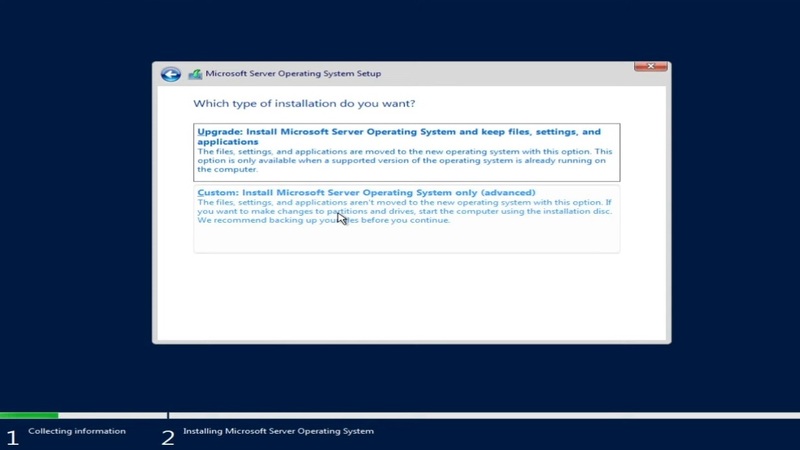
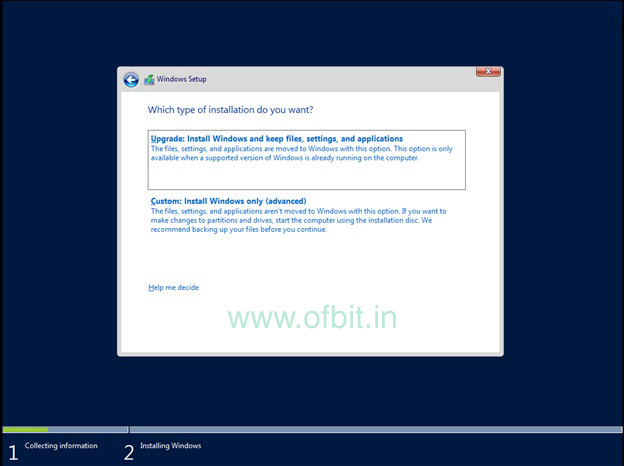
- When installing, select “Custom: Install Windows Server Operating System only” if you’re installing the OS on a fresh server. Otherwise, if upgrading from a previous version of Windows Server, choose the “Upgrade: Install Microsoft Server Operating System and keep files, settings, and applications” option.
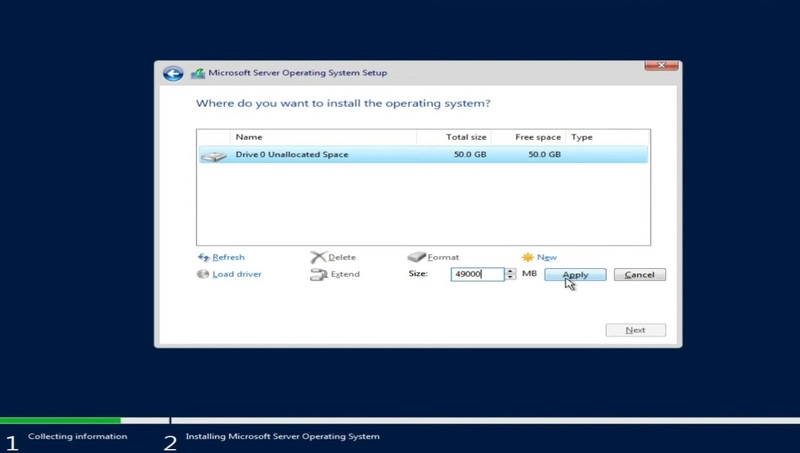
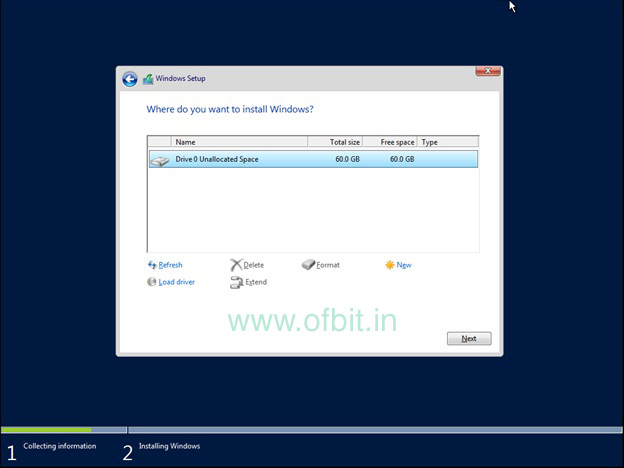
- Select a partition to install Windows Server onto. You can optionally create a new partition or use the entire drive size. When done selecting the designated OS partition, proceed by clicking “Next.”
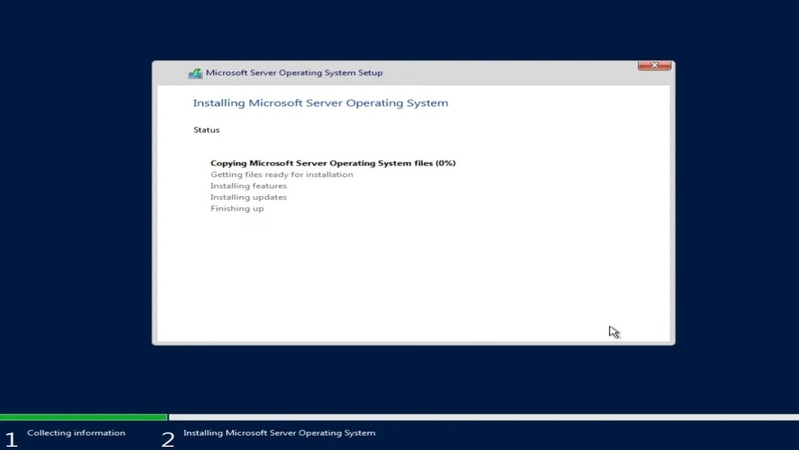
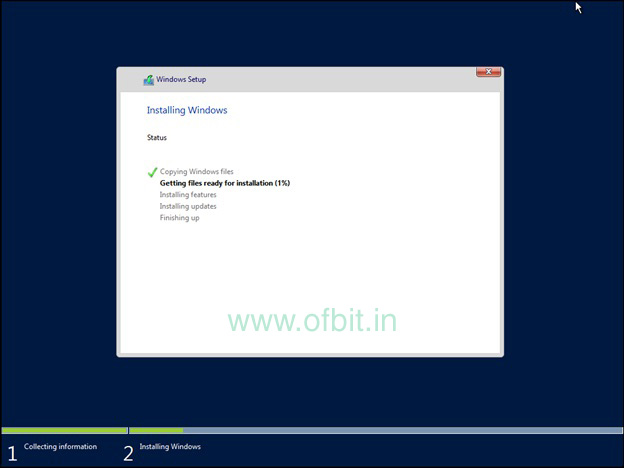
- The installer will begin installing the necessary system files. You’ll see when it’s completed, and the system reboots automatically.
- After a successful installation, the system should immediately reboot and prompt you for an administrator password. Enter this information before re-entering it once again to verify it, and then continue.
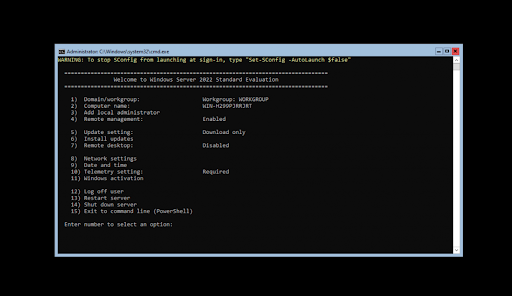
- Next, you’ll be taken directly into Microsoft’s PowerShell interface, where you can begin managing your newly installed Windows Server 2022 operating system via the Server Core interface.


Step 3.2 Installing Windows Server 2022 (Desktop Experience)
If you want to install Windows Server 2022 using Desktop Experience, follow the instructions in this section. The Desktop Experience installation has a dedicated GUI (Graphical User Interface) similar to a regular Windows operating system, making server management easier.
- Follow the same instructions as the Server Core installation until your system restarts after installing the operating system. Also, make sure to select Desktop Experience when choosing your Windows Server 2022 version.
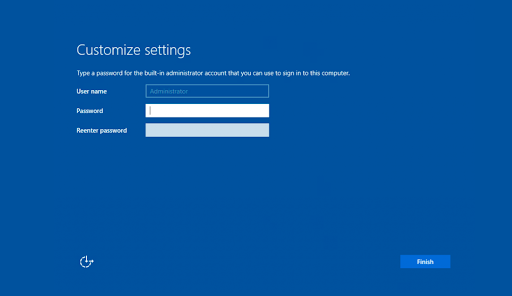
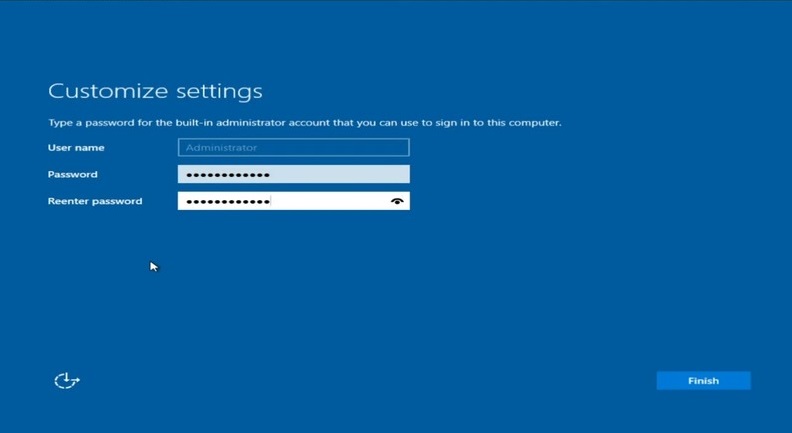
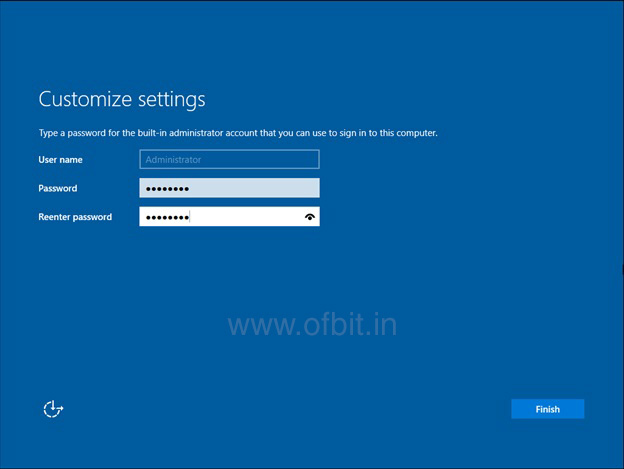
- After your system restarts, you’ll be greeted with a graphical interface. You’ll be prompted to create an administrator password before you can proceed. Click Finish when you’re done.

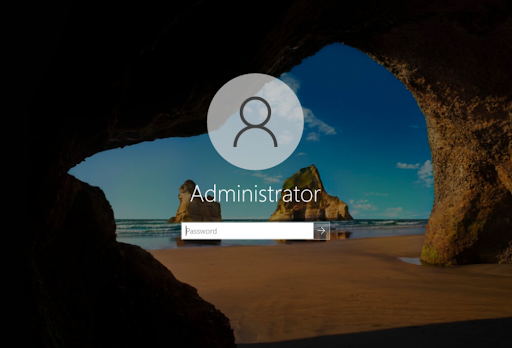
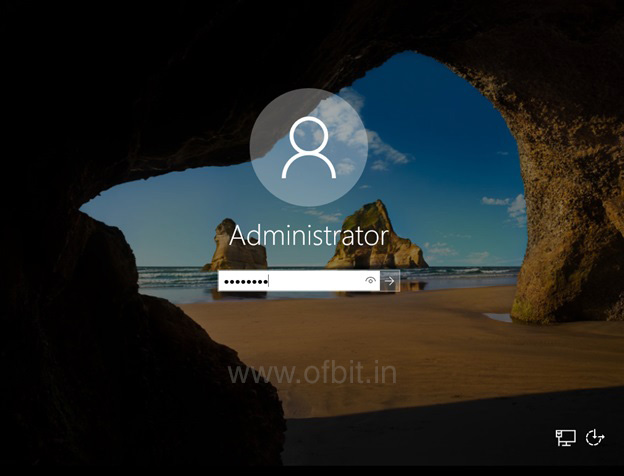
- The login screen will appear when you press Ctrl + Alt + Del. Enter the password set in the previous step to continue accessing your server.
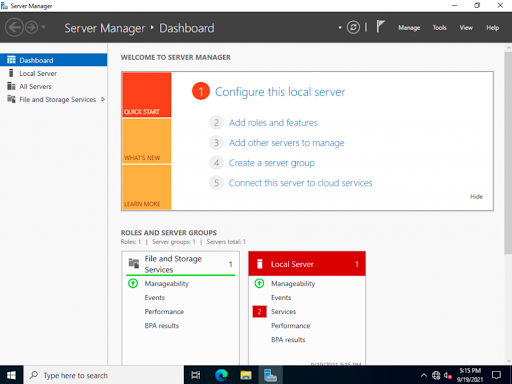
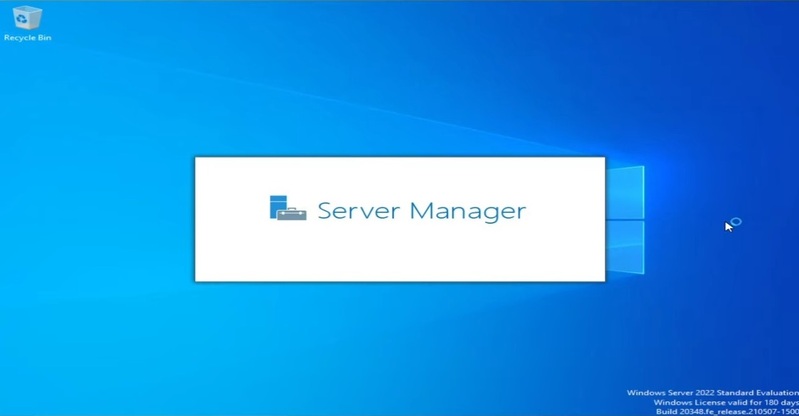
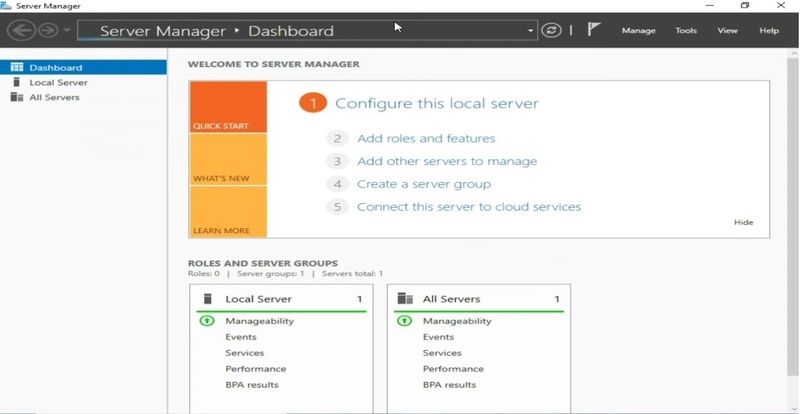
- You should see the Server Manager launch by default. You can begin configuring your server here or explore more options in the Control Panel accessible in the same way as it is on regular Windows operating systems.

Step 4. Configure your network on Windows Server 2022
The previous sections covered how to install Windows Server 2022, but now it’s time for configuration. The first things that need configuring on your network are IPs and gateway addresses so that system admins can manage the server remotely and reach other parts of their environments, including internet-based services.
Step 4.1 Network configuration on Windows Server 2022 Server Core
The instructions below will help you configure the network if you installed Windows Server 2022 with a Server Core installation.
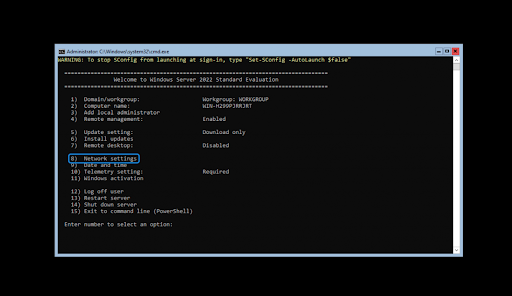
- To configure the network for Windows Server 2022, run the following command in the Command Prompt area:
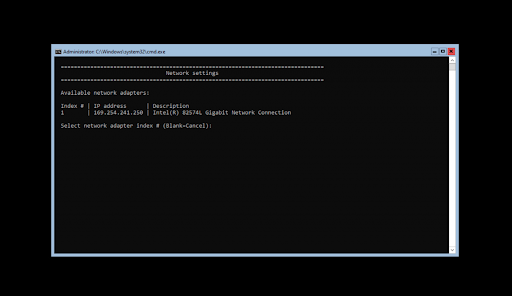
- You’ll see a menu open on the screen. Choose option 8 for Network Settings. You’ll be taken to your network configuration page, where all of these adjustments are made for both wired and wireless networks!
- To begin configuration, you need to select which IP to configure first. In this example case, we’ll choose 1 since our server has only one network connection. Normally, you might see multiple options here — select the one you want to work with first.
- Once you have selected your IP for configuration, you can begin customizing your settings. The computer’s network settings will be automatically updated. The process should take no more than five minutes to complete.
Step 4.2 Network configuration on Windows Server 2022 Desktop Experience
The instructions below will help you configure the network if you install Windows Server 2022 with a desktop experience.
- Open the Search interface in your taskbar by clicking on the magnifying glass icon. You can also bring it up with the Windows + S keyboard shortcut.
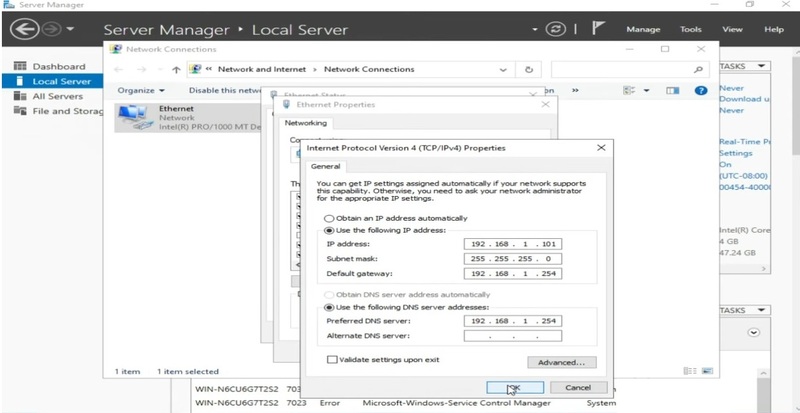
- Type in words Control Panel and click on the first matching search result. When it opens, navigate to Network and Internet > Network Connections.
- Right-click on the network you want to configure. We only have one network connection to the server computer in our example; however, you may see many possible options. Pick whichever you want to configure, and choose Properties from the context menu.
- You can begin configuring the network connection using the GUI, which resembles Windows 10’s.

How to install Server 2022 Updates
- Click Start > Settings
- Select Update and Security.
- Click Check for Updates.
- Now you should see the latest updates available for your Server 2022.
- Click Install Now to begin the installation of updates.
Final thoughts
Congratulations on completing the installation of Windows Server 2022. We hope that you found this guide helpful and that it will help you get up to speed with your new server software. If not, we’re here for you! Our Help Center and Blog offer a variety of articles on how to set up different services and features,so be sure to check there first if you need more information or assistance.
As always, feel free to contact us via available options. We’re here to answer any questions about our product and service offerings.
If you want to get early access to our newest blog posts, promotions, and discount codes, don’t forget to subscribe to our newsletter! You’ll get the best price on all products we offer at SoftwareKeep.
That’s all for today. Thanks for reading today’s article — see you next time!
Read next
» Microsoft Windows Server 2022 Buyer’s Guide
» Pricing and licensing for Windows Server 2022
» Windows Server 2022 vs 2019: Features and Security — All you need to know
Windows Server 2022 Installtion FAQ
How do I get Windows Server 2022?
There are two ways. First, Windows Server 2022 is available in the Microsoft Volume Licensing Center for customers with existing licensing agreements, or in the Azure Marketplace for use as an Azure virtual machine. Or you can get your Windows Server 2022 from SoftwareKeep. Alternatively, you can download evaluation versions from the Windows Evaluation Center, with ISO and VHD installer options.
Can you get Windows Server for free?
No. but Microsoft has a free trial for Windows servers. For example, you can upgrade to Windows Server 2019 or Windows Server 2022 for greater innovation, built-in security, and container support. Get started with a 180-day free trial.
How many editions of Windows Server 2022 are there
There are three editions/versions of Windows Server 2022: Essentials, Standard, and Data Center.
Currently, Windows Server 2022 is Microsoft’s latest version of Windows Server. This post from MiniTool teaches you how to install, set up, and configure Windows Server 2022. Besides, you can know other information about Windows Server 2022.
Windows Server 2022 was released in 2021 and will receive 10 years of long-term support, which is the latest version of Windows Server from Microsoft in the Long Term Servicing Channel (LTSC). In terms of features, Windows Server 2022 builds on Windows Server 2019.
Microsoft recommends you install Windows Server 2022 since it has new, better, more efficient features.
New Features of Windows Server 2022
This part lists the new features of Windows Server 2022.
- Windows Server 2022 enables TLS 1.3 and HTTPS by default. Typically, this protects client data connecting to the server and eliminates outdated encryption algorithms. It also enhances the security of older versions and aims to encrypt as many handshakes as possible.
- The advanced multi-layer security in the Server 2022 Security Module provides the comprehensive protection servers need in today’s modern technological world.
- Windows Server 2022 is built on three key pillars – Advanced Protection, Simplified Security, and Preventive Defense.
- The DNS client in Windows Server 2022 now supports DNS-over-HTTPS (DoH), which encrypts DNS queries using the HTTPS protocol.
- New improvements to Windows Admin Center for managing Server 2022 include the ability to report on the current status of security core features.
- HotPatching – A new way to install updates on new Windows Server Azure edition virtual machines (VMs) without requiring a reboot after installation.
- Several platform improvements for Windows containers, including application compatibility and the Windows container experience for Kubernetes.
- Microsoft Edge is included in Windows Server 2022, replacing Internet Explorer.
System Requirements of Windows Server 2022 Installation
If you want to install Windows Server 2022, you need to check if your PC meets the minimum hardware requirements. Let’s have a look at them below:
- Processor: 1.4 GHz 64-bit processor compatible with the x64 instruction set. Supports NX and DEP, CMPXCHG16b, LAHF/SAHF, and prefetch.
- Memory/RAM: 512 MB (2GB for servers with the Desktop Experience installation option). ECC (Error Correcting Code) type or similar technology for physical host deployments.
- Disk space: At least 32 GB.
- Network requirements: An Ethernet adapter with a throughput of at least 1 Gb/s. Compliant with the PCI Express Architecture Specification.
- Additional Requirements: UEFI 2.3.1c-based system and firmware supporting Secure Boot, Trusted Platform Module, graphics device, and monitor supporting Super VGA (1024 x 768) or higher resolution.
Tips:
Tip: To get more details about Windows Server 2022 requirements, refer to this post — Check Minimum Hardware Requirements for Windows Server 2022.
Windows Server 2022 Installation Options
Microsoft provides two installation options for you – Server Core and Server with Desktop Experience.
- Server Core (recommended installation option) – This option is a smaller installation that includes the core components of Windows Server and all server roles, but does not include the local graphical user interface (GUI). It is primarily used to remotely deploy images to client computers with the help of Windows Admin Center, PowerShell, or other server management tools.
- Server with Desktop Experience – This is a full installation with a full GUI and a larger footprint than Server Core.
How to Install Windows Server 2022
After downloading Windows Server 2022 ISO from Microsft Evaluation Center, you can start to install it on VMware or a physical machine. There are some differences between the two ways.
First, the bootable media is different. On a physical machine, many users prefer to install Windows Server 2022 from USB. On VMware, you can use the ISO file directly without burning it.
Second, Windows Server 2022 starts differently. On a physical machine, you need to create a bootable USB flash drive with an ISO file, connect the bootable USB flash drive to the server and set the boot priority, and then boot from it. And for VMware, you can directly add the ISO file to boot.
Installing Windows Server 2022 (Server Core)
If you want to install Windows Server 2022 using Server Core, follow the instructions in this section.
On VMware
Step 1: Open VMware Workstation and click Create a New Virtual Machine. Then, choose your Windows Server 2022 ISO as the installer disc.
Step 2: Then, you need to choose language, time and current format, and keyboard or input method. After choosing them click Next to continue.
Step 3: In the next window, click Install Now.
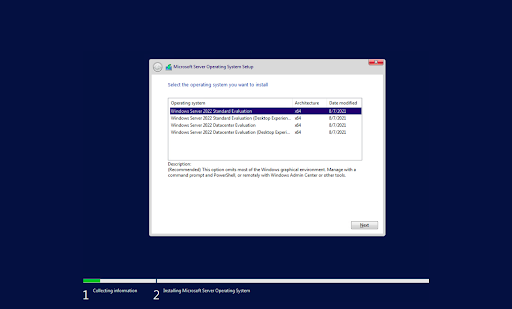
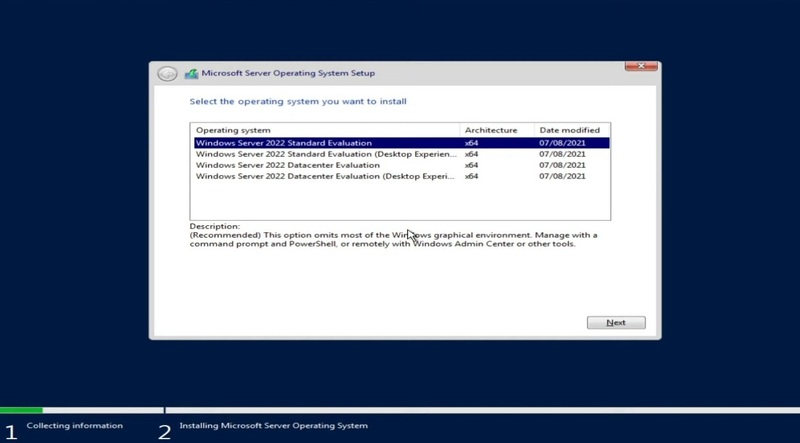
Step 4: Choose the operating system version you need to install. Here, we choose Windows Server 2022 Standard Evaluation and click Next.

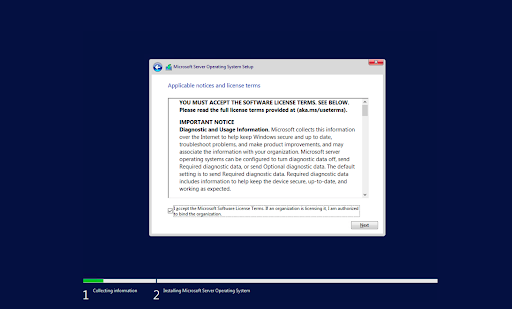
Step 5: Check the box to accept the software license terms and click Next.
Step 6: Then, choose Custom: Install Windows Server Operating System only. Otherwise, if upgrading from a previous version of Windows Server, choose the Upgrade: Install Microsoft Server Operating System and keep files, settings, and applications option.

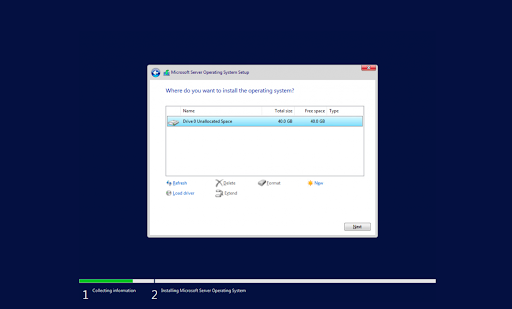
Step 7: Select a partition to install Windows Server and click Next. Then, it will start to install the necessary system files. When it’s completed, the system will restart automatically.
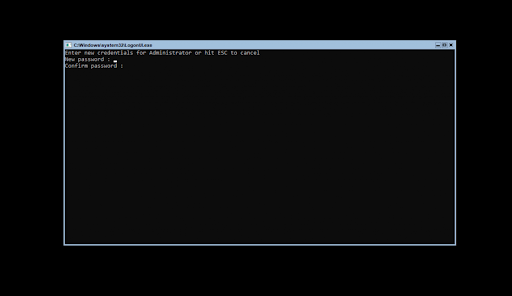
Step 8: Then, you will be asked to change the administrator password. Click OK.
Step 9: Enter the new administrator password and confirm it.

Step 10: Next, you’ll be taken directly into Microsoft’s PowerShell interface, where you can begin managing your newly installed Windows Server 2022 operating system via the Server Core interface.

On a Physical Device:
Step 1: Create a bootable USB flash drive and insert the installation USB into your PC.
Step 1: Restart your computer and press a specific key (eg: ESC, F2, F10) to enter BIOS.
Step 3: Choose the USB drive as the first boot option. Then, press F10 to save your changes and boot from it.
Step 4: Follow Step 2 – Step 10 of installing Windows Server 2022 on VMware. The steps are the same.
Installing Windows Server 2022 (Desktop Experience)
If you want to install Windows Server 2022 using Desktop Experience, follow the instructions in this section.
Step 1: Follow the same instructions as the Server Core installation until your system restarts after installing the operating system.
Note: You need to select Windows Server 2022 Standard Evaluation (Desktop Experience) when choosing your Windows Server 2022 version.
Step 2: After your system restarts, you’ll be greeted with a graphical interface. You’ll be prompted to create an administrator password before proceeding. Click Finish.
Step 3: The login screen will appear when you press Ctrl + Alt + Del. Enter the password set in the previous step to continue accessing your server.
Step 4: Then, Server Manager will be launched. You can start to configure your Windows Server 2022.

How to Configure Windows Server 2022
After installing Windows Server 2022, you can start to configure it. The first things that need configuring on your network are IPs and gateway addresses so that system admins can manage the server remotely and reach other parts of their environments, including internet-based services.
Configure Network on Windows Server 2022 Server Core
if you installed Windows Server 2022 with a Server Core installation, follow the below instructions to configure the network.
Step 1: Run the following command in the Command Prompt area:
SConfig
Step 2: Then, choose option 8 for Network Settings and you will be taken to your network configuration page.
Step 3: To begin configuration, you need to select which IP to configure first. Normally, you might see multiple options here — select the one you want to work with first.
Step 4: Once you have selected your IP for configuration, you can begin customizing your settings. The computer’s network settings will be automatically updated. The process should take no more than five minutes to complete.
Configure Network on Windows Server 2022 Desktop Experience
If you install Windows Server 2022 with a desktop experience, the instructions below will help you configure the network
Step 1: Press the Windows + I keys together to open the Settings application.
Step 2: Go to Network & Internet > Ethernet > Change adapter options.
Step 3: Right-click the network you want to configure to choose Properties from the context menu. You can begin configuring the network connection.

How to Install the Latest Windows Server Updates
Before starting to use Windows Server 2022, you had better run Windows Update to get the latest security fixes, bug fixes, and any new features.
Step 1: Press the Windows + I keys together to open the Settings application.
Step 2: Go to Update & Security > Windows Update.
Step 3: Click Check for updates and the latest cumulative updates for Windows Server, .NET Framework, etc. will be listed. You can click Install Now.

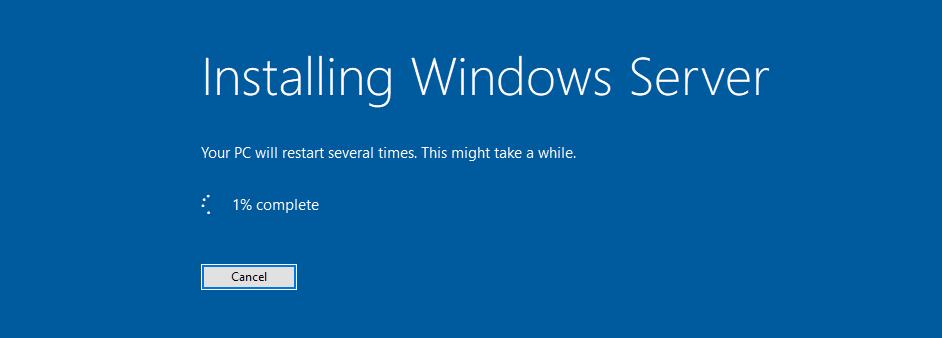
Step 4: After installing the Windows Server 2022 updates, your PC will restart several times automatically and you just need to wait patiently.
How to Back up Windows Server 2022
After configuring your Windows Server 2022, it’s highly recommended to back up the system to protect it. To do that, here is a piece of great and professional backup software for you – MiniTool ShadowMaker. It is designed to back up the operating system, disks, partitions, files, and folders.
MiniTool ShadowMaker provides data protection services and disaster recovery solutions for PCs, Servers, and Workstations. It supports Windows Server 2008/2012/2016/2019/2022. Now, we will show you how to use MiniTool ShadowMaker to back up Windows Server 2022.
MiniTool ShadowMaker TrialClick to Download100%Clean & Safe
Step 1. Download, install, and launch MiniTool ShadowMaker. Then click Keep Trial.
Step 2. After entering its main interface, go to the Backup page. MiniTool ShadowMaker chooses the operating system as the backup source by default.
Step 3. Then click Destination to choose a target disk to save the backup image.
Step 4. Then click Back Up Now to start the Windows Server backup process. Or, you can click Back Up Later to delay the backup task. Then, you can find the task on the Manage page.

After that, you performed a Windows Server backup. If you want to restore the system image, you can go to the Restore page and follow the on-screen wizard to continue. Besides, MiniTool ShadowMaker also enables you to create an Automatic Backup and it offers three different backup schemes.
Bottom Line
The above content teaches you how to install Windows Server 2022. Besides, you can know how to configure the network, how to install the latest updates, and how to back up Windows Server 2022. If you have any questions or suggestions, please contact us via [email protected] or leave a comment.
As a Windows Server administrator, you must keep the infrastructure secure, available, and flexible. If you prefer to install the 10th and latest LTSC release of the Windows Server OS, join us with the Complete Guide to Install Microsoft Windows Server 2022. Three years after Windows Server 2019, Microsoft released Windows Server 2022 on August 18.
Windows Server 2022 is the operating system that large organizations trust. However, if you are managing small-to-medium-sized businesses, follow the steps of this tutorial to start working with Windows Server 2022. In the end, you will be able to enjoy the new and more efficient features of Windows Server 2022 to increase your system performance.
Why You Should Choose Windows Server 2022?
Previously, you reviewed Windows Server 2019 Installation. Built on the solid basis of Windows Server 2019, Windows Server 2022 introduces numerous advances in the areas of security, Azure hybrid integration and administration, and application platform. Advanced multi-layer security, hybrid capabilities with Azure, and a configurable application platform are all features of Windows Server 2022. We are introducing secured-core capabilities as part of this version to aid in safeguarding hardware, firmware, and Windows Server OS capabilities against cutting-edge security threats.
A secured-core server reduces the risk of firmware flaws and sophisticated malware by relying on technologies like Windows Defender System Guard and Virtualization-based Security. AES 256 encryption for SMB, which is the industry standard, and faster and more secure encrypted HTTPS connections are just a few of the new features included in the new release’s secured connectivity.
Customers may continue to run their workloads securely, create new hybrid cloud scenarios, and upgrade existing applications with Windows Server 2022 to satisfy changing business requirements. When you decide to Install Windows Server 2022, you better be aware of its editions which are: Essentials, Standard, Datacenter, and Azure Datacenter.
With the new technical capabilities that come with Windows Server 2022, you can modernize your server environment. Let’s know more here. Also if you are thinking of Upgrading to Windows Server 2022, the below explanations might be efficient.
- Advanced multi-layered security: Windows Server has always placed a strong emphasis on security. You may benefit from multi-layer security in this release thanks to Secured-core server and Secured connectivity. With the Secured-core server’s cutting-edge defense across hardware, firmware, and virtualization layers, IT and SecOps teams are able to implement complete security extensively throughout their environment.
- Flexible application platform: When you install Windows Server 2022 or even upgrade to this version, you can benefit from scalability enhancements like support for 48TB of memory and 2,048 logical cores running on 64 physical sockets for those demanding Tier1 applications. Also, it is possible to benefit from improvements to Windows containers in this release. Windows Server 2022, for instance, increases the interoperability of Windows containers with third-party applications, adds HostProcess containers for node setup, supports IPv6 and dual-stack, and makes it possible to execute network policies consistently with Calico. Additionally, we’re still working with the Kubernetes community to add container support for Windows Server 2022 and add the additional features to both the Azure Kubernetes Service (AKS) and AKS on Azure Stack HCI.
- Hybrid capabilities with Azure: To digitally modernize your businesses, you can choose a hybrid or multi-cloud solution. By connecting to Azure Arc, you may now use on-premises Windows Server 2022 to benefit from cloud services. Additionally, you can benefit from File Server improvements like SMB Compression in Windows Server 2022. By compressing data as it travels over a network, SMB Compression enhances application file transfer. Last but not least, the beloved among admins Windows Admin Center tool offers a contemporary server management experience with features like a new event viewer and gateway proxy support for Azure-linked scenarios.
Prerequisites to Install Windows Server 2022
To let this tutorial works correctly, provide the Windows Server 2022 minimum hardware and system requirements.
- Server: Buying a Dedicated Server to prepare for Installation.
- CPU: 1.4 GHz x86-64 processor.
- RAM: 2 GB.
- Disk space: At least 32 GB free space.
- Network: A wireless adapter that supports 802.11, an Ethernet adapter capable of at least 1 gigabit per second throughput, or a NIC card with a minimum bandwidth of 1 Gbit/s.
- Graphics: 1024 x 768 pixels display
- BIOS: UEFI 2.3.1c-based system and firmware that supports secure boot (only required for certain features)
- Choosing Installation Option.
Windows Server 2022 Installation Option; Which one to Choose?
Customers who download the entire ISO will have to pick an installation method and an edition. The Datacenter and Standard editions are the subject of this ISO review. The most comprehensive edition is the Datacenter edition, which also offers unlimited server virtualization in addition to the additional Datacenter-specific features.
Installation Options:
- Server Core: The installation method that is advised is this one. It is a more compact installation that supports all server roles and has the essential parts of Windows Server but lacks a local graphical user interface (GUI). It is employed for “headless” deployments that are controlled from a distance using the Windows Admin Center, PowerShell, or other server administration programs.
- Server with Desktop Experience: For customers (Especially organizations) who prefer this alternative, this is a complete installation and includes a full GUI.
However, it is up to you to choose which option best suits your needs and preferences. Do your choice and move on.
Install Windows Server 2022 [Step by Step with Screenshots]
Let’s go through the steps of the Windows Server 2022 installation tutorial. It helps you take your job more seriously and keep your data secure. Windows Server 2022 is designed for professionals. Install Microsoft Windows 2022 and be one of them!
Step 1. Prepare to Install & Download the Windows Server 2022 ISO
Obtaining the installation file is the first and most important step in installing the new version of Windows Server 2022. This file is an ISO that has exactly the same information as an optical disc. You can use this file to make a bootable disk on which to install your new server operating system. You must first register on Microsoft’s official Windows Insider page in order to get the Windows Server 2022 ISO image. You can use any browser to access this website.
Then, from the menu that appears, choose Download the ISO by clicking on Windows Server 2022. Then click Next.
To be eligible for downloading the Windows Server 2022 ISO file, you must fill out your details. Make sure you accurately enter your information. Click “Continue” when finished.
When installing Windows Server 2022, select the language you want to use. There are now 8 languages available. After choosing, press the Download button.

It can take the download several hours to finish. Wait till the end.

Step 2. Install Microsoft Windows Server 2022
Power on your physical or virtual machine. It is time to get on with the installation process. Once the below screen is displayed, select your preferred language, keyboard layout preference, and time/currency settings. When you are finished, click ‘’Next’’ and continue.
To start the Windows Server 2022 installation procedure, click the Install Now option. The Server Core edition of Microsoft’s server platform will now start to install.
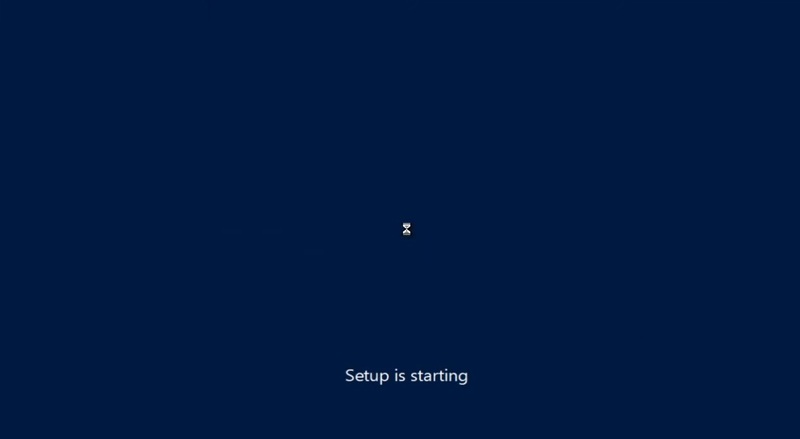
Wait till the setup process is completed.
Select the Windows Server 2022 server option with the Server Core that you want to install in order to get access to and use some of Microsoft’s robust command-line tools. If you prefer to choose to install Windows Server 2022 using Desktop Experience, attention to this step carefully till its end.
For the installation procedure to proceed, you must read the License terms and tick the “I accept all license agreements” box.
If you’re installing the OS on a brand-new server, choose “Custom: Install Windows Server Operating System only” while configuring the installation. Otherwise, pick the “Upgrade: Install Microsoft Server Operating System and keep files, settings, and applications” option if you’re upgrading from a previous version of Windows Server.
To install Windows Server 2022, choose a partition.
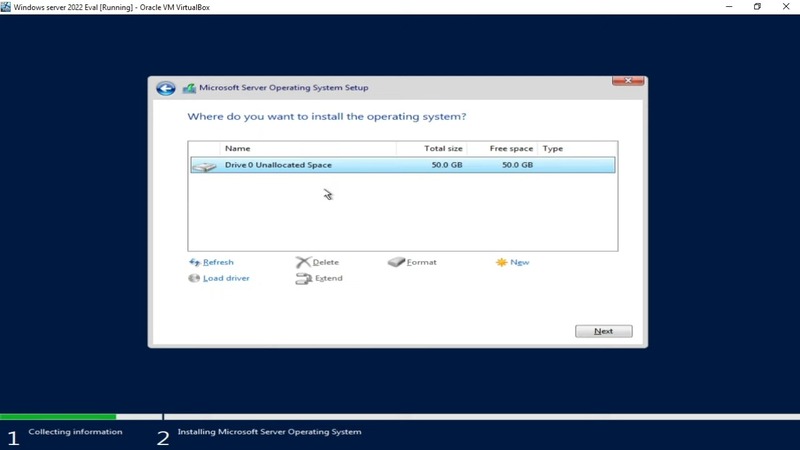
You can decide to use the entire drive size. Otherwise, click on New to make a new considered partition. After making your selection for the OS partition, click “Next.”
The required system files will start to be installed by the installation. When it is finished, you will see the system reboot on its own.
Server management is made simpler by the Desktop Experience installation’s specific GUI (Graphical User Interface), which resembles a standard Windows operating system. Once the operating system has been installed and your computer has restarted, continue with the Server Core installation procedures. In addition, be sure to use Windows Server 2022’s Desktop Experience option.
Your computer will restart and present you with a graphical user interface. Before continuing, you must first create an administrator password. When finished, click Finish.
When you hit Ctrl + Alt + Del, the login screen will appear. To access your server again, enter the password that you set up in the previous step.

The Server Manager ought to start up by default.
The Control Panel is available in the same way as it is on conventional Windows operating systems, so you can start customizing your server from here or explore more possibilities there.
Step 3. Configure Network on Windows Server 2022
So far you reviewed all the required steps to Install Microsoft Windows Server 2022. Let’s continue to learn How to Configure your Network on Windows Server 2022. So that system administrators can operate the server remotely and access other areas of their environments, including internet-based services, you must now configure IP addresses and gateway addresses on your network.
1. Windows Server 2022 Server Core
To Configure Network on Windows Server 2022, run the command below in your command prompt area:
SConfigOnce the screen is displayed, choose option 8 for Network Settings to let all the adjustments of wired and wireless networks be configured. Then, just select which IP (or IPs) you need to configure. If your server has more than one network, you must see multiple options. You can start adjusting your settings after choosing your IP for configuration. The network settings on the machine will be changed automatically. It should just take five minutes to complete the process.
2. Windows Server 2022 Desktop Experience
If you have chosen to install Windows Server 2022 with a desktop experience, follow the below instructions to do Network configuration on it.
1. By clicking the magnifying glass icon in your taskbar, you may access the Search interface. Additionally, you can access it by pressing Windows + S on your keyboard.
2. Enter “Control Panel” into the search box, then select the first result that matches. Go to Network and Internet > Network Connections when it opens.
3. Select with a right-click the network you wish to customize. In our case, we just have one network connection to the server computer, but there may be more alternatives available to you. Choose Properties from the context menu after selecting the item you want to configure.
The GUI, which mimics Windows 10’s, can be used to start configuring the network connection.
How to Install Windows Server 2022 Without Error?
As you know, a Dedicated server is a requirement for installing Windows Server. Since the support team of your provider does not install Windows Server 2022, you need to use virtual machines such as esxi or kvm.
Installing Windows Server on a PC also requires a virtual machine which seems difficult for many users. So, what is the OperaVPS team’s suggestion? You can easily buy Windows VPS with a pre-installed Windows Server 2022 to not have to do all the required steps of installation and manage the long process of installation.
FAQ
Windows Server 2022 is Not free. But for Windows servers, Microsoft offers a free trial period. You may upgrade to Windows Server 2019 or Windows Server 2022, for instance, to get more advanced features, integrated security, and support for containers. Start with a 180-day free trial to get going.
Windows PowerShell is available on all Windows Server 2022 editions such as Standard, Windows Datacenter, and Azure Edition.
Conclusion
In this article, you learned How to Install Microsoft Windows Server 2022. Now, you can enjoy some of the new features like improved security features which help you protect your system against attacks. Also, the Microsoft Edge is now your default web browser.
If you follow the above steps properly then you can smoothly install Windows Server 2022 without any errors but do not hesitate to contact us if you encounter any problems. Our technical support team will try their best to solve your problems.
Система Windows Server отличается от простой операционной системы, которую мы привыкли видеть дома. По сути, это тот же продукт, но он разработан для использования в компаниях, офисах и других местах, где требуется объединение множества компьютеров под одним сервером.

Windows Server — это очень популярная и полезная программа с множеством интересных и удобных функций
Хотя эта версия системы иная, в пользовании она так же проста, как Windows 8 или другие версии, да и установка такого ПО не требует особых знаний и затрат времени. Так что если вы решили самостоятельно установить Windows Server, мы расскажем, как это делается и остановимся на первичной настройке системы, параметра VPN и других вопросах, интересующих многих пользователей — например, как удалить службу в Windows Server 2008 R2.
Установка серверной версии Windows
Отметим, что существует несколько версий этого обеспечения — 2003, 2008 и 2012 года. Исходя из того, что последние версии всегда в большем приоритете, мы рассмотрим, как происходит установка Windows Server 2012. Даже если вас интересует, как установить Windows Server 2008 R2, не переживайте — оба процесса практически совпадают, поэтому вы легко сориентируетесь по нижеизложенной инструкции.

Итак, установка Windows Server 2012 R2 делается следующим образом:
- Зайдите в BIOS компьютера и установите загрузку с CD-ROM.
- Вставьте диск с образом системы, запустите свой ПК, чтобы он начал загрузку с внешнего носителя.
- После загрузки появится окно, где нужно указать язык, раскладку клавиатуры, и часовой пояс — сделайте это, следуйте далее.
- Нажмите «Установить».
- Перед вами появится запрос на выбор системы — есть несколько версий серверного обеспечения. Выберите необходимую версию, жмите «Далее».
- Примите условия лицензии.
- Выберите тип установки — если вы ставите Server с нуля, следует выбирать только вариант «Выборочная».
- Укажите накопитель, куда будет поставлена система, при необходимости разбейте диск на несколько разделов. При делении вам нужно согласиться на создание разделов для системных файлов.
- Кстати, обычно выбирается раздел «Основной» жёсткого диска.
- Нажимаем «Далее», и ждём, пока обеспечение загрузится на ПК.
- После перезагрузки вам предстоит создать пароль для входа в учётную запись — выбирайте надёжную и сложную комбинацию, при желании измените имя пользователя.
- Далее, перед вами появится стартовое окно системы, где будет написано, что нужно нажать Ctrl+Alt+Del — сделайте это, и введите созданный только что пароль.
- На этом установка Windows Server завершена — как видите, в процессе нет ничего сложного, почти все действия выполняются автоматически под вашим руководством.
Настройка системы
Этот процесс несколько отличается на разных версиях обеспечения, поэтому мы рассмотрим его отдельно на Windows Server 2008 и 2012.
Итак, начальная настройка версии 2008 R2 делается так:
- После первой загрузки перед вами появится меню «Задач первоначальной настройки».
- Задайте часовой пояс.
- Укажите имя для компьютера.
- Введите настройки сети VPN — IP и DNS адреса, данные шлюза и WINS.
Как сделать этот компьютер контроллером домена? Для этого вам потребуется следующее:
- Откройте Диспетчер Сервера.
- В меню слева выберите вкладку Roles.
- Нажмите Add roles («Добавить роли»).
- Появится ознакомительная информация — если вы впервые делаете установку подобных компонентов, вам стоит её прочесть.
- Далее, выберите роль Active Directory Domain Services.
- Вам отобразятся функции, которые будут загружены вместе с ролью, после следует выбрать их установку кнопкой Add required features.
- Теперь вы увидите ещё немного сопровождающей информации о том, что нужно ставить как минимум два контроллера, задать настройки DNS и запустить dcpromo после загрузки роли — это мы и сделаем позже.
- После прочтения жмите «Далее» и «Установить» (Next, Install).
- По окончании установки закройте окно и откройте Пуск.
- Введите в поле «Выполнить» значение dcpromo.
- Запустится мастер, после информации о совместимости нажмите Next.
- В окне выбора конфигурации остановитесь на Create a new domain in a new forest.
- Введите название домена, следуйте дальше.
- Выберите действующую версию Windows Server 2008 R
- В окне дополнительных функций отметьте DNS сервер, на предупреждение нажмите Yes.
- В следующем меню измените адреса директорий — но только если вам действительно это нужно.
- Установите пароль, жмите «Далее».
- Проверьте в Summary список устанавливаемых компонентов, если всё нормально, жмите Next.

После перезагрузки компьютера изменения вступят в силу.
Давайте теперь остановимся на том, как происходит первоначальная настройка VPN и прочих параметров на операционной системе 2012 года.
А выполняется она таким образом:
- После первого запуска перед вами появится Диспетчер серверов, выберите вкладку Локальный сервер.
- Первым делом можно изменить имя этого компьютера — кликните правой клавишей на текущее название, выберите Свойства.
- В открывшемся окне на вкладке «Имя компьютера» выберите «Изменить».
- Введите новое имя для ПК, кликните ОК, в основном окне — «Применить».
- Установите дату и время — соответствующая строка есть в том же меню локального сервера.
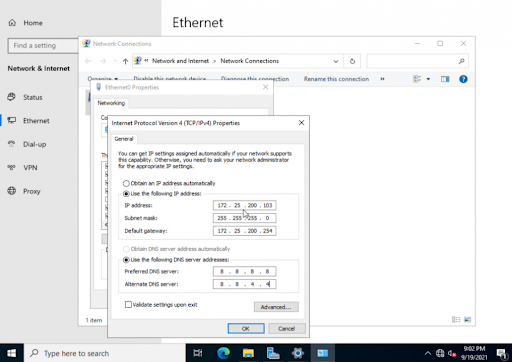
- Как настроить VPN на Windows Server 2012? Для этого нажмите на строку напротив Ethernet и впишите необходимые данные сети.
- В появившемся окне выберите адаптер сети, в контекстном меню — «Свойства».
- В свойствах подключения из списка выберите «Протокол интернета 4».
- В настройках протокола введите нужные данные — DNS-адрес, маску подсети и шлюз, сохраните изменения.
И последнее, что стоит сделать при первоначальной настройке — разрешить доступ к этому компьютеру с других устройств. Для этого в меню Диспетчера серверов снова выберите Локальный сервер, найдите строку «Удалённый рабочий стол».
Кликните по ссылке этой строки, в открывшемся окне отметьте «Разрешить удалённые подключения к компьютеру…» и поставьте галочку напротив пункта ниже — последнее действие выполняется по желанию.
Дополнительно
Как активировать Windows Server 2012 R2? Ниже строки с установками часового пояса в меню диспетчера серверов есть пункт «Код продукта». Чтобы ввести его, выберите этот пункт и в окне введите ключ продукта, нажмите «Активировать».
И ещё, некоторых пользователей интересует вопрос — как удалить службу в Windows Server 2008 R2? Для этого выполните следующее:
- Откройте Панель управления, меню Система и безопасность.
- Выберите раздел Администрирование, где будет пункт Службы.
- Перед вами появится список служб — выберите ту, что вас интересует, нажмите на её свойства и в появившемся окне кликните на «Остановить».
Другой способ — откройте командную строку и введите комбинацию sc delete, сразу за ней — название службы, нажмите Enter.

На этом всё — теперь вы знаете, как установить Server 2008 R2 и 2012, настроить каждую из этих версий для первоначального пользования. Можем сделать вывод, что все вышеприведённые операции выполнить нетрудно, главное — хорошо разобраться в них и следовать инструкциям, быть внимательным к мелочам.
In this tutorial, we will learn how to perform a clean installation of Windows Server 2019. A clean installation refers to installing the operating system on to a computer that does not have an installation present.
Before we start Windows Server 2019 installation GUI mode to get the Windows Server 2019 Desktop Experience, let’s know about some basic things.
System Requirements…
The following are
estimated minimum system requirements to install Windows Server 2019.
- Processor: 1.4 GHz 64-bit processor.
- RAM: 2 GB (for Server with Desktop Experience installation option).
- HDD: 80 GB
- Installation Media: Bootable DVD or Bootable USB Drive
Click here to Visit Microsoft Official site for more details of System requirements.
Performing Clean Installation
A clean installation refers
to installing the operating system on to a computer that does not have an
installation present.
This process is very
simple, you are just only asked to do the following:
- Select Language, Time and currency format and keyboard method.
- Choose an Edition and build of Windows Server.
- Agree to the License Agreement.
- Choose between manual and upgrade installation.
- Configure the disk.
- Set the Administrator password.
- Log in.
Before start Windows Server 2019 installation, we require…
- Windows Server 2019 ISO file. [You can download the Windows Server 2019 ISO from here]
- Create the Bootable USB or CD/DVD. [Click here to learn How to Create a Bootable USB drive.]
- Set up your Boot device priority in BIOS. [Click here to learn How to change Boot Device Priority.]
In this example, I perform a clean installation of Windows Server 2019 with Desktop Experience.
Step 1: In the first screen, you can able to configure language, region and time, keyboard settings. We should configure correct settings here and then select “Next” to continue.
Step 2: On this screen, I select “Install Now”. Here is another option available “Repair your computer” to choose if existing OS is missing some system files to repair.
Step 3: Wait for a while… Setup is Starting…

Step 4: On this screen, I ask to choose the edition of the server. Here are two types of edition available one is Standard Evaluation and another is Datacenter Evaluation with Core or with GUI option. In this tutorial, I am going to choose Standard with GUI Option.
Step 5: We can see the license terms on this screen,
select “I accept license terms” then click “Next” to
continue.
This is the License agreement which has to read and accept to further process. I know you people might think is it really require to read the full agreement as it soo boring, Well, a maximum of geeks moved to the next screen without reading a single sentence.
Step 6: In this screen select “Custom: Install Windows only (advanced)” here because I do a clean installation. But if you need an in-place upgrade you should select “Upgrade: Install and keep files, settings, and applications” here. This option suitable for supported OS, features, services, and roles. But keep in mind you should not prefer in-place upgrade for critical roles like Active Directory Services, etc.
Step 7: In this screen, we can select and configure disc information (You can set the installation disc, size, etc.). I used default settings here.
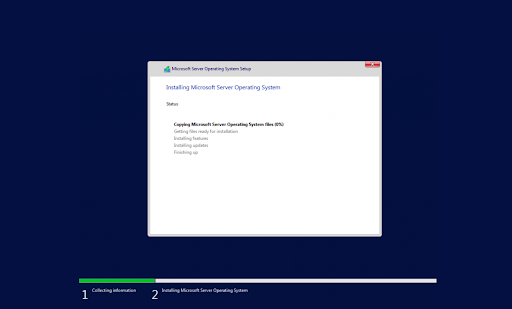
Step 8: Now sit back and wait for the next screen as you can see that the necessary files are copied and the installation process is running on this screen.
Step 9: After the installation process is completed it will automatically reboot.

Step 10: This screen shows that the necessary settings were made before the server was started.
Step 11: Here we can set a Password for the local administrator account. You should configure a secure password for the local administrator. Set your password to something very strong, in fact, you can use a passphrase.
Step 12: As we have completed our installation process now on the login screen, I can log in with the “Administrator” account and related Password which I set in the last step and press “Enter“.
Well, we have
successfully installed Windows server 2019 with Desktop experience and
ready for further configuration.
In our upcoming tutorial/article we will learn more about the Windows server tool, features, options, services, etc and their use.
Related Questions and Tags:
Windows Server 2019 Installation, Installing Windows Server 2019, Windows Server 2019 Installation step by step, Install Windows Server 2019 Step by Step, How to Install Windows Server 2019, How to install windows server 2019 from USB, Windows server 2019 install GUI.