In this article, I will explain how to enable network discovery in Windows Server 2022. Network Discovery is a Windows feature that permits Windows computers to discover and find other devices and computers on the network. When you are connected to a private network, like your home/workplace, the Windows discovery feature is automatically turned on.
Network discovery function
By default, the Network detection in Windows Server 2022 is disabled (for security reasons). Below is the function that offers us options such as.
Active – You can view servers and access other devices and computers on the network.
Disable – The default option doesn’t allow us to see other devices on the network.
Custom – this is the option to adjust network discovery settings to limit some of them.
Enable Network Discovery in Server 2022
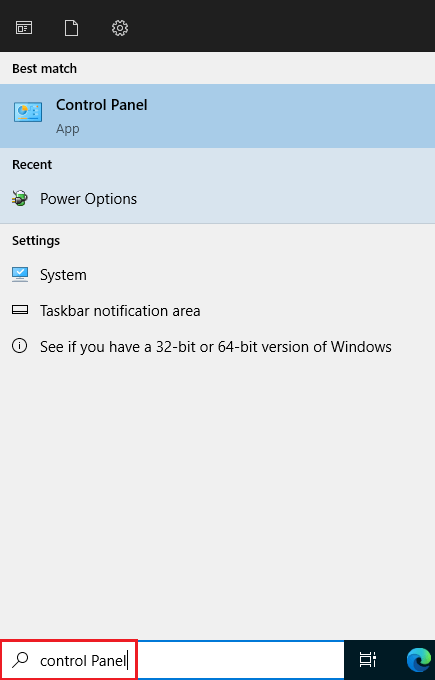
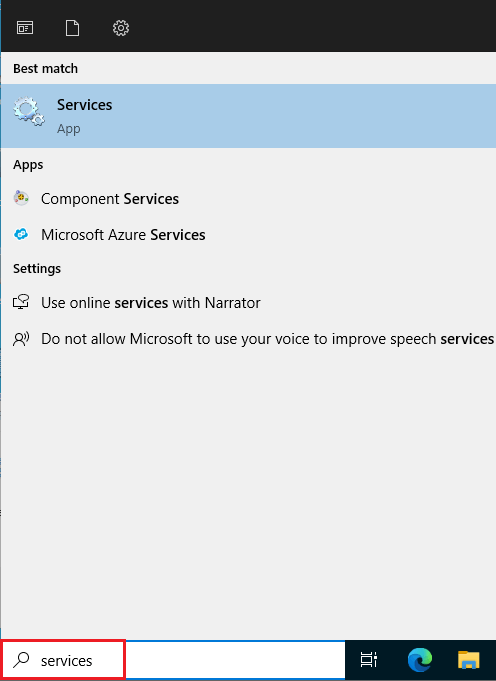
Launch the Control Panel by typing in the Windows search bar.
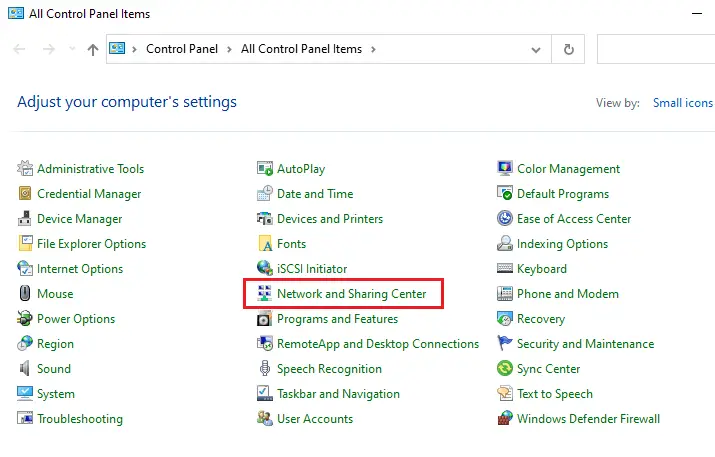
Click on Network and Sharing Center.
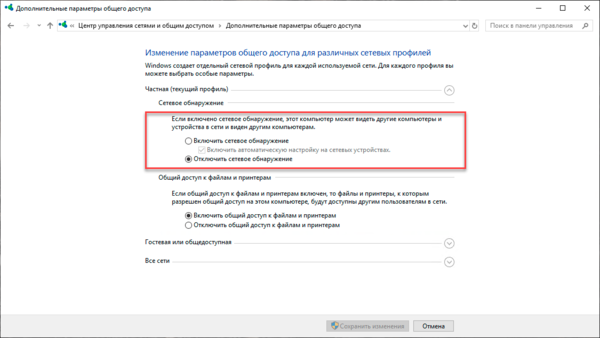
On your left side, click on Change advanced sharing settings.
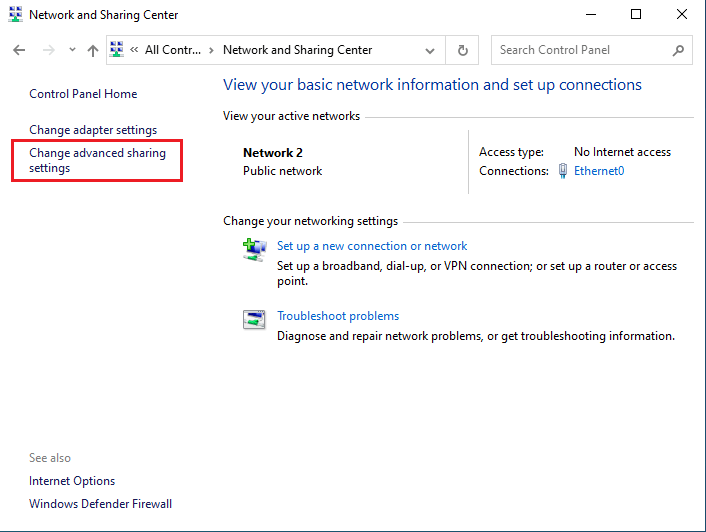
Expand the Domain section and then turn on the Activate network detection box. Apply the changes by clicking on the save changes button.

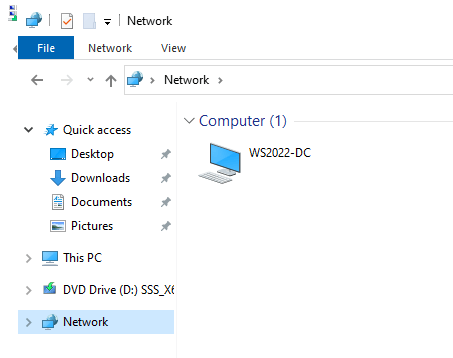
Now, open the file browser and then verify that devices are detected on your network.
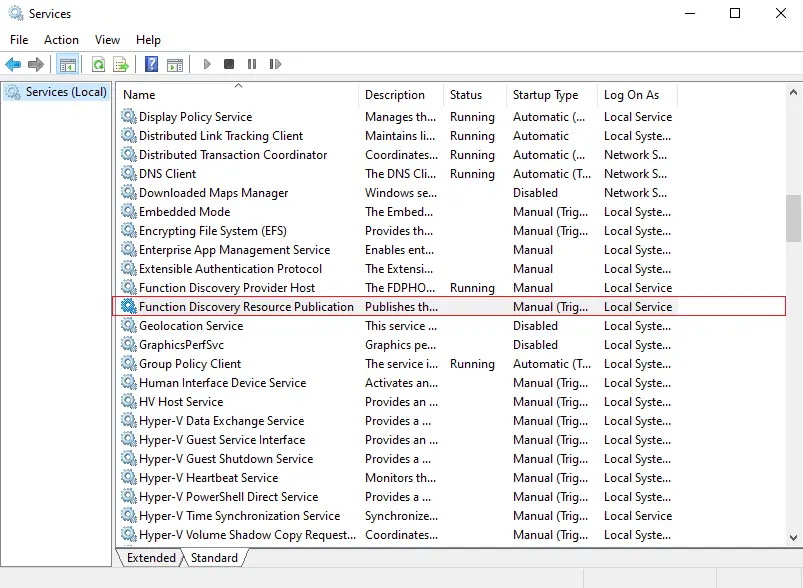
Open service by typing Services in the Windows search bar.
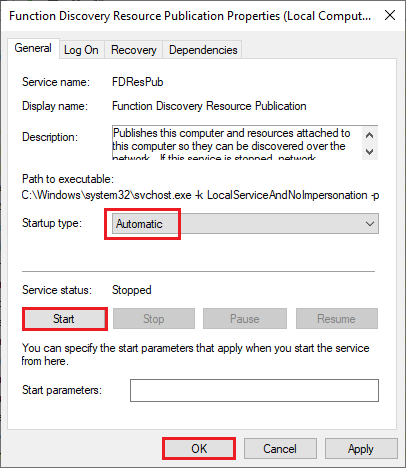
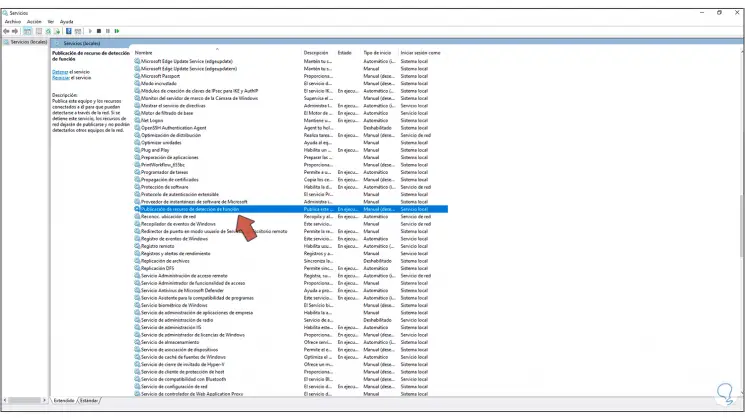
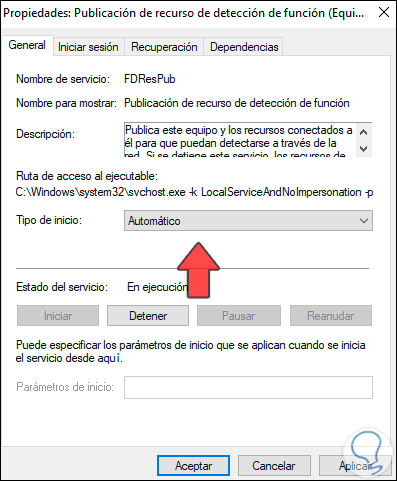
In the services fine and open the Function detection resource publication service.
Set it to Automatic, status start, and then apply the changes.
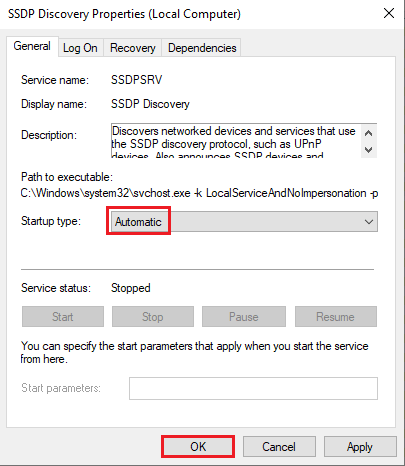
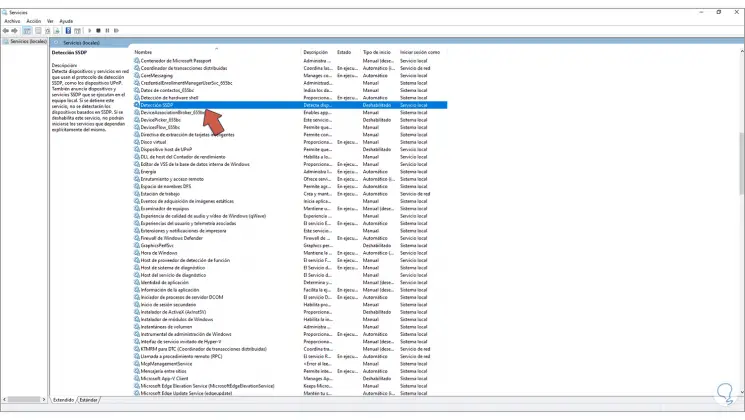
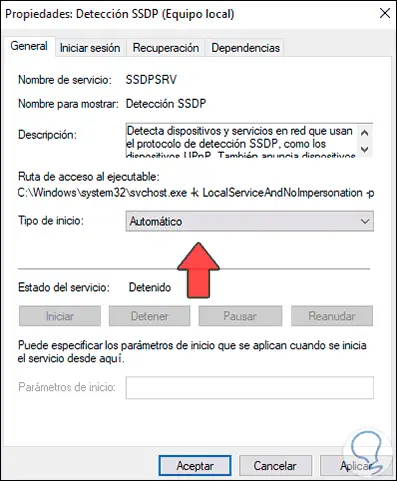
Now open the SSDP Discovery service.
Set it to Automatic and then click ok to apply the changes.
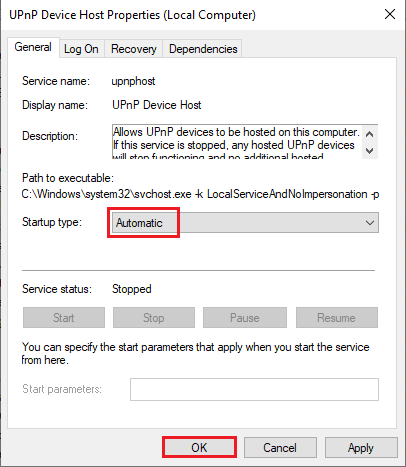
Open the UPnP host devices service
Set it to Automatic and then click ok to apply the changes.
After applying the changes, we will have activated network discovery in Windows Server 2022.
Conclusion
In the above steps, we have learned how to enable network discovery in Windows Server 2022. This is the way to solve this problem in our server. It is important to check the computers/devices inside the network.
For more details please visit Microsoft
Jamil Parvezhttps://www.xpertstec.com
Jamil Pervez works as a Network Administrator, based in Kuwait with a Primary focus on Microsoft technologies. Microsoft Certified MCSE, MCTP, MCITP, CCNP, CCIP, CCVP with 20 years of experience in administering Windows Servers, Exchange, VMWare, Veeam B&R, Veritas BackupExec.
— Advertisement —
Hi, how are you? Windows Server handles a protocol called Network Discovery. In fact, as its name indicates, it allows you to see or find other computers and network devices. Additionally, it allows other computers on the network to see the server. However, the system may fail to detect other computers on the network. This circumstance is burdensome since it can affect the normal development of the system. Consequently, let’s see how to activate network discovery in Windows Server 2019/2016
How to enable network detection in Windows Server 2019/2016.
Network discovery has three basic levels of configuration:
- Enable: This option allows the server to view other computers and devices on the network. In addition, let others see the active server
- Disable: This option prevents both seeing other devices on the network and others from seeing our server.
- Customized: With this option, we can adjust the settings associated with network discovery in order to allow only some of them.
In this opportunity, we will enable definitively the network detection in Windows Server 2019/2016. Well, if you’ve come this far, it’s because when you go to the file browser, the network detection has generated an error. But don’t worry, let’s see how we can fix this problem. First, it is necessary to enter the network settings. With this in mind, follow the next path: Control Panel>Network and Internet>Network and Sharing Center. Once there, please click on Change advanced sharing settings.

In the next window, display the Domain section. Once there, check the Enable network detection box. Then click on Save changes.

Now, go to the file browser and verify that devices are detected on the network.

Activate services to improve network detection.
It is our intention, that your Windows Server works in an optimal mode. Therefore, we will give you some tips to ensure the optimal functioning of network discovery. With that intention, it is necessary to activate some services. For them, from the Dashboard go to Tools and from there select Services.

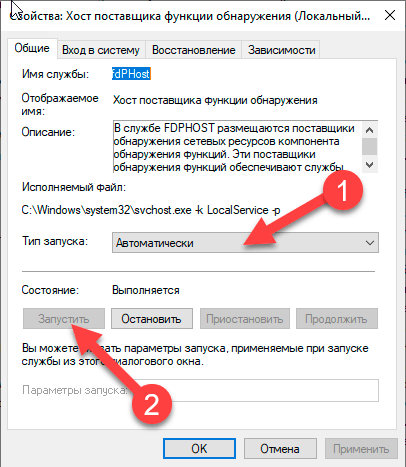
Now locate a service called Function Discovery Resource Publication

Then double-click on the service. Now in the Startup Type, set it to Automatic. Finally, click on OK.

Now locate a service called SSDP Discovery.

Next double-click on the service. Now in the Startup Type, set it to Automatic. Finally, click on OK.

Then locate a service called UPnP Device Host.

Next double-click on the service. Now in the Startup Type, set it to Automatic. Finally, click on OK.

Conclusion
Thus, we have seen how to enable network discovery in Windows Server 2019/2016. This way it is possible to solve this problem in our server. Since it is important to check the network devices inside the system. Well, this is all for now. Before I say goodbye, I invite you to see our post about disabling automatic updates in Windows Server 2019. Feel free to share this post on your social networks. Also, let us know what topic you want us to develop. Bye!
The configuration that Windows server has was causing problems, since sometimes said configuration programmed by the user changed suddenly, just by turning the equipment off and on, this happened. Now, to correct this, Microsoft has released a version of Windows Server 2022, in which it offers new features, such as the detection of other computers and also access to them; all reciprocally.
This is deactivated by default for security reasons and allows us to access three options, the first being Activated, which allows us to see the server and other devices. The Deactivated option, which is the one that comes by default, and hides the server and the Custom one, which has the peculiarity of being able to limit the view of some of them. In this article we will show you how to solve this problem, but you need to be aware of the CMD commands for networks and be able to apply the process.

Why can’t I turn on network discovery in Windows?
When we are working with Microsoft Windows and we need to share information with other computers, we may get the error that network detection is turned off or it is not possible. This can be due to some factors; like some services are not activated or available, that we are not in the same type of network with the equipment that we want to share or that there is simply no connection.
This problem can also be caused by the fact that network discovery and sharing is not enabled automatically, and you must proceed to do it manually. In any case, we must make sure that the Windows Firewall is correctly configured, this may also be the reason that a connection cannot be executed. When all possible causes are investigated we can arrive at the solution, so activating the Troubleshooter can help us rule out possible problems.
Where do you turn on networking on a Windows computer?
To activate networks, we must go to Start, from there we look for Settings, then a category called “Network and Internet” appears in the window, click on this section. From there you look for the Ethernet option, where a notice will appear that tells you whether or not you are connected to the internet and an option called Change Network Settings.
In the three options that appear you must enter the one called Sharing Options, then a pop-up window will be displayed. There you get the site where the networks are activated, we go to the “Activate Network Detection” box and mark it, then for this to take effect, click on “Save Changes”. In this way, Windows network detection will be activated.

How to change the type of network that Windows connects to?
Now what we must know in detail is what type of network we are going to use for our equipment, and if we need to change it, we can do it. So that later it is possible to synchronize and that it appears on the network, and have access to the other computers that are there and also be visible. This is important because this is where the connection is made from, suppose your computer is not on the same network as the others, this makes it impossible to share anything because they are obviously different.
In this case there are two types of networks, although there are more than two, these are the recommended and most used: The public network, with which you have to be careful, because you do not control the network, that is, the devices linked; Likewise, there is the Private network which is more recommended for security reasons. We can also prioritize the connection to a network automatically so that there is no need to do it manually later.
public network
We go to Start on the computer and from here to Settings; then we enter the section called “Network and Internet” and here you are located in the “Ethernet” section. It is from this window where we must mark the blue network icon that is on the left side and we are located in “Search devices and content”. Then we change to a public network in the options that are displayed.

For a private network
Like the previous way, we must search for the same route, however, when you are already located in the properties of the network in which you are connected, you will have to change the box from public network to private network and thus you will be able to connect to is. This action can be performed as many times as you need to change the type of network.
 Современные ОС предусматривают современные подходы ко многим привычным вещам, отказываясь от многих устаревших технологий. С одной стороны это правильно, с другой — может вызвать и вызывает проблемы в переходный период. Поэтому системный администратор всегда должен интересоваться всеми нововведениями используемых систем, а также уметь применять их на практике. Здоровый консерватизм — это хорошо, но он не должен препятствовать прогрессу. Сегодня мы поговорим об одной часто встречающейся проблеме — не включается сетевое обнаружение в последних версиях Windows 10 и Windows Server.
Научиться настраивать MikroTik с нуля или систематизировать уже имеющиеся знания можно на углубленном курсе по администрированию MikroTik. Автор курса, сертифицированный тренер MikroTik Дмитрий Скоромнов, лично проверяет лабораторные работы и контролирует прогресс каждого своего студента. В три раза больше информации, чем в вендорской программе MTCNA, более 20 часов практики и доступ навсегда.
Долгое время взаимоотношения систем семейства Windows c сетевой безопасностью были достаточно сложными. Ситуация начала меняться с выходом Windows XP, в которой появился встроенный брандмауэр, начиная с Vista были введены ограничения для учетных записей пользователей и произошло разделение подключенных сетей на домашние, рабочие и общественные.
Причиной этому стало широкое распространение интернета и широкополосных сетей, когда постоянное подключение к сети стало из роскоши нормой жизни. За ними последовало развитие домовых и личных сетей и сегодня практически каждое устройство так или иначе подключено к какой-либо сети c обязательным выходом в интернет. Это заставило по-новому посмотреть на вопросы безопасности, в частности в сторону ужесточения политик по умолчанию. Вторая проблема — это старые, уязвимые протоколы, многие из которых поддерживались в угоду совместимости, но дальнейшее их применение ставило серьезные проблемы безопасности, обусловленные самой архитектурой этих протоколов.
В современных ОС все сети делятся на частные и общедоступные, любая неизвестная сеть по умолчанию определяется как общедоступная и для нее включаются повышенные меры безопасности. Частные сети предполагают больший уровень доверия и позволяют включить Сетевое обнаружение, которое позволяет текущему узлу находить другие компьютеры в сети и быть видному самому. Ранее за этот функционал отвечал протокол NetBIOS over TCP/IP, но он не удовлетворяет современным требованиям безопасности и поэтому от его применения начали отказываться. На смену ему пришел новый протокол SSDP (Простой протокол обнаружения сервисов, Simple Service Discovery Protocol), который является частью более широкого протокола UPnP (Universal Plug and Play).
Новые протоколы позволяют сетевым устройствам не только обнаруживать и взаимодействовать друг с другом, но и самостоятельно конфигурировать активное сетевое оборудование, например, пробрасывать нужные порты на роутере.
Но вернемся к озвученной в заголовке проблеме. Достаточно часто можно столкнуться с ситуацией, когда сетевое обнаружение в системах Windows не хочет включаться. При этом нет никаких сообщений об ошибках, вы вроде бы включаете сетевое обнаружение, но оно все равно оказывается отключенным.
 Причина такого поведения заключается в том, что старые службы (NetBIOS over TCP/IP) оказываются выключенными, а новые (SSDP и прочие) не включенными. Чтобы решить данную проблему нужно включить автоматический запуск и запустить в указанном порядке следующие службы:
- Обнаружение SSDP — включает поддержку протокола SSDP
- Узел универсальных PNP-устройств — включает поддержку UPnP
- Хост поставщика функции обнаружения — отвечает за обнаружение других устройств в локальной сети
- Публикация ресурсов обнаружения функции — обеспечивает видимость компьютера в локальной сети
Также удостоверьтесь что у вас работает и настроена на автоматический запуск служба:
- DNS-клиент
 Теперь можно включить сетевое обнаружение и удостовериться что вам доступны ресурсы локальной сети.
Научиться настраивать MikroTik с нуля или систематизировать уже имеющиеся знания можно на углубленном курсе по администрированию MikroTik. Автор курса, сертифицированный тренер MikroTik Дмитрий Скоромнов, лично проверяет лабораторные работы и контролирует прогресс каждого своего студента. В три раза больше информации, чем в вендорской программе MTCNA, более 20 часов практики и доступ навсегда.
Enable Network Discovery in Windows Server 2022
Windows Server has had its new version (in the Insider phase) called Windows Server 2022 which offers us different functionalities both in role segments as well as its characteristics and services and one of them is the network detection function with which we can find and access other computers and devices on the network and reciprocally the other computers on the network will have server display in Windows Server 2022..
Network discovery function
Network detection in Windows Server 2022 is disabled by default (for security reasons) and this function offers us options such as:
- Active: this is the option so that the server can view and access other computers and devices on the network, as well as make the server visible
- Disabled: it is the default option and as such it does not allow us to see other devices on the network and the server will also be hidden
- Custom — As the name implies, this is an option to adjust network discovery settings to limit some of them
TechnoWikis will explain how to activate this functionality in Windows Server 2022.
To stay up to date, remember to subscribe to our YouTube channel! SUBSCRIBE
Enable Network Discovery in Windows Server 2022
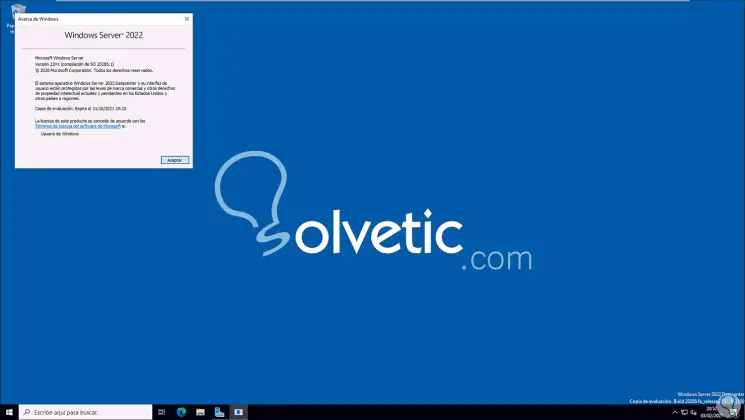
Step 1
We validate the version of Windows Server with «winver»:
Step 2
Now we go to the Control Panel, we will see the following:
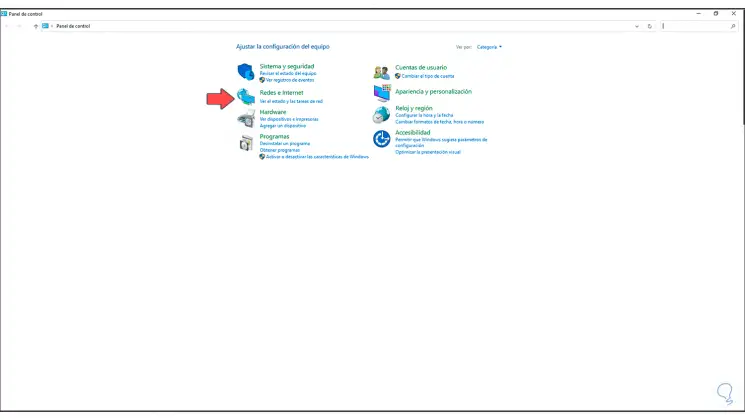
Step 3
We click on «Networks and Internet» and we will see the following options:
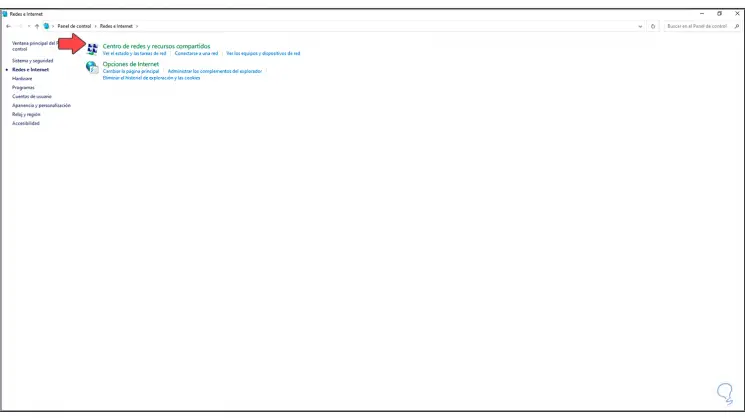
Step 4
We click on «Network and Sharing Center» and we will access the following window:
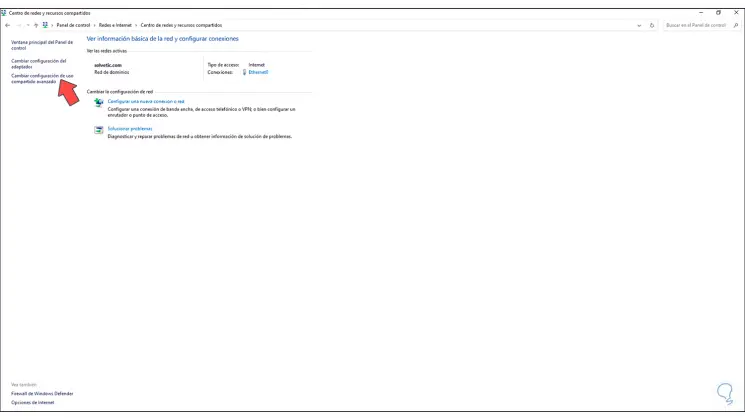
Step 5
We click on «Change advanced sharing settings»:
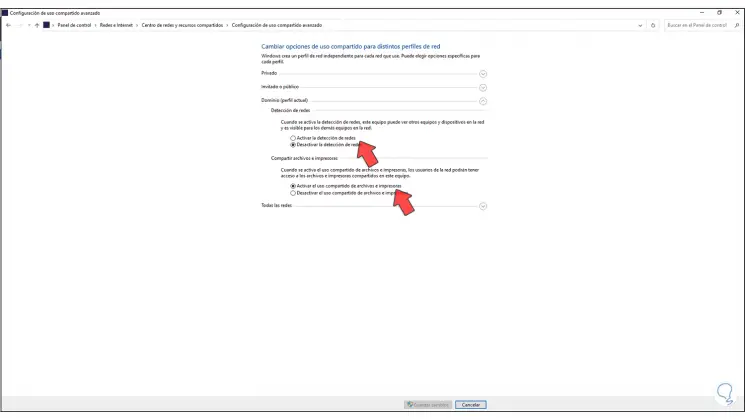
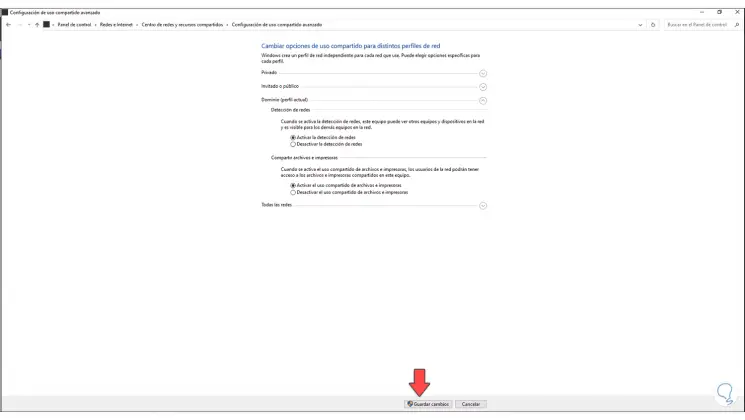
Step 6
We go to the «Domain» section and activate the «Activate network detection» box. We apply the changes by clicking on «Save changes».
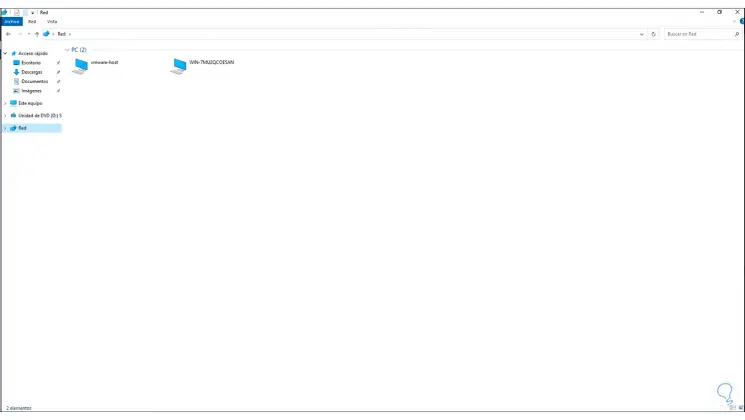
Step 7
Now we open the Explorer and in the «Network» section it is possible to detect the computers on the network:
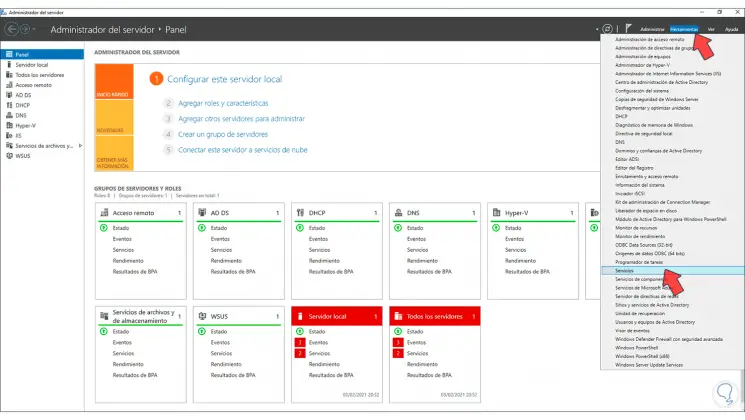
Step 8
After this we go to the Server Manager and there we open «Tools -Services»:
Step 9
In the services console we locate the «Function detection resource publication» service:
Step 10
We double click on it and set «Automatic» in «Startup type». We apply the changes.
Step 11
Now we locate the «SSDP Discovery» service:
Step 12
We double click on it and set «Automatic» in «Startup type». We apply the changes.
Step 13
Finally, we go to the «UPnP host device» service:
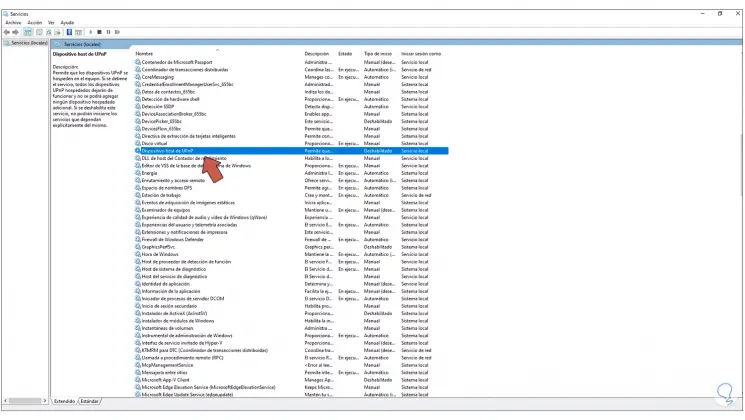
Step 14
We open the service and set «Automatic» to «Startup type»:
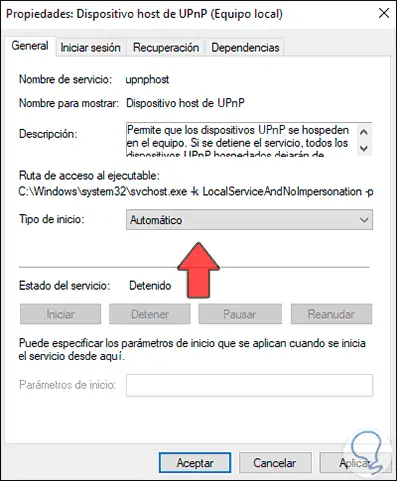
Apply the changes and in this way we have activated network discovery in Windows Server 2022..