When you install the windows server 2022, the next thing you would want to do is to manage the operating system remotely. For that, we could use something called Remote desktop in Windows.
RDP provides remote desktop access to the windows machine over port 3389. This blog post will configure RDP access on windows server 2022 for both administrators and local users.
After which, we will test the connectivity from different machines.
You need to keep in mind that we will use RDP in the Windows server 2022 to manage other services in the server, and it will not act as an RDP server where multiple users can log in. By default, the windows server would allow only two concurrent RDP sessions to the server.
To allow multiple sessions to RDP, you need to have an RDP license to allow more than two sessions.
After enabling the RDP we will restrict the access to a local user. We will further secure the access on the windows server firewall to allow RDP access to only specific IPs. This will be useful when you expose the Windows Server to the public internet.
Create local users.
The server I have installed is brand new and doesn’t have any other users apart from the Administrator. When you allow RDP access to the users, it is best to create a specific user and allow access to them, even when the user is an admin.
That way, you can track the activities done by the users when they RDP into the machine. If you allow RDP access to the Administrator, there are chances that the administrator account is shared among multiple server admins. And if any of the admins mess up some services, it will be hard to find who did it. So it is best to create a specific account for each individual.
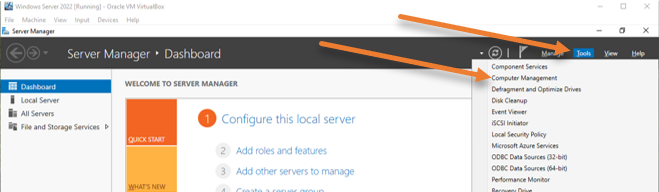
Open Computer management.
Start-> Server manager->Tools->Computer management.
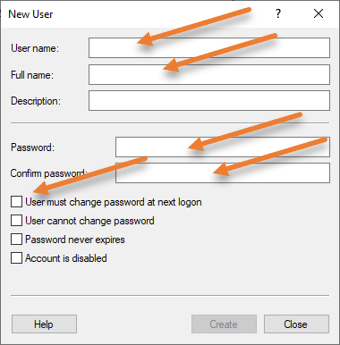
Expand Local Users and Groups-> Users-> Right-click New user..
Fill in the details for the new user and click on Create.
I have unchecked the option that says user must change password at next logon.
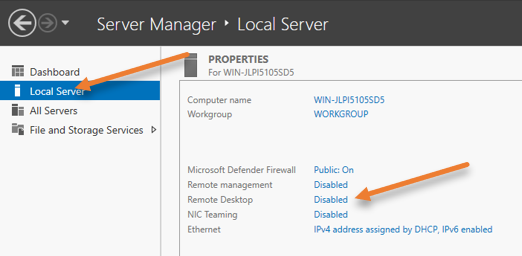
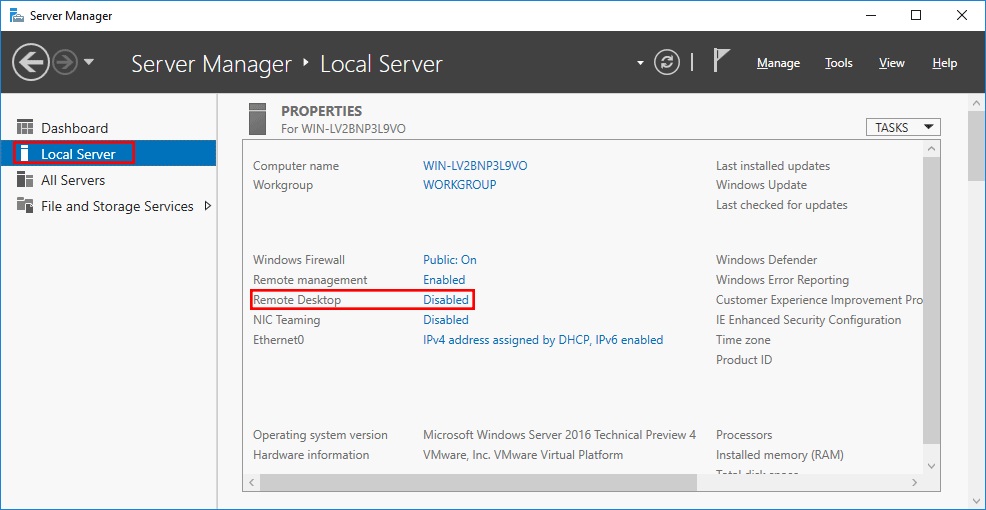
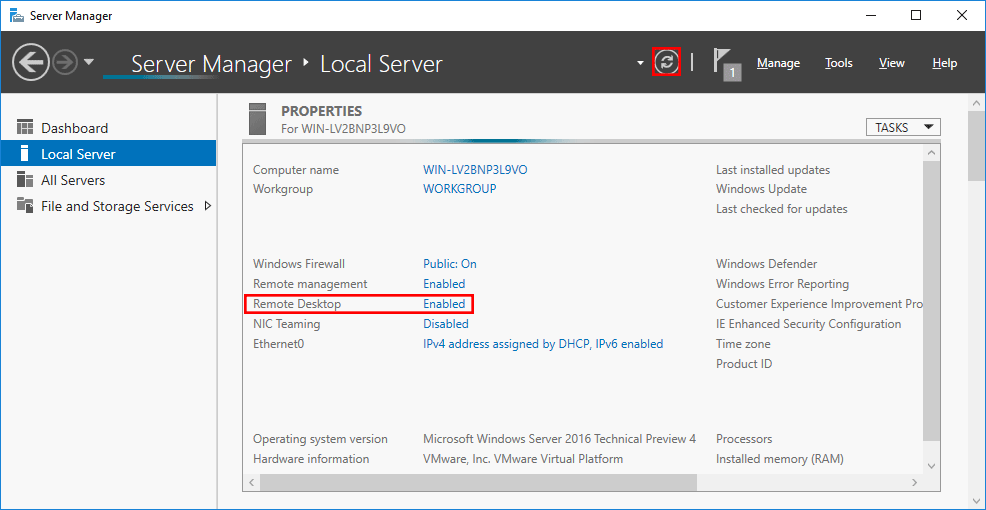
To enable RDP services, go back to the server manager, and click on Local Server on the left side.
You can see that the remote desktop service is disabled, which is the default configuration.
Click on Disabled on the Remote desktop.
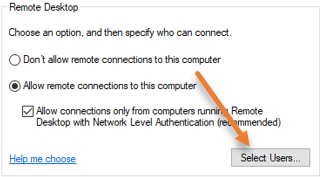
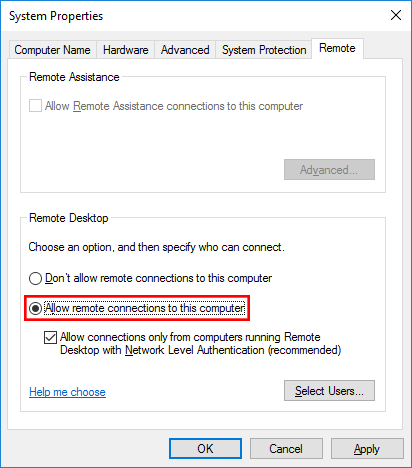
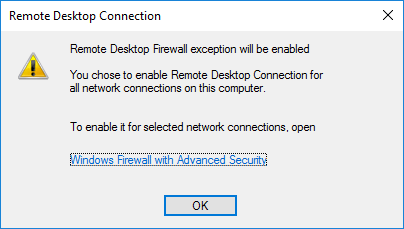
Select the option that says Allow remote connections to this computer. You will get a security warning that says, “Remote desktop firewall exception will be enabled”. This means that after this service is enabled, it will open port 3389 on the windows server firewall side to allow all the users from outside. We will further restrict this later on. For now, click on Ok on the warning.

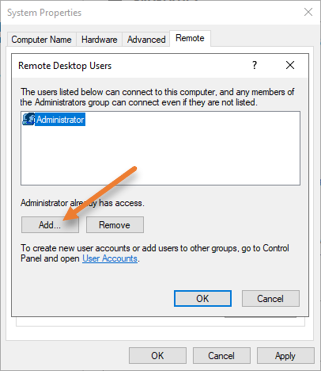
Restrict to Specific users.
Just below, Allow remote connections to this computer, and click on Select users. Here we can allow the RDP connections to specific users. We will enable RDP access to the newly created User plus the Administrator in our case.
You can see, Administrator user is already there. You can either keep it or remove it, depending on your requirement.
Click on Add.
Enter the username in the object name field that we defined and click on Check names.
It will detect the username on this local server, and you can now click on Ok.
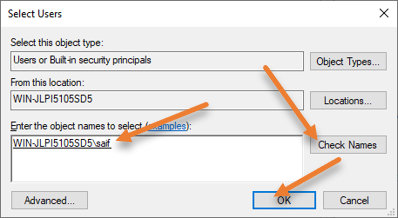
Click ok on other windows as well.
Get the IP address of the server.
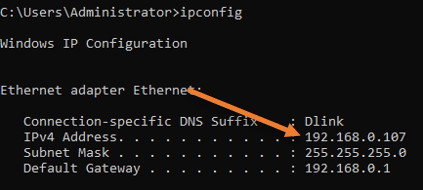
We just enabled RDP access to the specific user, and you may now get the machine’s IP address by going into the below.
Start-> Search CMD-> And select command prompt
In the command prompt window, type ipconfig. It will show you the IP address of the Windows server.
Test the connection.
You can now RDP into the server from a different machine.
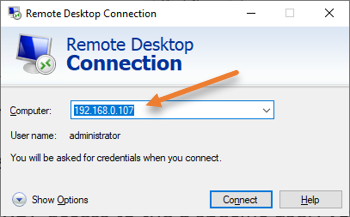
From another machine, open up the RDP application.
In the computer field, enter the IP address of the windows server where we enabled the RDP access.
Note: You need to ensure the network reachability between the machines.
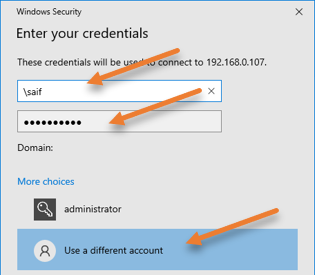
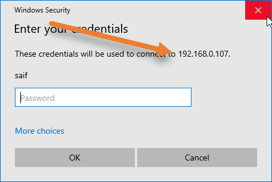
You will be asked to enter the password and click on more choices.
Choose Use a different account.
If you know the domain name, enter it and \username.
If you are not aware of the domain, you may type \username and then the password.
Click on ok.
If you get a security warning, say yes.
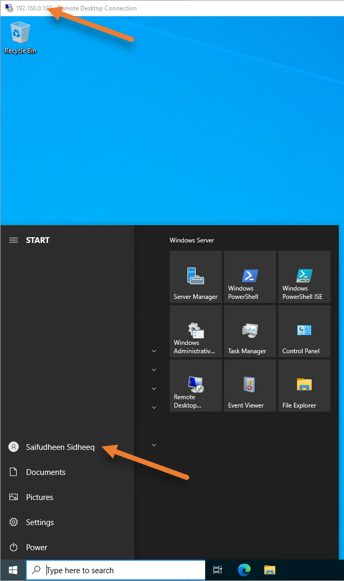
As you can see, I could get into the RDP just fine.
Restrict RDP access to specific IP.
To tighten the security, it is best to allow RDP access to a specific IP or a subnet to ensure only those who are part of the IP/Subnet should be able to get into the server.
I have two machines, one with the IP address of 192.168.0.123 and the second with 192.168.0.162. We will allow RDP access to only an IP address that ends with 123.
Access Windows advanced firewall.
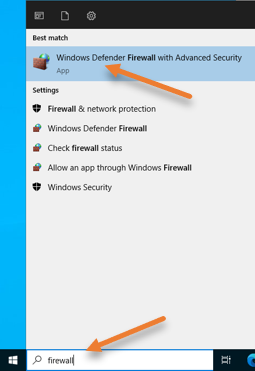
In Start -> Search for the firewall.
Open ‘Windows Defender Firewall with Advanced security‘.
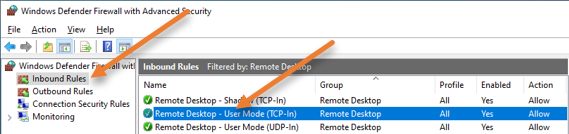
Select inbound rules.
I have filtered the rules with the Remote Desktop. You can see enabled rules with the green tick mark.
The rule that was enabled for RDP access is Remote Desktop – User Mode (TCP-In).
Double click on the rule, or right-click and click on Properties.
In the properties, choose a scope tab.
Under the remote IP address, you may add the source IP address you want to allow for RDP access, 192.168.0.123.
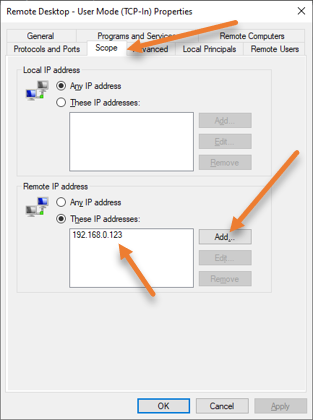
If you want to allow access to the entire network subnet, you can also add a subnet, for example, 192.168.0.0/24, if you wish.
And click on Ok.
You can further fine-tune the rule in such a way that only specific users should be allowed to connect (In the Remote users tab). And if your machine is part of the domain, you can even restrict access to specific computers in the domain by going into the Remote computers tab.
Test the RDP connection again.
To test the RDP access to the server, From the machine 192.168.0.162 try to do the RDP.
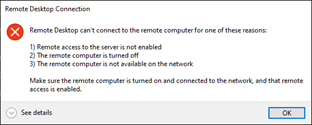
As you can see, I got an error message, and I can’t get into the RDP right now.
However, the machine’s IP address ending with 123 prompted for a password, and I was able to log in.
Check the logs.
I have enabled the logs for this troubleshooting.
From the logs, you can see that the machine with the IP address ending with 162 kept trying, and the server was dropping the traffic as per the firewall policy.
Similarly, the connection from the machine IP address 192.168.0.123 was allowed straight away and we were able to RDP into the machine.

Удаленный рабочий стол (RDP) является одной из основных функций в операционной системе Windows Server 2012. Он позволяет пользователям подключаться к удаленному серверу и работать с ним так, как будто они находятся непосредственно перед ним. Настройка RDP на Windows server 2012 является важным шагом в обеспечении удобного и безопасного удаленного доступа к серверам.
Для настройки RDP на Windows server 2012 следуйте следующим инструкциям:
- Войдите в систему под учетной записью администратора сервера.
- Откройте Панель управления и перейдите в раздел Система и безопасность.
- Выберите Система и откройте вкладку Удаленный доступ к компьютеру.
- В разделе Параметры удаленного рабочего стола установите галочку напротив Разрешить удаленные подключения к этому компьютеру.
- Дополнительно можно настроить другие параметры удаленного доступа, например, ограничить список пользователей, имеющих доступ к серверу.
- Сохраните настройки и закройте Панель управления.
Теперь настройка RDP на Windows server 2012 завершена. Вы можете удаленно подключаться к серверу, используя любой клиент RDP, введя IP-адрес сервера и учетные данные для входа.
Помните, что безопасность RDP крайне важна. Убедитесь, что ваши серверы защищены сильными паролями и имеют обновленные программы безопасности. Также рекомендуется использовать дополнительные меры безопасности, такие как включение двухфакторной аутентификации.
Содержание
- Установка Windows Server 2012
- Подготовка сервера к подключению по RDP
- Открытие порта для RDP
- Настройка пользователей для подключения по RDP
- Настройка RDP службы
- Подключение к серверу по RDP
Установка Windows Server 2012
Перед установкой Windows Server 2012 убедитесь, что ваш компьютер соответствует минимальным требованиям системы:
- Процессор: 1,4 ГГц 64-разрядный процессор
- Оперативная память: 512 МБ
- Свободное место на жестком диске: 32 ГБ
- Видеокарта: поддержка DirectX 9 с WDDM-драйвером
- Дисковод: DVD-привод
- Клавиатура и мышь: мультимедийные или Microsoft-совместимые
Далее следуйте этим шагам для установки Windows Server 2012:
- Вставьте загрузочный диск или подключите USB-накопитель с установочным образом Windows Server 2012 к компьютеру.
- Перезагрузите компьютер и выберите загрузку с установочного диска или USB-накопителя. Для этого может потребоваться изменение настроек BIOS.
- Выберите язык и другие предпочтения, а затем нажмите кнопку «Next».
- Нажмите на кнопку «Install now», чтобы начать процесс установки.
- Примите условия лицензионного соглашения и нажмите кнопку «Next».
- Выберите тип установки (рекомендуется выбрать «Custom: Install Windows only (advanced)») и нажмите «Next».
- Выберите диск, на который будет установлена операционная система, и нажмите кнопку «Next».
- Дождитесь завершения процесса установки.
- Задайте пароль для учетной записи администратора сервера и нажмите кнопку «Finish».
После успешной установки Windows Server 2012 можно будет начать настройку RDP для удаленного доступа к серверу.
Подготовка сервера к подключению по RDP
Прежде чем начать настраивать удаленный рабочий стол (RDP) на сервере Windows Server 2012, необходимо выполнить несколько предварительных действий.
1. Установите операционную систему Windows Server 2012 на сервер. Убедитесь, что сервер правильно настроен и подключен к сети.
2. Проверьте наличие достаточного количества лицензий для подключения к серверу по RDP. Убедитесь, что все пользователи, которым требуется доступ к серверу, имеют соответствующие лицензии.
3. Установите и настройте брандмауэр на сервере. Убедитесь, что порт 3389, который используется для RDP-соединения, открыт.
4. Создайте пользователя, который будет иметь доступ к серверу по RDP. Для этого можно использовать уже существующего пользователя или создать нового. Установите для пользователя необходимые разрешения и пароль.
5. Настройте соединение по RDP на сервере Windows Server 2012. Для этого выполните следующие действия:
| 1. | Зайдите на сервер под учетной записью с административными правами. |
| 2. | Откройте «Панель управления». |
| 3. | Перейдите в раздел «Система и безопасность» и выберите «Система». |
| 4. | На панели слева выберите «Удаленный доступ к компьютеру». |
| 5. | Убедитесь, что опция «Разрешить удаленные подключения к этому компьютеру» включена. |
| 6. | Дополнительно можно настроить параметры подключения, управление пользователями и другие настройки. |
| 7. | Сохраните изменения. |
После выполнения этих действий сервер Windows Server 2012 будет полностью подготовлен к подключению по RDP, и вы сможете удаленно управлять им.
Открытие порта для RDP
Для настройки RDP на Windows Server 2012 необходимо открыть порт в брандмауэре. Это позволит удаленным пользователям подключаться к серверу через RDP.
Для открытия порта для RDP выполните следующие шаги:
- Откройте «Панель управления» и выберите «Система и безопасность».
- Выберите «Межсетевой экран Windows» и нажмите «Дополнительные настройки межсетевого экрана» в левой панели.
- В открывшемся окне «Межсетевой экран Windows с расширенными безопасностными настройками» выберите «Правила входящих соединений» в левой панели.
- Нажмите правой кнопкой мыши на «Правила входящих соединений» и выберите «Новое правило».
- Выберите «Порт» в списке типов правил и нажмите «Далее».
- Выберите «TCP» и введите порт 3389 (порт по умолчанию для RDP) в поле «Конкретные локальные порты».
- Выберите «Разрешить подключения» и нажмите «Далее».
- Выберите, к каким сетям должно применяться правило, и нажмите «Далее».
- Введите имя правила (например, «RDP») и описание (необязательно). Нажмите «Готово».
После выполнения этих шагов порт 3389 будет открыт в брандмауэре и удаленные пользователи смогут подключаться к серверу по протоколу RDP.
Настройка пользователей для подключения по RDP
Подключение к серверу по RDP требует наличия у пользователя соответствующих прав и разрешений. Чтобы настроить пользователей для подключения по RDP на Windows Server 2012, следуйте следующим шагам:
- Откройте панель управления. На рабочем столе щелкните правой кнопкой мыши по кнопке «Пуск», и выберите «Панель управления» из контекстного меню.
- Выберите «Система и безопасность». В окне панели управления найдите и выберите категорию «Система и безопасность».
- Перейдите в раздел «Система». В разделе «Система и безопасность» найдите и выберите опцию «Система».
- Нажмите на ссылку «Удаленный доступ к компьютеру». В левой части окна «Система» найдите ссылку «Удаленный доступ к компьютеру» и нажмите на нее.
- Установите галочку «Разрешить удаленные подключения к этому компьютеру». В открывшемся окне поставьте галочку рядом с опцией «Разрешить удаленные подключения к этому компьютеру» и нажмите на кнопку «ОК».
- Добавьте пользователей в группу «Удаленный рабочий стол». Чтобы позволить пользователям удаленно подключаться к серверу, они должны быть добавлены в группу «Удаленный рабочий стол». Для этого нажмите на кнопку «Выберите пользователей» и добавьте нужных пользователей в список.
- Сохраните изменения. После добавления пользователей в группу «Удаленный рабочий стол», нажмите кнопку «ОК», чтобы сохранить изменения.
После выполнения этих шагов выбранные пользователи смогут подключаться к серверу по RDP с использованием своих учетных записей.
Обратите внимание, что для выполнения этих действий требуются права администратора.
Настройка RDP службы
Для настройки RDP службы на Windows Server 2012 необходимо выполнить следующие шаги:
1. Откройте «Панель управления».
2. Выберите «Система и безопасность».
3. Нажмите на «Система».
4. В левой панели выберите «Удаленный доступ к этому компьютеру».
5. В открывшемся окне установите галочку напротив «Разрешить подключение к этому компьютеру».
6. Нажмите на кнопку «Выбор пользователей» и добавьте пользователей, которым разрешено подключаться через RDP.
7. Откройте «Сервисы».
8. Найдите «Службы удаленных рабочих столов» в списке служб и откройте её.
9. Установите статус службы «Автоматически».
10. Запустите службу, если она ещё не запущена.
11. Переключитесь на закладку «Вход в систему».
12. Поставьте галочку «Позволить подключение только при наличии сетевого управления»
13. Нажмите на кнопку «Применить» и на «ОК».
Теперь RDP служба настроена на Windows Server 2012 и готова к использованию. Вы сможете подключаться к серверу удаленно по протоколу RDP.
Подключение к серверу по RDP
После успешной настройки RDP на Windows server 2012 можно подключиться к серверу удаленно с помощью удаленного рабочего стола.
Чтобы подключиться к серверу по RDP, выполните следующие шаги:
- Запустите программу «Подключение к удаленному рабочему столу».
- Введите адрес сервера, к которому хотите подключиться, и нажмите кнопку «Подключить».
- Если вам будет предложено ввести учетные данные, введите имя пользователя и пароль учетной записи, имеющей доступ к серверу.
- Подождите несколько секунд, пока будет установлено соединение.
- После успешного подключения вы увидите рабочий стол сервера и сможете управлять им удаленно.
При подключении к серверу по RDP рекомендуется учитывать следующие моменты:
- Убедитесь, что сервер доступен и он включен.
- Проверьте правильность введенного адреса сервера.
- Убедитесь, что у вас есть учетная запись с правами доступа к серверу.
- Установите надежный пароль для вашей учетной записи для защиты от несанкционированного доступа.
Подключение к серверу по RDP позволяет управлять удаленной машиной так, как будто она находится рядом с вами. Это особенно удобно для работы с серверами удаленно или для обслуживания удаленных клиентов.
Do you wish to enable RDP in Windows Server 2016? Need to establish remote connections but don’t know how to do so? Want to configure remote desktop using Command Prompt or PowerShell terminal? This how-to tutorial will answer your questions and help you with the configuration.
Why should you use Windows Server 2016?
In a previous article, we have explained how to enable RDP in Windows Server 2012. Now, it’s time to tell you about Windows Server 2016, and explain how you can enable Remote Desktop in Windows Server 2016. But let’s start with a brief history of Windows Server 2016.
Windows Server 2016 is the successor to Windows Server 2012 R2 released in October 2016. This is the seventh release of Windows Server families.

Need a Remote Desktop?
Reliable, high-performance RDP servers with 99.95 uptime. Take your desktop on the go to all the major cities in the US, Europe, and Asia.
Get an RDP Server
Main Features of Windows Server 2016
- Active Directory Federation Services
- Windows Defender (a pre-installed anti-malware)
- IIS 10, support for HTTP/2
- High-availability cluster (i.e. HA cluster, or Metro-clusters Active/Active, or even fail-over cluster)
- Web application proxy
- Windows PowerShell 5.1
- Windows Server Containers
- The feature of Nano-server
- Hyper-V cluster update
- Remote Desktop Services (like Support of Gen 2 VMs (virtual machines) with Remote Desktop, or Pen remoting support, or Edge support in RDSH, or even support of OpenGL applications and guest VMs in Remote Desktop)
- Windows Multipoint Services
- Personal session desktops
And client updates ( including Remote Desktop preview app for Windows 10, and Remote Desktop preview app for Mac)
As you see, Windows Server 2016 comes with brand new features that Allow Remote Desktop and better connections. Here, we will tell you how to enable RDP in Windows Server 2016.
Things to notice before configuring RDP in Windows Server 2016
- By default, Remote Desktop is disabled in all Windows Server 2016 editions (except Windows server 2016 Essential edition).
- RDP in Windows Server can be enabled through two environments including the PowerShell terminal, and logging into the GUI (Graphical User Interface).
- The main difference between these two installation options comes in the GUI shell package. Server Core 2016 does not have pre-installed GUI shell packages. In fact, the GUI is no longer an option in a default install in Windows Server 2016. If you wish to enable Remote Desktop on Windows Server 2016 using GUI, you should enable it.
Windows 10 VPS Hosting
Get yourself an efficient Windows 10 VPS for remote desktop, at the cheapest price out there. FREE Windows 10 running on NVMe SSD storage and high-speed internet.
Check Out Windows 10 VPS Plans
As you know, Graphic User Interface (GUI) allows for remote access to Windows Server 2016. So, when it comes to enabling RDP in Windows Server 2016 via Logging into the GUI, your first requirement is the installation of a Graphic User Interface. After installing the GUI, do the following steps:
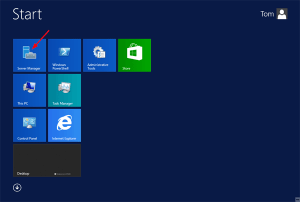
Step 1 : Find Server Manager option
Open Server Manager
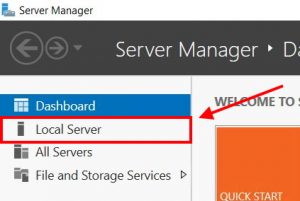
Step 2 : Select Local server
Click Local Server from the left panel
Step 3 : Disable Remote Desktop
Find the Remote Desktop option and click Disabled as shown in the following picture
Step 4 : Enable the Allow remote connections to this computer
In this step, a new window will appear. In System Properties Window, enable the Allow remote connections to this computer In this part, you can decide whether to choose Network Level Authentication (NLA) or not. You can also, add more users here.
Step 5 : Confirm the configuration
Once, you configure all required settings, you will see a message to enable the corresponding Windows Firewall rule. The Remote Desktop Connection Window helps you to establish remote desktop connections, so click OK to confirm the configuration.
Step 6 : Select the Refresh button to set the changes
Now, move back to the Server Manager window. In this window, select the Refresh button as highlighted below to set the changes. Congratulation. You configured a remote desktop.
Enable RDP in Windows Server 2016 via Powershell
PowerShell is an object-oriented command environment that has new features in Windows Server 2016. It utilizes small programs called cmdlets to simplify the management, administration, and configuration of heterogeneous environments.
To enable Remote Desktop in Windows Server 2016 via PowerShell, we can use two cmdlets. The first will enable remote desktop and the second will open the Firewall. They are listed here:
- A code used to configure remote access:
Set-ItemProperty -Path "HKLM:SYSTEMCurrentControlSetControlTerminal Server" -Name "fdenyTSXonnections" -Value 0
- A code for opening the firewall:
Enable-NetFirewallRule -DisplayGroup "Remote Desktop"
As you see, PowerShell enables RDP with these commands. Notice that administrators can remote in by default, while to provide non-admin users permission to Remote Desktop access, you should add them to the Remote Desktop Users’ local group.
Need a Remote Desktop?
Reliable, high-performance RDP servers with 99.95 uptime. Take your desktop on the go to all the major cities in the US, Europe, and Asia.
Get an RDP Server
Enable RDP in Windows Server 2016 with command line
Well, one of the answers to the “How to Enable RDP in Windows Server 2016” question is using PowerShell Terminal. In order to do this, you should follow the instructions below.
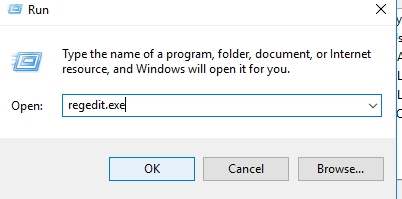
1- Click Windows + R key to open Run Window;
2- In this window, type regedit.exe and press OK;
3- In Registry Editor, select File and then select Connect Network Registry;
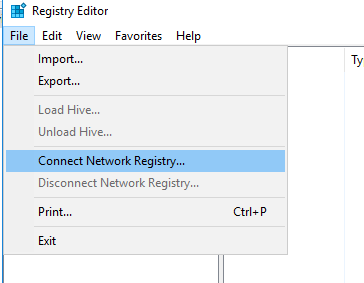
4- Specify the IP address or hostname of the remote computer and press But remember that:
If the remote computer could not authorize you as a current user, then a credential is needed.
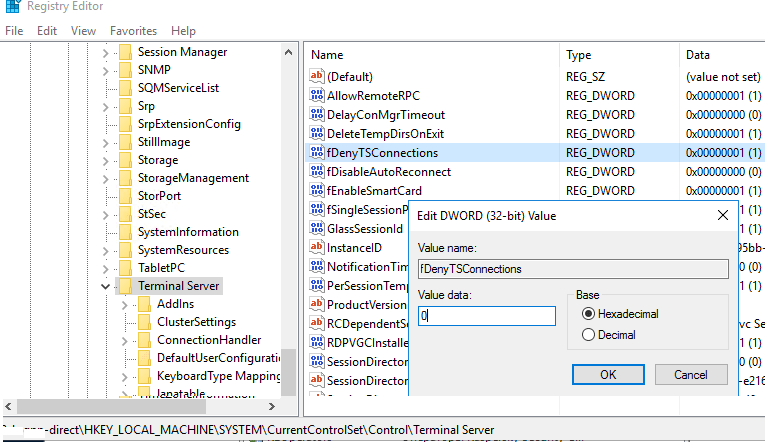
5- Now, the Registry Editor Panel appears. In this stage try to find “HKLMSYSTEMCurrentControlSetControlTerminal Server” and change the DWORD value of the fDenyTSConnections parameter from 1 to 0, and press OK;
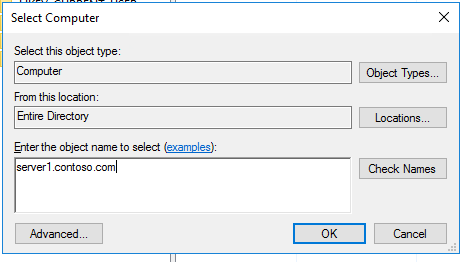
6- Now, it’s time to add one of the firewall rules in the Windows Firewall. This rule allows remote connections. You can add it via PowerShell Remoting, using PS exec, or using a GPO (Group Policy Object). Go to the Command Prompt and type the following code:
PsExec.exe \server1 -u contosoadmin -p password cmdnetsh advfirewall firewall add rule name="allow RemoteDesktop" dir=in protocol=TCP localport=3389 action=allowshutdown –f –r –t
7- Reboot your system and try to connect to a remote computer.
Note:
8- For more information about how to set firewall rules in Windows firewall, run the following command:
netsh advfirewall firewall add rule ?
9- Make sure to run all these codes in administrator mode. To do so, do the following:
Click on Start, type CMD, then right-click on Command Prompt and choose Run as Administrator.
Windows 10 VPS Hosting
Get yourself an efficient Windows 10 VPS for remote desktop, at the cheapest price out there. FREE Windows 10 running on NVMe SSD storage and high-speed internet.
Check Out Windows 10 VPS Plans
Conclusion
In this article, we learned how to enable RDP in Windows Server 2016 using various methods. We can mention one extra method here. By default, windows server 2016 sets external Remote Desktop Access to disabled. We can easily enable it using Server Manager (as we explained in a previous article named “how to enable RDP in Windows Server 2012”). So you can also use server manager to enable remote connections via Windows Server 2016. Do you know any more methods? Please share with us.
Установка службы удаленных рабочих столов Windows Server 2016/2019
Инструкция по установке RDP сервера терминалов состаит из 3-х частей:
- Установка службы удаленных рабочих столов RDP
- Активация сервера лицензирования RDP
- Добавление пользователей в группу разрешения для подключения
Службы удаленных рабочих столов Windows Server является самыми востребовательными по практическому использованию. Типичная связка подключения клиентского ПК к:
- Серверу приложений;
- Виртуальному рабочему столу.
Такой функционал решает задачи не только быстродействия(это все же сервер), но и вопрос с безопасностью коммерческой информации. Стоит отметить, что структурированные данные легче администрируются во всех аспектах этого понятия: предоставление доступа, резервное копирование и репликация, управление кластерными системами.
1. Установка службы удаленных рабочих столов RDP
Диспетчер сервера, добавление роли

Перед началом работы

Тип установки

Выбор сервера для установки

Выбор роли службы удаленных рабочих столов

Пропуск добавления компонентов

Описание службы удаленных рабочих столов

Добавление ролей для службы удаленных рабочих столов

Подтверждение установки

Процесс установки

Завершение установки, после этого требуется перезагрузить систему

2. Активация сервера лицензирования RDP

Мастер активации сервера, первый запуск

Сведения об организации


Мастер активация сервера, завершение работы

Мастер установки лицензий, запуск

Выбор метода подключения

Номер соглашения

Версия продукта

Мастер установки лицензий, завершение

Успешное завершение активации сервера лицензирования

Важный этап — указание сервера лицензирования, т.к. начиная с Windows 2012R2 эту опцию перенесли в групповые политики:

Указание типа лицензирования — на пользователя

Проверка работы службы терминалов

3. Добавление пользователей в группу разрешения для подключения
Во всех версия Windows Server, есть группа, по которой задаются разрешения для подключения к удаленному рабочему столу.

Остается только добавить пользователя

From Wikipedia, the free encyclopedia
| Other names | Terminal Services |
|---|---|
| Developer(s) | Microsoft |
| Operating system | Microsoft Windows |
| Service name | TermService |
| Type | Remote desktop software |
| Website | docs |
Remote Desktop Services (RDS), known as Terminal Services in Windows Server 2008 and earlier,[1] is one of the components of Microsoft Windows that allow a user to initiate and control an interactive session[2] on a remote computer or virtual machine over a network connection. RDS was first released in 1998 as Terminal Server in Windows NT 4.0 Terminal Server Edition, a stand-alone edition of Windows NT 4.0 Server that allowed users to log in remotely. Starting with Windows 2000, it was integrated under the name of Terminal Services as an optional component in the server editions of the Windows NT family of operating systems,[3] receiving updates and improvements with each version of Windows.[4] Terminal Services were then renamed to Remote Desktop Services with Windows Server 2008 R2[5] in 2009.
RDS is Microsoft’s implementation of thin client architecture, where Windows software, and the entire desktop of the computer running RDS, are made accessible to any remote client machine that supports Remote Desktop Protocol (RDP). User interfaces are displayed from the server onto the client system and input from the client system is transmitted to the server — where software execution takes place.[6] This is in contrast to application streaming systems, like Microsoft App-V, in which computer programs are streamed to the client on-demand and executed on the client machine.
RemoteFX was added to RDS as part of Windows Server 2008 R2 Service Pack 1.
Overview[edit]
Windows includes three client components that use RDS:
- Windows Remote Assistance – only Windows 10 and later
- Remote Desktop Connection (RDC)
- Fast user switching
The first two are individual utilities that allow a user to operate an interactive session on a remote computer over the network. In case of Remote Assistance, the remote user needs to receive an invitation and the control is cooperative. In case of RDC, however, the remote user opens a new session on the remote computer and has every power granted by its user account’s rights and restrictions.[6][7][8] Fast User Switching allows users to switch between user accounts on the local computer without quitting software and logging out. Fast User Switching is part of Winlogon and uses RDS to accomplish its switching feature.[9][10] Third-party developers have also created client software for RDS. For example, rdesktop supports Unix platforms.
Although RDS is shipped with most editions of all versions of Windows NT since Windows 2000,[3] its functionality differs in each version. Windows XP Home Edition does not accept any RDC connections at all, reserving RDS for Fast User Switching and Remote Assistance only. Other client versions of Windows only allow a maximum of one remote user to connect to the system at the cost of the user who has logged onto the console being disconnected. Windows Server allows two users to connect at the same time. This licensing scheme, called «Remote Desktop for Administration», facilitates administration of unattended or headless computers. Only by acquiring additional licenses (in addition to that of Windows) can a computer running Windows Server service multiple remote users at one time and achieve virtual desktop infrastructure.[5][9]
For an organization, RDS allows the IT department to install applications on a central server instead of multiple computers.[11] Remote users can log on and use those applications over the network. Such centralization can make maintenance and troubleshooting easier. RDS and Windows authentication systems prevent unauthorized users from accessing apps or data.
Microsoft has a long-standing agreement with Citrix to facilitate sharing of technologies and patent licensing between Microsoft Terminal Services and Citrix XenApp (formerly Citrix MetaFrame and Citrix Presentation Server). In this arrangement, Citrix has access to key source code for the Windows platform, enabling its developers to improve the security and performance of the Terminal Services platform. In late December 2004 the two companies announced a five-year renewal of this arrangement to cover Windows Vista.[12]
Server components[edit]
The key server component of RDS is Terminal Server (termdd.sys), which listens on TCP port 3389. When a Remote Desktop Protocol (RDP) client connects to this port, it is tagged with a unique SessionID and associated with a freshly spawned console session (Session 0, keyboard, mouse and character mode UI only). The login subsystem (winlogon.exe) and the GDI graphics subsystem is then initiated, which handles the job of authenticating the user and presenting the GUI. These executables are loaded in a new session, rather than the console session. When creating the new session, the graphics and keyboard/mouse device drivers are replaced with RDP-specific drivers: RdpDD.sys and RdpWD.sys. The RdpDD.sys is the device driver and it captures the UI rendering calls into a format that is transmittable over RDP. RdpWD.sys acts as keyboard and mouse driver; it receives keyboard and mouse input over the TCP connection and presents them as keyboard or mouse inputs. It also allows creation of virtual channels, which allow other devices, such as disc, audio, printers, and COM ports to be redirected, i.e., the channels act as replacement for these devices. The channels connect to the client over the TCP connection; as the channels are accessed for data, the client is informed of the request, which is then transferred over the TCP connection to the application. This entire procedure is done by the terminal server and the client, with the RDP mediating the correct transfer, and is entirely transparent to the applications.[13] RDP communications are encrypted using 128-bit RC4 encryption. Windows Server 2003 onwards, it can use a FIPS 140 compliant encryption schemes.[6]
Once a client initiates a connection and is informed of a successful invocation of the terminal services stack at the server, it loads up the device as well as the keyboard/mouse drivers. The UI data received over RDP is decoded and rendered as UI, whereas the keyboard and mouse inputs to the Window hosting the UI is intercepted by the drivers, and transmitted over RDP to the server. It also creates the other virtual channels and sets up the redirection. RDP communication can be encrypted; using either low, medium or high encryption. With low encryption, user input (outgoing data) is encrypted using a weak (40-bit RC4) cipher. With medium encryption, UI packets (incoming data) are encrypted using this weak cipher as well. The setting «High encryption (Non-export)» uses 128-bit RC4 encryption and «High encryption (Export)» uses 40-bit RC4 encryption.[14]
Terminal Server[edit]
Terminal Server is the server component of Terminal services. It handles the job of authenticating clients, as well as making the applications available remotely. It is also entrusted with the job of restricting the clients according to the level of access they have. The Terminal Server respects the configured software restriction policies, so as to restrict the availability of certain software to only a certain group of users. The remote session information is stored in specialized directories, called Session Directory which is stored at the server. Session directories are used to store state information about a session, and can be used to resume interrupted sessions. The terminal server also has to manage these directories. Terminal Servers can be used in a cluster as well.[6]
In Windows Server 2008, it has been significantly overhauled. While logging in, if the user logged on to the local system using a Windows Server Domain account, the credentials from the same sign-on can be used to authenticate the remote session. However, this requires Windows Server 2008 to be the terminal server OS, while the client OS is limited to Windows Server 2008, Windows Vista and Windows 7. In addition, the terminal server may be configured to allow connection to individual programs, rather than the entire desktop, by means of a feature named RemoteApp. Terminal Services Web Access (TS Web Access) makes a RemoteApp session invocable from the web browser. It includes the TS Web Access Web Part control which maintains the list of RemoteApps deployed on the server and keeps the list up to date. Terminal Server can also integrate with Windows System Resource Manager to throttle resource usage of remote applications.[4]
Terminal Server is managed by the Terminal Server Manager Microsoft Management Console snap-in. It can be used to configure the sign in requirements, as well as to enforce a single instance of remote session. It can also be configured by using Group Policy or Windows Management Instrumentation. It is, however, not available in client versions of Windows OS, where the server is pre-configured to allow only one session and enforce the rights of the user account on the remote session, without any customization.[6]
Remote Desktop Gateway[edit]
The Remote Desktop Gateway service component, also known as RD Gateway, can tunnel the RDP session using a HTTPS channel.[15] This increases the security of RDS by encapsulating the session with Transport Layer Security (TLS).[16] This also allows the option to use Internet Explorer as the RDP client. The official MS RDP client for macOS supports RD Gateway as of version 8. This is also available for iOS and Android.
This feature was introduced in the Windows Server 2008 and Windows Home Server products.
In October 2021, Thincast, the main contributor of the FreeRDP project, published the first Remote Desktop Gateway solution running natively on Linux.[17]
Remote Desktop HTML5 Web Client[edit]
In late 2018 Microsoft released the Remote Desktop HTML5 Web Client. The client allows users to connect to their remote apps or to their remote desktops without using an installed remote desktop client.[18][19] The web client uses the TLS secured port 443 and does not use the RD Gateway to transport traffic, instead relying solely on the remote desktop session host aspect of remote desktop services.[20][21]
Roles[edit]
- Remote Desktop Gateway
- Enables authorized users to connect to virtual desktops, Remote-App programs, and session-based desktops over a private network or the Internet.
- Remote Desktop Connection Broker Role
- Allows users to reconnect to their existing virtual desktop, RemoteApp programs, and session-based desktops. It enables even load distribution across RD Session Host servers in a session collection or across pooled virtual desktops in a pooled virtual desktop collection, and provides access to virtual desktops in a virtual desktop collection.
- Remote Desktop Session Host
- Enables a server to host RemoteApp programs as session-based desktops. Users can connect to RD Session Host servers in a session collection to run programs, save files, and use resources on those servers. Users can access Remote Desktop Session Host server by using the Remote Desktop Connection client or by using RemoteApp programs.
- Remote Desktop Virtualization Host
- Enables users to connect to virtual desktops by using RemoteApp and Desktop Connection.
- Remote Desktop Web Access
- Enables users to access RemoteApp and Desktop Connection through the Start Menu or through a web browser. RemoteApp and Desktop Connection provides users with a customized view of RemoteApp programs, session-based desktops, and virtual desktops.
- Remote Desktop Licensing
- Enables a server to manage RDS client access licenses (RDS CALs) that are required for each device or user to connect to a Remote Desktop Session Host server. RDS CALs are managed using the Remote Desktop Licensing Manager application.[22]
RemoteApp[edit]
RemoteApp (or TS RemoteApp) is a special mode of RDS, available in Windows Server 2008 R2 and later, where remote session configuration is integrated into the client operating system. The RDP 6.1 client ships with Windows XP SP3, KB952155 for Windows XP SP2 users,[23] Windows Vista SP1 and Windows Server 2008. The UI for the RemoteApp is rendered in a window over the local desktop, and is managed like any other window for local applications. The end result of this is that remote applications behave largely like local applications. The task of establishing the remote session, as well as redirecting local resources to the remote application, is transparent to the end user.[24] Multiple applications can be started in a single RemoteApp session, each with their own windows.[25]
A RemoteApp can be packaged either as a .rdp file or distributed via an .msi Windows Installer package. When packaged as an .rdp file (which contains the address of the RemoteApp server, authentication schemes to be used, and other settings), a RemoteApp can be launched by double clicking the file. It will invoke the Remote Desktop Connection client, which will connect to the server and render the UI. The RemoteApp can also be packaged in a Windows Installer database, installing which can register the RemoteApp in the Start menu as well as create shortcuts to launch it. A RemoteApp can also be registered as handler for file types or URIs. Opening a file registered with RemoteApp will first invoke Remote Desktop Connection, which will connect to the terminal server and then open the file. Any application which can be accessed over Remote Desktop can be served as a RemoteApp.[24]
Windows 7 includes built-in support for RemoteApp publishing, but it has to be enabled manually in registry, since there is no RemoteApp management console in client versions of Microsoft Windows.[26]
Windows Desktop Sharing[edit]
In Windows Vista onwards, Terminal Services also includes a multi-party desktop sharing capability known as Windows Desktop Sharing. Unlike Terminal Services, which creates a new user session for every RDP connection, Windows Desktop Sharing can host the remote session in the context of the currently logged in user without creating a new session, and make the Desktop, or a subset of it, available over RDP.[27] Windows Desktop Sharing can be used to share the entire desktop, a specific region, or a particular application.[28] Windows Desktop Sharing can also be used to share multi-monitor desktops. When sharing applications individually (rather than the entire desktop), the windows are managed (whether they are minimized or maximized) independently at the server and the client side.[28]
The functionality is only provided via a public API, which can be used by any application to provide screen sharing functionality. Windows Desktop Sharing API exposes two objects: RDPSession for the sharing session and RDPViewer for the viewer. Multiple viewer objects can be instantiated for one Session object. A viewer can either be a passive viewer, who is just able to watch the application like a screencast, or an interactive viewer, who is able to interact in real time with the remote application.[27] The RDPSession object contains all the shared applications, represented as Application objects, each with Window objects representing their on-screen windows. Per-application filters capture the application Windows and package them as Window objects.[29] A viewer must authenticate itself before it can connect to a sharing session. This is done by generating an Invitation using the RDPSession. It contains an authentication ticket and password. The object is serialized and sent to the viewers, who need to present the Invitation when connecting.[27][29]
Windows Desktop Sharing API is used by Windows Meeting Space and Windows Remote Assistance for providing application sharing functionality among network peers.[28]
Client software[edit]
Remote Desktop Connection[edit]

Remote Desktop Connection (RDC, also called Remote Desktop or just RD,[30][31] formerly known as Microsoft Terminal Services Client, mstsc or tsclient in Windows 2000 and prior)[32][33] is the client application for RDS. It allows a user to remotely log into a networked computer running the terminal services server. RDC presents the desktop interface (or application GUI) of the remote system, as if it were accessed locally.[6] In addition to regular username/password for authorizing for the remote session, RDC also supports using smart cards for authorization.[6]
RDC 6.0 was released as part of Windows Vista. With RDC 6.0, the resolution of a remote session can be set independently of the settings at the remote computer. If the Desktop Experience component is plugged into the remote server, remote application user interface elements (e.g., application windows borders, Maximize, Minimize, and Close buttons etc.) will take on the same appearance of local applications. In this scenario, the remote applications will use the Aero theme if the user connects to the server from a Windows Vista machine running Aero.[4] Later versions of the protocol also support rendering the UI in full 32-bit color, as well as resource redirection for printers, COM ports, disk drives, mice and keyboards. With resource redirection, remote applications can use the resources of the local computer. Audio is also redirected, so that any sounds generated by a remote application are played back at the client system.[6][4] Moreover, a remote session can also span multiple monitors at the client system, independent of the multi-monitor settings at the server. RDC can also be used to connect to Windows Media Center (WMC) remote sessions; however, since WMC does not stream video using RDP, only the applications can be viewed this way, not any media.
RDC prioritizes UI data as well as keyboard and mouse inputs, as opposed to print jobs or file transfers. so as to make the applications more responsive. It redirects plug and play devices such as cameras, portable music players, and scanners, so that input from these devices can be used by the remote applications as well.[4] RDC can also be used to connect to computers which are exposed via Windows Home Server RDP Gateway over the Internet.[34] Finally, few shortcuts that will be handy
- To achieve Ctrl+Alt+Del effect on remote desktop, you can use the Ctrl+Alt+End key combination.
- To alternate between the full screen and window mode of remote desktop, you can use Ctrl+Alt+Break ( Ctrl+Fn+Alt+⇧ Shift on certain HP laptops).
Other clients[edit]
Microsoft produces an official client for a variety of non Windows platforms:
- Windows Mobile[35][36]
- MacOS: Microsoft Remote Desktop for Mac
- Android: Microsoft Remote Desktop
- iOS and iPadOS: Microsoft Remote Desktop
There have been numerous non-Microsoft implementations of clients that implement subsets of the Microsoft functionality for a range of platforms. The most common are:
- FreeRDP — Open Source under Apache license
- rdesktop for Linux/Unix and Microsoft Windows
- Remmina for Linux (based on FreeRDP)
- CoRD for macOS (Discontinued in April 2020)
- Thincast Client for Linux, macOS and Windows
See also[edit]
- BlueKeep (security vulnerability)
- Windows MultiPoint Server
- Microsoft NetMeeting, a discontinued Microsoft product also provides Shared-desktop feature, in the similar time-frame of Windows NT Terminal Services Edition
- Virtual Network Computing
References[edit]
- ^ «Windows Remote Desktop Services spotlight». Retrieved 2010-11-18.
- ^ QuinnRadich. «Remote Desktop Sessions — Win32 apps». docs.microsoft.com. Retrieved 2022-07-09.
- ^ a b «Remote Desktop Connection». PC World. IDG. 17 August 2011.
- ^ a b c d e «Whats new in Terminal Services in Windows Server 2008». Retrieved 2007-07-23.
- ^ a b Russel, Charlie; Zacker, Craig (2009). «4: Remote Desktop Services and VDI: Centralizing Desktop and Application Management» (PDF). Introducing Windows Server 2008 R2. Redmond, WA: Microsoft Press. Archived from the original (PDF) on 29 August 2017. Retrieved 11 January 2014.
- ^ a b c d e f g h «Technical Overview of Terminal Services in Windows Server 2003». Microsoft. Archived from the original on 2003-01-26. Retrieved 2007-07-23.
- ^
«How to change the listening port for Remote Desktop». Retrieved 2010-11-18. - ^
«Frequently Asked Questions about Remote Desktop». Microsoft. Retrieved 2007-07-23. - ^ a b
Russinovich, Mark; Solomon, David A.; Ionescu, Alex (2012). Windows Internals (6th ed.). Redmond, WA: Microsoft Press. pp. 20–21. ISBN 978-0-7356-4873-9. - ^
«Architecture of Fast User Switching». Support. Microsoft. 15 January 2006. Retrieved 11 January 2014. - ^ «Remote Services». Log me in 123.
- ^ «Citrix and Microsoft Sign Technology Collaboration and Licensing Agreement». Citrix. 2004-12-21. Archived from the original on 2011-07-05. Retrieved 2012-04-13.
- ^
«How Terminal Services Works». Microsoft. 2003-03-28. Retrieved 2007-07-23. - ^ «Connection Configuration in Terminal Server». Support (5.0 ed.). Microsoft. 22 June 2014.
- ^ «Terminal Services Gateway (TS Gateway)». Microsoft TechNet. Retrieved 2009-09-10.
- ^ «Remote Desktop Protocol». Microsoft Developer Network (MSDN). Retrieved 2009-09-10.
- ^ «RD Gateway Documentation». Thincast. Retrieved 2021-10-17.
- ^ Waggoner, Rob. «Microsoft Has Released the HTML5-Based RDP Web Client». blog.mycloudit.com. Retrieved 2020-05-10.
- ^ «Remote Desktop HTML5 client on Windows Server 2019». msfreaks. 2018-10-06. Retrieved 2020-05-10.
- ^ «RD Web Client (HTML5) – New Features In 1.0.11». www.rdsgurus.com. Retrieved 2020-05-10.
- ^ Berson, Freek (2018-01-12). «The Microsoft Platform: HTML5 client for Microsoft Remote Desktop Services 2016: Remote Desktop Web Client». The Microsoft Platform. Retrieved 2020-05-10.
- ^ TechNet: Remote Desktop Licensing
- ^ «Description of the Remote Desktop Connection 6.1 client update for Terminal Services in Windows XP Service Pack 2». Retrieved 2010-11-18.
- ^ a b «Terminal Services RemoteApp (TS RemoteApp)». Retrieved 2007-07-23.
- ^ «Terminal Services RemoteApp Session Termination Logic». Retrieved 2007-10-02.
- ^ «How to enable RemoteApp (via RDP 7.0) within VirtualBox or VMWare running Windows 7, Vista SP1+ or Windows XP SP3». Retrieved 2010-11-18.
- ^ a b c «Windows Desktop Sharing». Retrieved 2007-10-11.
- ^ a b c «Windows Desktop Sharing API». Retrieved 2007-10-11.
- ^ a b «About Windows Desktop Sharing». Retrieved 2007-10-11.
- ^ «Remote Desktop Services — Access from anywhere». Microsoft.
- ^ «Get started with the Android client». Microsoft.
- ^ «Why doesn’t the New Folder command work in the root of a redirected drive resource in a Remote Desktop session?». The Old New Thing. Microsoft. 17 December 2013. Retrieved 18 December 2013.
- ^ Savill, John (1 October 2008). The Complete Guide to Windows Server 2008. Pearson Education. p. 1752. ISBN 978-0-13-279758-0. Retrieved 1 June 2012.
Windows XP, Windows Server 2003, Windows Vista, and Windows Server 2008 all contain the RDC tool,
mstsc.exe[…] MSTSC in the filenamemstsc.exestands for Microsoft Terminal Services Client. - ^ «Remote Desktop Connection». Remote Support.
- ^ Drager, Dave (27 March 2008). «How to Remotely Control your Mobile Phone from Desktop». MakeUseOf. Retrieved 27 January 2022.
- ^ Miniman, Brandon (2009-03-16). «Tutorial: Setting up Remote Desktop in Windows Mobile». PocketNow. Archived from the original on 2009-08-01. Retrieved 27 January 2022.
External links[edit]
- Welcome to Remote Desktop Services