Timing is everything! There are thousands of NTP servers around the world. Both the protocol and the client-server program that runs on computers are referred to as NTP. Network Time Protocol (NTP) is an internet protocol used to synchronize with computer clock time sources in a network. Join us with this article to review the way you can Set NTP Server on Windows Server. A time-stamp data exchange takes place between the server and client, which aids in precisely setting the time on the client systems to match the time on the NTP server.
Since a discrepancy of even a fraction of a second can cause problems, accurate time for all devices on a computer network is important for many reasons. So, NTP Server supports time synchronization and is made to be very fault-tolerant and scalable. After buying Windows VPS, you might need to synchronize the machines on your network at the same time. Setting up NTP Server on Windows Server is what you can do perfectly at the end of this guide. Let’s get started to make your NTP Server ready to synchronize time across your network.
What is NTP Server and Why Set it Up?
NTP is a network protocol that enables you to synchronize clocks on devices over a network. It always makes sure that time differences between the server and client systems are minimized and that client systems are always in sync with the server. It listens on UDP port 123.
Many services and IT applications depend on proper time settings to work as intended, thus keeping your server’s clock accurate is crucial. These comprise, to name a few, database replication, monitoring and auditing applications, and logging services. Server time skew, and client time skew in general, is undesirable and frequently results in conflict in time-critical applications. It is recommended to install and enable an NTP server on your server in order to keep accurate time settings on your server and, by extension, throughout the network.
Set NTP Server on Windows is not that complicated. This tutorial helps you to install and enable the NTP server on your server quickly and simply.
You can easily use NTP on your Windows Time service to synchronize time across a network. Let’s go through the steps of this guide to learn how to Install and Configure NTP Server on Windows. Two different methods will be explained, and you can choose the one you prefer more.
Step 1. Open Registry Editor
Search for the ”Run” application in the start menu. There, type in ”regedit” and press Enter.
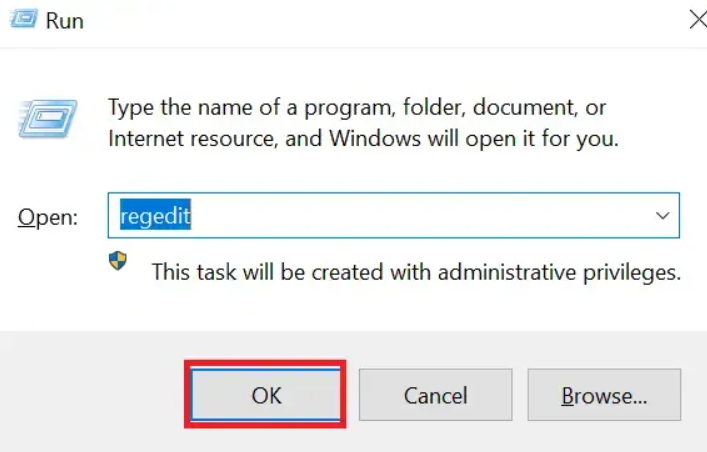
There will appear a window similar to the one below.
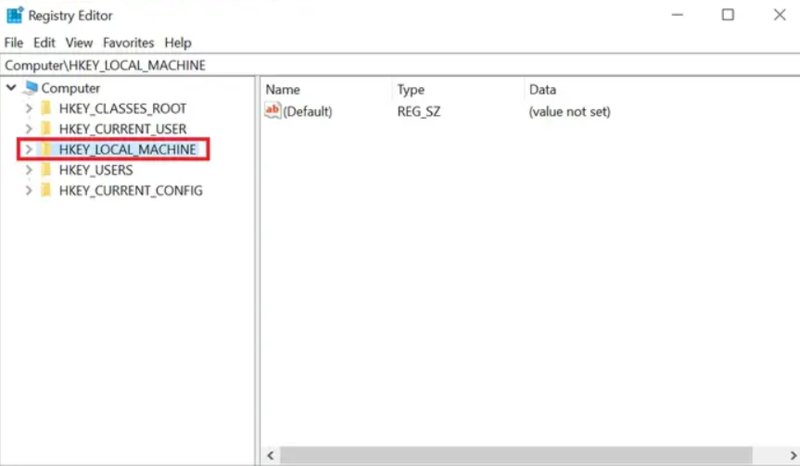
Step 2. Find NTP Server Files
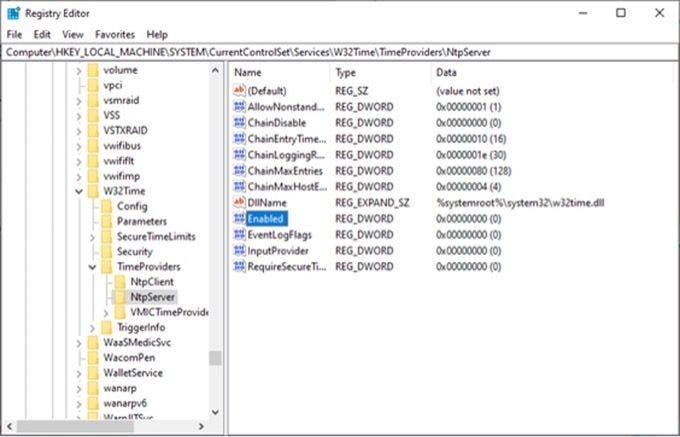
Follow the below path to go to the NTP Server Configuration:
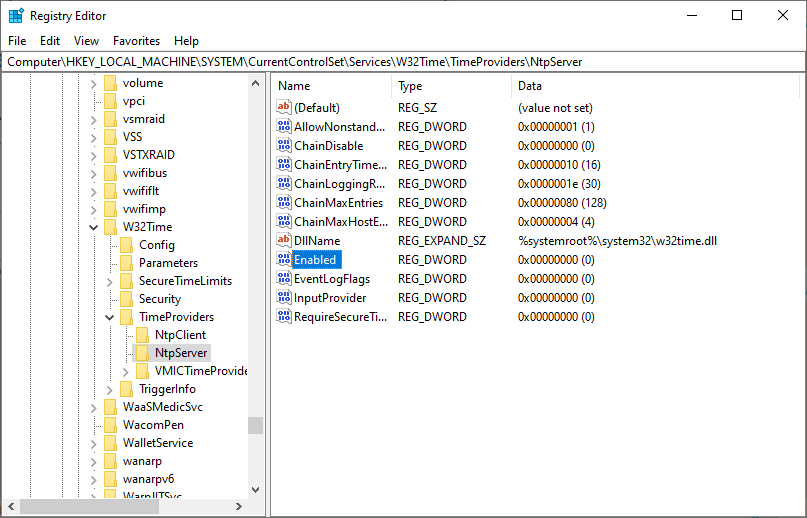
Computer>HKEY_LOCAL_MACHINE>SYSTEM>CurrentControlSet>Services>W32Time>TimeProviders>NtpServer.
You can see the tree’s end in the picture below. As you can see, the files we are looking for are on the right pane.

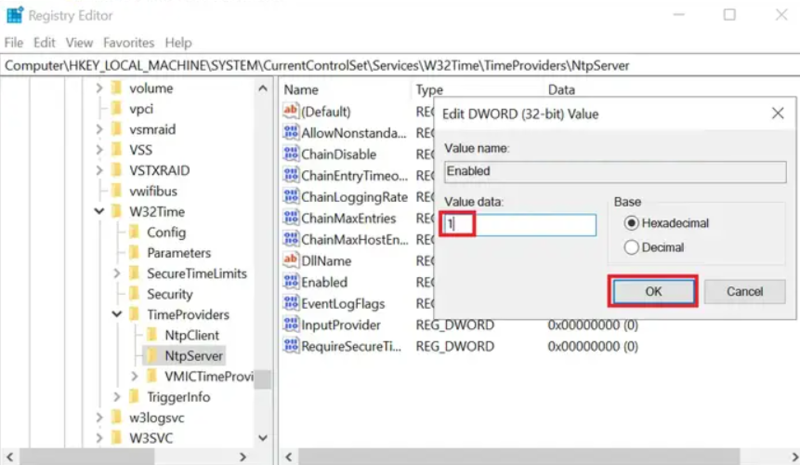
Step 3. Enable NTP Server
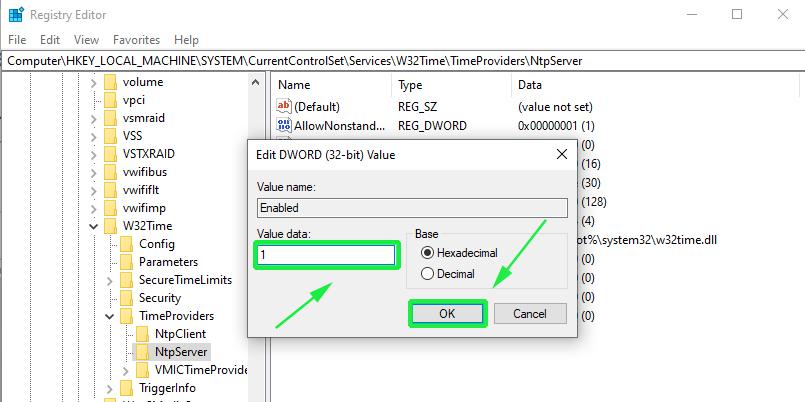
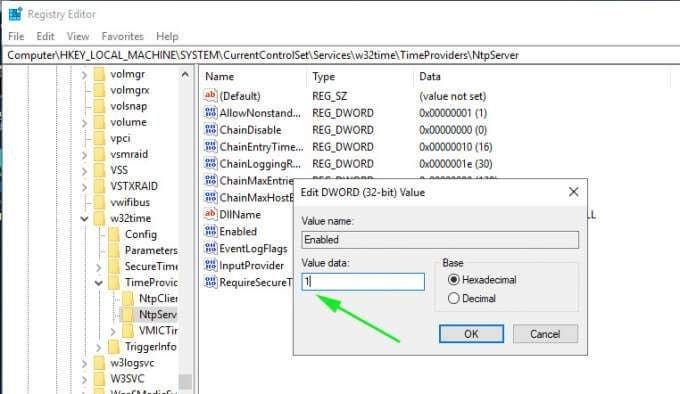
To open a tiny window, double-click the “Enabled” file. A section on the window titled “Value data” is there. As shown below, change the value from 0 to 1. After changing, click “OK”.
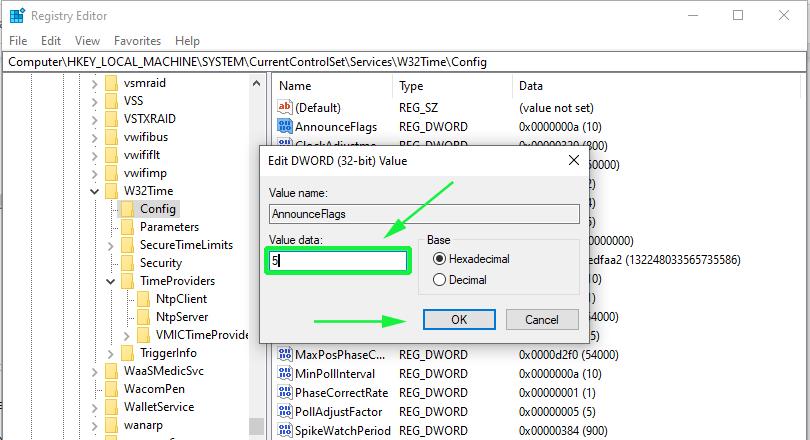
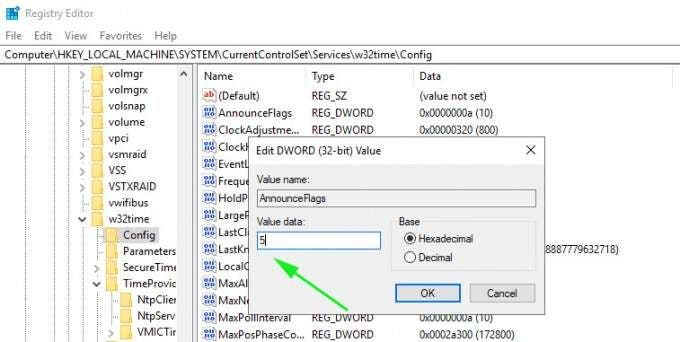
Step 4. Create the AnnounceFlags 5
First, let’s see what is AnnounceFlag?
This computer’s status as a trustworthy time server is controlled by entry. If a computer is not also designated as a time server, it cannot be certified as dependable. The default value for domain members is 10. The default value for stand-alone clients and servers is 10.
Follow the path below:
Computer>HKEY_LOCAL_MACHINE>SYSTEM>CurrentControlSet>Services>W32Time>
To go to the ”Config”:
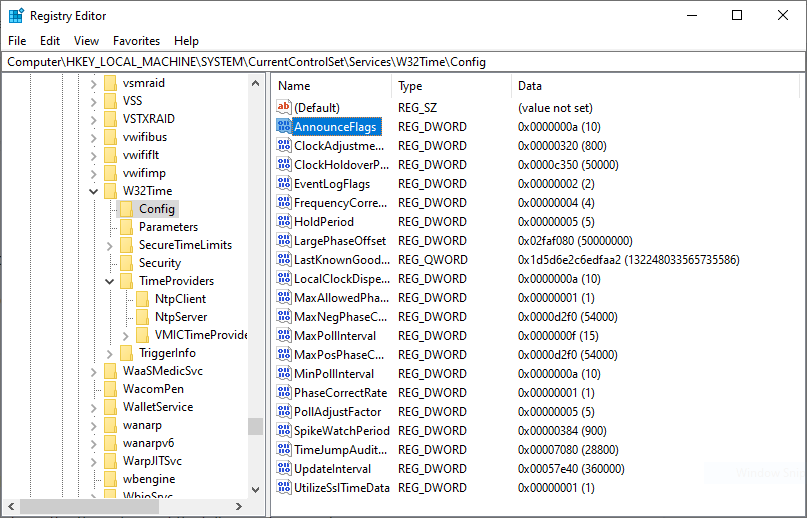
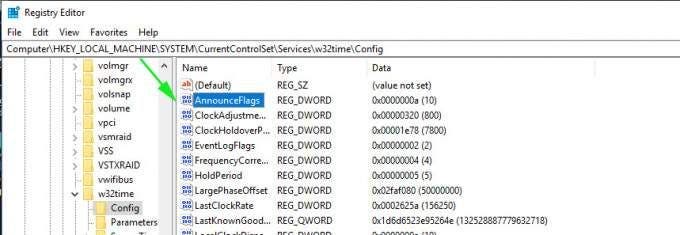
Computer>HKEY_LOCAL_MACHINE>SYSTEM>CurrentControlSet>Services>W32Time>Config.
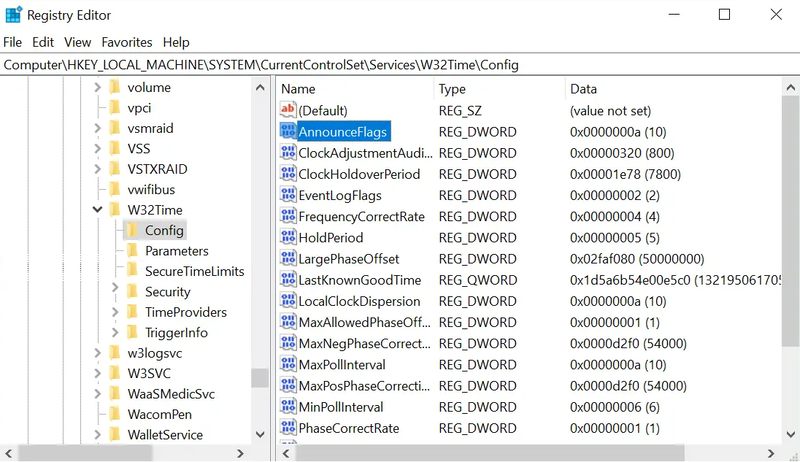
On the right pane, as seen above, you will find a file with the name “AnnounceFlags” while there. Double-click it. That will cause a tiny window akin to the one in Step 3 to open. Change the value from a to 5 under “Value data“.
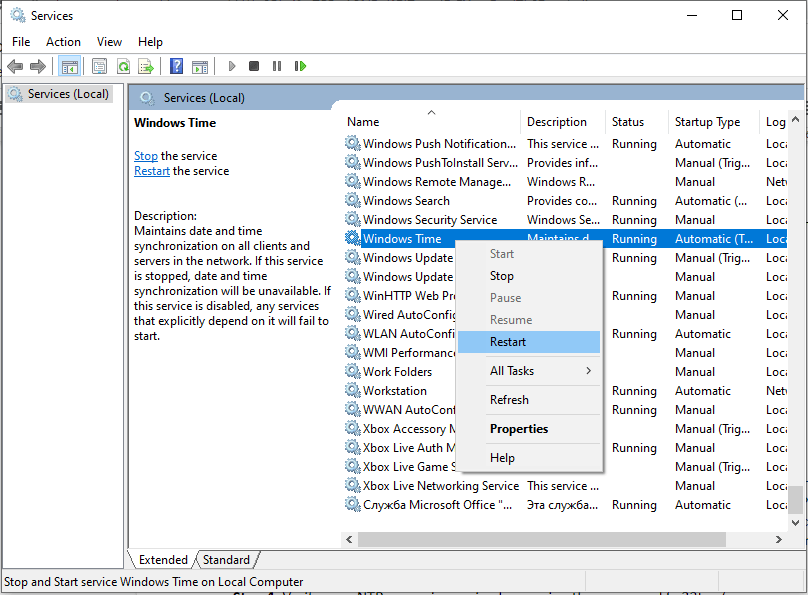
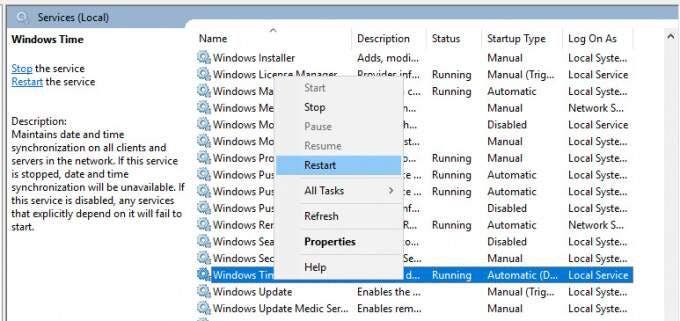
Step 5. Restart NTP Server
By pressing the Windows key and typing “Services,” the “Services” window will appear. Look for “Windows Time” once it has opened. Click “Restart” from the context menu when you right-click on it.

Step 6. Open UDP port 123 in the Firewall
Your Windows Server must have UDP port 123 open in order for NTP to connect to the clocks. Please check your firewall configuration if you can’t reach the servers. To complete this step, follow the How to open a Port on Windows VPS Firewall guide. Remember that this port is UDP and not TCP.
Configure NTP Using PowerShell
From Windows XP and Windows Server 2008 up to the most recent versions of each OS, PowerShell offers a command-line tool with the name w32tm.exe. You may set up your Windows PC to sync with online time servers using the w32tm.exe program. This is typically the tool of choice when configuring and keeping track of the time on your Windows Server installation. The command-line utility is very simple to use.
If you prefer to use PowerShell, the second method of this guide would be your preferred one to Set NTP Server on Windows. Just open your PowerShell as administrator and use the following commands to do all the steps of the previous method.
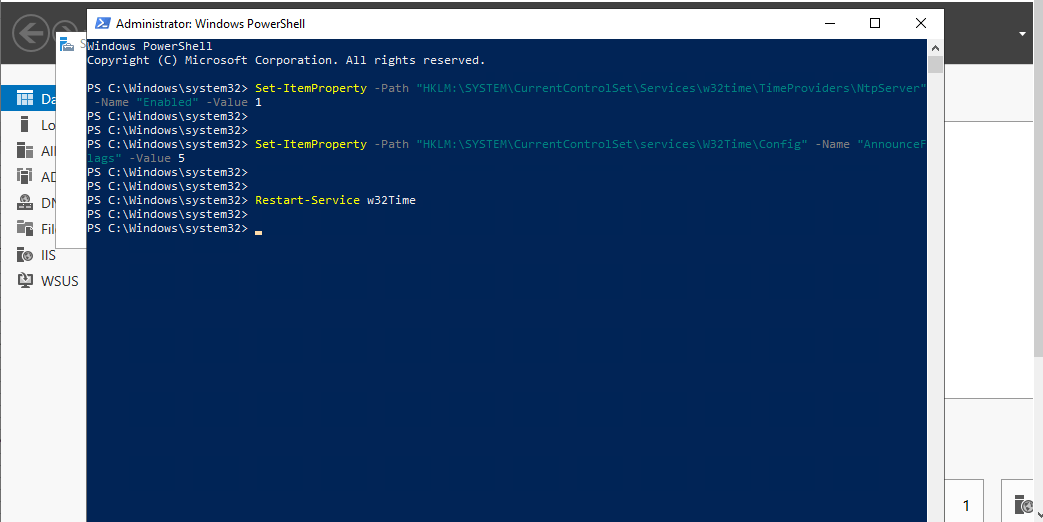
Enable NTP Server
Set-ItemProperty -Path "HKLM:\SYSTEM\CurrentControlSet\Services\w32time\TimeProviders\NtpServer" -Name "Enabled" -Value 1Create the AnnounceFlags 5
Set-ItemProperty -Path "HKLM:\SYSTEM\CurrentControlSet\services\W32Time\Config" -Name "AnnounceFlags" -Value 5Restart NTP Server
Restart-Service w32TimeRun the command below to allow NTP port: (If Firewall is running)
New-NetFirewallRule `
-Name "NTP Server Port" `
-DisplayName "NTP Server Port" `
-Description 'Allow NTP Server Port' `
-Profile Any `
-Direction Inbound `
-Action Allow `
-Protocol UDP `
-Program Any `
-LocalAddress Any `
-LocalPort 123
Most Used Commands to Configure NTP Server
Let’s review some useful commands while setting up NTP Server on Windows.
To check NTP configuration, run:
w32tm /query /configurationTo check NTP server list, type:
w32tm /query /peersTo force NTP server synchronization, run:
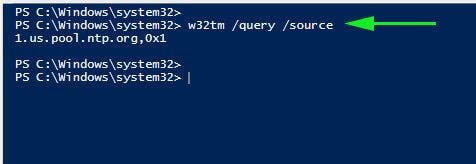
w32tm /resync /nowaitUse the command below to show the source of the NTP time:
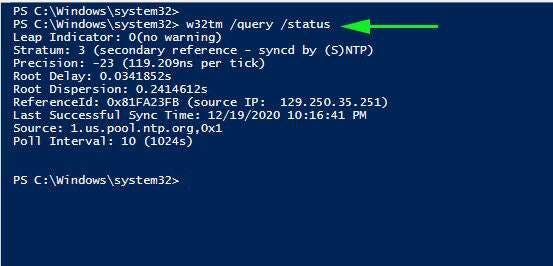
w32tm /query /sourceTo show the status of NTP service, type:
w32tm /query /statusAt this point, you know everything you need to Set NTP Server on Windows Server.
How to Disable NTP Server on Windows Server?
To disable Windows Internet Time Update, follow the below steps:
1. Load Control Panel.
2. Click Date and Time.
3. Click the Internet Time tab.
4. Click Change settings.
5. Click to clear the checkbox to Synchronize with an Internet time server.
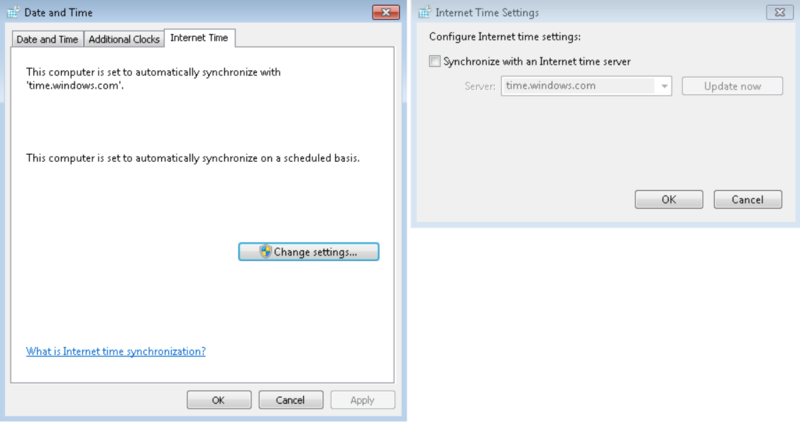
6. Click OK to save.
7. Close the Date and Time dialog box.
8. Close the Control Panel.
FAQ
A time-request exchange is started by the NTP client and the NTP server. The client can then determine the link latency, its local offset, and set its local clock to sync with the server computer’s clock.
Yes. Go to the «Internet Time» tab and select «Change Settings.» If you want the clock to sync automatically, click the «Synchronize with an internet time server» box; otherwise, uncheck it to set the clock manually.
It is always advised to select an NTP server that is located close to the device you wish to time-synchronize. It is also advised to use a server that is hosted by a reputable business or organization.
Conclusion
In this article, you earned How to Set NTP Server on Windows Server. As we promised, it was simple and straightforward to set up an NTP server on your Windows server instance. After setting up the NTP service on your server, Windows clients connected to the domain will synchronize with the domain controllers and other domain controllers in your environment. Keep in mind that if NTP is set up on a virtual machine, make sure it is configured to exclusively sync with the time service rather than the host system.
If you follow the steps of this guide properly then you can smoothly install and Set NTP Server on Windows without any errors but do not hesitate to contact us if you encounter any problems. Our technical support team will try their best to solve your problems.
Network Time Protocol (NTP) runs on the Transport Layer port 123 UDP and enables accurate time synchronization for network computers. This irons out time inconsistencies on servers and clients during file logging or replication of server databases among other resources.
In this article, we’ll outline the process of installing, configuring, and querying an NTP server on Windows Server 2019.
NTP Server
NTP servers utilize the Network Time Protocol to send time signals to servers across the globe upon request. NTP servers use the Universal Time Coordinated (UTC) time source for time signal synchronization.
The main purpose of NTP servers is to provide time synchronization for servers and computer networks with other major network servers and clients across the globe. In turn, this streamlines communications and transactions all over the world.
Installing and Configuring an NTP Server on Windows Server 2019
The process of installing, configuring, and querying an NTP Server on Windows Server 2019 is quite straightforward.
Set the NTP service to Automatic option
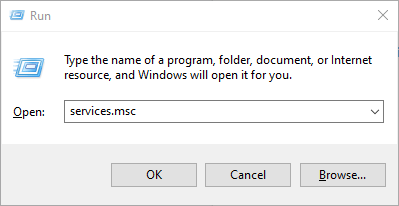
To start off, Hit Windows Key + R to launch the Run dialogue. Next, type services.msc and hit ENTER.
In the ‘Services’ window, locate the service ‘Windows Time’. Right-click and select the ‘Properties’ option as shown:
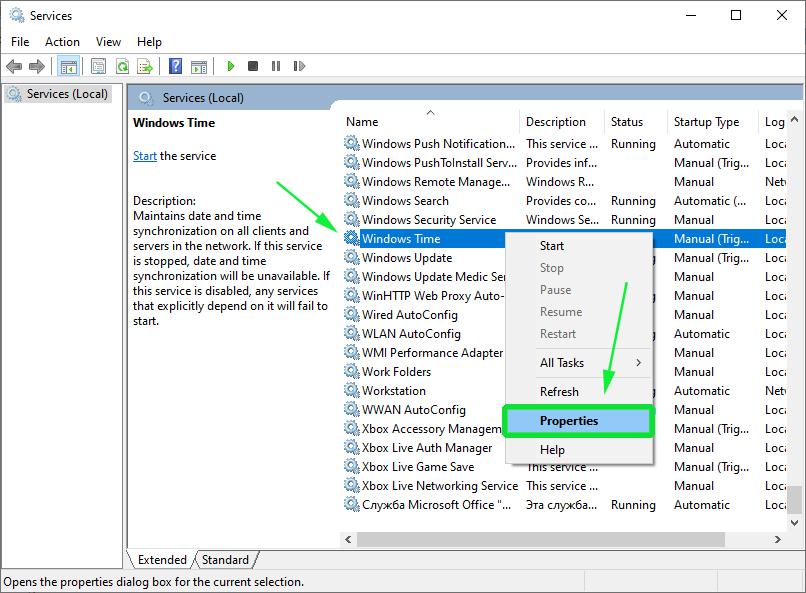
On the pop-up window, select the Startup type as ‘Automatic’.

Finally, click on ‘OK’ and then ‘Apply’.
Configuring NTP Server using Registry Editor
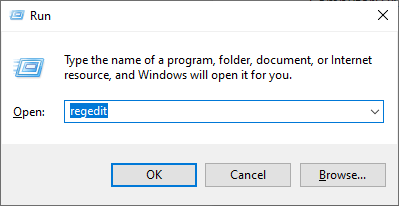
As before, launch the run dialogue by pressing Windows Key + R. Then type ‘regedit’ and hit ENTER.
The Registry editor will be launched as shown:
Navigate to the path shown below:
Computer\HKEY_LOCAL_MACHINE\SYSTEM\CurrentControlSet\Services\W32Time\TimeProviders\NtpServer
On the right pane, locate and double-click the ‘Enabled’ file as shown:
Set the Value data to 1 and click OK.
Next, follow this path.
Computer>HKEY_LOCAL_MACHINE>SYSTEM>CurrentControlSet>Services>W32Time>Config
At the right pane locate the ‘Announce Flags’ file.
Double click on the file and set its value to 5 in the ‘Value Data’ section.
Finally, reboot the NTP server for the changes to take place. Head back to the services Window, right-click on ‘Windows Time’ and select ‘Restart’
Configuring NTP Server on Windows 2019 using Windows PowerShell
If you love working in Powershell, launch Powershell as Administrator and enable NTP server using the command:
Set-ItemProperty -Path “HKLM:\SYSTEM\CurrentControlSet\Services\w32time\TimeProviders\NtpServer” -Name “Enabled” -Value 1
Next, configure Announce Flags value as shown:
Set-ItemProperty -Path “HKLM:\SYSTEM\CurrentControlSet\services\W32Time\Config” -Name “AnnounceFlags” -Value 5
Finally, restart the NTP server using the command:
Restart-Service w32Time
Important Note: UDP port 123 must be open for the NTP server traffic to reach your Windows Server 2019. If the NTP servers are unreachable, you can check your firewall settings to fix this.
Other useful commands
- w32tm /query /configuration to check and shows the NTP server configuration.
- w32tm /query /peers for checking the list of NTP servers configured alongside their configuration status
- w32tm /resync /nowait to force-synchronize time with your NTP server.
- w32tm /query /source to show the source of the time.
- w32tm /query /status to reveal NTP time service status.
Final take
Now your Windows Server 2019 clock is synchronized with time the NTP server’s pool.ntp.org and works as NTP client. You can achieve full network and accompanying infrastructure time synchronization by synchronizing all network workstations, servers, routers, hubs, and switches.
Since NTP servers operate over the UDP protocol using TCP/IP, these network infrastructures must be working efficiently for effective NTP server operation. In case you want to make time servers on windows server 2019 hosted on a virtual machine, you should disable the virtual machine time synchronization settings and sync their time with the domain Windows Server 2019.

There is no question about it, having accurate time in your environment set in critical infrastructure systems is a must. Many business-critical applications and infrastructure systems rely on accurate time synchronized between them to ensure the system functions as expected. Time skew can cause all kinds of weirdness when it is misconfigured or out of sync between different servers/systems. This is especially true in a Windows Server Active Directory domain. Having accurate time between a client computer and domain controllers is essential. Let’s take a look at how to set ntp server Windows 2016 or Windows 2019 to see how this can be easily carried out.
What is NTP?
Wen it comes to synchronizing time in most enviornments, Network Time Protocol (NTP) is the protocol that is used to ensure accurate time across your environent. In most environments, NTP servers, special time servers, are configured that provide an external time source for which your internal servers can synchronize with.
There are several widely known NTP IP addresses on the Internet that provide reliable time sources for your network. The NTP.org servers are one such set of time servers that provide an NTP source for configuration.
There are a few NTP values to be aware of:
- NTP Server – This is a specialized server that is able to detremine the precise time from an external timing reference such as GPS and passes these precise time values on to your network
- Offset – This is the difference in time between the external time server and the time on a local client computer. The larger the offset, the more inaccurate the timing source is.
- Delay – This is the value of the round-trip time (latency) of the timing message between the client to the server and back again.
How Time is synchronized in a Windows Server domain
In a Windows domain, Microsoft has default configuration in place that takes care of a good portion of the NTP configuration. Starting with Windows 2000 Server, Windows clients are configured as NTP Clients. When configured as an NTP client, Windows computers only attempt to contact the domain controller for NTP synchronization or a manually specified NTP server.

Microsoft has made the domain controller the default in a Windows domain since it makes sense that clients already have a secure channel established with DCs for other types of communications. Additionally, accurate and synchronized time between domain controllers and clients is especially important for all kinds of things such as logins, group policy synchronization and other tasks/operations.
The order of operations or hierarchy in a Windows domain is as follows:
- Domain members attempt to synchronize time with any domain controller located in the domain
- Domain controllers synchronize with a more authoritative domain controller
- The first domain controller that is installed in the environment is automatically configured to be a reliable time source.
- Other than the first domain controller installed, the PDC emulator (if role has been moved from the first DC installed) generally holds the position of best time source.
An important point to consider and that comes into play when thinking about why we set ntp server in Windows 2016 or Windows 2019 is the authoritative domain controller must have a reliable source to synchronize with as well. This is generally an external time server outside of the domain hierarchy.
Now that we know how the domain hierarchy for time is configured, how is the external time source configured on your domain controller that is configured as the reliable source of time?
Configuring Windows Time Service with W32tm.exe
When it comes to Windows Server environments like Windows Server 2016 or Windows Server 2019, there is a special Windows service that controls the time synchronization of your Windows hosts. This is the Windows Time Service.
Microsoft provides a command line tool to interact with the Windows Time Service called W32tm.exe. This has been included in Windows operating systems since Windows XP/Windows 2003 and later. It can be used to configure Windows Time service parameters as well as diagnose time service problems. This is generally the tool of choice when it comes to configuring, monitoring, and administering Windows Time.
Using the W32tm.exe utility is fairly straightforward. It can be used from a normal command prompt as well as from a PowerShell prompt. There are several command parameters included that allow not only configuring the NTP servers you want to query, but also parameters that allow viewing the low level registry configuration as well as the synchronization status.
You can read the official Microsoft KB on the Windows Time service and the W32tm.exe utility here:
- https://docs.microsoft.com/en-us/windows-server/networking/windows-time-service/windows-time-service-tools-and-settings
However, there are a few commands I would like to show you for the purposes of configuring your Domain controller that is to be the reliable time source (PDC Emulator) for your domain.
The first command is the command line entry to specify your NTP servers, which in this case I am using the NTP.org servers to set as the source of my NTP synchronization.
w32tm /config /syncfromflags:manual /manualpeerlist:"0.us.pool.ntp.org 1.us.pool.ntp.org 2.us.pool.ntp.org 3.us.pool.ntp.org" /update

Stop-Service w32time
Start-Service w32time
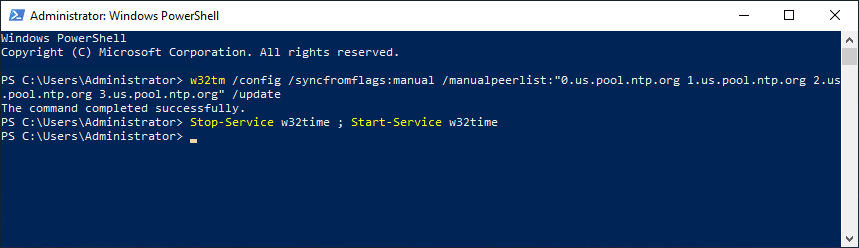
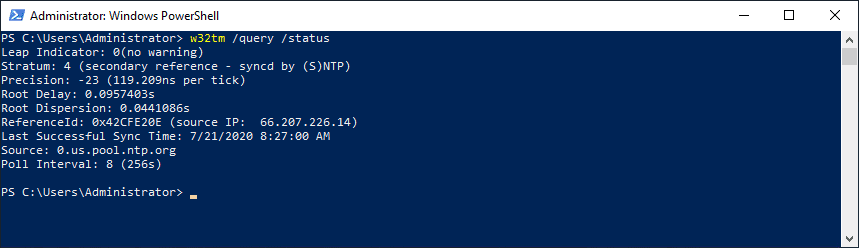
If you want to view the status of the NTP synchronization on your server after you have configured the values and restarted the w32time service, you can use the following command:
w32tm /query /status
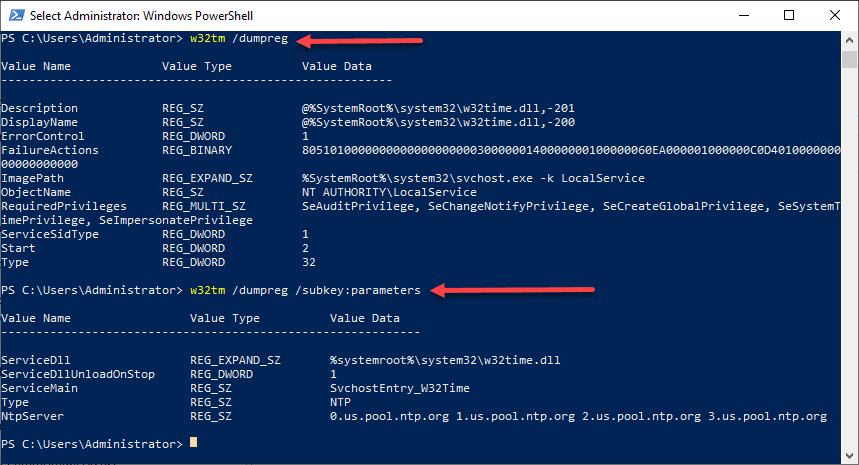
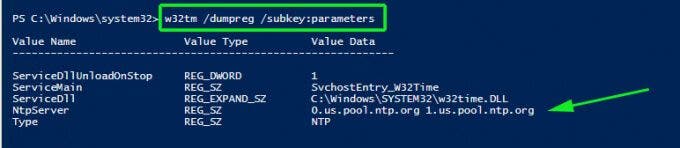
You can also check the values configured in your registry key hkey local machine system currentcontrolset services w32time config using the commands below. You can drill into the configuration parameters using the /dumpreg /subkey command.
w32tm /dumpreg

w32tm /dumpreg /subkey:parameters
Final Thoughts
As shown, you can easily set NTP Server Windows 2016 or Windows 2019 using the w32tm command utility that allows interacting with the time service in Windows Server.
In a Windows domain, you want to configure your authoritative time source domain controller, which by default is the PDC Emulator, to pull time information from an authoritative source like NTP.org or some other reliable NTP time server.
After configuring the time source, the other domain controllers will synchronize with this server and then the Windows clients joined to the domain will synchronize with the domain controllers that have the corrected time from the authoritative server.
Maintaining accurate time on your server is critical largely because many services and IT applications rely on accurate time settings to function as expected. These include logging services, monitoring and auditing applications, and database replication to mention a few.
Time skew in servers, and any client systems for that matter, is undesirable and usually causes conflict in time-critical applications. To maintain accurate time settings on your server and across the network by extension, it’s preferred to install and enable a NTP server on your server.

What is an NTP server?
NTP, short for Network Time Protocol, is a protocol that synchronizes time across network devices. It listens on UDP port 123 and always ensures that time inconsistencies across the server and client systems are mitigated and that client systems are always in sync with the server.
NTP server refers to a network device or a service that fetches time from an external time source and syncs the time across the network using the NTP protocol. This guide will focus on installing NTP service on Windows server 2019.
How Does NTP Work ?
Being a protocol, NTP requires a client-server architecture. The NTP client residing on a Windows PC, for example, initiates a time request exchange with the NTP server.
A time-stamp data exchange happens between the server and client and this helps in adjusting the clock on client’s systems to the highest degree of accuracy to match the time on the NTP server. In this guide, we will walk you through the installation and configuration of NTP server on Windows Server 2019.

There are several ways of setting up NTP server and we will look at each in turn.
In Windows Server environments, there is a special Windows time service that handles time synchronization between the server and the client systems. This is known as Windows Time service. PowerShell provides a command-line tool known as w32tm.exe and comes included in all versions of Windows from Windows XP and Windows Server 2008 to the latest versions of each OS.
Using the w32tm.exe utility, you can configure your Windows system to sync with online time servers. Usually, this is the tool of choice when setting up and monitoring time on your Windows Server system.
Using the command-line utility is quite straightforward.
For example, to set the Server to point to 2 different time servers, namely 0.us.pool.ntp.org and 1.us.pool.ntp.org , launch PowerShell as the Administrator and run the command below
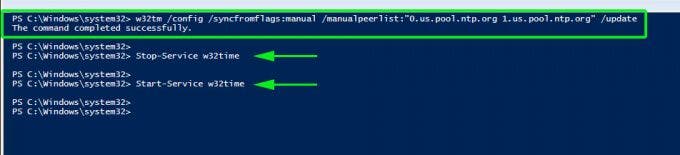
w32tm /config /syncfromflags:manual /manualpeerlist:”0.us.pool.ntp.org 1.us.pool.ntp.org” /update
Then restart Windows Time service using the commands:
Stop-Service w32time
Start-Service w32time
Here’s a snippet of the commands.
You can thereafter confirm the values of NTP servers configured in the registry by running this command:
w32tm /dumpreg /subkey:parameters
Configure NTP Server on Windows Server 2019 using Registry editor
The second method of installing and configuring the NTP server is using the registry editor. If you are not a fan of the Windows PowerShell, then this will truly come in handy.
To get started, open the registry editor. Press ‘Windows key + R’ and type ‘regedit’ and hit ENTER. The windows registry will be launched as shown below.
Next, head over to the path shown below
Computer\HKEY_LOCAL_MACHINE\SYSTEM\CurrentControlSet\Services\W32Time\TimeProviders\NtpServer
On the right pane. Be sure to find & double-click the file labelled ‘Enabled’ in the diagram shown below.
Next, In the ‘value data’ text field, set the value to ‘1’ and click the ‘Ok’ button.
Next, head over to the path:
Computer\HKEY_LOCAL_MACHINE\SYSTEM\CurrentControlSet\Services\W32Time\Config
In the right pane, double click the ‘Announce Flags’ file.
Double-click the file and in the Value data text field, type the value ‘5’ and click ‘OK’.
For the changes to come into effect, you need to reboot the NTP server by heading to the services Window. To achieve this, press ‘Windows key + R’ and type ‘services.msc’. Scroll and find ‘Windows Time’, right-click on it and select the ‘Restart’ option.
Useful w32tm commands
Once you have set up your NTP server, you can use the following commands to verify various aspects of the server:
To check the status of the NTP server, run the command:
w32tm /query /status
To reveal the current NTP pool being used to sync time with execute:
w32tm /query /source
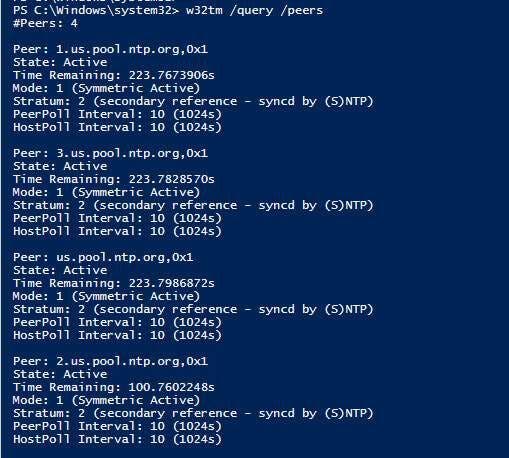
You can also display a list of NTP time servers along with their configuration status as shown.
w32tm /query /peers
To display NTP server configuration settings, run the command:
w32tm /query /source
This shows quite a wealth of information.

Final Take
We cannot stress enough how important it is to maintain accurate time and date settings on your server. As you have seen, setting up an NTP server on your Windows server instance is quite easy and straight forward.
Once you have configured the NTP service on your server, other domain controllers in your environment will sync with this server and the Windows clients in the domain will sync with the domain controllers. Hopefully, you can now install and configure NTP on Windows Server 2019.
Network Time Protocol (NTP) is a highly scalable internet protocol that determines the best time information and synchronizes accurate settings on a computer system. This guide explains how to set the time zone and configure NTP on a Windows Server.
This guide uses Windows Server 2019, but these instructions work on any machine with Server 2016 or later.
Prerequisites
Before you begin:
- Deploy a Vultr Windows Server.
- Connect to the server.

- Using the Windows Start Menu, open Server Manager.
- Locate Time zone in the local server properties section.
- Click the current timezone, which is UTC Coordinated Universal Timeby default.
- In the Date and Time window, click Change time zone.
- Expand the Time zone drop-down list.
- Select your preferred timezone. It’s recommended to set it to your server location.
- Click OK to save changes.
- Click Apply to load changes on the server.
- Re-open Server Manager, and verify the timezone change.
Optional: Set the Timezone using PowerShell
- From the start menu, open Windows PowerShell, or open the run dialog (Win key + R), type
powershellin the search bar, and click OK to start PowerShell. -
Run the following command to check the server timezone.
PS > Get-Timezone -
View all available timezones.
PS> Get-Timezone -ListAvailableTo find your target timezone, use the following command to filter by name.
PS> Get-Timezone -ListAvailable | Where-Object {$_.displayname -like "*US*"}The command above displays all names containing the characters
US. You can use a different string such as London. -
Change your timezone.
PS> Set-Timezone -Name "Central Standard Time"You can also change the timezone by ID.
PS> Set-Timezone -Id "Central Standard Time"
Configure NTP
In addition to setting the timezone, you can also configure Windows to use NTP to synchronize the time.
- Open the Run dialog window by pressing the Windows key (WIN) + R on your keyboard.
- In the search bar, enter
regeditand click OK to open Registry Editor. -
Expand the registry navigation tree:
HKEY_LOCAL_MACHINE -> SYSTEM -> CurrentControlSet -> Services
-
Expand W32Time.
- Click Config.
- Select AnnounceFlags
- Enter
5in the Value data field. - Click OK to save changes.
- In the left pane, click Parameters.
Optional: Change the NTP Server
By default, Vultr uses the time.constant.com time server, located on our high-speed infrastructure. If you want to use a different time server, you can change the value of the NtpServer parameter by following these steps.
- Double-click NtpServer
-
Change the value data field to your preferred value. For example, to sync with the United States NTP pool, use:
us.pool.ntp.orgYou can find a list of NTP Pool servers at the official website.
-
Expand TimeProviders.
- Click NtpServer.
- Double click Enabled, change the value data from
0to1, and click OK to save changes. - Close the registry editor, open the start menu, and search the keyword
services. -
In the services window, scroll through the list, select Windows Time, right-click, and select Restart to apply NTP changes.


Optional: Configure NTP Using PowerShell
If you prefer to use Powershell, you can use the following commands to configure NTP.
- Open PowerShell with administrative privileges.
-
Check the NTP time synchronization status.
PS> w32tm /query /status -
Enter the following command to set the time AnnounceFlags to
5.PS> Set-ItemProperty -Path "HKLM:\SYSTEM\CurrentControlSet\services\W32Time\Config" -Name "AnnounceFlags" -Value 5 -
(Optional) If you want to use NTP pool servers instead of Vultr’s NTP server, run the following command.
PS> Set-ItemProperty -Path "HKLM:\SYSTEM\CurrentControlSet\Services\w32time\Parameters" -Name "NtpServer" -Value us.pool.ntp.org -
Enable NTP Server.
PS> Set-ItemProperty -Path "HKLM:\SYSTEM\CurrentControlSet\Services\w32time\TimeProviders\NtpServer" -Name "Enabled" -Value 1 -
Restart the Windows Time service.
PS> Restart-Service w32Time -
Test NTP synchronization.
PS> w32tm /resync
Next Steps
You have successfully set the timezone and configured NTP on Windows Server 2019. If you plan to have other machines on a Vultr VPC use your NTP server, allow port 123 in the Windows Server Firewall. For further information, refer to the following guides.
- Official NTP Documentation
- List of database TimeZones
- Configure the Firewall on Windows Server 2019
- Create A Vultr Virtual Private Cloud (VPC)