On Windows Server 2022 (or 2019 and 2016), you can assign a static IP address in at least two ways through the graphical user interface (GUI) or commands, and in this guide, you will learn how.
When planning to install the server version of Windows, configuring a static IP address is among one the first tasks you have to complete as it will make it easier to share files and printers, and you may need this configuration to set up other networking features like port forwarding. Otherwise, services can stop working at any time.
By default, the server and client version of Windows receives a dynamic network configuration from the Dynamic Host Configuration Protocol (DHCP) server, and since it’s “dynamic,” it can change at any time. If this happens to a server, users won’t be able to connect to the services.
Regardless of the service you plan to configure on the server, you must make sure to set a static IP address, and on Windows Server 2022, you can perform this task in at least two ways through Control Panel and PowerShell.
This guide will teach you the steps to assign a static TCP/IP address on Windows Server 2022, 2019, and 2016.
- Configure static IP address on Windows Server from Control Panel
- Configure static IP address on Windows Server from PowerShell
Configure static IP address on Windows Server from Control Panel
To assign a static IP on Windows Server 2022, use these steps:
-
Open Control Panel on Windows Server.
-
Click on Network and Internet.
-
Click on Network and Sharing Center.
-
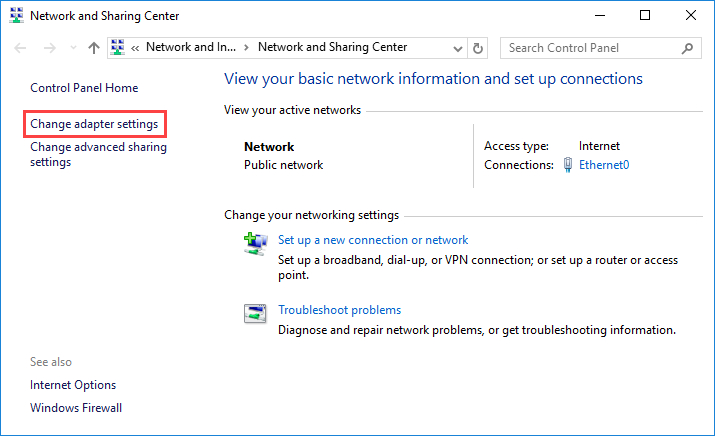
Click the Change adapter settings option on the left navigation pane.

-
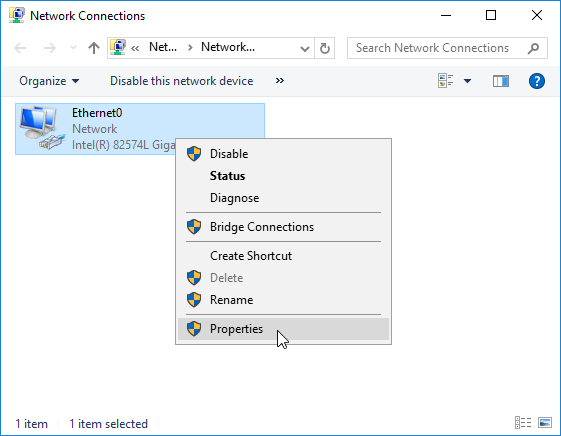
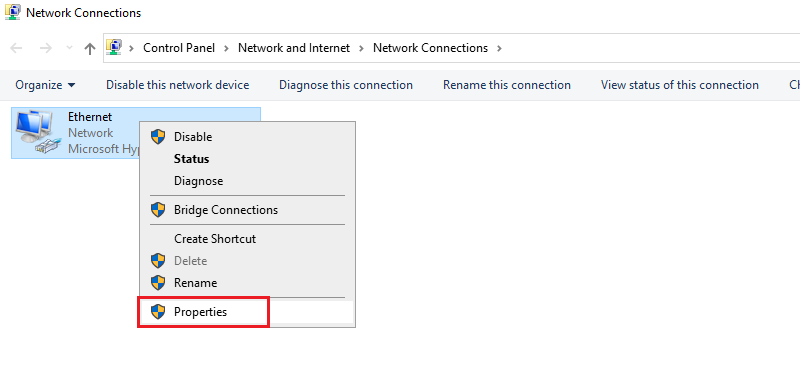
Right-click the network adapter and select the Properties option.
-
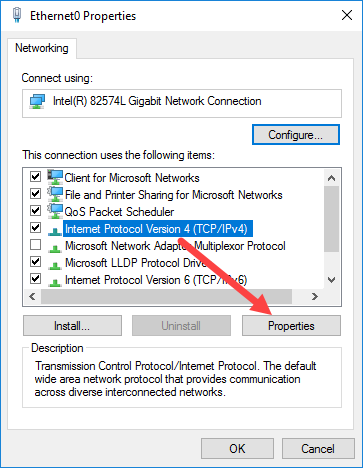
Select the “Internet Protocol Version 4 (TCP/IPv4)” option.

-
Click the Properties button.
-
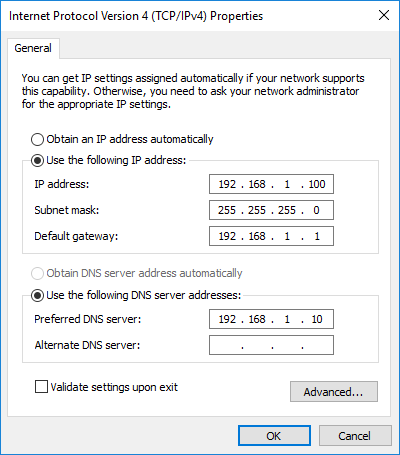
Select the “Use the following IP address” option.
-
Assign the static IP address – for example, 10.1.4.120.

-
Specify a Subnet mask. Typically, on a home network, the subnet mask is 255.255.255.0.
-
Specify a Default gateway. (Usually, your router’s IP address. For example, 10.1.4.1.)
-
Under the “Use the following DNS server addresses set Preferred DNS server” section, set the Preferred DNS server address, usually your router’s IP address or server IP address providing DNS resolutions (for example, 10.1.4.1).
-
(Optional) Specify an Alternative DNS server, which the computer will use if it cannot reach the preferred DNS server.
-
Click the OK button.
-
Click the Close button again.


Once you complete the steps, you can open your web browser and load a website to see if the configuration works.
Configure static IP address on Windows Server from PowerShell
To set a static IP address with PowerShell on Windows Server 2022, use these steps:
-
Open Start.
-
Search for PowerShell, right-click the top result, and select the Run as administrator option.
-
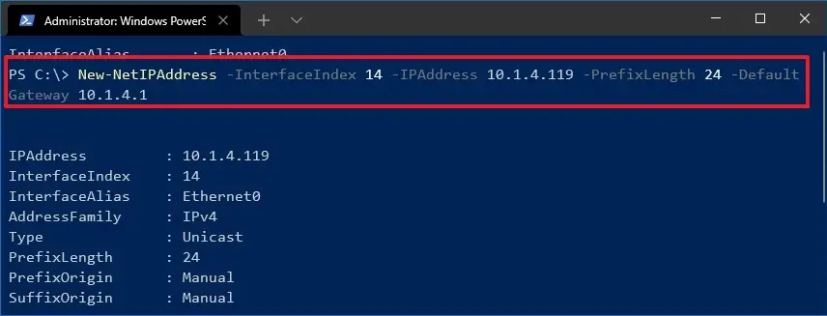
Type the following command to view the current configuration and press Enter:
Get-NetIPConfiguration

-
Confirm the “InterfaceIndex,” “IPv4Address,” “IPv4DefaultGateway,” and “DNSServer.”
-
Type the following command to set a static IP address on Windows Server 2022 and press Enter:
New-NetIPAddress -InterfaceIndex 14 -IPAddress 10.1.4.119 -PrefixLength 24 -DefaultGateway 10.1.4.1

In the command, replace the “InterfaceIndex” number with the corresponding number of your adapter. Change “IPAddress” with the static IP address you want to assign to your device. Replace “PrefixLength” (subnet mask) with the correct bit number if necessary. Usually, the setting is “24” to represent “255.255.255.0.” Also, replace the “DefaultGateway” option with the default gateway address (usually the router) of the network.
-
Type the following command to set the DNS server IP address and press Enter:
Set-DnsClientServerAddress -InterfaceIndex 14 -ServerAddresses 10.1.4.1
-
(Optional) Type the following command to set a secondary DNS server address and press Enter:
Set-DnsClientServerAddress -InterfaceIndex 14 -ServerAddresses 10.1.4.1, 8.8.8.8
In the command, change the “InterfaceIndex” number with your network adapter number and “ServerAddresses” with the DNS IP address.


Once you complete the steps, the PowerShell command will apply the static network to the server.
FAQ
Can I set a static IP configuration from the Settings app?
Yes, you can use the Settings app to configure a static configuration. However, it’s worth noting that the Settings app also provides an interface to configure a static network configuration. However, it’s not recommended to use this method, as you may encounter problems, such as “Can’t save IP settings. Check one or more settings and try again” and others. One of the reasons is that the “Subnet mask” has to represent with bit number, not the full address. For example, “24” instead of “255.255.255.0.” As a result,
Why Windows Server static IP address isn’t working?
The static IP address is not working on Windows Server, because you are using the Settings app to apply the configuration. The easiest way to assign a static TCP/IP address is using Control Panel.
Do these instructions only apply to Windows Server 2022?
No, you can use these instructions to configure a static IP address on Windows Server 2022, 2019, 2016, 2012, 2012 R2, and even older versions.
What TCP/IP address to use for a static configuration?
Always assign a TCP/IP address in the network range and outside of the DHCP server scope to allow proper connectivity and avoid configuration conflicts with other devices in the network.
Estimated reading time: 2 min
Introduction
In this tutorial, we will learn to configure a static IP address on Windows Server 2019. It may be possible that your Windows Server Ethernet adapter is configured to obtain an IP address from a DHCP server. In some networks, there may not be a DHCP server running on the network, hence the need for assigning a static IP arises. In this tutorial, we will learn how to configure static IPv4 and IPv6 address on a Windows Server 2019.
Prerequisites
- Cloud VPS or Dedicated Server with Windows Server 2019 installed.
- You must be logged in via Remote Desktop Protocol as an administrative user.
Step 1: Log in to Windows using RDP
To follow this tutorial, you need to connect to your Windows Server using RDP. You can follow these tutorials for the same.
- How to connect to your server via RDP on Windows 10
Step 2: Open Ethernet Adapter Properties
To open your Ethernet Adapter Setting, click on Control Panel in the Windows start menu. Under Control Panel, click Network and Internet and then click on Network and Sharing Center.
Under Network and Sharing Center click on Change Adapter Settings on left side pane. It will open the list of attached network adapters on your system.
On Ethernet, make a right click and click on Properties to open settings for that particular adapter.
Step 3: Find the Static IP of Your Server
Snel customers can find the IP address attached to their server by going to My.snel.com client area for the VPS or Dedicated Server. Click on Network tab >> Interfaces.
It will show you both the IPv4 and IPv6 address of interfaces attached to your server.
In the above screenshot note down the following as we will need it in Step #4 of the tutorial.
Number 1 is the IP address of the interface. In the above example, the example IPv4 address is 192.168.0.2. The subnet mask would be 255.255.255.0 and the default gateway would be 192.168.0.1.
Number 2 is the first DNS resolver server and similarly, number 3 is the second DNS resolver server.
If you are unsure about these values, feel free to contact our support team.
Step 4: Configure Static IPv4 Address
Under Properties for the Ethernet adapter, click once on Internet Protocol Version 4 (TCP/IPv4) to select this option. Now, click on properties to open IPv4 configuration.
Now, select the radio button saying Use the following IP address and put the IP address we noted down in Step #3 of the tutorial.
Similarly, also select the radio button Use the following DNS server addresses and put the address of the DNS resolver servers we obtained from Step #3.
Once done, click OK button to save the configuration.
Step 5: Obtain IPv6 Address
Snel customers can find the IPv6 address attached to their server by going to Snel control panel for the VPS or Dedicated Server. Click on Network tab >> Interfaces.
It will show you both the IPv4 and IPv6 address of interfaces attached to your server.
In the above screenshot note down the following as we will need it in Step #6 of the tutorial.
Number 1 is the IPv6 address of the interface. In the above example, the example IPv6 address is fc00:1234:abcd:12ab::236. The subnet mask length would be 48 and default gateway would be fc00:1234:abcd::1.
Number 2 is the first IPv6 DNS resolver server and similarly, number 3 is the second IPv6 DNS resolver server.
If you are unsure about these values, feel free to contact Snel Support.
Step 6: Configure Static IPv6 Address
Under Properties for the Ethernet adapter, click once on Internet Protocol Version 6 (TCP/IPv6) to select this option. Now, click on properties to open IPv6 configuration.
Under IPv6 configuration, select the radio button saying Use the following IPv6 address and put the IP address we noted down in Step #5 of the tutorial.
Similarly, also select the radio button Use the following DNS server addresses and put the address of the DNS resolver servers we obtained from Step #5.
Conclusion
In this tutorial, we looked at how to configure static IPv4 on Windows Server 2019. We looked at how to obtain the IP address assigned to the Snel Server. We also learned to configure static IPv6 on a Windows Server 2019.
Configuring network settings is one of the first steps you will need to take on Windows Server 2016. Whether you are using the GUI or Core version, changing the IP address, Subnet Mask, Default Gateway, and DNS Servers can be done in different ways depending on the case.
In today’s article, you will see how to change the basic IPv4 network settings for your machine’s adapters using the GUI, PowerShell, SConfig, and command prompt.
Configure network settings using the graphical user interface
Ok, the process is more than simple, but I mention it to make the article more complete.
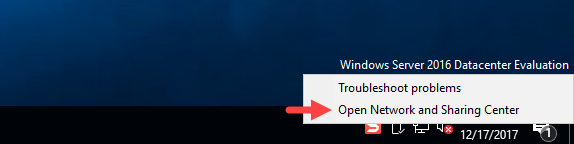
Right-click the network icon in the notification area, and then click Open Network and Sharing Center.

In the window that opens, click Change adapter settings to display the available network adapters of the machine.
Right-click the adapter you are about to change the IP settings and then click Properties.

Click Internet Protocol Version 4 (TCP / IPv4) and then the Properties button.

Here, enable Use the following IP address and enter the static IP addresses for the server, subnet mask, default gateway and DNS servers.

That’s it!
Configure network settings using PowerShell
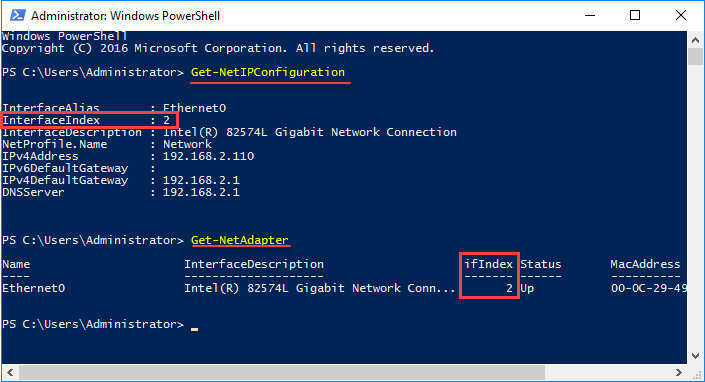
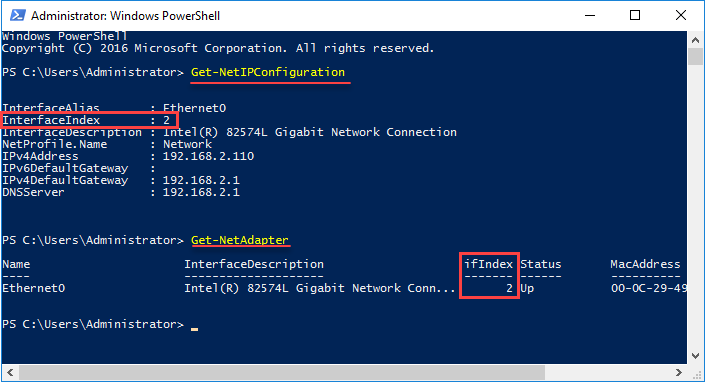
First, we need to identify the InterfaceIndex number for the network adapter we want and then based on that, we will proceed to set it up.
By typing the Get-NetIPConfiguration cmdlet you can see the current IP settings of all the network adapters of the machine. Note the InterfaceIndex.
Alternatively, type the Get-NetAdapter cmdlet to see the available network adapters. Note the number again in ifIndex.
To set the IP address, the Subnet (PrefixLength) and the Default Gateway, type the following command by changing the addresses according to your own network.
New-NetIPAddress -InterfaceIndex 2 -IPAddress 192.168.2.100 -PrefixLength 24 -DefaultGateway 192.168.2.1
To set up DNS servers, use the following Set-DnsClientServerAddress command.
Set-DnsClientServerAddress -InterfaceIndex 2 -ServerAddresses 192.168.2.10, 192.168.2.11
You can use the Get-NetIPConfiguration cmdlet again to confirm that it has declared the correct settings.
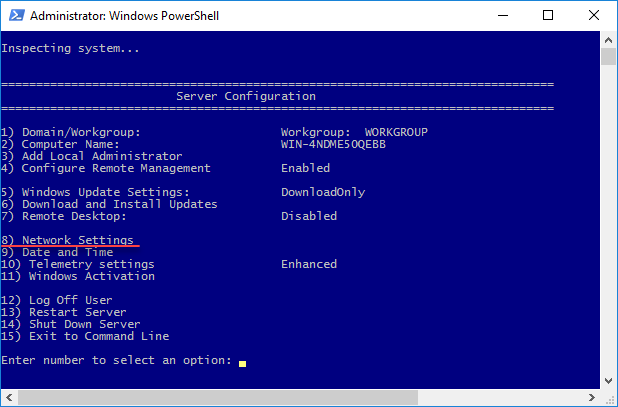
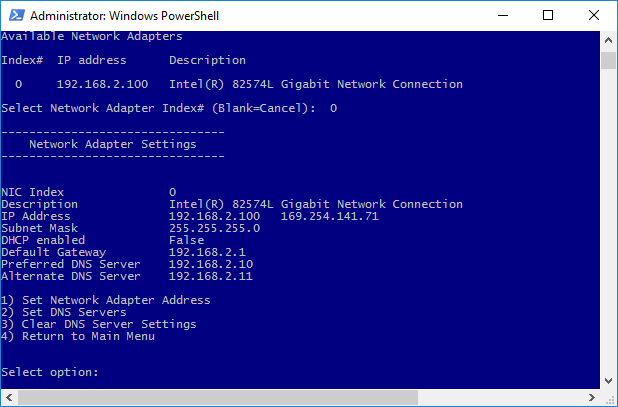
Configure network settings using the SConfig tool
For a more interactive process, you can use the SConfig tool through PowerShell. Type SConfig and press Enter.

To change the network settings, type the number 8 that corresponds to Network Settings.
Type the index number of the adapter you want to set up.

Then use Options 1 and 2 to set the IP address, Subnet Mask, Default Gateway, and the adapter’s DNS servers. I do not think I need to go further into this piece, it’s pretty easy and intuitive.

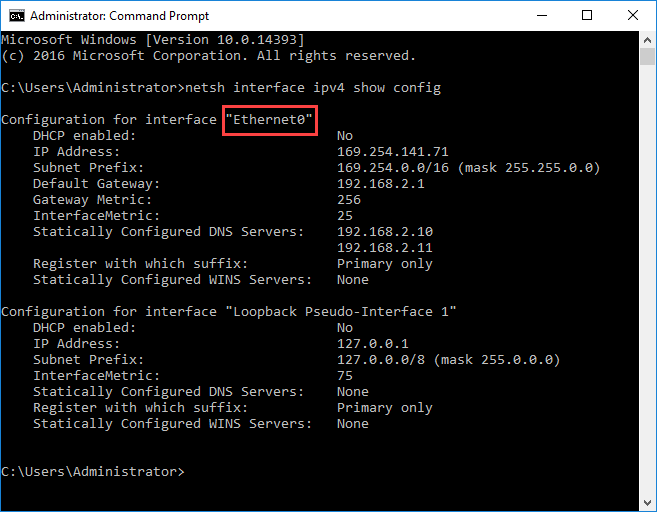
Configure network settings using the Command Prompt
In this case, we will use the netsh command.
First, run the following command to note the name of the adapter you are going to set up. In our case is Ethernet0.
netsh interface ipv4 show config

To change your IP address, Subnet Mask and Default Gateway, type the following command by changing the addresses according to your own settings.
netsh interface ipv4 set address name = "INTERFACE NAME" static IP_ADDRESS SUBNET_MASK GATEWAY
For example, it will be something like this.
netsh interface ipv4 set address name = "Ethernet0" static 192.168.2.100 255.255.255.0 192.168.2.1
Next, to configure the Primary DNS Server, use the following command.
netsh interface ipv4 set dns name = "INTERFACE NAME" static DNS_SERVER
For example, it will be something like this.
netsh interface ipv4 set dns name = "Ethernet0" static 192.168.2.10
To configure the Secondary DNS Server, use the following command.
netsh interface ipv4 set dns name = "INTERFACE NAME" static DNS_SERVER index = 2
Similarly to the previous example.
netsh interface ipv4 set dns name = "Ethernet0" static 192.168.2.11 index = 2
Finally, you can use the first command again to confirm that your settings are correct.
Настройка сетевых параметров — это один из первых шагов, с которых необходимо начинать настройку Windows Server 2016. Независимо от того, используете ли вы Windows Server с графическим интерфейсом (GUI) или Core версию, изменение IP-адреса, маски подсети, шлюза и DNS-серверов можно выполнить несколькими способами.
В данной статье вы увидите, как в Windows Server 2016 изменить основные сетевые параметры IPv4 для сетевых адаптеров вашей системы с помощи GUI, PowerShell, утилиты SConfig и командной строки.
- Настройка сетевых параметров с помощью графического интерфейса Windows
- Настройка сети с помощи PowerShell
- Настройка параметров сети с помощью инструмента SConfig
- Настройка сети из командной строки с помощью netsh
Содержание:
Настройка сетевых параметров с помощью графического интерфейса Windows
Итак, сам процесс настройки сети достаточно прост.
Щелкните правой кнопкой мыши по значку сети в области уведомлений, затем выберите пункт меню «Open Network and Sharing Center».
В открывшемся окне нажмите ссылку «Change adapter settings» в левой части окна, чтобы отобразить все сетевые адаптеры сервера.

Щелкните правой кнопкой мыши по сетевому адаптеру, настройки которого вы хотите изменить, затем выберите пункт меню «Properties».
В появившемся окне выделите строку «Internet Protocol Version 4 (TCP / IPv4)» и нажмите кнопку «Properties».
Затем следует переключится с автоматического типа настройки сети (через DHCP), активировав пункт «Use the following IP address» и ввести статический IP-адрес вашего сервера, маску подсети, шлюз, который будет использоваться по умолчанию, основной и альтернативный DNS-сервера.
Нажмите кнопку «OK», после этого все изменения будут сохранены. На этом процесс настройки завершен.
Настройка сети с помощи PowerShell
Для того чтобы изменить настройки конкретного адаптера вам необходимо сначала определить индекс этого интерфейса (InterfaceIndex). Сделать это можно при помощи команды Get-NetIPConfiguration. После ввода команды на экране появятся текущие настройки всех сетевых адаптеров. Обратите внимание на значение строки «InterfaceIndex».
С помощью команды Get-NetAdapter можно получить информацию о состоянии сетевых интерфейсов сервера. Обратите внимание на значение столбца «ifIndex».
Для того, чтобы установить статический IP-адрес, маску подсети и шлюз по умолчанию для интерфейса с индексом 2, выполните следующую команду PowerShell:
New-NetIPAddress -InterfaceIndex 2 -IPAddress 192.168.2.100 -PrefixLength 24 -DefaultGateway 192.168.2.1
Чтобы указать основной и альтернативный DNS-сервера, необходимо воспользоваться командой:
Set-DnsClientServerAddress
Пример команды представлен ниже:
Set-DnsClientServerAddress -InterfaceIndex 2 -ServerAddresses 192.168.2.10, 192.168.2.11
После всех изменений можно убедиться в корректности указанных вами сетевых настроек, для этого воспользуйтесь уже известной нам командой:
Get-NetIPConfiguration
Настройка параметров сети с помощью инструмента SConfig
Существует еще один способ изменения сетевых параметров – при помощи утилиты SConfig. Для запуска этой утилиты необходимо открыть PowerShell и ввести команду SConfig, после чего нажать «Enter».
Для входа в меню «Network Settings» введите цифру 8. Далее необходимо будет ввести индекс сетевого адаптера, настройки которого вы хотите поменять.

Затем, для установки статического IP-адреса, маски подсети, шлюза по умолчанию и DNS-серверов необходимо воспользоваться пунктами меню 1 — Set Network Adapter Address и 2 — Set DNS Servers. Я не буду описывать эту часть очень подробно т.к. весь интерфейс очень прост и интуитивно понятен.
Настройка сети из командной строки с помощью netsh
Для настройки сетевых параметров сервера при помощи командной строки Windows, воспользуемся командой netsh.
Сначала нам потребуется узнать имя сетевого адаптера, параметры которого нужно настроить. Введем команду:
netsh interface ipv4 show config
В нашем случае это Ethernet0.
Чтобы изменить IP-адрес, маску подсети и шлюз по умолчанию выполните следующую команду
netsh interface ipv4 set address name = "INTERFACE_NAME" static IP_ADDRESS SUBNET_MASK GATEWAY
Пример команды:
netsh interface ipv4 set address name = "Ethernet0" static 192.168.1.22 255.255.255.0 192.168.1.1
Формат команды для настройки основного DNS-сервера:
netsh interface ipv4 set dns name = "INTERFACE_NAME" static DNS_SERVER
Например:
netsh interface ipv4 set dns name = "Ethernet0" static 192.168.1.10
Чтобы настроить альтернативный DNS-сервер, нужно в команде использовать ключ index, определяющий приоритет данного DNS сервера:
netsh interface ipv4 set dns name = "INTERFACE_NAME" static DNS_SERVER index = 2
Например:
netsh interface ipv4 set dns name = "Ethernet0" static 192.168.1.11 index = 2
На этом настройка IP параметров сетевой карты сервера завершена. Чтобы проверить правильность сделанных настроек воспользуйтесь командой:
netsh interface ipv4 show config
A static IP address is an IP address that was manually configured for a Windows device instead of an IP address assigned by a DHCP server. This step by step tutorial covers how to configure a Static IP Address on Windows Server 2022
Demo environment
- Computer Name: server1
- Operating System: Windows Server 2022 Datacenter
The IP address is assigned by DHCP by default.
1. Open the Server Manager dashboard, select Local Server, and click Ethernet.
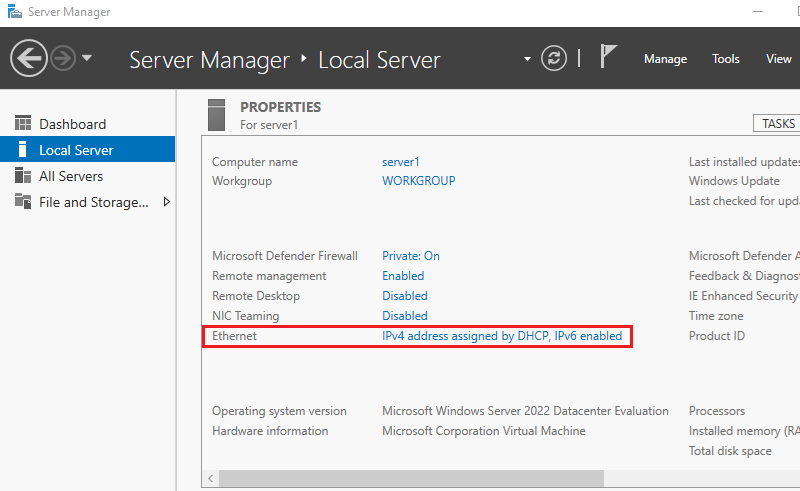
2. Right-Click on Ethernet and Click Properties.
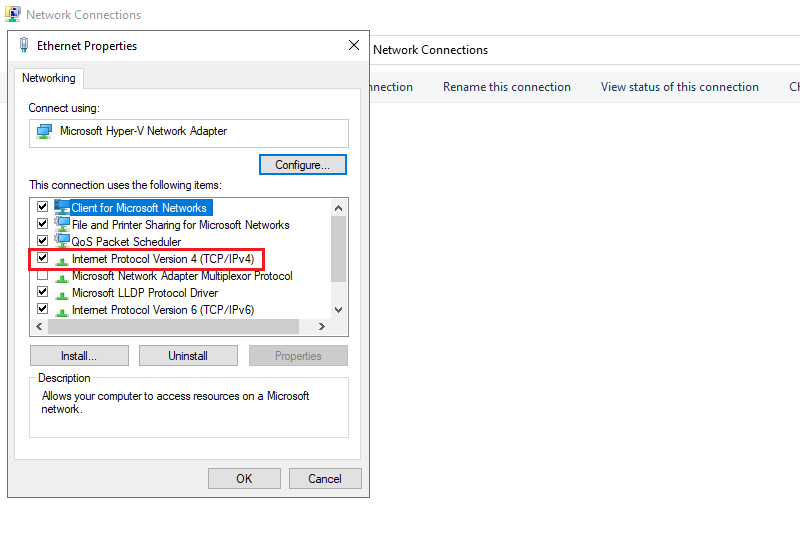
3. In Ethernet Properties, click Internet Protocol Version 4(TCP/IPv4)
4. In Internet Protocol Version 4(TCP/IPv4) Properties, set Static IP address, Gateway, and other details and click OK.
- IP address: 192.168.1.60
- Subnet mask: 255.255.255.0
- Default gateway:192.168.1.1
- Preferred DNS server: 8.8.8.8
- Alternate DNS server:8.8.4.4
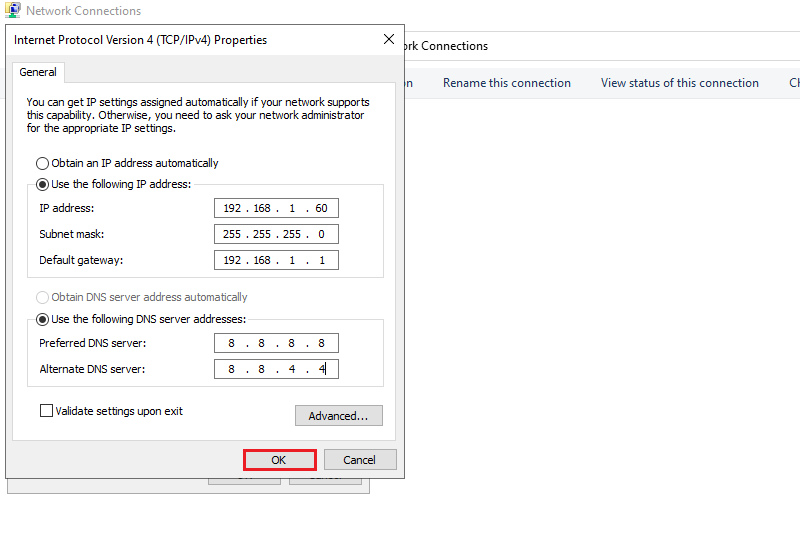
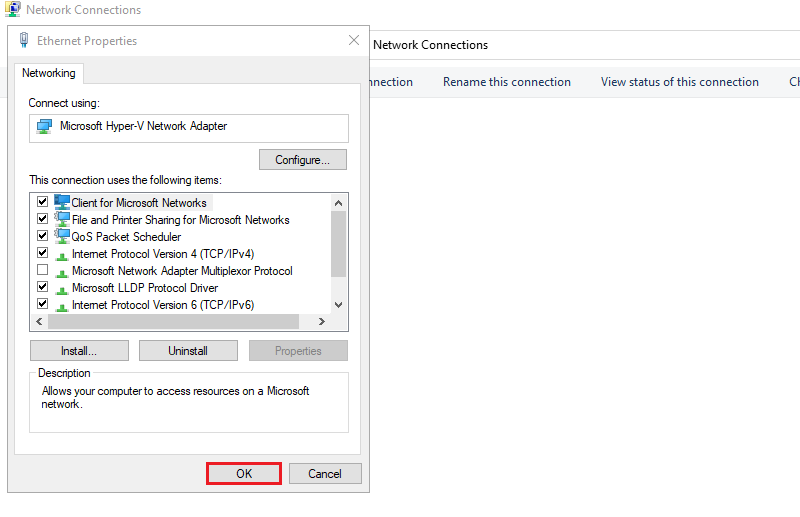
5. Click OK.
The static IP (IPv4) address has been configured.
IP Address (IPV4)
IP Addressing is logical addressing. An IP address can be divided into 2 portions network and host address. The network address is used to identify the network and the host address is used to identify devices on the network. IP V4 is 32-bit addressing. The 32 bits are divided into 4 octets and the total IP addressing scheme is divided into 5 classes (Class A, Class B, Class C, Class D, and Class E). Private IP Addresses used on private networks are not routable through the internet.
Class A
Class B is used for used Local area network (LAN) and Local area network (WAN).
- First octet range: 0 – 127
- Default Subnet Mask: 255.0.0.0
- Privet IP Address: 10.0.0.0-10.255.255.255
Class B
Class B is used for used Local area network (LAN) and Local area network (WAN).
- First octet range:128-191
- Default Subnet Mask: 255.255.0.0
- Privet IP Address: 172.16.0.0-172.31.255.255
Class C
Class B is used for used Local area network (LAN) and Local area network (WAN).
- First octet range: 192-223
- Default Subnet Mask: 255.255.255.0
- Privet IP Address: 192.168.0.0-192.168.255.255
Class D
Class D is used for Multicasting.
- First octet range: 224 – 239
Class E
Class E is used for Research and development.
- First octet range: 240 – 255