DNS (Domain Name System, Система Доменных имен) – система, позволяющая преобразовать доменное имя в IP-адрес сервера и наоборот.
DNS-сервер – это сетевая служба, которая обеспечивает и поддерживает работу DNS. Служба DNS-сервера не требовательна к ресурсам машины. Если не подразумевается настройка иных ролей и служб на целевой машине, то минимальной конфигурации будет вполне достаточно.
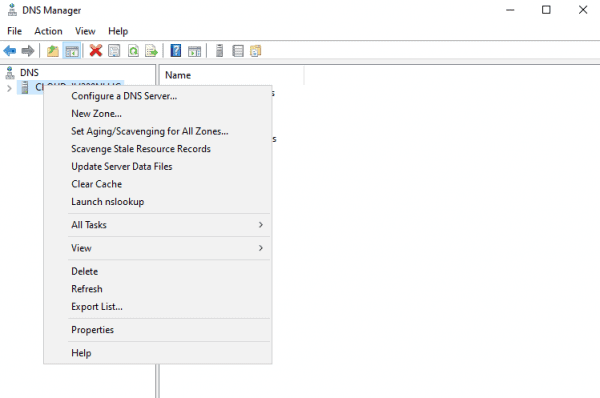
Как настроить DNS-сервер:
- Настройка сетевого адаптера для DNS-сервера
- Установка роли DNS-сервера
- Создание зоны прямого просмотра
- Создание зоны обратного просмотра
- Создание A-записи
- Описание функции Domain Name System (DNS), которые являются новыми или измененными в Windows Server 2016.
Настройка сетевого адаптера для DNS-сервера
Установка DNS-сервера предполагает наличие доменной зоны, поэтому необходимо создать частную сеть в личном кабинете и подключить к ней виртуальные машины.
После того, как машина будет присоединена к двум сетям, важно не перепутать, какое из подключений требует настройки. Первичный сетевой адаптер настроен автоматически с самого начала, через него открыт доступ к интернету, в то время как на дополнительно подключенных сетевых адаптерах доступа в интернет нет, пока не будет произведена ручная настройка:

Наведя курсор на значок сети в системном трее, можно вызвать всплывающую подсказку с краткими сведениями о сетях. Из примера выше видно, что присоединённая сеть это Network 3.
Далее предстоит проделать цепочку действий:
- Нажать правой клавишей мыши Пуск, в выпадающем меню выбрать пункт Сетевые подключения;
- Правой кнопкой мыши нажать на необходимый сетевой адаптер, в меню выбрать Свойства;
- В окне свойств выбрать IPv4 и нажать на кнопку Свойства;
- Заполнить соответствующие поля необходимыми данными:

Здесь в качестве предпочитаемого DNS-сервера машина назначена сама себе, альтернативным назначен dns.google [8.8.8.8].
Установка роли DNS-сервера
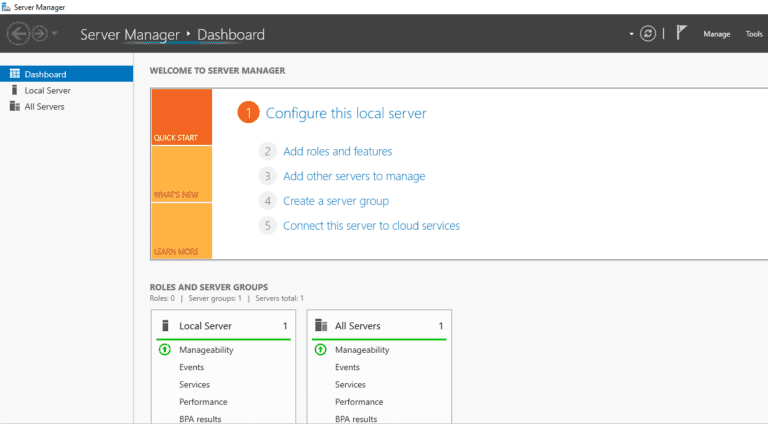
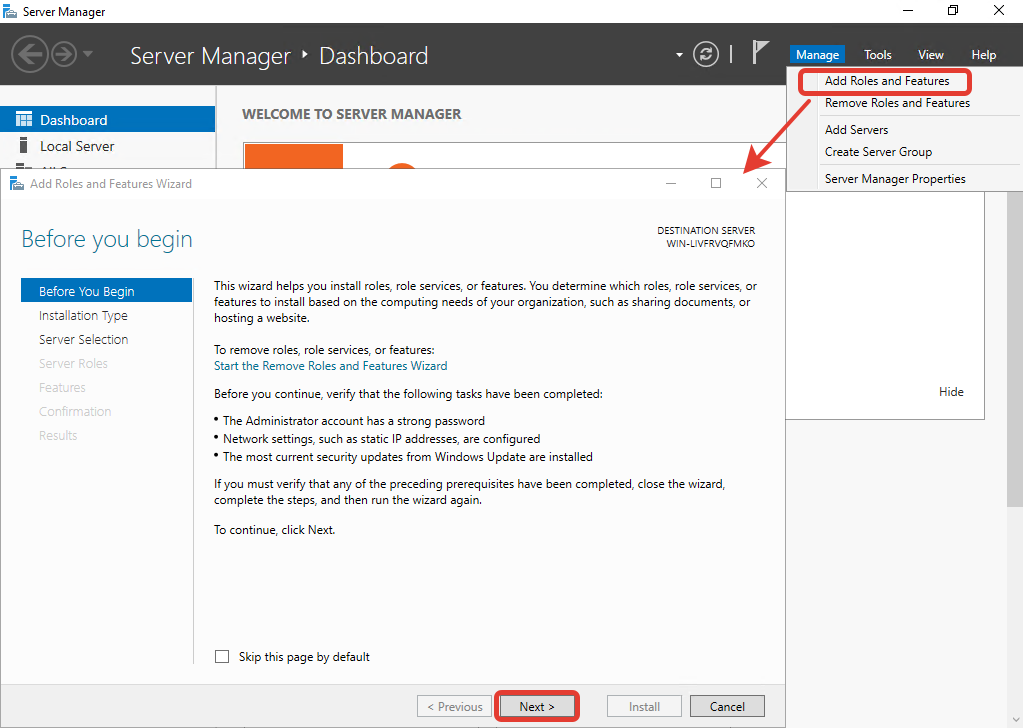
Для установки дополнительных ролей на сервер используется Мастер Добавления Ролей и Компонентов, который можно найти в Диспетчере Сервера.
На верхней навигационной панели Диспетчера сервера справа откройте меню Управление, выберите опцию Добавить Роли и Компоненты:

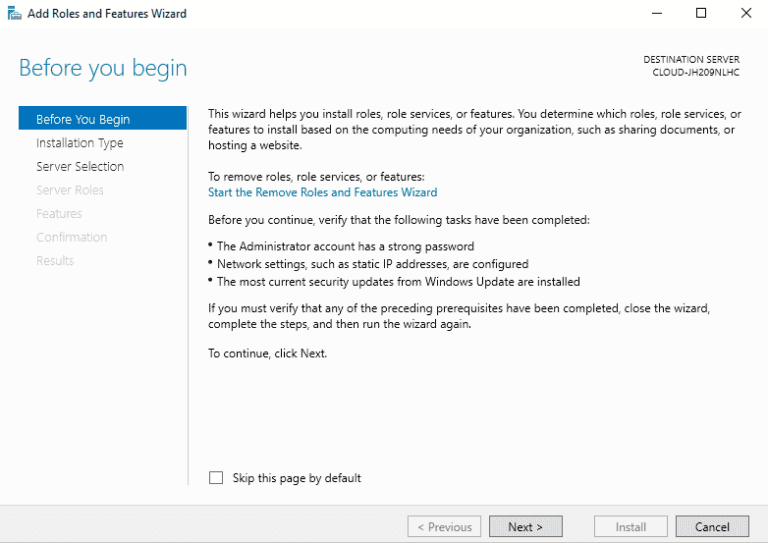
Откроется окно Мастера, в котором рекомендуют убедиться что:
1. Учётная запись администратора защищена надёжным паролем.
2. Настроены сетевые параметры, такие как статические IP-адреса.
3. Установлены новейшие обновления безопасности из центра обновления Windows.
Убедившись, что все условия выполнены, нажимайте Далее;
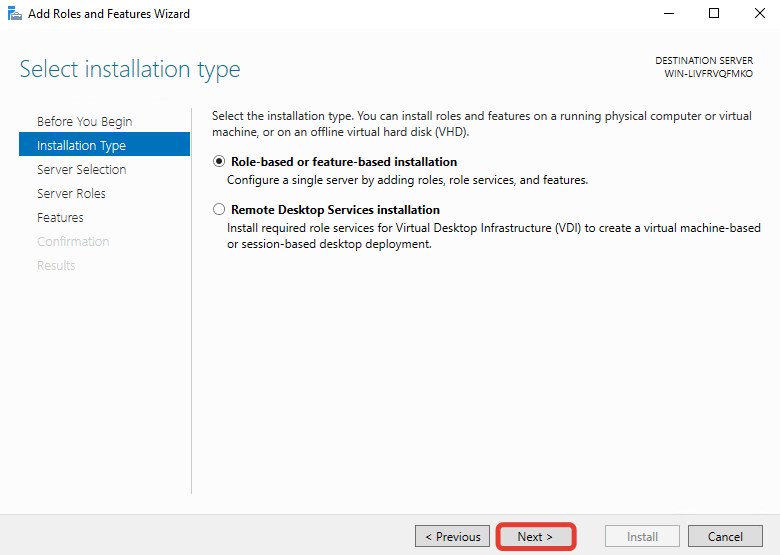
Выберите Установку ролей и компонентов и нажмите Далее:

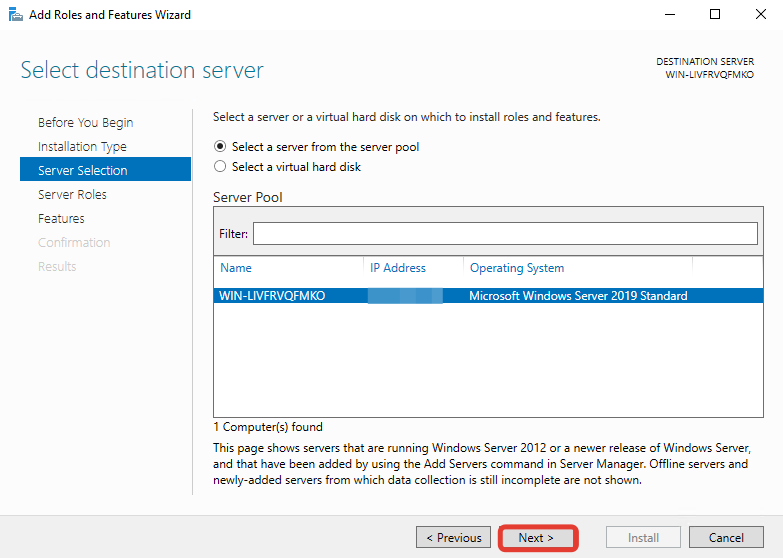
Выберите необходимы сервер из пула серверов и нажмите Далее:

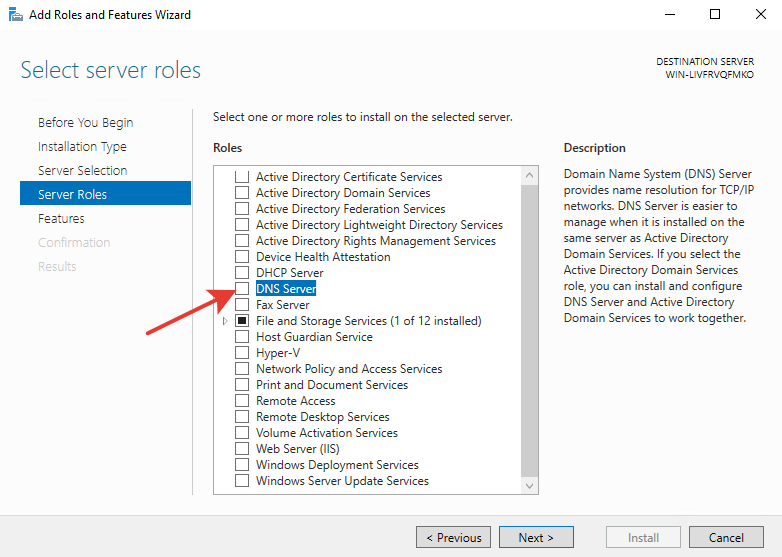
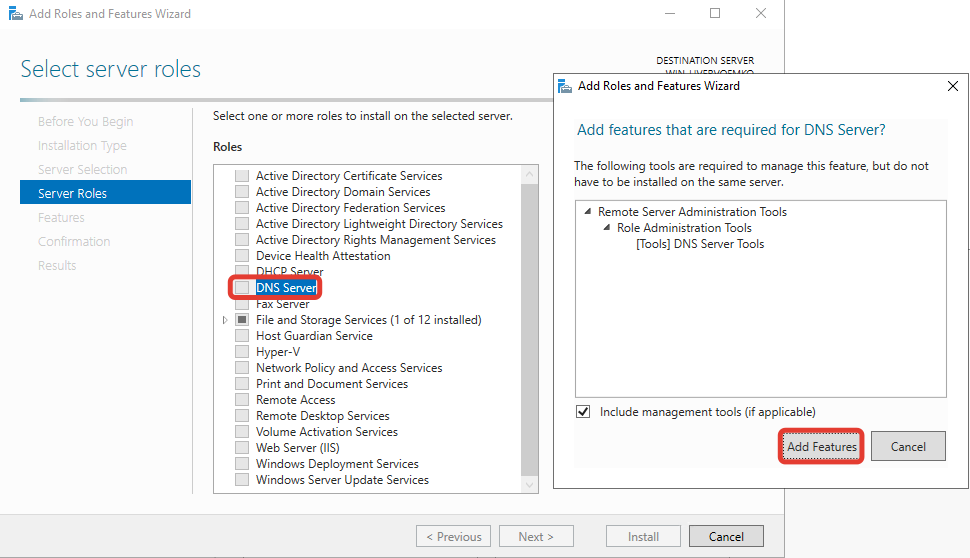
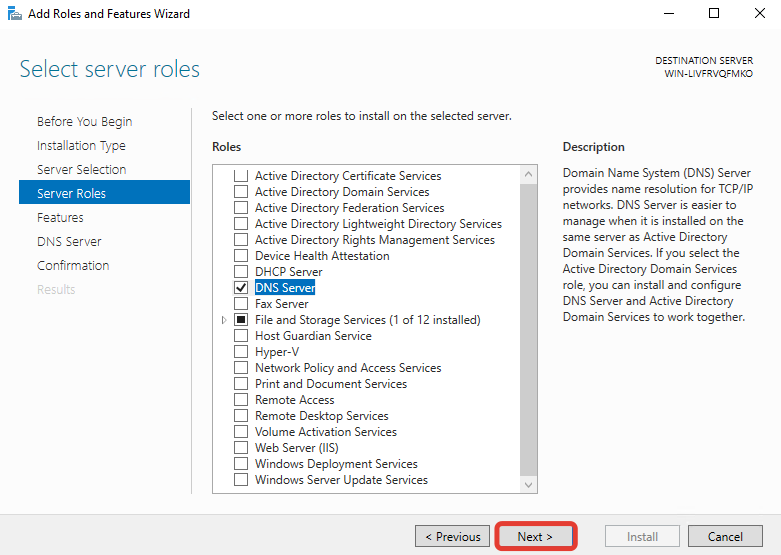
Отметьте чек-боксом роль DNS-сервер и перейдите Далее:

Проверьте список компонентов для установки, подтвердите нажатием кнопки Добавить компоненты:

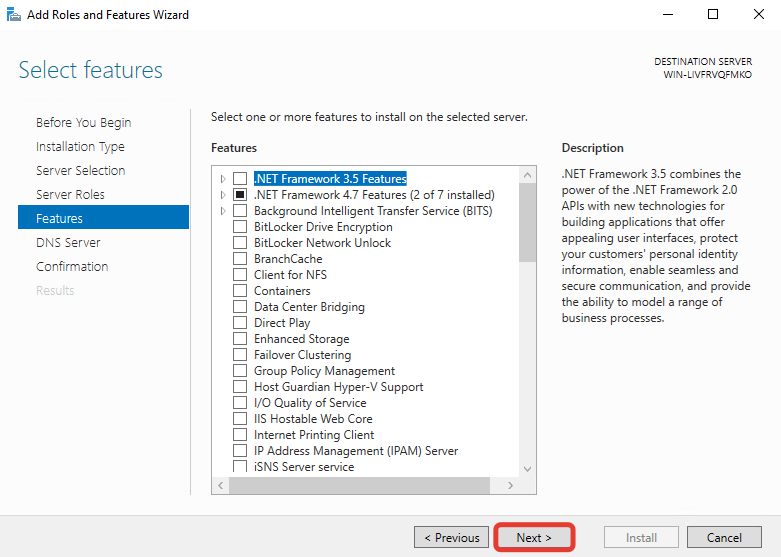
Оставьте список компонентов без изменений, нажмите Далее:

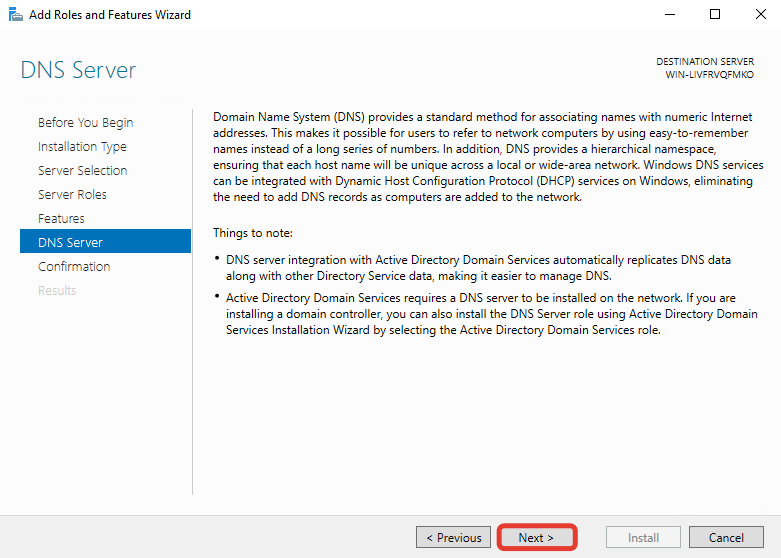
Прочитайте информацию и нажмите Далее:

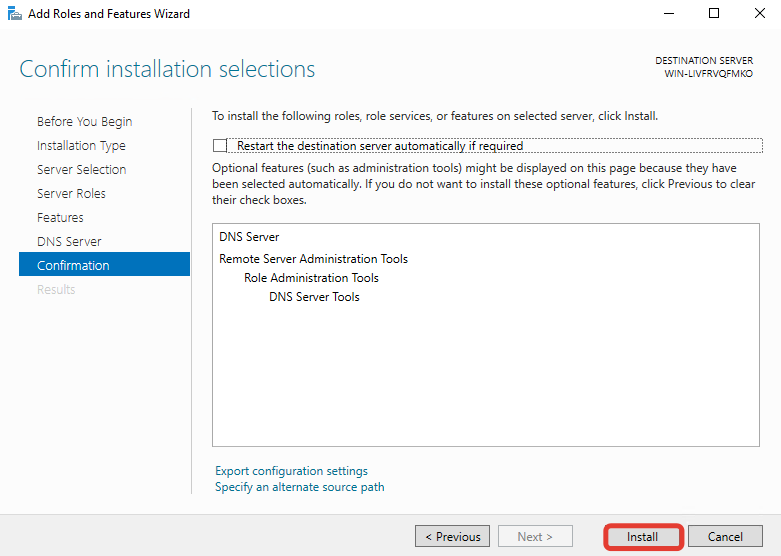
В последний раз проверьте конфигурацию установки и подтвердите решение нажатием кнопки Установить:

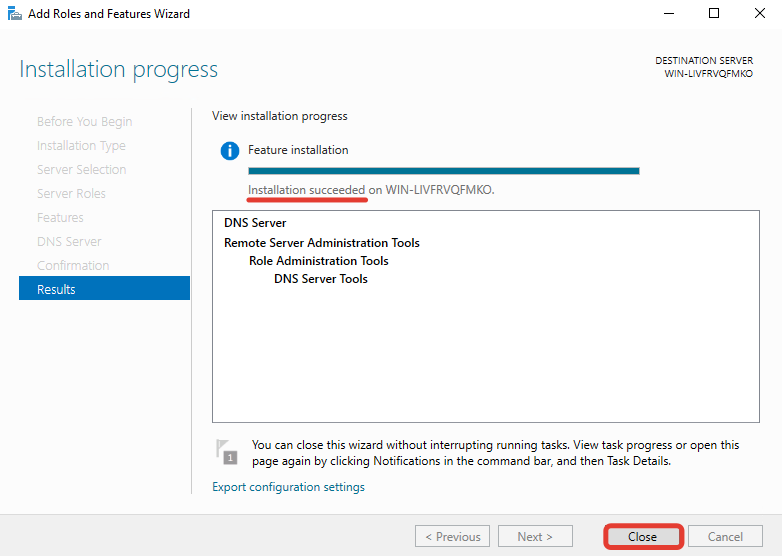
Финальное окно Мастера сообщит, что установка прошла успешно, Мастер установки можно закрыть:

Создание зон прямого и обратного просмотра
Доменная зона — совокупность доменных имён в пределах конкретного домена.
Зоны прямого просмотра предназначены для сопоставления доменного имени с IP-адресом.
Зоны обратного просмотра работают в противоположную сторону и сопоставляют IP-адрес с доменным именем.
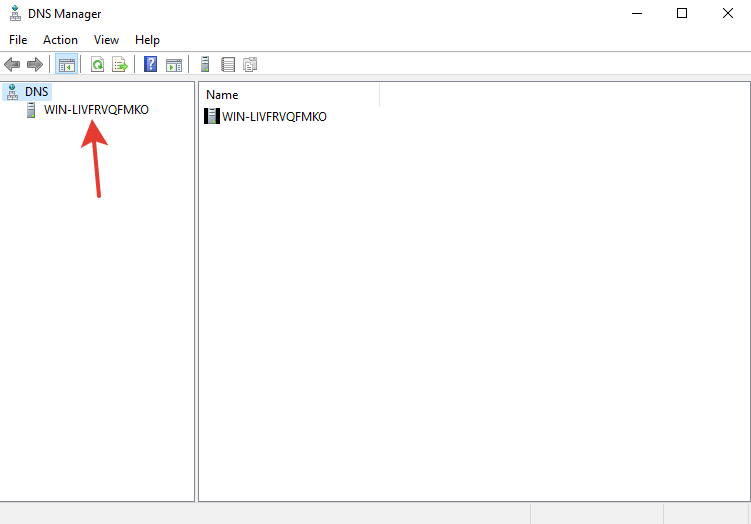
Создание зон и управление ими осуществляется при помощи Диспетчера DNS.
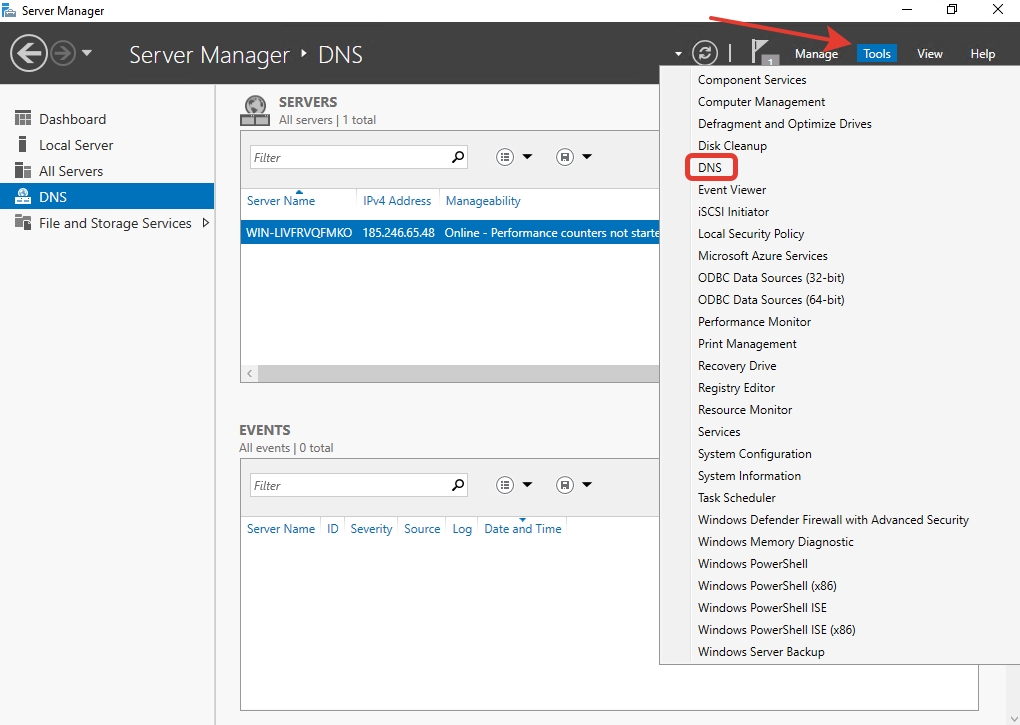
Перейти к нему можно в правой части верхней навигационной панели, выбрав меню Средства и в выпадающем списке пункт DNS:

Создание зоны прямого просмотра
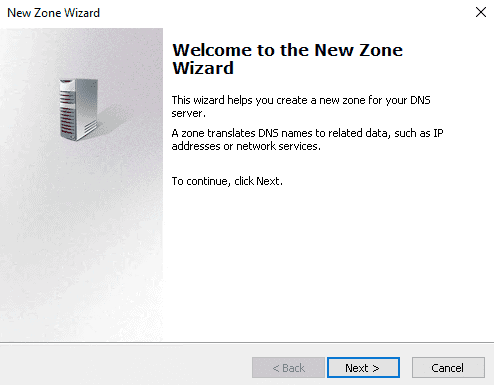
- Выделите каталог Зоны Прямого Просмотра, запустите Мастер Создания Новой Зоны с помощью кнопки Новая зона на панели инструментов сверху:

- Откроется окно Мастера с приветствием, нажмите Далее:

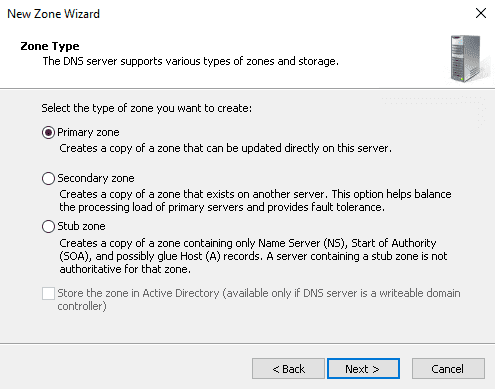
- Из предложенных вариантов выберите Основная зона и перейдите Далее:

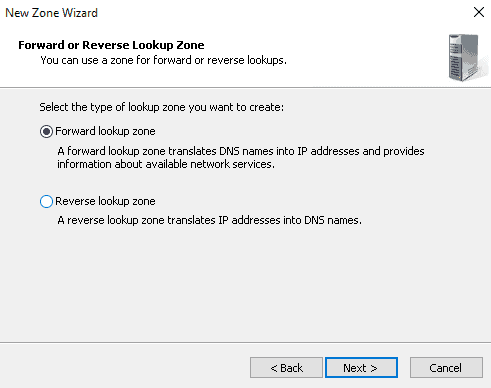
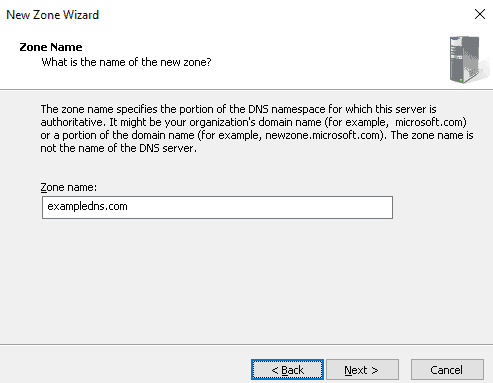
- Укажите имя зоны и нажмите Далее:

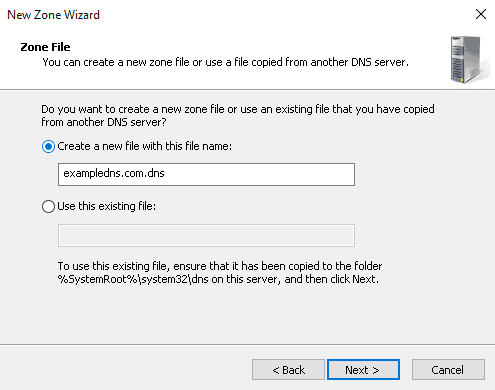
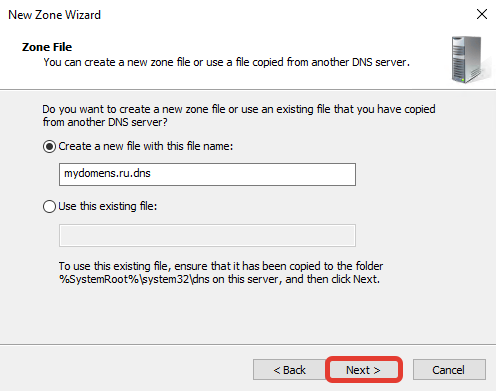
- При необходимости поменяйте название будущего файла зоны и перейдите Далее:

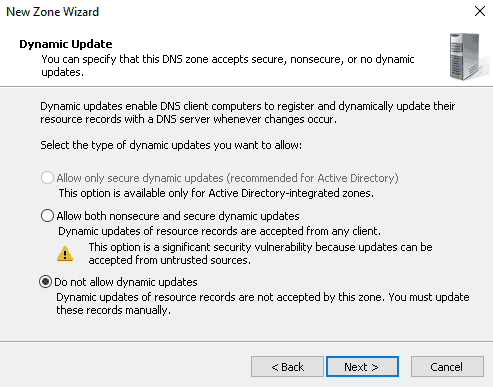
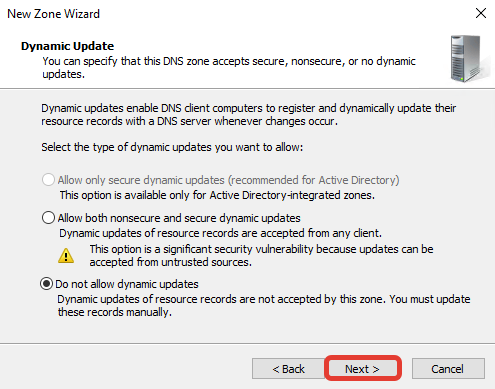
- Выберите, разрешить динамические обновления или нет. Разрешать не рекомендуется в силу значимой уязвимости. Перейдите Далее:

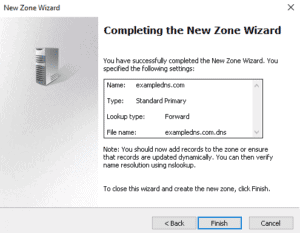
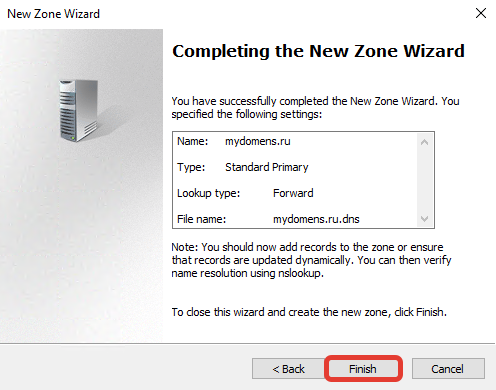
- Проверьте правильность выбранной конфигурации и завершите настройку, нажав кнопку Готово:

Создание зоны обратного просмотра
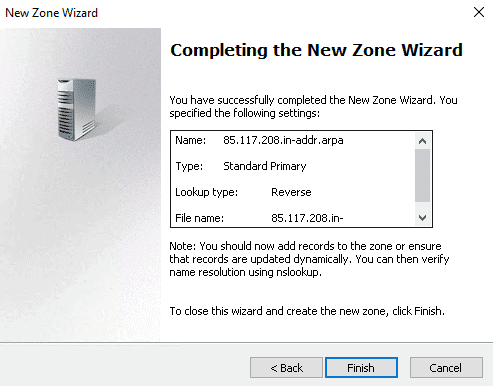
- Выделите в Диспетчере DNS каталог Зоны Обратного Просмотра и нажатием кнопки Новая зона на панели инструментов сверху запустите Мастер Создания Новой Зоны:

- Выберите тип Основная Зона, перейдите Далее:

- Выберите назначение для адресов IPv4, нажмите Далее:

- Укажите идентификатор сети (первые три октета сетевого адреса) и следуйте Далее:

- При необходимости поменяйте название будущего файла зоны и перейдите Далее:

- Выберите, разрешить динамические обновления или нет. Разрешать не рекомендуется в силу значимой уязвимости. Перейдите Далее:

- Проверьте правильность выбранной конфигурации и завершите настройку, нажав кнопку Готово:

Создание A-записи
Данный раздел инструкции в большей степени предназначен для проверки ранее проделанных шагов.
Ресурсная запись — единица хранения и передачи информации в DNS, заключает в себе сведения о соответствии какого-либо имени с определёнными служебными данными.
Запись A — запись, позволяющая по доменному имени узнать IP-адрес.
Запись PTR — запись, обратная A записи.
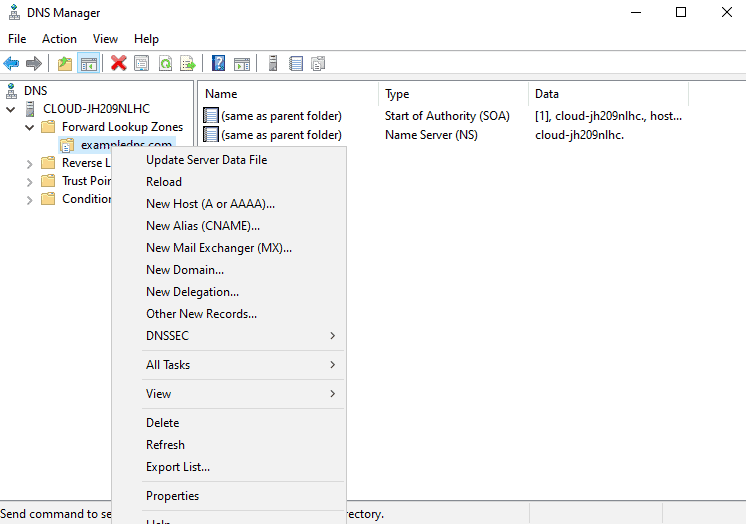
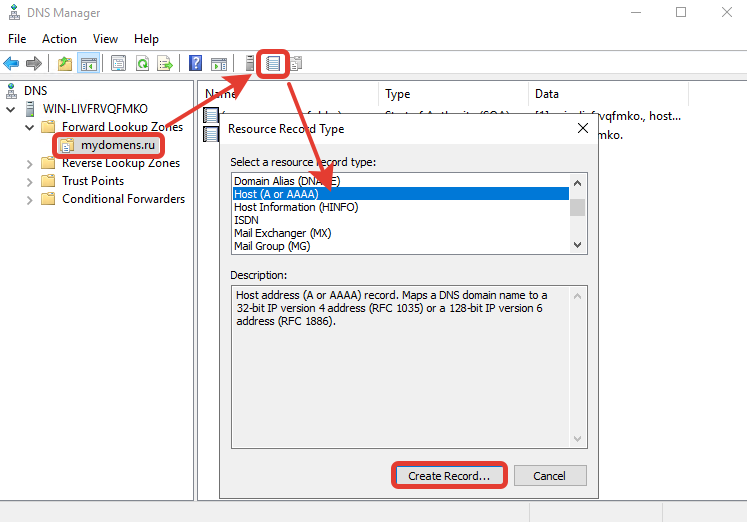
- В Диспетчере DNS выберите каталог созданной ранее зоны внутри каталога Зон Прямого Просмотра. В правой части Диспетчера, где отображается содержимое каталогов, правой кнопки мыши вызовите выпадающее меню и запустите команду «Создать узел (A или AAAA)…»:

- Откроется окно создания Нового Узла, где понадобится вписать в соответствующие поля имя узла (без доменной части, в качестве доменной части используется название настраиваемой зоны) и IP-адрес. Здесь же имеется чек-бокс Создать соответствующую PTR-запись — чтобы проверить работу обеих зон (прямой и обратной), чек-бокс должен быть активирован:

Если поле имени остается пустым, указанный адрес будет связан с именем доменной зоны.
- Также можно добавить записи для других серверов:

- Добавив все необходимые узлы, нажмите Готово.
Проверка
- Проверьте изменения в каталогах обеих зон (на примере ниже в обеих зонах появилось по 2 новых записи):


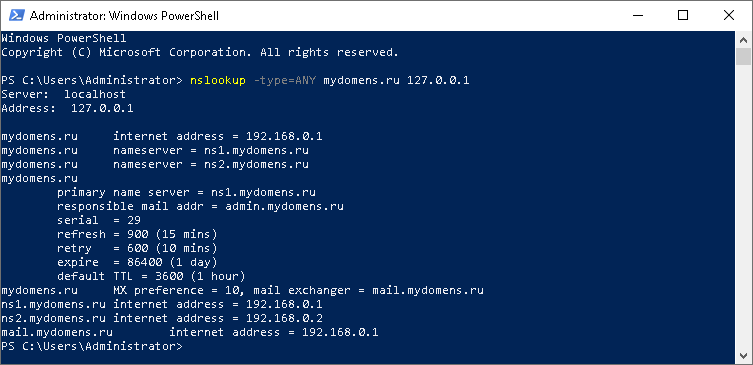
- Откройте командную строку (cmd) или PowerShell и запустите команду nslookup:

Из вывода команды видно, что по умолчанию используется DNS-сервер example-2012.com с адресом 10.0.1.6.
Чтобы окончательно убедиться, что прямая и обратная зоны работают как положено, можно отправить два запроса:
- Запрос по домену;
- Запрос по IP-адресу:

В примере получены подходящие ответы по обоим запросам.
- Можно попробовать отправить запрос на какой-нибудь внешний ресурс:

В дополнение к имени домена и адресам появилась строчка «Non-authoritative answer», это значит, что наш DNS-сервер не обладает необходимой полнотой информации по запрашиваемой зоне, а информация выведенная ниже, хоть и получена от авторитетного сервера, но сама в таком случае не является авторитетной.
Для сравнения все те же запросы выполнены на сервере, где не были настроены прямая и обратная зоны:

Здесь машина сама себе назначена предпочитаемым DNS-сервером. Доменное имя DNS-сервера отображается как неопознанное, поскольку нигде нет ресурсных записей для IP-адреса (10.0.1.7). По этой же причине запрос 2 возвращает ошибку (Non-existent domain).
Описание функции Domain Name System (DNS), которые являются новыми или измененными в Windows Server 2016.
В Windows Server 2016 DNS-сервер предлагает обновления в следующих областях:
- Политики DNS-серверов
- Ограничение скорости отклика (RRL)
- Аутентификация именованных объектов на основе DNS (DANE)
- Поддержка неизвестных записей
- Корневые подсказки IPv6
- Доработка поддержки Windows PowerShell
Политики DNS-серверов
Теперь вы сможете использовать:
- DNS-политики для управления трафиком на основе геолокации
- Интеллектуальные ответы DNS в зависимости от времени суток, для управления одним DNS-сервером, настроенным для развертывания с разделением
- Применять фильтры к DNS-запросам и многое другое.
Конкретное описание данных возможностей:
Балансировка нагрузки приложений.
Когда вы развернули несколько экземпляров приложения в разных местах, вы можете использовать политику DNS для балансировки нагрузки трафика между разными экземплярами приложения, динамически распределяя нагрузку трафика для приложения.
Управление трафиком на основе геолокации.
Вы можете использовать DNS-политику, чтобы разрешить первичным и вторичным DNS-серверам отвечать на запросы DNS-клиентов на основе географического положения как клиента, так и ресурса, к которому клиент пытается подключиться, предоставляя клиенту IP-адрес ближайшего ресурса. .
Разделенный Brain-DNS.
При разделенном DNS записи DNS распределяются по разным областям зоны на одном и том же DNS-сервере, а DNS-клиенты получают ответ в зависимости от того, являются ли клиенты внутренними или внешними. Вы можете настроить разделенный DNS для зон, интегрированных с Active Directory, или для зон на автономных DNS-серверах.
Фильтрация.
Вы можете настроить политику DNS для создания фильтров запросов на основе предоставленных вами критериев. Фильтры запросов в DNS-политике позволяют настроить DNS-сервер для ответа настраиваемым образом на основе DNS-запроса и DNS-клиента, отправляющего DNS-запрос.
Forensics.
Вы можете использовать политику DNS для перенаправления вредоносных DNS-клиентов на несуществующий IP-адрес вместо того, чтобы направлять их на компьютер, к которому они пытаются подключиться.
Перенаправление по времени суток.
Политику DNS можно использовать для распределения трафика приложения между различными географически распределенными экземплярами приложения с помощью политик DNS, основанных на времени суток.
Вы также можете использовать политики DNS для зон DNS, интегрированных с Active Directory.
Ограничение скорости отклика (RRL)
Теперь вы cможете настроить параметры RRL, чтобы контролировать, как отвечать на запросы к DNS-клиенту, когда ваш сервер получает несколько запросов, направленных на одного и того же клиента. Сделав это, вы можете предотвратить отправку атаки типа «Отказ в обслуживании» (Dos) с использованием ваших DNS-серверов.
Например, бот-сеть может отправлять запросы на ваш DNS-сервер, используя в качестве отправителя IP-адрес третьего компьютера. Без RRL ваши DNS-серверы могут отвечать на все запросы, переполняя третий компьютер. При использовании RRL вы можете настроить следующие параметры:
Количество ответов в секунду. Это максимальное количество раз, когда один и тот же ответ дается клиенту в течение одной секунды.
Количество ошибок в секунду. Это максимальное количество раз, когда ответ об ошибке отправляется одному и тому же клиенту в течение одной секунды.
Окно между запросами. Это количество секунд, на которое приостанавливаются ответы клиенту, если сделано слишком много запросов.
Скорость утечки. Это то, как часто DNS-сервер отвечает на запрос во время приостановки ответов. Например, если сервер приостанавливает ответы клиенту на 10 секунд, а уровень утечки равен 5, сервер по-прежнему отвечает на один запрос на каждые 5 отправленных запросов. Это позволяет обычным клиентам получать ответы, даже если DNS-сервер применяет ограничение скорости ответов в их подсети или полном доменном имени.
TC rate. Эта функция используется, чтобы сообщить клиенту о попытке соединения с TCP, когда ответы клиенту приостановлены. Например, если скорость TC равна 3, и сервер приостанавливает ответы данному клиенту, сервер выдает запрос на TCP-соединение для каждых 3 полученных запросов. Убедитесь, что значение скорости TC ниже, чем скорость утечки, чтобы дать клиенту возможность подключиться через TCP перед утечкой ответов.
Максимум откликов. Это максимальное количество ответов, которые сервер выдает клиенту, пока ответы приостановлены.
Белые домены. Это список доменов, которые нужно исключить из настроек RRL.
Белые подсети. Это список подсетей, которые необходимо исключить из настроек RRL.
Интерфейсы серверов белого списка. Это список интерфейсов DNS-серверов, которые необходимо исключить из настроек RRL.
Аутентификация именованных объектов на основе DNS (DANE)
Теперь вы сможете использовать поддержку DANE (RFC 6394 и 6698), чтобы указать своим DNS-клиентам, от какого CA они должны ожидать выдачи сертификатов для доменных имен, размещенных на вашем DNS-сервере.
Это предотвращает форму атаки «main in the middle», когда кто-то может повредить кэш DNS и указать DNS-имя на свой собственный IP-адрес.
Поддержка неизвестных записей
«Неизвестная запись» — это RR, формат RDATA которой неизвестен DNS-серверу. Недавно добавленная поддержка неизвестных типов записей (RFC 3597) означает, что вы cvожете добавлять неподдерживаемые типы записей в зоны DNS-сервера Windows в двоичном формате по сети.
Распознаватель кэширования Windows уже имеет возможность обрабатывать неизвестные типы записей. DNS-сервер Windows не выполняет никакой конкретной обработки неизвестных записей, но отправляет их обратно в ответах, если для них получены запросы.
Корневые подсказки IPv6
Корневые подсказки IPV6, опубликованные IANA, были добавлены на DNS-сервер Windows. Запросы имен в Интернете теперь могут использовать корневые серверы IPv6 для разрешения имен.
Доработка поддержки Windows PowerShell
В Windows Server 2016 представлены следующие новые командлеты (cmdlets) и параметры Windows PowerShell:
Add-DnsServerRecursionScope — Этот командлет создает новую область рекурсии на DNS-сервере. Области рекурсии используются политиками DNS для указания списка серверов пересылки, которые будут использоваться в запросе DNS.
Remove-DnsServerRecursionScope — Этот командлет удаляет существующие области рекурсии.
Set-DnsServerRecursionScope — Этот командлет изменяет параметры существующей области рекурсии.
Get-DnsServerRecursionScope — Этот командлет извлекает информацию о существующих областях рекурсии.
Add-DnsServerClientSubnet — Этот командлет удаляет существующие подсети DNS-клиентов.
Set-DnsServerClientSubnet — Этот командлет изменяет параметры существующей подсети DNS-клиента.
Get-DnsServerClientSubnet — Этот командлет извлекает информацию о существующих подсетях DNS-клиентов.
Add-DnsServerQueryResolutionPolicy — Этот командлет создает новую политику разрешения запросов DNS. Политики разрешения запросов DNS используются для указания того, как и следует ли отвечать на запрос на основе различных критериев.
Remove-DnsServerQueryResolutionPolicy — Этот командлет удаляет существующие политики DNS.
Set-DnsServerQueryResolutionPolicy — Этот командлет изменяет параметры существующей политики DNS.
Get-DnsServerQueryResolutionPolicy — Этот командлет извлекает информацию о существующих политиках DNS.
Enable-DnsServerPolicy — Этот командлет включает существующие политики DNS.
Disable-DnsServerPolicy — Этот командлет отключает существующие политики DNS.
Add-DnsServerZoneTransferPolicy — Этот командлет создает новую политику передачи зоны DNS-сервера. Политики передачи зоны DNS определяют, следует ли отклонять или игнорировать передачу зоны на основе различных критериев.
Remove-DnsServerZoneTransferPolicy — Этот командлет удаляет существующие политики передачи зон DNS-сервера.
Set-DnsServerZoneTransferPolicy. — Этот командлет изменяет параметры существующей политики переноса зоны DNS-сервера.
Get-DnsServerResponseRateLimiting — Этот командлет извлекает параметры RRL.
Set-DnsServerResponseRateLimiting — Этот командлет изменяет настройки RRL.
Add-DnsServerResponseRateLimitingExceptionlist — Этот командлет создает список исключений RRL на DNS-сервере.
Get-DnsServerResponseRateLimitingExceptionlist — Этот командлет извлекает списки исключений RRL.
Remove-DnsServerResponseRateLimitingExceptionlist — Этот командлет удаляет существующий список исключений RRL.
Set-DnsServerResponseRateLimitingExceptionlist — Этот командлет изменяет списки исключений RRL.
Add-DnsServerResourceRecord — Этот командлет был обновлен для поддержки неизвестного типа записи.
Get-DnsServerResourceRecord — Этот командлет был обновлен для поддержки неизвестного типа записи.
Remove-DnsServerResourceRecord — Этот командлет был обновлен для поддержки неизвестного типа записи.
Set-DnsServerResourceRecord — Этот командлет был обновлен для поддержки неизвестного типа записи.
С дополнительными сведениями вы можете ознакомится в следующих разделах справочника по командам Windows PowerShell для Windows Server 2016 от Microsoft:
Powershell DNS Server
Powershell DNS Client
Install and Configure DNS Server on Windows Server. Surely, to install Domain Name System (DNS) on Windows Server is straightforward. Still, it is essential to understand DNS and how it works to set up a robust and effective DNS infrastructure. That includes installing DNS and creating and managing our first DNS records.
Installing and Configuring DNS in Windows Server
We know the Domain Name System and what it does, but we need to know how to install and configure DNS. For this article, we use the Windows Server 2012R2 DNS install process, which we also use for later builds like Windows Server 2016, 2019, and 2022.
Overview of the Domain Name System
All in all, a Domain Name is a human readable version of an IP address. Well, an IP Address is what every computer on the internet uses to address itself when communicating with other computers via the TCP/IP network protocol. IP (v4) addresses, for example, look like a series of numbers and decimal points, such as 192.168.1.12.
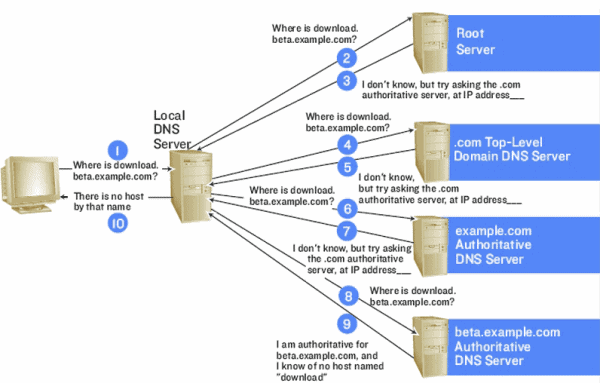
When users enter a domain name, such as www.infrasos.com, their browser communicates with a network of root domain name servers, which act as a reference book, providing the IP address associated with that domain name. The browser then communicates directly with the hosting server using that IP address.
Altogether, DNS serves as a go between, translating user requests into IP addresses. Without DNS, users need to memorize and enter long IP addresses when connecting to other websites, rather than simply typing in the website’s name.
Prerequisites
Before configuring our DNS, we must have the following information:
- Our domain name.
- The IP address and hostname of each server that we want to provide name resolution for.
Additionally, before we configure our computer as a DNS, we need to verify that the following minimum conditions are proper:
- A server running Windows Server 2012R2, 2016, 2019, or 2022 operating system and an open Remote Desktop Protocol (RDP) 3389 port.
- A domain user with appropriate administrative privileges in configuring the DNS.
- Minimum of 4 GB of RAM and 2-core CPU.
Installing the DNS Server Role
Basically, installing the DNS Server Role in Windows Server is a simple process that allows you to configure and manage a DNS server for your network. It involves adding the DNS server role to your Windows Server machine, configuring basic DNS settings, and creating and managing DNS records. First of all, log in as an administrator user to the Windows Server and follow the steps below to install the DNS server on our Windows Server:
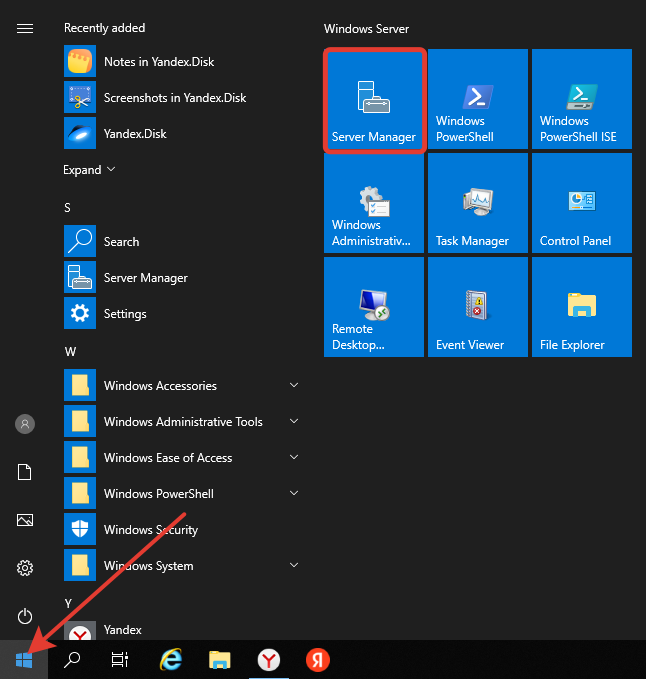
Step 1: Launch the Server Manager, as illustrated below:
Step 2: Select Add roles and features.
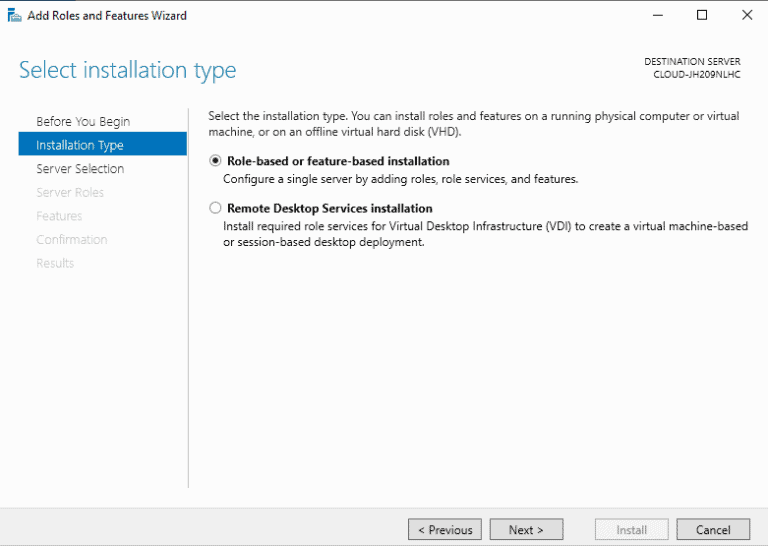
Step 4: Click on Next after selecting Role based and feature based installation.
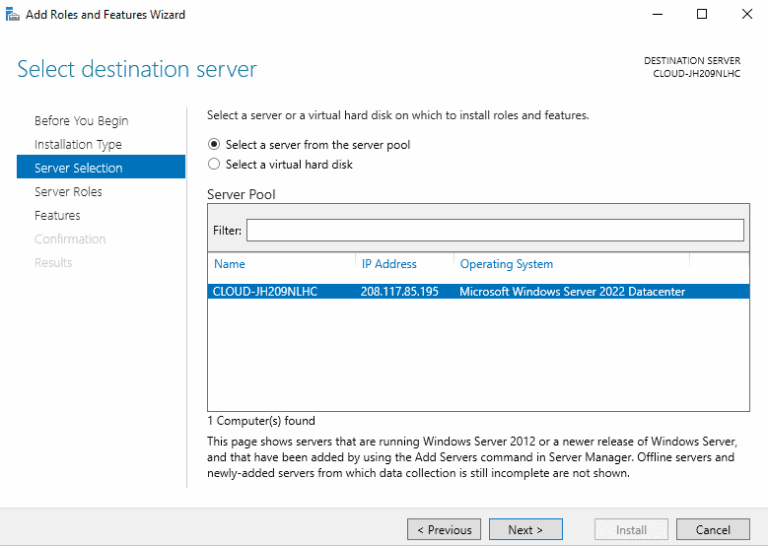
Step 5: Choose a server from the pool and press Next.
Step 6: Pick the DNS server and click Next.

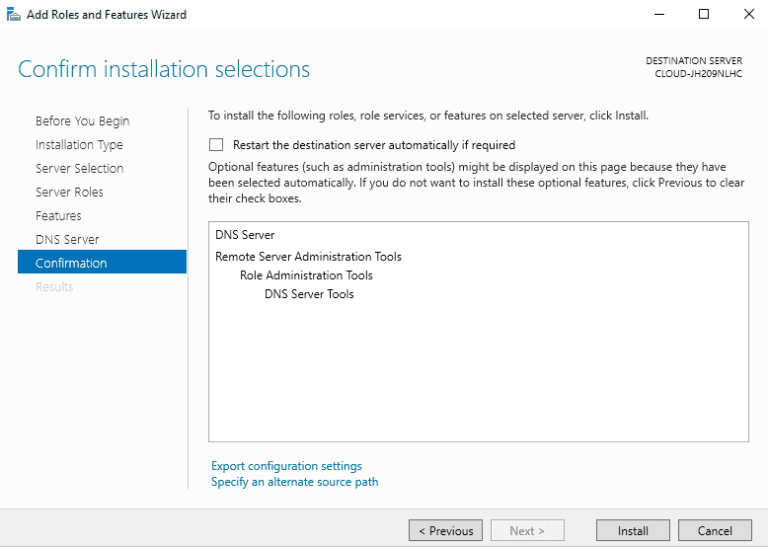
Step 7: Double check all settings before clicking the Install button to begin the installation.
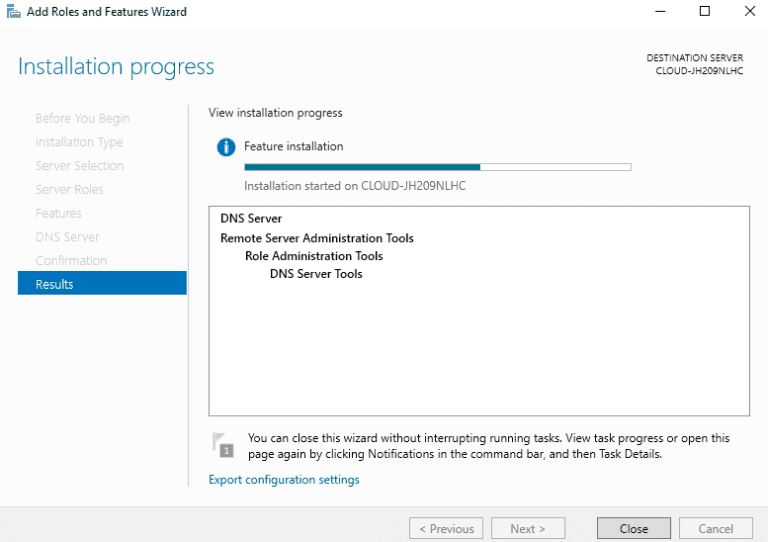
Step 8: Allow some time for the installation to complete. Once done, click the Close to exit the installation wizard.
Installing the DNS Server Role Using PowerShell
Using PowerShell, we automate the installation process, making it easier and more efficient to set up a DNS server for your network. Here are the steps to install the DNS Server Role using PowerShell on Windows Server:
Step 1: Open Windows PowerShell as an admin by pressing the Windows key + X and selecting Windows PowerShell (Admin) from the menu.
Step 2: Use the Install-WindowsFeature command to install the DNS Server Role:
Install-WindowsFeature -Name DNS -IncludeManagementTools
Step 3: Press Enter to run the command. You see a message indicating that the installation process has started.
Step 4: Wait for the installation process to complete, which may take several minutes.
Step 5: After the installation is complete, use the Get-WindowsFeature command to confirm that the DNS Server Role has been installed:
Get-WindowsFeature -Name DNS
Step 6: You should see a message indicating that the DNS Server Role is installed, and the display name should be DNS Server.
As a result, using PowerShell to install the DNS Server Role saves time and effort compared to manually installing the role through the graphical user interface. Additionally, using PowerShell allows us to automate the installation process, making it easier to set up multiple DNS servers consistently and repeatedly.
In this part of the article about how to Install and Configure DNS Server on Windows Server we are configuring DNS server first.
Active Directory & Azure AD User Reporting Tools by InfraSOS
Try us out for Free, Access to all features. – 200+ AD Report templates Available. Easily customise your own AD reports.
Configuring the DNS Server
Now, that we have set up the DNS server role, we can use the DNS service inside the server. We need to create forward and reverse lookup zones to resolve the name to IP address and vice versa.
Configuring the Forward Lookup Zone
Evidently, a Forward Lookup Zone in DNS is a database of resource records that map domain names to IP addresses. Hence, we use it to resolve host names to IP addresses.
Certainly, the Forward Lookup Zone is vital because it enables clients to access network resources using domain names instead of IP addresses. This lookup zone makes it easier for users to remember and access network resources, and it helps improve the network’s readability and maintainability.
Steps
In order to create a forward lookup zone, follow the steps below:
Step 1: On the server manager, navigate to Tools > DNS to access the DNS manager, as shown below:

Step 2: Right click on the server name and select Properties.
Step 3: Select the New Zone option.
Step 5: Choose the Primary zone and press Next.
Step 6: Click Next after selecting the Forward lookup zone.
Step 7: Enter the name of our zone and press Next.
Step 8: Choose “Create a file with the file name” and press Next.
Step 9: Check the box next to “Do not allow dynamic update” and click Next.
Step 10: Press the Finish button.
Next, with Install and Configure DNS Server on Windows Server we configure Reverse Lookup Zone.
Configuring the Reverse Lookup Zone
Following, a Reverse Lookup Zone in DNS is a database of resource records that map IP addresses to host names. By all means, we use this lookup zone to resolve IP addresses to hostnames.
Further, a Reverse Lookup Zone is different from the Forward Lookup Zone. In that it maps IP addresses to host names, while the Forward Lookup Zone maps host names to IP addresses. Additionally, the Reverse Lookup Zone is typically less frequently used than the Forward Lookup Zone, as clients are more likely to access network resources using host names rather than IP addresses.
Steps
Indeed, to create a forward lookup zone, follow the steps below:
Step 1: On the server manager, navigate to Tools > DNS to access the DNS manager:
Step 2: Right click on the server name and select Properties.
Step 3: Here, select the New Zone option.
Step 5: Now, choose the Primary zone and press Next.
Step 6: From this step forward, the setup is different from our previous section. Next, click Next after selecting the Reverse lookup zone.
Step 7: After, select IPv4 Reverse Lookup Zone and click on Next.
Step 8: Define your network ID and click Next.
Step 9: Further, choose “Create a file with the file name” and press Next.
Step 9: Please check the box next to “Do not allow dynamic update” and click Next.
Step 10: In sum, press the Finish button.
Configuring DNS Records
Moreover, DNS records are essential for several reasons:
- Domain name resolution: In short, we use DNS records to map domain names to IP addresses, allowing clients to access network resources using human readable names rather than IP addresses.
- Network functionality: Properly configured DNS records are critical for ensuring network services and applications function correctly.
- Network security: In similar fashion, we use DNS records to secure our network by providing information about which IP addresses correspond to our domain names. We use this information to block malicious traffic and improve network security.
- Load balancing: By creating multiple A records for the same hostname and assigning different IP addresses to each record, we distribute incoming traffic across multiple servers, improving the performance and reliability of our network.
- Management and administration: In this case, DNS records are managed and updated centrally, making organizing and maintaining our network easier.
Overall, DNS records are a fundamental part of the functioning of the internet and are critical for ensuring that domain names are resolved to IP addresses. That network services and applications work correctly and that networks are secure and reliable.
Steps
Please follow the below steps to add A and PTR records to DNS:
Step 1 : On the DNS manager, right click on the forward lookup zone.
Step 2: Click on the New Host (A or AAAA).

Step 3: Provide the host’s parent domain name and IP address, select “Create associated pointer record” and then click on the Add Host button.
When creating a zone in Windows Server DNS, the Start of Authority (SOA) and Name Server (NS) records are automatically created for several reasons:
-
Start of Authority (SOA) Record: The SOA record defines the start of a DNS zone and provides information about the zone itself. This record is required for all zones and is used to identify the authoritative source of information for the zone. In addition, the SOA record contains essential information, such as the primary DNS server for the zone, the email address of the person responsible for the zone, and the refresh and retry intervals for the zone.
-
Name Server (NS) Record: The NS record identifies the authoritative DNS servers for a particular zone. These servers serve DNS information for the zone and resolve DNS queries for the domain. The NS record is also used to delegate subdomains to other DNS servers.
Given that, the process is streamlined and simplified by automatically creating the SOA and NS records when creating a zone in Windows Server DNS, ensuring that the required information for the zone is present and accurate. Particularly, this helps to ensure that the zone functions correctly and that the network resolves DNS queries for the domain.
Other Types of DNS Records
In the above example, we created A (forward lookup) and PTR (reverse lookup) records. However, these are only some records available when managing the DNS. Here are some examples below:
| Type of Record | Definition | Example |
| A (Address) | Example, that maps a host name to an IPv4 address |
www.example.com A 192.168.1.100 |
| AAAA (IPv6 Address) | Another, that maps a host name to an IPv6 address |
www.example.com AAAA 2001:db8:0:1234::1 |
| MX (Mail Exchange) | Specifies the mail servers responsible for a specific domain name |
example.com MX mail.example.com |
| CNAME (Canonical Name) | Following example, that maps an alias to a true or canonical domain name |
www.example.com CNAME example.com |
| NS (Name Server) | Specifies the name servers for a specific domain name |
example.com NS ns1.example.com ns2.example.com |
| PTR (Pointer) | Here, it maps an IPv4 or IPv6 address to a host name (reverse DNS lookup) |
100.168.192.in-addr.arpa PTR www.example.com |
| SRV (Service) | Similarly, it specifies the host and port for a specific service for a domain name |
_sip._tcp.example.com SRV 10 5 5060 sip.example.com |
| TXT (Text) | Stores text-based information such as SPF records, email routing information, or other information |
example.com TXT “v=spf1 mx a:example.com ~all” |
Note: This table lists the most common types of DNS records, but many other types are available. In detail, the specific records we need depends on our network’s requirements and the services we want to provide.
Verifying DNS Records
Now, we need to test whether the DNS name resolution works. First, open our command line interface and run the nslookup command:
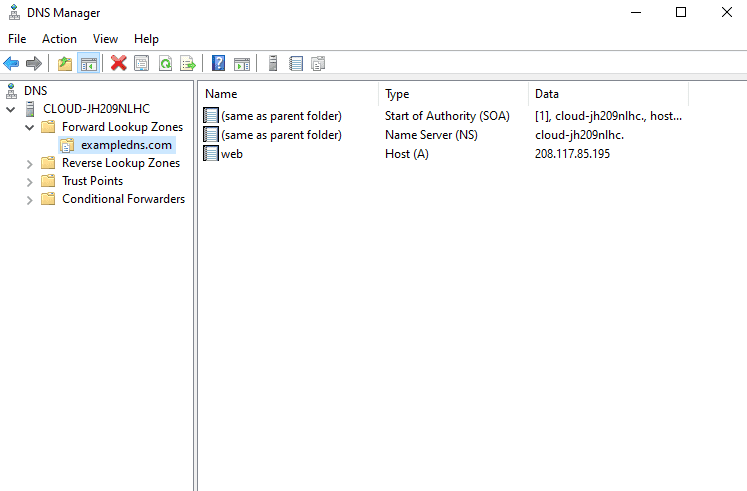
We should see the name of the Primary DNS server that our machine is currently connected to:
					Default Server:  web.exampledns.com
Address:  208.117.85.195
In fact, now please type the Fully Qualified Domain Name (FQDN) of our added host:
We should see the name to IP address resolution in the following output. A valid output means that our forward lookup is working:
					Server:  web.exampledns.com
Address:  208.117.85.195

Name:    sample.exampledns.com
Address:  208.117.85.1
Subsequently, next try typing, the IP address of our added host:
And we should see the IP address to name resolution in the following output which also means our reverse lookup is functioning:
					Server:  web.exampledns.com
Address:  208.117.85.195

Name:    sample.exampledns.com
Address:  208.117.85.1
Thank you for reading the article about how to Install and Configure DNS Server on Windows Server. We shall conclude the article now.
Install and Configure DNS Server on Windows Server Conclusion
In conclusion, installing and configuring DNS on Windows Server is critical for any organization that wants to provide reliable and secure domain name resolution services. Finally, DNS is a critical component of the internet. Therefore, it is vital to ensure that we resolve domain names to IP addresses, that network services and applications work correctly, and that networks are secure and reliable.
By configuring DNS in Windows Server, we improve the management and administration of our network, as well as provide enhanced security and reliability. Installing and configuring DNS in Windows Server is straightforward. We use the graphical user interface or the command line to configure DNS servers and create and manage DNS records.
Fell free to explore more about the Active Directory content by navigating here.
You will find more PowerShell content over here.
![]()
Try InfraSOS for FREE
Invite your team and explore InfraSOS features for free
- Free 15-Days Trial
- Easy Setup
- Full Access to Enterprise Plan
Настройка собственного DNS сервера вам может потребоваться в случае, если ваш хостинг-провайдер и регистратор домена не предоставляют NS сервера для привязки домена, либо вам самостоятельно необходимо контролировать настройки и записи DNS.
Данная инструкция будет актуальна для ОС Windows Server версии 2012 — 2022.
- Добавление роли «DNS-сервера»
- Создание первичной зоны «DNS-сервера»
- Добавление «DNS-записей»
- Проверка работоспособности
Добавление роли «DNS-сервера»
Откройте «Server Manager».
В правом верхнем меню выберите «Manage» > «Add Roles and Features». В появившемся окне нажмите «Next».
Далее убедитесь, что выбран пункт «Role-based or feature-based installation» и нажмите «Next».
В окне выбора сервера установки ничего не меняйте и нажмите «Next».
В окне выбора роли поставьте галочку на пункте «DNS Server».
В появившемся окне согласитесь с добавлением утилит, нажав на кнопку «Add Features».
Нажмите кнопку «Next».
Далее ничего не меняйте, нажмите кнопку «Next».
Нажмите «Next».
Далее для начала установки нажмите кнопку «Install».
Ждём завершения установки роли «DNS Server».

Как только увидите надпись о завершении установки «Installation succeeded», закройте окно, нажав «Close».
Создание первичной зоны «DNS-сервера»
Возвращаемся в «Server Manager», в правом верхнем углу наведите курсор на «Tools» и выберите пункт «DNS».
Двойным кликом выберите ваш сервер, в данном случае это «WIN-LIVFRVQFMKO».
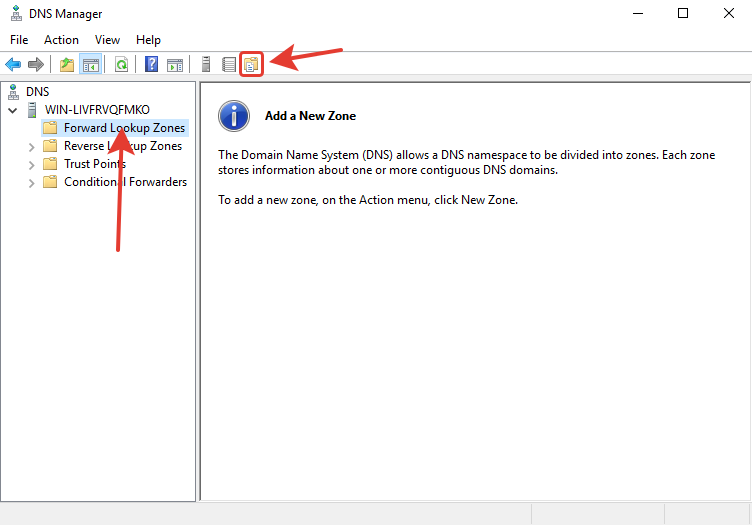
Выберите «Forward Lookup Zones» и нажмите кнопку «New Zone».
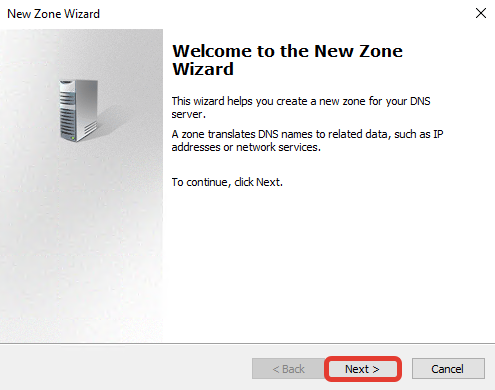
Нажмите «Next».
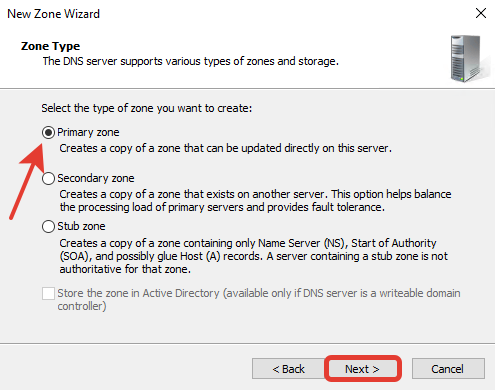
Выберите первичный тип зоны «Primary zone», нажмите «Next».
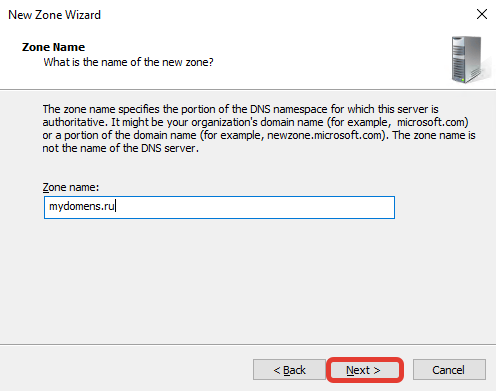
В поле «Zone name» введите имя домена, на основе которого будут создаваться DNS сервер, нажмите «Next».
При необходимости поменяйте название создаваемого файла зоны, нажмите «Next».
Выберите «Do not allow dynamic updates», чтобы запретить динамическое обновление зоны для повышения безопасности, нажмите «Next».
Нажмите «Finish».
Добавление «DNS записей»
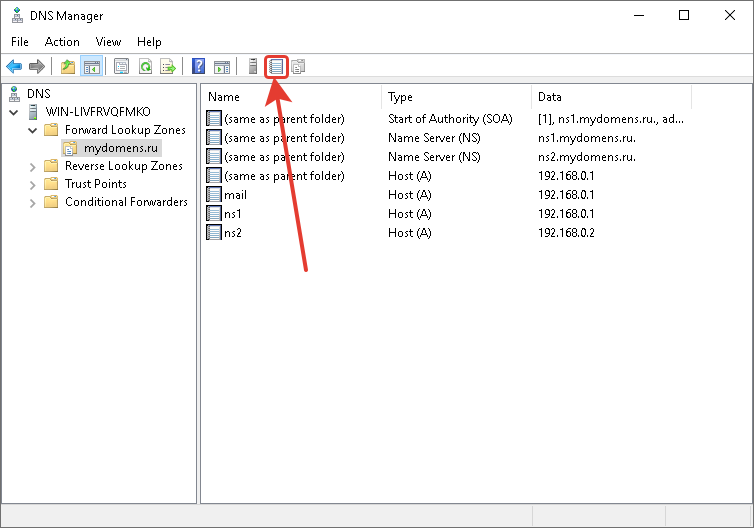
Выберите зону созданного домена и нажмите кнопку «New Record». Далее выберите из предложенного списка пункт «Host (A or AAAA)» для привязки домена к IP-адресу и нажмите кнопку «Create Record…».
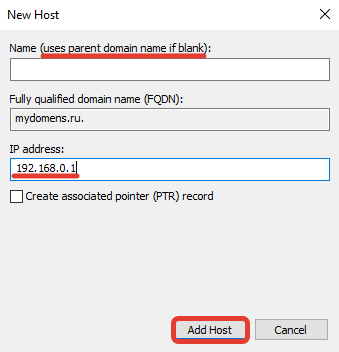
В появившемся окне добавьте «А» записи для основного домена зоны. Для этого поле «Name» оставьте пустым (в данном случае «А» запись будет добавлена для основного домена зоны mydomens.ru). В поле «IP address» введите IP, куда должен быть привязан домен. После нажмите кнопку «Add Host».
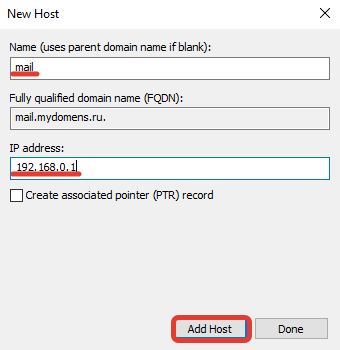
Остальные записи типа «А» добавляются по тому же принципу. Добавим для примера запись для домена mail.mydomens.ru. В поле «Name» введите имя поддомена mail, в поле «IP address» введите IP-адрес.
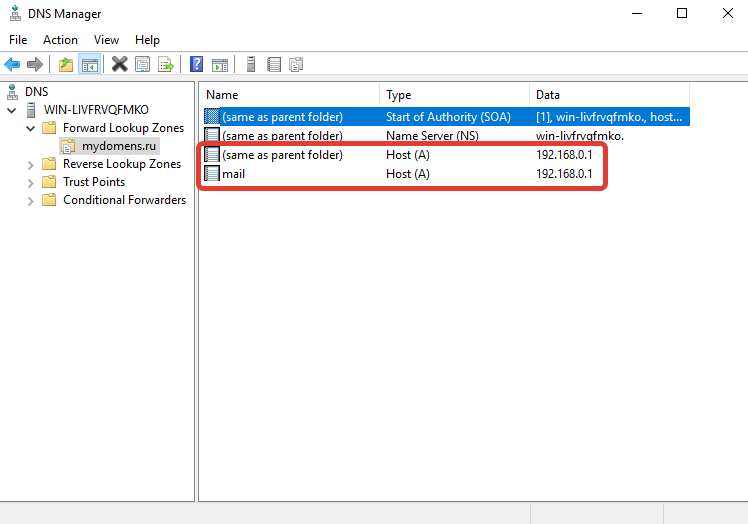
Все добавленные записи вы можете видеть в списке DNS записей зоны.
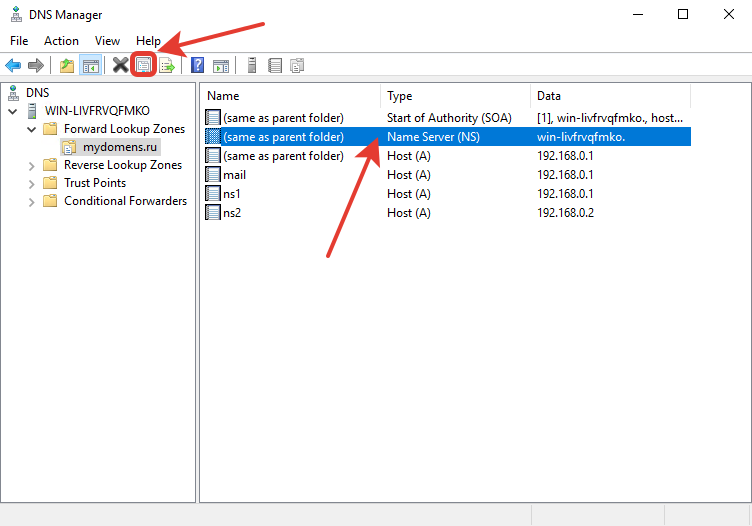
Добавьте все необходимые «А» записи для доменов. Обязательно добавьте «А» записи для NS адресов в том же соответствии, как они указаны у регистратора домена:
ns1.mydomens.ru\192.168.1.1
ns2.mydomens.ru\192.168.1.2
Далее отредактируйте запись типа «Name Server (NS)». Для этого выберите запись в списке, она создана по умолчанию, после нажмите кнопку «Properties».
В появившемся окне выделите имеющуюся запись из списка и нажмите кнопку «Edit…».
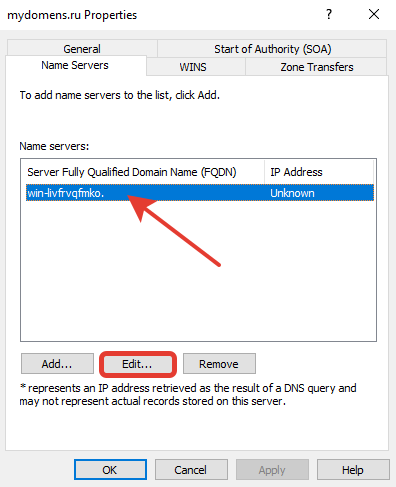
В первом поле введите имя NS адреса, ниже введите соответствующий ему IP, после нажмите «Enter» на клавиатуре, далее нажмите кнопку «OK».

Далее добавьте второй NS, для этого нажмите кнопку «Add…».
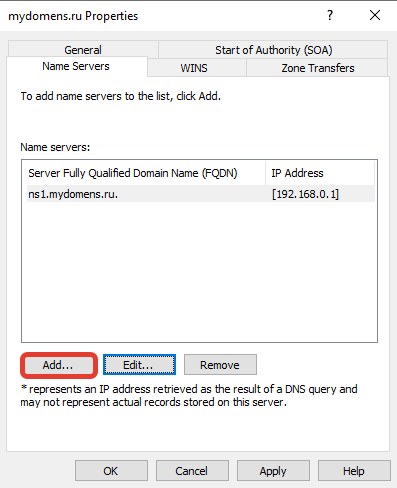
Введите соответствующие данные в поля и нажмите кнопку «ОК».

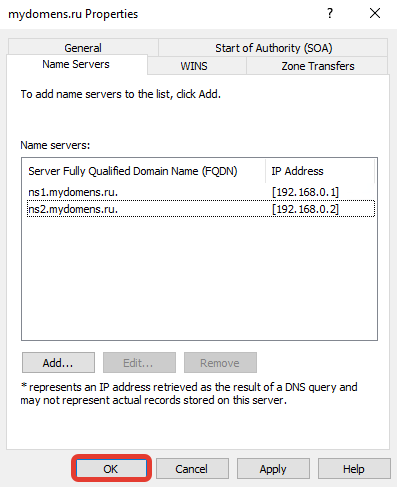
Проверьте, что все NS записи добавлены верно, и нажмите кнопку «ОК».
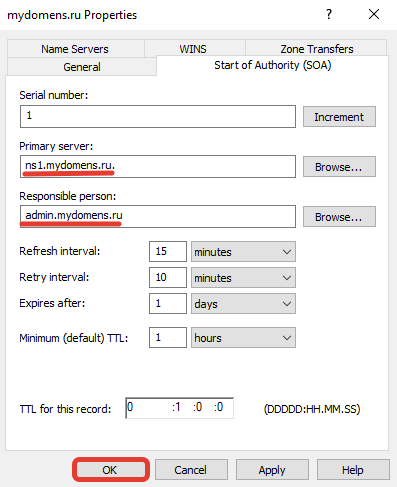
Отредактируйте «SOA» запись.
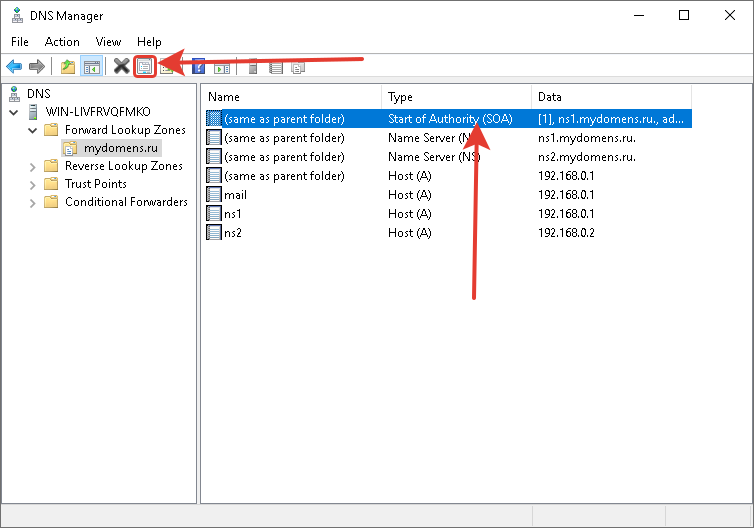
В поле «Primary server» введите первичный NS адрес вашей DNS зоны. В поле «Responsible person» введите email адрес ответственного лица зоны DNS, вместо знака @ поставьте точку. Далее нажмите кнопку «ОК».
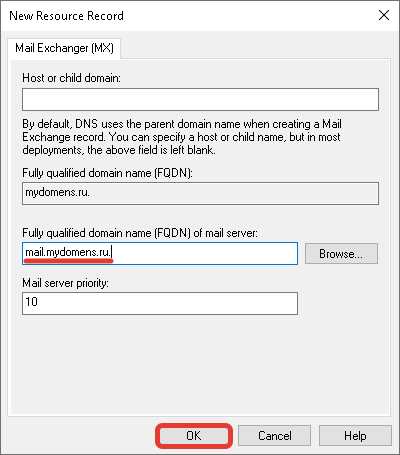
Добавьте «MX» запись для указания сервера, на который будет приходить почта на домен.
В окне выбора типа записи выберите «Mail Exchanger (MX)».

Если добавляете запись для основного домена зоны, поле «Host» оставьте пустым. В поле «mail server» введите доменное имя почтового сервера, куда будет пересылаться почта для домена.
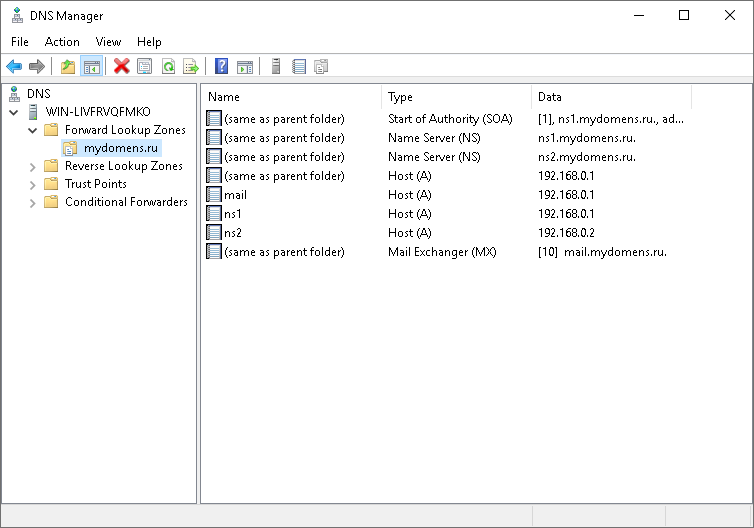
После выполнения всех настроек у вас должен получится примерно следующий перечень записей.
Проверка работоспособности
Для проверки вы можете воспользоваться командной строкой CMD или PowerShell, сторонними ресурсами для проверки DNS записей, например https://2whois.ru/?t=dig.
После выполнения запроса записей зоны вы должны получить соответствующую запись запрошенную с DNS сервера. При запросе записи типа ANY, с сервера будут отданы все имеющиеся DNS записи домена. Для примера рассмотрим два варианта проверки, через PowerShell и на сайте 2whois.ru.
PowerShell
Для проверки используйте следующий синтаксис команды: nslookup -type=ANY имя_домена IP_сервера
После выполнения соответствующей команды вы увидите сервер, с которого получена информация, и соответствующий перечень записей, добавленных вами ранее.
В случае если запрашиваемые записи не удалось получить, проверьте введенную команду, если введено всё верно, но записи не отдаются, обратитесь в службу поддержки вашего сервера.
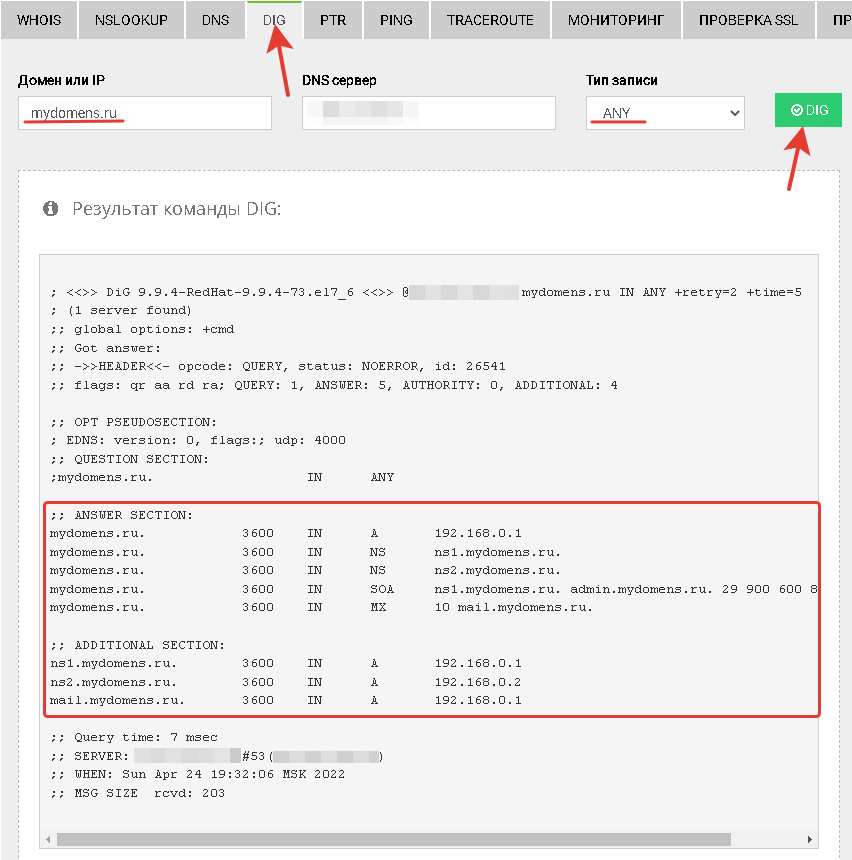
Онлайн сервис 2whois.ru
Для проверки работы DNS сервера на сайте https://2whois.ru/ выберите вкладку DIG, далее в поле «Домен или IP» введите имя домена, который вы добавляли ранее. В поле «DNS сервер» введите IP адрес сервера, на котором вы выполняли настройки. В поле «Тип записи» выберите «ANY» для получения всех записей доменной зоны. После нажмите кнопку «DIG».
После получения результата проверки в секции «ANSWER SECTION» вы увидите перечень записей, добавленных ранее на сервер, это будет означать, что DNS сервер функционирует и работает корректно.
Если добавленных ранее записей в данной секции не появится, обратитесь в службу поддержки вашего сервера.
Configuring a DNS server in Windows Server 2022 is a two-step process. First, you must create a DNS zone. Then, you must add a DNS server to that zone. In this article, we will walk you through the steps necessary to create a DNS zone and add a DNS server to it.
Creating a DNS Zone
To create a DNS zone, you must first open the DNS Manager console. To do this, open the Start menu, type dns, and then click the DNS Manager icon that appears.
In the DNS Manager console, you will see a list of zones. To create a new zone, click the Add Zone button.
In the Add Zone dialog box, you will need to provide a name for the zone and a description. Click the Next button.
In the Select a Zone Type dialog box, you will need to select the type of zone that you want to create. The options are Primary, Secondary, or Stub. Select the Primary zone type, and then click the Next button.
In the Select a DNS Server dialog box, you will need to specify the name of the DNS server that you want to use to serve the zone. Click the Next button.
In the Confirm Zone Creation dialog box, you will be asked to confirm that you want to create the zone. Click the Finish button to create the zone.
Adding a DNS Server to a Zone
Now that you have created a zone, you need to add a DNS server to it. To do this, open the DNS Manager console, and then click the Add Zone button.
In the Add Zone dialog box, you will need to provide a name for the zone and a description. Click the Next button.
In the Select a Zone Type dialog box, you will need to select the type of zone that you want to add the DNS server to. The options are Primary, Secondary, or Stub. Select the Primary zone type, and then click the Next button.
In the Select a DNS Server dialog box, you will need to specify the name of the DNS server that you want to use to serve the zone. Click the Next button.
In the Confirm Zone Creation dialog box, you will be asked to confirm that you want to add the DNS server to the zone. Click the Finish button to add the DNS server to the zone.
Table Of Contents Show
- What is DNS Server?
- What Is the Function of a DNS Server?
- DNS Resolution Process
- Windows DNS Server Installation and Configuration on Windows 2022
- Prerequisites
- Install DNS Server
- Create a Forward Lookup Zone
- Create a Reverse Lookup Zone
- DNS A and PTR records should be added.
- Verify DNS Name Resolution
- Conclusion to How to Setup Windows DNS Server and Configuration on Windows 2022
- In Windows, how do I set up a DNS server?
- How do you set up your DNS server?
- In Windows Server, how do I manage DNS?
- In Windows Server 2012, how do I set up a DNS server?
How to Install and Configure a Windows DNS Server in Windows 2022
by Hitesh Jethva
in DNS
In this post, we will introduce DNS server, its working process, and then move on to the DNS server setup and zone creation phase on Windows 2022.
The DNS server is the most important because you would be unable to find any website without it. It is a globally distributed service organized in a hierarchy, with each section denoting a subdivision.
Let’s get started with this blog post about Windows DNS Server Setup and Configuration on Windows 2022.
Also Read
Types of DNS Records: A, CNAME, AAAA, MX, TXT, NS, PTR, SRV, SOA
What is DNS Server?

DNS servers are quite similar to phonebooks and are crucial part of the Internet. What DNS servers do is they help convert website names into IP addresses so that machines can understand the query and load the requested pages for usersAs a result, users will find it easier and faster to access them online.
The domain name system (DNS) can be summed up as a naming database that stores data about domain names and the IP addresses that correspond to them. It also translates human readable domain names into the IP addresses that correspond to them, IPv4 or IPv6, which are difficult for people to remember and type out.
When a user types a domain name into a browser, it sends a request to the DNS server for its corresponding IP address (usually an IPv4 address). The DNS server then searches its database for the requested domain name, finds it, and returns its corresponding IP address to the browser, which uses this information to connect with the website.
A DNS server is a type of name server that responds to queries from other computers, such as web browsers and email clients. It is a hierarchical naming system for computers, services, or any resource connected to the Internet or a private network that associates various information with domain names assigned to each participating entity.
DNS servers are classified into four types: recursive servers, root name servers, TLD servers, and authoritative name servers.
Also Read
How Primary and Secondary DNS Function (Using DNS Servers)
What Is the Function of a DNS Server?
DNS basically converts domain names into IP addresses that computers can read, understand, and use. When a user types a query or domain into a browser, the DNS service translates the user type into Internet Protocol (IP) addresses that the machine can understand.
In exchange, the machine locates and delivers the requested webpage; this entire process of translating and discovering the requested data is known as DNS resolution.
DNS Resolution Process
The DNS resolution process includes the following steps:
- The user enters his or her query or a domain name into the browser.
- The recursive DNS query or message is forwarded to the network by the Browser in order to determine the corresponding IP address.
- The query is then forwarded to an ISP-managed recursive DNS server, which looks for the page and loads it for the user once it receives the address.
- If the recursive DNS server cannot find the correct answer to the user’s query, it will query other servers, beginning with the DNS root name servers, then moving on to top level domain (TLD) name servers, and finally authoritative name servers.
- These servers collaborate and redirect until they find a DNS record that contains the correct answer to the requested query.
- The recursive server also caches the information for future use, ensuring that the next time a similar request is made, it responds directly rather than querying a series of other servers.
- If the authoritative name servers also fail to find the information, the user receives an error message.
Because a domain name server (DNS) completes this process in a matter of seconds, the DNS protocol is the set of rules for querying and updating these servers that define how the Internet’s Domain Name System (DNS) works.
To put it simply, the process employs a recursive server that converts domain names into Internet Protocol (IP) addresses and asks on the user’s behalf.
Also Read
Configure Azure/AWS/Google GCP Cloud Windows DNS Server
It is now time to learn how to Setup and Configure Windows DNS Server on Windows 2022.
Windows DNS Server Installation and Configuration on Windows 2022
Prerequisites
- A server with the Windows Server 2022 operating system and RDP access.
- A user with administrative privileges.
- A minimum of 4 GB of RAM and a CPU with two cores is required.
Install DNS Server
Log in as an administrator user to Windows Server 2022 and follow the instructions below to install the DNS server.
Step 1: Launch the Server Manager, as illustrated below:
Step 2 — Select Add roles and features, and you should see the following screen:
Step 3 — After clicking the Next button, you should see the following screen:
Step 4 — Click the Next button after selecting Role-based and feature-based installation, and you should see the Select Destination Server screen:
Step 5 — From the server pool, select the server and click the Next button to bring up the roles selection screen:
Step 6 — Select the DNS server and press the Next button; you should see the following screen:
Step 7 — Check all settings and click the Install button to begin the installation; you should see the following screen:
Step 8 — Allow some time for the installation to complete before closing the installation wizard by clicking the Close button.
Also Read
How to Install and Configure a Linux BIND DNS Server on Azure/AWS/GCP
Create a Forward Lookup Zone
To resolve the name to an IP address, you must first create a forward lookup zone. To do so, follow the steps below:
Step 1 — On the server manager, navigate to Tools => DNS to access the DNS manager, as shown below:
Step 2: Right-click on the server name to reveal the following options:
Step 3 — Select New Zone, and the zone configuration wizard should appear:
Step 4 — Press the Next button to bring up the zone type selection screen:
Step 5 — Click the Next button after selecting the Primary zone, and you should see the following screen:
Step 6 — Choose Forward lookup zone and press the Next button to see the following screen:
Step 7 — Enter your zone name and click the Next button to see the following screen:
Step 8 — Click the Next button after selecting «Create a file with the file name,» and you should see the Dynamic update screen:
Step 9 — Select «Do not allow dynamic update» and click the Next button. The following screen should appear:
Step 10 — Click the Finish button, and your forward lookup zone should appear in the following screen:
Also Read
How to Modify DNS Server Settings in Windows 10/11
Create a Reverse Lookup Zone
The next step is for you to create a reverse lookup zone to resolve the IP address to the name. To do so, follow the steps below:
Step 1 — In the DNS manager, right-click on the server name and select New Zone; the zone creation wizard should appear:
Step 2 — Press the Next button to bring up the zone type selection screen:
Step 3 — Choose the Primary zone and press the Next button to see the following screen:
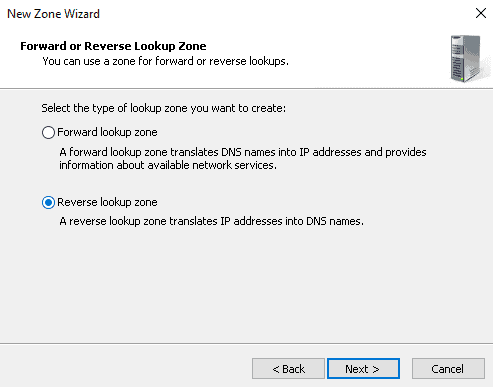
Step 4 — Click the Next button after selecting «Reverse lookup zone,» and you should see the following screen:
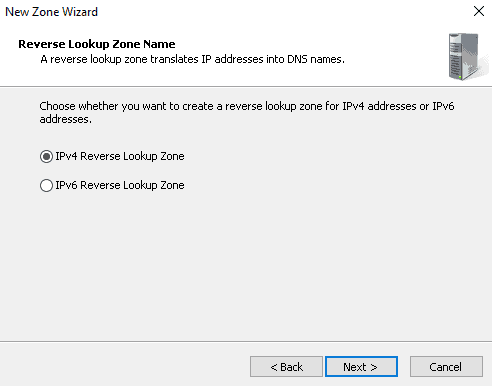
Step 5 — Click the Next button after selecting IPv4 Reverse Lookup Zone, and you should see the following screen:
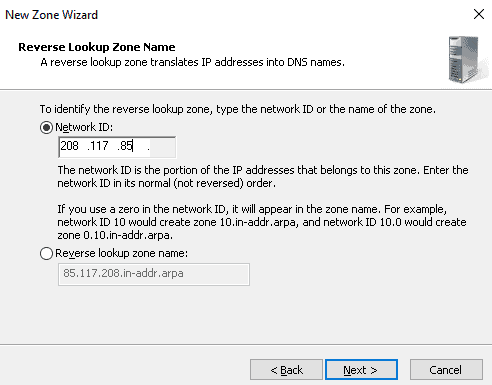
Step 6 — Enter your network id and press the Next button to see the following screen:
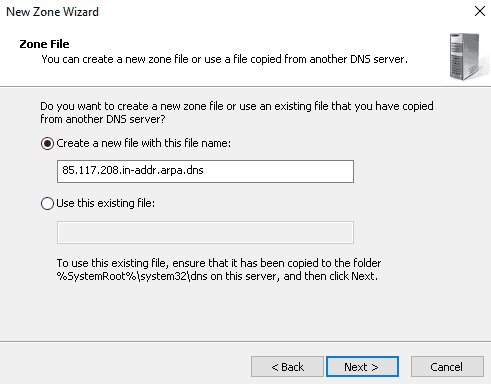
Step 7 — Click the Next button after selecting «Create a file with this file name,» and you should see the Dynamic update screen:
Step 8 — Select «Do not allow dynamic updates» and click the Next button. The following screen should appear:
Step 9 — Click the Finish button, and your reverse lookup zone should appear on the following screen:
Also Read
What is DNS Hierarchy Architecture (Explained) with Examples
DNS A and PTR records should be added.
The following steps should be followed to add A and PTR records to DNS for remote hosts in order to perform name resolution:
Step 1 — In the DNS manager, right-click on the forward lookup zone to bring up the following screen:
Step 2 — Select New Host (A or AAAA). The following screen should appear:
Step 3 — Enter your host’s parent domain name and IP address, and select «Create associated pointer record,» then click the Add Host button. Finally, click the forward lookup zone, and you should see your newly added A record on the screen below:
Also Read
Best DNS Security Practices for Securing Your DNS Server (Checklist)
Verify DNS Name Resolution
Now that the DNS server installation and configuration is complete, we must test whether or not the DNS name resolution works.
Open your command prompt and type the following command: nslookup
nslookup
You should get the following results:
					Default Server:  web.exampledns.com
Address:  208.117.85.195
Now, enter the FQDN of your newly added host:
> web.exampledns.com
The following output should show the name to IP address resolution:
					Server:  web.exampledns.com
Address:  208.117.85.195

Name:    web.exampledns.com
Address:  208.117.85.195
Then enter your newly added host’s IP address:
> 208.117.85.195
In the output, you should see the IP address to name resolution:
Server:  web.exampledns.com
Address:  208.117.85.195

Name:    web.exampledns.com
Address:  208.117.85.195
Thank you for reading this article on how to Setup and Configure Windows DNS Server on Windows 2022.
Also Read
Top 20 Open Source DNS Servers (Linux/Windows)
Conclusion to How to Setup Windows DNS Server and Configuration on Windows 2022
We explained how to install a DNS server, create a forward and reverse lookup zone, and add A/PTR records to DNS in this How to Setup Windows DNS Server and Configuration on Windows 2022 post, so I hope you can now easily deploy your own DNS server for local name resolution in your organization.
Furthermore, remembering a website’s IP address can be difficult, but DNS servers alleviate this problem by converting long IP addresses into human-readable domain names that are simple to remember and use.Finally, a DNS server and innovative features such as AI-based searches and chatbots allow you to make online transactions quickly.
In Windows, how do I set up a DNS server?
Windows..
Go to the Control Panel..
Change adapter settings by selecting Network and Internet > Network and Sharing Center.
Choose the connection for which you want to set up Google Public DNS..
Choose the Networking tab..
Select the DNS tab by clicking Advanced..
Click OK..
Select Use the DNS server addresses listed below.
How do you set up your DNS server?
How do I change the address of my DNS server?.
Launch the Google Home app…
Tap Wi-Fi Settings. Advanced Networking..
Tap DNS..
Choose your preferred public DNS server, or enter a primary and secondary server address if you want to use a custom DNS server.
Tap Save ..
In Windows Server, how do I manage DNS?
To edit a DNS zone..
Click IPAM in Server Manager..
Click DNS Zones under MONITOR AND MANAGE in the navigation pane..
Make one of the following choices in the lower navigation pane:…
Select IPv4 Reverse Lookup as an example.
Right-click the zone you want to edit in the display pane, and then select Edit DNS Zone.
In Windows Server 2012, how do I set up a DNS server?
Step 1: To install the DNS role, navigate to «Server Manager» and select Manage Add Roles and Features. Step 2: Click Next.Step 3 Select the Role-based or feature-based installation option, then click Next. Step 4 Install a Local DNS role, which will select a server from the server pool, then click Next.
— Advertisement —
Hello, how are you? Today we will continue to explore the functionalities of Windows Server. Specifically, we will talk about one of the most important roles. Indeed, a DNS server is of paramount importance within the system. Since this role, it has the function of translating IP addresses into domain names and vice versa. As a result, the functionality of the server will be considerably increased. Well, let’s see how to install and configure a DNS server in Windows Server 2019/2016.
How to install the DNS role in Windows Server 2019/2016.
Most commonly, this role has been installed along with the Active Directory role. Most commonly, this role has been installed along with the Active Directory role. So if you have reviewed our posts on Windows Server you should already know how to do it. However, I remind you of the steps. In the first place, from the Server Manager click on Add Roles and Features

Press Next to continue

Now select the type of installation. In this case, we will use the role or feature based installation.

Please select the server where the DNS server will be installed.

Below, you can see the DNS role already installed. If not, check the box and follow the instructions in the wizard.

Setting up a DNS server in Windows Server 2019/2016.
Once the installation is verified, it is time to configure the DNS role. To do this, once again we will use the Server Manager. Once there, please enter the Tools menu. Then, click on DNS:

Then the DNS manager will be displayed. Please right-click on the name of the server. Then select Configure a DNS Server.

The DNS Server Configuration Wizard will be displayed immediately. Press Next to continue.

Now it is time to select the optimal alternative for the zone to be used on the server. If you are using small networks, then I recommend creating a forward lookup zone.

Now please set the location of the primary server. This time, the server maintains the zone.

Then assign the name of the zone.

Now it’s time to set up how to receive updates. For security reasons, I recommend using the first option.

In this option, it is possible to configure the DNS server as a temporary reseller. This is very interesting, as it allows our DNS server to query other external DNS servers. This is in the case of those records that it is not able to resolve itself. With this in mind, please add the IP address of the external DNS server.

After this step, the assistant will have finished his work. After this step, the assistant will have finished his work.

Finally you will be able to see the area created correctly. Consequently, the DNS server administration is now available on Windows Server.

Conclusion
Well, in this simple way we have seen how to install and configure a DNS server in Windows Server 2019/2016. Therefore, the administrator has this important feature. All right, that’s it for now. Before saying goodbye I invite you to see our post about activating Wi-Fi in Windows Server. See you soon!