Recently while I was trying to install .Net Framework 3.5 in Windows Server 2012 R2 machine, I got the below error: “Windows Server roles and features cannot be automatically installed or uninstalled via the Windows Features Control Panel”.
I was trying to install SharePoint 2016 on windows server 2012 R2 where I got the above error. So I tried to download and install .Net Framework 3.5 in windows server 2012 R2. But simply .Net Framework cannot be downloaded and installed in Windows server 2012 r2.
Note: The screenshots has been deleted for some unknown reasons. Please following the steps.
It will give an error like below:
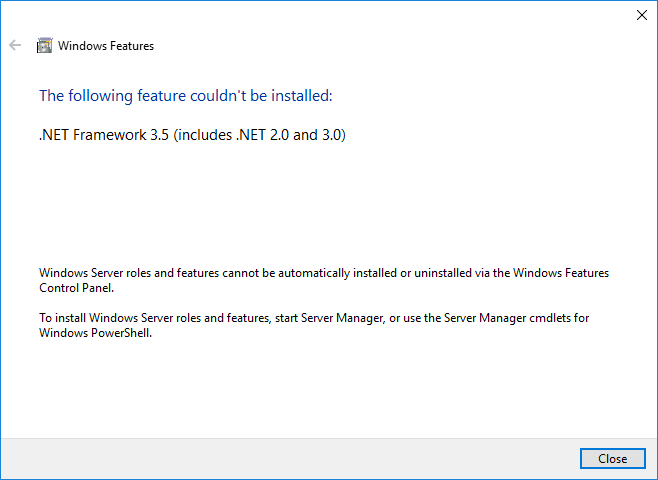
The following feature couldn’t be installed:
.NET Framework 3.5 (includes .NET 2.0 and 3.0)
Windows Server roles and features cannot be automatically installed or uninstalled via the Windows Features Control Panel.
To install Windows Server roles and features, start Server Manager, or use the Server Manager cmdlets for Windows PowerShell. For more information, see: Server Manager Help.
Solution:
We have to install .Net Framework 3.5 through Server Manager in Windows Server 2012 r2. Follow the below steps:
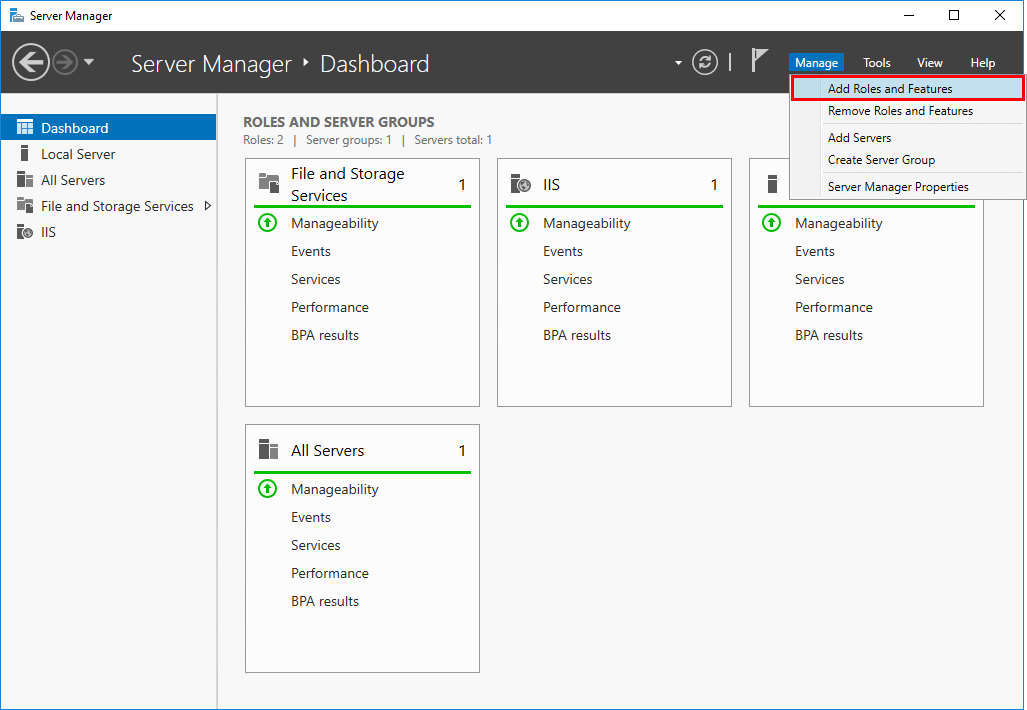
Open Server Manager, then from “Configure this local server”, click on “Add roles and features” as shown in the fig below:
Windows Server roles and features cannot be automatically installed or uninstalled
This will open the Before you begin dialog box, click on Next.
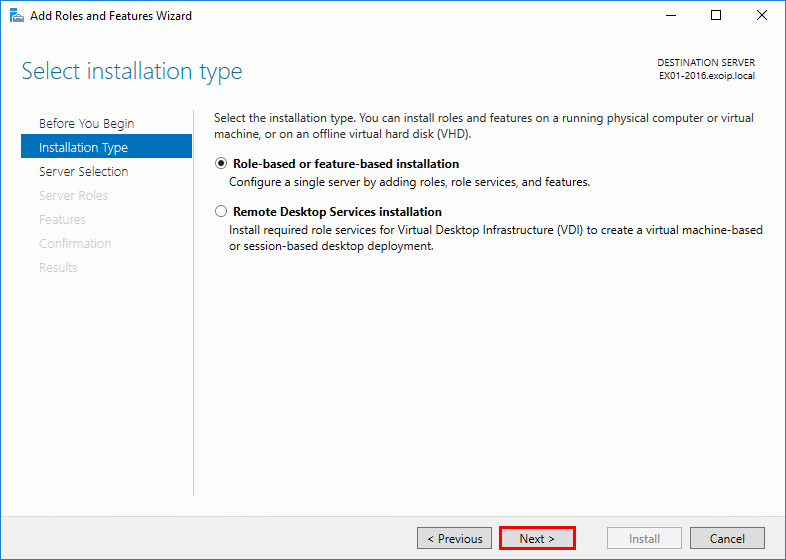
Here in the Select installation type, choose “Role-based or feature-based installation” and then click on Next like below:
Windows Server roles and features cannot be automatically installed or uninstalled via the Windows Features Control Panel
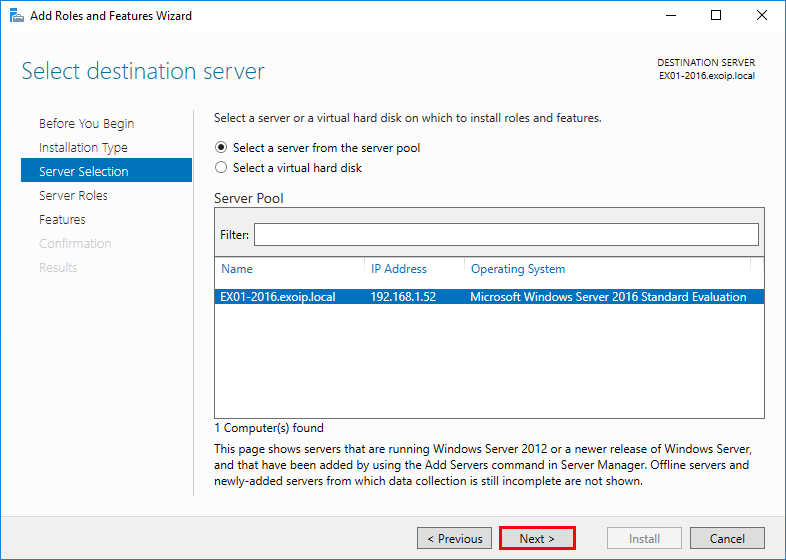
Then in the Select destination server, select the “Select a server from the server pool” radio button and choose the server name and click on Next.
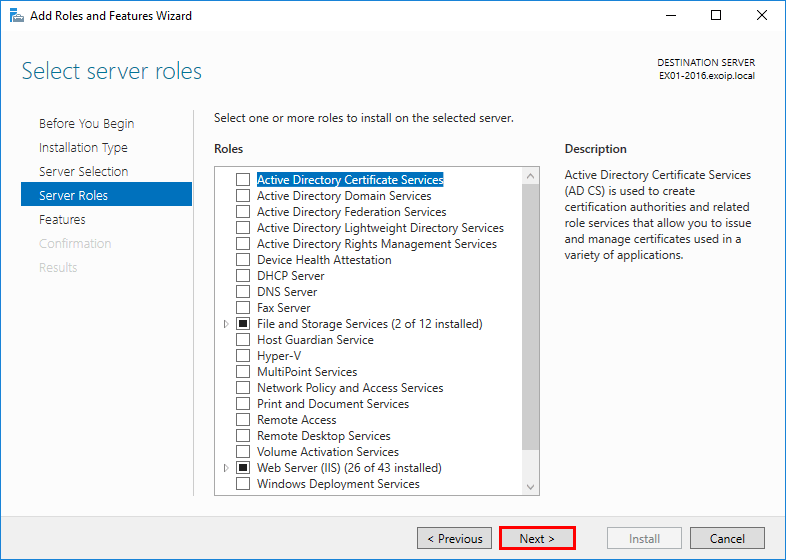
In the Select server roles, no need to select anything. Just click on Next like below:
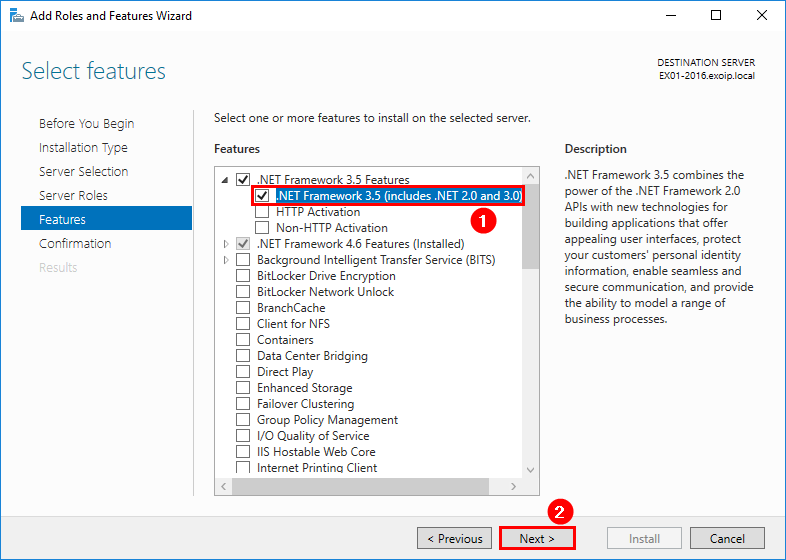
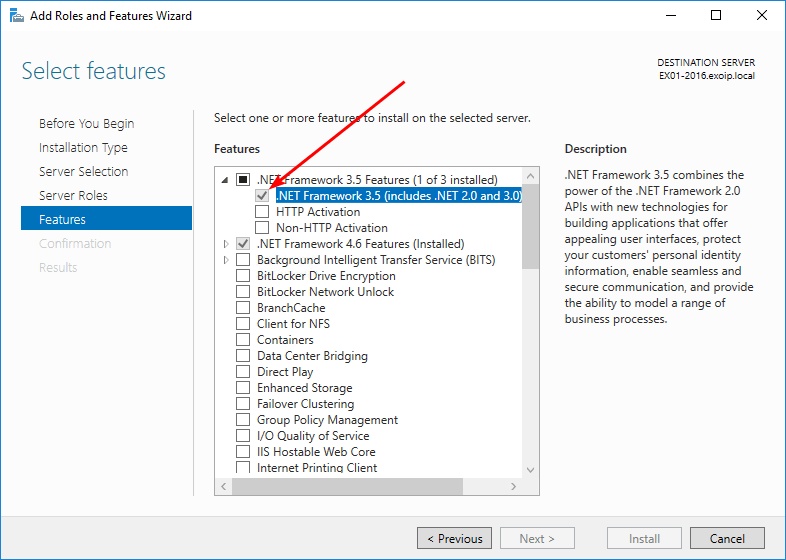
Then in the Select features screen, select .NET Framework 3.5 Features. And then .NET Framework 3.5 (includes .NET 2.0 and 3.0) as shown in the fig below:
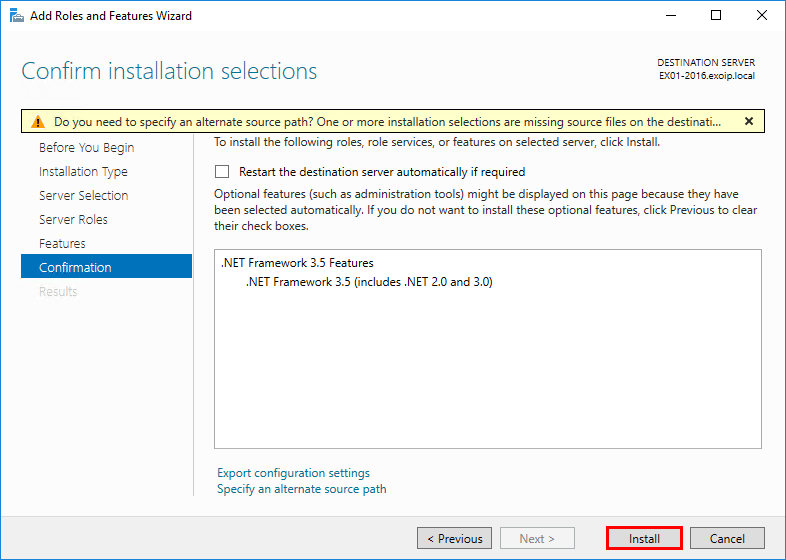
Then click on Next which will open the “Confirm installation selections” dialog box. There choose the checkbox “Restart the destination server automatically if required.” Then click on Install.
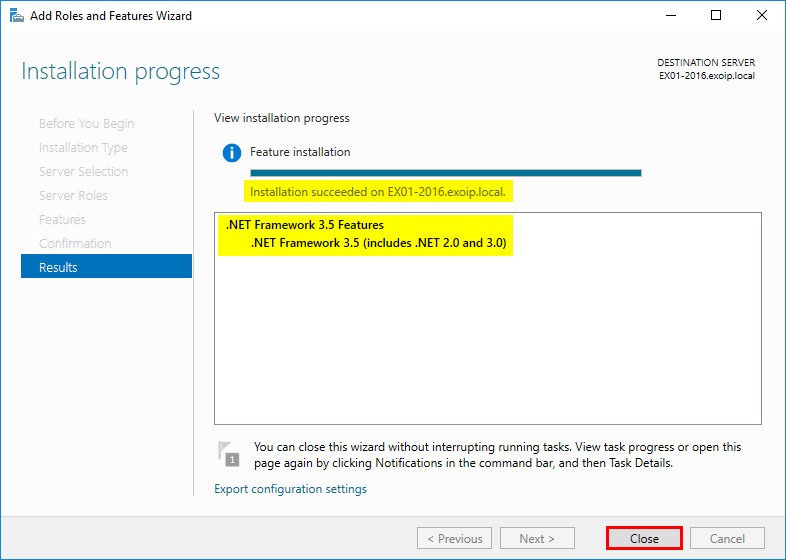
The above step will install .Net framework 3.5 in windows server 2012 r2 machine. After this, I can proceed with the SharePoint 2016 installation steps.
You may also like:
- How to install and configure Active directory windows server 2012 r2
- Installation of one or more roles role services or features failed
- SharePoint Designer Workflow 2013 Error: Windows Workflow Foundation, part of .Net Framework 3.0, must be installed to use this feature
- This edition cannot be upgraded error in Windows server 2016 datacenter

After working for more than 15 years in Microsoft technologies like SharePoint, Office 365, and Power Platform (Power Apps, Power Automate, and Power BI), I thought will share my SharePoint expertise knowledge with the world. Our audiences are from the United States, Canada, the United Kingdom, Australia, New Zealand, etc. For my expertise knowledge and SharePoint tutorials, Microsoft has been awarded a Microsoft SharePoint MVP (9 times). I have also worked in companies like HP, TCS, KPIT, etc.
We like to start an application that we just installed on Windows Server. After starting the application, the Windows Features screen shows up that .NET Framework 3.5 (includes .NET 2.0 and 3.0) feature couldn’t be installed. We like to enable .NET Framework 3.5 on Windows Server to run the application. In this article, you will learn how to install .NET Framework 3.5 on Windows Server.
Table of contents
- The following feature couldn’t be installed: .NET Framework 3.5 (includes .NET 2.0 and 3.0)
- How to install .NET Framework 3.5?
- Check .NET Framework 3.5 with PowerShell
- Install .NET Framework 3.5 with PowerShell
- Verify .NET Framework 3.5 with PowerShell
- Install .NET Framework 3.5 with Server Manager
- Verify .NET Framework 3.5 with Server Manager
- Conclusion
The following feature couldn’t be installed: .NET Framework 3.5 (includes .NET 2.0 and 3.0)
After opening the application, the Windows Features screen shows up with the message:
The following feature couldn’t be installed: NET Framework 3.5 (includes .NET 2.0 and 3.0). Windows Server roles and features cannot be automatically installed or uninstalled via the Windows Features Control Panel. To Install Windows Server roles and features, start Server Manager, or use the Server Manager cmdlets for Windows PowerShell.
There are a couple of ways to install .NET Framework on Windows Server. In this article, we are going to use:
- Windows PowerShell
- Add Roles and Features in Server Manager
Check .NET Framework 3.5 with PowerShell
Find .NET Framework 3.5 on Windows Server with PowerShell. Run PowerShell as administrator. Use one of the cmdlets.
PS C:\> Get-WindowsFeature -Name "NET-Framework-Core"

Display Name                                            Name                       Install State
------------                                            ----                       -------------
    [ ] .NET Framework 3.5 (includes .NET 2.0 and 3.0)  NET-Framework-Core               Removed


PS C:\> (Get-ItemProperty -Path "HKLM:SOFTWARE\Microsoft\NET Framework Setup\NDP\v3.5").Version
Get-ItemProperty : Cannot find path 'HKLM:\SOFTWARE\Microsoft\NET Framework Setup\NDP\v3.5' because it does not exist.
At line:1 char:2
+ (Get-ItemProperty -Path "HKLM:SOFTWARE\Microsoft\NET Framework Setup\ ...
+  ~~~~~~~~~~~~~~~~~~~~~~~~~~~~~~~~~~~~~~~~~~~~~~~~~~~~~~~~~~~~~~~~~~~~
    + CategoryInfo          : ObjectNotFound: (HKLM:\SOFTWARE\... Setup\NDP\v3.5:String) [Get-ItemProperty], ItemNotFoundException
    + FullyQualifiedErrorId : PathNotFound,Microsoft.PowerShell.Commands.GetItemPropertyCommand
The first cmdlet output shows that the install state is Removed. The second cmdlet output shows that it can’t find the registry path because it does not exist.
Now that we can see that the .NET Framework version is not installed on the system, we will install it in the next step.
Install .NET Framework 3.5 with PowerShell
If there is an internet on the Windows Server and you can retrieve Windows Updates from Microsoft, you can install .NET Framework 3.5 with PowerShell.
PS C:\> Install-WindowsFeature NET-Framework-Core

Success Restart Needed Exit Code      Feature Result
------- -------------- ---------      --------------
True    No             Success        {.NET Framework 3.5 (includes .NET 2.0 and...
The column Exit code with value Success means that it’s installed successfully.
Verify .NET Framework 3.5 with PowerShell
Verify that .NET Framework 3.5 is installed on Windows Server with the cmdlets.
PS C:\> Get-WindowsFeature -Name "NET-Framework-Core"

Display Name                                            Name                       Install State
------------                                            ----                       -------------
    [X] .NET Framework 3.5 (includes .NET 2.0 and 3.0)  NET-Framework-Core             Installed


PS C:\> (Get-ItemProperty -Path "HKLM:SOFTWARE\Microsoft\NET Framework Setup\NDP\v3.5").Version
3.5.30729.4926
Install .NET Framework 3.5 with Server Manager
Start Server Manager and click Manage. Click Add Roles and Features in the menu to start the wizard.
Click Next.
Again, click on Next.
One more time on Next.
Check the checkbox .NET Framework 3.5 (includes .NET 2.0 and 3.0). Click Next.
Click Install to confirm the installation.
Installation succeeded. Click Close.
Verify .NET Framework 3.5 with Server Manager
Go through the same steps as above. This time you will see a greyed out checked checkbox in front of .NET Framework 3.5 (includes .NET 2.0 and 3.0).
I hope that this helped you to install .NET Framework 3.5 on Windows Server. If the installation is giving you errors, and .NET Framework 3.5 is not installing, read the documentation by Microsoft.
Keep reading: Check which NET Framework versions are installed »
Conclusion
In this article, you learned how to install .NET Framework 3.5 on Windows Server. In my example, it was Windows Server 2016. It will work for Windows Server 2012/R2, Windows Server 2016, and Windows Server 2019. Run the PowerShell cmdlet to download and install the feature .NET Framework version. You can also use Server Manager and the Add Roles and Features to install the .NET Framework version.
Did you enjoy this article? You may also like Which NET Framework for Exchange Server. Don’t forget to follow us and share this article.
![]()
ALI TAJRAN is a passionate IT Architect, IT Consultant, and Microsoft Certified Trainer. He started Information Technology at a very young age, and his goal is to teach and inspire others. Read more »
The error I was receive reads:
Windows Server roles and features cannot be automatically installed or uninstalled via the Windows Features Control Panel.
To install Windows Server roles and features, start Server Manager, or use the Server Manager cmdlets for Windows PowerShell. For more information, see: Server Manager Help.

Opening Server Manager as instructed (by default, it has an icon pinned to the Taskbar), I clicked on Number 2 “Add roles and Features” from the Server Manager Dashboard.

After clicking on this link, the Add Roles and Features Wizard pops up. I choose Role-based or feature-based installation and click ‘Next’.

I want to install it on the local server I was remoted into, so I chose it from the list and clicked ‘Next’.

At this point, I didn’t need to any roles, so I just clicked ‘Next’ to get to choosing Features to install.


I found an article from Microsoft’s MSDN library and it gave a few options to solve the problem. I chose the straight-forward solution listed for Enterprises. I created a Registry key and value as directed.
This tells the Features Installer to bypass the WSUS and go to Windows Updates. While it consumes bandwidth to the web and can take some time to download the sources, it works. I set this registry key and reran the Installer and received the feature has been successfully installed message.

Источник
Содержание
- Table of contents
- Conclusion
- ALI TAJRAN
- What Others Are Reading
- FIX: Unable to Add Roles and Features on Server 2016 because the Server Requires Restart (Solved)
- How to fix: Cannot Add Roles and Features on Server 2016 or 2012, because the Server Requires Restart.
- Windows server roles and features cannot be automatically installed
- Answered by:
- Question
- Answers
- All replies
- Install or Uninstall Roles, Role Services, or Features
- Install roles, role services, and features by using the Add Roles and Features Wizard
- To install roles and features by using the Add Roles and Features Wizard
- Install roles, role services, and features by using Windows PowerShell cmdlets
- To install roles and features by using the Install-WindowsFeature cmdlet
- Remove roles, role services, and features by using the Remove Roles and Features Wizard
- To remove roles and features by using the Remove Roles and Features Wizard
- Remove roles, role services, and features by using Windows PowerShell cmdlets
- To remove roles and features by using the Uninstall-WindowsFeature cmdlet
- Install roles and features on multiple servers by running a Windows PowerShell script
- To install roles and features on multiple servers
- Configure alternate sources for feature files in Group Policy
- To configure a default alternate source path in Group Policy
Table of contents
After opening the application, the Windows Features screen shows up with the message:
The first cmdlet output shows that the install state is Removed. The second cmdlet output shows that it can’t find the registry path because it does not exist.
The column Exit code with value Success means that it’s installed successfully.
Start Server Manager and click Manage. Click Add Roles and Features in the menu to start the wizard.
Click Next.
Again, click on Next.
One more time on Next.
Click Install to confirm the installation.
Installation succeeded. Click Close.
Conclusion
Did you enjoy this article? You may also like Which NET Framework for Exchange Server. Don’t forget to follow us and share this article.
![]()
ALI TAJRAN
ALI TAJRAN is a passionate IT Architect, IT Consultant, and Microsoft Certified Trainer. He started Information Technology at a very young age, and his goal is to teach and inspire others. Read more »
What Others Are Reading
Why do we need to use the import CSV (comma-separated values) delimiter in PowerShell? By…
We like to get a list of all the Organizational Units (OUs) in Active Directory…
The allocation unit size or named block size of a partition is vital for the…
Источник
FIX: Unable to Add Roles and Features on Server 2016 because the Server Requires Restart (Solved)
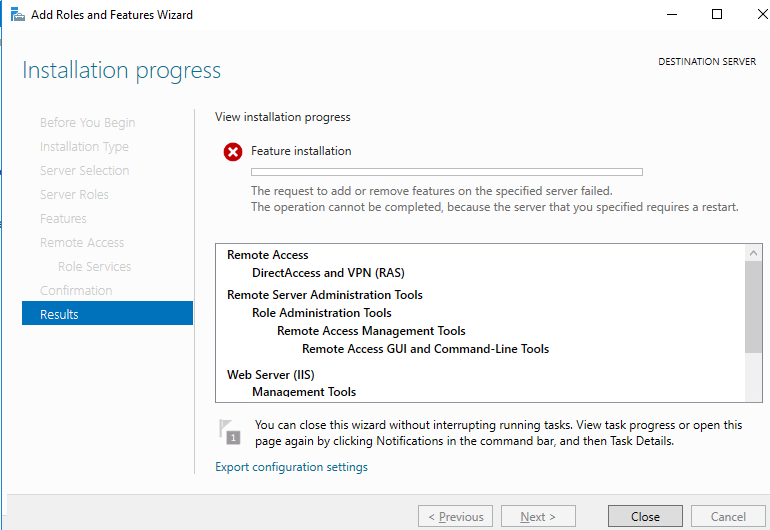
This tutorial contains instructions to resolve the following problem: Unable to add roles and features on Server 2016 or Server 2012 with error: «Feature installation Failed: The request to add or remove features on the specified server failed. The operation cannot be completed, because the server that you specified requires a restart».

As a result of the above error, we were unable to install roles and features on the Server, because the problem remained even after restarting the server and installing the latest updates.
At the same time in the Event Viewer (Windows Logs > System) the following error was recorded:
«Event 7041: Service Control Manager.
The MSSQL$MICROSOFT##WID service was unable to log on as NT SERVICEMSSQL$MICROSOFT##WID with the currently configured password due to the following error:
Logon failure: the user has not been granted the requested logon type at this computer.
Service: MSSQL$MICROSOFT##WID
Domain and account: NT SERVICEMSSQL$MICROSOFT##WID
This service account does not have the required user right «Log on as a service.»
Assign «Log on as a service» to the service account on this computer. You can use Local Security Settings (Secpol.msc) to do this. If this computer is a node in a cluster, check that this user right is assigned to the Cluster service account on all nodes in the cluster.
If you have already assigned this user right to the service account, and the user right appears to be removed, check with your domain administrator to find out if a Group Policy object associated with this node might be removing the right.»

How to fix: Cannot Add Roles and Features on Server 2016 or 2012, because the Server Requires Restart.
Suggestion according to user comments: Before you continue below, try to restart the Remote Registry service and try again to install the rules. If this also fails, follow the instructions below.
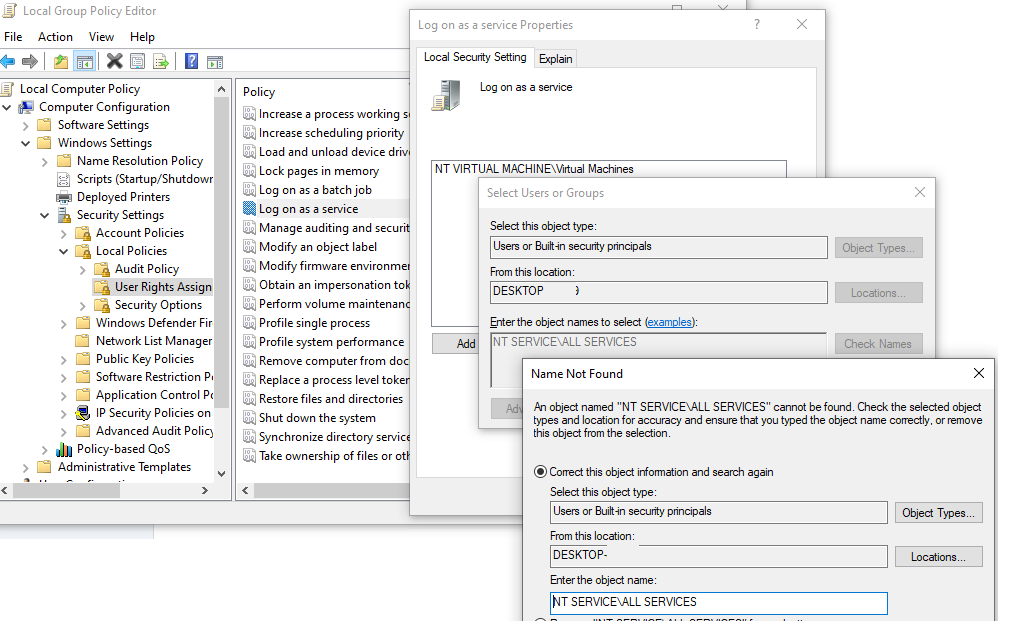
To resolve the Feature Installation error «The request to add or remove features on the specified server failed, because the server requires a restart», proceed and assign the «Log on as a service» user right to «NT SERVICEALL SERVICES» & to «NT SERVICEMSSQL$MICROSOFT##WID».
Case A. If your Server is part of a Domain, then proceed and modify the Default Domain Policy as follows:
1. Simultaneously press the Windows  + R keys to open run command box.
2. In run command box, type: gpmc.msc and press Enter.

3. In Group Policy Management go to:
3a. Right click at Default Domain Controller Policy and select Edit.

5. Proceed to Step–4 below…
Case B. If your Server is a Local Server then proceed and modify the Local Group Policy as follows:
1. Simultaneously press the Windows + R keys to open run command box.
2. In run command box, type: gpedit.msc and press Enter.

3. In Local Group Policy Editor, go to:

4. Now, double click at Log as a service item.

5. Click on Add User or Group button.

6. Type NT SERVICEALL SERVICES and click OK. *
* Read this Note if you are having trouble when adding the account.

7. At the main window, click OK and then close the Group Policy Editor.

8. Now open Command Prompt as Administrator and give the following command to update the group policy.

9. Reboot your server.
10. After the restart, open the Group Policy Management, and go again to User Rights Assignments.
11. Double click at Log as a service item and click Add User or Group.
12. Type NT SERVICEMSSQL$MICROSOFT##WID and click OK. *

* Note: If you cannot add the «NT SERVICEMSSQL$MICROSOFT##WID» or the «NT SERVICEALL SERVICES» account to ‘Log on as service’ item, then:
1. Add the «Everyone» (without quotes), to log as service.
2. Reboot the server.
3. Add the «NT SERVICEALL SERVICES» & the «NT SERVICEMSSQL$MICROSOFT##WID» users to log as service.
4. Run gpupdate /force
5. Reboot the server
6. Remove «Everyone» from the log on as service.
7. Proceed to Add Roles and Features. on the Server.
13. Click OK again and then close the Group Policy Editor.

14. Open Command Prompt as Administrator and give the following command to update the group policy.
15. Reboot your server.
16. After the restart, try to install Roles and Features.
That’s it! Let me know if this guide has helped you by leaving your comment about your experience. Please like and share this guide to help others.
Источник
This forum has migrated to Microsoft Q&A. Visit Microsoft Q&A to post new questions.
Answered by:

Question
I have a Windows Server 2016 Standard with Active Directory Domain Services and DNS installed. The server is working for a few months now. Yesterday I was going to install the DHCP role and it gives the error «The referenced assembly could not be found. Error: 0x80073701».
I cannot also install updates with Windows Update, I can however install updates manually.
I searched for this error and some people worked this around by installing missing language packs, but I have never installed or removed any language pack.
Answers
You can also try a repair install by running setup.exe from the root of the install media but do so can be risky so I’d opt to stand up a new one, patch it fully, license it, join existing domain, add active directory domain services, promote it, transfer FSMO roles also making it a GC, check health via dcdiag / repadmin tools, when all is good decommission / demote old one. Sounds like a lot but should only take around an hour or so to do.
Disclaimer: This posting is provided «AS IS» with no warranties or guarantees, and confers no rights.
I searched for this error and some people worked this around by installing missing language packs, but I have never installed or removed any language pack.
I would not go down that rabbit hole unnecessarily. I’d check system and servicing health by running;
sfc /scannow
dism /online /cleanup-image /restorehealth
also try installing the latest cumulative update.
Disclaimer: This posting is provided «AS IS» with no warranties or guarantees, and confers no rights.
I will try that, already have done sfc /scannow but did not help.
I have checked system and servicing health, both found and fixed errors. But I am still getting the same assembly error 0x80073701
You can also try a repair install by running setup.exe from the root of the install media but do so can be risky so I’d opt to stand up a new one, patch it fully, license it, join existing domain, add active directory domain services, promote it, transfer FSMO roles also making it a GC, check health via dcdiag / repadmin tools, when all is good decommission / demote old one. Sounds like a lot but should only take around an hour or so to do.
Disclaimer: This posting is provided «AS IS» with no warranties or guarantees, and confers no rights.
Right, so after spending a few hours on this issue, I finally found a solution. The internet has a few sources on this, while https://www.urtech.ca/2018/02/solved-windows-feature-installation-the-referenced-assembly-could-not-be-found-error-0x80073701/ this link was probably the closest to solution, but not enough info.
Windows thinks there is a language pack installed and hence attempts to install additional MUI files during role deployment. This fails and the installation as well.
2. Looking at the DISM log, I found nothing useful. SBC.log however contained the following error:
2018-05-31 18:21:40, Error CSI 0000000e (F) HRESULT_FROM_WIN32(ERROR_SXS_ASSEMBLY_MISSING) #17491# from Windows::ServicingAPI::CCSITransaction::ICSITransaction_PinDeployment(Flags = 0, a = Microsoft-Windows-ServerManager-Core-MgmtProvider-Deployment-LanguagePack, Version = 6.3.9600.16384, pA = PROCESSOR_ARCHITECTURE_AMD64 (9), Culture = [l:10<5>]»es-ES», VersionScope = 1 nonSxS, PublicKeyToken = , Type neutral, TypeName neutral, PublicKey neutral, cb = (null), s = (null), rid = [140]»Microsoft-Windows-ServerManager-Core-Package
6.3.9600.16384.ServerManager-Core-MgmtProvider-Deployment-LangPack», rah = (null), manpath = (null), catpath = (null), ed = 0, disp = 0)[gle=0x80073701]
Note the fact it attempted to install a Spanish package, while our server has nothing to do with the Spanish language. This brings us to the registry editing and dependency cleanup.
WARNING: registry editing, especially on PRODUCTION SERVERS is a DANGEROUS task and should be taken with care, knowledge, patience and proper backup (or even several of different types). Please be warned.
The key «HKEY_LOCAL_MACHINESOFTWAREMicrosoftWindowsCurrentVersionComponent Based Servicing» contains a few subkeys, notably PackageDetect, UpdateDetect and a few more. I did a registry search from this location («Component Based Servicing») and looked for «Microsoft-Windows-ServerManager-Core-Package
es-ES» (without the quotes), looking for the «data» entries. Those entries represent dependencies and once removed, solved the issue. Few notes:
a. Many of the keys are protected, but you have full control, so you can either add full permissions for the «administrators» group or take ownership of the key and then give the «administrators» group full permissions.
b. Permissions are set on the key level (the folder icon), not the data level.
c. You need to delete only the data entries you see are odd and out of place. For example, a package for ServerCore-something had a few dependencies, all of them language-neutral and an oddball of «Microsoft-Windows-ServerManager-Core-Package
es-ES». Obviously it is out of place and can be removed.
d. i also searched for «es-es» under «packageDetect» and for some reason had a spanish version of a Windows KB. In this case it was not a dependency, but I deleted it anyway as I could not find any evidence Spanish version for this update was in fact installed.
I hope it will save someone a few hours. By the way, I was working on Server 2012 R2
Источник
Install or Uninstall Roles, Role Services, or Features
Applies To: Windows Server 2012, Windows Server 2012 R2
In Windows ServerВ® 2012 R2 and Windows ServerВ® 2012, the Server Manager console and Windows PowerShellВ® cmdlets for Server Manager allow installation of roles and features to local or remote servers, or offline virtual hard disks (VHDs). You can install multiple roles and features on a single remote server or offline VHD in a single Add Roles and Features Wizard or Windows PowerShell session.
Server Manager cannot be used to manage a newer release of the Windows Server operating system. Server Manager running on Windows Server 2012 or Windows 8 cannot be used to install roles, role services, and features on servers that are running Windows Server 2012 R2.
You must be logged on to a server as an administrator to install or uninstall roles, role services, and features. If you are logged on to the local computer with an account that does not have administrator rights on your target server, right-click the target server in the Servers tile, and then click Manage As to provide an account that has administrator rights. The server on which you want to mount an offline VHD must be added to Server Manager, and you must have Administrator rights on that server.
For more information about what roles, role services, and features are, see Roles, Role Services, and Features.
This topic contains the following sections.
Install roles, role services, and features by using the Add Roles and Features Wizard
In a single session in the Add Roles and Features Wizard, you can install roles, role services, and features on the local server, a remote server that has been added to Server Manager, or an offline VHD. For more information about how to add a server to Server Manager to manage, see Add Servers to Server Manager.
If you are running Server Manager on Windows Server 2012 or Windows 8, you can use the Add Roles and Features Wizard to install roles and features only on servers and offline VHDs that are running Windows Server 2012. If you are running Server Manager on Windows Server 2012 R2 or Windows 8.1, you can use the Add Roles and Features Wizard to install roles and features only on servers and offline VHDs that are running Windows Server 2012 R2.
To install roles and features by using the Add Roles and Features Wizard
If Server Manager is already open, go on to the next step. If Server Manager is not already open, open it by doing one of the following.
On the Windows desktop, start Server Manager by clicking Server Manager in the Windows taskbar.
On the Windows Start screen, click the Server Manager tile.
On the Manage menu, click Add Roles and Features.
On the Before you begin page, verify that your destination server and network environment are prepared for the role and feature you want to install. Click Next.
On the Select installation type page, select Role-based or feature-based installation to install all parts of roles or features on a single server, or Remote Desktop Services installation to install either a virtual machine-based desktop infrastructure or a session-based desktop infrastructure for Remote Desktop Services. The Remote Desktop Services installation option distributes logical parts of the Remote Desktop Services role across different servers as needed by administrators. Click Next.
On the Select destination server page, select a server from the server pool, or select an offline VHD. To select an offline VHD as your destination server, first select the server on which to mount the VHD, and then select the VHD file. For information about how to add servers to your server pool, see Add Servers to Server Manager. After you have selected the destination server, click Next.
Select roles, select role services for the role if applicable, and then click Next to select features.
As you proceed, the Add Roles and Features Wizard automatically informs you if conflicts were found on the destination server that can prevent selected roles or features from installation or normal operation. You are also prompted to add any roles, role services, or features that are required by the roles or features that you have selected.
Additionally, if you plan to manage the role remotely, either from another server, or from a Windows client-based computer that is running Remote Server Administration Tools, you can opt not to install management tools and snap-ins for roles on the destination server. By default, in the Add Roles and Features Wizard, management tools are selected for installation.
On the Confirm installation selections page, review your role, feature, and server selections. If you are ready to install, click Install.
You can also export your selections to an XML-based configuration file that you can use for unattended installations with Windows PowerShell. To export the configuration you specified in this Add Roles and Features Wizard session, click Export configuration settings, and then save the XML file to a convenient location.
You can specify a WIM file as an alternate feature file source when you are installing roles, role services, and features on a running, physical server. The source path for a WIM file should be in the following format, with WIM as a prefix, and the index in which the feature files are located as a suffix: WIM:e:sourcesinstall.wim:4. However, you cannot use a WIM file directly as a source for installing roles, role services, and features to an offline VHD; you must either mount the offline VHD and point to its mount path for source files, or you must point to a folder that contains a copy of the contents of the WIM file.
After you click Install, the Installation progress page displays installation progress, results, and messages such as warnings, failures, or post-installation configuration steps that are required for the roles or features that you installed. In Windows Server 2012 R2 and Windows Server 2012, you can close the Add Roles and Features Wizard while installation is still in progress, and view installation results or other messages in the Notifications area at the top of the Server Manager console. Click the Notifications flag icon to see more details about installations or other tasks that you are performing in Server Manager.
Install roles, role services, and features by using Windows PowerShell cmdlets
The Server Manager deployment cmdlets for Windows PowerShell function similarly to the GUI-based Add Roles and Features Wizard and Remove Roles and Features Wizard, with an important difference. In Windows PowerShell, unlike in the Add Roles and Features Wizard, management tools and snap-ins for a role are not included by default. To include management tools as part of a role installation, add the IncludeManagementTools parameter to the cmdlet. If you are installing roles and features on a server that is running the Server Core installation option of Windows Server 2012 R2 or Windows Server 2012, you can add a role’s management tools to an installation, but GUI-based management tools and snap-ins cannot be installed on servers that are running the Server Core installation option of Windows Server. Only command-line and Windows PowerShell management tools can be installed on the Server Core installation option.
To install roles and features by using the Install-WindowsFeature cmdlet
Do one of the following to open a Windows PowerShell session with elevated user rights.
If you are installing roles and features on a remote server, you do not need to run Windows PowerShell with elevated user rights.
On the Windows desktop, right-click Windows PowerShell on the taskbar, and then click Run as Administrator.
On the Windows Start screen, right-click the tile for Windows PowerShell, and then on the app bar, click Run as Administrator.
In Windows PowerShell 3.0 and later releases of Windows PowerShell, there is no need to import the Server Manager cmdlet module into the Windows PowerShell session before running cmdlets that are part of the module. A module is automatically imported the first time you run a cmdlet that is part of the module. Also, neither Windows PowerShell cmdlets nor the feature names used with the cmdlets are case-sensitive.
Type Get-Help Install-WindowsFeature, and then press Enter to view the syntax and accepted parameters for the Install-WindowsFeature cmdlet.
Type the following, and then press Enter, where feature_name represents the command name of a role or feature that you want to install (obtained in step 2), and computer_name represents a remote computer on which you want to install roles and features. Separate multiple values for feature_name by using commas. The Restart parameter automatically restarts the destination server if required by the role or feature installation.
To install roles and features on an offline VHD, add both the ComputerName parameter and the VHD parameter. If you do not add the ComputerName parameter, the cmdlet assumes that the local computer is mounted to access the VHD. The ComputerName parameter contains the name of the server on which to mount the VHD, and the VHD parameter contains the path to the VHD file on the specified server.
Example:В В The following cmdlet installs the Active Directory Domain Services role and the Group Policy Management feature on a remote server, ContosoDC1. Management tools and snap-ins are added by using the IncludeManagementTools parameter, and the destination server is to be restarted automatically, if installation requires that the servers be restarted.
Remove roles, role services, and features by using the Remove Roles and Features Wizard
You must be logged on to a server as an administrator to uninstall roles, role services, and features. If you are logged on to the local computer with an account that does not have administrator rights on your uninstallation target server, right-click the target server in the Servers tile, and then click Manage As to provide an account that has administrator rights. The server on which you want to mount an offline VHD must be added to Server Manager, and you must have Administrator rights on that server.
To remove roles and features by using the Remove Roles and Features Wizard
If Server Manager is already open, go on to the next step. If Server Manager is not already open, open it by doing one of the following.
On the Windows desktop, start Server Manager by clicking Server Manager in the Windows taskbar.
On the Windows Start screen, click the Server Manager tile.
On the Manage menu, click Remove Roles and Features.
On the Before you begin page, verify that you have prepared for removing roles or features from a server. Click Next.
On the Select destination server page, select a server from the server pool, or select an offline VHD. To select an offline VHD, first select the server on which to mount the VHD, and then select the VHD file.
For information about how to add servers to your server pool, see Add Servers to Server Manager. After you have selected the destination server, click Next.
You can use the Remove Roles and Features Wizard to remove roles and features from servers that are running the same release of Windows Server that supports the version of Server Manager that you are using. You cannot remove roles, role services, or features from servers that are running Windows Server 2012 R2, if you are running Server Manager on Windows Server 2012 or Windows 8. You cannot use the Remove Roles and Features Wizard to remove roles and features from servers that are running Windows Server 2008, Windows Server 2008 R2, or Windows Server 2003.
Select roles, select role services for the role if applicable, and then click Next to select features.
As you proceed, the Remove Roles and Features Wizard automatically prompts you to remove any roles, role services, or features that cannot run without the roles or features that you are removing.
Additionally, you can opt to remove management tools and snap-ins for roles on the destination server. By default, in the Remove Roles and Features Wizard, management tools are selected for removal. You can leave management tools and snap-ins if you plan to use the selected server to manage the role on other remote servers.
On the Confirm removal selections page, review your role, feature, and server selections. If you are ready to remove the roles or features, click Remove.
After you click Remove, the Removal progress page displays removal progress, results, and messages such as warnings, failures, or post-removal configuration steps that are required, such as restarting the destination server. In Windows Server 2012 R2 and Windows Server 2012, you can close the Remove Roles and Features Wizard while removal is still in progress, and view removal results or other messages in the Notifications area at the top of the Server Manager console. Click the Notifications flag to see more details about removals or other tasks that you are performing in Server Manager.
Remove roles, role services, and features by using Windows PowerShell cmdlets
The Server Manager deployment cmdlets for Windows PowerShell function similarly to the GUI-based Remove Roles and Features Wizard, with an important difference. In Windows PowerShell, unlike in the Remove Roles and Features Wizard, management tools and snap-ins for a role are not removed by default. To remove management tools as part of a role removal, add the IncludeManagementTools parameter to the cmdlet. If you are uninstalling roles and features from a server that is running the Server Core installation option of Windows Server 2012 R2 or Windows Server 2012, this parameter removes command-line and Windows PowerShell management tools for the specified roles and features.
To remove roles and features by using the Uninstall-WindowsFeature cmdlet
Do one of the following to open a Windows PowerShell session with elevated user rights.
If you are uninstalling roles and features from a remote server, you do not need to run Windows PowerShell with elevated user rights.
On the Windows desktop, right-click Windows PowerShell on the taskbar, and then click Run as Administrator.
On the Windows Start screen, right-click the Windows PowerShell tile, and then on the app bar, click Run as Administrator.
In Windows PowerShell 3.0 and later releases of Windows PowerShell, there is no need to import the Server Manager cmdlet module into the Windows PowerShell session before running cmdlets that are part of the module. A module is automatically imported the first time you run a cmdlet that is part of the module. Also, neither Windows PowerShell cmdlets nor the feature names used with the cmdlets are case-sensitive.
Type Get-Help Uninstall-WindowsFeature, and then press Enter to view the syntax and accepted parameters for the Uninstall-WindowsFeature cmdlet.
Type the following, and then press Enter, where feature_name represents the command name of a role or feature that you want to remove (obtained in step 2), and computer_name represents a remote computer from which you want to remove roles and features. Separate multiple values for feature_name by using commas. The Restart parameter automatically restarts destination servers if required by the role or feature removal.
To remove roles and features from an offline VHD, add both the ComputerName parameter and the VHD parameter. If you do not add the ComputerName parameter, the cmdlet assumes that the local computer is mounted to access the VHD. The ComputerName parameter contains the name of the server on which to mount the VHD, and the VHD parameter contains the path to the VHD file on the specified server.
Example:В В The following cmdlet removes the Active Directory Domain Services role and the Group Policy Management feature from a remote server, ContosoDC1. Management tools and snap-ins are also removed, and the destination server is to be restarted automatically, if removal requires that the servers be restarted.
Install roles and features on multiple servers by running a Windows PowerShell script
Although you cannot use the Add Roles and Features Wizard to install roles, role services, and features on more than one target server in a single wizard session, you can use a Windows PowerShell script to install roles, role services, and features on multiple target servers that you are managing by using Server Manager. The script that you use to perform batch deployment, as this process is called, points to an XML configuration file that you can create easily by using the Add Roles and Features Wizard, and clicking Export configuration settings after advancing through the wizard to the Confirm installation selections page of the Add Roles and Features Wizard.
All target servers that are specified in your script must be running the release of Windows Server that matches the version of Server Manager you are running on the local computer. For example, if you are running Server Manager on WindowsВ® 8, you can install roles, role services, and features on servers that are running Windows Server 2012. If GUI-based management tools are added to the installation, the installation process automatically converts target servers that are running the Server Core installation option of Windows Server to the full installation option (server with a full GUI). The script provided in this section is an example of how batch deployment can be performed by using the Install-WindowsFeature cmdlet and a Windows PowerShell script. There are other possible scripts and methods of performing batch deployment to multiple servers. To search for or provide other scripts for deploying roles and features, search the Script Center Repository.
To install roles and features on multiple servers
If you have not already done so, create an XML configuration file that contains the roles, role services, and features that you want installed on multiple servers. You can create this configuration file by running the Add Roles and Features Wizard, selecting roles, role services, and features that you want, and clicking Export configuration settings after advancing through the wizard to the Confirm installation selections page. Save the configuration file to a convenient location. You do not need to click Install or complete the wizard if you are running it only to create a configuration file.
Do one of the following to open a Windows PowerShell session with elevated user rights.
On the Windows desktop, right-click Windows PowerShell on the taskbar, and then click Run as Administrator.
On the Windows Start screen, right-click the Windows PowerShell tile, and then on the app bar, click Run as Administrator.
Copy and paste the following script into your Windows PowerShell session.
Target servers are automatically restarted if required by the roles and features that you select.
Run the function by doing the following.
Do one of the following to open a Windows PowerShell session with elevated user rights.
If you are installing roles and features from a remote server, you do not need to run Windows PowerShell with elevated user rights.
On the Windows desktop, right-click Windows PowerShell on the taskbar, and then click Run as Administrator.
On the Windows Start screen, right-click the Windows PowerShell tile, and then on the app bar, click Run as Administrator.
On a server that is running the Server Core installation option of Windows Server 2012 R2 or Windows Server 2012, type powershell into a command prompt, and then press Enter.
Type the following command, and then press Enter. In the following example, the source files are located in a side-by-side store (abbreviated to as SxS) in installation media on drive D.
If you want the command to use Windows Update as a source for missing feature files, or if a default source has already been configured by using Group Policy, you do not need to add the Source parameter unless you want to specify a different source.
On the Manage menu in Server Manager, click Add Roles and Features.
Select a destination server that is running Windows Server 2012 R2 orWindows Server 2012.
On the Select features page of the Add Roles and Features Wizard, select .NET Framework 3.5.
If the local computer is allowed to do so by Group Policy settings, the installation process attempts to get missing feature files by using Windows Update. Click Install; you do not need to go on to the next step.
Provide a path to a side-by-side store (referred to as SxS) in installation media, or to a WIM file. In the following example, installation media is located on drive D.
D:SourcesSxS
To specify a WIM file, add a WIM: prefix, and add the index of the image to use in the WIM file as a suffix, as shown in the following example.
WIM:\server_nameshareinstall.wim:3
Click OK, and then click Install.
Do one of the following to open a Windows PowerShell session with elevated user rights.
If you are installing roles and features from a remote server, you do not need to run Windows PowerShell with elevated user rights.
On the Windows desktop, right-click Windows PowerShell on the taskbar, and then click Run as Administrator.
On the Windows Start screen, right-click the Windows PowerShell tile, and then on the app bar, click Run as Administrator.
On a server that is running the Server Core installation option, type powershell into a command prompt, and then press Enter.
Run one of the following DISM commands.
If the computer has access to Windows Update, or a default source file location has already been configured in Group Policy, run the following command.
If the computer has access to installation media, run a command similar to the following. In the following example, the operating system installation media is located on drive D. The LimitAccess parameter prevents the command from attempting to contact Windows Update or a server that is running WSUS.
The DISM command is case-sensitive.
Configure alternate sources for feature files in Group Policy
You must be a member of the Administrators group to change Group Policy settings on the local computer. If Group Policy settings for the computer you want to manage are controlled at the domain level, you must be a member of the Domain Administrators group to change Group Policy settings.
To configure a default alternate source path in Group Policy
In Local Group Policy Editor or Group Policy Management Console, open the following policy setting.
Computer ConfigurationAdministrative TemplatesSystemSpecify settings for optional component installation and component repair
Select Enabled to enable the policy setting, if it is not already enabled.
In the Alternate source file path text box in the Options area, specify a fully qualified path to a shared folder or a WIM file. To specify a WIM file as an alternate source file location, add the prefix WIM: to the path, and add the index of the image to use in the WIM file as a suffix. The following are examples of values that you can specify.
Path to a shared folder: **\server_nameshare**folder_name
Path to a WIM file, in which 3 represents the index of the image in which the feature files are found: WIM:\server_nameshareinstall.wim:3
If you do not want computers that are controlled by this policy setting to search for missing feature files in Windows Update, select Never attempt to download payload from Windows Update.
If the computers that are controlled by this policy setting typically receive updates through WSUS, but you prefer to go through Windows Update and not WSUS to find missing feature files, select Contact Windows Update directly to download repair content instead of Windows Server Update Services (WSUS).
Click OK when you are finished changing this policy setting, and then close the Group Policy editor.
Источник
Содержание
- Ошибка установки/удаления ролей в Windows Server: не удается завершить операцию, требуется перезагрузить сервер
- Install or Uninstall Roles, Role Services, or Features
- Install roles, role services, and features by using the add Roles and Features Wizard
- To install roles and features by using the add Roles and Features Wizard
- Install roles, role services, and features by using Windows PowerShell cmdlets
- To install roles and features by using the Install-WindowsFeature cmdlet
- Remove roles, role services, and features by using the remove Roles and Features Wizard
- To remove roles and features by using the remove Roles and Features Wizard
- Remove roles, role services, and features by using Windows PowerShell cmdlets
- To remove roles and features by using the Uninstall-WindowsFeature cmdlet
- Install roles and features on multiple servers by running a Windows PowerShell script
- To install roles and features on multiple servers
- Install .NET Framework 3.5 and other features on-demand
- To install .NET Framework 3.5 by running the Install-WindowsFeature cmdlet
- To install .NET Framework 3.5 by using the add Roles and Features Wizard
- To install .NET Framework 3.5 by using DISM
- Configure alternate sources for feature files in Group Policy
Ошибка установки/удаления ролей в Windows Server: не удается завершить операцию, требуется перезагрузить сервер
При установке любой роли или компонента в Windows Server 2016 появляется ошибка, что сервер требует перезагрузки: “ The operation cannot be completed, because the server that you specified requires a restart ” ( Сбой запроса на добавление или удаление компонентов на указанном сервере. Не удается завершить операцию, так как требуется перезагрузить указанный сервер ). Ок, перезагружаем сервер, пытаемся установить роль и опять появляется ошибка, что нужна перезагрузка сервера. Но ошибка повторяется, и так дальше по циклу.
В результате не получается установить/удалить ни одну из ролей/компонентов на сервере.
В журнале событий сервера (Event Viewer -> Windows Logs -> System) при этом фиксируетсся ошибка EventID 7041 от источника Service Control Manager. В событии указано:
Чтобы решить проблему, необходимо предоставить права входа в качестве службы для “NT SERVICEALL SERVICES» (и для NT SERVICEMSSQL$MICROSOFT##WID, если ошибка связана с установкой роли сервера обновлений WSUS или SQL Server).
- Откройте консоль управления локальными политиками gpedit.msc ;
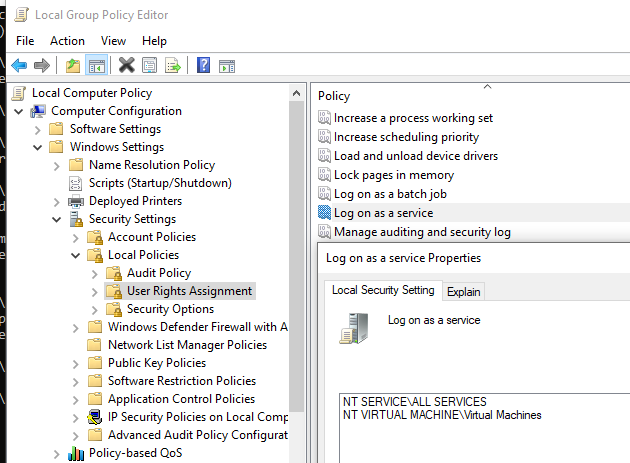
- Перейдите в раздел Computer Configuration –>Windows Settings –>Security Settings –>Local Policies –>User Rights Assignment;
- Найдите политику Log on as a service (Вход в качестве службы);
- Как вы видите, в политике входа как службы отсутствует NT SERVICEALL SERVICES. Попробуем ее добавить -> Add User or Group -> NT SERVICEALL SERVICES. Появляется ошибка: система не может найти эту служебную учетную запись;

Как же добавить в локальную политику сервисную учетную запись? Единственный вменяемый способ, который мне удалось найти, чтобы предоставить права “Log on as a service” для NT SERVICEALL SERVICES – воспользоваться утилитой ntrights.exe (из старого пакета Windows Server 2003 Resource Kit).
Скачайте и установите Server 2003 Resource Kit (rktools.exe), затем предоставьте право SeServiceLogonRight командами:
cd “C:Program Files (x86)Windows Resource KitsTools”
ntrights.exe +r SeServiceLogonRight -u “NT SERVICEALL SERVICES”
ntrights.exe +r SeServiceLogonRight -u “NT SERVICEMSSQL$MICROSOFT##WID”
Проверяем, что NT SERVICEALL SERVICES появилось в разрешениях “Log on as a service” в консоли редактора политики.
Перезагрузите свой Windows Server и попробуйте установить/удалить роль. Все должно пройти без ошибки.
Install or Uninstall Roles, Role Services, or Features
Applies To: Windows Server (Semi-Annual Channel), Windows Server 2016, Windows Server 2012 R2, Windows Server 2012
In Windows Server, the Server Manager console and Windows PowerShell cmdlets for Server Manager allow installation of roles and features to local or remote servers, or offline virtual hard disks (VHDs). You can install multiple roles and features on a single remote server or offline VHD in a single add Roles and Features Wizard or Windows PowerShell session.
Server Manager cannot be used to manage a newer release of the Windows Server operating system. Server Manager running on Windows Server 2012 R2 or Windows 8.1 cannot be used to install roles, role services, and features on servers that are running Windows Server 2016.
You must be logged on to a server as an administrator to install or uninstall roles, role services, and features. If you are logged on to the local computer with an account that does not have administrator rights on your target server, right-click the target server in the Servers tile, and then click Manage As to provide an account that has administrator rights. The server on which you want to mount an offline VHD must be added to Server Manager, and you must have Administrator rights on that server.
For more information about what roles, role services, and features are, see Roles, Role Services, and Features.
This topic contains the following sections.
Install roles, role services, and features by using the add Roles and Features Wizard
In a single session in the add Roles and Features Wizard, you can install roles, role services, and features on the local server, a remote server that has been added to Server Manager, or an offline VHD. For more information about how to add a server to Server Manager to manage, see Add Servers to Server Manager.
If you are running Server Manager on Windows Server 2016 or Windows 10, you can use the add Roles and Features Wizard to install roles and features only on servers and offline VHDs that are running Windows Server 2016.
To install roles and features by using the add Roles and Features Wizard
If Server Manager is already open, go on to the next step. If Server Manager is not already open, open it by doing one of the following.
On the Windows desktop, start Server Manager by clicking Server Manager in the Windows taskbar.
On the Windows start screen, click the Server Manager tile.
On the Manage menu, click add Roles and Features.
On the Before you begin page, verify that your destination server and network environment are prepared for the role and feature you want to install. Click Next.
On the Select installation type page, select Role-based or feature-based installation to install all parts of roles or features on a single server, or Remote Desktop Services installation to install either a virtual machine-based desktop infrastructure or a session-based desktop infrastructure for Remote Desktop Services. The Remote Desktop Services installation option distributes logical parts of the Remote Desktop Services role across different servers as needed by administrators. Click Next.
On the Select destination server page, select a server from the server pool, or select an offline VHD. To select an offline VHD as your destination server, first select the server on which to mount the VHD, and then select the VHD file. For information about how to add servers to your server pool, see Add Servers to Server Manager. After you have selected the destination server, click Next.
To install roles and features on offline VHDs, target VHDs must meet the following requirements.
VHDs must be running the release of Windows Server that matches the version of Server Manager you are running. See the note at the start of Install roles, role services, and features by using the add Roles and Features Wizard.
VHDs cannot have more than one system volume or partition.
The network shared folder in which the VHD file is stored must grant the following access rights to the computer (or local system) account of server that you have selected to mount the VHD. User-only account access is not sufficient. The share can grant Read and Write permissions to the Everyone group to allow access to the VHD, but for security reasons, this is not recommended.
- Read/Write access on the File Sharing dialog box.
- Full Control access on the Security tab, file or folder Properties dialog box.
Select roles, select role services for the role if applicable, and then click Next to select features.
As you proceed, the add Roles and Features Wizard automatically informs you if conflicts were found on the destination server that can prevent selected roles or features from installation or normal operation. You are also prompted to add any roles, role services, or features that are required by the roles or features that you have selected.
Additionally, if you plan to manage the role remotely, either from another server, or from a Windows client-based computer that is running Remote Server Administration Tools, you can opt not to install management tools and snap-ins for roles on the destination server. By default, in the add Roles and Features Wizard, management tools are selected for installation.
On the Confirm installation selections page, review your role, feature, and server selections. If you are ready to install, click Install.
You can also export your selections to an XML-based configuration file that you can use for unattended installations with Windows PowerShell. To export the configuration you specified in this add Roles and Features Wizard session, click Export configuration settings, and then save the XML file to a convenient location.
The Specify an alternate source path command on the Confirm installation selections page lets you specify an alternate source path for the files that are required to install roles and features on the selected server. In Windows Server 2012 and later releases of Windows Server, Features on Demand lets you reduce the amount of disk space used by the operating system, by removing role and feature files from servers that are exclusively managed remotely. If you have removed role and feature files from a server by using the Uninstall-WindowsFeature -remove cmdlet, you can install roles and features on the server in the future by specifying an alternate source path, or a share on which required role and feature files are stored. The source path or file share must grant Read permissions either to the Everyone group (not recommended for security reasons), or to the computer account (DOMAINSERverNAME$) of the destination server; granting user account access is not sufficient. For more information about Features on Demand, see Windows Server Installation Options.
You can specify a WIM file as an alternate feature file source when you are installing roles, role services, and features on a running, physical server. The source path for a WIM file should be in the following format, with WIM as a prefix, and the index in which the feature files are located as a suffix: WIM:e:sourcesinstall.wim:4. However, you cannot use a WIM file directly as a source for installing roles, role services, and features to an offline VHD; you must either mount the offline VHD and point to its mount path for source files, or you must point to a folder that contains a copy of the contents of the WIM file.
After you click Install, the Installation Progress page displays installation progress, results, and messages such as warnings, failures, or post-installation configuration steps that are required for the roles or features that you installed. In Windows Server 2012 and later releases of Windows Server, you can close the add Roles and Features Wizard while installation is still in progress, and view installation results or other messages in the Notifications area at the top of the Server Manager console. Click the Notifications flag icon to see more details about installations or other tasks that you are performing in Server Manager.
Install roles, role services, and features by using Windows PowerShell cmdlets
The Server Manager deployment cmdlets for Windows PowerShell function similarly to the GUI-based add Roles and Features Wizard and remove Roles and Features Wizard, with an IMPORTANT difference. In Windows PowerShell, unlike in the add Roles and Features Wizard, management tools and snap-ins for a role are not included by default. To include management tools as part of a role installation, add the IncludeManagementTools parameter to the cmdlet. If you are installing roles and features on a server that is running the Server Core installation option of Windows Server 2012 or later releases, you can add a role’s management tools to an installation, but GUI-based management tools and snap-ins cannot be installed on servers that are running the Server Core installation option of Windows Server. Only command-line and Windows PowerShell management tools can be installed on the Server Core installation option.
To install roles and features by using the Install-WindowsFeature cmdlet
Do one of the following to open a Windows PowerShell session with elevated user rights.
If you are installing roles and features on a remote server, you do not need to run Windows PowerShell with elevated user rights.
On the Windows desktop, right-click Windows PowerShell on the taskbar, and then click Run as Administrator.
On the Windows Start screen, right-click the tile for Windows PowerShell, and then on the app bar, click Run as Administrator.
Type Get-WindowsFeature and then press Enter to view a list of available and installed roles and features on the local server. If the local computer is not a server, or if you want information about a remote server, run Get-WindowsFeature -computerName , in which computer_name represents the name of a remote computer that is running Windows Server 2016. The results of the cmdlet contain the command names of roles and features that you add to your cmdlet in step 4.
In Windows PowerShell 3.0 and later releases of Windows PowerShell, there is no need to import the Server Manager cmdlet module into the Windows PowerShell session before running cmdlets that are part of the module. A module is automatically imported the first time you run a cmdlet that is part of the module. Also, neither Windows PowerShell cmdlets nor the feature names used with the cmdlets are case-sensitive.
type Get-help Install-WindowsFeature, and then press Enter to view the syntax and accepted parameters for the Install-WindowsFeature cmdlet.
type the following, and then press Enter, where feature_name represents the command name of a role or feature that you want to install (obtained in step 2), and computer_name represents a remote computer on which you want to install roles and features. Separate multiple values for feature_name by using commas. The Restart parameter automatically restarts the destination server if required by the role or feature installation.
To install roles and features on an offline VHD, add both the computerName parameter and the VHD parameter. If you do not add the computerName parameter, the cmdlet assumes that the local computer is mounted to access the VHD. The computerName parameter contains the name of the server on which to mount the VHD, and the VHD parameter contains the path to the VHD file on the specified server.
You must add the computerName parameter if you are running the cmdlet from a computer that is running a Windows client operating system.
To install roles and features on offline VHDs, target VHDs must meet the following requirements.
VHDs must be running the release of Windows Server that matches the version of Server Manager you are running. See the note at the start of Install roles, role services, and features by using the add Roles and Features Wizard.
VHDs cannot have more than one system volume or partition.
The network shared folder in which the VHD file is stored must grant the following access rights to the computer (or local system) account of server that you have selected to mount the VHD. User-only account access is not sufficient. The share can grant Read and Write permissions to the Everyone group to allow access to the VHD, but for security reasons, this is not recommended.
- Read/Write access on the File Sharing dialog box.
- Full Control access on the Security tab, file or folder Properties dialog box.
Example: The following cmdlet installs the active directory Domain Services role and the Group Policy Management feature on a remote server, ContosoDC1. Management tools and snap-ins are added by using the IncludeManagementTools parameter, and the destination server is to be restarted automatically, if installation requires that the servers be restarted.
When installation is finished, verify installation by opening the All Servers page in Server Manager, selecting a server on which you installed roles and features, and viewing the Roles and Features tile on the page for the selected server. You can also run the Get-WindowsFeature cmdlet targeted at the selected server (Get-WindowsFeature -computerName ) to view a list of roles and features that are installed on the server.
Remove roles, role services, and features by using the remove Roles and Features Wizard
You must be logged on to a server as an administrator to uninstall roles, role services, and features. If you are logged on to the local computer with an account that does not have administrator rights on your uninstallation target server, right-click the target server in the Servers tile, and then click Manage As to provide an account that has administrator rights. The server on which you want to mount an offline VHD must be added to Server Manager, and you must have Administrator rights on that server.
To remove roles and features by using the remove Roles and Features Wizard
If Server Manager is already open, go on to the next step. If Server Manager is not already open, open it by doing one of the following.
On the Windows desktop, start Server Manager by clicking Server Manager in the Windows taskbar.
On the Windows Start screen, click the Server Manager tile.
On the Manage menu, click Remove Roles and Features.
On the Before you begin page, verify that you have prepared for removing roles or features from a server. Click Next.
On the Select Destination Server page, select a server from the server pool, or select an offline VHD. To select an offline VHD, first select the server on which to mount the VHD, and then select the VHD file.
The network shared folder in which the VHD file is stored must grant the following access rights to the computer (or local system) account of server that you have selected to mount the VHD. User-only account access is not sufficient. The share can grant Read and Write permissions to the Everyone group to allow access to the VHD, but for security reasons, this is not recommended.
- Read/Write access on the File Sharing dialog box.
- Full Control access on the Security tab , file or folder Properties dialog box.
For information about how to add servers to your server pool, see add Servers to Server Manager. After you have selected the destination server, click Next.
You can use the remove Roles and Features Wizard to remove roles and features from servers that are running the same release of Windows Server that supports the version of Server Manager that you are using. You cannot remove roles, role services, or features from servers that are running Windows Server 2016, if you are running Server Manager on Windows Server 2012 R2, Windows Server 2012, or Windows 8. You cannot use the remove Roles and Features Wizard to remove roles and features from servers that are running Windows Server 2008 or Windows Server 2008 R2.
Select roles, select role services for the role if applicable, and then click Next to select features.
As you proceed, the remove Roles and Features Wizard automatically prompts you to remove any roles, role services, or features that cannot run without the roles or features that you are removing.
additionally, you can opt to remove management tools and snap-ins for roles on the destination server. By default, in the remove Roles and Features Wizard, management tools are selected for removal. You can leave management tools and snap-ins if you plan to use the selected server to manage the role on other remote servers.
On the Confirm removal selections page, review your role, feature, and server selections. If you are ready to remove the roles or features, click remove.
After you click remove, the removal progress page displays removal progress, results, and messages such as warnings, failures, or post-removal configuration steps that are required, such as restarting the destination server. In Windows Server 2012 and later releases of Windows Server, you can close the remove Roles and Features Wizard while removal is still in progress, and view removal results or other messages in the Notifications area at the top of the Server Manager console. Click the Notifications flag to see more details about removals or other tasks that you are performing in Server Manager.
Remove roles, role services, and features by using Windows PowerShell cmdlets
The Server Manager deployment cmdlets for Windows PowerShell function similarly to the GUI-based remove Roles and Features Wizard, with an IMPORTANT difference. In Windows PowerShell, unlike in the remove Roles and Features Wizard, management tools and snap-ins for a role are not removed by default. To remove management tools as part of a role removal, add the IncludeManagementTools parameter to the cmdlet. If you are uninstalling roles and features from a server that is running the Server Core installation option of Windows Server 2012 or a later release of Windows Server, this parameter removes command-line and Windows PowerShell management tools for the specified roles and features.
To remove roles and features by using the Uninstall-WindowsFeature cmdlet
Do one of the following to open a Windows PowerShell session with elevated user rights.
If you are uninstalling roles and features from a remote server, you do not need to run Windows PowerShell with elevated user rights.
On the Windows desktop, right-click Windows PowerShell on the taskbar, and then click Run as Administrator.
On the Windows start screen, right-click the Windows PowerShell tile, and then on the app bar, click Run as Administrator.
Type Get-WindowsFeature and then press Enter to view a list of available and installed roles and features on the local server. If the local computer is not a server, or if you want information about a remote server, run Get-WindowsFeature -computerName , in which computer_name represents the name of a remote computer that is running Windows Server 2016. The results of the cmdlet contain the command names of roles and features that you add to your cmdlet in step 4.
In Windows PowerShell 3.0 and later releases of Windows PowerShell, there is no need to import the Server Manager cmdlet module into the Windows PowerShell session before running cmdlets that are part of the module. A module is automatically imported the first time you run a cmdlet that is part of the module. Also, neither Windows PowerShell cmdlets nor the feature names used with the cmdlets are case-sensitive.
type Get-help Uninstall-WindowsFeature, and then press Enter to view the syntax and accepted parameters for the Uninstall-WindowsFeature cmdlet.
Type the following, and then press Enter, where feature_name represents the command name of a role or feature that you want to remove (obtained in step 2), and computer_name represents a remote computer from which you want to remove roles and features. Separate multiple values for feature_name by using commas. The Restart parameter automatically restarts destination servers if required by the role or feature removal.
To remove roles and features from an offline VHD, add both the computerName parameter and the VHD parameter. If you do not add the computerName parameter, the cmdlet assumes that the local computer is mounted to access the VHD. The computerName parameter contains the name of the server on which to mount the VHD, and the VHD parameter contains the path to the VHD file on the specified server.
You must add the computerName parameter if you are running the cmdlet from a computer that is running a Windows client operating system.
The network shared folder in which the VHD file is stored must grant the following access rights to the computer (or local system) account of server that you have selected to mount the VHD. User-only account access is not sufficient. The share can grant Read and Write permissions to the Everyone group to allow access to the VHD, but for security reasons, this is not recommended.
- Read/Write access on the File Sharing dialog box.
- Full Control access on the Security tab, file or folder Properties dialog box.
Example: The following cmdlet removes the active directory Domain Services role and the Group Policy Management feature from a remote server, ContosoDC1. Management tools and snap-ins are also removed, and the destination server is to be restarted automatically, if removal requires that the servers be restarted.
When removal is finished, verify that the roles and features are removed by opening the All Servers page in Server Manager, selecting the server from which you removed roles and features, and viewing the Roles and Features tile on the page for the selected server. You can also run the Get-WindowsFeature cmdlet targeted at the selected server (Get-WindowsFeature -computerName ) to view a list of roles and features that are installed on the server.
Install roles and features on multiple servers by running a Windows PowerShell script
Although you cannot use the add Roles and Features Wizard to install roles, role services, and features on more than one target server in a single wizard session, you can use a Windows PowerShell script to install roles, role services, and features on multiple target servers that you are managing by using Server Manager. The script that you use to perform batch deployment, as this process is called, points to an XML configuration file that you can create easily by using the add Roles and Features Wizard, and clicking Export configuration settings after advancing through the wizard to the Confirm installation selections page of the add Roles and Features Wizard.
All target servers that are specified in your script must be running the release of Windows Server that matches the version of Server Manager you are running on the local computer. For example, if you are running Server Manager on Windows 10, you can install roles, role services, and features on servers that are running Windows Server 2016. If GUI-based management tools are added to the installation, the installation process automatically converts target servers that are running the Server Core installation option of Windows Server to the full installation option (server with a full GUI, also known as running Server Graphical Shell).
The script provided in this section is an example of how batch deployment can be performed by using the Install-WindowsFeature cmdlet and a Windows PowerShell script. There are other possible scripts and methods of performing batch deployment to multiple servers. To search for or provide other scripts for deploying roles and features, search the Script Center Repository.
To install roles and features on multiple servers
If you have not already done so, create an XML configuration file that contains the roles, role services, and features that you want installed on multiple servers. You can create this configuration file by running the add Roles and Features Wizard, selecting roles, role services, and features that you want, and clicking Export configuration settings after advancing through the wizard to the Confirm installation selections page. Save the configuration file to a convenient location. You do not need to click Install or complete the wizard if you are running it only to create a configuration file.
Do one of the following to open a Windows PowerShell session with elevated user rights.
On the Windows desktop, right-click Windows PowerShell on the taskbar, and then click Run as Administrator.
On the Windows start screen, right-click the Windows PowerShell tile, and then on the app bar, click Run as Administrator.
Copy and paste the following script into your Windows PowerShell session.
Target servers are automatically restarted if required by the roles and features that you select.
Run the function by doing the following.
Create a variable in which to store the names of your target computers, separated by commas. In the following example, the variable $ServerNames stores the names of target servers Contoso_01 and Contoso_02. Press Enter.
To run the function, type the following, and then press Enter, where $ServerNames is an example of the variable that you created in the preceding step, and C:UsersSampleuserDesktopDeploymentConfigTemplate.xml is an example of a path to the configuration file that you created in step 1.
Invoke-WindowsFeatureBatchDeployment -computerNames $ServerNames -ConfigurationFilepath C:UsersSampleuserDesktopDeploymentConfigTemplate.xml
When installation is finished, verify installation by opening the All Servers page in Server Manager, selecting a server on which you installed roles and features, and viewing the Roles and Features tile on the page for the selected server. You can also run the Get-WindowsFeature cmdlet targeted at a specific server ( Get-WindowsFeature -computerName ) to view a list of roles and features that are installed on the server.
Install .NET Framework 3.5 and other features on-demand
starting with Windows Server 2012 and Windows 8, the feature files for .NET Framework 3.5 (which includes .NET Framework 2.0 and .NET Framework 3.0) are not available on the local computer by default. The files have been removed. Files for features that have been removed in a Features on Demand configuration, along with feature files for .NET Framework 3.5, are available through Windows Update. By default, if feature files are not available on the destination server that is running Windows Server 2012 or later releases, the installation process searches for the missing files by connecting to Windows Update. You can override the default behavior by configuring a Group Policy setting or specifying an alternate source path during installation, whether you are installing by using the add Roles and Features Wizard GUI or a command line.
You can install .NET Framework 3.5 by doing one of the following.
Use To install .NET Framework 3.5 by running the Install-WindowsFeature cmdlet to add the Source parameter, and specify a source from which to get .NET Framework 3.5 feature files. If you do not add the Source parameter, the installation process first determines if a path to feature files has been specified by Group Policy settings, and if no such path is found, searches for missing feature files by using Windows Update.
Use To install .NET Framework 3.5 by using the add Roles and Features Wizard to specify an alternate source file location on the Confirm installation options page of the add Roles and Features Wizard.
Use To install .NET Framework 3.5 by using DISM to get files from Windows Update by default, or by specifying a source path to installation media.
Configure alternate sources for feature files in Group Policy for .NET Framework 3.5 or other features, if feature files are not found on the local computer.
When you are installing feature files from a remote source, the source path or file share must grant Read permissions either to the Everyone group (not recommended for security reasons), or to the computer (local system) account of the destination server; granting user account access is not sufficient.
Servers that are in workgroups cannot access external file shares, even if the computer account for the workgroup server has Read permissions on the external share. Alternate source locations that work for workgroup servers include installation media, Windows Update, and VHD or WIM files that are stored on the local workgroup server.
You can specify a WIM file as an alternate feature file source when you are installing roles, role services, and features on a running, physical server. The source path for a WIM file should be in the following format, with WIM as a prefix, and the index in which the feature files are located as a suffix: WIM:e:sourcesinstall.wim:4. However, you cannot use a WIM file directly as a source for installing roles, role services, and features to an offline VHD; you must either mount the offline VHD and point to its mount path for source files, or you must point to a folder that contains a copy of the contents of the WIM file.
To install .NET Framework 3.5 by running the Install-WindowsFeature cmdlet
Do one of the following to open a Windows PowerShell session with elevated user rights.
if you are installing roles and features from a remote server, you do not need to run Windows PowerShell with elevated user rights.
On the Windows desktop, right-click Windows PowerShell on the taskbar, and then click Run as Administrator.
On the Windows start screen, right-click the Windows PowerShell tile, and then on the app bar, click Run as Administrator.
On a server that is running the Server Core installation option of Windows Server 2012 R2 or Windows Server 2012 , type PowerShell into a command prompt, and then press Enter.
type the following command, and then press Enter. In the following example, the source files are located in a side-by-side store (abbreviated to as SxS) in installation media on drive D.
If you want the command to use Windows Update as a source for missing feature files, or if a default source has already been configured by using Group Policy, you do not need to add the Source parameter unless you want to specify a different source.
To install .NET Framework 3.5 by using the add Roles and Features Wizard
On the Manage menu in Server Manager, click add Roles and Features.
Select a destination server that is running Windows Server 2016.
On the select features page of the add Roles and Features Wizard, select .NET Framework 3.5.
If the local computer is allowed to do so by Group Policy settings, the installation process attempts to get missing feature files by using Windows Update. Click Install; you do not need to go on to the next step.
if Group Policy settings do not allow this, or you want to use another source for the .NET Framework 3.5 feature files, on the Confirm installation selections page of the wizard, click Specify an alternate source path.
Provide a path to a side-by-side store (referred to as SxS) in installation media, or to a WIM file. In the following example, installation media is located on drive D.
D:SourcesSxS
To specify a WIM file, add a WIM: prefix, and add the index of the image to use in the WIM file as a suffix, as shown in the following example.
WIM:\server_nameshareinstall.wim:3
Click OK, and then click Install.
To install .NET Framework 3.5 by using DISM
Do one of the following to open a Windows PowerShell session with elevated user rights.
if you are installing roles and features from a remote server, you do not need to run Windows PowerShell with elevated user rights.
On the Windows desktop, right-click Windows PowerShell on the taskbar, and then click Run as Administrator.
On the Windows Start screen, right-click the Windows PowerShell tile, and then on the app bar, click Run as Administrator.
On a server that is running the Server Core installation option, type PowerShell into a command prompt, and then press Enter.
Run one of the following DISM commands.
if the computer has access to Windows Update, or a default source file location has already been configured in Group Policy, run the following command.
if the computer has access to installation media, run a command similar to the following. In the following example, the operating system installation media is located on drive D. The LimitAccess parameter prevents the command from attempting to contact Windows Update or a server that is running WSUS.
The DISM command is case-sensitive.
Configure alternate sources for feature files in Group Policy
The Group Policy setting described in this section specifies authorized source locations for .NET Framework 3.5 files, and other feature files that have been removed as part of a Features on Demand configuration. The policy setting Specify settings for optional component installation and component repair is located in the computer ConfigurationAdministrative TemplatesSystem folder in the Group Policy Management Console or Local Group Policy editor.
You must be a member of the Administrators group to change Group Policy settings on the local computer. If Group Policy settings for the computer you want to manage are controlled at the domain level, you must be a member of the Domain Administrators group to change Group Policy settings.
To configure a default alternate source path in Group Policy
In Local Group Policy editor or Group Policy Management Console, open the following policy setting.
computer ConfigurationAdministrative TemplatesSystemSpecify settings for optional component installation and component repair
Select Enabled to enable the policy setting, if it is not already enabled.
In the Alternate source file path text box in the Options area, specify a fully qualified path to a shared folder or a WIM file. To specify a WIM file as an alternate source file location, add the prefix WIM: to the path, and add the index of the image to use in the WIM file as a suffix. The following are examples of values that you can specify.
path to a shared folder: \server_namesharefolder_name
path to a WIM file, in which 3 represents the index of the image in which the feature files are found: WIM:\server_nameshareinstall.wim:3
if you do not want computers that are controlled by this policy setting to search for missing feature files in Windows Update, select Never attempt to download payload from Windows Update.
If the computers that are controlled by this policy setting typically receive updates through WSUS, but you prefer to go through Windows Update and not WSUS to find missing feature files, select Contact Windows Update directly to download repair content instead of Windows Server Update Services (WSUS).
Click OK when you are finished changing this policy setting, and then close the Group Policy editor.
- Remove From My Forums
-
Вопрос
-
I am running Windows 2012 R2 standard in a virtual machine. When I run the server manager I get 2 errors:
1. Cannot get role and feature data
2. Windows Modules Installer stopped (I will ask about this in a separate question so that we can stay on point)
Why am I getting error 1 and how can I resolve it?
Thanks
Sam
Ответы
-
Good news, at least for me is that I now have WSUS running. The issue was that all of the updates were not installed even though Windows Update said they were. I found out by doing the reboot after the updates on the system console that 1 or more updates
failed. The problem was a GPO issue which when resolved allowed the successful installation of WSUSCase closed
-
Помечено в качестве ответа
3 июня 2015 г. 16:31
-
Помечено в качестве ответа
Uptimetech Support Stories

The Energy of Help Emotion: How Emotional Help Can Rework Lives
Introduction Feelings play a major function in our lives, influencing our ideas, behaviors, and general well-being. Whereas adverse feelings can have…
![]()
Zixo Designer
Sep 17, 2023
7 min read

The Significance of Superior Trauma Life Help: Saving Lives in Essential Conditions
When a person experiences a life-threatening harm or trauma, each second counts. In these crucial conditions, the appliance of superior trauma…
![]()
Zixo Designer
Sep 14, 2023
6 min read

Cannon Help: Enhancing English Language Expertise
Cannon Help in English Introduction English is a world language spoken by hundreds of thousands of individuals world wide. It’s the…
![]()
Zixo Designer
Sep 11, 2023
3 min read

Technical Assist: Making certain Easy Operations and Buyer Satisfaction
Technical Assist Introduction Technical assist performs an important function in immediately’s technology-driven world. It supplies help and steerage to customers going…
![]()
Zixo Designer
Sep 8, 2023
11 min read

Direct TV Technical Assist
Direct TV Technical Assist The Significance of Direct TV Technical Assist In terms of having fun with seamless leisure at dwelling,…
![]()
Zixo Designer
Sep 5, 2023
7 min read

Understanding the Significance of IT 247 Assist
IT 247 Assist Introduction In at the moment’s fast-paced digital world, companies closely depend on expertise to streamline their processes and…
![]()
Zixo Designer
Sep 2, 2023
4 min read

How you can Get an Emotional Help Pet: A Complete Information
Emotional help animals (ESAs) have gained important recognition and recognition lately as a method of offering consolation, companionship, and therapeutic advantages…
![]()
Zixo Designer
Aug 30, 2023
8 min read

QuickBooks Help: Making Monetary Administration a Breeze
Introduction Managing funds is a vital side of working a profitable enterprise. It includes numerous duties akin to bookkeeping, invoicing, payroll…
![]()
Zixo Designer
Aug 27, 2023
5 min read

Netgear Help: Your Final Information to Getting Help
Netgear Help Introduction Netgear, a world networking firm, is thought for its dependable and revolutionary merchandise. Nevertheless, even the very best…
![]()
Zixo Designer
Aug 24, 2023
3 min read

Fb Help Cellphone Numbers
Fb Help Cellphone Numbers Fb has grow to be an integral a part of our lives, permitting us to attach with…
![]()
Zixo Designer
Aug 21, 2023
3 min read

The Significance of Ark Baby Help
Baby help is a vital facet of making certain the well-being and growth of youngsters whose dad and mom have separated…
![]()
Zixo Designer
Aug 18, 2023
5 min read

Help Teams Close to Me: Discovering Group and Therapeutic
Help teams have emerged as a robust software for people dealing with numerous challenges in life. Whether or not it is…
![]()
Zixo Designer
Aug 15, 2023
8 min read