Утилита RDCMan (Remote Desktop Connection Manager) — удобный менеджер RDP соединений для системного администратора Windows, позволяющая управлять в одном окне большим количеством RDP подключений, создавать древовидные структуры с удаленными Windows серверами и рабочими станциями (с которыми вы постоянно работаете или управляете). В RDCMan вы можете использовать различные параметры RDP подключения для отдельных серверов и групп и сохранять учетные данные администратора (пользователя) для автоматической авторизации на RDP серверах, что избавляет от рутины и здорово экономит время.
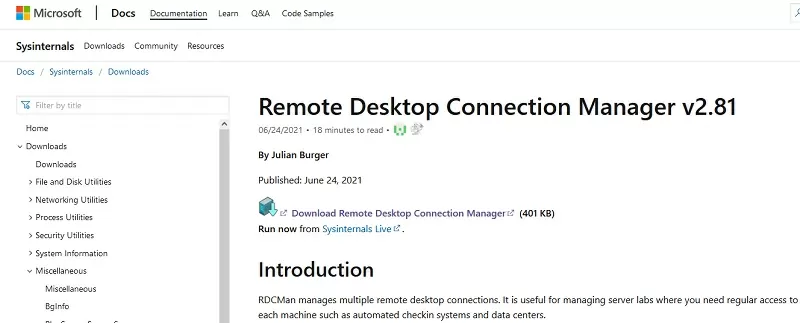
Последняя доступная версия RDCMan 2.7 была выпущена в 2014 году и тех пор ее развитие остановилось. Кроме того, в этой версии был выявлена критическая уязвимость и Microsoft решила полностью удалить страницу загрузки RDCMan в 2020 году. Однако в июне 2021 года Марк Русинович заявил, что утилита RDCMan переходит в состав инструментов Sysinternals и продолжит развитие. Новая версия Remote Desktop Connection Manager 2.81, в которой были исправлены уязвимости была выпущена в 24 июня 2021 года.
Содержание:
- Установка RDCMan (Remote Desktop Connection Manager) в Windows
- Настройка RDCMan, создание групп RDP серверов
- Настройка параметров RDP подключений в RDCMan
- Импорт серверов в RDCMan
- RDCMan: Доступ к консоли виртуальных машин Hyper-V
Установка RDCMan (Remote Desktop Connection Manager) в Windows
Утилита RDCman является бесплатной и доступна к загрузке на сайте Microsoft. Актуальная версия 2.81 доступна по ссылке https://docs.microsoft.com/en-us/sysinternals/downloads/rdcman (размер 0,4 MБ).
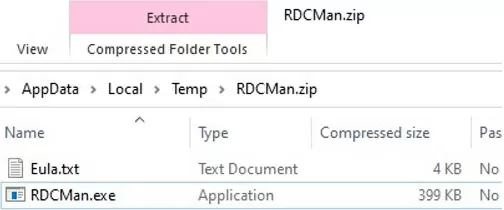
Новая версия RDCMan 2.81 поставляется в виде portable приложения RDCMan.exe и не требует установки (в отличии от RDCMan 2.71, которая представляет собой установочный MSI файл. Просто скачайте архив RDCMan.zip и распакуйте его в нужный каталог.
Remote Desktop Connection Manager поддерживаются все современные версии Windows, вплоть до Windows 10 (Windows 11) и Windows Server 2019. Поддерживаются также Windows XP и Windows Server 2003, но на этих ОС нужно предварительно установить клиент RDP версии 6 версии и выше.
Настройка RDCMan, создание групп RDP серверов
Запустите RDCMan.exe. Перед вами откротся пустая консоль. Сначала нужно создать файл конфигурации, в котором будут хранится ваши настройки, нажав Ctrl+N или через меню “File” – “New”. Задайте имя файла *.rdg (по сути это текстовый XML файл, которые можно отредактировать вручную). В одном файле конфигурации можно сохранить любое количество RDP подключений к вашим удаленным серверам. Утилита позволяет структурировать RDP подключения по удобному вам признаку: пользуйтесь этим и создавайте группы.
Например, вы можете создать группу с серверами 1C и группу с контроллерами доменов. Вы можете сгруппировать удаленные сервера по местоположению, ролям или по заказчику.
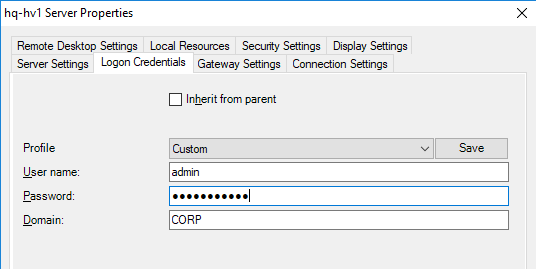
Вы можете сохранить учетные данные RDP пользователя для подключения к серверам в этой группе. В свойствах группы найдите вкладку “Logon Credentials” и укажите учетные данные. Все серверы в этой группе наследуют настройки группы. Чтобы изменить какой-либо параметр сервера, отличный от заданных настроек группы, снимите галочку в чек-боксе “Inherit from parent” в его свойствах и задайте персональные настройки.
Не забудьте нажать “Save”.
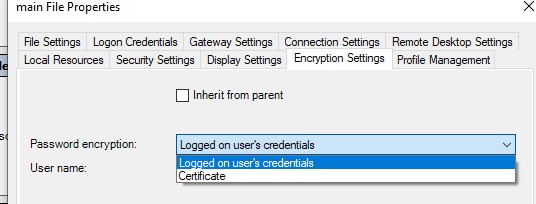
Внимание! Пароли для RDP подключения в RDCMan хранятся не в Windows Credential Manager, а прямо в RDG файле в зашифрованном виде (не зависит от доменных политик, запрещающих сохранять пароли для RDP подключений). Для широфвания используются контекст безопасности текущего пользователя (logged on user’s credentials) или можно использовать сертификат X509
Для дополнительной безопасности желательно зашифровать файл конфигурации RDCMan при помощи, например BitLocker или TrueCrypt).
Настройка параметров RDP подключений в RDCMan
Теперь перейдите в настройки параметров RDP на вкладке “Connection Settings”. По умолчанию для RDP подключения используется стандартный порт 3389. Вы можете изменить порт, если ваш RDP сервер слушает на нестандартном порту. Снимаем галку с чек-бокса “Inherit from parent” и измените номер порта. Поставьте галку в чек-боксе “Connect to console”, это позволит подключаться к на консоль сервера или рабочей станции. Режим консоли имитирует прямое подключение к локальному монитору серверу. Он используется для подключения к серверу со службой RDS без использования клиентской СAL лицензии или в ситуациях, когда сервер лицензирования не доступен или не задан режим лицензирования.
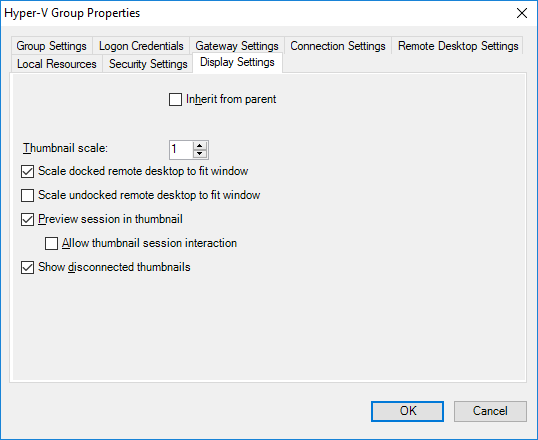
Настройте разрешение экрана, которое будет использоваться в удаленной RDP сессии на вкладке “Remote Desktop Settings” (рекомендую выставить “Full screen”) и локальные ресурсы в “Local Resources”, которые необходимо перенаправлять при удаленном подключении (например, вы можете пробросить в RDP сессию буфер обмена, локальный принтер, локальные диск ии т.д.). Чтобы у вас не было скроллингов и чтобы rdp окно гарантированно вписалось в ваш монитор, обязательно выставите галку “Scale docked remote desktop to fit window”.
Основной недостаток версии RDCMan 2.81 – она не поддерживает автоматические изменение размера окна RDP сессии. Если вы хотите изменить размер окна RDCMan, вам придется переподключиться ко всем серверам. В этой случае за счет автоматического изменения RDP окна (RDP size auto-fit), ваши подключения будет отображаться корректно.
В группы RDCMan можно добавить хосты (сервера и рабочие станции):
- Server Name – имя хоста или его IP;
- Display Name – имя сервера, отображаемое в консоли RDCMan.
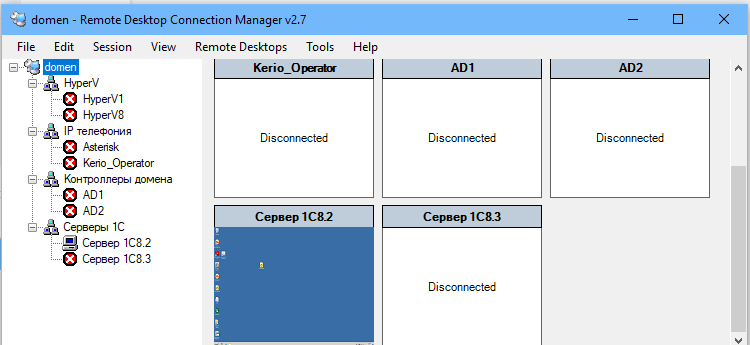
В результате у вас получится вот такая консоль с плитками серверов, которые обновляются в реальном времени.
Теперь при двойном щелчке по серверу будет установлено RDP соединение с использованием сохраненного пароля.
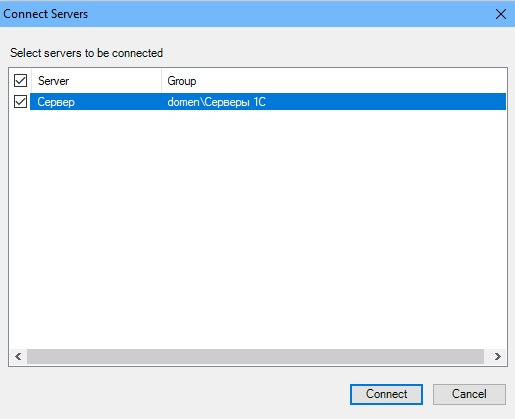
Можно сделать Connect Group — тогда будут открыты RDP консоли ко всем серверам в группе.
С сервером можно выполнять стандартные действия, они все интуитивно понятны.

- Reconnect server – переподключение, если сервер заблокировался;
- Send keys – отправить на сервер стандартные сочетания клавиш;
- Disconnect server – отсоединиться от сервера;
- Log off server – разлогиниться на сервере;
- List sessions – просмотр подключенных к серверу сессий;
- Undock – выносит текущий сервер в отдельное окно;
- Dock – возвращает сервер в консоль.
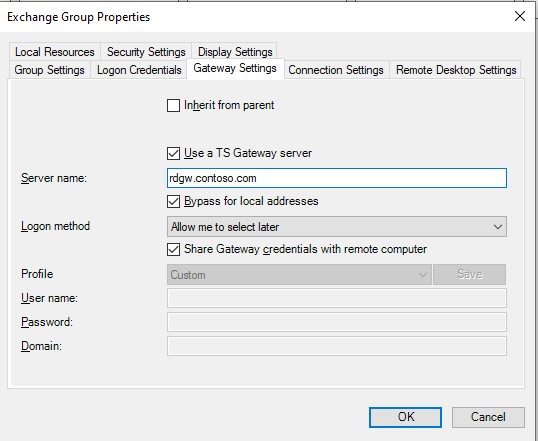
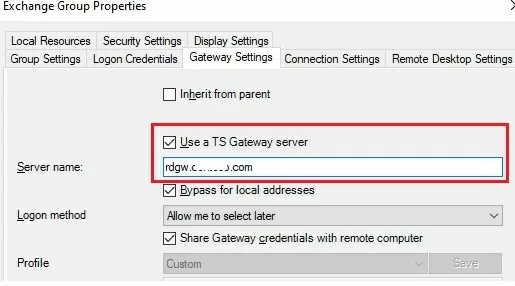
Если к удаленному RDSH хосту можно подключиться через опубликованный сервер с роль RD Gateway, его параметры можно задать на вкладке Gateway Settings.
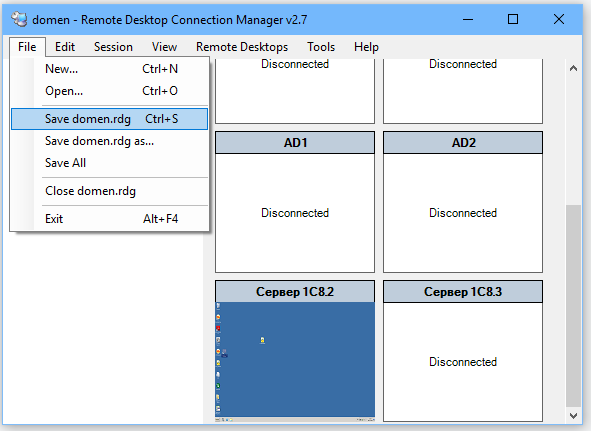
Самое главное – обязательно сохраните конфигурационный файл (File -> Save *.rdg). Иначе при выходе все ваши настройки исчезнут.
Новый формат RDG файлов RDCMan 2.81 не совместим с предыдущими версиями программы.
При следующем запуске RDCMan появится окно, где нужно выбрать сервера и группы, к которым нужно переподключиться.
Импорт серверов в RDCMan
К сожалению, нет возможности импортировать серверы непосредственно из Active Directory. Довольно странно, так как это разработанный Microsoft инструмент.
Но вы можете импортировать серверы из текстового файла или CSV файла. Например, вы можете выгрузить списки компьютеров или серверов из AD с помощью командлета Get-ADComputer:
(Get-ADComputer -Filter {enabled -eq "true" -and OperatingSystem -Like '*Windows Server*' } | select name).name | Out-File -FilePath c:\tools\rdgman\servers.txt
Чтобы импортировать полученный файл в меню “Edit” выберите “Import Servers”. В открывшемся окне укажите путь к файлу со списком серверов и нажмите “Import”.
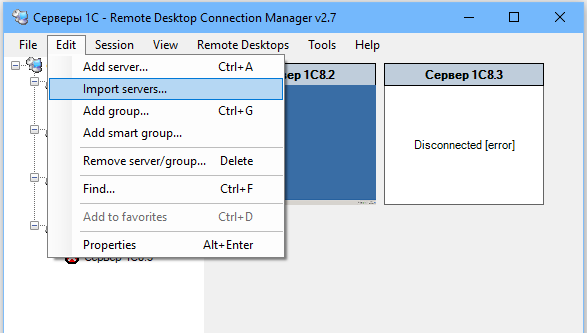
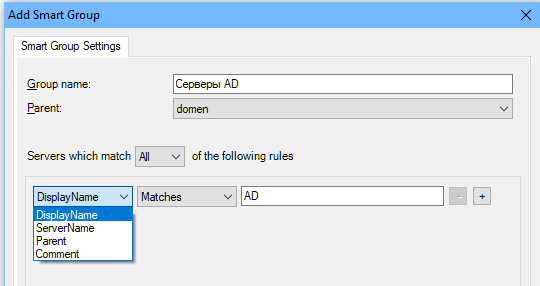
Для того, чтобы разбить импортированный список серверов по группам, используйте опцию “Edit” -> ”Add smart group”. Назовите группу и установите правила, по которым серверы будут помещены в нее (например, общий фрагмент отображаемого имени или IP адреса).

При добавлении сервером можно использовать патттерны:
-
{msk,spb,ekb}
– подставить указанные значения по-очереди -
[1-5]
– подставить все значения из цифрового диапазона
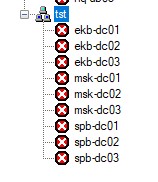
Например, укажите в качестве имени сервера следующую строку:
{msk,spb,ekb}-dc0[1-3]
и в консоль RDCman будет добавлены 9 серверов.
RDCMan: Доступ к консоли виртуальных машин Hyper-V
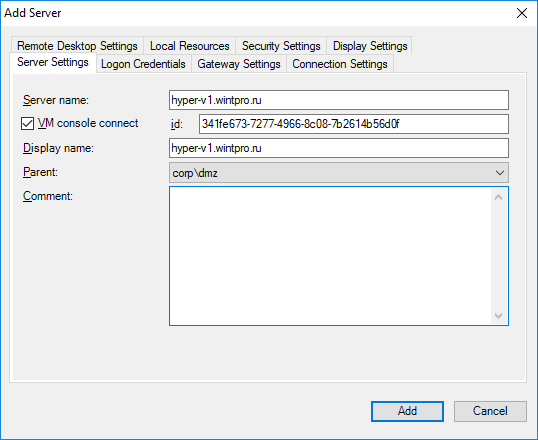
В RDCMan 2.81 вы можете настроить прямое подключения к консолям виртуальных машин, запущенных на Hyper-V хосте (используется режим Enhanced Session Mode). Для этого вам нужно получить идентификатор виртуальной машины на сервере Hyper-V. Используйте команду:
Get-VM -Name your_vmname1 | select ID
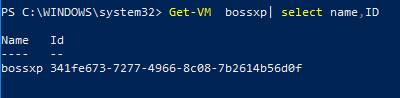
После того, как вы получили идентификатор ВМ, вы можете использовать его при настройке подключения в RDCMan. При добавлении нового сервера в консоли RDCMan укажите имя Hyper-V хоста, поставьте галку “VM console connect” и в поле ID скопируйте полученный идентификатор ВМ. Подключение выполняется под учетной записью с правами администратора Hyper-V, через шину VMBus (т.е. вам не нужен сетевой доступ к IP адресу гостевой ОС – доступ работает через Hyper-V хост по порту 2701).
RDCMan имеет простой пользовательский интерфейс и очень прост в использовании.
Если вам просто нужен менеджер RDP соединений, то это отличный и простой в использовании повседневный инструмент Windows администратора.

Remote Desktop Services, known as Terminal Services in Windows Server 2008 and earlier, is one of the components of Microsoft Windows that allow a user to take control of a remote computer or virtual machine over a network connection. Here are the step-by-step guide for installing Remote Desktop Services Setup on Windows Server. Kindly refer to these related guides: Changed expired RDP password: How to change a password on a Remote Desktop session, how to fix “the logon attempt failed for the remote desktop connection“, and how to Resolve Microsoft RDP Connection Black Screen.
Step 1: Prerequisite Remote Desktop Services Setup on Windows Server
- Users need to be created in AD
- You need a User Access group and
- Computer groups are all created in AD to access this Terminal server.
Kindly stay put! I will be creating two new guides on how to deploy RDS using Quick Start and Standard deployment using Windows Server 2019. Please see this guide on Publish Remote Desktop Web Client: How to install HTML 5 Web Client for Microsoft RDS Server. Below is the core architecture of RDS.

We have to add the Server we wish to configure RDS as shown below. Select the DNS name and search using the FQDN of the VM. Here is a comprehensive guide on “how to install RDS via Quick Start Deployment: Install, Publish, Update and Uninstall Remote Desktop Web Client“

Click on the arrow and click on OK. Now on the Server Manager, navigate to the All Servers tab and click on it. Then it would display the two added servers.
Note: This server must be added with the domain administrator’s right if joined to the domain where special permissions are assigned and not the local administrator’s password.
Since we have all servers necessary for configuring the RDS, now let’s add the Remote Desktop Services role and features to the Terminal server itself.
You may be interested in these guides: How to change a password on a Remote Desktop session, How to Activate and Press Ctrl+Alt+Del in Anydesk for Remote Access Connection to Windows system, and how to Deploy MVC Application to AWS EC2 Using RDP Connection and Web Deploy.
Step 2: Installing the Remote Desktop Services Roles on the Test-RDPServer
Click on Manage,
Select add Roles and Features wizard,
The installation type is Remote Desktop Services Installation.

The deployment type chosen is a standard deployment

Deployment Scenario is a Session-based desktop deployment

Below are the roles services tat will be installed

The RD connection Broker, select the Test-RDP Server VM and click on next

For RD Web Access select the added server in step 1 which is the test-VM from the server pool.
Note: By selecting this option, the web access role services are being installed to the test-VM server (which will act as our RD gateway)

For the RD Session Host, select the RDP from the Pool of servers

In the confirmation option, select restart the destination server automatically if required, or else you can’t proceed.

Note: The server restarts afterward and continues with the installation and if completed successfully it displays success.
From the Server Manager, open Remote Desktop Services, and Test-RDP VM

Part 3: Here we currently have the RD Licensing option missing
Add the licensing Server as the Terminal Server itself.

Click on next and select add and after it succeeds, click on close.

Now install RD Gateway server, this would be added server in step 1. This is the test-VM

Click on next and then Install the SSL certificates. This is needed to encrypt the communication between the RD Gateway server and remote desktop services clients.

The entered URL will be used by the clients to access the remote gateway server. Ensure you have an A record created for this in your DNS server.

And click on Add

After this step, still on the Terminal Server (locate). Open the Remote Desktop Services
Navigate to the deployment overview and select Edit deployment Properties

And Modify the deployment of these configurations
– Remote Desktop Gateway
– RD Licensing,
– RD Web Access:
– Certificates
Now type https://xxxxxxxxxx.com/rdweb to any web browser and access.
For the certificates, we can see they are not configured

Click on select existing certificates and enter the password for all the role services not configured.
Create Collections
This is necessary to have users that are allowed to access the Remote Desktop Services and to let the RDS Know what to publish.
Open Server Manager,
- Click on Remote Desktop Services,
- Click on Session Collections,
- Click Tasks and
- Click Create Session Collection.
Specify the Collection name e.g. Test representing the Customer or user, and select the RD Session Host servers by click the add (arrow) button to add the users

Add the user group created to access the RDS Server to restrict access to the specified groups only.
And deselect User Profile Disks.

Verify that all entered information is valid and click on create a collection as shown below.

And finally if succeeded, you will be prompted with the screen below

After completion, you should have your collection displayed as below.

Now to publish Remote app programs

Select the created Collection
Navigate to remote App Programs
Select Tasks,
Click on publish Remote App as shown below

Select the Programs you wish to publish or add additional programs you wish to publish.

Here we have the Calculator and WordPad selected as shown below

And click on publish and when completed it shows

Now you have the programs published under RemoteApp Programs
Part 4: On the test Web Server, (Acting as the RD Gateway)
Add both Servers to the Sever pool, which are test-TS and Test VM as well.

Remote Desktop Services: Access the RD Gateway manager
Now access the RD Gateway manager to assign the user and computer group that can access the Terminal Server.
– Connect to the Test-Web-I server
– Open Remote Desktop Services,
– Click on Servers as shown below

Select from the Server pool the Test VM and right-click on it
Select RD Gateway Manager
Expand the Test VM
Expand the Policies node and Select the Connection Authorisation Policies as shown below. It allows you to specify users who can access the Server.

On the connection Authorization Tab, double click on the Policy or right-click and select properties
Note: You can create new policies and disable the existing ones or modify the existing one. Here we are modifying it.
Here navigate through the various properties TAB
Under General: You can give the policy whatever name you want
Requirements: Add the user group from the Active Directory. Here we have the test-User-Access group created (populated with the users) that can access this Terminal Server.
Navigate through the Device Redirection and Timeout to define the required idle timeout. Click on apply and close.
Now select the second Resource Authorization Policies.
Here you also have to add the Remote User group,
And under Network resource, select the test-RDGW-Acc_Computer group created. Click on apply and finish.

Note: You can get details of connected users here from the Monitory as shown in the diagram.
I hope you found this blog post helpful on the steps to install Remote Desktop Services Setup on Windows Server. If you have any questions, please let me know in the comment session.
RDCMan (Remote Desktop Connection Manager) is a convenient RDP connection manager for Windows system administrators. It allows to manage multiple RDP sessions in a single window, create tree-like structures with the remote Windows hosts you are constantly using or managing, use different RDP connection settings for servers or groups, and save administrator (or user) credentials to automatically authenticate on RDP/RDS servers.
The last available version of RDCMan 2.7 was released in 2014 and development has stopped since then. In addition, a critical vulnerability was found in this version and Microsoft decided to completely remove the RDCMan download page in 2020. However, in June 2021, Mark Russinovich announced that the RDCMan tool is moving to the Sysinternals tools and will develop further. On June 24, 2021, a new version of Remote Desktop Connection Manager 2.81 was released with fixed vulnerabilities.
Contents:
- Installing RDCMan (Remote Desktop Connection Manager) on Windows
- Configuring RDCMan, Creating RDP Host Groups
- Configuring RDP Connection Settings in RDCMan
- How to Import Servers into RDCMan?
- Accessing Hyper-V Virtual Machine Console via RDCMan
Installing RDCMan (Remote Desktop Connection Manager) on Windows
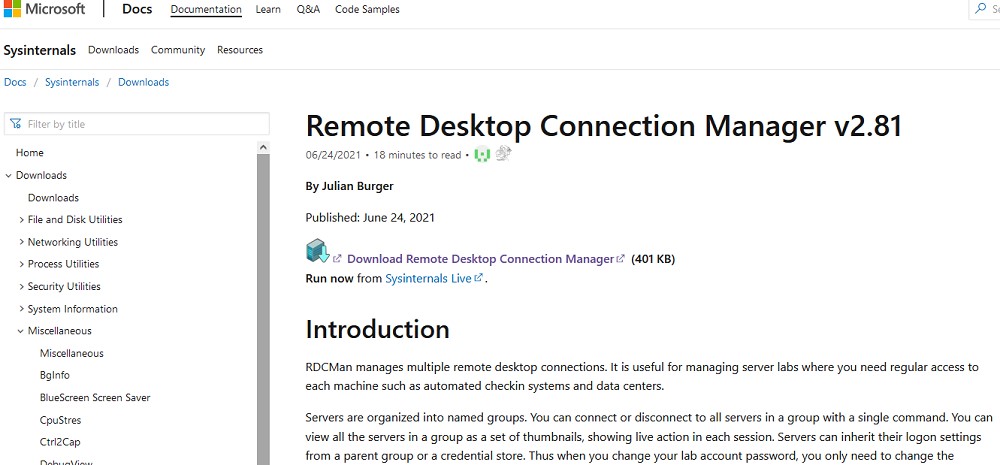
The RDCMan is a free tool and you can download it from the Microsoft website. The current version 2.81 is available here https://docs.microsoft.com/en-us/sysinternals/downloads/rdcman (0.4 MB).
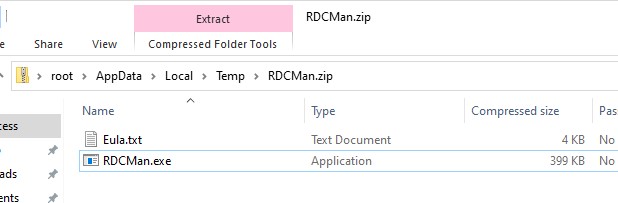
The new version of RDCMan 2.81 comes as a portable application RDCMan.exe and doesn’t require installation (unlike RDCMan 2.71, which is an MSI installation file). Just download the RDCMan.zip archive and extract it to any folder.
Remote Desktop Connection Manager supports all Windows versions, up to Windows 10 (Windows 11) and Windows Server 2019. Windows XP and Windows Server 2003 are also supported, but ou must first install the RDP client version 6 or newer on these operating systems.
Configuring RDCMan, Creating RDP Host Groups
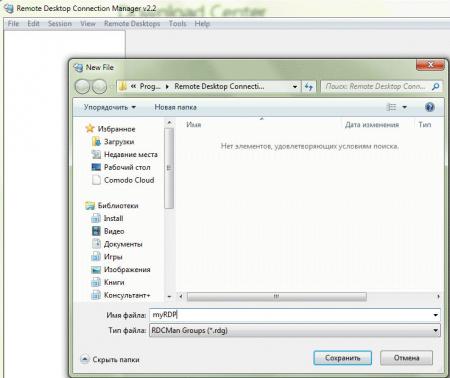
When you start RDCMan.exe, you will see an empty console. First of all, you must create a configuration file to store your settings by pressing Ctrl+N or in the menu: File –> New. Enter the file name *.rdg (actually, it is a text XML file that you can edit manually). In a single configuration file, you can save any number of RDP connections for your remote servers. The tool allows you to structure RDP connections by any criteria you choose: use this feature to create groups.
For example, you can create a group of Hyper-V servers or a group with AD domain controllers. You can group your remote servers by their location, role, or customer.

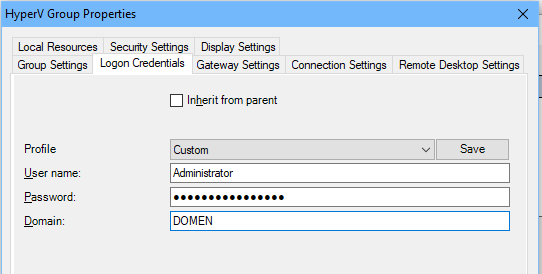
You can save your RDP credentials to connect to the servers in this group. In the Group Properties, go to the Logon Credentials tab and specify your credentials. All servers in this group inherit the group settings. To change any server option different from the specified group settings, uncheck the “Inherit from parent” and set the personal settings.
Don’t forget to click the Save button.
Warning! RDP connection credentials are stored encrypted in the RDG configuration file instead of Windows Credential Manager (it does not depend on Domain Group Policy settings that prevent the saving of RDP credentials). The security context of the current user is used (logged on user’s credentials) or you can use the X509 certificate for encription.

It is recommended to encrypt the RDCMan configuration file using third-party tools (for example, using BitLocker or TrueCrypt).
Configuring RDP Connection Settings in RDCMan
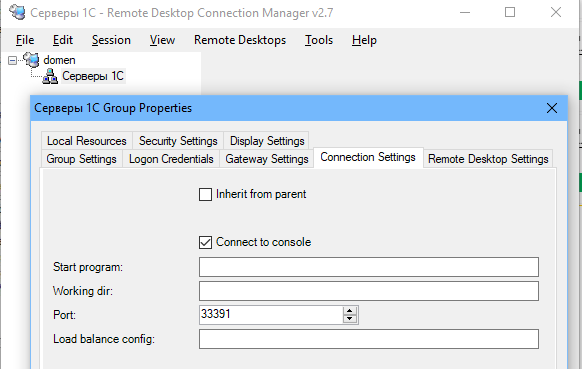
Go to RDP connection properties in the “Connection Settings” tab. By default, the standard port 3389 is used for RDP connection. You can change the port number if your RDP server listens on a non-standard port. Uncheck the option “Inherit from parent” and change the RDP port number.
If you check the “Connect to console” option, you will be connected to your server’s console. The console mode simulates a direct connection to the local monitor of your server and is used to connect to the RDS server without using client CAL license, or if the licensing server is not available, or the RDSH licensing mode is not configured.

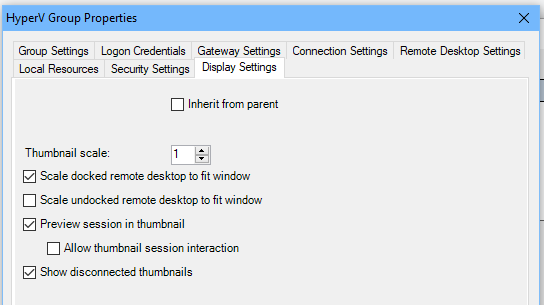
Configure the screen resolution to be used in the RDP session in the “Remote Desktop Settings” tab (I recommend to set it to “Full screen”) and local resources in the corresponding tab to be redirected to the RDP session (for example, you can redirect your clipboard to the RDP session, local printers, use a local drives sharing, etc.).
If you don’t need to scroll and the RDP window fits your screen, do check the option “Scale docked remote desktop to fit window”.
The main drawback of RDCMan 2.81 is that it doesn’t support automatic resizing of the RDP session window. If you want to resize the RDCMan window, you will have to reconnect to all remote servers. In this case, by automatically changing the RDP window (RDP size auto-fit), your connections will be displayed correctly.
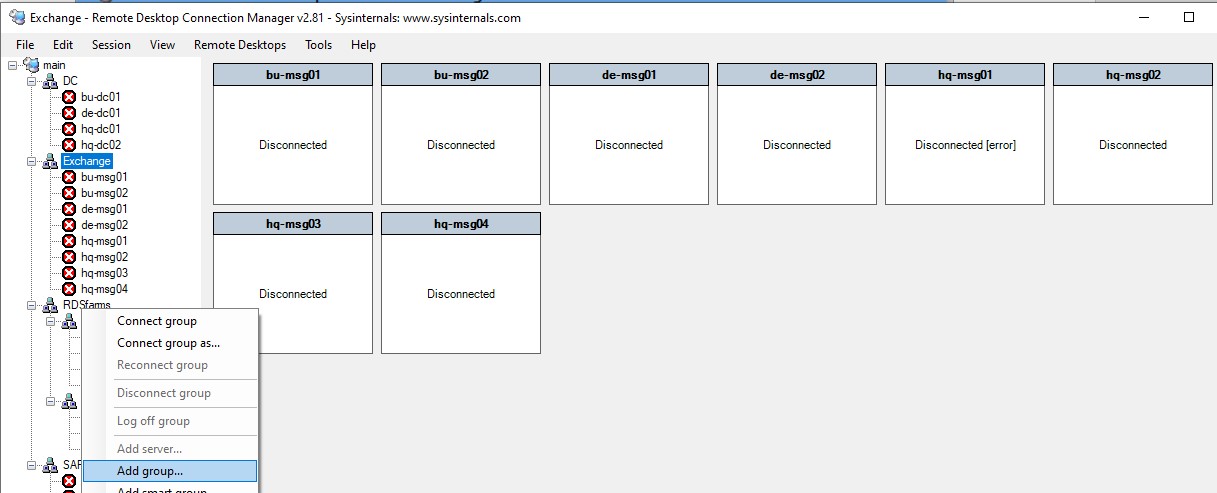
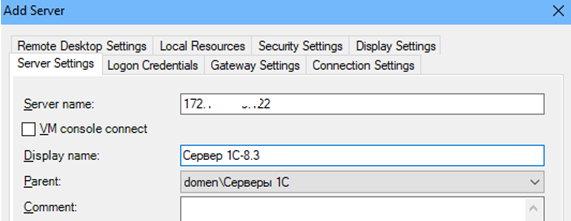
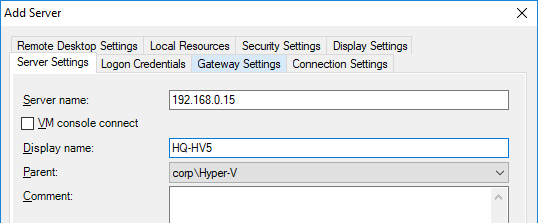
Hosts (servers and workstations) can be added to RDCMan groups. Right-click the group and add a server:
- Server Name – specify hostname or its IP address;
- Display Name – server name displayed in the RDCMan console.
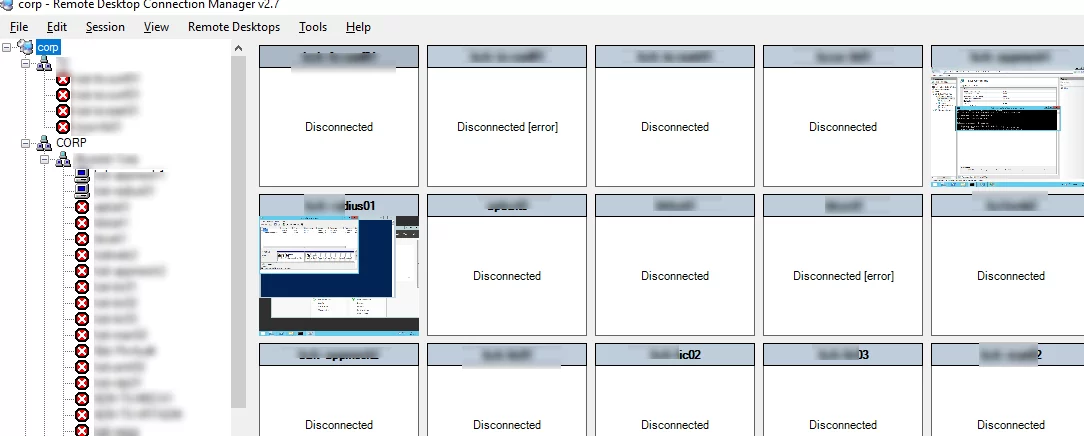
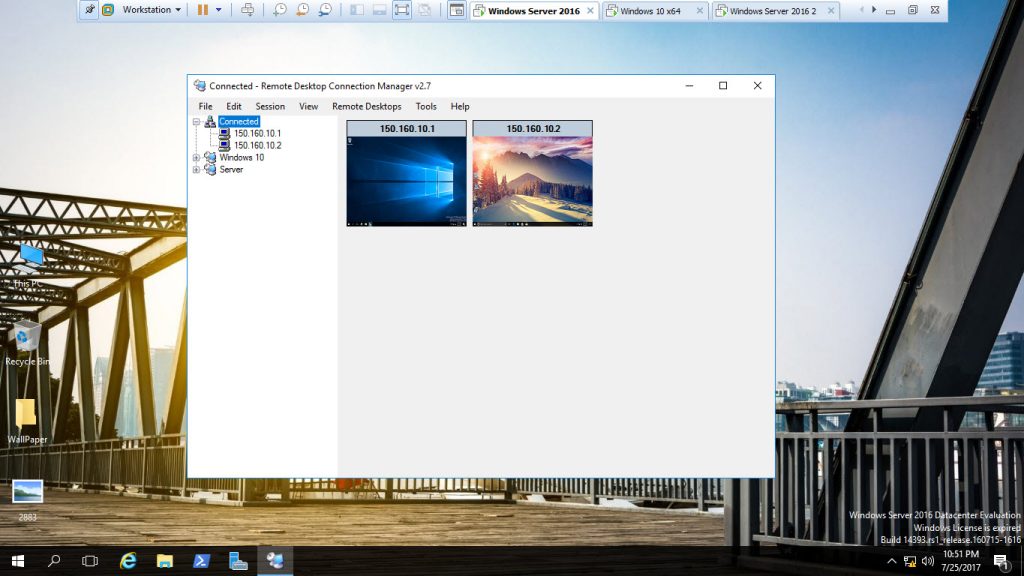
Finally, you will get this kind of console with remote server tiles updated in real-time.
When you double-click a server, you will access a server using RDP with the saved credentials.
You can use the “Connect Group” option. Thus, RDP consoles will be opened for all hosts in a group.
You can do standard things with your server, they are intuitive.
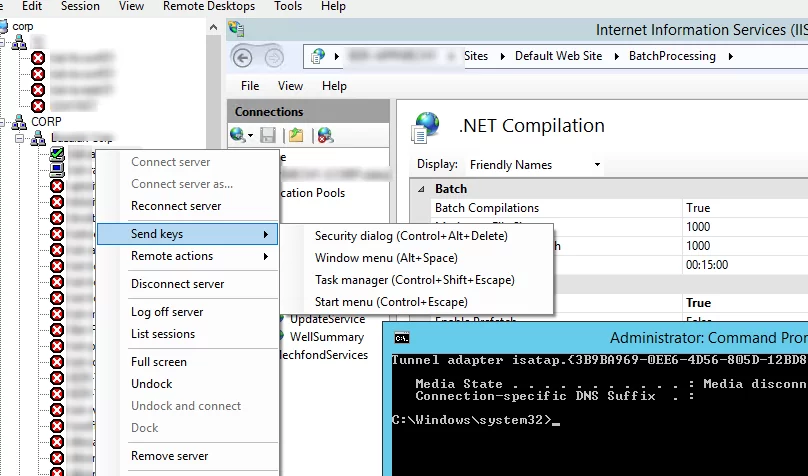
- Reconnect server – reconnect if a remote session is disconnected;
- Send keys – send standard keyboard shortcuts to a server;
- Disconnect server – disconnects from a server;
- Log off server – logs off a server;
- List sessions – view server active sessions;
- Undock – brings a server to a separate RDP window;
- Dock – returns a server to the console.
If you need to connect to a remote RDSH host through a published server with the RD Gateway role, you can set its parameters on the Gateway Settings tab.
The main thing: don’t forget to save the configuration file (File -> Save *.rdg). Otherwise, all your settings will be lost when you exit.
New RDG file format RDCMan 2.81 is not compatible with previous versions of the tool.
The next time you start RDCMan, you will see a window where you will need to select servers or groups you would like to reconnect.
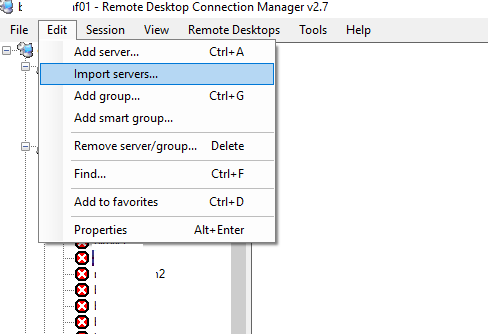
How to Import Servers into RDCMan?
Unfortunately, you cannot import your server or workstations directly from Active Directory. It looks quite strange since RDCMan is a tool developed by Microsoft.
However, you can import servers from a text or a CSV file. For example, you can export the lists of computers or servers from AD using the Get-ADComputer cmdlet:
(Get-ADComputer -Filter {enabled -eq "true" -and OperatingSystem -Like '*Windows Server*' } | select name).name | Out-File -FilePath c:\PS\ad_servers.txt
To import the server list into the RDCMan console, select “Import Servers” in the Edit menu. In the next window, specify the path to the text file containing the list of servers and click Import.
To split the imported list of servers into groups, use Edit -> Add smart group. Type the group name and set the rules, according to which the servers will get into it (e. g., the common part of the name or IP addresses).
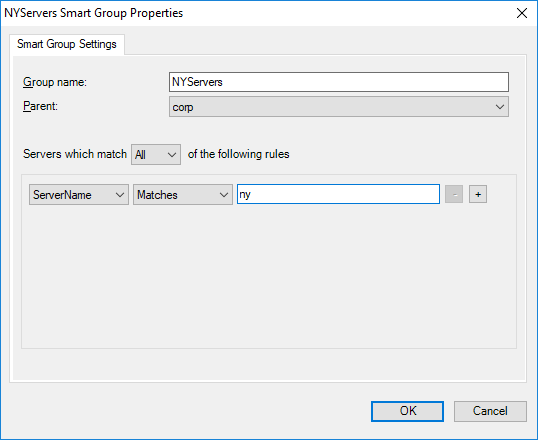
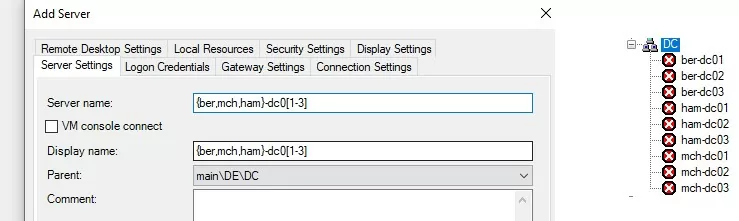
When adding servers to RDCman, you can use patterns:
{ber,mch,ham}– substitute the specified values in turn[1-5]– substitute all numbers from the range
For example, specify the following string as the server name: {ber,mch,ham}-dc0[1-3] and 9 servers will be added to the RDCman console.
Accessing Hyper-V Virtual Machine Console via RDCMan
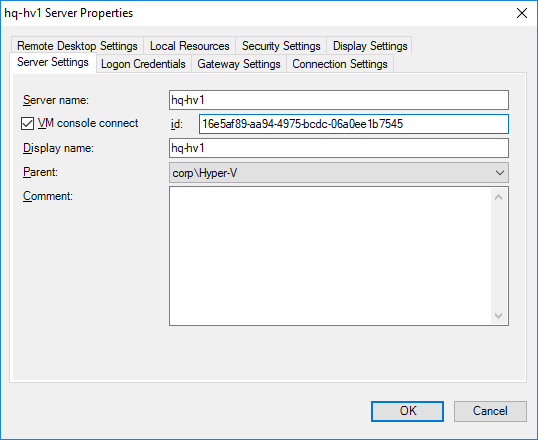
In RDCMan 2.81 you can configure a direct connection to the console of virtual machines running on the Hyper-V host (the Enhanced Session Mode is used). To do it, you have to get the virtual machine ID on your Hyper-V host. Use this PowerShell command:
Get-VM -Name WS2016 | select ID
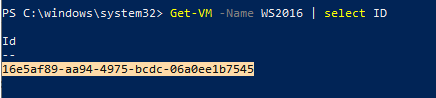
After you have got the VM ID, you can use it to configure a connection in RDCMan. When adding a new server in the RDCMan, specify the name of the remote Hyper-V host, check the option “VM console connect”, and paste the VMID into the ID field. You will be connected under an account with Hyper-V administrator privileges over VMBus (it means that you don’t need the network access to the FQDN or IP address of a guest OS – the access is provided through the Hyper-V host bus over TCP Port 2701).
RDCMan has a simple user interface and is very easy to use. If you just need an RDP connection manager, this is an excellent and easy-to-use everyday tool for a Windows administrator.

Если вы работает с большим количеством серверных и пользовательских операционных систем от Microsoft и вам приходится часто посещать их по протоколу RDP, то от mstsc.exe потихоньку начинает тошнить. В этом случае для вас есть бесплатное «родное» решение в виде программы Remote Desktop Connection Manager.
Научиться настраивать MikroTik с нуля или систематизировать уже имеющиеся знания можно на углубленном курсе по администрированию MikroTik. Автор курса, сертифицированный тренер MikroTik Дмитрий Скоромнов, лично проверяет лабораторные работы и контролирует прогресс каждого своего студента. В три раза больше информации, чем в вендорской программе MTCNA, более 20 часов практики и доступ навсегда.
Скачать ее вы можете отсюда. Поддерживаются все версии серверных операционных систем, начиная с Microsoft Windows Server 2008 и пользовательские ОС, начиная с Windows Vista. Для Windows Server 2003 и Windows XP вам потребуется обновить на них RDP до 6 версии (или выше). RDCM представляет собой, прежде всего, инструмент централизованного управления RDP-сессиями. Единая точка авторизации позволяет упростить в разы процессы управления и переключения между серверами и рабочими станциями.
Установка программы не вызывает особых затруднений. Сам интерфейс программы довольно прост. Вначале нам потребуется создать файл конфигурации. Этот файл будет содержать все наши настройки и именно его мы будем запускать для доступа к своему дереву созданных серверов и рабочих станций. Для создания файла конфигурации перейдите в меню File и выберите New. Укажите место хранения конфигурации.
Вы можете создавать различные группы серверов и рабочих станций, а для каждой группы задавать конкретные настройки (например авторизации и внешнего вида). Для создания новой группы выделите созданную конфигурацию (в нашем случае это test), откройте ее свойства и выберите Add group.
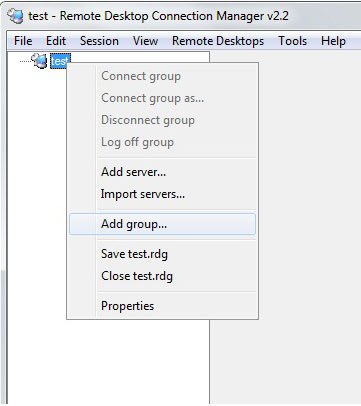
В появившемся окне настроек доступно большое количество опций. Задав имя группы, настройте в Logon Credentials параметры пользователя, под которым будете выполнять вход на все машины в этой группе. В нашем случае это будет администратор домена domenadmin.
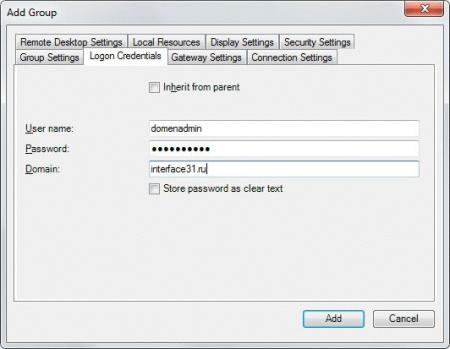
Активная опция Inherit from parent позволяет брать настройки, заданные не в самой группе, а в директории выше. Если вы оставляете здесь галку, то параметры берутся из конфигурации test. Если снимаете, то задавать их придется для этой группы отдельно.
В следующих вкладках вам предоставляется возможность изменить настройки дисплея, установить шлюз, изменить порты, опции перенаправления и т.д.
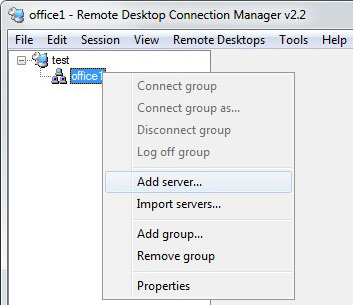
Создав группу, следует в нее добавить сервера, только теперь в качестве объекта, в котором мы будем создавать сервер, выделяем уже группу. Созданный сервер будет брать все настройки из группы office1.
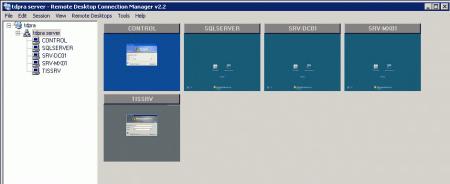
Подключиться к целой группе сразу можно нажав на ее название и выбрав Connenct Group. Мы получим справа уменьшенное изображение рабочих столов компьютеров, к которым присоединились.
Как мы видим, задачу одновременного администрирования нескольких серверов можно заметно упростить, используя бесплатные программные инструменты.
Научиться настраивать MikroTik с нуля или систематизировать уже имеющиеся знания можно на углубленном курсе по администрированию MikroTik. Автор курса, сертифицированный тренер MikroTik Дмитрий Скоромнов, лично проверяет лабораторные работы и контролирует прогресс каждого своего студента. В три раза больше информации, чем в вендорской программе MTCNA, более 20 часов практики и доступ навсегда.
Using Remote Desktop Connection Manager (RDC Man) is an important tool from Microsoft, especially for those whose occupations are creating Learning Tutorials such as cbtnuggets.com, who are only Recording tons of Videos just For IT Users.
Not only CBTnuggets are using this Tool, Administrators, developers, testers and lab managers who work with groups of computers, server labs or large server farms, such as automated check-in systems and data centers where regular access to each machine is necessary. The ability to consolidate multiple RDP connections into a single window reduces desktop clutter.
click the below link to learn more about the usage of RDC Manager.
Remote Desktop Connection Manager (RDCMan)
Remote Desktop Connection Manager (RDC Man) is a tool for managing multiple remote desktops. It creates a single location for IT administrators to organize, group and manage connections.
Using Remote Desktop Connection Manager (RDC Man)
Note: If you aren’t a beginner user, you can skip Step 1.
Step 1: Install Remote Desktop Connection Manager
Step 1. Download RDC Manager
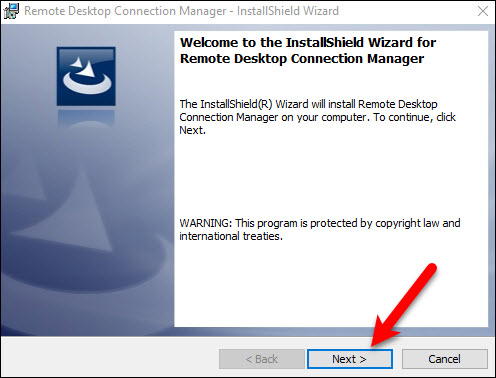
Step 2. Double click on the setup to open the installation wizard.
Step 3. On the welcome screen click Next.
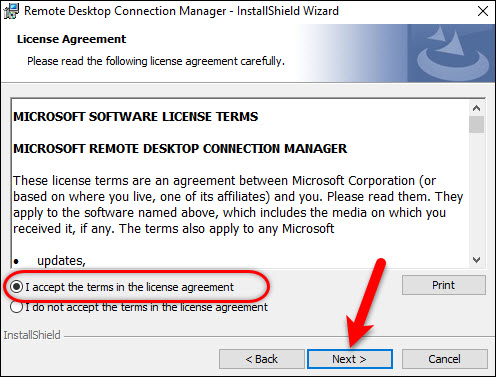
Step 4. Accept the license by selecting the I accept the terms in the License Agreement and click Next.
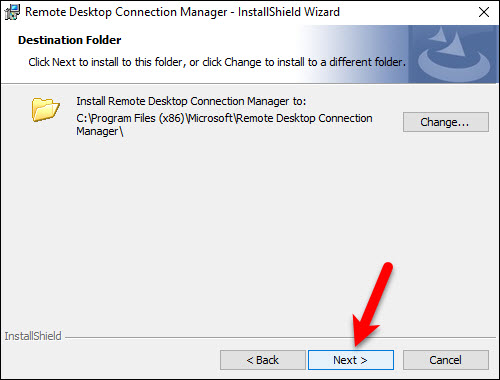
Step 5. Specify the Destination folder for the files to store and click Next.
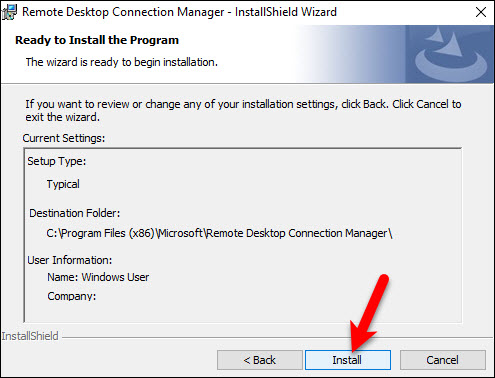
Step 6. Now you are ready to Install the RDC Manager, click Install to the Install it on the Server.
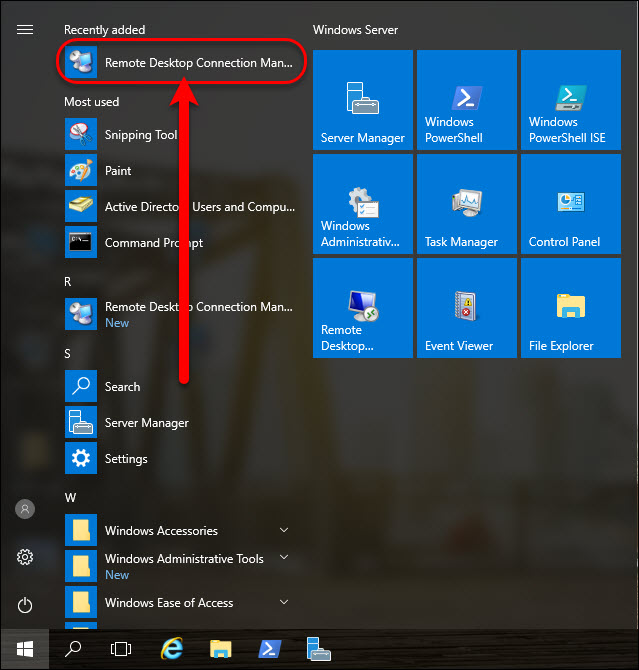
Step 7. When the Installation completes click Finish to exit the Installation Process.

Here you can its icon on the Start menu.
Step 2: Create a new connection settings file
Step 1. Navigate to the File menu and select New to select a location to save your new connection settings file. In this case, I have created two connections for the Server and the Clients.
Step 3. Add a server group
Step 1. Once You created a new connection you need to add Group member on the list. To create a new Server Group, right click on the node in the tree and Add Server. However, if you do this then you can’t add further groups later.
The only reason for creating a connection is that it can help us to navigate a large number of connections, as well as managing their settings (you can specify that certain settings such Parents, Login Credentials, Remote Desktop Setting and Other settings).
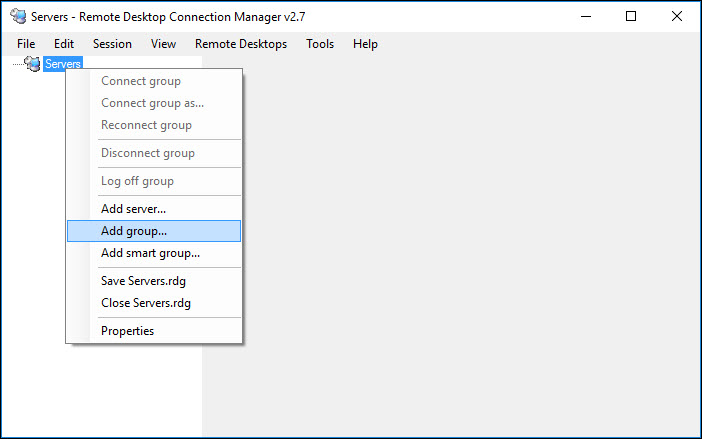
Step 2. Now you have to give a name for the Group. In this case, I have given a name of Domain Controller with Little Description.
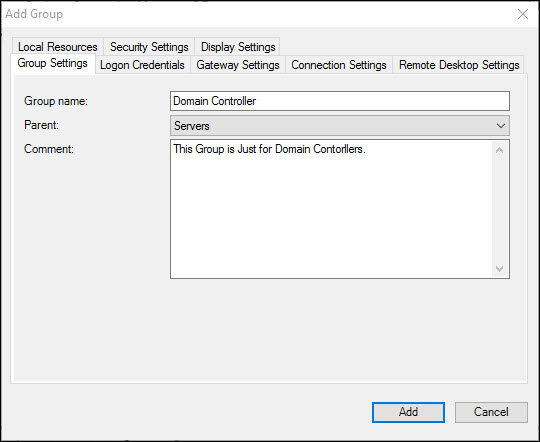
Step 4: Add a Server & Connect that Remotely
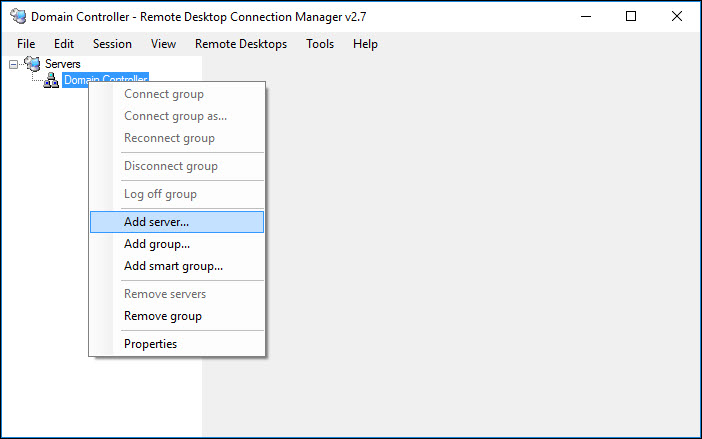
Step 1. Now that you have created a Group, it is time for you to add a server. To add a server Connection, right click on the Domain Controller and select add server.
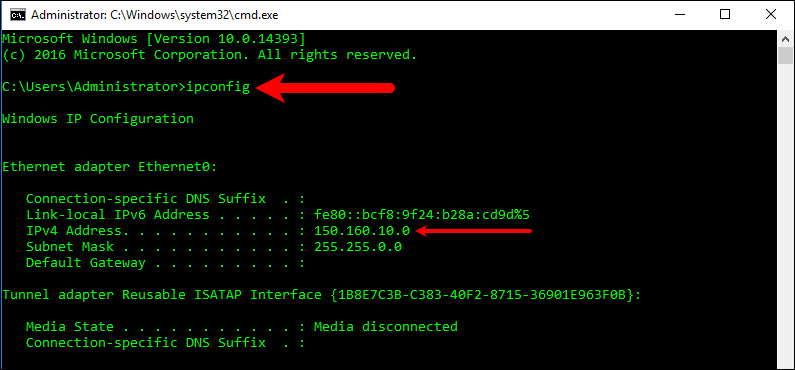
Step 2. Now you have to specify the Server name whether using the name or an IP address. In this case, I will type the IP address of the Server.

Note 1: If you have Problem Finding the IP address of the Server follows these Procedures:
- Open Cmd.
- Type their Ipconfig, scroll down and find the IP address.
Note 2: After typing the IP Address or the Name for the Server, there are other tabs too, you edit those settings in case if need them.
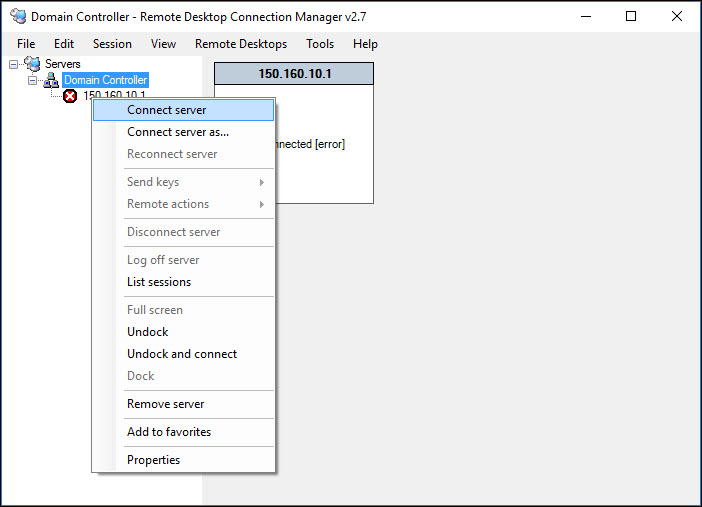
Step 3. Now that you have added the Server it is time to connect it Remotely to the Server. To connect it, right click on the IP or the name and select Connect Server.
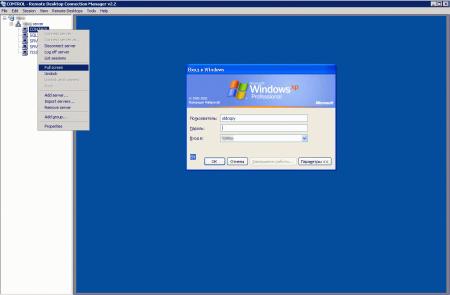
Step 4. If you haven’t already entered the credentials, you will be prompted for the Credential.
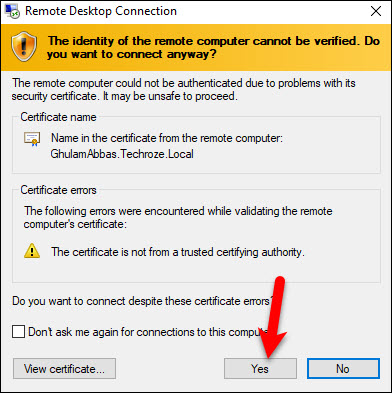
Step 5. If it was not a part of the Domain, you will be warned by the RDC for the Certificate. Don’t Worry select yes and wait until they should be connecting Remotely.
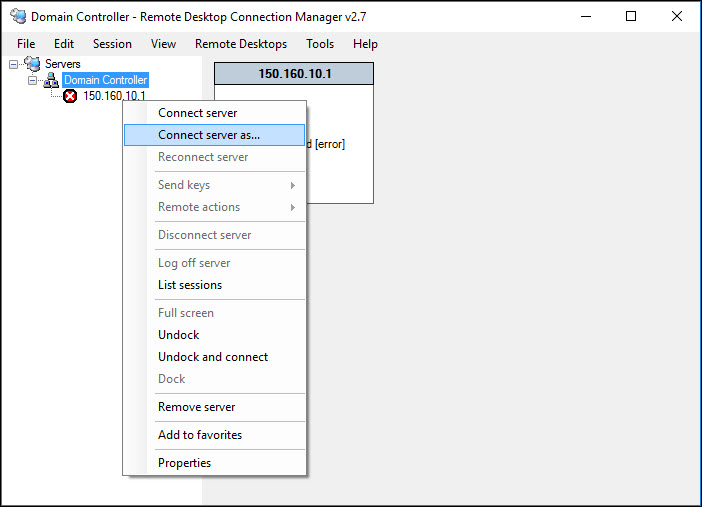
Note: sometimes it may happen that you inserted wrong Credentials, to edit that right on the Name or the IP of the server and select Connect Server as.
Here you can specify the settings such as name, Password, Domain and connection settings on the other Tab.

and here is the screenshot with ROC Man.
Conclusion
- Download and Install ROD Manager.
- Create a Group.
- Connect to the Server.
That’s all, I hope this article helped you Using Remote Desktop Connection Manager (RDC Man) on Server 2016.If you liked this article, then please subscribe to our YouTube Channel for WordPress video tutorials. You can also find us on Twitter and Facebook.