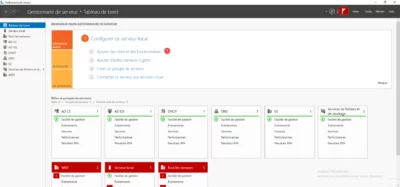
 В данной заметке поговорим о внедрении и последующем обслуживании сервера печати (по др. принт-сервера) полезной серверной роли в Windows Server 20xx, обеспечивающей эффективный, централизованный контроль за работой всех принтеров в организации.
Внедрение сервера печати, по сравнению с обычной клиентской установкой принтера, сулит следующие преимущества:
- Возможность централизованного управления всеми принтерами в организации, очередью печати, драйверами.
- Обеспечение общего доступа к принтерам через публикацию в Active Directory;
- Возможность разворачивать принтеры при помощи групповой политики;
- Создавать пулы, что позволяет объединить несколько физических принтеров в один логический.
Исходные условия у нас таковы, что имеется определенный парк сетевых принтеров HP и Kyocera и нам необходимо настроить к ним доступ таким образом, что бы пользователь мог самостоятельно выбирать ближайший к себе принтер и устанавливать себе в систему. Для этого нам как администраторам, необходимо сначала развернуть сервер печати, добавить на него все наши принтеры, опубликовать в Active Directory, обучить пользователей простым шагам по установке\добавлению принтера или устанавливать их в автоматическом режиме при помощи групповой политики. В процессе работы, выполнять простые шаги по администрированию системы и устранять возникающие неполадки с печатью, о чем речь пойдет ниже.
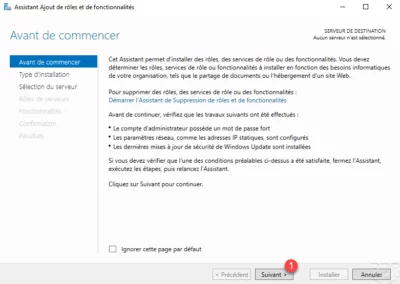
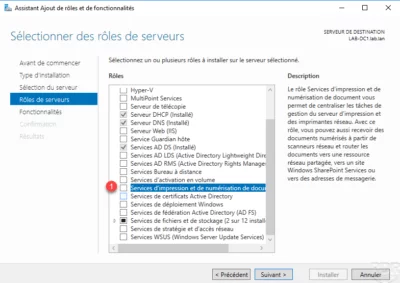
1) Установка роли Print and Document Services (Служба печати и документов);
Итак, у нас имеется машина с установленным Windows Server 2012R2, хотя это может быть и 2008 и последняя на текущий момент Windows Server 2016, т.к. процесс установки службы от версии к версии отличается не сильно и сводится буквально к нескольким кликам по кнопке Далее. Запускаем Server Manager, выбираем Add Role and Features Wizard (Добавить роль и мастер компонентов).

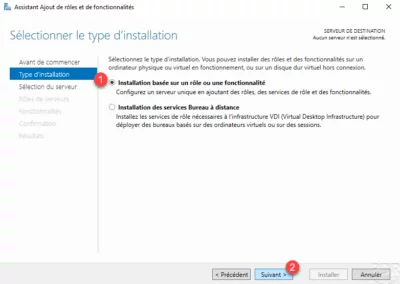
Затем соглашаемся с первым пунктом Role-based or feature-based installation (Базовая установка ролей и компонентов) жмем Далее.

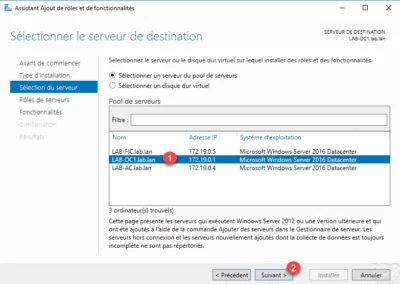
На следующем экране Select Destination server (Выбор сервера назначения) выбираем сервер из пула или расположенный на VHD-диске. Поскольку у нас, пока только один локальный сервер, то жмем Next.

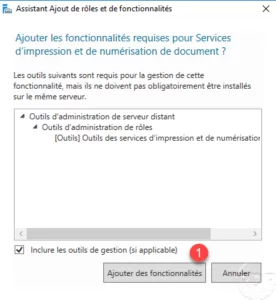
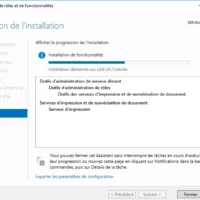
Выбираем роль для установки — Print and Document Services, соглашаемся с установкой дополнительных фичей — Print and Document Services Tools. Жмем Next.

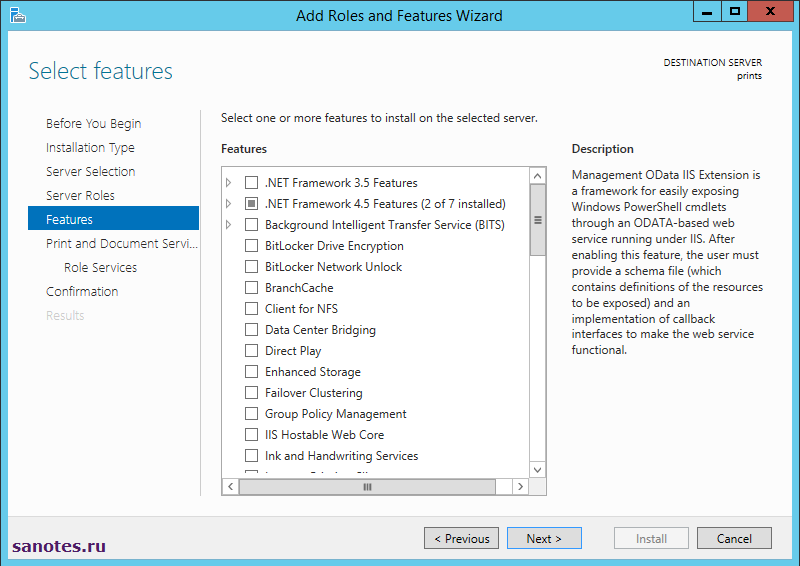
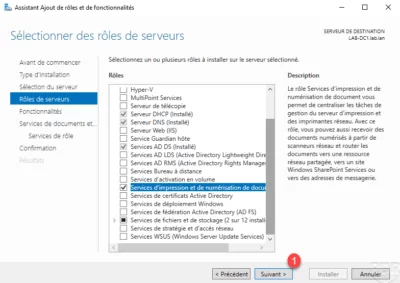
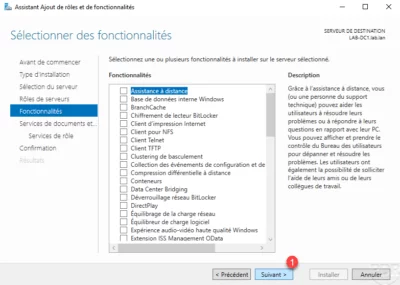
На следующем экране Features, опционально выбираем компоненты для установки если нужно. Жмем Next.
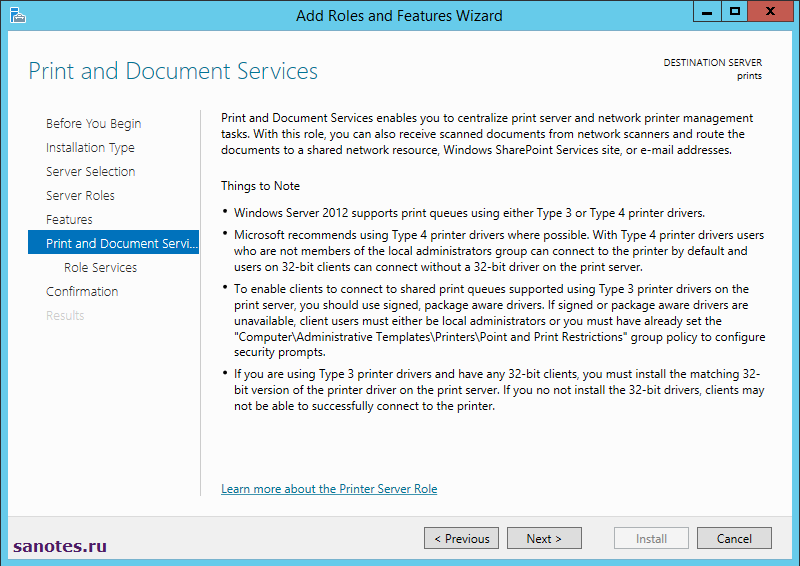
Далее нам предлагают ознакомится с полезной информацией по службе печати Print and Document Services. Ознакамливаемся и жмем Next 
Затем выбираем конкретные сервисы для установки. По мимо Print Server (Сервер печати) можно выбрать еще Distributed Scan Server (Распределенный сервер сканирования), Intetnet Printing (Поддержка печати через Интернет) и LPD Service (Служба печати UNIX). В рамках данной заметки нас интересует только cервер печати, поэтому выбираем его и жмем Next.

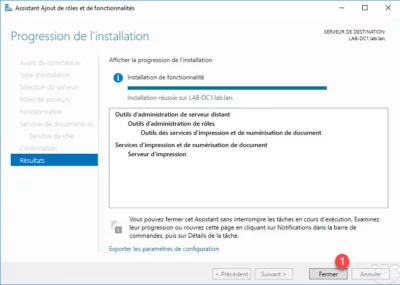
На завершающем экране, соглашаемся с установкой выбираемых компонентов нажатием кнопки Install.

Закрываем мастер при помощи close.
Те же действия, но в Powershell, можно выполнить буквально в несколько команд:
Fipmo ServerManager
add-WindowsFeature Print-Server
После установки службы, перезагружать сервер не требуется. Но, перед тем как начать добавление принтеров на сервер, добавим его в домен, что позволит в последствии публиковать принтеры сразу в Active Directory.
Используем классический gui-вариант добавления, либо при помощи несложной команды в PS:
Add-Computer -DomainName test.ru
Перезапускаем сервер командой:
2) Консоль управления Print Managment. Добавление драйверов и принтеров на сервер;
Запускаем консоль управления Print Managment. Для этого переходим в Пуск\Administrative tools\Print management. Либо запускаем в командной строке: printmanagement.msc

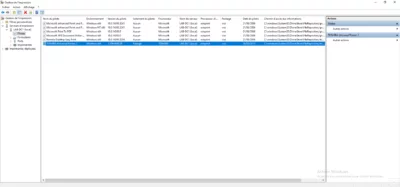
Здесь, самый верхний узел Print Managment позволяет добавлять/удалять локальные и другие серверы печати для администрирования, а так же выполнять миграцию принтеров.
Custom Filters фильтрует принтеры по категориям: Все принтеры (All Printers), Все драйверы (All Drivers), Принтеры в состоянии «не готов» (Printers Not Ready) и принтеры с активными заданиями печати (Printers With Jobs). Так же, по правой кнопке, можно задать свой фильтр, если вам не хватает текущих.
Print Servers отображает текущие принт-серверы. В данном случае видно что у нас только один (локальный) сервер печати, где Drivers (Драйверы) показывает все драйверы на текущем сервере печати, Forms (Формы) — все поддерживаемые форматы бумаги, Ports — локальные и сетевые порты на текущем сервере печати, Printers — все установленные принтеры на текущем сервере печати.
Deployed Printers — принтеры, которые были развернуты с использованием групповой политики.
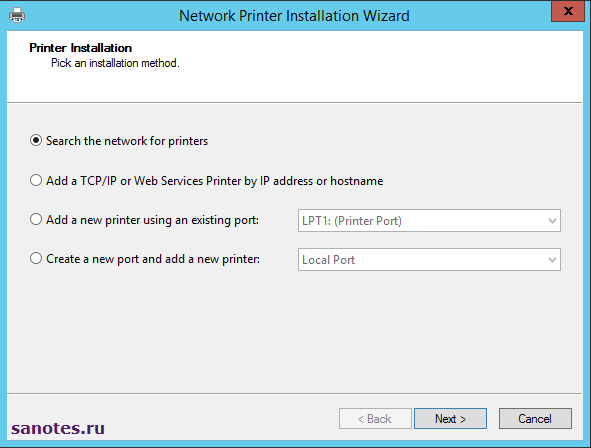
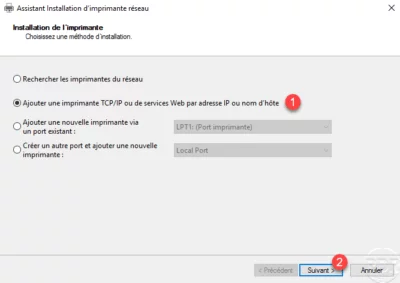
Что бы добавить новый принтер на сервер, переходим к узлу Print Servers, выбираем наш локальный сервер prints (local) в разделе Printers. Щелкаемся правой кнопкой и выбираем Add Printers (Добавить принтер). Запустится мастер добавления принтера Network Printer Installation Wizard, где доступно четыре метода установки. Первый и самый быстрый способ обнаружить сетевые принтеры это выполнить поиск в автоматическом режиме — Search the network for printers, вторым пунктом идет возможность добавить TCP/IP принтер или веб принтер по его IP-адресу или имени узла — Add a TCP/IP or Web Services Printer by IP address or hostname, далее идет возможность добавить новый принтер используя существующий порт — Add a new printer using an existing port, и последний пункт, это создание своего порта с последующим добавлением нового принтера — Create a new port and add a new printer.
Если выбрать первый пункт и позволить мастеру добавить принтер в автоматическом режиме то возникнет ситуация когда драйвер для принтера может быть так же добавлен в автоматическом режиме из дистрибутива операционной системы, что не желательно, поскольку, во-первых драйвер будет далеко не свежим, во-вторых он будет конкретно под данную модель принтера. Если принтеров не много, то в этом нет трагедии — все будет работать, но поскольку у нас принт-сервер, где как правило может быть n-ое количество устройств печати, то имеет смысл использовать самую актуальную версию драйвера с сайта производителя. Лучше использовать универсальный драйвер сразу для нескольких моделей, что позволит избежать в будущем разного рода конфликтов связанных с работой нескольких разношерстных устройств на одном сервере и позволит снизить временные затраты при будущем обновлении. Почитать еще о преимуществах универсального драйвера можно по следующей ссылке.
И всего вышесказанного следует, что для корректной работы системы нам сначала необходимо установить на сервер правильный драйвер, а затем уже добавлять сами принтеры. Поэтому скачиваем универсальный драйвер с сайта производителя, например для HP здесь, а для Kyocera тут. Что касаемо типа драйвера, PCL5 или PCL6 то тут решайте сами. Кто то говорит что PCL5 стабильнее, но лично я не заметил особой разницы. По идее PCL версии 6 это просто более новая реализация PCL драйвера от HP, поэтому имеет смысл использовать ее.
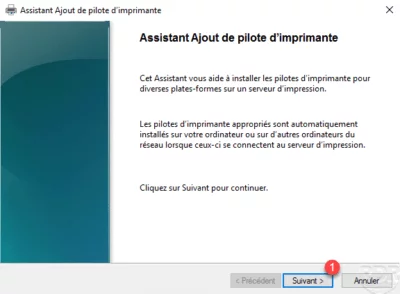
Для добавления драйверов, в консоле Print Managment переходим на наш локальный сервер в раздел Drivers и по правой кнопке запускаем мастер добавления драйверов — Add Driver. На следующем экране выбираем тип архитектуры процессора. Если необходима поддержка 32-разрядных клиентских операционных систем то так же отмечаем чекбокс x86. Жмем Далее.

На экране Printer Driver Selection выбираем драйвер для принтера. Жмем Have Disk и Browse для обзора и добавления драйверов.

Выбираем ранее скаченный драйвер. В нашем примере это универсальный драйвер Kyocera, жмем Next и Finish. Повторяем операцию для других ваших устройств.

Лично у меня на сервере, в ходу принтеры только HP и Kyocera, соответственно и драйверы используются только этих производителей. Правда, надо отметить, что при использовании универсального драйвера от HP, далеко не все принтеры поддерживаются или не все функции поддерживаются корректно, хотя большая часть принтеров корпоративного класса работает без проблем. Посмотреть список поддерживаемых устройств можно по ссылке. После добавления драйверов, получим примерно следующую картинку.

Обратим внимание на вкладку Driver Isolation (Изоляция драйвера), где у нас, драйверы по умолчанию помечены флагом «shared» т.е. находятся в неком изолированном режиме с общим доступом. Технология изоляции драйвера или Printer Driver Isolation (PDI), позволяет выводить работу принтеров в отдельный процесс PrintIsolationHost.exe, отдельно от диспетчера печати spoolsv.exe, и других драйверов на сервере, т.е. если возникает проблема в драйвере, то она затрагивает только процесс, который подгрузил этот драйвер, но не саму службу печати spoolsv.exe, которая при этом, остается работоспособной.
И в случае режима shared (общий доступ) все драйверы принтера настроены на работу с одним, общим экземпляром процесса PrintIsolationHost.exe, но отдельно от диспетчера печати. Данный режим является рекомендуемым Microsoft. В случае, возникновения проблем с драйверами, несовместимостью и частым падением принтеров, особенно в терминальном режиме, можно попробовать использовать режим isolated (изолированный), где уже каждый драйвер принтера, настроен на использование своего собственного экземпляра процесса PrintIsolationHost.exe и так же отдельно от диспетчера печати (spooler).
При установленном флаге «none», драйверы принтеров загружаются как обычно, при помощи диспетчера печати (spooler), т.е. если падает процесс spoolsv.exe, то это затрагивает работу сразу всех принтеров на сервере.
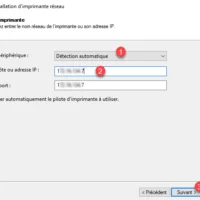
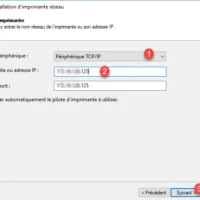
Теперь, после добавления корректных драйверов можно приступать к установке принтеров. Для этого снова запускаем уже знакомый нам мастер добавления принтеров, выбираем добавить TCP/IP принтер или веб принтер по его IP-адресу. Затем выбираем тип устройства: Auto detect — автоматическое определение параметров или TCP/IP Device, в поле «host name or IP address» вводим IP-адрес сетевого принтера. Галочку Auto detect the printer driver to use (Автоматический поиск драйвера принтера) оставляем по умолчанию активной или снимаем. В данном случае она не препятствует процессу добавления «правильного» драйвера. Жмем Next.
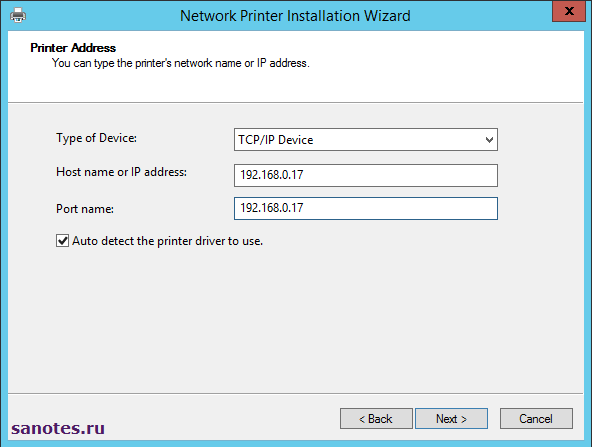
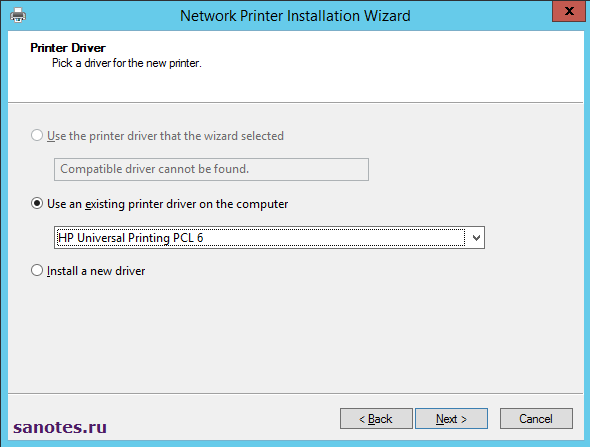
На следующем экране, выбираем ранее установленный универсальный драйвер HP или Kyocera из списка или добавляем новый. Жмем Next.
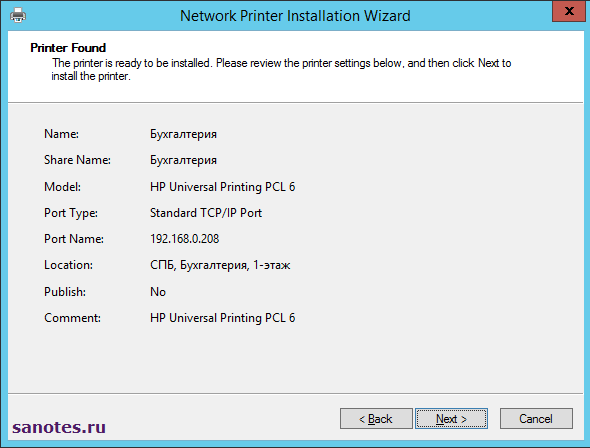
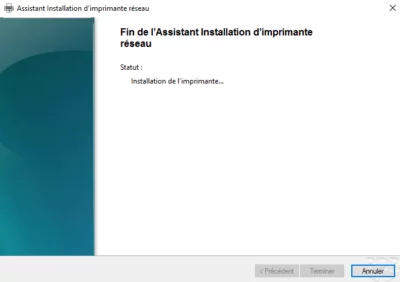
Затем, задаем имя принтеру и добавляем его в общий доступ, указав имя расшаренного ресурса, физическое расположение и комментарий. По этой информации пользователи смогут идентифицировать нужный им принтер в службе каталогов и добавить его к себе в систему. Жмем Next.

Соглашаемся с предложением установить принтер. Жмем Next и дожидаемся окончания процесса установки.
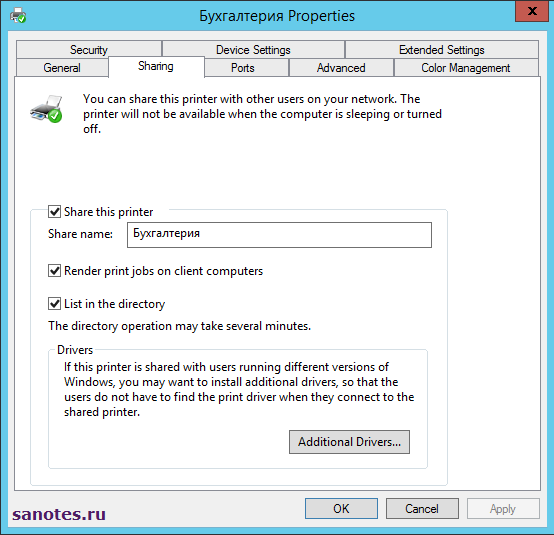
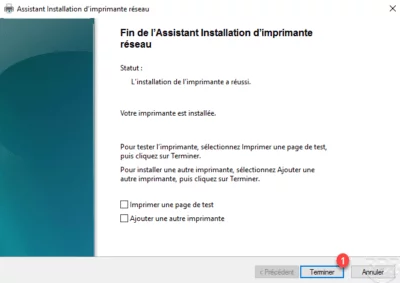
Затем, что бы принтер был доступен в Active Directory для выбора, необходимо его опубликовать. Для этого переходим в свойства принтера на вкладку Sharing и отмечаем галочку List in Directory (Внести в Active Directory) и жмем Apply (Применить).
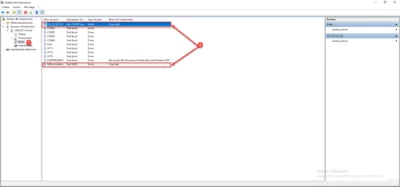
Проделываем ту же операцию для всех принтеров в организации. Можно выделить все принтеры сразу и по правой кнопке сказать: List in Directory. В итоге, можно получить примерно следующий список.

Теперь, на клиентском компьютере в домене, пользователь сможет увидеть нужный ему принтер в списке и установить его.

Но это в теории, или по крайней мере так было раньше! На практике, при добавлении сетевого принтера под доменной учетной записью, нередко можно получить следующую ошибку:
Подключение к принтеру. Установленная на данном компьютере политика не позволяет подключение к данной очереди печати. Обратитесь к системному администратору.
Или английский вариант:
Connect to Printer. A policy is in effect on your computer which prevents you from connecting to this print queue. Please contact your system administrator.

Связано это с тем, что 12 июля 2016 года Microsoft выпустила обновление безопасности KB3170455, устраняющее критическую уязвимость в системе печати, что повлекло за собой новые требования к безопасности драйверов принтера, а именно:
1. Драйвер принтера должен быть доверенным и подписан цифровой подписью. Процесс установки проверяет наличия хешированных файлов в пакете драйвера, и если обнаруживает не хешированные (без цифровой подписи), то выводит сообщение об ограничениях существующей политики. В случае универсального драйвера от HP проверка на цифровую подпись файлов в пакете проходит успешно и принтер ставится без проблем, а вот при попытке установить на клиенте принтер от Kyocera, где в качестве драйвера используется Kyocera Universal Classic Driver, который, кстати говоря на сайте числится как ‘signed’ вылезает ошибка выше.

2. Драйвер принтера должен быть упакованным, спецификация (package-aware v3). При попытке установить не упакованный драйвер (non-package-aware v3) получим сообщение о недоверии к принтеру и запрос на повышении прав позволяющий установить драйвер с административной учетной записью.
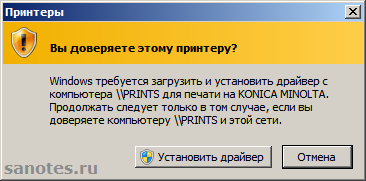
Проверить упакован драйвер принтера или нет, можно в консоли управления принтерами (Printer Managment) в разделе Drivers, колонка Packages. Как видим, драйвер Konica Minolta находится в состоянии false.

Решить проблему с установкой не доверенных драйверов принтеров на клиентских компьютерах, нам поможет включение групповой политики: Point and Print Restriction (Ограничения указания и печати), которая находится по адресу:
Computer Configuration\Policies\Administrative Templates\Printers (Конфигурация компьютера\Политики\Административные шаблоны\Принтеры).
Отмечаем галочки напротив Users can only point and print to these server (Функцию указания и печати можно использовать только на этих серверах) и через точку с запятой, указываем полные доменные имена серверов печати (FQDN). В нашем примере это: prints.test.ru В поле Security Promts (Запросы безопасности), параметрам «Then installing drivers for a new connection» и «Then updating drivers for a exsiting connection» (При установке/обновлении драйверов для нового подключения) выставляем: Don’t show warning or elevation promt (Не показывать предупреждение или запрос на повышении прав).
 Не лишним будет так же включение политики: Package Point and Print — Approved servers (Функция указания и печати для пакетов — Разрешенные серверы) которая находится там же по адресу: Computer Configuration\Policies\Administrative Templates\Printers. Данная политика полностью независима от Point and Print Restriction и распространяется только на пакетные драйверы, что в итоге помогло снять ошибку возникающую во время установки универсального драйвера от Kyocera.
В поле Enter fully qualified server names (Введите полные доменные имена серверов) задаем имя сервера печати. Жмем применить. На принт-сервере и на клиентских ПК запускаем принудительное обновление политик при помощи gpupdate /force. После чего установка принтеров должна происходить без вопросов.

3) Консоль управления Print Managment. Добавление принтеров в пул (Print Pooling);
Print Pooling — это технология позволяющая объединять несколько принтеров в один логический, что может оказаться полезным в организациях с большим объемом печати и большим количеством печатающих устройств. Например, в ситуации когда есть 5-ть одинаковых принтеров и не понятно, какой из них загружен печатью, а какой свободен, один логический принтер установленный в системе позволяет автоматически определять свободный принтер в пуле, что в итоге экономит время между решением отправить задание на печать и фактически самой печатью.
Для того что бы объединить несколько принтеров в пул, переходим в раздел Printers нашего принт-сервера и добавляем как обычно новый принтер в систему либо выбираем существующий. Затем переходим на вкладку Ports (порты) и добавляем новый TCP/IP-порт соответствующий IP-адресу другого принтера в будущем пуле.

Выбираем Standart TCP/IP Port и жмем New Port… Затем прописываем IP-адрес принтера, жмем Next и Finish. Добавляем столько портов сколько нам нужно в пуле.
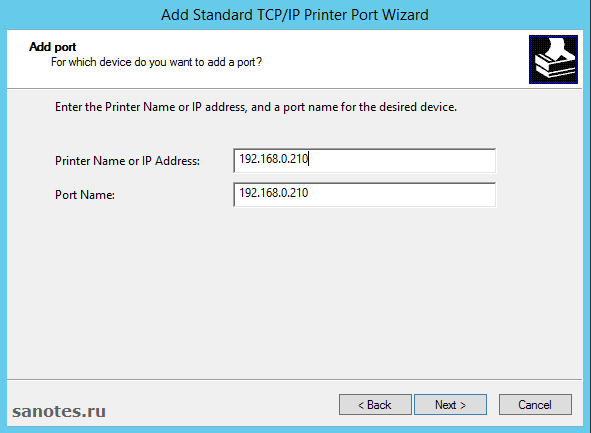
Теперь переходим в свойства будущего логического принтера, на вкладку Ports (Порты) и отмечаем чекбокс Enable print pooling (Разрешить группировку принтеров в пул), затем дополнительно выбираем ранее созданный порт 192.168.0.210 и жмем Apply (Применить);

Таким образом мы добавили два физических принтера в пул, и получили на выходе один логический.
4) Консоль управления Print Managment. Установка принтеров при помощи групповой политики;
Что если в нашей организации 50-100 и более компьютеров, а пользователи, как это не редко бывает сами не хотят / не умеют или не знают какой из принтеров в каталоге им необходимо установить? В данном сценарии нам поможет инструмент установки принтера при помощи групповой политики. Например, если известно, что у определенного пользователя или группы должен быть установлен определенный принтер, то можно заранее в автоматическом режиме развернуть нужные принтеры, незаметно для пользователя и без прямого вмешательства системного администратора. Для этого необходимо авторизоваться на сервере-печати под доменной учетной записью с правами Print Operators или выше, затем перейти в консоль Print Managment, отметить нужный принтер и по правой кнопке выбрать пункт Deploy with Group Policy (Развернуть с помощью групповой политики). В качестве примера, проделаем данную операцию для принтера «Операторы». В поле GPO name выберем объект групповой политики на который будет распространяться политика автоматической установки принтера. Я выберу заранее созданный объект Operator, который в свою очередь привязан к подразделению Operators, внутри которого находятся объекты пользователей для которых и производится установка принтера.
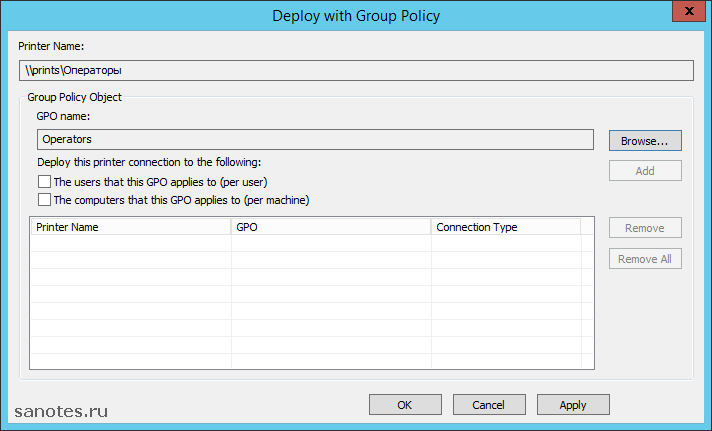
Отмечаем галочкой на кого будет распространяться политика подключения принтера, на пользователей или компьютеры. Жмем добавить, применить, ОК.

Перезапускаем клиентский компьютер и видим что принтер «Операторы» успешно добавлен в сиcтему.
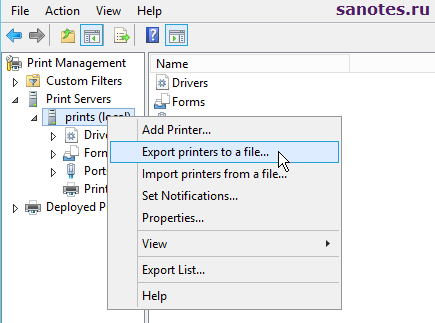
5) Перенос конфигурации с одного сервера печати на другой;
В случае, замены сервера печати или аварийной ситуации может потребоваться быстро восстановить существующую конфигурацию на другой сервер. И дабы сократить время восстановления, желательно уже иметь в запасе резервную машину с установленной службой печати и заранее экспортированным файлом резервной копии в специальном формате .printerExport. Данный файл содержит полную копию всех установленных принтеров, портов и драйверов позволяющих развернуть аналогичную конфигурацию на другом сервере. Для того что бы получить такой файл, необходимо перейти в корень локального сервера утилиты Print Managment, в нашем случае ‘prints (local)’, щелкнуться правой кнопкой и выбрать Export printers to a file… (Экспортировать принтеры в файл). Следовать указаниям мастера и получить на выходе файл резервной копии.
В рамках данной статьи, текущий (исходный) сервер у нас имеет сетевое имя: prints, новый, конечный, куда переносится конфигурация: prints-new, таким образом шаги по переносу данных с одного принт-сервера на другой будут следующими:
- На резервном (новом) сервере, поднимаем роль службы печати и документов, если она не была добавлена ранее.
- На старом сервере отменяем публикацию в Active Directory, снятием галочки List in Directory в свойствах каждого установленного принтера либо выделяем все принтеры сразу и по правой кнопке выбираем: Remove from Directory;
- Выводим, если это возможно старый сервер из домена, меняем сетевое имя на prints-old, перегружаемся. Если данная возможность не доступна, например в случае физического выхода из строя сервера, то удаляем компьютер/сервер на контроллере, например из оснастки «Active Directory Users and Computers» в контейнере Computers. На предложение удалить все вложенные объекты (Confirm Subtree Deletion) отвечаем утвердительно.
- На новом сервере, куда переносим конфигурацию меняем сетевое имя на prints, добавляем в домен.
- Восстанавливаем экспортированный ранее файл .printerExport на новом сервере. (Import printers from a file…). В процессе импорта есть возможность сразу опубликовать принтеры для общего доступа в службе каталогов (List in directory). После чего, проверяем работу принтеров на новом сервере.
6) Устранение неполадок в работе службы печати;
Что касаемо, неполадок возникающих в процессе работы службы печати и их устранении, то здесь писать особо нечего, т.к. все сводится буквально к нескольким шагам, по остановке службы печати, зачистке очередей печати в %windir%\System32\spool\PRINTERS и последующем старте службы, что известно практически каждому админу и не только. Для полноты обзора, и для совсем «зеленых» товарищей приведу всем известную последовательность команд
Запускаем командную строку — cmd.exe;
Останавливаем службу печати:
Чистим очередь печати, удаляя *.SHD, *.SPL, *.TMP файлы внутри директории, командой:
del /q /f %windir%\System32\spool\PRINTERS\*.*
Запускаем службу печати:
Либо делаем профилактический рестарт службы, без зачистки очереди:
net stop spooler & net start spooler
Можно сделать батник для запуска а автоматическом режиме. Сохраняем файл например под именем spool.cmd.
setlocal
net stop spooler
del /q /f %windir%\System32\spool\PRINTERS\*.*
net start spooler
Перезапустить службу можно и при помощи gui интерфейса, в оснастке «службы» — services.msc, а почистить папку \PRINTERS в проводнике, но как по мне в консоле или батником быстрее.
After you’ve found out you can turn your Server Core installation of Windows Server 2012 into a full-fledged File Server, I bet you’re curious how you could transform it into a highly performing Print Server. You’re in luck, because that’s the topic of today’s article! Let’s dive into the Print and Document Services Server Role.
Contents
- Print and Document Services Server Role in Server Core
- How to install the Print and Document Services Server Role
- How to add printers to a Server Core Print Server
- Using the (old) printing admin scripts
- Using the Print Server-related PowerShell cmdlets
- Using the GUI
- Managing printers and print jobs
- Concluding
- Author
- Recent Posts

The Print Server Server Role has been a part of Server Core installations since Windows Server 2008.
Print and Document Services Server Role in Server Core
In Server Core installations of Windows Server 2012, the Print and Document Services Server Role features four Role Services:
- Print Server
This is the core of every Windows Server 2012–based Print Server. When you install the Print and Document Services Server Role, this Role Service is installed by default. - Distributed Scan Server
The Distributed Scan Server Role Service provides a central administration point for sharing and managing DSM-aware network scanners. - Internet Printing
The Internet Printing service creates a website where users can manage print jobs on a Print Server. It also enables users who have the Internet Printing Client installed to use a web browser to connect and print to shared printers by using the Internet Printing Protocol (IPP). - LPD Service
The Line Printer Daemon service enables UNIX-based computers or other computers using the Line Printer Remote (LPR) service to print to shared printers on a Windows Print Server.
How to install the Print and Document Services Server Role
Turning a Windows Server 2012–based Server Core installation into a Print Server is pretty easy. You’ll only need one PowerShell command:
Install-WindowsFeature Print-Services

Install Print Services
As mentioned previously, this installs the Print Server Role Service automatically too.
How to add printers to a Server Core Print Server
A Print Server without printers is likely to become a sad server, even when it’s a Server Core installation. It’s time to add some printers.
You can add printers in three ways in Windows Server 2012–based Server Core installations:
- Use the (old) Printing Admin scripts.
- Use the Print Server-related PowerShell cmdlets.
- Use the Graphical User Interface (GUI).
Using the (old) printing admin scripts
When the Print Server Role is installed, a special folder is created on your hard disk. This folder contains the (old) *.vbs-style Printing Admin scripts. The scripts are located in a subfolder with the installed language (most likely en-US) of the C:\Windows\System32\Printing_Admin_Scripts folder.
The following scripts are available:
- Prncnfg.vbs
- Prndrvr.vbs
- Prnjobs.vbs
- Prnmngr.vbs
- Prnport.vbs
- Prnqctl.vbs
- Pubprn.vbs

Printing_Admin_Scripts
It’s good to see these trusty old scripts on Windows Server 2012–based Server Core installations because this means you can reuse your current printer configuration scripts.
A line to add a printer port would look something like this:
cscript prnport.vbs -a -r 10.2.255.11 -h 10.2.255.11 -o raw
To add a printer on this printer port, you could use a line that looks like:
cscript prnmngr.vbs -a -p PRT-Location1-HRM -m "Xerox Global Print Driver PS" -r 10.2.255.11
After you’ve created the printer, you can share it:
cscript prncnfg.vbs -t -p PRT-Location1-HRM -r 10.2.255.11 -h PRT-Location1-HRM +shared -direct -m "Default printer for HR" -l "Location 1"
When the Print Server is a member of an Active Directory domain, you might also want to publish the printer in Active Directory. This is done with the following command:
cscript pubprn.vbs \\SC2\PRT-Location1-HRM "LDAP://CN=MyContainer,DC=Domain,DC=tld"
The *.vbs-style commands are pretty short, but they are not very human-readable.
Using the Print Server-related PowerShell cmdlets
The promise of PowerShell is to provide a more straightforward, human-readable shell. It’s good to know, then, that Windows Server 2012–based Server Core Print Servers come with 20 Print Server-related PowerShell cmdlets:
- Add-Printer, Get-Printer, Set-Printer, Rename-Printer, and Remove-Printer
- Add-PrinterDriver, Get-PrinterDriver, and Remove-PrinterDriver
- Add-PrinterPort, Get-PrinterPort, and Remove-PrinterPort
- Get-PrintConfiguration and Set-PrintConfiguration
- Get-PrinterProperty and Set-PrinterProperty
- Get-PrintJob, Restart-PrintJob, Suspend-PrintJob, Resume-PrintJob, and Remove-PrintJob
Again, we start with creating a printer port. Begin by typing PowerShell on the console of your Server Core installation and then type:
Add-PrinterPort -Name "10.2.255.11" -PrinterHostAddress "10.2.255.11"
In contrast to the *.vbs-style Printing Admin scripts, you can add a printer, share it, and publish it in one line of PowerShell code:
Add-Printer -Name PRT-Location1-HRM -DriverName "Xerox Global Print Driver PS" -PortName 10.2.255.11 -Shared -ShareName "PRT-Location1-HRM" –Published

Install Printer with PowerShell
Using the GUI
If you feel less adventurous, or if you need to create only one printer, you can use the GUI to create printers. The following command unlocks the Add Printer Wizard:
C:\Windows\System32\printui.exe /il
Another way to add printers with a GUI is to use the Print Management MMC Snap-in from the Remote Server Administration Tools (RSAT).
Managing printers and print jobs
With several printers installed on your Server Core Print Server, you might occasionally want to perform management tasks on the print jobs submitted by your co-workers.
Again, you can use the Print Management MMC Snap-in from the Remote Server Administration Tools (RSAT). This tool is automatically installed when you install the RSAT. For more information, read Part 1 of the Server Core Remote Management series.

Print Management
In the left node, right-click the Print Management node and select Add/Remove Servers… from the context menu. Then, type the name of your Print Server (or Browse… to it) and click Add to list. Click OK when done. Your Server Core Print Server, its printers, and its print jobs can now be managed remotely.
On the console of the server, you can use Get-PrintJob, Restart-PrintJob, Suspend-PrintJob,Resume-PrintJob, and Remove-PrintJob to manage print jobs.
Another neat trick you might have to pull often when dealing with Print Servers is to reset the print spooler. On both Server with a GUI and Server Core Print Servers, this is done with:
net stop spooler && net start spooler
Concluding
The Print Server Server Role in Server Core installations of Windows Server 2012 is a powerful Server Role, featuring most of the command-line tools available since Windows 2000 Server as well as 20 brand new PowerShell cmdlets. From a remote management perspective, Server Core Print Servers are no different than Server with a GUI Print Servers.
- Server Roles in Server Core
- How to configure Server Core as Domain Controller
- How to install a DNS Server on Server Core
- How to install a DHCP Server on Server Core
- How to install File Services on Server Core
- Certificate Server in Server Core
- Install and manage a Print Server in Server Core
- Server Core Remote Access Services -DirectAccess and Routing
- How to install Hyper-V on Server Core
- Internet Information Services (IIS) on Server Core
- How to install the FTP Server Role on Server Core
- WSUS on Server Core
Print Server is very important roles for the system administrator and the management. Directly All printer sharing via windows server.
Prerequisites
This step is requirements in configure time printer management:
- Administrator password must be strong.
- Static IP is configured and windows updates are installed.
- Hardware and Software firewall are turned off.
Installing the Print Server step by step :-
1) Open the server manager and Click on the Add roles and features.
2)Click on Next.

3) Choose Role-based or feature-based installation and click on Next.

4) Choose the destination printer server for this configuration and click on Next.

5) Choose the Print and document services from server roles and when a new window appear, click on Add Features.

6) Click on Next.

7) Click on Next.

 Choose Print Server and click on Next.

9) Click on Install.

10) After installation click to Close button.

11) Open the print server management console in right-click on Printers server machine and click on Add Printer. Attach the printer to your infrastructure computer. Choose the right port where your printer is connected.

12) Choose the your printer manufacture name and printer model number select.

13) Rename the printer name and select the share printer button.

14) Click on Finish button.

You have successfully configured and deployed your network print server. This printer will be visible to other users on your infrastructure network.
Table Of Contents
- Introduction
- Print service installation
- Print service administration
- Install drivers
- Installing a printer on the print server
- Setting up a printer
- Troubleshooting
- Change the WSD port to TCP / IP
- Add the TCP / IP port of the printer
- Change the printer port
- Purge the queue (Spooler)
- Change the WSD port to TCP / IP
- Conclusion
Introduction
In this article, we will see how to setup and configure a print server on Windows Server.
Installing the Print and Document Scanning Service role adds an administrative console for managing the print server.
This service is not required to install and share a printer from a Windows server, it is possible to go directly through the control panel.
Print service installation
From the server manager where you want to install the print service, click Add Roles and Features 1 .
When launching the wizard, click Next 1 .
Choose the option based on role one or feature 1 and click Next 2 .
Select server 1 and click Next 2 .
Check the box for printing and scanning documents 1 .
Click Add Features 1 .
The Print Services role is selected, click Next 1 .
Skip the list of features by clicking Next 1 .
A Print Services Summary is displayed, click Next 1 .
From Windows 2012 Server, you can use Type 4 drivers that make it easy to deploy printers using WSD ports.
Select the Print Server 1 service and click Next 2 .
Click on the Install 1 button.
Wait while installing the print service …
The installation completed, exit the wizard by clicking Close 1 .
Print service administration
Now that the print service is installed, we will see how to administer it using the Print Management Console.
Open the console that is available from the Start menu.

After the console opens, unpack the Print Servers node 1 to access the local server.
Now we will see how to add drivers and printers.
I usually add the drivers first to the server and then install the printer, it is possible to add the drivers at the time of installation of the printer.
Install drivers
Retrieve the drivers that you need based on the printer models and copiers you are going to install. If your computer is composed of 32-bit workstations,, you must also download the x86 drivers.
From the Print Management Console, right-click Drivers 1 and click Add Driver 2 .

When launching the Add Printer Driver Wizard, click Next 1 .
Choose processor type 1 then click Next 2 .

Click on Disk provided … 1 to select the driver.
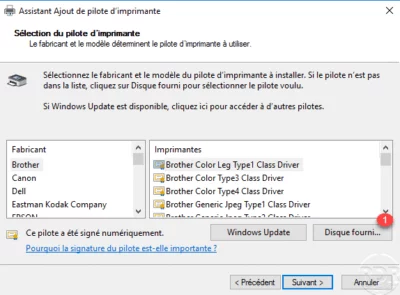
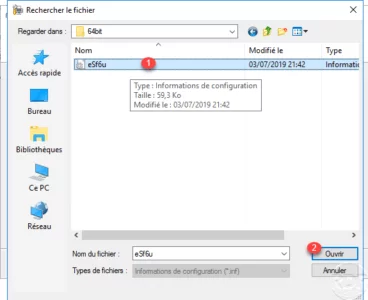
Select the driver inf 1 file and click Open 2 .
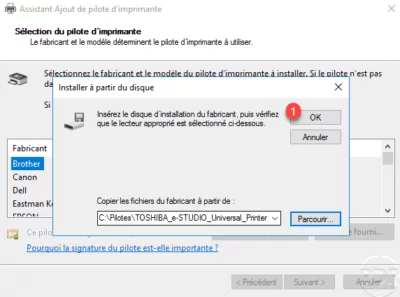
Click OK 1 to validate the selection of the file.
Choose the available printer 1 and click Next 2 .

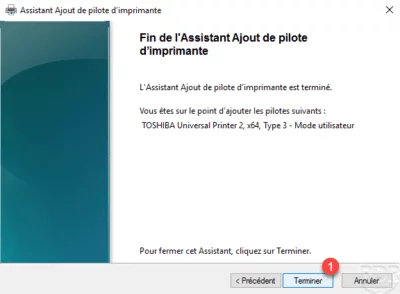
Click Finish 1 to confirm the driver installation and close the wizard.
The driver is now added to the server.
If necessary, repeat the same operation to install the 32-bit (x86) driver. It is recommended to install the same version of the driver.
Installing a printer on the print server
Now that we have the driver to install, we will see how to add a printer.
Right click on Printers 1 and click on Add Printer 2 .

When launching the wizard, choose the installation method, for a network printer with an IP address, choose Add TCP / IP Printer or Web Service by IP Address or Hostname 1 and click Next 2 .
Choose device type 1 , enter IP address 2 and click Next 3 .
Since Windows 10/2016, when the device type is auto, the print server will try to install the printer in Web Service Printer mode and create a WSD port. This mode makes plug and play network devices. On a print server containing a lot of printers, it is advisable to choose the TCP / IP Device type.
Name the printer 1 , set the share name 2 and click Next 3 .

An overview of the parameters is displayed, it can also be seen that the driver was automatically detected at the model level. Click Next 1 to confirm the addition of the printer.

Wait while installing the printer …
Once the printer is installed, close the wizard by clicking the Finish button 1 .
The printer is available from the Printers 1 node.

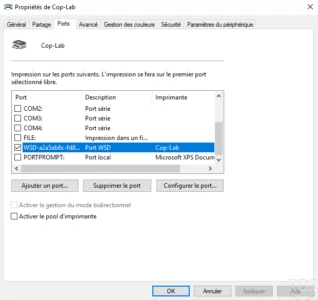
On the screenshot below, we can see that the driver is Type 4 because the copier has been installed in automatic detection and a WSD port has been created.
So that we can see the difference, I installed a second copier on the server but this time specifying the port type. Go to Ports node 1 in the Print Management Console. We can see the two added ports linked to copiers 2 .
Setting up a printer
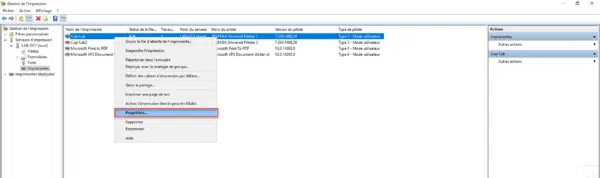
From the list of printers available on the print server, right click on the printer 1 to configure and click Properties 2 .

The General tab allows you to configure the name of the printer visible from the server, displays a summary of the features and starts printing a test page.
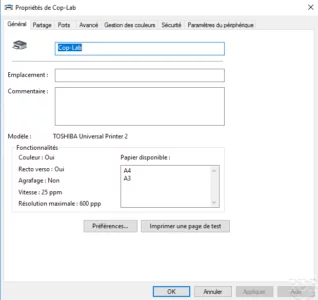
The Sharing tab is used to configure the SMB name.
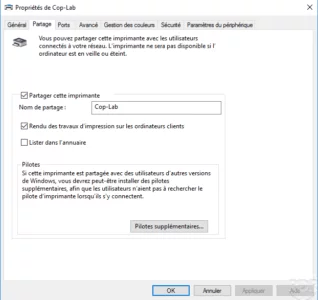
The Ports tab allows you to modify and configure the printer port on the print server.
The Advanced tab allows you to configure the driver used as well as the default print settings (black and white, double-sided ….).

The Security tab allows you to configure permissions on the printer as NTFS rights on a folder.

Troubleshooting
Change the WSD port to TCP / IP
It is not possible to convert the port, for this it is necessary to add a TCP / IP port on the print server and change the port of the printer.
Add the TCP / IP port of the printer
Right-click on Ports 1 and click on Add Port 2 .
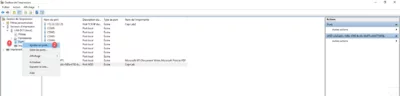
Select Standard TCP / IP Port 1 and click Add Port 2 .

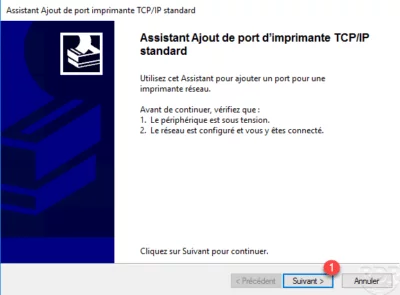
When launching the wizard, click Next 1 .
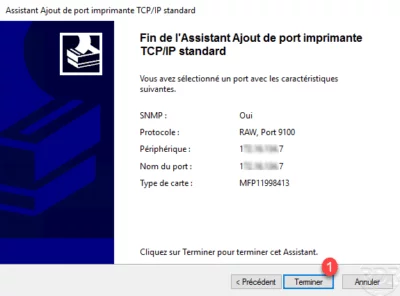
Enter the printer address 1 and click Next 2 .

Click Finish 1 to confirm the addition of the port.
Change the printer port
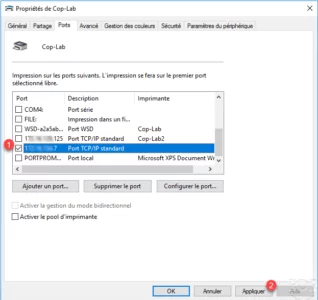
Ouvrir les propriétés de l’imprimante.
Go to the Ports tab, check the box of port 1 that has just been created and click on Apply 2 .
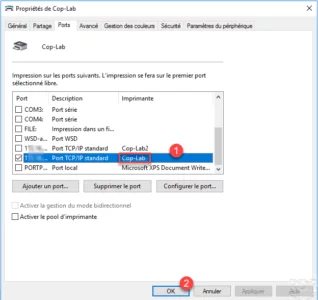
The printer port is changed 1 , click OK 2 to close the Properties window.
Purge the queue (Spooler)
It happens in some cases that an impression blocks the print service of the server, here is how to purge the files.
In batch:
net stop spooler
del %systemroot%\System32\spool\printers\* /Q /F /S
net start spooler
In PowerShell :
Stop-Service spooler
Remove-Item -Path $env:windir\system32\spool\PRINTERS\*.* -Force
Start-Service spooler
Conclusion
The print server is ready, all you have to do is deploy the printers automatically to GPO or Scripts.
If you want to log your impressions Papercut offers several solutions:
- Papercut NG which is complete solution of quota management and static (paying).
- PrinterLogger allows you to log impressions for free into a CSV file.
It is also possible to log impressions in Windows events by activating the Operational Log in Application Logs and Services / Microsoft / Windows / PrintService.
Printing and file sharing are the essential sectors for users, groups, organizations in a network. Like in a network, there are a large number of printers with different varieties and there are an enormous number of groups, users who need to use. As an administrator, you should know how to install and configure print services in Windows Server to manage tens or hundreds of printers in a network. As most of the modern printers have a network interface card and Internet Protocol (IP) address can be assigned to the printers. Therefore, all users through the network can access and use them. One of the most handful features in print services is print pooling by which a number of printers are added to a pool. When one is performing a print job, other printers perform the next print jobs sent to them. As you can grant priority access to a printer from 1 through 99. When there are two print jobs in the print server, the user with higher priority will get the job done before the another. In this lesson, we will learn + understand how to install and configure print services fully in Windows Server 2016. Let’s get started.
- Don’t Miss: Sharing files & folders in Windows Server 2016
- MCSA Lab Manual Articles.
Understanding Windows Print Architecture
Microsoft uses some terms referring to components of print services architecture, better to know for the certification exams or working with them. The Components involved with the print services are the following:
1. Print Device: printer device is actual hardware that produces hard-copy documents on paper.
2. Printer: It is the software interface through which a computer communicates with the print device.
3. Print Server: It is a server or a standalone computer which receives print jobs from clients that are attached locally or connected to the network.
4. Driver: It is a device driver that converts print jobs generated by an application to appropriate string of commands for a specific printer.
Attaching Printer Device
These are four fundamental configurations, you can configure a printer to work. As a result, the printer works depending on your configurations to print documents.
1. Direct Printing is the simplest way of using a printer device. That a printer is attached directly to a Server. The Server sends a print job to the printer, as a result, it produces the hard-copy document.
2. Local-attached printer sharing: Except direct printing, you also need to share printer and printer device with other clients on the same network. In this arrangement, the Server which is directly attached to the printer device works as a print server. Doing this, you can share the print server’s printer. Consequently, the clients can use the print device through server’s print interface. As a result, the advantage of this arrangement is that everyone from everywhere in the network has access to the printer device. Also, it is handful when you have light printing jobs.
3. Network-attached printing: Unlike the previous kinds of attaching the printer device with computer by USB or other port, here you don’t need to attach them. Instead, you can attach a printer device directly to a network. As a result of attaching printer device to a network, it becomes the network component. Most of the printer devices nowadays have network interface card (NIC) which allow you to attach a network standard cable to it. Due to this capability, a print device can have their own IP addresses. Also, you can buy NIC card separately and attach to a printer device. If the printer device has none of this capabilities a standalone print server is possible to be used.
Finally, by network attached printing you’ve to choose a computer to act as print server or let all or everyone uses the printer directly (or be print server) by sending print jobs and seeing their own queue. If you’ve chosen to be the print server everyone or multiple users then there are many disadvantages, which includes:
- Users examining the print queue see only their own jobs.
- Users are oblivious of the other users accessing the print device. They have no way of
knowing what other jobs have been sent to the print device or how long it will be until
the print device completes their jobs. - Administrators have no way of centrally managing the print queue because each client
has its own print queue. - Administrators cannot implement advanced printing features, such as printer pools
or remote administration. - Error messages appear only on the computer that originated the job that the print
device is currently processing. - All print job processing is performed by the client computer rather than being partially
offloaded to an external print server.
4. Network-attached printer sharing: In this method, you assign a computer as a print server and use it to serve clients means when you install a printer on a computer(that becomes the print server), you will share it on the network and configure it to access the printer directly through TCP (Transmission Control Protocol) port. When done, you just share the printer for the clients and manage them for accessing + managing.
First of all, we need to install Print and document services role on Windows server 2016. Consequently you can use Windows server print services.
Role Installation
1. Open Server Manger and click on Add roles and features to install Print and document services role.

2. In the Welcome we’ve got nothing to do at all. Click on Next button. In Select destination server page, elect the Select a server from the server pool. Select the server you want to install the role on from the list below. Click on Next button.

3. Put a check mark in the box next to Print and document services. A small windows pops up and wants you to add some features for print services management. Click on Add features to install management tools. If you don’t install the management features, you just install the core service.

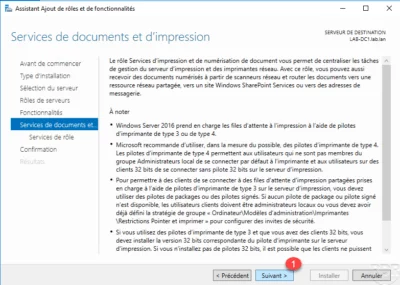
4. In the Print and Document Services page, provided essential information about the services to be noted. Finally click on Next button.

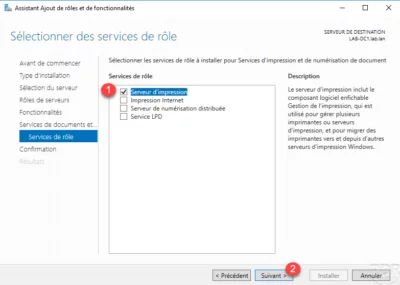
5. In the Select role services page four options are visible:
1. Print Server: It is the actual print server. Selecting this option you can manage print services components as printers and drivers and furthermore things.
2. Distributed Scan Server: allows you to send scanned images to specific users or groups in the domain.
3. Internet Printing: It creates a web page and gives the access to printer clients using printers through IIS web server.
4. LPD Service: This option enables UNIX clients running line printer remote (LPR) to send print jobs to Windows printers. I install only Print Server.

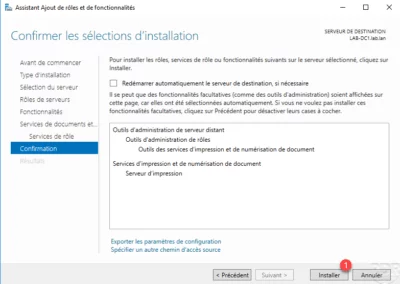
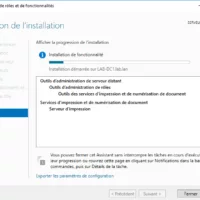
6. We’re almost done. Click on Install button for installing the role on server. No reboot is needed.

Configure Print Services in Windows Server
First of all we need to add some printers and drivers on the server and manage them.
Open Server Manager, click on Tools dropdown menu and select Print Management services. Using this tool we can add and manage print services easily.

While Print Management tool is opened. Expand Custom Filters on the left pane to see the custom filters. You see four default filters:
- All Printers: It shows the list of all printer connected to the domain from all print servers.
- All Drivers: You can see a complete list of all drivers available for your clients through all the domain.
- Printers Not Ready: It shows you list the servers which are not available to clients. They don’t work, fix them.
- Printers With Jobs: Shows the list of printers currently doing print jobs.
Below Custom Filters another option is visible by the name Print Servers. Expand it to see all the print server in your domain. You can add all print servers in the domain here for easy management. Just right-click on Print Servers and select Add Server and go on.

You can see the same options like drivers and printer below the SVR-A server as the below Custom Filters. So the difference between this and the Custom Filter is that which the printers shown below the filter is the list of all printers in the domain. The printers below the Print Servers is the list of printers installed on each print server.
Add Printer
1. Print Management tool opened, expand Print Servers and right-click on the server and select Add Printer option.

2. In the Welcome page we’ve nothing to do so just click on Next button. In the Printer Installation page select the Add a new printer using an existing port. Elect a port and hit Next button.

3. In the Printer Driver page select Use an existing printer driver on the computer option. From the drop-down list select a driver that matches your printer device manufacturer and model.

4. Now you need to type a name for the printer in the box shown in the picture below. Below the Printer Name you can also see another option: Share this printer. As a result you can choose a share name and location for the printer. If needed you can leave a comment for users guidance.

5. Finally we are done with adding printer on a server. Just click on Finish button to finish the wizard. While finished the wizard you can find the printer in All Printers option in the left pane. If you would like to print a test page selecting Print a test page at the bottom of the wizard also you can add another printer by selecting Add another printer.

Add Driver
Maybe you need different kinds of drivers for client computers to use be able to use print device. So you need to have 32-bit and 64-bit drivers.
1. First of all you need to right-click on Drivers option below the server which you want to add driver to. Select the Add driver option.

2. In the Welcome page we have nothing to do. In the Processor Selection page you need to specify which kind of processors do your clients use. You can one or both of the options and hit Next.

3. In the Printer Driver Selection page you need to specify two things. First of all you should specify your devices’s manufacturer. Secondly specify the printer model. In addition to these you have one more useful option. If you have driver on a disk, you can click on Have Disk button and find path of the source and add it.

4. We are done and the driver was added to the server. So click on Finish button due to finish the wizard.

Conclusion
Ok, that’s all. For any kind of question feel free and leave a comment below the post. I answer you as soon as possible.