Migrating to a new server can be a daunting task for many IT professionals, especially when there are so many different tools available. Fortunately, Microsoft has developed an easy-to-use set of tools called the Windows Server Migration Tools to help streamline the migration process.
In this article, we’ll take a look at what the Windows Server Migration Tools are, how they can help, and how to use them.
Windows Server Migration Tools are a set of programs and scripts developed by Microsoft to facilitate the transfer of server roles and settings from one server to another. It enables administrators to quickly and easily migrate server roles and features from one Windows Server computer to another. It supports the migration of roles such as active directory, DNS, DHCP, file and print services, web server (IIS), and more. It also supports the migration of configurations, operating system settings, and user data.
Introduction to Windows Server Migration Tools
Windows Server Migration Tools (WSMT) are a set of tools that can help you migrate your server from one version of Windows Server to another. The tools are designed to help you move your data, settings, and applications from one server to another, making the process easier and more efficient. They can also be used to migrate from one server to another in a cloud-based environment or from an on-premises server to a cloud-based one. The tools are free and can be downloaded from the Microsoft Download Center.

Windows Server Migration Tools can be used to migrate data, settings, and applications from one server to another. They are designed to simplify the process of migrating a server, as well as to ensure that the data, settings, and applications are correctly migrated. The tools include a variety of features and functions, such as the ability to migrate multiple servers at once, the ability to migrate large amounts of data quickly and securely, and the ability to ensure that the data, settings, and applications are correctly migrated.
Benefits of Using Windows Server Migration Tools
Using Windows Server Migration Tools can provide a number of advantages. For example, the tools can help reduce the time and effort required to migrate a server, as well as reduce the risk of data loss or corruption during the migration process. The tools can also help to ensure that the data, settings, and applications are correctly migrated, as well as to minimize downtime during the migration process.
Finally, the tools can help to save money, as they can reduce the costs associated with purchasing new hardware or software for the migration process. Using Windows Server Migration Tools can also help to ensure that the data, settings, and applications are migrated in an efficient and secure manner. The tools can ensure that the data is securely transferred and that the settings and applications are correctly configured on the new server.
Additionally, the tools can help to reduce the risk of data loss or corruption during the migration process, as well as to minimize downtime during the migration process.
Types of Windows Server Migration Tools
There are a variety of different Windows Server Migration Tools available. These include tools for migrating from one version of Windows Server to another, as well as tools for migrating from an on-premises server to a cloud-based one. Additionally, there are tools for migrating from one cloud-based environment to another.
The most popular Windows Server Migration Tools are Microsoft’s own tools, such as the Windows Server Migration Assistant (WSMA) and the Microsoft Assessment and Planning Toolkit (MAP). The Windows Server Migration Assistant is designed to help simplify the process of migrating data, settings, and applications from one version of Windows Server to another.
The Microsoft Assessment and Planning Toolkit is designed to help organizations assess their environment and plan for a migration.
How to Use Windows Server Migration Tools
Using Windows Server Migration Tools is relatively straightforward. Generally, the process involves downloading the tools from the Microsoft Download Center, installing them on the source server, and then running the tools on the source server to migrate the data, settings, and applications to the target server.
The tools can also be used to migrate from an on-premises server to a cloud-based one or from one cloud-based environment to another.
Installing the Tools
The first step in using Windows Server Migration Tools is to download and install the tools on the source server. The tools can be downloaded from the Microsoft Download Center and are typically relatively easy to install.
Once the tools are installed, they can be used to migrate data, settings, and applications from the source server to the target server.
Migrating Data, Settings, and Applications
Once the tools are installed, they can be used to migrate the data, settings, and applications from the source server to the target server. This process typically involves running the tools on the source server to transfer the data, settings, and applications to the target server.
The tools can also be used to migrate from an on-premises server to a cloud-based one or from one cloud-based environment to another.
Verifying the Migration
Once the data, settings, and applications have been migrated, it is important to verify that the migration was successful.
This can be done by running the tools on the target server to ensure that the data, settings, and applications were correctly migrated. Additionally, it is important to ensure that the data, settings, and applications are configured correctly on the target server.
Top 6 Frequently Asked Questions
What Are Windows Server Migration Tools?
Windows Server Migration Tools are a set of PowerShell cmdlets that allow you to migrate roles, features, and operating system settings from one Windows Server to another. This can be used to migrate from one physical server to another, from one virtual machine to another, or from one cloud environment to another. It can also be used to upgrade from one version of Windows Server to another.
How Do I Install the Windows Server Migration Tools?
The Windows Server Migration Tools are installed as an additional feature on Windows Server. To install the tools, open the Server Manager and select the “Add Features” option. In the Add Features Wizard, select the “Windows Server Migration Tools” option and follow the instructions to install the tools.
What Are the Requirements for Using the Windows Server Migration Tools?
The Windows Server Migration Tools can be used to migrate roles and features from Windows Server 2008 R2 or later versions of Windows Server. The source and destination servers must be running the same version of Windows Server in order to use the tools. Additionally, the source and destination servers must both have PowerShell 3.0 or later installed.
What Can I Migrate Using the Windows Server Migration Tools?
With the Windows Server Migration Tools, you can migrate roles, features, and operating system settings from one Windows Server to another. This includes roles such as Active Directory, DNS, DHCP, File Services, IIS, and many others. Additionally, you can migrate settings such as registry keys, environment variables, and IIS configuration.
What Are the Advantages of Using the Windows Server Migration Tools?
The Windows Server Migration Tools provide a number of advantages over manual migration. It can save time and resources by automating the migration process, and it can also be used to upgrade from one version of Windows Server to another. Additionally, the tools can be used to migrate from physical servers to virtual machines, or from one cloud environment to another.
Are There Any Disadvantages of Using the Windows Server Migration Tools?
The Windows Server Migration Tools can be used to automate the migration process, but there are some limitations. For example, the tools cannot migrate applications or user profiles, and some roles or features may not be supported. Additionally, the tools cannot be used to migrate from one version of Windows Server to another if the versions are not compatible. In conclusion, Windows Server Migration Tools are an invaluable asset for businesses who are looking to move their data and applications from one server to another. The tools allow for a seamless transition and can save time and money. With the easy-to-use interface and comprehensive features, businesses can rest assured that their data and applications are securely transferred from one server to another.
Categories
- Transfer Programs from C Drive to D Drive
- Transfer Installed Software to New PC
- Transfer Files from Old PC to New PC
- Transfer Microsoft Office
- Find Office Product Key
- Move User Folder
- Move Google Chrome Bookmarks
| Workable Solutions | Step-by-step Troubleshooting |
|---|---|
| Part 1. Top 3 Best Windows Server Migration Tools |
1. (Recommended) EaseUS Todo PCTrans..Full steps 2. Zinstall WinServ…Full steps 3. Storage Migration Service…Full steps |
| Part 2. How to Migrate Windows Server Data and Programs | Run EaseUS Todo PCTrans > Choose «PC to PC»…Full steps |
Part 1. Why Migrating Windows Server Data and Applications By Hand is Hard
In the previous post, I talked about Windows Server 2016/2012/2008/2003 upgrade strategies and how to clone a Windows Server hard drive. Here, I am going to talk about why it is hard to move Windows Server programs and data manually. Moving applications by hand is hard because of the following reasons:
- Complex reconfiguration
- Production cutover
- Time-consuming
- …
Since manual Windows Server data migration is difficult and time-consuming, the best choice is turning to professional Windows Server migration tools. You can easily transfer programs, files, and settings to a new Windows Server PC with simple clicks.
Part 2. Top 3 Best Windows Server Migration Tools
After testing, I have listed three reliable Windows Server migration tools. You can perform Windows Server application migration and transfer data and apps from an old server to another new server with them. Find out their advantages and select the best migration tool for yourself.
- Top 1. EaseUS Todo PCTrans
- Top 2. Zinstall WinServ
- Top 3. Storage Migration Service
Top 1. EaseUS Todo PCTrans (Recommended)
Among these Windows Server migrating applications, EaseUS Todo PCTrans ranks top for its easiness and excellence. This PC transfer software can meet your exact needs with options ranging from file selection to account settings. You can move your stuff and get started with your new PC. What’s more, this tool allows you to transfer settings, applications, files, and even user profiles from an old PC to a new one. It supports the most common applications/programs, including MS Office (Word, Excel, Outlook, etc.), Photoshop, Adobe software, AutoCAD, Dropbox.
Highlights:
- It is compatible with Windows Server 2003/2008/2012/2016/2019 and Windows 7-10
- This software allows you to move programs from PC to PC
- It supports to change the installation location of programs on Windows Server local drive.
- You can create images of your files, programs & account, and automatically export them from the source PC to the target PC
EaseUS Todo PCTrans Technician
- ☆ Deploy & install Todo PCTrans on multiple PCs.
- Transfer unlimited files, programs, apps between Servers.
- Transfer account, domain account, and settings.
- Data rescue, find product key of installed programs.
- One license for multiple PCs.
Top 2. Zinstall WinServ
Zinstall WinServ migrates applications, settings, shares, profiles, data, etc. from one Windows Server to another. It is compatible with Windows Server 2019, 2016, 2012, 2008, 2003.
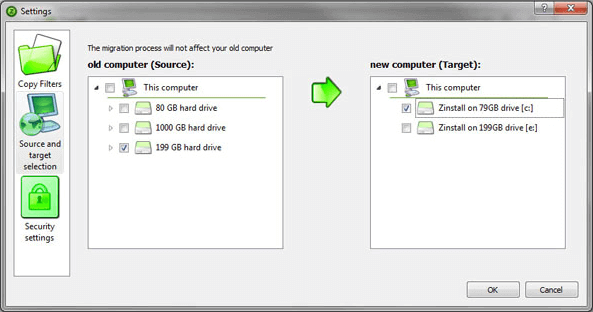
Highlights:
- You can transfer programs, settings, profiles, shares, and data from one server to another.
- WinServ can transfer from physical to virtual (P2V, V2V, V2P).
- It also works with Windows 10 (including Windows 10 to Windows 10), Windows 8/8.1, Windows 7, XP, and Vista.
Cons:
- It’s more like a disk cloning process between PCs.
- The interface looks old and hard to use.
Top 3. Storage Migration Service
Microsoft’s recommended method for performing a migration from Windows Server 2008/R2 is what they call a Storage Migration Service. This tool provides a graphical tool that inventories data on Windows and Linux servers and then transfers the data to newer servers or to Azure virtual machines. With it, you build a new server, either physical or virtual, running a new Windows Server version and then move your roles and services to the newly built physical/VM Windows Server.
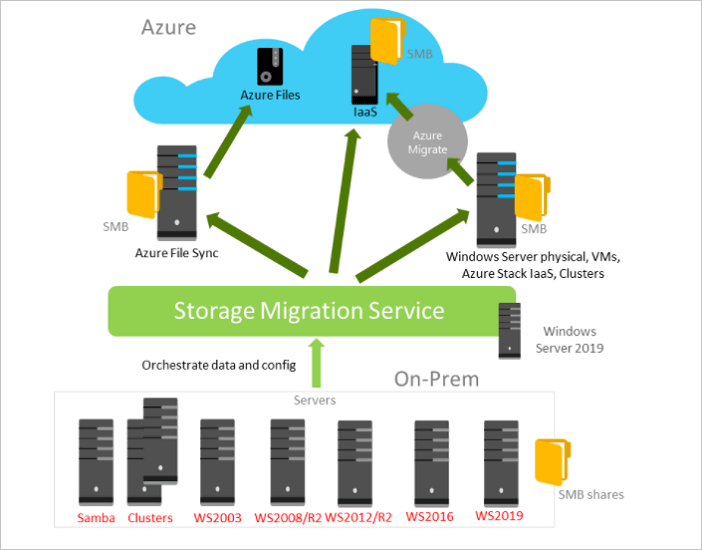
Highlights:
- It can transfer files, file shares, and security configuration from the source servers rapidly.
- It takes over the identity of the source servers optionally so that users and apps don’t have to change anything to access existing data.
- You can manage one or multiple migrations from the Windows Admin Center user interface.
Cons:
- It can only run on Windows Server operating systems.
- The operation process is difficult for beginners.
If you are looking for an easy and fast way to migrate data, applications, files, or settings from Windows Server to Server, my recommendation is using EaseUS Todo PCTrans. This easy-to-use Windows Server migration tool can move Windows Server data with simple clicks. Follow the steps below and migrate files from Windows Server to another quickly.
Step 1. Launch EaseUS Todo PCTrans on your source and target computers, connect both PCs via the internet.
1. At the «PC to PC» section, click «PC to PC» to continue.

2. Select your target computer via its device name, then enter its account password or verification code and select the transfer direction. Then click «Connect» to continue.
You can check the verification code on the right top of «PC to PC» mainscreen on the target computer.

Step 2. Select the categories Applications, Files, and Accounts to transfer via the internet.
If you want to transfer data selectively, click «Edit» under each category, and choose the specific items.

Step 3. Click «Transfer» to start transferring your apps/files/accounts from one computer to another computer via the Internet.

Conclusion
Even if you have no way to install your applications on a new server, you can still transfer them from the old one with a dedicated migration tool. So if you are looking for a way to automate a large part of your server migration project, EaseUS data migration tool is the right one for you.
Windows Server Migration Related Questions (FAQs)
It is hard to migrate installed programs to another PC or drive manually. It’s an excellent choice to try a reliable application migration tool. We have talked about the top 3 Windows Server migration tools, and how to migrate wanted files. If you still have problems, read on.
What are Windows Server Migration Tools?
Windows Server Migration Tools are utilities that work with Server 2003 and newer Server OS versions. They can migrate Server applications, personal files, settings, and other data from Windows Server to another.
What is Windows Server migration?
Windows Server migration is when you move one role or feature at a time from a source computer that is running Windows Server to another destination computer that is running Windows Server, either the same or a newer version.
How long does server migration take?
It depends on a variety of factors, including the amount of data being migrated, the stability of the original server, or other unforeseeable issues, a typical migration can take anywhere from a few minutes to a few hours.
How do I move my data from one Server to another?
To migrate Windows Server data:
Step 1. Open EaseUS Todo PCTrans on both of your computers. Choose PC to PC and go to the next step.
Step 2. Follow the interface guides to complete the connection between the two computers.
Step 3. Click Files > Transfer to copy all the files from one server to another. Or you can click Edit > Finish > Transfer to migrate specific data you have chosen.
Step 4. Wait for the process finishes. PCTrans will transfer files at a fast speed.
Some people may have learned about Windows Server Migration Tools. You want your files or some other data to be shared among multiple Windows Servers; in that case, Windows Server Migration Tools can help you realize it. This article on MiniTool Website will reveal a guide for using Windows Server Migration Tools.
Migration tools are used to manage and facilitate the modernization of an organization’s IT infrastructure and resources.
They support the migration of files, databases, applications, operating systems, physical and virtual servers, networks, and data centers to new or upgraded platforms and products.
As one member of the migration tools, Windows Server Migration Tool can also play the role to meet your demands. So, what is Windows Server Migration Tool?
Windows Server Migration Tools can help you migrate server roles, features, operating system settings, and other file data to servers, including later versions of Windows Server.
The server migration tool allows users to transfer all assets from the current server to the new server. This tool can run as a shell script on the server you want to move. When you are prepared to migrate to Windows Server, it can be your right hand.
As for how to use Windows Server Migration Tool, you will learn it in three parts as follows.
Part 1: Prepare for Installation
Before you install the Windows Server Migration Tools, there is some information you need to verify.
Point 1: Check if your operating system is supported.
The supported source server operating systems are as follows:
- Windows Server 2003 with Service Pack 2
- Windows Server 2003 R2
- Windows Server 2008
- Windows Server 2008 R2
- Server Core installation option of Windows Server 2008 R2
- Windows Server 2012
- Server Core installation option of Windows Server 2012
For those systems, you can migrate to Windows Server 2012 R2 or Windows Server 2012.
For Windows Server 2012 R2 and the Server Core installation option of Windows Server 2012 R2, you can only migrate to Windows Server 2012 R2.
Windows Server Migration Tools are also available for the newer versions of Windows Server except the above. But you can’t migrate to a destination server that is running an operating system in a different system UI language.
Note:
Note: Roles that are running on the Server Core installation option of Windows Server 2008 cannot be migrated.
Point 2: Make sure your source server has at least 23MB of space for the Windows Server Migration Tools deployment folder.
Besides, for the Windows Server 2008 or Windows Server 2003/2003 R2 source server, you need to install Windows PowerShell.
Part 2: Install Windows Server Migration Tools
Point 1. Install Windows Server Migration Tools on the destination and source servers.
There are two different installation methods you can choose:
Method 1: Use Windows PowerShell
Step 1: Right-click the Windows PowerShell on the Windows Start screen.
Step 2: Click Run as Administrator and type the following command on the pop-up window and press Enter.
Install-WindowsFeature Migration –ComputerName
Then the installation will be prepared. You can wait for a moment and then follow the instruction to finish that.
Method 2: Use Server Manager
Step 1: Type Server Manager in the Search box and press Enter.
Step 2: Click on Add Roles and Features under the Manage tab and then Next.
Step 3: Select your destination server and then Next.
Step 4: Go to the Features tab and check the box of Windows Server Migration Tools. Then click Next.
Step 5: Click Install after confirming your installation selections.
Point 2. Create a deployment folder on the destination computer.
In this section, you need to create the deployment folder on your destination server that is running Windows Server Migration Tools. Please do as follows:
Step 1: Type cmd on the Start screen, right-click Command Prompt, and then click Run as administrator.
Step 2: Type the following command and press Enter.
cd %Windir%\System32\ServerMigrationTools\
step 3: Based on your destination Windows Server version, type one of the following commands. They represent the path of the deployment folder on the source computer. Then press Enter.
For Windows Server 2012 – SmigDeploy.exe /package /architecture amd64 /os WS12 /path
For Windows Server 2008 R2 – SmigDeploy.exe /package /architecture amd64 /os WS08R2 /path
For Windows Server 2008 – SmigDeploy.exe /package /architecture amd64 /os WS08 /path
For Windows Server 2003 – SmigDeploy.exe /package /architecture amd64 /os WS03 /path
After that, the deployment folder has been set up.
Point 3. Register Windows Server Migration Tools on the source computer.
The Windows Server Migration Tools need to be registered with Windows PowerShell before you start to use it.
There are two things you need to check out if you are using Windows Server 2008 or Windows Server 2003.
- Microsoft .NET Framework 2.0 is installed on Windows Server 2003.
- Windows PowerShell 1.0 or a later version is installed on Windows Server 2008 or Windows Server 2003.
Step 1: Copy the deployment folder generated by the destination computer to a local drive on the source one.
Note:
Note: Ensure that the operating system architecture of the deployment folder matches that of the source computer to which you are copying the folder.
Step 2: On the source computer, press the Windows and X keys together and select Command Prompt from the menu.
Step 3: At the Command Prompt, switch to the directory where the Windows Server Migration Tools deployment folder is copied in Step 1.
Step 4: Type the following command and press Enter to register Windows Server Migration Tools cmdlets.
.\Smigdeploy.exe
After finishing those three points, you have successfully installed the Windows Server Migration Tool. In the next part, you can migrate data using Windows Server Migration Tools.
Part 3: Use Windows Server Migration Tools
Situation 1: Export the local users from the source server.
Step 1: Type Server Manager in the Search box and open it on the source server.
Step 2: Click Tools.
Step 3: Open the Windows Server Migration Tools.
Step 4: Run the following command:
Export-SmigServerSetting -User All -Group –Path C:SysAdminExportMigUsersGroups –Verbose
Situation 2: Import local users to the targeted Server.
Step 1: Follow the route to open Windows Server Migration Tools on the destination server.
Server Manager﹥ Tools﹥ Windows Server Migration Tools
Step 2: Run the following command:
Import-SmigServerSetting –User Enabled –Group -Path C:SysAdminExportMigUsersGroups –Verbose
For the above part, you have learned how to install and use Windows Server Migration Tools. If you want to know how to remove it, the issue will be clarified in this part.
Step 1: Type Windows PowerShell in the Search box and run it as an administrator.
Step 2: Type the following, and then press Enter.
Uninstall-WindowsFeature Migration –ComputerName
Then the Windows Server Migration Tools can be safely removed.
As you can see, the installation process of Windows Server Migration Tools is complicated and the tool is less flexible. Although it can help you transfer data, the command you need to remember is hard for a non-professional.
If you want to enjoy a similar function as Windows Server Migration Tools and more sync features with easy operations, MiniTool ShadowMaker can be an optimal option.
You can easily synchronize files between Windows Servers. First of all, you can download and install this program and you will get a 30-day free trial version.
MiniTool ShadowMaker TrialClick to Download100%Clean & Safe
Step 1: Click Keep trial to enter the program.
Step 2: Switch to the Sync tab and click the Source section.

Step 3: Choose the files you want to sync and then click OK.

Step 4: Click the Destination section to select a destination folder to save the synchronized files. Here, you can sync your files to multiple places, such as the Administrator account folder, Libraries, Computer, and NAS.
If you want to sync your files to another server, you can choose Shared and then click Add new to input path, user name, and password. Then click OK and then OK to save your changes.

Step 5: After selecting the sync source and target, you can click the Sync Now button to immediately execute the synchronization operation. Or click Sync Later and then start the delayed sync task on the Manage page.
Different from Windows Server Migration Tools, more useful features are developed here. For example, you can also configure your scheduled sync tasks and set exclude conditions to filter backup files. Also, you can compare the contents of the file.
Further Reading: Server Migration and How to Plan for It?
Now that we’ve covered Windows Server Migration Tools, we can expand a little bit further and discuss what server migration is.
Server migration is a term used to describe copying or moving critical data from one server to another and configuring the target server to replace the first server.
How to Plan for Server Migration?
First of all, a complete and accurate picture of your existing infrastructure, including all data, hardware, software, and network components is necessary for successful data migration.
There are five points to Windows Server Migration steps.
Point 1: Prepare your new server
It is critical that your new server be properly sized and prepared for any incoming data and digital assets.
Point 2: Assess data fidelity
It is important to ensure that all data is taken into account before the migration and installed correctly after the migration.
Point 3: Data transfer
With the new server in place and all the data properly secured and ready for migration, it’s time for the final replication. Data transfer is typically the most time-consuming part of the migration. You’d better prepare a good Internet environment.
You can read this article to learn a good Internet speed: What Is a Good Internet Speed? Check the Answer Right Now!
Point 4: Testing (QA/QC)
Checking for full functionality and full data transfer can be time-consuming and cumbersome, but the time is worth it and prevents problems from being discovered much later.
Point 5: Change DNS
After all of that, you can switch your DNS so traffic goes from the old server to the new infrastructure. It’s a relatively simple process in most cases.
This article has introduced how to install, use, and remove Windows Server Migration Tools. If you are interested in or find it useful, you can share it on Twitter.Click to Tweet
Bottom Line:
You can weigh the value of the Windows Server Migration Tool and make the decision based on your own situation. Windows Server Migration Tool can be your right hand for your better experience. You can also carry on migration with the help of other sync programs.
If you have encountered any issues when using MiniTool ShadowMaker, you can leave a message in the following comment zone and we will reply as soon as possible. If you need any help when using MiniTool software, you may contact us via [email protected].
How much does server migration cost?
This manual effort drives the cost of such migrations, typically ranging from $1000 per server at the low end, to $3000 for an average case, and as high as $15000 for more complex scenarios.
How long does it take to migrate servers?
Depending on a variety of factors, including the amount of data being migrated, the stability of the original server, or other unforeseeable issues, a typical migration can take anywhere from a few days to a few weeks. It is best to plan for this process to take a few weeks.
What are the advantages of a server migration?
Businesses typically migrate servers for increased capacity, faster response times, and a host of other important benefits. Whether you anticipate migrating servers in 5 months or 5 years, it’s never too early to take these planning tips into consideration.
Why is server migration important?
Organizations may migrate to: Take advantage of new technology or better service, or ensure that the operating system (OS) and the hardware beneath it stay up-to-date with current technology. Move to the cloud for increased flexibility or scalability.
The Windows Server Migration Tools (WSMT) have shipped with Windows Server since version 2003. Admins can use them to transfer roles and features to a newer version of the operating system. Since Microsoft hasn’t updated these tools for quite some time, they show some bugs when used with Server 2022. Nevertheless, the WSMT are still a viable option when upgrading Windows Server.
- Author
- Recent Posts

Brandon Lee has been in the IT industry 15+ years and focuses on networking and virtualization. He contributes to the community through various blog posts and technical documentation primarily at Virtualizationhowto.com.
Depending on the role you want to migrate, there are alternatives to WSMT. For file servers, Microsoft has introduced the Storage Migration Service with Windows Server 2019. When updating domain controllers, admins usually install a new server and replicate the Active Directory database and SYSVOL to the new machine. However, WSMT are still useful when migrating roles such as DHCP and several local settings such as users and groups.
Installing and running WSMT
On the destination server, install the Windows Server Migration Tools using the Server Manager GUI. You can also use PowerShell to install the tools using the following command:
Install-WindowsFeature Migration –ComputerName <computer_name>

Install the Windows Server Migration Tools
Once you install the WSMT on the destination server, the workflow then allows you to deploy these tools to the source server. Here, I am using a UNC path, which is supported.

Deploy the server migration tools from the destination server to the source server
Note that the directory is created on the source server, as specified in the command run above.

Directory is created on the source server
Weird issues
In my testing with newer servers, I ran into multiple buggy behaviors with WSMT. After deploying the tools to the source server, you are supposed to run the SMIGDeploy.exe command on the source server and automatically register the PowerShell cmdlets. I ran into several oddities during this process, including:
- .NET errors stating that .NET was not installed, even when it was installed
- PowerShell crashes when registering the cmdlets
- Access denied errors and memory corruption errors
Below, you can see the SMIGDeploy.exe file in the directory published to the source server from the destination server. Running this file registers the PowerShell cmdlets on the source server.

Viewing the SMIGdeploy.exe command
Even though the .NET feature was installed on the source server, I saw issues with the server not seeing the .NET components installed. Similar problems have been reported across various message boards, including TechNet. See here.

NET errors even though .NET is installed on the source server
Workarounds
The workaround in my case was simply installing WSMT on the source server instead of using the published WSMT from the destination. After installing the Windows feature on the source server, I manually registered the snap-in using the cmdlet:
Add-PSSnapin Microsoft.Windows.ServerManager.Migration
Then, you can run the Export-SmigServerSetting cmdlet to export roles and features. The example below shows exporting the BranchCache feature to a target folder.
Export-SmigServerSetting -featureID <your FeatureID> -User All -Group -path c:\SMIG -Verbose

Exporting compatible roles and features from the source server
Once the feature ID is exported, you can then import the features on the destination server using the import cmdlet.
Subscribe to 4sysops newsletter!
Import-SmigServerSetting -FeatureID <your FeatureID> -Path <path to the source export> -Verbose

Importing features using the WSMT import cmdlet
Conclusion
Microsoft hasn’t improved the WSMT for several years. So when using them with Windows Server 2022, you will probably run into some annoying bugs. Nevertheless, they’re still useful for certain scenarios where you don’t have newer tools or an in-place update isn’t an option.
![]()
Windows Server 2022 Essentials is a server edition of the Windows Server operating system. It is a low-cost, low-power server operating system that is designed for small to medium businesses. Windows Server 2022 Essentials is a successor to Windows Server 2016 Essentials.
Windows Server 2022 Essentials is a server edition of the Windows Server operating system. It is a low-cost, low-power server operating system that is designed for small to medium businesses. Windows Server 2022 Essentials is a successor to Windows Server 2016 Essentials.
Windows Server 2022 Essentials is a server edition of the Windows Server operating system. It is a low-cost, low-power server operating system that is designed for small to medium businesses. Windows Server 2022 Essentials is a successor to Windows Server 2016 Essentials.
Windows Server 2022 Essentials is a server edition of the Windows Server operating system. It is a low-cost, low-power server operating system that is designed for small to medium businesses. Windows Server 2022 Essentials is a successor to Windows Server 2016 Essentials.
Windows Server 2022 Essentials is a server edition of the Windows Server operating system. It is a low-cost, low-power server operating system that is designed for small to medium businesses. Windows Server 2022 Essentials is a successor to Windows Server 2016 Essentials.
Windows Server 2022 Essentials is a server edition of the Windows Server operating system. It is a low-cost, low-power server operating system that is designed for small to medium businesses. Windows Server 2022 Essentials is a successor to Windows Server 2016 Essentials.
Windows Server 2022 Essentials is a server edition of the Windows Server operating system. It is a low-cost, low-power server operating system that is designed for small to medium businesses. Windows Server 2022 Essentials is a successor to Windows Server 2016 Essentials.
Windows Server 2022 Essentials is a server edition of the Windows Server operating system. It is a low-cost, low-power server operating system that is designed for small to medium businesses. Windows Server 2022 Essentials is a successor to Windows Server 2016 Essentials.
Windows Server 2022 Essentials is a server edition of the Windows Server operating system. It is a low-cost, low-power server operating system that is designed for small to medium businesses. Windows Server 2022 Essentials is a successor to Windows Server 2016 Essentials.
Windows Server 2022 Essentials is a server edition of the Windows Server operating system
Table Of Contents Show
- Part 1: Install Windows Server Migration Tools on both the source and destination servers.
- Part 2: On the destination computer, create a deployment folder.
- Part 3: Install Windows Server Migration Tools on the source machine.
- Part 4: Step-by-Step Use of Windows Server Migration Tools
- A Less Difficult Alternative to Windows Server Migration Tools
- Step-by-Step Instructions for Syncing Files Between Windows Servers
- What is the purpose of Windows Server Migration Tools?
- What is server migration tool?
- In migration mode, how do I install Windows Server Essentials?
- How do I get ready for a server migration?
Transferring workloads from one Server to another, particularly significant files/folders, is a common occurrence for many businesses. Many methods and tools can be used to transfer files from Server to Server.The most common is Windows Server Migration Tools, which is a collection of PowerShell cmdlets.
Windows Server Migration Tools is a built-in Windows Server tool that works with Server 2003 and newer Server OS versions to migrate server roles, features, operating system settings, shares, and other data from one Server to another.
In this post, I’ll go over how to use Windows Server Migration Tools in detail, but if you find the process too time-consuming, you can also use to transfer files from one server to another.
The procedure for using Windows Server Migration Tools is not simple, so I have divided it into four sections for your convenience:
Part 1: Install Windows Server Migration Tools on both the source and destination servers.
Step 1: In the lower left corner of the computer, click Start.Enter Server Manager in the search box and press Enter.
Step 2: Under the Manage tab, click Add Roles and Features.Then press Next.
Step 3: Determine the destination server.Then press Next.
Step 4: Navigate to the Features tab and select Windows Server Migration Tools.Then press Next.
Step 5: Confirm your installation choices.Then, on the destination computer, click Install to install this tool.
Step 6: Install this utility on the source computer using the method described above.
Tip:
Windows Server migration tools also make it simple to migrate Windows Server 2016 to new hardware.
Part 2: On the destination computer, create a deployment folder.
Step 1: Press the Windows + X key.Then select Command Prompt (Admin).
Step 2: At the command prompt, navigate to the directory containing the smigdeploy.exe tool.Enter the following command after typing it.
cd %Windir%\System32\ServerMigrationTools\
Step 3: Run the following command. Path represents the location of the deployment folder on the source computer.Then press Enter.
/package /architecture X86 /os WS08 /path SmigDeploy.exe
Part 3: Install Windows Server Migration Tools on the source machine.
Step 1: Copy the deployment folder created by the destination computer to the source computer’s local drive.Check that the deployment folder’s operating system architecture matches that of the source computer.
Step 2: Press the Windows logo key + X.Then, on the source computer, select Command Prompt (Admin) to open a Command Prompt window.
Step 3. Change the directory to which you copied the deployment folder in Step 1 at the command prompt.
Step 4: Run the command below to register the Windows Server Migration Tools cmdlets.Then press Enter.
.\Smigdeploy.exe
Now that you’ve finished all of your preparations, let’s learn how to use server migration tools.
Part 4: Step-by-Step Use of Windows Server Migration Tools
Follow these steps if you want to export the local users and groups from the source Server.
Step 1: Navigate to the source Server and select Server Manager and Tools.Then, to open it, click Windows Server Migration Tools.
Step 2: Execute the command:
-User All -Group -Path C:SysAdminExportMigUsersGroups -Verbose Export-SmigServerSetting
If you want to import local users and groups to the target Server, follow these steps.
Step 1: Launch Windows Server Migration Tools on the destination server (Server Manager>nbsp;Tools>nbsp;Windows Server Migration Tools).
Step 2: Enter the following command after typing it.
Import-SmigServerSetting -Enabled -User -Group -Path C:SysAdminExportMigUsersGroups -Verbose
How to Use Windows Server Migration Tools 2012? You can complete this task by following the above-mentioned operating steps. Use this utility with caution, as serious problems may occur if you operate incorrectly.
Although Windows Server Migration Tools in 2016/2012/2008 Server can assist users in data transfer, the operating steps are complex, especially for some non-technical users; if you believe this utility is difficult to use, you should use an easier alternative.
AOMEI Backupper Server is a dependable alternative to Windows Server Migration Tools, with a useful Sync feature that allows you to easily synchronize files between Windows Servers without having to learn any complicated command line syntax.You can also sync files to a network, NAS device, or cloud drive, among other things.
To save time, users can use this software to set up an automatic sync based on daily, weekly, monthly, event triggers, USB plug in.nbsp;Also available are comments, email notification, sync the deletions in the source directory to the destination, wake the computer to run scheduled tasks, and so on.
Simply download the 30-day free trial and then follow the quick guide to sync files over a network.nbsp;Windows Server 2003/2008/2012/2016/2019/2022 (including R2)/SBS 2003/2008/2011 and Windows PC systems are currently supported.
Step-by-Step Instructions for Syncing Files Between Windows Servers
Step 1: Download and run this utility.Under the Sync tab, select Basic Sync.nbsp;To monitor any changes made to synced files and sync them immediately when detected, use the «Real-Time Sync» feature.
Step 2: Modify the Task Name based on your requirements.Select the folder you want to share by clicking + Add Folder and then clicking OK.
Tip:
To configure a specific requirement, such as automatically backing up files with a specific file extension, click File Filter on the right side of the selected folders.
Step 3: Click the inverted triangle and choose a network location, then click Add Network Location and enter the network path, username, and password to add the destination path.
Step 4: After selecting the sync destination, confirm the operation and then click Start Sync to sync files over the network.
If you want to sync files and changes on a regular basis, there are several useful features you can use:
-
Daily/weekly/monthly schedule sync: You can enable daily, weekly, or monthly sync to continuously sync files to a network location.nbsp;
-
Event triggers: Syncing files at a specific event, such as System Shutdown, can assist you in avoiding interference.nbsp;
-
Wake the computer to run scheduled tasks: If you set the backup time to midnight or any other time, it will wake your computer 2 minutes before the task begins, which is especially useful for transferring large files.
-
After the scheduled task is completed: To reconfigure the operation after the scheduled task, check this box and select Shut down, Restart, Sleep, or Hibernate, and then do whatever you want.
When the operation is finished, you can check the target directory to see if the folders were successfully synchronized.
✎Notes:
-
If you are syncing a share folder from the source directory to the target directory, please re-set the share permissions of the folder in the target directory after the first sync.nbsp;This is because the initial settings cannot be retained when the network path changes.
-
If you change the name of the source folder after syncing, the program will no longer be able to sync it.
-
The «Basic Sync» feature performs one-way file sync, and only changes made in the source directory are reflected in the destination; to sync files in both directories, consider using the «Two-Way Sync» feature.
Verdict
How to use Windows Server Migration Tools? This article shows the detailed steps for you. If you find that these steps are difficult for you, you can turn to the best alternative – AOMEI Backupper ServerThis professional software allows you to easily transfer files from one server to another.
It has a graphical user interface that is simple to understand for all levels of users, as well as many useful features that make this process more flexible and automatic, such as daily/weekly/monthly sync, event trigger, USB plug in, and so on.You could use AOME Backupper TechPlus for IT technicians.
What is the purpose of Windows Server Migration Tools?
Windows Server Migration Tools is a feature of Windows Server that allows you to migrate server roles, features, operating system settings, and other data and shares to servers, including later versions of Windows Server. It is easily installed using the Add Roles and Features wizard or PowerShell.enables you to migrate server roles, features, operating system settings, and other data and shares to servers, including later versions of Windows Server. It is a feature of Windows Server and so it is easily installed using the Add Roles and Features wizard, or PowerShell.
What is server migration tool?
The server migration tool, which runs as a shell script on the server to be moved, allows users to push all assets from the current server to the new server.Users can filter what is migrated using the tool, though everything is migrated by default.allows users to push all assets from current server to new server. This tool runs as a shell script when placed on the server you wish to move. Through the tool, users are able to filter what is migrated, although everything will be migrated by default.
In migration mode, how do I install Windows Server Essentials?
On the Destination Server, install Windows Server Essentials..
Start the Destination Server and place Windows Server Essentials DVD1 in the DVD drive..
Click New Installation..
If your internal hard drive is not listed, click Load Drivers and install the necessary driver before proceeding.
How do I get ready for a server migration?
To prepare for migration..
Back up your Source Server..
Install the latest service packs.
Examine the Source Server’s health.
On the Source Server, launch the Migration Preparation Tool.
Plan the migration of line-of-business applications.