In this article, we’ll focus on Windows Server 2019 / 2016 migration tools and overall migration guidelines. In short, we’ll describe a way to migrate applications, databases, user profiles, shares, data from any server to a new Server 2019 / 2016 (even 2003 to 2019 / 2016 is support, with compatibility considerations of course). We will also cover role migration best practices and tutorials.
Migration covered here is native migration – not app virtualization. You can use these methods to migrate from physical to physical, physical to virtual / Cloud, Cloud to Cloud etc. Virtualization can be added for compatibility workarounds, but we will not be using it in this tutorial.
The goal of this how to is to allow to complete a server migration in less than 4 hours for application and file servers, and less than 24 hours for role-focused servers (although complicated cases may require more time).
Just want to find out how to automate the migration, and don’t need a general tutorial?
Click here to skip to the part with the actual migration process.
Or, if you need to migrate workstations, click here for migration to Windows 10.
WinServ is also available from IBM Services, as part of their full service package for large scale deployments. Contact your IBM account team in your region for more information.
Video demo – automatic server migration tool
Before you begin: Audit your servers and plan your migration.
Audit your servers: In a typical environment, you’ll have quite a few different server types. There will be role-oriented servers, which focus on Windows Server roles such as Domain Controller, Active Directory, IIS, Exchange, DNS, DHCP. The more common group, however, are application and file servers, which run the actual business applications and store the company data. They typically outnumber the role-based group.
Migration is done in a different way for these two. Roles are migrated manually, or with utility tools that are typically focused on one specific role (see below).
Application and file servers, however, can be migrated automatically and on massive scale, using server migration software such as Zinstall WinServ.
In the planning stage, you need to prepare a list of servers in the environment, and figure out what each of them is responsible for.
Even just knowing how many role servers and how many application servers is already a big step. Since application server migration can be automated, you will be able to develop a fairly accurate estimate of time and effort that will be required for the migration.
Schedule your migration time slot: Migrations take time, and during that time, your users may be affected to some extent. If possible, try and schedule the actual migration to be performed after hours or during a weekend. Note that you don’t actually have to stay there yourself at that time: application migration can be performed remotely or launched in advance in unattended mode.
Verify your backups are up to date, and are actually restorable: Any major upgrade may go wrong, and without a valid up-to-date backup, you risk losing everything you’ve had on the server. Make sure to verify that the backup you have is not damaged and ready to be restored if needed!
Decide on replacement type: Once you have decided to replace a server, you have several options regarding what the replacement will be. It may be a physical Windows 2019 / 2016 server, a virtual server running on premise, or a Cloud-based server running off premise (such as migration to Azure or migration to Amazon AWS). If you are using WinServ, it supports any of those transfers, so migration difficulty does not vary significantly with your choice.
In-depth demo: Windows Server application migration
How to migrate to Windows Server 2019 / 2016
The process below outlines the migration steps for moving from Server 2003 / 2008 / 2012 / 2016 / 2019 to a new Windows Server 2016 / 2019.
Option 1: Direct migration to Server 2019 / 2016 over the network
- Before you begin, consider disabling the firewall on the old server, or at least adding Zinstall to its whitelist, so that the firewall does not interfere with the migration.
- Run Zinstall WinServ on both servers.
Note: You can get Zinstall WinServ here, and its user guide here. - Select the first option, “Moving between two machines”, on both servers.
- If you do NOT want to transfer server applications, and are only interested in a profile, data and shares transfer, switch the radio button on the main screen to “profile and settings only” mode.
- On the source server, choose the “Source computer” option, and leave it running. It will be waiting for connection from the new one.
- On the new Server 2019 / 2016, choose the “Target computer” option.
- WinServ will automatically detect the source server. Alternatively, if the servers are on different networks, you can manually specify the source server’s IP address.
- If you’d like to select exactly what you want to transfer, press the Advanced menu. If you just want to transfer everything, you don’t need to go to the Advanced menu.
- Click Next and then Go to start the migration.
- The transfer will take a while (depending on how much data you have to transfer), and report to you when done.
- That’s it!
Option 2: Indirect migration, via intermediate storage
- Run Zinstall WinServ on both servers.
Note: You can get Zinstall WinServ here, and its user guide here. - On the source server, select the 3rd option, “Moving from Machine to Container”
- Choose the container location (such as a network share, a NAS, a USB hard drive – any type of storage), and press Go to perform a full capture of the source server to that location.
- On the new 2019 / 2016 server, select the 4th option, “Moving from Container to Machine”
- If you do NOT want to transfer programs, and are only interested in a profile, data and shares transfer, switch the radio button on the main screen to “profile and settings only” mode.
- Specify the location of the container created in step 3.
- If you’d like to select exactly what you want to transfer, press the Advanced menu. If you just want to transfer everything, you don’t need to go to the Advanced menu.
- Click Next and then Go to start the migration.
- The transfer will take a while (depending on how much data you have to transfer), and report to you when done.
- That’s it!
Server Roles migration
This part of the migration is done manually, and multiple tutorials exist that may help. We recommend John Savill’s excellent guide: Winding Down Windows Server 2003 in Your Organization. Information below is based on the article above.
- IIS migration: If all you have running on IIS 6 are basic HTML pages or Active Server Pages (ASP), you can copy the content to the IIS version running on Server 2012 or Server 2012 R2, then update the DNS records to point to the new IIS server. However, organizations typically have more complex configurations. The good news is that you can use a migration toolkit named Web Deploy 3.6. If you need to migrate websites to Microsoft Azure Web Apps, there’s a separate tool available named Azure Web App Migration Assistant.
- DC and AD migration: Providing you have followed best practices, your domain controllers (DCs) don’t run any other software, which means the existing domain and forest will be prepared for Server 2012 or Server 2012 R2. In this case, you need to create new DCs running Server 2012 or Server 2012 R2, migrate the Flexible Single-Master Operation (FSMO) roles, migrate any certificates or other items, then decommission the Server 2003 DCs. To introduce Server 2012 DCs, the forest (and therefore the domains) must be Windows Server 2003 mode. For detailed guidance on migrating DCs, see Upgrade Domain Controllers to Windows Server 2012 R2 and Windows Server 2012.
- DHCP migration: DHCP scopes provide the IP addresses given to clients, along with their IP configuration (e.g., gateway, DNS server). To migrate DHCP scopes, the best option is to export the scopes from the Server 2003 instance, then import them to the Server 2012 or Server 2012 R2 instance. Full details on this approach are available in the TechNet Networking Blog post “Steps to move a DHCP database from a Windows Server 2003 or 2008 to another Windows Server 2008 machine.” If there is any delay in the DHCP scope export and import and a risk of IP address reuse, you can configure the DHCP server to check if an IP address is being used before it’s allocated by enabling address conflict detection.
- DNS migration: If you’re hosting DNS on Windows, you’re likely integrating it with AD and your DNS servers are DCs. Therefore, when you migrate AD, the DNS configuration will move as well. It’s important to remember to migrate any DNS server configurations, such as forwarding. If the DNS servers will be hosted on new IP addresses, you need to make sure that you update any static IP configurations and all DHCP configurations. To avoid this time-consuming task, most organizations will change the IP addresses of the new servers to that of the old servers once the old servers are retired.
- Print services: Like file services, printer configurations and shares must be migrated from the source server to the target server. In addition, you’ll need new printer drivers that are 64-bit and compatible with Server 2012 or Server 2012 R2 as well as with modern clients. Microsoft has a print migration wizard and command-line tool you can use for migrating printer services. You can download these tools from the Migrate Print and Document Services to Windows Server 2012 web page.
- Exchange migration: Upgrade from Exchange 2007 to Exchange 2013
- SQL server migration: See Supported Version and Edition Upgrades
Dealing with incompatible applications:
Some legacy 3rd party applications running on Windows Server 2003 may be incompatible with Windows Server 2019 / 2016. Such applications are generally legacy DOS, 16-bit or 32-bit only software, or older versions such as SQL Server 2000 or 2005, which has not been updated for newer OS versions. It is strongly recommended to eliminate these applications from the production environment as soon as possible.
If these applications cannot be eliminated immediately, and are mission-critical for continued operation of the organization, the recommended option to preserve them operation is to perform a virtualized migration of those applications, into a virtual Server 2003 instance running on newer replacement server. Then, continue to take the steps required to phase those applications out and stop running the virtualized 2003 instances.
WinServ is application-generic, and can migrate even custom and in-house applications that have not been seen by the outside world – as long as they are capable of running on the new server. Here is a partial list of common applications that our customers have migrated in the past:
- MS SQL
- MySQL
- SAP (including SAP Business One)
- Oracle
- Sybase
- DB2
- Java Application Server
- Crystal Reports
- Avaya
- PeopleSoft
- JD Edwards Enterprise One (JDE E1)
- Citrix
- Apache (Windows only)
- WebSphere
- Microsoft Dynamics
After the migration:
Once the migration process is complete, it is time to verify the results.
- You may need to adjust your domain’s DNS to point to the new server where needed. For example, changing the CRM-SERVER DNS entry to the new server’s address.
- Same goes for login scripts and GPO policy.
- Launch every application and console you use, and verify they load correctly.
- Using a client workstation, verify that clients can access the migrated server correctly and their applications run without issues.
Congratulations! Your server migration is now complete.
Ready to migrate to Windows Server 2019 / 2016?
Get Zinstall WinServ here
You can also contact us for assistance, volume licensing, and help in setting up a POC.
Microsoft has introduced the new Windows Server Storage Migration Service as part of Windows Admin Center (WAC). It automates the process of migrating from legacy Windows Server versions to supported platforms. Let’s look at the Storage Migration Service, installing it, and using it to perform a migration.
Contents
- What is Windows Server 2019 Storage Migration?
- Storage migration prerequisites
- Installing Windows Server Storage Migration Service
- Running the Windows Server Storage Migration Service
- Cutover phase
- Wrapping up
- Author
- Recent Posts

Brandon Lee has been in the IT industry 15+ years and focuses on networking and virtualization. He contributes to the community through various blog posts and technical documentation primarily at Virtualizationhowto.com.
Migrating from legacy servers has always been a difficult task for IT admins. Especially if the legacy server is a Windows Server file server, there may be many shares, permissions, files, folders, and other components you must duplicate on a new server to assume those resources properly in a seamless way.
What is Windows Server 2019 Storage Migration?
Windows Server 2008 and R2 went out of support earlier this month (January 2019), and older Windows Server operating systems like Windows Server 2003 are long out of support. Thus, if you are running these Windows Server releases, you need to think about how you can migrate to newer, supported Windows Server platforms.
Thankfully, Microsoft has realized the need to provide a tool to make this process seamless for IT admins. They can perform the migration process in a way that allows copying all data, shares, and permissions without resulting in missed permissions, resources, or even data loss.
A shocking number of legacy Windows Server operating systems are still out in production. For example, a surprising number of environments still have Windows Server 2003 installed.
Windows Server 2019 Storage Migration is a new extension available for installation inside WAC. What are its capabilities?
- Take inventory of your servers that are migration candidates (including files, users, permissions, etc.).
- Select a destination server.
- Transfer all files, file shares, and security permissions from the source to the destination server.
- Assume the identity of the source server on the destination server (cutover).
- Coordinate and manage multiple migration processes from a single WAC console.
The steps above all take place within a three-phase process:
- Inventory
- Transfer
- Cutover
Source servers can include:
- Windows Server 2003 and newer
Destination servers can include:
- Windows Server 2012 R2 and newer, including Semi-Annual Channel releases
Let’s look at installing the Windows Server 2019 Storage Migration extension inside WAC.
Storage migration prerequisites
A prerequisite for the Storage Migration service is to have WAC installed. As most are aware, WAC is the new method moving forward for managing Windows Server installations. In fact, with Windows Server 2019, Microsoft is certainly touting WAC as the tool for managing their latest Windows Server operating system.
In the walkthrough below, we have already installed WAC in Gateway Server mode as a designated gateway server for accessing and managing Windows Server connections.
With Storage Migration, the gateway server basically coordinates the entire operation between a legacy Windows Server and a modern Windows Server version like 2019. Also keep in mind that you can install WAC on the target Windows Server that will be the destination for migrating data from a legacy Windows Server. However, in this case, we will use a standalone WAC gateway mode server.
For an overview of the different WAC installation modes, check out the official overview of the installation options.
Installing Windows Server Storage Migration Service
To install Windows Server Storage Migration Service, launch WAC and navigate to Settings > Extensions. The available Storage Migration Service extension is a bit non-intuitive. WAC lists the extension as msft.sme.storage-migration.
Highlight the extension and click the Install button.
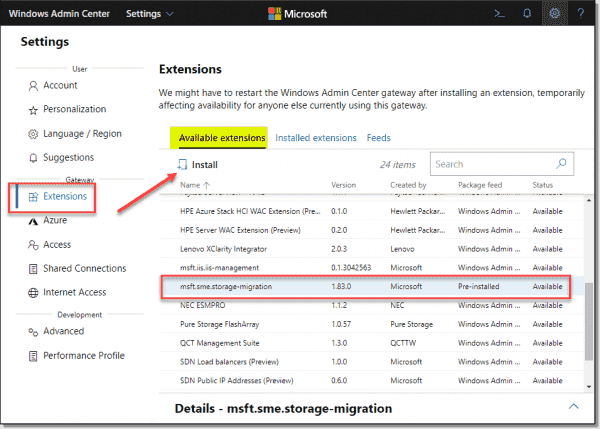
Installing the Storage Migration extension in WAC
WAC will install the extension and reload the WAC interface in your browser. After the interface reloads, navigate back to Settings > Extensions > Installed extensions. Verify you see the Storage Migration Service listed. You may have an Update available as shown below. If so, highlight the extension and click the Update button.

Update available for the Storage Migration Service
After updating, you will see the same behavior. The WAC interface will reload. Navigate back to the Installed extensions under Extensions. You should see the Windows Server Storage Migration Service at version 1.83.1. Microsoft seems to have gone through quite a few extension versions along the way.

After updating the Windows Server Storage Migration Service
Running the Windows Server Storage Migration Service
When you launch the Storage Migration Service on your WAC gateway, you will see the pop-up box giving an overview of the service. Note: You may see a box asking you to install the Storage Migration Service. Even though you have installed the extension, you may need to install the Windows Features. The WAC dashboard for the Storage Migration Service will install it for you when you initiate the install from there.
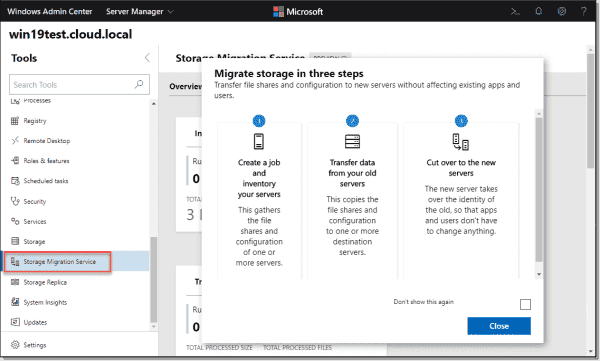
Launching the Storage Migration Service in WAC
Click the button to create a New job for the Storage Migration Service.
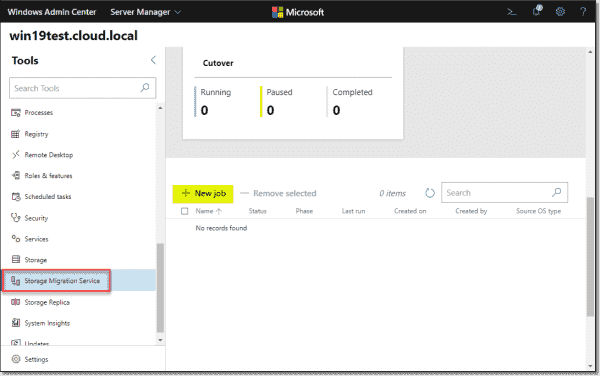
Create a new Storage Migration Service job
It will prompt you to enter the name of the source server you want to migrate.
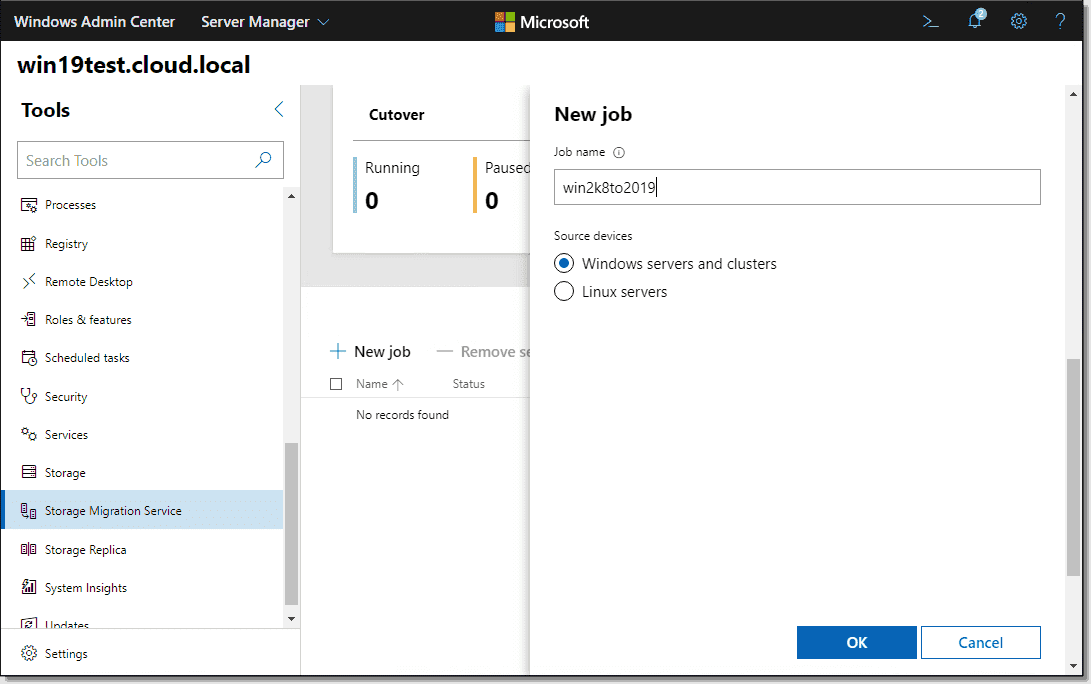
Enter a new Storage Migration job name
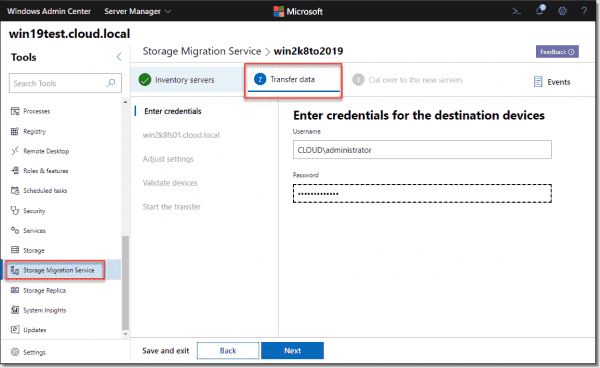
Enter credentials that will allow you to connect to the source server.
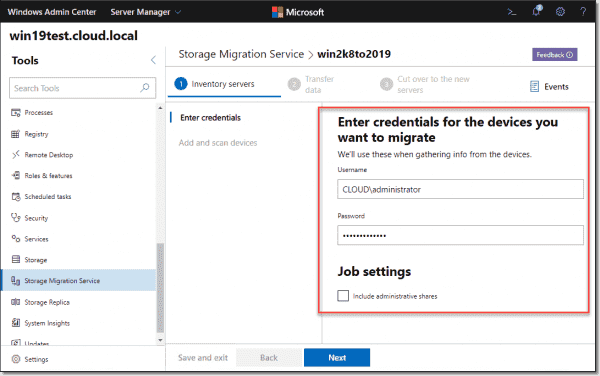
Enter credentials for the source device
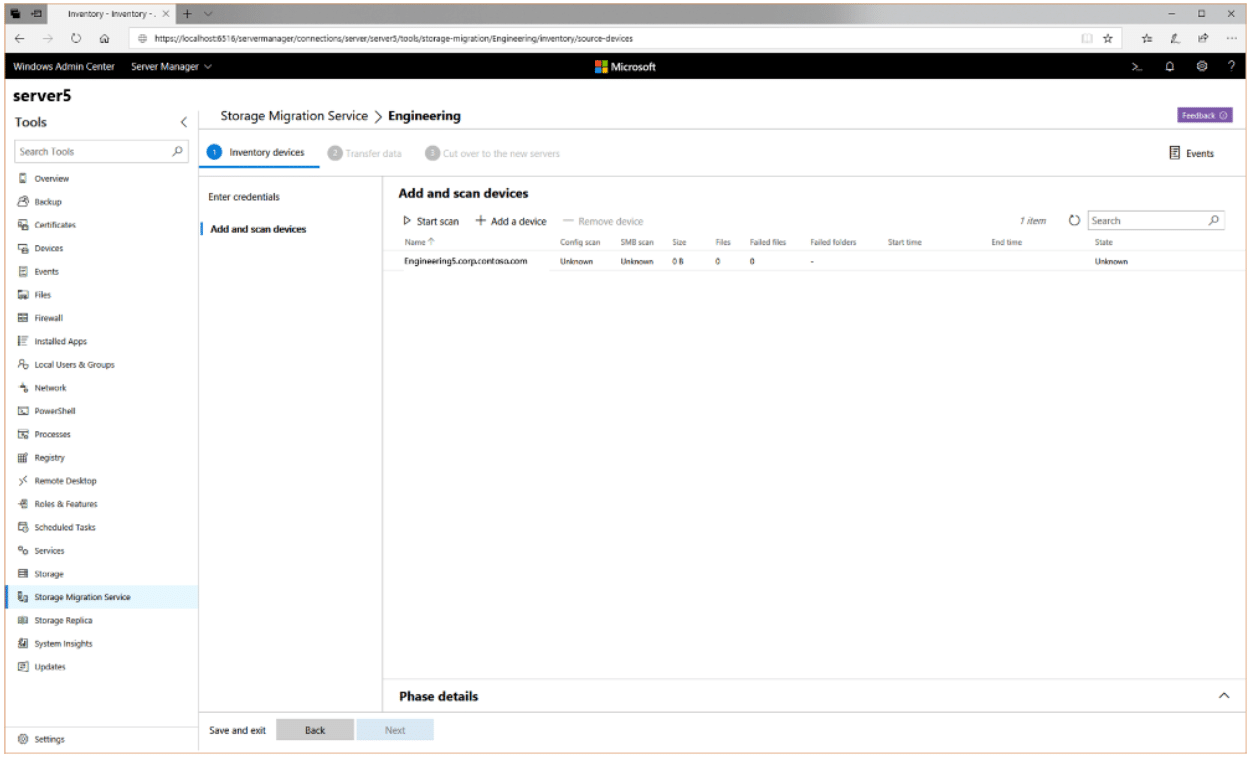
Add the source device for the Storage Migration.

Add and scan the source device for Storage Migration
Enter the device name. In this case, it is a legacy Windows Server 2008 R2 server.
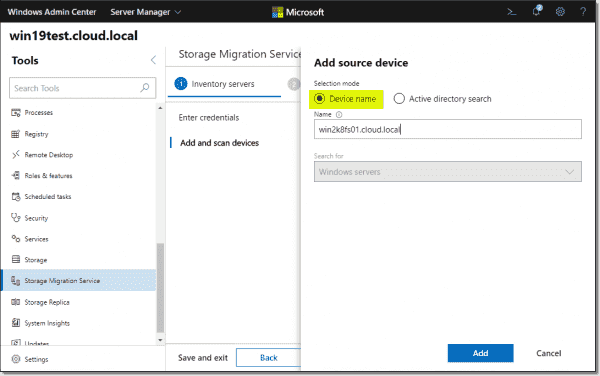
Enter the name of the source device
Scan the source Windows Server.
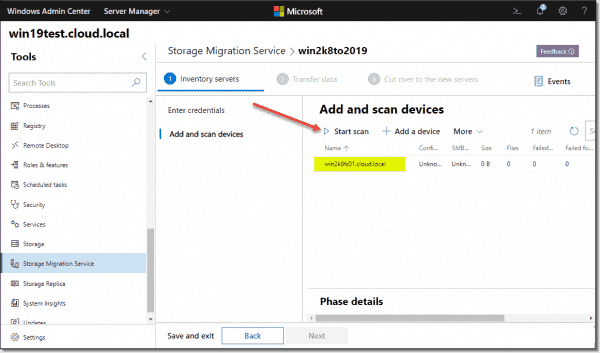
Start scanning the source server with Storage Migration
WAC enumerates shares on the source Windows Server.
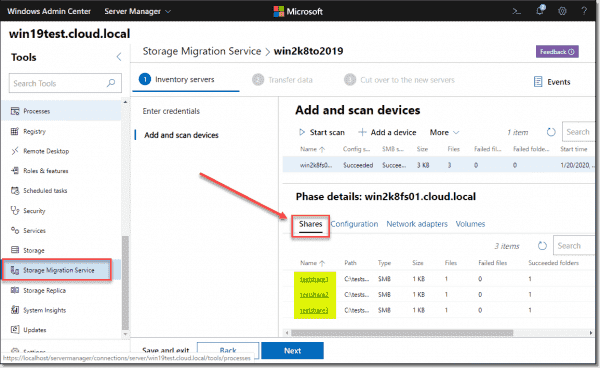
Shares enumerated as part of the Storage Migration scan
Enter connection credentials for the destination Windows Server.
Enter credentials for the Storage Migration target
Enter the destination Windows Server name, scan the server, map the volumes, and proceed.

Specify the Storage Migration operation target
Decide how you want to handle any conflicts during data copy as well as retry values.

Adjust transfer settings
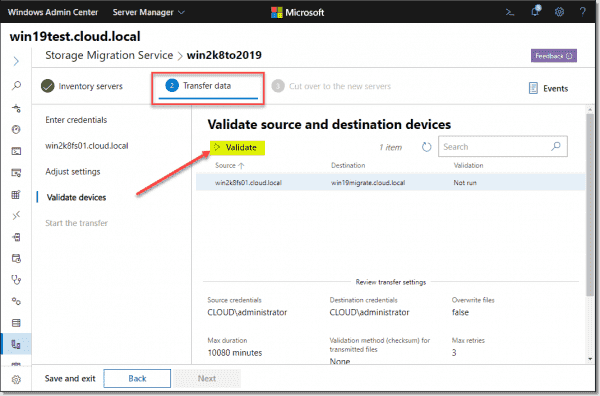
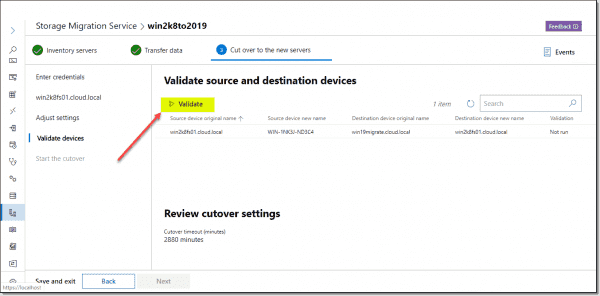
Validate the source and destination devices for any issues.
Validate source and destination devices
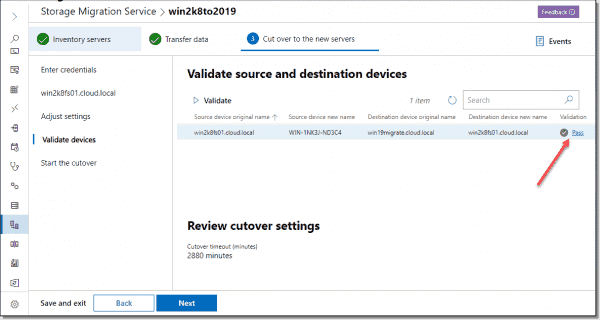
Validation of both servers completes successfully.
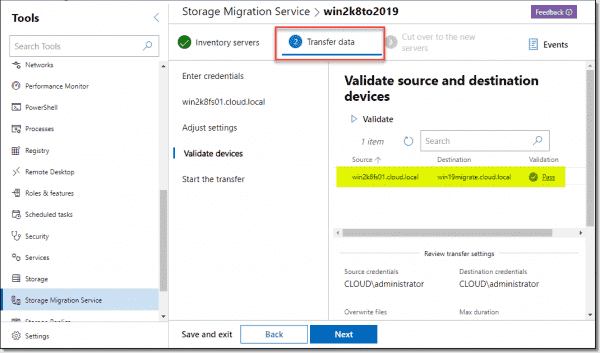
Validation is successful for the Storage Migration operation
Start the data transfer. This includes folders, shares, permissions, and users.

Start transferring files and resources using Storage Migration
The transfer finishes successfully.

Data transfer is successful
Cutover phase
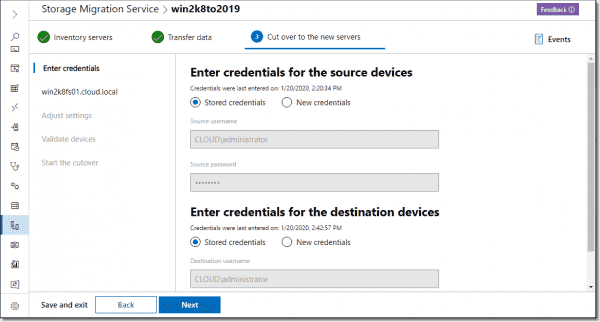
For the cutover phase, enter the credentials for the source and destination devices. These will also be cached from previous steps.
Enter credentials for the cutover phase
Choose how you want to handle the network settings migration. The Storage Migration wizard will show current values on both servers and allow you to define the IP address you want to assume for the server. DHCP is also an option. You must choose the destination network adapter to assign settings to as well.
Network settings migration during the Storage Migration cutover phase
Validate the settings defined for the cutover process.
Validate source and destination devices for cutover
The validation process completes successfully.
Validation passes for cutover
Now you are ready to begin the cutover process. This will cut over resources from the source server to the destination server. It will rename the source server, and the target server will assume the identity of the source server.

Begin the Storage Migration cutover phase
The process will reboot the servers during the various rename operations.

Cutover progresses to restart the servers
After the migration finishes successfully, your target server will have assumed the identity of the source server and should answer to any file shares it has assumed. As you can see below, the target Windows Server 2019 server has assumed the legacy WIN2K8FS01 hostname.

Successful Windows Server Storage Migration Service migration between servers
Wrapping up
The Windows Server Storage Migration Service is a great new tool in the hands of IT admins who often have the challenging task of migrating from legacy platforms up to supported versions of Windows Server. The new tool is a great addition to the already powerful WAC.
As shown, it’s easy to install the extension via WAC. The actual Storage Migration process itself is very intuitive and «wizard driven» from the WAC interface. It performs all the heavy lifting of copying data, permissions, share names, and even assuming identity.
Subscribe to 4sysops newsletter!
If you have the task of migrating from legacy servers to supported platforms, be sure to test out the new Windows Server Storage Migration Service. It can make your life much easier!
![]()
![]()
Skip to content

Overview of Windows Server 2019 Storage Migration Service

For many organizations, getting rid of technical debt is a constant challenge, whether it be legacy hardware or legacy software. As new versions of Windows Server have been released, many organizations have not been able to keep up with the latest Server OS providing resources for production workloads. The number of businesses still running legacy Windows Server versions such as Windows Server 2003 is alarming, even though this operating system has been out of support for years now.
A huge challenge is seamlessly being able to migrate data along with network resources that are required to make a smooth transition from a legacy server operating system to a new operating system. With Windows Server 2019, one of the exciting new features that organizations have available to them that can greatly facilitate the migration process from legacy server resources is the new Storage Migration feature. Storage Migration in Windows Server 2019 is purpose-built to allow organizations to seamlessly migrate from legacy Windows Server operating systems to Windows Server 2019.
In this post, let’s take a closer look at Windows Server 2019 Storage Migration, what it is, and how it can be used to migrate data and network resources from a legacy resource to a new Windows Server, either in Azure, or on-premises.
Introducing Windows Storage Migration Service
The new Storage Migration service is a brand-new feature of Windows Server 2019 that works hand-in-hand with the new Windows Admin Center. As mentioned, the Storage Migration feature is a service that allows migrating not only data, but the resources that house the data, including network share names, permissions, as well as the server name itself and even the IP address bound to the current legacy production host.

The team working on the new Storage Migration service had many important goals in mind when developing the service and the integration with the Windows Admin Center. It was apparent when reviewing information as to why most organizations didn’t migrate away from legacy versions of the Windows Server operating system, the main reason that was listed was migration is complicated and difficult. This is especially the case when thinking about performing each step of server migration manually.
It was clear the end goal in building a product that would take care of a server migration would need to perform all the steps in an automated fashion and take care of the heavy lifting involved with the process. Only in this way would it be a valuable tool in facilitating the server migration process. With the objective clearly in sight, the Server Migration tool had lofty goals in the design phase and it is great to see that Microsoft has delivered on many of the stated objectives with providing a server migration tool that would actually benefit and help organizations finally cut ties with legacy server operating systems.
Some of the features of the Storage Migration service include the following:
- Ability to migrate data from legacy Windows Server to new Windows Server version
- The process is completely automated
- Uses the easy, graphical interface found in Windows Admin Center
- All files and folders need to transfer
- All share and security permissions must transfer
- Local users and groups must transfer during the process
- Network addresses
- Computer name, DNS, and other network connectivity must transfer from source to target
As you can tell, from the list, there are many tasks that are part of the overall process of migrating resources from a source legacy Windows Server to a new Windows Server operating system that will begin hosting the resources.
Let’s take a look at the requirements of the Storage Migration Service and considerations that need to be made before using this as a tool for server migration.
Storage Migration Requirements and Considerations
Before being able to use the new Storage Migration service found in Windows Server 2019, let’s discuss the requirements for using it, including the components and prerequisites. What is required?
- To migrate from a legacy Windows Server to a new Windows Server, Microsoft recommends having (2) Windows Server 2019 servers. One server will run as the orchestrator and the other will run as the destination of the migration.
- ***Note*** It is not required to have (2) Windows Server 2019 servers for this process. It is possible to run the orchestrator on the same server that is to be the destination of the migration. However, this is only recommended in smaller environments with only a single server to migrate.
- The destination of the migration can also be Windows Server 2012 R2 and higher as well and does not have to be Windows Server 2019.
- Windows Admin Center – Windows Admin Center is the new purpose-built management tool for Windows Server 2019 that provides an all-in-one graphical interface for many management tools. The Storage Migration component is an extension that allows interacting with the Storage Migration and Storage Migration Proxy.
- Both the Storage Migration Service and Storage Migration Service Proxy roles are required for running the Storage Migration service
- Storage Migration Proxy – installs automatically when orchestrator is selected and is also the required role on the destination server for the storage migration process.
- Storage Migration Service Tools – installs automatically when orchestrator is selected
- Computers must be domain-joined
- A migration account needs to be selected that is an administrator on the source and destination computers
- Firewall rules must be in place to allow:
- File & Printer Sharing (SMB-In)
- Netlogon Service (NP-In)
- WMI (DCOM-In)
- WMI (WMI-In)
What are the supported source operating systems?
- Windows Server 2003!
- Windows Server 2008 and R2
- Windows Server 2012 and R2
- Windows Server 2016
- Windows Server 2019
Supported Destination operating systems:
- Windows Server 2012 R2
- Windows Server 2016
- Windows Server 2019
There are three phases to the Storage Migration Service operation, including:
- Inventory – The Storage Migration Service orchestrator queries the storage, networking, security, share settings, and data for migration and reports back
- Transfer – By way of administrator interaction, the Storage Migration Service pairs source and destination resources from inventory, data to transfer, targets of the transfer, and then performs the transfer of data, resource creation, etc.
- Cutover – In the final phase, the administrator finalizes the source networks and transferring of identity from the old server over to the new Windows Server. At that time, the old server is placed in a decommissioned state that is inaccessible by users and applications after the identity is assumed by the new server.
A Look at the Windows Server 2019 Storage Migration Service
Let’s take a look at a few of the screens taken from the Storage Migration Service in Windows Server 2019 and the Windows Admin Center.
Below, the two features that are required for the Storage Migration Service in Windows Server 2019 must be installed for the functionality to work.
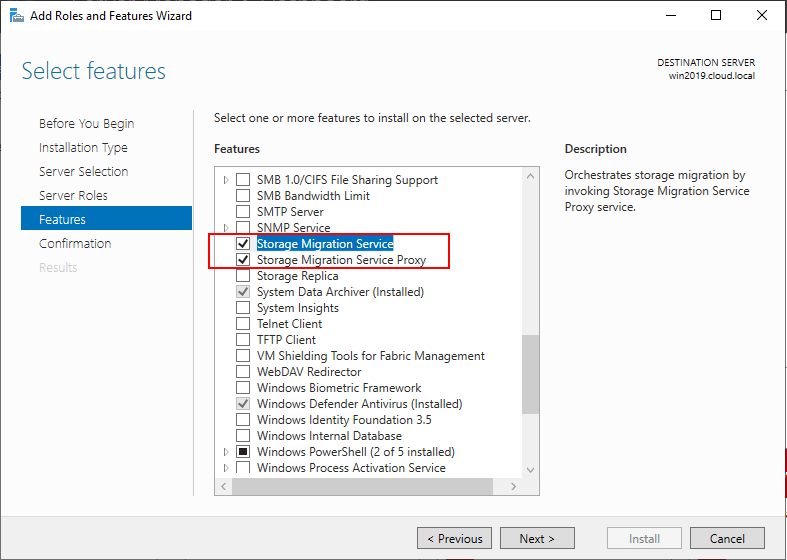
Installing the Storage Migration Service and Storage Migration Service Proxy
During the Inventory phase, you add the device you want to scan as the source.
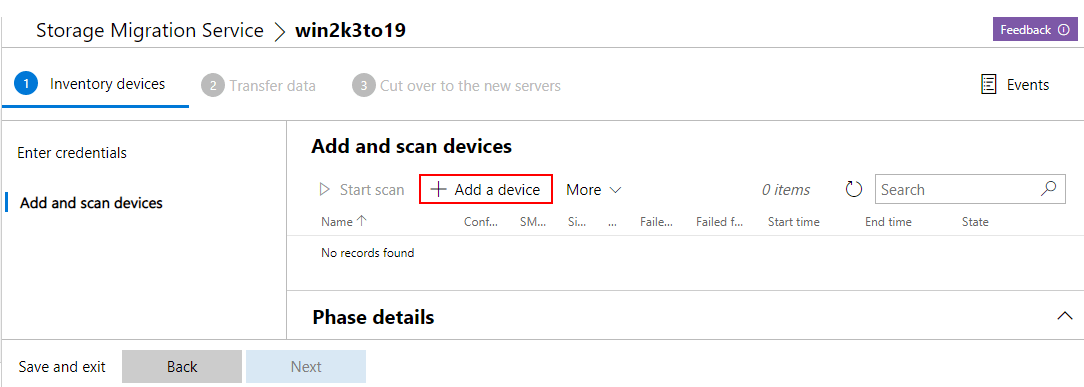
Adding a device as the source of the inventory scan
During the Transfer data phase, you add the destination device to receive the migrated data and resources.
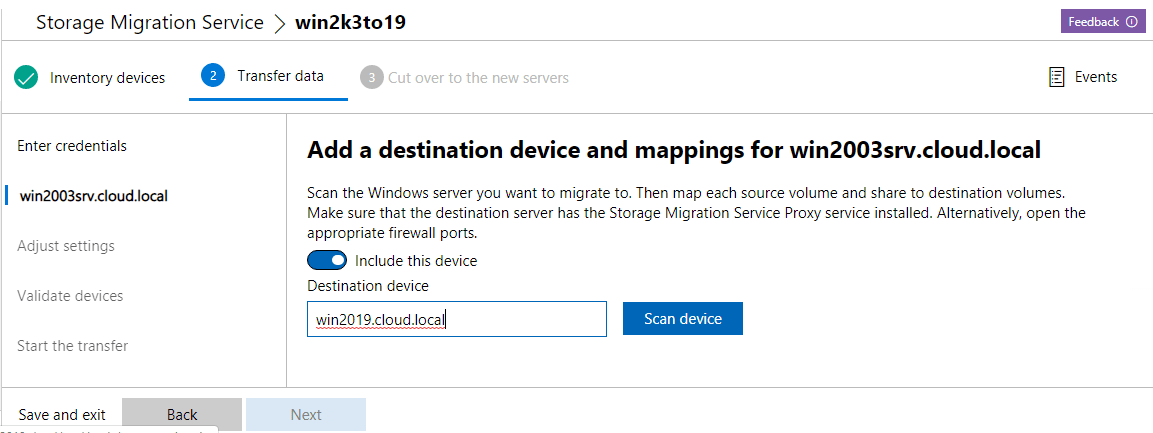
Transferring the actual data from the legacy server to the new Windows Server operating system
During the cutover phase, you can specify the timeout settings as well as others to control the parameters of the actual cutover and assuming of identity.
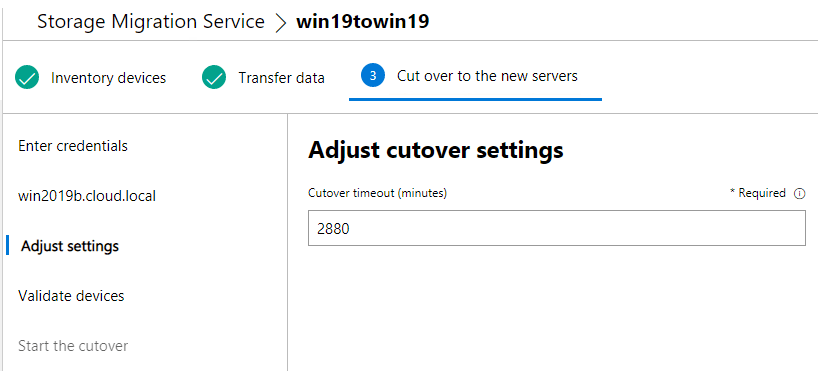
Adjusting the configuration for the cutover phase
Concluding Thoughts
The new Storage Migration Service in Windows Server 2019 fills a use case that has been sorely needed for quite some time now. Many organizations have legacy servers still providing production resources for business-critical applications. Windows Server versions as old as 2003 are still surprisingly found in many environments. This is mainly due to the complexities and difficulty of migrating resources between nodes.
With the introduction of the new Storage Migration Service, businesses have an effective, automated, and streamlined way to transfer not only data but also shares, groups, users, permissions, network resources, identity, and all other necessary configuration to successfully migrate to a new Windows Server platform. It will be interesting to see if this new tool will facilitate migrations en masse of organizations who have been hanging onto legacy Windows Server platforms. Whatever the case, this will certainly provide the needed tools and processes needed for businesses who choose to migrate to do it effectively, efficiently, and successfully.
Follow our Twitter and Facebook feeds for new releases, updates, insightful posts and more.

Migrating from Windows Server 2008 to Windows Server 2019 can be a crucial task for many organizations. With the end of support for Windows Server 2008, businesses are encouraged to upgrade to a more secure and efficient operating system. This blog post will provide a step-by-step guide to help you successfully migrate from Windows Server 2008 to Windows Server 2019. We will explore different methods, their pros and cons, and provide recommendations for a smooth migration process.
Video Tutorial:
What’s Needed
Before starting the migration process, there are a few prerequisites and requirements to consider. Here’s what you will need:
1. Windows Server 2019 installation media: You will need the installation DVD or ISO file for Windows Server 2019.
2. Backup solution: It’s crucial to have a backup solution in place to ensure the safety of your data during the migration process.
3. Hardware requirements: Make sure your hardware meets the minimum requirements for Windows Server 2019. These include processor, RAM, storage, and network requirements.
4. Application compatibility: Check the compatibility of your existing applications with Windows Server 2019. Some applications may require updates or patches to work properly on the new operating system.
What Requires Your Focus?
When migrating from Windows Server 2008 to Windows Server 2019, there are a few key areas that require your focus:
1. Application compatibility: As mentioned earlier, ensure that all your applications are compatible with Windows Server 2019. This may involve reaching out to software vendors for support or seeking alternative solutions.
2. Data migration: Plan the migration of your data carefully, ensuring that all critical files, databases, and settings are successfully transferred to the new server.
3. Active Directory migration: If you have an Active Directory infrastructure, you will need to plan and execute a smooth migration of your domain controllers.
Method 1: How to Migrate Windows Server 2008 to 2019 via Windows Server Migration Tools
One method to migrate from Windows Server 2008 to 2019 is by using the Windows Server Migration Tools. This method allows for a more automated and streamlined migration process. Here’s how you can do it:
Step 1: Prepare the source server
1. Install the Windows Server Migration Tools on the Windows Server 2008 source server.
2. Create a migration answer file using the Windows Server Migration Tools cmdlets. This answer file will contain the configuration settings for the migration.
Step 2: Prepare the destination server
1. Install the Windows Server Migration Tools on the Windows Server 2019 destination server.
2. Run the Windows Server Migration Tools cmdlets to import the migration answer file and configure the destination server.
Step 3: Perform the migration
1. Use the Windows Server Migration Tools cmdlets to initiate the migration process.
2. Monitor the migration progress and resolve any issues that may arise.
3. Once the migration is complete, verify the functionality of the new Windows Server 2019 environment.
| Pros | Cons |
|---|---|
| 1. Automates and streamlines the migration process. | 1. Requires additional installation and configuration steps. |
| 2. Allows for more control over the migration process. | 2. May encounter compatibility issues with certain applications or settings. |
| 3. Enables a seamless migration of user accounts, data, and other server configurations. | 3. Requires familiarity with Windows Server Migration Tools. |
Method 2: How to Migrate Windows Server 2008 to 2019 via In-Place Upgrade
Another method to migrate from Windows Server 2008 to 2019 is by performing an in-place upgrade. This method is suitable when you want to keep the existing server hardware and configurations. Here’s how you can do it:
Step 1: Prepare the server
1. Take a full backup of the Windows Server 2008 system to ensure data safety.
2. Ensure that all necessary drivers and software updates are installed on the server.
Step 2: Perform the in-place upgrade
1. Insert the Windows Server 2019 installation media and run the setup.
2. Select the option to upgrade the existing installation and follow the on-screen instructions.
3. During the upgrade process, the system will preserve existing applications, settings, and data.
Step 3: Verify the upgrade
1. Once the upgrade is complete, log in to the Windows Server 2019 environment and verify that all applications and services are functioning correctly.
2. Perform thorough testing to ensure compatibility and functionality.
| Pros | Cons |
|---|---|
| 1. Preserves existing server configurations and settings. | 1. May experience compatibility issues with certain applications or drivers. |
| 2. Provides a straightforward upgrade process. | 2. Requires a backup and restore plan in case of any issues during the upgrade. |
| 3. Saves time and effort by utilizing existing hardware. | 3. Limited opportunity for hardware optimizations and upgrades. |
Method 3: How to Migrate Windows Server 2008 to 2019 via Server Migration Service
Server Migration Service is a cloud-based service provided by Amazon Web Services (AWS). This method is suitable for organizations utilizing AWS and looking to migrate their on-premises Windows Server 2008 instances to Windows Server 2019 in the cloud. Here’s how you can do it:
Step 1: Set up the Server Migration Service
1. Create an AWS account and enable the Server Migration Service.
2. Set up a replication server to act as a replication target for the migration.
Step 2: Configure replication
1. Install the AWS SMS Connector on the Windows Server 2008 source server.
2. Configure replication settings, including the replication server and migration settings.
Step 3: Perform the migration
1. Trigger the replication process in the AWS Management Console.
2. Monitor the replication progress and resolve any issues that may arise.
3. Once the replication is complete, launch the Windows Server 2019 instance in AWS.
| Pros | Cons |
|---|---|
| 1. Simplifies the migration process with minimal downtime. | 1. Requires familiarity with AWS and associated services. |
| 2. Provides scalability and flexibility by migrating to the cloud. | 2. May incur additional costs for AWS services. |
| 3. Enables easy rollback and recovery options. | 3. Requires a stable network connection for data transfer. |
Method 4: How to Migrate Windows Server 2008 to 2019 via Manual Server Rebuild
For organizations with complex server environments or specific infrastructure requirements, a manual server rebuild may be the preferred migration method. This method involves building a new Windows Server 2019 environment from scratch and manually migrating data and configurations. Here’s how you can do it:
Step 1: Plan the new server environment
1. Determine the hardware requirements for the new server and acquire the necessary equipment.
2. Install Windows Server 2019 on the new hardware and configure basic server settings.
Step 2: Migrate data and applications
1. Identify critical data and applications that need to be migrated.
2. Use backup and restore tools to transfer data from the Windows Server 2008 server to the new environment.
3. Install and configure applications on the new server.
Step 3: Verify the migration
1. Validate that all data, applications, and configurations have been successfully migrated.
2. Perform thorough testing to ensure functionality and compatibility.
| Pros | Cons |
|---|---|
| 1. Offers complete control and customization of the new server environment. | 1. Requires extensive planning and preparation. |
| 2. Provides an opportunity to optimize the new server for performance. | 2. Time-consuming process, especially for complex server environments. |
| 3. Enables a clean start by eliminating potential issues from the old server. | 3. Manual migration may introduce human error during the process. |
Why Can’t I Migrate My Windows Server 2008 to 2019?
While migrating from Windows Server 2008 to 2019 is generally feasible, there are some potential roadblocks that may hinder the process. Here are a few reasons why you may encounter difficulties and their potential fixes.
1. Compatibility issues with applications: Some older applications may not be compatible with Windows Server 2019. Consider updating or replacing these applications with newer versions that support the new operating system.
2. Hardware limitations: Windows Server 2019 has higher hardware requirements compared to Windows Server 2008. If your hardware does not meet the minimum requirements, you may need to upgrade or replace it before migrating.
3. Lack of preparation and planning: Proper planning is essential for a successful migration. Identify potential issues, create a detailed migration plan, and allocate sufficient time and resources for the process.
Implications and Recommendations
Here are three recommendations to help ensure a smooth migration from Windows Server 2008 to 2019:
1. Thoroughly test application compatibility: Before initiating the migration, conduct comprehensive testing to verify the compatibility of all critical applications with Windows Server 2019. Engage with software vendors if necessary and seek alternative solutions if certain applications are not compatible.
2. Implement a robust backup and recovery plan: Data loss during the migration process can be catastrophic. Implement a reliable backup and recovery solution to safeguard your data and ensure a quick recovery in case of any issues or failures.
3. Consider automation and cloud options: Automation tools, such as Windows Server Migration Tools or cloud-based migration services like AWS Server Migration Service, can simplify the migration process and minimize manual effort. Explore these options based on your organization’s requirements and resources.
5 FAQs about Migrating Windows Server 2008 to 2019
Q1: Can I perform an in-place upgrade from Windows Server 2008 to 2019 if I have custom applications?
A: In-place upgrades may encounter compatibility issues with custom applications. It is recommended to test the compatibility of custom applications and consider alternative migration methods if necessary.
Q2: Is it possible to migrate Windows Server 2008 domain controllers to Windows Server 2019?
A: Yes, domain controllers can be migrated to Windows Server 2019 using methods like AD DS (Active Directory Domain Services) migration or Windows Server Migration Tools.
Q3: How long does the migration process typically take?
A: The duration of the migration process depends on various factors such as the size of the environment, the complexity of configurations, and the chosen migration method. It is best to allocate sufficient time for planning, testing, and executing the migration.
Q4: Can I migrate Windows Server 2008 to a different server hardware?
A: Yes, migration to different server hardware is possible using methods like server rebuild or Windows Server Migration Tools. However, ensure that the new hardware meets the requirements of Windows Server 2019.
Q5: What are the risks of not migrating from Windows Server 2008?
A: The risks of not migrating from Windows Server 2008 include potential security vulnerabilities, lack of technical support, and limited access to updates and patches. Upgrading to a supported operating system is essential to maintain a secure and efficient IT infrastructure.
Final Words
Migrating from Windows Server 2008 to Windows Server 2019 is a critical process that requires careful planning and execution. It is essential to consider factors such as application compatibility, data migration, and hardware requirements to ensure a successful migration. By following the step-by-step methods outlined in this blog post and considering the recommendations provided, you can navigate the migration process smoothly and transition to a more secure and efficient server environment.
In a previous post, we talked about Windows Server 2008 end of life upgrade strategies and considerations that need to be made when choosing an upgrade path. If an in-place upgrade is not an option, performing a migration or data migration to a different server running a supported Windows Server operating system is a great way to leave Windows Server 2008/R2 behind for a current Windows Server release.
Even if you have already migrated upwards from 2008, we take a look at Windows Server data migration tools and best practices to get a feel for the best way to easily migrate your data/roles/services to newer Windows Server platforms.
Migrate to the cloud or not?
You can easily see when reading through Microsoft’s documentation on migrating legacy Windows Servers to modern versions of Windows Server that they strongly recommend migrating to Azure. We covered some of the benefits in the Windows Server 2008 end of life upgrade strategies post, but why might Azure be a good option?
A few of the standout advantages that Azure gives your business:
See how SMB business and tech leaders are using networking technology for competitive advantage
Research
Strategies
Checklist

- Reduced maintenance, no more hardware upgrades
- Global scale – many datacenters around the world
- Improved security – some of the best security tools and mechanisms are available to you
- Compliance tools – many Azure tools for meeting compliance objectives
What are some considerations you need to make before migrating from Windows Server 2008/R2 to VMs hosted in Azure?
- Consider which apps you can “lift and shift” directly to the cloud
- Can you make use of Azure app services for migration? Azure Active Directory, SQL Services, SharePoint, etc.
- Will some of your apps require re-architecting?
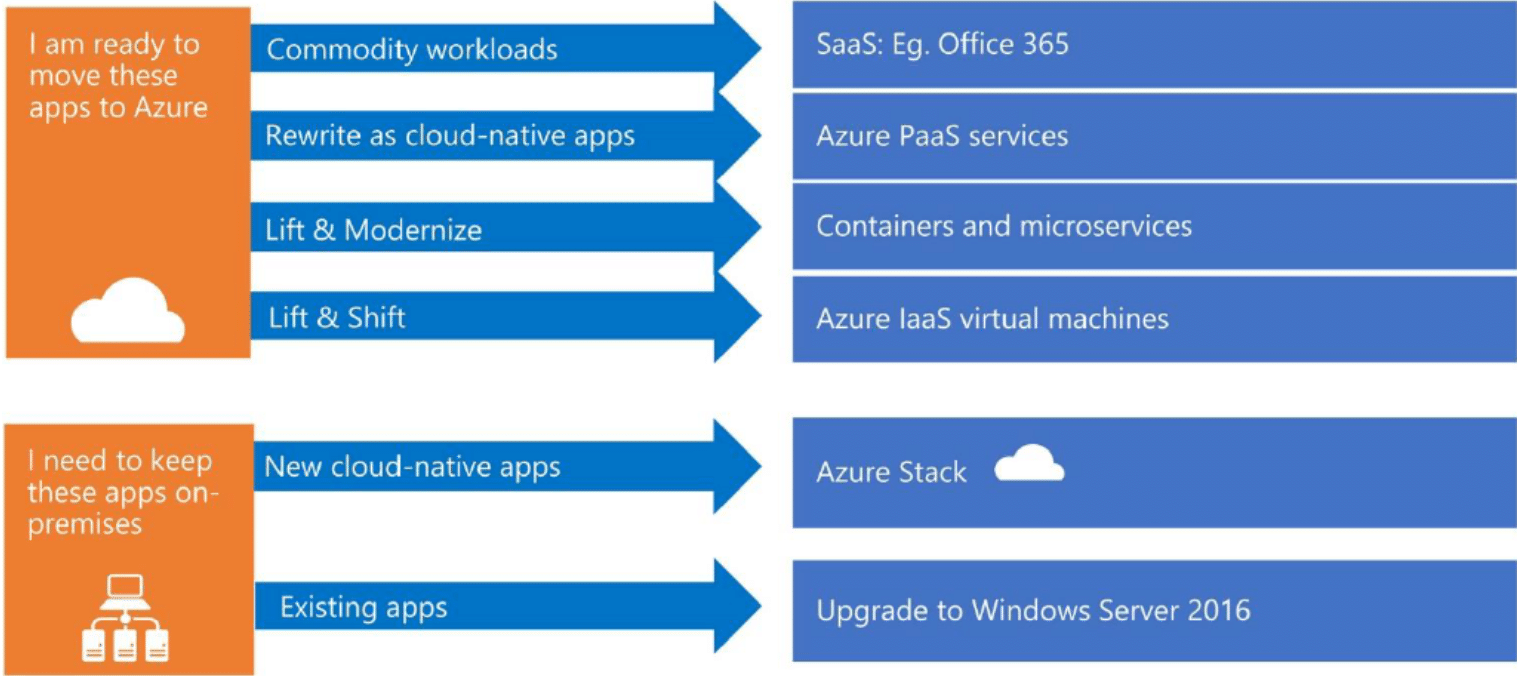
Infographic provided by Microsoft looking at migration workflows to Azure (Image courtesy of Microsoft)
Windows Server 2008/R2 migration assessment
A critical component of a successful Windows Server 2008/R2 migration is understanding the technical as well as the business requirements of the environment, architectural dependencies, roles/services, and custom applications that may be running on the existing server. Having a good picture of your Windows Server 2008/R2 environment helps to reduce the chances of adverse effects on business continuity during the migration process.
During the assessment phase of the migration process, it is good to ask questions regarding the Windows Server 2008/R2 migration.
- Will the applications, data, roles, services remain on-premises or is migration to Azure a possibility?
- Which applications might be able to migrate to Azure and which would need to stay on-premises?
- What are the dependencies of the applications on the Windows Server 2008/R2 server?
- Will there be any authentication changes after migrating?
- What are the architectural dependencies? If so, will this affect migration to Azure?
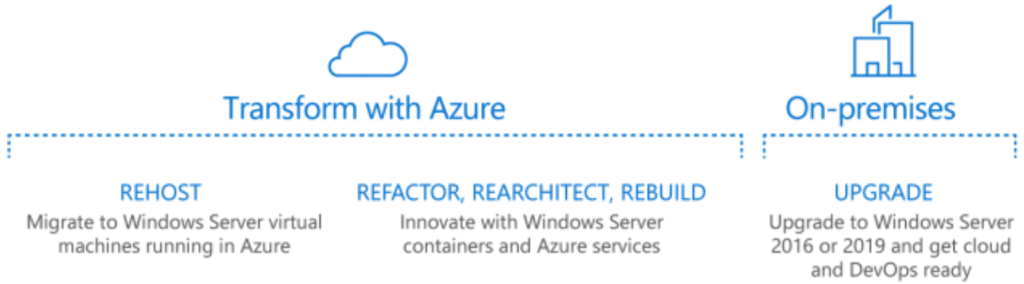
Deciding which applications can migrate to Azure or those that need to stay on-premises (Image courtesy of Microsoft)
The above are only a few of the questions you might consider when looking at migrating your Windows Server 2008/R2 servers to a newer platform. We can break out the Windows Server 2008/R2 resources into (4) components that you need to think about during migration.
- Roles and Services
- Data
- Microsoft applications
- Third-party and custom applications
Let’s look at each of these areas and talk about tools and best practices in performing the actual migration regarding these.
Windows Server 2008/R2 server roles and services migration
Microsoft’s recommended method for performing a migration from Windows Server 2008/R2 is what they call a server role migration. With server role migration, you build a new server, either physical or virtual, running a new Windows Server version (Windows Server 2016 or 2019 most likely) and then move your roles and services to the newly built physical/VM Windows Server.
What is a role/service? Typically, when thinking about a role/service, we are referring to the “in the box” roles and services included in the Windows Server operating system. Roles may include Active Directory Certificate Services, Active Directory Domain Services, DHCP Server, DNS Server, etc.
Microsoft publishes several Migration Guides that detail migration of the more common server roles/services that may be running on your Windows Server 2008/R2 servers.
Windows Server 2008/R2 data migration
One of the roles that may be served by a legacy Windows Server 2008/R2 server is a file server. You may have a large amount of data hosted by the Windows Server 2008/R2 server that needs to be migrated. Microsoft has released a new Windows Server data migration tool with Windows Server 2019 called the Storage Migration Service that will be a game-changer when migrating your Windows Server 2008/R2 servers to Windows Server 2019. What is the Storage Migration Service?
Storage Migration was developed to make it easier for IT administrators to migrate Windows Servers to newer versions. File Server migration is one of the roles that can be the most tedious to migrate. However, Storage Migration Service makes this extremely easy as it automates the entire process down to even assuming the identity of the legacy server. As noted by Microsoft, you can perform the following with the new Storage Migration Service:
- Inventory data on a single server or multiple servers
- Transfer files, file shares, and security ACLs from your source
Windows Server 2008/R2 servers to destination Windows Server 2019
- Assume the identity of the source servers so that users and apps don’t have to change anything to access existing data, mapped drives, paths, etc
- Use the Windows Admin Center interface to drive the entire Storage Migration Service process
- Use Storage Migration Service to migrate to a new server either on-premises or in the Azure cloud
The “all-encompassing” nature of the Storage Migration Service makes it extremely easy to move from legacy Windows Server versions such as Windows Server 2008/R2 in an automated way.
Using the Storage Migration Service to migrate to Windows Server 2019 (Image courtesy of Microsoft)
You can migrate the following source server versions to Windows Server 2019:
- Windows Server, Semi-Annual Channel
- Windows Server 2019
- Windows Server 2016
- Windows Server 2012 R2
- Windows Server 2012
- Windows Server 2008 R2
- Windows Server 2008
- Windows Server 2003 R2
- Windows Server 2003
With the Windows Server 2019 Storage Migration Service, data migrations involving files servers, large lists of ACLs, file shares, and other details are completely carried over from your legacy Windows Server 2008/R2 servers to Windows Server 2019. This is a powerful tool that you can leverage to move away from Windows Server 2008/R2.
Windows Server 2008/R2 Microsoft application migration
If you are hosting Microsoft applications on Windows Server 2008/R2, there are many attractive SaaS options available from the Microsoft Azure cloud. Applications such as SharePoint Online, Exchange Online, and Remote Desktop Services can easily be migrated and hosted in the Microsoft Azure cloud with all the benefits that come from the Azure ecosystem.
Email, SharePoint, and other communications platforms businesses run with Microsoft applications provide some of the core fundamental capabilities for the business. Moving these core applications to the Azure cloud makes sense for many businesses with the added functionality, flexibility, and security offered by Microsoft for those applications hosted in Azure.
The Office 365 Software-as-a-Service environment provides a great offering for you to migrate away from legacy on-premises servers to the Azure-backed public cloud.
Third-party and custom applications
What about third-party or custom applications that you may be running on legacy Windows platforms like Windows Server 2008/R2 in your environment? Microsoft has strong relationships with many of the major third-party, independent software vendors like SA, Adobe, and Citrix. The great news is that many of the vendors are natively moving to Azure-based solutions.
If you are thinking of rehosting in Azure, you can likely take advantage of native Azure integrations. Additionally, the Azure Marketplace often has Azure-native solutions that you can use for migrating from on-premises legacy Windows Server versions.
If you have custom applications, written in-house, you have a couple of options and tools you can use. Using Azure Site Recovery, you can replicate on-premises VMs to Azure and wait on third-party vendors to release an Azure-native solution for migration. With Azure Database Migration Service, you can move databases to Azure.
If you have custom web apps, you can also make use of Azure for containers or on-premises Windows Container services to house your web apps with little or no code changes. Containers also make a great candidate for housing custom .NET applications your business may be using.
Windows Server data migration best practices
There are certainly best practices to consider when thinking about your Windows Server data migration from Windows Server 2008/R2 to Windows Server 2019. We have already covered a few. However, you should certainly look at the following recommendations before performing your Windows Server data migration:
- Thoroughly assess your environment – including data, services, roles, applications (Microsoft and third-party)
- Do consider the Azure cloud – Azure includes many benefits and capabilities to take advantage of
- Consider the underlying architecture of your applications – Can they operate in a hybrid environment? Can they exist in Azure, what are the connectivity requirements to other server resources?
- Do use the new Storage Migration Service where possible
- Do understand the expectations from business stakeholders, before, during, and after a migration
- Consider leveraging Office 365 for core business services (Email, SharePoint, etc.)
- Use Azure Site Recovery for moving VMs to Azure
- Make use of Windows Containers for rehosting .NET and web apps either on-premises or in Azure for Containers
Wrapping up
As the end of extended support for Windows Server 2008/R2 approaches, creating a plan of action for either upgrading or migrating away from this now legacy Windows platform is no doubt a priority. There are many great migration tools and features available to make this easier than ever before.
With Microsoft Azure as well as great new tools like the Storage Migration Service, IT administrators have many options at their disposal to move away from Windows Server 2008/R2. As noted in this post and our previous post, proper planning and accurate assessment of the current Windows Server 2008/R2 environment is key to successfully migrating away from the legacy platform with the least amount of business interruption.
By utilizing the tools available as well as migrating to the cloud where feasible and possible, you can easily eliminate legacy Windows Server platforms from your environment while adding features and capabilities, agility, and flexibility.