A static IP address is an IP address that was manually configured for a Windows device instead of an IP address assigned by a DHCP server. This step by step tutorial covers how to configure a Static IP Address on Windows Server 2022
Demo environment
- Computer Name: server1
- Operating System: Windows Server 2022 Datacenter
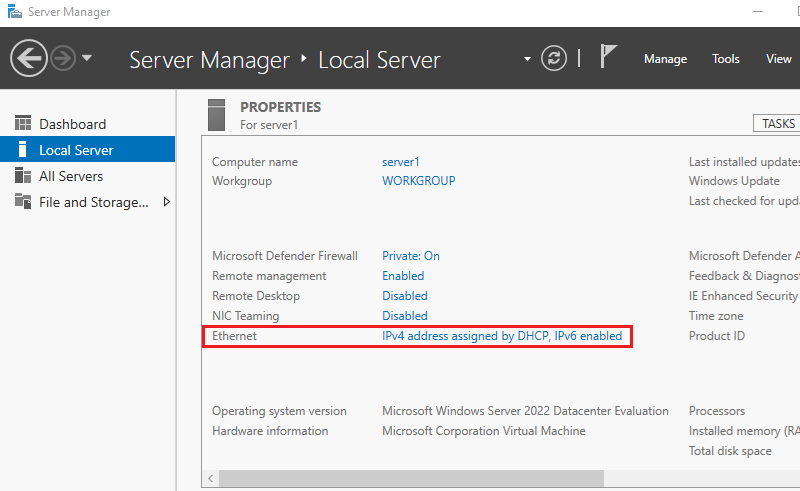
The IP address is assigned by DHCP by default.
1. Open the Server Manager dashboard, select Local Server, and click Ethernet.
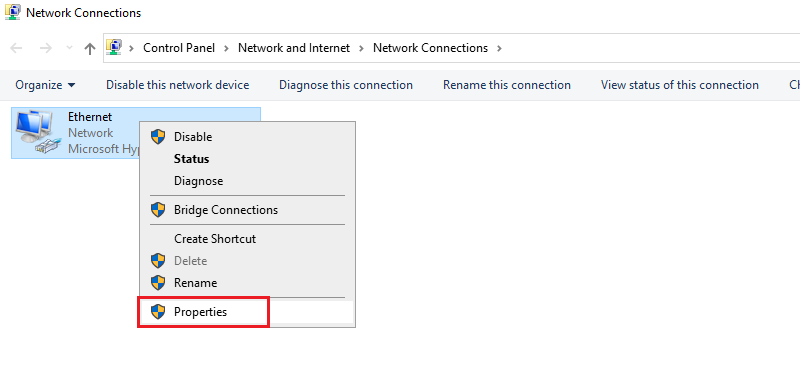
2. Right-Click on Ethernet and Click Properties.
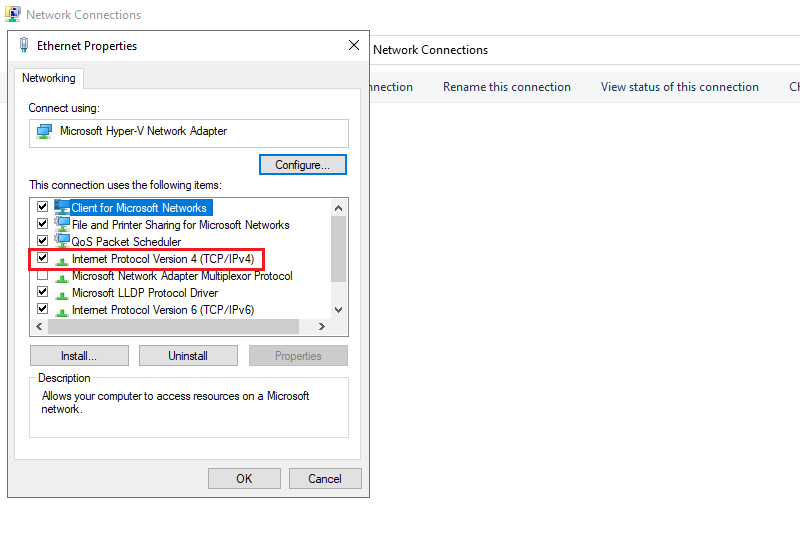
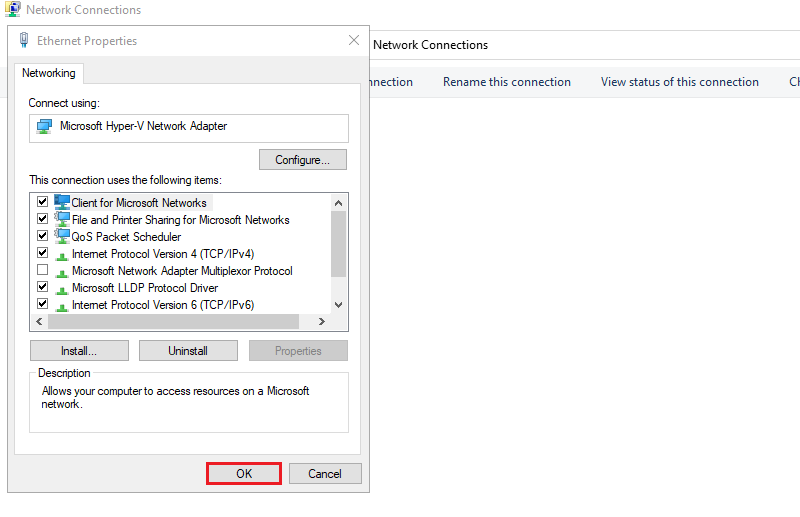
3. In Ethernet Properties, click Internet Protocol Version 4(TCP/IPv4)
4. In Internet Protocol Version 4(TCP/IPv4) Properties, set Static IP address, Gateway, and other details and click OK.
- IP address: 192.168.1.60
- Subnet mask: 255.255.255.0
- Default gateway:192.168.1.1
- Preferred DNS server: 8.8.8.8
- Alternate DNS server:8.8.4.4
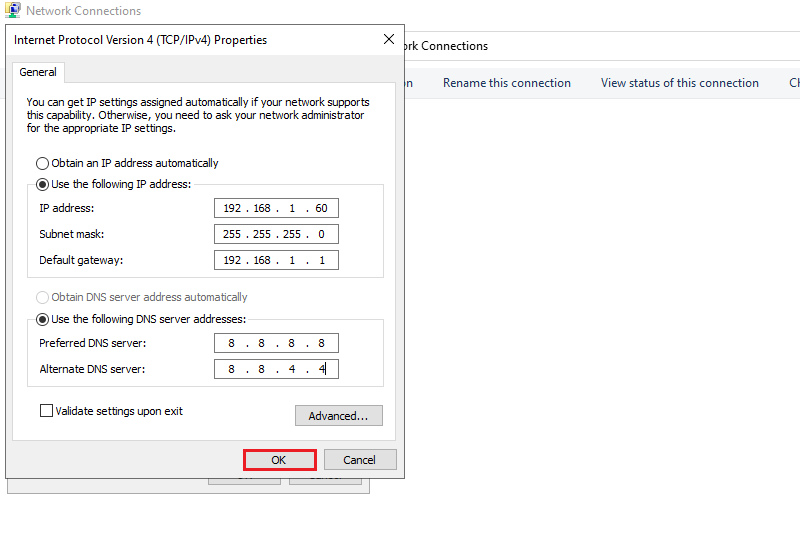
5. Click OK.
The static IP (IPv4) address has been configured.
IP Address (IPV4)
IP Addressing is logical addressing. An IP address can be divided into 2 portions network and host address. The network address is used to identify the network and the host address is used to identify devices on the network. IP V4 is 32-bit addressing. The 32 bits are divided into 4 octets and the total IP addressing scheme is divided into 5 classes (Class A, Class B, Class C, Class D, and Class E). Private IP Addresses used on private networks are not routable through the internet.
Class A
Class B is used for used Local area network (LAN) and Local area network (WAN).
- First octet range: 0 – 127
- Default Subnet Mask: 255.0.0.0
- Privet IP Address: 10.0.0.0-10.255.255.255
Class B
Class B is used for used Local area network (LAN) and Local area network (WAN).
- First octet range:128-191
- Default Subnet Mask: 255.255.0.0
- Privet IP Address: 172.16.0.0-172.31.255.255
Class C
Class B is used for used Local area network (LAN) and Local area network (WAN).
- First octet range: 192-223
- Default Subnet Mask: 255.255.255.0
- Privet IP Address: 192.168.0.0-192.168.255.255
Class D
Class D is used for Multicasting.
- First octet range: 224 – 239
Class E
Class E is used for Research and development.
- First octet range: 240 – 255
On Windows Server 2022 (or 2019 and 2016), you can assign a static IP address in at least two ways through the graphical user interface (GUI) or commands, and in this guide, you will learn how.
When planning to install the server version of Windows, configuring a static IP address is among one the first tasks you have to complete as it will make it easier to share files and printers, and you may need this configuration to set up other networking features like port forwarding. Otherwise, services can stop working at any time.
By default, the server and client version of Windows receives a dynamic network configuration from the Dynamic Host Configuration Protocol (DHCP) server, and since it’s “dynamic,” it can change at any time. If this happens to a server, users won’t be able to connect to the services.
Regardless of the service you plan to configure on the server, you must make sure to set a static IP address, and on Windows Server 2022, you can perform this task in at least two ways through Control Panel and PowerShell.
This guide will teach you the steps to assign a static TCP/IP address on Windows Server 2022, 2019, and 2016.
- Configure static IP address on Windows Server from Control Panel
- Configure static IP address on Windows Server from PowerShell
Configure static IP address on Windows Server from Control Panel
To assign a static IP on Windows Server 2022, use these steps:
-
Open Control Panel on Windows Server.
-
Click on Network and Internet.
-
Click on Network and Sharing Center.
-
Click the Change adapter settings option on the left navigation pane.

-
Right-click the network adapter and select the Properties option.
-
Select the “Internet Protocol Version 4 (TCP/IPv4)” option.

-
Click the Properties button.
-
Select the “Use the following IP address” option.
-
Assign the static IP address – for example, 10.1.4.120.

-
Specify a Subnet mask. Typically, on a home network, the subnet mask is 255.255.255.0.
-
Specify a Default gateway. (Usually, your router’s IP address. For example, 10.1.4.1.)
-
Under the “Use the following DNS server addresses set Preferred DNS server” section, set the Preferred DNS server address, usually your router’s IP address or server IP address providing DNS resolutions (for example, 10.1.4.1).
-
(Optional) Specify an Alternative DNS server, which the computer will use if it cannot reach the preferred DNS server.
-
Click the OK button.
-
Click the Close button again.


Once you complete the steps, you can open your web browser and load a website to see if the configuration works.
Configure static IP address on Windows Server from PowerShell
To set a static IP address with PowerShell on Windows Server 2022, use these steps:
-
Open Start.
-
Search for PowerShell, right-click the top result, and select the Run as administrator option.
-
Type the following command to view the current configuration and press Enter:
Get-NetIPConfiguration

-
Confirm the “InterfaceIndex,” “IPv4Address,” “IPv4DefaultGateway,” and “DNSServer.”
-
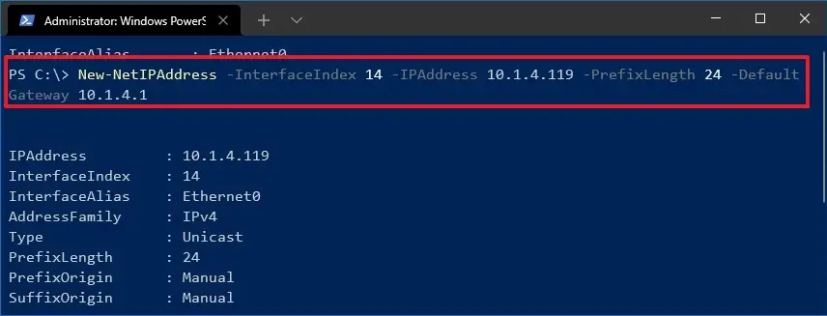
Type the following command to set a static IP address on Windows Server 2022 and press Enter:
New-NetIPAddress -InterfaceIndex 14 -IPAddress 10.1.4.119 -PrefixLength 24 -DefaultGateway 10.1.4.1

In the command, replace the “InterfaceIndex” number with the corresponding number of your adapter. Change “IPAddress” with the static IP address you want to assign to your device. Replace “PrefixLength” (subnet mask) with the correct bit number if necessary. Usually, the setting is “24” to represent “255.255.255.0.” Also, replace the “DefaultGateway” option with the default gateway address (usually the router) of the network.
-
Type the following command to set the DNS server IP address and press Enter:
Set-DnsClientServerAddress -InterfaceIndex 14 -ServerAddresses 10.1.4.1
-
(Optional) Type the following command to set a secondary DNS server address and press Enter:
Set-DnsClientServerAddress -InterfaceIndex 14 -ServerAddresses 10.1.4.1, 8.8.8.8
In the command, change the “InterfaceIndex” number with your network adapter number and “ServerAddresses” with the DNS IP address.


Once you complete the steps, the PowerShell command will apply the static network to the server.
FAQ
Can I set a static IP configuration from the Settings app?
Yes, you can use the Settings app to configure a static configuration. However, it’s worth noting that the Settings app also provides an interface to configure a static network configuration. However, it’s not recommended to use this method, as you may encounter problems, such as “Can’t save IP settings. Check one or more settings and try again” and others. One of the reasons is that the “Subnet mask” has to represent with bit number, not the full address. For example, “24” instead of “255.255.255.0.” As a result,
Why Windows Server static IP address isn’t working?
The static IP address is not working on Windows Server, because you are using the Settings app to apply the configuration. The easiest way to assign a static TCP/IP address is using Control Panel.
Do these instructions only apply to Windows Server 2022?
No, you can use these instructions to configure a static IP address on Windows Server 2022, 2019, 2016, 2012, 2012 R2, and even older versions.
What TCP/IP address to use for a static configuration?
Always assign a TCP/IP address in the network range and outside of the DHCP server scope to allow proper connectivity and avoid configuration conflicts with other devices in the network.
Wondering how to configure Static IP address in Windows Server? We can help you.
As part of our Server Management Services, we assist our customers with several Windows queries.
Today, let us see how our techs go about the static IP configuration in Windows.
Configure Static IP address in Windows Server
In this article let us see how we can configure the Server IP to its Static IP from its default DHCP.
To do so, our Support Techs recommend the below steps:
1. Initially, we log in to the server via the admin credentials.
2. Then we open Server Manager and from the left panel we click the ‘Local Server’ option.
3. Here, we can find the ‘Ethernet’ section. When we click on it, It will show, “IPv4 address assigned by DHCP“.
4. We right-click on the Ethernet icon and select properties.
5. Now, we select the Internet Protocol Version 4 and then click the Properties button.
6. Later, to assign the static IP, we select the “Use the following IP address” option.
7. After that, we need to enter the static IP on the IP address tab
8. In addition, we add the gateway and subnet mask info.
9. Finally, after we set the static IP address, the changes will be enabled on Server Manager.
[Need help with the configuration? We’d be happy to assist you]
Conclusion
In short, we can configure the Server IP to its Static IP from its default DHCP. Today, we saw how our Support Techs perform the same for our customers.
PREVENT YOUR SERVER FROM CRASHING!
Never again lose customers to poor server speed! Let us help you.
Our server experts will monitor & maintain your server 24/7 so that it remains lightning fast and secure.
GET STARTED
Windows Server является одной из основных платформ для развертывания и управления серверными сетями. Назначение правильного IP-адреса на сервере является одним из важных шагов в его настройке. Это позволяет серверу обмениваться данными с другими устройствами в сети и обеспечивает его работу.
В этом подробном руководстве будут представлены шаги по назначению IP-адреса на Windows Server. Они подходят для различных версий операционной системы, включая Windows Server 2012, 2016 и 2019. В процессе мы рассмотрим как назначить IP-адрес с использованием графического интерфейса пользователя (GUI) и с помощью командной строки.
Когда сервер подключен к сети, он обычно автоматически получает IP-адрес от DHCP-сервера. Однако, есть случаи, когда требуется назначить статический IP-адрес, чтобы обеспечить постоянное соединение с сервером. Это может быть необходимо, например, при настройке служб, доступ к удаленному рабочему столу или управлении службами виртуальной машины.
Примечание: Перед началом назначения IP-адреса убедитесь, что у вас есть необходимые права администратора и доступ к серверу.
Содержание
- Как установить IP-адрес на Windows Server
- Шаг 1: Открытие «Настроек сети»
- Шаг 2: Выбор подключения и настройка IP-адреса
- Шаг 3: Настройка DNS-сервера
- Шаг 4: Проверка соединения и сохранение настроек
Как установить IP-адрес на Windows Server
Шаг 1: Откройте «Панель управления» на вашем Windows Server и найдите раздел «Сеть и Интернет».
Шаг 2: В разделе «Сеть и Интернет» выберите «Центр управления сетями и общим доступом».
Шаг 3: В левой панели выберите «Изменение параметров адаптера».
Шаг 4: Выберите сетевой адаптер, на который вы хотите назначить IP-адрес, и щелкните правой кнопкой мыши по нему. Затем выберите «Свойства».
Шаг 5: В открывшемся окне выберите «Протокол интернета версии 4 (TCP/IPv4)» и нажмите кнопку «Свойства».
Шаг 6: В появившемся окне выберите «Использовать следующий IP-адрес» и введите IP-адрес, подсеть и шлюз по умолчанию.
Шаг 7: Нажмите кнопку «ОК», чтобы сохранить настройки IP-адреса.
Шаг 8: После сохранения настроек IP-адреса закройте все открытые окна.
Шаг 9: Перезагрузите ваш Windows Server, чтобы изменения вступили в силу.
Теперь вы успешно установили IP-адрес на Windows Server!
Шаг 1: Открытие «Настроек сети»
Перед тем, как назначить IP-адрес на Windows Server, необходимо открыть «Настройки сети», чтобы получить доступ к соответствующим опциям. Для этого выполните следующие действия:
- Откройте «Панель управления» на вашем сервере.
- Выберите опцию «Сеть и интернет».
- В разделе «Сеть и общий доступ к сети» нажмите на ссылку «Центр управления сетями и общим доступом к сети».
- В открывшемся окне нажмите на ссылку «Изменение параметров адаптера».
После выполнения этих действий вы попадете в настройки сетевых адаптеров вашего сервера, где сможете произвести требуемые изменения.
Шаг 2: Выбор подключения и настройка IP-адреса
После установки Windows Server и входа в систему, необходимо настроить IP-адрес для подключения к сети. Для этого следуйте инструкциям ниже:
1. Откройте «Центр управления сетями и общим доступом» (Network and Sharing Center), нажав правой кнопкой мыши на значок сети в системном трее и выбрав соответствующий пункт меню.
2. Перейдите в раздел «Изменение параметров адаптера» (Change adapter settings).
3. Выберите сетевое подключение, для которого нужно настроить IP-адрес, и нажмите правой кнопкой мыши на него, затем выберите пункт «Свойства» (Properties) в контекстном меню.
4. В открывшемся окне свойств сетевого подключения найдите и выберите протокол «Интернет-протокол версии 4 (TCP/IPv4)» (Internet Protocol Version 4 (TCP/IPv4)) и нажмите кнопку «Свойства» (Properties).
5. Откроется окно настройки параметров TCP/IPv4. Здесь вы можете выбрать один из двух способов получения IP-адреса: автоматическое получение (через DHCP) или ввод IP-адреса вручную.
6. Если вы хотите настроить IP-адрес вручную, выберите опцию «Использовать следующий IP-адрес» (Use the following IP address) и введите необходимые параметры:
- IP-адрес: введите желаемый IP-адрес для сервера
- Маска подсети: введите маску подсети для вашей сети
- Основной шлюз: введите IP-адрес шлюза по умолчанию
- Предпочитаемый DNS-сервер: введите IP-адрес DNS-сервера
7. Нажмите кнопку «OK», чтобы сохранить изменения и закрыть окно свойств сетевого подключения.
Теперь вы успешно настроили IP-адрес для сетевого подключения на Windows Server. Убедитесь, что ваш сервер может подключаться к сети, проверив подключение и выполнение сетевых операций.
Шаг 3: Настройка DNS-сервера
Настраивая DNS-сервер, вы позволяете вашему серверу распознавать и переводить доменные имена в соответствующие IP-адреса. Здесь вы узнаете, как настроить DNS-сервер на Windows Server.
Чтобы настроить DNS-сервер, выполните следующие действия:
- Откройте «Панель управления» на вашем сервере и выберите «Установка ролей и функций».
- В мастере установки выберите «Роль DNS-сервер» и пройдите по инструкциям по установке.
- После установки роли откройте «DNS-менеджер» и создайте новую зону.
- Выберите тип зоны (обычно «Primary Zone» или «Forward Lookup Zone») и введите имя зоны.
- Укажите источник данных для новой зоны, в результате чего вы можете использовать службу Active Directory или указать другой источник данных.
- Продолжайте следовать инструкциям мастера, чтобы завершить создание зоны.
После завершения настройки DNS-сервера, ваш Windows Server будет готов к обработке запросов по доменным именам.
Обратите внимание, что настройка DNS-сервера зависит от конкретной версии Windows Server, и некоторые шаги могут отличаться.
Шаг 4: Проверка соединения и сохранение настроек
После внесения изменений в настройки IP-адреса необходимо проверить, правильно ли они были применены и соединение работает. Для этого выполните следующие действия:
1. Откройте командную строку, нажав клавишу Win+R и введя команду «cmd».
2. В командной строке введите команду «ipconfig» и нажмите клавишу Enter.
3. В результате будет выведен список сетевых адаптеров и их настроек. Проверьте, что у вас есть соединение с указанным IP-адресом.
4. Также вы можете проверить соединение, попробовав открыть веб-браузер и перейти на любой веб-сайт. Если страница открывается, значит соединение работает.
5. После проверки соединения, убедитесь, что внесенные изменения сохранены. Для этого перезагрузите сервер или выполните команду «ipconfig /all». В полученных результатах проверьте, что настройки IP-адреса не изменились.
Теперь, когда вы проверили соединение и убедились, что настройки сохранены, вы успешно назначили IP-адрес на Windows Server. Теперь ваш сервер готов к работе в сети.
Настройка сети на Windows Server 2019 является важной операцией. Без настроенной сети вы не сможете ни обновить ни активировать ваш сервер.
Ранее я уже писал о том как установить Windows Server 2019. После установки обычно первым делом устанавливают вне необходимые драйвера, которые зависят от используемого железа или способа виртуализации. А вторым шагом настраивают сеть.
На сервере обычно используется статический IP адрес. Но, по умолчанию, после установки системы сетевые интерфейсы пытаются получить IP адреса по dhcp. Сейчас я покажу как установить статический IP адрес на сетевой интерфейс вашего Windows сервера:
В меню «Пуск» переходим в «Параметры«:
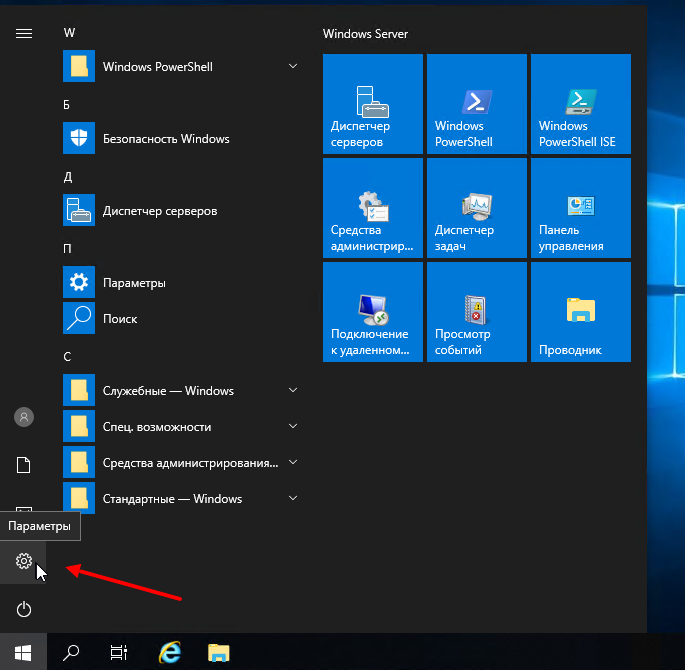
В настоящее время программисты из Microsoft пытаются перенести все элементы управления из старой «Панели управления» в новую панель под названием «Параметры Windows«. Дальше в открывшемся окне выбираем «Сеть и Интернет«:
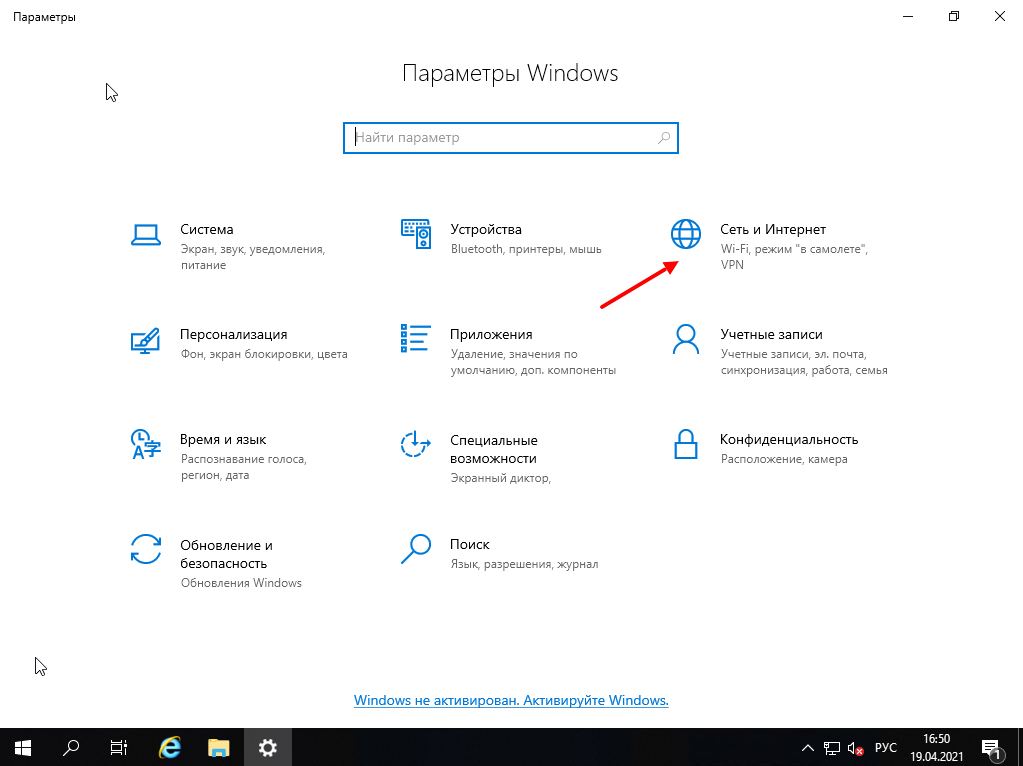
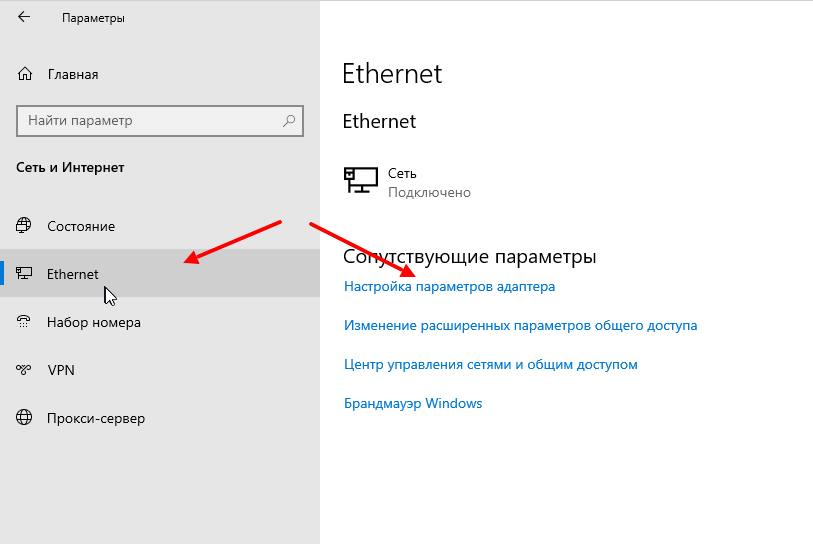
В следующим окне с лева выбираем «Ethernet«, а справа «Настройка параметров адаптера«:
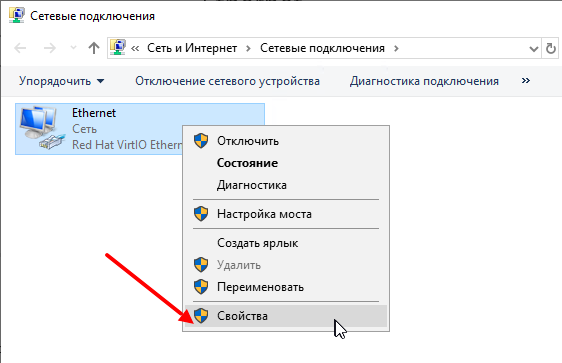
Кликаем правой кнопкой мыши по адаптеру и выбираем пункт меню «Свойства«:
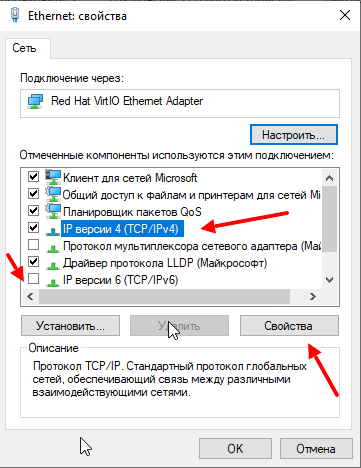
Дальше выделяем компонент «IP версии 4 (TCP/IP)«. Дополнительно, ещё я отключаю «IP версии 6 (TCP/IPv4)«:
В следующем окне переключаемся на «Использовать следующий IP-адрес» и вводим необходимый адрес, не забываем указать маску, шлюз и адрес DNS сервера:
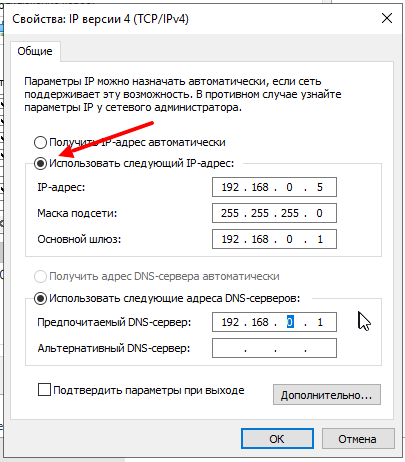
После чего остаётся нажать кнопку «ОК» и закрыть оставшиеся окна.
Сводка

Имя статьи
Настройка сети Windows Server 2019
Описание
Настройка сети на Windows Server 2019 является важной операцией. Без настроенной сети вы не сможете ни обновить ни активировать ваш сервер