How to check Windows server logs (Windows Event Log Types. Microsoft Windows Server is an operating system that provides network administrators with a collection of enterprise level management features. Accordingly, some of these features include data storage, applications, security, network, and hardware management.
Similarly, Microsoft’s collection of desktop operating systems allow you to view event logs through a set of Administrative Tools. So, Windows Server offers similar features but in a more enterprise capacity. After all, event logging and tracing are important parts of running servers. Thus, this guide will explore how you can find Windows server logs and how to interpret the information from them.
Shall we start with How to check Windows server logs (Windows Event Log Types).
Understanding The Windows Event Log
![]()
If your servers are positioned in a fairly medium or large company, they may be collecting thousands of events hourly. Especially if you have not configured your Windows Server Event Logs. Basically, the event log is separated into channels. The four most important are:
- System: Features events related to system software and/or hardware. For instance, driver failures or installations.
- Application: Contains events logged by (mostly) Windows applications.
- Security: Contains events pertaining to the security of the Windows system. This may include failed login attempts.
- Setup: Features system related event logs for setups and updates. For instance, Windows updates.
Besides, Microsoft also has channels for its features such as BitLocker, AppLocker, and Windows Firewall. Additionally, the event log may also contain channels for third party software. As a result, Windows Server allows you to collect all your events from separate servers and combine them in a central location. Alternatively, you could feed event logs to a Security Information and Event Management (SIEM) solution that isn’t Microsoft based.
While there is a lot of information collected by the events log by default, it is the auditing feature in Windows that determines what information gets collected and logged.
How to Check Windows Server Logs
There are two main graphical ways you can access the Windows Server event log:
- Event Viewer Microsoft Management Console (MMC)
- Windows Admin Center (WAC)
The WAC isn’t as fully-featured as the Event Viewer. Nonetheless, you can access the Event Viewer from the server or client machine(s) using Windows Administrative Tools. Alternatively, you can use the Windows Server Manager to run the Event Viewer.
Launching The Windows Server Manager
Again, there are quite a few ways you can check server event logs from Windows Server. One of the best ways is using Windows Server Manager which acts as a central hub for our server. By default, Windows Server Manager is a Windows Server start up application. This means that it’s one of the first applications to run when you launch Windows Server. However, you can also run the Server Manager from the start menu or search bar:
- Open the Start Menu (WinKey).
- Search through the applications list for Server Manager or type it into the search field.
- Double click on the Server Manager item.

How to Launch The Event Viewer
Once again, the best way to check Windows Event Logs is through the Event Viewer. You can launch it from the Server Manager using the following steps:
- Click on the top Tools menu button.
- Search the list for Event Viewer.
- Double click on it to open it .

Using The Roles and Server Groups Section To Check Events
You may have noticed that the Events Viewer isn’t the only place you can view events from the Server Manager. As seen, the Server Manager also allows you to view roles and server specific events on the dashboard. You can view File and Storage, Local Server, and All Servers events by using the various widgets in the dashboard.

Clicking on one of the Events options in these widgets will launch a screen similar to this one:

This is called the Events Detail View. It gives you a list of filtration options including:
- Event Security Levels: Filter events according to their severity.
- Event Sources: Origin of an event (applications, services, etc).
- Servers: The machine the event occurred on.
- Time Period: The hours and/or minutes the event occurred in between.
- Event IDs: Each event has a unique ID. You can filter events using these IDs.
Again, we’ll stick to using the Event Viewer because it’s the most fully featured option.
Navigating Through the Event Viewer

One of the most unfortunate facts about Windows Server’s event management system is its lack of built in alerts or notifications. However, you can apply a script or run a program that is triggered when a particular event enters one of your custom views.
Nevertheless, you should be able to see the four channels we previously mentioned under the Windows Logs folder. You can use the above image as a reference. Ultimately, this is where you will check your Windows Servers Log.
You will notice that the above image features an additional channel called Forwarded Events. This channel is used by servers that have been set up as event collectors. It allows you to see events from other servers.
If you scan through the Event Viewer tree, you should notice a top folder labeled Applications and Services Log. It contains event channels related to installed server software and hardware.
Event Log Levels
When checking Windows Server Logs through the Event Viewer, you’re bound to run into a plethora of event types. They include:
- Information: Logs information event. For instance, when a task is completed successfully or when the system informs the user of something.
- Warning: Used to log system and software warnings. They don’t demand immediate action. However, they may warn you of a future problem, like disk space running out.
- Error: Indicates a system, software, or hardware issue that requires immediate action. For instance, a driver failing to load upon start up.
- Success Audit (Security log): This signifies the success of an audited security event. For instance, a user successfully logging onto the server or client.
- Failure Audit (Security log): This signifies the success of an audited security event. For instance, a user failing to log onto a server or client.
It is time to explain How to Check Windows Server Logs (Windows Event Log Types).
Event Log Types
In this section of the guide, you’ll explore the event types (Event Sources) you should be monitoring. Ultimately, keeping track of important logs requires you to use event sources to identify vulnerabilities in your system. Certainly, you’ll be able to find the event source by using the Source tab for each event.

Alternatively, you can create a custom view by:
- Right clicking on any one of the folders or objects on the right tree panel eg. Windows Logs.
- Next, select Create Custom View… from the context menu.
If you execute the above steps correctly, you should be presented with this screen.

You can then use either the filer screen or XML screen to create an event source-based view.
1. Application Whitelisting
As shown, you should have a list of approved services and applications. Anything that doesn’t appear on your whitelist should be flagged as suspicious. Consequently, there are two systems built into the latest versions of Windows for application control:
- AppLocker
- Microsoft Defender Device Guard
You can either use these systems individually or in tandem. Regardless, DeviceGuard is considered the most difficult to configure but also the most secure. As such, admins may elect to use it over AppLocker. AppLocker is easy to bypass by compromising the Windows NT Kernel. Comparatively, the Device Guard is much more robust and much more secure against exploits against the Windows NT Kernel.
However, if it’s your first time working with application control software, it is recommended that you use AppLocker with the Event Viewer.
What Should You Do When You Encounter This Event?
Your event source is dependent on the application control solution you’ve chosen to use for black and whitelisting. For instance, any event related to the AppLocker will use AppLocker as a source. Likewise, if you use Microsoft Defender, Device Guard events will use DeviceGuard as a source. It’s important that you investigate any suspicious events related to these sources. Correspondingly, bad actors may be trying to whitelist apps that you’ve previously blacklisted because of the vulnerabilities they impose on your system. You should:
- Check your app control configurations.
- Consult with a network security specialist to track down the person that may have changed your rules.
- Change all necessary Passovers.
2. Randomly Cleared Events and Audit Logs
If you notice that some of your events have been randomly cleared, then your network/system has most likely been compromised by bad actors. Especially, these bad actors may be trying to hide malicious activity by purging events. At this time it’s important to remember that event logs are not typically cleared during normal operations. As such, if you notice the following event logs, you should be worried:

What Should You Do When You Encounter This Event?
Nevertheless, collecting logs centrally on a server that only you (or your network’s admin) can access is the best way to protect yourself against cleared event logs. This will allow you to view deleted or cleared event logs without restoring your server from a backup. You can then confirm if a bad actor compromised your system.
3.Account Usage
A variety of users will log in to your server(s). You can use these event types and IDs to detect unauthorized account usage and remote desktop logins. Some users can use Windows Remote Desktop to configure systems that they should not be allowed to. Equally, users should not be logging into your server using Remote Desktop when there are other tools such as Power Share, Windows Admin Console (WAC), etc.
You (or your network administrator) should especially be paying attention to privileged Active Directory groups such as the domain and enterprise admin groups. Furthermore, you must make sure that your system isn’t adding or removing users from these groups without permission.
Account lockouts are important events that should be monitored. They can often signify brute force attempts by malicious actors. These bad actors may be trying to guess a user’s password. Nevertheless, the following are the events that fall under this category:

What Should You Do When You Encounter This Event?
When you encounter this event, it’s important to connect all related users and/or groups. First step is to investigate why a specific user was locked out. Was it indeed a bad actor or have they forgotten their password? Once you’ve fully ascertained the reasons for the user’s failed login attempts, you can act accordingly.
4. Group Policy Errors
Evidently, you use Group Policy Objects (GPOs) to configure and enforce your organization’s security policy. Thus, if the group policies you’ve set aren’t enforced, then your system may be compromised. In most cases, it may be the result of a bad actor attempting to prevent your system from enforcing certain policies so they can enact their own.
However, it can also be something benign or innocent. For instance, the group policy client may be failing for some reason. Regardless, it’s always important to monitor your group policies as they may indicate something nefarious occurring on your network..

What Should You Do When You Encounter This Event?
Your group policies can be viewed in the GroupPolicy channel (Microsoft > Windows > GroupPolicy). It allows you to see if your system is applying Group Policy Objects (GPOs) successfully. Once you encounter any errors in this view, you should first determine why the error is concerning. It may not be the result of a breach or attempted exploit. One of your machines may be struggling with low system resources. Make sure to check if your GroupPolicies are operational.
5. Software and Service Installation
By the same token, you may be regularly installing and updating software and services on your server. However, installations occur daily. Of course, this depends on the server’s usage and age. Freshly commissioned servers may require daily installations, backups, and updates. Nonetheless, if you see suspicious software and service-related events, then it may be a sign of malicious activity carried out by a bad actor.
What Should You Do When You Encounter This Event?
Look out for keywords in events such as “Installed”, “New”, “Removed”, “Update”, and ”Updated”. You can find the above keywords by using a search or a custom view of your creation. You must investigate every suspicious occurrence you find and review logs to ensure that every software/service installation and removal has been approved.
6. Windows Updates
As with the desktop version of the operating system, Windows Server also requires regular updates. These updates are imperative because they often contain important system patches. If these Windows updates fail, it may leave your system vulnerable.
Consequently, you must check the WindowUpdateClient and Servicing event sources from the System channel. Alternatively, you can create a custom view filtered according to these event sources. Nevertheless, you must validate that there are no errors or information events that indicate Windows Update failures.
What Should You Do When You Encounter This Event?
The first thing you must do is investigate why your Windows Updates are being interrupted. It may not be a result of a malicious. Your server(s) may be low on system resources or your system may be experiencing a network error. As you investigate the source of the issue, you must ensure that your Windows Server operating system is up to date. You can manually download and install Windows Server Cumulative Updates.
7. Windows Firewall
The Windows Firewall is enabled by default. It protects servers and clients against malicious activities from your internal trusted network. Henceforth, it’s just as important as any firewall you have segregated in your network. Thus, you must check that your firewall is it’s working, and if the status and/or rules have been updated or changed, etc.
Event sources to look out for include: Firewall, Firewall-Client, Firewall-CPL, Firewall-Driver, and Firewall-Service. Again, you can create a custom view with these event sources.
What Should You Do When You Encounter This Event?
Again, you must determine the source of the issue. Is someone trying to reconfigure your firewall? You should consider using third party firewalls for your internal system. There are other steps you can take to improve your overall cybersecurity.
8. Application Crashes
Application crashes are fairly common. However, they may indicate a malicious attack where a bad actor is forcing processes and services to shut down. Therefore, you or your system administrator must check the event logs for instances of Blue Screen of Death (BSOD), Windows Error Reporting (WER), Application Crashes, and Hang events.

What Should You Do When You Encounter This Event?
Again, you should determine the source of the crash, freeze, etc. Are the affected applications important to the security of your network? Which machines are they specifically related to? This will help you decide if you must investigate further or change the posture of your network’s security.
Thank you for reading How to Check Windows Server Logs (Windows Event Log Types Explained). We shall conclude.
How to Check Windows Server Logs (Windows Event Log Types) Conclusion
In any enterprise that uses file servers to store and share data, auditing is important to ensure data security. Proper monitoring of all file servers in your domain can help you to spot unwanted or potentially damaging events, including file accesses and read events on files containing sensitive data.
In this article, you will see how to track who accesses files on Windows File Servers in your organization using Windows Server’s built-in auditing. At the end of the article, you will also see how much simpler the process is when using Lepide File Server Auditor.
How to Audit Who Read, Access a File on Windows File Server
Here are the steps to track who read a file on Windows File Server.
- Step 1 – Set ‘Audit Object Access’ audit policy
- Step 2 – Set auditing on the files that you want to track
- Step 3 – Track who reads the file in Windows Event Viewer
Step 1 – Set ‘Audit Object Access’ audit policy
Follow these steps one by one to enable the “Audit object access” audit policy:
- Launch “Group Policy Management” console. For that, on the primary “Domain Controller”, or on the system where “Administration Tools” is installed, type “gpmc.msc” in the “Run” dialog box, and click “OK”.
- After you have opened the “Group Policy Management” window, you will have to create a new GPO, or edit an existing one.
- To edit an existing GPO, in the left pane, right-click on the default or a user-created GPO, and click “Edit” on the context menu. This action opens the Editor window of Group Policy Management Editor.
Note: If you want to track multiple folders, you will have to configure an audit for every folder individually.
- Navigate to “Security” tab.
Note: It is suggested to create a new GPO, link it to the domain, and edit it.
- In the “Group Policy Management Editor” window, you have to set the appropriate audit policy.
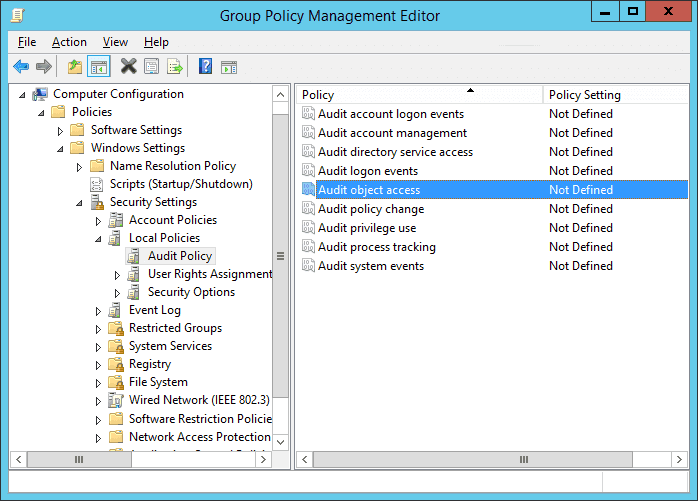
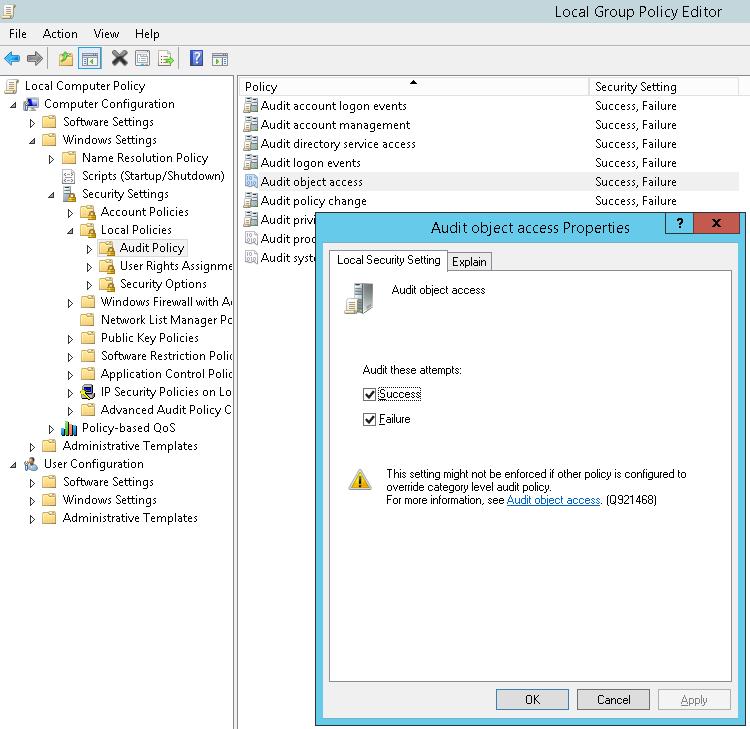
- To audit file accesses, you have to set the “Audit object access” policy. For that, navigate to “Computer Configuration” → “Windows Settings” → “Security Settings” → “Local Policies” → “Audit Policy”. All the available policies under “Audit Policy” are displayed in the right panel.

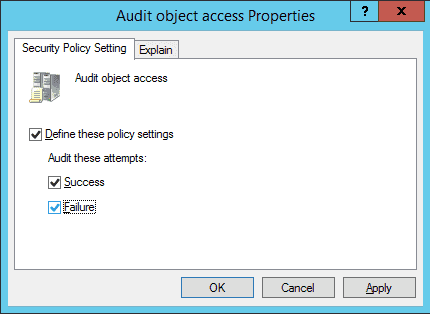
Figure 1: “Audit Object Access” policy - Double-click the “Audit object access” policy to open its “Properties”.

Figure 2: Properties of Audit Object Access Policy - On this window, click the “Define these policy settings” checkbox. Then, you get two options to audit – “Success” and “Failure”. The former lets you audit successful attempts made to access the objects, whereas the latter lets you audit failed attempts.
- Select any one or both the options as per requirement. It is recommended to select both options. In our case, we have selected both options because we want to audit both the successful and the failed attempts.
- Click “Apply” and “OK” to close the window.
- To immediately update the Group Policy instead of waiting for it to auto-update, run the following command in the “Command Prompt”:
Gpupdate /force
Step 2 – Set auditing on the files that you want to track
After configuring GPO, you have to set auditing on each file individually, or on folders that contain the files. Here are the steps:
- Open “Windows Explorer” and navigate to the file or folder that you want to audit.
- Right-click the file and select “Properties” from the context menu. The file’s properties window appears on the screen.
Note: If you want to track multiple files, put them into one, two or more folders to enable their auditing easily. Doing this saves you from repeating these steps for each file.
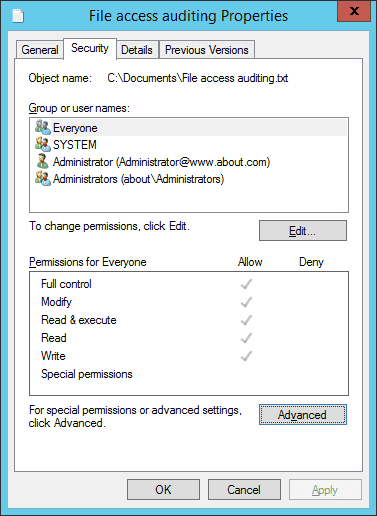
- By default, the “General” tab of the “Properties” window appears on the screen. Go to the “Security” tab.

Figure 3 Auditing tab of “Advanced Security Settings” - On the “Security” tab, click “Advanced” to access the “Advanced Security Settings for” window that appears on the screen.
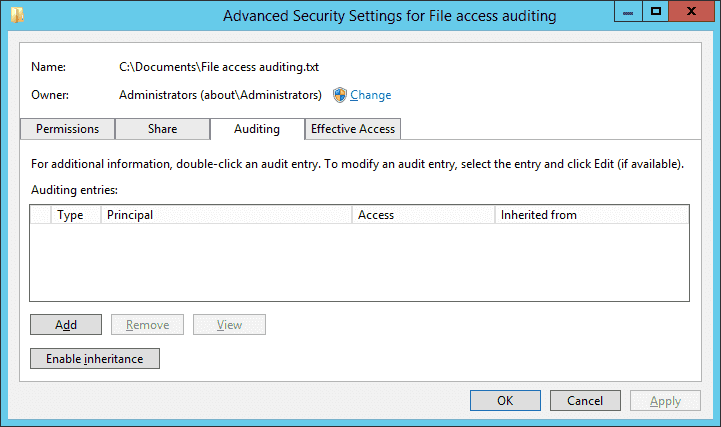
- In the “Advanced Security Settings for” window, go to the “Auditing” tab.

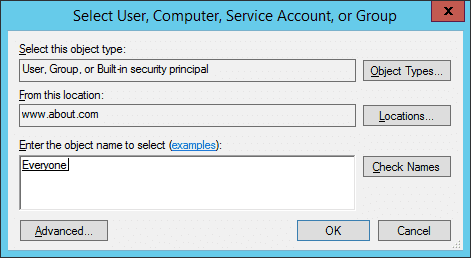
Figure 4: Select User, Computer, Service Account, or Group
- On this tab, you have to create a new audit entry. For that, click “Add”. The “Auditing Entry for” window appears on the screen.
- In the “Auditing Entry for” window, at first, select users whose actions you want to audit. Click “Select a Principal”, to open the “Select User, Computer, Service Account, or Group” dialog box.
- Here, choose users to audit. If you want to audit all users’ activities, enter “Everyone” in the “Enter the object name to select” field, and click “Check Names”. In our case, we enter “Everyone”.

Figure 5: “Auditing Entry” window of the file - Click “OK” to close the dialog box.
- Three options are available in the “Type” picklist: “Success”,” Fail”, and “All”. We select the “All” option because we want to audit both successful and failed attempts.
- In the “Permissions” section, you can select all activities that you want to audit. In the case of audit file read, select “Traverse Folder/Execute File”, “List Folder/Read data”, “Read attributes”, and “Read extended attributes” permissions.
NOTE: If you want to audit all the activities, select the “Full Control” checkbox.
- Click “OK” to close the “Auditing Entry for File Access auditing” window.

Figure 6: The file access event - Back in the “Advanced security settings” window, now you see the new audit entry.
- Click “Apply” and “OK” to close the window.
- Click “Apply” and “OK” to close file properties.

Step 3 – Track who reads the file in Windows Event Viewer
To see who reads the file, open “Windows Event Viewer”, and navigate to “Windows Logs” → “Security”. There is a “Filter Current Log” option in the right pane to find the relevant events.
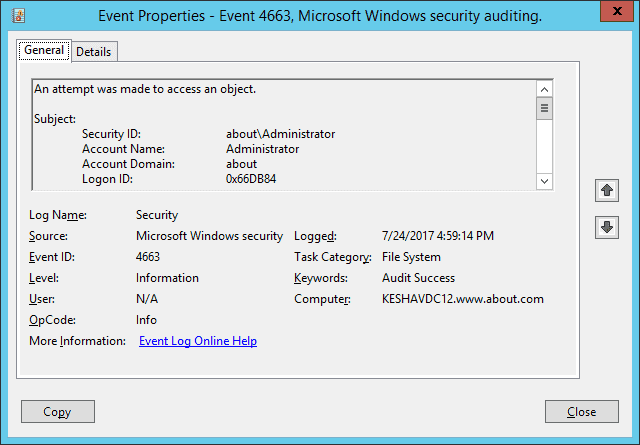
If anyone opens the file, event ID 4656 and 4663 will be logged. For example, in our case, someone opened the file (File access auditing.txt), and as shown in the following image, a file access event (ID 4663) was logged. You can see who accessed the file in the “Account Name” field and access time in the “Logged” field.
In the below image, you can see the file’s name (C:\Users\Administrator\Documents\New Text Document.txt), which is visible after you scroll down the sidebar, under the “Object Name” field.
In the next section, you will see how Lepide File Server Auditor can make file auditing even quicker and straightforward.
How to Use Lepide File Server Auditor to Track File Read/Access Events
At Lepide, we understand the role that File Server auditing plays in keeping your sensitive, unstructured data secure. Tracking and auditing file-read events on Windows File Servers and other changes occurring to sensitive data on File Servers couldn’t be easier with Lepide File Server Auditor. The below image shows our “Read Successful” report, just one of the hundreds of File Server audit reports available on the platform. The answers to critical audit questions regarding file access are displayed in a single pane of glass.
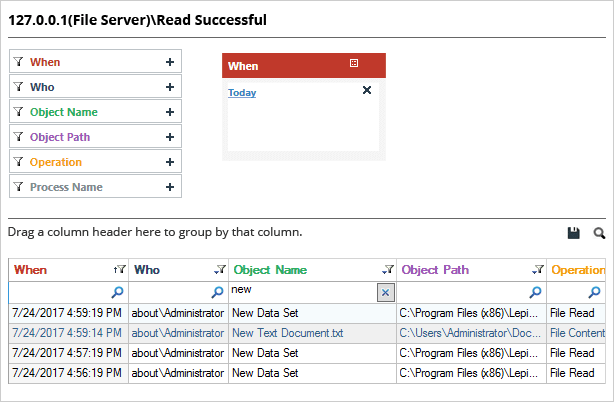
In the above image, you can see the same file read the report (C:\Users\Administrator\Documents\New Text Document.txt) in Lepide File Server Auditor. The event is highlighted, and all the audit information like who accessed the file, when, and from which system is available in a single line record.
To generate this report, you simply need to select it from a list of file server auditing reports and apply the filter you want. It couldn’t be easier.
File Server Auditing Made Simple, With Lepide
In this article, we’ve covered the native method of tracking file read events in Windows File Servers using event logs. We’ve also shown you how much easier the process is made by using Lepide. In addition to providing detailed audit information on file-read events, Lepide can also track and audit numerous other critical File Server security changes/interactions. Using Lepide File Server Auditor, you can:
- Locate and classify files containing sensitive data.
- Track files being copied, moved, modified, and deleted.
- Analyze user behavior and spot anomalies
- Spot users with excessive permissions and implement zero trust by changing permissions
Windows Logs
Windows 2008 Server
The primary tool for log viewing in Server 2008 is the Event Viewer. To start event viewer, choose either
- Start → Administrative Tools
- Server Manager → Diagnostics → Event Viewer
- Run the command
eventvwr.msc
Documentation on Event Viewer is available in Help (Contents: Event Viewer)
To get a handle on the value of the Windows logs, start by determining the number and names of the various Windows logs.
Take a look at the security log; you are likely to see a number of 4624 Logon events as well as a number of 4634 Logoff events. Microsoft has provided a description of the various security events in KB 947226. I will leave it to you to decide how valuable that reference may be.
Rather than work our way through the documentation, let’s see what happens in the domain controller log when we do something relatively common. Select a workstation other than your domain controller(s) and log in to that machine as a domain user. Now let’s go back to the security log and see what we find. (Be sure to refresh your log view!) Find the event that corresponds to your account login; be sure to identify the EventID. You may wish to use the Find entry in the action pane.
Once you have found the log on entry, go ahead and log out of the workstation. Can you find a corresponding logoff entry in the domain controller logs? Are you sure you have the right event? Take a very close look at the time stamps of the logon event and the logoff event, and be sure to compare them to the actual time you logged off. Do you notice anything?
The question of exactly how Windows keeps track of account logons and logon/logoff events is more complex than would appear. Fortunately, Randy Franklin Smith has a nice article available on the EventTracker blog that explains some of these points. Unfortunately, we do not have sufficient class time to delve into these issues in detail.
You may wish to compare the log on and log off process noted above with what occurs when you log on from a Linux machine that you have connected to the domain.
Windows Vista
Even if a system is not a domain controller, it will still contain a set of logs; the primary tool for log viewing is still Event Viewer. In Windows Vista, navigate My Computer (right-click) → Properties → Event Viewer, or simply run eventvwr.msc.
What are the differences between event viewer for Windows Vista and Windows Server 2008?
Windows 7
The primary tool for log viewing is still Event Viewer. Navigate My Computer (right-click) → Properties → Event Viewer, or simply run eventvwr.msc.
What are the differences between event viewer for Windows 7 and Windows Server 2008?
Remote viewing of logs
It is possible to view use event viewer on one computer to view the logs on another windows computer. From Event Viewer, select Action → Connect to Another Computer. Be sure that you have selected Event Viewer (Local) in the navigation pane, or the option to connect to another computer will not appear in the Action menu. Enter the name, and the account details (if different) for the other machine.
In general, this process will fail.
Did you say fail?
What could the problem be?
If you said “Firewall” pat yourself on the back.
To enable these connections, you must adjust the firewall on the remote computer.
In Windows Server 2008, navigate Start → Administrative Tools → Windows Firewall with Advanced Security. Select Inbound Rules. There are three inbound rules for Remote Event Log Management. Enable them. You may wish to configure these rules as well- Right-click, select properties.
In Windows 7, navigate Start → Control Panel → System and Security → Allow a program through windows firewall → Change Settings → Remote Event Log Management. You can specify that this is allowed from other domain members, from computers connecting through a private network (home/work) or through a public network.
In Windows Vista, navigate Start → Control Panel → Allow a program through Windows firewall → UAC → Remote Event Log Management.
Auditing Policies
Windows machines have an auditing policy that is set locally, as well as policies that they can inherit from GPOs, including domain policies as we have already seen.
To find the local auditing policy in Windows Vista / Windows 7 / Server 2008, navigate Control Panel → Administrative Tools → Local Security Policy
→ Security Settings → Local Policies → Audit Policy.
What is the default Local audit policy in Vista? In 7? In Server 2008?
By default, significant auditing policies are set at the domain controller OU level. [Which override the local policies!]
On Windows Server 2008, navigate Start → Administrative Tools → Group Policy Management. What are the default doman level OU group policy settings for auditing?
With Windows Server 2008 and Windows Vista, Microsoft introduced a a new hierarchy for organizing audit policies. Rather than the nine broad categories we have seen so far, we can instead manage policies on a much finer level. Unfortunately, they did not update the GUI tools in these OSes to view these setting. The way to get at these settings is directly from the command line. Indeed, run the command
C:\Windows\system32>auditpol /get /category:*
What? “A required privilege is not held by the client”? Remember that, by default command prompts, even command prompts started by an administrator are not command prompts with administrator privileges. You must right-click on the entry in the start menu, and select “Run as Administrator” and pass through UAC first.
Examine the standard audit policy for your server; repeat the process for a Vista and/or a 7 box. Are the policies the same?
To manage the policies on a box with the command-line tool, start by running
C:\Windows\system32>auditpol /?
Usage: AuditPol command [<sub-command><options>]


Commands (only one command permitted per execution)
  /?               Help (context-sensitive)
  /get             Displays the current audit policy.
  /set             Sets the audit policy.
  /list            Displays selectable policy elements.
  /backup          Saves the audit policy to a file.
  /restore         Restores the audit policy from a file.
  /clear           Clears the audit policy.
  /remove          Removes the per-user audit policy for a user account.
  /resourceSACL    Configure global resource SACLs


Use AuditPol  /? for details on each command
to see the command lne options. See also
http://technet.microsoft.com/en-us/library/cc836528.aspx
If we want to see the policies in the logon/logoff category, we ran run
C:\Windows\system32>auditpol /get /category:Logon/Logoff
System audit policy
Category/Subcategory                      Setting
Logon/Logoff
  Logon                                   Success and Failure
  Logoff                                  Success
  Account Lockout                         Success
  IPsec Main Mode                         No Auditing
  IPsec Quick Mode                        No Auditing
  IPsec Extended Mode                     No Auditing
  Special Logon                           Success
  Other Logon/Logoff Events               No Auditing
  Network Policy Server                   Success and Failure
and if want to see only the logoff subcategory, we run
C:\Windows\system32>auditpol /get /subcategory:logoff
System audit policy
Category/Subcategory                      Setting
Logon/Logoff
  Logoff                                  Success
If we want to change the settings so that we record both successful and failed attempts to logoff, we run
C:\Windows\system32>auditpol /set /subcategory:logoff /failure:enable
The command was successfully executed.
A subsequent check of the policies will show the change:
C:\Windows\system32>auditpol /get /subcategory:logoff
System audit policy
Category/Subcategory                      Setting
Logon/Logoff
  Logoff                                  Success and Failure
Suppose that you want to modify the audit policy on the different machines in your domain. You can’t use Group Policy, as the GUI does not aupport this new audit policy heirarchy.

[Although interestingly, if you set the policies using auditpol and then join a domain, apparently the group policies will overwrite the auditpol created settings- at least according to some of the texts I have read.] There is a way to do this- by first writing a custom script that uses the auditpol tool, then by using a netlogon share you can have computers that log onto the domain run that script, and so set the policies to your preferred values. See http://support.microsoft.com/kb/921469 for the details.
Auditing File Access
Unlike the generic linux logging system, Windows can also generate log entries when particular files are accessed / modified / changed. To illustrate the process, create a file- say on the Desktop named test.txt. Navigate test.txt (right-click) → Properties → Security → Advanced → Auditing → UAC

The window shows the user(s) and the privilege(s) that will be audited. In general you want to be broad here. If you specify that you will only audit file access from the user “Bill”, then if the user “Ted” accesses the file, then no log entry will be generated.
To illustrate, let us audit any attempt to access / modify / delete our file, from anyone. Select the Add button; for the object name, select “Everyone”. For the auditing entry, select Full Control both successful and failed. This means that an audit entry will be generated whenever any of the checked privliges are used by a user- either successfully or not. Apply your changes. Examine the security log- note that there are no entries about your file.
Open your file, modify it, and save the result. Once again examine the security log. Huh? Why are there no entries here- did we do something wrong? Although you set the auditing policy for that file, Windows does not actually pay attention to those settings unless you turn on file level auditing in your audit policy. Run the command
C:\Windows\system32>auditpol /set /subcategory:"file system" /success:enable
/failure:enable
The command was successfully executed.
Open Your file. Open your security log. [You may need to refresh your view if you still have the log open from above.][Use the F5 key to refresh your view.] At this point, you should see Audit Success entries for the File System related to your auditied file.
Splunk
To install Splunk on a Windows system, select the appropriate installer and launch. Because Splunk runs services, you will be prompted to choose the user that will be used to run those services. If you use a domain member, then your Splunk install can access information about other domain members through Windows methods like WMI. However, last year’s class found that process somewhat problematic. This year, we will use local system users for our installation. This means that we will need to use forwarders to collect data from other Windows hosts in the same fashion that they are necessary to collect data from other Linux hosts.
After installation, proceed to the Splunk Manager web interface as before; be sure to change your license to the Free License. You can do that by navigating through Manager → Licensing &rarr Change License Group. Simply select the Free License, and restart Splunk.

Note also that you may need an updated version of Flash Player, depending on the particular Windows image you are using. They are available on the labshare as well as online.
Once installed, one very valuable data source would be the Windows event logs. Note that, since we installed Splunk as a local user, we will not be able to use WMI to collect Windows event logs from other machines in the domain.
Experiment with the Windows Management Splunk application, available on the labshare or online at splunkbase.

You can set up Splunk to collect data from multiple machines in the same fashion as we did with Linux machines, by using forwarders. Start by configuring your receiver by navigating Manager → Forwarding and receiving &rarr Configure receiving → New then select a port e.g. 9997. Be sure to open that port in your firewall.
In Windows 7, navigate Control Panel → Windows Firewall → Advanced Settings → UAC.

Once there, select New Rule from the action pane; choose the port, the action, the network profiles, and the name of the subsequent rule.
Essentially the same actions are taken in Windows 2008, save that you navigate Start → Administrative Tools → Windows Firewall with Advanced Security.
In Vista, navigate Control Panel & rarr; Security → Windows Firewall → Change Settings → Exceptions → Add port.

With the receiver correctly configured, go to the Splunk Manager web interface on the hosts you want to forward data. Navigate Manager → Forwarding and receiving → Configure forwarding → New; then provide the information for your receiver.
By correctly configuring forwarders throughout your network, you can have all of the log data for all of your hosts forwarded to a central location for subsequent correlation and analysis.
It is possible to forward data from linux splunk instances to windows ones and vice versa. Try it!
Remember- splunk can forward to multiple machines, and receive from multiple machines- so you can contruct a distributed / redundant splunk network.
Note also that it will take some time after forwarding and receiving is set up for all of the information from the forwarder to be sent to the receiver. My experience with my virtual machines suggest that the process can be very resource intensive, and may slow the virtual machines until the transfers complete.
Other options- Snare
Snare for Windows is a tool that can be used to convert Windows log entries into syslog format and then send them to other hosts via either the syslog protocol or the Snare protocol.
Installation of Snare for Windows proceeds in the usual fashion. I recommend that you install Snare as a local system user, and recommend that you enable web access, at least for your localhost, to allow you to more easily configure the tool.
When the installation is complete, use your browser and visit localhost, TCP port 6161. If you specified a password, remember that the user name will be “snare”.
To configure Snare to forward its log messages to another host using the syslog protocol, navigate to Network configuration and enter the host name and the (UDP) port number to receive the logs. You also need to manually tell Snare to use syslog headers (instead of Snare native); you also choose the facility and priority for all of the syslog messages your system will dispatch.

We can also collect Snare and syslog messages on a host, this time using Snare Backlog. It too is installed in the usual fashion. Once running it listens on both the standard syslog (UDP 514) and the Snare native (UDP 6161) ports for messages. You can then configure either Linux machines (via syslog) or Windows machines (via syslog or Snare native) to send their results to this central server. Be sure you open the proper ports in the firewall!
Here you can see Snare backlog receiving messages from the host on which it is running, as well as syslog messages sent by a Linux machine and Snare messages sent by a Windows machine.

SSH
The best client for SSH from a Windows System in PuTTY. It is available on the lab share and online.
PuTTY supports password based logons; it also supports PKI. Read the section in the PuTTY help manual on PKI; use PKI to log on to one of your linux servers. Save the session variables in your PuTTY configuration so that they do not need to be specified each time a connection is made.
There are some SSH servers available for Windows- see FreeSSHd, OpenSSH Server, and CopSSH.
File Sharing
Microsoft Windows operating systems are designed to allow users to share files and folders.
Creating a (SMB) file share (Windows 7 / Vista)
Create a folder; navigate Folder (right click) → Sharing → Advanced Sharing. Specify the Share name, and the permissions of the users allowed to access the share. The default is everyone can read, no one can write. Note that two sets of permissions apply to the share- the NTFS (file system) and the SMB (sharing). Be sure that both are set appropriately.
Setting up a file server (Windows 2008)
We can also use a Windows 2008 R2 server as a file server. In this example, we will create a new server to act as the file server for our network separate from our domain controller and DNS architecture.
Follow the existing notes; set up the IP address and networking of the new
server. Set up the name of the host and join it to our domain. Be sure that the
appropriate entries exist in the DNS server.
With the basics covered, go to initial configuration tasks, select Add Roles → File Services. In this example, we install both the File Server and the File Server Resource Manager.

With the role installed, now we need to create the shared directory that the approved domain users can use. Navigate Server Manager → Roles → File Services → Share and Storage Management. In the action pane, choose Provision Share.

The first task when provisioning a share is to select the location of the directory to be shared. In this example, we will create the directory C:\ShareData\CommonData and will share that directory.

With the folder created, we modify permissions for the folder in the usual fashion so that all domain users have full control over that directory.
We will use SMB as our file sharing protocol; this is the preferred method for Windows systems. We have not discussed NFS, nor have we even installed the necessary services for NFS component on the server.
When the wizard asks for the SMB permissions to be used, we specify that Administrators have Full Control while all other users have Read and Write permissions. Remember- the enforced permission set is the more restrictive of the SMB permissions and the NTFS permissions.
For simplicity in this example, we will not apply a quota policy, nor will we set up a file screen.
The wizard will then ask whether we want to publish the SMB share to a DFS namespace. DFS is a system that allows one namespace to be served by multiple physical file servers and shares. Since our time is limited and our examples small, this is unnecessary for us.
Automatic Drive Mappings via Group Policy
We would like each user to have a drive letter mapped to the file share just created; this is done through Group Policy.
On a domain controller, go to group policy management and create a new group policy object- say “Common Drive Mapping”. Edit that policy: Common Drive Mapping → User Configuration → Preferences → Windows Settings → Drive Maps.
In the Drive Maps window, right click and select New → Mapped Drive. For Action, select “Create”; for Location, select the file share created previously. (You did remember the Share path in Step xii didn’t you?) Select a label for the drive share; select a drive letter- say P:. Apply the result.
Exit the group policy editor (with our policy now saved).
Return to Group Policy Management; select Group Policy Management → Forest → Domains → “YourDomainNameWhateverItIs” (Right click) → Link an existing GPO → Select your new GPO, which this example calls “Common Drive Mapping”. Apply this policy.
You do not need to apply this policy to the entire domain; you could simply apply it to one or more OUs.
Log onto a machine in your domain; verify that the drive p: is now mapped to the file share.
Individual file shares
We can also set up a directory to provide an individual file share for each domain user. We start by creating the file share itself, so we launch Share and Storage Management (Start → Administrative Tools → Share and Storage Management). Here we again Provision a Share; given that we have set up our common share at c:\ShareData\CommonData, in this example we will set up the directory c:\ShareData\UserData.
Now we will be more careful about the NTFS permission set we will apply. Select Edit Permissions, and then choose Advanced; when you do you will be presented with a dialog similar to the following:

From this we see that all users have read and execute privileges on the folder- something that we do not want, so we want to remove them. Attempting to do so however, we discover that we cannot. The reason for this is that these permissions are being inherited from the object’s parent. Thus, we start by unchecking the appropriate box. You are then given three options:
- To cancel, and not make any changes,
- To remove, and remove all inherited permissions, and
- To Add, which will convert the inherited permissions into explicit ones.
We select Add, which will keep the settings as they are, but allow us to now modify them. Remove the permissions for USERS. We now need to be sure that we can create the required subdirectories, so we require that Domain Admins have full control over the directory. Doing so, we end up with a permission set like

For the remaining settings we proceed as we did for the Commmon Share; be sure that your SMB permissions give users and groups Read and Write Access.
With the share complete, we now move to the individual users. From a domain controller, navigate to Active Directory Users and Computers (e.g. Start → Administrative Tools → Active Directory Users and Computers). Select a user, then select Properties. From the dialog box that results, choose the Profile tab. Under Home Folder, choose a drive letter and then provide the path to the file share we just created- with one additional twist. We will actually provide a link to a subdirectory based on the account user name; we can even simply specify %username in the directory name:

We repeat this process for each user.
When complete, we can simply login as a user, and verify that both drives are mapped to the correct places:

When you perform these tasks, you should also verify that you are unable to access the file shares of other users.
Accessing a (SMB) file share
Suppose that the file share is on the server “Server” with share name “fileshare”. [Note that the share name can be different from the name of the folder that is beng shared.] This can be from a file server, but does not need to be.
Windows (File explorer)
From file explorer or the equivalent, navigate to
\\Server\fileshare
You will need sufficient permissions to access the share.
These permissions are cached, so you can run into trouble if either the settings or your credentials change during e.g. the process of setting up the share.
Windows (command line)
Run the command
c:\>net use z: "\\Server\fileshare"
to map the file share to the drive letter z:. You can also specify the user & password used to authenticate to the share on the command line; use the help command
c:\net use /?
to see the command line options. Running net use without any arguments will provide a list of all existing shares:
Z:\>net use
New connections will be remembered.


Status       Local     Remote                    Network

-------------------------------------------------------------------------------
OK           P:        \\stolat\commondata       Microsoft Windows Network
OK           Z:        \\stolat\userdata\vetinari
                                                Microsoft Windows Network
OK                     \\stolat\UserData         Microsoft Windows Network
The command completed successfully.
Windows (File explorer → Drive mapping)
From file explorer, navigate Tools → Map Network Drive. From here you can specify the drive letter, the remote share, and the user and password that will be used to authenticate to the share.
Linux (Gnome GUI- e.g. CentOS, Ubuntu)
Navigate Places → Connect to Server → Windows Share. Enter the Server name, Share, User Name, and Domain Name. Provide the password when asked.
On e.g. a Mint 11 machine, you can start navigate File → Connect to Server from the file browser.
Linux (KDE4 GUI- e.g. OpenSuSE)
Open Dolphin (the file browser); in the address bar, enter
smb://Server/fileshare
When asked for credentials, for the user name enter domain/username together with the the corresponding password.
Как посмотреть кто удалил файл из общей папки
Просмотр полной версии : Кто удаляет файлы?
Вирусов точно нет, т.к. стоит NOD32.
гы.
как самонадеяно.
Подробнее можно, какие файлы, как, когда удаляет. Пока версий много: начиная от мастера очиски рабочего стола (он, сцука, ярлыки трет :gigi: ), заканчивая NOD32.
Вам смешно. А меня пытаются подставить. Конечно есть свидетели, что я здесь ничего не удалял, да и вообще за компы не садился.
Подробнее можно, какие файлы, как, когда удаляет.
Всякие *.doc, exel`евские, картинки, файлы баз данных и т.п.
Помогите поймать вредителя.
1. Заходим в LSP: Start -> Settings -> Control Panel -> Administrative tols -> local security policy
2. Включаем аудит доступа к файлам: Local policy -> Audit Policy. Выставляем Object Access в Success, Failure.
3. Выделяем папку, откуда исчезают файлы. Смотрим её свойства -> Security
4. На закладке Security выбираем Advanced, далее — Auditing. Жмём Add.
5. Выбираем группу Everyone, жмём на Check names (название должно подчеркнуться). Жмём ОК
6. Выбираем Delete, всё закрываем.
Потом смотрим в Event Viewer -> Security, ищем нужные файлы
Локальная политика безопасности -> Локальные политики -> Политика аудита.
Аудит доступа к объектам выставляю Отказ.
Выделяю папку -> Свойства -> Безопасность -> Дополнительно -> Аудит -> Добавить
Выбрал группу «Все», нажал «Проверить имена». Жму Ок.
Далее, выбрать Удаление и поставить галочки. А где именно в столбцах: Успех и Отказ, или только отказ?
ruslansstu1146494329
В общем я поставил в политике аудита -> Аудит доступа к объектам: Успех и Отказ.
ruslansstu1146494940
Решил все это дело проверить.
Создал папку, скопировал туда несколько файлов и с другой машины по сети решил удалить. Во что я получил:
Тип события: Аудит успехов
Источник события: Security
Категория события: Доступ к объектам
Код события: 560
Дата: 01.05.2006
Время: 18:41:56
Пользователь: NATASHAАдминистратор
Компьютер: NATASHA
Описание:
Открытие объекта:
Сервер объекта: Security
Тип объекта: File
Имя объекта: D:РусланКопия WineLinux College.files
Код дескриптора: 2276
Код операции:
Код процесса: 4
Имя файла рисунка:
Основной пользователь: NATASHA$
Домен: COMPAUD
Код входа: (0x0,0x3E7)
Пользователь-клиент: Администратор
Домен клиента: NATASHA
Код входа клиента: (0x0,0xA7881)
Доступ DELETE
Привилегии —
Счетчик ограниченного SID: 0
Жаль, что не пишет с какой машины произведено удаление.
Жаль, что не пишет с какой машины произведено удаление.
Всё прекрасно пишет. Комп «NATASHA».
NaimaD1146518236
Компьютер: NATASHA
Жаль, что не пишет с какой машины произведено удаление.
Всё прекрасно пишет. Комп «NATASHA».
Компьютер: NATASHA
э-э-э. дело в том, что комп НАТАША — это тачка, на которой был запущен Эвент Вьюер, то бишь комп, на котором удаляли файлы, а не с которого удаляли файлы; думается, в одноранговой сетке узнать (только средствами оси) кто удалял — не карма
Пользователь: NATASHAАдминистратор
хмм. и одноранговая сеть
Это говорит о том, что удаляют локально. из под учетки локального администратора.
Т.е. это может быть radmin или аналог, telnet (или опять-же аналог) или вредный сервис — прога.
или удалают по сети подключаясь к этому компу под логин-паролем админа — сменить — проверить.
В пакет friendly pinger http://www.kilievich.com/fpinger/ входит логгер сетевых подключений. (по IP)
Сожно попробовать.
Или чтоб наверняка, filemon от sysinternals. Так определишь приложение, которое удаляет. но придется ловить момент.
Аудит удаления и доступа к файлам и запись событий в лог-файл средствами Powershell
Я думаю, многие сталкивались с задачей, когда к Вам приходят и спрашивают: «У нас тут файл пропал на общем ресурсе, был и не стало, похоже кто-то удалил, Вы можете проверить кто это сделал?» В лучшем случае вы говорите, что у вас нет времени, в худшем пытаетесь найти в логах упоминание данного файла. А уж когда включен файловый аудит на файловом сервере, логи там, мягко говоря «ну очень большие», и найти что-то там — нереально.
Вот и я, после очередного такого вопроса (ладно бекапы делаются несколько раз в день) и моего ответа, что: «Я не знаю кто это сделал, но файл я Вам восстановлю», решил, что меня это в корне не устраивает…
Начнем.
Для начала включим к групповых политиках возможность аудита доступа к файлам и папкам.
Локальные политики безопасности->Конфигурация расширенной политики безопасности->Доступ к объектам
Включим «Аудит файловой системы» на успех и отказ.
После этого на необходимые нам папки необходимо настроить аудит.
Проходим в свойства папки общего доступа на файловом сервере, переходим в закладку «Безопасность», жмем «Дополнительно», переходим в закладку «Аудит», жмем «Изменить» и «Добавить». Выбираем пользователей для которых вести аудит. Рекомендую выбрать «Все», иначе бессмысленно. Уровень применения «Для этой папки и ее подпапок и файлов».
Выбираем действия над которыми мы хотим вести аудит. Я выбрал «Создание файлов/дозапись данных» Успех/Отказ, «Создание папок/дозапись данных» Успех/отказ, Удаление подпапок и файлов и просто удаление, так же на Успех/Отказ.
Жмем ОК. Ждем применения политик аудита на все файлы. После этого в журнале событий безопасности, будет появляться очень много событий доступа к файлам и папкам. Количество событий прямопропорционально зависит от количества работающих пользователей с общим ресурсом, и, конечно же, от активности использования.
Итак, данные мы уже имеем в логах, остается только их оттуда вытащить, и только те, которые нас интересуют, без лишней «воды». После этого акурратно построчно занесем наши данные в текстовый файл разделяя данные симовлами табуляции, чтобы в дальнейшем, к примеру, открыть их табличным редактором.
А теперь очень интересный скрипт.
Скрипт пишет лог об удаленных файлах.
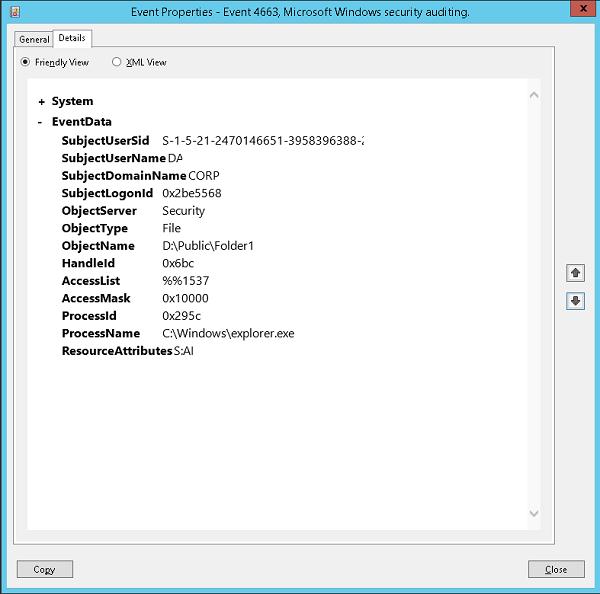
Как оказалось при удалении файлов и удалении дескрипторов создается одно и тоже событие в логе, под При этом в теле сообщения могут быть разные значения «Операции доступа»: Запись данных (или добавление файла), DELETE и т.д.
Конечно же нас интересует операция DELETE. Но и это еще не все. Самое интересное, то что, при обычном переименовании файла создается 2 события с ID 4663, первое с Операцией доступа: DELETE, а второе с операцией: Запись данных (или добавление файла). Значит если просто отбирать 4663 то мы будем иметь очень много недостоверной информации: куда попадут файлы и удаленные и просто переименованные.
Однако мной было замечено, что при явном удалении файла создается еще одно событие с ID 4660, в котором, если внимательно изучить тело сообщения, содержится имя пользователя и еще много всякой служебной информации, но нет имени файла. Зато есть код дескриптора. 
Однако предшествующим данному событию было событие с ID 4663. Где как раз таки и указывается и имя файла, и имя пользователя и время, и операция как не странно там DELETE. И самое главное там имеется номер дескриптора, который соответствует номеру дескриптора из события выше (4660, помните? которое создается при явном удалении файла). Значит теперь, чтобы точно знать какие файлы удалены, необходимо просто найти все события с ID 4660, а так же предшествующие каждому этому событию, событие с кодом 4663, в котором будет содержаться номер нужного дескриптора. 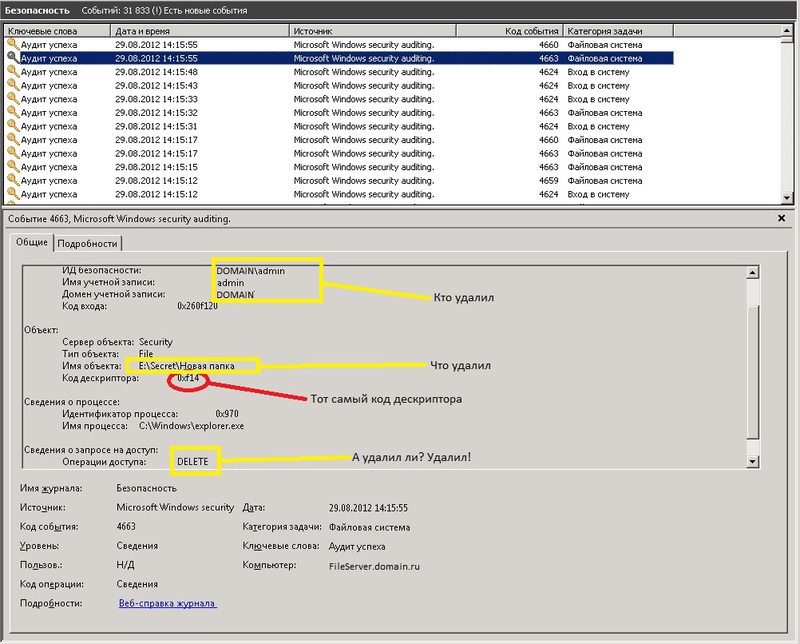
Эти 2 события генерируются одновременно при удалении файла, но записываются последовательно, сначала 4663, потом 4660. При этом их порядковые номера различаются на один. У 4660 порядковый номер на единицу больше чем у 4663.
Именно по этому свойству и ищется нужное событие. 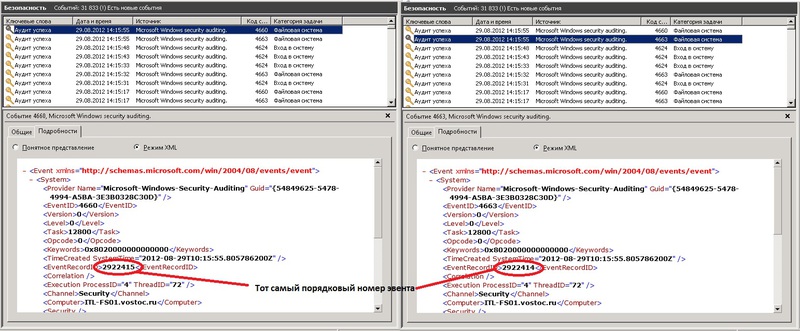
Т.е. берутся все события с ID 4660. У них берется 2 свойства, время создания и порядковый номер.
Далее в цикле по одному берется каждое событие 4660. Выбирается его свойства, время и порядковый номер.
Далее в переменную $PrevEvent заносится номер нужного нам события, где содержится нужная информация об удаленном файле. А так же определяются временные рамки в которых необходимо искать данное событие с определенным порядковым номером (с тем самым который мы занесли в $PrevEvent). Т.к. событие генерируется практически одновременно, то поиск сократим до 2х секунд: + — 1 секунда.
(Да, именно +1 сек и -1 сек, почему именно так, не могу сказать, было выявлено экспериментально, если не прибавлять секунду, то некоторые может не найти, возможно связано с тем, что возможно два эти события могут создаваться один раньше другой позже и наоборот).
Сразу оговорюсь, что искать только по порядковому номеру по всем событиям в течении часа — очень долго, т.к. порядковый номер находиться в теле события, и чтобы его определить, нужно пропарсить каждое событие — это очень долго. Именно поэтому необходим такой маленький период в 2 секунда (+-1сек от события 4660, помните?).
Именно в этом временном промежутке ищется событие с необходимым порядковым номером.
После того как оно найдено, работают фильтры:
Т.е. не записываем информацию об удаленных временных файлах (.*tmp), файлах блокировок документов MS Office (.*lock), и временных файлах MS Office (.*
$*)
Таким же образом берем необходимые поля из этого события, и пишем их в переменную $BodyL.
После нахождения всех событий, пишем $BodyL в текстовый файл лога.
Для лога удаленных файлов я использую схему: один файл на один месяц с именем содержащим номер месяца и год). Т.к. удаленных файлов в разы меньше чем файлов к которым был доступ.
В итоге вместо бесконечного «рытья» логов в поисках правды, можно открыть лог-файл любым табличным редактором и просмотреть нужные нам данные по пользователю или файлу.
Рекомендации
Вам придется самим определить время в течении которого вы будете искать нужные события. Чем больше период, тем дольше ищет. Все зависит от производительности сервера. Если слабенький — то начните с 10 минут. Посмотрите, как быстро отработает. Если дольше 10 минут, то либо увеличьте еще, вдруг поможет, либо наоборот уменьшите период до 5 минут.
После того как определите период времени. Поместите данный скрипт в планировщик задач и укажите, что выполнять данный скрипт необходимо каждые 5,10,60 минут (в зависимости какой период вы указали в скрипте). У меня указано каждый 60 минут. $time = (get-date) — (new-timespan -min 60).
Простая система аудита удаления файлов и папок для Windows Server
Любой администратор Windows сталкивался с ситуацией, когда разъяренные пользователи хотят узнать, кто именно удалил мега важный файл с годовым отчетом в общей папке на файловом сервере. Эту информацию можно получить только при условии ведения аудита удаления файлов и папок на файловом сервере, иначе останется только восстановить удаленный файл из резервной копии (а вы их уже делаете?) и развести руками.
Но, даже при включенном аудите удаления файлов, найти что-то в логах бывает проблематично. Во-первых, найти нужную запись среди тысячи событий довольно сложно (в Windows отсутствуют вменяемые средства поиска интересующего события с возможностью гибкой фильтрации), а во-вторых, если файл был удален давно, это событие может просто отсутствовать в журнале, т.к. было перезатерто более новыми.
В этой статье мы покажем пример организации на встроенных средствах Windows системы аудита удаления файлов и папок в общем сетевом каталоге (файловом сервере) с записью событий в отдельную базу данных на MySQL.
Благодаря наличию БД с информацией обо всех удаленных файлах администратор сможет дать ответы на вопросы:
- Кто и когда удалил файл
- Из какого приложения удален файл
- На какой момент времени нужно восстанавливать бэкап
В первую очередь на файловом сервере Windows нужно включить аудит событий, обеспечивающий запись информации об удалении файлов в журнал системы. Эту процедуру мы уже рассматривали в статье Аудит доступа к файлам и папкам в Windows.
Аудит может быть включен через общую политику Audit Object Access в разделе политик Security Settings -> Local Policy -> Audit Policy
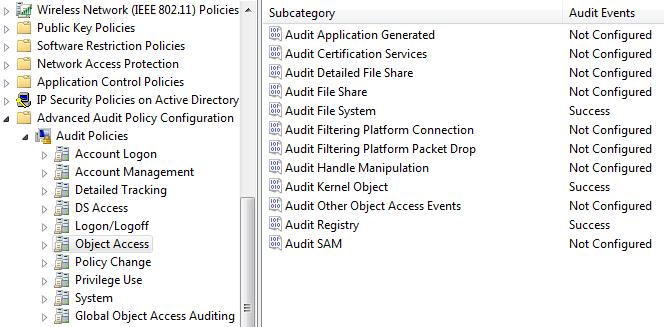
Или (предпочтительнее) через расширенные политики аудита в GPO: Security Settings -> Advanced Audit Policy Configuration -> Object Access -> Audit File System.
В свойствах общей сетевой папки (Security -> Advanced -> Auditing), удаление файлов в котором мы хотим отслеживать, для группы Everyone включим аудит событий удаления папок и файлов (Delete subfoldersand files).
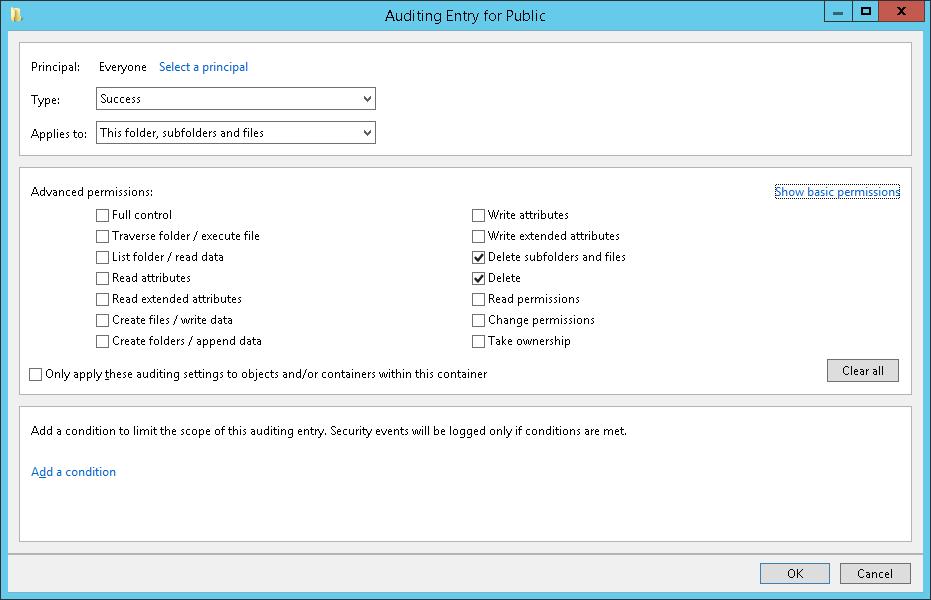
Совет. Аудит удаления файлов в конкретной папке можно включить и через PowerShell:
$Path = «D:Public»
$AuditChangesRules = New-Object System.Security.AccessControl.FileSystemAuditRule(‘Everyone’, ‘Delete,DeleteSubdirectoriesAndFiles’, ‘none’, ‘none’, ‘Success’)
$Acl = Get-Acl -Path $Path
$Acl.AddAuditRule($AuditChangesRules)
Set-Acl -Path $Path -AclObject $Acl
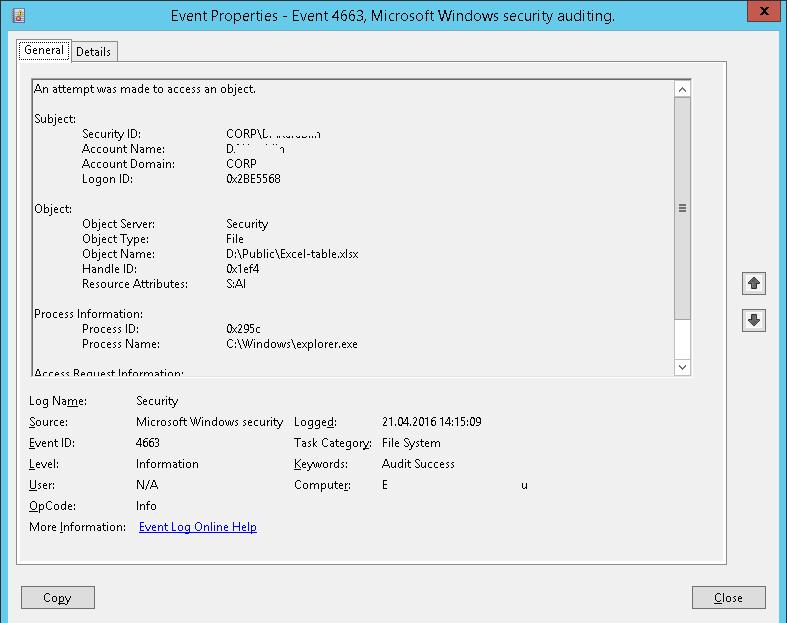
При успешном удалении файла в журнале безопасности системы появляется событие Event ID 4663 от источника Microsoft Windows security auditing. В описании события есть информация об имени удаленного файла, учетной записи из-под которой было выполнено удаление и имени процесса.
Итак, интересующие нас события пишутся в журнал, настала пора создать на сервере MySQL таблицу, состоящую из следующих полей:
- Имя сервера
- Имя удаленного файла
- Время удаления
- Имя пользователя, удалившего файл
MySQL запрос на создание такой таблицы будет выглядеть так:
CREATE TABLE track_del (id INT NOT NULL AUTO_INCREMENT, server VARCHAR(100), file_name VARCHAR(255), dt_time DATETIME, user_name VARCHAR(100), PRIMARY KEY (ID));
Скрипт сбора информации из журнала событий. Мы фильтруем журнал по событию с ID 4663 за текущий день
Следующий скрипт запишет полученные данные в БД MySQL на удаленном сервере:
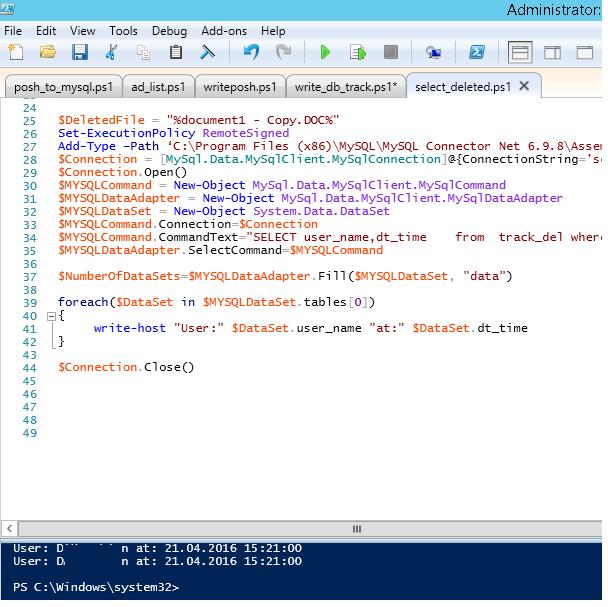
Теперь, чтобы узнать, кто удалил файл «document1 — Copy.DOC», достаточно в консоли PowerShell выполнить следующий скрипт.
В консоли получаем имя пользователя и время удаления файла.
Скрипт сброса данных из журнала в БД можно выполнять один раз в конце дня по планировщику или повесить на событие удаления (On Event), что более ресурсоемко. Все зависит от требования к системе.
При желании по аналогии можно реагировать простую веб страницу на php для получения информации о виновниках удаления файлов в более удобном виде. Задача решается силами любого php программиста за 1-2 часа.
Итак, мы предложили идею и некий общий каркас системы аудита и хранения информации об удаленных файлах в сетевых шарах, при желании ее с лёгкостью можно будет модифицировать под ваши нужды.
Как посмотреть ошибки системы в Windows Server 2019
При работе с различным программным обеспечением на Windows VDS может возникнуть задача посмотреть лог ошибок Windows. Также это может быть полезно для режим отладки, периодического контроля Windows, проверки что все работает должным образом.
Итак. Сначала мы должны войти на наш сервер, затем нажать на «Пуск», а затем нажать на «Просмотр событий».
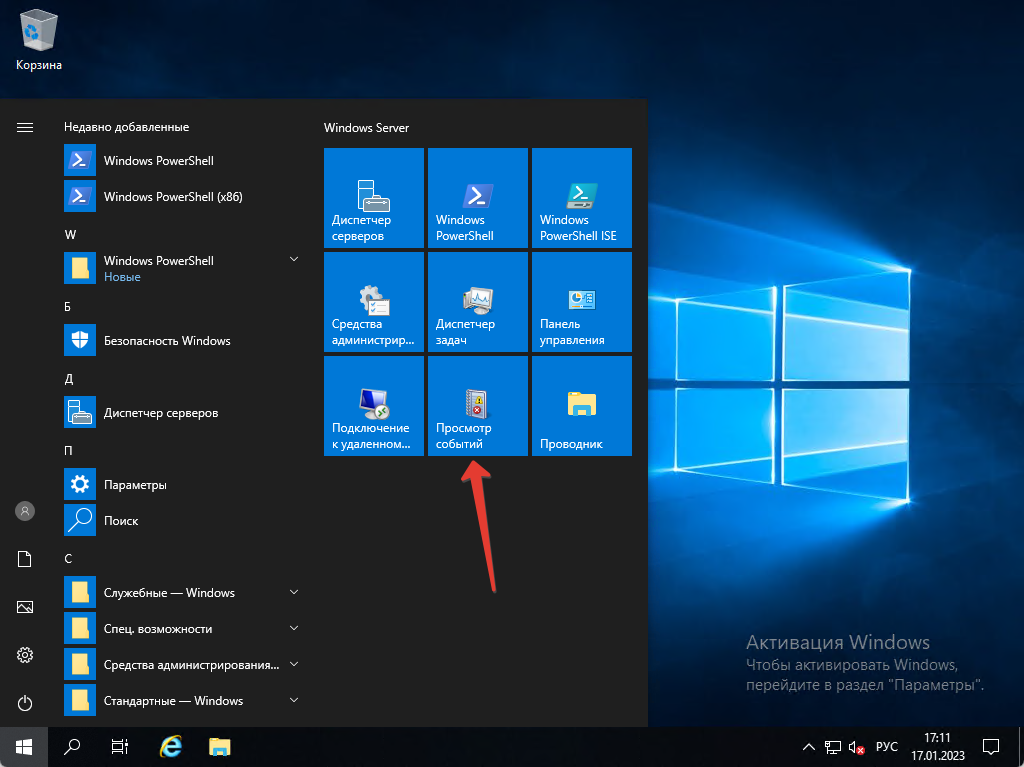
После этого как открылось новое окно мы можем посмотреть логи системы — нажимаем на «Журналы Windows» и выбираем «Система». Тут мы можем посмотреть все логи, которые связаны с самой системой.
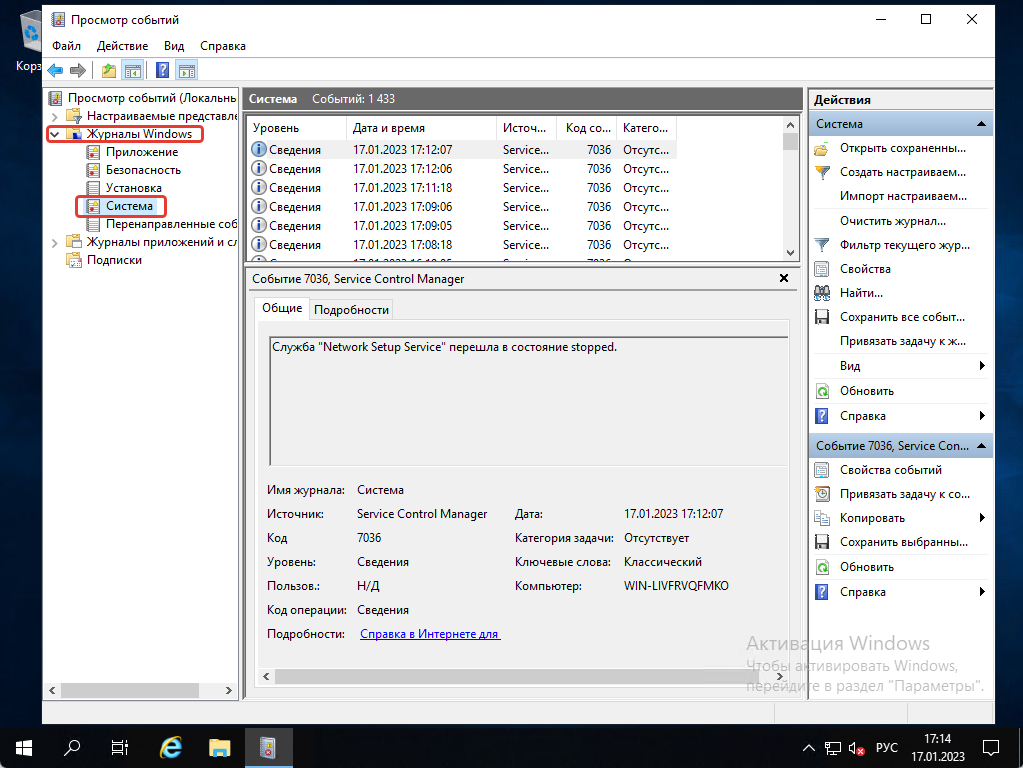
Как сохранить логи системы
Если вы хотите посмотреть логи на другом ПК, вы можете их сохранить. Нажимаем на «Сохранить все события как», выбираем где мы хотим сохранить лог и нажимаем на «Сохранить».
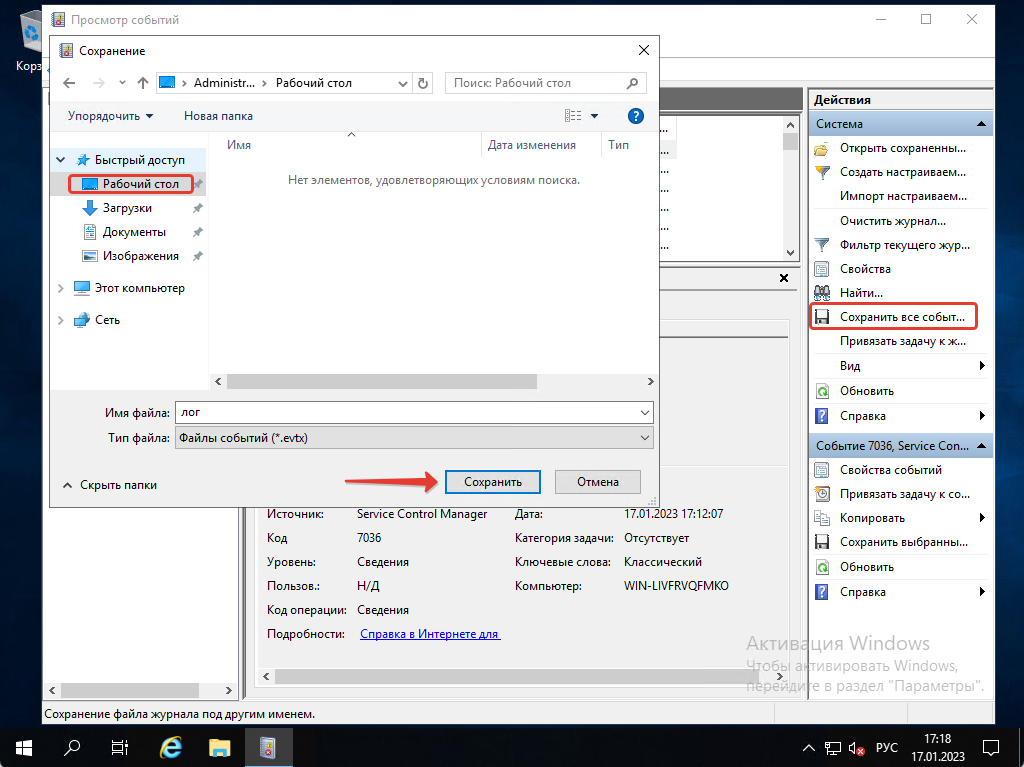
Сохранить лог вы можете также в текстовом формате, если вам будет удобнее смотреть логи именно так.