High Availability of data and applications has been an important topic in IT for decades. One of the critical services in many companies is the file servers, which serve file shares where users or applications store their data. If the file server is offline, then people cannot work. Downtime means additional costs, which organizations try to avoid. Windows Server 2019 (and earlier versions) allow you to create highly available file services.
This blog describes how to create a file server cluster with Microsoft Windows Server 2019. An earlier blog post describes how to set up a Windows Failover Cluster (WFC) with Server 2019, while this blog post presumes that the failover cluster already exists.
Setting up a File Server Cluster
Before we can start with the file server cluster configuration, the file server role must be installed and permissions must be set in Active Directory for the failover cluster computer object.
There are two ways to install the file server role on the two cluster nodes:
- Via the Add Roles and Features Wizard of the server manager
- Via PowerShell
In Server manager, click Add roles and features and follow the wizard. Select the File Server role and install it. A reboot is not required.
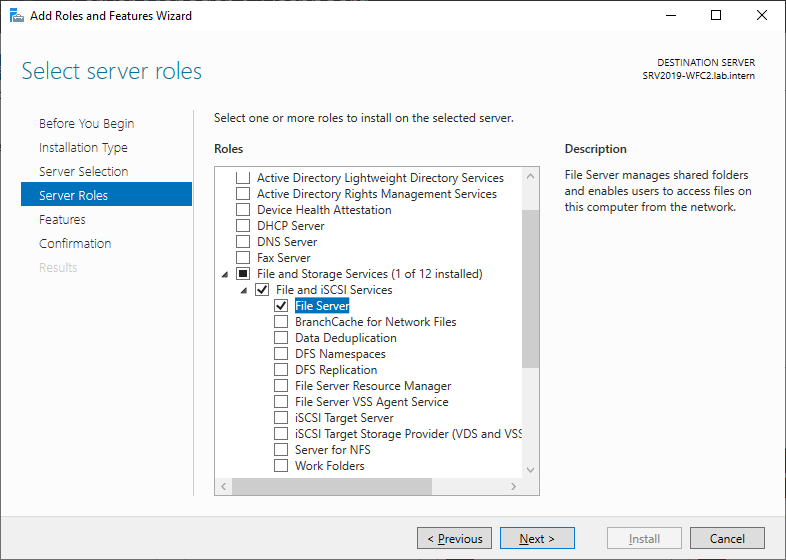
As an alternative, you can use the following PowerShell command to install the file server feature:
Install-WindowsFeature -Name FS-FileServer

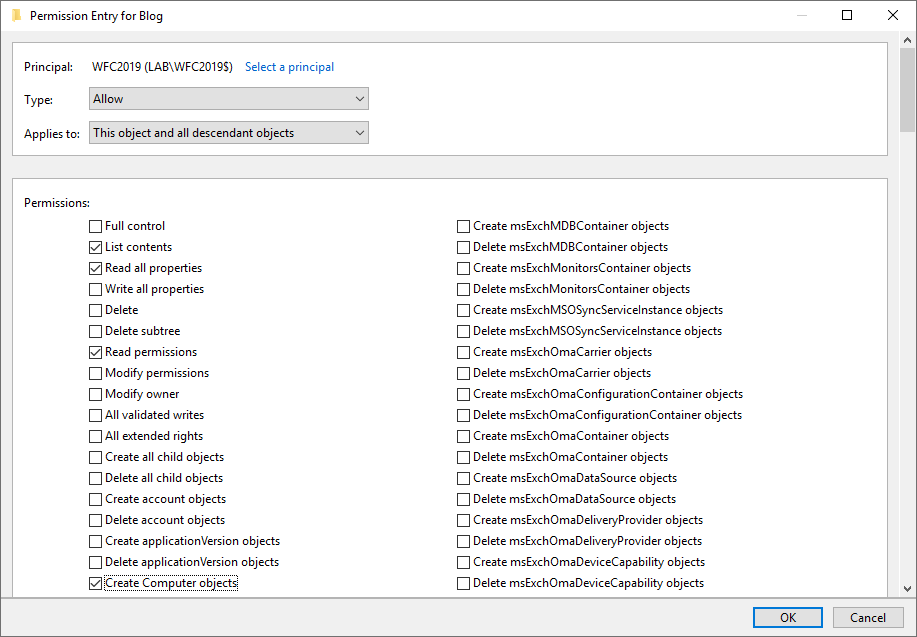
To avoid errors at later steps, first configure Active Directory permissions for the failover cluster computer object. The computer object of the cluster (in my case, WFC2019) must have the Create Computer Objects permissions in the Active Directory Organizational Unit (OU).

If you forget about this, the role will fail to start later. Errors and event IDs 1069, 1205 and 1254 will show up in the Windows event log and failover cluster manager.
Open the Active Directory Users and Computers console and switch to Advanced Features in the View menu.

Go the OU where your cluster object is located (in my case the OU is Blog). Go to the Security tab (in properties) and click Advanced.
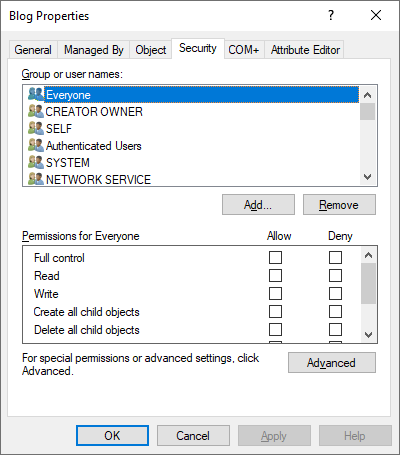
In the new window click Add and select your cluster computer object as principal (in my case WFC2019).

In the Permissions list select Create Computer objects
Click OK in all windows to confirm everything
Configure the file server cluster role
Because all pre-requisites are now met, we can configure the file server cluster role. Open the Failover Cluster manager and add the role to your cluster (right-click on Roles of your cluster -> configure role -> and select the File Server role).

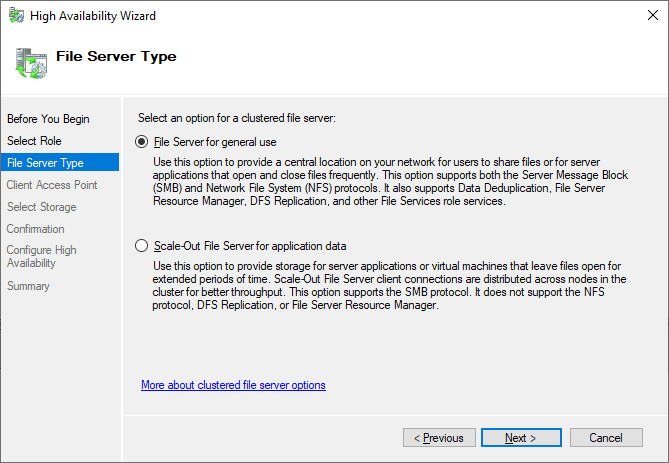
We will create a file server for general use as we plan to host file shares for end users.
In the next step we define how clients can access the file server cluster. Select a name for your file server and assign an additional IP address.

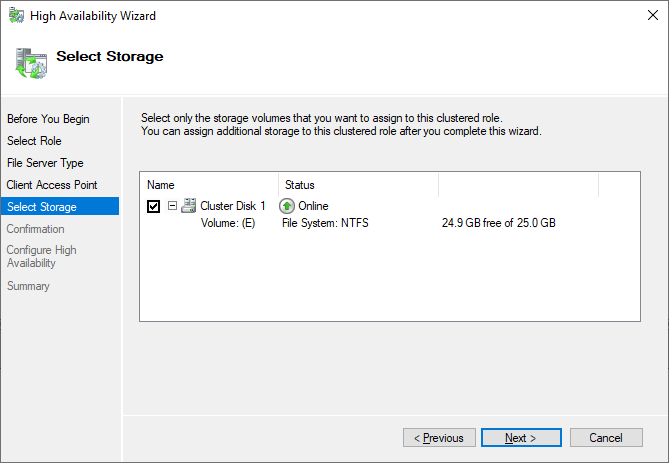
Use the storage configured earlier.
After you finish the wizard, you can see the File Server role up and running in the Failover Cluster Manager. If you see errors here, check the create computer objects permissions described earlier.

A new Active Directory object also appears in Active Directory Users and Computers, including a new DNS entry.

Now it’s time to create file shares for users. You can right-click on the file server role or use the actions panel on the right hand side.
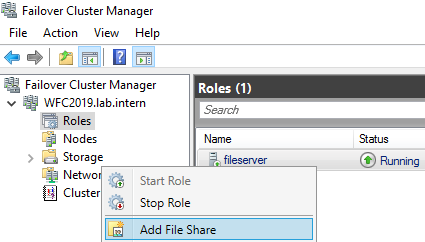
I select the SMB Share – Quick as I plan a general purpose file server for end users.

I also keep the default permissions because this is just an example. After you have finished the wizard, the new file share is ready to use.
In the following video I show the advances of a continuous available file share. The upload of the file will continue even during a cluster failover. The client is a Windows 10 1809. I upload an iso to the file share I created earlier. My upload speed it about 10-20Mbit/s WAN connection. During failover to a different cluster node, the upload stops for some seconds. After successful failover it continues uploading the ISO file.
Next steps and backup
As soon as the file server contains data, it is also time to think about backing up the file server. Veeam Agent for Microsoft Windows can back up Windows failover clusters with shared disks. We also recommend doing backups of the entire system of the cluster. This also backs up the operating systems of the cluster members and helps to speed up restore of a failed cluster node because you don’t need to search for drivers, etc. in case of a restore.
See More:
- How to follow the 3-2-1 backup rule
Hannes Kasparick
Hannes Kasparick has been working in the IT business since 2004. He managed Windows, Linux, storage systems, firewalls and did consulting for data center solutions. Today Hannes is a member of the Veeam product management team.
More about author
-
Setting up a File Server Cluster
- Configure the file server cluster role
-
Next steps and backup
- See More:
Similar Blog Posts
Best Practices for Secure Hybrid and Multi-Cloud Backup
Read more
From Tokyo’s Tech Scene to the London Legal Sector: What I’ve Learned on My Data Protection Journey
Read more
Linux Hardened Repositories: Achievable Immutability for All
Read more
You’re all set!
Watch your inbox for our weekly blog updates.
OK
Accessing data via a network is common today. File shares for regular users and administrative purposes are widely used in business environments. Network file shares are also used to store application data that should be accessible from the servers running the applications. Hyper-V servers can be configured to store virtual machine (VM) files on file shares and to access these files via the network. For important VM files located on file shares, there are advanced requirements for these file shares. For example, file shares must provide high availability, high performance, etc.
This blog post explains how to set up a Scale-Out File Server (SOFS) for Microsoft Hyper-V.
Preparing a Cluster
Deploying a failover cluster is a main requirement for configuring an Scale-Out File Server (SOFS). The SOFS can run on the same Hyper-V cluster or on a separate cluster based on Windows machines. When you use the same cluster to provide multiple services, this cluster is called a hyper-converged cluster. Hyper-converged environments are used in virtualized datacenters or software-defined datacenters.
You can read our blog posts about deploying a Hyper-V failover cluster and check the complete guide about Hyper-V clustering to learn about deploying clusters with Windows machines.
Here we will focus on the Scale-Out File Server configuration. You must use Cluster Shared Volumes based on iSCSI targets or Storage Space Direct as the storage connected to cluster nodes. Cluster Shared Volumes and Storage Spaces allow multiple servers to connect to the same disk simultaneously, which is important for a cluster.
When you create a cluster, you should add two identical cluster nodes to an Active Directory domain, and you must install the Failover Clustering role with the File Server role. You can use the graphical user interface in Windows Server or the command line interface in PowerShell.
You can install the Windows File Server role and Failover Clustering role on all nodes of the cluster with these PowerShell commands:
Install-WindowsFeature -Name FS-FileServer
Install-WindowsFeature -Name Failover-Clustering -IncludeManagementTools
Note: Functionality of the browser-based Windows Admin Center is limited and creating a cluster role and managing SOFS are not supported. Use the traditional Admin Center in the Windows graphical user interface.
Scale-Out File Server Configuration
Once you have prepared the environment according to the requirements and have the failover cluster configured, you can configure a Scale-Out File Server.
Open Failover Cluster Manager: Start > Administrative Tool > Failover Cluster Manager. Right click your cluster name (cluster1 in our case) and, in the context menu, click Configure Role.
The High Availability wizard is launched.
Before You Begin. Skip this step and click Next.
Select Role. Select File Server as the needed role to deploy the Scale-Out File Server. Hit Next at each step of the wizard to continue. Note that this File Server role is not the same as the File Server role in the Add Windows Roles and Features Wizard of Windows Server.
File Server Type. Select Scale-Out File Server for application data. This option is suitable for Hyper-V storage and database storage. Client connections are distributed across cluster nodes for better performance. The SMB 3.0 network protocol is supported for this option. SMB 3.0 is suitable for a Scale-Out File Server as it supports SMB Transparent Failover, VSS for SMB shares, SMB Encryption, SMB Multichannel, and SMB Direct. SMB Multichannel is used to provide multiple connections simultaneously over the network to increase performance and add fault tolerance functionality at the network layer.
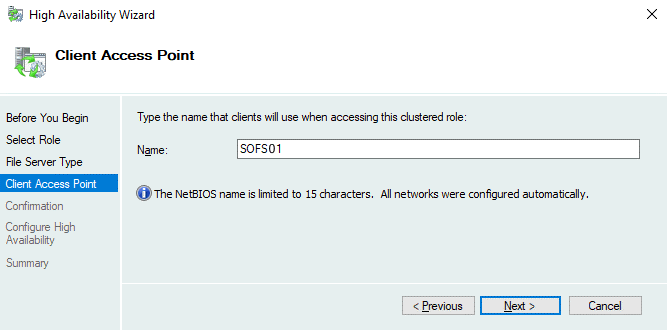
Client Access Point. Enter the name that clients must use to access this clustered SOFS role, for example, SOFS01. Follow the rules of entering a NetBIOS name.
Confirmation. Check your configuration and continue if you confirm this configuration. The needed objects are created in Active Directory.
Summary. Check configuration summary and click Finish to save settings and close the wizard.
The SOFS clustering role is now configured. We have not entered an IP address to access the SOFS share because DNS Round Robin is used to resolve the name defined for the Scale-Out File Server. The distributed network name is used without using a single clustered IP address.
Adding a File Share for SOFS
Now you can add a file share to the Scale-Out File Server.
Go back to Failover Cluster Manager, select your cluster, select roles, and right-click the SOFS role (SOFS01 in our case). In the context menu, click Add File Share.
The New Share wizard opens.
Select Profile. The profile is needed to define optimized settings for the needed share type. There are five file share profiles:
- SMB Share – Quick
- SMB Share – Advanced
- SMB Share – Applications
- NFS Share – Quick
- NFS Share – Advanced
Select SMB Share – Applications because this share type is intended to access storage for Hyper-V, databases and other server applications with the optimal settings. Click Next at each step to continue.
Share Location. Select the file server and path for the share. In my case, Iselect the file server named SOFS01. In the Share location section, click Select by volume with the appropriate path to the shared folder. A Cluster Shared Volume must be configured to enable the Select by volume option.
Share Name. Type an SOFS share name, for example, sharedVMs. The name is reflected in the path to the share. The format of the local path to the share is like C:\ClusterStorage\Volume1\Shares\sharename. The format of the remote path looks like \\SOFSname\sharename.
Other Settings. Configure share settings. Leave the Enable continuous availability checkbox selected. This option is selected by default at the Other Settings step if you select the “SMB Share – Applications” profile at the Select Profile step before.
You can leave other options as is (see the screenshot below).
Permissions. Set permissions to control access to the SOFS share. On the screenshot, you can see permissions selected by default. If you are configuring scale-out storage for Hyper-V, then you must grant full control to all Hyper-V computer accounts, Hyper-V administrators accounts, and the SYSTEM account. Access must be granted on the file share and file system level. If you need to use a Scale-Out File Server to store MS SQL Server database files, then you must grant full access to the SQL Server service account on the file system and share level.
Confirmation. Check your configuration and click Create.
Results. Wait until the wizard configures the SOFS share.
Now you can open Failover Cluster Manager, select Your cluster name > Roles > Your SOFS name and click the Shares tab in the bottom of the Failover Cluster Manager window to view the shared folder and the path to this folder.
Now you can enter a network path to the shared folder and access the SOFS share. All servers of a file server cluster serve the file share. In my case, I use this path:
\\SOFS01\sharedVMs
I can create a Hyper-V virtual machine on Hyper-V hosts and define the \\SOFS01\sharedVMs path to the SOFS share to store the virtual machine files, including virtual disk files.
Conclusion
This blog post has explained how to deploy a highly available file share by using Windows clustering functionality and covered installation of a Scale-Out File Server in Windows Server 2019. An SOFS can be configured after preparing the failover cluster with the File Server role on all cluster nodes. The main steps of setting up an SOFS are configuring a high availability file server role and configuring an SMB network share.
Using a Scale-Out File Server to store Hyper-V VM files with high availability reduces the risk of VM failure from a storage perspective. However, it is highly recommended that you perform Hyper-V backup for all important virtual machines regularly. Having a Hyper-V VM backup allows you to protect data, avoid data loss, and restore workloads in a short time when needed.
NAKIVO Backup & Replication is the data protection solution that can protect your Microsoft Hyper-V VMs on standalone Hyper-V hosts and in failover clusters. Download the Free Edition of NAKIVO Backup & Replication and start backing up Microsoft Hyper-V VMs.
Installing the Cluster is easy now days. But just this I post a little blog on how to do this, In my blog stats it shows that the 2012 post is still very active , so time for an update to Windows Server 2019. in the creation there isn’t much changed, it gets only easier. but If you still not in PowerShell you got more clicks to do an less Coffee. And Windows Admin Center is also a great addition to manage a cluster. This blog post is also usable in Azure Only you need to add Storagespacesdirect and a CSV file share.
Just install a bare metal (VM) windows Server 2019 and do a domain join and the fun can start.
Installing the Cluster Feature in powershell
|
Install-WindowsFeature –Name Failover-Clustering –IncludeManagementTools #Create cluster validation report Test-Cluster -Node MVP19-01,MVP19-02 #Create new Cluster New-Cluster -Name MVP1911-27 -Node MVP19-01,MVP19-02 -NoStorage -StaticAddress «10.255.255.45» #place witness file on USB device from my router Set-ClusterQuorum -FileShareWitness SERVERSHARE -Credential $(Get-Credential) |
Now that the basic cluster is ready we start with the HA share
File share witness enhancements We enabled the use of a file share witness in the following scenarios:
- Absent or extremely poor Internet access because of a remote location, preventing the use of a cloud witness.
- Lack of shared drives for a disk witness. This could be a Storage Spaces Direct hyperconverged configuration, a SQL Server Always On Availability Groups (AG), or an * Exchange Database Availability Group (DAG), none of which use shared disks.
- Lack of a domain controller connection due to the cluster being behind a DMZ.
- A workgroup or cross-domain cluster for which there is no Active Directory cluster name object (CNO). Find out more about these enhancements in the following post in Server & Management Blogs: Failover Cluster File Share Witness and DFS.
We now also explicitly block the use of a DFS Namespaces share as a location. Adding a file share witness to a DFS share can cause stability issues for your cluster, and this configuration has never been supported. We added logic to detect if a share uses DFS Namespaces, and if DFS Namespaces is detected, Failover Cluster Manager blocks creation of the witness and displays an error message about not being supported.
that’s it the cluster is created, we can start with the File server
Next is installation of the file server role
A restart is needed! After the restart we can build the cluster with the HA file share
|
$servers = («MVP19-01», «MVP19-02») foreach ($server in $servers) {Install-WindowsFeature -Name file-services -ComputerName $server} |
Now that the File Server Role is added we can add the Disk. Or use a disk that you already added before.
First we need to add a disk this can be done in the Failover Cluster manager or with PowerShell

Get-ClusterAvailableDisk | Add-ClusterDisk
The Roles are there and the Disk is added
Next step is adding the File server Role to the Cluster and add the HA File Share.
In this case I have a fail over disk and I use the File Server for general use.

So when adding the Disk it is not showing the disk. This is The disk is added to the cluster but the disk isn’t formatted!
Keep in mind that formating the cluster disk while it is online is not possible. You need to set the disk in maintenance mode else the format will fail.

So after the disk format we will see the Disk appear and can be added to the File server
After this the File server is up and running. As you can see the setup is screen intense, building this with PowerShell is a lot faster.
Powershell
|
add-ClusterFileServerRole -Storage «Cluster Disk 1» -Name MyFiles New-SmbShare -Name «Data» -Path «J:Data» -EncryptData $True |
Quick steps with powershell and even the share is created and encrypted
Next step is adding the file share.
go for the Quick setup
Pick the disk and select the folder with the data on the disk, if there is no data then create a folder that will hold the data later.
as you can see the UNC path from the File Server.

As you can see the settings can be adjusted for you needs and also set the right access, and keep in mind this needs to be don on the Cluster Level!
All Done
So creating a File Server and 2 file shares is Click intensive if you don’t use PowerShell.
But What about Windows Admin Center ? yes that would be an option also except here you can’t create a cluster role.
You can create a new role but no file server /share etc.
But when the share is created and running like now you can use Windows Admin Center for migration the data to the file share.
But more and more options are coming in Windows Admin Center below are some links that you can use to add your request to the UserVoice
https://docs.microsoft.com/en-us/windows-server/manage/windows-admin-center/use/manage-failover-clusters
More Coming
Failover cluster management in Windows Admin Center is actively under development and new features will be added in the near future. You can view the status and vote for features in UserVoice:
Feature Request
Show more clustered disk info
Support additional cluster actions
Support converged clusters running Hyper-V and Scale-Out File Server on different clusters
View CSV block cache
See all or propose new feature
+++++++++++++++
Follow Me on Twitter @ClusterMVP
Follow My blog https://robertsmit.wordpress.com
Linkedin Profile Robert Smit MVP Linkedin profile
Google : Robert Smit MVP profile
Installing the Cluster is easy now days. But just this I post a little blog on how to do this, In my blog stats it shows that the 2012 post is still very active , so time for an update to Windows Server 2019. in the creation there isn’t much changed, it gets only easier. but If you still not in PowerShell you got more clicks to do an less Coffee. And Windows Admin Center is also a great addition to manage a cluster. This blog post is also usable in Azure Only you need to add Storagespacesdirect and a CSV file share.
Just install a bare metal (VM) windows Server 2019 and do a domain join and the fun can start.
Installing the Cluster Feature in powershell
Install-WindowsFeature –Name Failover-Clustering –IncludeManagementTools
#Create cluster validation report
Test-Cluster -Node MVP19-01,MVP19-02
#Create new Cluster
New-Cluster -Name MVP1911-27 -Node MVP19-01,MVP19-02 -NoStorage -StaticAddress «10.255.255.45»
#place witness file on USB device from my router
Set-ClusterQuorum -FileShareWitness \\SERVER\SHARE -Credential $(Get-Credential)
Now that the basic cluster is ready we start with the HA share
File share witness enhancements We enabled the use of a file share witness in the following scenarios:
- Absent or extremely poor Internet access because of a remote location, preventing the use of a cloud witness.
- Lack of shared drives for a disk witness. This could be a Storage Spaces Direct hyperconverged configuration, a SQL Server Always On Availability Groups (AG), or an * Exchange Database Availability Group (DAG), none of which use shared disks.
- Lack of a domain controller connection due to the cluster being behind a DMZ.
-
A workgroup or cross-domain cluster for which there is no Active Directory cluster name object (CNO). Find out more about these enhancements in the following post in Server & Management Blogs: Failover Cluster File Share Witness and DFS.
We now also explicitly block the use of a DFS Namespaces share as a location. Adding a file share witness to a DFS share can cause stability issues for your cluster, and this configuration has never been supported. We added logic to detect if a share uses DFS Namespaces, and if DFS Namespaces is detected, Failover Cluster Manager blocks creation of the witness and displays an error message about not being supported.
that’s it the cluster is created, we can start with the File server
Next is installation of the file server role
A restart is needed! After the restart we can build the cluster with the HA file share
$servers = («MVP19-01», «MVP19-02»)
foreach ($server in $servers) {Install-WindowsFeature -Name file-services -ComputerName $server}
Now that the File Server Role is added we can add the Disk. Or use a disk that you already added before.
First we need to add a disk this can be done in the Failover Cluster manager or with PowerShell

Get-ClusterAvailableDisk | Add-ClusterDisk
The Roles are there and the Disk is added
Next step is adding the File server Role to the Cluster and add the HA File Share.
In this case I have a fail over disk and I use the File Server for general use.

So when adding the Disk it is not showing the disk. This is The disk is added to the cluster but the disk isn’t formatted!
Keep in mind that formating the cluster disk while it is online is not possible. You need to set the disk in maintenance mode else the format will fail.

So after the disk format we will see the Disk appear and can be added to the File server
After this the File server is up and running. As you can see the setup is screen intense, building this with PowerShell is a lot faster.
Powershell
add-ClusterFileServerRole -Storage «Cluster Disk 1» -Name MyFiles
New-SmbShare -Name «Data» -Path «J:\Data» -EncryptData $True
Quick steps with powershell and even the share is created and encrypted
Next step is adding the file share.
go for the Quick setup
Pick the disk and select the folder with the data on the disk, if there is no data then create a folder that will hold the data later.
as you can see the UNC path from the File Server.

As you can see the settings can be adjusted for you needs and also set the right access, and keep in mind this needs to be don on the Cluster Level!
All Done
So creating a File Server and 2 file shares is Click intensive if you don’t use PowerShell.
But What about Windows Admin Center ? yes that would be an option also except here you can’t create a cluster role.
You can create a new role but no file server /share etc.
But when the share is created and running like now you can use Windows Admin Center for migration the data to the file share.
But more and more options are coming in Windows Admin Center below are some links that you can use to add your request to the UserVoice
https://docs.microsoft.com/en-us/windows-server/manage/windows-admin-center/use/manage-failover-clusters
More Coming
Failover cluster management in Windows Admin Center is actively under development and new features will be added in the near future. You can view the status and vote for features in UserVoice:
Feature Request
Show more clustered disk info
Support additional cluster actions
Support converged clusters running Hyper-V and Scale-Out File Server on different clusters
View CSV block cache
See all or propose new feature
+++++++++++++++
Follow Me on Twitter @ClusterMVP
Follow My blog https://robertsmit.wordpress.com
Linkedin Profile Robert Smit MVP Linkedin profile
Google : Robert Smit MVP profile
Robert Smit is Senior Technical Evangelist and is a current Microsoft MVP in Clustering as of 2009.
Robert has over 20 years experience in IT with experience in the educational, health-care and finance industries.
Robert’s past IT experience in the trenches of IT gives him the knowledge and insight that allows him to communicate effectively with IT professionals
who are trying to address real concerns around business continuity, disaster recovery and regulatory compliance issues. Robert holds the following certifications:
MCT — Microsoft Certified Trainer, MCTS — Windows Server Virtualization, MCSE, MCSA and MCPS. He is an active participant in the Microsoft newsgroup community and is currently focused on Hyper-V, Failover Clustering, SQL Server, Azure and all things related to Cloud Computing and Infrastructure Optimalization.
Follow Robert on Twitter @ClusterMVP
Or follow his blog https://robertsmit.wordpress.com
Linkedin Profile Http://nl.linkedin.com/in/robertsmit
Robert is also capable of transferring his knowledge to others which is a rare feature in the field of IT. He makes a point of not only solving issues but also of giving on the job training of his colleagues.
A customer says » Robert has been a big influence on our technical staff and I have to come to know him as a brilliant specialist concerning Microsoft Products. He was Capable with his in-depth knowledge of Microsoft products to troubleshoot problems and develop our infrastructure to a higher level. I would certainly hire him again in the future. »
Details of the Recommendation: «I have been coordinating with Robert implementing a very complex system. Although he was primarily a Microsoft infrastructure specialist; he was able to understand and debug .Net based complext Windows applications and websites. His input to improve performance of applications proved very helpful for the success of our project
View all posts by Robert Smit [MVP]
Search code, repositories, users, issues, pull requests…
Provide feedback
Saved searches
Use saved searches to filter your results more quickly
Sign up


