No, it doesn’t have to be configured as a domain controller, but can be so configured.
The Microsoft blog
Windows Server 2019 Essentials update
has this to say:
If configured as a Domain Controller, Windows Server 2019 Essentials must be the only Domain Controller, must run all Flexible Single Master Operations (FSMO) roles, and cannot have two-way trusts with other Active Directory domains.
In short, configuring it as domain controller will have drastic consequences for
the network in which it is found.
I strongly advise to skip Windows Server 2019 Essentials and get instead
Windows Server 2016 Essentials.
The article
Windows Server 2019 Essentials – end of an era!
says this:
While Microsoft will still be releasing an “Essentials” SKU for Windows Server 2019, it will be completely devoid of everything that we recognize as being part of Windows Server Essentials in its current form.
Basically, Microsoft is releasing their first (and last) non-essentials Windows Server Essentials release that is completely gutted of anything even remotely resembling Windows Server Essentials as we currently know it. And obviously, without the underlying “Essentials” bits, there can be no more new WSE RemoteApp or WSE WorkFolders product releases going forward.
My suggestion to those who want to continue running an on-premises Essentials server would be to grab up as many Windows Server 2016 (Standard, Datacenter, or Essentials) licenses as you possibly can (before they’re all gone), and then ride it out with that particular version for as long as Microsoft will be providing support for it (see: Windows Server 2016 Essentials servicing timeline).

- Remove From My Forums
-
Вопрос
-
… Or you can operate this in a Workgroup with local users?, or do i have to create a domain?
The new 2019 Essentials will be the only one server in the environment.
Greetings

-
Изменено
Windows 3.1 User
27 июня 2019 г. 8:58
-
Изменено

Все ответы
-
Hi,
Windows Server 2019 still has license limitation, it should be PDC and only one Essentials version on the domain. For new WS2019 Essentials, based on my VM test, it can be configured and used in Workgroup environment as AD DS server role is not forced to be
installed.Best Regards,
Eve Wang
Please remember to mark the replies as answers if they help.
If you have feedback for TechNet Subscriber Support, contact
tnmff@microsoft.com. -
based on my VM test, it can be configured and used in Workgroup environment as AD DS server role is not forced to be installed.
Yes i made the same experience. But will i be alerted some day, to promote the 2019 Essentials to a PDC?
-
Hi,
>Windows Server 2019 Essentials has the same licensing and technical characteristics as its predecessor, Windows Server 2016 Essentials. If configured as a Domain Controller, Windows Server 2019 Essentials must be the only Domain Controller,
must run all Flexible Single Master Operations (FSMO) roles, and cannot have two-way trusts with other Active Directory domains.Quote from blog “Windows Server 2019 Essentials update”:
https://cloudblogs.microsoft.com/windowsserver/2018/09/05/windows-server-2019-essentials-update/Best Regards,
Eve Wang
Please remember to mark the replies as answers if they help.
If you have feedback for TechNet Subscriber Support, contact
tnmff@microsoft.com.-
Предложено в качестве ответа
Eve WangMicrosoft contingent staff
5 июля 2019 г. 7:37
-
Предложено в качестве ответа
-
Yep i know this, but what means ( if
configured as a Domain Controller…)
?, what if not? Could it stay in a workgroup as single server?-
Изменено
Windows 3.1 User
28 июня 2019 г. 9:17
-
Изменено
-
Just an FYI …
As you are dealing with Essentials, you may want to ask the Essentials experts your questions. Essentials is based on Windows Server, but its implementation is unique, meaning general Windows Server knowledge does not always apply to Essentials installations.
That’s why there is a separate forum located at https://social.technet.microsoft.com/Forums/en-US/home?forum=ws16essentials.
tim
-
Hi,
For system license consideration, and for Microsoft, AD domain is recommended. If you only want to keep the WSE 2019 on Workgroup, it is supported but not recommended, and just the warning message as you had mentioned.
Best Regards,
Eve Wang
Please remember to mark the replies as answers if they help.
If you have feedback for TechNet Subscriber Support, contact
tnmff@microsoft.com.-
Предложено в качестве ответа
Eve WangMicrosoft contingent staff
5 июля 2019 г. 7:37
-
Предложено в качестве ответа
-
Hi,
How things are going there on this issue?
Please let me know if you would like further assistance.
Best Regards,
Eve Wang
Please remember to mark the replies as answers if they help.
If you have feedback for TechNet Subscriber Support, contact
tnmff@microsoft.com. -
Hi,
Is there any update?
Best Regards,
Eve Wang
Please remember to mark the replies as answers if they help.
If you have feedback for TechNet Subscriber Support, contact
tnmff@microsoft.com.
Установим роль контроллера домена на Windows Server 2019. На контроллере домена работает служба Active Directory (AD DS). С Active Directory связано множество задач системного администрирования.
AD DS в Windows Server 2019 предоставляет службу каталогов для централизованного хранения и управления пользователями, группами, компьютерами, а также для безопасного доступ к сетевым ресурсам с проверкой подлинности и авторизацией.
Подготовительные работы
Нам понадобится компьютер с операционной системой Windows Server 2019. У меня контроллер домена будет находиться на виртуальной машине:
Установка Windows Server 2019 на виртуальную машину VMware
После установки операционной системы нужно выполнить первоначальную настройку Windows Server 2019:
Первоначальная настройка Windows Server 2019
Хочется отметить обязательные пункты, которые нужно выполнить.
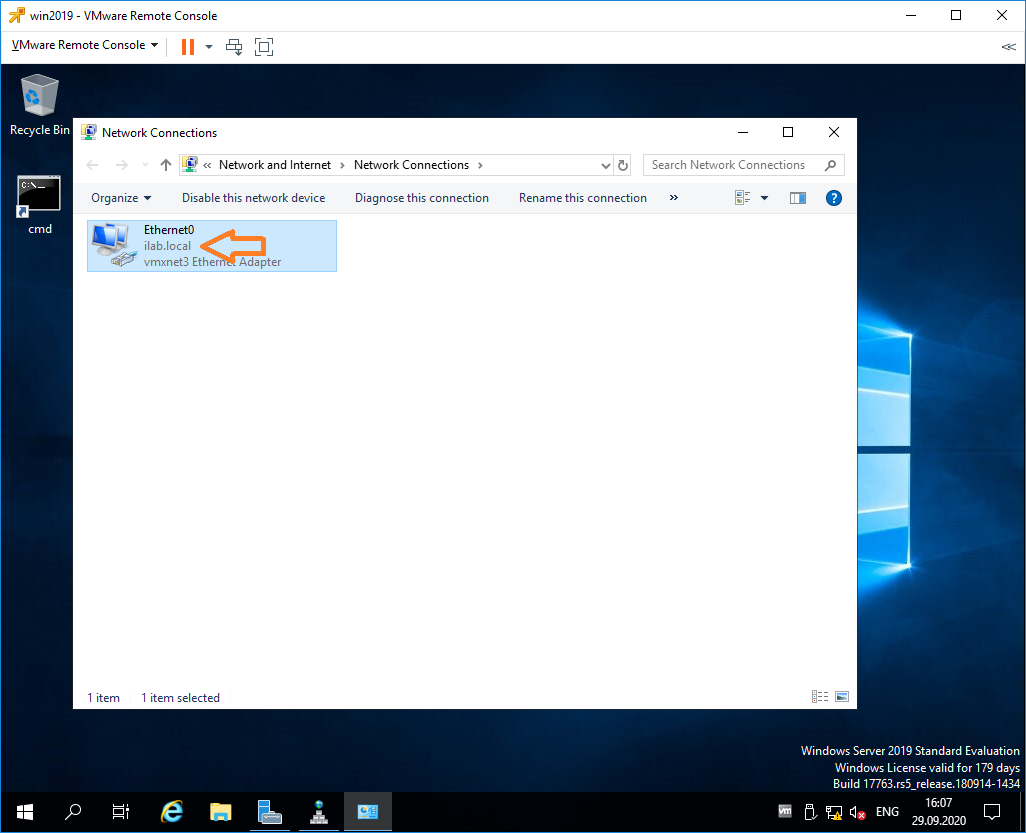
Выполните настройку сети. Укажите статический IP адрес. DNS сервер указывать не обязательно, при установке контроллера домена вместе с ним установится служба DNS. В настройках сети DNS сменится автоматически. Отключите IPv6, сделать это можно и после установки контроллера домена.

Укажите имя сервера.
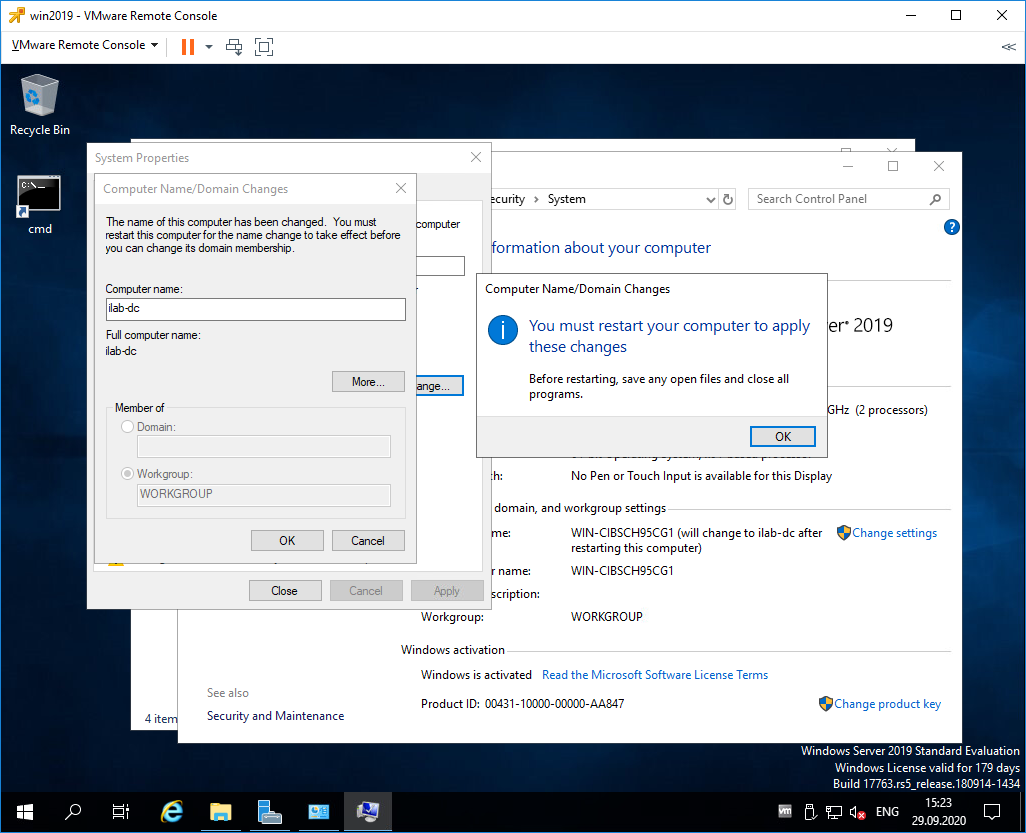
Было бы неплохо установить последние обновления, драйвера. Указать региональные настройки, время. На этом подготовка завершена.
Установка роли Active Directory Domain Services
Работаем под учётной записью локального администратора Administrator (или Администратор), данный пользователь станет администратором домена.
Дополнительно будет установлена роль DNS.
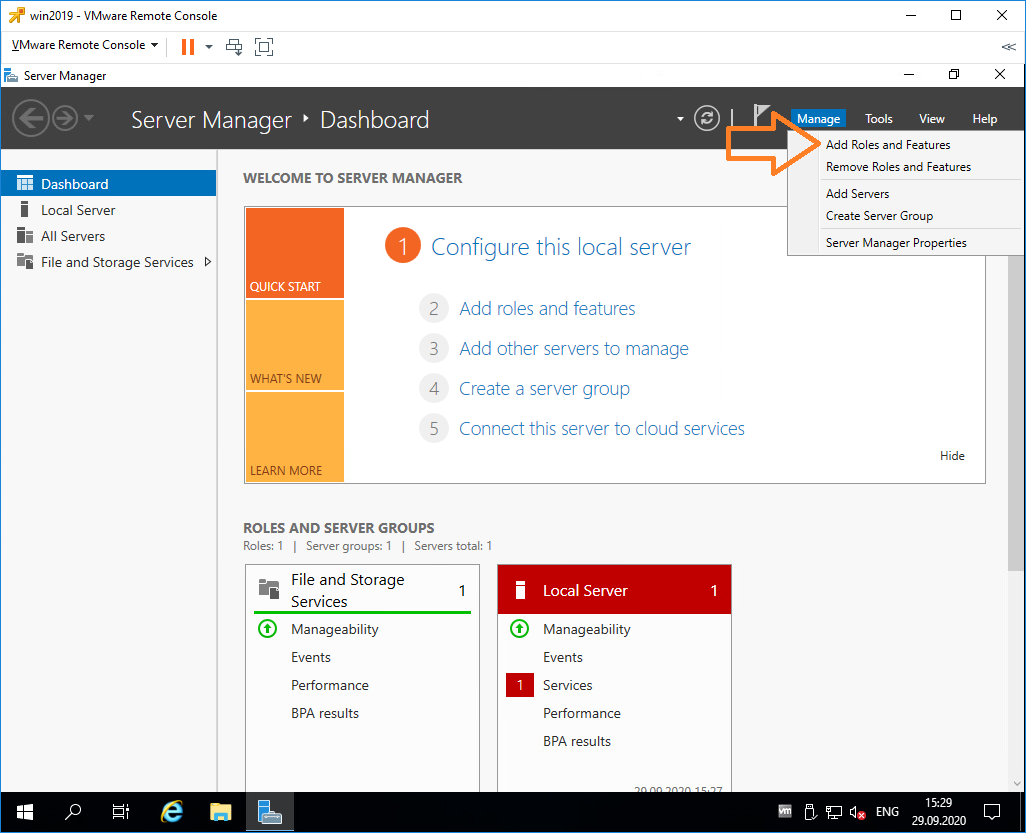
Следующий шаг — установка роли AD DS. Открываем Sever Manager. Manage > Add Roles and Features.
Запускается мастер добавления ролей.

Раздел Before You Begin нас не интересует. Next.
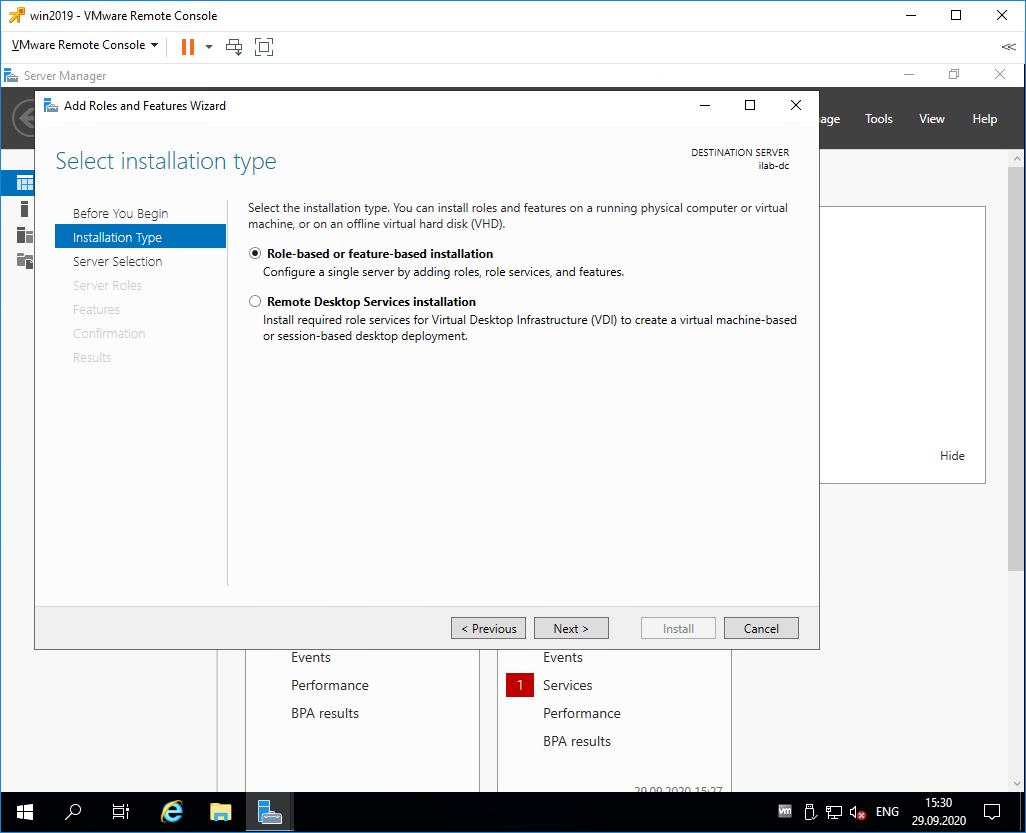
В разделе Installation Type выбираем Role-based or feature-based installation. Next.
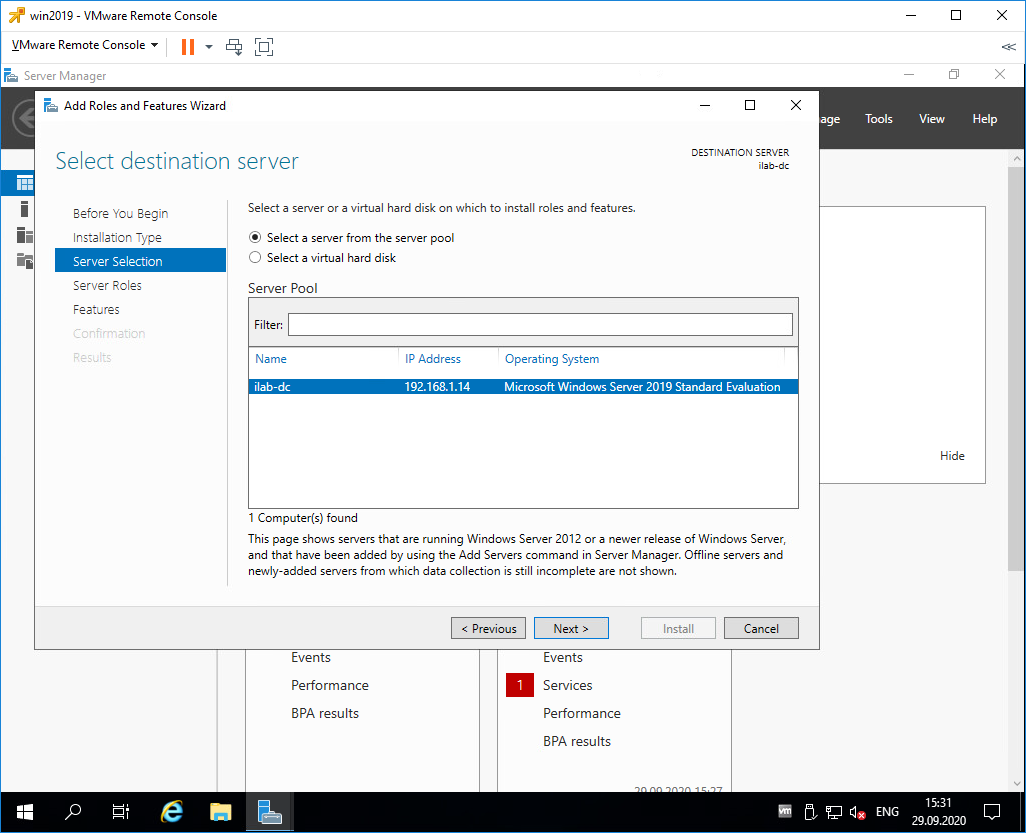
В разделе Server Selection выделяем текущий сервер. Next.
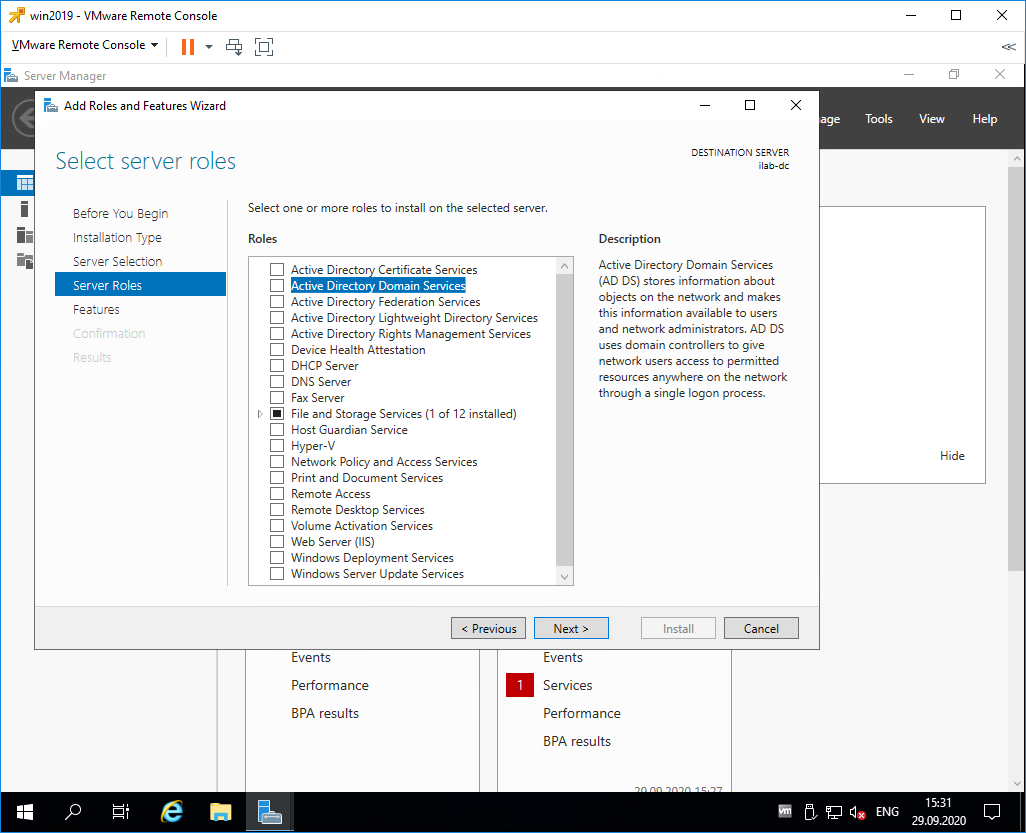
В разделе Server Roles находим роль Active Directory Domain Services, отмечаем галкой.
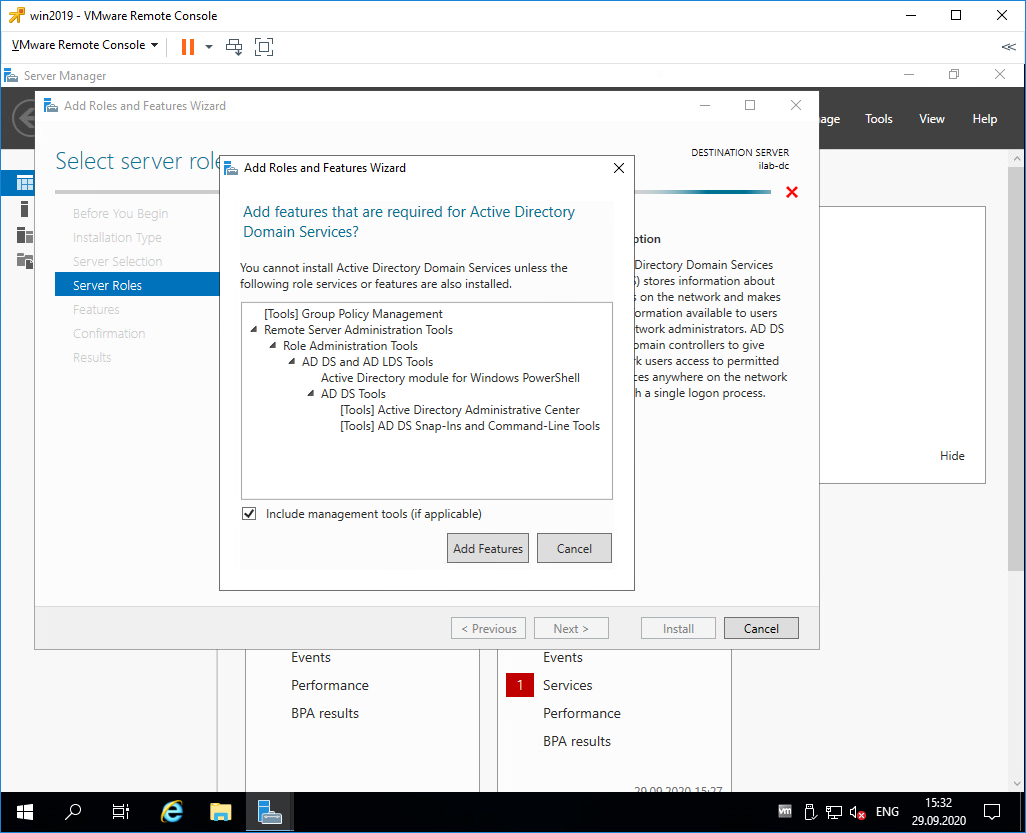
Для роли контроллера домена нам предлагают установить дополнительные опции:
- [Tools] Group Policy Management
- Active Directory module for Windows PowerShell
- [Tools] Active Directory Administrative Center
- [Tools] AD DS Snap-Ins and Command-Line Tools
Всё это не помешает. Add Features.

Теперь роль Active Directory Domain Services отмечена галкой. Next.
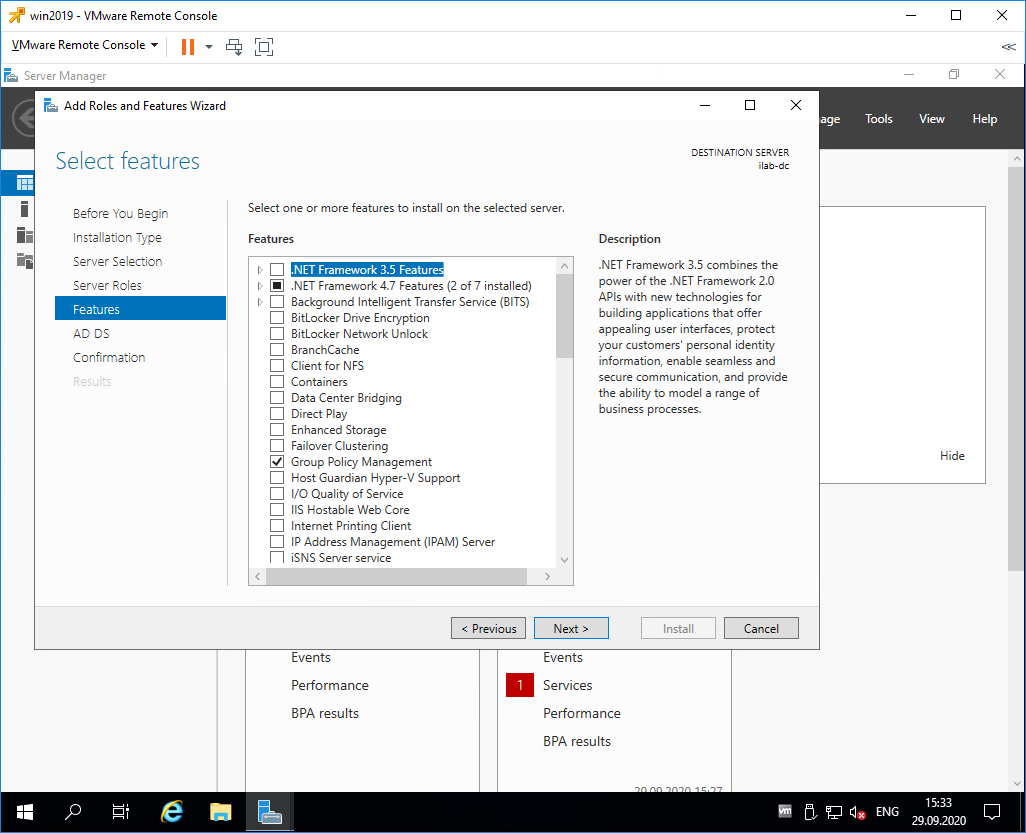
В разделе Features нам не нужно отмечать дополнительные опции. Next.
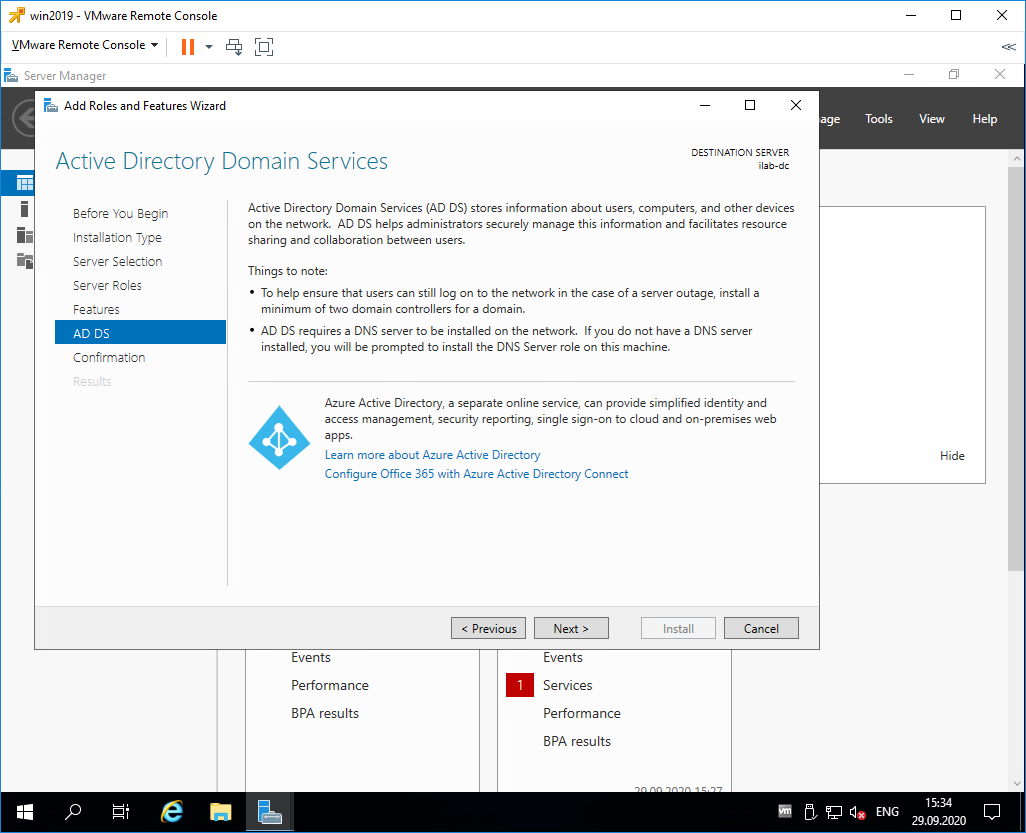
У нас появился раздел AD DS. Здесь есть пара ссылок про Azure Active Directory, они нам не нужны. Next.
Раздел Confirmation. Подтверждаем установку компонентов кнопкой Install.
Начинается установка компонентов, ждём.
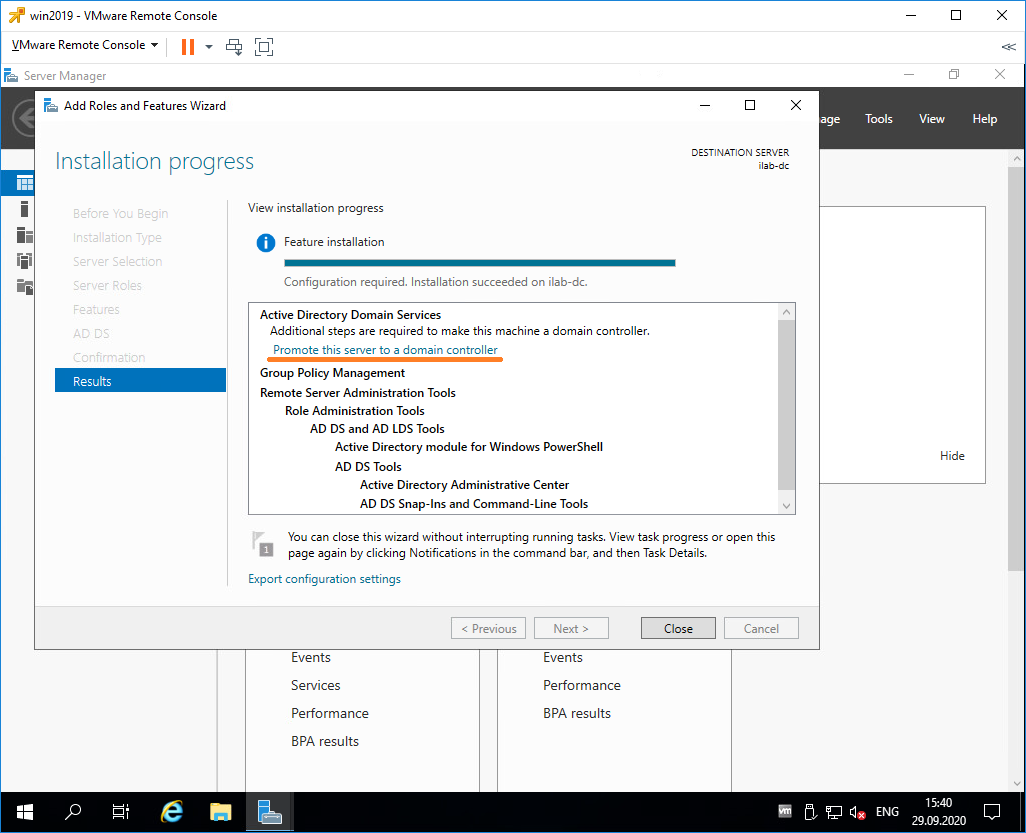
Configuration required. Installation succeeded on servername. Установка компонентов завершена, переходим к основной части, повышаем роль текущего сервера до контроллера домена. В разделе Results есть ссылка Promote this server to domain controller.
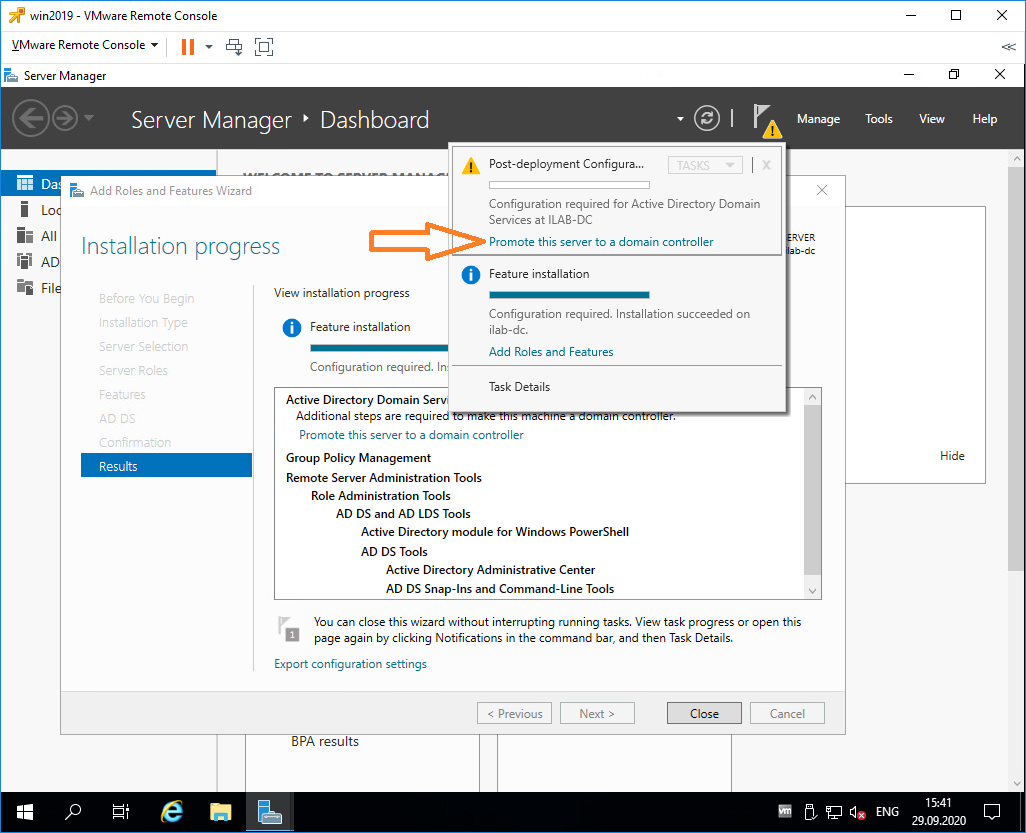
Она же доступна в предупреждении основного окна Server Manager. Нажимаем на эту ссылку, чтобы повысить роль сервера до контроллера домена.
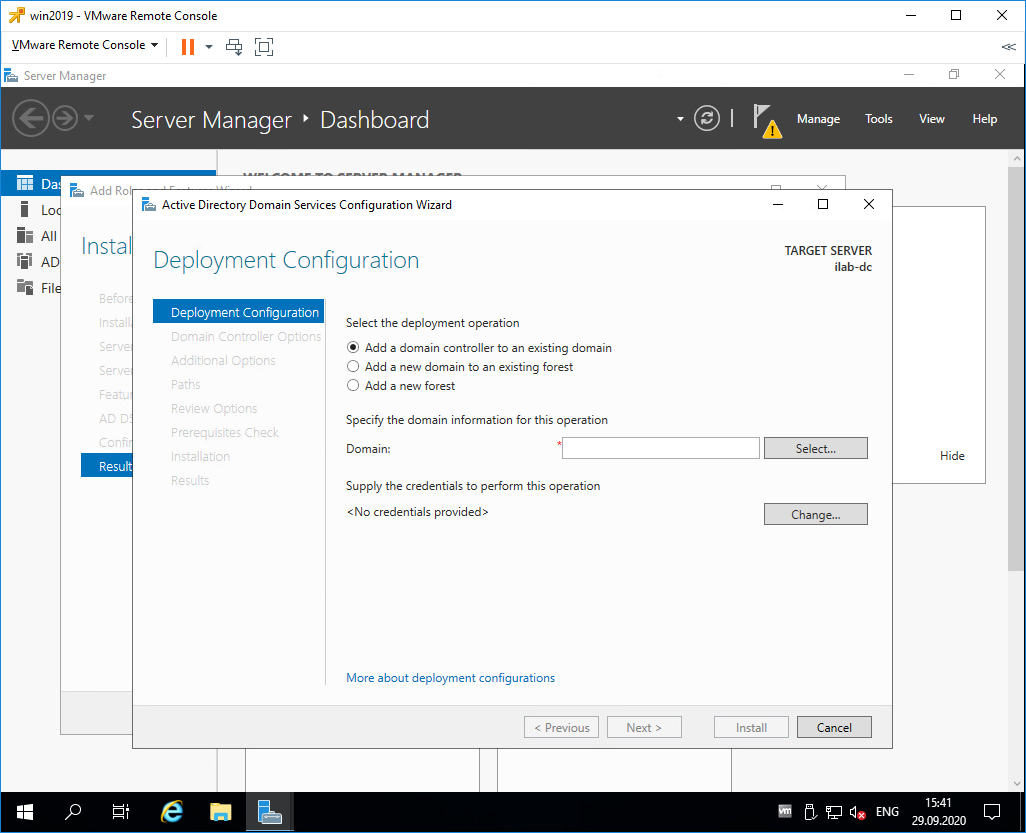
Запускается мастер конфигурации AD DS — Active Directory Domain Service Configuration Wizard. В разделе Deployment Configuration нужно выбрать один из трёх вариантов:
- Add a domain controller to an existing domain
- Add a new domain to an existing forest
- Add a new forest
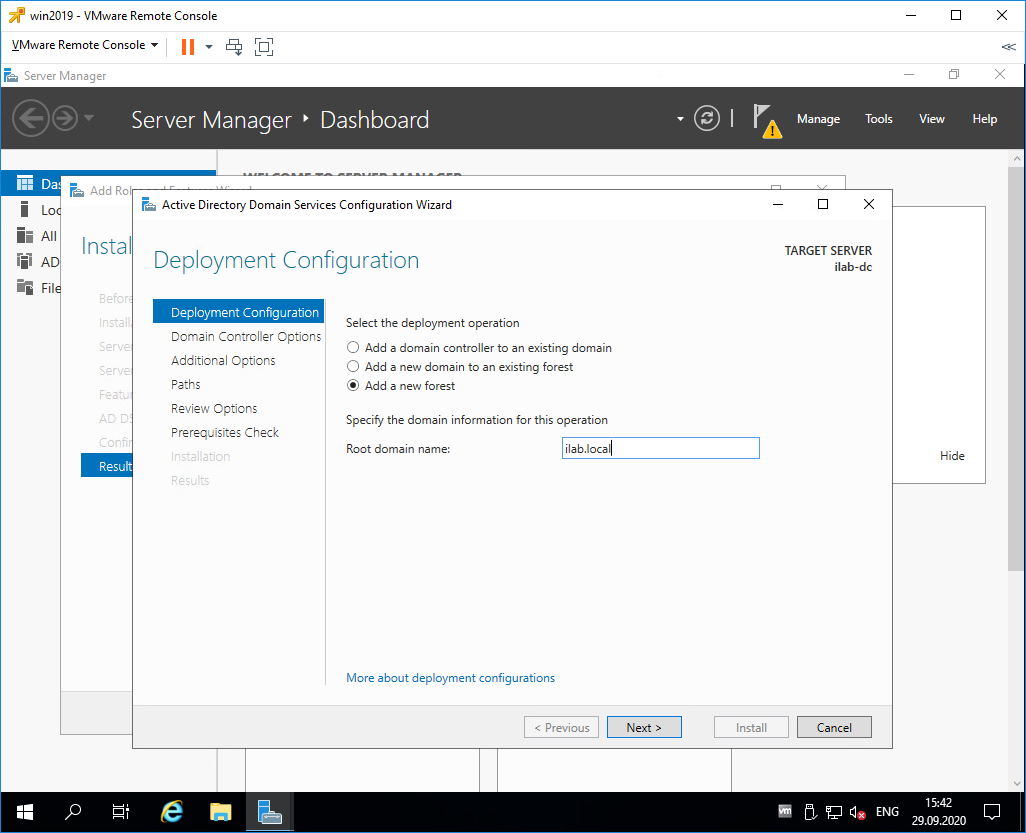
Первый вариант нам не подходит, у нас нет текущего домена, мы создаём новый. По той же причине второй вариант тоже не подходит. Выбираем Add a new forest. Будем создавать новый лес.
Укажем в Root domain name корневое имя домена. Я пишу ilab.local, это будет мой домен. Next.
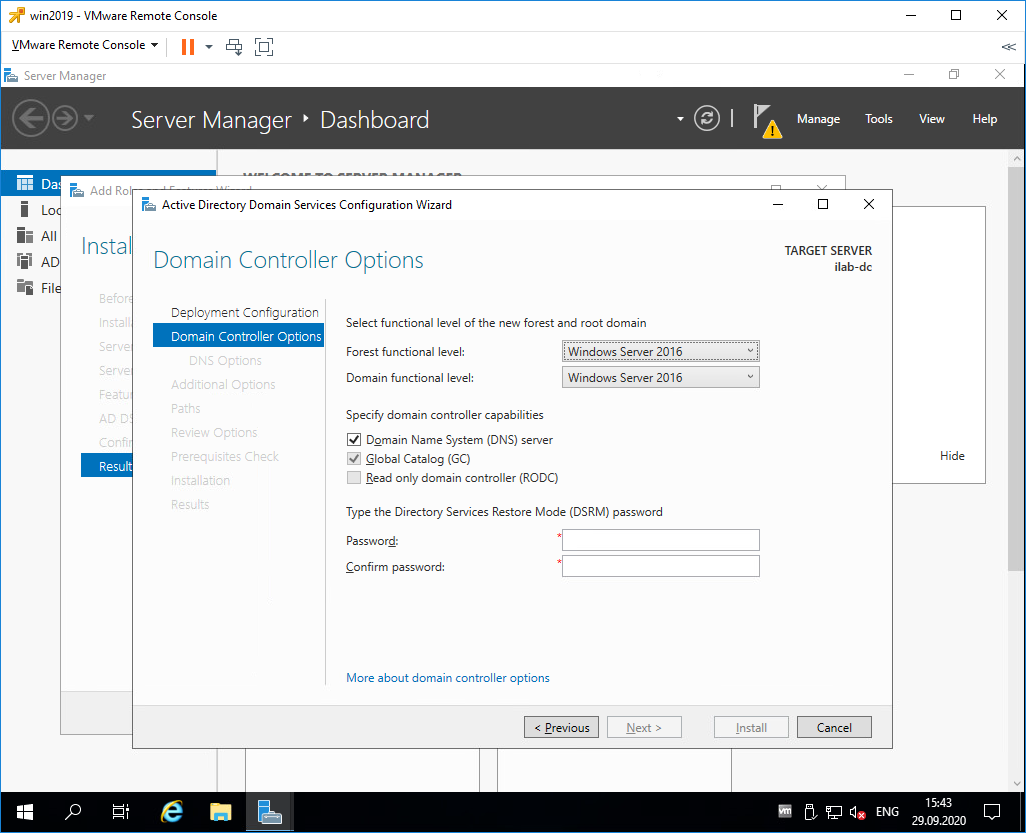
Попадаем в раздел Doman Controller Options.
В Forest functional level и Domain functional level нужно указать минимальную версию серверной операционной системы, которая будет поддерживаться доменом.

У меня в домене планируются сервера с Windows Server 2019, Windows Server 2016 и Windows Server 2012, более ранних версий ОС не будет. Выбираю уровень совместимости Windows Server 2012.
В Domain functional level также выбираю Windows Server 2012.
Оставляю галку Domain Name System (DNS) server, она установит роль DNS сервера.
Укажем пароль для Directory Services Restore Mode (DSRM), желательно, чтобы пароль не совпадал с паролем локального администратора. Он может пригодиться для восстановления службы каталогов в случае сбоя.
Next.
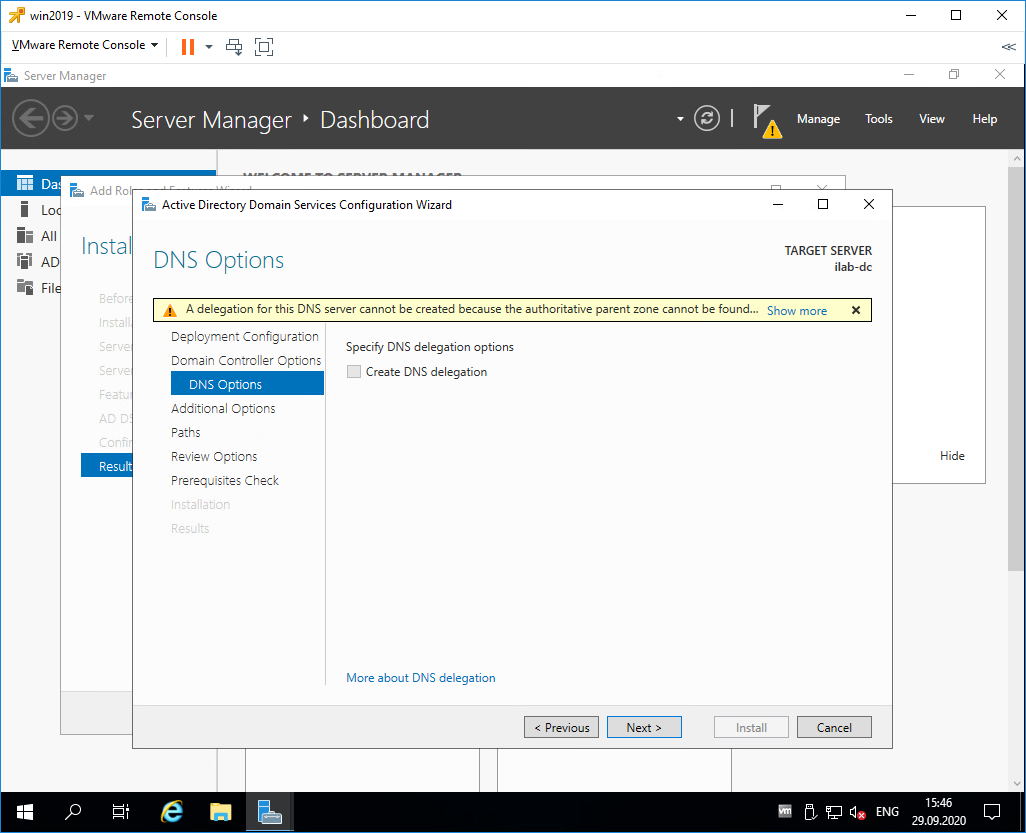
Не обращаем внимание на предупреждение «A delegation for this DNS server cannot be created because the authoritative parent zone cannot be found…». Нам не нужно делать делегирование, у нас DNS сервер будет на контроллере домена. Next.
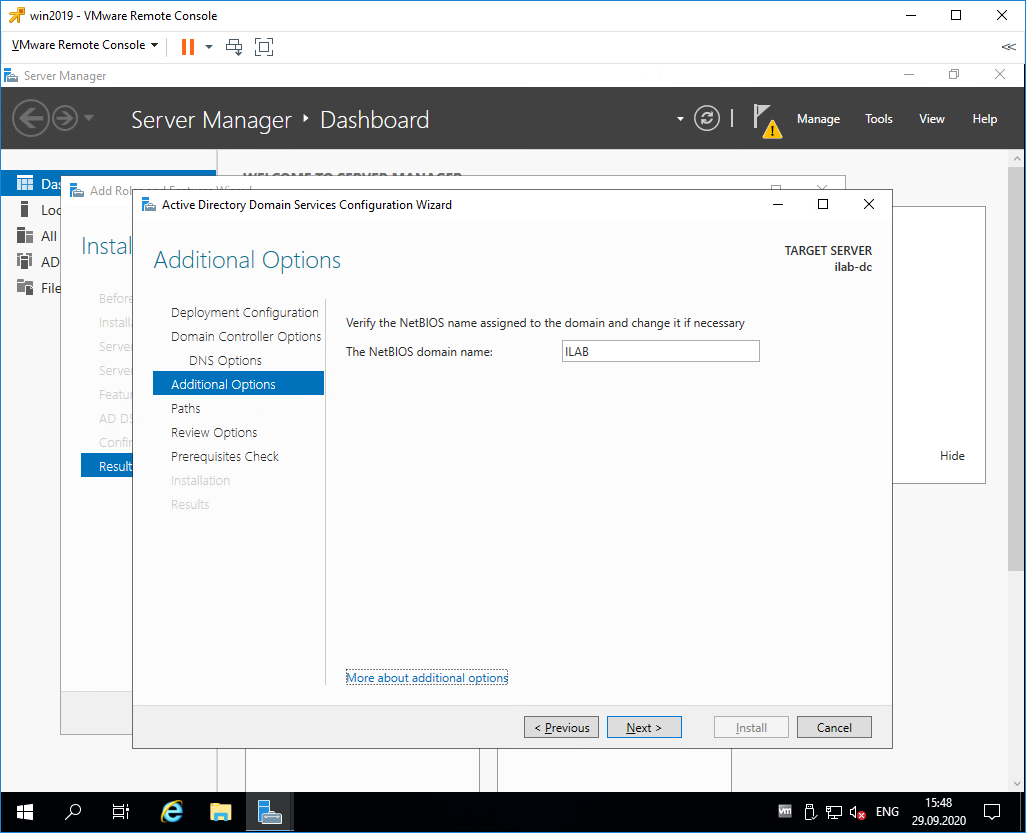
В разделе Additional Options нужно указать NetBIOS name для нашего домена, я указываю «ILAB». Next.
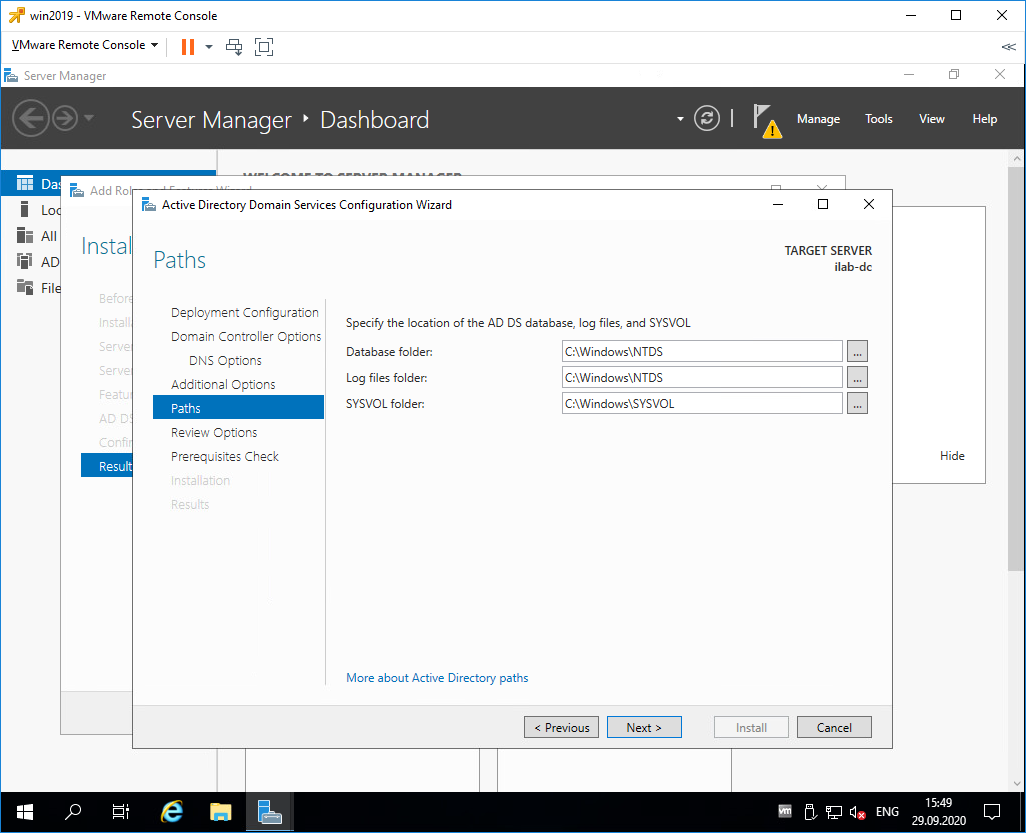
В разделе Paths можно изменить пути к базе данных AD DS, файлам журналов и папке SYSVOL. Без нужды менять их не рекомендуется. По умолчанию:
- Database folder: C:\Windows\NTDS
- Log files folder: C:\Windows\NTDS
- SYSVOL folder: C:\Windows\SYSVOL
Next.
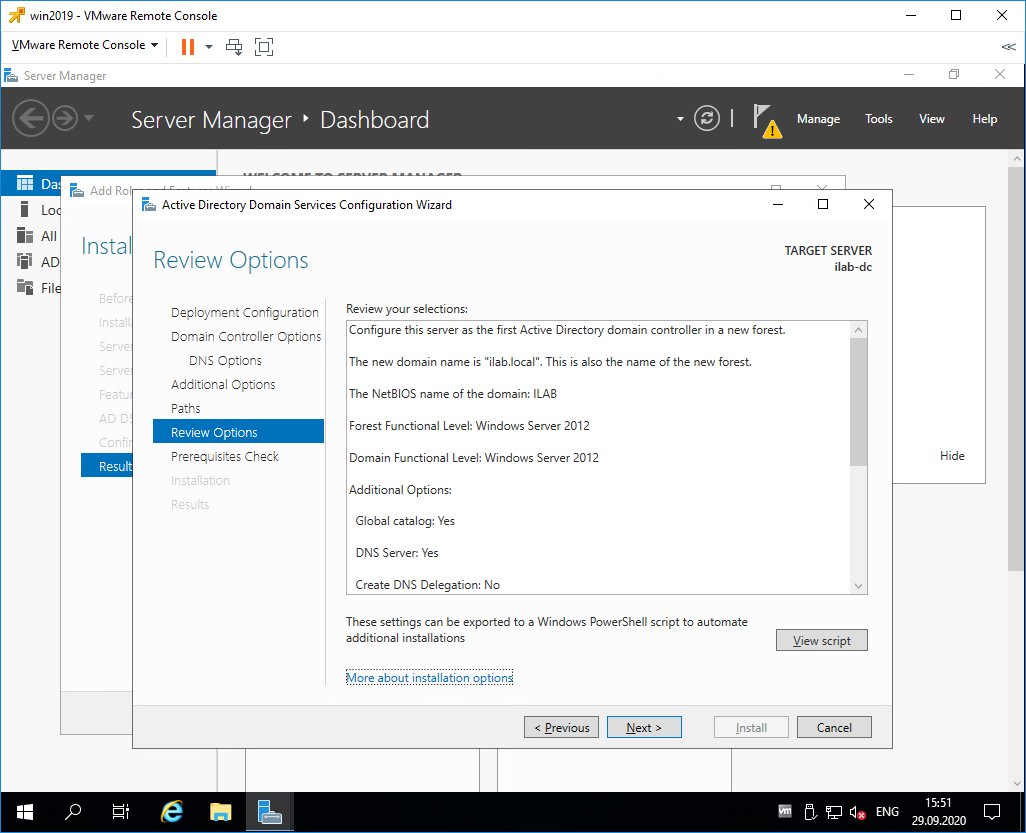
В разделе Review Options проверяем параметры установки. Обратите внимание на кнопку View script. Если её нажать, то сгенерируется tmp файл с PowerShell скриптом для установки контроллера домена.
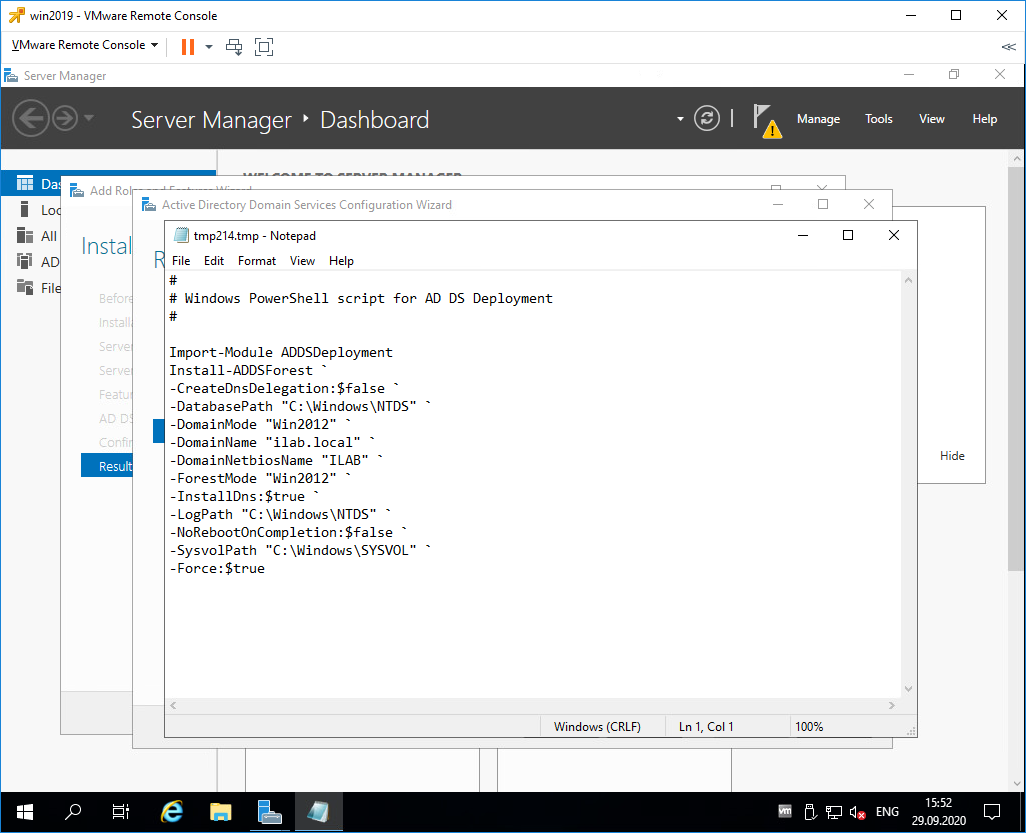
Сейчас нам этот скрипт не нужен, но он может быть полезен системным администраторам для автоматизации установки роли контроллера домена с помощью PowerShell.
Next.
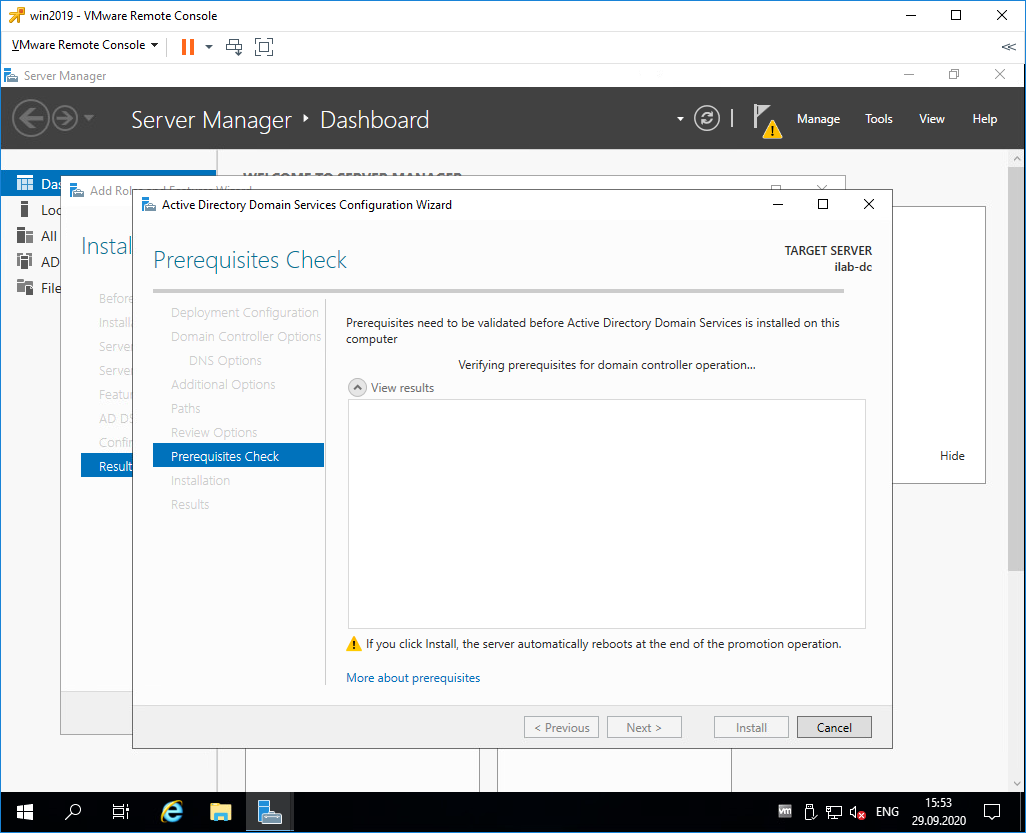
Попадаем в раздел Prerequisites Check, начинаются проверки предварительных требований.
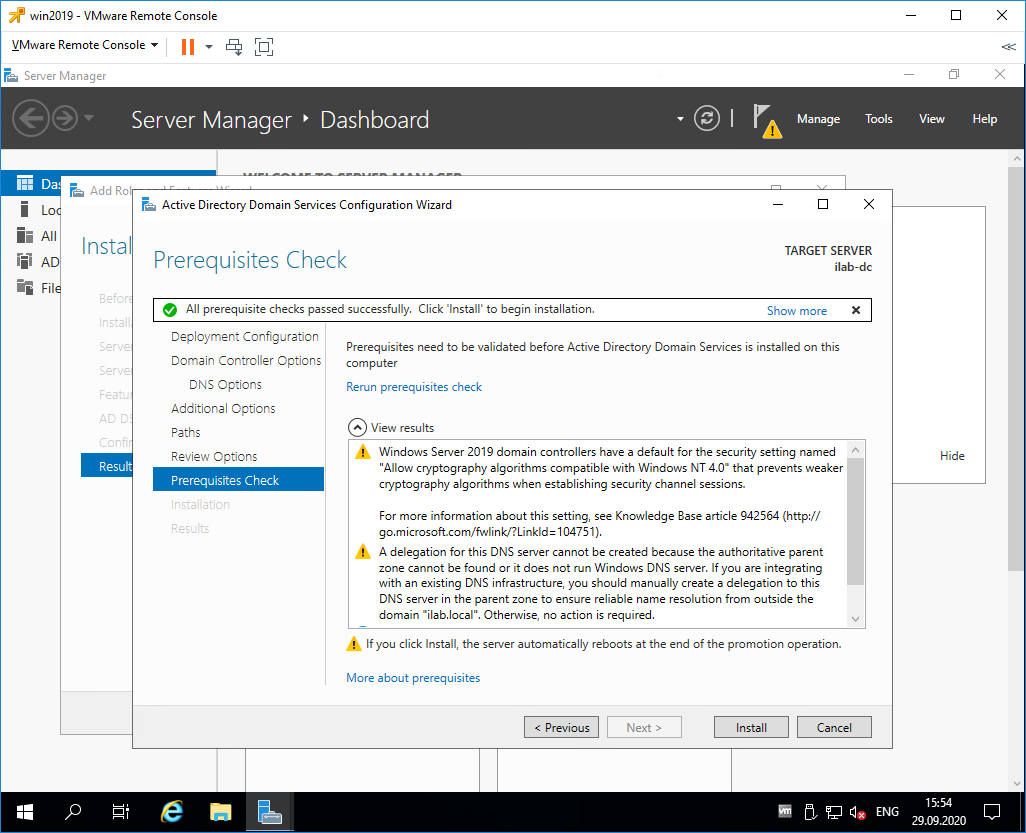
Проверки прошли успешно, есть два незначительных предупреждения про DNS, которое мы игнорируем и про безопасность, тож игнорируем. Пытался пройти по предложенной ссылке, она оказалась нерабочей.
Для начала установки роли контроллера домена нажимаем Install.
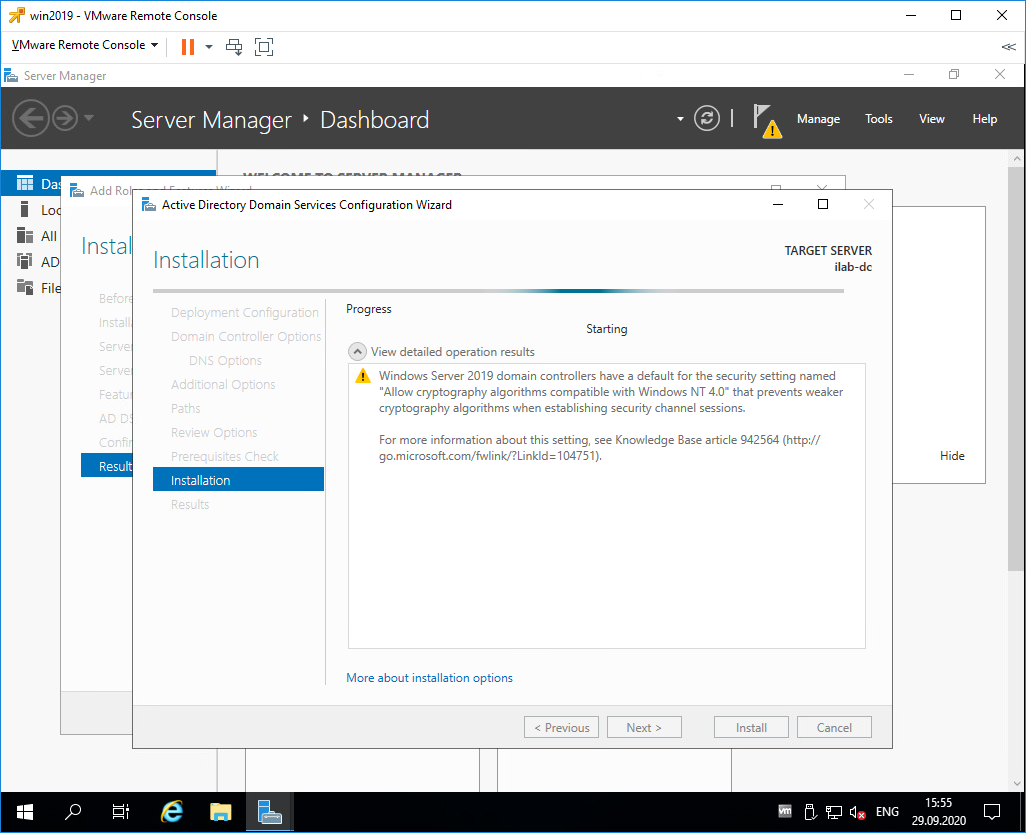
Начинается процесс установки.
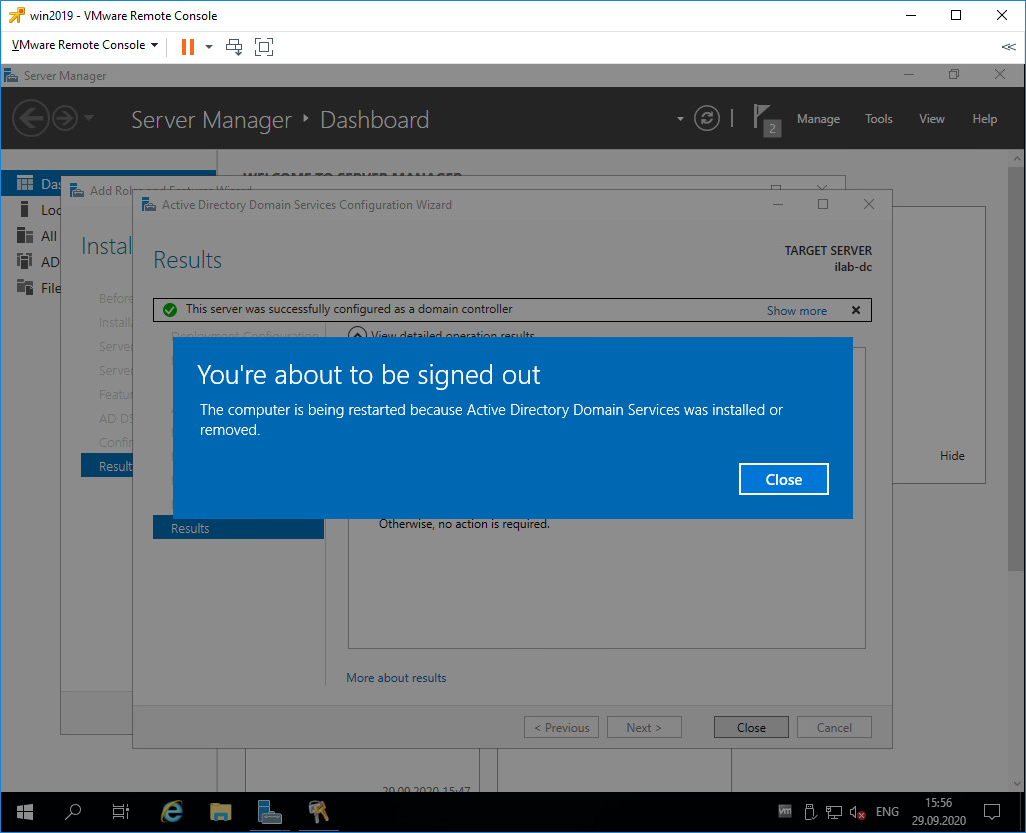
Сервер будет перезагружен, о чём нас и предупреждают. Close.

Дожидаемся загрузки сервера.
Первоначальная настройка контроллера домена
Наша учётная запись Administrator теперь стала доменной — ILAB\Administrator. Выполняем вход.
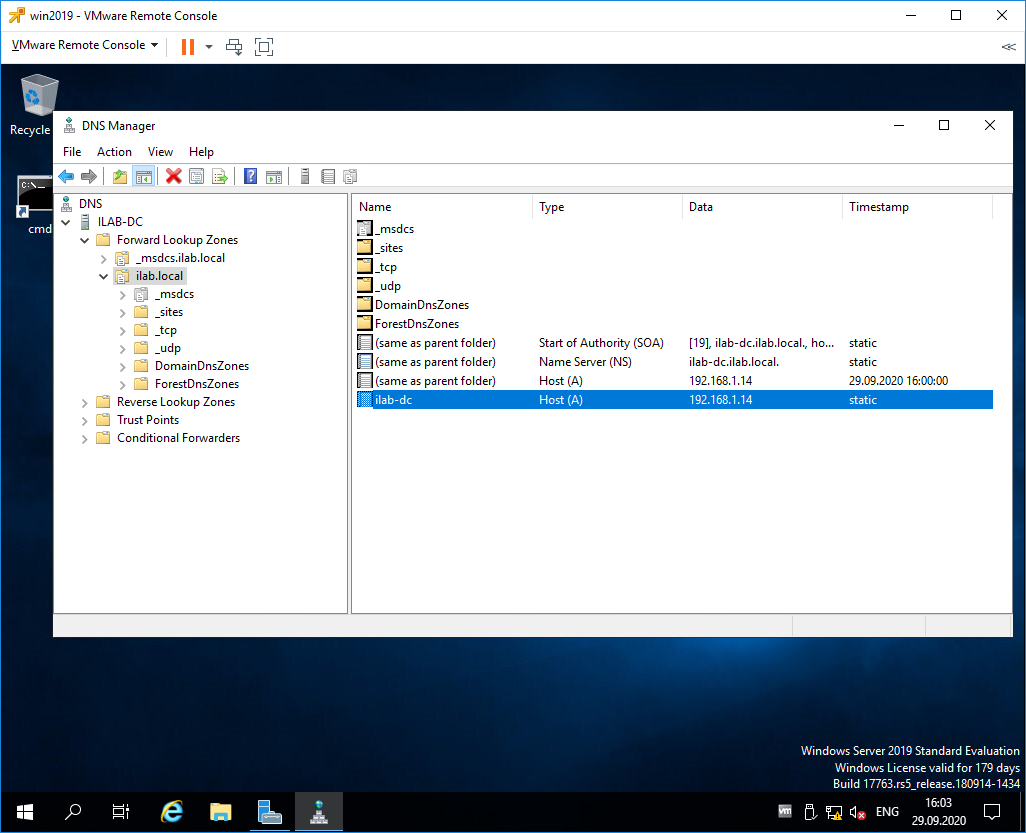
Видим, что на сервере автоматически поднялась служба DNS, добавилась и настроилась доменная зона ilab.local, созданы A-записи для контроллера домена, прописан NS сервер.
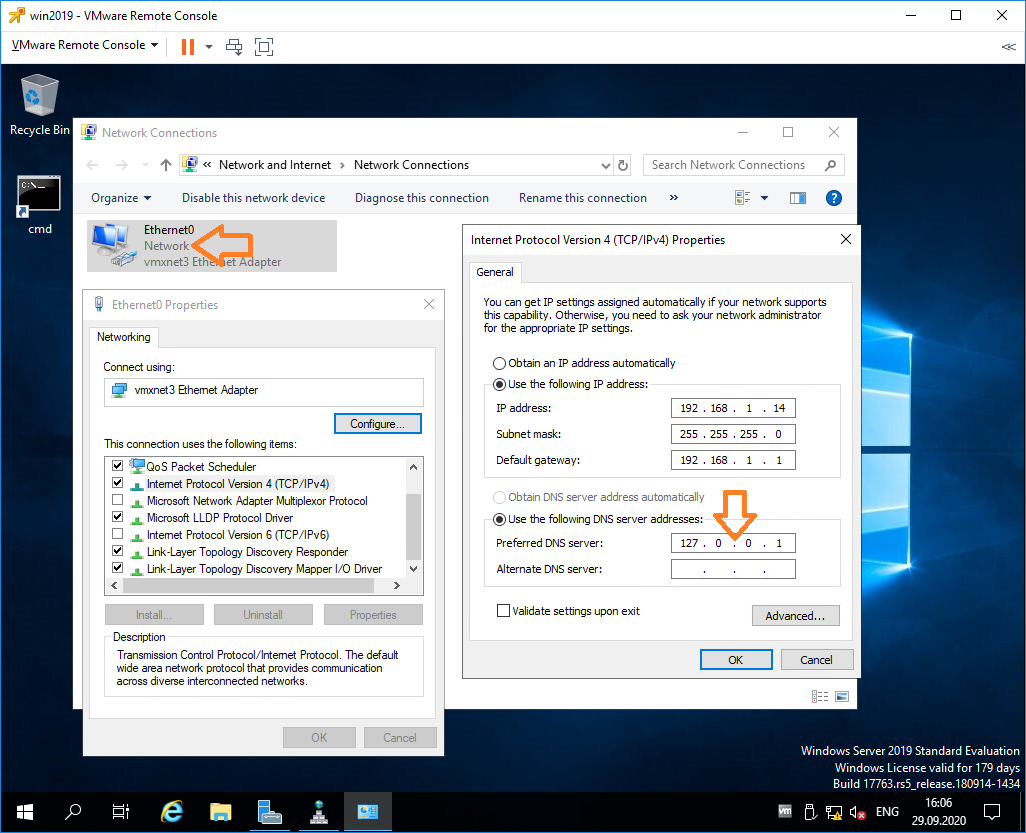
На значке сети отображается предупреждение, по сетевому адаптеру видно, что он не подключен к домену. Дело в том, что после установки роли контроллера домена DNS сервер в настройках адаптера сменился на 127.0.0.1, а данный адрес не обслуживается DNS сервисом.
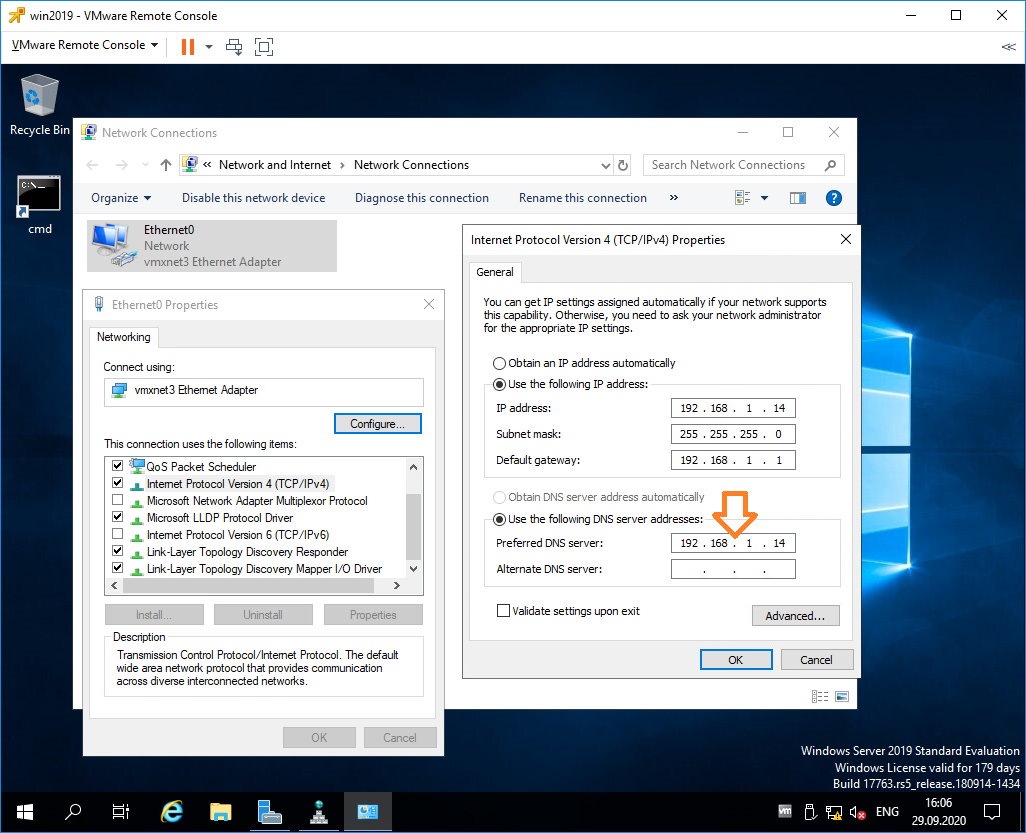
Сменим 127.0.0.1 на статический IP адрес контроллера домена, у меня 192.168.1.14. OK.
Теперь сетевой адаптер правильно отображает домен, предупреждение в трее на значке сети скоро пропадёт.
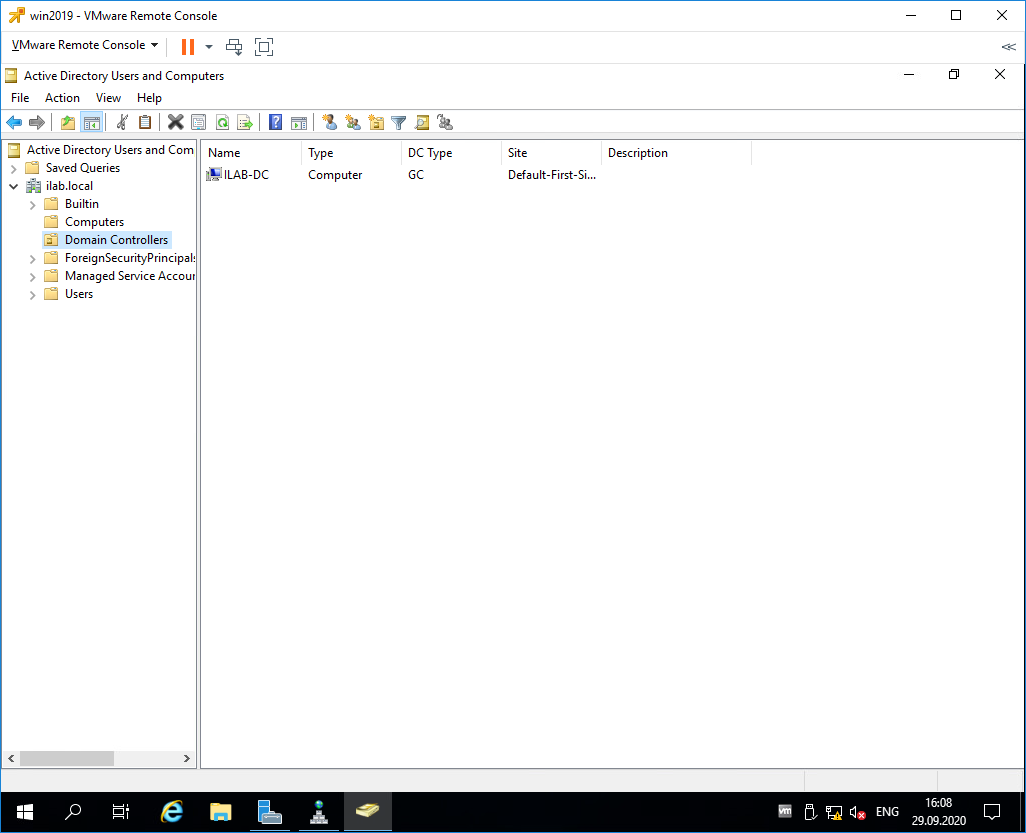
Запускаем оснастку Active Directory Users and Computers. Наш контроллер домена отображается в разделе Domain Controllers. В папкe Computers будут попадать компьютеры и сервера, введённые в домен. В папке Users — учётные записи.

Правой кнопкой на корень каталога, New > Organizational Unit.
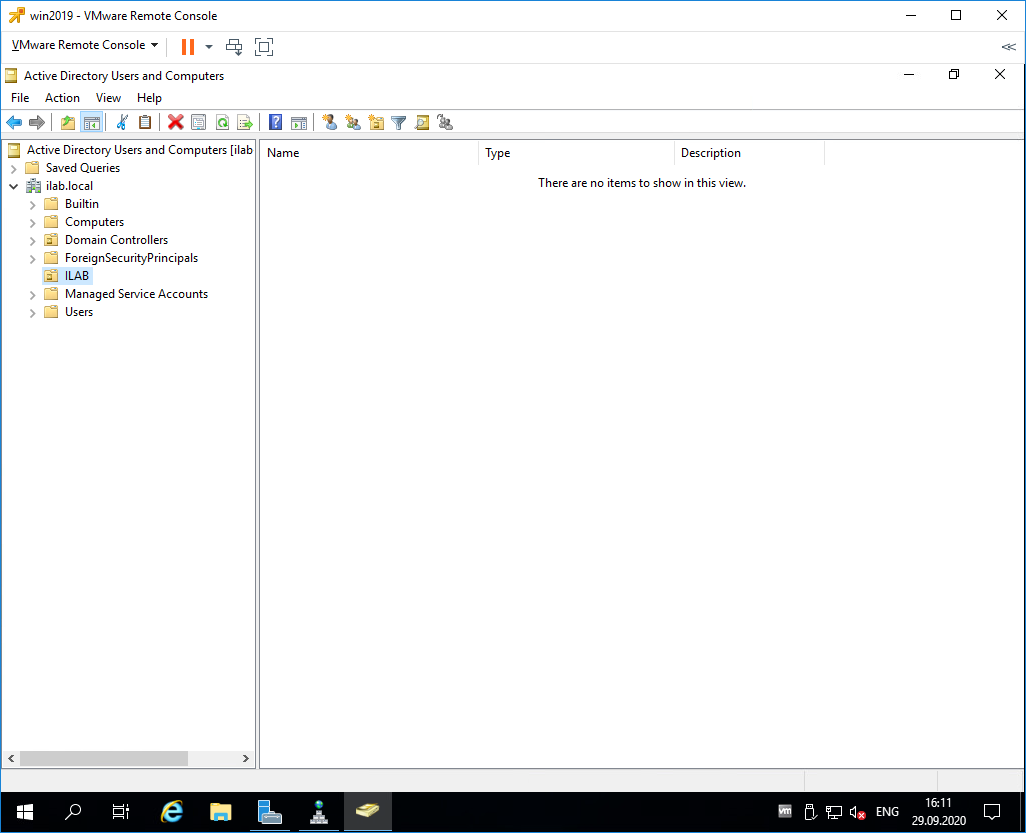
Создаём корневую папку для нашей компании. При создании можно установить галку, которая защищает от случайного удаления.

Внутри создаём структуру нашей компании. Можно создавать учётные записи и группы доступа. Создайте учётную запись для себя и добавьте её в группу Domain Admins.
Рекомендуется убедиться, что для публичного сетевого адаптера включен Firewall, а для доменной и частной сетей — отключен.
Article :: KB00015
Microsoft Active Directory is a critical service for any domain architecture, and the server which holds these services are called Domain Controllers.
Today, we’ll install and configure the first Domain Controller in the single forest single Domain architecture. Follow the below step-by-step process to install and configure the Domain Controller.
Prerequisite Required
1) VM or Physical Server with Windows Server 2019 installed (we are using Server with Desktop Experience installation option)
2) Assign a static IP address to the server that we promote as Domain Controller.
3) As we’ll configure Active Directory-integrated DNS, therefore change the DNS settings in the network interface and set the same server IP address as the primary DNS server.
Step 1: Install Active Directory Domain Services (ADDS)
Log into your Windows Server 2019 with administrative credentials. Open Server Manager → click on Dashboard → click on Add roles and features.

The «Before you begin» tab contains some important informations. Please go through it and click «Next«.

In the «Installation Type» tab choose Role-based or Feature-based installation and click on the Next button.

In the Server Selection tab, please select the destination server on which the role will be installed. Please verify the hostname and the IP address points of the selected server. Click Next to continue.

In the Server Roles tab, put a tickmark for «Active Directory Domain Services» (you can select the DNS Server role as well, as we will configure AD integrated DNS server. If not selected, during installation it will automatically select and install the DNS Role).
Then, it will prompt to show you the associated features for the role. Click on Add Features to add those. Then click Next to continue.


In the Features tab, the basic features for this required role are already selected by default. Click Next to install continue.

In the next window, it gives brief information about the «Active Directory Domain Services» service. Click next to proceed.

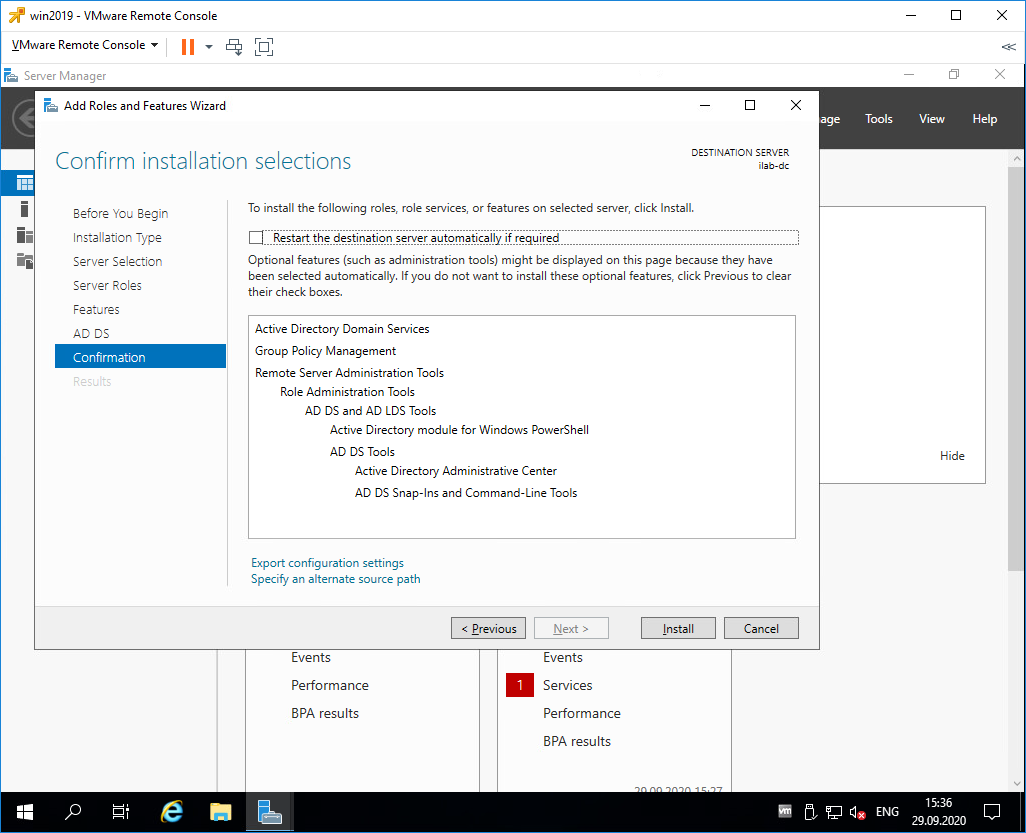
In the Confirmation tab, verify the selections and click on the Install button. You may or may not select the option «Restart the destination server automatically if required». It is always a best practice to restart the server post-installation.

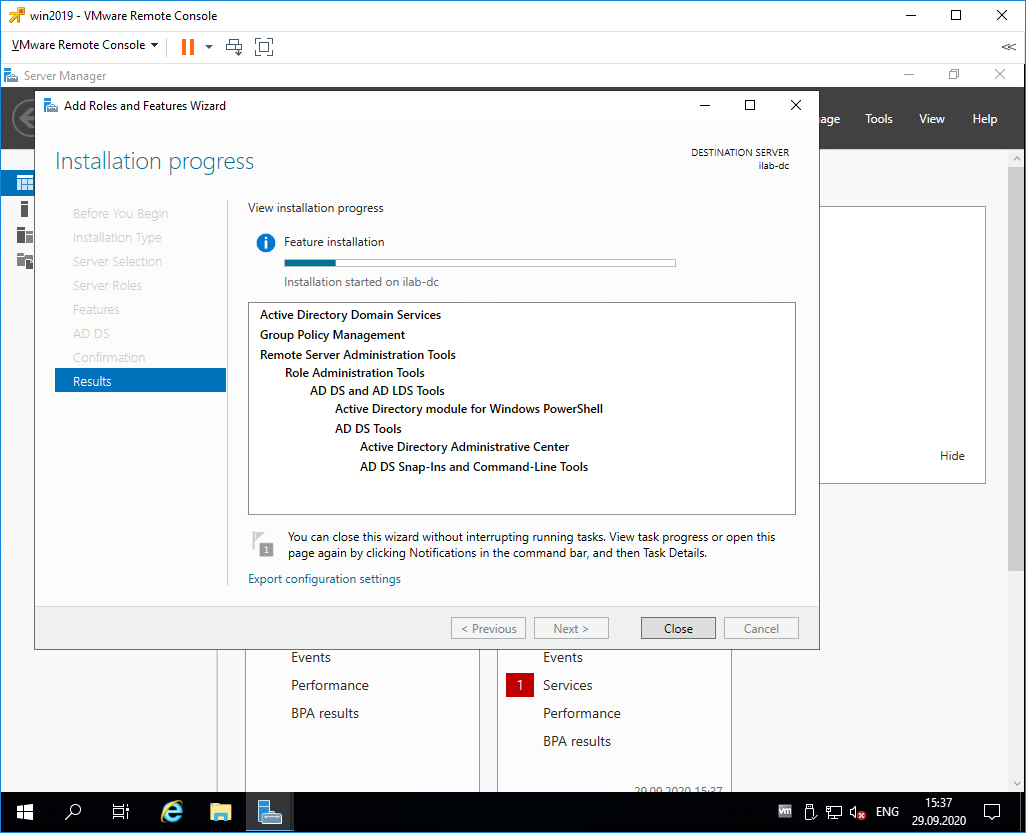
Once done, it will start the installation process and you can check the same in the Results tab.

Step 2: Promote the server into a Domain Controller
Once the ADDS role installation completes, click on the option «Promote this server to a Domain Controller» (highlighted in the below image). Alternately, you will see a notification flag next to the Manage menu. From there also you can select «Promote this server into a domain controller», this will start the configuration process.

It will open the «Active Directory Configuration Wizard». Now, from the Deployment Configuration tab, select «Add a new forest» (as I am configuring a new Forest and it is my first domain controller). Provide a Root Domain name, mine is «VirtualGyanis.Com» (you have to put your domain name here). Then, click on Next to continue.
Note: If you are adding this domain controller into an existing domain/forest you can choose the relevant option accordingly.

In the Domain Controller Option tab, select a Forest functional level and a Domain functional level as per your environment.
Since this is the first domain controller in the forest, please select the DNS Server (as we are configuring AD integrated DNS) and the Global Catalog (GC) checkboxes.
Then, enter the Active Directory Restore Mode (DSRM) password, this is used to retrieve/restore Active Directory data. Then, click Next to continue

Since we have configured an AD-integrated DNS server, you can ignore the DNS Delegation warning as shown in the below screen. Then, click Next to continue.

In the Additional Options tab, enter a NetBIOS name for your domain. It is suggested to keep the NetBIOS name the same as the root domain name (by default, it will fetch the domain name only). Then, click Next to continue.

In the Path tab, you have to mention the Database (NTDS Database), LOG files and SYSVOL folders path. You can change the default path as per your organization security policies. I have kept them default. Now, click Next to continue.

In the Review Options tab, you will review the configuration. If everything is as per your need, you can click Next to proceed or otherwise you can go back and change the required setting as per your need and then proceed further.
You can also view the powershell script for future deployment. The below-mentioned script is from my environment.
Note: Always test your PowerShell scripts in a test environment, before running in a production environment.
##############################################
# Windows PowerShell script for AD DS Deployment #
##############################################
Import-Module ADDSDeployment
Install-ADDSForest `
-CreateDnsDelegation:$false `
-DatabasePath «C:\Windows\NTDS» `
-DomainMode «WinThreshold» `
-DomainName «VirtualGyanis.Com» `
-DomainNetbiosName «VIRTUALGYANIS» `
-ForestMode «WinThreshold» `
-InstallDns:$true `
-LogPath «C:\Windows\NTDS» `
-NoRebootOnCompletion:$false `
-SysvolPath «C:\Windows\SYSVOL» `
-Force:$true
############### End of Script ####################

In the Prerequisites Check tab, it will do prerequisite check.

Once prerequisite checks completed successfully, it will enable/highlight the Install option. Then, click on Install button to start the installation process.

Once installation completed successfully, you will get the below confirmation message. Close this window and restart the Server.

Once server rebooted, you have to login with your domain Admin credentials. By default, the local admin account will promoted as a Domain Admin account. Login and verify the health of the Domain controller. You can run DCDIAG command to check the health.
You can also verify the settings/configurations from the Active Directory tools like Active Directory Users and Computers or Active Directory Domains and Trusts etc. You will get all the Active Directory tools in the folder named Administrative Tools on the Start menu. Go and explore the tools.

If you liked this article, do share the same. You can also Buy me a Coffee using Paypal at «paypal.me/duttaavijit», This is purely a volunteer effort. THANK YOU !!!
You can also refer to the below books for further knowledge enhancement.
Нет, он не должен быть настроен как контроллер домена, но может быть настроен так.
В блоге Microsoft Windows Server 2019 Essentials об этом говорится следующее:
При настройке в качестве контроллера домена Windows Server 2019 Essentials должен быть единственным контроллером домена, должен выполнять все роли Flexible Single Master Operations (FSMO) и не может иметь двусторонние отношения доверия с другими доменами Active Directory.
Короче говоря, его настройка в качестве контроллера домена будет иметь радикальные последствия для сети, в которой он находится.
Я настоятельно рекомендую пропустить Windows Server 2019 Essentials и получить вместо этого Windows Server 2016 Essentials.
Статья Windows Server 2019 Essentials — конец эпохи! говорит это:
Хотя Microsoft по-прежнему будет выпускать SKU Essentials для Windows Server 2019, она будет полностью лишена всего, что мы признаем частью Windows Server Essentials в его нынешнем виде.
По сути, Microsoft выпускает свой первый (и последний) несущественный выпуск Windows Server Essentials, в котором полностью отсутствует все, даже отдаленно напоминающее Windows Server Essentials, как мы его знаем в настоящее время. И очевидно, что без базовых «Essentials» битов больше не будет новых выпусков продуктов WSE RemoteApp или WSE WorkFolders.
Тем, кто хочет продолжить работу на локальном сервере Essentials, я бы предложил собрать как можно больше лицензий Windows Server 2016 (Standard, Datacenter или Essentials), а затем покататься. это связано с этой конкретной версией до тех пор, пока Microsoft будет обеспечивать ее поддержку (см. график обслуживания Windows Server 2016 Essentials).