If you wonder how basic network configuration is managed across your environment, today is your lucky day. You’ll learn how to connect to your Microsoft DHCP server and manage all of the common components from DHCP scopes, DHCP policies, DHCP reservations, and DHCP leases!
Not a reader? Watch this related video tutorial!
Not seeing the video? Make sure your ad blocker is disabled.
Prerequisites
This article is a tutorial. If you plan on following along step-by-step, you will need the following:
- A Microsoft DHCP Server in an Active Directory environment- This tutorial uses Windows Server 2019, but any server from 2008R2 onwards would work. The server is called dc01.stevesherry.com.
- An Active Directory account that is a member of the DHCP Administrators group or equivalent.
DHCP Scopes
At its simplest, a Microsoft DHCP server is a machine on a network that hands out IP addresses to clients. It ensures all clients receive IP addresses so they can communicate on the network. It does this through DHCP scopes.
A DHCP scope represents contains various components such as:
- Assignable IP addresses for a particular group of devices (address pools)
- A client’s DNS server and default gateway
- IPs to only assign to certain devices (DHCP reservations)
- Address pools (groups of assignable IP addresses)
The DHCP scope is a core element on a network and that allows you to configure network settings common to all of the clients on that network.
Creating a DHCP Scope via Server Manager
Let’s kick off this tutorial by learning how to add DHCP scopes to an existing DHCP server. For this first demo, you’re going to learn how to set up a DHCP scope via the Windows Server Manager.
Assuming you’re at the Windows desktop of a test DHCP server:
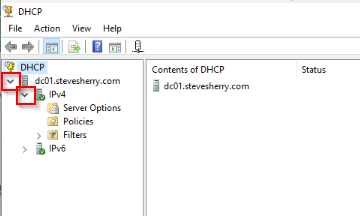
1. Click on your Start menu and type dhcpmgmt.msc to open the DHCP Microsoft Management Console (MMC).
2. Once the DHCP MMC opens, click on the dropdown to the left of the server name and then on IPV4.
Microsoft DHCP Server supports both IPv4 and IPv6 address allocation to clients. This tutorial will only focus on IPv4 scopes.
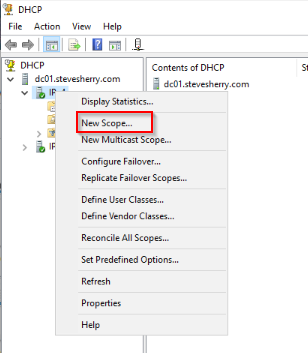
3. Right click on IPv4 and select New Scope to start the New Scope Wizard, and click Next on the introduction screen.
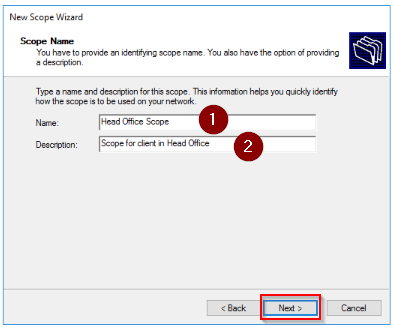
4. Provide a name of your choice for the Name and Description. This tutorial will create a scope for the company’s head office. Click Next when complete.
Scopes are commonly assigned to physical buildings or sometimes IP subnets.
5. Next, define an IP Address Range indicating the IP address range you’d like to assign to the DHCP server’s clients. The tutorial will ensure the first IP address allocated to clients will be 10.0.0.100 and the last IP address will be 10.0.0.200. These start and end IP addresses create the scope’s address pool which you’ll learn about later.
Also on this screen, enter a CIDR Length or Subnet mask which will be assigned to all clients.
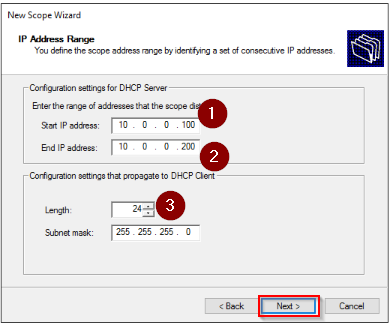
It is common to deliberately leave the beginning and end of the address pool free to allow for any statically assigned addresses.
6. Click Next to skip past the Add Exclusions and Delay step.
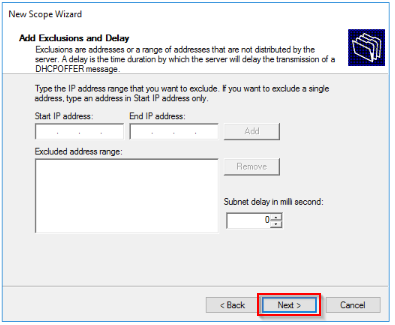
If you know of one or more IP addresses that are already in use within the defined address range, an exclusion prevents the DHCP server from attempting to assign a particular IP address in its address pool.
7. For now, click Next to accept the default Lease Duration. You’ll learn a lot about DHCP leases later in this tutorial.

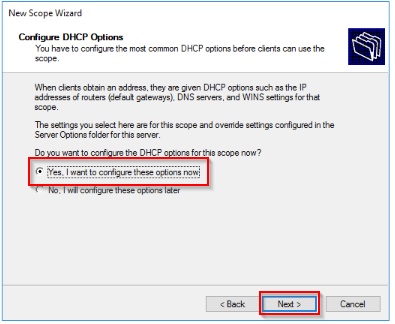
8. Leave the default setting of Yes, I want to configure these options now and click Next on the Configure DHCP Options step. You will configure various scope options shortly in this tutorial.
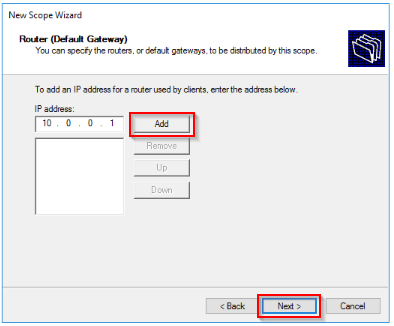
9. Next, provide an IP address of 10.0.0.1 for the Router (Default Gateway). Once the DHCP scope is available to clients, the DHCP server will hand out this IP address as the clients’ default gateway. The default gateway is the primary way clients can communicate with other networks or the Internet in general.
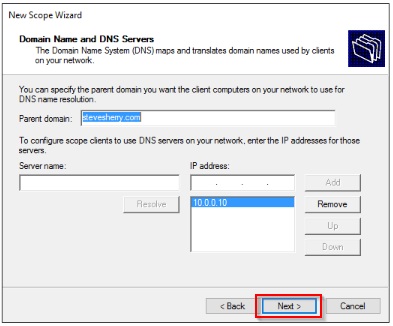
10. Since this tutorial is using an environment that has a DNS server located at 10.0.0.10, provide the IP address on the Domain name and DNS Servers step. This IP address will be handed out as the DNS client for DHCP clients to translate names into IP addresses.
The Parent domain should automatically populate based on the Active Directory domain the DHCP server is a member of.
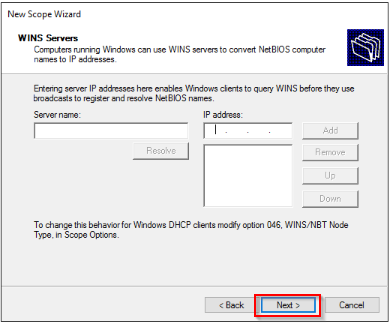
11. If your environment still uses a WINS server, provide its IP address on the WINS Server step. This tutorial does not use one, so click Next to continue.
12. Finally, activate the new DHCP scope and make it available to clients by ensuring that Yes, I want to activate this scope now is selected. Then click Next to continue.

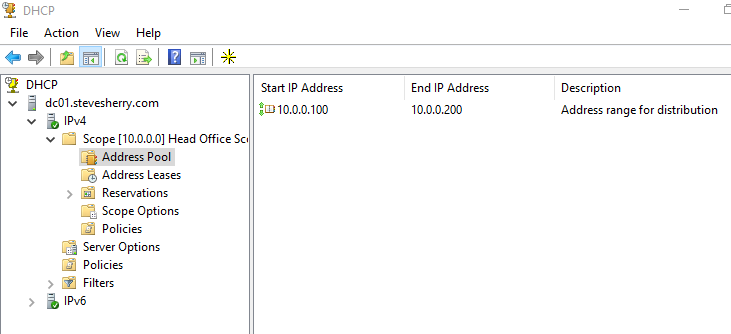
Once all of the above steps are followed, you should now see the new scope under IPv4 as shown below.
Creating a DHCP Scope with PowerShell
If you’re not a fan of the GUI or simply need to automate DHCP tasks, look no further than PowerShell. Let’s now cover the same process as just performed via the Server Manager, only this time with PowerShell.
Assuming you’re at the Windows desktop of a test DHCP server:
1. Open Windows PowerShell as administrator.
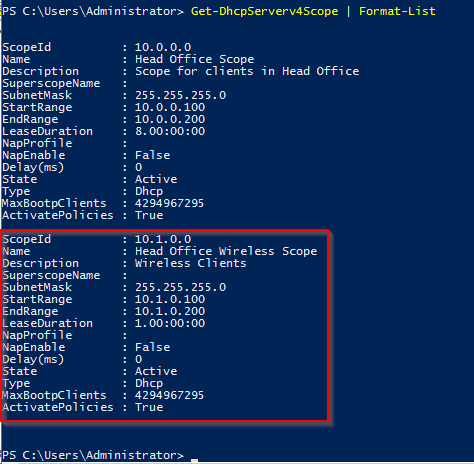
2. Run the Get-DhcpServerv4Scope cmdlet to find all existing DHCP scopes.
As you’ll see in the below example, this server only has the scope that you’ve created using the GUI in the previous steps.

3. Run the Add-DhcpServerv4Scope cmdlet to create a new DHCP scope. Since this cmdlet has many parameters, save time by defining each parameter in a PowerShell hashtable and using splatting to pass all parameters to the cmdlet.
This cmdlet will create a DHCP scope called Head Office Wireless Scope that, when activated, will hand out IP addresses 10.1.0.100 – 10.1.0.200 with a subnet mask of 255.255.255.0 with a lease that expires after one day (day.hrs:mins:secs).
# Create an IPv4 DHCP Server Scope
 $HashArgs = @{
     'Name' = 'Head Office Wireless Scope';  # This sets the name of the wireless scope
     'Description' = 'Wireless Clients';     # This is the human-readable description of the scope
     'StartRange' = '10.1.0.100';            # Specifies the starting IP address in the scope
     'EndRange' = '10.1.0.200';              # Specifies the end IP address in the scope
     'SubnetMask' = '255.255.255.0';         # Specifies the subnet mask of the scope
     'State' = 'Active';                     # Activates the scope
     'LeaseDuration' = '1.00:00:00';         # Specifies the length of the lease duration
 }
 Add-DhcpServerv4Scope @HashArgs
4. Now, run Get-DhcpServerv4Scope again to verify PowerShell successfully created the DHCP scope.
Piping output to the
Format-ListPowerShell cmdlet allows you to see each property name and it’s value rather than a truncated row.
Managing Scope Options
Once you’ve created a scope, you can modify any attribute you’d like. Microsoft DHCP has an area specifically called Scope Options which allows you to change some common DHCP attributes sent to DHCP clients.
Let’s now walk through the available scope options and cover their affect on your clients.
While in the DHCP MMC:
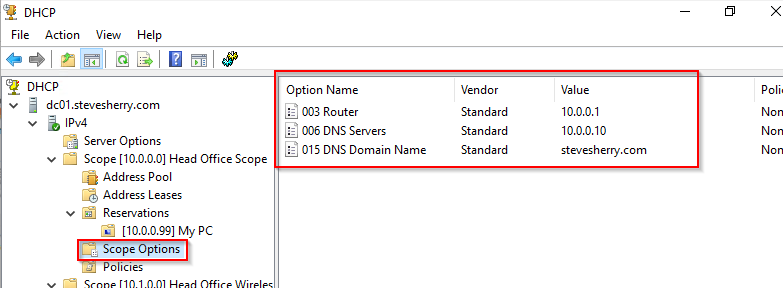
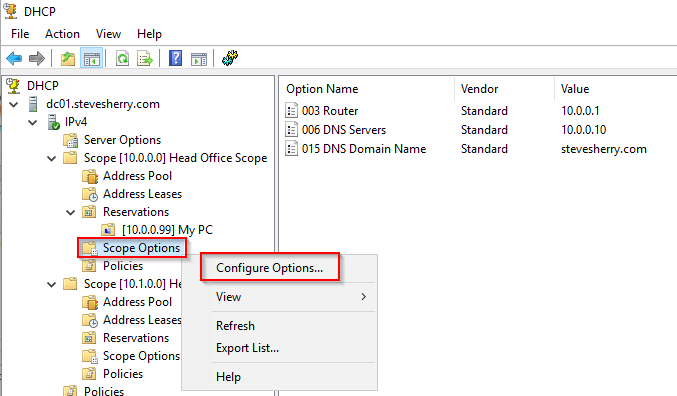
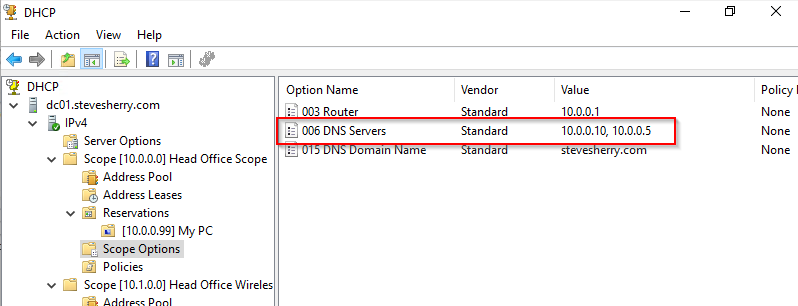
- Click on Scope Options under <server name> —> IPv4 —> Scope [X.X.X.X]. In the screenshot below, you can see the scope previously created. Here you can see the Router, DNS Servers, and DNS Domain Name that this scope will hand out to DHCP clients.
2. Right click on Scope Options and choose Configure Options to navigate to the Scope Options box to change these options.
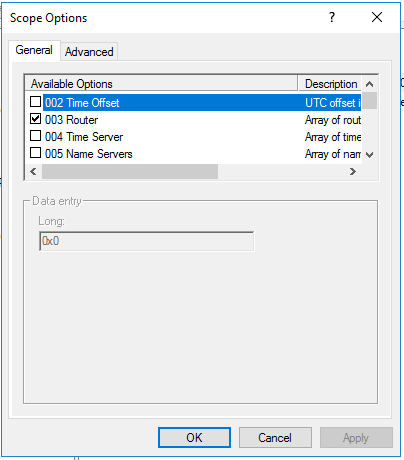
3. Scroll down the available options under the General tab. You’ll see dozens of options that the DHCP server can assign to clients.
If you have a specific setting that is not available to you by default, you’ll need to follow the vendor’s specific information using the Advanced tab to create a custom Option.
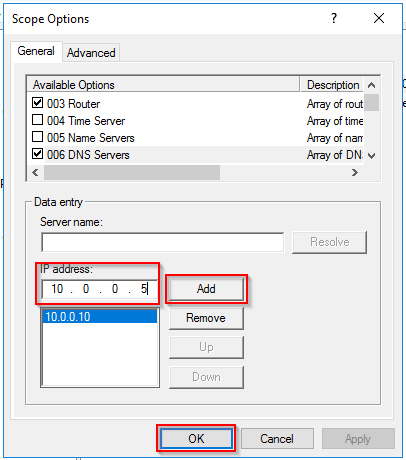
4. Perhaps you forgot to add one of your DNS servers. Find the 006 DNS Servers option, enter it’s IP address, click Add, and OK. This tutorial will be using the IP address of 10.0.0.5.
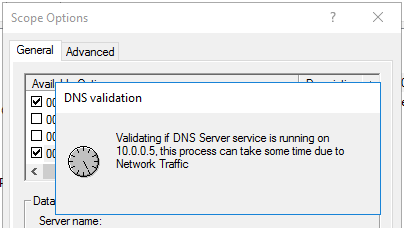
Once you click OK, Windows will then validate if DNS services are available on your provided IP address.
5. Return to the main screen and review the Options pane. You’ll now see two IP addresses listed under 006 DNS Servers.
DHCP Leases
An important part of DHCP is the lease. A device is known to “lease” an IP address from a DHCP server for a certain period of time (lease time).
Network administrators typically configure DHCP servers to lease IP addresses based on different use cases. For example, for devices on a wired connection that rarely leave the network, administrators may assign a longer lease time like eight days. If the device never leaves the network, it’s not efficient to go through the lease renewal process.
On the other hand, if a wireless device roams on and off the network several times a week, administrators may assign a shorter lease period (12-24 hours) to save available IP addresses for other devices.
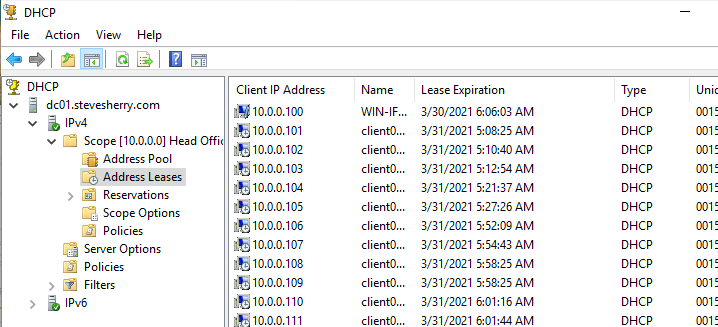
While in the DHCP console, you can find all current leases in <server name> —> IPv4 —> Scope [X.X.X.X] —> Address Leases as shown below.
Once on the Address Leases window, you’ll see each IP address that the DHCP server has assigned along with the Lease Expiration date.
Setting the Microsoft DHCP Lease Period
Let’s now discover how to set the DHCP lease period at the server level for DHCP clients.
While still in the DHCP console on the DHCP server:
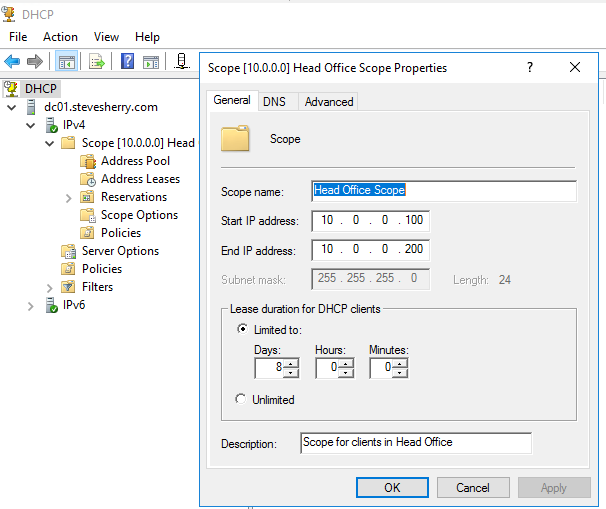
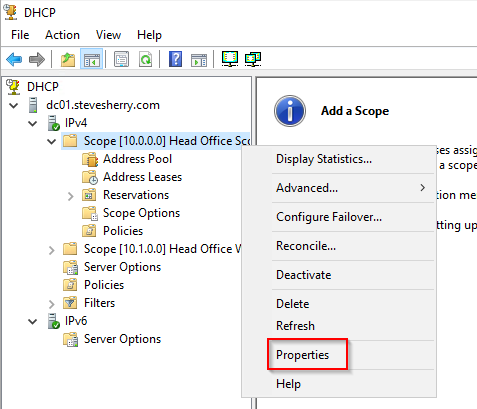
1. Find the scope containing the IP address pool you’d like to look at, right-click on the scope name, and select Properties.

2. Within the Properties window, you’ll now see a Lease duration for DHCP clients. This setting is the DHCP lease time for all IP addresses in that scope.
The default DHCP lease period on Microsoft DHCP servers is eight days, but it can be updated to any period of time to suit the business needs.
3. Click Cancel to close the Properties box.
Finding Assigned DHCP Lease Times
DHCP services can only assign one IP address per device. How does the DHCP server know when it can re-use an IP address in the pool? The DHCP lease time.
If a device doesn’t renew its dynamically assigned IP address within the lease time, the lease expires and is available to other devices to lease.
How do you actually discover the lease time on a device? Unfortunately, each operating system (OS) has a different way of exposing the DHCP lease time. This tutorial will cover how to determine lease time on Windows 10.
In Windows 10, you see your DHCP lease time on the command-line either with the command prompt (cmd.exe) or PowerShell. This tutorial assumes you are an IT pro so let’s use PowerShell.
To find a Windows DHCP client’s lease time, on the Windows client console, open Windows PowerShell and run the ipconfig /all command.

You’ll see the time the lease was made (Lease Obtained) and when it expires (Lease Expires). The Lease Obtained field is the exact time the DHCP server assigned the IP address to this device. The Lease Expires field indicates the time the device will ask the DHCP server to renew its lease.
Subtract the Lease Expires value from the Lease Obtained value and you have your DHCP lease time.
DHCP Address Pools
Once you’ve configured the scope, you already have an address pool. The address pool is the range of IP addresses the DHCP server will assign to clients in a lease. Let’s navigate through the address pool already set up.
Updating the Address Pool
IP address scopes are not fixed in stone. It’s inevitable that after some time you’ll need to expand the address pool to allow more devices to connect to your network. Rather than creating a new address pool, it’s often easier to expand an existing pool. To do that:
1. Right click on <server name> —> IPv4 —> Scope [X.X.X.X] and click on Properties to open the Scope Properties configuration wizard.
2. Update the fields to increase the range of IP addresses for your existing address pool so that more addresses are available for any future allocation. Once complete, click OK.
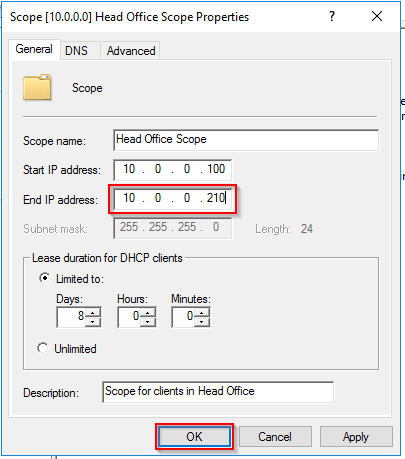
3. Click on <server name> —> IPv4 —> Scope [X.X.X.X] —> Address Pool to bring up the address pool. Notice below that it now shows the expanded Address Pool in the scope.

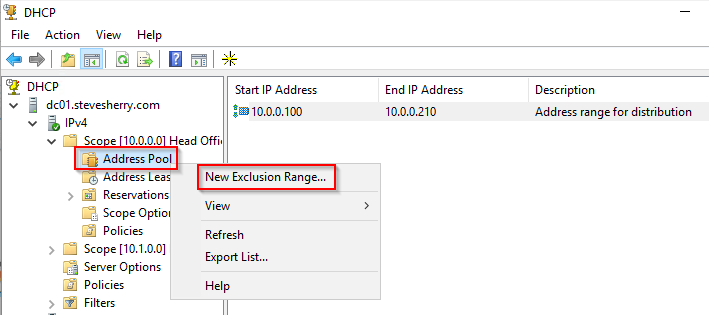
Adding Exclusion Ranges to the Address Pool
Imagine that you need to create a small list of IP addresses within the address pool that are not assigned to any new devices on the network. Exclusion ranges are how you’d achieve this.
Assuming that you still have the DHCP console open:
1. Click on <server name> —> IPv4 —> Scope [X.X.X.X] —> Address Pool to bring up the address pool.

2. Right-click on Address Pool and click on New Exclusion Range to open the Add Exclusion wizard.
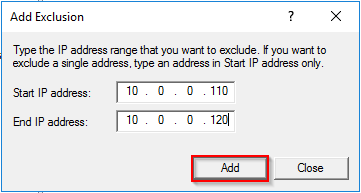
3. Complete the fields to create a small range of IP addresses within your existing address pool that will not be included in any future allocation of leases. Once complete, click Add.
4. Back on the DHCP console, refresh the screen and note that the exclusion is now in place.
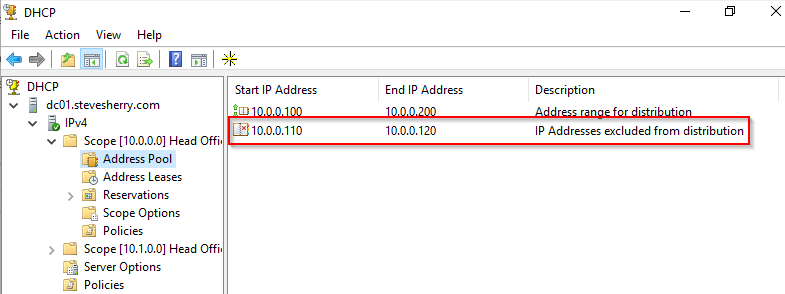
At this point, whenever a new device connects to the network, your DHCP server will not lease an address from within this exclusion range.
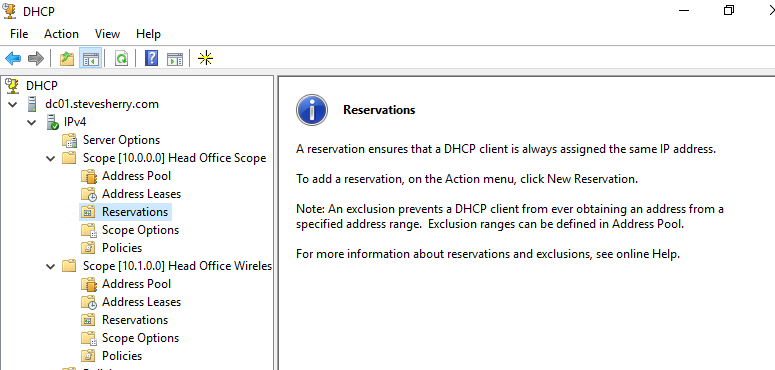
DHCP Reservations
IP addresses are, by their nature, dynamic. Most of the time this is OK as you typically don’t care what the IP address of your PC is. Occasionally you’ll need to manually specify the address of a device such as an admin laptop or a printer.
When you need to statically assign an IP address to a particular device, use a DHCP reservation.
Adding Reservations
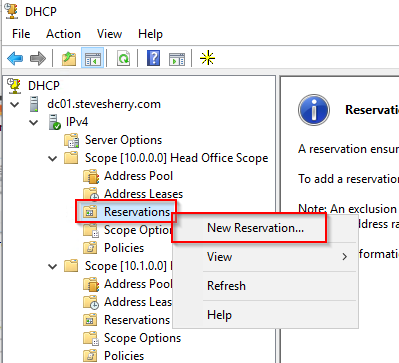
Let’s start out by adding a reservation to a scope previously created. While in the DHCP console on the DHCP server:
1. Select <server name> —> IPv4 —> Scope [X.X.X.X] —> Reservations to open the Reservations window. You’ll see no reservations exist.
2. Right-click on Reservations and then choose New Reservation to open the New Reservation input box.
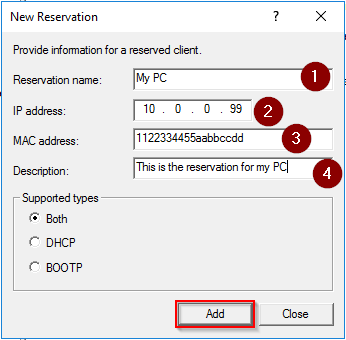
3. Complete the fields with details that are relevant to a device you’d like to assign a “static” IP address to.
- The Reservation name – This name is commonly as a hostname for the device or other identifying attribute.
- The IP address to reserve for the device.
- The MAC address of the device
Find the MAC address of a device from either the label that is on the back, or by using these methods.
- The Description – Be sure to make sense here so that other administrators can understand what this reservation is for.
Once complete, click Add.
4. Back on the DHCP console, refresh the screen and note that the reservation is now in place.
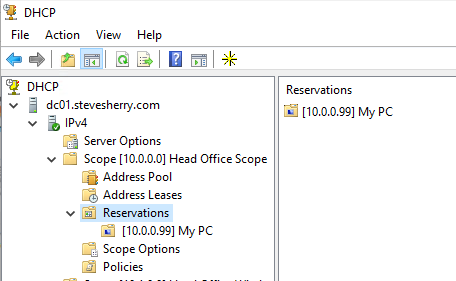
At this point, when the device that has the MAC address you’ve provided in the reservation goes through its DHCP lifecycle, it will be assigned the expected reserved IP address.
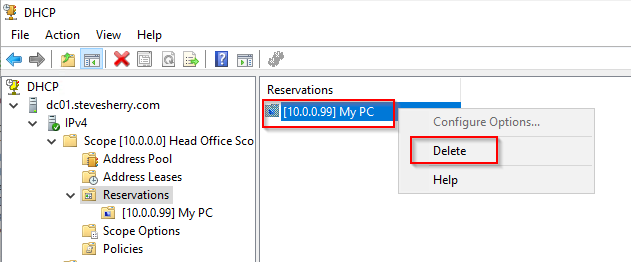
Removing Reservations
As part of the general lifecycle of devices within your organization, you’ll occasionally have to retire old devices, some of which will have DHCP reservations.
Assuming you’re still in the DHCP console, removing DHCP reservation requires a right click on the reservation and clicking Delete.
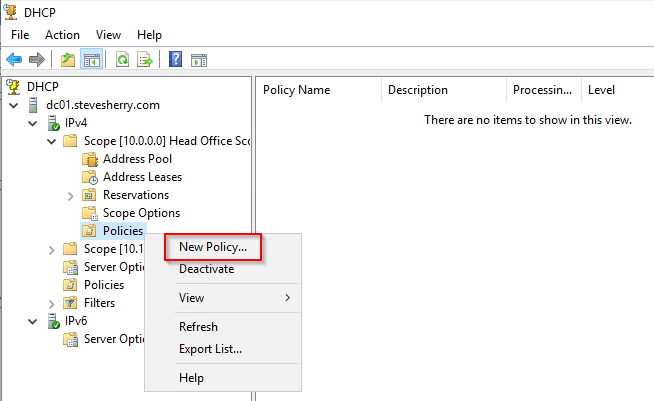
DHCP Policies
Previously, you learned how to set reservations by MAC address. Although reservations are useful, they don’t allow you to assign addresses or specific scope options based on other criteria. Using a DHCP policy, you can define various conditions a client must meet to assign an IP address.
Using a DHCP policy, you can assign a specific category of devices a different DNS server, default gateway, or TFTP server, for example.
To create a DHCP policy:
1. Right click <server name> —> IPv4 —> Scope [X.X.X.X] —> Policies and click on New Policy to open the Policy configuration window.
2. Complete the fields with details of the Policy Name and a Description for the policy. Click Next, once complete.

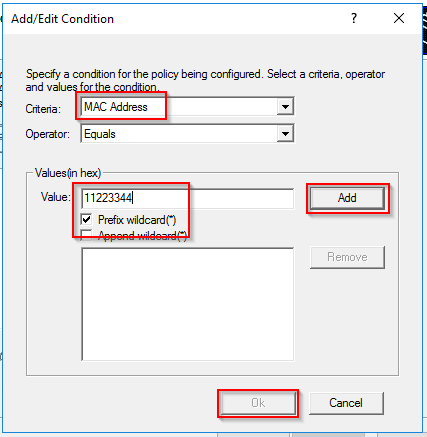
3. Click on the Criteria dropdown and notice the many conditions you can check for on a client. For this tutorial, select MAC Address and add a relevant Value, selecting Wildcard.
Click Add, and then OK to move along.
4. Either Add another condition for the policy or click Next to continue.
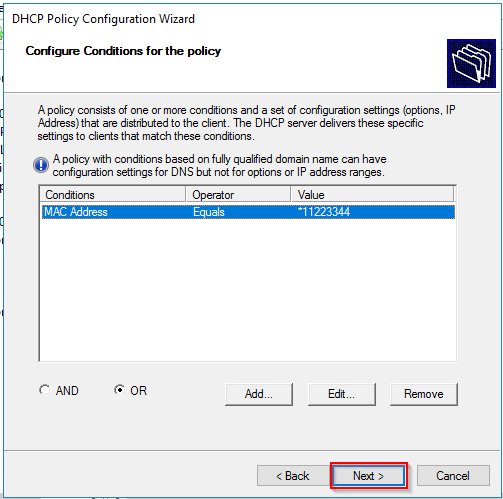
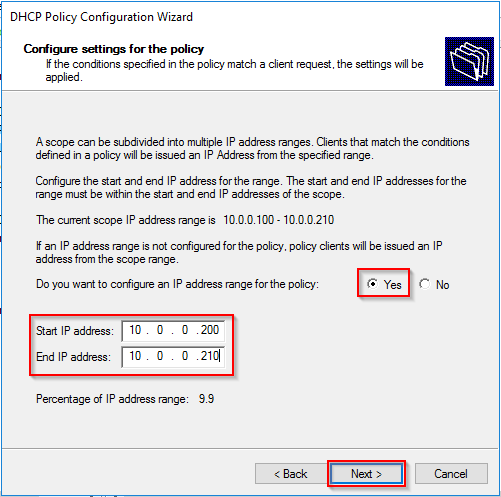
5. Next, add a subset of IP addresses from within your existing range. The DHCP server will assign devices matching the conditions defined earlier an IP address from this range. Once complete, click Next.
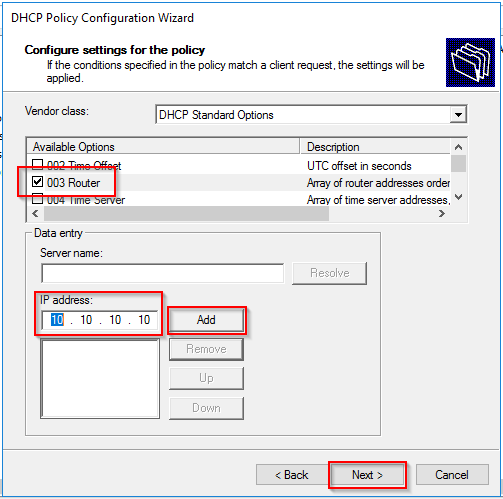
6. Now it’s time to define the options the client will receive if it meets the condition. For this tutorial, select 003 Router to modify the default gateway clients matching the condition will receive.
Enter an IP address for the new gateway, click Add and then Next.
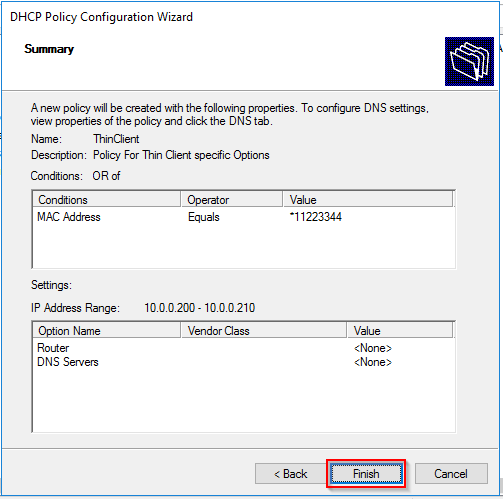
7. Review the screen and confirm that the details are correct. Click Finish to close the wizard.
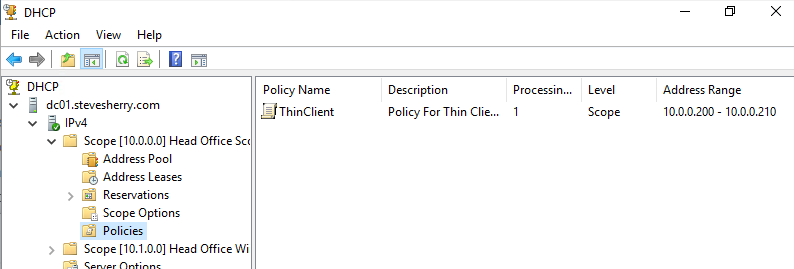
8. Refresh the screen to confirm that the new policy is in place.
Conclusion
In this article, you’ve covered a lot of ground when it comes to DHCP. You’ve learned how to set up DHCP scopes and everything that comes with them. You also learned how DHCP assigns IP addresses and other information to clients.
Armed with all of this new information, you can now confidently tackle DHCP like a champion. How are you planning on using this knowledge?
The default lease duration on a Windows DHCP server is 8 days. This duration is set to ensure that IP addresses are efficiently managed and prevent IP address exhaustion. Here are the steps to check and modify the lease duration on a Windows DHCP server:
1. Open the DHCP console: Go to «Start» -> «Administrative Tools» -> «DHCP«.
2. Expand the server and locate the relevant DHCP scope that you want to modify.
3. Right-click on the scope and select «Properties«.
4. In the «Lease duration for DHCP clients» section, you can view the current lease duration.
5. To modify the lease duration, enter the desired value (in hours, days, or weeks). Note that the lease duration cannot exceed 999 days.
6. Click «OK» to save the changes.
It’s worth mentioning that while the default lease duration is set to 8 days, DHCP clients usually attempt to renew their lease halfway through the lease period. This allows for the renegotiation of the lease and prevents IP addresses from being released back to the DHCP pool prematurely.
Remember, adjusting the lease duration should be done carefully. A shorter lease duration may cause increased DHCP network traffic, while an excessively long lease duration can lead to IP address inefficiency. It’s essential to strike a balance based on the specific network requirements and the number of devices connecting to the DHCP server.
Video Tutorial: What is the default lease time for DHCP Windows?
What happens if the DHCP lease time is too short?
If the DHCP (Dynamic Host Configuration Protocol) lease time is set too short, it can cause several issues and inconveniences for network users and administrators. Here are some reasons and potential consequences of having a DHCP lease time that is too short:
1. Frequent IP address reassignment: A short lease time means that IP addresses are assigned dynamically and need to be renewed frequently. As a result, network devices may need to constantly request new IP addresses, causing interruptions in network connectivity. This can affect productivity and user experience.
2. Increased DHCP server load: With shorter lease times, DHCP servers receive a higher number of renewal requests, requiring more processing power. This increased load can potentially result in slower response times or even server overload in large networks.
3. Network congestion: Renewing IP addresses frequently can lead to increased DHCP traffic on the network. This additional traffic can contribute to network congestion, especially in high-density environments where numerous devices are connected simultaneously.
4. Disruption in ongoing connections: If a device’s lease time expires before it can successfully renew, the device may lose its IP address and experience a temporary loss of network connectivity. This disruption can affect ongoing connections, such as active downloads or streaming sessions, requiring users to reestablish connections.
5. Administrative overhead: In a network with a short DHCP lease time, network administrators may need to handle more frequent DHCP lease management tasks. This can involve monitoring lease expiration, resolving IP conflicts, and manually assigning static IP addresses to specific devices to prevent interruption. This increased administrative overhead can be time-consuming and inefficient.
To mitigate the potential issues caused by a short DHCP lease time, network administrators can consider adjusting the lease duration to better suit their network’s requirements. Finding a balance between IP address utilization, network stability, and administrative overhead is crucial. Longer lease times can reduce disruptions but may result in IP address wastage, while shorter lease times enhance address utilization but can create network congestion and administrative challenges.
The default lease duration on a Windows DHCP server is 8 days. This duration refers to the amount of time a client device can use an IP address assigned by the DHCP server before it needs to renew the lease. However, it’s important to note that the actual lease duration can be customized and changed by the network administrator according to specific requirements and network policies.
To provide a more detailed response, let’s dive into further steps or reasons:
1. Default Setting: The default lease duration of 8 days is set by Microsoft for Windows DHCP servers. This duration strikes a balance between conserving IP address resources while ensuring that client devices don’t frequently lose connectivity due to IP lease expirations.
2. Customization Options: Network administrators have the flexibility to adjust the lease duration to meet the specific needs of their network environment. Shorter lease durations, such as hours or days, can be configured for dynamic networks or environments where devices frequently connect and disconnect. On the other hand, longer lease durations, such as weeks or even months, can be set for more stable networks or devices that are constantly connected.
3. Network Considerations: The lease duration should be determined based on the network’s size, the number of devices, and the expected rate of IP address usage. For larger networks or networks with a high turnover of devices, shorter lease durations may be more appropriate to ensure efficient IP management. Conversely, smaller networks with a steady set of devices may benefit from longer lease durations to reduce network traffic caused by frequent lease renewals.
4. IP Address Pool Management: The lease duration also impacts IP address pool management. Shorter lease durations allow the DHCP server to reclaim unused addresses more quickly, ensuring efficient utilization of available IP addresses. Longer lease durations provide more stability but may result in addresses being allocated to devices that are no longer actively using them.
5. DHCP Lease Renewal Process: When a client’s lease duration approaches expiration, it initiates a lease renewal process with the DHCP server to extend its lease. If the client fails to renew the lease in time, the DHCP server can reclaim the IP address and make it available for allocation to other devices.
Remember, network administrators have the flexibility to configure lease durations based on their specific network requirements. These settings can impact network performance, IP address management, and overall efficiency.
What is the default DHCP lease time Windows Server 2012?
In Windows Server 2012, the default DHCP lease time is 8 days. This lease duration specifies the length of time that a client can obtain or renew an IP address lease from the DHCP server. During this lease period, the client can use the assigned IP address for its network communication.
While the default DHCP lease time in Windows Server 2012 is set to 8 days, it’s important to note that this value can be customized to fit the specific requirements of your network environment. Administrators have the flexibility to configure DHCP lease times based on factors such as network utilization, device mobility, or security policies.
To change the DHCP lease time in Windows Server 2012, follow these steps:
1. Open the DHCP management console.
2. Expand the server node and go to the IPv4 or IPv6 node, depending on your network configuration.
3. Right-click on the IPv4 or IPv6 node and select Properties.
4. In the General tab, under Lease duration for DHCP clients, adjust the lease time according to your requirements.
5. Click OK to save the changes.
By modifying the lease duration settings, you can ensure optimal IP address assignment and management for your network infrastructure. Consider factors such as the number of devices, expected client mobility, and network stability when determining the appropriate DHCP lease time for your Windows Server 2012 deployment.
How to clear DHCP leases in Windows Server 2012?
To clear DHCP leases in Windows Server 2012, you can follow these steps:
1. Launch the DHCP Manager: Click on the Start button, then select «Administrative Tools,» and choose «DHCP.«
2. Expand the DHCP server: In the DHCP Manager window, expand the DHCP server where the DHCP leases are located.
3. View active leases: In the DHCP server’s folder, expand the «IPv4» or «IPv6» folder based on your network configuration, and then click on «Scope.» This will display a list of active IP leases for that particular scope.
4. Delete individual leases: To delete a specific lease, right-click on the lease entry in the list and choose «Delete.» Confirm the deletion when prompted.
5. Delete all leases: If you want to delete all active leases, right-click on the scope folder (IPv4 or IPv6), select «All Tasks,» and choose «Delete All Statistics.» Confirm the deletion when prompted.
6. Authorize changes: After deleting the DHCP leases, it’s crucial to authorize the changes you made. Right-click on the DHCP server and select «Authorize.» This step ensures that the DHCP server remains operational.
Please note that these steps may vary slightly depending on the specific version of Windows Server 2012 you are using.
What is the default DHCP server policy?
The default DHCP server policy determines the behavior of the DHCP server when assigning IP addresses and other network configuration information to devices on a network. Typically, the default policy is set to be more generalized and suitable for a wide range of network environments. However, specific configurations can vary depending on the DHCP server software and vendor. Here are some common steps and considerations related to the default DHCP server policy:
1. IP Address Assignment: The default policy generally includes settings for automatically assigning IP addresses to devices on the network. This may utilize dynamic IP address allocation, where unused IP addresses from a defined range are assigned to devices as they connect. It can also involve static IP address assignment, where specific IP addresses are manually linked to particular devices based on their MAC addresses.
2. Lease Duration: A DHCP server policy usually defines the duration of the IP address lease. This specifies the amount of time a device can use an assigned IP address before it needs to renew the lease. The lease duration can be customized based on network requirements, balancing factors such as network stability and efficient resource utilization.
3. DNS Configuration: The default DHCP server policy may include DNS (Domain Name System) configuration settings. This involves assigning DNS server IP addresses and search domain information to devices on the network. DNS settings are crucial for resolving domain names to corresponding IP addresses and enabling seamless internet connectivity.
4. Gateway Configuration: DHCP can also be used to provide information about the default gateway for devices on the network. The gateway acts as an access point for devices to connect to external networks and the internet. The DHCP server policy may specify the IP address of the default gateway to be assigned to devices.
5. Additional Configuration Options: DHCP servers offer various configuration options beyond the basics. These may include additional settings such as NTP (Network Time Protocol) server addresses, WINS (Windows Internet Name Service) server addresses, and vendor-specific options for specialized requirements.
6. Security Considerations: DHCP server policies should incorporate security measures to mitigate potential risks. This may involve implementing techniques like MAC address filtering, where only known devices are assigned IP addresses, or using DHCP Snooping to prevent malicious DHCP server spoofing.
It’s important to note that specific DHCP server policies can be customized based on the network’s specific needs and the DHCP server software being utilized. These steps provide a general overview of the considerations involved in default DHCP server policies.
In a network I was faced with exceptionally large number of IP address DHCP leases for short-time usage. Even though the lease duration was set as relatively short, the DHCP server still occasionally complained about the DHCP scope being full, being unable to assign an IP address to a client.
Let’s demonstrate the situation with a lab setup. Here I have a Windows Server 2022 as the DHCP server, and there is the scope for 192.168.60.0/24 subnet configured with 10 available IP addresses:
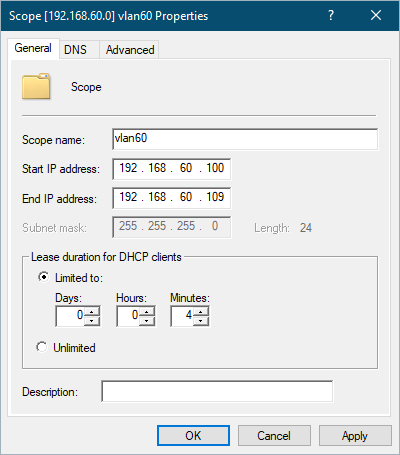
I set the lease duration to only 4 minutes (again, this is a lab!). There is no failover configuration in this case, so I don’t have to worry about the MCLT (Maximum Client Lead Time, see my earlier post if you wonder why your leases occasionally come out as one hour instead of the configured lease duration).
Then, let’s request some leases. I’ll use dhtest here, requesting 11 addresses with random MAC addresses, and this is what the DHCP server logged in the log file in C:\Windows\system32\dhcp:
10,09/27/23,22:35:33,Assign,192.168.60.100,,000102779CEA,,3420294190,0,,,,,,,,,0
10,09/27/23,22:35:35,Assign,192.168.60.101,,0001027415FE,,782297866,0,,,,,,,,,0
10,09/27/23,22:35:38,Assign,192.168.60.102,,000102A4826B,,261183525,0,,,,,,,,,0
10,09/27/23,22:35:39,Assign,192.168.60.103,,000102ECBE08,,796500092,0,,,,,,,,,0
10,09/27/23,22:35:43,Assign,192.168.60.104,,00010235ACB1,,3638647650,0,,,,,,,,,0
10,09/27/23,22:35:45,Assign,192.168.60.105,,000102A0D8A0,,3352944510,0,,,,,,,,,0
10,09/27/23,22:35:47,Assign,192.168.60.106,,00010269A74C,,3111520259,0,,,,,,,,,0
10,09/27/23,22:35:49,Assign,192.168.60.107,,00010204FC4B,,407990128,0,,,,,,,,,0
10,09/27/23,22:35:51,Assign,192.168.60.108,,0001023C9850,,1532426350,0,,,,,,,,,0
10,09/27/23,22:35:52,Assign,192.168.60.109,,000102D06DC5,,2298912365,0,,,,,,,,,0
14,09/27/23,22:35:58,Scope Full,192.168.60.0,,,,0,6,,,,,,,,,0
The first ten clients got their IP address leases nicely, but the 11th client didn’t get anything as the scope was already full.
The leases are shown in the database (I removed the hostname column to compress the output):
PS C:\> (Get-Date).ToString("yyyy-MM-dd HH:mm:ss")
2023-09-27 22.44.18
PS C:\> Get-DhcpServerv4Lease -ScopeId 192.168.60.0

IPAddress       ScopeId       ClientId           AddressState LeaseExpiryTime
---------       -------       --------           ------------ ---------------
192.168.60.100  192.168.60.0  00-01-02-77-9c-ea  Active       27.9.2023 22.39.33
192.168.60.101  192.168.60.0  00-01-02-74-15-fe  Active       27.9.2023 22.39.35
192.168.60.102  192.168.60.0  00-01-02-a4-82-6b  Active       27.9.2023 22.39.38
192.168.60.103  192.168.60.0  00-01-02-ec-be-08  Active       27.9.2023 22.39.39
192.168.60.104  192.168.60.0  00-01-02-35-ac-b1  Active       27.9.2023 22.39.43
192.168.60.105  192.168.60.0  00-01-02-a0-d8-a0  Active       27.9.2023 22.39.45
192.168.60.106  192.168.60.0  00-01-02-69-a7-4c  Active       27.9.2023 22.39.47
192.168.60.107  192.168.60.0  00-01-02-04-fc-4b  Active       27.9.2023 22.39.49
192.168.60.108  192.168.60.0  00-01-02-3c-98-50  Active       27.9.2023 22.39.51
192.168.60.109  192.168.60.0  00-01-02-d0-6d-c5  Active       27.9.2023 22.39.52
Looks fine, all leases are Active.
Except that the current time is already 22:44:18, shouldn’t the leases be all expired by now?
So, what’s going on? Why are the leases still shown as Active even though they all have already expired?
The “secret” component in Windows DHCP service is Database Cleanup. It happens every 60 minutes by default, and it is its job to get the expired leases out of the way.
Incidentally, a moment later this was shown in the log:
24,09/27/23,22:47:38,Database Cleanup Begin,,,,,0,6,,,,,,,,,0
18,09/27/23,22:47:38,Expired,192.168.60.100,,,,0,6,,,,,,,,,0
18,09/27/23,22:47:38,Expired,192.168.60.101,,,,0,6,,,,,,,,,0
18,09/27/23,22:47:38,Expired,192.168.60.102,,,,0,6,,,,,,,,,0
18,09/27/23,22:47:38,Expired,192.168.60.103,,,,0,6,,,,,,,,,0
18,09/27/23,22:47:38,Expired,192.168.60.104,,,,0,6,,,,,,,,,0
18,09/27/23,22:47:38,Expired,192.168.60.105,,,,0,6,,,,,,,,,0
18,09/27/23,22:47:38,Expired,192.168.60.106,,,,0,6,,,,,,,,,0
18,09/27/23,22:47:38,Expired,192.168.60.107,,,,0,6,,,,,,,,,0
18,09/27/23,22:47:38,Expired,192.168.60.108,,,,0,6,,,,,,,,,0
18,09/27/23,22:47:38,Expired,192.168.60.109,,,,0,6,,,,,,,,,0
And now all the leases seem to be available:
PS C:\> Get-DhcpServerv4Lease -ScopeId 192.168.60.0
PS C:\>
But, when I test the with a DHCP client, it still doesn’t get a lease, and the DHCP server logs that the scope is still full:
14,09/27/23,22:48:42,Scope Full,192.168.60.0,,,,0,6,,,,,,,,,0
What this all means is that the leases switched to Expired state, but they were still allocated to the clients. These expired leases can be seen with the -AllLeases parameter:
PS C:\> Get-DhcpServerv4Lease -ScopeId 192.168.60.0 -AllLeases

IPAddress       ScopeId       ClientId           AddressState LeaseExpiryTime
---------       -------       --------           ------------ ---------------
192.168.60.100  192.168.60.0  00-01-02-77-9c-ea  Expired      27.9.2023 22.39.33
192.168.60.101  192.168.60.0  00-01-02-74-15-fe  Expired      27.9.2023 22.39.35
192.168.60.102  192.168.60.0  00-01-02-a4-82-6b  Expired      27.9.2023 22.39.38
192.168.60.103  192.168.60.0  00-01-02-ec-be-08  Expired      27.9.2023 22.39.39
192.168.60.104  192.168.60.0  00-01-02-35-ac-b1  Expired      27.9.2023 22.39.43
192.168.60.105  192.168.60.0  00-01-02-a0-d8-a0  Expired      27.9.2023 22.39.45
192.168.60.106  192.168.60.0  00-01-02-69-a7-4c  Expired      27.9.2023 22.39.47
192.168.60.107  192.168.60.0  00-01-02-04-fc-4b  Expired      27.9.2023 22.39.49
192.168.60.108  192.168.60.0  00-01-02-3c-98-50  Expired      27.9.2023 22.39.51
192.168.60.109  192.168.60.0  00-01-02-d0-6d-c5  Expired      27.9.2023 22.39.52
As far as I know, there is no way to see the Expired leases in the DHCP MMC (the management console), so you have to use PowerShell to see them.
So, while the leases have been expired due to the short lease duration, the leases are still kept reserved for those clients, if they happen to come back to network to request them again.
Based on this old document about the DHCP service in Windows Server 2003 (the best Microsoft-published documentation I could find on this), the grace period for expired leases is 4 hours.
Basically, after the database cleanup has expired the leases, it will still take 4 hours before the cleanup run will actually delete the expired leases.
However, there is some adaptive algorithm in the background as well. In some situations the expired leases can be deleted already earlier, apparently in situations where the scope is full and new clients have been asking for addresses. In those cases the database cleanup can actually run out-of-schedule as needed.
There are two ways to influence the described behavior if needed:
- You can adjust the scheduled database cleanup interval (default = 60 minutes) with a registry setting:
DatabaseCleanupIntervalinComputer\HKEY_LOCAL_MACHINE\SYSTEM\CurrentControlSet\Services\DHCPServer\Parameters(the value is specified in minutes) - You can adjust the expired lease grace period (default = 4 hours) with another registry setting:
LeaseExtensioninComputer\HKEY_LOCAL_MACHINE\SYSTEM\CurrentControlSet\Services\DHCPServer\Parameters(this value does not exist by default; create it as DWORD value, and set the value in seconds)
Note that if the DHCP client releases the lease with a DHCPRELEASE message, the lease is deleted right away, so the discussion above basically concerns only leases that have not been released, but not renewed either.
Conclusions
These are the conclusions when using the Windows Server DHCP service (other DHCP server implementations may have similar features):
- The configured lease duration is not the only parameter that affects the IP address availability after client has stopped renewing the lease.
- Active leases are expired and eventually deleted only when the database cleanup runs (see the DHCP log files for the activity).
- The database cleanup can also run sooner than configured if the DHCP service decides so (based on the DHCP client activity, scope utilization, or some other factor).
- The default grace period after lease expiration is 4 hours but it can also be shorter if the DHCP service decides so.
- Use
Get-DhcpServerv4Lease -AllLeasesto see the actual current utilization of a DHCP scope.
DHCP Lease Time: What it Is, how it Works, and how to Change it
The standard DHCP lease time is 24 hours, but you can change it to meet your networks needs. For example, if youre setting up a lease time on your restaurants WiFi network, you can restrict it to an hour or two while a guest office network could have about 12 hours.
What is the Default Lease Time for DHCP?
The default lease time for the DHCP server is 24 hours. When setting the lease time on your DHCP server, consider your goals, usage patterns of your site, and service arrangements for your DHCP server. Use the following questions to help you decide on an appropriate lease time.
What is the Default Lease Time for an IP Address on a Windows DHCP Server?
The DHCP lease time can be configured to any amount of time, however, it’s set to 24 hours by default.
What is the Default Time Frame for DHCP Renewals?
When you leave the DHCP Lease Time on the default 24 hours 1440 minutes after 200 guest no other guest can use the free wifi network. Because all the 200 IP Addresses are reserved for the first 200 guests. With a lease time one hour, the client will try to renew the lease after 30 minutes.
Computers that are set up to automatically retrieve IP addresses from a DHCP (Dynamic Host Configuration Protocol) server are given an IP address that is only valid for a certain amount of time. The DHCP Lease Time is the name given to this period of time. This IP address becomes available when the lease expires and can be assigned to another device on the network.
The client tries to extend the lease of the specified IP address on the DHCP server after half (1/2) of the lease term has passed. The client does this by sending a DHCPREQUEST request to the server. The DHCP server sends a DHCPACK message with the new lease time and TCP/IP setup information if the IP address lease can be extended. The DHCP client adjusts its network settings after getting confirmation. If the DHCP client fails to renew the IP address lease, it will attempt again.
The client will send a broadcast DHCPREQUEST packet to communicate with any accessible DHCP server in the network when 87.5 percent (7/8) of the lease time has expired.
ipconfig /all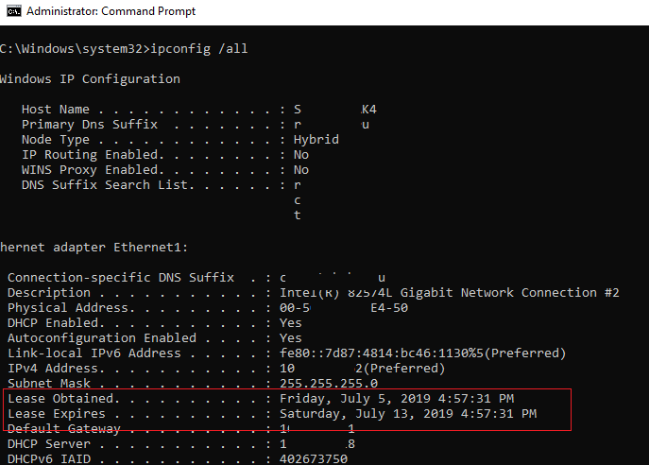
You will see the date of obtaining an IP address, and the expiration time:
Lease Obtained. . . . . . . . . . : Friday, July 5, 2019 4:57:31 PM
Lease Expires . . . . . . . . . . : Saturday, July 13, 2019 4:57:31 PM
How to Change DHCP Lease Time in Windows Server?
The DHCP server on Windows Server employs an 8-day lease time by default. In most circumstances, this is the best option. If your IP subnet has a lot of free addresses, you can reduce the Lease Time setting to get unused IP addresses released sooner.
Optimal values DHCP lease time for different network types:
- For wired Ethernet networks – 8 days;
- For wireless networks – 1 day;
- For guest Wi-Fi networks – 2-8 hours;
You can change lease time settings for each scope on the DHCP server. In this example, we will show how to reduce DHCP Lease Time from 8 to 2 days on Windows Server 2012 R2.
- Run the DHCP management console—dhcpmgmt.msc;
- Open the properties of the DHCP scope for which you want to reduce the lease time;
- On the “General” tab in the “Lease Duration for DHCP clients” section, in the “Limited to” field, specify a new lease time for clients of this scope (you can even completely disable the lease time, in this case, the IP addresses will be issued to devices permanently);
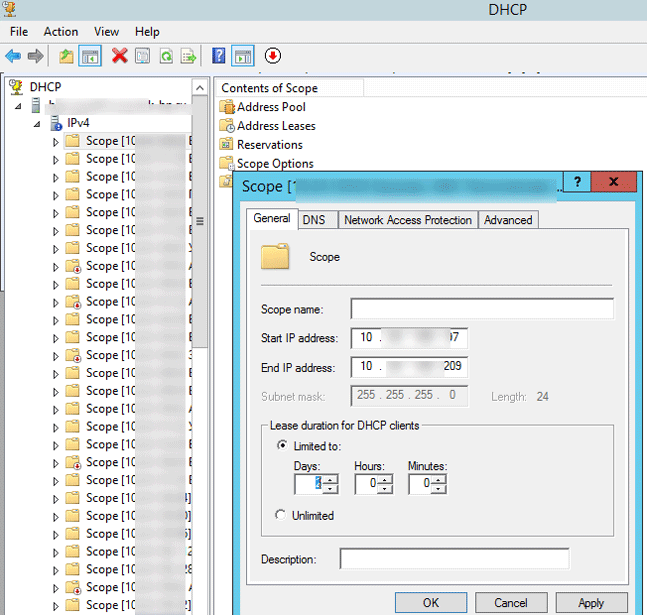
- Save your changes by clicking OK.
New DHCP lease time settings will apply for DHCP requests from new clients of the DHCP server and on the next renewal of the IP address by old clients.
You can also change the DHCP Lease time for a specific scope using the Set-DHCPServerv4Scope PowerShell cmdlet:
Set-DHCPServerv4Scope ScopeID 10.1.1.0 -LeaseDuration 2.00:00:00With the Acquire-DHCPServerv4Scope command, you may get the current properties after updating the DHCP scope parameters.