This tutorial describes the essential configuration tasks when you install a DHCP server for IPv6 (DHCPv6 server) on Windows Server 2008 R2.
Contents
- Configure an IPv6 address for the interface on the DHCPv6 server
- Install the DHCP server role
- Add an IPv6 scope to the DHCPv6 server
- Windows client configuration
- Obtain an IPv6 address with ipconfig
- Add scope or server options
- Author
- Recent Posts

Michael Pietroforte is the founder and editor in chief of 4sysops. He has more than 35 years of experience in IT management and system administration.
Even though I only scratched the surface of IPv6 theory in my little IPv6 tutorial, it is now time for a little IPv6 praxis. One of the first things you probably will want to do when you deploy IPv6 in your test network is to install a DHCP server to assign IPv6 addresses to client computers. Since DHCP for IPv6 works a bit differently than DHCP for IPv4, there is a new name for the protocol: DHCPv6. If you are interested in how DHCPv6 works in detail, I recommend this article. In today’s post, I will just explain the minimum configuration tasks for getting a DHCP server running for IPv6 on Windows Server 2008 R2.
Configure an IPv6 address for the interface on the DHCPv6 server
By default, IPv6 is enabled on Windows Server 2008 R2. This means that the server already has a link-local IPv6 address. Link-local addresses are supposed to allow communication on the link, and DHCP is such a local service. However, if you don’t manually assign a global, site-local, or unique local IPv6 address to the network interface of a Windows DHCPv6 server, it can’t assign IPv6 addresses to clients.

To assign an IPv6 address, open the Network and Sharing Center on the server, click «change adapter settings,» right-click the network adapter, and launch the properties page. For the purpose of this test, you can use this IPv6 address: 2001:DB8::1
Install the DHCP server role
To install a DHCP server on Windows Server 2008 R2, you have to add the DHCP server role in Server Manager by right-clicking the Roles node. After you select the DHCP server role, a wizard will guide you through the installation process. If you only want to play with DHCPv6, you don’t need to configure any of the settings in the wizard. This also applies for DHCPv6-related settings about the stateful and stateless mode. Most tutorials on the web will tell you to disable stateless mode, but according to my tests this is unnecessary; I will explain this in detail in my next post.

If you already have a DHCP server running on Windows Server 2008 R2, you can skip this step. Whenever you add the DHCP server role to a Windows Server 2008 R2 machine, you automatically also install a DHCPv6 server.
Add an IPv6 scope to the DHCPv6 server
Right-click the IPv6 node in the DHCP management console and then click «New Scope.» After specifying a name for the scope, you can use 2001:DB8:: as a prefix for testing purposes. You can change the Preference of the scope to 255 to make IP address assignments a bit quicker. If you have multiple DHCPv6 servers, the Preference setting tells DHCPv6 clients which server to use. Whenever a client receives an Advertise message of 255, it will immediately proceed with the DHCPv6 message exchange process.

Windows client configuration
I added this section because many tutorials on the web will tell you to disable Router Discovery and enable Managed Address Configuration or Other Stateful Configuration on Windows clients. The source of this information is probably this Microsoft KB article, which explains how to configure a Windows Vista client to obtain an IPv6 DHCP address. According to my tests, these configurations are not required on Vista SP2 and Windows 7. The only thing you have to ensure is that «Obtain IPv6 address automatically» is selected in the IPv6 properties of the client network adapter.

Obtain an IPv6 address with ipconfig
To assign an IPv6 address through DHCPv6, launch an elevated command prompt and run ipconfig /renew6. Notice that ipconfig /renew won’t do the trick because the renew parameter is only for IPv4. This also applies for the release parameter. If you want to release an IPv6 address, you have to type ipconfig /release6. If you want to renew the IPv6 address only for a particular network interface, you have to specify the the name of the interface: ipconfig /renew6 «Local Area Connection».

Add scope or server options
As with DHCP for IPv4, you can assign additional parameters to Windows clients, such as DNS servers or a domain search list. These parameters can either be added for all scopes on the DHCP server or only for a particular scope.

These server options will play a crucial role in my next post, where I will explain the difference between stateless and stateful mode of a Windows Server 2008 R2 DHCPv6 server.
Внедряя протокол IPv6 на своем предприятии, я столкнулся с тем, что для установки и настройки необходимых служб принцип Next-Next-Next не работает, а документации на русском не нашел вообще.
Эта статья пошагово расскажет на примере моей инфраструктуры о том, как развернуть IPv6 на предприятии используя стандартные службы DNS и DHCP операционной системы Windows Server 2008 / 2008 R2.
- Адресация IPv6
- Установка и настройка DNS
- Установка и настройка DHCPv6
- Маршрутизация IPv6
- Полезные ссылки
Адресация IPv6
Как известно, в IPv4 стандартизированы диапазоны «серых» адресов для локальных сетей (10.0.0.0/8, 172.16.0.0/12, 192.168.0.0/16), аналогично и в IPv6 для локальных адресов принят диапазон fc00:/7.
Рассмотрим следующую схему адресации IPv6, которая принята для локальных сетей на платформе Windows Server:
- префикс сети (адрес сети в терминологии IPv4):
fc00:a:b:c::/64, где a, b, c — выбирайте на ваше усмотрение из диапазона 0000-ffff, например fc00:10:18:1::/64 - адрес хоста в сети
fc00:a:b:c:v:x:y:z, где v, x, y ,z определяют адрес хоста, напримерfc00:10:18:1:feab:01cc:65de:180a— такой адрес может назначить DHCP-серверfc00:10:18:1::10— настроенный вручную более читабельный адрес, например для сервера, который нужно будет указывать руками (:: означает пропуск группы нулей, может использоваться однократно в адресе).
На картинке показан пример настроек сервера, на котором далее будет настроена служба DHCPv6.

Как работает IPv6 совместно с IPv4
IPv6 замечательно работает совместно с уже развернутой инфраструктурой IPv4 следующим образом:
- На Windows Server 2008 / 2008 R2 разворачиваются службы DNS и DHCP, поддерживающие IPv6.
- Клиенты, поддерживающие IPv6 (Windows Vista, Windows 7), получают настройки от DHCP и регистрируют свои имена в DNS.
- Далее при обращении к узлам по DNS-имени в первую очередь идет попытка получить их адреса IPv6 (тип записи AAAA), в случае их отсутствия — IPv4 (тип записи A).
- Клиенты, не поддерживающие IPv6 (Windows Server 2003, Windows XP) продолжают пользоваться старым протоколом IPv4 как раньше.
При выборе префикса создаваемой сети IPv6 рекомендую схитрить: если в этой же физической сети располагается IPv4 сеть 10.18.1.0/24, то можно выбрать префикс fc00:10:18:1::/64 для сети IPv6.
Установка и настройка DNS
Так как адреса IPv6 еще менее человечны, чем в IPv4, то их применение без DNS можно оправдать только с точки зрения садомазохизма. Поэтому в первую очередь необходимо развернуть DNS сервер, поддерживающий IPv6 адреса. Такая поддержка есть в службе DNS начиная с Windows Server 2008.
Все, что нужно сделать — это сконфигурировать статические IPv6 адреса (например fc00:10:18:1::1) на DNS серверах, включить динамическое обновление записей клиентами (в окружении Active Directory — безопасное) и передать эти настройки клиентам локальной сети через DHCP, о чем рассказывается далее.
Установка и настройка DHCPv6
Протокол IPv6 менее приспособлен для ручных настроек, в отличии от IPv4, поэтому предполагает автоматическое конфигурирование параметров узлов сети через DHCP версии 6. Поддержка DHCPv6 появилась начиная с Windows Server 2008 и является частью стандартной роли DHCP сервера.
Перед установкой DHCP-сервера необходимо сконфигурировать статические адреса IPv6 для сетевых адаптеров, с которых сервер DHCPv6 будет обслуживать своих клиентов. Например, fc00:10:18:1::10.
Теперь можно перейти к установке стандартной роли DHCP. Первая опция, относящаяся к IPv6 называется DHCPv6 Stateless Mode. Её нужно включить, тогда на следующей странице у вас запросят адреса IPv6 DNS серверов и DNS-имя родительского домена.
Если DHCPv6 сервер был установлен с отключенным DHCPv6 Stateless Mode, то включить его можно выполнив команду:
netsh int ipv6 set interface InterfaceName other=en
и установив опции сервера DHCPv6:
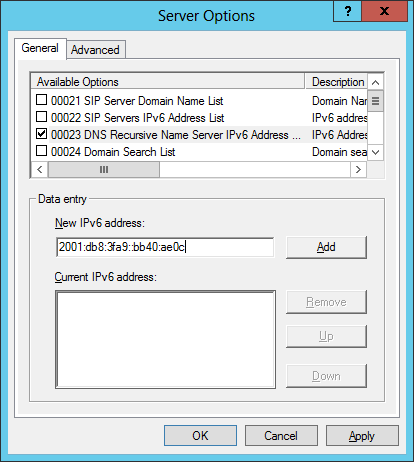
- 00023 DNS Recursive Name Server IPv6 Address ;mdash; адреса IPv6 DNS серверов
- 00024 Domain Search List ;mdash; DNS-имя родительского домена
Теперь нужно создать область, в которой DHCPv6 серверу предстоит выдавать адреса своим клиентам. Особенностью DHCPv6 в Windows Server является то, что можно создать область только для адресов с длиной префикса сети равной 64, например fc00:10:18:1::/64.
На следующей странице предлагается указать область исключений, из которой DHCPv6 сервер не будет выдавать адреса. Так как адреса сервер выдает не по порядку, а псевдослучайным образом (по хитрому алгоритму, основанному на MAC адресе сетевого интерфейса), то область исключений должка включать IPv6 адреса серверов, которые был сконфигурированы вручную (DNS и DHCPv6 сервера). Пример области исключений: 0:0:0:1-0:0:0:99.
Казалось бы, осталось только активировать диапазон и авторизовать DHCPv6 сервер в Active Directory. Вскоре сервер начнет выдавать клиентам IPv6 адреса и настройки DNS. Но здесь начинается самое интересное: хоть клиенты эти настойки исправно получают, общаться между собой они не могут. Причем сие печальное поведение на момент написания этой статьи в официальной документации явно не отражено.
Чтобы исправить ситуацию, вызываем на клиенте
route print
и видим, что клиент не имеет маршрута в сеть fc00:10:18:1::/64.
Вызываем на сервере
netsh int ipv6 show route
и среди прочего видим:
| Publish | Type | Met | Prefix | Idx | Gateway/Interface Name |
|---|---|---|---|---|---|
| No | Manual | 256 | fc00:10:18:1::/64 | 10 | Local |
Из этого следует, что маршрут в сеть fc00:10:18:1::/64 на сервере DHCPv6 существует, но не опубликован. Для того, чтобы этот маршрут выдавался клиентам, необходимо включить на сервере объявление маршрутов командой
netsh int ipv6 set interface Local adv=en man=en other=en
и опубликовать маршрут командой
netsh int ipv6 add route fc00:10:18:1::/64 Local publish=yes
где fc00:10:18:1::/64 — ваш префикс IPv6, Local — имя или индекс сетевого интерфейса DHCPv6 сервера.
Маршрутизация IPv6
Встроенная роль Routing and Remote Access начиная с Windows Server 2008 поддерживает маршрутизацию IPv6, однако для того, чтобы она полноценно заработала, необходимо выполнить следующие, не очевидные вещи.
1. В свойствах сервера Routing and Remote Access на вкладке IPv6 включить Enable IPv6 Forwarding и Enable Default Route Advertisement.
2. На сервере-маршрутизаторе IPv6 должно быть как минимум две сетевых карты.
Local (fc00:10:18:1::10/64 в моих примерах), смотрящая в локальную сеть, для которой мы на предыдущих шагах настраивали раздачу IPv6 адресов, префикса сети и других параметров по DHCP.
External (например fc00:10:18:2::10/64), которая по идее должна смотреть в другую сеть (у нас маршрутизатор все-таки), но может смотреть и в ту же, что и Local.
3. Для того, чтобы IPv6 клиенты в сети могли использовать наш маршрутизатор, он должен объявить себя как маршрут по умолчанию (Default Route Advertisement, как шлюз по умолчанию в терминах IPv4).
Для этого в Windows Server 2008 нужно выполнить команду
netsh int ipv6 add route ::/0 External fc00:10:18:2::180 publish=yes
где fc00:10:18:2::180 — адрес следующего маршрутизатора по умолчанию (next-hop), находящегося в сети External. Не важно, существует он реально или нет. Для объявления маршрута по умолчанию в сеть Local на текущем маршрутизаторе next-hop должен быть указан.
Для Windows Server 2008 R2 всё проще, достаточно выполнить команду
netsh int ipv6 set Local advertisedefaultroute=enabled
для объявления маршрутизатора в сети Local как Default Route.
Полезные ссылки
- DHCPv6 — Understanding of address configuration in automatic mode and installation of DHCPv6 Server
- The Cable Guy / The DHCPv6 Protocol
- Кабельщик / Протокол DHCPv6
- IPv6 address — Wikipedia
- IPv6 на TechNet
- Introducing IPv6 on Your Network — материал TechNet из раздела WS2003
- IP Version 6 — скудный материал TechNet из раздела WS2008
В статье описан процесс настройки динамического назначения адресов пртокола IPv6 в среде операционных систем Microsoft Windows. Рассматривается классическая сеть из клиентских рабочих станций с операционной системой Windows Vista
или Windows 7 и серверов Windows Server 2008, без выхода в интернет (не используются технологии трансляции IPv6-в-IPv4).
Способы
автоконфигурирования адресов в протоколе IPv6
Таких способов существует ровно два:
1. Автоконфигурация без сохранения состояния (Stateless Autoconfiguration).
В этой конфигурации никто не знает о состоянии выданных адресов клиентам, потому что нет выделенного сервера раздающего адреса (классического DHCP сервера). Нужно чётко себе представлять порядок запроса адреса клиентом в протоколе
IPv6 после того, как вы воткнули патчкорд в сетевую карту, т.к. этот порядок отличен от подобного алгоритма в IPv4. В частности в новом протокле является необходимым для работы даже локальной сети присутсвие маршрутизатора IPv6. Он регулирует режим получения
клиентом IPv6 адресов.
Порядок следующий:
-
После выбора своего link-local IPv6 адреса на интерфейсе компьютеры определяют наличие маршрутизатора в локальной сети используя запрос ICMPv6 Router Solicitation (Запрос маршрутизатора) на широковещательный адрес ff02::2 (все
маршрутизаторы в сети). -
Роутер отвечает соответсвующим сообщением ICMPv6 Router Advertisement (объявление маршрутизации). Если в сети нет DHCPv6 сервера и маршрутизатор об этом знает (в его конфигурации установлены соответсвующие флаги), то в этом сообщении
содержится адрес подсети, в терминологии IPv6 он называется префиксом и маршрут по умолчанию. -
Клиент принимает информацию и на основе префикса сети формирует IPv6 адрес для своего интерфейса, при этом адрес хоста либо выбирается стандартным образом либо формируется из MAC адреса по формату EUI-64.
При этом роутер периодически рассылает сообщения ICMPv6 Router Advertisement, что позволяет изменять конфигурацию клиентов при изменении топологии или адресации.
Следует иметь в виду, что в этот момент общение происходит по lokal-link IPv6 адресам, которые присутсвуют на IPv6 устройстве независимо от какой-либо конфигурации.
2. Автоконфигурация с сохранением состояния DHCPv6 (Statefull).
В этом режиме состояние о выданных адресах хранится на выделенном DHCPv6 сервере. Такая конфигурация позволяет администратору контролировть адресное пространство, а также назначать клиентам дополнительные параметры, такие как DNS
сервера, доменное имя и т.п.
В том случае, если в пункте 2 в абзаце выше роутер сообщает в Router Advertisement о том, что в сети присутвует DHCPv6 сервер или клиент вообще не получает сообщений ICMPv6 Router Advertisement (что говорит о том, что в сети нет
роутеров IPv6) , то клиент должен использовать автоконфигурацию с сохранением состояния (statefull) и начинает процесс запроса адреса у DHCPv6 сервера. Замечание о том, что в сети может и не быть IPv6 роутера содержится в соответствующем
RFC 2462, однако без роутера клиенты Windows 7 и Vista ведут себя не вполне корректно, что возможно исправят в будущих сервис паках.
Конфигурация
стенда
Стенд собирался на виртуальных машинах VMWare Workstation 7 с использованием сетевых возможностей этой программы. Используются следующие виртуальные машины:
dc.tail.dom — контроллер домена и DNS сервер под управлением Windows Server 2008 с сетевым интерфейсом «LAN»;
router.tail.dom — программный IPv6 маршрутизатор под управлением Windows Server 2008, в реальной сети может использоваться и аппаратный маршрутизатор с поддержкой протокола IPv6, но в рамках проводимого эксперимента на виртуальных машинах применяется
Windows Server 2008 с одним сетевым интерфейсом «LAN» и установленной службой RRAS;
seven — клиентский компьютер под управлением Windows 7 с сетевым интерфейсом «LAN», все виртуальные машины находятся в одном сетевом сегменте.
Настройка
и проверка работоспособности протокола DHCPv6
1. Устанавливаем и настраиваем контроллер домена и DNS сервер на компьютере под управлением Windows Server 2008 с именем dc.tail.dom и следующими настройками интерфейса «LAN»:
IPv4:

IP: 172.16.1.11

SM: 255.255.255.0

DG: 172.16.1.254

DNS: 127.0.0.1
IPv6:

IP: fc00::1:1:1:a

prefix Length: /64

DR: fc00::1:1:1:f

DNS: ::1
2. На этом же сервере поднимаю DHCP с областью 172.16.1.101 – 172.16.1.199; DG:172.16.1.254; DNS:172.16.1.11, при установке выбираю отключить режим без отслеживания состояния DHCPv6. После установки конфигурирую IPv6 область (в
оснастке DHCP) с префиксом fc00::. Из предопределенных параметров выбираю «00023 Список адресов IPV6 рекурсивных серверов имен DNS» задаю адрес, соответственно fc00::1:1:1:a.
3. На втором сервере Windows Server 2008 router.tail.dom с двумя сетевыми интерфейсами «LAN» и «WAN» поднимаем службы RRAS с NAT. В настройках RRAS сервера (в оснастке «Маршрутизация и удаленный доступ») выбираю IPv6-маршрутизатор
(помимо IPv4). Далее на вкладке IPv6 проверяем, что включено объявление маршрута по умолчанию. В качестве этого устройства может выступпать также маршрутизаторы Cisco, IOS начиная с версии 12.2T поддерживает работу этого протокола.
Настройки интерфейса «LAN» на router.tail.dom:
IPv4

ip: 172.16.1.254

SM: 255.255.255.0

DG:

DNS: 172.16.1.11
IPv6

ip: fc00::1:1:1:f

prefix Length: /64

DR: fc00::1:1:1:f (далее будет ясно почему)

DNS: fc00::1:1:1:a
После назначения машине router в качестве DR собственного адреса в таблице маршрутизации появляется маршрут для префикса нулевой длины ::/0 (читаем в справке: «Указывает, объявлен ли на данном сервере маршрут по умолчанию. Маршрут
по умолчанию – маршрут для префикса нулевой длины. Используемый в качестве IPv6-маршрутизатора компьютер, на котором запущена операционная система семейства Windows Server® 2008, будет объявлять себя маршрутизатором по умолчанию только в том случае, если он
настроен с маршрутом по умолчанию (::/0), публикация которого включена»). Если бы маршрутизатор имел два сетевых интерфеса, на одном из которых был бы маршрутизатор по умолчанию, то публикация маршрута к этому маршрутизатору (маршрут нулевой длины) включилась
бы автоматически.
Далее На router.tail.dom ввожу последовательно следующие команды:
1). Включаем публикацию маршрута по умолчанию:
netsh interface ipv6 set route ::/0 «LAN» publish=yes
2). Устанавливаем значения флагов M и O в 1:
netsh interface ipv6 set interface «LAN» managedaddress=enabled
netsh interface ipv6 set interface «LAN» otherstateful=enabled
3). Включаем объявление маршрутизатора:
netsh interface ipv6 set interface «LAN» advertise=enabled
4. На клиентской машине seven установлена Windows 7. Все настройки интерфейс «LAN» должен получить динамически.
После перезагрузки машины seven интерфейс «LAN» получает следующие настройки:
IPv4

ip: 172.16.1.101

SM: 255.255.255.0

DG: 172.16.1.254

DNS: 172.16.1.11
IPv6:

IP: fc00::1:1:1:101 (создана резервация в оснастке DHCP)

prefix Length: /64

DG: ::

DNS: fc00::1:1:1:a
Для проверки работоспособности протокола IPv6 на клиентской машине следует отключить IPv4. В нашем случае компьютер seven был введён в домен tail.dom полностью с использованием протокла IPv6.
Windows Server 2016 automatically prefers IPv6 addresses, if available, but the manual configuration steps differ from IPv4 and necessitate new tools. Here’s how to approach IPv6 in your daily admin work.
One common reason why IT managers shy away from IPv6 is the hexadecimal notation with colons that divide the address into eight blocks, each with a length of 16 bits. For example, an IPv6 address looks like this: 001:0db7:85b3:07d3:1319:8a2d:437a:63d4
. These addresses are difficult to memorize and assign manually. Consequently, automatic assignment is the way to go in IPv6 infrastructures.
All IPv6 nodes automatically configure a local address with the fe80::/64
prefix for each physical or logical IPv6 interface. These addresses can only be used for communication with neighboring nodes. They are not registered in the DNS, and if data needs to be sent to such an address, a zone ID is also required. In the case of manual configuration or allocation of an IPv6 address by a DHCP server, the corresponding entries are, of course, made automatically.
IPv6 Preferred
Microsoft Windows Server 2016 uses the Next Generation TCP/IP Stack, a TCP/IP protocol stack that integrates both IPv4 and IPv6. For example, if a DNS query returns IPv6 and IPv4 address, the stack will first attempt to communicate over IPv6. The preference of IPv6 over IPv4 offers IPv6-enabled applications better network connectivity.
Enabling IPv6 and its preference by default has no negative effect on IPv4 connectivity. In networks in which no IPv6 DNS entries are available, IPv6 addresses are not used for communication. Windows Server 2016 always tries to communicate with IPv6; if no IPv6 addresses are available, the server will use IPv4.
In a network with Windows Server 2016, IPv6 offers several advantages:
- Larger address space. The IPv6 128-bit address space provides enough space for each device to have its own globally valid address.
- More efficient routing. The revised IPv6 header and the new addressing scheme, which supports a hierarchical routing infrastructure, allow IPv6 routers to forward the corresponding network traffic faster.
- Easy configuration. IPv6 hosts can configure themselves either by DHCP or a local router. The basic setup might be a bit more complicated, but the running operation is simpler.
- Improved security. The IPv6 standards fix some of the security problems of IPv4 and provide better protection against address and port scans. They stipulate that IPv6 implementations must support Internet Protocol Security (IPsec).
Windows Server 2016 supports IPv6 after installation, so if you display network connection properties, you will see that IPv6 is automatically linked to the network connections (Figure 1 and Figure 2).
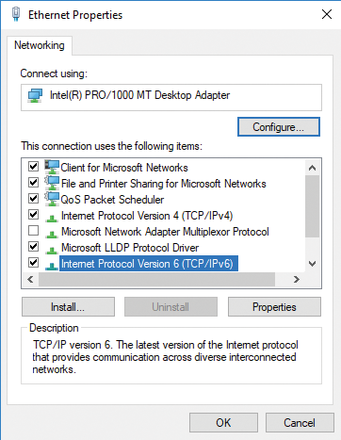
Figure 1: The Windows Server 2016 network settings are adjusted for IPv6.
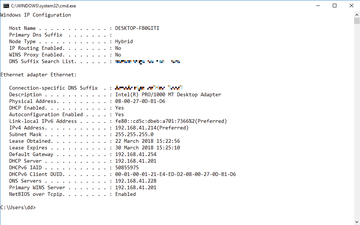
Figure 2: IPv6 addresses can be displayed together with IPv4 addresses at the command line.
Configuring IPv6
If you configure a server with Windows 2016 for IPv6, the following automatic settings are possible:
1. An IPv6 host sends a multicast message and receives one or more router messages. The latter contain subnet prefixes that the IPv6 host uses to specify additional IPv6 addresses and add routes to the IPv6 routing table. Other configuration parameters are also included – for example, the standard gateway.
2. DHCPv6 provides subnet prefixes and other configuration parameters for the IPv6 host. For example, DHCPv6 is often used on IPv6 hosts under Windows to configure the DNS servers’ IPv6 addresses, which is not possible with router detection. Windows Server 2016 has an IPv6-enabled DHCP server.
Windows Server 2016 provides a graphical interface for manually configuring IPv6. For Core or Nano servers, Windows Server 2016 also supports configuration at the command prompt with the netsh command. However, because Microsoft prefers PowerShell, you should use the appropriate cmdlets to control or query network settings. For a list of all relevant cmdlets, type:
Get-Command -Noun Net*
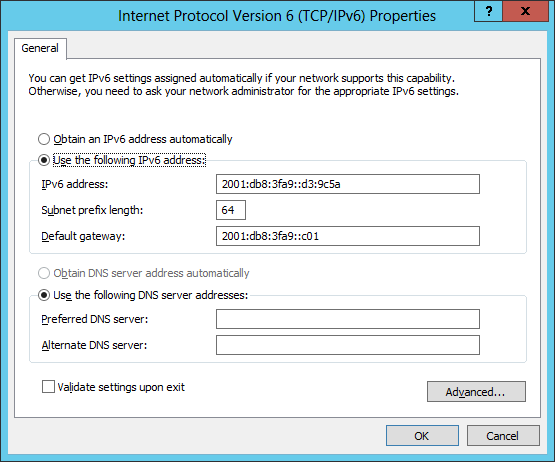
Under the properties for the IPv6 network connection, you can select the following settings:
- Obtain an IPv6 address automatically
. Configures the IPv6 addresses for this connection or adapter to be set automatically. - Use the following IPv6 address
. Manually configures the IPv6 address and the default gateway for this connection or adapter. - IPv6 address
. Specifies an IPv6 unicast address. - Subnet prefix length
. Defines the length of the subnet prefix for the IPv6 address. For unicast IPv6 addresses, this should be 64
(the default). - Default gateway
. Defines the default gateway’s IPv6 unicast address. - Obtain DNS server address automatically
. Assigns the DNS server’s IPv6 address by DHCPv6. - Use the following DNS server addresses
. Manually sets the addresses of the preferred and alternate DNS servers.
You can access the additional settings for IPv6 from the Advanced
button. In the IP Settings
tab, specify the computer’s IPv6 addressing in more detail: For each IPv6 unicast address, you must specify an IPv6 address and a subnet prefix length. The Add
button is only available if the Use the following IPv6 address
option is set in the IPv6 address settings. For each default gateway, you must specify an IPv6 address and specify whether the metric for this gateway is to be determined using the connection speed or the adapter speed or whether you want to define the metric yourself. You decide whether such a metric applies to the IPv6 addresses or the standard gateways or whether it is determined by the connection speed or the adapter speed. The metric is used when there are multiple routes to choose from in the routing table that correspond to the destination address of a forwarded packet. Windows Server 2016 selects the route with the lowest metric. The metric can reflect the number of hops, the speed and reliability of the path, the path throughput, or administrative properties.
Adapting DNS for IPv6
Under advanced IPv6 settings, the DNS
tab lets you make adjustments for name resolution. No changes need to be made here for generally adding Windows Server 2016 to a domain. Freshly installed, the following options are enabled by default:
- Append primary and connection specific DNS suffixes
- Append parent suffixes of the primary DNS suffix
- Register this connection’s addresses in DNS
The individual options play a significant role in name resolution in a DNS infrastructure. Append primary and connection specific DNS suffixes
means that when resolving hostnames, the host always automatically tries to append the configured primary DNS suffix of its own computer name. For example, if you want to resolve a hostname with the name dc01
, the host attempts name resolution in the style of dc01.contoso.int
, given a primary DNS suffix of contoso.int
.
The Append parent suffixes of the primary DNS suffix
option means that the names of superordinate domains are also used for name resolution. For example, if you want to resolve a server name dc05
in a subordinate domain named muenchen.de.contoso.int
, the computer first tries the resolution via dc05.muenchen.de.contoso.int
if this is the computer’s primary DNS suffix. Then it tries to resolve the name as dc05.de.contoso.int
followed by dc05.contoso.int
, because these domains are on a higher level than the muenchen.de.contoso.int
domain. In this area, you also have the option of entering another DNS suffix of your choice with DNS suffix for this connection
. If the computer does not find the entered name on its configured DNS server via its own primary DNS suffix, it tries to find it with the DNS suffix in this field.
Register this connection’s addresses in DNS
allows a DNS server to register entries dynamically. This dynamic DNS eliminates the need for manual host entries. As soon as a computer logs on to the network, it tries automatically to enter its fully qualified domain name (FQDN) on the configured DNS server, unless this option has been deactivated. This point is very important for internal name resolution on an Active Directory (AD) network.
Under the DNS
tab, you can also use Append these DNS suffixes (in order)
to configure DNS suffixes to resolve incomplete hostnames. Enabling this means that neither the server’s primary DNS suffix nor the connection’s DNS suffixes are used. Instead, Windows Server 2016 appends the DNS suffixes in the order that can be found in this field.
During the configuration, make sure that the DNS suffix of the Windows domain in which this server is a member is entered first in this list if possible. This option is often required for name resolution in forests with several trees. To do this, all the trees in the forest are entered in the sequence to ensure name resolution within AD. This option is particularly useful when using Exchange servers if the Exchange servers are distributed across several trees and domains. This option is not enabled by default.
Additionally, stipulating Use this connection’s DNS suffix in DNS registration
ensures that the server name is registered in DNS with its computer name and its primary DNS suffix – that is, its FQDN. Additionally, the name with the DNS suffix configured in the DNS suffix for this connection
field is also stored on the DNS server. This option also is not activated by default.
To resolve server names quickly and efficiently in different DNS zones, enable the Append these DNS suffixes (in order)
option under Advanced IPv6 settings on the server using the DNS
tab. Enter your own tree’s namespace and then append the other trees’ namespaces. The purpose of this configuration is the fast resolution of servers in other trees. For example, if you want to resolve the dc1
domain controller (DC) in the contoso.int
tree, you must always enter dc1.contoso.int
if the machine is not a member of this tree. This setting is only optional, but it adds more robustness to AD name resolution. You will want to configure this setting on every DC and on every Exchange server in your forest, as well as on computers of administrators or power users who constantly need to connect to other domains. You should always enter your own domain and namespace before you query other namespaces.
You can check the effect of this action by entering the nslookup command, where you can only enter dc1
at this point. The server asks its preferred DNS server whether a server named dc1.contoso.int
can be found (if contoso.int
is your primary DNS suffix). If this server does not exist in this domain, the next namespace is queried.
Many administrators simply enter a new static host entry on their DNS server that points to the IP address of the server in the other namespace. However, this procedure is not correct, even if it works in principle. In this case, it does not return the correct DNS name of the corresponding server, but the server name with the zone of the DNS server in which the server was entered as the host. Particularly in a larger AD, you should make sure that the configurations are also formally correct. This often helps to avoid problems that you have not considered. For example, if you create a new dc1
entry for the dc1.contoso.com
DC in the microsoft.com
zone, pointing to the server’s IP address, the name is resolved as dc1.microsoft.com
, although the actual name of the server is dc1.contoso.com
. Resolution will work, but it will return an incorrect name.
After configuring or adding the computer to the domain, open a command prompt and type nslookup. The command must not cause any error messages and must display the correct FQDN of the DNS server and its IP address. If this is not the case, first check that the primary DNS suffix matches the zone name. The domain’s primary DNS suffix is automatically assigned when it is added to the domain. Next, determine whether the DNS server’s IP address is correctly entered in the computer’s IP settings.
On IPv4 networks, you can assign addresses to interfaces in three ways: manually assigning by static address, dynamically assigning addresses using DHCP, or automatically assigning using APIPA. Administrators of small networks often configure IPv4 addresses manually, in medium and larger organizations using DHCP. Automatic address configuration using APIPA is usually done in very small networks such as at home, or your LAN, connecting to the Internet through a DSL router.
- About IPv6 address
Assigning addresses on an IPv6 network is a bit different from IPv4. IPv6 can be assigned to an Interface in the following ways:
- Manually configure one or more IPv6 addresses on the Interface
- Configure the address with status using DHCPv6 server
- Configuring stateless addresses — stateless, based on messages received by Router Advertisement
- Automatically configure both status and stateless addresses
In addition, link-local address is always automatically configured whether the status or stateless status (automatically configured) is being used.
The main difference between IPv4 and IPv6 is that the IPv6 protocol is designed to automatically configure. This means that, in most cases, you will not need to manually assign addresses, or deploy DHCPv6 servers, and you will instead use the stateless address autoconfiguration feature. for most of my network servers. Do you see the opposite of physical interfaces on IPv4 servers? Servers such as network adapters on IPv4 are usually assigned an address, but most physical interfaces on IPv6 are assigned multiple addresses. Specifically, a physical Interface of IPv6 uses at least two addresses:
- Link-local is created automatically, used for traffic on internal links.
- Additional Unicast addresses, used for traffic, need to be routed outside the internal link.
Assign IPv6 address manually
Manually assigning IPv6 addresses is generally done in 2 cases:
- For current servers on your network
- On most routers interface
On Windows Server 2012 or Windows Server 2012 R2-based machines, you can assign IPv6 addresses by using one of the following options:
- Use Internet Protocol Version 6 (TCP / IPv6) Properties
- Use the New-NetIPAdress cmdlets and Set-DnsClientServerAddress of Windows PowerShell
- Use the netsh commands from the Netsh.exe command line context menu
Method 1: Use Internet Protocol Version 6 (TCP / IPv6) Properties
Right click on the network icon in the taskbar> Open network and sharing center> look to the left select Change adapter settings> right click on the network icon select Properties> Select Internet Protocol Version 6 (TCP / IPv6)> Properties to open the dialog box Internet Protocol Version 6 (TCP / IPv6) Properties. Here you configure the IPv6 address, the length of the subnet prefix, the default gateway and the DNS server address as shown.

Method 2: Use Windows PowerShell
The following example will use Windows PowerShell to configure the addition of an IPv6 address on the Physical Interface of a Windows Server 2012/2012 R2 computer. First, run the Ipconfig command on the server, this is the result:
PS C:> ipconfig
Windows IP Configuration
Ethernet Ethernet adapter:
Connection-specific DNS Suffix.:
Link-local IPv6 Address…..: fe80 :: 2025: 61fb: b68: c266% 12
IPv4 Address………..: 172.16.11.75
Subnet Mask………..: 255.255.255.0
Default Gateway………: 172.16.11.1
Tunnel adapter isatap. {DD59BFFD-706A-4685-9073-647788046335}:
Media State………..: Media disconnected
Connection-specific DNS Suffix.:
Tunnel adapter Teredo Tunneling Pseudo-Interface:
Media State………..: Media disconnected
Connection-specific DNS Suffix.:
From this command you will notice that the physical interface named Ethernet is assigned two addresses:
- IPv4 address: 172.16.11.75
- Link-local IPv6: fe80 :: 2025: 61fb: b68: c266% 12
% 12 at the end of the link-local address is called the Zone indentifier, used to identify the links on the set address. On Windows, Zone identifier is equivalent to the Interface index, you can use the Get-NetAdapter cmdlet to display the list of physical Interface names and indexes on a Windows Server 2012/2012 R2 computer as shown below:
PS C:> Get-NetAdapter |fl Name, ifIndex
Name: Ethernet
ifIndex: 12
Instead of using the Ipconfig command, you can also use the Get-NetIPAdress cmdlet as shown below to display the Address information for an Ethernet named:
PS C:> Get-NetIPAddress |where {$ _. InterfaceAlias -eq «Ethernet»}
IPAddress: fe80 :: 2025: 61fb: b68: c266% 12
InterfaceIndex: 12
InterfaceAlias: Ethernet
AddressFamily: IPv6
Type: Unicast
PrefixLength: 64
PrefixOrigin: WellKnown
SuffixOrigin: Link
AddressState: Preferred
ValidLifetime: Infinite ([TimeSpan] :: MaxValue)
PreferredLifetime: Infinite ([TimeSpan] :: MaxValue)
SkipAsSource: False
PolicyStore: ActiveStore
IPAddress: 172.16.11.75
InterfaceIndex: 12
InterfaceAlias: Ethernet
AddressFamily: IPv4
Type: Unicast
PrefixLength: 24
PrefixOrigin: Manual
SuffixOrigin: Manual
AddressState: Preferred
ValidLifetime: Infinite ([TimeSpan] :: MaxValue)
PreferredLifetime: Infinite ([TimeSpan] :: MaxValue)
SkipAsSource: False
PolicyStore: ActiveStore
Did you notice this command returns more information than Ipconfig?
You can use cmdlet NewNetIPAdress to assign a new Unicast IPv6 global address with prefix length of 64 and the default gateway address for Ethernet Interface as follows:
PS C:> New-NetIPAddress -InterfaceAlias »Ethernet» -IPAddress 2001: DB8: 3FA9 :: D3: 9C5A `
PrefixLength 64 -DefaultGateway 2001: DB8: 3FA9 :: 0C01
IPAddress: 2001: db8: 3fa9 :: d3: 9c5a
InterfaceIndex: 12
InterfaceAlias: Ethernet
AddressFamily: IPv6
Type: Unicast
PrefixLength: 64
PrefixOrigin: Manual
SuffixOrigin: Manual
AddressState: Tentative
ValidLifetime: Infinite ([TimeSpan] :: MaxValue)
PreferredLifetime: Infinite ([TimeSpan] :: MaxValue)
SkipAsSource: False
PolicyStore: ActiveStore
IPAddress: 2001: db8: 3fa9 :: d3: 9c5a
InterfaceIndex: 12
InterfaceAlias: Ethernet
AddressFamily: IPv6
Type: Unicast
PrefixLength: 64
PrefixOrigin: Manual
SuffixOrigin: Manual
AddressState: Invalid
ValidLifetime: Infinite ([TimeSpan] :: MaxValue)
PreferredLifetime: Infinite ([TimeSpan] :: MaxValue)
SkipAsSource: False
PolicyStore: PersistentStore
To confirm the result, you need to use Get-NetIPAddress with the AddressFamily parameter to display only IPv6 information as follows:
PS C:> Get-NetIPAddress-AddressFamily IPv6 |where {$ _. InterfaceAlias -eq «Ethernet»}
IPAddress: fe80 :: 2025: 61fb: b68: c266% 12
InterfaceIndex: 12
InterfaceAlias: Ethernet
AddressFamily: IPv6
Type: Unicast
PrefixLength: 64
PrefixOrigin: WellKnown
SuffixOrigin: Link
AddressState: Preferred
ValidLifetime: Infinite ([TimeSpan] :: MaxValue)
PreferredLifetime: Infinite ([TimeSpan] :: MaxValue)
SkipAsSource: False
PolicyStore: ActiveStore
IPAddress: 2001: db8: 3fa9 :: d3: 9c5a
InterfaceIndex: 12
InterfaceAlias: Ethernet
AddressFamily: IPv6
Type: Unicast
PrefixLength: 64
PrefixOrigin: Manual
SuffixOrigin: Manual
AddressState: Preferred
ValidLifetime: Infinite ([TimeSpan] :: MaxValue)
PreferredLifetime: Infinite ([TimeSpan] :: MaxValue)
SkipAsSource: False
PolicyStore: ActiveStore
The interface is now multihomed (connecting multiple networks) because it has an IPv6 address link-local and IPv6 global. Open the Internet Protocol Version 6 dialog box (TCP / IPv6) Properties you will see the address information is configured manually as desired, like the following figure:
This snapshot confirms the successfully configured IP address using Windows PowerShell
Automatically configure stateless addresses
This is the most valuable feature of IPv6 because it allows IPv6 nodes to communicate on the network without manually assigning addresses to them or using a DHCP server.
Assigning link-local addresses automatically for Interface on IPv6 servers is an example of automatically configuring IPv6 addresses, which allows servers on the same communication link to each other. This type of automatic address configuration is called stateless because it does not use the address configuration protocol like DHCP.
Another example of automatic stateless address configuration is when the IPv6 server uses a router to automatically configure additional addresses, such as a link-local or global Unicast address, a gateway address to wear. and other IPv6 configuration parameters. As follows:
- Host (here is the Windows Server 2012/2012 R2 computer) sends a Router Solicitation notification to request Router Advertisement notifications from any router that is «listening» on the host’s link.
- The router (IPv6 or ISATAP) on the host’s link will respond to the server’s message by sending Router Advertisement messages to the server.
- The server uses the information in this message to assign an expected address to it along with the additional settings specified. The configured IPv6 address can be in any of the following states:
- Tentative: The address still needs to be verified as unique by performing duplicate address detection. The expected address cannot receive Unicast traffic until they are validated.
- Valid: Address is unique. A valid address can also be a preferred or outdated address.
- Preferred: Valid address and therefore can be used to send or receive traffic Unicast.
- Deprecated: Is a valid address and can therefore be used to send or receive Unicast traffic, but not used to initiate a new communication session.
- Invalid (Invalid): This address is no longer used to send or receive traffic Unicast anymore.
- The time when the address is assigned a specific status will be determined by the information provided by the router.
Note: Automatic address configuration is not available for routers. In addition to configuring link-local addresses, address autoconfiguration is only used to assign addresses to servers. Addresses for routers must be configured using other methods, such as manual assignment.
- Cisco Router Configuration Guide 1800 series (Cisco 1801, 1802, 1803, 1811, 1812)
Automatic configuration of addresses with status
Automatic address configuration is based on the use of address resolution protocols. On IPv4 networks, DHCP is such a protocol, it is used to assign automatic IP addresses and other configuration settings to the Interface on the host. DHCP infrastructure includes: DHCP server, DHCP clients, DHCP Relay Agent (can relay DHCP messages between server and client on different subnets).
The IPv6 version of this protocol is called DHCPv6, which uses the same infrastructure as that of DHCPv6 servers, DHCPv6 clients, and DHCPv6 Relay Agent. However, DHCPv6 can provide IPv6 hosts both stateless and automatically configured. This can be a bit confusing because it leads to additional addresses being assigned to the host. If you want to prevent this, you only need to configure IPv6 routers reasonably so that the DHCPv6 server can only assign addresses with status to the host.
One reason to deploy a DHCPv6 server on an IPv6 network is because Windows does not support automatically configuring the stateless address of DHCPv6 server settings by using Router Advertisement messages. This means that you need to use a DHCPv6 server if Windows must perform domain resolution using IPv6.
DHCPv6 client software is integrated into the following Windows versions:
- Windows 8.1
- Windows 8
- Windows 7
- Windows Vista
- Windows Server 2012 R2
- Windows Server 2012
- Windows Server 2008 R2
- Windows Server 2008
Configure DHCPv6 server
The DHCP server service in the following Windows Server versions supports both stateless and status addresses:
- Windows Server 2012 R2
- Windows Server 2012
- Windows Server 2008 R2
- Windows Server 2008
You can configure a Windows Server 2012/2012 R2 computer as a stateless or stateless DHCPv6 server by following these steps:
- Start by installing the role of the DHCP server on the server.
- Assign static IPv6 addresses for DHCPv6 interfaces to «listen» to request messages sent to DHCPv6.
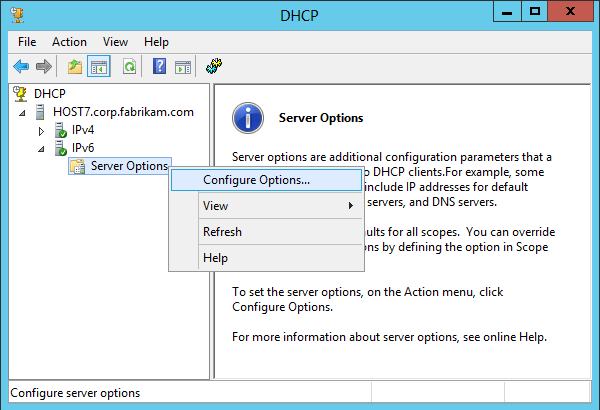
- Open DHCP and expand IPv6 node on the server node.
- To configure DHCPv6 options for automatically configuring stateless addresses, right-click the Server Options button under the IPv6 button and select Configure Options as shown:
- To configure DHCPv6 options for automatic address configuration, right-click the IPv6 button and select New Scope as shown:
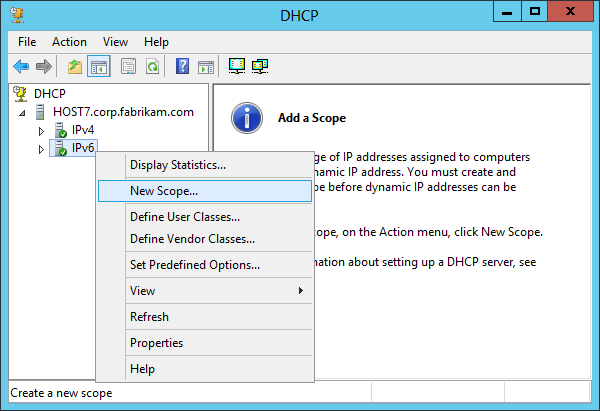
Then use the New Scope Wizard to name and describe the scope, the IPv6 subnet prefix, and other required information.
These are ways to manually assign IPv6 addresses. Hope the article is useful to you :).