Table of Contents
- Introduction
- DHCP-DNS Integration: The Basics
- DHCP-DNS Integration: Deeper Drive
- Introduction to DnsUpdateProxy Group
- How to use DnsUpdateProxy Group
- Changing zone settings from non-secure to secure
- Case 1: For those systems where IP addresses are manually assigned
- Case 2: For those systems where IP addresses are assigned through DHCP
- How to segregate between Case 1 and Case 2 ?
- DHCP in a Multi-Domain AD Forest
- Conclusion
- Managing Stale Records
- Name Protection
- See Also
Introduction
For any large organization with lots of servers, workstations, appliances, and devices, DNS and DHCP both are very fundamental and crucial components.
The purpose of this article is to highlight some often overlooked areas, which are related to integration between DHCP and DNS.
As DNS and DHCP both are the backbones of organization’s IT Infrastructure, changing any setting in a production environment might cause a severe impact. Due to this,
the integration between DNS and DHCP should be planned well before implementation and should be part of Infrastructure Design Document.
This article assumes a few things:
- You are using Active Directory Integrated DNS.
- You are using Windows DHCP Server.
DHCP-DNS Integration: The Basics
Before we dive deeper, let’s jot down the basic rules of DHCP-DNS integration.
- As we know, DNS records can be Static or Dynamic. Static records are created manually, either through DNS console or programmatically using some script. Dynamic records, on the other hand, are registered by DNS Client or by DHCP
Server.
- When DHCP is implemented, by default the PTR Records are registered to DNS by DHCP Server, whereas the Host (A) records are registered by DHCP client. This is due to the fact that client is the source of the hostname and DHCP
is the source of the IP address.
- From Windows Server 2008 / Vista onwards, it is DHCP who registers both A and PTR records on behalf of client, regardless of client is requesting DHCP server to perform the update or not. Of course, if the IP address is statically
assigned to client, there is no role of DHCP and it is client who updates the record in this case.
As a best practice, we should ensure that it is DHCP who should update both A and PTR records for all clients which are getting IP address from DHCP.
To ensure that, please select this option: Always dynamically update DNS A and PTR records.
If this option is selected, DHCP server would update A and PTR records as soon as it assigns an IP address to a DHCP client, and it will not check whether client is asking DHCP server to register/update the DNS record. We always
recommend using this option.

- If the IP address is manually assigned on a system, and not assigned by DHCP, then that record is registered by the system itself. In a production environment, most of the critical servers are having an IP address assigned directly
and not through DHCP. All such records would be registered to DNS by the system itself and there is no role of DHCP in this case.
DHCP-DNS Integration: Deeper Drive
Now that we know the basics, let’s take a deeper drive.
An AD Integrated DNS Zone offers three different security settings which are associated with Dynamic DNS update (DDNS) :
- None: Dynamic update is not allowed and all records need to be updated/managed manually.
- Nonsecure and Secure: This setting will allow all dynamic updates, without verifying the authenticity of the source from where update request is coming.
- Secure Only: This setting will allow Dynamic update only if the authenticity of the source is verified by Active Directory. In other words, the source should be a
member of the “Authenticated Users” security principle.
 Note Note |
|---|
| Secure only option is only available if the DNS zone is AD Integrated. |

As option 3 offers an additional layer of security and ensures that the DNS update request is coming from an authentic source, most of the organizations prefer to use this option.
When we configure option 3 (Secure Only Dynamic update), there is another important point that we need to consider, which is DNS record permission (ACL).
When the Dynamic update setting is configured as “Secure and nonsecure”, there is no record specific ACL, and all records inherit ACL from the DNS Zone. In this setting, any source can create a new record and also update
an existing record.
However, things get changed when we change the settings to “Secure only”. In this setting:
- Only authorized source, which has access to create a new record, can create a new record.
- When a new record is created, the creator becomes the owner of that record, having special permission to the record so that it can read and modify the record.
- Next time, only that owner can update/modify that record.
Let’s assume a scenario where an IP address is directly assigned by Server1, and it is not assigned by DHCP. So Server1 will register the record in the DNS Server and will become the owner of the record. Next time, only server1
can update this record if we change its IP address. There is no role of DHCP here.
Please note that as the zone accepts only secure update, Server1 must be a member of AD Domain so that it can register/update the record in DNS server.
Now, let’s assume we have a workstation named WS1. The IP address is assigned by DHCP Server A, so the DNS record will be registered and owned by DHCP server A. No other system, including WS1 or any other DHCP server, can update
this record.
Introduction to DnsUpdateProxy Group
There is a major drawback in the approach, where a single DHCP server is becoming an owner of a huge number of records. What happens if the original DHCP server fails, and we deploy a new DHCP server?
Can the new DHCP server update all records which were registered (and owned) by previous DHCP server?
The answer is NO.
Let’s assume DHCP Server A registered 5000 records in DNS Server, and then for some reason, it crashed. We have commissioned a new DHCP Server, which is DHCP Server B. But DHCP Server B will NOT be able to update those 5000 records
which were registered and owned by DHCP Server A. Even if we rename DHCP Server B to DHCP Server A, the issue will not be resolved as ACL works through SID, and not by hostname. The computer account SID of DHCP Server A and DHCP Server B will never be same.
Microsoft offers a solution to this problem. There is a built-in group called
DnsUpdateProxy, which can be (and should be) used in this scenario.
How to use DnsUpdateProxy Group
Step 1: The first thing that we need to do is to put DHCP servers within the DnsUpdateProxy group. Please note that this is a Global Security Group, so it will not allow adding any DHCP server
which is not in current domain.

Step 2: Now create a user (service) account in Active Directory which would be used by all DHCP servers during a secure dynamic update. Please name the account something like <dhcp_update> so that we can understand
later the purpose of this account.
This account should be created in the same AD Domain, where we have added the DHCP servers in the DnsUpdateProxy group in step 1. However, Microsoft confirms that it is possible to create the account in a different forest if forest
trust is configured.
Step 3: The next step is to configure this user account and credential, which we have created in step 2. This credential would be used by all DHCP servers to securely register the record in the DNS Server. This
needs to be configured in each DHCP server, which we have added in the DnsUpdateProxy group.
To configure this, right click on IPv4
> Advanced > Credentials .
Type the username and password of the user account. We have to make sure that we are using the same user account for all DHCP servers.
Please repeat step 3 for all DHCP servers which we have added in the DnsUpdateProxy group.

With this, the dynamic update configuration is complete.
|
Note |
|---|
| Configuring a credential is not a mandatory step if Domain Controller and DHCP server roles are installed in different servers. But it is a best practice recommended by Microsoft. |
The advantages of this approach are :
- When we configure credential in DHCP server, then all the records which are updated by that DHCP server will have that user account as owner and not the DHCP server. So even if someone adds a rouge DHCP server
in the DnsUpdateProxy group accidentally / intentionally, still that new DHCP server would not be able to update existing records registered by other DHCP servers, as those records are owned by the user account.
- If one DHCP Server crashes, another DHCP server in the pool will be able to update those records registered by the previous server. This is because both servers are using the same user account to register DNS record, so ACL will
not cause any problem.
To illustrate the scenario, let’s assume that we have configured a user account “dhcp_update” in DHCP Server A. This DHCP server is a member of the DnsUpdateProxy group. Now, when DHCP server A will register records in DNS, those
records would be owned by “dhcp_update” and not by DHCP Server A.
Now, let’s assume that DHCP Server A crashes, and we have deployed a new DHCP Server B. We have added DHCP server B in DnsUpdateProxy group and configured same credential which was configured in DHCP server A. Now, DHCP server
B can update all records which were registered by DHCP server A, as those records are owned by the account “dhcp_update” and not by DHCP Server A.
Please note that if we deploy Domain Controller and DHCP Server roles in the same server, then using dynamic update credential is not optional but mandatory. If DC and DHCP are on the same server, dynamic update would not work
properly without configuring credential.
As Microsoft confirmed, we must configure a dedicated user account and configure the DHCP server with the account credentials under the following circumstances:
- A domain controller is configured to function as a DHCP server
- The DHCP server is configured to perform DNS dynamic updates on behalf of DHCP clients.
- The DNS zones to be updated by the DHCP server are configured to allow only secure dynamic updates.
Changing zone settings from non-secure to secure
Now let’s assume a scenario, where an organization is having an AD integrated DNS zone, where dynamic update settings is configured as “Nonsecure and secure”. After a recent security audit, they have identified this security flaw
and decided to change it to “Secure only”. What are the things that we need to consider before changing the zone security type? Let’s consider these points:
- As this is an existing zone already in production, there are thousands of live records.
- This activity will not cause any impact on those records which are statically created. Generally, those are non-windows devices which do not support DDNS, like storage, network devices. Also, since Windows Server 2008, all Domain
Controllers register static DNS records during DC promotion. However, if we delete the Domain Controller static record, next time the same record would be registered as dynamic.
- At least 80% of those records are dynamic, means they are updated/refreshed after a certain interval, either by the system itself or by DHCP server.
- Since current dynamic update settings are: Allow Nonsecure and Secure update, there is no ACL associated with any of these dynamic records and all records have inherited ACL (permission) from the parent DNS zone.
- The moment we will change the zone type from non-secure to secure, ACL will come into the picture and it will NOT allow updating any of these dynamic records because there will be no matching entry (ACE) found with appropriate
permission to modify the record.
- Changing the zone type may not cause an immediate outage, as all records will not be updated at the same time. However, over the time, as and when system will get new IP addresses and will try to update corresponding DNS records,
those attempts would not be successful which will cause a big issue and would make the entire environment unstable.
Now that we have identified the potential risk, let’s proceed towards the solution.
Case 1: For those systems where IP addresses are manually assigned
In this case, the system itself will try to update DNS record if there is any change in the IP address. So far, it was not a problem as the zone was not secured and there was no custom ACL. But before securing the zone, we need
to ensure that such entries have corresponding system account as the owner.
What we are trying to achieve would be something like this:
| DNS Record Name | Entry to be added in Record ACL |
| Server1 | Computer account of Server 1 |
| Server2 | Computer account of Server 2 |
| Server3 | Computer account of Server 3 |
But how can we achieve this? How can we do this for a huge number of records?
I have created two PowerShell scripts which would help here:
Script 1:
Get Owner of Multiple DNS Records
Script 2:
Set and Remove DNS Records ACL
Using the second script, we can change ACL of bulk DNS records. The above links would tell us how to use these scripts.
Case 2: For those systems where IP addresses are assigned through DHCP
In this case, the DHCP server would try to register IP addresses on behalf of DHCP client. Let’s assume we have configured DnsUpdateProxy, and also configured credential on each DHCP server with the username “DHCP_Update”. Now,
before securing the zone, we have to ensure that this account will get sufficient privilege to update all existing records. How to ensure that?
Again, we have to run the same script to update the ACL of existing records, and to add “DHCP_Update” account in the ACL with full control.
How to segregate between Case 1 and Case 2 ?
Let’s assume there are 5000 existing dynamic records, some of which are updated by the system itself (Case 1) and some of which are updated by the DHCP server (Case 2).
How to segregate this?
One way is to use the first script and get the owner of the record. If the owner is the system itself, the record is registered and will be updated by the system. If the owner is DHCP server, the record is registered and will be
updated by DHCP server.
However, if there is confusion, and to avoid any possible outage after securing the zone,
the best approach is to configure both permissions.
So in this approach, each dynamic record will have two entries added with full control permission:
- The system computer account.
- The DHCP user (service) account: “DHCP_Update” in this case.
This is the safest approach, as it will ensure that after securing the zone the record would be updated, no matter who requests the update, system itself or DHCP server. So in this way, we can avoid/minimize any possible outage
after changing an existing DNS Zone from non-secure to secure.
If we have to change the security settings for multiple DNS zones which are already in production, the best approach is to change it in one zone, observe the result for few weeks and then proceed for others one by one. In case
of any critical issue, the backout plan is to change back the settings from “Secure Only” to “Nonsecure and secure”.
However, the best approach is to secure the zone before going to production, to avoid all these future complexities.
DHCP in a Multi-Domain AD Forest
Let’s now discuss a common scenario, where DHCP server is authorized in an AD forest and serving DHCP clients from multiple domains within that forest. Now, when DHCP server will register a DNS record, which DNS domain it will
choose to register the record?
Consider below scenario:
- We have a forest root domain subhro.com.
- We have deployed DHCP server in the forest root domain subhro.com.
- We have configured DHCP credential and put the DHCP server in the subhro.com\DnsUpdateProxy group so that it can update records in a secure only zone.
- We have also selected the option: Always dynamically update DNS records.

- There is a child domain: abc.subhro.com.
- A server EXMB01 is a member of abc.subhro.com domain.
- We have created a new scope for abc.subhro.com computers.
- Reverse lookup zone is setup both in parent domain as well as in child domain. This is for testing purpose.
Now, when DHCP will allocate IP addresses to abc.subhro.com computers, in which DNS server it will update the record:
- DNS server of subhro.com domain? (DHCP server is a member of this domain),
Or - DNS server of abc.subhro.com domain? (DHCP client is a member of this domain)
We know that in this scenario when DHCP server will allocate an IP address, it will register the A and PTR records in the DNS, but in which DNS zone The DNS zone where DHCP server belongs or the DNS zone where the DHCP client belongs?
In other words, how DHCP registration works in a multi-domain environment? Let’s try to find out the answer. As we can see in below diagram, we have configured a scope in the DHCP server which is at the root domain subhro.com.
But, we have not configured any scope option.

The DHCP server has assigned an IP address from its pool.

Now, let’s check whether the DNS record is updated, and if yes, where.
As we can see, the Host (A) record is updated in abc.subhro.com DNS zone, which is correct, as this server is a member of abc.subhro.com domain.
However, the PTR record is registered in the reverse lookup zone which is hosted on subhro.com AD Domain, not the reverse lookup zone which is in the child domain.

Now, to do some further testing, let’s disjoin this server from abc.subhro.com domain and join it in subhro.com domain, and see the result.
Before that, please delete the current lease, DNS Host record, and PTR record.
When we disjoin this server from domain and reboot in the workgroup, still DHCP will provide an IP address. The host record will not be updated in DNS, but the reverse lookup will still be updated in parent DNS zone without FQDN.
Delete this record before joining this server to subhro.com domain.

Once the server is joined to subhro.com domain, please reboot it.
We will now see that both Host and PTR records are registered in subhro.com domain.


We should also validate the record ACL, to ensure that it is updated by DHCP server using the credential.
Conclusion
When updating the host record, DHCP server searches for a DNS server which is authoritative for the zone matching the domain name of DHCP client.
So if DHCP client is a member of abc.subhro.com domain, DHCP server will look for a DNS server which is authoritative for the zone abc.subhro.com.
If DHCP client is a member of subhro.com domain, DHCP server will look for a DNS server which is authoritative for the zone subhro.com.
Even if we specify a different domain name in DHCP scope option 15 (DNS Domain Name), this behavior would not change. We have tested this point.
However, it has been observed that for updating PTR record it always looks for the parent domain DNS server.
So, we can conclude that in a multi-domain forest, we can deploy DHCP server in parent domain which would serve clients from parent domain as well as child domain, and would register DNS records in the correct DNS server based
on the domain membership of DHCP client. In order to do so, we have to configure below things:
- Configured all AD Integrated zones to allow Secure Only Dynamic update.
- Put all DHCP servers in the DnsUpdateProxy group.
- Configure one single DHCP credential in all DHCP servers to perform a secure update.
Managing Stale Records
Another key area to maintain a healthy DNS database is to identify and delete stale records.
Stale records in the DNS database would lead to incorrect/duplicate DNS records for crucial servers, devices, and databases causing major disruption in service.
There is a setting in the DHCP server: Discard A and PTR records when a lease is deleted.
When this setting is enabled, the A and PTR record would be deleted from DNS, as soon as the lease is deleted from DHCP server.
We have tested this scenario in our test lab, keeping DHCP server and client in two different domains, and it worked every time. Enabling scavenging is not required for this to work. In our test lab, we did not enable scavenging
in forward or reverse zone, but still, it worked immediately.

To manage other stale records in DNS server, scavenging needs to be enabled.
However, scavenging is beyond the scope of this article as we are only covering integration between DNS and DHCP. Please keep in mind to set the scavenging NOREFRESH and REFRESH values combined to be equal to or greater than the DHCP lease period.
Name Protection
DHCP Name Protection is a feature, which has been introduced to prevent something called Name Squatting. This feature was first introduced in Windows Server R2.
Name squatting happens when the DHCP server registers an FQDN in DNS, which is already registered by another client. In this case, the first machine will no longer become accessible.
In a secure only zone, this generally does not happen for Windows clients as those are protected using ACL. However,
there is no ACL for non-windows systems so they can be overwritten easily by another entry.
When Name Protection is enabled, it uses a resource record known as DHCID. This DHCID records is initiated by DHCP, and it is stored in DNS Server. When another client will try to register a record with the same FQDN, it will be
prevented to do so, thus keeping the record intact for the first client.
If there are too many non-windows systems, devices present in the environment which use DHCP and DNS, then it is recommended to enable Name Protection feature to prevent Name Squatting.
Name Protection can be enabled from the DHCP server level, as well as scope level. The scope level settings take precedence over the server level.

See Also
- How DHCP and DNS update interaction works
- DNS Record Ownership and the DnsUpdateProxy Group
- How to Secure DNS Updates on Microsoft DNS Servers
- Dynamic DNS registration process can cause queue build up and failures
- DHCP, Dynamic DNS Updates , Scavenging
Установка и настройка DNS-сервера и Active Directory, DHCP-сервера в Windows Server 2019 не отличается от предыдущих выпусков серверов компании Microsoft, таких как Windows Server 2016, 2012. Пройдя несколько шагов несложно устанавить следующие роли: DNS-сервер и Доменные службы Active Directory, DHCP-сервер.
- Переименование сервера
- Настройка сетевого интерфейса
- Установка на сервера ролей: DNS-сервер, Доменные службы Active Directory, DHCP-сервер
- Повышение роли сервера до уровня контроллера домена
- Настройка обратной зоны DNS
- Настройка DHCP-сервера
Переименование сервера
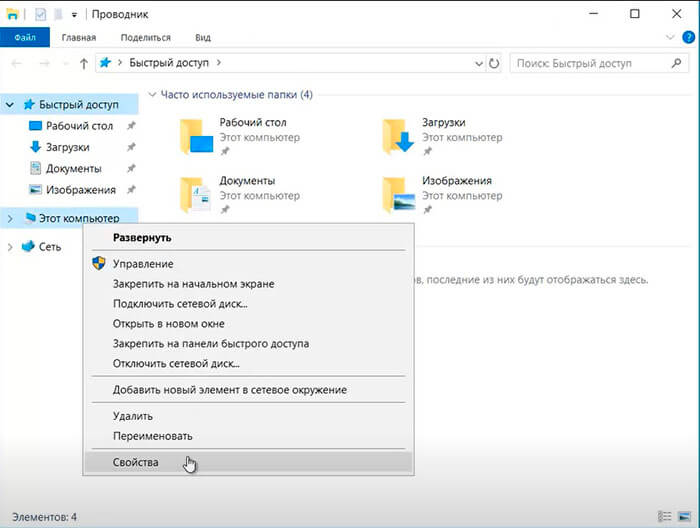
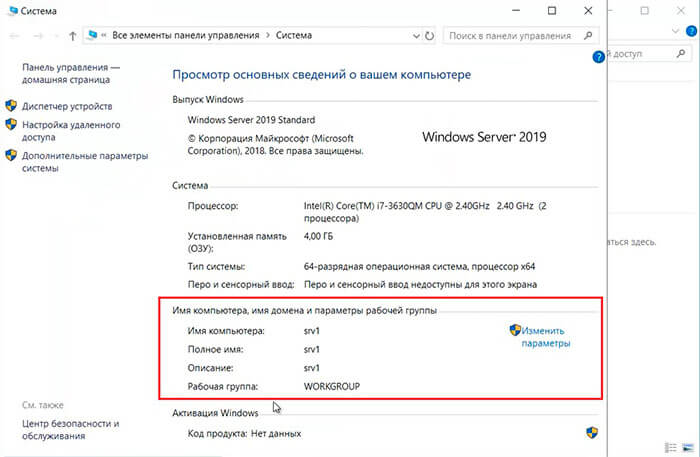
1. Для изменения имени сервера нажимаем правой клавишей мыши на «Этот компьютер«, в появившемся меню выбираем «Свойства«.
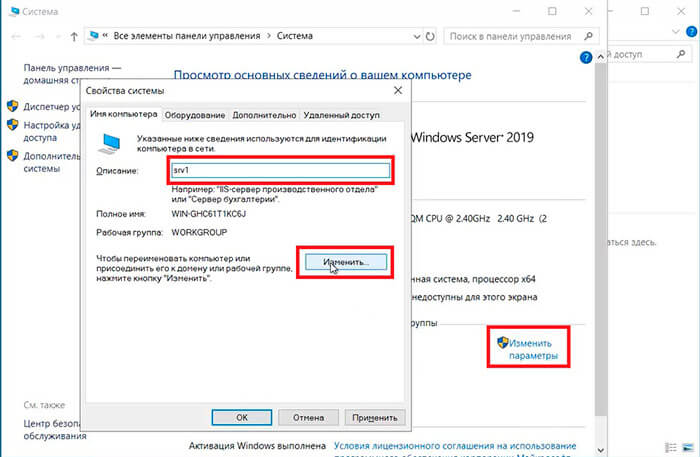
2. Далее нажимаем «Изменить параметры«. В открывшемся окне добавляем описание сервера, далее выбираем «Изменить«.
3. Задаём «Имя компьютера«, нажимаем «ОК«. Появится предупреждение о том, что изменения вступят в силу после перезагрузки компьютера. Подтверждаем — «ОК«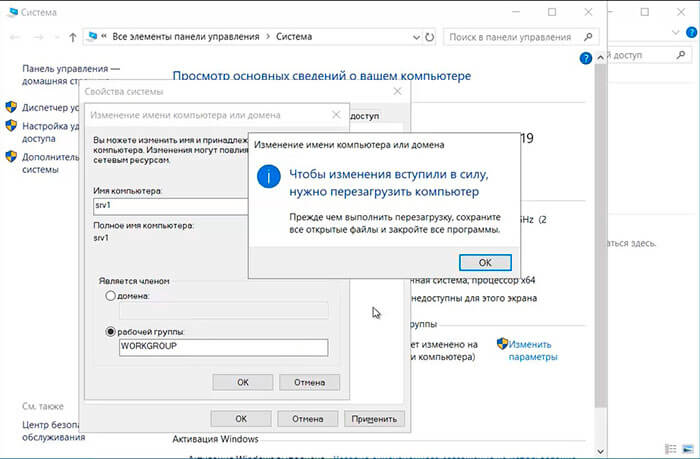
4. Нажимаем «Перезагрузить сейчас» и ожидаем перезагрузки сервера.
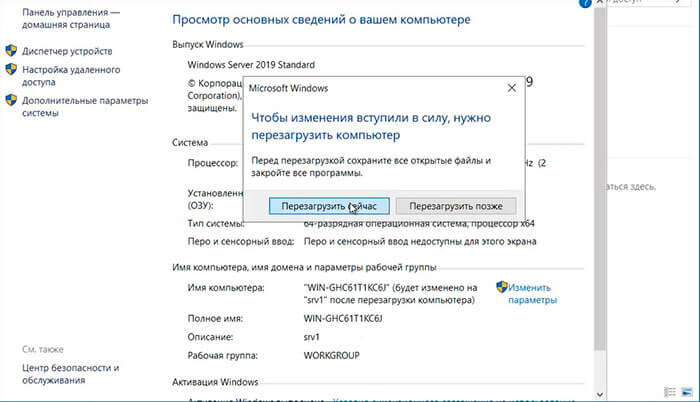
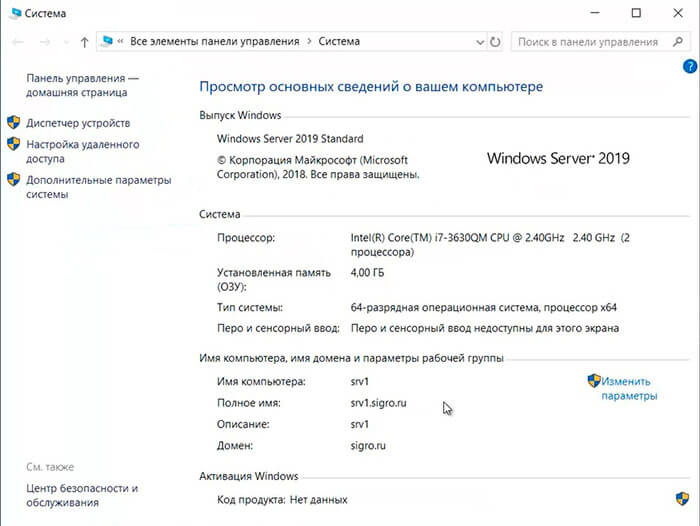
5. После перезагрузки компьютера проверяем имя сервера («Мой компьютер» — правой клавишей мыши — «Свойства«).
Настройка сетевого интерфейса
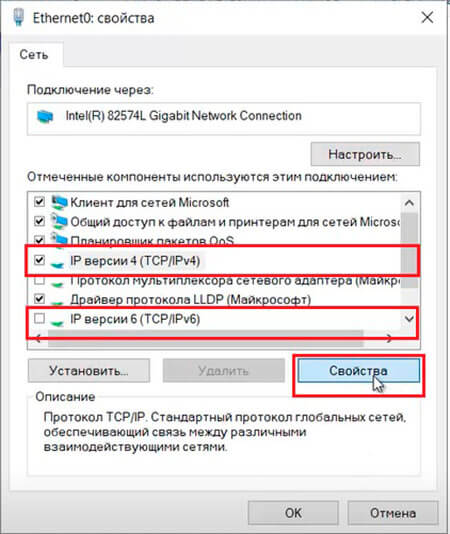
6. Для настройки сетевого интерфейса в поиске набираем ncpa.cpl, далее «Enter«. Снимаем чекбокс «IP версии 6«, далее выбираем «IP версии 4«, далее «Свойства«.
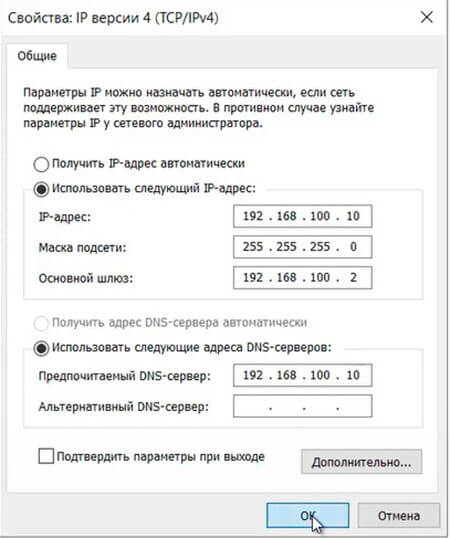
7. Выбираем «Использовать следующий IP-адрес» и задаём статический IP-адрес сервера, маску подсети, основной шлюз (если есть), и предпочитаемый DNS-сервер. Нажимаем «ОК«. На этом настройка сетевого интерфейса закончена.
Установка на сервера ролей: DNS-сервер, Доменные службы Active Directory, DHCP-сервер
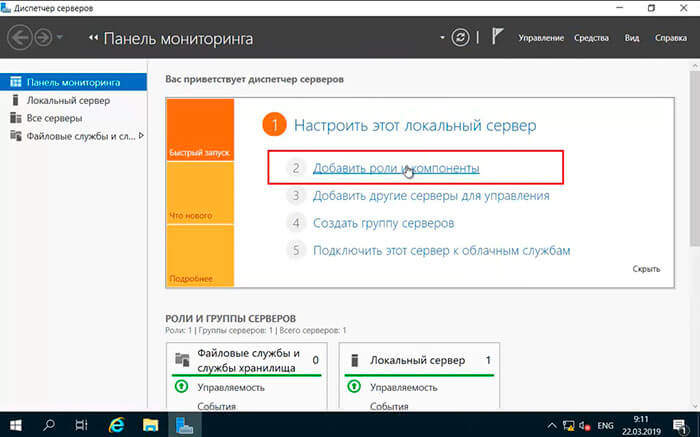
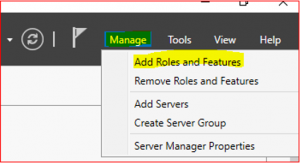
8. Нажимаем «Пуск«, далее «Диспетчер серверов«.

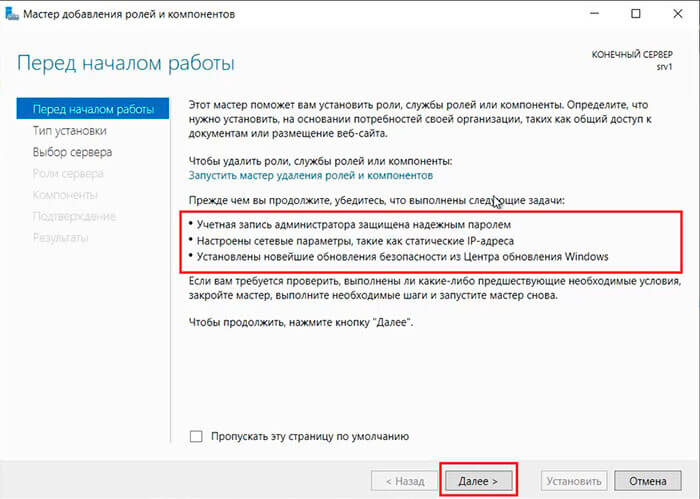
9. В новом окне выбираем «Добавить роли и компоненты«.
10. Читаем предупреждение сервера «Перед началом работы«, не забываем защитить учетную запись администратора надежным паролем, затем «Далее«.
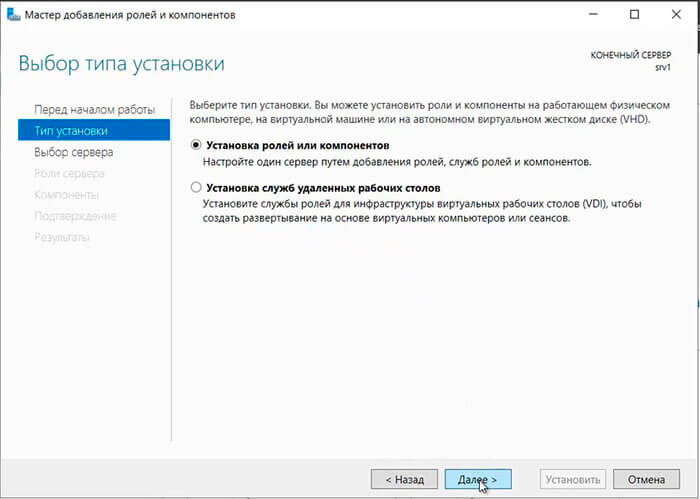
11. Проверяем, что чекбокс стоит на «Установка ролей или компонентов«, затем «Далее«.
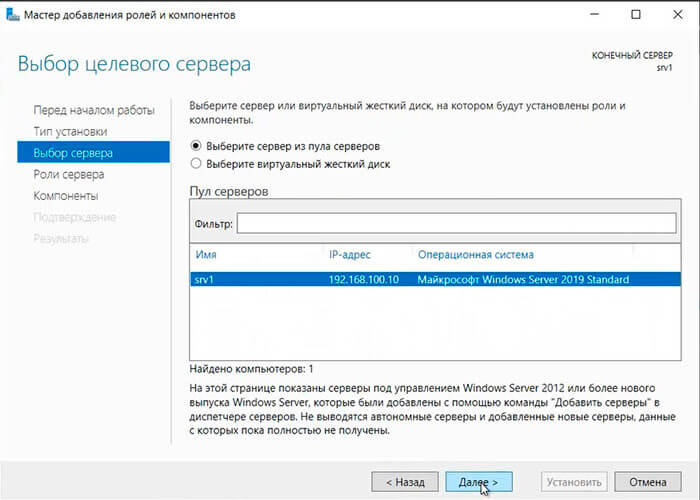
12. Выбираем сервер, на который будут установлены роли и компоненты. Снова «Далее«.
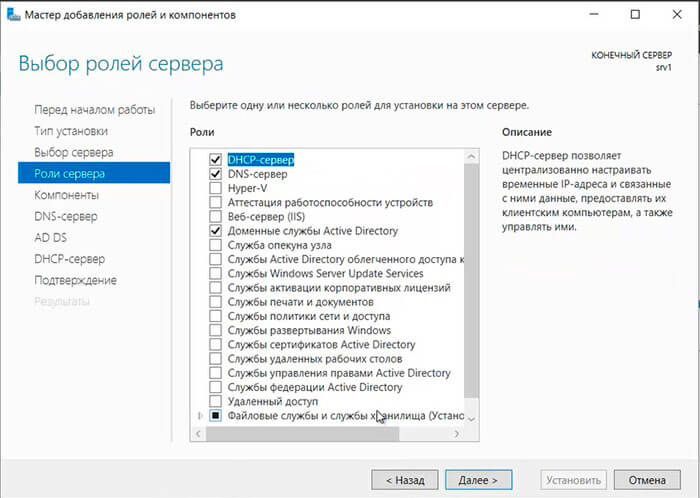
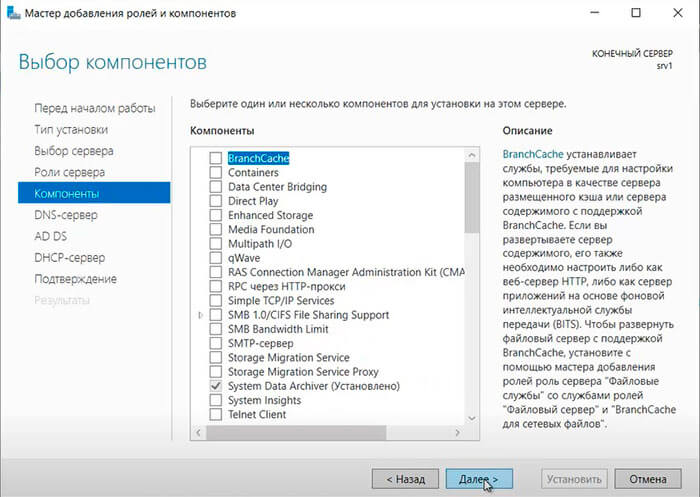
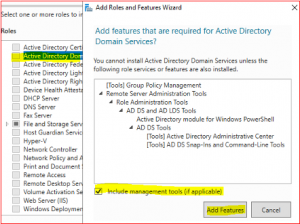
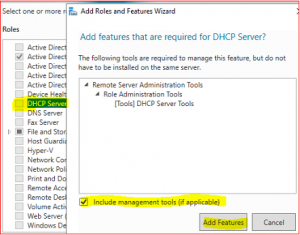
13. Устанавливаем чекбоксы напротив выбранных ролей сервера, в данном случае это DNS-сервер, Доменные службы Active Directory, DHCP-сервер. Нажимаем «Далее«.
14. При каждом выборе роли будет появляться «Мастер добавление ролей и компонентов«, который будет спрашивать о добавлении компонентов для выбранных ролей сервера. Нажимаем «Добавить компоненты«.

15. Нажимаем «Далее«, необходимые компоненты были выбраны в предыдущем шаге.
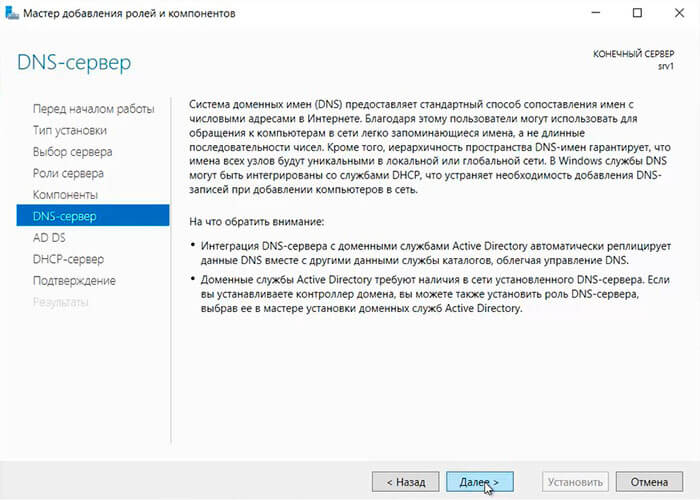
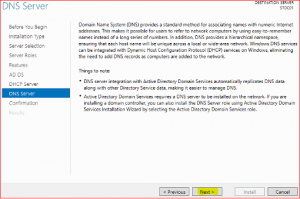
16. Читаем предупреждение DNS-сервера на что обратить внимание, затем «Далее«.
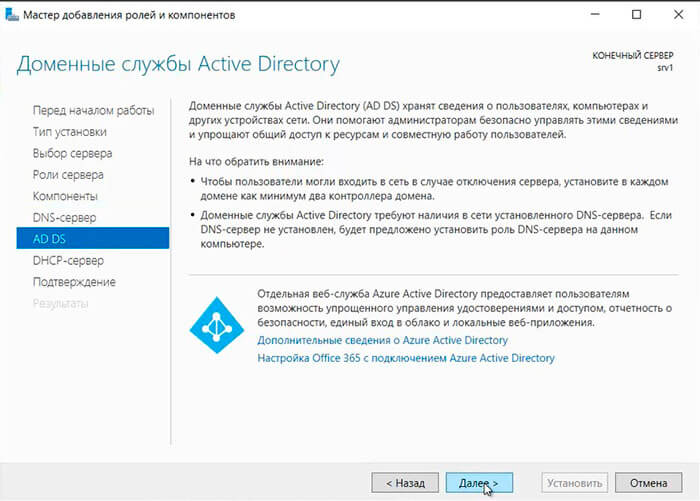
17. Читаем предупреждение AD DS, нажимаем «Далее«.
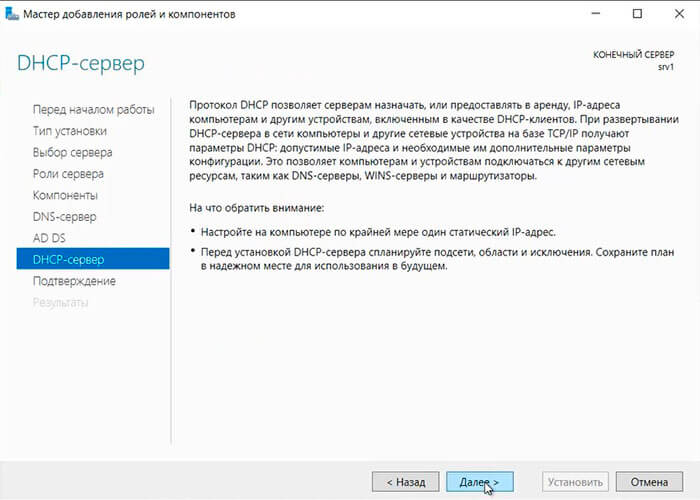
18. Читаем предупреждение DHCP-сервера, снова «Далее«.
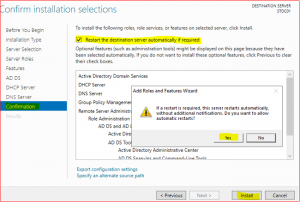
19. Ставим «чекбокс» напротив «Автоматический перезапуск конечного сервера, если требуется«, нажимаем «Установить«.
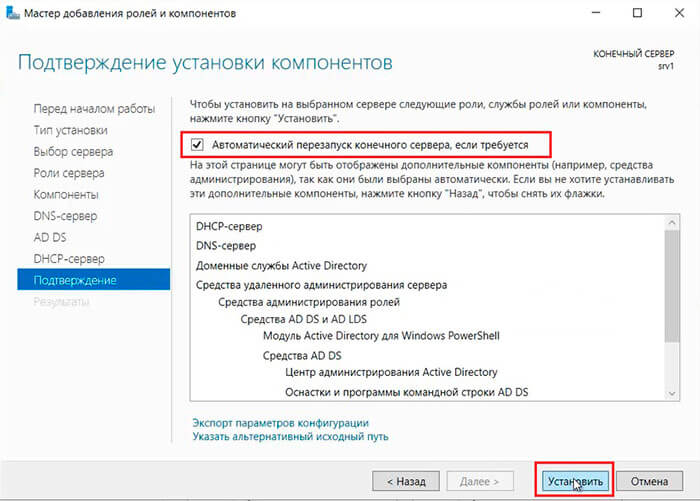
В результате произойдет установка выбранных ролей сервера.
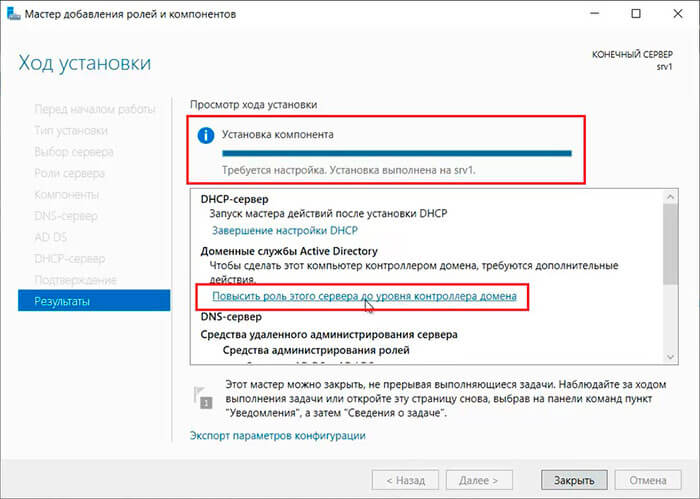
Повышение роли сервера до уровня контроллера домена
20. Нажимаем «Повысить роль этого сервера до уровня контроллера домена«.
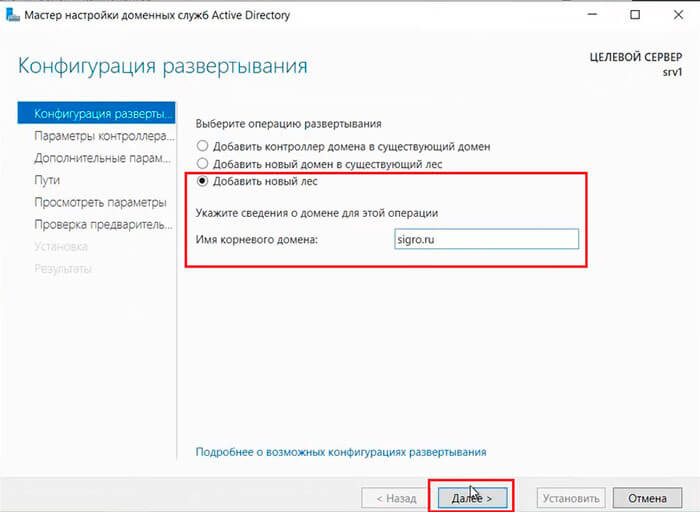
21. Далее выбираем «Добавить новый лес» и задаем «Имя корневого домена«.
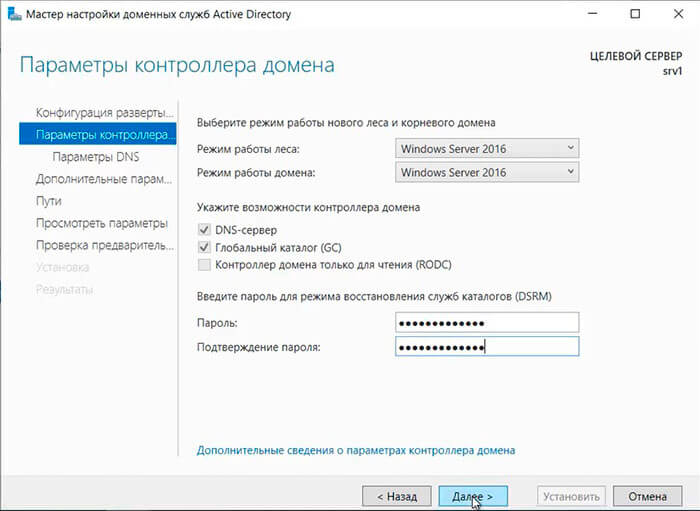
22. В следующем окне дважды вводим пароль для режима восстановления служб каталогов (DSRM), затем «Далее«.
23. В следующем окне снова «Далее«.
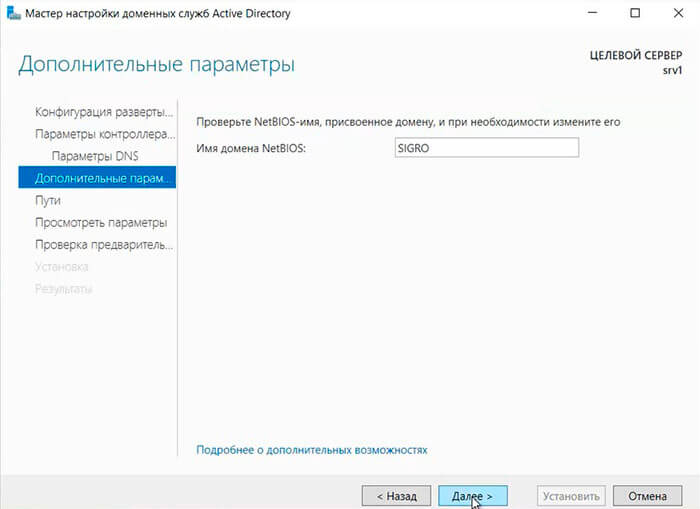
24. Проверяем NetBIOS-имя, присвоенное домену, и при необходимости меняем его. Затем «Далее«.
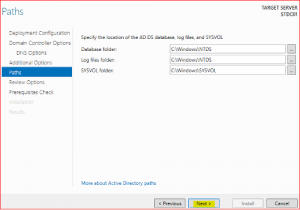
25. Оставляем по умолчанию расположение базы данных AD DS, файлов журналов и папки SYSVOL, снова «Далее«.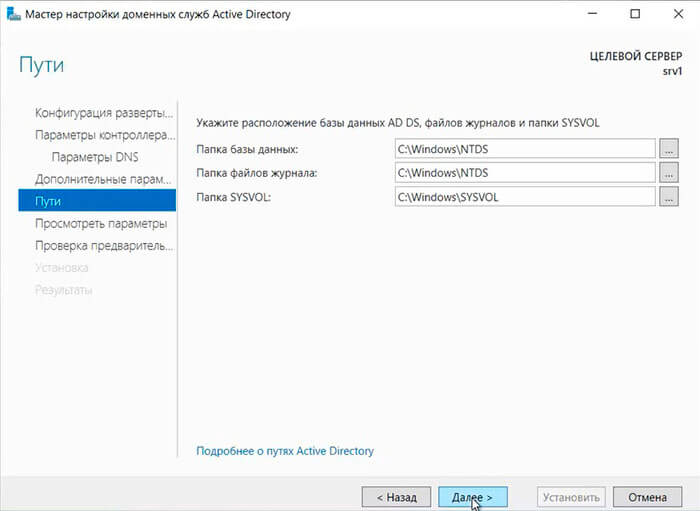
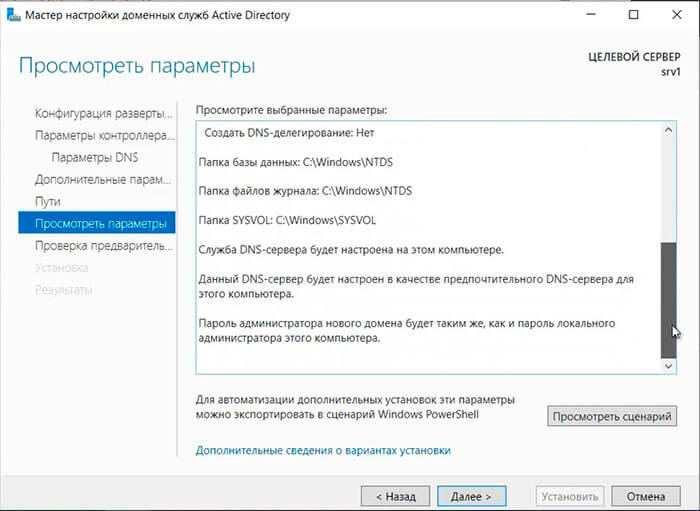
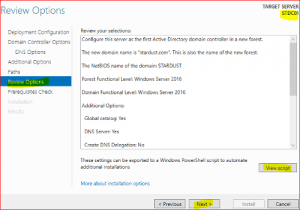
26. После просмотра выбранных параметров и их одобрения нажимаем «Далее«.
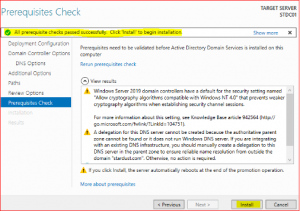
27. Если проверка готовности к установке выполнена успешна, то запускаем установку — «Установить«.
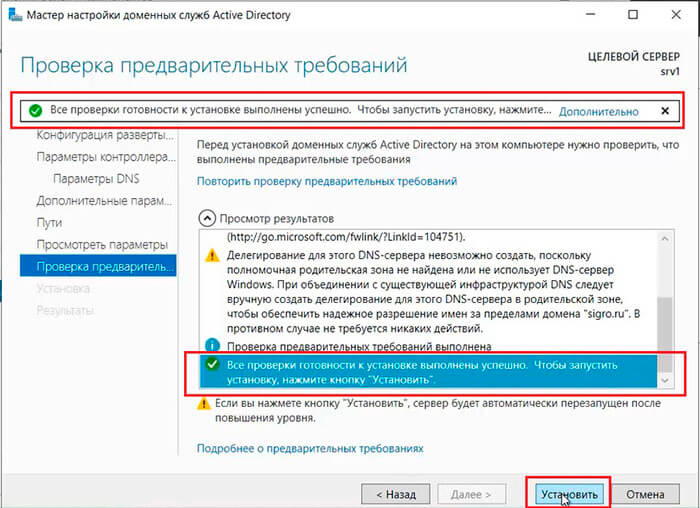
28. По завершению установки произойдет перезагрузка сервера.
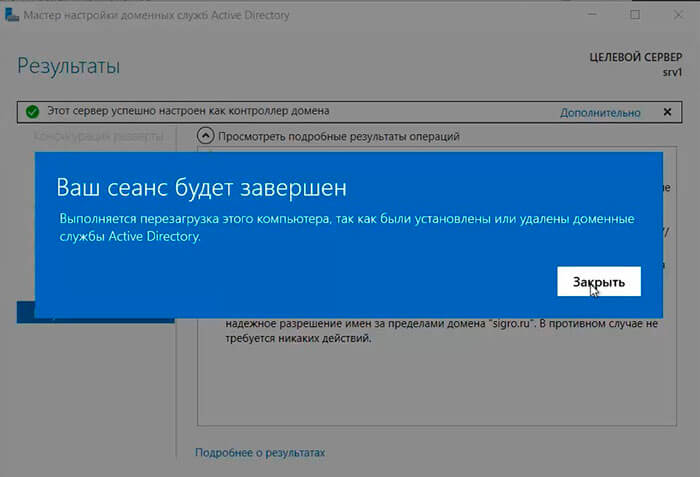
29. После перезагрузки полное имя компьютера изменится, к имени сервера добавиться доменное имя. Active Directory можно использовать.
Настройка обратной зоны DNS
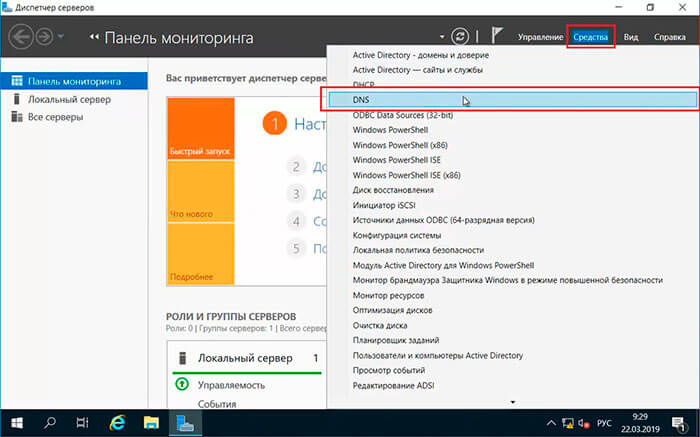
30. Для настройки обратной зоны DNS в Диспетчере серверов выбираем «Средства» — «DNS«
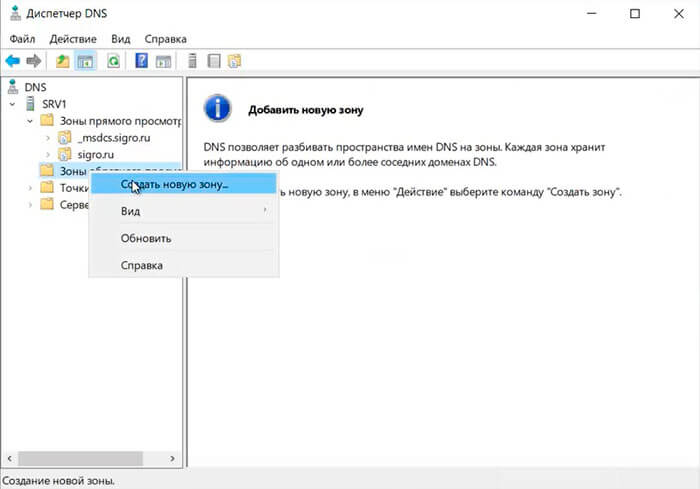
31. Раскрываем дерево DNS, нажимаем правой клавишей мыши на «Зоны обратного просмотра«, в появившемся меню «Создать новую зону…«.
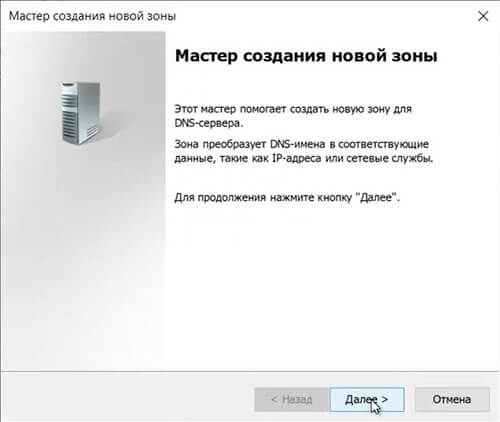
32. В появившемся мастере создания новой зоны нажимаем «Далее«.
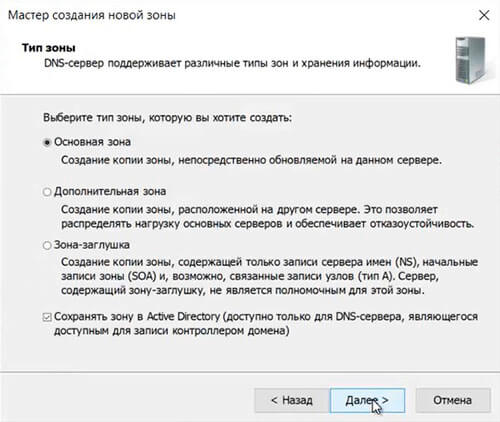
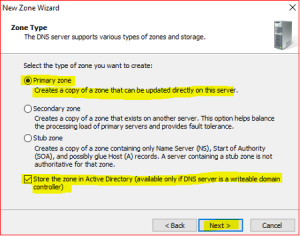
33. Выбираем «Основная зона«, затем «Далее«.
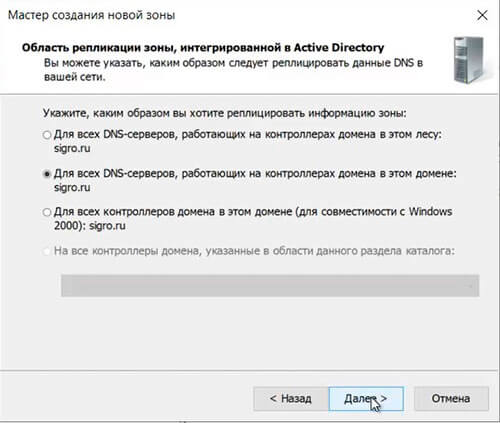
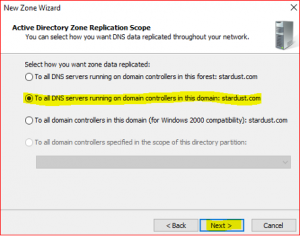
34. Оставляем по умолчанию область репликации зоны, интегрированной в Active Directory, нажимаем «Далее«.
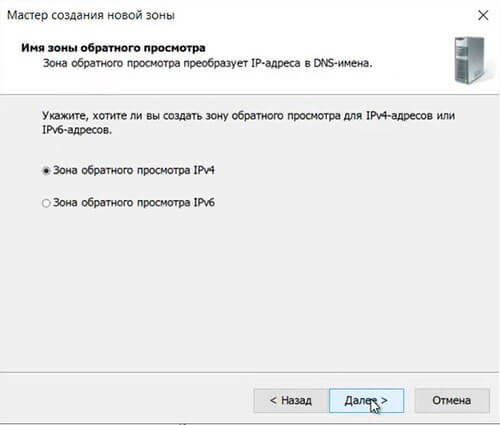
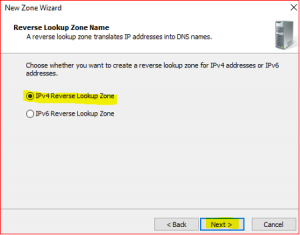
35. Оставляем «Зона обратного просмотра IPv4», просто «Далее«.
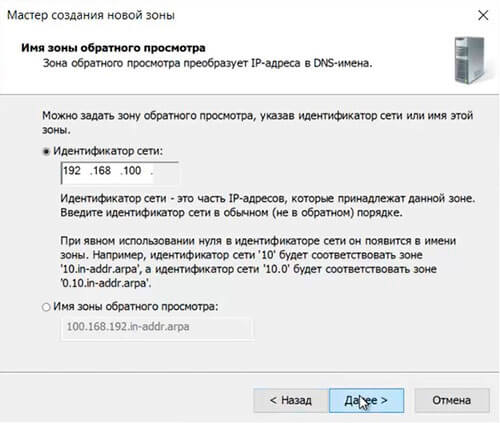
36. В следующем окне задаем Зону обратного просмотра, которая преобразует IP-адреса в DNS-имена. В идентификатор сети забиваем три актета своей сети, затем «Далее«.
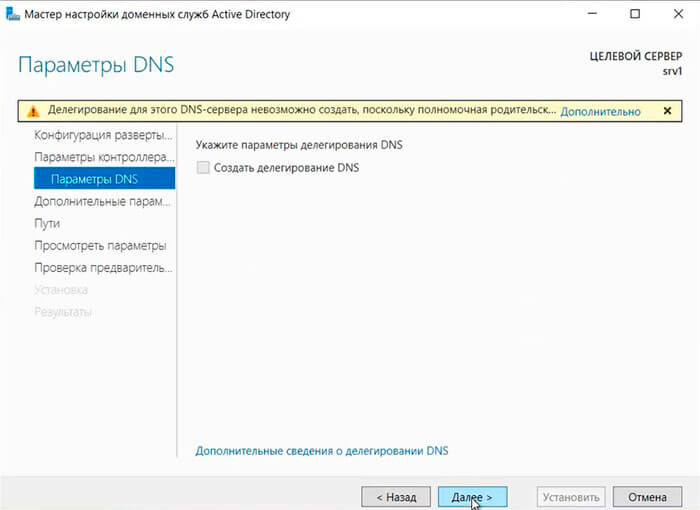
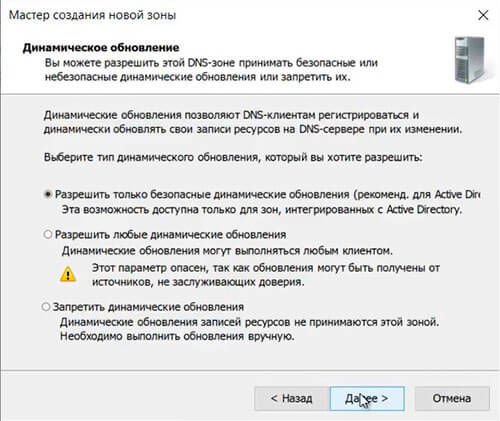
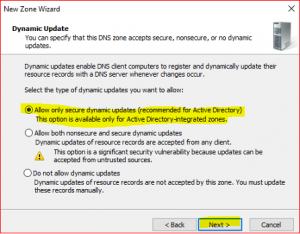
37. Разрешаем только безопасные динамические обновления, снова «Далее«.
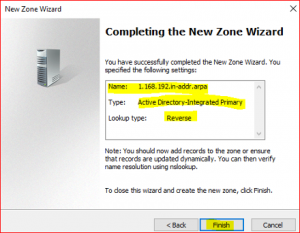
38. Зона обратного просмотра создана.

Настройка DHCP-сервера
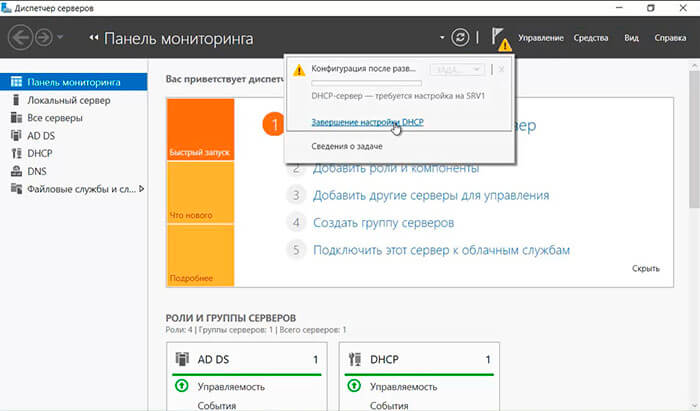
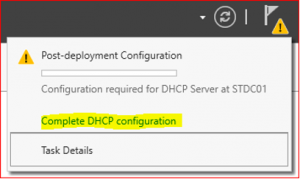
39. После установки роли DHCP-сервера в Диспетчере серверов нажимаем на желтый треугольник, в появившемся окне выбираем «Завершение настройки DHCP«.
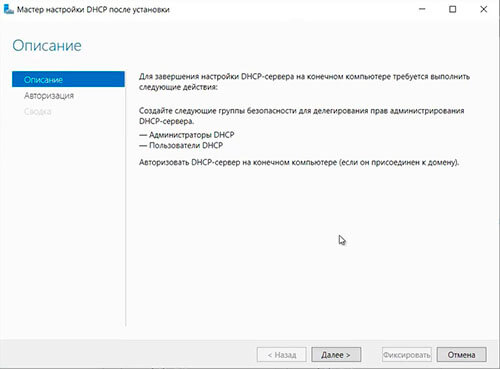
40. В следующем окне читаем описание завершения настройки DHCP-сервера на конечном компьютере, затем «Далее«.
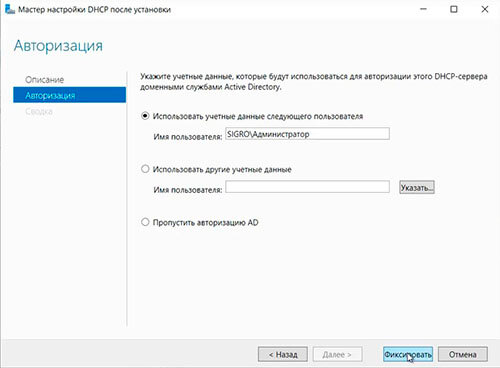
41. Оставляем по умолчанию учетные данные, которые будут использоваться для авторизации DHCP-сервера доменными службами Active Directory. Нажимаем «Фиксировать«.
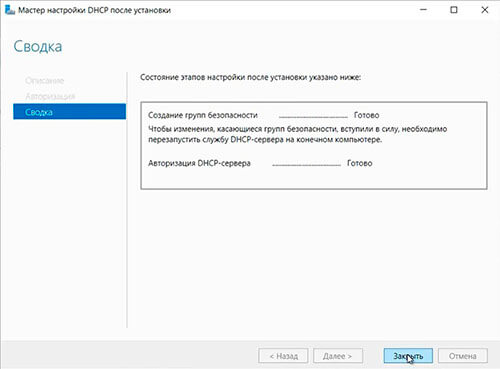
42. В следующем окне нажимаем «Закрыть«.
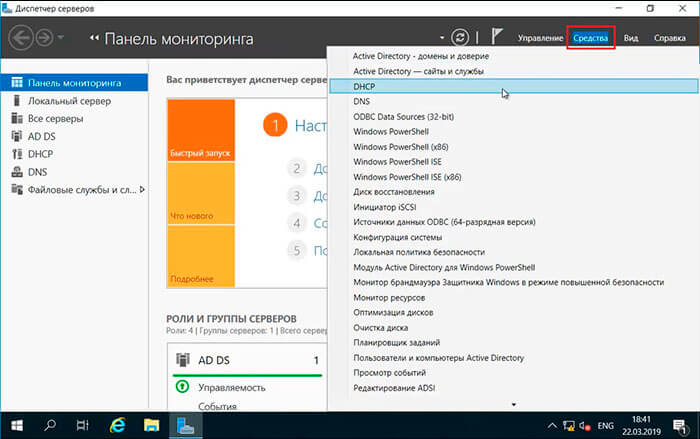
43. В диспетчере серверов нажимаем «Средства» — «DHCP«.
44. В открывшемся окне открываем дерево DHCP. Правой клавишей мыши нажимаем на домен, в появившемся окне выбираем «Добавить или удалить привязки…«.
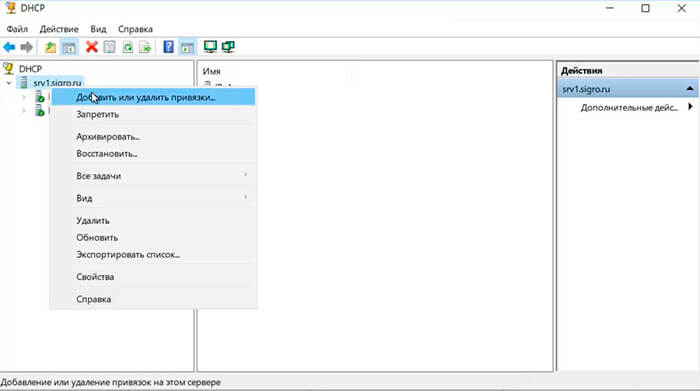
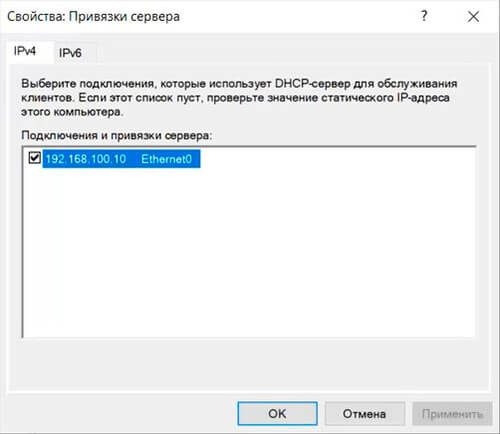
45. Проверяем сетевой интерфейс, который будет использовать DHCP-сервер для обслуживания клиентов. Далее «ОК«.
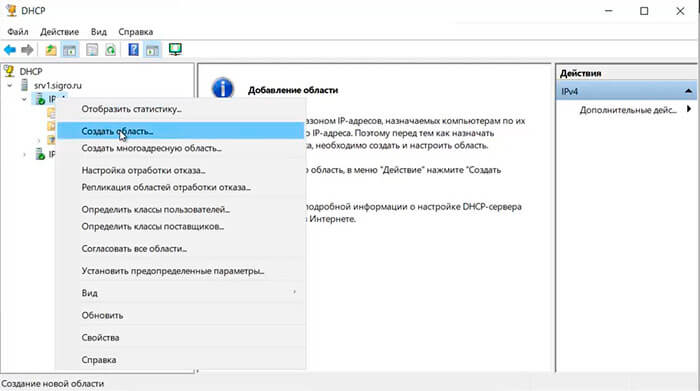
46. Затем правой клавишей нажимаем на IPv4, в появившемся меню выбираем «Создать область…«.
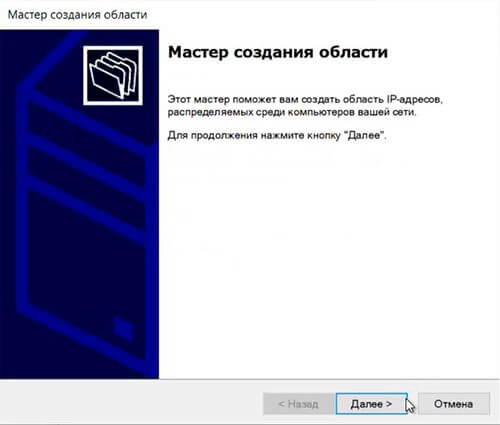
47. Откроется мастер создания область, который помогает создать область IP-адресов, распределяемых среди компьютеров вашей сети. Нажимаем «Далее«.
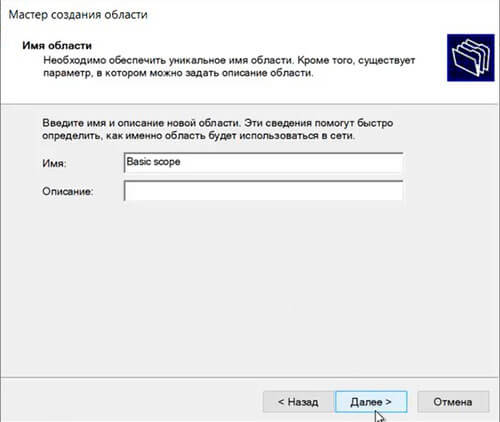
48. Задаем имя новой области, если необходимо, задаем также описание новой области. Снова «Далее«.
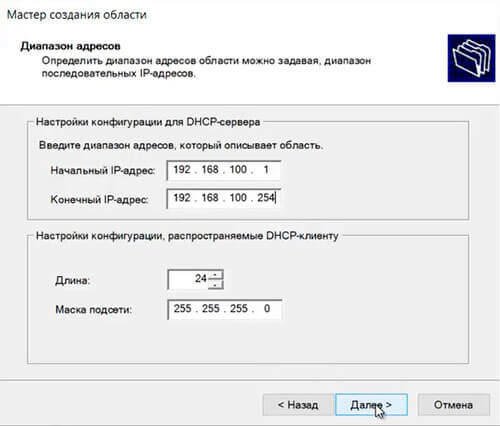
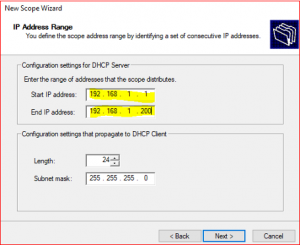
49. Вводим диапазон адресов, который описывает создаваемую область, маску подсети. Нажимаем «Далее«.
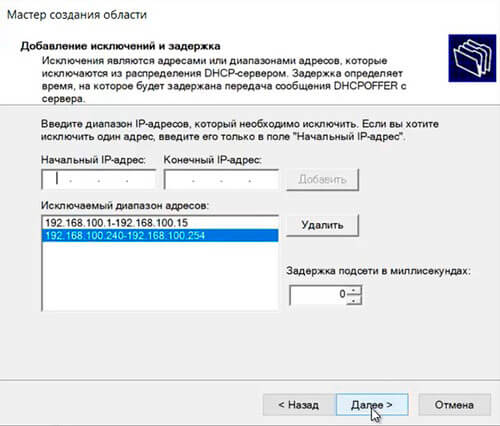
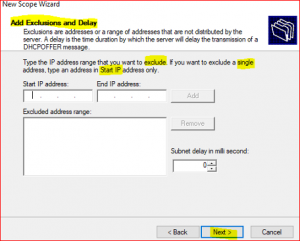
50. В следующем окне вводим с помощью кнопки «Добавить» один адрес или диапазон IP-адресов, который необходимо исключить. После ввода всех адресов или диапазонов нажимаем «Далее«.
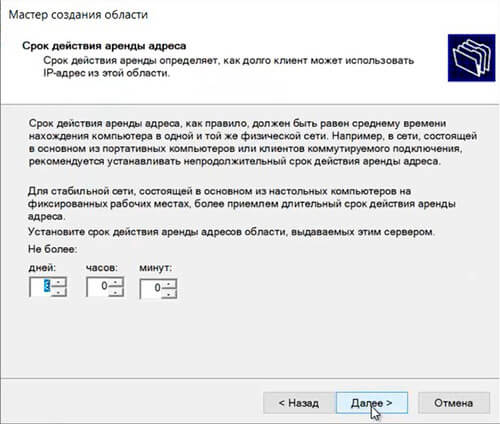
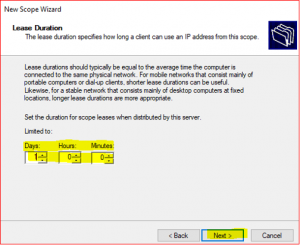
51. Оставляем по умолчанию срок действия аренды адресов области, выдаваемых сервером. Снова «Далее«.
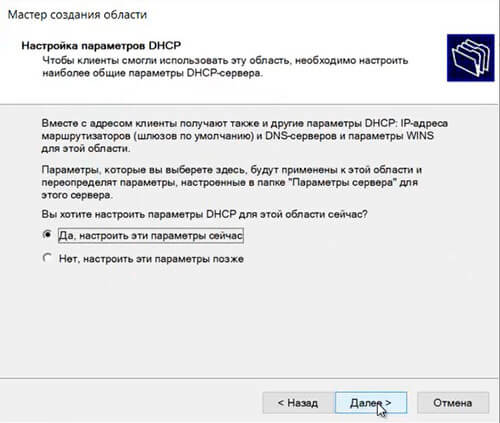
52. Для настройки других параметров DHCP выбираем «Да, настроить эти параметры сейчас«, затем «Далее«.
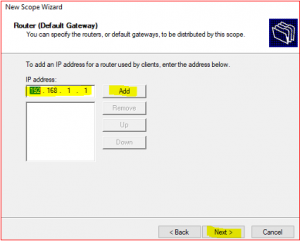
53. Добавляем с помощью кнопки «Добавить» IP-адрес маршрутизатора, снова «Далее«.

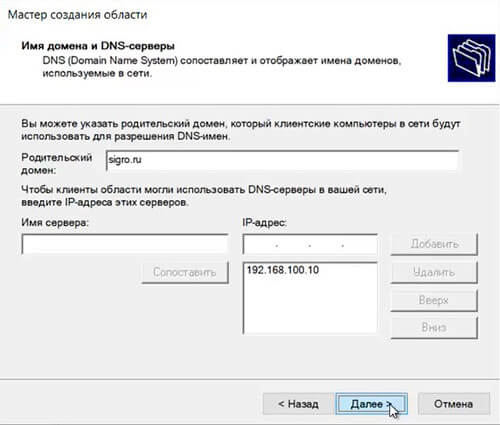
54. Оставляем по умолчанию родительский домен, который клиентские компьютеры в сести будут использовать для разрешения DNS-имен. Затем «Далее«.
55. Вводим IP-адреса WINS-сервера, или нажимаем просто «Далее«.

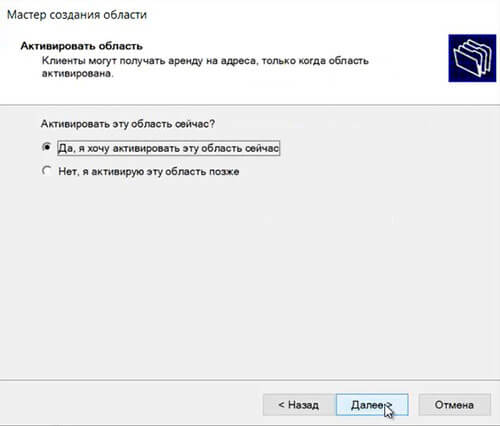
56. Выбираем «Да, я хочу активировать эту область сейчас«, затем «Далее«.
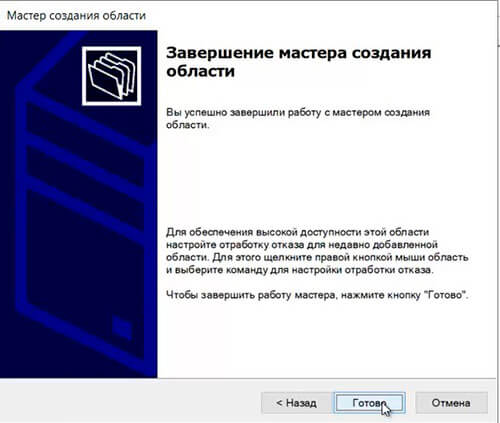
57. В следующем окне появится «Вы успешно завершили работу с мастером создания области», нажимаем «Готово».
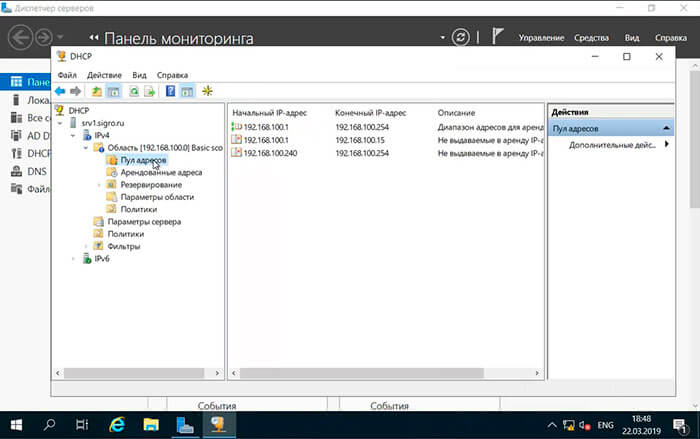
58. Вновь созданный диапазон появится в «Пул адресов«.
Посмотреть видео можно здесь:
Читайте также:
- Windows server 2019 — установка и настройка WSUS, создание и настройка GPO
- Windows server 2019 — добавление и удаление компьютера в домене
- Windows server 2019 — переименование администратора домена, изменение формата выводимого имени пользователя
- Windows server 2019 — создание и удаление пользователя, группы, подразделения в домене
- Windows server 2019 — установка и настройка сервера печати, разворачивание МФУ с помощью GPO
- Windows server 2019 — GPO изменение экранной заставки, отключение монитора, изменение политики паролей
Как установить и настроить Active Directory, DNS, DHCP?
Здравствуйте, уважаемые друзья! В предыдущем выпуске мы с вами рассмотрели базовые настройки Windows Server 2019. В сегодняшней статье мы с вами продолжим разговор про Windows server 2019, в частности рассмотрим установку и настройку Active Directory, DNS, DHCP Windows Server 2019.
Прежде чем приступить к дальнейшей установке, нам с вами необходимо будет проверить ip адрес сетевого интерфейса. Сделать это можно при помощи специальной команды ncpa.cpl, прописав ее в командной строке.

Проверим еще раз ip адрес сетевого интерфейса

На следующем шаге откроем «Диспетчер серверов» и нажмем «Добавить роли и компоненты» и нажимаем несколько раз «Далее», чтобы перейти к выбору установок ролей на Windows Server 2019.

Теперь нам с вами нужно определиться какие конкретно роли мы хотим установить на свой Windows Server 2019.

На следующем шаге потребуется перейти по кнопкам «Далее» и установить «Автоматический перезапуск конечного сервера».

Теперь нам с вами потребуется в процессе создать новый лес и повысить роль этого сервера до уровня контроллера домена, как показано на рисунке ниже.

В процессе установки нам с вами нужно будет подтвердить правильность заданных параметров, перейдя по кнопкам «Далее». В завершении нажимаем «Установить».

Затем Сервер будет перезагружен, о чем уведомит нас в соответствующим сообщением.

Ждем перезагрузки компьютера и проверяем имя компьютера в созданном нашем домене.

Как настроить зону обратного просмотра?
На следующем шаге мы с вами будем настраивать зону обратного просмотра. Для этого в главном окне диспетчера серверов заходим «Средства» -> «DNS».

В открывшемся окне диспетчера серверов необходимо будет кликнуть ПКМ по «Зона обратного просмотра».

Теперь нужно будет нажать несколько раз «Далее» и указываем, что мы хотим создать зону обратного просмотра.

Далее задаем наш соответствующий идентификатор сети, как показано на рисунке ниже.

Как мы видим, зона обратного просмотра успешно создана.

Как настроить DHCP сервер?
В завершении нам оcтается выполнить настройку DHCP сервера. Для этого заново переходим в «Средства» -> «DHCP».

Если говорить простыми словами, то нам с вами потребуется настроить зону IP адресов, благодаря которым компьютеры будут выходить в общедоступную локальную сеть.
В нашем варианте используем DHCP сервер Ipv4 для обслуживания клиентов. Кликаем правой кнопкой мыши (ПКМ) и создаем область.

Необходимо будет указать диапазон IP адресов, как показано на рисунке ниже.

На следующем этапе переходим по кнопкам «Далее» и соглашаетесь с тем, что хотите активировать эту область сейчас.

Стоит также добавить в исключения IP адреса.

На следующем шаге проверяем домен


В завершении мы с вами можем перейти в пул адресов нашего сервера Windows Server 2019 и посмотреть общие правила настройки IP адресов.

Did you know that Windows DHCP server can update records dynamically for its clients on DNS server? Having DHCP server updating DNS records for client machines is very useful if you have a network application that relies so much on the name resolution for its communication. However, the default configuration of Windows DHCP server is to update A and PTR records for the clients only when requested. In most case, it doesn’t work very consistent. In this post, we’ll guide you to Configure DNS Dynamic Update in Windows DHCP Server and ensure it is fully working.
In our post about the concept of refresh and update in DNS server, we have briefly explained the DHCP server can take the ownership of DNS record for its clients. Owner of a record is given the right to modify/delete the record. Now our goal here is to make sure that DHCP server can consistently update the DNS records for all its clients.
Step 1 – Set DHCP server to always dynamically update records
You can start configure DNS dynamic update in Windows DHCP server by opening the DHCP console. Expand the server name > right-click on IPv4 > select Properties > DNS tab.

You’ll see by default on Windows Server 2012 R2 the option to “Enable DNS dynamic updates according to the settings below” is enabled by default and you have two selection options as follow:
- Dynamically update DNS A and PTR records only if requested by the DHCP clients – This is the default selection. This setting means that your DHCP server will only update DNS records for the clients only if the clients for some reason unable to perform the update. As stated below, this may not work correctly, especially if the clients are non-Windows machine.
- Always dynamically update DNS A and PTR records – Now you must change the selection to this option. What will happen is the DHCP server will perform the update regardless the client is able to do it or not.

Now you may also notice there are several other options in the same tab in DHCP server properties. The explanation below will tell you the function of each option and what you need to do with them:
- Discard A and PTR records when lease is deleted — As the name implies, it will delete the previously registered A and PTR record when the DHCP lease for the corresponding client is deleted. Tick the box to enable this option as it will help clean-up unused records in the DNS Server.
- Dynamically update DNS records for DHCP clients that do not request for updates — This option is present just in case you have a very old machine or non-Windows machine as DHCP client that do not perform dynamic update of its own record in the DNS server. Tick the box to enable this option and force the DHCP server to perform DNS update for them.
- Disable dynamic updates for PTR records — When you active this option, your DHCP server will only perform the dynamic update for A records. It’s up to you on what to do with this option, but in this example we don’t tick the box for this option and let the DHCP server to also manage the PTR records.

With all the things configured here, we actually have set the DHCP server to take ownership of all its client records in the DNS server. However, we’re still far from done as there are few additional steps that we must do.
Step 2 — Add the DHCP server to DnsUpdateProxy security group
If the DHCP server is on a different machine than the Domain Controller, make sure to include the DHCP server in the DnsUpdateProxy group in Active Directory (see figure below). Otherwise, the DHCP server will not be able to update the records on DNS server.

Step 3 – Provide credential to secure the DNS dynamic update
This applies if the DNS zone where your DHCP server will register/update records is an Active Directory-integrated zone which allows only secure dynamic updates.

You need to provide a user account in the DHCP server properties. Open the Advanced tab of the DHCP server properties and click the Credentials button.

Fill in the username, domain, and password in the available field.

Note that the account can be a regular user account without any special privilege but it must exist in the same forest as the DNS server. You can also use user account from different forest, as long as its forest has established a forest trust with the forest where the DNS server resides.
Step 4 — Configure name protection
Since we’re enabling the “Dynamically update DNS records for DHCP clients that do not request for updates” option, means that we’re allowing non-domain machine or non-Windows machine to have their records as well in the DNS server. There is a chance such machine has the same host name with other existing machine in the network. If this happen, this could cause confusion in the name resolution.
To prevent such issue, we can activate the DHCP name protection. Back to the DNS tab in DHCP server option, under Name Protection > click Configure.

Tick the box to Enable Name Protection.

With this way, DHCP server will still lease the IP address normally but will not create the DNS record if a record with the same name already exists.
Well, that’s pretty much all the stuffs you need to configure DNS dynamic update in Windows DHCP server. From now, your DHCP server will take care of DNS records for its clients. DHCP server will register and update records for its clients, and will also delete the record for expired leases. This will ensure that DNS server will not be filled up with records for inactive clients. Additionally, you can also configure aging and scavenging in the DNS zone to match the DHCP lease time and this will help clean up the unused records.
The following two tabs change content below.
- Bio
- Latest Posts

I am IT practitioner in real life with specialization in network and server infrastructure. I have years of experience in design, analysis, operation, and optimization of infrastructure solutions for enterprise-scaled network. You can send me a message on LinkedIn or email to arranda.saputra@outlook.com for further inquiry regarding stuffs that I wrote or opportunity to collaborate in a project.
In the previous article, we looked at installing Windows Server 2019 in a virtual box environment.
In this article, we will be configuring Active Directory, DNS AND DHCP for System Center Configuration manager (SCCM).
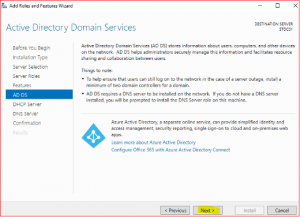
Active Directory (AD) is a database which holds information on users, computers, and other resources for centralized domain management. AD keeps critical information of any organizational resources including what users and computers there are as objects in the directory service including permissions that are attached to these objects. For example, user information such as job title, phone number and password including permissions. AD makes sure each person is who they claim to be using authentication mechanisms, usually by checking the user ID and password they enter and allowing them to access only the data that they are allowed to by checking against authorization mechanisms.
Domain Name System (DNS) holds information about Domains in internet. There are lots of different devices which communicate with each other using a unique address over the internet called an IP address. To communicate with a website using web browser, we use a domain name (example, stardust.com) and not the IP address. Domain Name System translates human readable domain names (for example, www.stardust.com) to machine readable IP addresses (for example, 192.168.1.222).
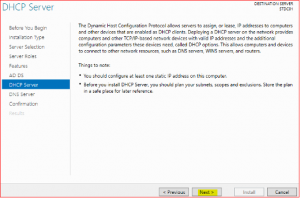
Dynamic Host Configuration Protocol (DHCP) allocates IP addresses to computers and other devices in the network which allow these devices to use network services like DNS and NTP through any communication protocol like TCP or UDP. A DHCP server dynamically assigns an IP address and other network configuration parameters to the devices. For example, if an organization has 100’s of client computers, its going to be painful configuring IP addresses on each individual machine one by one. System Administrator manages DHCP servers to distribute dynamic IP for all devices automatically when they join the domain.
Domain Controller VM
VM: STDC01
Role: Domain Controller
Memory: 4GB
Storage HDD: 50GB
Static IP: 192.168.1.10
Installing AD DS, DNS and DHCP
These are the roles and features of server.
-
Click Manage on Server Manage
-
Select Add Roles and Features then click Next.
-
Select Role-based or Feature-based installation then click Next.
-
Tick Select a server from the server pool and select STDC01. Click Next.

-
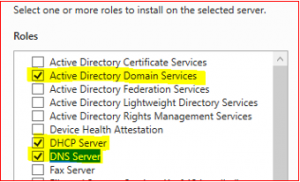
Select Active Directory Domain Service. Then select Add Features.
-
Select DHCP Server and then Add Features.
-
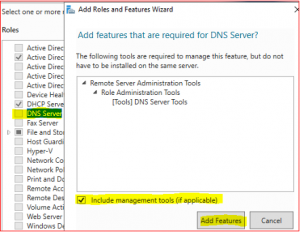
Select DNS Server and then Add Features.
-
Make sure all three Roles and Features are selected.
-
Click Next.
-
Click Next.
-
Click Next.
-
Tick Restart the destination server automatically if required. Then click on Yes and Install.
-
Click on Close after installation has finished.
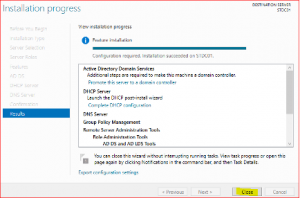
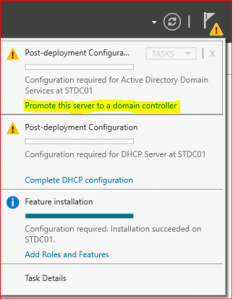
Installation has been completed, we now need to promote this server to a Domain Controller and finalize DHCP configuration.
Promote server to a domain controller
Promoting a server into a domain controller means converting a standalone server to be managed by an Active Directory Domain and Active Directory Forest.
-
Click on Promote this server to a domain controller
-
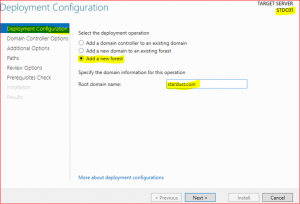
Click on Add new forest and type root domain name e.g., stardust.com
-
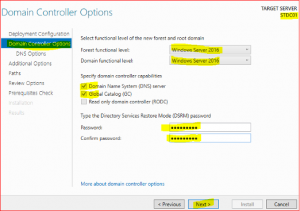
In Domain Controller Options leave everything as is, just type Directory Services Restore Mode (DSRM) password and keep it safe as it might be required in future.
-
Click Next.
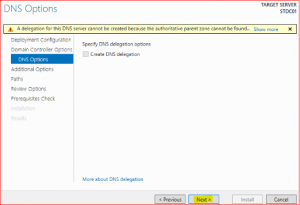
-
Click Next.
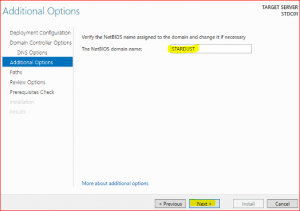
-
Click Next.
-
Click Next.
-
If all prerequisite checks have passed, click on install.
After installation and a reboot, login with System Administrator Credentials.
Configure DHCP Server
-
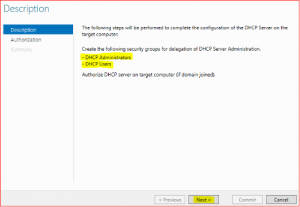
Click on Complete DHCP configuration
-
Leave everything as default and click on Commit and finally on Close

DHCP configuration is now done and now we are going to create DHCP Scope. It is a way of providing valid IP addresses to DHCP clients on a particular subnet.
-
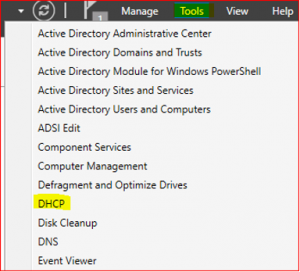
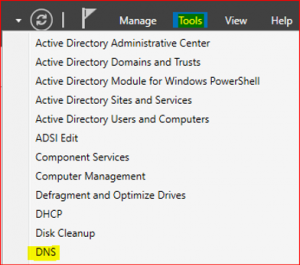
Go to Server Manager Dashboard and click on Tools. Select DHCP.
-
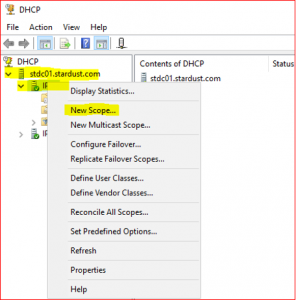
Expand stdc01.stardust.com. Right click on IPv4 and select New Scope. Click on Next.
-
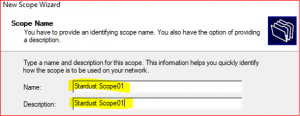
Type Name and Description and click on Next.
-
Provide Start IP address : 192.168.1.1 and End IP address: 192.168.1.200 and click on Next.
-
If you have any IP addresses that you don’t want to include in this scope then input that IP or IPs addresses range. Then, click on Next
-
A DHCP server assigns a dynamic IP to a DHCP client computer when they join the domain. IP addresses are leased to clients for a certain time set in DHCP lease duration and it can be Day, Hour and Minutes. After the lease ends, DHCP server will renew the lease with same IP or new IP address for new lease time duration.
-
Select Yes I want to configure these options now and click Next.
-
Provide Default gateway information which means your router IP or the gateway.
-
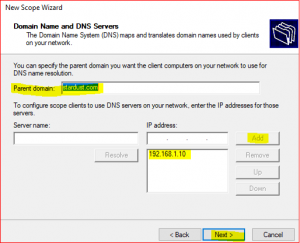
If you have multiple DNS Servers for fault tolerance, you can add them here with server name and IP address, else leave as default but make sure that the Parent domain and IP address provided here is same as your DNS server’s IP address.
-
Leave WINS Server as is because they are not used anymore.
-
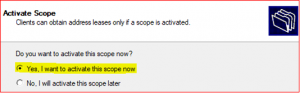
Click on Yes, I want to activate this scope now.
-
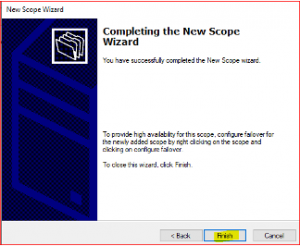
Click on Finish.
Configure Reverse Lookup Zone
Forward DNS works when a user types in the text form of an email address or web page URL. This request is first sent to a DNS server. The DNS server then checks its records and returns the domain’s IP address. If unable to locate the domain’s IP address, the DNS server forwards the request to another server. e.g., stardust.com > 192.168.1.222. Forward Lookup Zone already created so no need to create new one.
A reverse DNS lookup is a DNS query for the domain name associated with a given IP address. This accomplishes the opposite of the more commonly used forward DNS lookup, in which the DNS system is queried to return an IP address. Reverse lookup zone translates IP addresses into DNS Names. e.g.: 192.168.1.222 > stardust.com.
-
In Server Manager Dashboard select Tools and click on DNS.
-
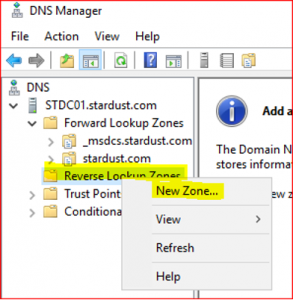
Expand STDC01.stardust.com, right click on Reverse Lookup Zone and select New Zone. Click on Next.
-
Leave defaults in Zone Type.
-
Leave default in Active Directory Zone Replication Scope. Click on Next.
-
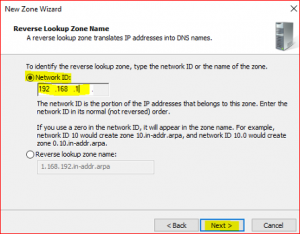
Leave default in Reverse Lookup Zone Name. Click on Next.
-
Input Network ID which is first three IP numbers only 192.168.1 not the whole IP address 192.168.1.10.
-
Leave default in Dynamic Update
-
Click on Finish
Setting of DNS pointer record (PTR)
A PTR provides the domain name associated with an IP address. It is exactly the opposite of the A record, which provides the IP address associated with a domain name. DNS PTR records are used in reverse DNS lookups.
-
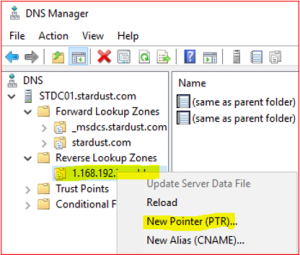
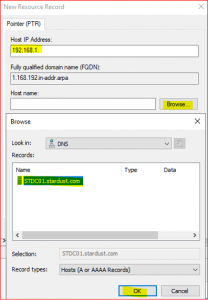
Expand Reverse Lookup Zone, right click on 1.168.192.in-addr.arp and select New Pointer (PTR)
-
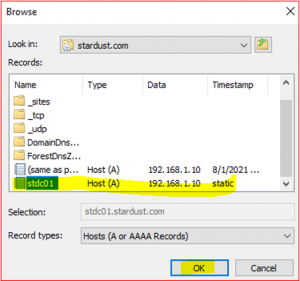
Click on Browse and select STDC01.stardust.com.
- Double click on Forward Lookup Zone and then double click on stardust.com and then select stdc01
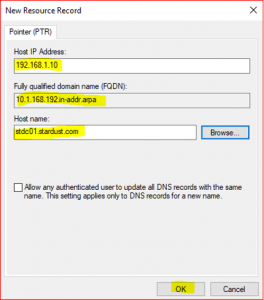
After completing these steps, you will find Host IP address and Host name as below:
Host IP Address: 192.168.1.10
Host name: stdc01.stardust.com
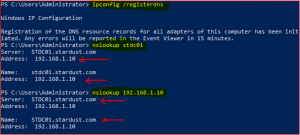
We have successfully created a PTR record and now its time to check both Forward and Reverse lookup zones.
Open Powershell or Command Prompt and type command as per below:
Creating User, Group and Organizational Unit
Active Directory Users and Computers (ADUC) is a management console which allows system administrators to administer objects (users, computers), Organizational Units (OU) including their attributes. System administrators configure authentication and authorization mechanisms for AD objects through ADUC snap-in console.
We are going to create two users as below:
-
SC_Admin (This is the Main Administrator who performs sys admin jobs)
-
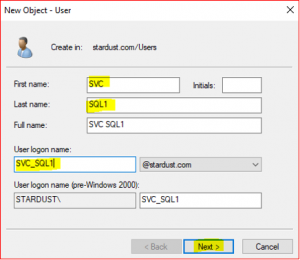
SVC_SQL1 (This is the Service account which performs SQL task)
-
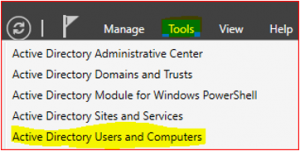
In Server Manager Dashboard select Tools and click on Active Directory Users and Computers.
-
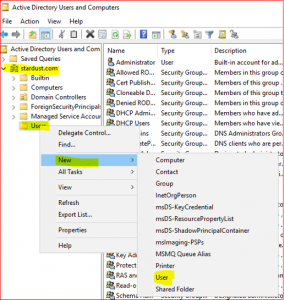
Expand stardust.com, right click on Users and select New. Click on User.
-
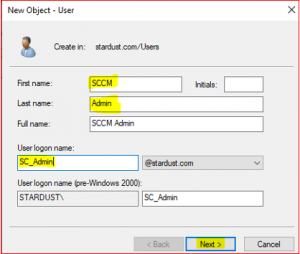
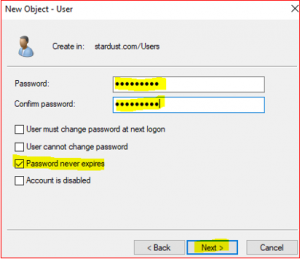
Type the details for SCCM Administrator as per below,
Lets apply Domain Administrator roles to the SCCM_Admin account,
-
In Server Manager Dashboard select Tools and click on Active Directory Users and Computers.
-
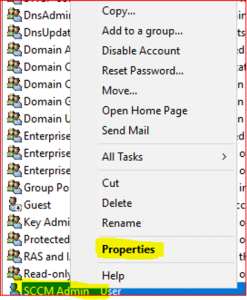
Expand stardust.com, right click on Users, right click on SCCM_Admin. Select Properties.
-
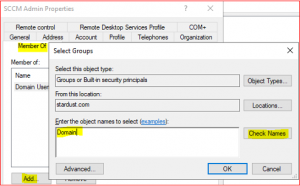
Select Member of Tab, click on Add and enter Domain for the object name.
-
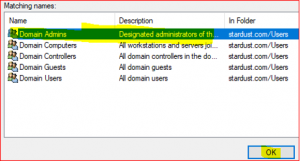
Click on Check Names, select Domain Admins and click Ok.
-
Repeat the above steps for creating Service account user (SVC_SQL1) except the user information,
Now we are going to create an Organizational Unit (OU) for,
- Sydney Workstation
- Canberra Workstation
- Melbourne Workstation
-
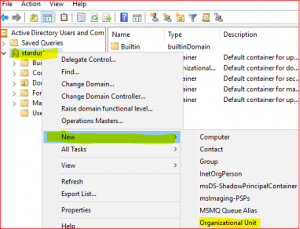
In Server Manager Dashboard select Tools and click on Active Directory Users and Computers.
-
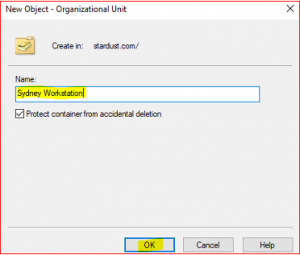
Select New, select Users, select Organizational Unit. Type name Sydney Workstation. Click on Ok
Now repeat the same steps for Canberra Workstation and Melbourne Workstation.
Create GPO for File Share and Printer Sharing and WMI (Windows Management Instrumentation)
Group Policy Object (GPO) is storage of multiple policy settings which defines system behavior, application settings, security settings and assigned applications. For example, we can set a particular time for computer startup and shutdown. Microsoft provides a program snap-in that allows you to use the Group Policy Management Console (GPMC).
WMI is a Microsoft Management Toolkit. It contains a bunch of tools and extensions which provide information about the desktops computer and servers located on the network. Administrators can also extend the capability of the framework by writing scripts in VBScript or PowerShell.
There will be two Inbound and Outbound Rules for the purpose of SSCM configuration.
-
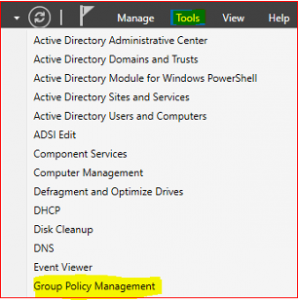
In Server Manager Dashboard select Tools and click on Group Policy Management.
-
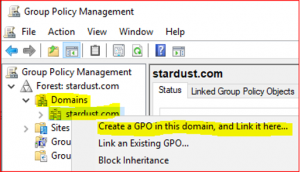
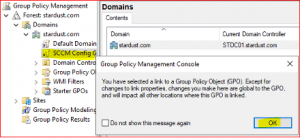
Expand Forest:stardust.com, expand Domains, right click on stardust.com and select Create a GPO in this domain, and Link it here…
-
Type a name for new GPO and click on OK.
-
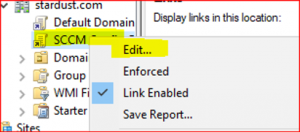
Expand stardust.com to see new blank GPO. Right click on SCCM Config GPO and select Edit
-
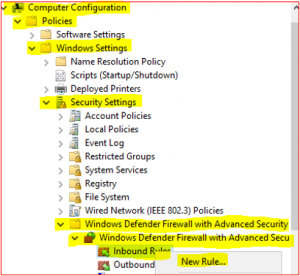
Expand Computer Configuration, Policies, Windows Settings, Security Settings, Windows Defender Firewall with Advance Security, Windows Defender Firewall with Advance Security and click on Inbound Rules and select New Rule.

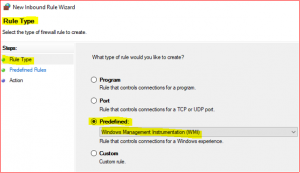
Setting up Predefined Rules
-
Select Predefined, click Drop Down Menu, select File and Printer Sharing and click Next.
-
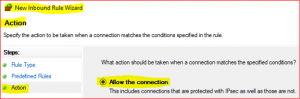
In Predefined Rules accept default click on Next, select Allow the connection and click on Finish

Repeat above for WMI Inbound Rules except below,
-
Select Predefined, click Drop Down Menu, select Windows Management Instrumentation (WMI)
-
In Predefined Rules accept default click on Next, select Allow the connection and click on Finish
Please repeat the same steps again for Outbound Rules for File and Printer Sharing and WMI
- Right click on Outbound Rule > New Rules and follow Setting up Predefined Rules — follow above procedures.
We have successfully created GPO (SCCM Config GPO) with Inbound and Outbound Firewall Rules.
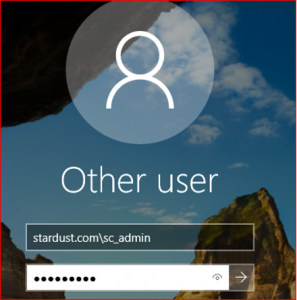
Login to stardust.com with sc_admin credential:
We are now at the end of part 2. We have successfully setup AD, DNS, DHCP, Reserve lookup zone, OU, GPO and Users as part of this article. In the next one, we will be setting up an SQL server for SCCM.