Windows Server Core 2012, как и любой другой продукт Microsoft необходимо поддерживать в актуальном состоянии, вовремя устанавливая обновления безопасности, выпускаемые компанией Microsoft (список последних обновлений и патчей на продукты Microsoft доступен в разделе Обзор обновлений безопасности Microsoft).
Установка обновлений безопасности на Windows Server Core 2012 несколько отличается от оной для графического варианта установки Windows Server 2012 (Full GUI). Естественно основное отличие в том, что в Core режиме отсутствует графические элементы управления, позволяющие настроить и запустить установку обновлений (всплывающий балон в трее, и соответствующий элемент в консоли Server Manager). Конечно, из Core режима можно переключится в графический, установить обновления и удалить GUI (подробно процедура переключений между режимами описана в статье Переключение между графическим и Core режимами в Windows Server 2012), однако это не очень удобно и требует дополнительных затрат времени администратора.
Разберем стандартные способы установки обновлений на Windows Server 2012:
- Автоматическое обновление с сервера Microsoft Windows Update или WSUS (Как настроить сервер обновлений WSUS на Windows Server 2012)– сервер автоматически скачивает и устанавливает обновления с заданного сервера WSUS или центра обновлений Microsoft . Этот вариант в большинстве случаев не приемлем, т.к. установка обновлений на серверах обычно выполняется в заранее запланированное окно обслуживания.
- Ручной запуск установки обновлений, полученных с сервера обновлений (Windows Update или WSUS). В такой конфигурации сервер автоматически скачивает обновления с сервера обновлений, но запуск установки патчей осуществляется вручную администратором (предпочтительный вариант).
- Ручная установка обновлений. Администратор самостоятельно скачивает обновления и вручную устанавливает их на сервере.
Управление автоматическим обновлением в Sever Core 2012
Текущие настройки службы обновлений можно получить с помощью команды:
Cscript scregedit.wsf /AU /v
Включить автоматическую установке обновлений можно с помощью команд:
Net stop wsuaserv cscript scregedit.wst /AU 4

net start wsuaserv
Отключить автоматическое обновление можно так:
Net stop wsuaserv

cscript scregedit.wsf /AU 1

net start wsuaserv
Запустить принудительный поиск доступных обновлений можно с помощью команды:
wuauclt /detectnow
Если сервер должен установить обновления автоматически, но не перезагружаться, можно отключить автоматическую перезагрузку Windows после установки обновлений.
Ручная установка обновлений, полученных с WSUS
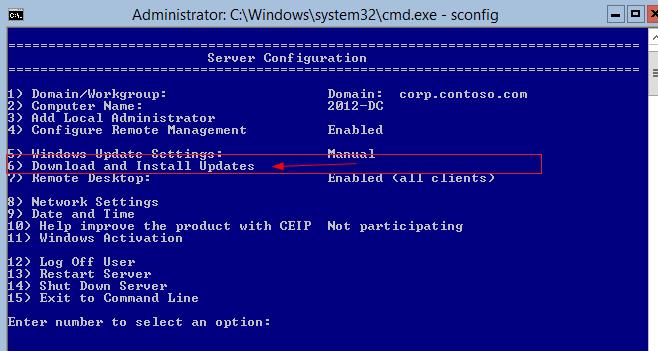
Эта методика установки обновлений на Windows Core 2012 является оптимальной в большинстве случаев: с помощью групповой политики или путем ручной модификации реестра указывается WSUS сервер и задается режим ручного запуска установки обновлений, затем в профилактическое окно администратор сервера вручную стартует установку обновлений. Возникает вопрос: как же запустить установку обновлений, полученных со WSUS сервера, на Windows Core 2012? В этом нам поможет утилита sconfig, входящая в стандартную поставку Windows Core.
Запустите утилиту
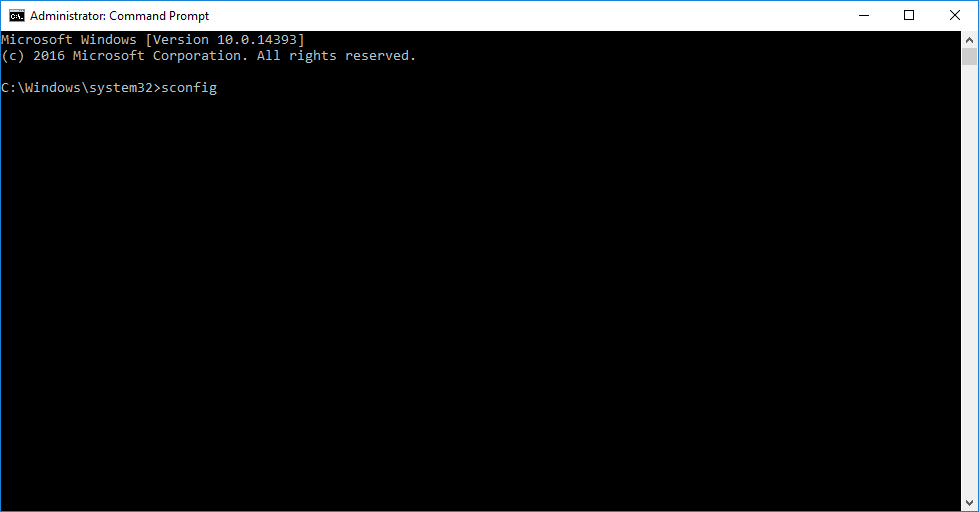
sconfig
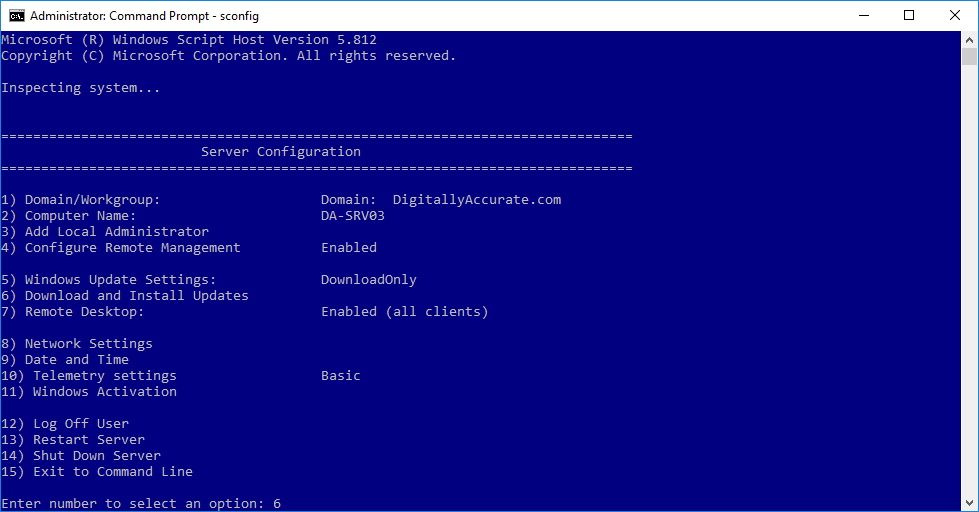
Выберите 6 пункт: Download and Install Updates
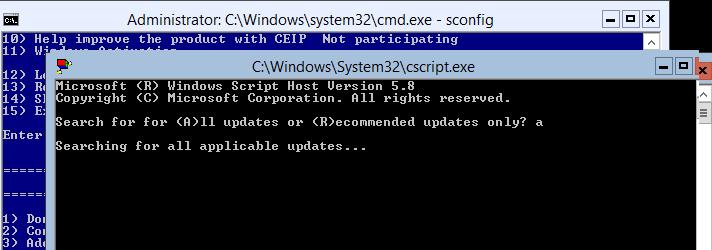
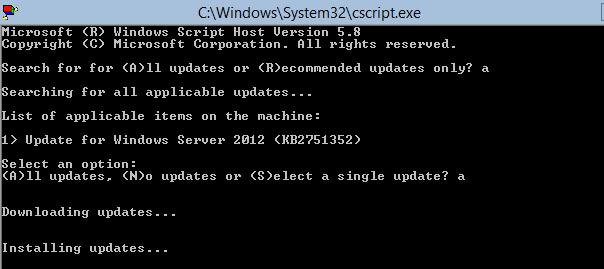
На вопрос необходимо ли искать все или рекомендованные обновления, выберем все (A).
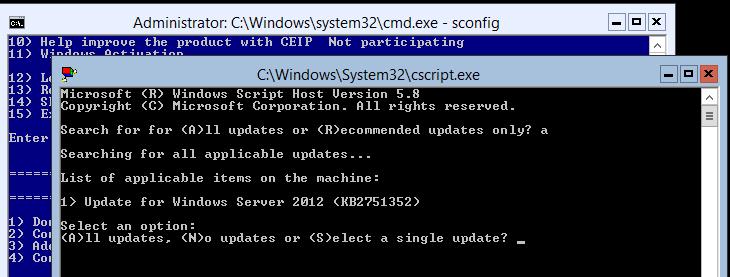
Система обнаружит и отобразит список обнаруженных обновлений и предложит их установить (все сразу, по одному) или совсем отказаться от их установки.
Если выбрана установка обновлений, систем приступит к закачке и установке обновлений Windows Server Core 2012.
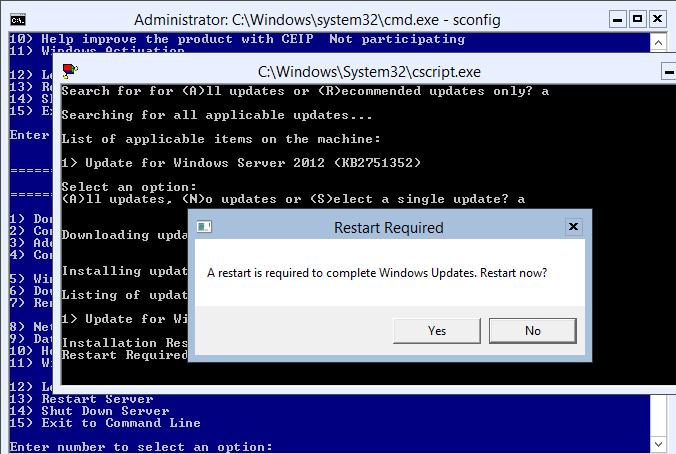
После установки обновлений, система может потребовать перезагрузки.
Ручная установка обновлений
Обновлений на Server Core можно установить и вручную, хотя это и достаточно трудоемкий и в большой степени ручной процесс. Необходимо сначала вручную скачать нужные обновлений с сайта Microsoft Update, распаковать их, скопировать на сервер и вручную последовательно их установить.
Вручную обновление можно установить командой:
Wusa <kbupdate>.msu /quiet
В случае необходимости удалить установленное обновление можно так:
Wusa /uninstall <kbupdate>.msu /quiet
Если необходимо узнать, какие обновлений уже установлены, можно вывести их список по методике, описанной в статье Как в Windows вывести список всех установленных обновлений.
In this guide, I will show you how to patch server core installation with the latest Windows Updates. Through Windows Update, you can install the latest patches on the server core automatically or manually install the latest updates.
When you install the Server Core, it is recommended to install the latest patches to keep it secure and updated. Unlike Windows Server (installed with Desktop Experience), the Server Core doesn’t have a GUI to check for updates.
When you have multiple server core installations in your setup, patching all them of the servers becomes a critical task. By patching a server core installation, you get the performance improvements and the known issues or bugs are fixed.
Methods to Patch Server Core Installations
There are three methods that you can use to patch a server running Windows Server Core:
- Using Windows Updates automatically: By using Windows Update, either automatically or with command-line tools, you can patch server core installations.
- Windows Server Update Services (WSUS): Using Windows Server Update Services (WSUS), you can service servers running a Server Core installation.
- Manually install updates on Server Core: Organizations that do not use Windows update or WSUS, you can apply updates manually and keep the server core updated.
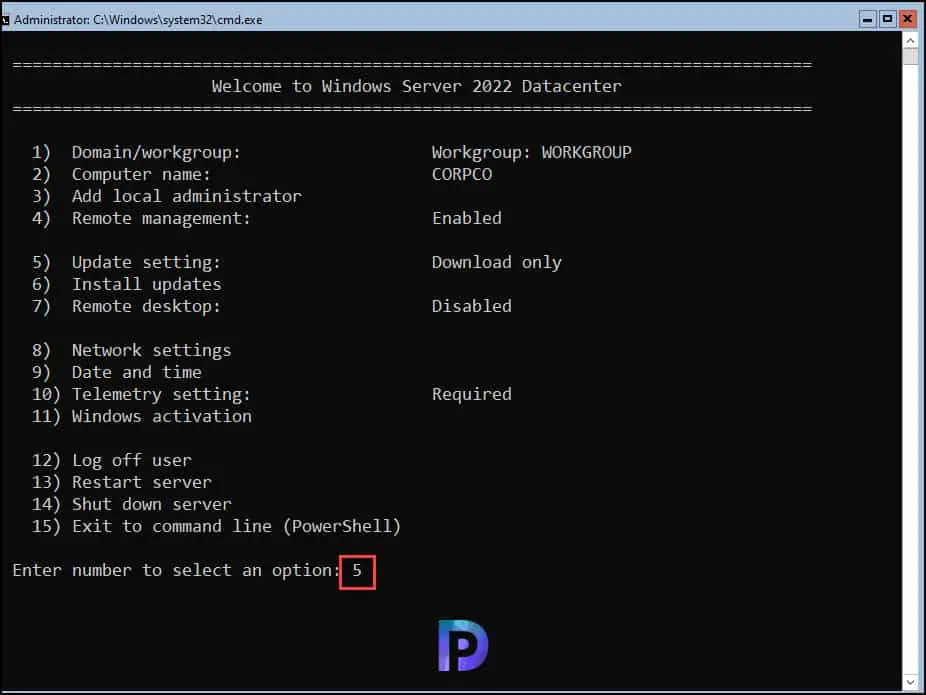
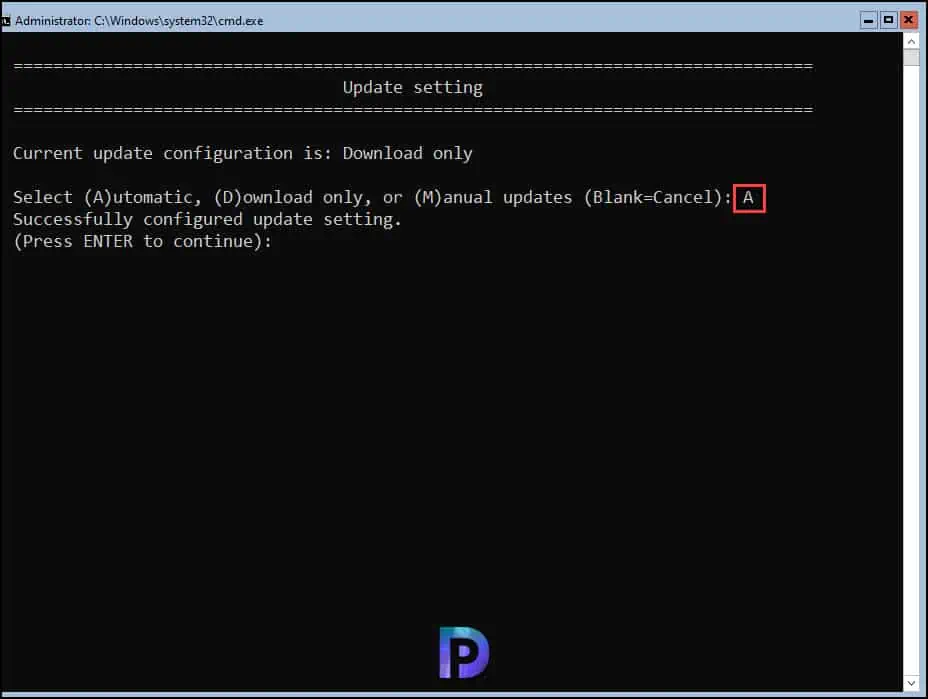
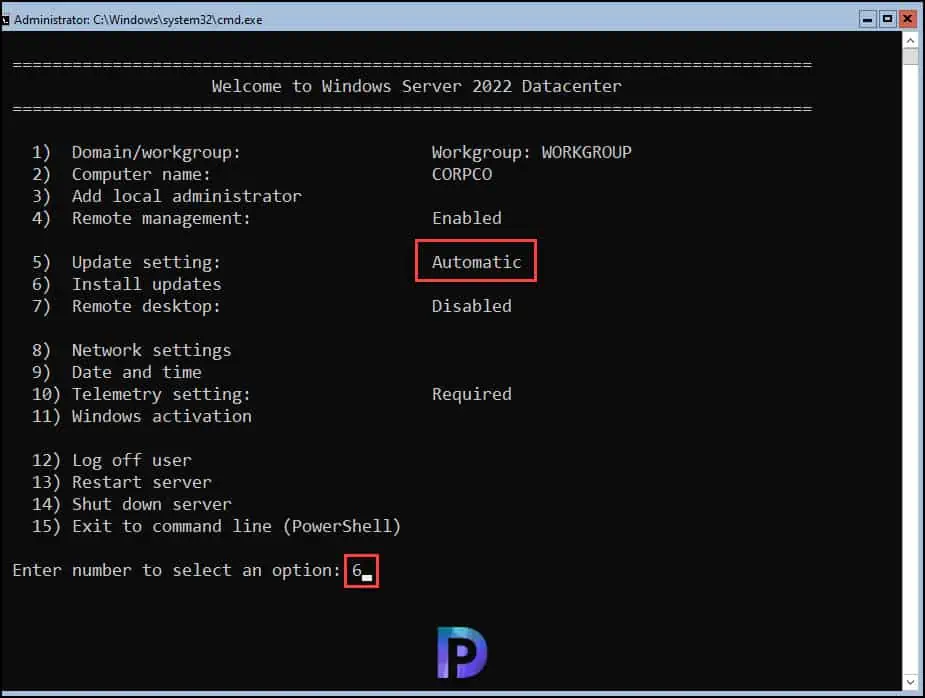
We’ll now go through the steps to automatically install the latest updates on the server core using Windows Update. The first step involves configuring the update setting on the server core. When a server core is first installed, the update setting is set to Download only. However, the SConfig screen allows you to modify this configuration.
You will be presented with three update options:
- Automatic
- Download Only
- Manual Updates
To enable automatic updates on the server core, type “A” and press the Enter key.
On the SConfig screen, notice that the update setting is now changed to Automatic. We have now enabled automatic updates on the Windows Server core. In the next step, we will check for the latest updates from Microsoft and install them. Select the option 6 to install the updates.
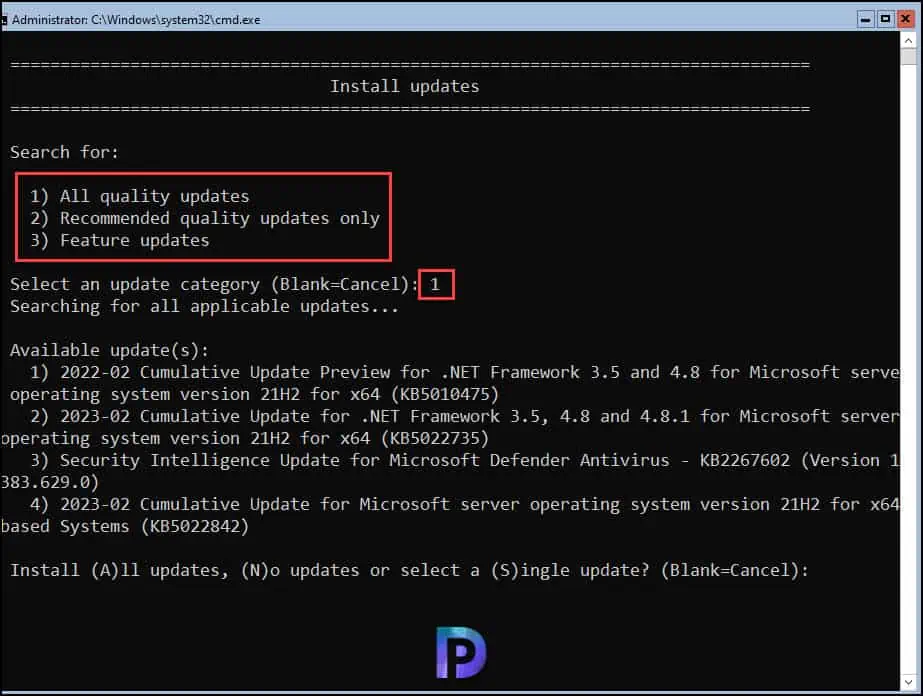
There are three options presented when you choose to install updates on server core:
- All quality updates
- Recommended quality updates only
- Feature Updates
Type the option “1” and press the enter key. The Server Core now checks for the quality updates. From the screenshot below, we see there are 4 Windows updates applicable for the server core.
You can install all the updates, select and install single update or choose not to install any update.
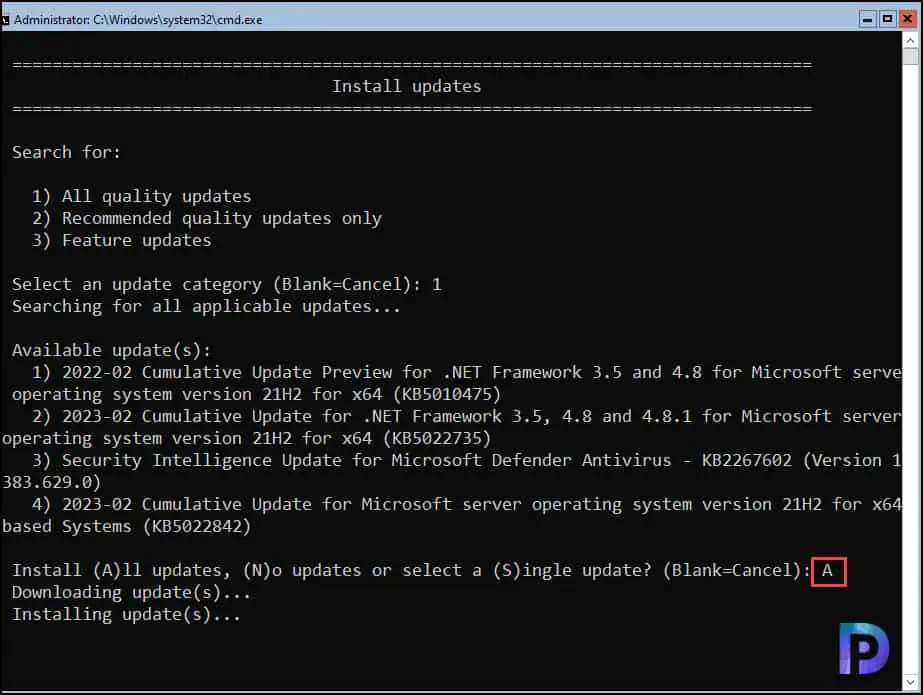
To install all the latest updates on Server Core, select the option “A” and press the enter key. The updates are now downloaded and installed on the server core. Remember that downloading and installing the updates will take time. Make sure the server has connectivity to the internet.
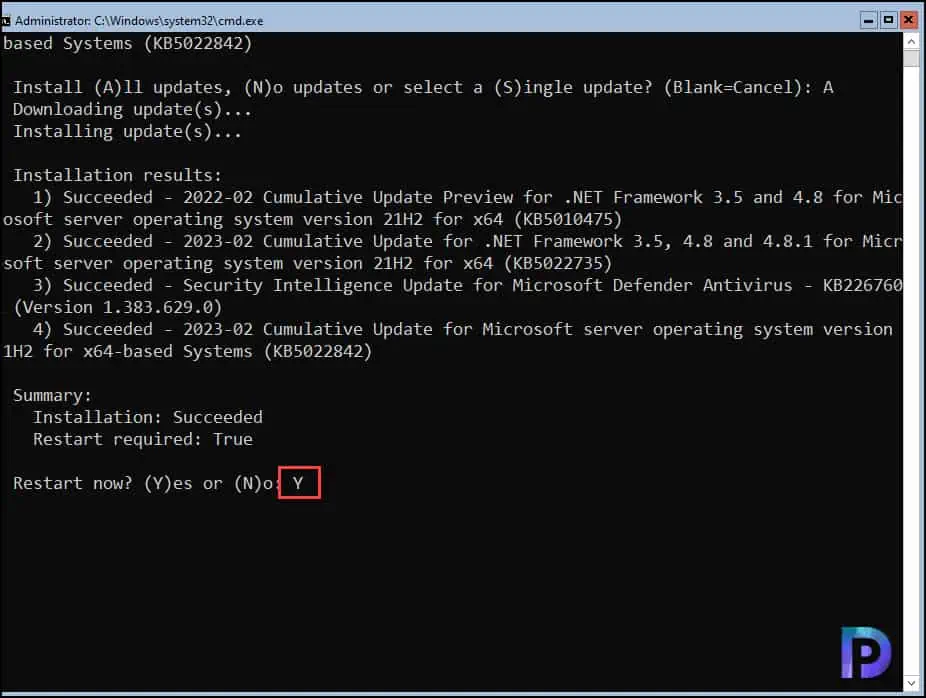
After sometime, the updates are installed on the server core, and we see a server restart is required to complete the installation of updates. Type “Y” and press the enter key to confirm the server restart.
Check Installed Updates on Server Core
There are multiple ways to check the installed updates on server core. You can use any of the commands listed below to get Windows updates installed on server core.
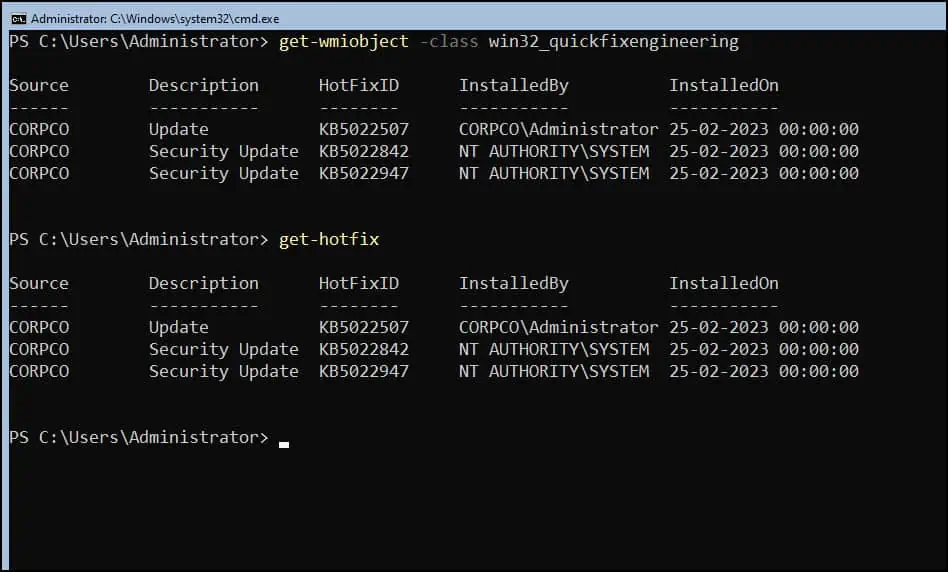
- get-wmiobject -class win32_quickfixengineering
- get-hotfix
- run wmic qfe list from the command line
- View updates by running a command systeminfo.exe
Manually Patch Server Core Installation
To manually install updates on the server core installation, you have to download the update and make it available to the server core installation. At a command prompt, run the following command:
Wusa update.msu /quiet
Depending on the updates that are installed, you may need to restart the computer, although the system will not notify you of this. To uninstall an update manually, run the following command on server core:
Wusa /uninstall update.msu /quiet
Additional Resources
- Patch a Server Core Installation
- Deploy Software Updates Using SCCM ConfigMgr
- Step-by-Step Guide to Import Updates into SCCM | ConfigMgr
- How to Run WSUS Server Cleanup Wizard to Clean Updates

Prajwal Desai is a Microsoft MVP in Intune and SCCM. He writes articles on SCCM, Intune, Windows 365, Azure, Windows Server, Windows 11, WordPress and other topics, with the goal of providing people with useful information.
- Remove From My Forums
-
Question
-
Stupid Question but … how can i update my windows core with manual control and not automatic ?
There are any wuapp?
How can i choose what to update ?
Answers
-
In Windows 6.0 Windows Update can operate in 5 modes.
Since large parts of the Graphical User Interface are missing only option 1 (disabled) and 4 (Automatically download updates and install them on the schedule specified below) are usable (and thus possible to set through SCregEdit.wsf) you cannot use option 2 (Notify before downloading any updates and notify again before installing them) which seems to represent what you want to achieve.
Microsoft doesn’t provide updates through FTP, the Microsoft Baseline Security Analyzer (MBSA) isn’t usable on Server Core installations of Windows Server 2008 (since Internet Explorer is not part of Server Core) and the Microsoft Update website doesn’t work with FireFox or Opera.
Therefore you have two options remaining:
-
Download updates manually from the Microsoft Download website, transfer them to your Server Core box (you can use USB sticks, CD-Rs, DVD-Rs, FTP and network shares) and manually install them using msiexec.exe (More info) or wusa.exe. (More info)
-
Deploy a Full installation of Windows Server 2003 or Windows Server 2008 with Windows Server Update Services (WSUS) and use it to deploy updates through registry settings or Group Policies.
-
We’re all used to updating our Windows Server operating systems with the Windows Update GUI, but did you know that you can update your server using command prompt and “sconfig”?
The past few years I’ve been managing quite a few Windows Server Core Instances that as we all know, do not have a GUI. In order to update those instances, you need to run Windows Update using the command line, but this method actually also works on normal Windows Server instances with the GUI as well!
Please enjoy this video or read on for why and how!
Why?
Using a GUI is great, however sometimes it’s not needed, and sometimes it even causes problems if it looses the backend connection where it’s pulling the data from. I’ve seen this true on newer Windows operating systems where the Windows Update GUI stops updating and you just sit there thinking the updates are running, when they are actually all complete.
The GUI also creates additional overhead and clutter. If there was an easier alternative to perform this function, wouldn’t it just make sense?
On Windows Server instances that have a GUI, I find it way faster and more responsive to just open an elevated (Administrative) command prompt, and kick off Windows Updates from there.
How
You can use this method on all modern Windows Server versions:
- Windows Server (with a GUI)
- Windows Server Core (without a GUI)
This also works with Windows Server Update Services so you can use this method either connecting to Windows Update (Microsoft Update) or Windows Server Update Services (WSUS).
Now lets get started!
- Open an Administrative (elevated) command prompt
- Run “sconfig” to launch the “Server Configuration” application
- Select option “6” to “Download and Install Windows Updates”
- Choose “A” for all updates, or “R” for recommended updates, and a scan will start
- After the available updates are shown, choose “A” for all updates, “N” for no updates, or “S” for single update selection
After performing the above, the updates will download and install.
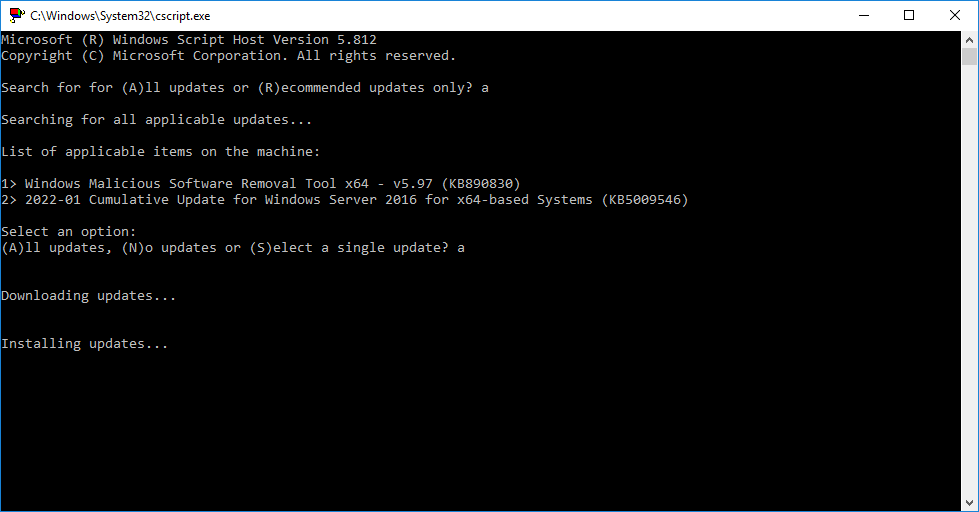
I find it so much easier to use this method when updating many/multiple servers instead of the GUI. Once the updates are complete and you’re back at the “Server Configuration” application, you can use option “13” to restart Windows.
Perform these steps to specify Automatic for Windows Update using Server Configuration.
- Type sconfig and press Enter to start Server Configuration.
- Type 5 and press Enter to change the setting for Windows Update.
- Type a and press Enter to specify Automatic for Windows Update.
Do Windows Update via PowerShell?
Yes, you can install the latest updates on Windows 10 using PowerShell, and this guide, you’ll learn the steps to complete this task.
How do I update Windows PowerShell?
There are two ways to upgrade:
- You can download the PowerShell Core MSI installer manually from GitHub;
- You can download and install (update) it directly from the PowerShell console.
How do I update Windows Server 2012?
Detailed steps for Windows 8.1 and Windows Server 2012 R2 In the search box, type Windows Update, and then tap or select Windows Update. In the details pane, select Check for updates, and then wait while Windows looks for the latest updates for your computer.
How do I update Windows from the command line?
Open up the command prompt by hitting the Windows key and typing in cmd. Don’t hit enter. Right click and choose “Run as administrator.” Type (but do not enter yet) “wuauclt.exe /updatenow” — this is the command to force Windows Update to check for updates.
How do I manually fix Windows Server?
Follow the steps mentioned below to install/uninstall patches for Windows OS.
- Step 1: Name the Configuration. Provide a name and description for the Install/uninstall Patches Configuration.
- Step 2: Define Configuration.
- Step 3: Define Target.
- Step 4: Deploy Configuration.
- Creating a configuration from All Patches View.
How do I trigger Windows Update?
How to Run Microsoft Windows Update
- Choose Start→All Programs→Windows Update.
- In the resulting window, click the Updates Are Available link to see all optional or important updates link.
- Click to select available critical or optional updates that you want to install and then click the OK button.
How do I fix a corrupted Windows Update?
How to reset Windows Update using Troubleshooter tool
- Download the Windows Update Troubleshooter from Microsoft.
- Double-click the WindowsUpdateDiagnostic.
- Select the Windows Update option.
- Click the Next button.
- Click the Try troubleshooting as an administrator option (if applicable).
- Click the Close button.
Is PowerShell dead?
Short answers are, no it’s not dead, but there is no plans to introduce new functionalities. Windows PowerShell is still supported trough Windows OS life cycle. If you are developing PowerShell: You should start developing with PowerShell Core, if you are not developing workflows, Snap-Ins and WMIv1.
How do update PowerShell?
There are three steps for running Windows Update through PowerShell. Running the following commands step by step: Install-Module PSWindowsUpdate Install Module PSWindowsUpdate This will install the Windows Update module in PowerShell. Get-WindowsUpdate Get WindowsUpdate This command will check for updates.
Can I update PowerShell?
If you need to update your existing version of PowerShell, in Windows, use the following table to locate the installer for the version of PowerShell you want to update to. On the initial release of Windows 10, with automatic updates enabled, PowerShell gets updated from version 5.0 to 5.1.
How do you uninstall PowerShell?
In the “Uninstall a Program” option on Control Panel , locate Windows PowerShell and click “Uninstall” or “Remove” button to start deleting the program.
Does PowerShell Core run on .NET Core?
PowerShell Core runs on top of .NET Core, a cross-platform, open-source version of the code base powering most of the Windows world. This version of PowerShell will be different than the Windows PowerShell edition you see built into Windows today.
