Skip to content

How to Manage Windows Server Core

Table of Contents
- Windows Server Core Benefits
- Windows Server Core Management
- Managing Server Core with Remote PowerShell
- Sconfig
- Managing Server Core with Server Manager
- Managing Server Core with Remote Server Administration Tools (RSAT)
- Managing Server Core with Windows Admin Center
- Windows Server Core Install Considerations
The trend for both on-premises housed servers, as well as those servers in the public cloud, is leaner, is better and automation is king. This is driving servers that are “headless” or GUI-less and using configuration management tools and other automation tools to interact with and configure these server resources.
Since Windows Server 2008, Microsoft has had the Server Core version of the Windows Server operating system that could be installed rather than the full GUI enabled traditional Windows Server environment. Server Core has many advantages from a security and footprint standpoint that make it a great choice for “cattle” type servers that are part of today’s immutable infrastructure.
In this post, we will take a look at:
- Benefits of Windows Server Core
- How to manage Windows Server Core
- Install considerations for using Windows Server 2019
Windows Server Core Benefits
The “pets vs cattle” debate has been won by the “cattle” and immutable infrastructure is the way of the future. For agile, fast-paced infrastructure needs both on-premises and in the cloud, servers treated as “pets” that are cared for, updated, massaged to continue working, are no longer viable.

Immutable infrastructure dictates that a server will only exist in its current form. If there is a new software update or component required, a new server will be built to take its place. This allows for a more consistent and reliable approach to infrastructure. It leads to a more predictable and stable environment with fewer issues coming from the unknowns and artifacts left over from a previous software installation on the same server.
Since Windows Server Core does not run the classic GUI frontend for Windows Server, it is a much smaller footprint and contains much less complexity than the GUI-enabled Windows Server counterparts. This lends itself very well to automation and scalability when thinking about rolling out Windows Server deployments in mass. Mass automation is only possible by having a standardized configuration. This is how public cloud infrastructure is possible and so powerful.
Server Core lends itself to this type of operational model due to its smaller footprint including reduced hard drive space, memory consumption, and increased security posture. In fact, comparing a full installation of Windows Server with the GUI installation to a Server Core installation, organizations will see roughly a 50% reduction in space requirements.
Windows Server Core installation is actually the default installation type when performing a new Windows Server 2019 installation. As you notice, if you simply “click” through the installation of Windows Server, Windows Server 2019 Standard operating system (non-GUI) is selected as default. The GUI-enabled variants are highlighted in the Windows Setup screen below.
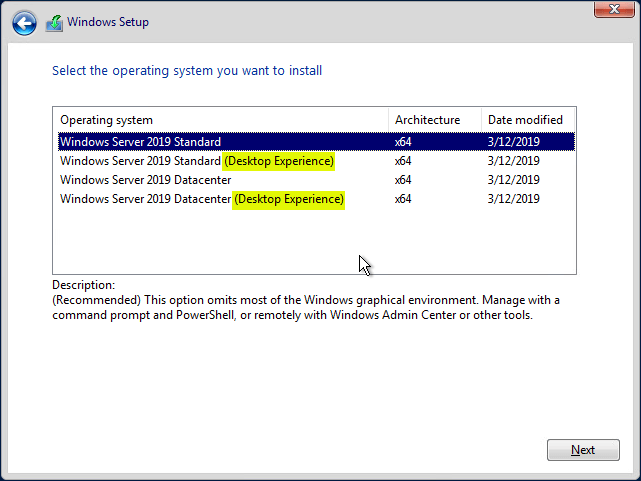
Note the “Desktop Experience” for both Standard and Datacenter are not the defaults
Once organizations get on board with Windows Server Core, it has many tremendous benefits.
However, its slow adoption can be attributed to factors including the lack of comfort from an administrative standpoint in managing Windows Server Core installations. This can easily be overcome by administrators understanding and getting used to the available Server Core management tools.
Windows Server Core Management
Becoming accustomed to the management with Windows Server Core is key to successfully utilizing this powerful variant of Windows for immutable infrastructure, scripting, automation, etc. This has been the major deterrent among administrators who are used to managing Windows using the traditional Windows Server GUI. There are many tools and utilities that can be used to successfully manage and maintain Windows Server Core.
Let’s take a look at the following tools:
- Remote PowerShell
- Sconfig
- Server Manager
- Remote Server Administration Tools (RSAT)
- Windows Admin Center
Let’s briefly look at the capabilities of each management tool and how it can be utilized.
Managing Server Core with Remote PowerShell
PowerShell is the framework for automating Microsoft Windows Server. Basically, anything you can do in the Windows GUI, you can do with Windows PowerShell. It allows effectively automating Windows Server functions so tasks and provisioning can be performed at scale when dozens or even hundreds of servers need to be configured or provisioned.
With Windows Server 2019, upon first boot, you will be prompted to change your password of the local Administrator account. Unlike previous Windows Server Core releases, the default Sconfig application does not run (more on this utility later).
Using the Get-NetIPConfiguration cmdlet to get the current IP address information.
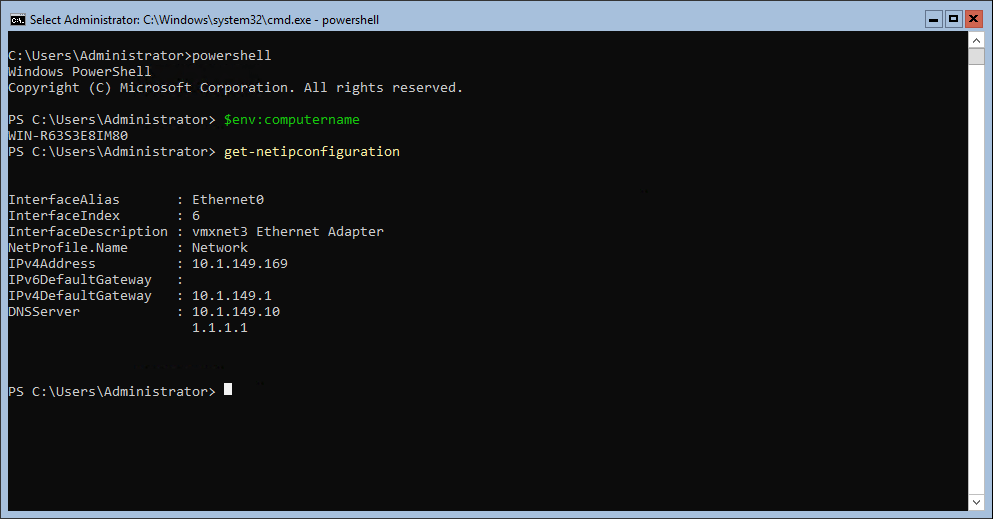
Using PowerShell to interact with a Windows Server 2019 Core installation
Just a quick example of having no GUI to work with and effectively renaming your Windows Server 2019 Core server with the Rename-Computer cmdlet.
The sky is the limit with PowerShell and using it for automating any of the configuration and deployment processes with Windows Server Core.
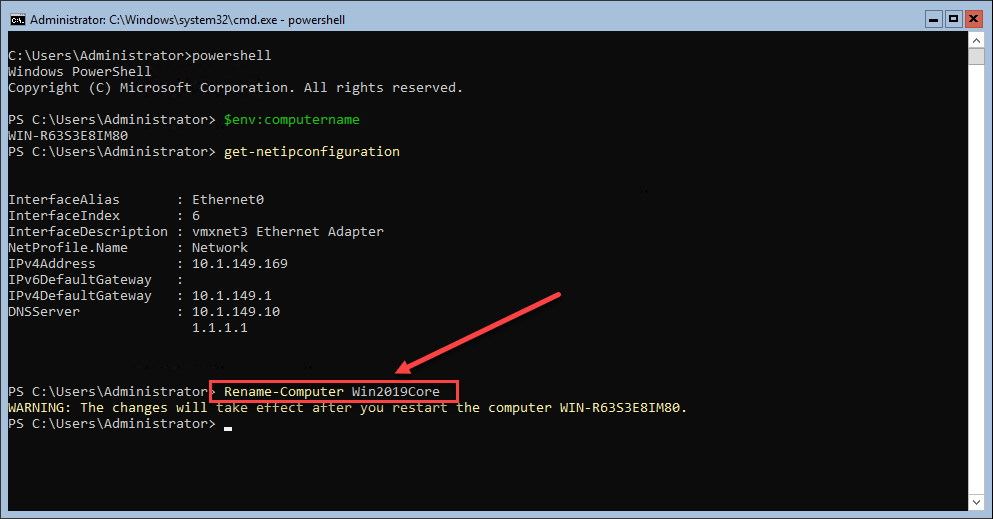
Renaming a Windows Server Core server with PowerShell
Sconfig
The Sconfig utility is the legacy utility for managing Windows Server Core installations since the very beginning with Windows Server 2008. Sconfig is still present in Windows Server 2019 Core installations, however, it is no longer launched by default which may indicate Microsoft’s thinking on the future of the utility. It is still viable as a tool for use for now.
To launch the Sconfig utility, simply type “sconfig” from the command line or PowerShell.
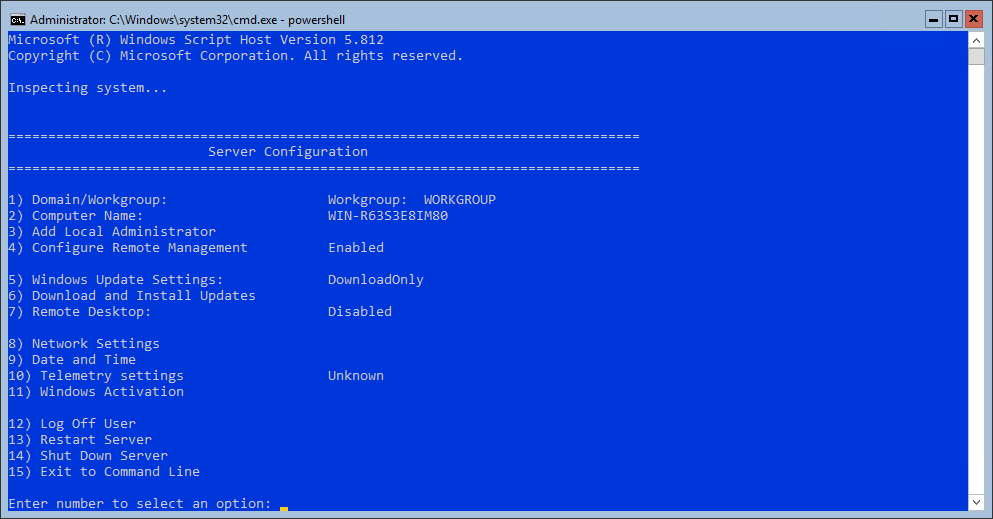
The Sconfig utility provides most of the common configuration needed for Server Core installations all in one place
Managing Server Core with Server Manager
Like the Sconfig utility, Server Manager is more of a legacy utility for managing servers now with the introduction of the Windows Admin Center. However, it is still a very viable solution for managing Windows Server Core installations. Simply add the Core Server via the Server Manager. With Server Manager, you can manage many aspects of the Windows Server Core installation, including installation and removal of Roles & Features. To get to the Server Manager utility, you can type servermanager.exe from a run or cmd window.
Using Server Manager to manage a Windows Server 2019 Core installation
Managing Server Core with Remote Server Administration Tools (RSAT)
The Remote Server Administration Tools or RSAT allows installing the Windows Server management tools on a client workstation that can then be used to manage both local and remote servers. RSAT is not a provisioning utility, but rather is the collection of server management consoles including Server Manager that you are used to when logging into a GUI enabled server. The RSAT suite of consoles is readily available for download from Microsoft, depending on the version of Window 10 you are running, etc.
Managing Server Core with Windows Admin Center
Windows Admin Center is the big news among managing Windows Server operating systems recently. Microsoft has engineered the new Windows Admin Center as the way forward for managing its Windows Server OS’es including Server Core.
Windows Admin Center is a web-based modern Windows Server management platform that is extensible and able to manage not only Windows Server and Server Core, but also Windows HCI solutions like Storage Spaces Direct.
The Windows Admin Center or WAC provides everything at your “fingertips” for management and administration with the ability to perform many of the common types of administration tasks right from the WAC console. You can also interact with PowerShell right from within WAC.
Due to its web interface interaction, WAC can be pulled up remotely via the Gateway Mode which is the default installation on Windows Server operating systems.
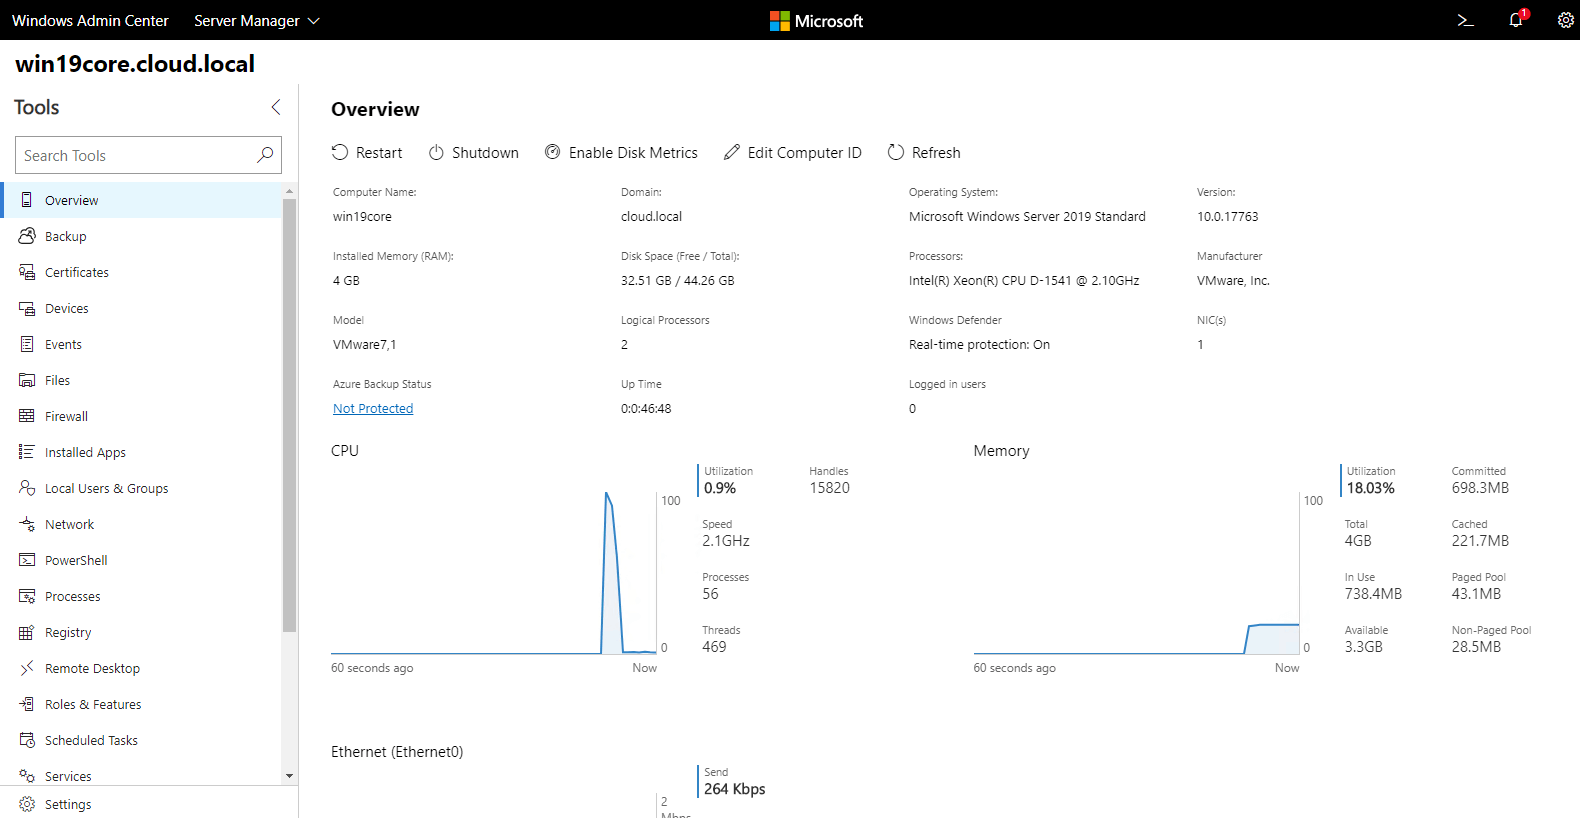
Managing a Windows Server 2019 Core installation with Windows Admin Center
Windows Server Core Install Considerations
In Windows Server 2019, the installation of Server Core needs to be determined ahead of time and administrators must make sure of either a GUI or Server Core installation. Starting with Windows Server 2016 and higher, you can no longer change between Server Core and the Desktop version of Windows Server, so there is much more finality in making that decision during the installation phase. This is certainly a consideration for installing Windows Server Core.
Additionally, becoming familiar with the management tools ahead of time is a great way for organizations to successfully utilize Windows Server core installations both on-premises and in the public cloud.
Also, can Server Core be used for anything? Not necessarily. The list of supporting roles for Server Core contains the following:
- Active Directory Certificate Services
- Active Directory Domain Services
- Active Directory Federation Services
- Active Directory Lightweight Directory Services
- Active Directory Rights Management Services
- Device Health Attestation
- DHCP Server
- DNS Server
- File Services
- Host Guardian Service
- Hyper-V
- Print and Document Services
- Remote Access
- Volume Activation Services
- Web Server (IIS)
- Windows Server Update Services
As an example, the following roles and role services are not in Windows Server Core:
- Fax
- MultiPointServerRole
- NPAS
- WDS
Role Services not in Server Core
- Print-Scan-Server
- Print-Internet
- RDS-Gateway
- RDS-RD-Server
- RDS-Web-Access
- Web-Mgmt-Console
- Web-Lgcy-Mgmt-Console
- WDS-Deployment
- WDS-Transport (before Windows Server version 1803)
Determining if the service is available and supported for use with Server Core may determine whether it is an option for a certain use case.
Concluding Thoughts
Windows Server Core is a powerful, lightweight, and capable version of Windows that is well-suited both on-premises and in the cloud.
It allows more easily implementing automated solutions at scale and achieving the goal of immutable infrastructure. Managing and maintaining Server Core installations requires familiarity with the tools used to do so.
As shown in the post, there are many utilities and tools that can be utilized to successfully manage the “headless” Server Core installation of Windows Server. It is much more important with the latest Windows Server versions to make the correct decision on Server Core vs. Desktop edition as this can no longer be changed. Additionally, not every role is included or supported in Server Core installations.
Related Posts
Beginners Guide for Microsoft Hyper-V: How to Install Microsoft Hyper-V in Windows Server Core – Part 4
How to manage Hyper-V Server Core with Sconfig
How to Install and Configure Hyper-V Core 2019
Follow our Twitter and Facebook feeds for new releases, updates, insightful posts and more.

Introduction
Server Manager is a powerful tool for managing Windows Server 2019 Core. It provides a graphical user interface (GUI) for managing server roles, features, and services. It also allows you to manage local and remote servers, as well as manage user accounts and groups. In this guide, we will show you how to open Server Manager in Windows Server 2019 Core.
Step-by-Step Guide to Opening Server Manager in Windows Server 2019 Core
1. Begin by logging into the Windows Server 2019 Core system.
2. Once logged in, press the Windows key on the keyboard to open the Start menu.
3. In the Start menu, type “Server Manager” and press Enter.
4. The Server Manager window will open.
5. If this is the first time opening Server Manager, a Getting Started page will appear.
6. On the Getting Started page, click the “Local Server” tab.
7. The Local Server page will open.
8. On the Local Server page, click the “Manage” button.
9. The Server Manager window will open.
10. The Server Manager window will display the various roles and features of the Windows Server 2019 Core system.
11. From here, you can manage the roles and features of the Windows Server 2019 Core system.
Exploring the Benefits of Using Server Manager in Windows Server 2019 Core
Windows Server 2019 Core is a powerful and versatile operating system that provides a wide range of features and capabilities. One of the most useful tools for managing and configuring Windows Server 2019 Core is Server Manager. Server Manager is a graphical user interface (GUI) that allows administrators to easily manage and configure the server.
Server Manager provides a comprehensive view of the server’s configuration and status. It allows administrators to quickly view and manage the server’s roles and features, as well as the server’s hardware and software components. It also provides a centralized console for managing multiple servers from a single location.
Server Manager also provides a number of features that make it easier to manage and configure Windows Server 2019 Core. It allows administrators to quickly install and configure roles and features, as well as manage user accounts and access control. It also provides a comprehensive view of the server’s performance, allowing administrators to quickly identify and address any performance issues.
In addition, Server Manager provides a number of tools for troubleshooting and diagnosing server issues. It allows administrators to quickly identify and address any hardware or software issues, as well as any security issues. It also provides a comprehensive view of the server’s event logs, allowing administrators to quickly identify and address any errors or warnings.
Finally, Server Manager provides a number of tools for managing and configuring Windows Server 2019 Core remotely. It allows administrators to remotely manage and configure the server from any location, as well as remotely monitor the server’s performance and security.
Overall, Server Manager is an invaluable tool for managing and configuring Windows Server 2019 Core. It provides a comprehensive view of the server’s configuration and status, as well as a number of tools for quickly installing and configuring roles and features, managing user accounts and access control, and troubleshooting and diagnosing server issues. It also provides a number of tools for managing and configuring the server remotely. As such, Server Manager is an essential tool for any administrator managing Windows Server 2019 Core.
Windows Server 2019 Core is a lightweight version of Windows Server 2019 that is designed to be managed remotely. It is ideal for scenarios where a physical server is not available or when a minimal footprint is desired. Server Manager is a graphical user interface (GUI) tool that can be used to manage Windows Server 2019 Core. This article will provide an overview of how to use Server Manager to manage Windows Server 2019 Core.
The first step in using Server Manager to manage Windows Server 2019 Core is to install the Remote Server Administration Tools (RSAT) on a computer running Windows 10. RSAT provides the necessary tools to remotely manage Windows Server 2019 Core. Once RSAT is installed, open Server Manager and select the “Add Servers” option. This will open a window where you can enter the IP address or hostname of the Windows Server 2019 Core server. Once the server is added, you will be able to manage it from the Server Manager interface.
Once the server is added, you can use Server Manager to manage various aspects of the server. For example, you can view the server’s performance, manage roles and features, and manage users and groups. You can also use Server Manager to manage the server’s storage, network, and security settings.
In addition to managing the server, Server Manager can also be used to deploy applications and services. You can use Server Manager to deploy web applications, databases, and other services. You can also use Server Manager to deploy virtual machines and manage their settings.
Finally, Server Manager can be used to monitor the server’s health and performance. You can use Server Manager to view the server’s event logs, performance counters, and other system information. This can help you identify any potential issues with the server and take corrective action.
In summary, Server Manager is a powerful tool that can be used to manage Windows Server 2019 Core. It provides a graphical user interface that makes it easy to manage the server’s roles, features, users, and other settings. It can also be used to deploy applications and services, and to monitor the server’s health and performance.
Troubleshooting Common Issues with Server Manager in Windows Server 2019 Core
Server Manager is a powerful tool for managing Windows Server 2019 Core installations. It provides a graphical user interface (GUI) for managing server roles, features, and services. However, it is not without its issues. This article will discuss some of the most common issues with Server Manager in Windows Server 2019 Core and how to troubleshoot them.
1. Server Manager Fails to Launch
If Server Manager fails to launch, the first step is to check the Windows Event Viewer for any errors. If there are any errors, they should be addressed before attempting to launch Server Manager again. Additionally, it is important to ensure that the Remote Server Administration Tools (RSAT) are installed and up to date.
2. Server Manager Fails to Connect to Remote Servers
If Server Manager fails to connect to remote servers, the first step is to check the Windows Firewall settings. The firewall should be configured to allow remote connections. Additionally, it is important to ensure that the remote server is running the same version of Windows Server as the local server.
3. Server Manager Fails to Install Roles and Features
If Server Manager fails to install roles and features, the first step is to check the Windows Update settings. It is important to ensure that the latest updates are installed and that the server is up to date. Additionally, it is important to ensure that the server has enough disk space to install the roles and features.
4. Server Manager Fails to Manage Services
If Server Manager fails to manage services, the first step is to check the permissions settings. It is important to ensure that the user has the correct permissions to manage services. Additionally, it is important to ensure that the services are running and that the server is up to date.
These are some of the most common issues with Server Manager in Windows Server 2019 Core and how to troubleshoot them. By following the steps outlined above, most issues can be resolved quickly and easily.
Tips and Tricks for Optimizing Server Manager in Windows Server 2019 Core
1. Utilize the Server Manager Dashboard: The Server Manager Dashboard provides a comprehensive overview of the server’s performance and health. It is a great tool for quickly identifying any issues that may be occurring on the server.
2. Use the Server Manager Remote Management Tool: The Server Manager Remote Management Tool allows you to manage multiple servers from a single console. This can help to reduce the amount of time spent managing multiple servers.
3. Utilize the Server Manager Command Line Interface: The Server Manager Command Line Interface (CLI) allows you to quickly and easily manage servers from the command line. This can help to reduce the amount of time spent managing servers.
4. Utilize the Server Manager PowerShell Scripts: The Server Manager PowerShell Scripts allow you to quickly and easily automate server management tasks. This can help to reduce the amount of time spent managing servers.
5. Utilize the Server Manager Event Viewer: The Server Manager Event Viewer allows you to quickly and easily view events that have occurred on the server. This can help to quickly identify any issues that may be occurring on the server.
6. Utilize the Server Manager Performance Monitor: The Server Manager Performance Monitor allows you to quickly and easily monitor the performance of the server. This can help to quickly identify any performance issues that may be occurring on the server.
7. Utilize the Server Manager Task Scheduler: The Server Manager Task Scheduler allows you to quickly and easily schedule tasks to be performed on the server. This can help to reduce the amount of time spent managing servers.
8. Utilize the Server Manager Update Manager: The Server Manager Update Manager allows you to quickly and easily manage updates for the server. This can help to ensure that the server is always up to date with the latest security patches and updates.
Understanding the Security Implications of Using Server Manager in Windows Server 2019 Core
Windows Server 2019 Core is a minimal installation option for Windows Server 2019 that provides a low-maintenance server environment with limited UI elements. Server Manager is a tool used to manage multiple servers from a single console. It is available in both Windows Server 2019 Core and Windows Server 2019 with Desktop Experience.
Using Server Manager in Windows Server 2019 Core has several security implications that must be taken into consideration. First, Server Manager is a powerful tool that can be used to manage multiple servers from a single console. This means that if an attacker gains access to the Server Manager console, they can potentially gain access to all of the servers managed by it.
Second, Server Manager is a web-based application, which means that it is vulnerable to web-based attacks such as cross-site scripting and SQL injection. If an attacker is able to exploit these vulnerabilities, they can gain access to the Server Manager console and potentially gain access to all of the servers managed by it.
Third, Server Manager is a remote management tool, which means that it is vulnerable to remote attacks such as man-in-the-middle attacks. If an attacker is able to intercept the communication between the Server Manager console and the managed servers, they can potentially gain access to all of the servers managed by it.
Finally, Server Manager is a Windows-based application, which means that it is vulnerable to Windows-based attacks such as buffer overflows and privilege escalation. If an attacker is able to exploit these vulnerabilities, they can gain access to the Server Manager console and potentially gain access to all of the servers managed by it.
In order to ensure the security of the servers managed by Server Manager in Windows Server 2019 Core, it is important to take the necessary steps to secure the Server Manager console. This includes implementing strong authentication and authorization measures, using secure protocols for communication, and regularly patching the Server Manager console. Additionally, it is important to monitor the Server Manager console for any suspicious activity and take appropriate action if any is detected.
Q&A
Q1: How do I open Server Manager in Windows Server 2019 Core?
A1: To open Server Manager in Windows Server 2019 Core, you can use the command line tool sconfig.exe. To launch the tool, open a command prompt window and type “sconfig”. This will open the Server Manager window.
Introduction
Server Manager is a powerful tool for managing Windows Server 2016 Core. It provides a graphical user interface (GUI) for managing server roles, features, and services. It also allows you to manage local and remote servers, as well as manage user accounts and groups. In this guide, we will show you how to open Server Manager in Windows Server 2016 Core.
Step-by-Step Guide to Opening Server Manager in Windows Server 2016 Core
1. Log in to the Windows Server 2016 Core server using an administrator account.
2. Press the Windows key on the keyboard to open the Start menu.
3. Type “Server Manager” in the search box and press Enter.
4. The Server Manager window will open.
5. If this is the first time you are opening Server Manager, you will be prompted to select the server roles and features you want to install. Select the roles and features you need and click “Next”.
6. Once the installation is complete, the Server Manager window will open.
7. You can now use the Server Manager to manage the server roles and features, as well as configure the server settings.
Exploring the Benefits of Using Server Manager in Windows Server 2016 Core
Windows Server 2016 Core is a powerful and efficient operating system that provides a wide range of features and capabilities. One of the most useful tools included in Windows Server 2016 Core is Server Manager. Server Manager is a graphical user interface (GUI) that allows administrators to manage and configure the server, as well as monitor its performance.
Server Manager provides a comprehensive view of the server’s configuration and performance. It allows administrators to quickly and easily view the server’s hardware, software, and services. It also provides detailed information about the server’s roles and features, as well as the ability to manage and configure them. Additionally, Server Manager provides a centralized view of the server’s event logs, allowing administrators to quickly identify and address any issues.
Server Manager also provides a number of other benefits. It allows administrators to quickly and easily install and configure roles and features, as well as manage and monitor their performance. It also provides a centralized view of the server’s security settings, allowing administrators to quickly identify and address any potential security issues. Additionally, Server Manager provides a comprehensive view of the server’s performance, allowing administrators to quickly identify and address any performance issues.
Overall, Server Manager is an invaluable tool for administrators of Windows Server 2016 Core. It provides a comprehensive view of the server’s configuration and performance, allowing administrators to quickly and easily manage and configure the server, as well as monitor its performance. Additionally, it provides a centralized view of the server’s security settings, allowing administrators to quickly identify and address any potential security issues. As such, Server Manager is an essential tool for any administrator of Windows Server 2016 Core.
Server Manager is a powerful tool for managing Windows Server 2016 Core. It provides a graphical user interface (GUI) for managing server roles, features, and other components of the operating system. This guide will provide an overview of how to use Server Manager to manage Windows Server 2016 Core.
First, open Server Manager by clicking the Start button and selecting Server Manager from the list of programs. Once Server Manager is open, you will be presented with a dashboard that provides an overview of the server’s status. From here, you can access the various tools and features available in Server Manager.
To manage server roles, click on the “Manage” menu and select “Add Roles and Features”. This will open the Add Roles and Features Wizard, which will guide you through the process of adding roles and features to the server.
To manage server features, click on the “Manage” menu and select “Add Features”. This will open the Add Features Wizard, which will guide you through the process of adding features to the server.
To manage server components, click on the “Manage” menu and select “Manage Server Components”. This will open the Manage Server Components window, which will allow you to view and manage the various components of the server.
Finally, to manage server settings, click on the “Manage” menu and select “Server Settings”. This will open the Server Settings window, which will allow you to view and manage the various settings of the server.
Using Server Manager, you can easily manage Windows Server 2016 Core. With its intuitive GUI, you can quickly and easily add roles, features, and components to the server, as well as manage server settings.
Troubleshooting Common Issues with Server Manager in Windows Server 2016 Core
Server Manager is a powerful tool for managing Windows Server 2016 Core. It provides a graphical user interface (GUI) for managing server roles, features, and other components. However, it is not without its issues. In this article, we will discuss some of the most common issues with Server Manager in Windows Server 2016 Core and how to troubleshoot them.
The first issue is that Server Manager may not open. This can be caused by a number of things, including a corrupt installation, missing files, or incorrect permissions. To troubleshoot this issue, you should first try to repair the installation. If that does not work, you should check the permissions on the Server Manager folder and make sure they are correct. If the issue persists, you should try reinstalling Server Manager.
The second issue is that Server Manager may not be able to connect to remote servers. This can be caused by a number of things, including incorrect credentials, firewall settings, or network issues. To troubleshoot this issue, you should first check the credentials you are using to connect to the remote server. If they are correct, you should check the firewall settings to make sure they are allowing connections from the Server Manager. If the issue persists, you should check the network settings to make sure they are configured correctly.
The third issue is that Server Manager may not be able to install roles or features. This can be caused by a number of things, including incorrect permissions, missing files, or corrupt installations. To troubleshoot this issue, you should first check the permissions on the Server Manager folder and make sure they are correct. If the issue persists, you should try reinstalling the roles or features. If that does not work, you should check the installation files to make sure they are not corrupt.
These are just a few of the most common issues with Server Manager in Windows Server 2016 Core. If you are having any other issues, you should consult the Microsoft documentation for more information. With the right troubleshooting steps, you should be able to resolve any issues you may be having with Server Manager.
Tips and Tricks for Optimizing Server Manager in Windows Server 2016 Core
1. Utilize the Server Manager Dashboard: The Server Manager Dashboard provides a comprehensive overview of the server’s performance and health. It is a great tool for quickly identifying any issues that may be occurring on the server.
2. Use the Server Manager Remote Management Tool: The Server Manager Remote Management Tool allows you to manage multiple servers from a single console. This can help to reduce the amount of time spent managing multiple servers.
3. Utilize the Server Manager Command Line Interface: The Server Manager Command Line Interface (CLI) allows you to quickly and easily manage servers from the command line. This can help to reduce the amount of time spent managing servers.
4. Utilize the Server Manager PowerShell Scripts: The Server Manager PowerShell Scripts allow you to automate server management tasks. This can help to reduce the amount of time spent managing servers.
5. Utilize the Server Manager Event Viewer: The Server Manager Event Viewer allows you to quickly and easily view events that have occurred on the server. This can help to quickly identify any issues that may be occurring on the server.
6. Utilize the Server Manager Performance Monitor: The Server Manager Performance Monitor allows you to monitor the performance of the server. This can help to quickly identify any performance issues that may be occurring on the server.
7. Utilize the Server Manager Task Scheduler: The Server Manager Task Scheduler allows you to schedule tasks to be performed on the server. This can help to reduce the amount of time spent managing servers.
8. Utilize the Server Manager Update Services: The Server Manager Update Services allows you to quickly and easily update the server. This can help to ensure that the server is running the latest version of Windows Server 2016 Core.
Understanding the Security Implications of Using Server Manager in Windows Server 2016 Core
The use of Server Manager in Windows Server 2016 Core has significant security implications that must be understood and addressed in order to ensure the safety of the system. Server Manager is a graphical user interface (GUI) that allows administrators to manage and configure Windows Server 2016 Core. It provides a centralized platform for managing server roles, features, and services, as well as configuring server settings.
Server Manager is a powerful tool that can be used to configure and manage a wide range of server settings, including user accounts, security policies, and system services. As such, it is important to understand the security implications of using Server Manager in Windows Server 2016 Core.
First, it is important to note that Server Manager is a privileged tool. It is designed to provide administrators with the ability to manage and configure the server, and as such, it should only be used by authorized personnel. Unauthorized access to Server Manager can lead to serious security risks, such as the potential for malicious users to gain access to sensitive data or to modify system settings.
Second, it is important to ensure that all users who have access to Server Manager are properly trained and knowledgeable about the security implications of using the tool. All users should be aware of the potential risks associated with using Server Manager, and should be instructed on how to use the tool securely.
Third, it is important to ensure that all users who have access to Server Manager are properly authenticated. Authentication is the process of verifying the identity of a user before granting them access to the system. This can be done through the use of passwords, biometric authentication, or other methods.
Finally, it is important to ensure that all users who have access to Server Manager are properly monitored. Monitoring can help to detect any suspicious activity or unauthorized access to the system.
In conclusion, it is important to understand the security implications of using Server Manager in Windows Server 2016 Core. By following the steps outlined above, administrators can ensure that Server Manager is used securely and that the system remains safe and secure.
Q&A
Q1: How do I open Server Manager in Windows Server 2016 Core?
A1: To open Server Manager in Windows Server 2016 Core, open a command prompt and type “ServerManager.exe”. This will launch the Server Manager console.
Наверно, немногим нравится управлять серверами Microsoft Windows Server через
командную строку или PowerShell.
Это неизбежно, если Server был установлен в режиме Server Core.
Server Core появился на серверах начиная с версии 2008, а с 2012 Core редакция
предлагается по умолчанию при установке. Это оправдано с точки зрения
безопасности и уменьшения аппаратной нагрузки на сервер. Однако выполнять
ежедневные задачи не слишком удобно. Управлять Core серверами можно
удаленно как через Server Manager
на Windows Server,
так и с рабочих станций через RSAT
(Remote Server Administration Tools)
Управление Core версией Windows Server через локальный
сервер
Для управления сервером Core мы будем использовать Windows Server 2012R2 с графическим интерфейсом (GUI) и Server Manager. Для эксперимента был
выбран Windows Hyper—V Server 2016. Это бесплатный
сервер Hyper—V от Microsoft, который является
гипервизором для виртуализации и поддерживает только 3 роли:

Microsoft Hyper—V Server появились
в версии 2008 и обновлялась с каждым выходом новой версии Windows Server. Основным отличием 2016 Hyper—V от 2012R2 это
конечно же «Вложенная виртуализация» (Nested Virtualization), которая появилась
не только на Hyper—V Server 2016, но и на Server 2016
и соответственно появилось аппаратное требование поддержки — SLAT (Second Level Address Translation). SLAT
позволяет виртуализовать страницы памяти и отдать их под прямой контроль
гостевой системы, не затрагивая гипервизор, что конечно же быстрее и надёжнее.

Установка достаточно стандартна для Microsoft систем
и останавливаться на этом не будем.
После завершения установки и ввода пароля администратора Server Core встречает
нас интерфейсом командной строки и запуском sconfig.cmd.
Sconfig.cmd позволяет
сделать предварительную настройку системы.

Подключение Core Server к локальному Server Manager
1. Устанавливаем сетевое соединение между серверами. Прописываем
IP адреса, DNS. Проверяем пинги.
По умолчанию пинги закрыты файрволом. Если нужно открыть для
проверки соединения, то запускаем PowerShrell:
New-NetFirewallRule -DisplayName «Allow
inbound ICMPv4» -Direction Inbound -Protocol ICMPv4 -IcmpType 8 -Action
Allow

2.
Открываем файрвол для Remote Management через PowerShell на обеих серверах
1. Enable-NetFirewallRule -DisplayGroup
«Remote Event Log Management»
2. Enable-NetFirewallRule -DisplayGroup
«Remote Service Management»
3. Enable-NetFirewallRule -DisplayGroup
«File And Printer Sharing»
4. Enable-NetFirewallRule -DisplayGroup
«Remote Volume Management»
Или через командную строку CMD:
1.
netsh advfirewall firewall set rule
group=” Remote Event Log Management” new enable=yes
2.
netsh advfirewall firewall set rule
group=” Remote Service Management” new enable=yes
3.
netsh advfirewall firewall set rule
group=” File And Printer Sharing” new enable=yes
4.
netsh advfirewall firewall set rule
group=”Remote Volume Management” new enable=yes

3. На локальной машине включаем
RemoteManagement
winrm quickconfig

Добавляем в список надежных хостов
PS: Set-Item
wsman:\Localhost\Client\TrustedHosts ServerName -Concatenate -Force
Get-Item
wsman:\Localhost\Client\TrustedHosts
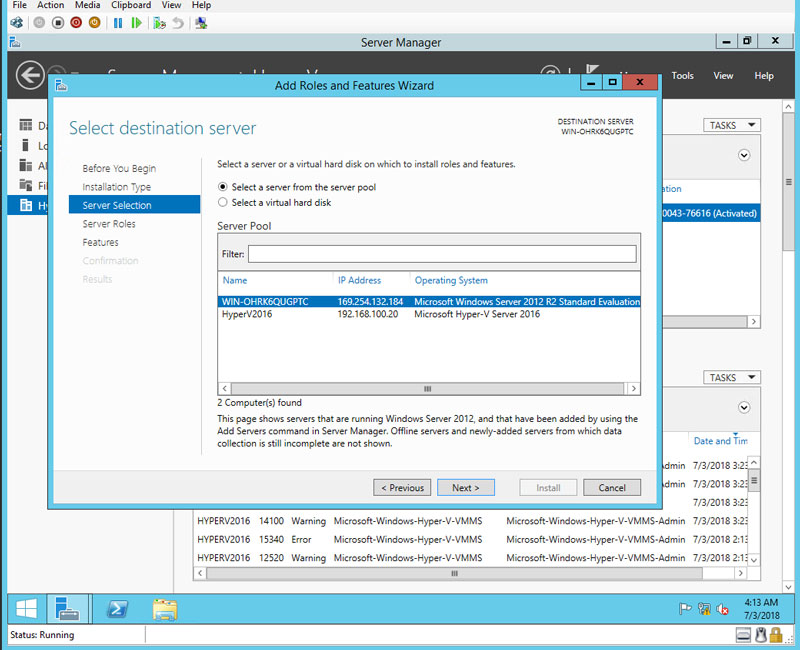
4.
Добавляем сервер для удаленного управления в Server Manager
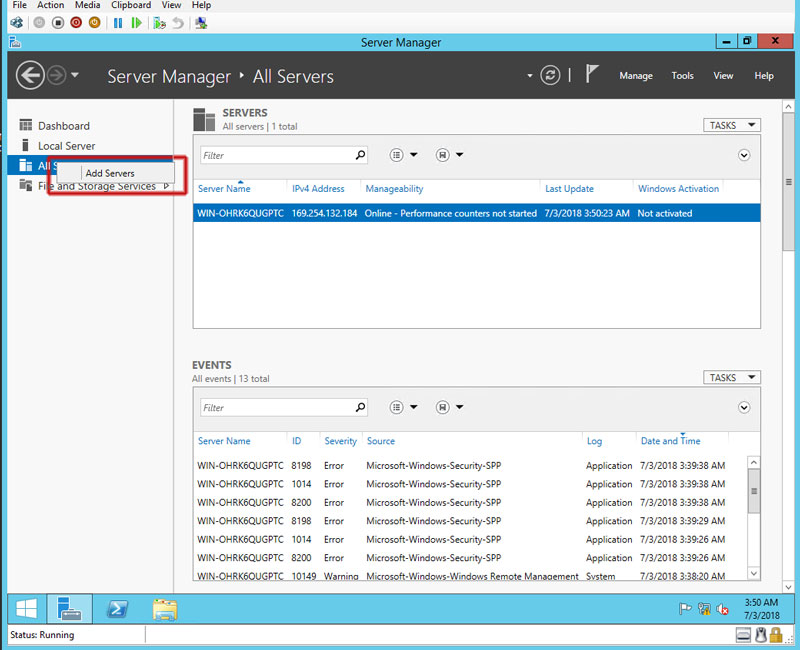
5.
Указываем DNS имя удаленного сервера или IP

Если возникает ошибка Online — Access is denied,
правой кнопкой мышки выберите Managed As … и введите учетные данные пользователя удаленного сервера в
формате ServerName\UserName.
6.
После соединения с удаленным сервером появится
вкладка Hyper—V в
левой части Server Manager
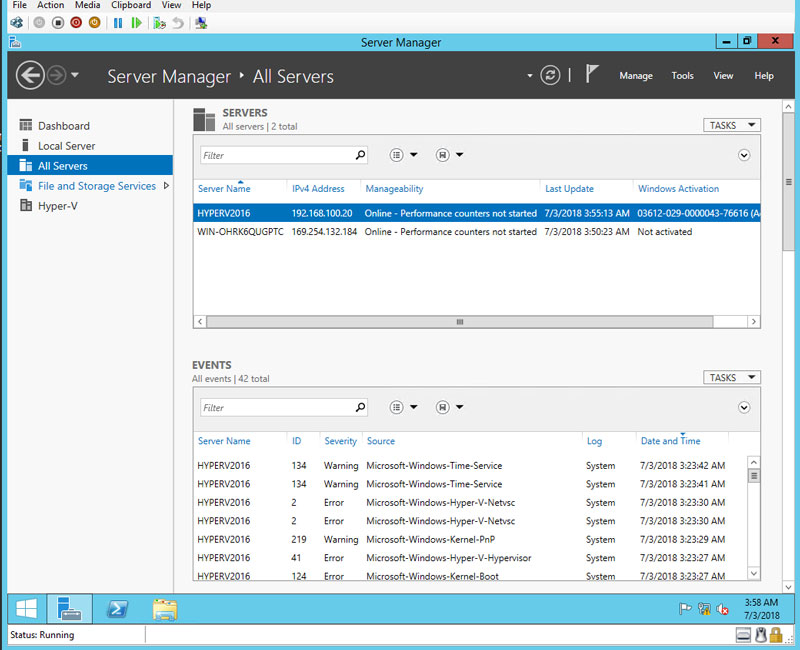

Наш
удаленный Core сервер готов к управлению с локального сервера с помощью Server Manager.
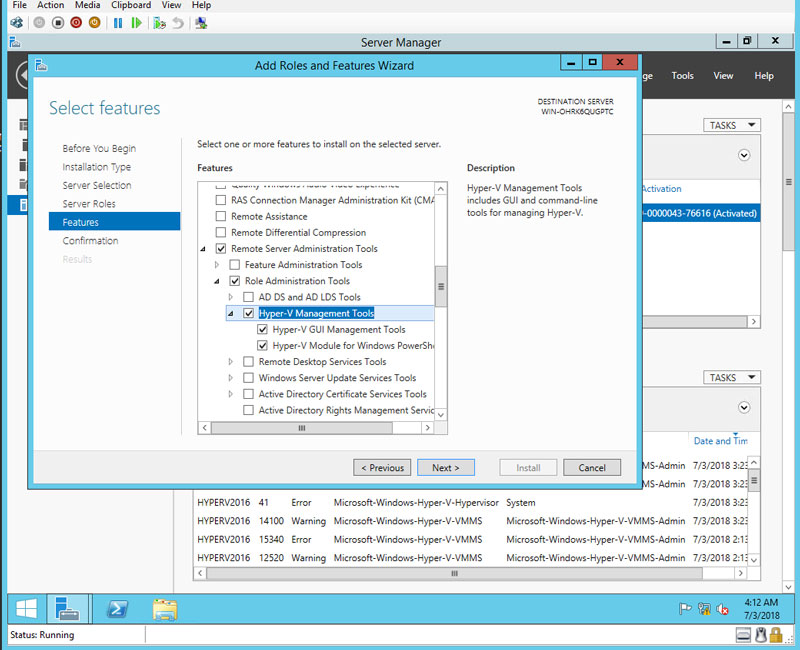
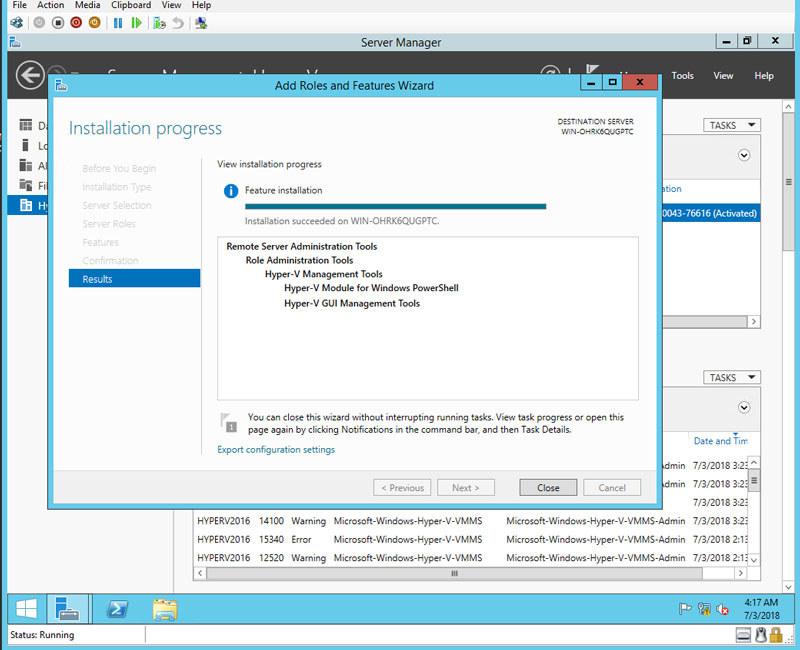
Осталось
только установить панель управления Hyper—V. Установим
из Server Manager
1
Mange -> Add Role and Features
2
Server Selection –> ServerName (локальный сервер)
3
Features -> Remote Server
Administration Tools -> Role Administration Tools -> Hyper-V Management
Tools
Некоторые пункты в последовательности пропущены. Просто
нажимаем Next
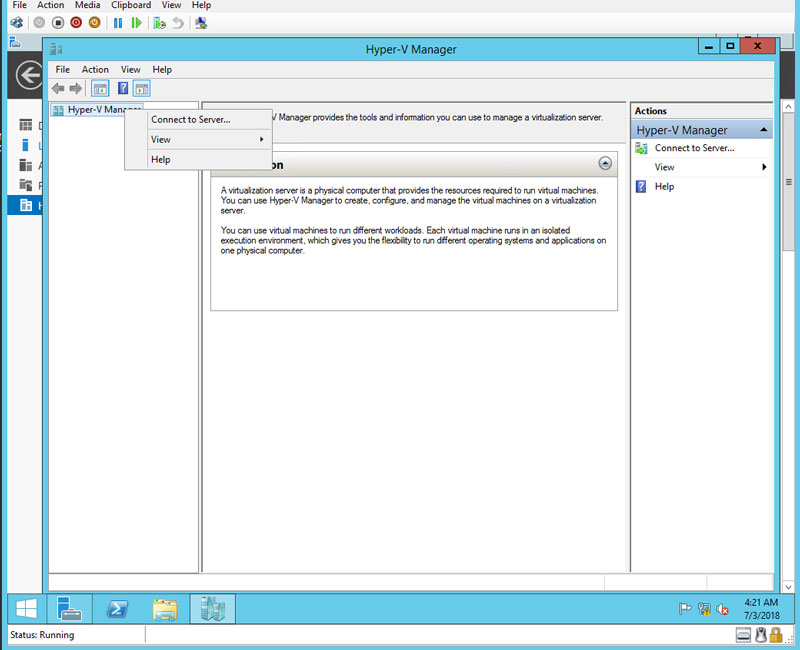
Запускам Hyper-V
Manager
Server Manager
-> Hyper-V Manager
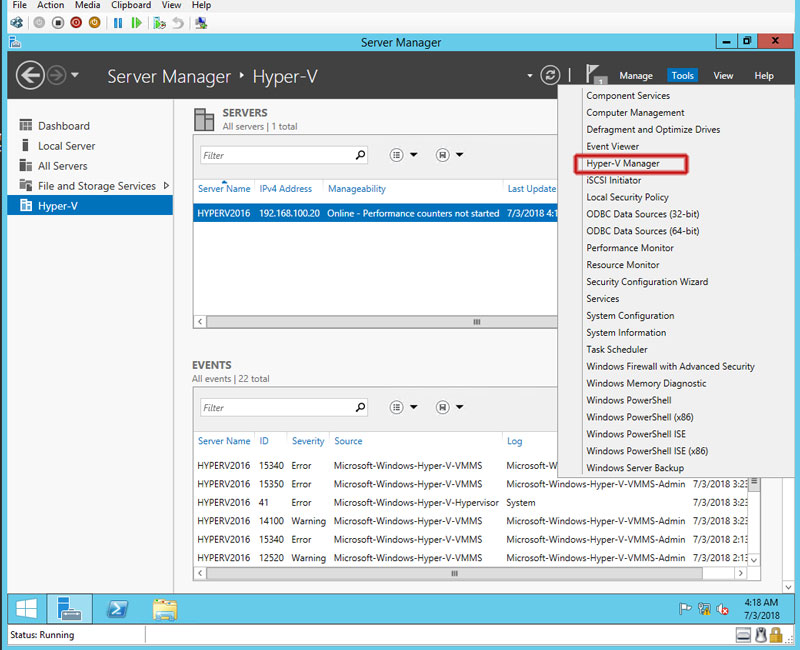
В Hyper—V Manager выбираем
Connect to Server и вводим имя удаленного сервера


Аналогично можно удаленно управлять всеми ролями и службами Windows Server.
The purpose of this post is to document the steps I had to follow to get my Hyper-V Server 2016 (the free hypervisor) manageable on my Windows Server 2016 GUI server via Server Manager. Both servers are in a workgroup, which means you need to do a number of things to get this working. The same steps would also apply to a Windows Server 2016 Core installation.
- Author
- Recent Posts

Robert is a small business specialist from the UK and currently works as a system administrator. He was a Microsoft MVP for eight years and has worked as a technical reviewer for Microsoft Press. You can follow Robert on Twitter and in his blog.
The GUI server is my production Hyper-V host, and I wanted to use Server Manager to keep an eye on the lab server. There are many, many guides on this out there. However, what I found since the last time I did this was that something is always missing from my notes or the posts I am trying to follow. For example, I had the server showing up and populated correctly in Server Manager, but I was unable to view the storage.
First off, I’ll assume you have completed the installation of the operating system. Once logged in, you will see the SConfig tool. Here, our goal is to configure Windows Remote Management (WinRM) to work over HTTPS. First, we have to enable Remote Desktop.
Choose option 7 (Remote Desktop) and then press E to enable it.
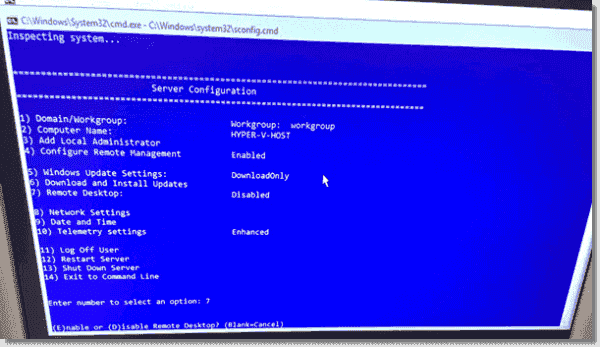
SConfig menu on Server Core
When asked which authentication method to enable, choose option 1.
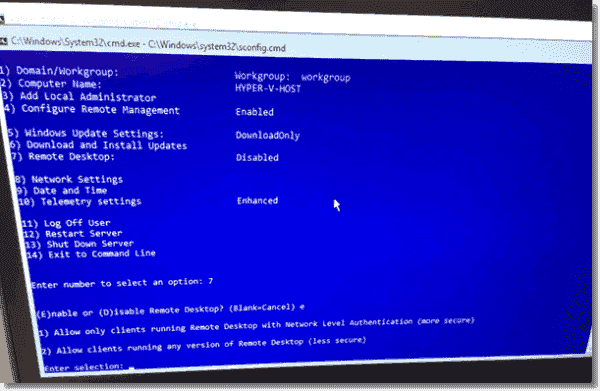
SConfig menu option 7
You should then see a message box indicating it has enabled Remote Desktop.

SConfig menu enabling Remote Desktop
Now you can Remote Desktop to your Core server if you wish.
Once logged in, select the cmd window floating in the background. Enter this command:
winrm e winrm:config:listener
This will show you the current listeners configured by WinRM.

Check WinRM listener
You can see we just have one listener enabled using the default HTTP.
Type PowerShell and press Enter.
Run this command:
get-childitem cert:\localmachine\my

Check local certificates
You should receive no output for this, and this means you have no certificates installed on the machine.
Using this post as a guide, we can set up a self-signed certificate and assign it to a WinRM listener.
New-SelfSignedCertificate -DnsName hyper-v-host.sbs.local ‑CertStoreLocation cert:\localmachine\my
New-SelfSignedCertificate
Now this certificate is self-signed, so our GUI server won’t trust it. We will need to install this certificate on our GUI server. Make a note of the thumbprint from your new certificate, as we will need that in our next command.
First, we can store our certificate in a variable.
$cert = get-childitem cert:\localmachine\my | where { $_.ThumbPrint -eq "E941D147E708A1EA04EEA8E48B7A88328B5AC47D" }
We need to protect our certificate with a password, which we need to store as a secure string.
$password = ConvertTo-SecureString P@ssw0rd -AsPlainText –Force
Now we can export our certificate.
$cert | Export-PfxCertificate -FilePath c:\hyper-v-host.pfx -Password $password

Export certificate
We can collect that file later and then install it on our GUI server.
Now we need to set up our WinRM HTTPS listener. Switch back to cmd.
The command we need to enter is quite long and needs two pieces of information: your server’s fully qualified domain name (FQDN) and the thumbprint of the certificate we just generated.
winrm create winrm/config/Listener?Address=*+Transport=HTTPS @{Hostname="hyper-v-host.sbs.local"; CertificateThumbprint="E941D147E708A1EA04EEA8E48B7A88328B5AC47D"}
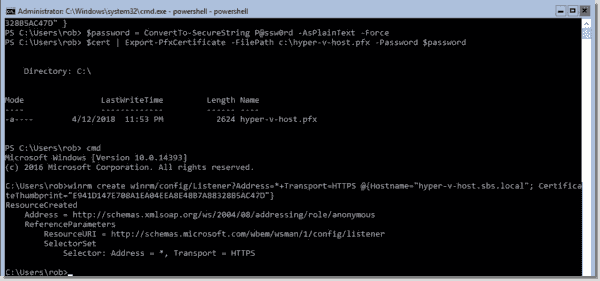
New HTTPS listener
Now we can run our first WinRM command and make sure our listener is enabled.
winrm e winrm/config/listener
We can see here we now have two listeners enabled.

Show HTTPS listeners
Moving over to our GUI server, we need to configure some things before we can connect to the Core server.
We need to store the password for the Core server’s built-in Administrator account in the credential store.
Open a PowerShell window and enter the following:
cmdkey /add:hyper-v-host /user:administrator /pass:P@ssw0rd
cmdkey /add:hyper-v-host.sbs.local /user:administrator /pass:P@ssw0rd
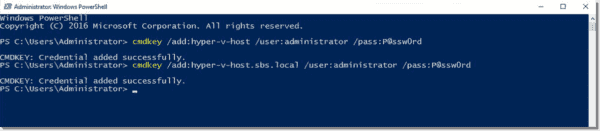
Save credentials
Notice we have saved the credential for the hostname and the FQDN.
Next we can add the Core server as a trusted host.
set-item wsman:\localhost\client\trustedhosts -Value hyper-v-host ‑Concatenate
set-item wsman:\localhost\client\trustedhosts -Value hyper-v-host.sbs.local ‑Concatenate

Add trusted host
Again we add both the hostname and the FQDN.
We can now use PowerShell remoting to connect to our Core server, which is lucky since we need to do a couple of other bits. We need to configure the firewall for file and print sharing, allow remote access for local accounts, and enable remote firewall management.
Enter-PSSession HYPER-V-HOST
New-ItemProperty -Path HKLM:\Software\Microsoft\Windows\CurrentVersion\Policies\System -Name LocalAccountTokenFilterPolicy -Value 1 -Type DWORD
netsh advfirewall set currentprofile settings remotemanagement enable
netsh advfirewall set rule group="File and Printer Sharing" new enable=Yes
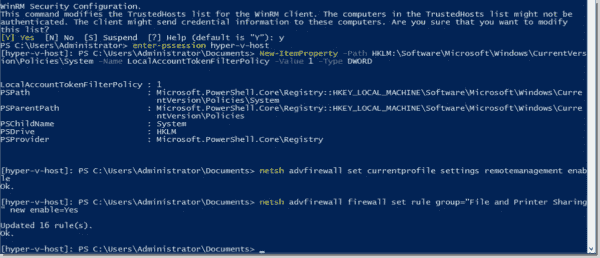
Edit the registry
We can now browse the folders on our Core server.
If we open the c$ share, we can get our certificate and install it.
Right-click the PFX file and follow the Certificate Import Wizard to install the certificate into the Trusted Root Certificate Authorities for the local machine.
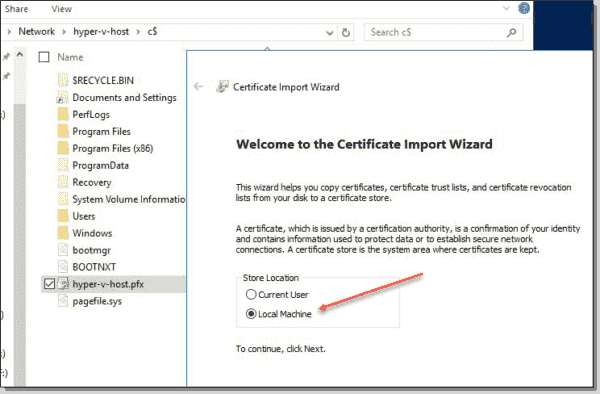
Import PFX
Trusted Root Certificate Authorities store
We should now have done enough to get Server Manager able to manage our Core server remotely.
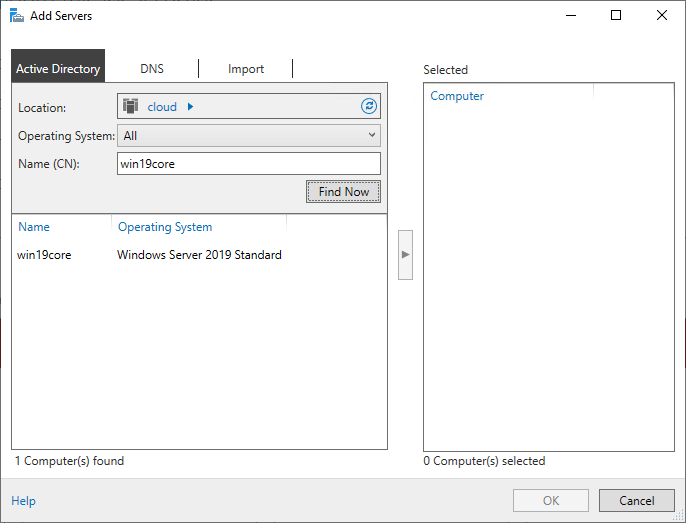
Open Server Manager and choose option 3 to add other servers.
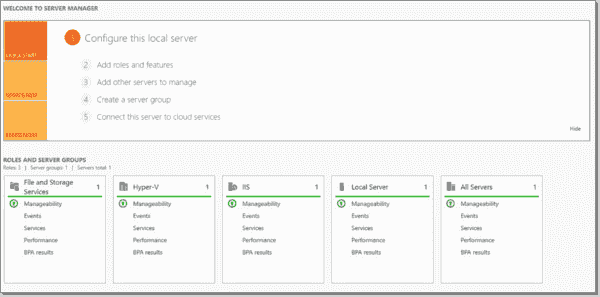
Server Manager
Choose the DNS tab and enter the name of your Core server.
Use the arrow to add it to the list of selected computers and click OK. Server Manager will add the server.

Adding a server
Move to All Servers and we can see our server listed.
Subscribe to 4sysops newsletter!

Server online
You should see Online in the Manageability column, and that’s all there is to it.
![]()