Changing DNS in Windows Server is a crucial step for ensuring smooth network connectivity and efficient domain resolution. In this tutorial, we will walk you through the process of changing DNS settings on your Windows Server.
Step 1: Accessing Network Connections
To begin, we need to access the Network Connections settings. Here’s how you can do it:
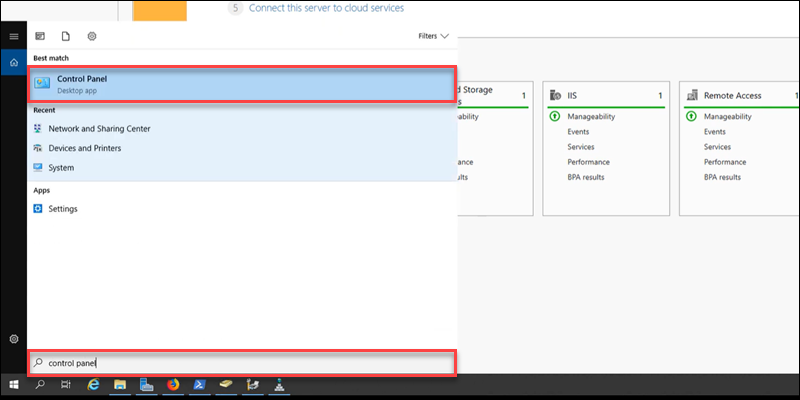
- Step 1.1: Click on the Start button and open the Control Panel.
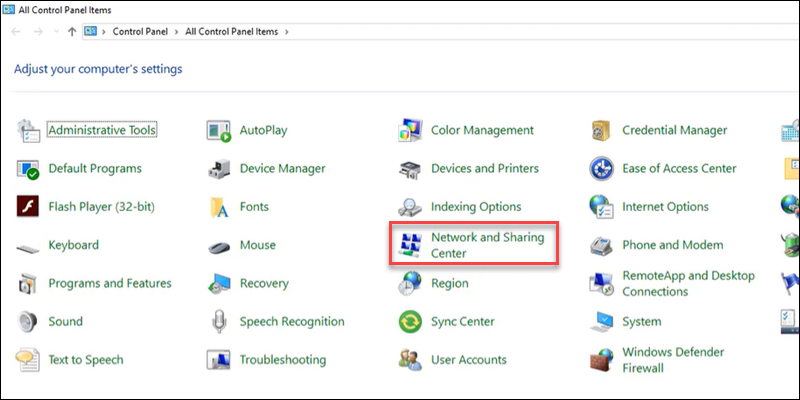
- Step 1.2: In the Control Panel, select “Network and Sharing Center.”
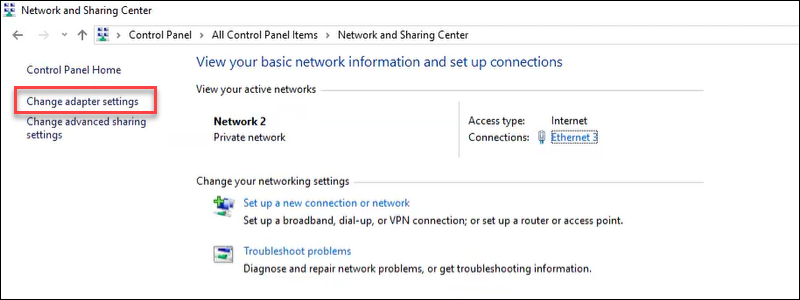
- Step 1.3: From the left-hand side menu, click on “Change adapter settings.”
This will open a window displaying all your network connections.
Step 2: Modifying DNS Settings
In this step, we will modify the DNS settings of the desired network connection:
- Step 2.1: Right-click on the network connection you want to change DNS for.
- Step 2.2: Select “Properties” from the context menu.
A properties window will appear with various tabs.
- Step 2.3: Locate and select “Internet Protocol Version 4 (TCP/IPv4)” from the list of available items.
Note: If you are using IPv6, select “Internet Protocol Version 6 (TCP/IPv6)” instead.
- Note:
- This step assumes that you want to modify the IPv4 DNS settings.
- If you want to modify IPv6 DNS settings, select “Internet Protocol Version 6 (TCP/IPv6)” instead.
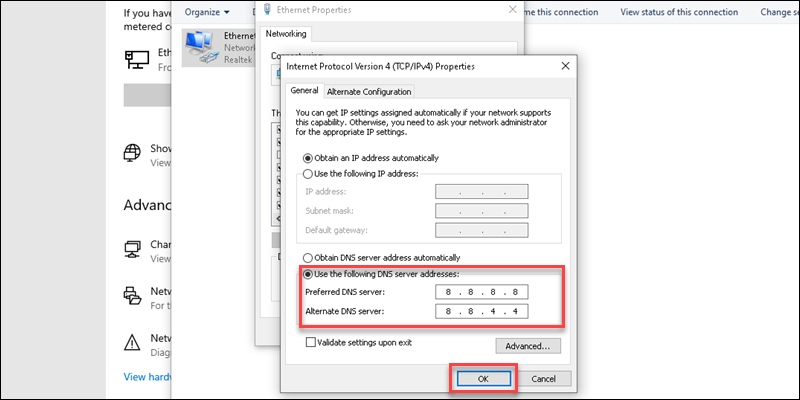
Step 3: Configuring DNS Settings
Now, we will configure the DNS settings for the selected network connection:
- Step 3.1: In the properties window, click on the “Properties” button.
- Step 3.2: A new window will open displaying the properties for TCP/IPv4.3: Select the “Use the following DNS server addresses” option.
You will notice that two text fields become editable below this option.
- Step 3.4: In the “Preferred DNS server” field, enter the IP address of your desired DNS server.5: In the “Alternate DNS server” field, you can optionally enter a secondary DNS server IP address. This is useful for redundancy and fault tolerance purposes.
Note:
- If you are unsure about which DNS servers to use, consult your network administrator or Internet Service Provider (ISP).
- You can also use public DNS servers like Google DNS (8.8.8 and 8.4.4) or Cloudflare DNS (1.1.1 and 1.0.1).
Step 4: Applying Changes and Testing
We are almost done! Now it’s time to apply the changes and test the new DNS settings:
- Step 4.1: Click on the “OK” button to save the changes.
- Step 4.2: Close all opened windows.
The changes should take effect immediately. To verify if the new DNS settings are working correctly, you can perform a simple test:
- Step 4.3: Open a web browser and visit any website. If the website loads successfully, it means that the new DNS settings are functioning correctly.
Congratulations! You have successfully changed the DNS settings on your Windows Server. Remember that these steps can be applied to any network connection on your server.
Conclusion
In this tutorial, we have learned how to change DNS settings on a Windows Server. By following these steps, you can ensure efficient domain resolution and network connectivity for your server environment. Remember to choose reliable DNS servers and regularly review and update your DNS configuration for optimal performance.
We hope you found this tutorial helpful! If you have any further questions or need additional assistance, feel free to reach out to us.
I just want to change the DNS server that my windows 2016 server is pointing to, but I can’t seem to find this basic information.
All that is available online in any searches is how to make my Windows 2016 Server a new DNS server, which I don’t want it to do.
I just need it to point to an existing DNS server. Anyone know how to do this? I think it’s very basic but it’s another one of those very basic things that seems impossible to find.
asked Jul 30, 2019 at 19:09
![]()
You change it (and any Windows server) in the NIC settings.
See here for more information/citation.
Log in to -the server- with an administrator account. To change the IP address and DNS server settings for a network adapter using the GUI:
On the desktop, right-click the network icon in the bottom right of the Task Bar and select Open Network and Sharing Center from the menu.
In the Network and Sharing Center, click Change adapter settings.
Right-click the relevant network adapter in the Network Connections window and select Properties from the menu.
In the adapter’s Properties window, select Internet Protocol Version 4 (TCP/IPv4) and click Properties.
Enter the required IP address and DNS server settings and then click OK.
Click Close in the adapter’s Properties window.
answered Jul 30, 2019 at 19:26
![]()
TheCleanerTheCleaner
32.7k26 gold badges132 silver badges191 bronze badges
2
You can easily change the DNS server settings using control panel:
1.Go to Control Panel.
2.Click on Network and Internet.
3.Network and sharing
4.Click Change adapter settings options in the left pane.
5.Click the network interface connected to the internet
6.Select Properties option.
7.Select the Internet Protocol version 4 (TCP/IPv4)
8.Click Properties.
9.Click the Use the following DNS Server address option.
- Type your preferred and alternate DNS address.
and that’s all.
if you want to know more about check this Windows DNS Configuration.
answered Dec 1, 2019 at 17:03
![]()
You must log in to answer this question.
Not the answer you’re looking for? Browse other questions tagged
.
Not the answer you’re looking for? Browse other questions tagged
.
Configuring a DNS server in Windows Server 2022 is a two-step process. First, you must create a DNS zone. Then, you must add a DNS server to that zone. In this article, we will walk you through the steps necessary to create a DNS zone and add a DNS server to it.
Creating a DNS Zone
To create a DNS zone, you must first open the DNS Manager console. To do this, open the Start menu, type dns, and then click the DNS Manager icon that appears.
In the DNS Manager console, you will see a list of zones. To create a new zone, click the Add Zone button.
In the Add Zone dialog box, you will need to provide a name for the zone and a description. Click the Next button.
In the Select a Zone Type dialog box, you will need to select the type of zone that you want to create. The options are Primary, Secondary, or Stub. Select the Primary zone type, and then click the Next button.
In the Select a DNS Server dialog box, you will need to specify the name of the DNS server that you want to use to serve the zone. Click the Next button.
In the Confirm Zone Creation dialog box, you will be asked to confirm that you want to create the zone. Click the Finish button to create the zone.
Adding a DNS Server to a Zone
Now that you have created a zone, you need to add a DNS server to it. To do this, open the DNS Manager console, and then click the Add Zone button.
In the Add Zone dialog box, you will need to provide a name for the zone and a description. Click the Next button.
In the Select a Zone Type dialog box, you will need to select the type of zone that you want to add the DNS server to. The options are Primary, Secondary, or Stub. Select the Primary zone type, and then click the Next button.
In the Select a DNS Server dialog box, you will need to specify the name of the DNS server that you want to use to serve the zone. Click the Next button.
In the Confirm Zone Creation dialog box, you will be asked to confirm that you want to add the DNS server to the zone. Click the Finish button to add the DNS server to the zone.
Table Of Contents Show
- What is DNS Server?
- What Is the Function of a DNS Server?
- DNS Resolution Process
- Windows DNS Server Installation and Configuration on Windows 2022
- Prerequisites
- Install DNS Server
- Create a Forward Lookup Zone
- Create a Reverse Lookup Zone
- DNS A and PTR records should be added.
- Verify DNS Name Resolution
- Conclusion to How to Setup Windows DNS Server and Configuration on Windows 2022
- In Windows, how do I set up a DNS server?
- How do you set up your DNS server?
- In Windows Server, how do I manage DNS?
- In Windows Server 2012, how do I set up a DNS server?
How to Install and Configure a Windows DNS Server in Windows 2022
by Hitesh Jethva
in DNS
In this post, we will introduce DNS server, its working process, and then move on to the DNS server setup and zone creation phase on Windows 2022.
The DNS server is the most important because you would be unable to find any website without it. It is a globally distributed service organized in a hierarchy, with each section denoting a subdivision.
Let’s get started with this blog post about Windows DNS Server Setup and Configuration on Windows 2022.
Also Read
Types of DNS Records: A, CNAME, AAAA, MX, TXT, NS, PTR, SRV, SOA
What is DNS Server?

DNS servers are quite similar to phonebooks and are crucial part of the Internet. What DNS servers do is they help convert website names into IP addresses so that machines can understand the query and load the requested pages for usersAs a result, users will find it easier and faster to access them online.
The domain name system (DNS) can be summed up as a naming database that stores data about domain names and the IP addresses that correspond to them. It also translates human readable domain names into the IP addresses that correspond to them, IPv4 or IPv6, which are difficult for people to remember and type out.
When a user types a domain name into a browser, it sends a request to the DNS server for its corresponding IP address (usually an IPv4 address). The DNS server then searches its database for the requested domain name, finds it, and returns its corresponding IP address to the browser, which uses this information to connect with the website.
A DNS server is a type of name server that responds to queries from other computers, such as web browsers and email clients. It is a hierarchical naming system for computers, services, or any resource connected to the Internet or a private network that associates various information with domain names assigned to each participating entity.
DNS servers are classified into four types: recursive servers, root name servers, TLD servers, and authoritative name servers.
Also Read
How Primary and Secondary DNS Function (Using DNS Servers)
What Is the Function of a DNS Server?
DNS basically converts domain names into IP addresses that computers can read, understand, and use. When a user types a query or domain into a browser, the DNS service translates the user type into Internet Protocol (IP) addresses that the machine can understand.
In exchange, the machine locates and delivers the requested webpage; this entire process of translating and discovering the requested data is known as DNS resolution.
DNS Resolution Process
The DNS resolution process includes the following steps:
- The user enters his or her query or a domain name into the browser.
- The recursive DNS query or message is forwarded to the network by the Browser in order to determine the corresponding IP address.
- The query is then forwarded to an ISP-managed recursive DNS server, which looks for the page and loads it for the user once it receives the address.
- If the recursive DNS server cannot find the correct answer to the user’s query, it will query other servers, beginning with the DNS root name servers, then moving on to top level domain (TLD) name servers, and finally authoritative name servers.
- These servers collaborate and redirect until they find a DNS record that contains the correct answer to the requested query.
- The recursive server also caches the information for future use, ensuring that the next time a similar request is made, it responds directly rather than querying a series of other servers.
- If the authoritative name servers also fail to find the information, the user receives an error message.
Because a domain name server (DNS) completes this process in a matter of seconds, the DNS protocol is the set of rules for querying and updating these servers that define how the Internet’s Domain Name System (DNS) works.
To put it simply, the process employs a recursive server that converts domain names into Internet Protocol (IP) addresses and asks on the user’s behalf.
Also Read
Configure Azure/AWS/Google GCP Cloud Windows DNS Server
It is now time to learn how to Setup and Configure Windows DNS Server on Windows 2022.
Windows DNS Server Installation and Configuration on Windows 2022
Prerequisites
- A server with the Windows Server 2022 operating system and RDP access.
- A user with administrative privileges.
- A minimum of 4 GB of RAM and a CPU with two cores is required.
Install DNS Server
Log in as an administrator user to Windows Server 2022 and follow the instructions below to install the DNS server.
Step 1: Launch the Server Manager, as illustrated below:
Step 2 — Select Add roles and features, and you should see the following screen:
Step 3 — After clicking the Next button, you should see the following screen:
Step 4 — Click the Next button after selecting Role-based and feature-based installation, and you should see the Select Destination Server screen:
Step 5 — From the server pool, select the server and click the Next button to bring up the roles selection screen:
Step 6 — Select the DNS server and press the Next button; you should see the following screen:
Step 7 — Check all settings and click the Install button to begin the installation; you should see the following screen:
Step 8 — Allow some time for the installation to complete before closing the installation wizard by clicking the Close button.
Also Read
How to Install and Configure a Linux BIND DNS Server on Azure/AWS/GCP
Create a Forward Lookup Zone
To resolve the name to an IP address, you must first create a forward lookup zone. To do so, follow the steps below:
Step 1 — On the server manager, navigate to Tools => DNS to access the DNS manager, as shown below:
Step 2: Right-click on the server name to reveal the following options:
Step 3 — Select New Zone, and the zone configuration wizard should appear:
Step 4 — Press the Next button to bring up the zone type selection screen:
Step 5 — Click the Next button after selecting the Primary zone, and you should see the following screen:
Step 6 — Choose Forward lookup zone and press the Next button to see the following screen:
Step 7 — Enter your zone name and click the Next button to see the following screen:
Step 8 — Click the Next button after selecting «Create a file with the file name,» and you should see the Dynamic update screen:
Step 9 — Select «Do not allow dynamic update» and click the Next button. The following screen should appear:
Step 10 — Click the Finish button, and your forward lookup zone should appear in the following screen:
Also Read
How to Modify DNS Server Settings in Windows 10/11
Create a Reverse Lookup Zone
The next step is for you to create a reverse lookup zone to resolve the IP address to the name. To do so, follow the steps below:
Step 1 — In the DNS manager, right-click on the server name and select New Zone; the zone creation wizard should appear:
Step 2 — Press the Next button to bring up the zone type selection screen:
Step 3 — Choose the Primary zone and press the Next button to see the following screen:
Step 4 — Click the Next button after selecting «Reverse lookup zone,» and you should see the following screen:
Step 5 — Click the Next button after selecting IPv4 Reverse Lookup Zone, and you should see the following screen:
Step 6 — Enter your network id and press the Next button to see the following screen:
Step 7 — Click the Next button after selecting «Create a file with this file name,» and you should see the Dynamic update screen:
Step 8 — Select «Do not allow dynamic updates» and click the Next button. The following screen should appear:
Step 9 — Click the Finish button, and your reverse lookup zone should appear on the following screen:
Also Read
What is DNS Hierarchy Architecture (Explained) with Examples
DNS A and PTR records should be added.
The following steps should be followed to add A and PTR records to DNS for remote hosts in order to perform name resolution:
Step 1 — In the DNS manager, right-click on the forward lookup zone to bring up the following screen:
Step 2 — Select New Host (A or AAAA). The following screen should appear:
Step 3 — Enter your host’s parent domain name and IP address, and select «Create associated pointer record,» then click the Add Host button. Finally, click the forward lookup zone, and you should see your newly added A record on the screen below:
Also Read
Best DNS Security Practices for Securing Your DNS Server (Checklist)
Verify DNS Name Resolution
Now that the DNS server installation and configuration is complete, we must test whether or not the DNS name resolution works.
Open your command prompt and type the following command: nslookup
nslookup
You should get the following results:
					Default Server:  web.exampledns.com
Address:  208.117.85.195
Now, enter the FQDN of your newly added host:
> web.exampledns.com
The following output should show the name to IP address resolution:
					Server:  web.exampledns.com
Address:  208.117.85.195

Name:    web.exampledns.com
Address:  208.117.85.195
Then enter your newly added host’s IP address:
> 208.117.85.195
In the output, you should see the IP address to name resolution:
Server:  web.exampledns.com
Address:  208.117.85.195

Name:    web.exampledns.com
Address:  208.117.85.195
Thank you for reading this article on how to Setup and Configure Windows DNS Server on Windows 2022.
Also Read
Top 20 Open Source DNS Servers (Linux/Windows)
Conclusion to How to Setup Windows DNS Server and Configuration on Windows 2022
We explained how to install a DNS server, create a forward and reverse lookup zone, and add A/PTR records to DNS in this How to Setup Windows DNS Server and Configuration on Windows 2022 post, so I hope you can now easily deploy your own DNS server for local name resolution in your organization.
Furthermore, remembering a website’s IP address can be difficult, but DNS servers alleviate this problem by converting long IP addresses into human-readable domain names that are simple to remember and use.Finally, a DNS server and innovative features such as AI-based searches and chatbots allow you to make online transactions quickly.
In Windows, how do I set up a DNS server?
Windows..
Go to the Control Panel..
Change adapter settings by selecting Network and Internet > Network and Sharing Center.
Choose the connection for which you want to set up Google Public DNS..
Choose the Networking tab..
Select the DNS tab by clicking Advanced..
Click OK..
Select Use the DNS server addresses listed below.
How do you set up your DNS server?
How do I change the address of my DNS server?.
Launch the Google Home app…
Tap Wi-Fi Settings. Advanced Networking..
Tap DNS..
Choose your preferred public DNS server, or enter a primary and secondary server address if you want to use a custom DNS server.
Tap Save ..
In Windows Server, how do I manage DNS?
To edit a DNS zone..
Click IPAM in Server Manager..
Click DNS Zones under MONITOR AND MANAGE in the navigation pane..
Make one of the following choices in the lower navigation pane:…
Select IPv4 Reverse Lookup as an example.
Right-click the zone you want to edit in the display pane, and then select Edit DNS Zone.
In Windows Server 2012, how do I set up a DNS server?
Step 1: To install the DNS role, navigate to «Server Manager» and select Manage Add Roles and Features. Step 2: Click Next.Step 3 Select the Role-based or feature-based installation option, then click Next. Step 4 Install a Local DNS role, which will select a server from the server pool, then click Next.
Introduction
DNS configuration sets up a Domain Name System server to translate domain names (URLs) into IP addresses. The configuration helps manage the DNS records for domains.
Knowing how to configure a DNS server is essential for any network administrator. The steps to configure a DNS differs depending on the operating system.
This article shows how to configure DNS on a Windows, macOS, and Linux machine.
Prerequisites
- A stable internet connection.
- Access to an account with administrator privileges.
- Access to the command line/terminal.
Why Change DNS Configuration?
Internet service providers use a preconfigured DNS server to filter traffic. There are many reasons to change the default DNS configuration, such as:
- Speed improvements. A DNS maps domain names to IP addresses. Custom DNS configuration helps improve domain name resolution times, which reduces the time needed to access a website.
- Greater security. Specific DNS servers block malicious web pages and focus on preventing access to unsafe websites. Changing the DNS configuration to use such servers improves internet security and restricts exposure to online threats.
- Customized experience. Configure the DNS to block access to specific web pages or reroute domain names to different addresses. For example, some DNS servers help create a family-friendly environment by blocking access to unsafe or suspicious websites.
- Privacy. Some DNS servers log internet queries for advertising purposes. Changing the DNS configuration to a privacy-focused server enables better control over online privacy.
- Troubleshooting. Changing to a different DNS server is crucial in troubleshooting DNS issues.
There are many free DNS resolvers available. While some solely focus on reducing DNS lookups and speed improvements, other resolvers aim to provide an additional security and filtering layer.
The table below shows example providers, the purpose of the DNS, and the IPv4 and IPv6 addresses:
| Provider | Purpose | IPv4 Addresses | IPv6 Addresses |
|---|---|---|---|
| Speed improvements. | 8.8.8.8 8.8.4.4 |
2001:4860:4860::8888 2001:4860:4860::8844 |
|
| Cloudflare | Speed improvements. | 1.1.1.1 1.0.0.1 |
2606:4700:4700::1111 2606:4700:4700::1001 |
| Quad9 | Filters malware, phishing, and exploits. | 9.9.9.9 149.112.112.112 |
2620:fe::fe 2620:fe::9 |
| OpenDNS | Security filtering and user-defined policies. | 208.67.222.222 208.67.220.220 |
2620:119:35::35 2620:119:53::53 |
The table shows a brief list of popular DNS servers. Research further to find a DNS resolver for your use case.
How to Change DNS Configuration on Windows
Changing the DNS configuration on Windows OS requires administrator privileges. Below are instructions to change the DNS configuration on a Windows 10/11 or Windows Server machine.
Windows 10/11
To change the DNS configuration on Windows, do the following:
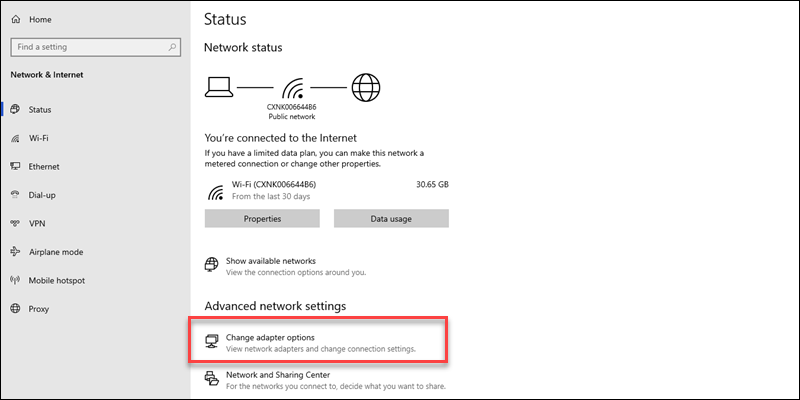
1. In the Start menu, search for Network Status.
2. Select Change adapter options.
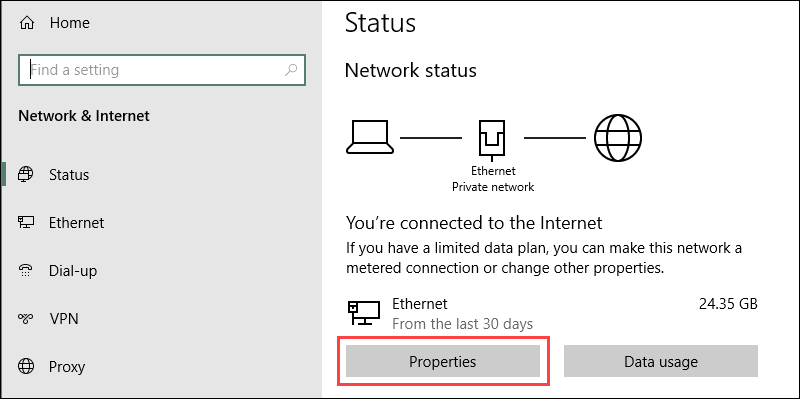
3. Right-click the network connection and open Properties.
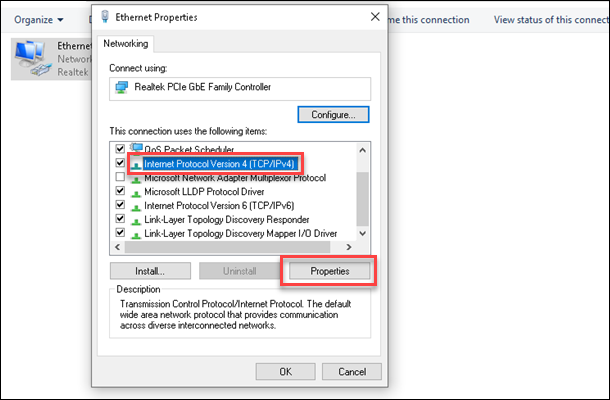
4. Locate and select the Internet Protocol Version 4 (TCP/IPv4) option from the list.
5. Click the Properties button to open the IPv4 settings.
6. Select the Use the following DNS server addresses option.
7. Fill out the primary and secondary addresses. For example, to use Google’s DNS resolver addresses, set 8.8.8.8 as preferred and 8.8.4.4 as alternate.
8. Click OK to save the changes.
Restart the browser to apply the changes.
Windows Server
To change the DNS configuration on a Windows Server, follow the steps below:
1. Open the Start menu.
2. Search for Control Panel and press Enter.
3. Open the Network and Sharing Center.
4. In the left pane, select Change adapter settings.
The steps after this are similar to Windows 10/11 machines.
5. Right-click the connection and open Properties.
6. Double-click the Internet Protocol Version 4 (TCP/IPv4) option on the list.
7. Set the preferred and alternate DNS server address in the fields, and click OK to apply the changes.
Note: If you use an Active Directory domain, enter the loopback address from the IP field and set up a DNS forwarder with the public DNS addresses instead.
How to Change DNS Configuration on Linux
The following steps work on Ubuntu 22.04. The steps can slightly differ between different Linux distributions.
To permanently change the DNS configuration on Linux, do the following:
1. Open the terminal (Ctrl+Alt+T).
2. Open the resolv.conf file using a text editor, such as nano:
sudo nano /etc/resolv.conf3. Add primary and alternate DNS addresses above the current configuration:
nameserver 8.8.8.8
nameserver 8.8.4.4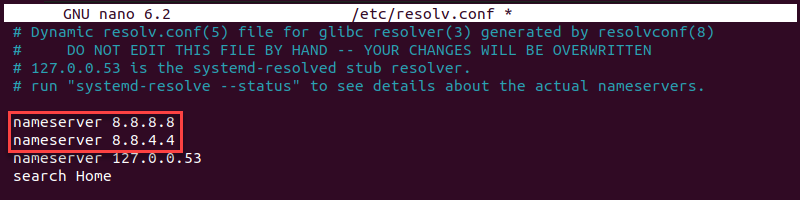
The addresses use Google’s DNS resolver. Replace the IPs with your preferred DNS.
4. Save the file and close nano.
5. To ensure the changes persist after restarting the machine, use the resolvconf tool. Install it with the following command:
sudo apt install resolvconfWait for the installation to complete and proceed to the next step.
6. Start and enable the service with the following two commands:
sudo systemctl start resolvconf.servicesudo systemctl enable resolvconf.service
7. Edit the configuration file:
sudo nano /etc/resolvconf/resolv.conf.d/head8. Add the following lines above all other configurations:
nameserver 8.8.8.8
nameserver 8.8.4.4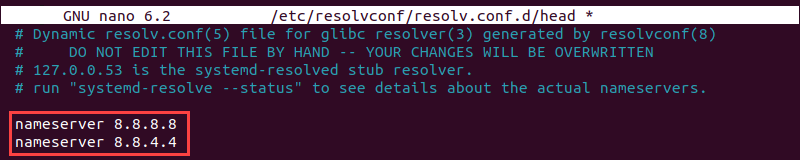
9. Save the file and close the text editor.
10. Restart the service:
sudo systemctl restart resolvconf.service11. Confirm the changes applied:
resolvectl status
The addresses show as the current DNS server for the Global settings. Alternatively, run the dig command:
dig phoenixnap.com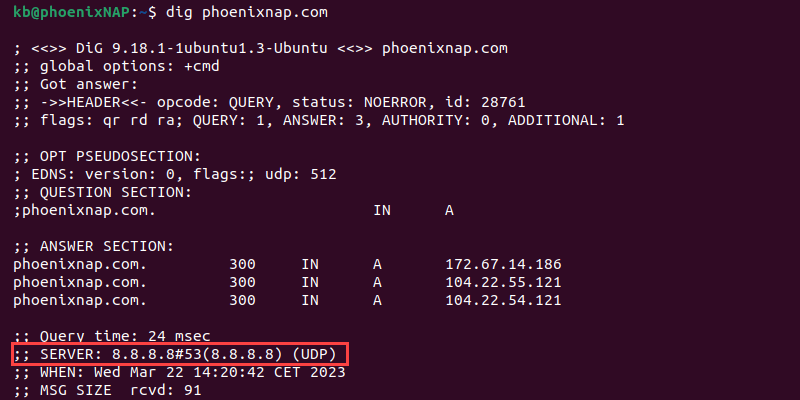
The SERVER section shows the DNS addresses.
How to Change DNS Configuration on macOS
To change the DNS configuration on macOS, follow the steps below:
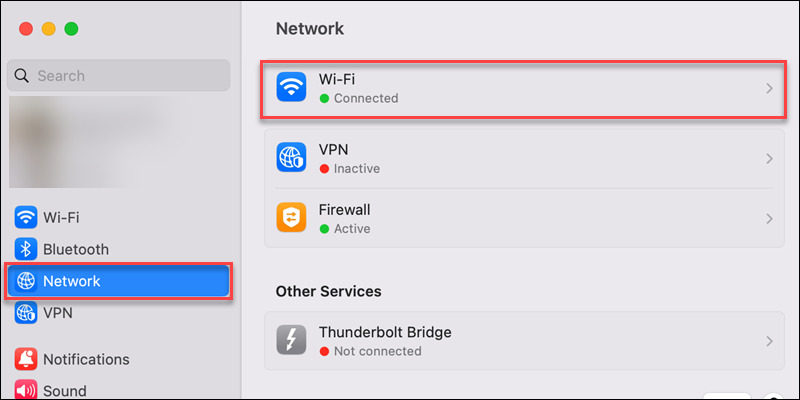
1. Open Apple Menu->System Settings.

2. Open the Network settings from the left menu.
3. Choose the network from the list in the right pane (Wi-Fi or Ethernet).
4. Click the Details button to view the connection settings.
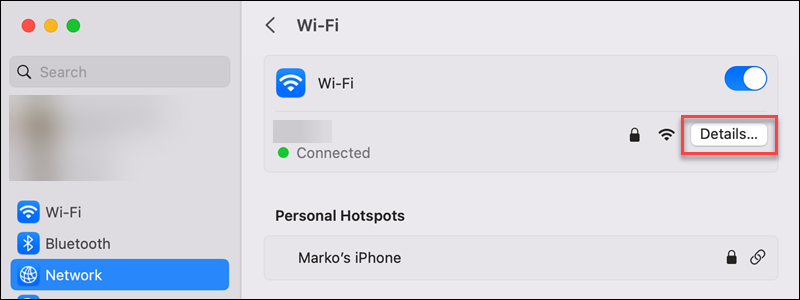
5. Switch to the DNS tab in the left pane.
6. Click the plus (+) button to add DNS server addresses.
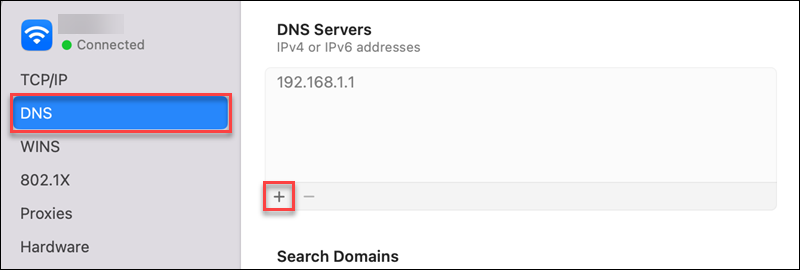
7. Add the primary and secondary addresses for the DNS server.
8. Click OK to save the changes and apply the settings.
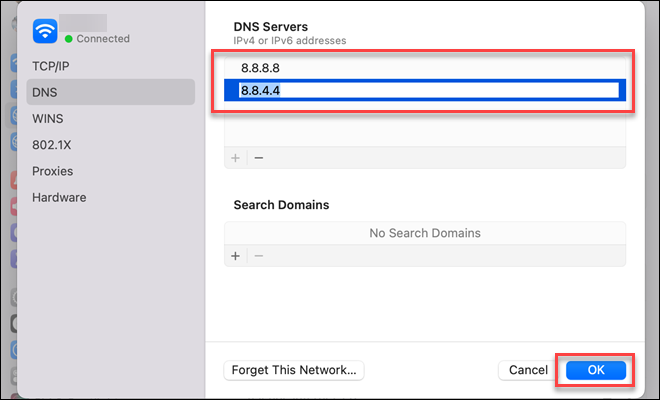
Restart the browser to test and see the changes.
How to Change DNS Configuration on Router Level?
Changing DNS configuration on a router level affects all connected devices, such as computers, smartphones, and any additional smart device that uses Wi-Fi. Routers that manage multiple signals, such as a phone or TV signal, often do not allow changing DNS settings at all.
The precise instructions to change the DNS configuration on a router are different for every model. Check the router’s instruction manual to see if there are specific steps and guidelines. Alternatively, search for the router name and model and add the «change DNS configuration» phrase.
Conclusion
After going through the steps in this guide, you know how to set up a custom DNS configuration on three different operating systems. Configuring DNS comes with many benefits, and it is essential for proper network administration.
Next, read about the best DNS practices for security and performance.
Usually, when you type a website name you want to visit in your browser, the DNS servers in background are responsible for translating that domain name into numeric IP addresses and finally leading you to the correct website. Without DNS server, it is not possible to surf web like we do everyday. In Windows operating system (OS), DNS servers are automatically set by the OS depending upon the network you connect to. Although, if you ever need change DNS server in Windows, this article is for you!
There are different possible methods to change DNS server in your Windows operating system. However, the most common methods are mentioned below in this article. You can try them as per your convenience.
Page Contents
How to change DNS server in Windows 10/8.1/7/Server
Method 1 – Using Network Adapter Properties
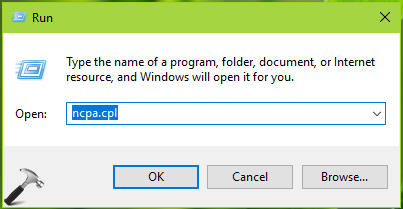
1. Press  + R to open Run, type ncpa.cpl and click OK.
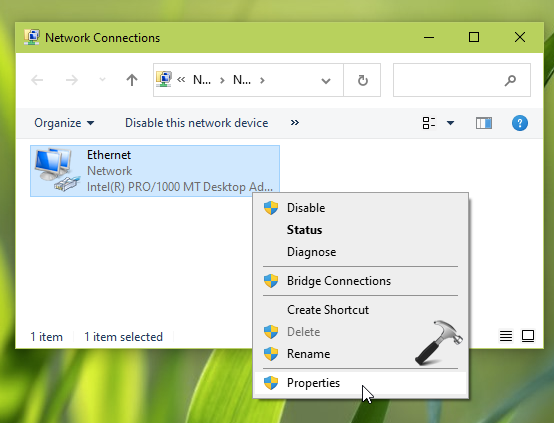
2. In the Network Connections window, select your currently active network adapter and right click on it, choose Properties.
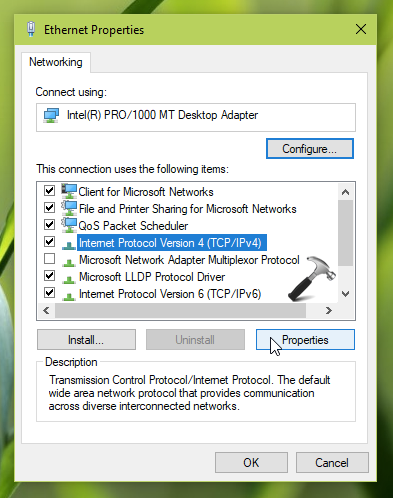
3. Next, on the property sheet, select Internet Protocol Version 4 (TCP/IPv4) option and then click Properties.
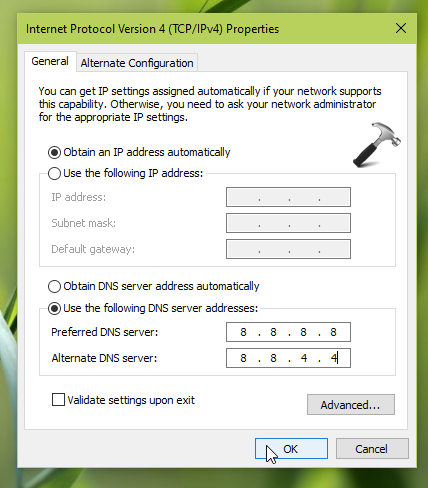
4. Finally, on the Internet Protocol Version 4 (TCP/IPv4) property sheet, choose Use the following DNS server address and type the DNS server address you want to change to in Preferred DNS server and Alternate DNS server sections. Three most common DNS server used worldwide are:
- Google Public DNS: 8.8.8.8 and 8.8.4.4
- Cloudflare: 1.1.1.1 and 1.0.0.1
- Cisco OpenDNS: 208.67.222.222 and 208.67.220.220
In this example, we’ve used Google DNS values. You’ve to check Validate settings on exit option and then click OK.
Your new DNS server address should now be used.
Method 2 – Using Command Prompt
1. In Windows 10/Server, right click on Start Button and select Command Prompt (Admin). On older Windows editions such as Windows 8/7, you can open Command Prompt as administrator, using search.
2. Now in the Command Prompt window, type following commands one-by-one and press Enter key after each:
netsh
interface show interface
interface ip set dns name="Ethernet" source="static" address="8.8.8.8"
*Make sure you replace Ethernet with your actual network adapter name in above command. When you run second command above, you’ll get network adapter name under Interface Name.
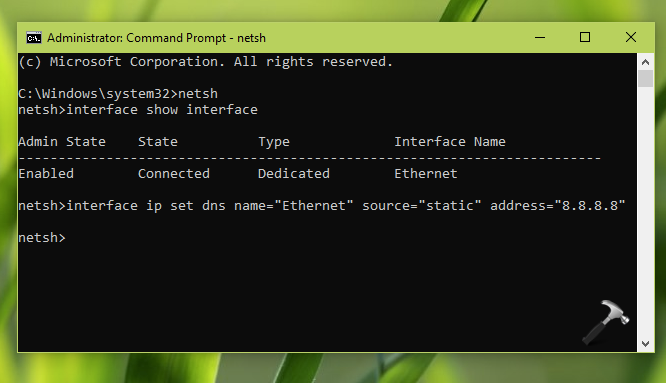
Once all commands executed successfully, your system DNS server should be changed and active now.
Method 3 – Using Windows PowerShell
Try these steps to change DNS server using Windows PowerShell.
1. Open Windows PowerShell as administrator.
2. Type following cmdlet and press Enter:
Set-DnsClientServerAddress -InterfaceAlias Ethernet -ServerAddresses 8.8.8.8
In above command, you can change -InterfaceAlias with your primary network adapter name.
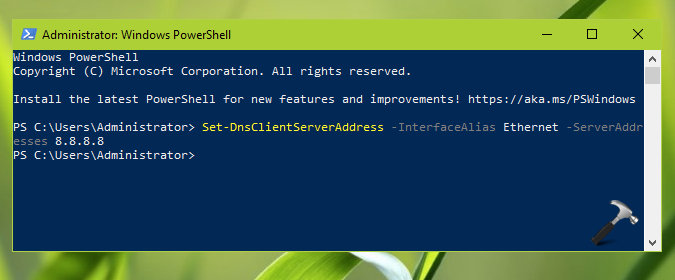
3. Once cmdlet execution is successfully, you new DNS server should be in effect now.
That’s it!
Read next: Configure secure DNS in Google Chrome.
READ THESE ARTICLES NEXT
- Fix: Can’t see other computers on network in Windows 11
- Fix: Wi-Fi icon missing in Windows 11
- Fix: Internet not working on Windows 11
- Reset network settings in Windows 11
- Fix: DHCP is not enabled for Wi-Fi in Windows 11
- Fix: WiFi network not showing up on Windows 11
- How To Use WiFi And Ethernet At Same Time In Windows 11/10
- Fix: Windows couldn’t automatically bind the IP protocol stack to the network adapter
- Fix: Can’t connect to this network error on Windows 11
- Fix Limited access WiFi in Windows 11/10/8.1