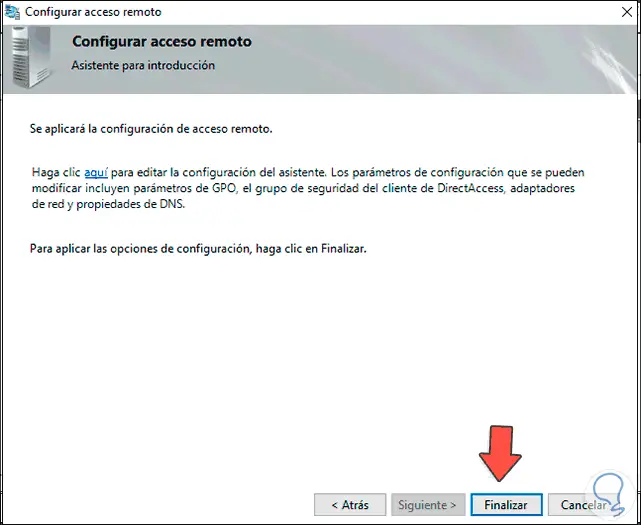
In this article we will show you how to install and set up a VPN server with Windows Server 2022. We will go through the setup step by step.
This article is based on the article VPN Server with Windows Server 2019 (RAS) and has been updated for Windows Server 2022.
To access the corporate network and access corporate resources while on the road, there is rarely any way around a VPN. A virtual private network is one of the dial-up and connection options of a remote access server (RAS). Since modem and ISDN dial-up connections are rather extinct today, these systems are almost only used for VPN dial-ups. Nowadays, integrated solutions from firewall providers such as Juniper, Cisco, Unfiy and others are often used for this purpose.
As a basis for my installation I take a VM with 2 vCPU and 4 GB Ram, for the few VPN connections that are needed here this is perfectly sufficient.
Here’s another warning for safety
This is for my test environment, accordingly the security requirements are not as high as for an enterprise RAS server. For companies, I recommend a hardened reverse proxy in a DMZ, for example a Kemp Loadmaster, which still provides some security. Also, multi-factor authentication should be considered.
You should also think about the structure in advance. RAS implementations range from very simple to highly complex. It is important to find the right one for you.
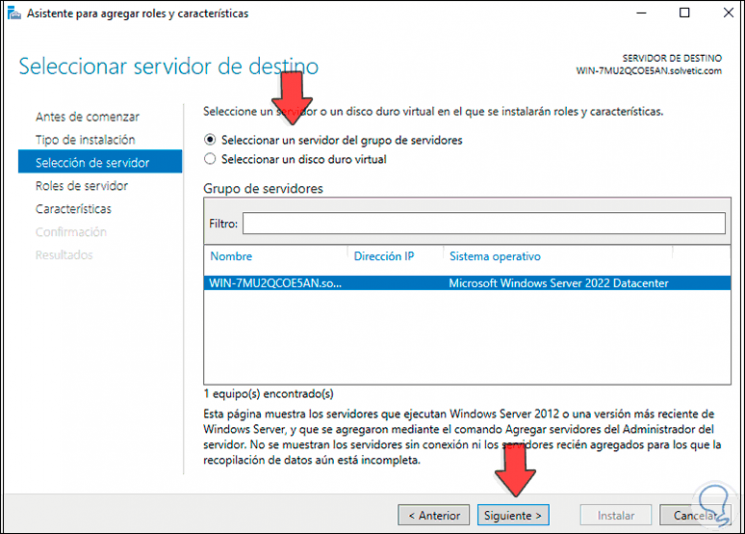
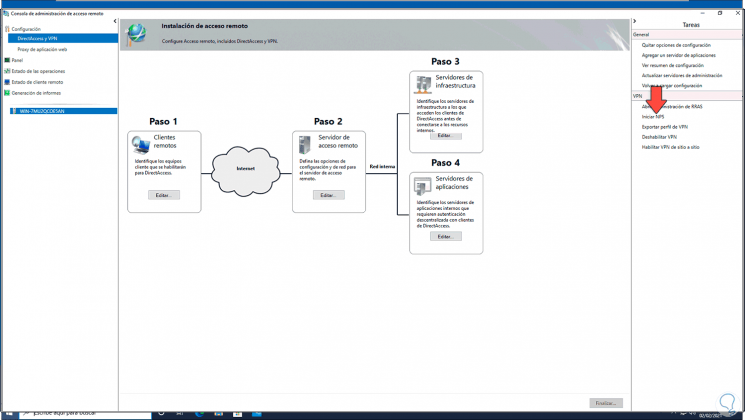
Operating system installation
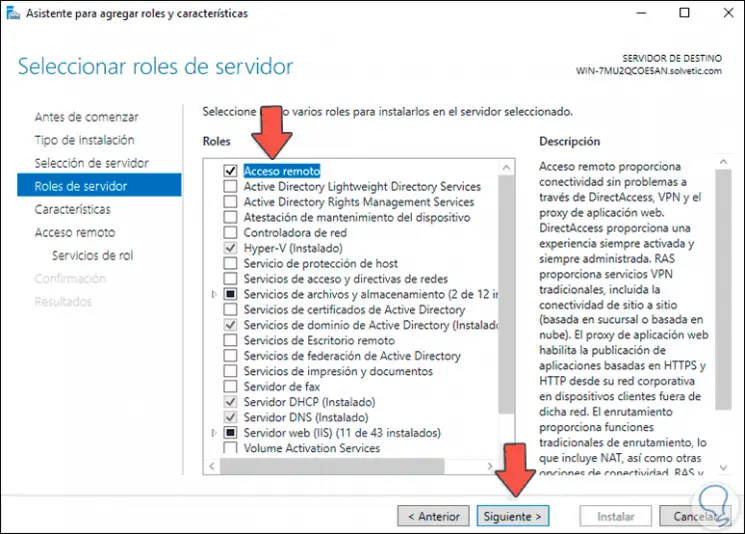
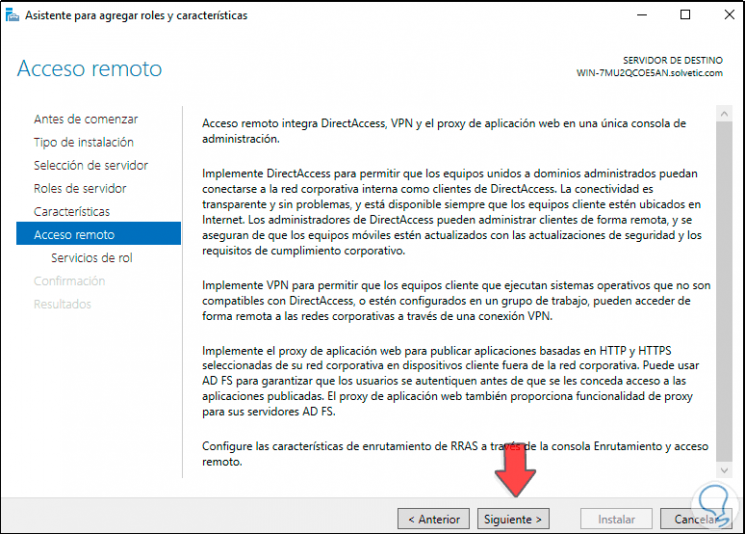
After installing Windows Server 2022, the system should first be provided with the latest updates. Start with the installation of the server role “Remote Access”, which includes not only the RAS services with VPN protocols such as PPTP, DirectAccess, SSTP and L2TP/Ipsec, but also a reverse proxy for web applications or a routing service. You should not install the latter as well.
 4")
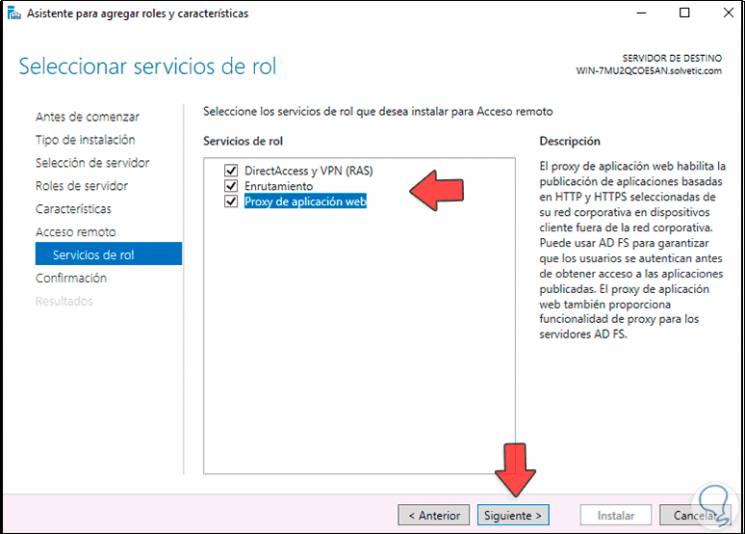
You must select which of the 3 function types you want to use in the role services. Select “DirectAccess and VPN (RAS)” here.
 5")
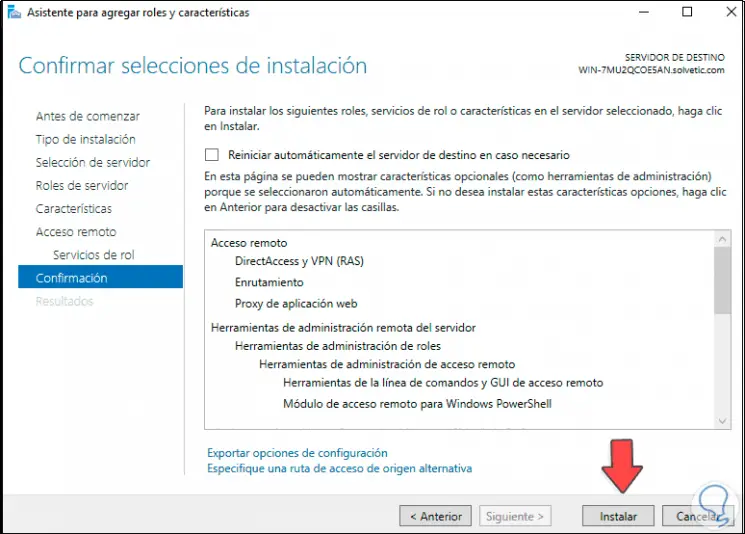
After the selection, the required dependencies are displayed. Please confirm them.
 6")
No further configuration is required for easy installation.
Advertisements


 7")
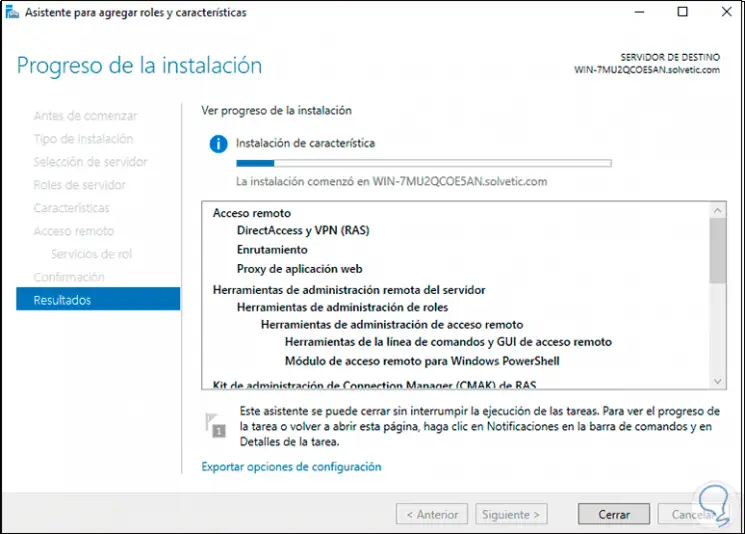
Start the installation and restart the server if necessary. A restart should not actually be necessary.
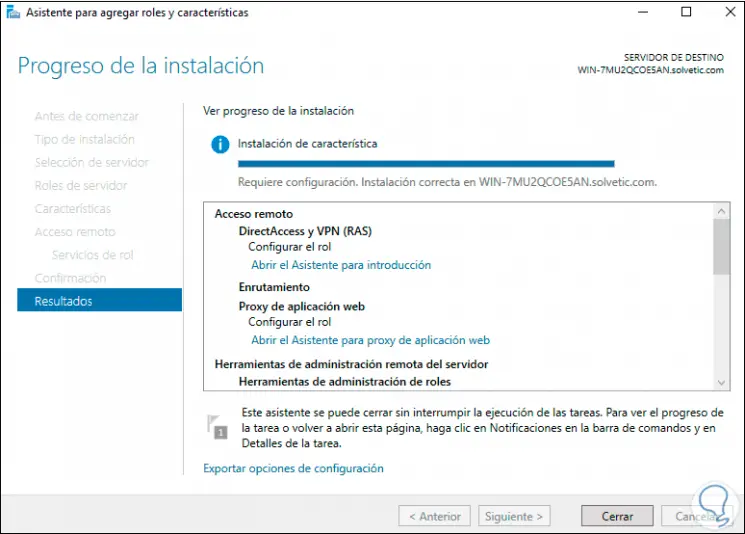
After installing the roles, the “First Steps Wizard” must be executed.
 9")
For most scenarios, a VPN connection is perfectly adequate. In addition, DirectAccess also brings IPv6 dependencies with it. So for now, we will only deal with VPN.
 11")
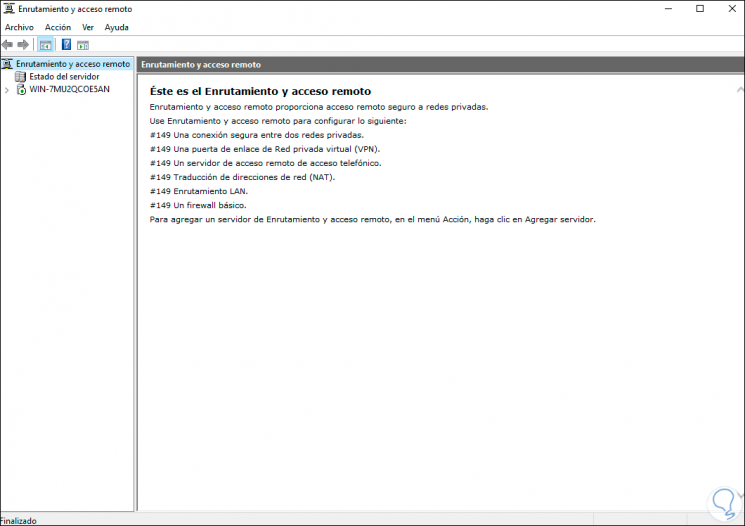
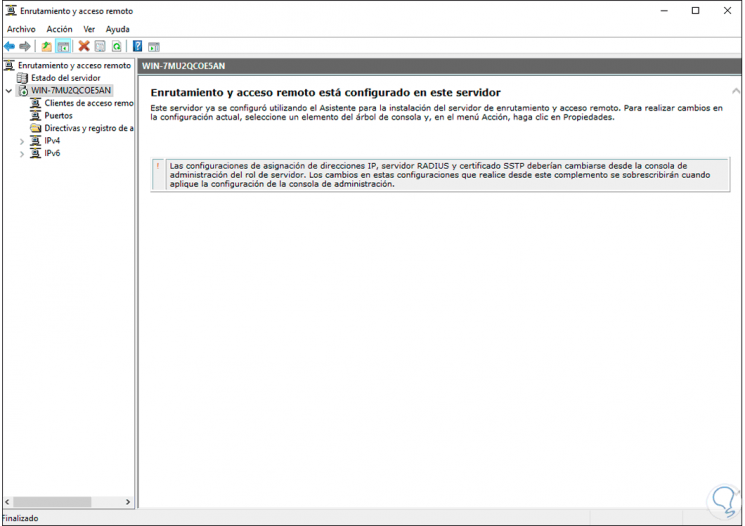
The “Routing and RAS” console opens, which has not changed since Windows Server 2008.
 13")
Right-click on the server and select “Configure and activate routing and RAS”.
 15")
Click on “Next” in the setup wizard
 17")
In the next step you have to specify more precisely which scenario you want to set up. Next, I choose the “Custom Configuration” because “RAS (Dial-up or VPN)” expects certain requirements that we do not need.
 19")
In the next step, select “VPN access”
 21")
In the next step, you complete the configuration selection.
 23")
Confirm the message to start the service.
Afterwards, the VPN protocols can be configured.
 25")
Configuration of the VPN protocols
Supported protocols
- PPTP (Point-to-Point Tunneling Protocol) the first implementation was in Windows NT 4.0. Communication takes place via port 1723 TCP and the protocol 47 GRE. PPTP is widely used, but is no longer secure enough today, see also Microsoft security recommendation 2743314.
- L2TP (Layer 2 Tunneling Protocol) which is used by Microsoft together with IPsec. Communication takes place via port 1701 TCP and 500 UDP.
- IKEv2 (actually “Internet Key Exchange V 2”, but here a synonym for IPsec, IP Security). Communication takes place via port 500 and 4500 UDP.
- SSTP (Secure Socket Tunneling Protocol), a Microsoft own protocol based on port 443 TCP. Thus, it gets through all firewalls as long as the HTTPS tunnel is not broken. The protocol requires a functional SSL tunnel. Disadvantage: only available on Microsoft devices.
Protocol selection
The choice of protocols depends on several factors. Each protocol has strengths and weaknesses.
For me personally, the best thing about SSTP is that it works everywhere. Even in free hotel WLANs, which actually only allow VPN in paid WiFi. The disadvantage is that I need a valid certificate from a trusted CA with a public revocation list. This rules out most internal certification authorities, because they do not have public spear lists. Alternatively, a regkey can be set in the client so that this is ignored. SSTP is also only supported by Microsoft operating systems.
PPTP is too insecure for most people, but is supported by almost all end devices.
L2TP is compatible with most devices, depending on the configuration. But in this configuration is the tricky part.
The same applies to IKEv2 / IPsec, depending on the type of authentication, there is quite a bit of work to be done here.
Basic configuration of the protocol ports
The wizard initially created 2 ports for each protocol, except for PPPoE, which only has one. Depending on the selection of protocols and the expected connections, I would disable unused ports or add new ones. With Windows Server 2022, the number of standard ports has been significantly reduced; with previous versions, up to 128 ports were created.
 27")
To do this, right-click on “Ports” and select “Properties”.
 29")
In my case, I switch off the protocols I don’t need and reduce the ports to 1. For the protocols I do need, I leave the number of ports at 2, which is enough for me.
 31")
Configuration of the IP address ranges
The clients that connect remotely need a private IP address. The DHCP server in the network can be used for this, or a static range can be assigned. This is managed by the RAS server.
Firewall configuration
Since the RAS server is not located in the DMZ and does not have a public IP address, port forwarding must be set up on the firewall for the ports of the selected protocols. It is important that the RAS server has a static IP address or a DHCP reservation.
Assigning rights for users
It is also important that the users have the necessary rights for remote access.
 33")
Read also our article: SSTP VPN with Let’s Encrypt certificates.
VPN networks (Virtual Private Network) are one of the current mechanisms available with secure access to a network, we know well that vulnerabilities in the network are increasing and more dangerous, hence the importance of implementing a VPN service. Using a VPN in Windows Server 2022 (the next edition of Windows Server) assumes a functional option so that all processes that require connectivity (which are sensitive) are much more available and secure..
VPN Features
when we talk about VPN networks we will have characteristics such as:
- Ease of accessing geo-blocked sites
- Offers protection of browsing data
- Avoid internet censorship
- Access to various networks even when we are not physically in the
If we decide to use a VPN network in Windows Server 2022, a much more complete administration of this network segment is possible and we can offer clients better accessibility alternatives.
Let’s see how to create and configure a VPN network in Windows Server 2022..
To stay up to date, remember to subscribe to our YouTube channel! SUBSCRIBE
Configure VPN network in Windows Server 2022
Step 1
First, let’s check the version of Windows Server with «winver»:
Step 2
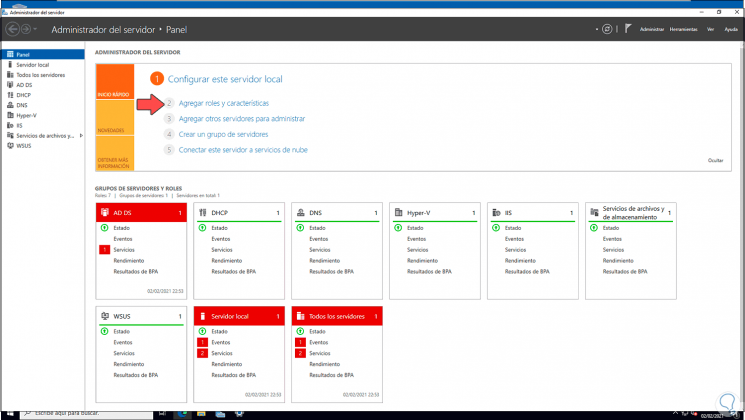
After this, we open the Server Manager and select «Add roles and features»:
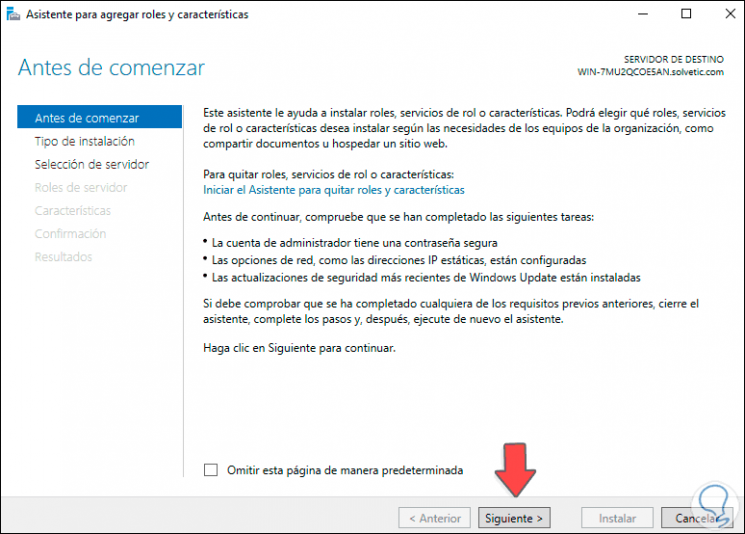
Step 3
The following window will be displayed:
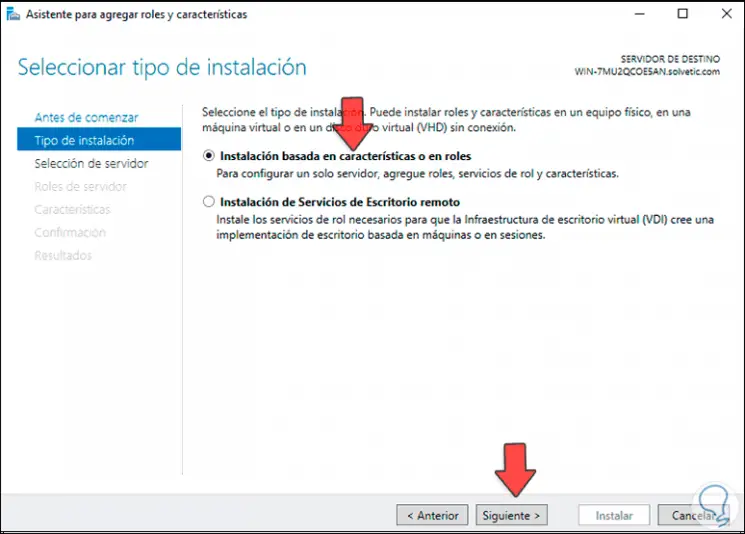
Step 4
In the next window we activate the box «Installation based on characteristics or roles»:
Step 5
Then we select the server:
Step 6
In the Roles section we locate and activate the «Remote access» box:
Step 7
Click Next and in the Features section we do not modify anything:
Step 8
In the next window we will see a summary of the role to install:
Step 9
We click Next and there we select the server roles to use:
These are:
- DirectAccess and VPN (RAS): allows access from external networks through DirectAccess or VPN technology.
- Routing: this role gives the option for the server to fulfill the role of a router
- Web application proxy: this role gives us the option to publish web-based applications.
Step 10
We click Next to see a general summary of the role that we are going to install in Windows Server 2022:
Step 11
We click Install to complete the process:
Step 12
At the end of this process we will see the following:
Note
We can also install this role from PowerShell with the following cmdlet:
Install-WindowsFeature DirectAccess-VPN -IncludeManagementTools
Step 13
We click on Close and at the top we click on «Open the Introduction Wizard»:
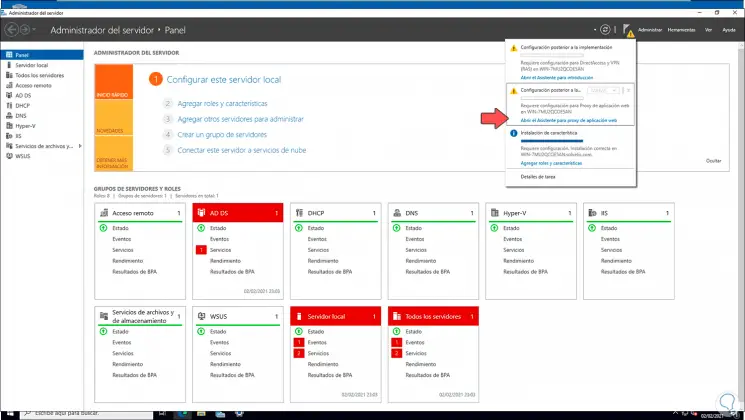
Step 14
The following wizard will be displayed:
Step 15
The available options are:
- Implement DirectAccess and VPN: with this option it is possible to define the parameters at both the DirectAccess and VPN levels on the Windows Server 2022 server
- Implement DirectAccess only — As the name suggests, this option allows you to configure local DirectAccess settings
- Implement VPN only: only allows you to configure the VPN role on the server
Step 16
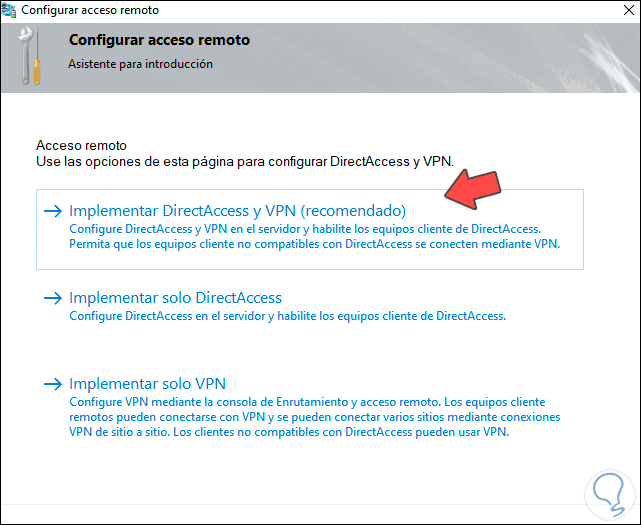
We click on «Implement DirectAccess and VPN» to see the following:
Step 17
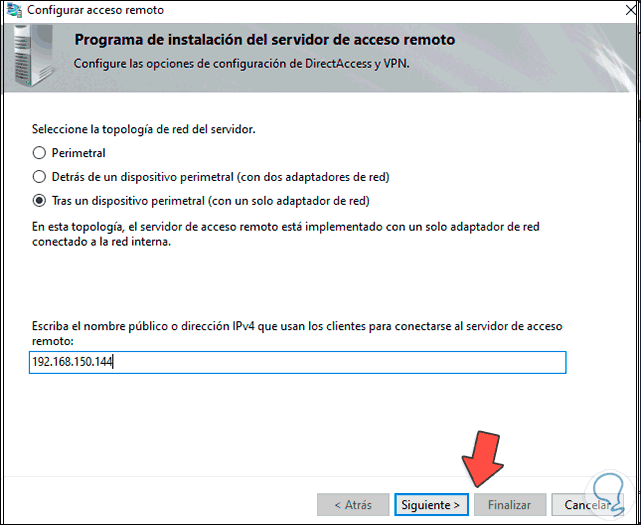
In this case we are going to choose the Windows Server 2022 topology, the options to use are:
- Edge: This option implies that the server must have two physical network cards, one for external connections and one for internal connections.
- Behind an edge device (with two network adapters): when selecting this option, one of the cards in the computer is required not to be connected to the public network but to a DMZ.
- After a perimeter device: this option requires that the server is managed by the Firewall.
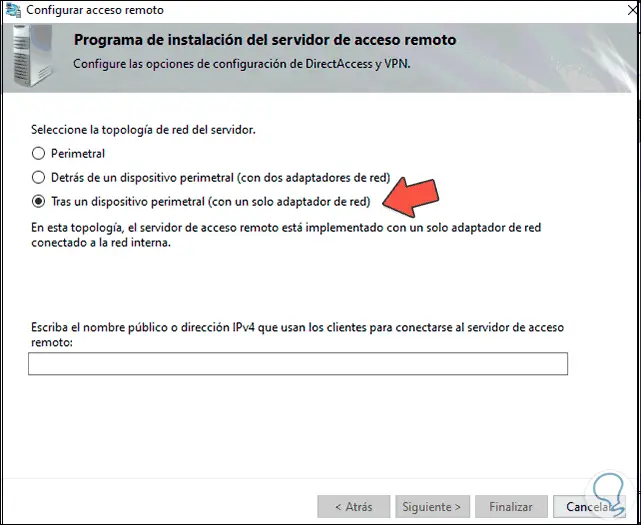
Step 18
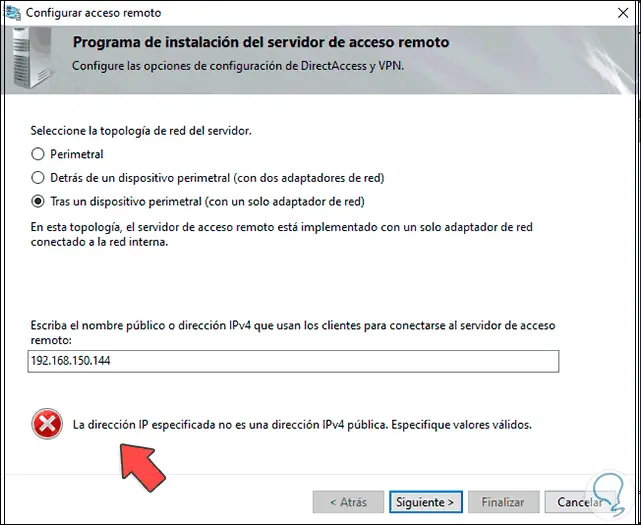
Select «After a perimeter device» and we can use the local IP by accessing CMD and using the command «ipconfig»:
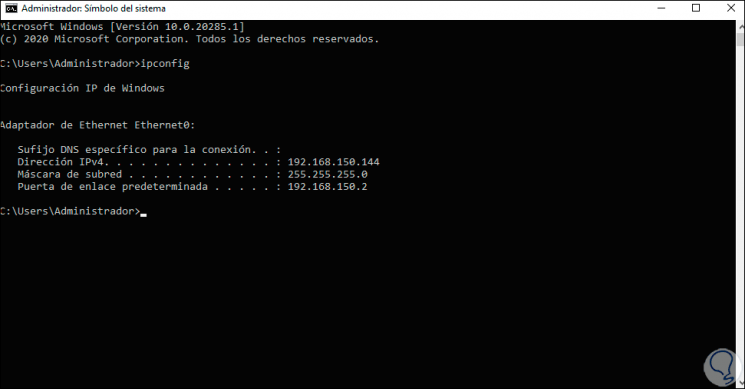
Step 19
We enter this IP address:
Step 20
When we click Next we will see the following error:
Step 21
For this case, the use of the public IP address of the server is required, to find out, we open a browser and we can detect it there:
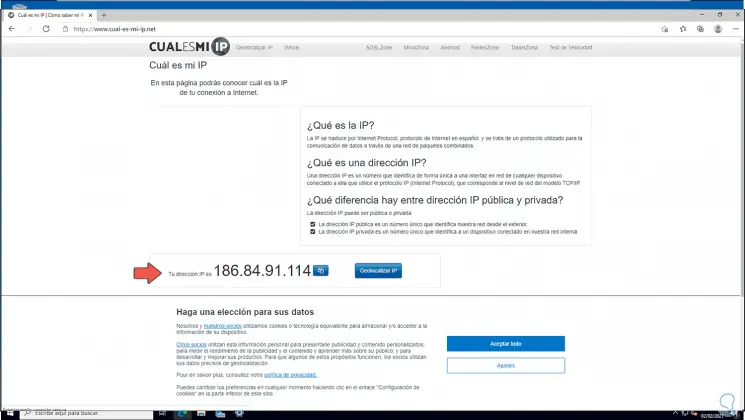
Step 22
We enter this public IP in the respective field:
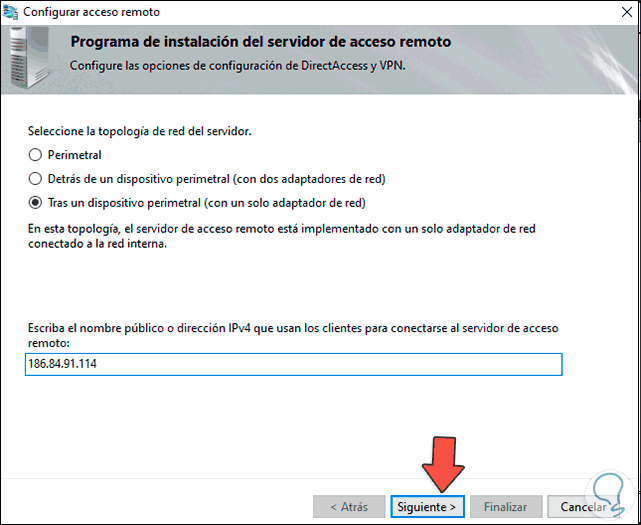
Step 23
We click Next and we will see the following:
Step 24
We click on «Finish» to complete the process.
Step 25
When completed we will see the following. Click on «Close» to exit the wizard.
Step 26
We access the Windows Server 2022 Remote Access console:
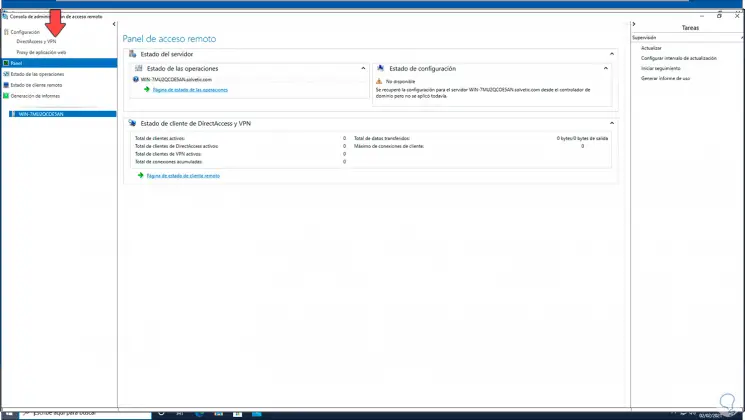
Step 27
We go to the «DirectAccess and VPN» section and the following will be displayed:
Step 28
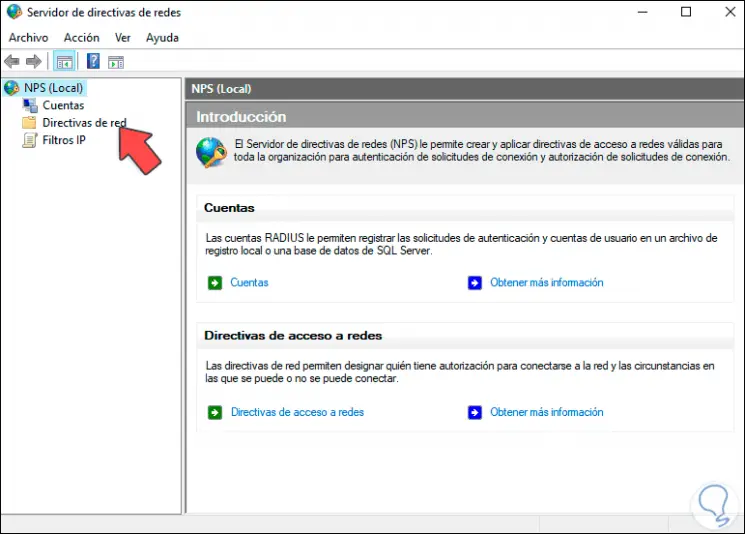
We click on «Start NPS» and a new window will open:
Step 29
We select the server to see the different options:
Step 30
Right click on «Policies and remote access registry» and select «Start NPS»
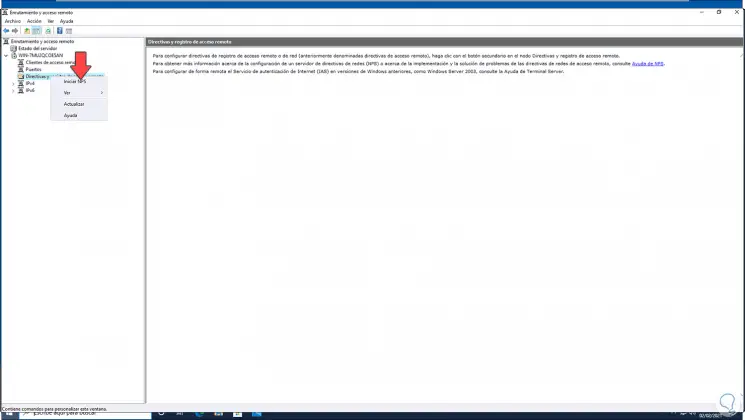
Step 31
We will see this:
Step 32
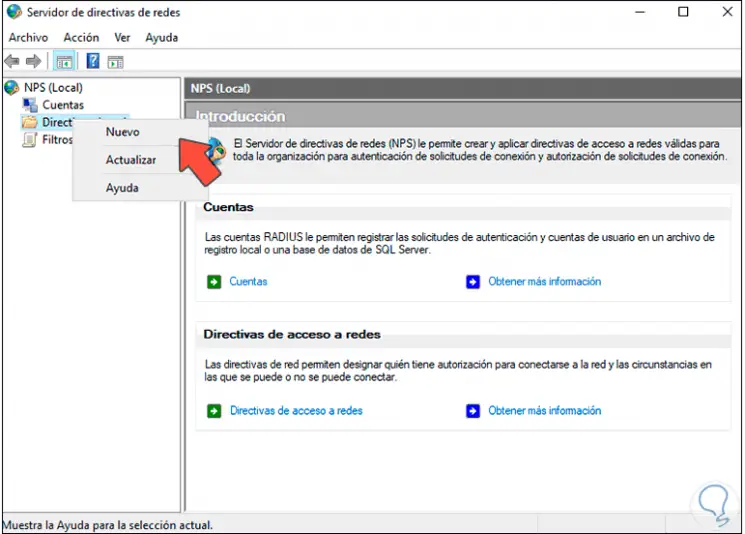
Right click on «Network Policies» and select «New»:
Step 33
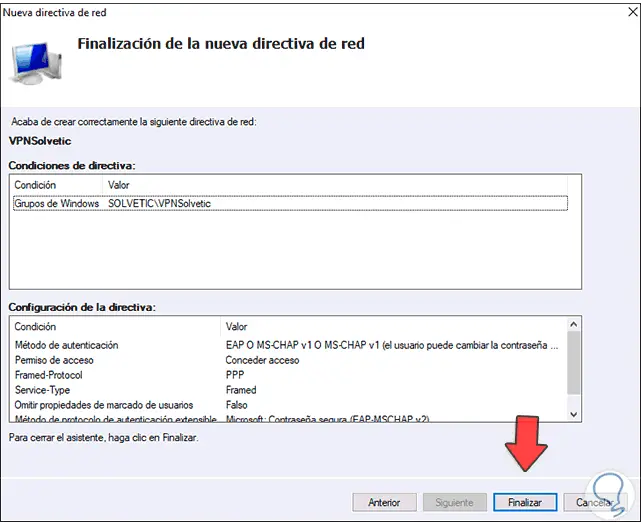
In the pop-up window we enter the name of the directive:
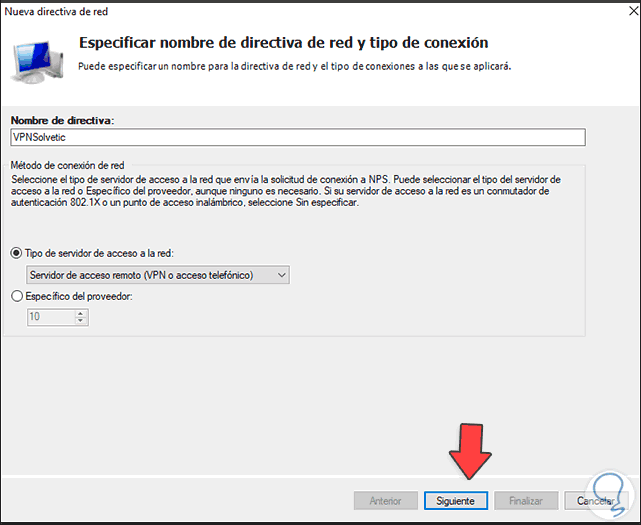
Step 34
We also choose the type of server, in this case «Remote access server (VPN or dial-up)», we click Next and the following will be displayed:
Step 35
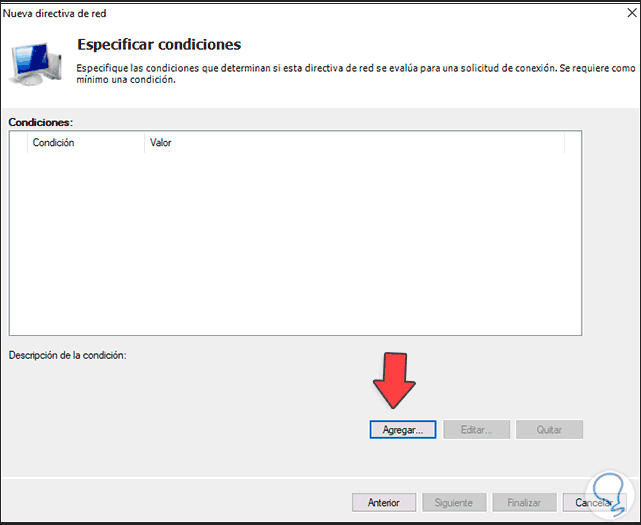
Click Add to see the following:

Step 36
Add the option «Windows Groups» and the following will be displayed:

Step 37
There we click on «Add groups» and select the group to use:
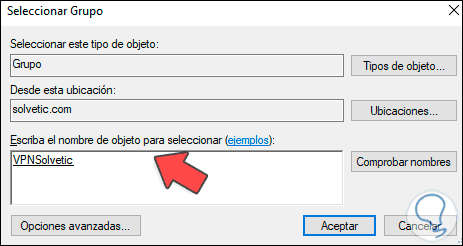
Step 38
Click OK to see it added:
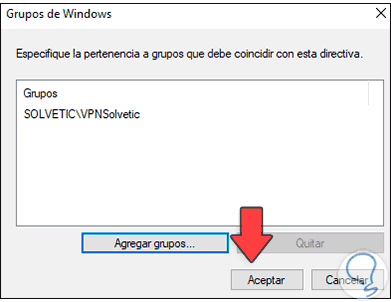
Step 39
We apply the changes:
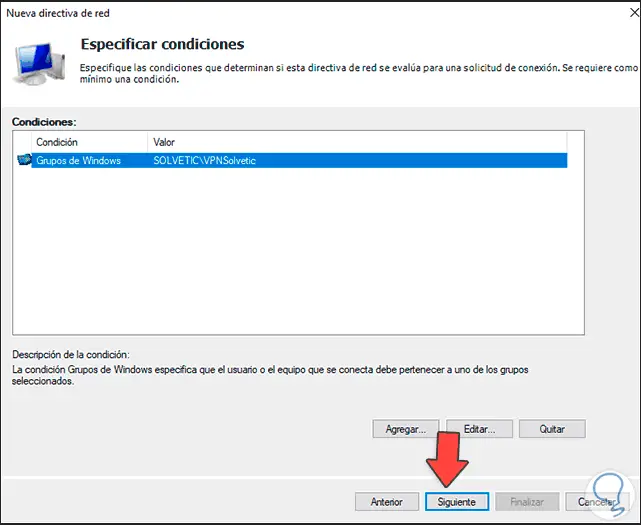
Step 40
Click Next and now we define the permissions to use:
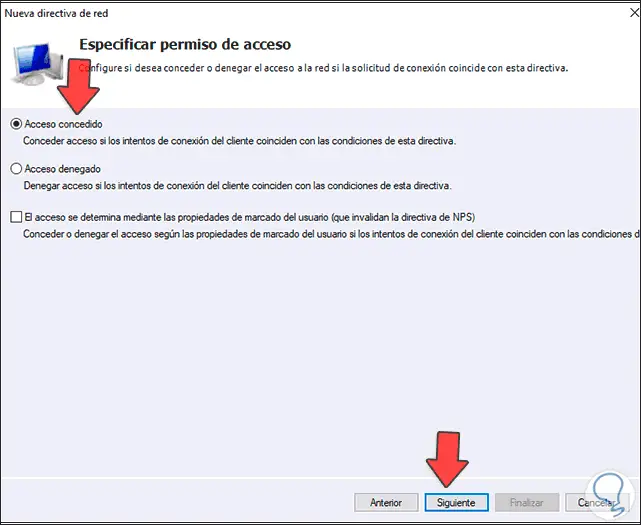
Step 41
Click Next to define the authentication method to use:
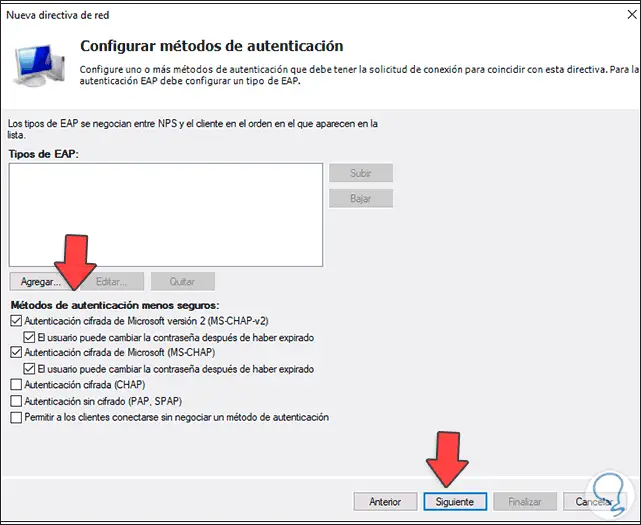
Step 42
We click on Add and there we select the Microsoft option: Secure password (EAP-MSCHAP v2):
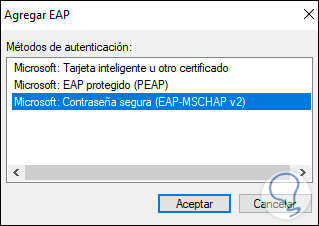
Step 43
Click OK.
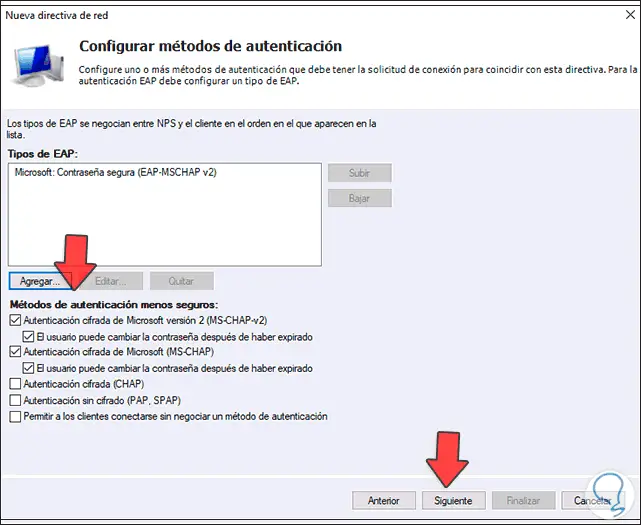
Step 44
We click Next and now it is possible to add restrictions:
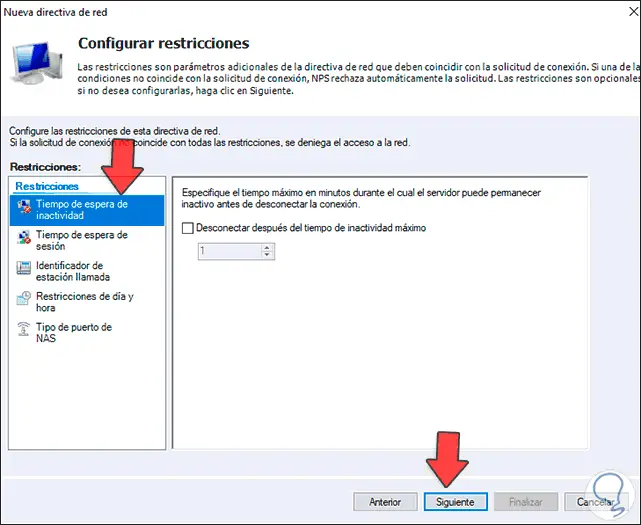
Step 45
In the following window it is possible to configure additional options:
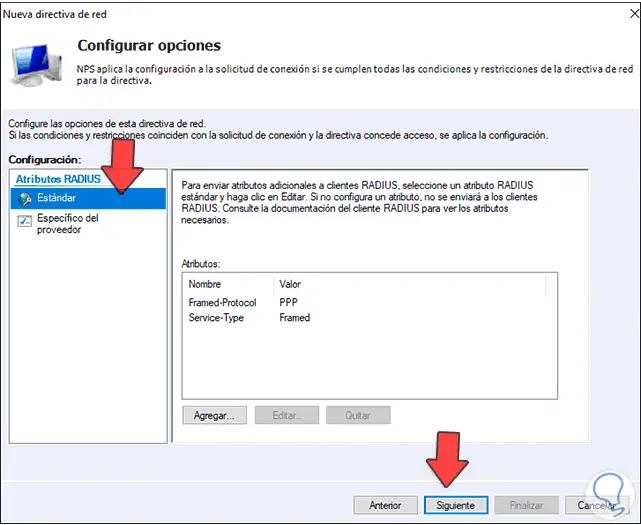
Step 46
Click Next again to see the configuration structure. Click Finish to complete the process.
Step 47
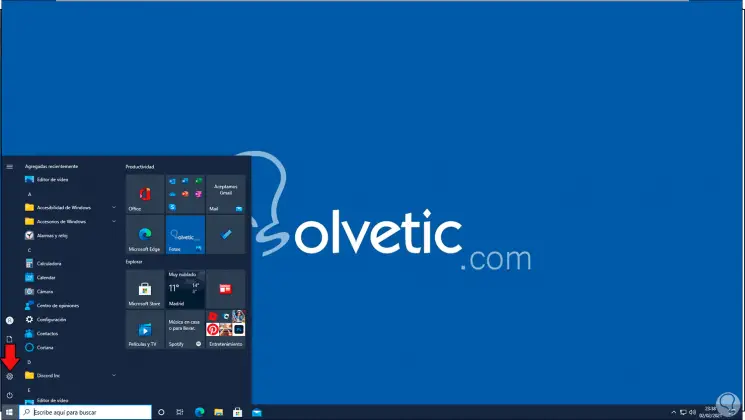
We go to the client computer and go to «Configuration»:
Step 48
Then we go to «Network and Internet»:

Step 49
In the next window we go to the VPN section:
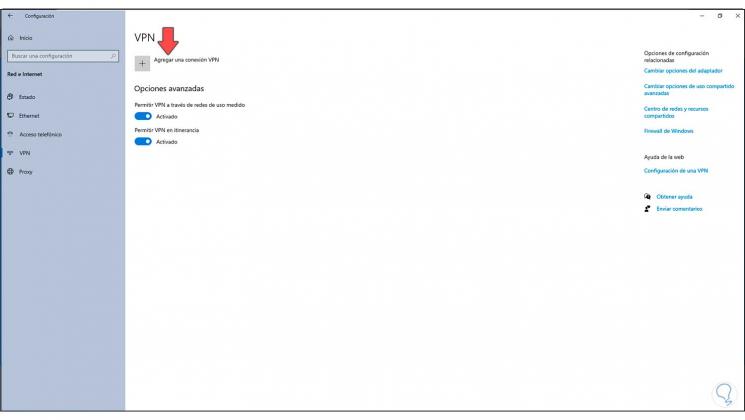
Step 50
We click on «Add a VPN connection» and in the pop-up window we enter the details of the Windows Server 2022 VPN name:
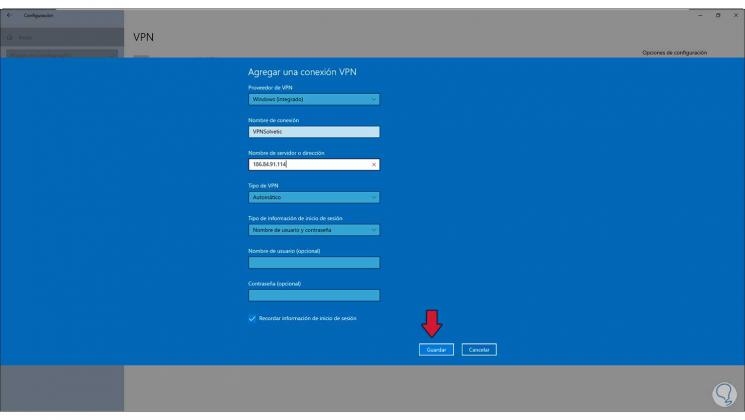
Step 51
We click on Save to apply the changes and we will see the VPN network created:

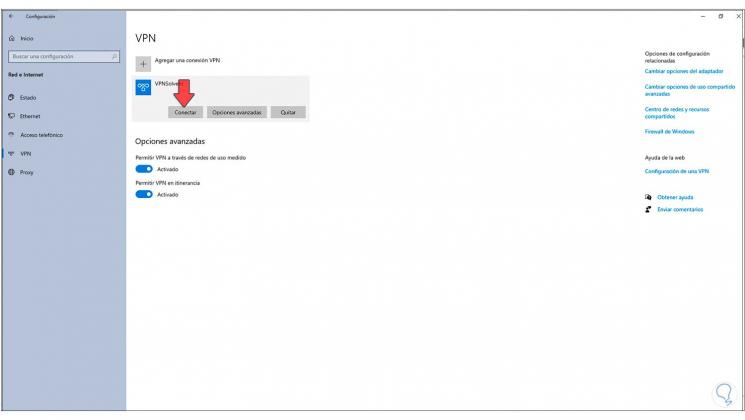
Step 52
Click on the VPN and click on «Connect»:
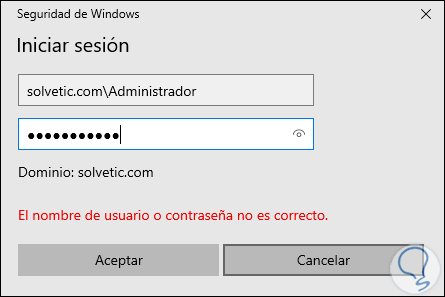
Step 53
In the displayed pop-up window we must enter the domain credentials. This will establish VPN connectivity.
Step 54
In Windows Server 2022 we right click on the server and select «Properties»:
Step 55
In the «Security» tab we can establish access mechanisms if necessary:
This is the process to configure a VPN on Windows Server 2022 and thereby offer network security enhancements.

Remote access is used to access your network remotely. This provides an encrypted and secure connection over an insecure network such as the Internet. A remote access connection consists of a server(s) and clients that remotely access the contents of the server (network). Then, what is a virtual private network (VPN)? A VPN is a means of connecting to a private network such as your corporate network. A VPN combines the virtues of a dial-up connection to a dial-up server with the ease and flexibility of an Internet connection. These steps to can be used to configure VPN on Windows Server 2016, 2019, and 2022. Here are some related contents: Windows 10 Always On VPN (AOVPN), Quick Steps in Setting Up AWS VPC, how to Activate (License) Cisco ASA 5505, how to create a certificate template for BitLocker Network Unlock, and how to configure AnyConnect SSL VPN Client Connections.
This guide will demonstrate how to install, configure and use Windows Server VPN. In this guide, we will be using "Only VPN" for providing remote access to your clients. In the next guide, I will be showing you how to use the rich remote access experience based on DirectAccess by enabling DirectAccess on this server. The two tunneling protocols included with Windows are:
- Point-to-Point Tunneling Protocol (PPTP): Provides data encryption using Microsoft Point-to-Point Encryption.
- Layer Two Tunneling Protocol (L2TP): Provides data encryption, authentication, and integrity using IPSec.
Step A
This step is optional and it depends if you will be using L2TP to configure VPN on Windows in your environment. In this case, you will have to install a certificate to the VPN server and VPN client or on the VPN Server only. You may want to see how to install and configure Active Directory Certificate Services. Please see the following interesting related how-to articles on how to import a certificate into the Trusted Root and Personal file certificate store, how to request a certificate signing request in Windows using Microsoft Management Console, and how to export a certificate in PFX format in Windows. You may also be interested in this guide: How to install and configure Active Directory Certificate Services.
Step B
Launch the server Manager from the Start Menu as shown below

On this window, click on “Add Roles and Features”.

Click on Next as this window provides you with information only. You may also want to skip this step in the future by checking n the skip button.

Select Role-Based or Feature-based installation.
– Please see some role and feature-based installations I have configured previously. How to Setup a Domain Controller, how to add a second Domain Controller to your environment, how to set up and install WDS role, and how to install DHCP role on Windows Server, etc.

Click on Next on the Server selection window. We only have one server in the pool, there no much work to do here 🙂

Select the Remote Access Role and click Next.


Click on the Next button again

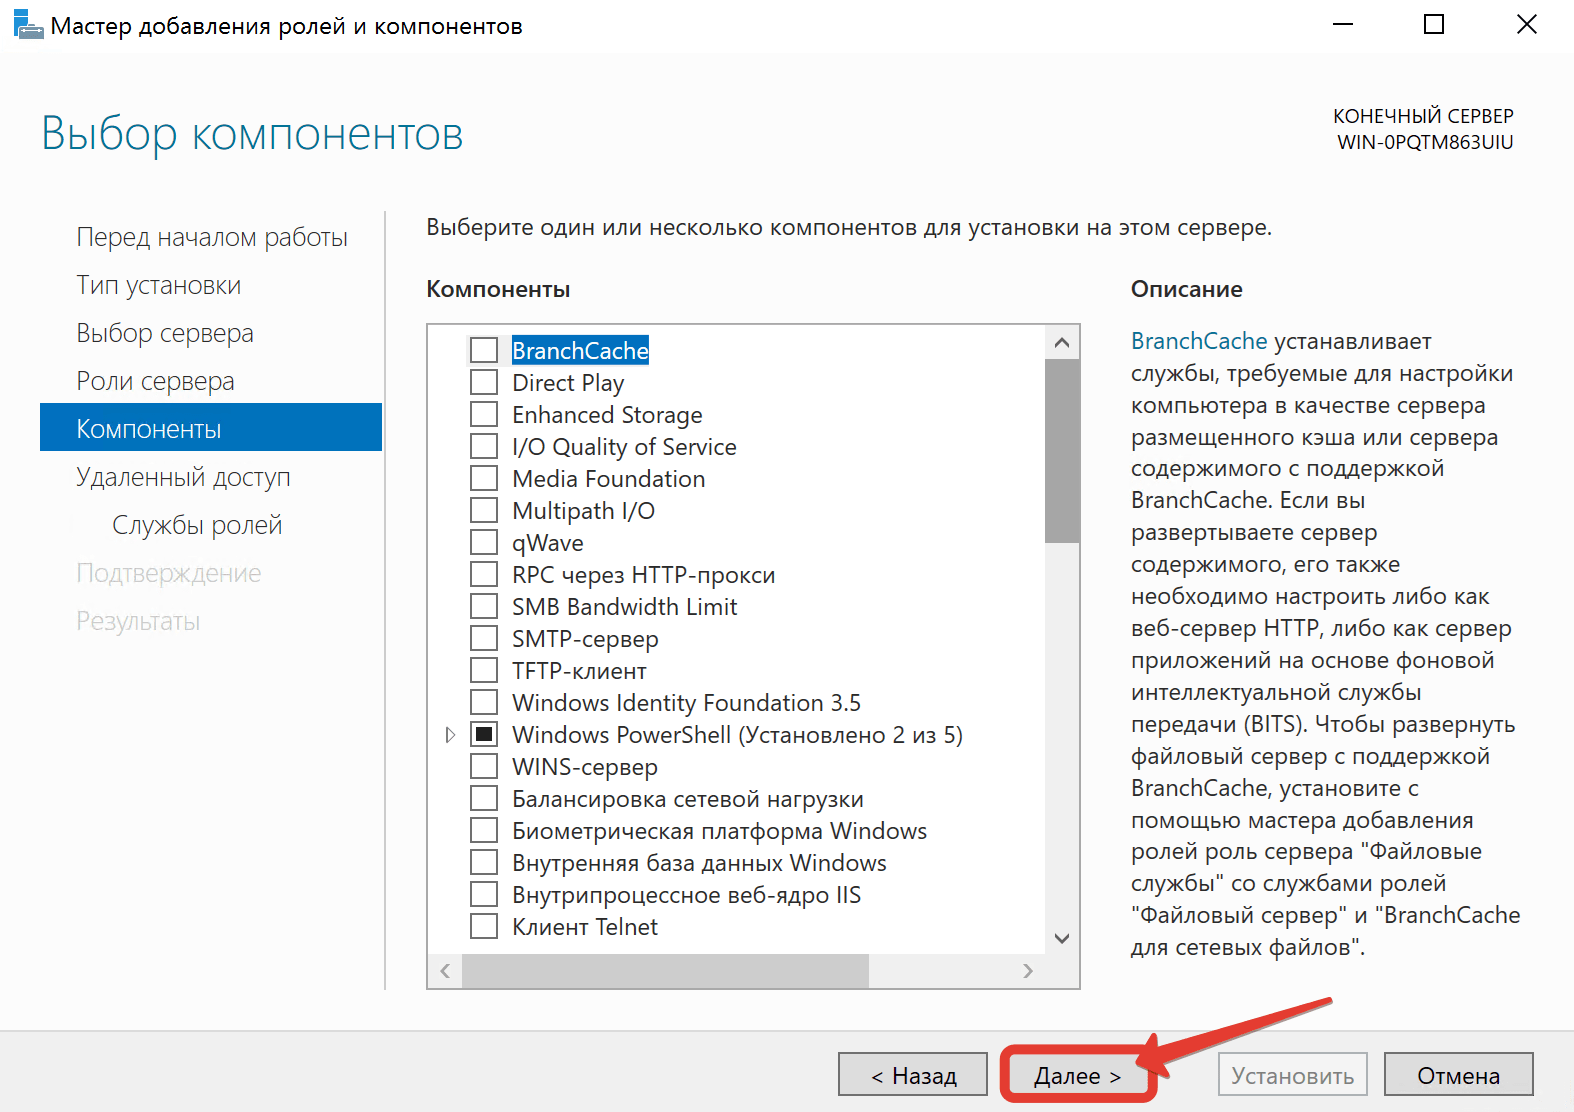
In the step, select the DirectAccess and VPN (RAS), Click on the Add features and click on Next to procced.


On the final step, select install to install the Remote Access role.

You can now close this window. A restart is not required for this installation.

Part C -Post-deployment Configuration
After the features are installed, you see the link, click on “Open the Getting Started Wizard“.

Select Deploy VPN only as shown below.

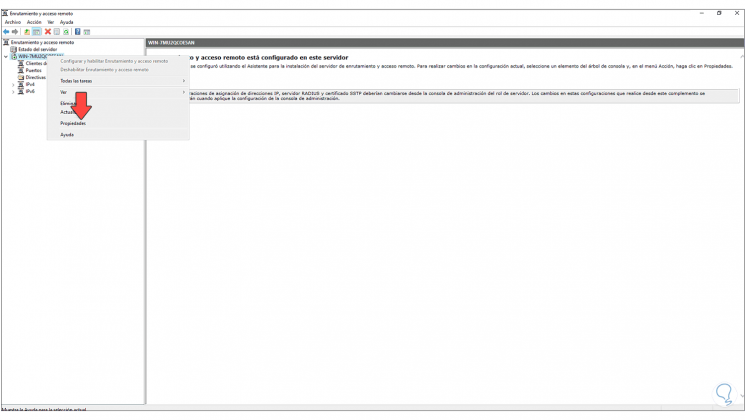
This will open the Routing and Remote Access Management Console. Right click on the Server name and click on “Configure and Enable Routing and Remote Access“.

On this Window, click on Next

Select Custom configuration and click on Next

Select “VPN Access“ as shown below and click on Next to proceed

Click on Finish. Click on start the service that is prompted. This will ensure the “Routing and Remote Access” Service is started.


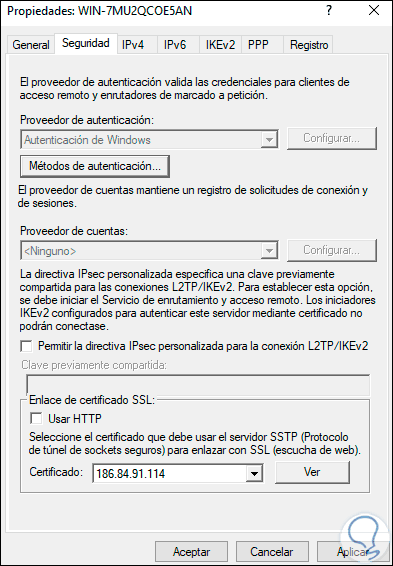
Right click on your server name and click on Properties.

This will open the Properties Windows as shown below. On the general tab, I am okay with the settings.

– Click on the Security tab and ensure that you only have EAP and MS-CHAP v2 selected


On the IPv4 tab, select Static address pool. if you have a DHCP server, select “Dynamic Host Configuration Protocol (DHCP).
– I will statically define the pool range as shown below. You will see later that the IP address from this pool will be assigned to my VPN client.


Select the Logging tab and check the Log additional Routing and Remote Access information box.

Part D
To Allow Remote VPN Access for a Domain User: The process of configuring a user’s property settings to allow remote VPN access is slightly different when the account is a domain user account, as opposed to a local user account. Local user property settings are adjusted through the computer management utility in Windows operating systems while domain user property settings are adjusted through the active directory users and computers utility in Windows server software. In order to grant a domain user remote VPN access, you have to have access to your network’s domain controller computer.
- Active Directory Users and Computers" to open the Active Directory Users and Computers window.
- Double-click on the domain user account you would like to grant remote VPN access to. The Properties box for the selected domain user will open up.
- Go to the Dial-in tab. In the Remote Access Permissions (Dial-in or VPN) section, click the "Allow access" radio button. Click "Apply" to save your new settings. Click "OK" to close the Properties box.
If you wish to create local accounts to access your VPN, please follow the steps discussed here. Alternatively, you can launch there this via the server manager as well.
- Click on Start, type "run" and type "compmgmt.msc" to access computer management.
- Right click on Users and click New User. Give the user a name and password.
You can proceed to Part F and part E is optionally and start testing by connecting to the VPN server.Part E – Create firewall rules (Optional step)
Since I will be demonstrating the L2PT setup, let me create the following rules. Open the Windows Firewall with Advanced Security applet via Windows Administrative tool or via Server Manager as shown below.

Right click on Inbound Rules and click New Rule. You could also create a new rule under “Actions” as shown below.

Select Port and click Next under Rule Type

Since I will be demonstrating the L2PT setup, let me create the following rules (You do not need to create them). Select UDP and type port 500,1701 and 4500 then click Next.

Click Allow the connection and then click Next

Apply the rule to all profiles and click on Next

Enter your desired rule name and description if you wish and click on Finish.

As you can see, we have our firewall rule ready for L2TP VPN Server.

Part F – Creating VPN Client Connection (Profile)
Whether it’s for work or personal use, you can connect to a virtual private network (VPN) on your Windows 10 PC. A VPN connection can help provide a more secure connection and access to your company’s network and the internet. I recommend setting up a shared connection.

Set up (create) a new VPN connection: Before you can connect to a VPN, you must have a VPN profile on your PC. You can either create a VPN profile on your own or set up a work account to get a VPN profile from your company.

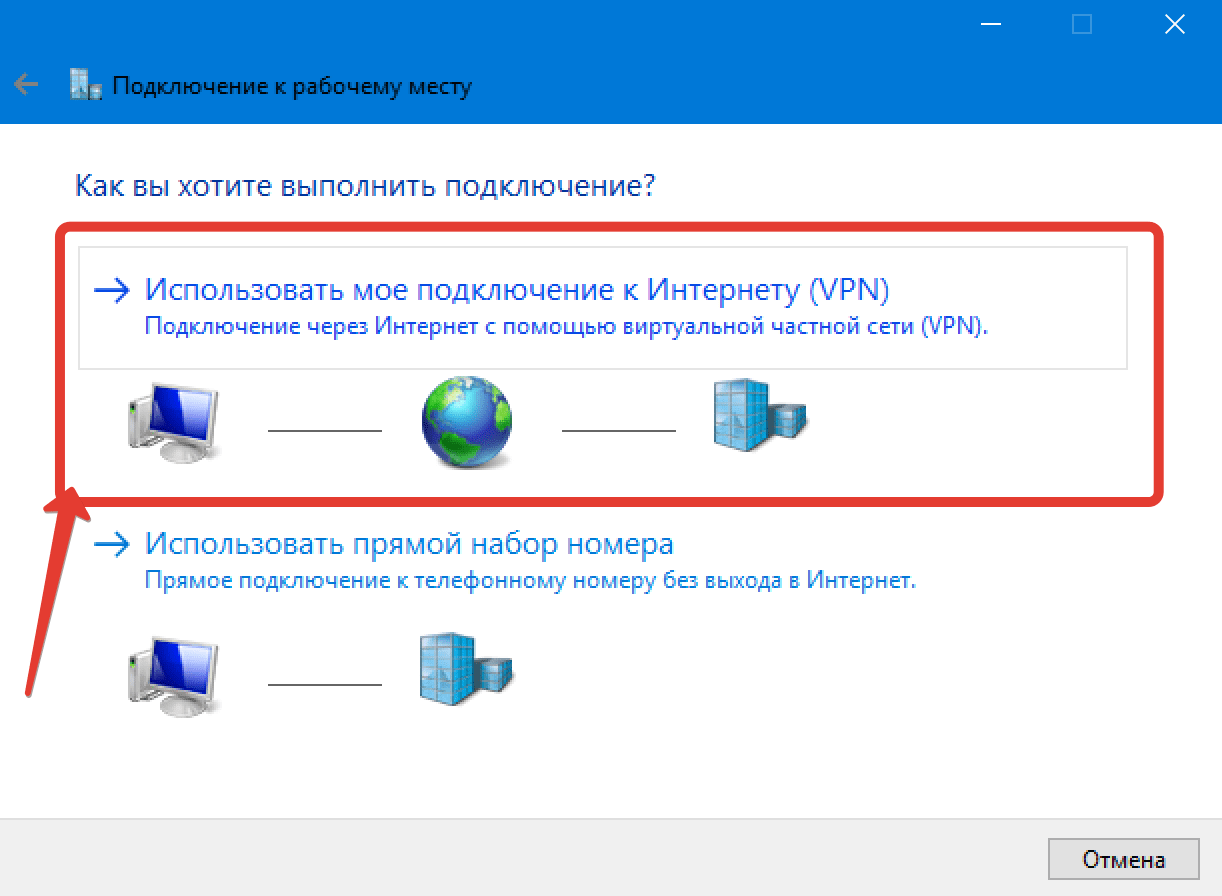
Select connect to a workplace as shown below.

Select use my internet connection (VPN)

You will be prompted to enter the domain name or IP address etc. Click on Remember my credential and
– Allow other people to use this connection.
– When you are done, click on Create.

As you can see, our connection profile is now available. You can now connect to the VPN. This basically means, that when you have a VPN profile, you’re ready to connect to your organization’s network.
– If the Connect button displays under the VPN connection, select connect or

Sign-in method
For the Type of sign-in info, we are using a username and password.
Note: Depending on your setup (authentication method), you could use a one-time password, certificate, or a smart card.


As you can see, I am now connected to my VPN server.

Let’s verify some basic settings. You can see we now have an additional network interface for our VPN connection as shown below.


You will also notice my client’s has an IP address assigned from the defined IP address range, which is “192.168.xxx.101.”

Other ways to see if you’re connected to the VPN
Select the Network icon on the far right of the taskbar, then see if the VPN connection says Connected as shown below.

As you can see from the image below, we have connected to the server I via the domain user account I enabled remote access for.

I hope you found this blog post on Configuring VPN on Windows Server helpful. If you have any questions, please let me know in the comment session.
 Zip File, мои юные любители сисадминства. Нынче мы затронем такую балдёжную тему, как настройка VPN. Эта аббревиатура означает виртуальную частную сеть. С её помощью можно осуществлять подключение к рабочей сети вашего предприятия через безопасный канал. Такая схема позволяет использовать все внутренние ресурсы ЛВС, такие как общие папки, принтеры, почту и т.д. находясь за тысячи километров от офиса.
Для работы нам понадобится Windows Server, который имеет белый IP и выход за NAT. Т.к. данный урок я снимаю преимущественно для слушателей закрытой академии Kurets.Ru, весь процесс поднятия VPN будет продемонстрирован на версии сервера 2016 года. Данный релиз является наиболее актуальным и распространённым на сегодняшний день.
Однако тот же алгоритм действий вполне применим, как более новой версии 2019 года, так и к устаревшим 2012 и 2008 года соответственно. В качестве клиента будет использоваться стандартная рабочая станция с Windows 10. Такие дела. Что ж, ребятки, меньше слов, больше дела. Не будем сёдня долго запрягать. Погнали настраивать.
Шаг 1. Первым делом заходим на сервер в корпоративной сети и в оснастке «Диспетчер серверов» кликаем по пункту «Добавить роли и компоненты».

Шаг 2. Далее.

Шаг 3. Оставляем параметр «Установка ролей и компонентов».

Шаг 4. В данном окне выбираем сервер, на котором собираемся поднимать службу VPN. У нас выбор не велик. Жмём «Далее».

Шаг 5. Отмечаем пункт «Удалённый доступ». Next.

Шаг 6. В компонентах ничего не меняем.
Шаг 7. Знакомимся с информацией о том, что такое в принципе VPN и зачем нужен удаленный доступ.

Шаг 8. Отмечаем галочкой параметр «DirectAccess и VPN» и добавляем необходимые компоненты.

Шаг 9. Далее.

Шаг 10. Далее.

Шаг 11. Всё. Можно приступить к установке. Кликаем по соответствующей кнопке и идём заваривать чай.

Шаг 12. По завершению установки закрываем данную оснастку.

Шаг 13. В диспетчере серверов раскрываем «Средства» и ищем пункт «Маршрутизация и удаленный доступ».

Шаг 14. Видим слева наш сервер, отмеченный красной меткой. Данный цвет кружка свидетельствует о том, что сервер VPN не настроен и соответственно не функционирует. Исправим это недоразумение. Кликаем правой кнопкой. «Настроить и включить маршрутизацию и удаленный доступ».

Шаг 15. Выбираем пункт «Особая конфигурация».

Шаг 16. Отмечаем «Доступ к виртуальной частной сети (VPN)».

Шаг 17. И после нажатия на «Готово» в последнем окне кликаем по кнопке «Запустить службу».

Шаг 18. Сервер взлетел. Остались нюансы. Вызываем контекстное меню. «Свойства».

Шаг 19. У меня на учебном сервере не настроен DHCP, поэтому на вкладке IPv4 укажем статический пул адресов. Из этого диапазона будут получать настройки наши рабочие станции, которые мы далее будем подключать извне.

Шаг 20. Отлично. Диапазон задали. Теперь затронем вопрос безопасности. Переходим на соответствующую вкладку и отмечаем параметр «Разрешить пользовательские политики IPsec для L2TP». Вводим секретный ключ, который будет использоваться для подключения к нашей корпоративной сети из интернета. Жмём «Применить» и в появившемся окне соглашаемся с предупреждением о важности перезапуска службы маршрутизации.

Шаг 21. Перезапускать мы её будем прямо сейчас. В диспетчере привычным движением раскрываем «Средства» — «Службы».

Шаг 22. Ищем в длинном списке «Маршрутизация и удаленный доступ» и вызвав контекстное меню, перезапускаем эту историю.

Шаг 23. Осталось подумать, каким пользователям будет предоставлен доступ к нашей частной сети. У меня данная тачка не в домене. Т.к. подразумевается, что она выполняет исключительно роль общей шары. Поэтому будем мудрить с локальными пользюками. Открываем в пуске «Управление компьютером» и на соответствующей вкладке отмечаем нужного пользователя. Я заранее создал одного Юзверя.

Шаг 24. Заходим в свойства данной учётки и на вкладке «Входящие звонки» разрешаем «Права доступа к сети». Применяем наши изменения.

Шаг 25. И переходим к настройке клиентского компьютера. У меня это комп на Windows 10. Отмечу, что он не находится в одной сети с сервером, но при этом имеет выход в Интернет. Открываем «Центр управления сетями и общим доступом» и далее «Создание и настройка нового подключения или сети».

Шаг 26. В открывшемся окне помощника выбираем пункт «Подключение к рабочему месту».

Шаг 27. «Использовать моё подключение к интернету».
Шаг 28. Вводим белый ip-адрес нашего сервера, который выведен за NAT. И при желании изменяем название подключения. Я оставлю по умолчанию. Ждём «Создать».

Шаг 29. Хорошо. Далее заходим в «Свойства» созданного подключения.

Шаг 30. И на вкладочке «Сеть» раскрываем «Свойства» компонента IPv4. Жмём «Дополнительно» и снимаем галочку с пункта «Использовать основной шлюз в удаленной сети». Это очень важный момент. Если этого не сделать, то сразу после подключения к корпоративной сети, ваше локальное подключение к Интернету на компьютере пропадёт, ибо по умолчанию VPN использует шлюз удалёнки. Так что будьте предельно внимательны и не пропускайте данный шаг при настройке внешних рабочих станций.

Шаг 31. Сохраняем изменения и переходим на вкладочку «Безопасность». Тут нам необходимо изменить тип протокола на «L2TP» и в дополнительных параметрах задать «Ключ для проверки подлинности», который мы ранее указывали на сервере.

Шаг 32. Всё, братцы. Теперь смело можно подключаться. Кликаем по значку сети на панели задач и выбираем наше подключение.

Шаг 33. Вводим данные от учетной записи пользователя. Помним, что в данном примере мы разрешали доступ к нашей сети извне только одному Юзверю.

Шаг 34. И дожидаемся статуса «Подключено». С этого момента мы находимся в корпоративной сети, а следовательно можем пользоваться её ресурсами.

Шаг 35. Давайте попробуем проверить функционал общих папок. Открываем проводник и в адресной строке вводим ip сервера.

Шаг 36. Через некоторое время видим расшареную папку «Общий обмен». Это свидетельствует о том, что наше VPN-подключение к серверу сконфигурировано корректно.

Более подробно о том, как создавать общие папки, настраивать квоты и в целом производить полную настройку виндового сервера, что называется, под ключ. Вы можете узнать в нашем полноценном обучающем курсе по администрированию Windows Server 2016.

Друзья, сегодня мы научились создавать защищённое VPN-соединение. С его помощью вы сможете не только наладить свою собственную работу на удалёнке и выполнять большую часть задач прямо из дома, но также при возникновении соответствующей потребности объединить сети нескольких филиалов в единый канал.
Если урок оказался полезным, то не забудьте поставить лайк этому видео и оформить подписку с колокольчиком. Таким образом вы первыми будете получать информацию о новых выпусках. В заключении, традиционно, хочу пожелать вам удачи, успеха и самое главное отличного настроения. Берегите себя и свои сервера. До новых встреч.

Introduction
A virtual private network (VPN) extends a private network across a public network so that you will be able to access your data remotely through the public network securely. You can also use a VPN to secure your internet activity by using the VPN server as a proxy server.
This article will show you how you can set up an L2TP/IPsec VPN on a Windows Server 2016 Standard with step by step screenshots. This VPN can be used to get access to your business network.
We will configure the VPN with the built-in feature (Routing and Remote Access RRAS) which Microsoft is providing in Windows Server 2016. This can feature can be enabled in the Add Roles and Features wizard.
Prerequisites
- Server with Windows Server 2016 or 2019 or 2022 Standard installed.
- Access to your Windows Server with administrator or a user with administrator permissions
Step 1 – Log in using RDP
You must be logged in via RDP as an administrator or a user with administrator permission. Please see this article for instructions if you don’t know how to connect.
Step 2 – Update Windows
All Windows updates needs to be installed before you start with installing and configuring L2TP/IPsec. This is needed to keep the server up to date with all security patches.
Open Windows Start menu and click Settings

Navigate to Update & Security

Click on Check for updates to check if there are any updates for your server.

Download and install all updates if there is any available.

Step 3 – Install Dependencies
Open Windows Start menu and click on Server Manager

Click on Manage -> Add Roles and Features

A new screen will be opened and click on Next

Select Role-based or feature-based installation and click on Next

Select Select a server from the server pool and click on Next

Select Remote Access and click on Next

Click on Next

Click on Next

Select DirectAccess and VPN (RAS) and Routing. Once it’s selected a pop up will be shown and click on Add Features

Click on Next

Click on Next

Click on Next

Select Restart the destination server automatically if required

Once it’s selected a pop up will be shown and click on Yes to allow the system to reboot if required.

The last step is to click on Install.

Pending installation.

Installation is finished.

Step 4 – Routing and Remote Access
Open Routing and Remote Access in Server Manager -> Tools -> Routing and Remote Access.

A new screen will be opened. Right click on the server name and click on Configure Routing and Remote Access.

A new screen will be opened to setup Routing Access Server and click on Next

We are using Custom configuration because Virtual private network (VPN) access and NAT requires two or more network interfaces.

Select Custom configuration and click on Next

Select VPN access and NAT and click on Next

Complete the wizard by clicking on Finish

After the wizard is completed a pop up will be shown with the question if you want to Start the Routing and Remote Acess Service. Click on Start Service


Step 5 – Configure Routing and Remote Access
Right click on the server name (VPN) and click on Properties

Navigate to Securitytab and select Allow custom IPsec policy for L2TP/IKev2 connection. In our screenshot section Preshared Key but you have to fill this with a strong password.
You can use a password. passphrase generator for creating a preshared key. Generate a strong pre-shared key with at least 32+ characters.

Navigate to IPv4. In our setup we do not have a DHCP server, therefore, we have to select the option Static address pool and click on Addto enter your IP address range.

We used the following range:
Start IP address: 10.10.10.1
End IP address: 10.10.10.254
Number of addresses: 254

Click on OK to save the IPv4 range.
Click on OK to apply the changes which we made in the properties of the Routing and Remote Access service. You should get a warning pop up with the information to restart the service click OK.

Step 6 – Configure NAT
Right click on NAT by navigating to Routing and Remote Access -> VPN (server name) -> IPv4 -> NAT and click on New Interface...

A new screen will be opened and select Ethernet and click on OK.

Select Public interface connected to the Internet and select Enable NAT on this Interface

Open Services and Ports tab select VPN Gateway (L2TP/IPsec - running on this server) from the list.

A new screen will be opened. Edit Private address variable from 0.0.0.0 to 127.0.0.1 and click on OK

Click on OK

Step 7 – Restart Routing and Remote Access
Right click on server name (VPN) and navigate to All Tasks and click on Restart

Step 8 – Windows Firewall
Open Windows Start menu and click on Control Panel

Open System and Security

Open Windows Firewall

Click on Advanced settingsin the left menu

A new screen will be opened and open Inbound Rules

Create a new rule by clicking on New Rule... in the right menu.

A new screen will be opened. Select Predefined: Routing and Remote Access and click on Next

Select Routing and Remote Access (L2TP-In) and click on Next

Click on Finish

Verify that the rule is created

Step 9 – Configure User(s)
Before user(s) can start using VPN we have to give them permission to connect.
Right click on the Windows icon and click on Computer Management

Open Local Users and Groups from the left menu and click on Users

You should see a list of users of your server. Right click on the user you want to enable VPN and click on Properties
In our article we are enabling VPN for our Administrator user. We advise creating/using separate users for VPN purposes with limited permissions.

A new screen will be opened with User Properties. In our example it’s Administrator. Open Dial-Intab and select Allow access

Click on OK and close Computer Management. User Administrator has now the permission to connect to the server via L2TP/IPsec VPN connection.
Step 10 – Remote Access Management
Open Windows start menu and click on Server Manager.

Navigate to Tools -> Remote Access Management. A new screen will be opened with the Remote Access Dashboard. You can see in our overview that services are running without warnings.

More information regarding Remote Access Management can be found here.
Step 11 – Reboot the server
Open Windows Start menu

Right click on the power icon and click on Restart

Conclusion
Congratulations, you have now configured an L2TP/IPsec VPN on your Windows Server 2016 Standard.