Подключение библиотек документов SharePoint Online через клиента OneDrive и использование веб-интерфейса являются предпочтительными и рекомендованными методом доступа к файлам на SharePoint. Однако вы можете подключать библиотеки файлов сайтов SharePoint Online и OneDrive как сетевые диски в Windows.
Многие пользователи предпочитают использовать классический способ доступа к общим файлам – через общие сетевые папки или подключенные диски. Вы можете реализовать этот способ подключения к библиотекам документов SharePoint. Сетевой диск SharePoint можно подключить вручную или с помощью GPO.
Содержание:
- Как вручную подключить сетевой диск сайта SharePoint Online?
- Монтируем сетевой диск SharePoint с помощью групповой политики
Для доступа к библиотекам документов SharePoint через HTTPS нужно использовать протокол WebDAV. Для этого в Windows должна быть запущена служба WebClient.
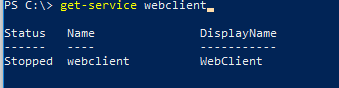
Проверьте, что служба запушен и если нужно настройте для нее автоматический запуск:
Get-Service webclient
Set-Service webclient –startuptype automatic –passthru
В Windows 10/11 клиент WebDAV уже встроен в ОС, а в Windows Server 2022/2019/2016 его нужно установить отдельно:
Install-WindowsFeature WebDAV-Redirector –Restart
Это установит две новые службы:
- WebClient
- MRxDAV – драйвер файловой системы WebDAV
Как вручную подключить сетевой диск сайта SharePoint Online?
Чтобы вручную подключить библиотеку документов SharePoint Online в Windows, нужно открыть проводник, щелкнуть правой кнопкой по This PC и выбрать Map Network drive.
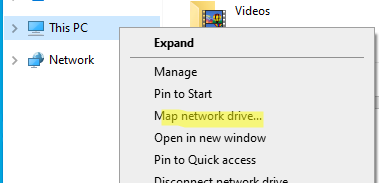
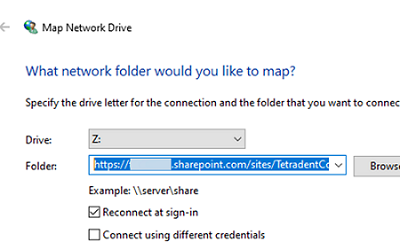
В открывшемся окне нужно выбрать букву диска, указать HTTPS путь к вашему сайту SharePoint (например,
https://tetranew.sharepoint.com/sites/company/Shared%20Documents/General
), нужно ли сделать этот сетевой диск постоянным (Reconnect at sign-in).
Однако при подключении сетевого диска появится ошибка:
The mapped network drive could not be created because the following error has occurred:
Access Denied. Before opening files in this location, you must first add the web site to your trusted site list, browse to the web sites, and select the option to login automatically.
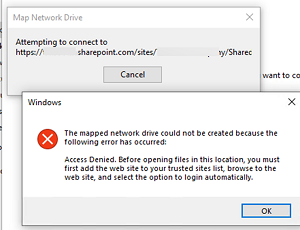
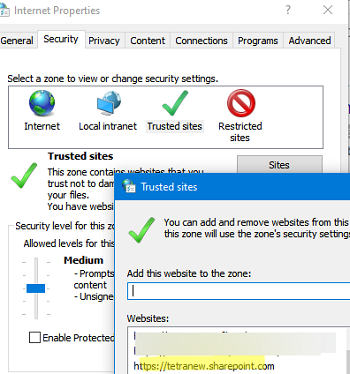
Ок, нужно добавить ваш адрес сайта SharePoint в доверенные. Откройте Internet Options в панели управления (выполните команду inetcpl.cpl).
Перейдите на вкладку Security, выберите зону Trusted sites, нажмите Sites и добавьте URL адрес вашего сайта Sharepoint.
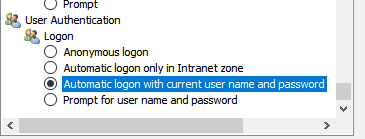
Теперь нажмите кнопку Custom Level и в разделе User Authentication измените значение Logon на Automatically log in with current user name and password.
Для доступа к сайту Sharepoint Online вам нужно получить токен с помощью современной проверки подлинности Microsoft (Modern Authentication). Поэтому откройте браузер IE (Internet Explorer) и перейдите на страницу https://login.microsoftonline.com/ .
Если браузер IE отключен на вашем компьютере, можно выполнить аутентификацию в Azure через Edge в режиме совместимости с Internet Explorer. Адрес вашего сайта SharePoint нужно добавить в разделе
edge://settings/defaultBrowser
-> Internet Explorer Mode Pages -> Add.
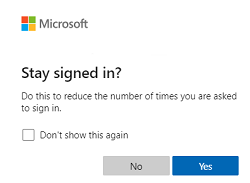
Здесь вам нужно выполнить аутентификацию под вашей учетной записью Azure (Microsoft 365). Чтобы не выполнять аутентификацию при каждой перезагрузке, включите опцию Stay signed in.
По умолчанию это позволит получить токен доступа, который будет действовать в течении 90 дней. При активности пользователя, этот токен продлевается автоматически.
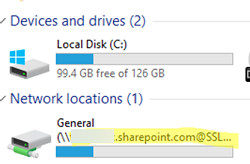
Попробуйте еще раз подключить сетевой диск SharePoint из проводника Windows. Он должен появится в списке доступных ресурсов.
Если сетевой диск не подключается, рекомендуем проверить что вы выполнили вход в ваш аккаунт Microsoft.
Также вы можете подключить сетевой диск SharePoint из командной строки:
net use T: "https://tetranew.sharepoint.com/sites/company/Shared Documents/General" /persistent:yes
В PowerShell можно использовать класс WScript.Network:
$SPOLibrary = "https://tetranew.sharepoint.com/sites/company/Shared Documents/General"
$Network = new-object -ComObject WScript.Network
$Network.MapNetworkDrive('Z:', $SPOLibrary)
Или командлет New-PSDrive:
New-PSDrive -name "Z" -Root $SPOLibrary -PSProvider filesystem

При подключии сетевого диска из командной строки может появится ошибка:
System error 224 has occurred.
Access Denied. Access Denied. Before opening files in this location, you must first add the web site to your trusted site list….

В этом случае проверьте, что вы добавили сайты Sharepoint Online в доверенные и выполнили аутентификацию в Azure (возможно токен аутентификации уже истек).
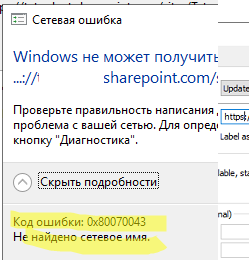
Если на компьютере не установлен клиент WebDav, то при подключении сетевого диска появится ошибка:
Не найдено сетевое имя
Код ошибка: 0x80070043
Монтируем сетевой диск SharePoint с помощью групповой политики
Теперь рассмотрим, как автоматически подключать сетевой диск сайта SharePoint Online с помощью групповых политик Windows.
- Откройте консоль Group Policy Management (
gpmc.msc
); - Создайте новую политику и назначьте ее на OU, в которой находятся целевые компьютеры, на которых нужно подключать диск SharePoint;
- Перейдите в раздел Computer Configuration -> Policies -> Administrative Templates -> Windows Components -> Internet Explorer -> Internet Control Panel -> Security Page
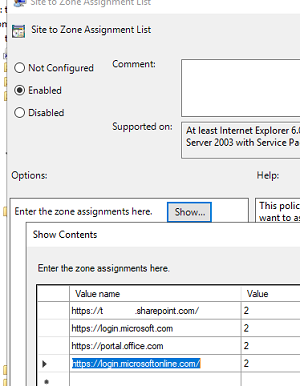
- Включите политику Site to Zone Assignment List и добавьте следующие URL адреса в список доверенных (код 2):
https://tetranew.sharepoint.com/
https://login.microsoft.com
https://portal.office.com
https://login.microsoftonline.com/

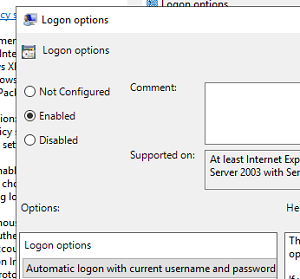
- Затем перейдите в раздел Trusted Sites Zone и включите политику Logon options = Automatic logon with current username and password.
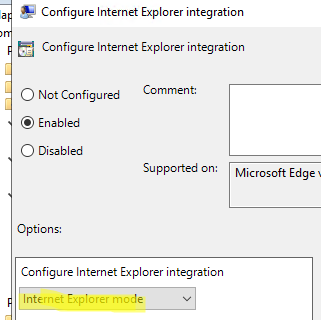
- Затем, чтобы пользователь выполнил аутентификацию в Microsoft 365 через IE, нужно установить административные (ADMX) шаблоны для MS Edge и поместить их в центральное хранилище GPO
- Перейдите в раздел Computer Configuration -> Administrative Templates -> Microsoft Edge. Включите параметр политик Configure Internet Explorer Integrations и установите его значение Internet Explorer Mode; ,h
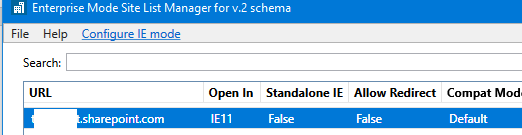
- Затем установите утилиту Enterprise Mode Site List Manger v2 (https://www.microsoft.com/en-us/download/details.aspx?id=49974) и сформируйте XML файл со следующими настройками:
URL: tetranew.sharepoint.com
Open in: IE 11
Default Compat mode
Сохраните файл в NetLogon (например
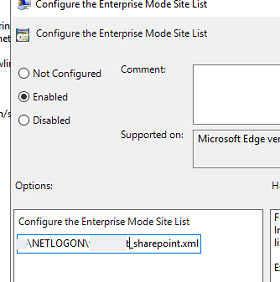
\\winitpro.ru\NETLOGON\edgeiemode_sharepoint.xm
l) - Теперь откройте параметр GPO Configure the Enterprise Mode Site List. Включите его и укажите UNC путь к XML файлу со списком сайтов, который вы создали ранее.
- Чтобы отключить лишние окна и диалоги при первом запуске Edge, включите политики:
Hide the one-time redirection dialog and the banner on Microsoft Edge
Hide the first-run experience and splash screen
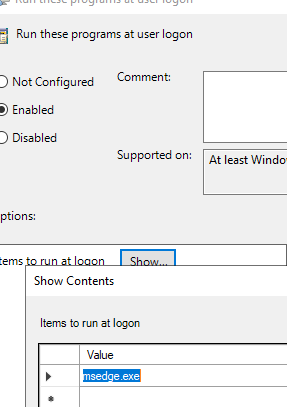
- Чтобы при входе пользователя появлялось окно аутентификации Microsoft, нужно с помощью политики Run these programs at the user logon (Computer Configuration -> Administrative Templates -> System -> Logon) включить автозапуск процесса
msedge.exe
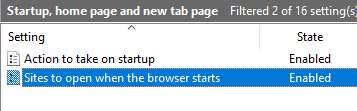
; - Затем в разделе GPO Microsoft Edge -> Start, home page and new tab включить политики:Actions to take on startup: Open a list of URLsSites to open when the browser starts:
https://login.microsoftonline.com/
https://tetranew.sharepoint.com/
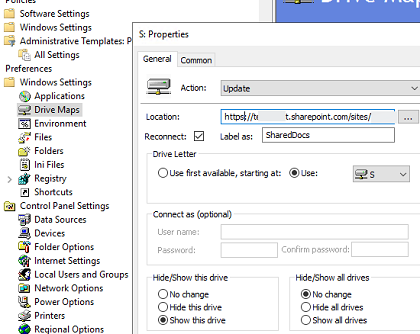
- Теперь можно настроить политику подключения сетевого диска через Group Policy Preferences. Перейдите в раздел User Configuration -> Preferences -> Windows Settings -> Drive Maps. Создайте новый параметр политики New -> Mapped Drive со следующими настройками:
Action: Update
Location: https://tetranew.sharepoint.com/sites/company/Shared%20Documents/General
Reconnect: True
Drive Letter: Show this drive

Теперь при входе пользователя в браузере Edge откроется окно аутентификации Microsoft. Укажите имя пользователя и пароль, подтвердите вход через MFA. Завершите сеанс (logoff).
При следующем входе в систему сетевой диск SharePoint подключится автоматически.
Несколько замечания касательно использования сетевого диска SharePoint:
- Для обновления безопасности токена нужно периодически (раз в месяц) открывать ваш сайт SharePoint Online в браузере (в Edge с настроенным режимом совместимости);
- Сетевой диск доступен только в активной сессии;
- Скорость доступа к файлам зависит от скорости подключения
В этой статье, мы показали, как смонтировать библиотеку документов с сайта SharePoint как сетевой диск в Windows.
Нужно понимать, что использование веб интерфейса сайтов SharePoint предпочтительнее с точки зрения доступного функционала:
- Веб версия SharePoint предоставляет более широкие возможности интерфейса с точки зрения пользовательского опыта;
- Доступны широкие возможности поиска;
- Поддерживается версионность документов;
- Возможность добавлять метатеги (метки);
- Настройка оповещений об изменении документов;
- Во многих организациях используется несколько сайтов и библиотек SharePoint для разделения данных. Не всегда целесообразно подключать их все в виде сетевых дисков.
WebDAV (Web Distributed Authoring and Versioning) является расширением протокола HTTP / 1.1. и позволяет обращаться к файлам на удаленном сервере и выполнять с ними общие операции, такие как чтение, запись, копирование, удаление файлов и т.д. Как правило, этот протокол используется пользователями для совместной работы с удаленными файлами. Проще говоря, webdav — это, по сути, общая сетевая папка, расположенная на веб-сервере. Для доступа к общим ресурсам WebDAV на клиентской стороне должен быть установлен клиент WebDAV.
В серверных операционных системах Microsoft отдельного клиента WebDAV нет. Например, в Windows Server 2008 R2,2012/2012 R2 клиент WebDAV входит в состав компоненты Desktop-Experience. Поэтому для доступа к WebDAV ресурсам на этих ОС необходимо установить это расширение.
Install-WindowsFeature Desktop-Experience
Совет. В Windows Server 2008 R2, отсутствует командлет Install-WindowsFeature, вместо него нужно использовать другой командлет — Add-WindowsFeature.
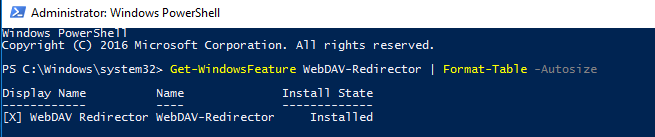
В Windows Server 2016 ситуация немного другая. В этой операционной системе появился отдельный компонент WebDAV-Redirector. Для эго установки, нужно выполнить такую команду (потребуется перезагрузка сервера)
Install-WindowsFeature WebDAV-Redirector –Restart
После перезагрузки проверим, что компонент WebDAV-Redirector установлен:
Get-WindowsFeature WebDAV-Redirector | Format-Table –Autosize
В системе при этом появятся две новые службы:
- WebClient (get-service WebClient) – позволяет программ Windows создавать, изменять и получать доступ к файлам в Интернете.
- MRxDAV (get-service MRxDAV) – драйвер файловой системы (WebDav Client Redirector Driver)
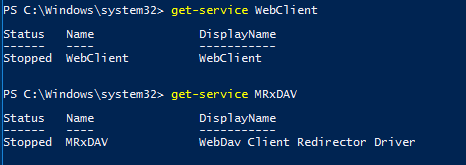
По умолчанию служба WebClient и драйвер MRxDAV отключены и настроены на запуск в ручном режиме, при срабатывании определенного триггера. По-видимому, идея разработчиков была в том, что сервис должен автоматически запускаться при попытке доступа через драйвер MRXDAV.SYS, но, увы, это не работает. Поэтому лучше изменить тип запуска этих служб на автоматический.
Set-Service WebClient -StartupType Automatic
Set-Service MRxDAV -StartupType Automatic
Осталось запустить данные службы:
Start-Service WebClient
Start-Service MRxDAV
![]()
Служба WebClient настраивается только через реестр. Все ее параметры хранятся в ветке HKLM\SYSTEM\CurrentControlSet\Services\WebClient\Parameters.

С практической точки зрения, могут быть интересны следующие параметры службы WebClient
AcceptOfficeAndTahoeServers — отвечает за возможность подключения к веб-серверам SharePoint и Office Web Server (по умолчанию значение — 1)
BasicAuthLevel – тип аутентификации, используемый клиентом WebClient. Доступны следующие значения:
- 0 — Базовая (Basic) аутентификация отключена
- 1 — Базовая (аутентификация включена только SSL каталогов — это значение используется по умолчанию в Windows Server 2016)
- 2 и выше— используется базовая аутентификация для любого типа общих каталогов, как с поддержкой SSL, так и без (это небезопасный вариант, т.к. имя и пароль пользователя при таком типе аутентификации пересылаются по сети в открытом виде)
FileSizeLimitInBytes — максимальный размер передаваемых файлов (задается в байтах, по умолчанию размер файлов ограничен 50 Мб)
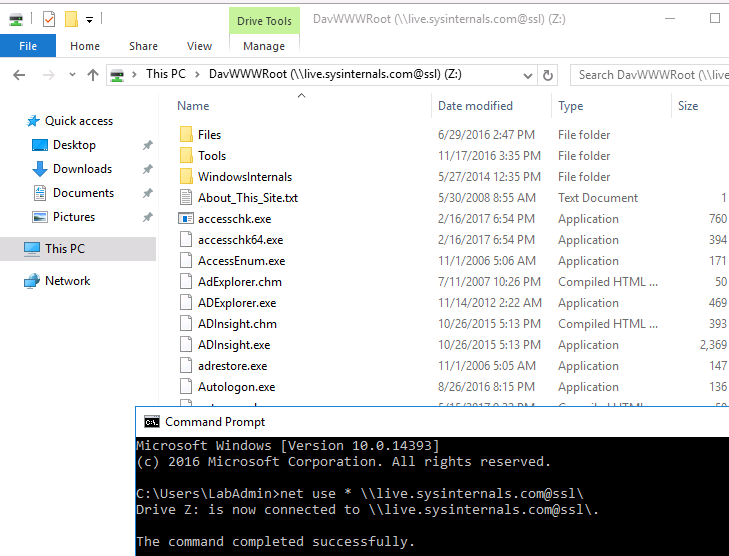
Для проверки работы клиента WebDav можно попробовать подключить к общедоступному ресурсу с включенной поддержкой Webdav, например live.sysinternals.com. В этом веб-каталоге хранятся популярные утилиты от Sysinternals (Марка Русиновича).
Сетевую папку WebDAV в Windows Server 2016 можно подключить следующими способами :
- Без SSL:
net use * \\live.sysinternals.com\ - С SSL:
net use * \\live.sysinternals.com@ssl\ - Можно указать данные для авторизации на удаленном сервере:
net use * \\live.sysinternals.com@ssl\ /user:vmblog * - Можно указать конкретный порт TCP:
\\live.sysinternals.com@80\folderили\\live.sysinternals.com@ssl\share - Чтобы отмонтировать подключенный по WebDav диск, выполните команду:
net use * /del /y
Если при монтировании диска Webdav через Проводник или командную строку вы получаете ошибку:
System error 67 has occured.
The network name cannot be found.
Проверьте, что служба WebClient запущена, измените значение ключа реестра BasicAuthLevel, на 1 и перезагрузите сервер.

The Web Server (IIS) role in Windows Server 2019 provides a secure, easy-to-manage, modular, and extensible platform for reliably hosting websites, services, and applications. Therefore, with IIS 10 you can share information with users on the Internet, intranet, or extranet. IIS 10 is a unified web platform that integrates IIS, ASP.NET, FTP services, PHP, and Windows Communication Foundation (WCF). It supports HTTP, HTTP/2, HTTPS, FTP, FTPS, and SMTP etc. This article explore how to add and remove IIS web server. Kindly refer to the following related contents: Event ID 5059: Application pool has been disabled or Changing identity user for IIS Application Pool, how to install Pleasant Password Server, how to perform redirection from HTTP to HTTPS, how to create a self-signed certificate using PowerShell and how to configure SSL between WSUS upstream and downstream servers and how to setup and configure Windows server update services (WSUS).
In this article, I will deliberately miss a role service installation and I will be showing you how to do (install and uninstall this service) via PowerShell. But then, let us install the IIS role via this via the Server Manager. Click on the Server Manager icon on your desktop in order to open Server Manager. From the Server Manager,
– Click on Manage and then
– Click on click on “Add Roles and Features”. You may want to see the following guide too How to Disable HTTP TRACE Method for Apache, IIS, sunOne, and Lotus Domino.

Note: You can decide to skip the “Before you begin” page for just click on Next as shown below.

Select Role based or feature based installation as shown below. We are not interested in setting up Remote Desktop Services, so this option is irrelevant.

Choose the server from the server pool on the Server Selection page and then click on Next. We currently have one server selected by default. When there are multiple serves in the server pool, please take not to select the right server.

Here, I will be installing the Web Server (IIS) as shown below. You can also select the role and any other role you may want to install. As you can see it has been selected.


I will be clicking on Next to continue as I do not have any feature to install. However, this may not be your case!

You will receive prompt on the following Window below. Click on the Add Features to add the management tools for IIS

To proceed with the process of adding and removing the IIS Web Server, simply click “Next” on the Web Server Role (IIS) section. This step is for information purposes.

Note
As I said, I will not be adding additional role service I need on purpose just to demonstrate how this can be done via PowerShell.
– Please check all applicable roles that you need.

To add and remove IIS web server, you will have to confirm (verify) on this page that the features, roles, and role services which you have selected are correct. When they are not correct, please use the “Previous” button, otherwise
– Click on Install to install the role, features and role services.

On the result page, the installation progress will be displayed. You can close this window below if you are impatient even when the installation has not completed and it will complete in the background.

As you can see from the image above, the installation has succeeded. Thus, we will not launch the IIS tool. There are various ways to launch the IIS console when adding and removing IIS web server. However, you can use the Tool menu and select “IIS Manager” or
– Select IIS as shown below, right click on the server and select “IIS Manager”

This will Open IIS 10 console as shown below. That is all you need to install the IIS web server role.

Install IIS with PowerShell
You can automate the IIS role and features installation by using the Powershell cmdlet. Please run the commands below. You can optionally also install additional features by using the “Add Roles and Features” wizard.
Install-WindowsFeature -name Web-Server -IncludeManagementTools
Install WebDAV redirector server 2019
This guide walks you through the installation of WebDAV redirector. If you want to access a WebDAV share on a Windows Server 2016 or 2019, you have to install a feature that is not activated in the standard installation. The best way to do this is to start a PowerShell as admin and enter the following:
Install-WindowsFeature WebDAV-Redirector –Restart

Note: You can also launch the Add roles and features wizard and select the WebDAV-Redirector and have it installed as well. But I just wanted to show to you that PowerShell is capable of doing this.
To uninstall IIS via the Server Manager
If you wish to remove certain roles (IIS in my case) and features, you will have to use the “Remove Roles and Features” wizard of Server Manager. By just unchecking the IIS Web Server Role, you will be able to remove (uninstall) the IIS web server role at once. You can remove a single role, role service, or feature by simply unchecking it in the wizard. Please follow the steps below to remove the ISS role from Windows Server 2019.
Click on the Server Manager icon on your desktop in order to open Server Manager. From the Server Manager, click on Manage and then click on click on the “Remove Roles and Features”.

Note:
You can decide to skip the “Before you begin” page for just click on Next as shown below.

Choose the server from the server pool on the Server Selection page and then click on Next. We currently have one server and this is selected by default. When there are multiple serves in the server pool, please take not to select the right server.

Here, I will be unchecking the Web Server (IIS) as shown below. Adding and removing IIS web server also involves removal of every other role you no longer want from this window.
– Just clear its checkbox. If you have additional features installed, you will be promoted to remove them. In my case, I do not have any feature, so I will skip this window below.

Another step to follow to add and remove IIS web server is the verification of features and role services. Now, you will have to confirm (verify) on this page that the features, roles, and role services which you have selected are correct.
– You can optionally click on the “Restart the destination server automatically if required”.
– When you are done, please click on Remove.
– Click on YES when prompted to acknowledge the automatic server restart
It is recommended to have your server restarted after removing features, roles, and role services. You can continue working if you have other actions to perform on the server, but remember to restart the server afterwards. 

You will be prompted with the result page as shown below. This will also show you the IIS web server removal progress

Remove the IIS Web Server Role with PowerShell
To remove the webserver role via PowerShell, you will have to launch the PowerShell console as administrator and issue the following command in PowerShell. This will remove your IIS configuration and yu must restart your server.
Uninstall-WindowsFeature -remove Web-Server

I hope you found this blog post helpful. If you have any questions, please let me know in the comment session. Adding and removing IIS web server has become easy with these steps.
- Remove From My Forums
-
Question
-
Hi.
I’m trying to access SharePoint files trough File Explorer. I’ve tried «Open with File Explorer« from within
SharePoint, but this only give me the option to install/login to OneDrive. The address is added to the Trusted Site, but still no luck.If I try to Access these files from a client computer I’ve connected to the same network, this work like a charm. I very much like to access these files from the server itself. Mapping or adding the SharePoint address as a network drive does
not work either.Is there any way I can Access these «raw« files locally from a SharePoint 2019 on premise server. I’m not interested
in connecting to OneDrive or using SharePoint Online.I have seen several solutions on this forum but all I can see is People trying this from a Windows 10 Client machine. As I said, I want to Access these from the SharePoint server itself.
My Setup is SharePoint 2019 on premise, installed on a Server 2019 Standard. This is a test setup.-Dan
Answers
-
Hi Dan,
Can you check the following:
1. Is the WebClient service running on the server?
2. Compare the WebClient parameters in the registry between the server and a client system
Computer\HKEY_LOCAL_MACHINE\SYSTEM\CurrentControlSet\Services\WebClient\Parameters3. Are you using IE11?
Paul | SLIM Applications
-
Marked as answer by
Friday, May 10, 2019 8:43 AM
-
Marked as answer by
-
Hi Dan,
In windows 2019 standard, you can install the WebDAV Redirector feature.
Go to server manager->add roles and features->install the WebDAV Redirector feature->restart the server.
And then go to start->search “services”->start the “WebClient” service.
After that, you could go to the document library and click “open with explorer” in the ribbon, it will open the document library in the windows explorer.
For more detailed information, refer to the article below.It also can work in windows 2019 standard.
Installing support for WebDAV to access documents inside Document Storage.
Best regards,
Sara Fan
Please remember to mark the replies as answers if they helped. If you have feedback for TechNet Subscriber Support, contact
tnmff@microsoft.com.SharePoint Server 2019 has been released, you can click
here to download it.
Click
here to learn new features. Visit the dedicated
forum to
share, explore and talk to experts about SharePoint Server 2019.
-
Edited by
Sara Fan
Friday, May 10, 2019 7:35 AM -
Marked as answer by
Dan Beev
Friday, May 10, 2019 8:43 AM
-
Edited by
-
Hi.
Thank you so much, Paul and Sara for fast reply and a working solution. Installing and activate the WebClient service was all it took
-Dan
-
Marked as answer by
Dan Beev
Friday, May 10, 2019 8:43 AM
-
Marked as answer by


![]()
Клиент WebDAV по умолчанию в серверных операционных системах Windows не установлен. Установим.
WebDAV (Web Distributed Authoring and Versioning) является расширением протокола HTTP/1.1. Позволяет обращаться к файлам на удаленном сервере и выполнять с ними операции чтения, записи, копирования, удаления и т.д.
Для установки WebDAV клиента на сервере Windows требуется установить дополнительную компоненту. В Windows Server 2008 R2,2012/2012 R2 клиент WebDAV входит в состав компоненты Desktop-Experience. В Windows Server 2016 появился отдельный компонент WebDAV-Redirector.
Установить можно командой (потребуется перезагрузка):
Install-WindowsFeature WebDAV-Redirector –RestartИли через GUI, открываем Server Manager: Add Roles and Features.

В мастере в разделе Features выделяем галкой компонент WebDAV Redirector. Next.

Устанавливаем галку «Restart the destination server automatically if required».
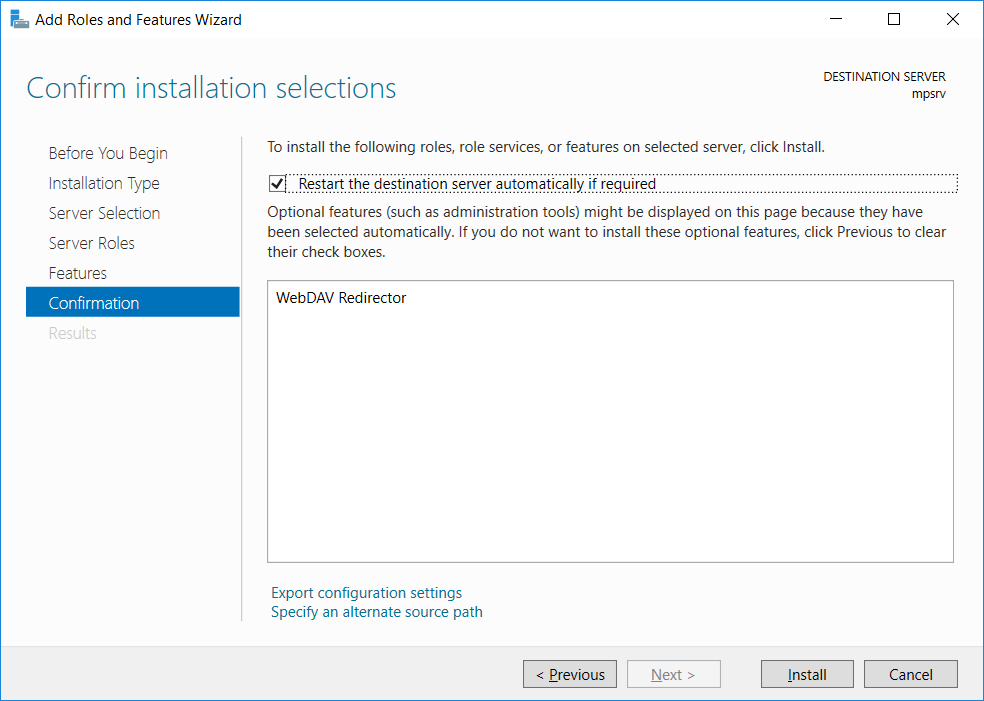
Install. Начинается установка компонента.
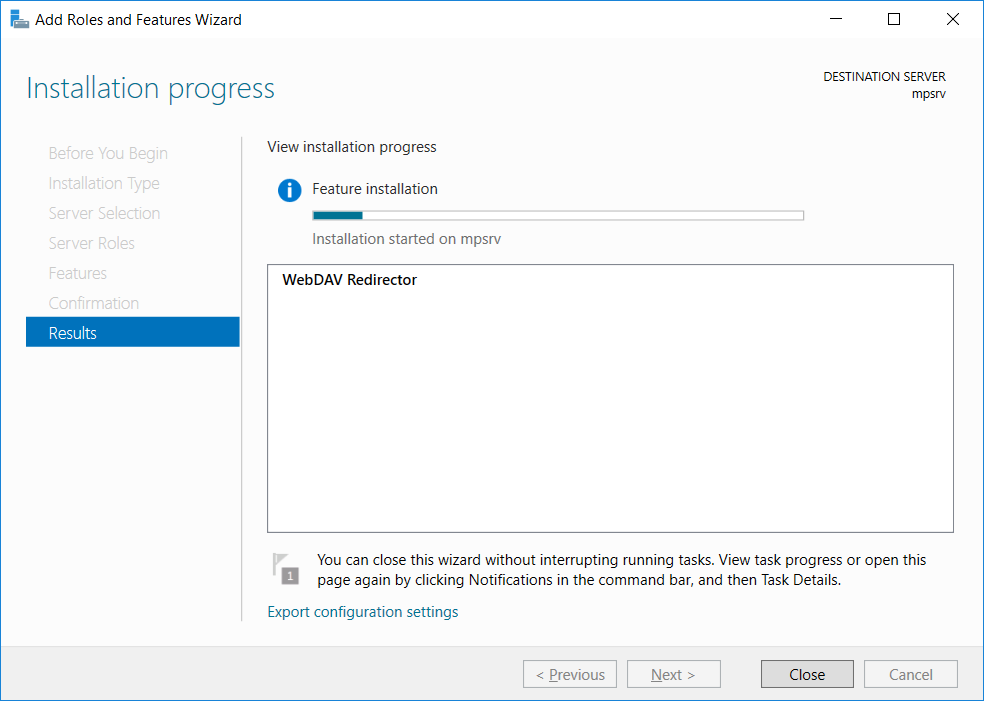
Сервер после установки компонента автоматически перезагрузится.

Клиент WebDAV установлен. После перезагрузки в системе появятся две новые службы:
- WebClient — позволяет создавать, изменять и получать доступ к файлам в Интернете
- MRxDAV — драйвер файловой системы (WebDav Client Redirector Driver)
По умолчанию служба WebClient и драйвер MRxDAV отключены и настроены на запуск в ручном режиме, при срабатывании определенного триггера. Меняем тип запуска этих служб на автоматический и запускаем.
get-service WebClient
get-service MRxDAV
Set-Service WebClient -StartupType Automatic
Set-Service MRxDAV -StartupType Automatic
Start-Service WebClient
Start-Service MRxDAV
get-service WebClient
get-service MRxDAV
Параметры WebClient хранятся в ветке реестра:
HKLM\SYSTEM\CurrentControlSet\Services\WebClient\Parameters
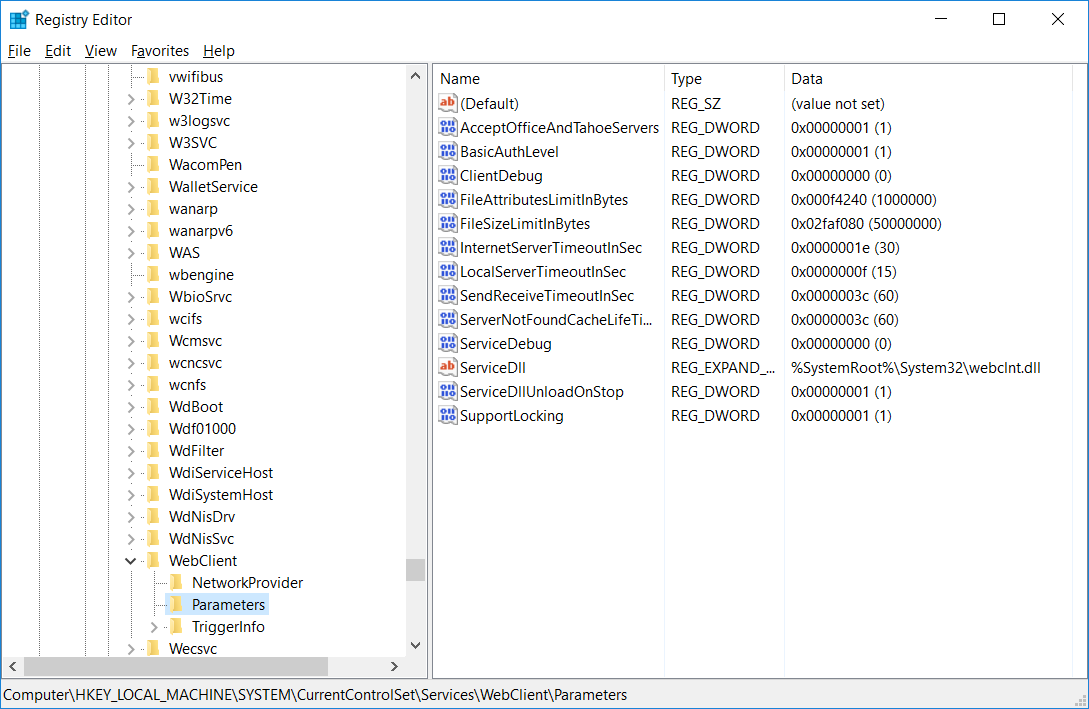
AcceptOfficeAndTahoeServers — возможность подключения к веб-серверам SharePoint и Office Web Server (по умолчанию значение — 1)
BasicAuthLevel – тип аутентификации:
- 0 — аутентификация отключена
- 1 — аутентификация включена только для SSL каталогов (по умолчанию в Windows Server 2016)
- 2 и выше— используется базовая аутентификация для любого типа общих каталогов, как с SSL, так и без (небезопасный вариант)
FileSizeLimitInBytes — максимальный размер передаваемых файлов в байтах (по умолчанию 50 Мб). Но у меня и 4 ГБ грузится без изменения этих настроек.