Данная статья предназначена для тех, кто искал подробное и понятное руководство о том, как установить Windows Server 2019.
Настоятельно рекомендую никогда не использовать никаких сторонних сборок Windows. Используйте только оригинальные установочные образы. Это поможет вам избежать множества проблем и получить максимальное быстродействие и стабильность.
Рекомендую всегда использовать англоязычные издания Windows Server. Как показывает практика, оригинальные (английские) версии Windows работают стабильнее, к тому же вам будет проще общаться на одном языке с профессионалами в случае возникновения проблем или при желании обменяться опытом.
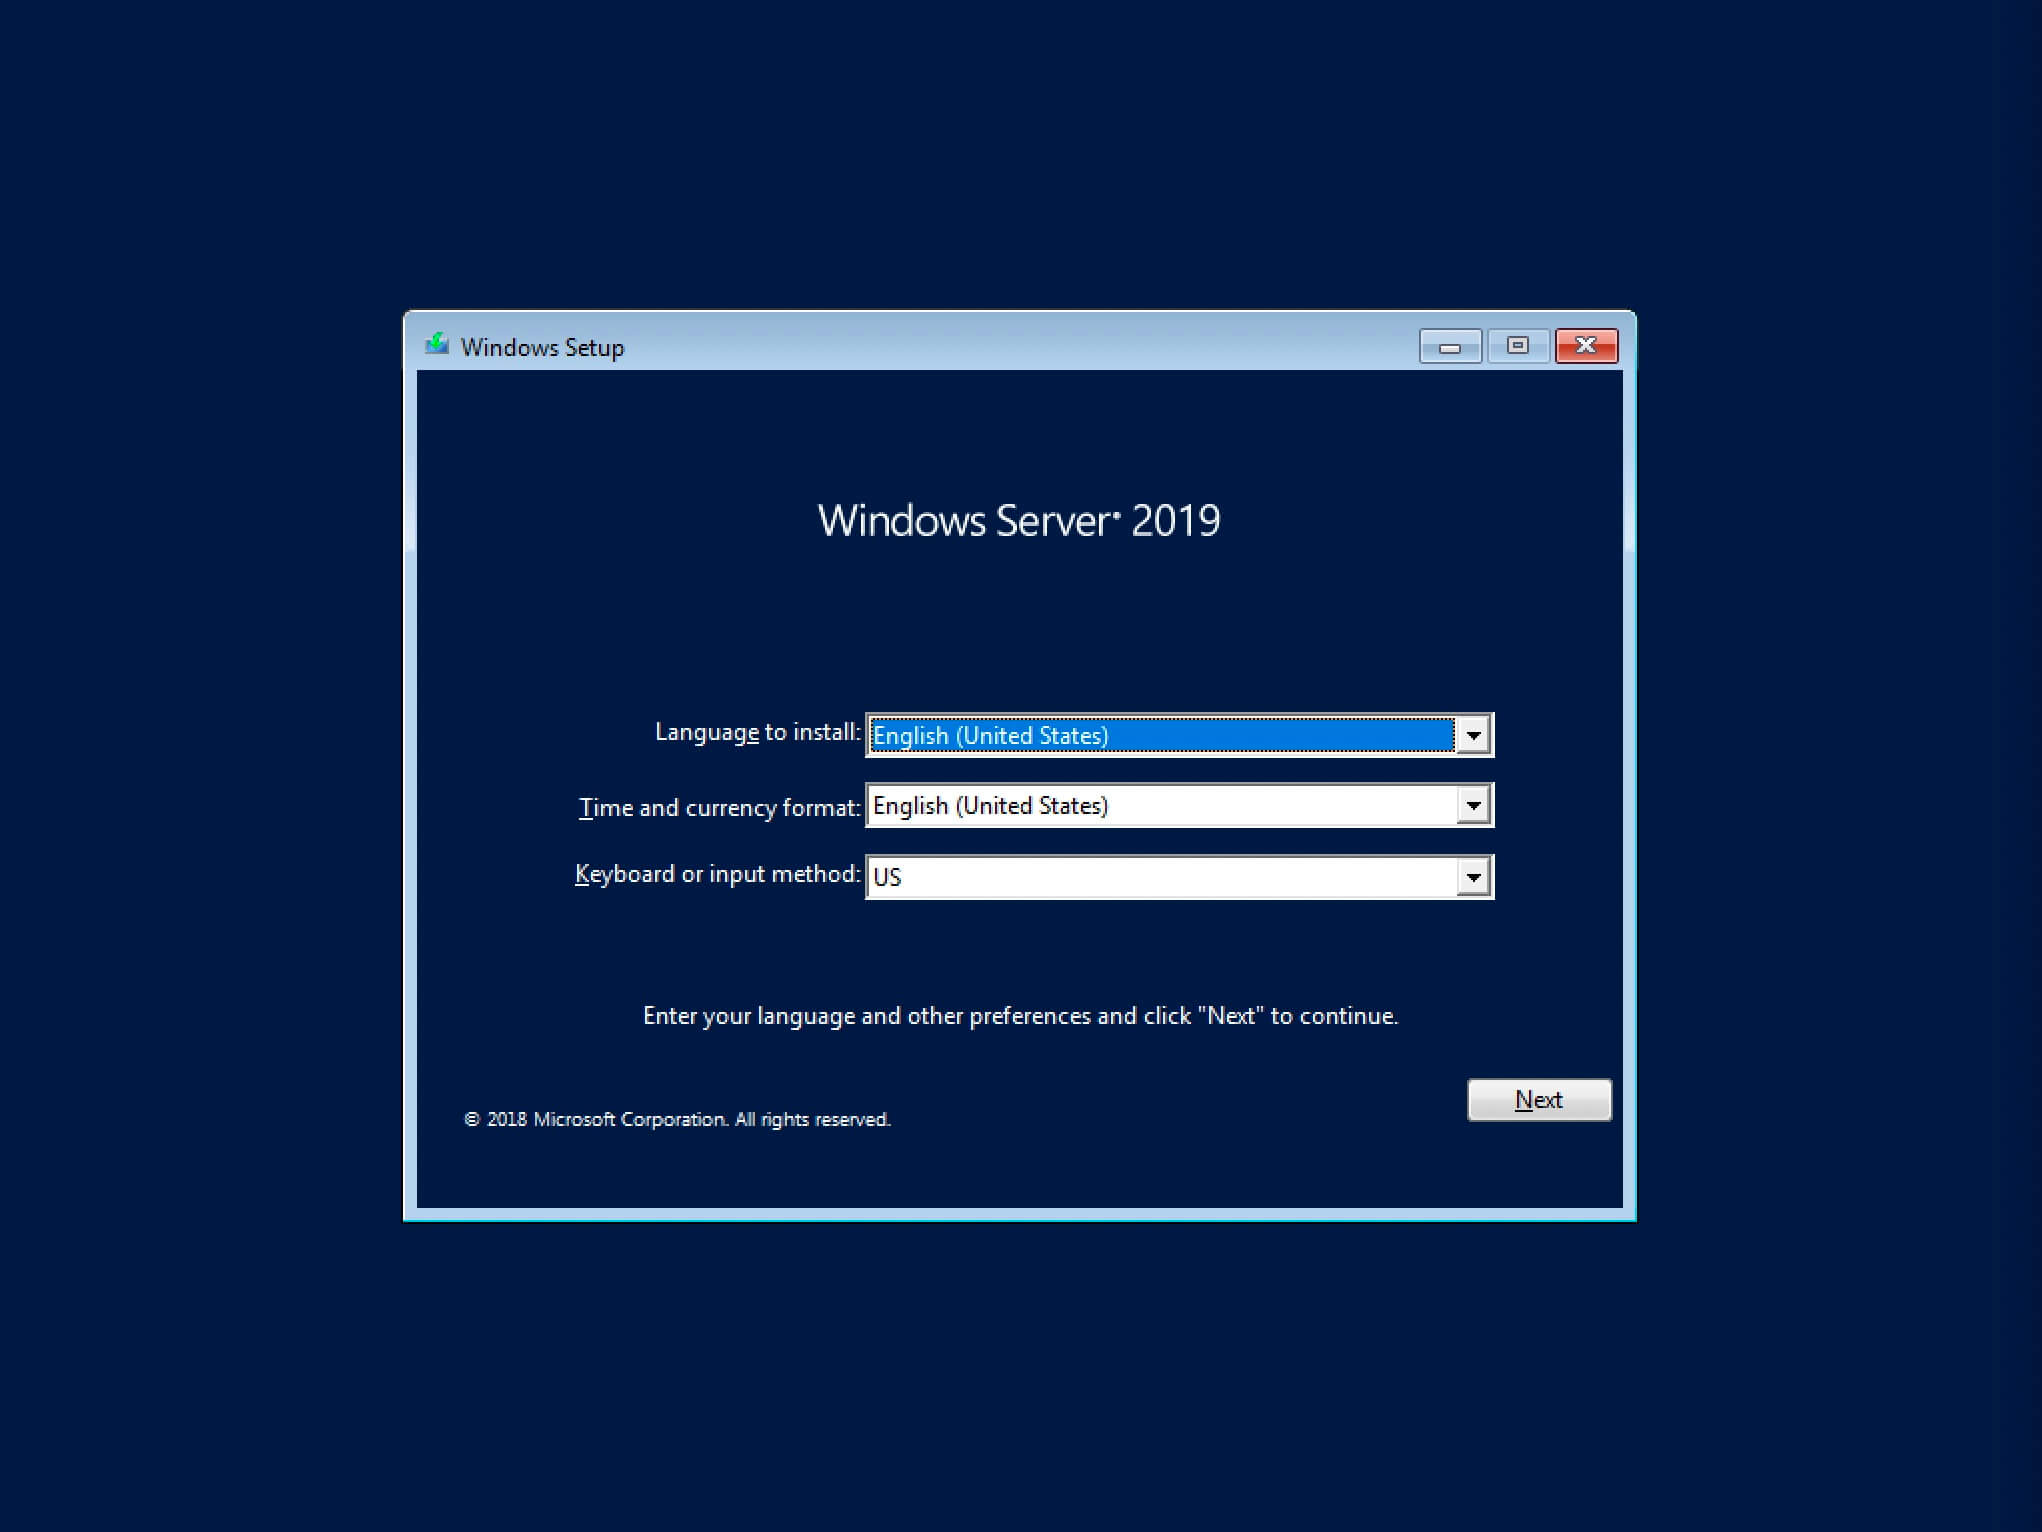
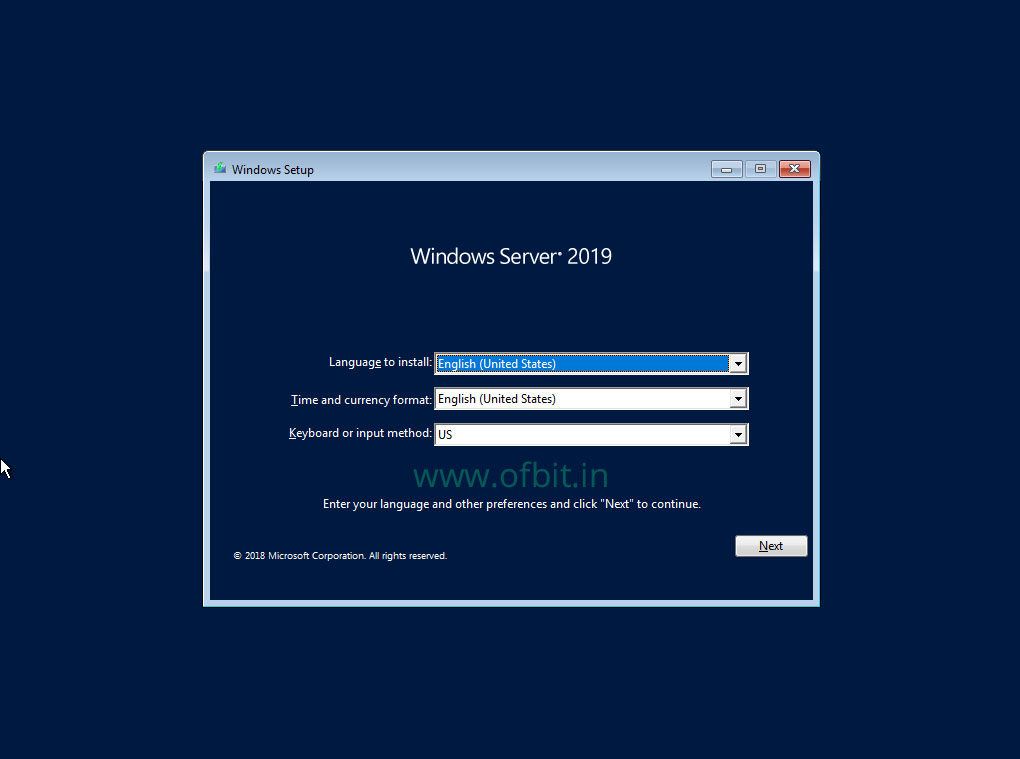
После успешной загрузки с установочной флешки или DVD-диска Windows Server 2019, первым делом необходимо выбрать языковые параметры.
В данном руководстве рассматривается установка Windows Server 2019 на английском языке.
Нажимаем на кнопку “Next”.
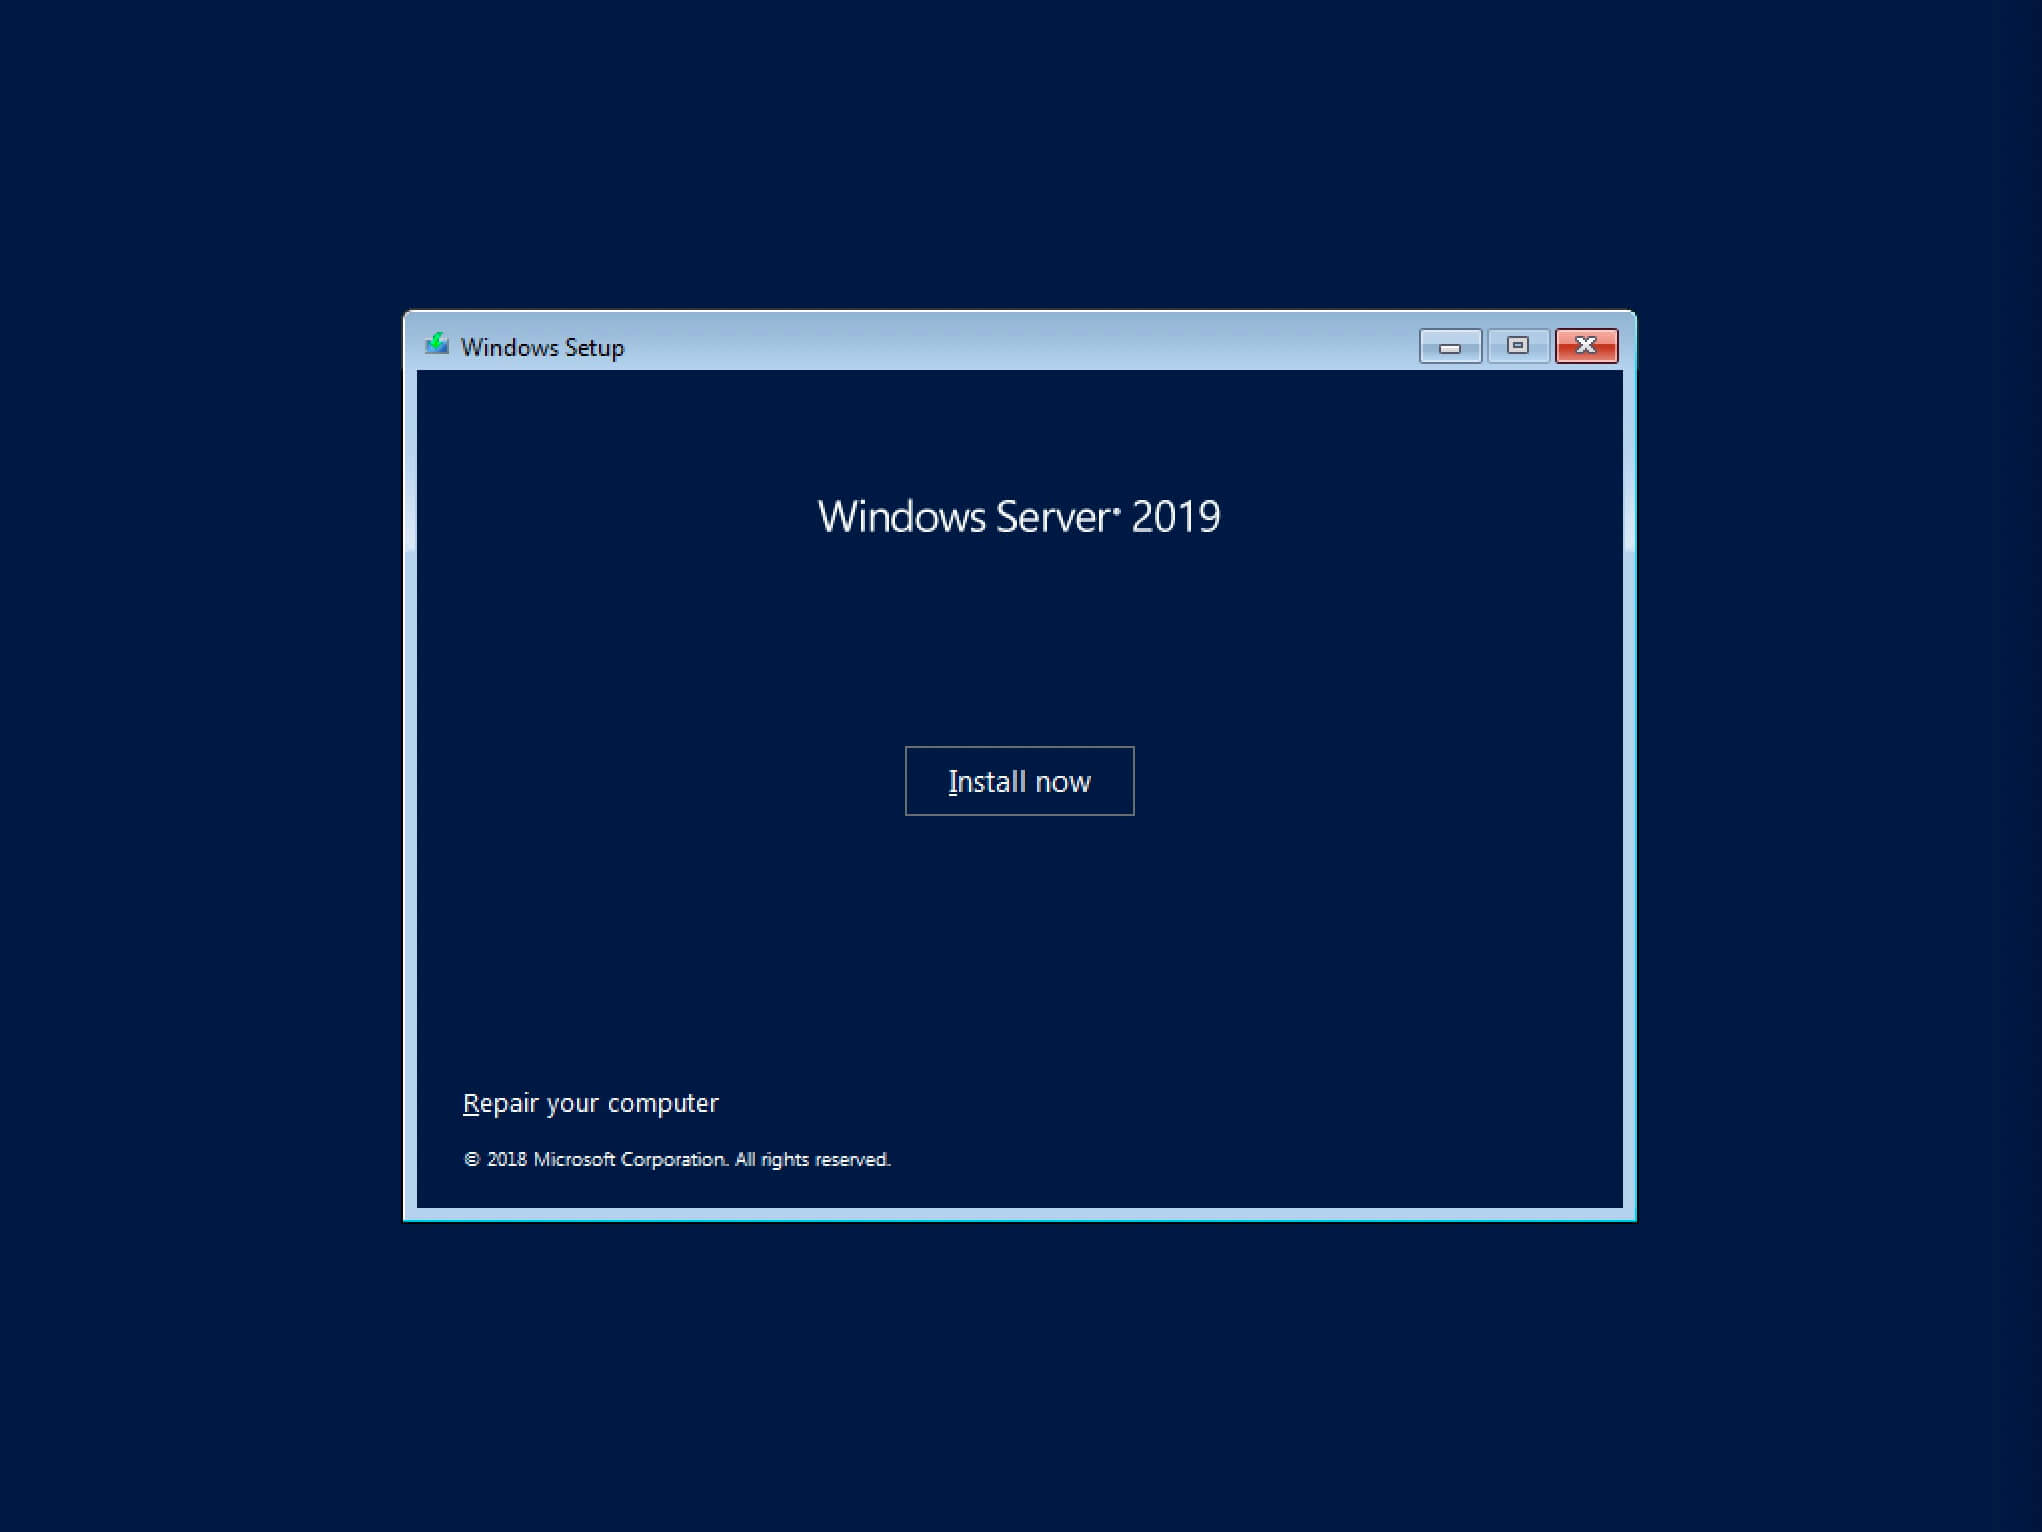
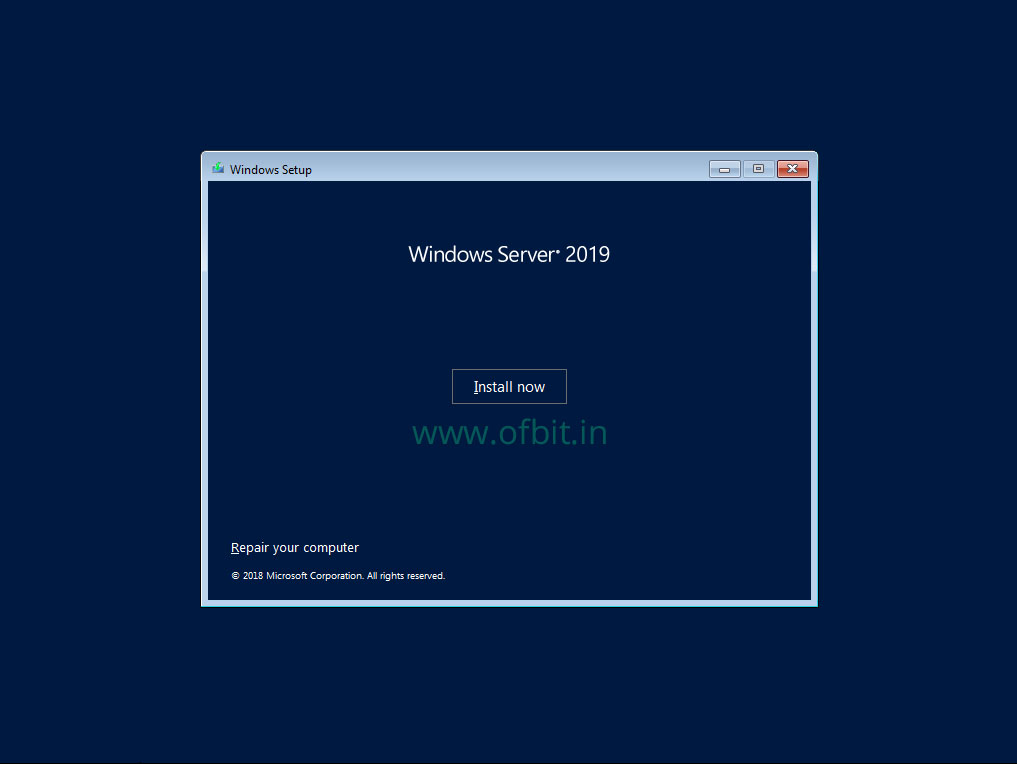
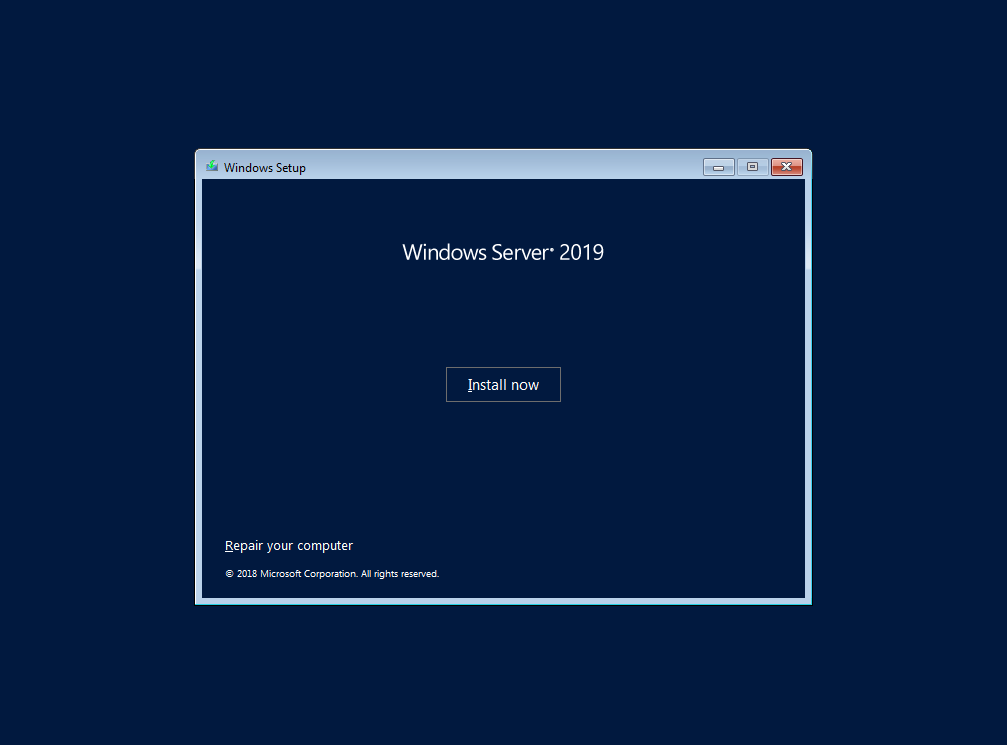
Нажимаем на кнопку “Install now”.
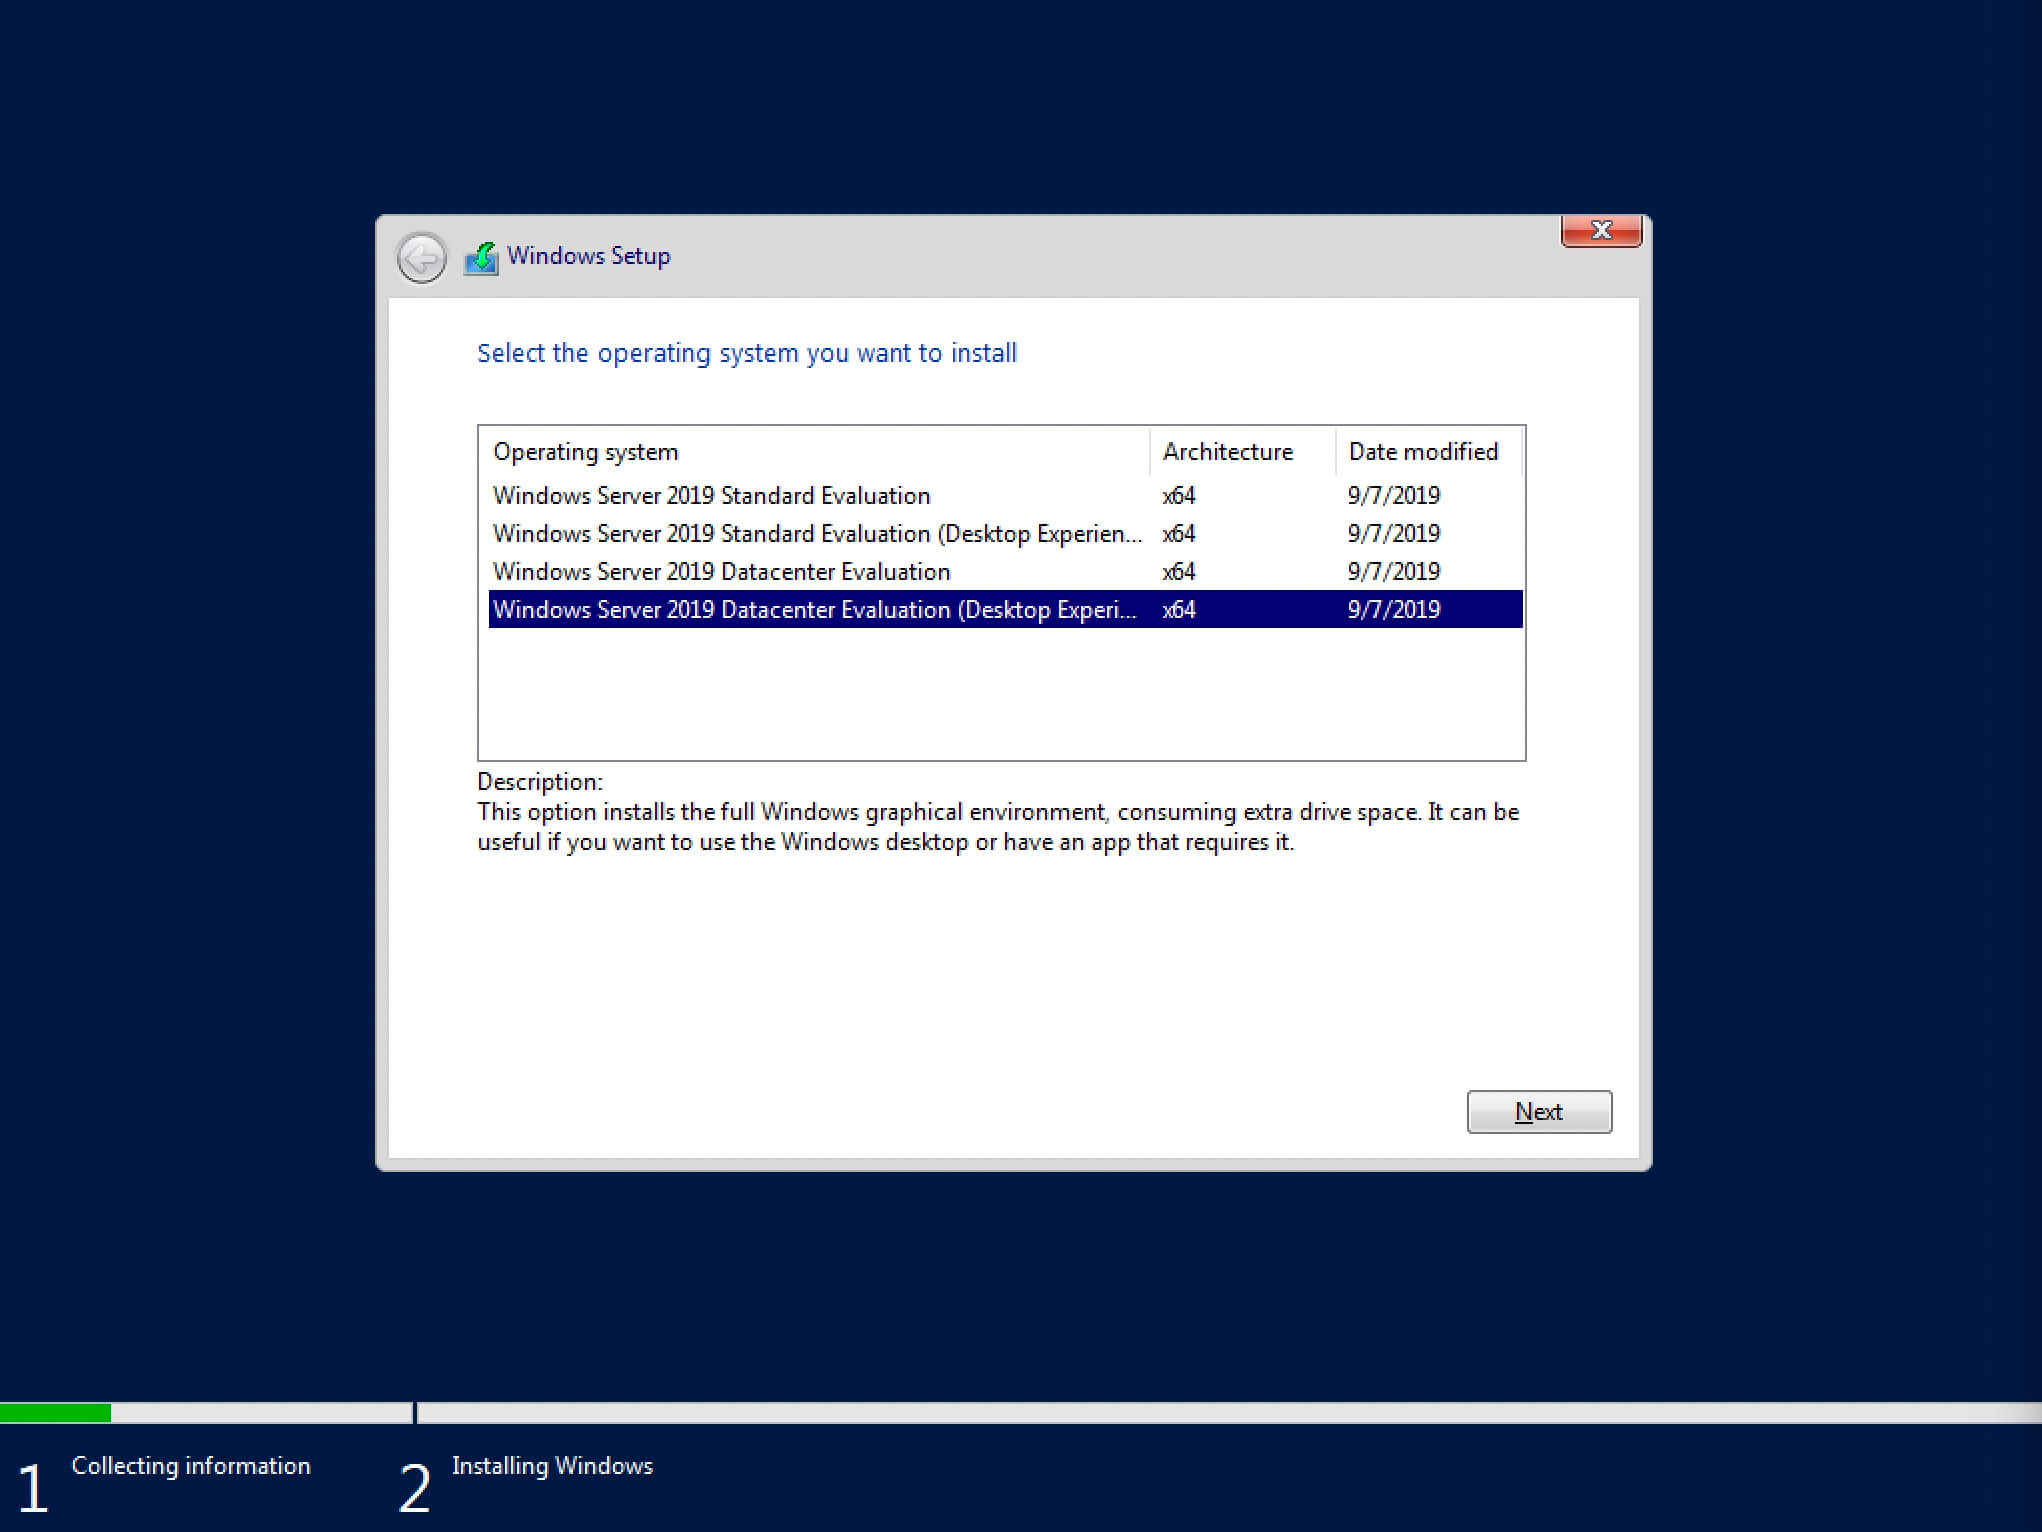
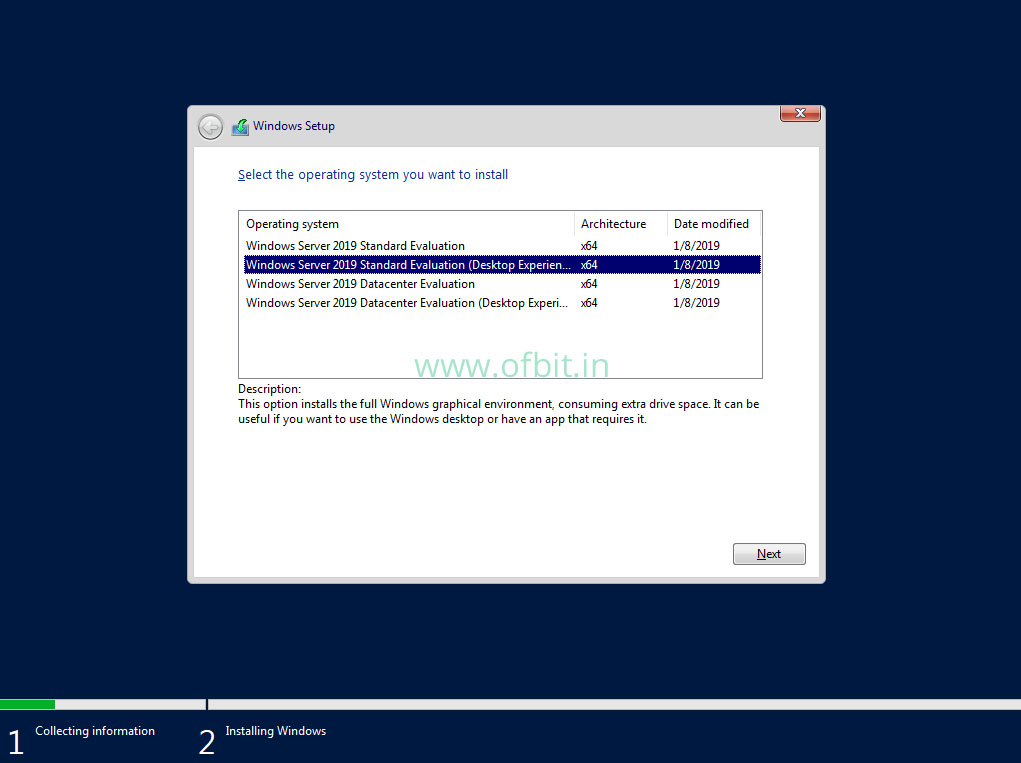
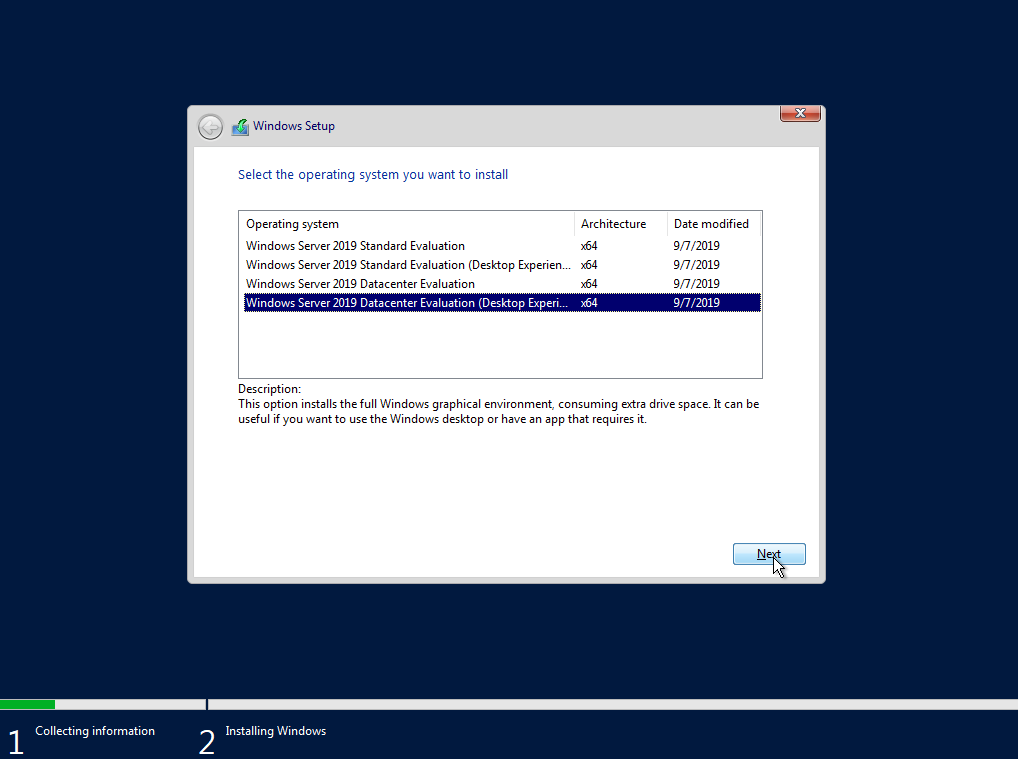
Обратите внимание, если вам необходимо установить Windows Server 2019 в режиме Server Core (без GUI), то вам нужно выбрать “Windows Server 2019 Standard Evaluation” или “Windows Server 2019 Datacenter Evaluation”.
В данном примере рассматривается установка Windows Server 2019 Datacenter Evaluation (Desktop Experience).
Выбираем “Windows Server 2019 Datacenter Evaluation (Desktop Experience)” и нажимаем “Next”.
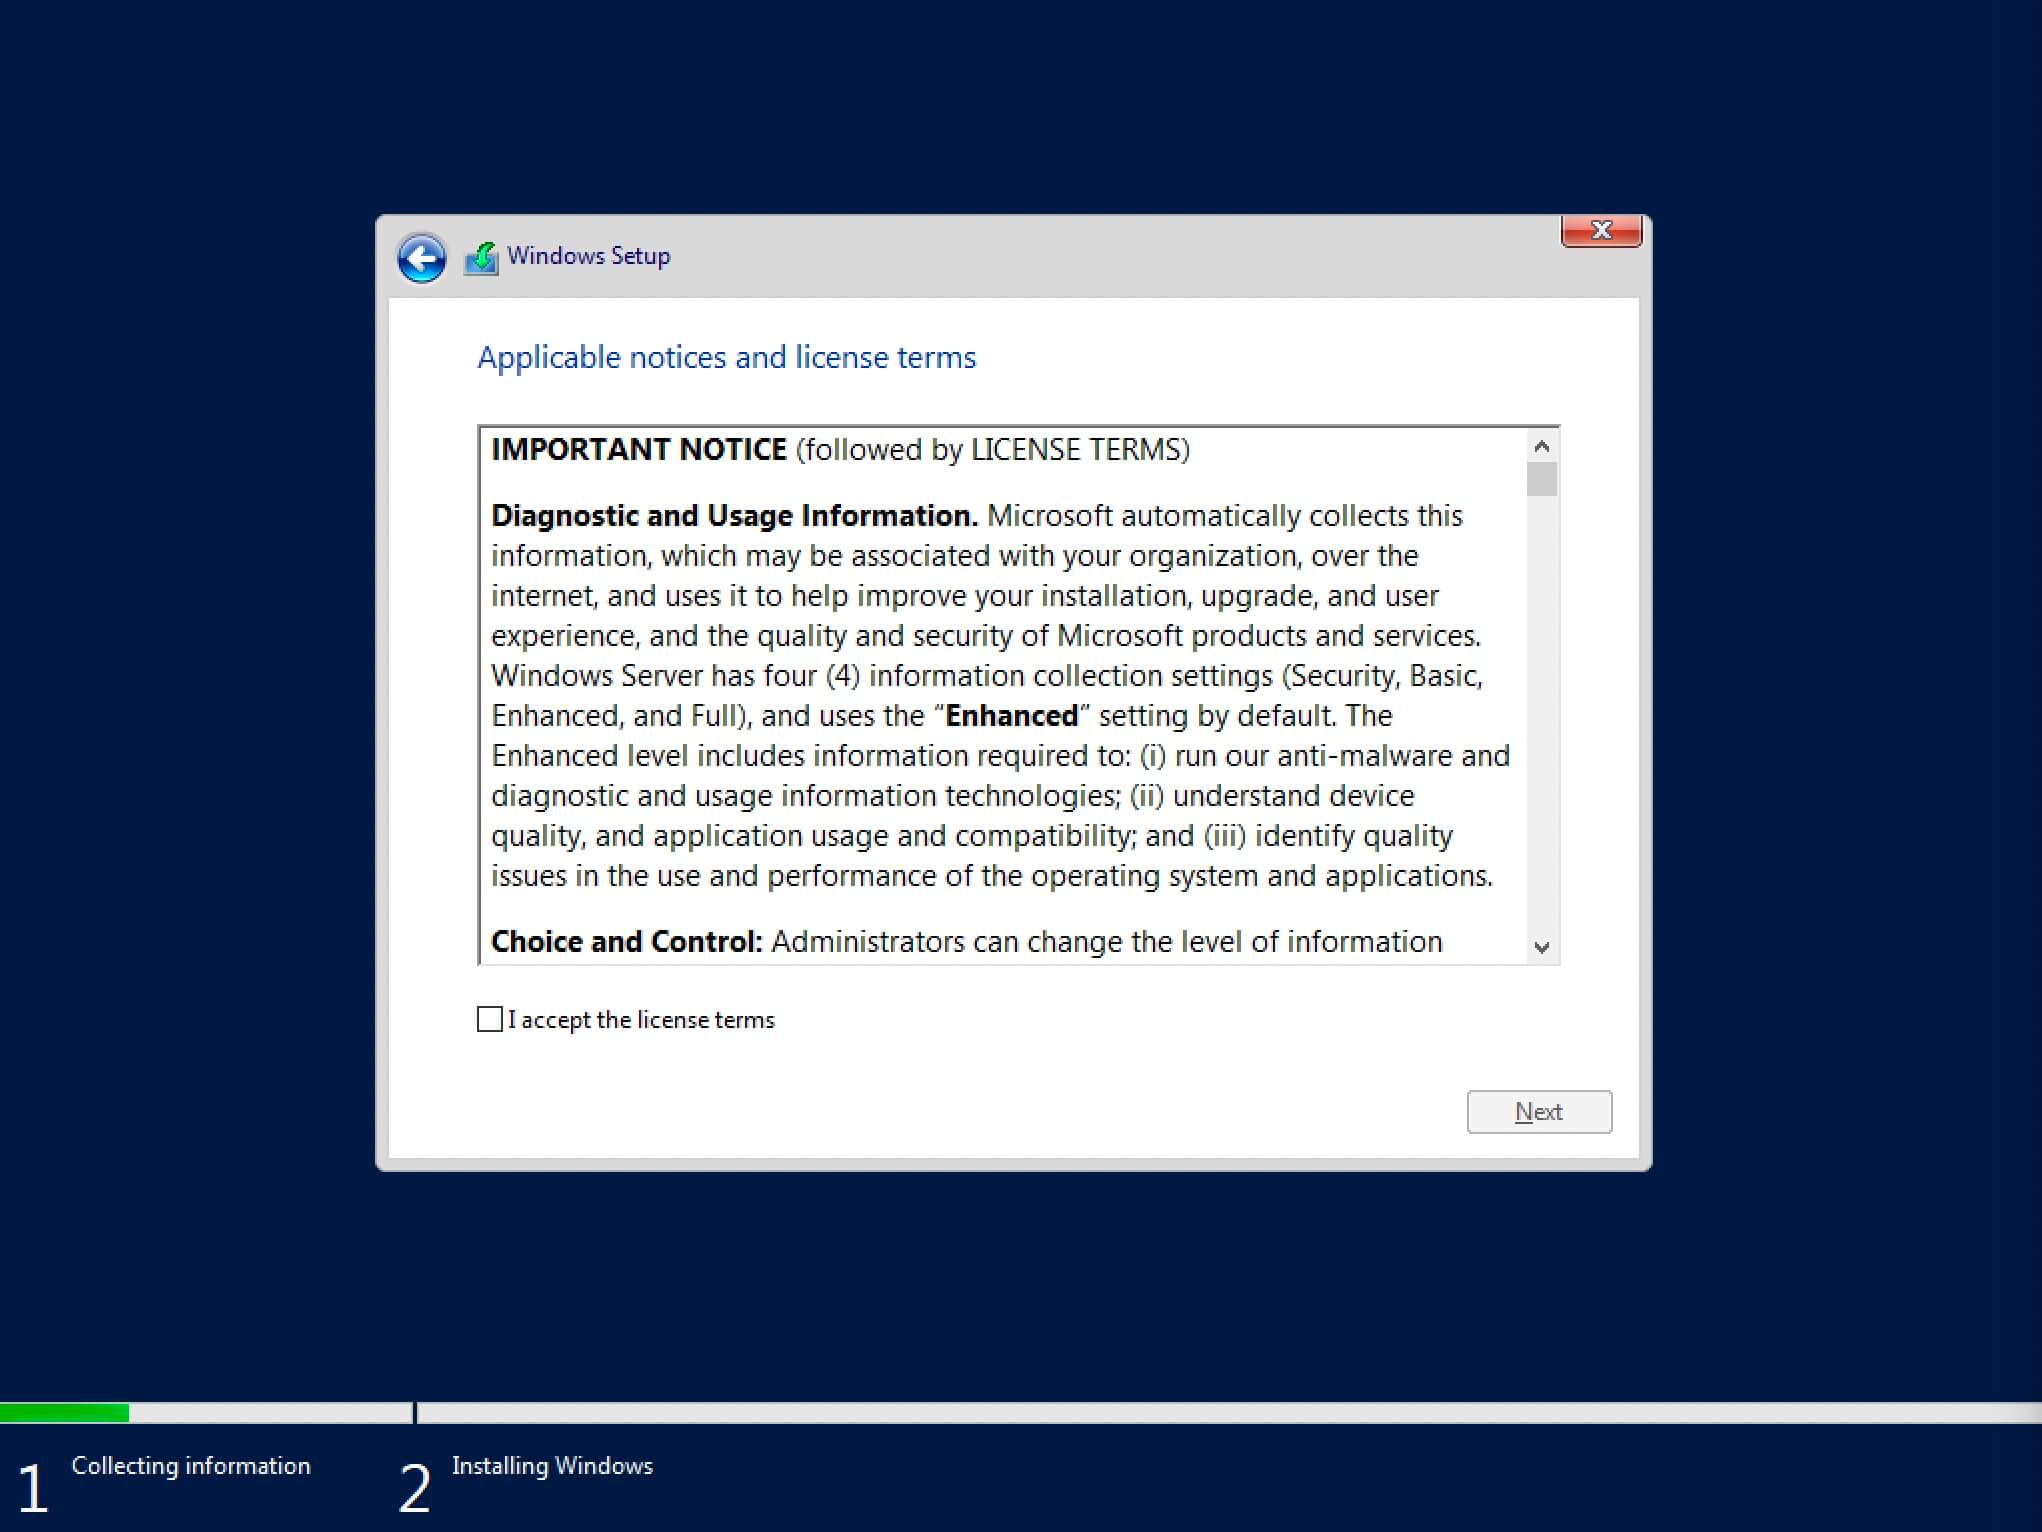
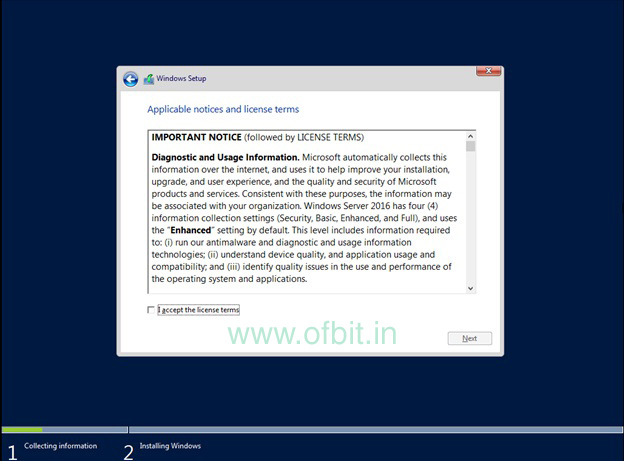
Теперь необходимо принять условия лицензии.
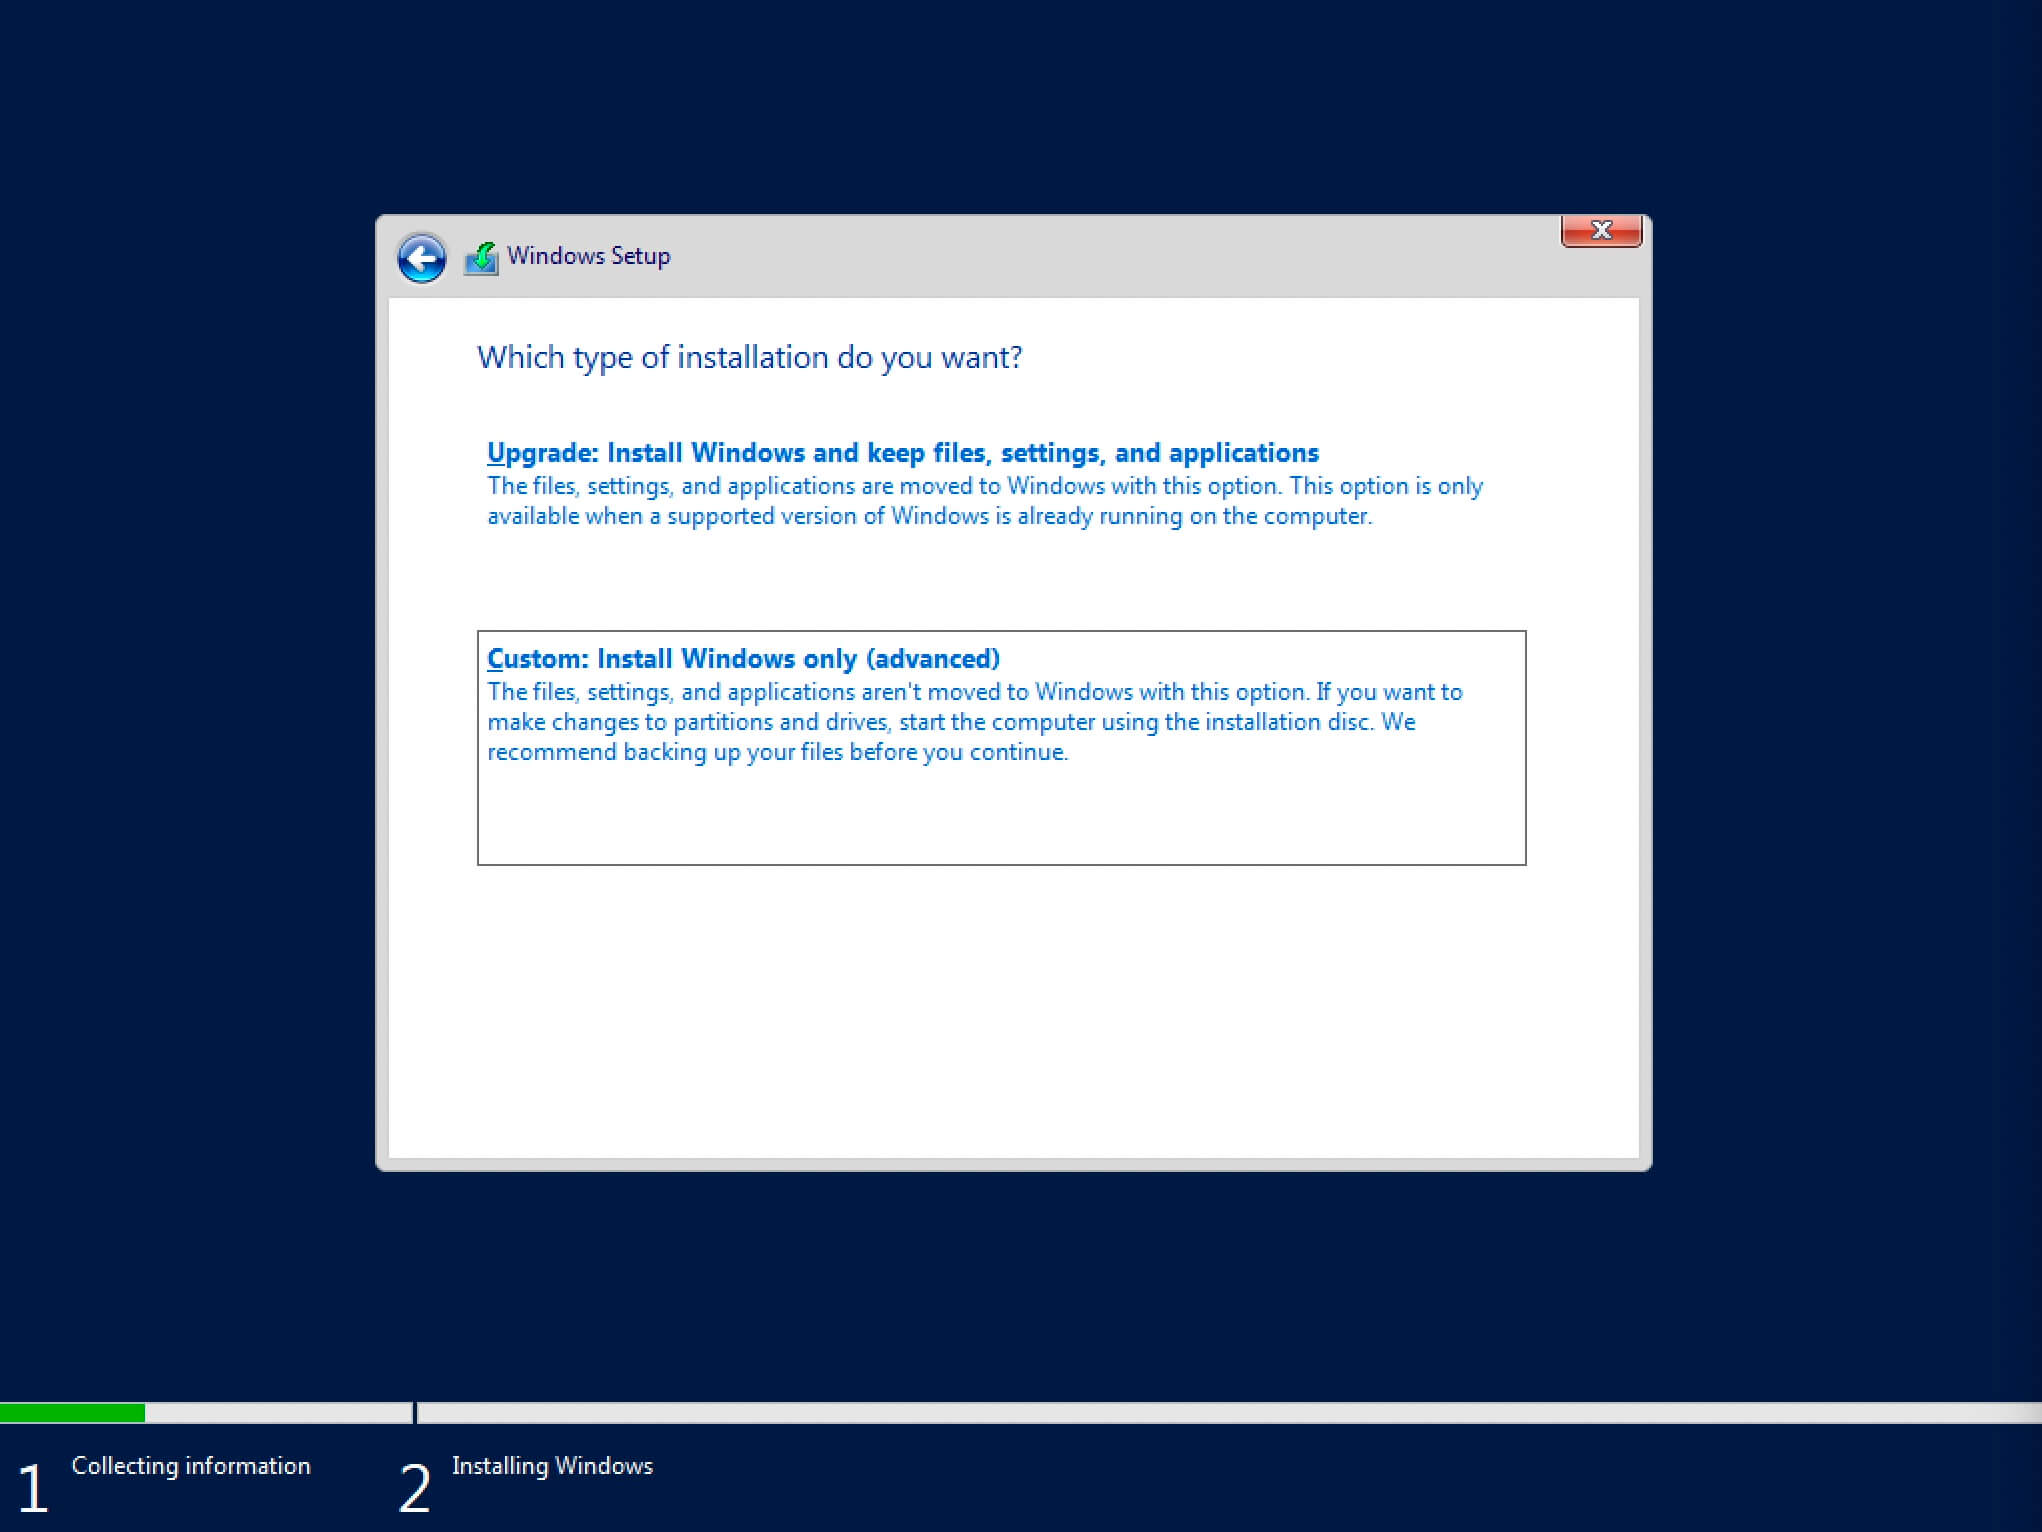
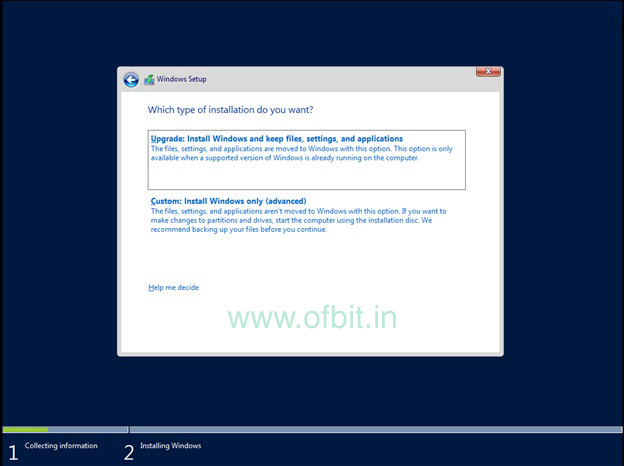
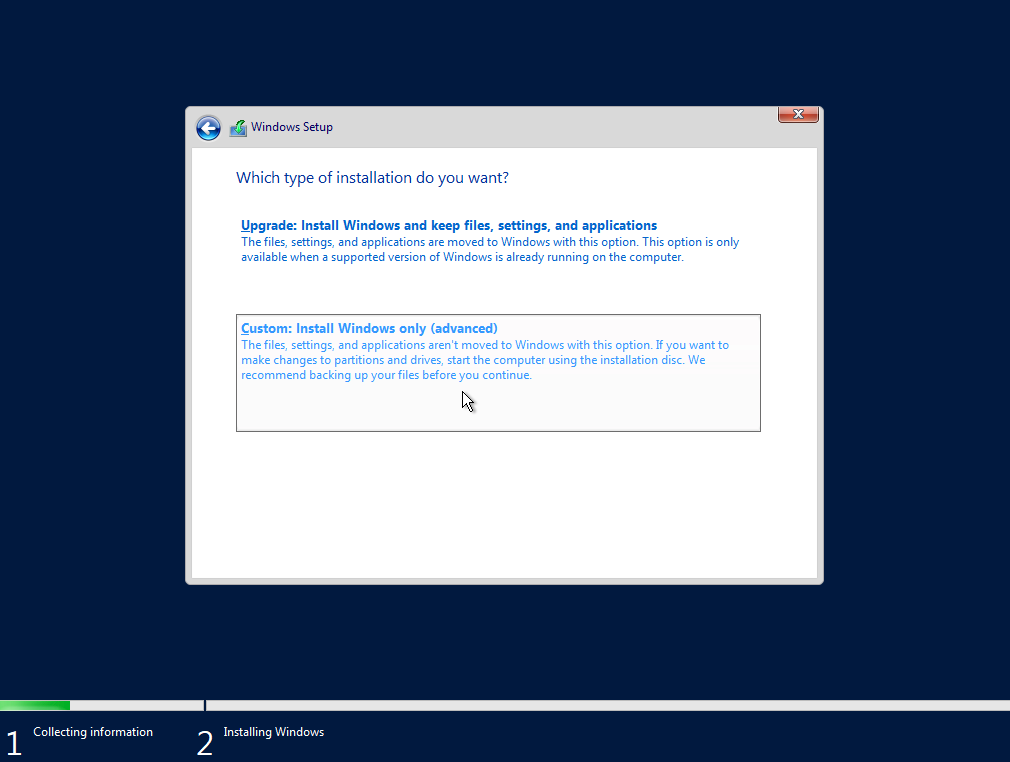
На этом шаге предлагается два варианта установки:
-
“Upgrade”. Это не самый лучший вариант. Как показывает практика, многочисленные программы могут быть не совместимы с новой операционной системой, и после обновления вы не сможете с ними работать, кроме того есть вероятность перетащить проблемы со старой операционной системы в новую, таким, образом потеряв всякую стабильность.
-
“Custom”. Это лучший вариант для установки любой версии операционной системы Windows. Он позволяет начать работу с системой “с чистого листа”, таким образом, после установки вы получите максимальное быстродействие и стабильность. Останется только установить драйвера и привычное для работы программное обеспечение.
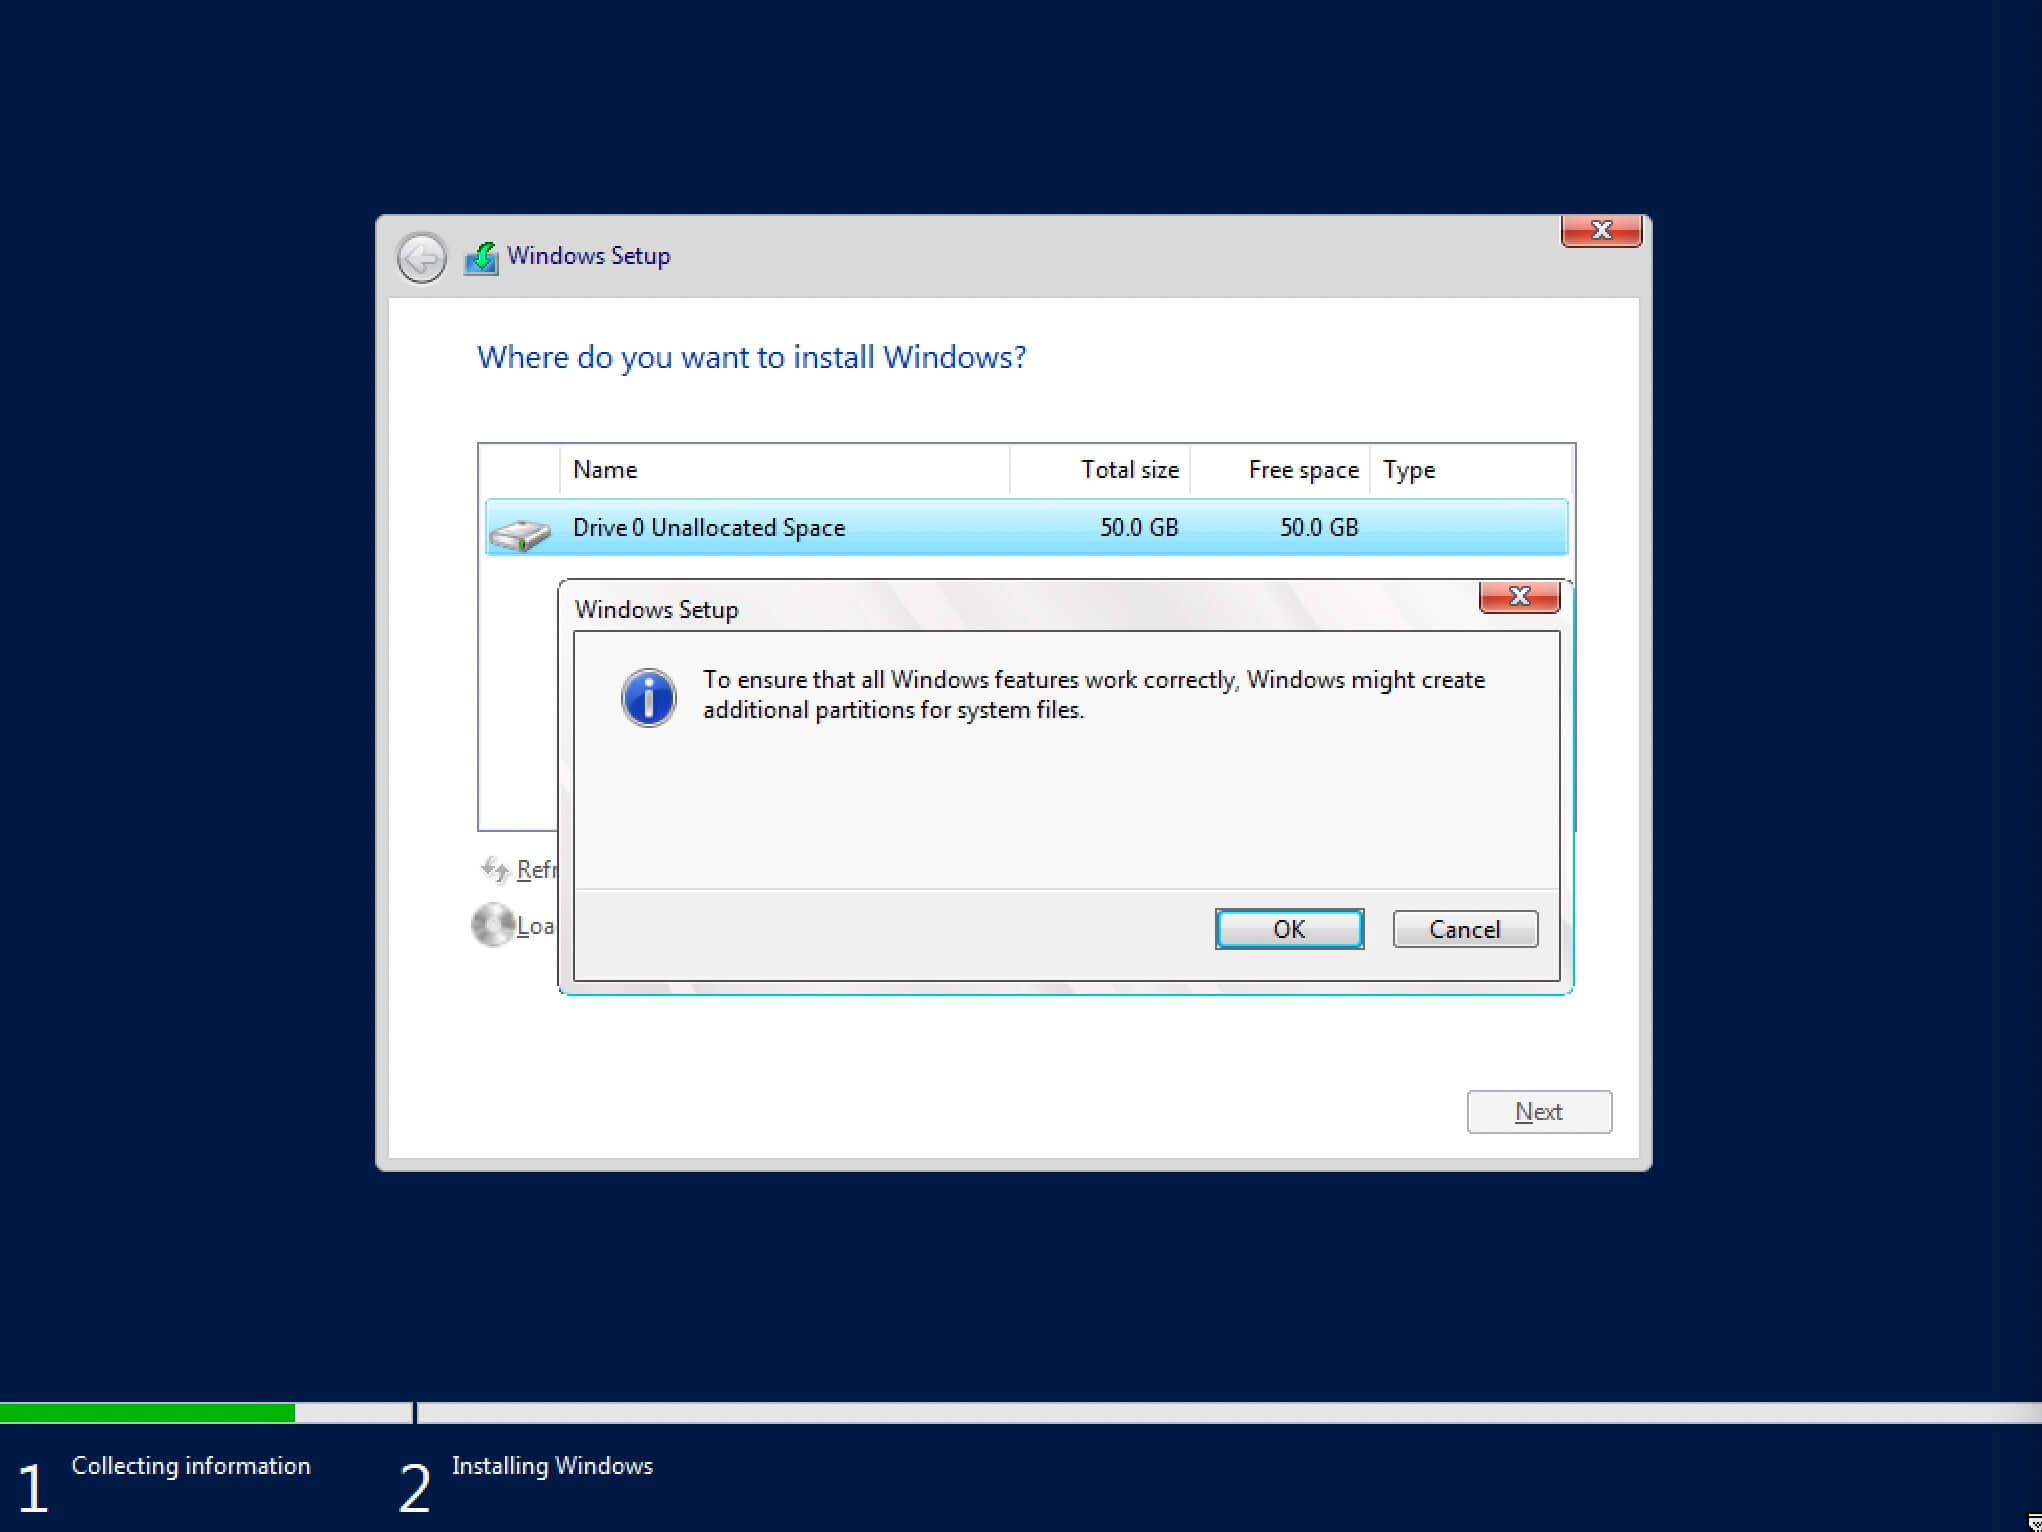
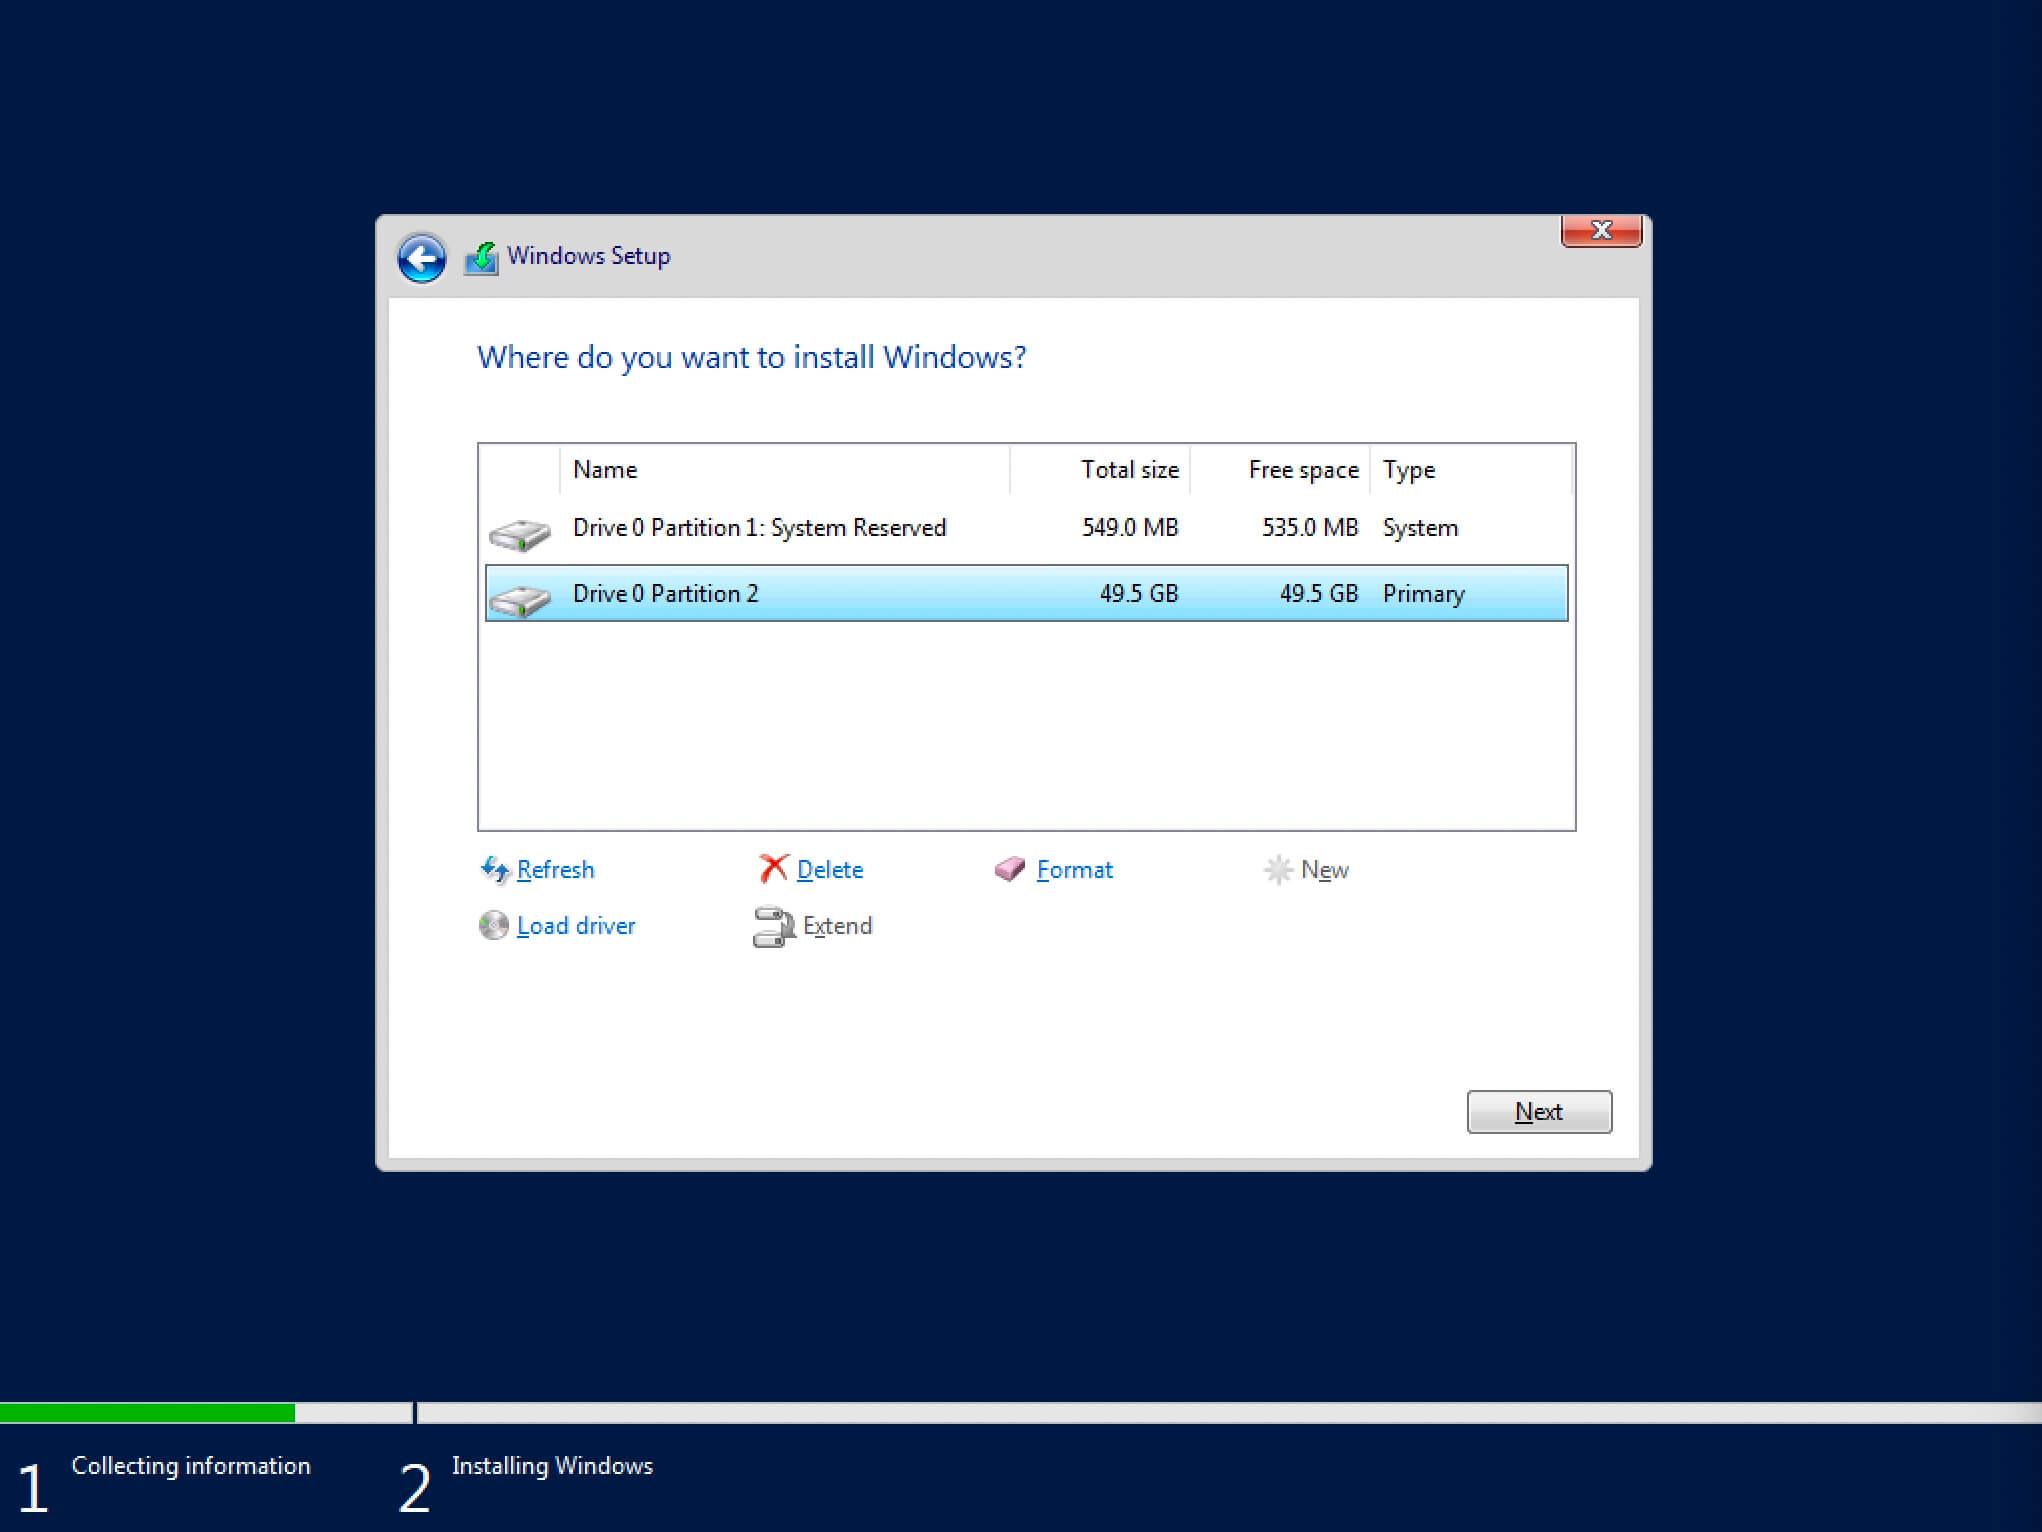
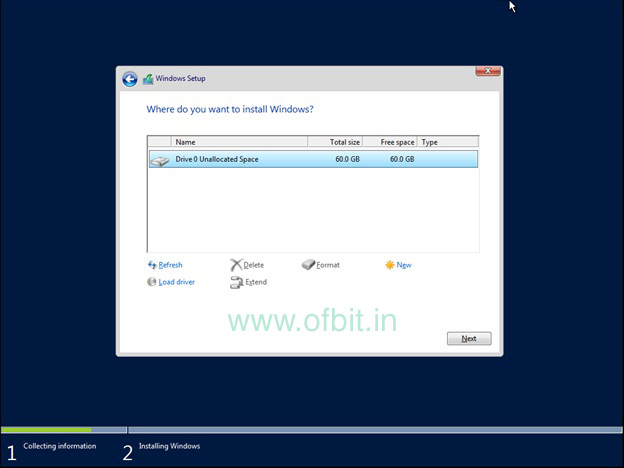
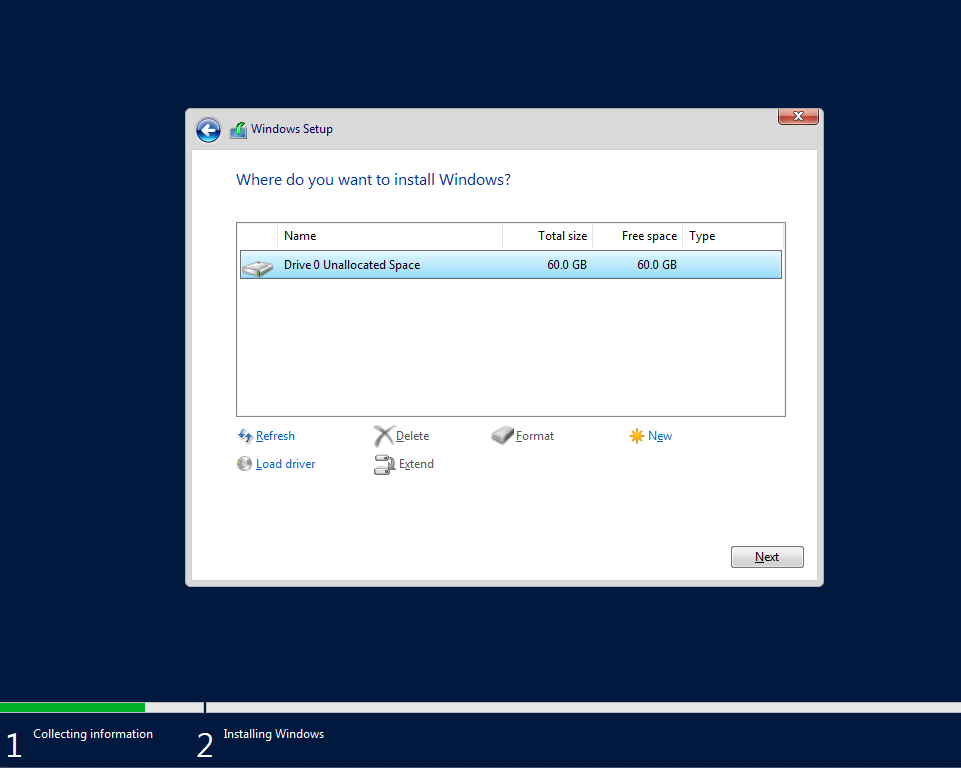
Теперь необходимо выбрать на какой диск будет установлена новая операционная система и выделить место для установки.
В случае если у вас установлено более одного диска или на диске уже имеется несколько разделов, все это будет отображаться на данном этапе. Необходимо соблюдать осторожность и заранее понимать, на какой раздел вы хотите установить операционную систему.
В данном примере установлен один диск объемом 50 GB.
Нажимаем на кнопку “New”.

В данном случае под систему будет выделено все свободное место на диске, поэтому оставляем значение в разделе “Size” по умолчанию.
Нажимаем на кнопку “Apply”.

Операционная система уведомляет о том, что ей может понадобиться создать дополнительные разделы на диске для хранения системных файлов.
Нажимаем на кнопку “OK”.
Таким образом, под операционную систему было выделено все свободное место на диске, но в то же время система зарезервировала для себя небольшой раздел.
Теперь необходимо выбрать раздел, на который предполагается установить операционную систему, и нажать на кнопку “Next”.
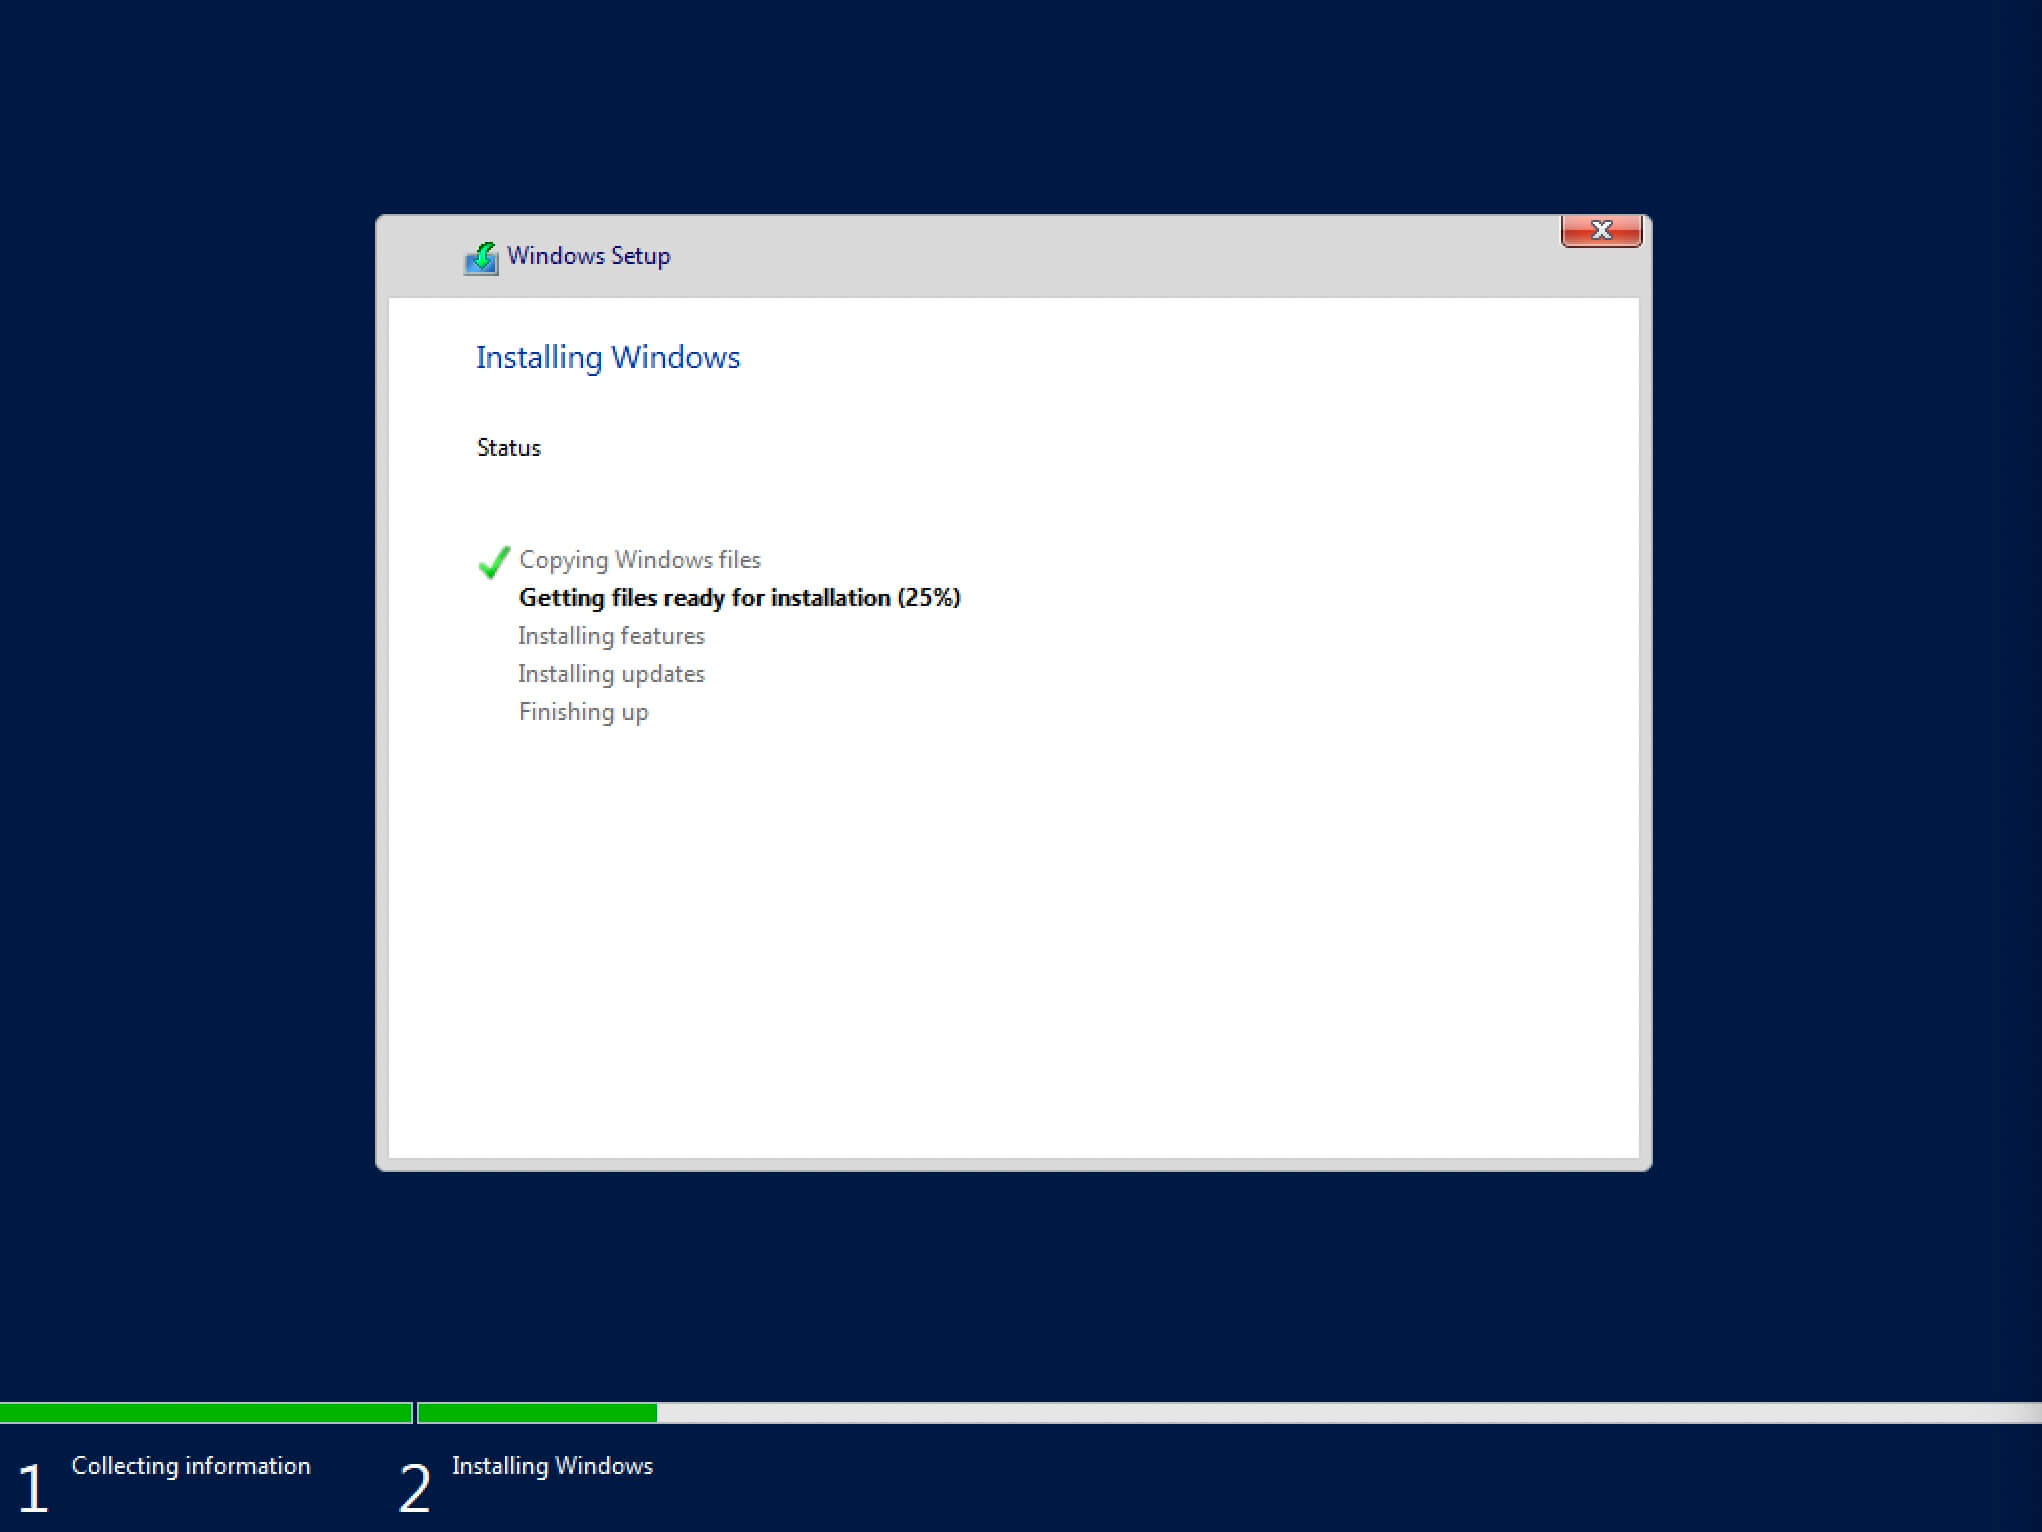
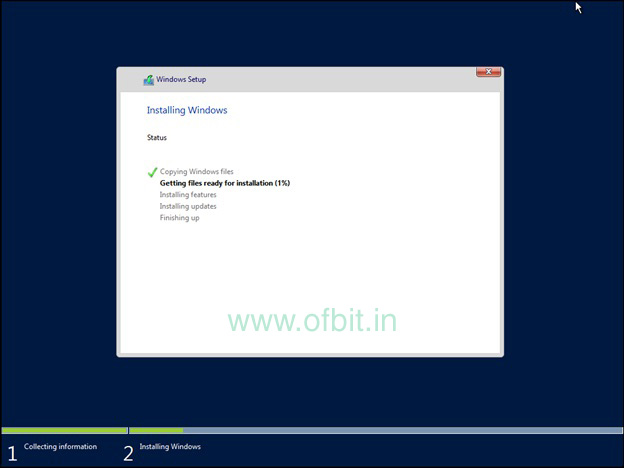
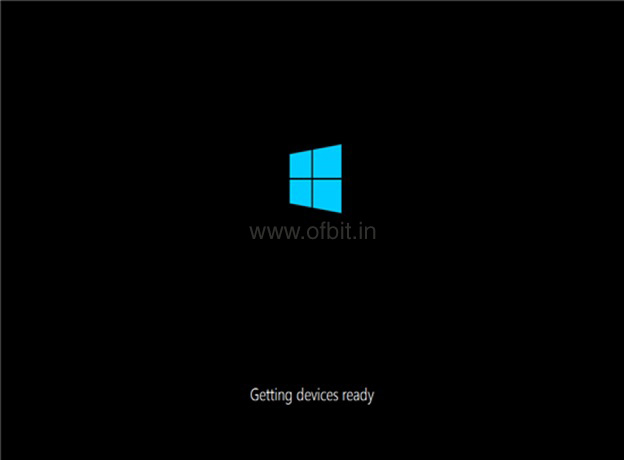
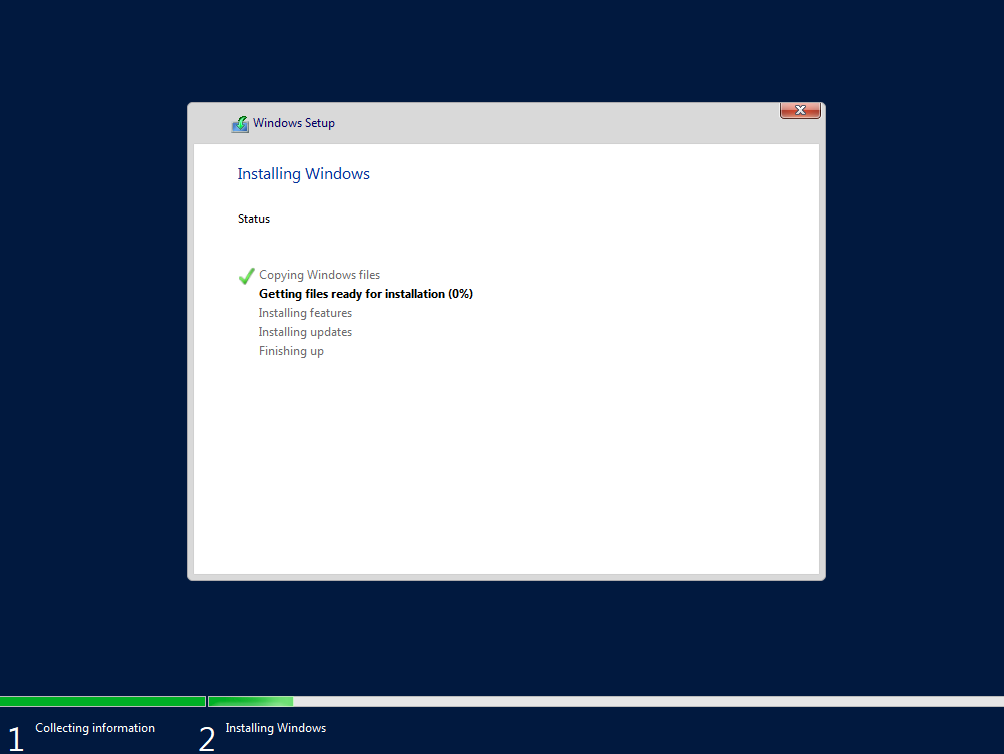
Начался процесс установки операционной системы.
Компьютер автоматически перезагрузится.

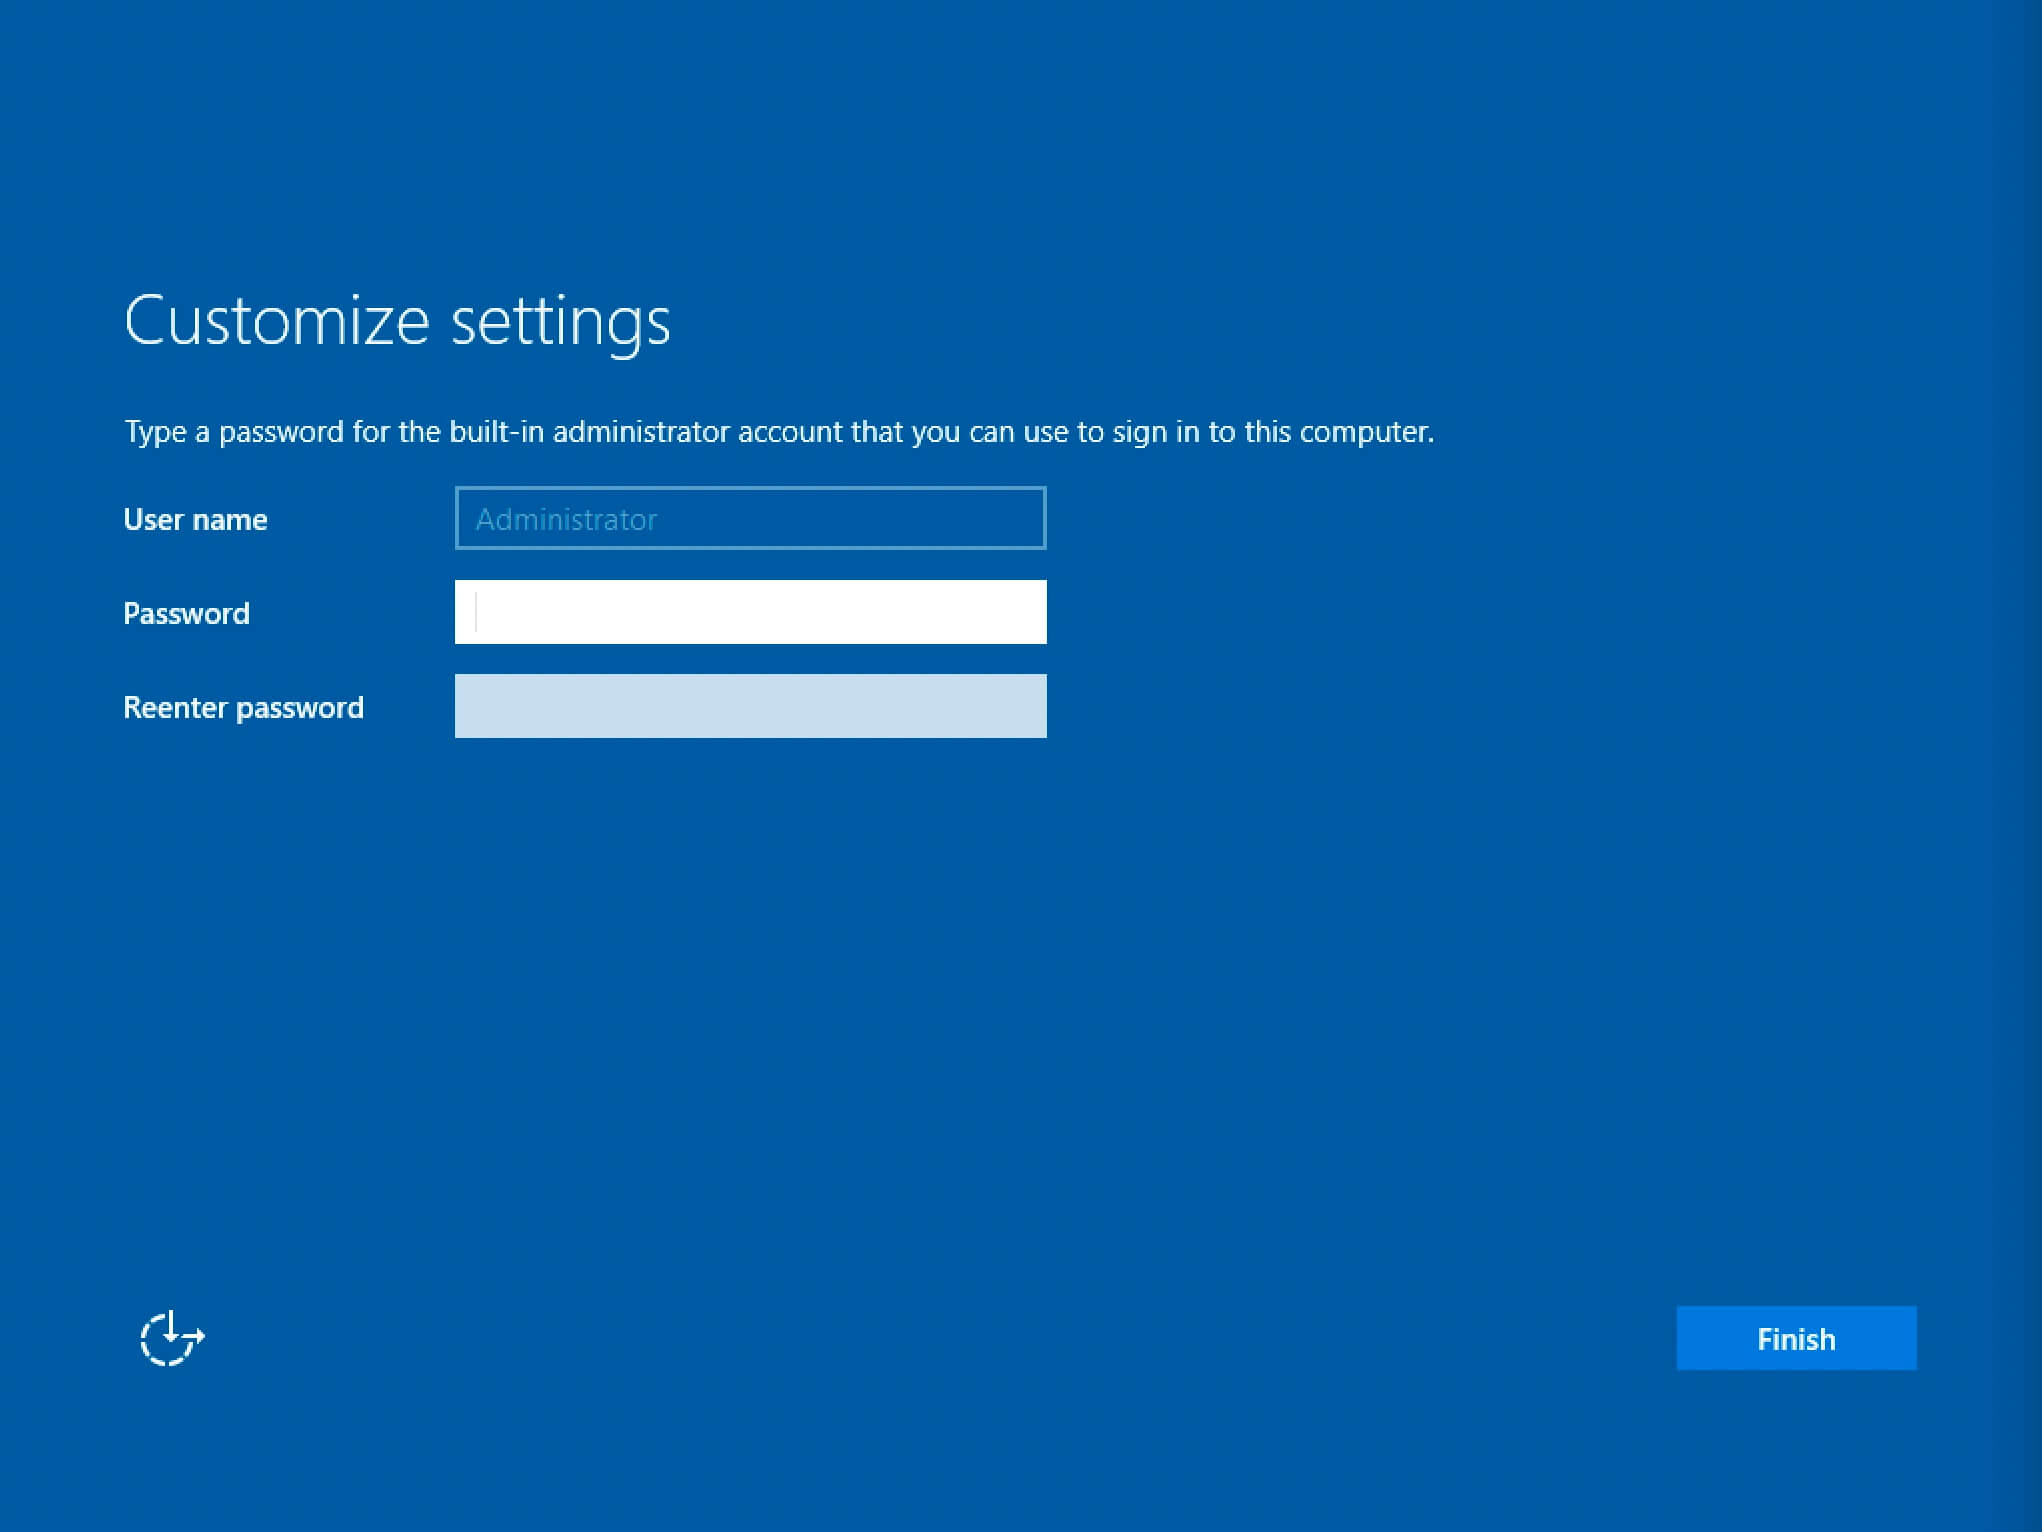
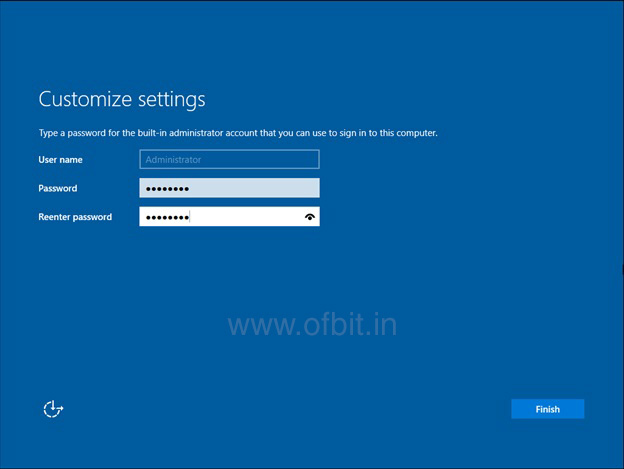
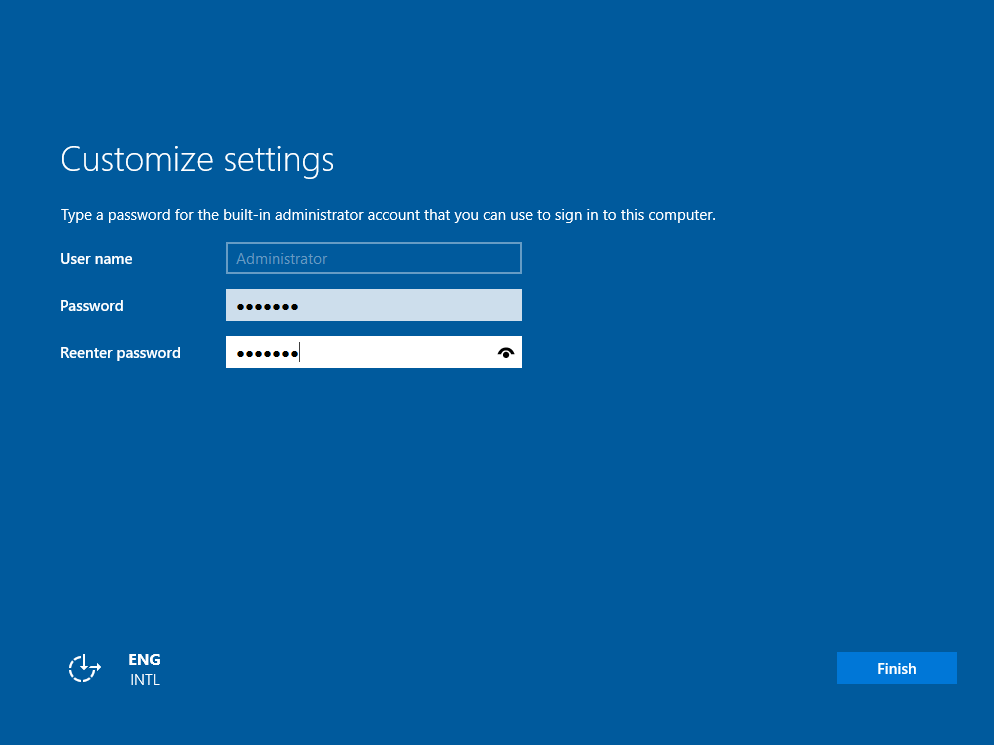
Теперь нужно указать надежный пароль для учетной записи “Administrator”.
Нажимаем на кнопку “Finish”.
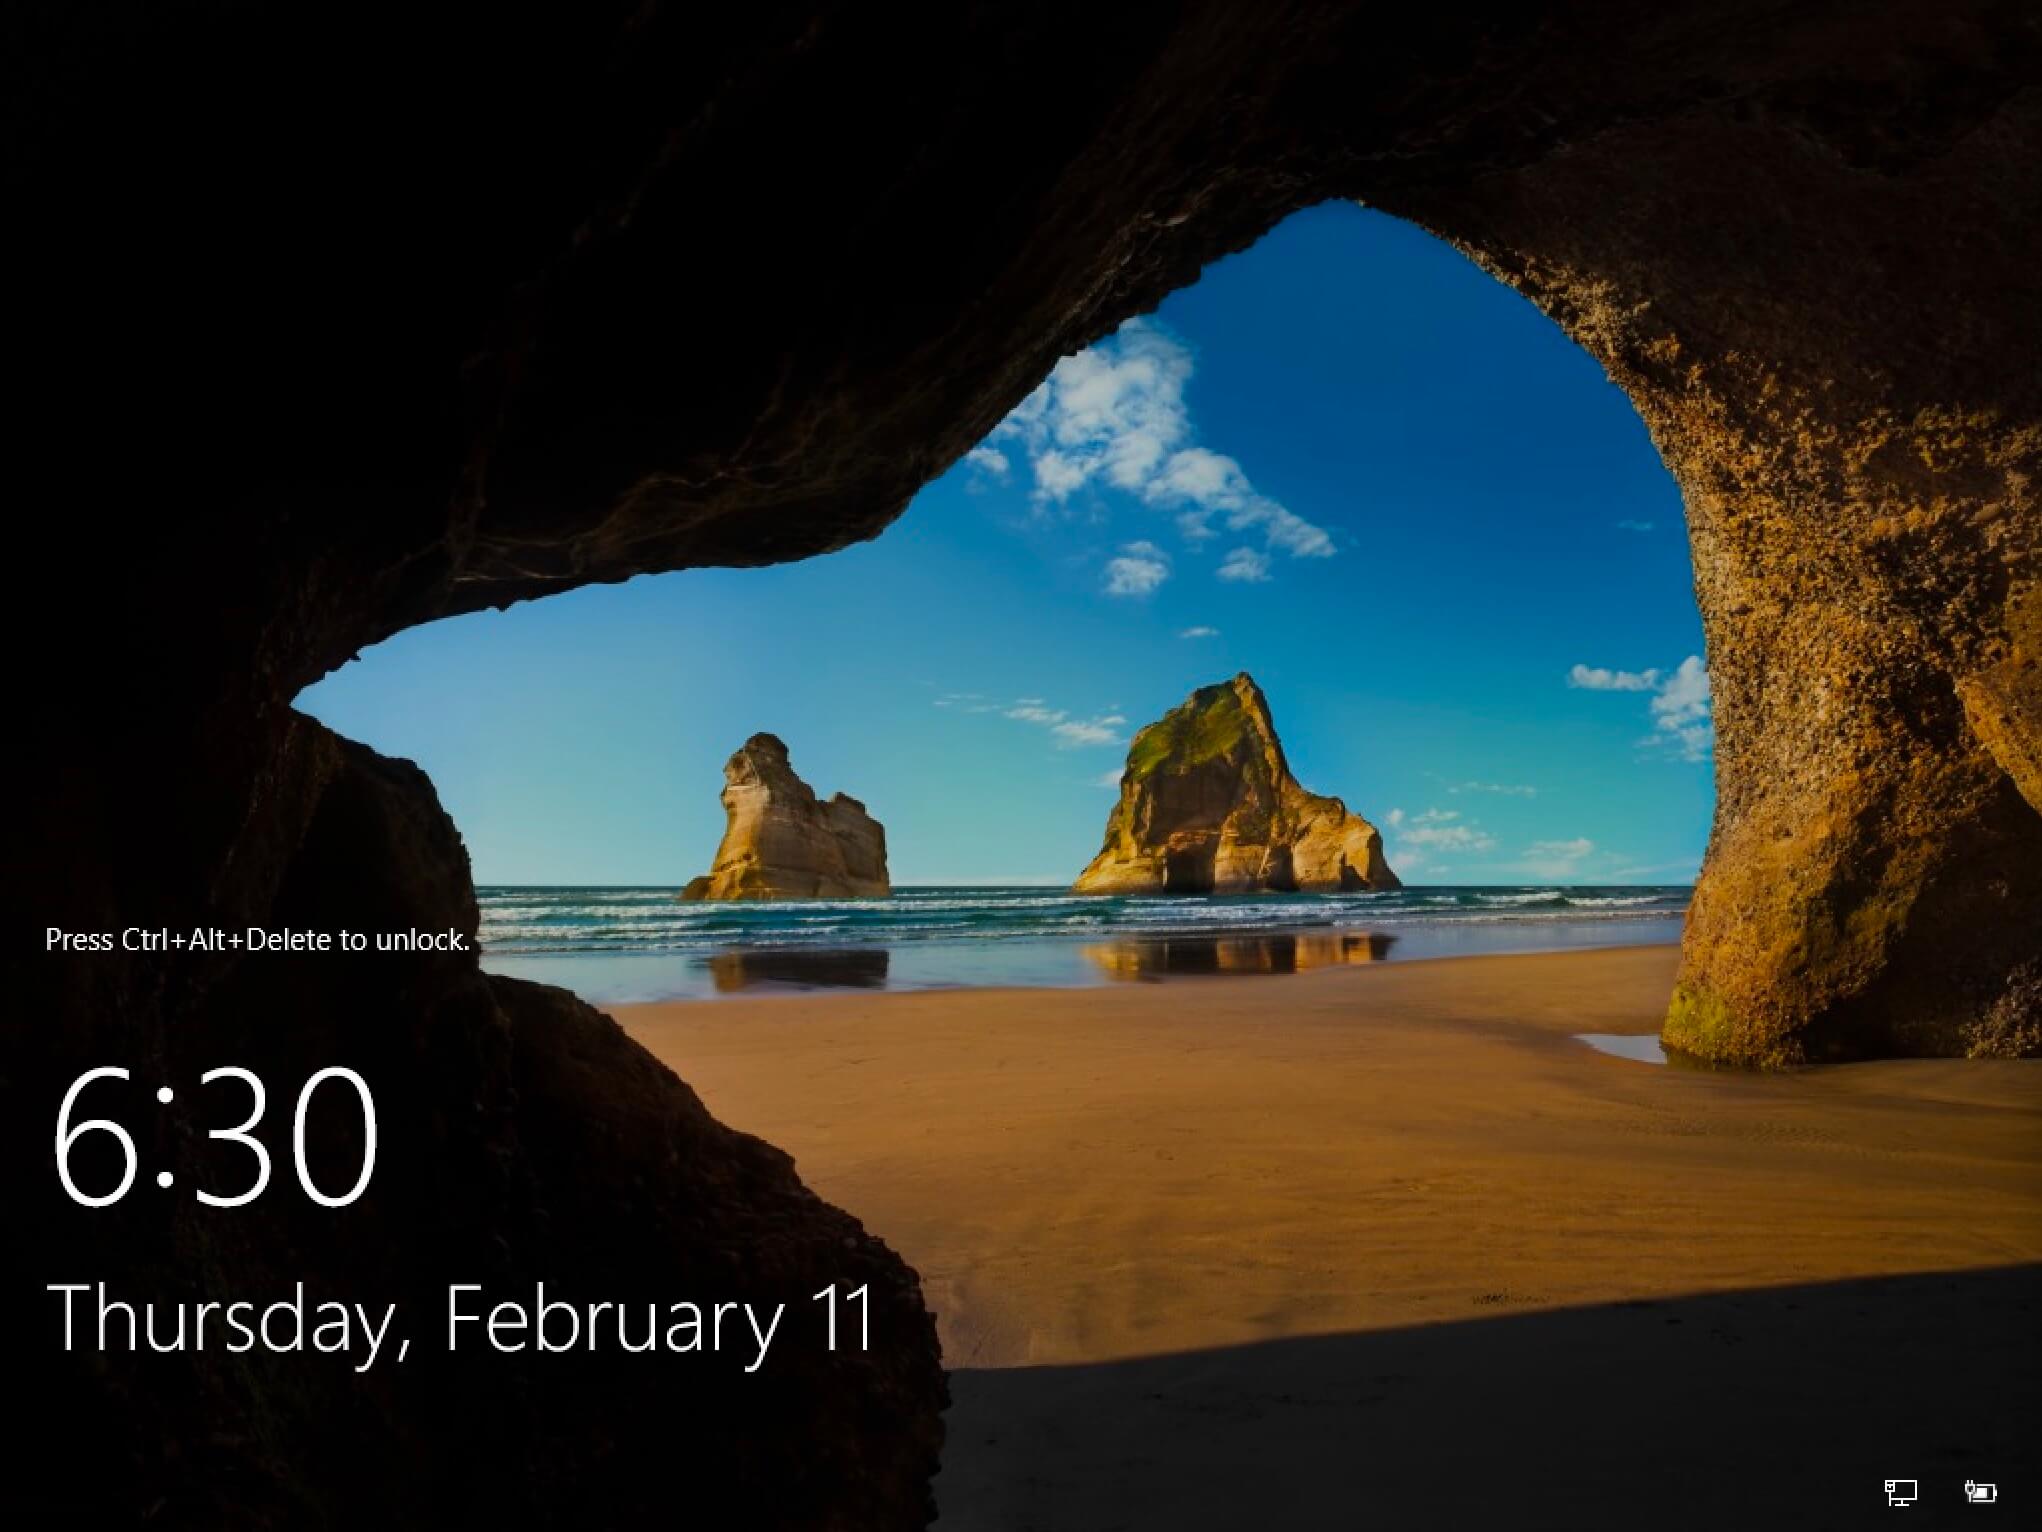
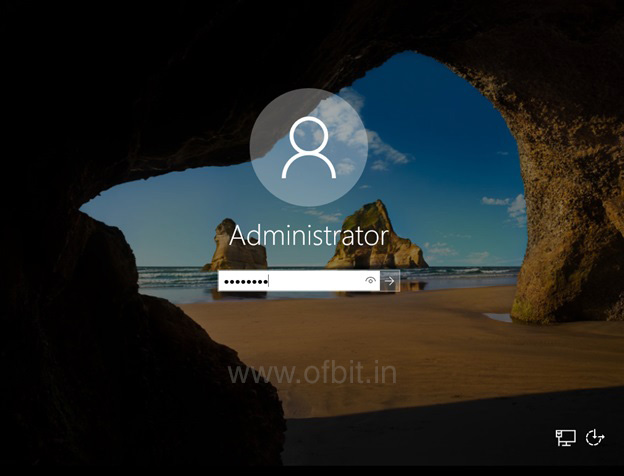
После завершения настроек, вас встретит экран блокировки Windows Server 2019.
Нажимаем “Ctrl+Alt+Delete”.
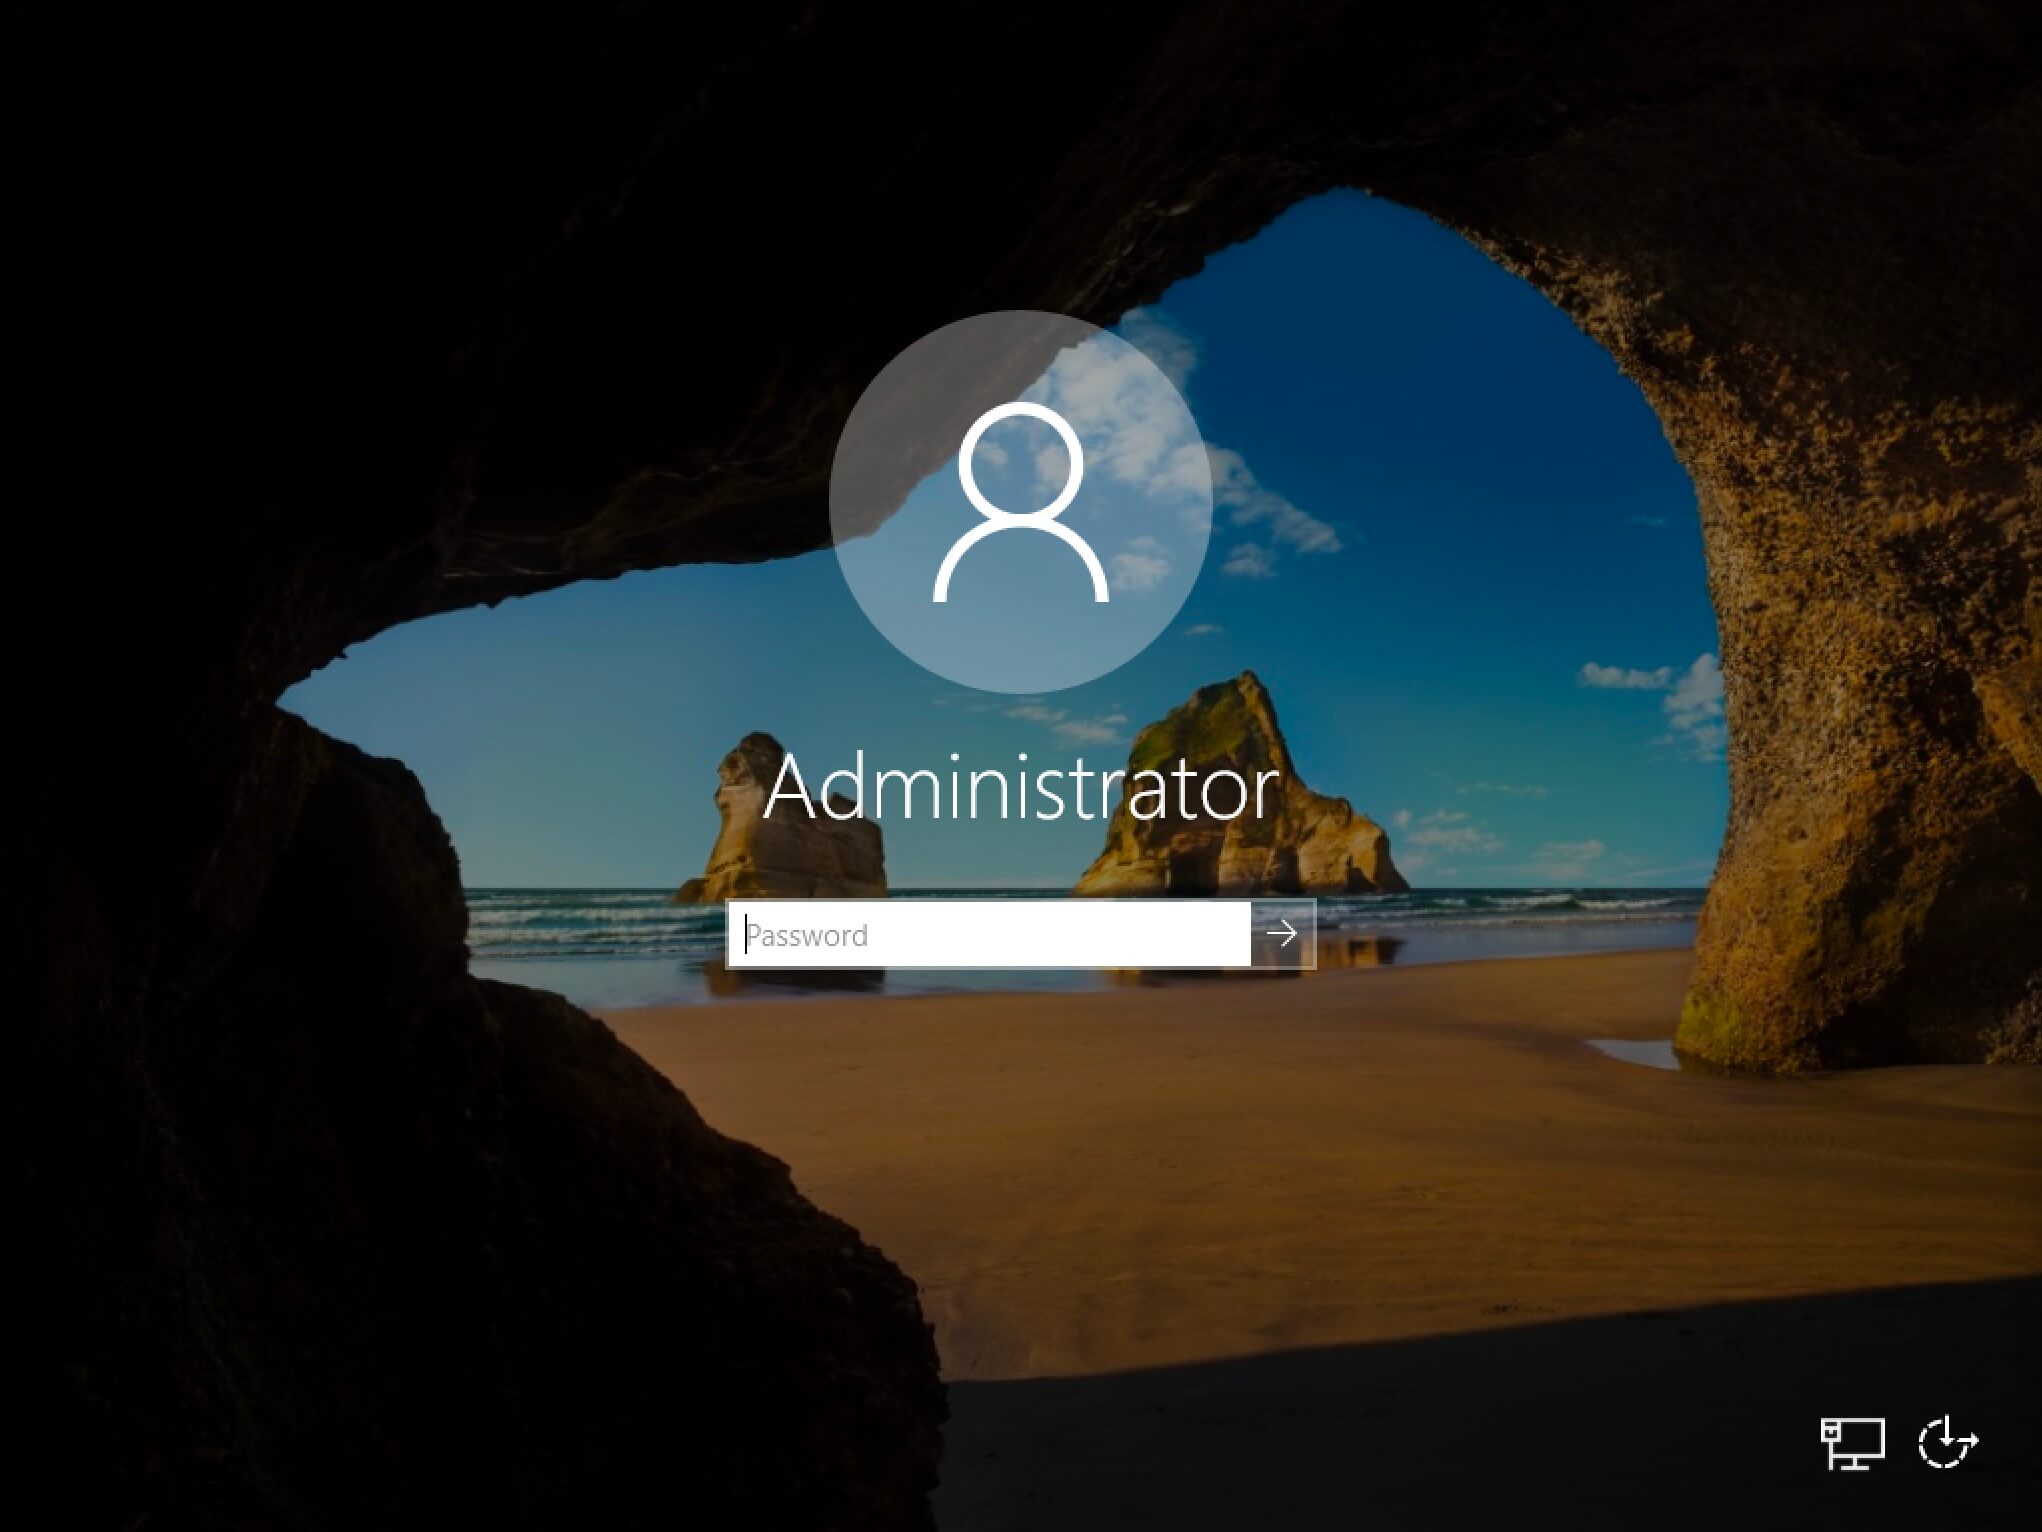
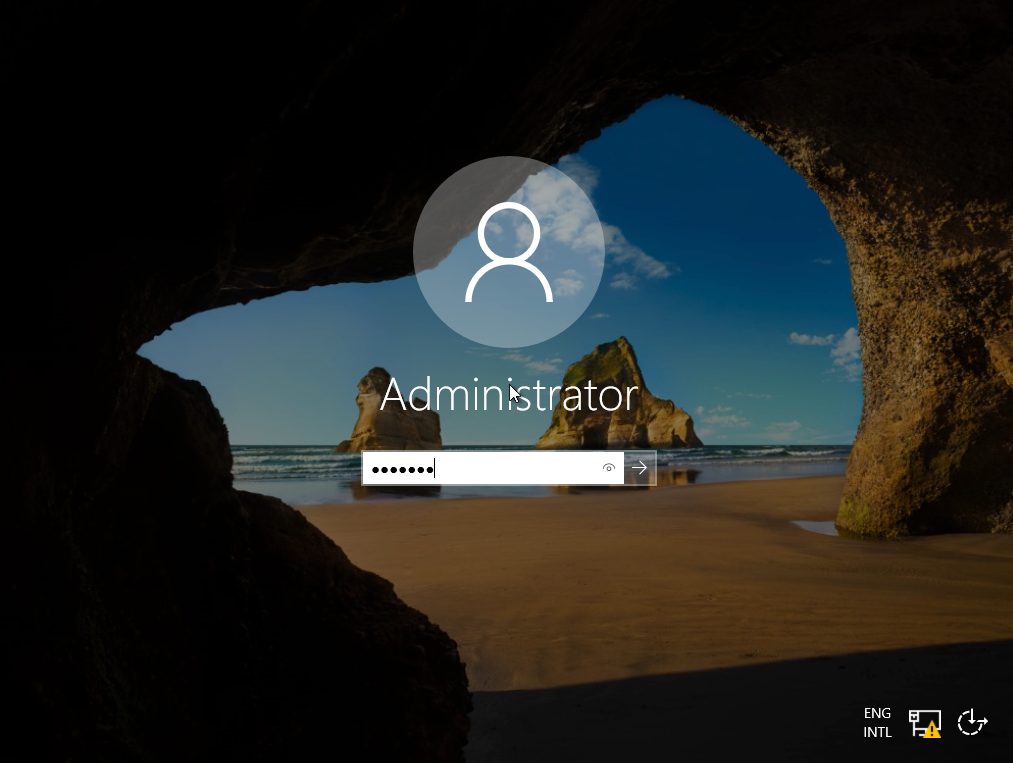
Далее необходимо войти в систему под учетной записью “Administrator”.
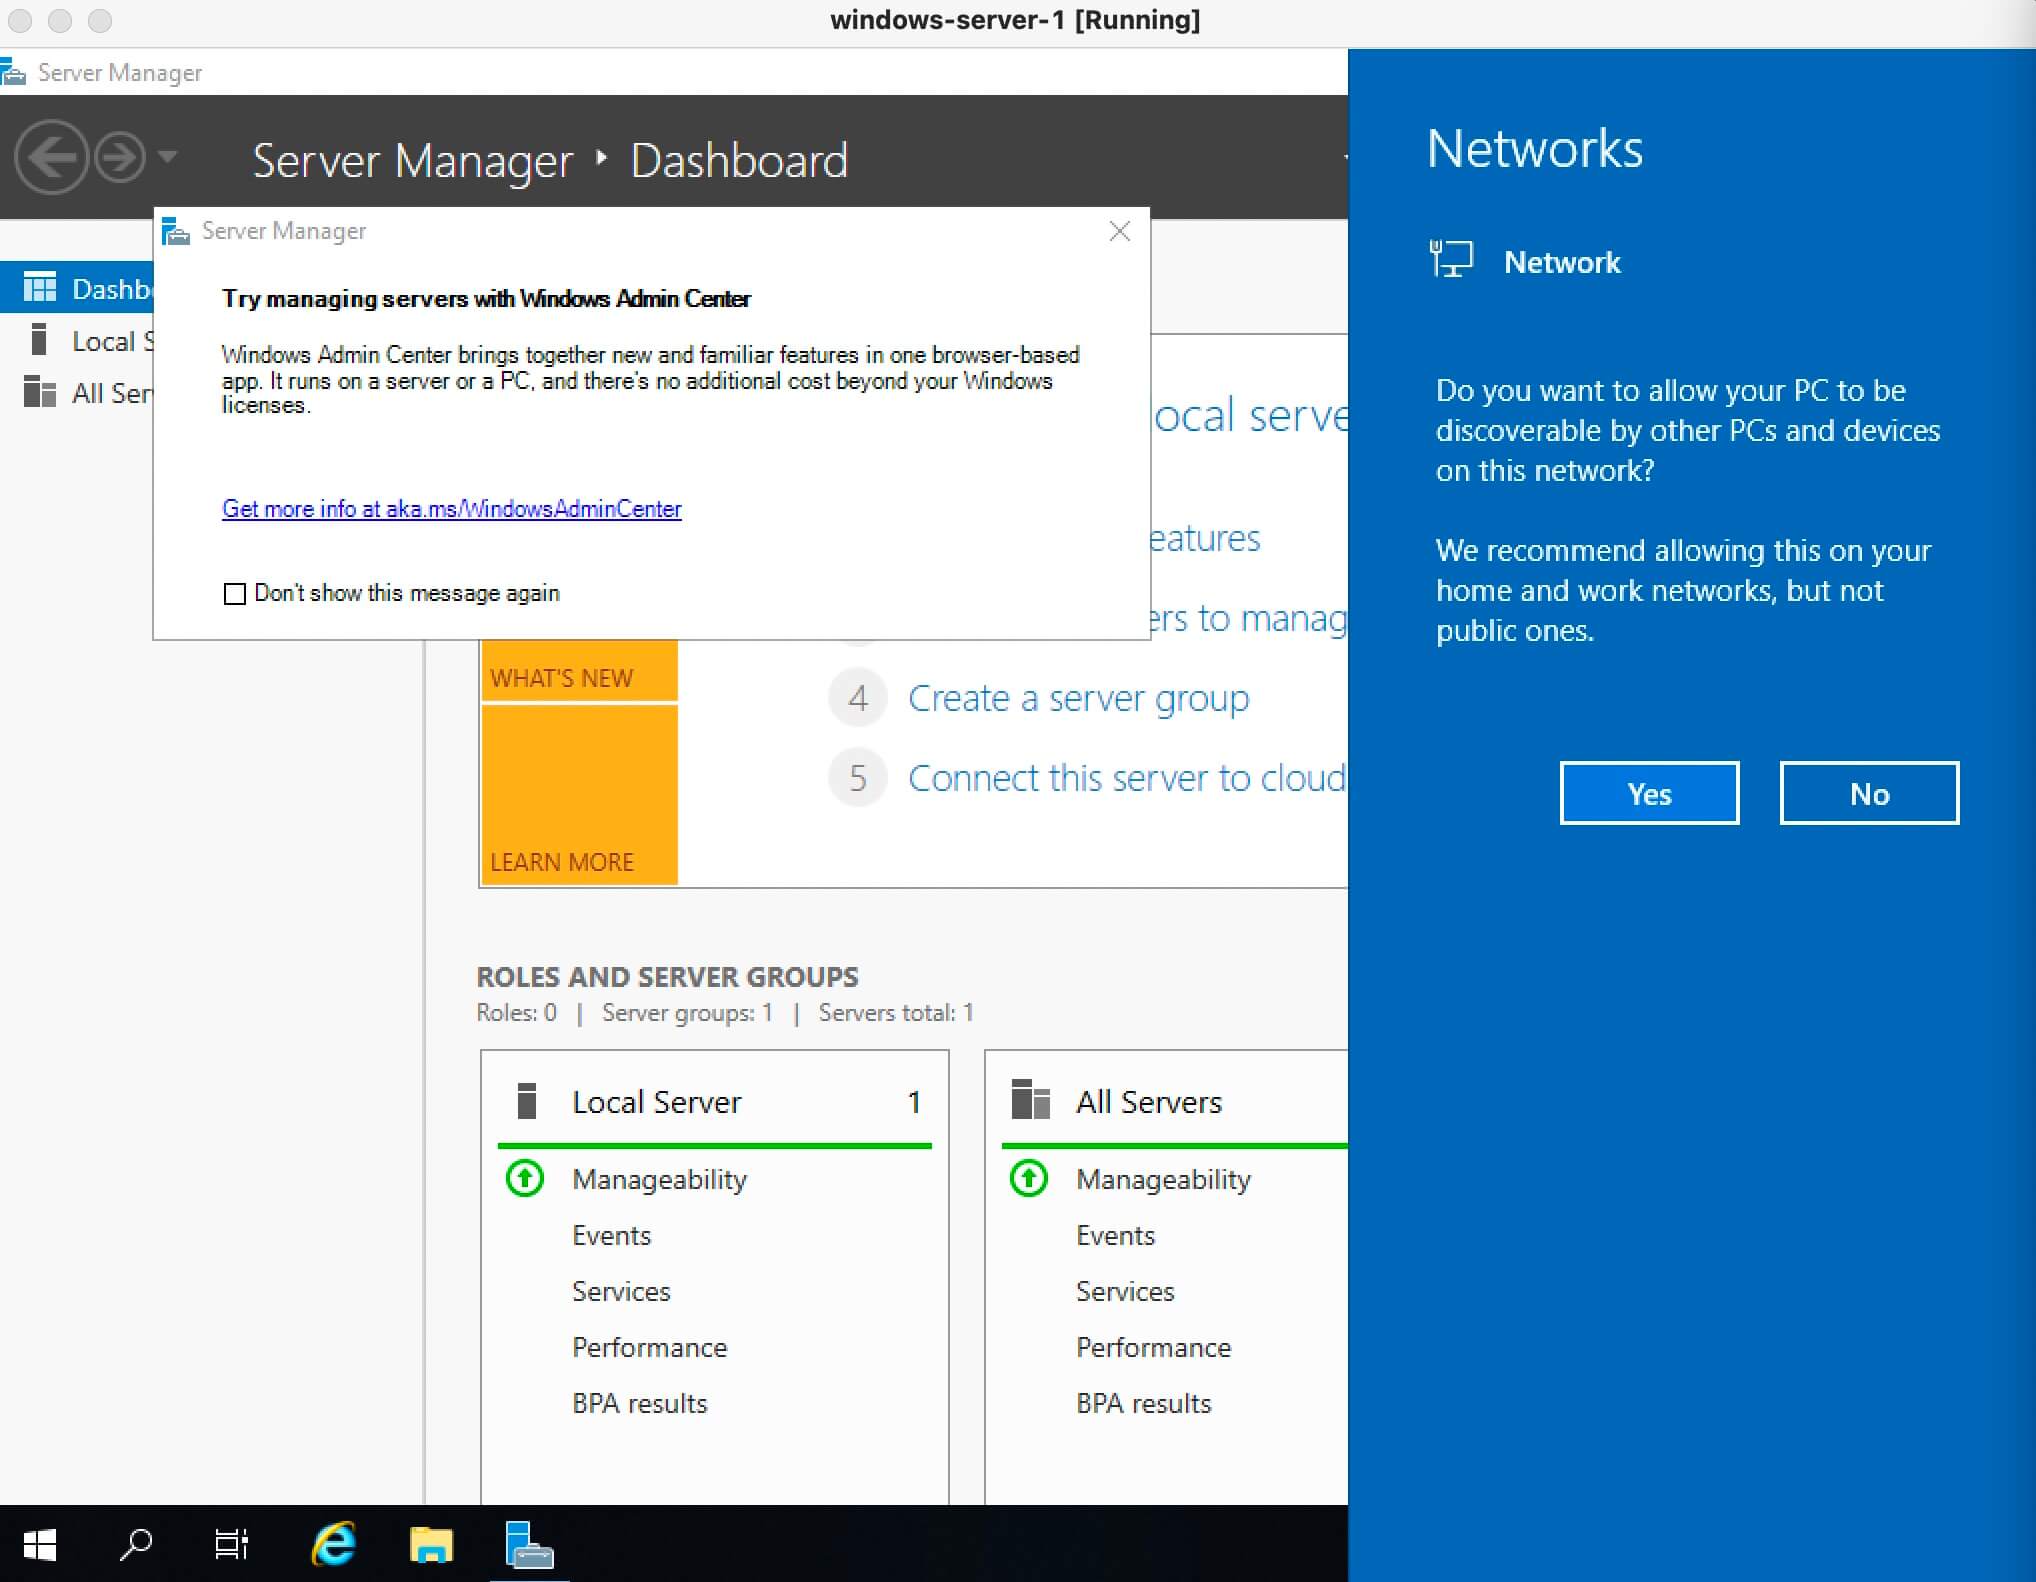
Далее будет возможность включить сетевое обнаружение, чтобы сервер был виден другим компьютерам в сети.
Обратите внимание, сетевое обнаружение не рекомендуется включать в публичных сетях.
Нажимаем на кнопку “Yes”.
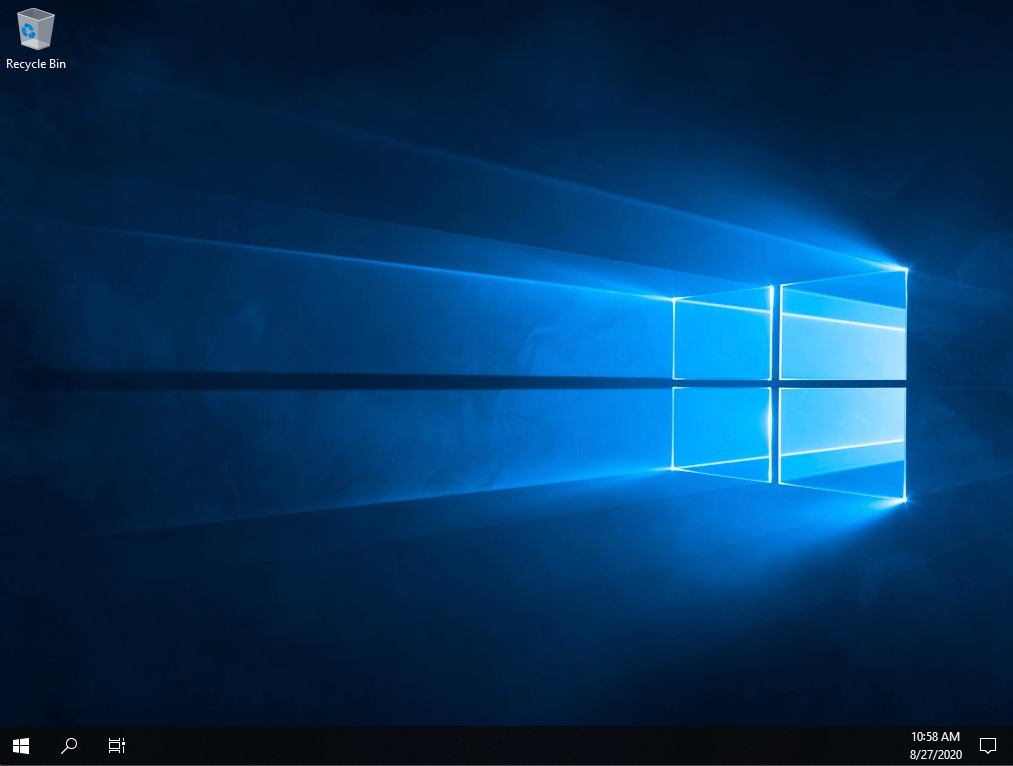
Установка Windows Server 2019 завершена.
With the release of the latest technical preview of Windows Server 2019, we decided to learn how to install and configure Windows Server 2019. The Honolulu project has been officially released as the Windows Admin Center. Microsoft has also released the Honolulu project, which is a new management platform for Windows Server. In this tutorial, we’ll take a look at the Windows Server 2019 installation and configuration and the Henololo project. You can visit the packages available in Eldernode to purchase a Windows VPS server.
Table of Contents
Tutorial install and configure Windows Server 2019
In the first step, you have to download the latest version. In the continuation of this article, join us to learn how to install and configure Windows Server 2019.
Install and Configure Windows Server 2019
Windows Server is one of the server-specific operating systems that users install on their server according to their needs when purchasing a VPS Server or Dedicated Server. Among the different versions of Windows Server, the latest and most recent version is Windows Server 2019, which has better performance than previous versions. It should be noted that this version, despite the time since its introduction by Microsoft, is still not recognized as a completely stable version, and new updates for it are constantly released. Follow us in the continuation of this tutorial.
How to install Windows Server 2019 via ISO file in VMware
To install Windows Server 2019 on VMware, we used the following virtual machine:
– Windows Server 2019 x64 bit
– VMware ESXi version 6.5
In the images below, you can see the Windows Server 2019 installation page, the ISO file of which is in the VMware virtual machine:
On the page above, specify the language and keyboard, and then click Next.
Click Install to begin the installation process.
Select the Windows Server version and click Next.
Confirm the agreement (check I accept the license terms).
Select the drive in which you are installing Windows.
As you can see, the installation process is very simple.
How to install Windows Server 2019 on Hyper-V 2016
With Hyper-V, all you have to do is download the VHDX file and copy it to the datastore where you want to run the Hyper-V virtual machine. Details of the Hyper-V environment are as follows:
– Windows Server 2016 Hyper-V
– Windows Server 2016 is installed on VMware ESXi 6.5.
The process of using the downloaded VHDX file is similar to creating other Hyper-V virtual machines. But here we connect the disk to the downloaded Microsoft Insider file.
In the image above, we specify the name and path of the virtual machine storage.
Then select Generation 2 for the Generation version:
In the image below, we allocate only 2 GB of RAM to this virtual machine.
Note: If you do this in operating environments, be aware that high RAM should be allocated to virtual machines, otherwise you will face many problems when loading high.
Then select the network card configuration for the Hyper-V virtual machine in Windows Server 2019.
In the Connect Virtual Hard Disk section, select Use an existing virtual hard disk. Below is the path to the downloaded VHDX file that is attached to the virtual machine.
On the last page, you will see a summary of the status of the virtual machine that you configured. Click Finish to create this machine.
After turning on Hyper-V, you will see that the technical preview is Server Core.
How to install the Honolulu project on Windows Server 2019
Honolulu is a browser-based local tool that allows you to manage Windows Server without the need for Azure or cloud. Honolulu allows IT administrators access to full control of all server structural features. It is generally suitable for management on private networks that are not connected to the Internet.
Honolulu is a modern evolutionary tool for in-box management tools, such as Server Manager or MMC. In fact, the project complements the System Center and Operations Management Suite but has not been created to replace these products and services.
You can install the Honolulu project locally on the Windows Server 2019 Core version. To do this, we need to run and install the MSI package using CMD.
C:\Users\administrator.CLOUD\Downloads>msiexec /i honolulu_install.msi /qn /L*v log2.txt SME_port=6513 SSL_CERTIFICATE_OPTION=generateNote: Instructions for installing the Honolulu project on the Windows Server 2019 can be found on the official Microsoft page.
msiexec /i <HonoluluInstallerName>.msi /qn /L*v log.txt SME_PORT=6513 SSL_CERTIFICATE_OPTION=generateAs you can see in the above command, we also specify the log file. Using the log file to see the installation status and troubleshooting problems during installation is appropriate. At first, the installation of Honolulu was faulty, but after resetting the server and reinstalling it, the problem was solved.
The Honolulu project and its implementation on Windows Server 2019
At first glance, the Honolulu project on Windows Server 2019 was very appealing to us. Microsoft has done an interesting job of designing and adding charm to it. In addition, the dashboard has an interesting search feature that allows you to easily find different items. You can type the letters in it so that the Honolulu project quickly displays the item you were looking for. Of course, the Search feature still needs improvements, which I hope will be improved in future versions.
Below you can see pictures of the Honolulu project on Windows Server 2019.
*
**
***
****
Conclusion
This article is one of the most complete Windows Server 2019 installation and configuration training references. In this tutorial, we tried to fully teach you how to install Windows Server 2019 via ISO file in VMware and Hyper-V 2016. You were also taught how to install the Honolulu project on Windows Server 2019.
In this tutorial, we will learn how to perform a clean installation of Windows Server 2019. A clean installation refers to installing the operating system on to a computer that does not have an installation present.
Before we start Windows Server 2019 installation GUI mode to get the Windows Server 2019 Desktop Experience, let’s know about some basic things.
System Requirements…
The following are
estimated minimum system requirements to install Windows Server 2019.
- Processor: 1.4 GHz 64-bit processor.
- RAM: 2 GB (for Server with Desktop Experience installation option).
- HDD: 80 GB
- Installation Media: Bootable DVD or Bootable USB Drive
Click here to Visit Microsoft Official site for more details of System requirements.
Performing Clean Installation
A clean installation refers
to installing the operating system on to a computer that does not have an
installation present.
This process is very
simple, you are just only asked to do the following:
- Select Language, Time and currency format and keyboard method.
- Choose an Edition and build of Windows Server.
- Agree to the License Agreement.
- Choose between manual and upgrade installation.
- Configure the disk.
- Set the Administrator password.
- Log in.
Before start Windows Server 2019 installation, we require…
- Windows Server 2019 ISO file. [You can download the Windows Server 2019 ISO from here]
- Create the Bootable USB or CD/DVD. [Click here to learn How to Create a Bootable USB drive.]
- Set up your Boot device priority in BIOS. [Click here to learn How to change Boot Device Priority.]
In this example, I perform a clean installation of Windows Server 2019 with Desktop Experience.
Step 1: In the first screen, you can able to configure language, region and time, keyboard settings. We should configure correct settings here and then select “Next” to continue.
Step 2: On this screen, I select “Install Now”. Here is another option available “Repair your computer” to choose if existing OS is missing some system files to repair.
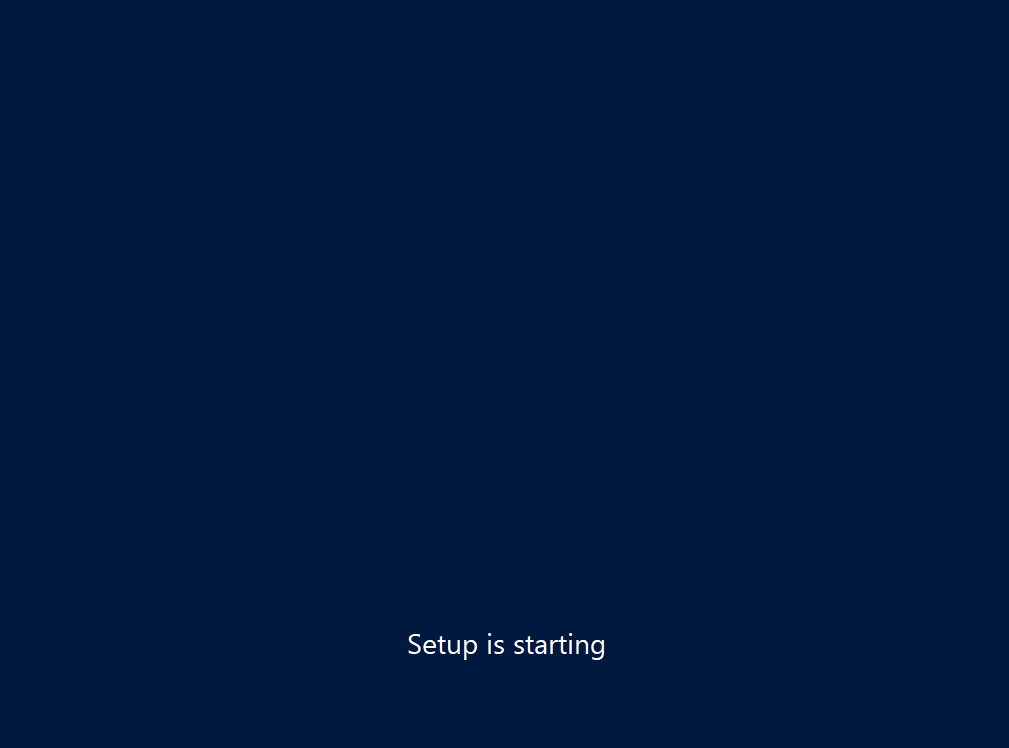
Step 3: Wait for a while… Setup is Starting…

Step 4: On this screen, I ask to choose the edition of the server. Here are two types of edition available one is Standard Evaluation and another is Datacenter Evaluation with Core or with GUI option. In this tutorial, I am going to choose Standard with GUI Option.
Step 5: We can see the license terms on this screen,
select “I accept license terms” then click “Next” to
continue.
This is the License agreement which has to read and accept to further process. I know you people might think is it really require to read the full agreement as it soo boring, Well, a maximum of geeks moved to the next screen without reading a single sentence.
Step 6: In this screen select “Custom: Install Windows only (advanced)” here because I do a clean installation. But if you need an in-place upgrade you should select “Upgrade: Install and keep files, settings, and applications” here. This option suitable for supported OS, features, services, and roles. But keep in mind you should not prefer in-place upgrade for critical roles like Active Directory Services, etc.
Step 7: In this screen, we can select and configure disc information (You can set the installation disc, size, etc.). I used default settings here.
Step 8: Now sit back and wait for the next screen as you can see that the necessary files are copied and the installation process is running on this screen.
Step 9: After the installation process is completed it will automatically reboot.

Step 10: This screen shows that the necessary settings were made before the server was started.
Step 11: Here we can set a Password for the local administrator account. You should configure a secure password for the local administrator. Set your password to something very strong, in fact, you can use a passphrase.
Step 12: As we have completed our installation process now on the login screen, I can log in with the “Administrator” account and related Password which I set in the last step and press “Enter“.
Well, we have
successfully installed Windows server 2019 with Desktop experience and
ready for further configuration.
In our upcoming tutorial/article we will learn more about the Windows server tool, features, options, services, etc and their use.
Related Questions and Tags:
Windows Server 2019 Installation, Installing Windows Server 2019, Windows Server 2019 Installation step by step, Install Windows Server 2019 Step by Step, How to Install Windows Server 2019, How to install windows server 2019 from USB, Windows server 2019 install GUI.
Why start this series in the 2020, when everything is about cloud, and Microsoft is pulling the plug on its “on-premise” certificates including MCSA, MCSE on Windows Server on 31.01.2021. Why even bother?
For a start… This series is obviously aimed at those of you who are just starting in IT, and want to pursue a career in IT infrastructure/services.
Although everything today is about cloud, Windows Server is still everywhere and will be for some time, since not every workload is suited for cloud, be it practical, security or regulatory reasons. That may change in future, but for now it is like that…
Also, I think that mastering Windows Server 2019 will help you understand basic concepts of services and IT infrastructure.
And in the end, Microsoft Azure is built on Windows Server 2019 at the moment, so if you have a chance to work on ASDK (Azure Stack) you will benefit from this knowledge, because you will understand how it is all connected and working.
This “Server Basics” series will not go into details too deep, the goal is to make you act and try technology by doing something practical and simple that works. That way you will quickly get the result which will make you excited about technology and push you to explore more.
Before you start…
Where to get the Windows Server 2019 installation?
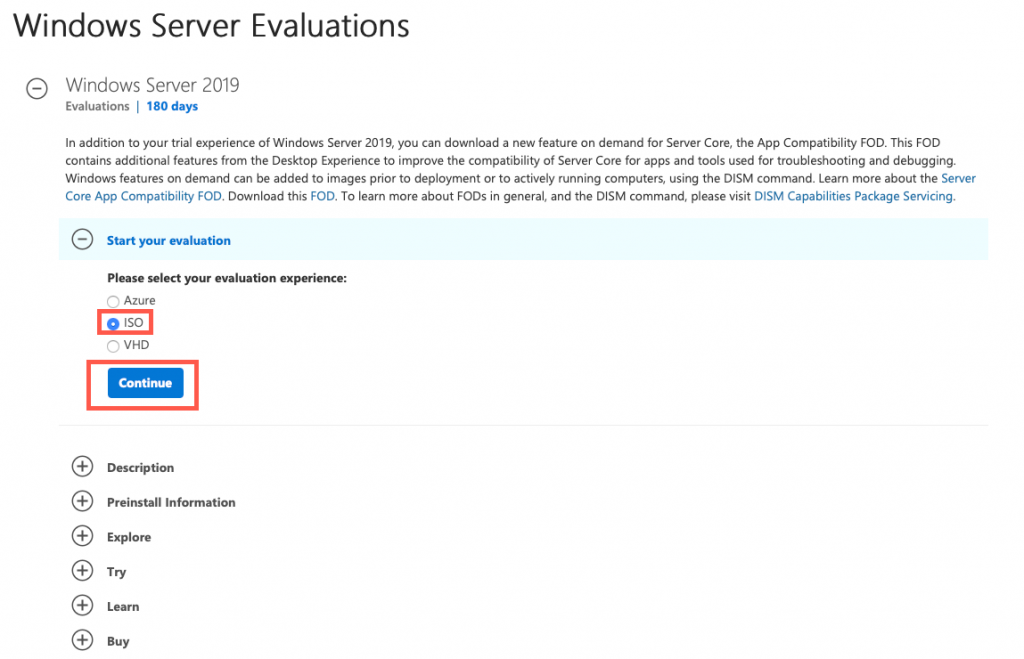
No need for piracy, Microsoft offers trial version of software that will work for 180 days (and more) and is fully functioning.
You can get the software here – https://www.microsoft.com/en-us/evalcenter/evaluate-windows-server-2019
Select ISO image and click on Continue
You will be asked for your details, and after you enter everything select Continue
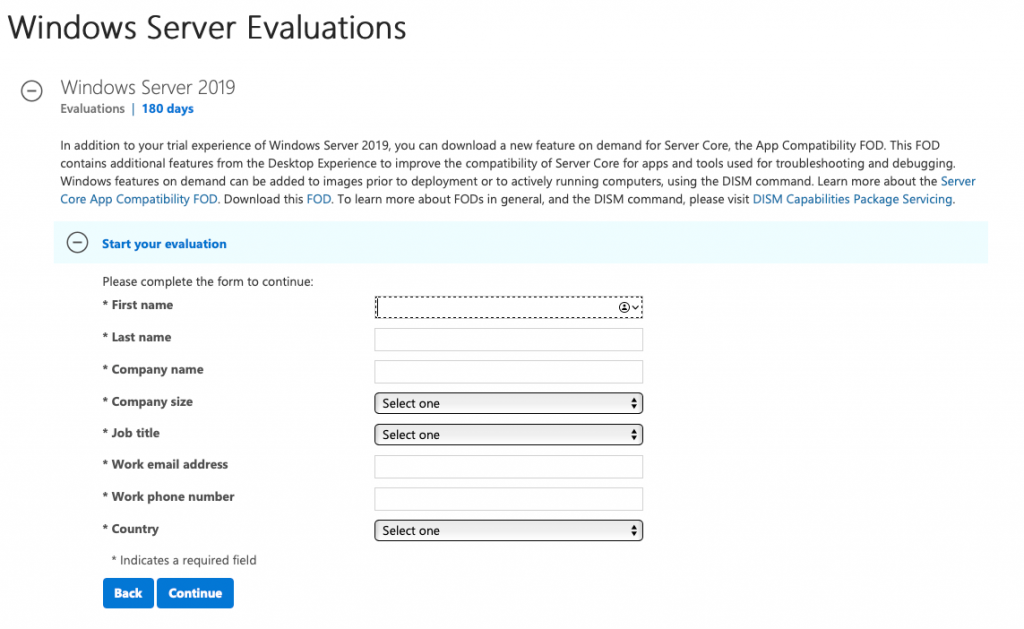
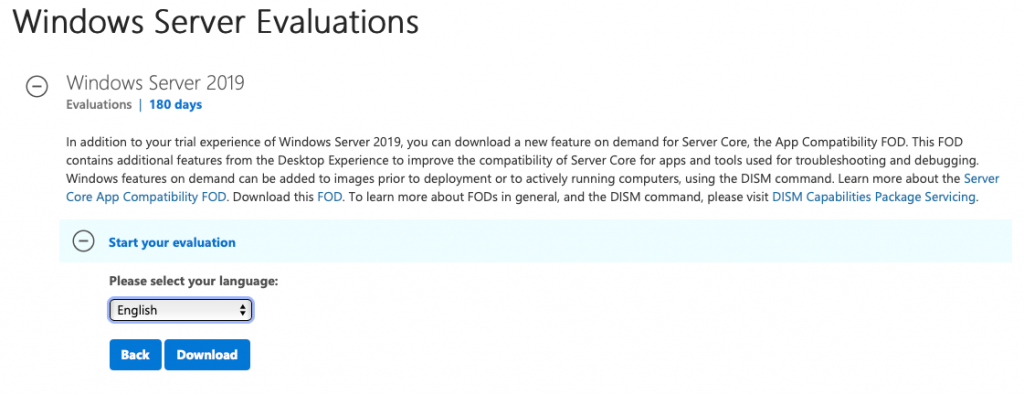
You will then select the language and click on Download…
If you are planing to do Windows Server 2019 installation on physical machine you will have to “burn” ISO image you downloaded to CD or USB stick (USB preferably) – you can do that with a tool called Rufus, you can find it here – https://rufus.ie/
Installation on Hardware or Virtual Machine?
Hardware
If you are installing on a physical machine (bare metal) there are a couple of thing to be aware of:
Minimal requirements are (same goes for virtual machines (VMs)) – 1.4Ghz 64bit CPU (it is very important you have 64bit capable CPU, otherwise this won’t work), 512MB of RAM – 2GB of RAM is minimal for graphic environment (which we will do) and 4GB is optimal in my experience. 32GB of disk space, 1Gbit ethernet, 1024×768 screen resolution, keyboard/mouse.
My advice would be to have CPU with multiple cores (2 or more if you can afford), at least 16GB of RAM (the more the better) 1TB disk drive at minimum for testing, if you plan to do LAB and test Windows Server 2019 and its services.
If you are installing on a server, be sure that you first upgraded all the firmwares on your machine. Also, create RAID field on the server on which you will place your Windows Server 2019 installation.
Make sure you set boot device in BIOS to USB stick (or whatever you burned your Windows Server 2019 installation to)
In the end have storage drivers (raid controller) or motherboard storage drivers at hand – Windows Server recognises a huge variety of storage controllers but you never know… Better to be prepared then to waste time. If you are practicing on Dell, HP, Lenovo server equipment, you are covered out of the box.
If you don’t have a server at hand and you are practicing in home lab on “desktop” grade hardware, no worries, installation should work, just make sure you have minimal requirements covered in your PC or laptop. There may be an odd driver issue to resolve if you have “exotic” configuration, so be aware of that.
Virtualization:
With virtual machines you just need to mount Windows Server 2019 ISO image we downloaded earlier after you created empty VM for your Windows Server 2019 ISO install. Procedure depends on the virtualisation software you are using, I can show you VMware vSphere, but more or less all the virtualisation softwares are same with these options, it just depends how you navigate to the option you need.
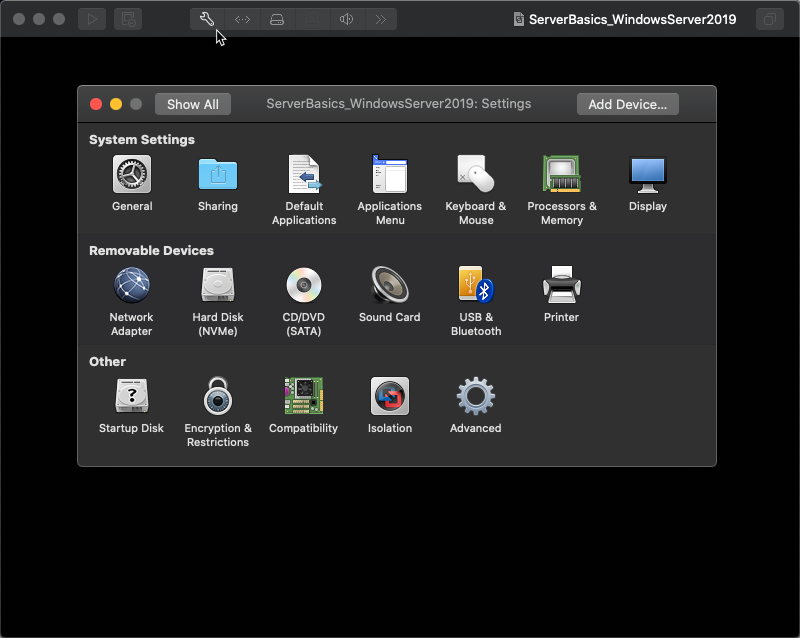
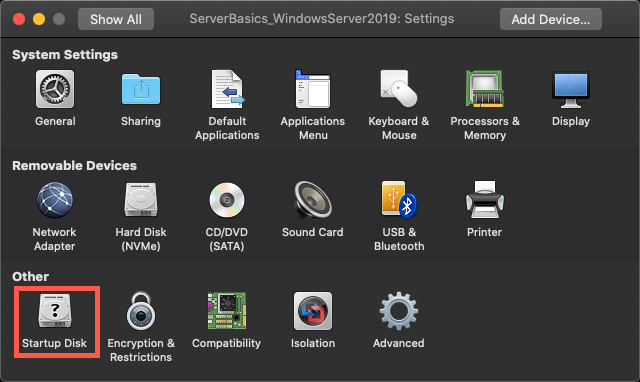
In vSphere you click on settings on virtual machine you created, it is a little wrench on the top of the screen. Under Removable Devices section you will select CD/DVD (SATA)
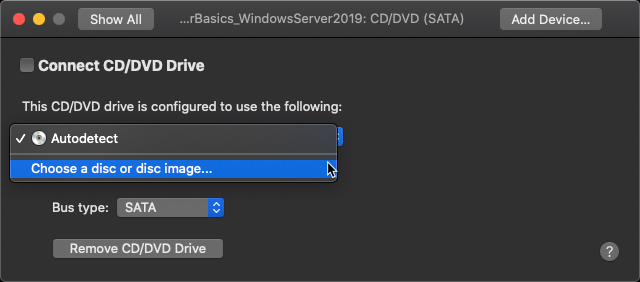
Click on the selection box and select “Choose a disc or disc image…”
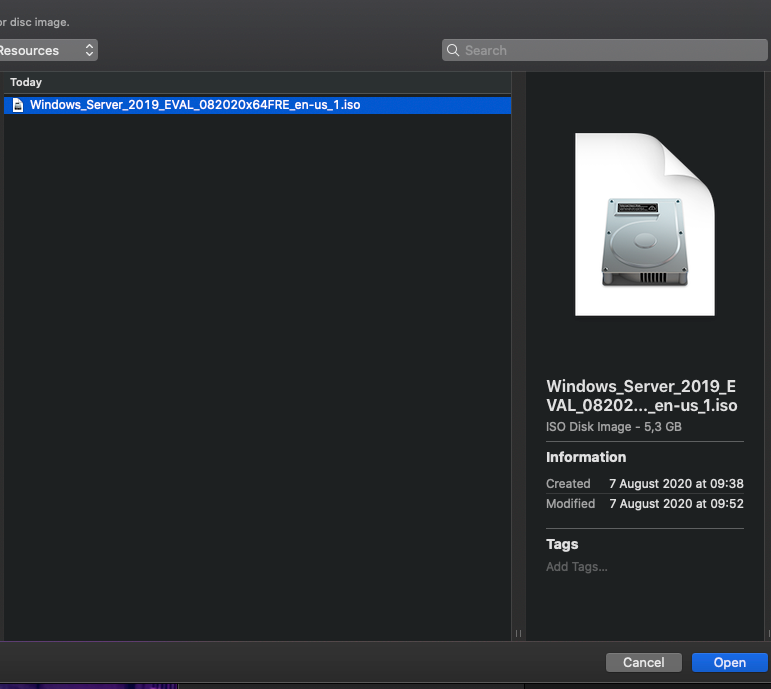
Navigate to the location you downloaded your Windows Server 2019 ISO image and select it.
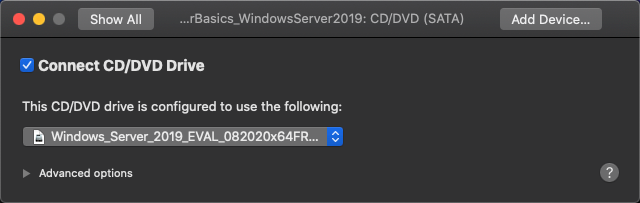
Now that we selected our ISO image, make sure you selected “Connect CD/DVD Drive” checkbox and then back to the main settings screen.
We need to set one more thing so we are sure that we will boot from our ISO image
Under Other Section select “Startup Disk”
Select CD/DVD as your startup device.
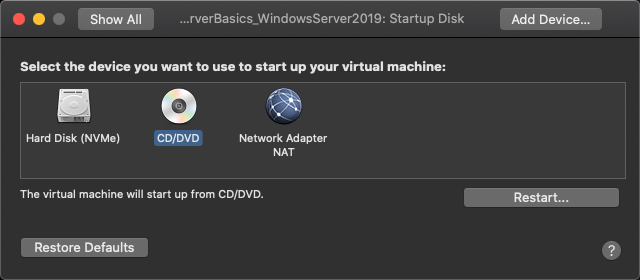
Again, settings in your virtualisation software may differ from this, so explore or Google for the steps you need.
Goal is clear whatever method – hardware or software you are using – mount Windows Server 2019 image we downloaded earlier and select it as bootable device. Also change hardware settings (CPU, RAM, disk) to the settings I mentioned above.
Installation
Now, to the final step, installation of our first Windows Server 2019 machine.
If you are doing it on physical machine be sure you set the USB stick (or CD/DVD if you burned downloaded ISO image to it) as main bootable device in BIOS (probably under boot menu) and in your virtualisation software follow steps I mentioned earlier.
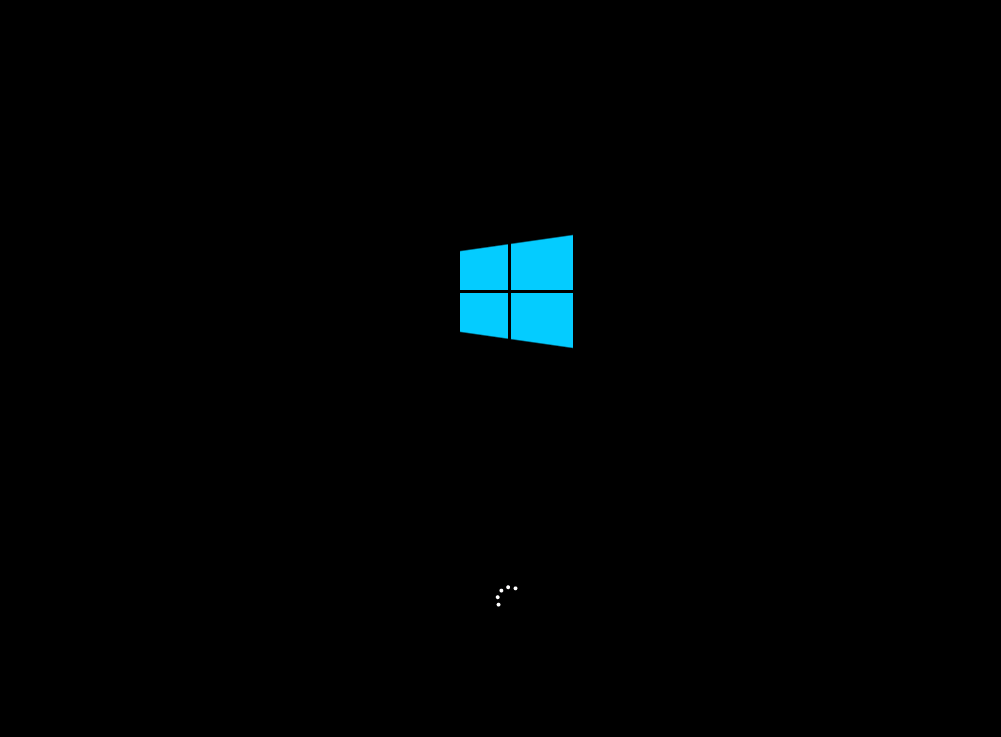
If you did everything correctly, you will be greeted with this screen…
“Press any key to boot from CD or DVD” – press a key on your keyboard to boot from it…

Wait…
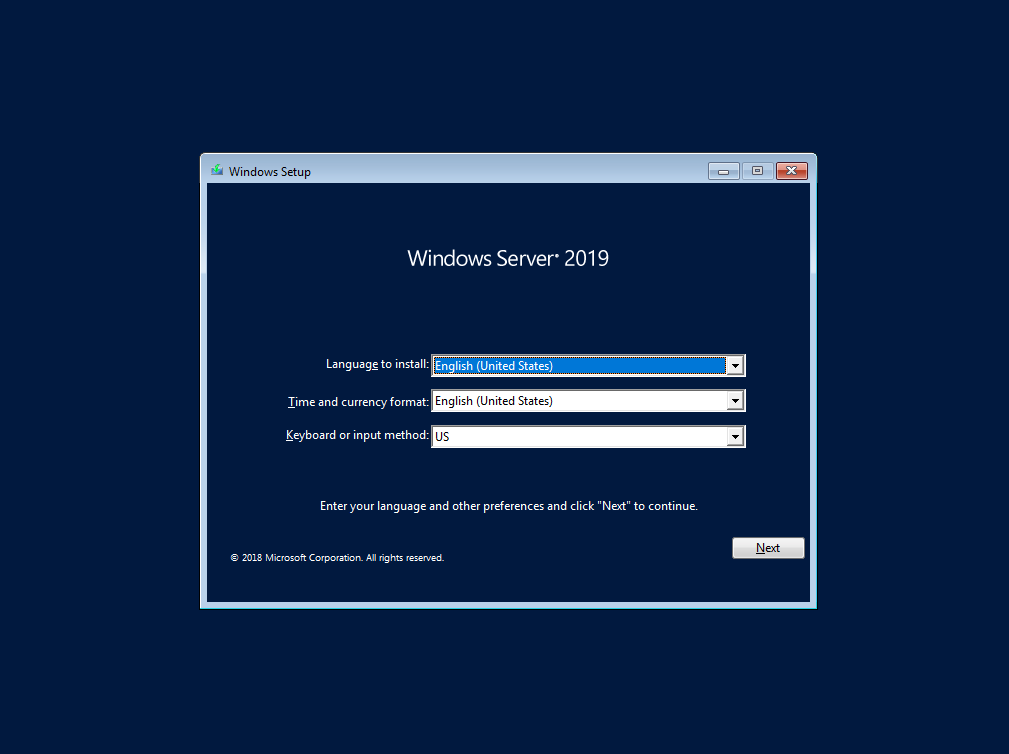
Language to install: Select language you wish your Windows Server installation to be – I will select English
Time and currency format – again, select your local settings
Keyboard or input method – select a keyboard layout, I will select English keyboard layout.
Install now…
…
We will select Windows Server 2019 Datacenter Evaluation (Desktop Experience)
Read agreement, select “I accept…” and click on Next

Select “Custom: Install Windows only (advanced) option
Now, select the disk you prepared for this installation. If this is a blank screen for you, you will need to prepare and load drivers for your storage controller (or RAID controller) I mentioned before. Copy drivers (drivers need to be for the Windows Server 2016/19 or some Windows 10 will even work) to USB, plug it in your machine and click on the Load driver on bottom of the screen. Then browse to your driver, select it and hope for the best.
Also, make sure disk you are installing on is empty with no important data on it, this operation will delete everything on it.
If you can see your disk on the screen below, then select Next and the installation will start…
We will now wait a bit… Waiting depends primarily on the speed of your PC, it may take longer on be very quick to install…
After you reached last step you will get restart screen…
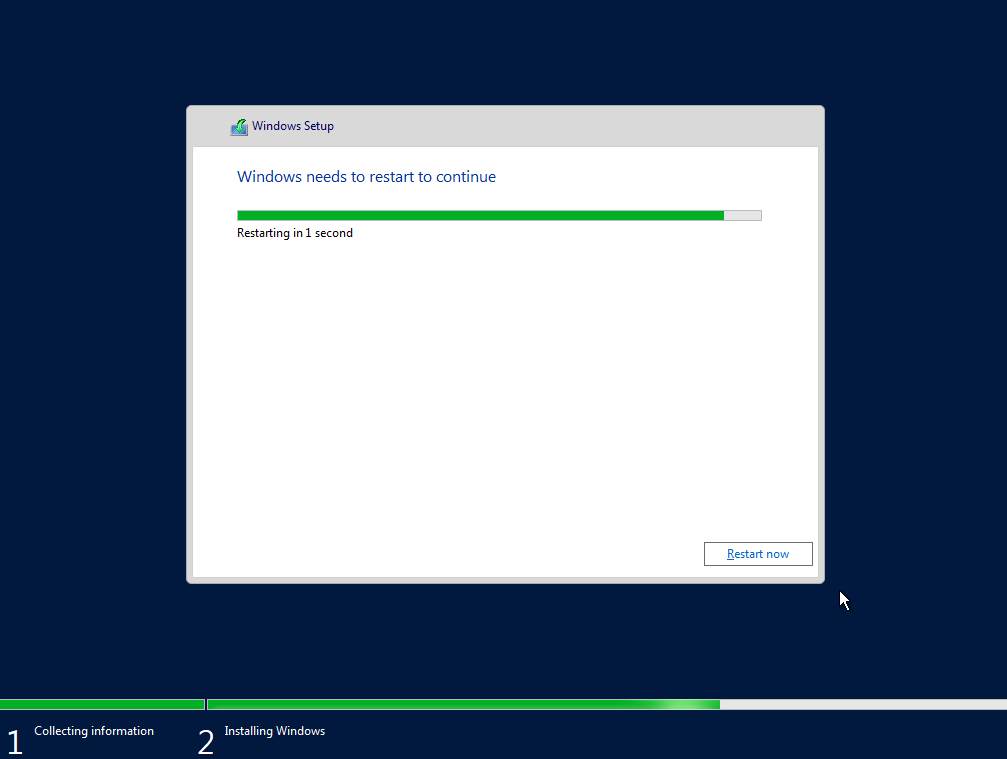
Let the computer/VM restart and this time let it pass “Press any key to boot from CD or DVD” – do not press any key on that screen.
You will be greeted with this screen… Enter password of your selection for your installation. Always make sure you use strong passwords (Minimum 12 signs – combination of letters, numbers, special chars…)
Click on Finish
That is it, you are greeted with lock screen
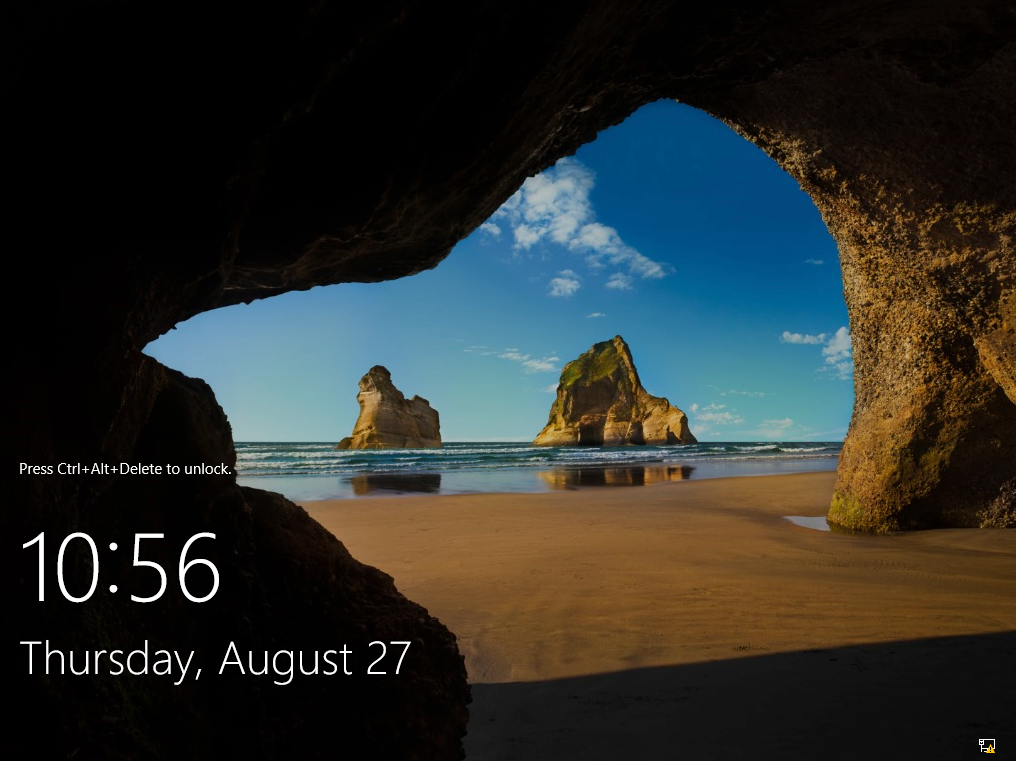
Press CTRL+ALT+DEL if you did install on physical machine, if you done install on a VM, look for a CTRL+ALT+DEL shortcut in a menu.
Enter your password and press enter on a keyboard.
Congratulations, you did your first Windows Server 2019 installation.
In the future I will try to expand this “Server Basics” series with more tutorials on how to configure your Windows Server 2019 installation and set various services on it (DHCP, DNS, file share, failover…)
I have a very busy schedule, so I can’t promise much, but I will try to write as much as time allows.
If you are interested in a video version of this tutorial – here is the video:
Disclaimer
Other tutorials in this series:
Server basics 02: First steps adter Windows Server 2019 install
Server Basics 03: How to install Hyper-V
Server Basics 04: How to create VM on Hyper-V
Server Basics 05: How to create virtual machine template
Server Basics 06: How to create windows domain
Server Basics 07: How to create user in domain, join computer to domain
Server Basics 08: How to create DHCP server
Server Basics 09: How to configure Groupe Policy Part1
Server Basics 10: How to configure Groupe Policy Part2
Server Basics 11: How to create iSCSI Target in Windows Server
Server Basics 12: How to create file server (DFS) in Windows Server
Server Basics 13: How to create Print Server