В Windows Server 2016 и 2019 по умолчанию установлен и включен “родной” бесплатный антивирус Microsoft — Windows Defender (начиная с Windows 10 2004 используется название Microsoft Defender). В этой статье мы рассмотрим особенности настройки и управления антивирусом Windows Defender в Windows Server 2019/2016.
Содержание:
- Графический интерфейс Windows Defender
- Удаление антивируса Microsoft Defender в Windows Server 2019 и 2016
- Управление Windows Defender с помощью PowerShell
- Добавить исключения в антивирусе Windows Defender
- Получаем статус Windows Defender с удаленных компьютеров через PowerShell
- Обновление антивируса Windows Defender
- Управление настройками Microsoft Defender Antivirus с помощью GPO
Графический интерфейс Windows Defender
В версиях Windows Server 2016 и 2019 (в том числе в Core редакции) уже встроен движок антивируса Windows Defender (Защитник Windows). Вы можете проверить наличие установленного компонента Windows Defender Antivirus с помощью PowerShell:
Get-WindowsFeature | Where-Object {$_. name -like "*defender*"} | ft Name,DisplayName,Installstate

Однако в Windows Server 2016 у Windows Defender по-умолчанию нет графического интерфейса управления. Вы можете установить графическую оболочку Windows Defender в Windows Server 2016 через консоль Server Manager (Add Roles and Features -> Features -> Windows Defender Features -> компонент GUI for Windows Defender).
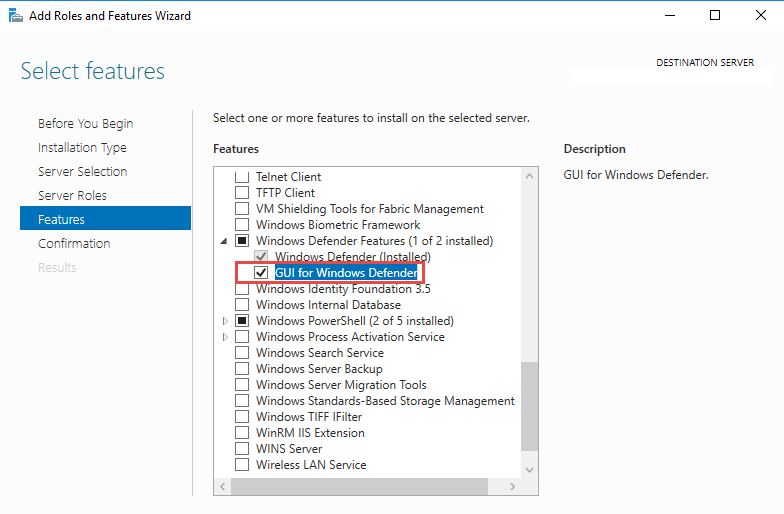
Установить графический компонент антивируса Windows Defender можно с помощью PowerShell командлета Install-WindowsFeature:
Install-WindowsFeature -Name Windows-Defender-GUI
Для удаления графического консоли Defender используется командлет:
Uninstall-WindowsFeature -Name Windows-Defender-GUI
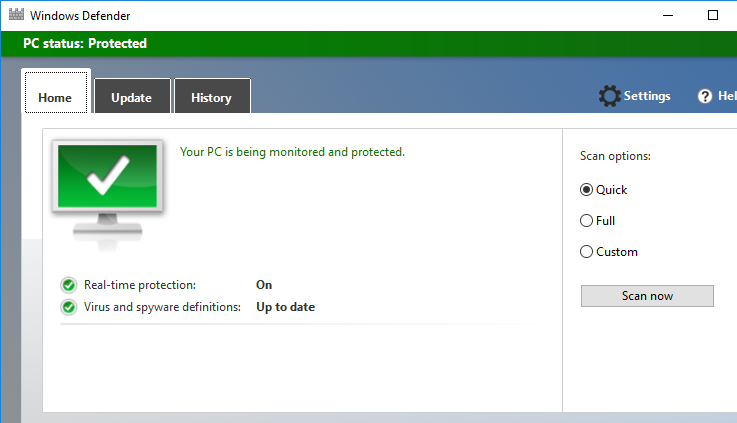
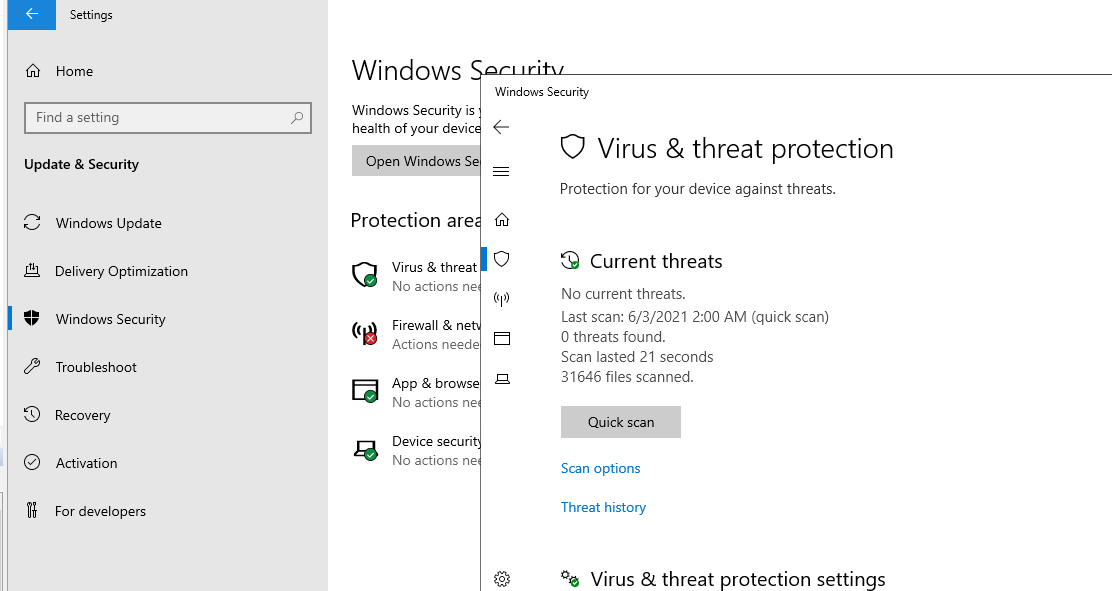
В Windows Server 2019 графический интерфейс Defender основан на APPX приложении и доступен через меню Windows Security (панель Settings -> Update and Security).
Настройка Windows Defender производится через меню “Virus and threat protection”.
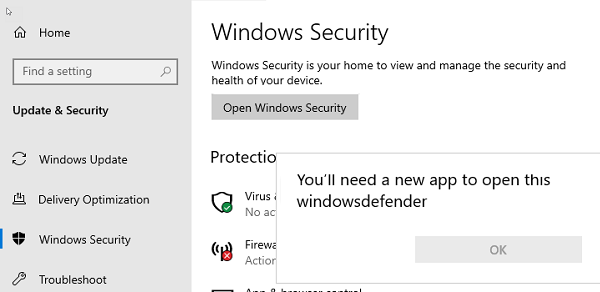
Если вы не можете открыть меню настроек Defender, а при запуске апплета Windows Security у вас появляется ошибка “You’ll need a new app to open this windowsdefender”, нужно перерегистрировать APPX приложение с помощью файла манифеста такой командой PowerShell:
Add-AppxPackage -Register -DisableDevelopmentMode "C:\Windows\SystemApps\Microsoft.Windows.SecHealthUI_cw5n1h2txyewy\AppXManifest.xml"
Если APPX приложение полностью удалено, можно его восстановить вручную по аналогии с восстановлением приложения Micorosft Store.
Удаление антивируса Microsoft Defender в Windows Server 2019 и 2016
В Windows 10 при установке любого стороннего антивируса (Kaspersky, McAfee, Symantec, и т.д.) встроенный антивирус Windows Defender автоматически отключается, однако в Windows Server этого не происходит. Отключать компонент встроенного антивируса нужно вручную (в большинстве случаев не рекомендуется использовать одновременно несколько разных антивирусов на одном компьютере/сервере).
Удалить компонент Windows Defender в Windows Server 2019/2016 можно из графической консоли Server Manager или такой PowerShell командой:
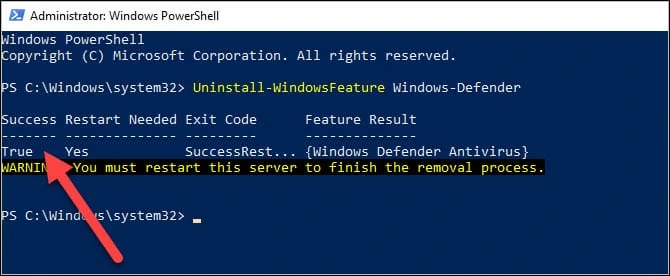
Uninstall-WindowsFeature -Name Windows-Defender
Не удаляйте Windows Defender, если на сервере отсутствует другой антивирус.
Установить службы Windows Defender можно командой:
Add-WindowsFeature Windows-Defender-Features,Windows-Defender-GUI

Управление Windows Defender с помощью PowerShell
Рассмотрим типовые команды PowerShell, которые можно использовать для управления антивирусом Windows Defender.
Проверить, запущена ли служба Windows Defender Antivirus Service можно с помощью команды PowerShell Get-Service:
Get-Service WinDefend
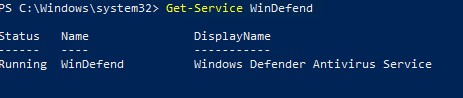
Как вы видите, служба запушена (статус –
Running
).
Текущие настройки и статус Defender можно вывести с помощью командлета:
Get-MpComputerStatus

Вывод комадлета содержит версию и дату обновления антивирусных баз (AntivirusSignatureLastUpdated, AntispywareSignatureLastUpdated), включенные компоненты антвируса, время последнего сканирования (QuickScanStartTime) и т.д.
Отключить защиту в реальном времени Windows Defender (RealTimeProtectionEnabled) можно с помощью команды:
Set-MpPreference -DisableRealtimeMonitoring $true
После выполнения данной команды, антивирус не будет сканировать на лету все обрабатываемые системой файлы.
Включить защиту в реальном времени:
Set-MpPreference -DisableRealtimeMonitoring $false
Более полный список командлетов PowerShell, которые можно использовать для управления антивирусом есть в статье Управление Windows Defender с помощью PowerShell.
Добавить исключения в антивирусе Windows Defender
В антивирусе Microsoft можно задать список исключений – это имена, расширения файлов, каталоги, которые нужно исключить из автоматической проверки антивирусом Windows Defender.
Особенность Защитника в Windows Server – он автоматически генерируемый список исключений антивируса, который применяется в зависимости от установленных ролей сервера. Например, при установке роли Hyper-V в исключения антивируса добавляются файлы виртуальных и дифференциальных дисков, vhds дисков (*.vhd, *.vhdx, *.avhd), снапшоты и другие файлы виртуальных машин, каталоги и процессы Hyper-V (Vmms.exe, Vmwp.exe)
Если нужно отключить автоматические исключения Microsoft Defender, выполните команду:
Set-MpPreference -DisableAutoExclusions $true
Чтобы вручную добавить определенные каталоги в список исключения антивируса, выполните команду:
Set-MpPreference -ExclusionPath "C:\Test", "C:\VM", "C:\Nano"
Чтобы исключить антивирусную проверку определенных процессов, выполните команду:
Set-MpPreference -ExclusionProcess "vmms.exe", "Vmwp.exe"
Получаем статус Windows Defender с удаленных компьютеров через PowerShell
Вы можете удаленно опросить состояние Microsoft Defender на удаленных компьютерах с помощью PowerShell. Следующий простой скрипт при помощи командлета Get-ADComputer выберет все Windows Server хосты в домене и через WinRM (командлетом Invoke-Command) получит состояние антивируса, время последнего обновления баз и т.д.
$Report = @()
$servers= Get-ADComputer -Filter 'operatingsystem -like "*server*" -and enabled -eq "true"'| Select-Object -ExpandProperty Name
foreach ($server in $servers) {
$defenderinfo= Invoke-Command $server -ScriptBlock {Get-MpComputerStatus | Select-Object -Property Antivirusenabled,RealTimeProtectionEnabled,AntivirusSignatureLastUpdated,QuickScanAge,FullScanAge}
If ($defenderinfo) {
$objReport = [PSCustomObject]@{
User = $defenderinfo.PSComputername
Antivirusenabled = $defenderinfo.Antivirusenabled
RealTimeProtectionEnabled = $defenderinfo.RealTimeProtectionEnabled
AntivirusSignatureLastUpdated = $defenderinfo.AntivirusSignatureLastUpdated
QuickScanAge = $defenderinfo.QuickScanAge
FullScanAge = $defenderinfo.FullScanAge
}
$Report += $objReport
}
}
$Report|ft

Для получения информации о срабатываниях антивируса с удаленных компьютеров можно использовать такой PowerShell скрипт:
$Report = @()
$servers= Get-ADComputer -Filter 'operatingsystem -like "*server*" -and enabled -eq "true"'| Select-Object -ExpandProperty Name
foreach ($server in $servers) {
$defenderalerts= Invoke-Command $server -ScriptBlock {Get-MpThreatDetection | Select-Object -Property DomainUser,ProcessName,InitialDetectionTime ,CleaningActionID,Resources }
If ($defenderalerts) {
foreach ($defenderalert in $defenderalerts) {
$objReport = [PSCustomObject]@{
Computer = $defenderalert.PSComputername
DomainUser = $defenderalert.DomainUser
ProcessName = $defenderalert.ProcessName
InitialDetectionTime = $defenderalert.InitialDetectionTime
CleaningActionID = $defenderalert.CleaningActionID
Resources = $defenderalert.Resources
}
$Report += $objReport
}
}
}
$Report|ft
В отчете видно имя зараженного файла, выполненное действие, пользователь и процесс-владелец.

Обновление антивируса Windows Defender
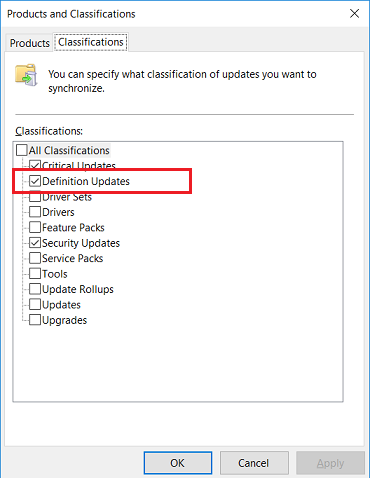
Антивирус Windows Defender может автоматически обновляться из Интернета с серверов Windows Update. Если в вашей внутренней сети установлен сервер WSUS, антивирус может получать обновления с него. Убедитесь, что установка обновлений одобрена на стороне WSUS сервера (в консоли WSUS обновления антивирусных баз Windows Defender, называются Definition Updates), а клиенты нацелены на нужный сервер WSUS с помощью GPO.
В некоторых случаях, после получения кривого обновления, Защитник Windows может работать некорректно. В этом случае рекомендуется сбросить текущие базы и перекачать их заново:
"%PROGRAMFILES%\Windows Defender\MPCMDRUN.exe" -RemoveDefinitions -All
"%PROGRAMFILES%\Windows Defender\MPCMDRUN.exe" –SignatureUpdate
Если на сервере нет прямого доступа в Интернет, вы можете настроить обновление Microsoft Defender из сетевой папки.
Скачайте обновления Windows Defender вручную (https://www.microsoft.com/en-us/wdsi/defenderupdates) и помесите в сетевую папку.
Укажите путь к сетевому каталогу с обновлениями в настройках Defender:
Set-MpPreference -SignatureDefinitionUpdateFileSharesSources \\fs01\Updates\Defender
Запустите обновление базы сигнатур:
Update-MpSignature -UpdateSource FileShares
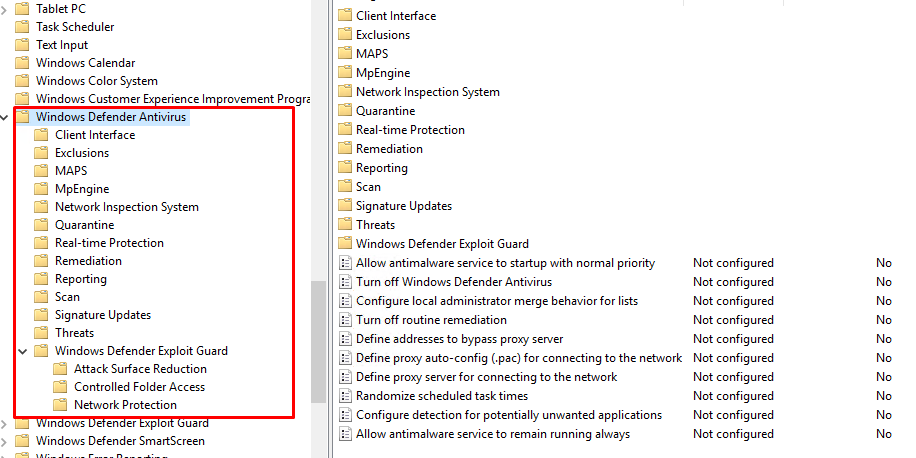
Управление настройками Microsoft Defender Antivirus с помощью GPO
Вы можете управлять основными параметрами Microsoft Defender на компьютерах и серверах домена централизованно с помощью GPO. Для этого используется отдельный раздел групповых политик Computer Configurations -> Administrative Template -> Windows Component -> Windows Defender Antivirus.
В этом разделе доступно более 100 различных параметров для управления настройками Microsoft Defender.
Например, для отключения антивируса Microsoft Defender нужно включить параметр GPO Turn off Windows Defender Antivirus.
Более подробно о доступных параметрах групповых политик Defender можно посмотреть здесь https://docs.microsoft.com/en-us/microsoft-365/security/defender-endpoint/use-group-policy-microsoft-defender-antivirus
Централизованное управление Windows Defender доступно через Advanced Threat Protection доступно через портал “Azure Security Center” (ASC) при наличии подписки (около 15$ за сервер в месяц).

![]()
Вместе с Windows Server 2016/2019 по умолчанию устанавливается встроенный антивирус Windows Defender. Иногда он очень к месту, например, когда согласно правилам информационной безопасности на сервере должна быть установлена антивирусная защита. А иногда он совсем не нужен, поскольку снижает производительность высоконагруженных сервисов.
Удалим Windows Defender с сервера Windows Server 2016/2019.
Проверим, что Defender установлен и работает:
sc query windefend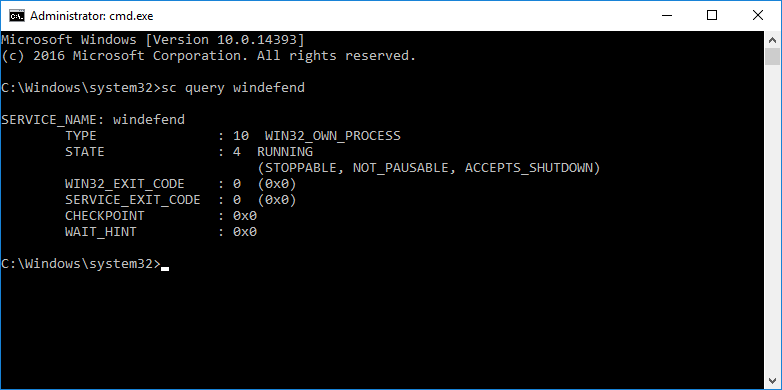
Служба антивируса в состоянии RUNNING.
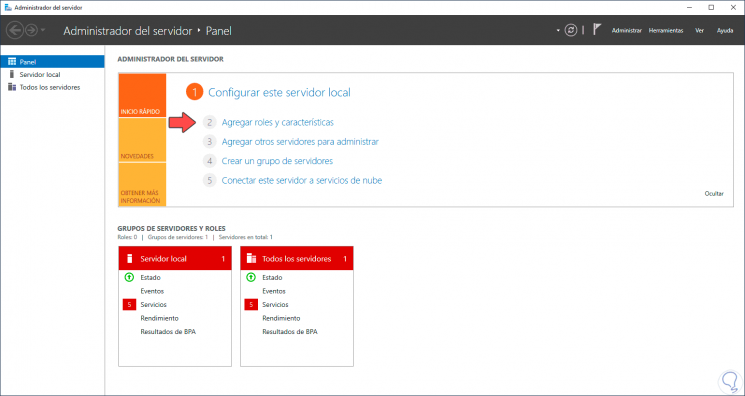
Запускаем графическую консоль Server Manager.
Manage → Remove Roles and Featires.
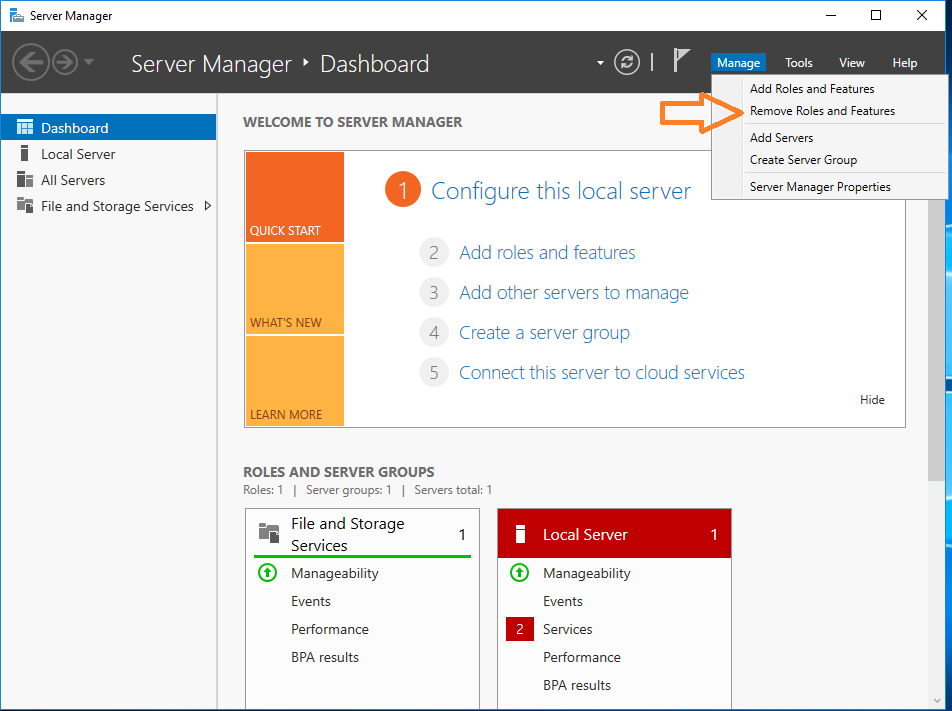
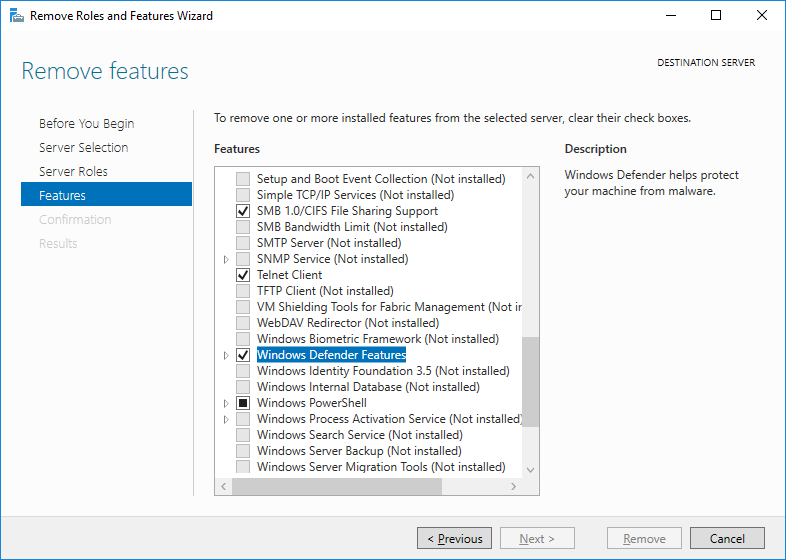
В разделе Features находим компонент Windows Defender Features, снимаем с него галку, нажимаем Next и следуем дальнейшим инструкциям по удалению компонениа.
Сервер потребует перезагрузки.
Проверка
Проверим, что Defender удалён:
sc query windefend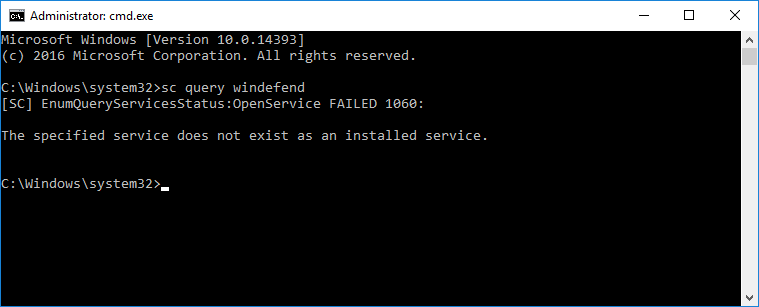
Служба антивируса не найдена.
Примечание
Удалить компонент Windows Defender в Windows Server 2016/2019 можно PowerShell командой:
Uninstall-WindowsFeature -Name Windows-DefenderWindows Defender is the security-level solution that has been integrated into Windows systems to protect from all types of threats , whether local or external, especially from threats on the network which can have a critical impact on services and general processes of the organization since the presence of a virus can cause general effects. For this reason Windows Defender is the appropriate solution to maintain the integrity of the information, in some special cases it is possible to require that Windows Defender be deactivated or uninstalled (although it is not ideal and this occurs for reasons such as:
Reasons to uninstall Windows Defender
- Purchase of a special firewall for the company
- Support or control tasks
- Configuration errors
If for any reason you need to disable or uninstall Windows Defender in Windows Server 2019, TechnoWikis will give you the different options for it..
To stay up to date, remember to subscribe to our YouTube channel! SUBSCRIBE
1. Disable Windows Defender Windows Server from Security
Step 1
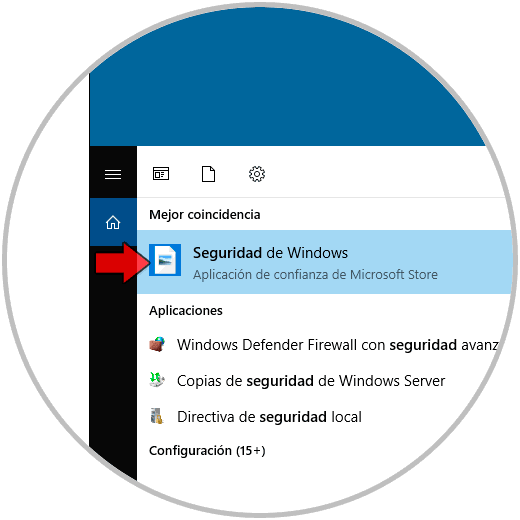
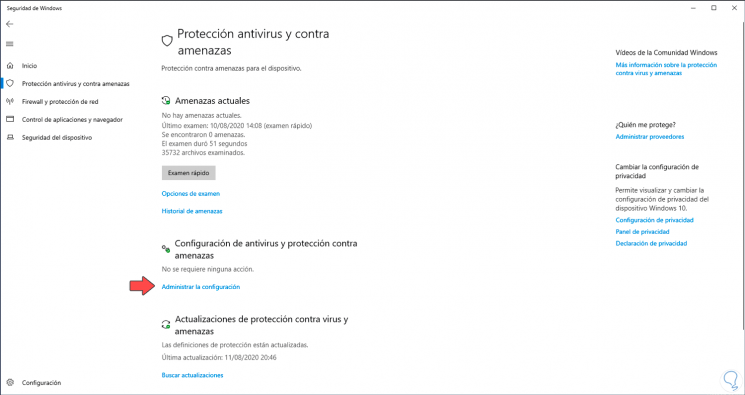
Windows Defender is integrated in the system security section, to deactivate Windows Defender we must go to the search engine and there we enter «security», in the displayed list we select Windows Security:
Step 2
In the open window, go to the «Virus and threat protection» section and click on «Manage settings»:
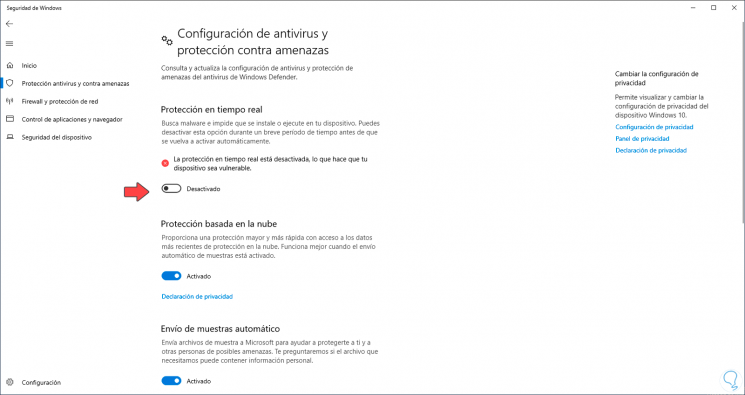
Step 3
Then we must click on the «Real-time protection» switch to disable Windows Defender security:
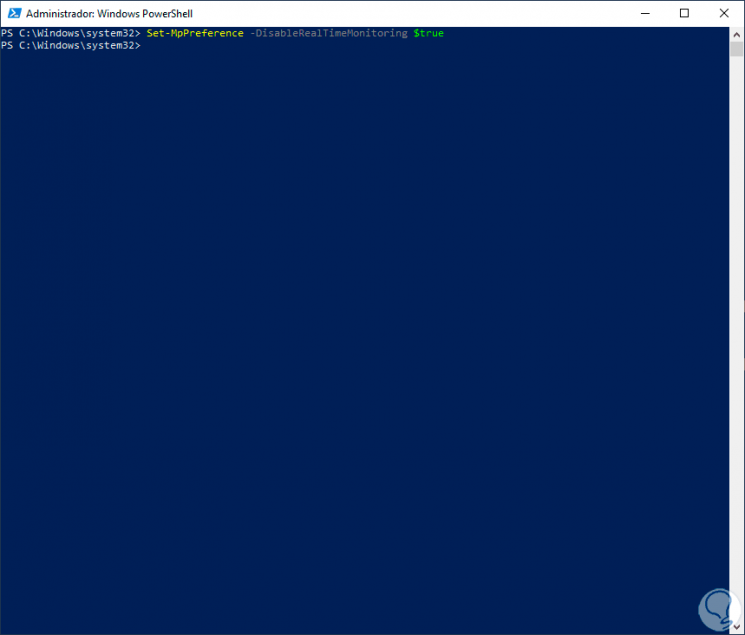
2. Disable Windows Defender Windows Server from PowerShell
The PowerShell console is another of the options available for this purpose, in this case we must access the PowerShell console as administrators and there execute the following:
Set-MpPreference -DisableRealtimeMonitoring $ true
Note
In case we want to activate Windows Defender again from PowerShell we must execute:
"Set-MpPreference -DisableRealtimeMonitoring $ false"
Now we are going to see how to uninstall Windows Defender in Windows Server 2019.
3. Uninstall Windows Defender Windows Server from PowerShell
Step 1
Again the PowerShell console is the ally for this task, we access as administrators and we will execute the following:
Uninstall-WindowsFeature -Name Windows-Defender
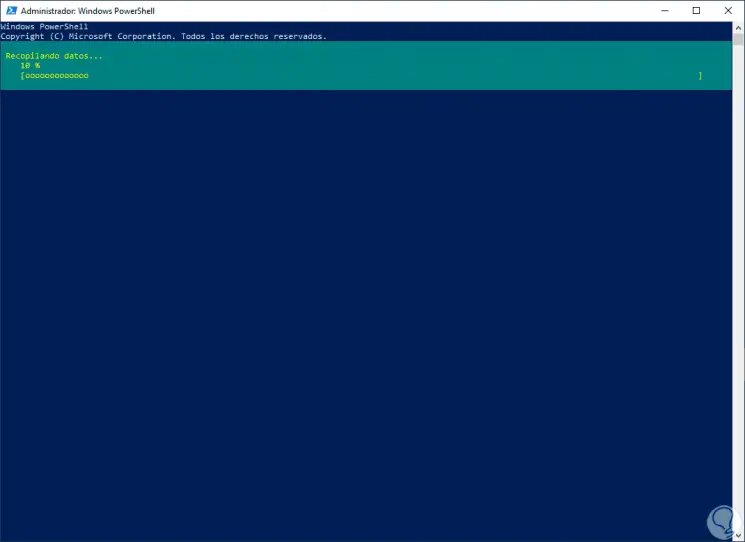
Step 2
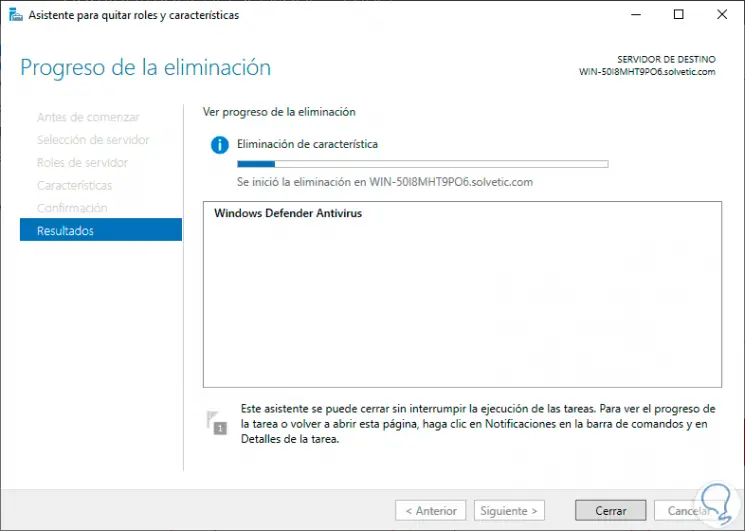
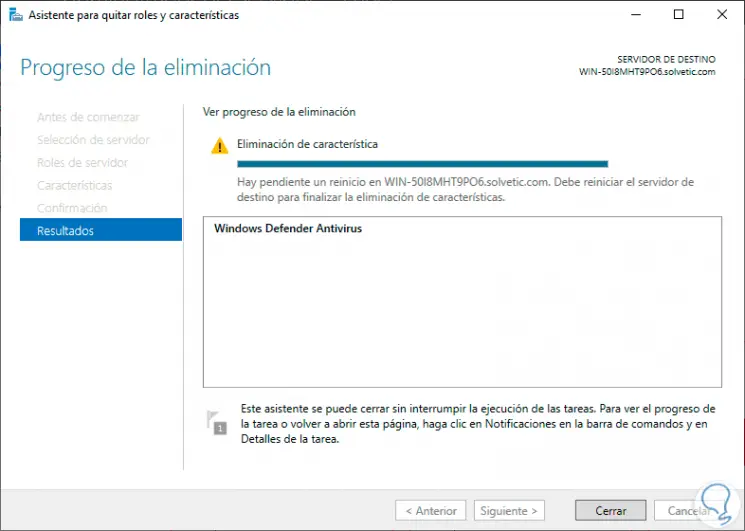
After all the information is collected we will see the following:
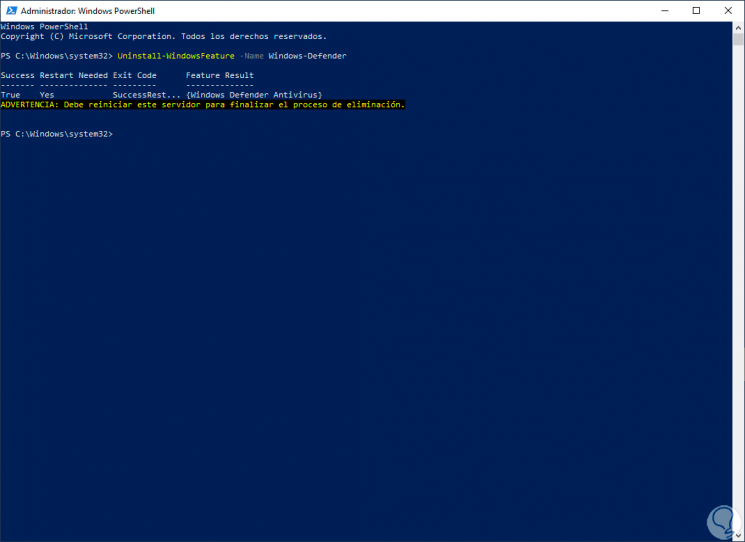
Step 3
There we check that Windows Defender has been uninstalled and the process will be completed when the server is restarted.
Note
to install Windows Defender again with this method we must execute:
Install-WindowsFeature -Name Windows-Defender
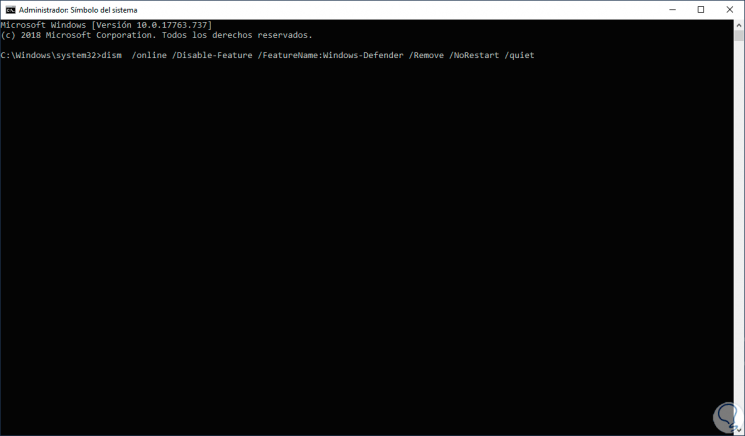
4. Uninstall Windows Defender Windows Server from CMD
The command prompt console is another of the mechanisms available to uninstall Windows Defender and this is achieved thanks to the DISM command (Deployment Image Servicing and Management) with which we can manage the system image, it should be noted that this command is much more delicate since if we run it, we not only uninstall Windows Defender but also the Windows Defender installation package is eliminated, so we cannot install it again.
As a reference, the order to execute with DISM is as follows: Press Enter and Windows Defender will be completely uninstalled from the server..
Dism / online / Disable-Feature / FeatureName: Windows-Defender / Remove / NoRestart / quiet
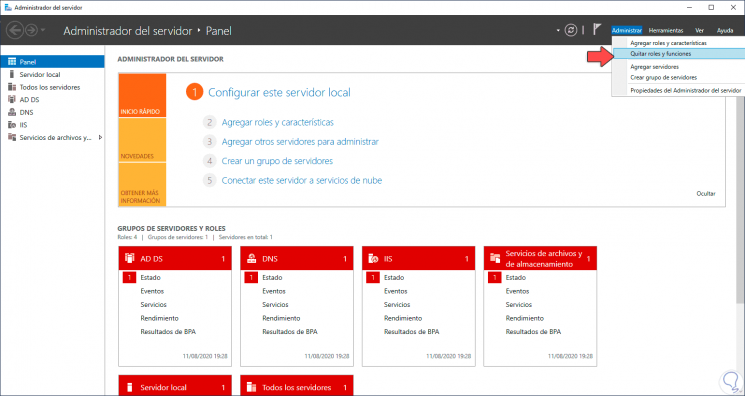
4. Uninstall Windows Defender Windows Server from Server Manager
Step 1
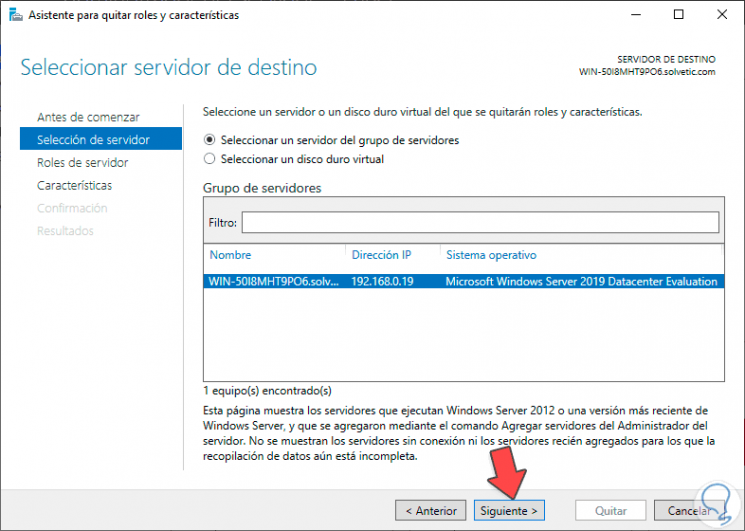
The Server Administrator is a central point in Windows Server from where we manage the team roles, to use this method we open the Server Administrator and we will go to «Manage -Remove roles and functions»:
Step 2
The uninstall wizard will be displayed:
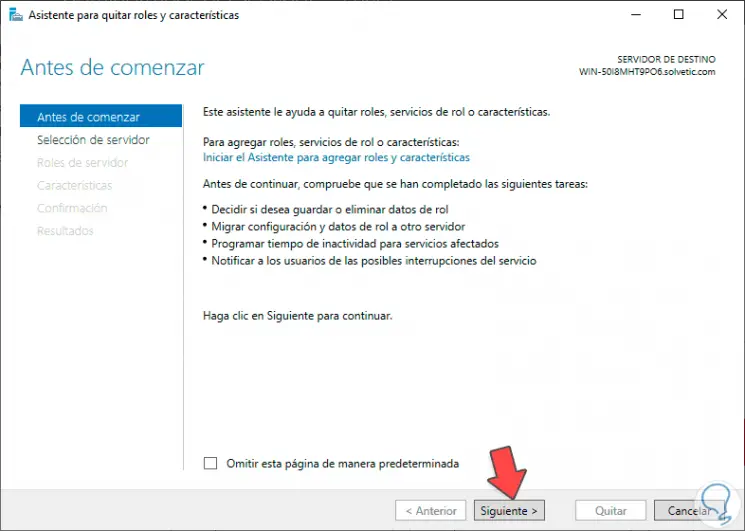
Step 3
We click Next and select the current server:
Step 4
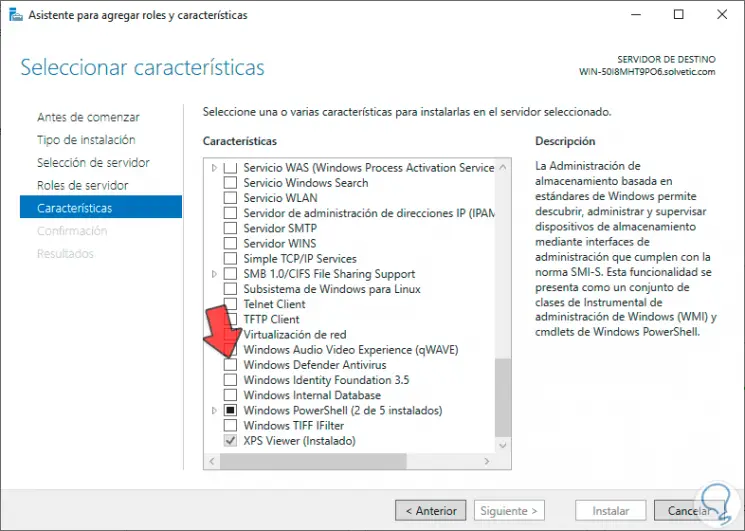
In the next window we do not edit anything and we will go to the «Features» section where we locate the Windows Defender Antivirus line:
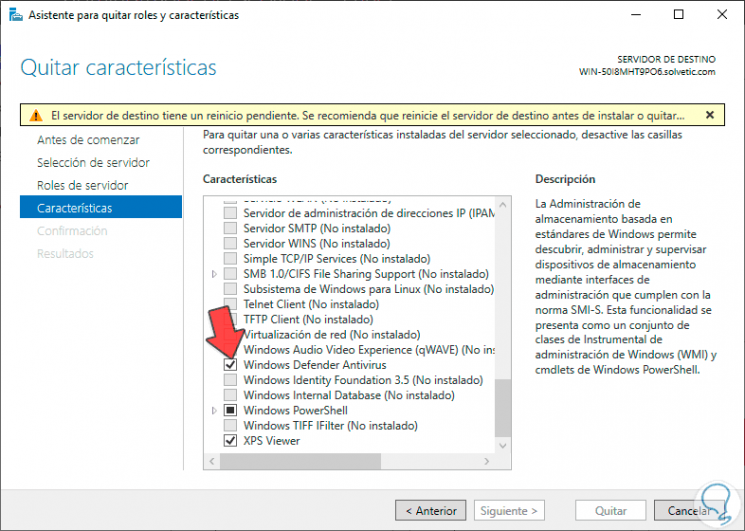
Step 5
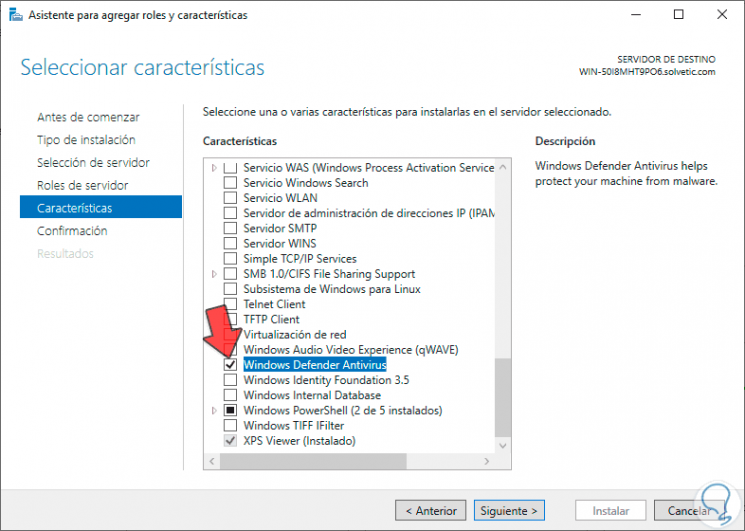
We deactivate the Windows Defender Antivirus box:
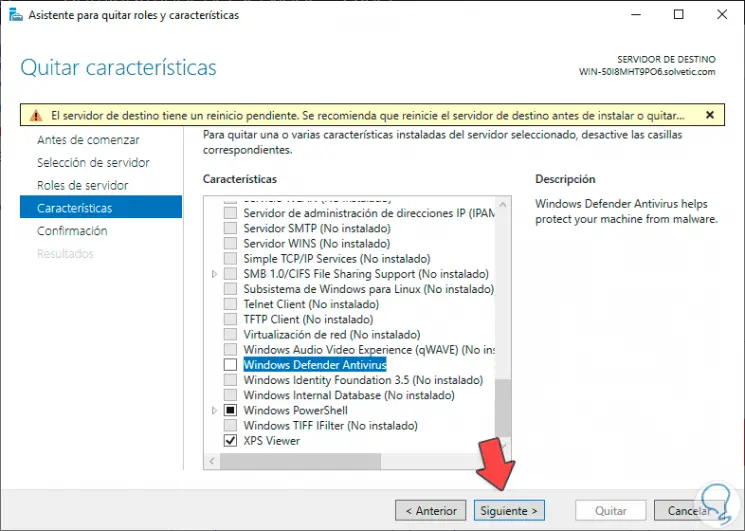
Step 6
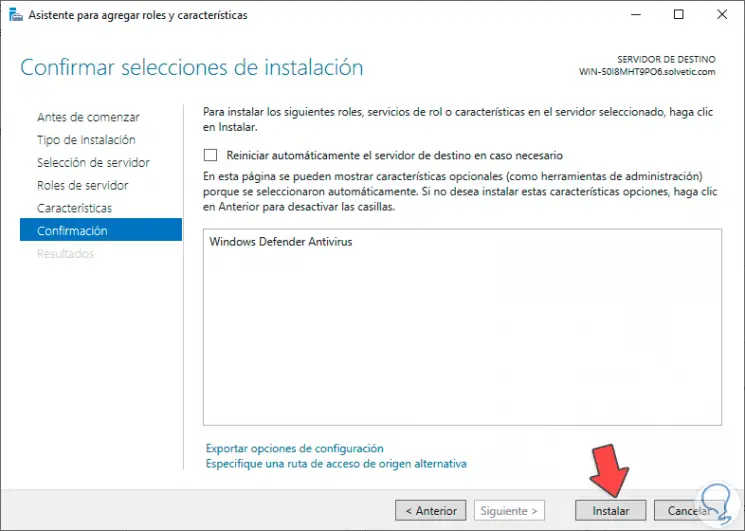
We click Next and we will see the summary of the action to execute:
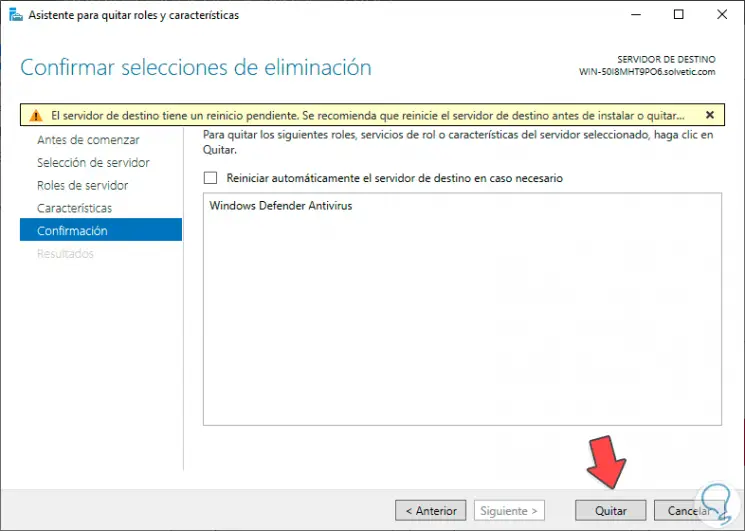
Step 7
We click on «Remove» to complete the process:
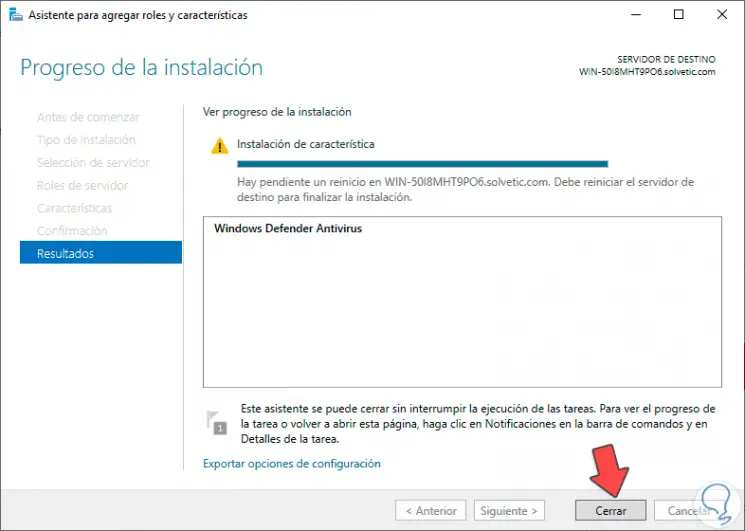
Step 8
When this comes to an end we will see the following:
Step 9
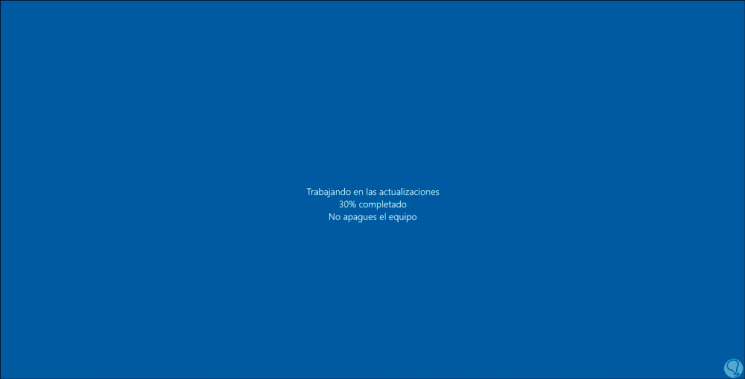
We click Close and in all cases we must restart the system to complete the uninstallation process. Once you log in, we will be without Windows Defender.
Step 10
If we want to activate it with this method, we must go to the Server Manager and select «Add roles and functions»:
Step 11
In the wizard we select the server and we will go to the «Features» section where we will locate «Windows Defender Antivirus»:
Step 12
We activate the box to enable it:
Step 13
We click Next and after confirming we are ready to install it again in Windows Server 2016 or 2019. We click Install and when the process finishes we will see the following:
Step 14
It only remains to restart the computer so that everything is active at the level of Windows Defender in the system.
We have seen different ways either to deactivate or to uninstall Windows Defender in Windows Server 2016 or 2019 but always remembering that this is one of the system’s built-in default security measures.
- Remove From My Forums
-
Question
-
On our Server 2019 Server the Windows Defender is not installing definition updates (Protection definition update failed…Error code -21447023293).
I am wondering if uninstalling and reinstalling Windows Defender will help fix the problem. How can I uninstall and reinstall Windows Defender on Windows Server 2019?
On a side note is there a way to repair Windows Defender?
Answers
-
Hello,
You can uninstall Windows Defender with PowerShell, restart your server and then try reinstalling it.
Uninstalling Windows Defender:
Uninstall-WindowsFeature -Name Windows-Defender
Installing Windows Defender:
Install-WindowsFeature -Name Windows-Defender
Best regards,
Leon
Blog:

https://thesystemcenterblog.com
LinkedIn:-
Marked as answer by
Wednesday, July 3, 2019 3:21 PM
-
Marked as answer by
On your Windows Server 2019, you can uninstall Windows Defender using a PowerShell command. In this short post, I will show you how to remove Windows Defender from your Windows Server 2019 OS.
The Windows Defender Antivirus is available on Windows Server 2016 and Windows Server 2019. You can also use the same steps to uninstall the Windows Defender on your Windows Server 2016 OS.
Windows Defender antivirus comes preinstalled with Windows Server 2016 and Windows Server 2019. In addition, the AV has built in ransomware protection feature that keeps your computer secure. However if you have a third-party antivirus or security software that you prefer to use, you may want to uninstall Defender anti-virus on your server.
Most of all in Windows Server, Windows Defender Antivirus does not automatically disable itself if you are running another antivirus product. For example when you install Sophos cloud protection on your Windows Server 2019, the Windows Defender services will still run on the server. You don’t want to run 2 security products that pretty much does same functions and eat your CPU.
We know that with other third-party anti-virus this is not the case. When you install any third-party anti-virus, it disables the other security products by default. You cannot uninstall this AV from add or remove programs. So to uninstall Windows Defender feature, you can use either PowerShell or use remove roles and features wizard.
If you want to use Windows Defender later, you can always run Install-WindowsFeature -Name Windows-Defender in PowerShell and restart the server to reinstall Windows Defender.
To uninstall or remove Windows Defender using PowerShell on Server 2019.
- Login to Windows Server 2019 with administrator account.
- Right click Start and click Windows PowerShell (admin).
- Enter the command Uninstall-WindowsFeature Windows-Defender.
- A server restart is required when you remove Windows Defender feature.
Restart the Windows Server 2019 and now you will notice Windows Defender is removed.
Back to top button