Джон, Обновлено: 6 июня 2023 г.
То же самое с предыдущей версией, Windows Server 2019 имеет собственный инструмент управления дисками, помогающий управлять разделами диска. Но он может выполнять только некоторые основные операции, он не такой мощный, как стороннее программное обеспечение. В этой статье рассказывается, что делает Windows Server 2019 Управление дисками и ограничения по сравнению с программным обеспечением диспетчера разделов диска сервера.
Содержание:
- Что Windows Server 2019 Управление дисками
- Как изменить размер раздела с Server 2019 Управление дисками
- Сравнение с диспетчером разделов диска сервера
Что Windows Server 2019 Управление дисками
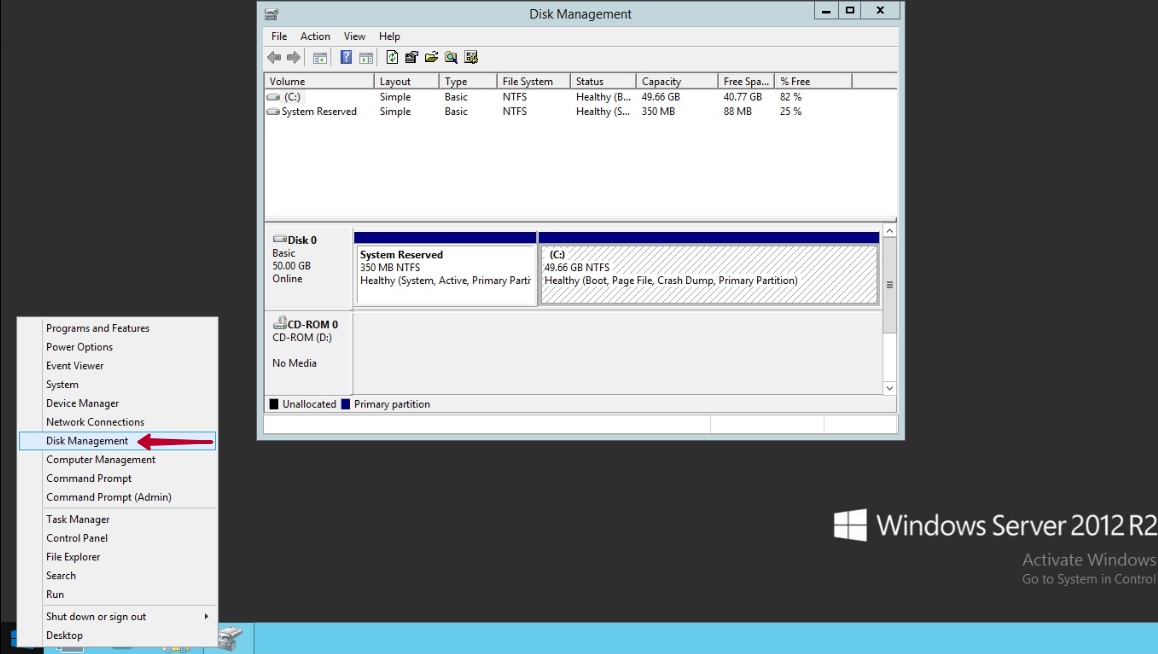
Есть 3 способа открыть Управление дисками в Windows Server 2019:
- Щелкните правой кнопкой мыши Windows значок в левом нижнем углу и нажмите Управление дисками в списке.
- Нажмите Windows и X вместе на клавиатуре, вы увидите Управление дисками в списке.
- Нажмите Windows + R чтобы открыть Run, наберите diskmgmt.msc и нажмите Enter.
Щелкните правой кнопкой мыши раздел или передний диска, вы увидите варианты. Недоступные параметры выделены серым цветом, это означает, что тип диска/раздела текущей конфигурации не соответствует требованиям этой функции.
Для выделенного раздела параметры включают в себя:
- Новый Spanned Volume
- Новый Полосатый Объем
- Новый зеркальный том
- Новый том RAID-5
- Преобразовать в динамический диск
- Конвертировать в GPT диск
- Не в сети
- Объекты

Для диска параметры включают в себя:
- Откройте корневой каталог в проводнике
- Пометить раздел как активный
- Изменить букву диска и путь
- Формат
- Расширить том
- Сжать том
- Добавить зеркало
- Удалить раздел
- Объекты

Помимо базовой способности создавать, удалять и форматировать раздел, Windows Server 2019 Управление дисками имеет некоторые расширенные возможности.
Управление динамическими томами:
Server 2019 Управление дисками может создавать и управлять динамическими томами Simple, Mirrored, Striped, Spanned и RAID 5.
Динамические тома диска потребляют много ресурсов сервера, если один диск поврежден, все данные на этом томе будут потеряны. Стоимость аппаратного обеспечения теперь намного дешевле, поэтому большинство серверов используют аппаратные RAID-массивы вместо динамического тома.
Преобразование диска:
Управление дисками имеет возможность конвертировать диск между MBR и GPT, конвертировать диск между Basic и Dynamic.
Тем не менее, он может конвертировать только базовый диск в динамический без потери данных. Чтобы преобразовать динамический диск в базовый или конвертировать между MBR и GPT, необходимо удалить все разделы на диске.
Изменить размер раздела:
То же самое с предыдущей версией, Server 2019 Управление дисками имеет Сжать том и Расширить том функции, помогающие изменить размер выделенного раздела без потери данных (в большинстве случаев).
Но из-за некоторых ограничений обеих функций, Управление дисками не может расширить раздел сжимая еще один. Кроме того, только NTFS раздел может быть изменен.
Как изменить размер раздела с Server 2019 Управление дисками
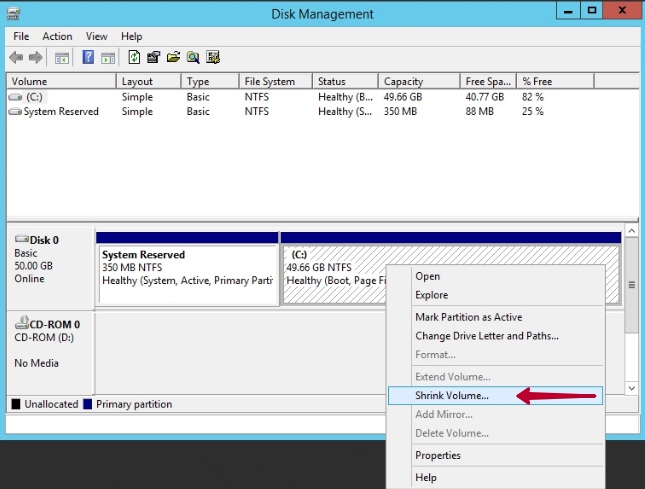
Сократить раздел в Server 2019 Управление диском:
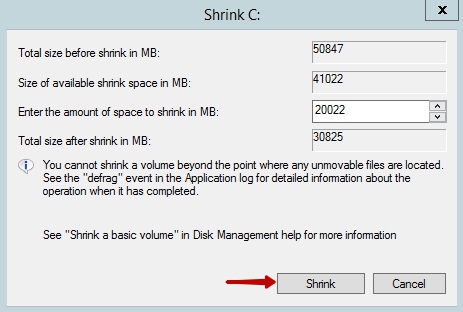
- Щелкните правой кнопкой мыши раздел NTFS в разделе «Управление дисками» и выберите Сжать том.
- Введите и количество места и нажмите Сжиматься, (Если вы не введете сумму, будет использовано максимально доступное пространство.)
Недостатки функции «Уменьшить объем»:
- Нераспределенное пространство может быть сделано только на правильно пока сжимается.
- Он может уменьшить пространство только в том случае, если на этом диске есть неподвижные файлы.
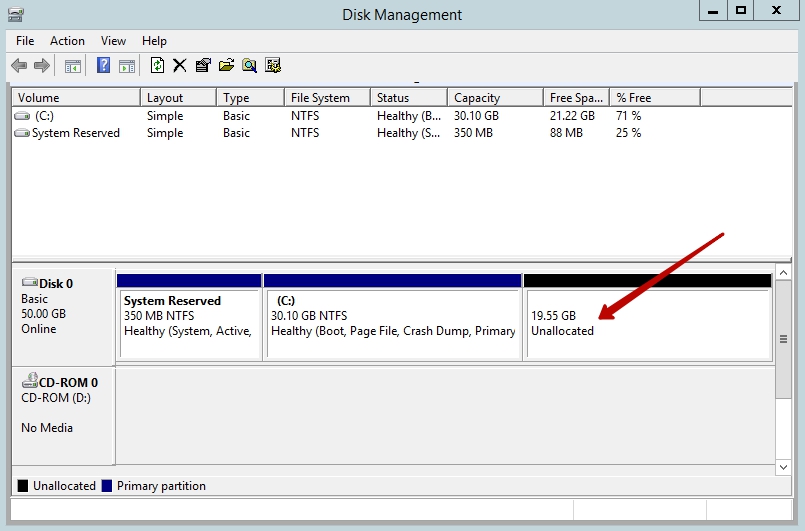
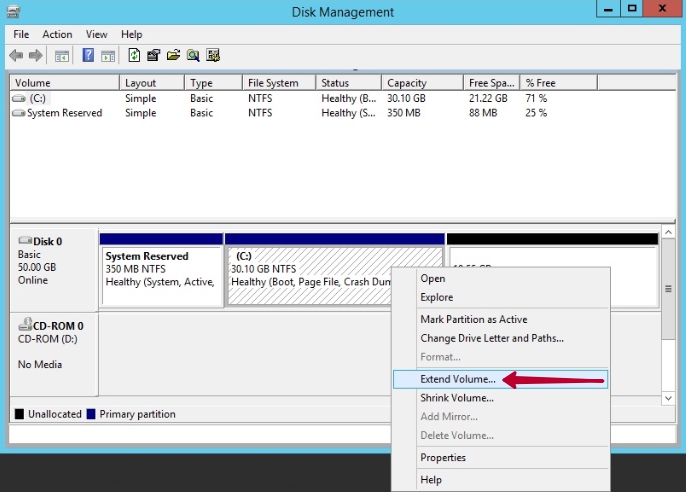
Расширить раздел в Server 2019 Управление диском:
- Щелкните правой кнопкой мыши правый непрерывный раздел (D
 и выберите «Удалить том».
 - Щелкните правой кнопкой мыши раздел, который вы хотите расширить (C выберите Расширить том.
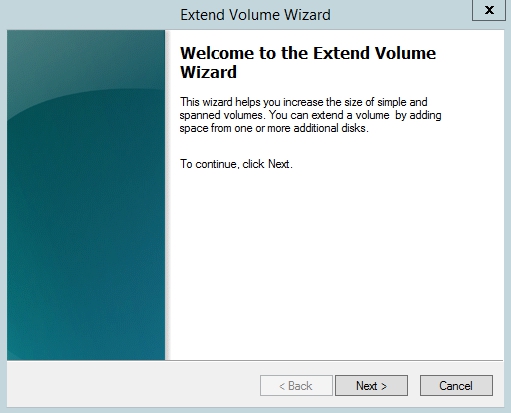
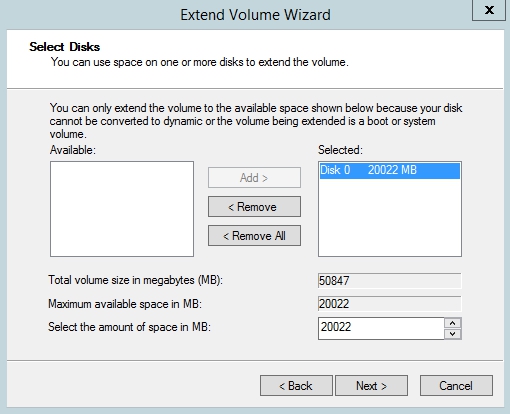
- Просто нажмите Следующая к Завершить во всплывающем окне мастера расширения тома.
 и выберите «Удалить том».
Недостатки функции «Увеличить громкость»:
- Должно быть примыкающий Нераспределенное пространство на правильно раздела, который вы хотите расширить, в противном случае, Опция расширения отключена.
- Если диск D логический, ты все еще невозможно продлить диск C: даже после удаления D.
Следуйте лучшему методу, чтобы изменить размер раздела на Windows Server 2019.
Сравнение с диспетчером разделов диска сервера
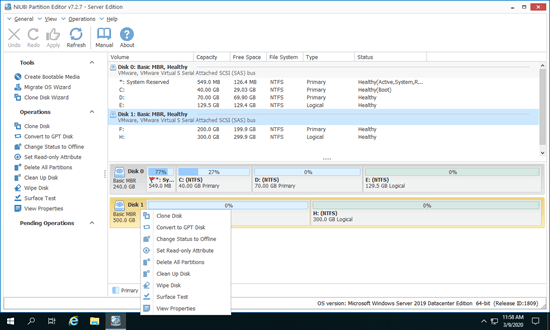
Сравнивая с Windows Server 2019 встроенный инструмент управления дисками, стороннее программное обеспечение намного мощнее. Таких программ на рынке много, графический интерфейс и функции у всех одинаковые. Но лучше, чем другое программное обеспечение, NIUBI Partition Editor намного безопаснее и быстрее благодаря передовым технологиям:
- Виртуальный режим — все операции сначала отображаются как ожидающие, реальные разделы диска не будут изменены, пока не будет нажата кнопка «Apply» чтобы подтвердить.
- Отменить-на-хорошо — если вы применили неправильные операции, вы можете отменить текущие операции в любой момент без разрушения разделов.
- 1 второй откат — если при изменении размера раздела обнаружена какая-либо известная ошибка, он автоматически мгновенно возвращает сервер к исходному состоянию.
- Фильтр алгоритм перемещения файлов — перемещать и расширять раздел на 30–300% быстрее.
- Hot Clone — клонировать диск в Windows без прерывания работы сервера, поэтому вы можете регулярно клонировать систему в качестве резервной копии для быстрой загрузки.
Скачать NIUBI Partition Editor и вы увидите главное окно со структурой разделов диска и другой информацией справа. Доступные операции с диском или разделом перечислены слева и по щелчку правой кнопкой мыши. Недоступные операции будут скрыты, чтобы интерфейс оставался чистым.

Доступные операции для раздела:
- Изменить размер тома (уменьшить и расширить)
- Переместить расположение раздела
- Объединить два смежных тома за 1 шаг
- Скопировать том в нераспределенное пространство
- Преобразовать раздел между логическим и основным
- Конвертировать NTFS в FAT32
- Оптимизировать файловую систему
- Изменить букву диска (например, D:)
- Изменить метку (добавить или изменить имя раздела)
- Сделать активным
- Проверьте целостность файловой системы
- Дефрагментация для улучшения производительности
- Скрыть из проводника
- Удалить (файлы можно восстановить)
- Формат тома для использования в качестве нового
- Протрите (стереть данные навсегда)
- Тест поверхности (сканирование поврежденных секторов)
- Исследуйте (просмотр файлов / папок с каталогом)
- Посмотреть недвижимость

Доступные операции на весь диск:
- Инициализировать новый диск
- Изменить статус на оффлайн или онлайн
- Установить атрибут только для чтения
- Протрите диск (не может быть восстановлено)
- Тест поверхности
- Посмотреть недвижимость
- Клонировать диск для переноса данных и ОС
- Конвертировать MBR диск в GPT
- Удалите все разделы
- Очистка диска
Скачать
Изучай как управлять разделом диска для Server 2019 с этим мощным инструментом.
The steps to create New Partition in Windows Server 2022/2019/2016 are discussed here in a step-by-step guide. Four different methods are mentioned and you can follow any one that is suitable for you:
| Workable Solutions | Step-by-step Troubleshooting |
|---|---|
| Fix 1. Use Thrid-Party Partition Manager Software | Step 1. Check for free space…Full steps |
| Fix 2. Use Disk Management | Step 1: Click «This PC» on your computer…Full steps |
| Fix 3. Use CMD | Step 1 — Press the «Win+R» buttons together on your keyboard…Full steps |
| Fix 4. Use PowerShell | Step 1. Right-click the Windows icon, select Run, type Powershell, and click «OK» to open it…Full steps |
The Necessity of Creating New Partitions in Windows Server
Whenever we purchase a new laptop/server/computer that has windows inbuilt, the hard disk always has a preset single partition unless someone has done partition deliberately. It is a default setting that every hard disk comes with. Now you may not see any issue with this initially, but quite a few genuine issues get solved once you partition your drive. Such as:
- Easy backing up of files
When you organize your drive with multiple partitions, it becomes easy to manage and backup your files in separate sections. Imagine you can have one complete partition to save your essential backed-up files.
- Perfect management
Partitioning your system will allow you to segregate your files based on the criteria you select. This will help you not mix up files between the 100 folders you create. For example, you can have three partitions for OS, another for work, and the last for personal.
- Better probability of retrieving data
When you have partitioned your system and accidentally lose access to any file. For example, you delete something. It becomes easier to retrieve that file.
- More than a single operating system
Once you create multiple parts in your server, you can install multiple operating systems in different partitions.
4 Methods to Create New Partitions in Windows Server 2019/2016 and Older Servers
Several ways are there following which you can partition your drives into your server. This blog will describe each method, starting with the easiest one coming first and the hardest one the last. And just for the information, the ascending order of difficulty of different methods is as follows.
- Method 1. Create New Partitions via Thrid-Party Partition Manager Software — Easiest
- Method 2. Create New Simple Volumes Using Disk Management — Medium
- Method 3. Create a New Partition Using CMD — Complex
- Method 4. Create a New Volume Using PowerShell — Complex
Method 1. Create New Partitions in Windows Server 2019/2016 Using Third-Party Software
Using third-party software is the easiest way to create new divisions in your hard drive. And the best tool available on the internet for disk partitioning is none other than the EaseUS Partition Master Enterprise. The tool is undoubtedly the best in the task as it has:
- One of the best interfaces which makes using the tool easy to use.
- Accurate and fastest execution time.
- Has all in one disk management toolkit which lets you manage and handle your hard drives properly post process.
EaseUS Partition Master is the best tool for both Windows and Mac-based computers. And it can be downloaded from their official website /partition-manager/epm-enterprise.html.
EaseUS Partition Master Enterprise
Your trustworthy Windows Server disk manager.
- Extend System drive, combine/split partitions.
- Clone disk, migrate OS to HDD/SSD.
- Convert MBR to GPT, GPT to MBR, no data loss.
- 1-click adjust disk layout, create volumes at one time.
24/7 Tech Chat
Free Inquiry
Let’s see how to create new partition on your Windows Server computers now:
Step 1. Launch EaseUS Partition Master to check for free space at the Partition Manager section.
- If your hard drive has unallocated space, jump to Step 3 to create partition.
- If the hard drive has no unallocated space, continue with Step 2.
Step 2. Shrink a disk partition to create unallocated space.
Right-click on the target drive partition with a lot free space and select «Resize/Move».
Drag either end of the partition rightwards or leftwards to shrink the partition size so as to get ample unallocated space. You can visually know how much space you’ve decreased in the «Partition size» area. Click «OK».
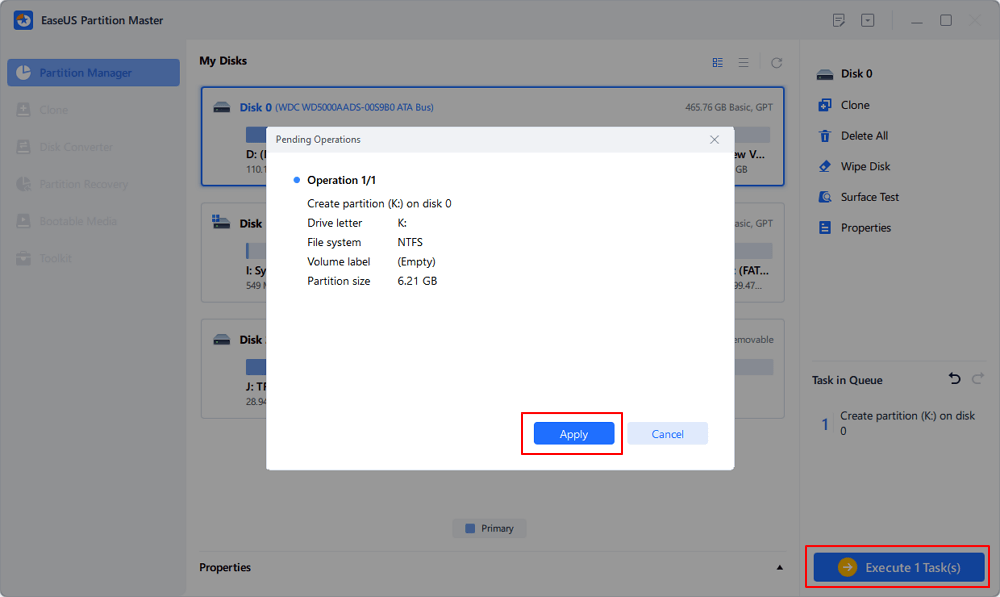
Click «Execute xx Task» and then «Apply» to save all the changes.

Go back to Partition Manager, there should be unallocated space appearing on the same disk and you can continue with the next step to create new partition on your hard drive.
Step 3. Create a new partition with unallocated space on the target hard drive.
Right-click on the unallocated space and choose «Create».
Customize the partiton size, partition drive letter, partition label, file system (NTFS, FAT32, EXT2/3/4, exFAT) and more in the Advanced Settings. Click «OK».
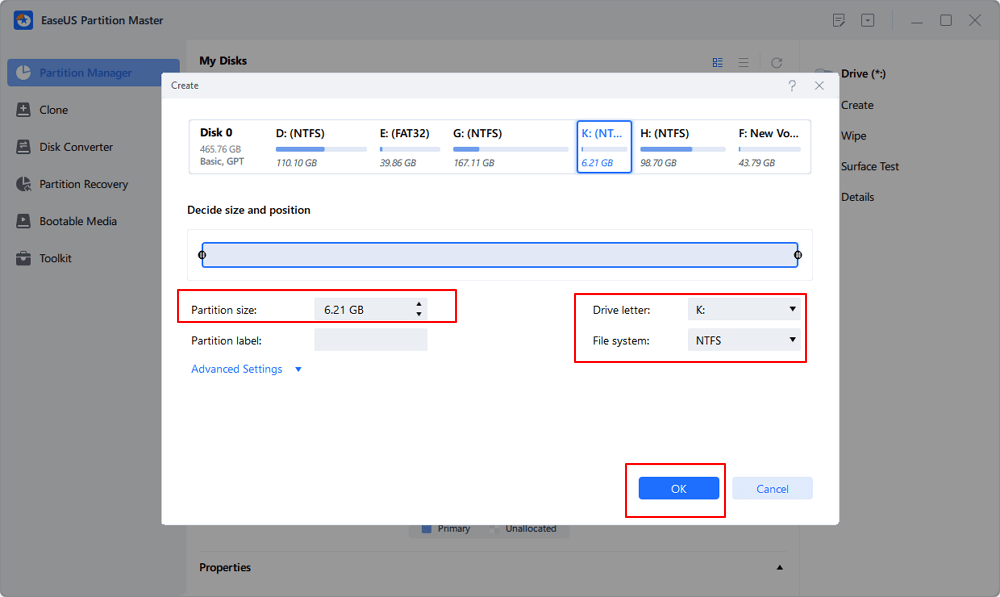
Finally, click «Execute * Task» and «Apply» to complete creating partition with the unallocated space on your disk. Repeat the steps to partition a hard drive and get many more partitions.
Method 2. Create New Simple Volumes in Windows Server 2019/2016 Using Disk Management
Starting with the easiest method possible. Disk management is a built-in tool in Windows that allows you to organize your server partitions and volumes. Follow the below steps to add or modify your current partition.
Step 1: Click on the «This PC» option on your computer. And then go to the manage option on the top. And then select «Disk Management.»
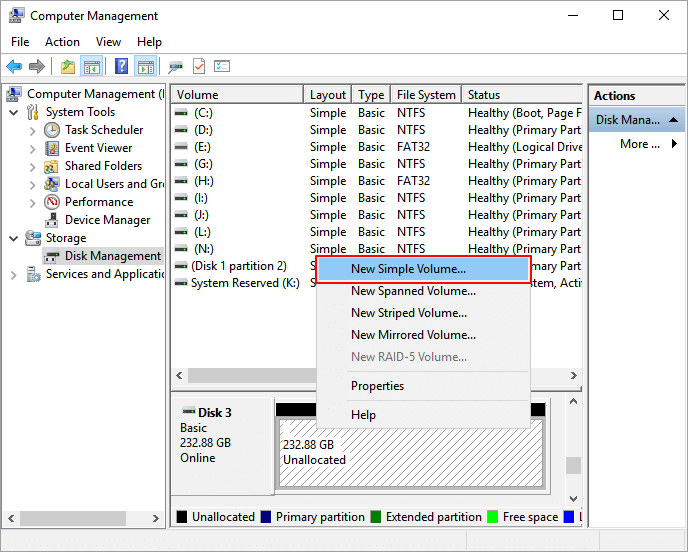
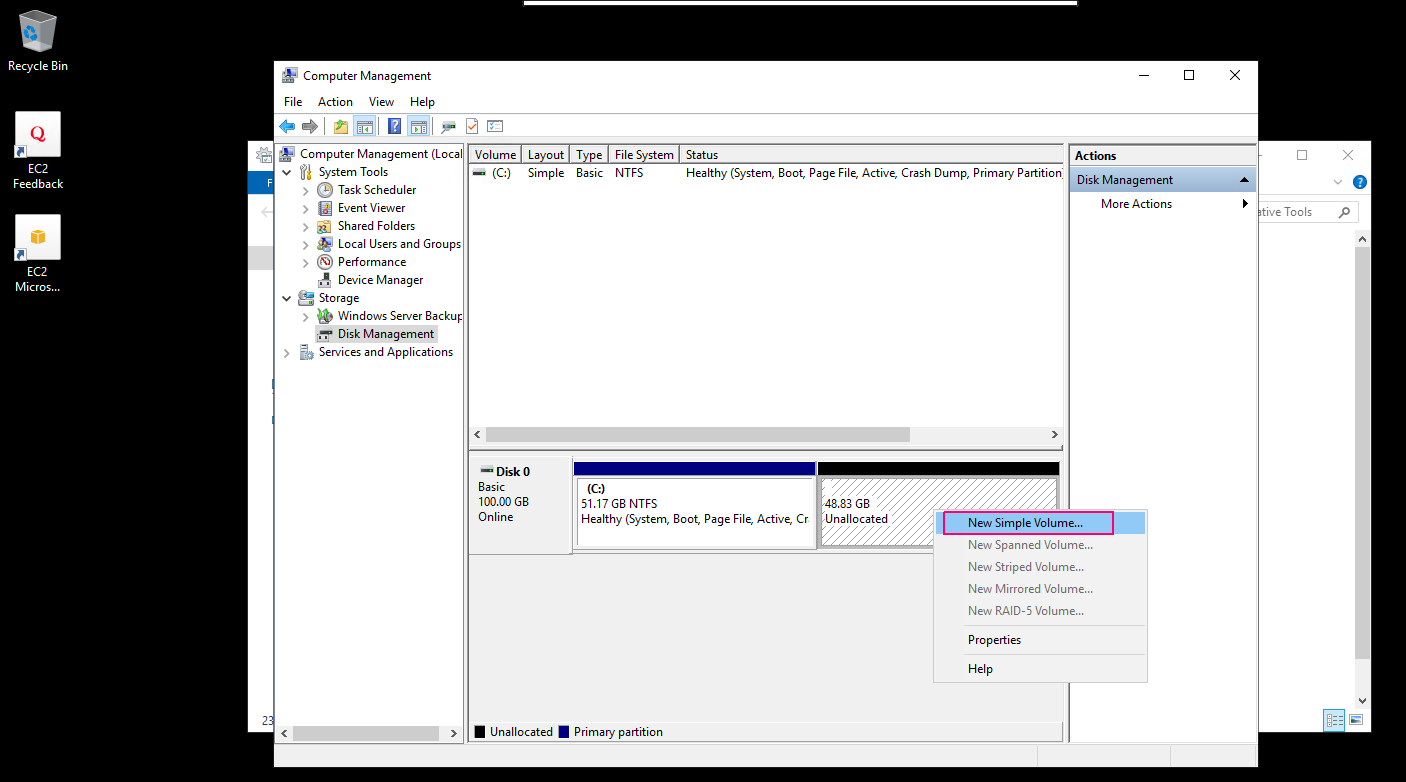
Step 2: Select the «unallocated space» option and click on «new simple volume.»
Step 3: Click on the «next» button in the popped up New simple volume wizard.
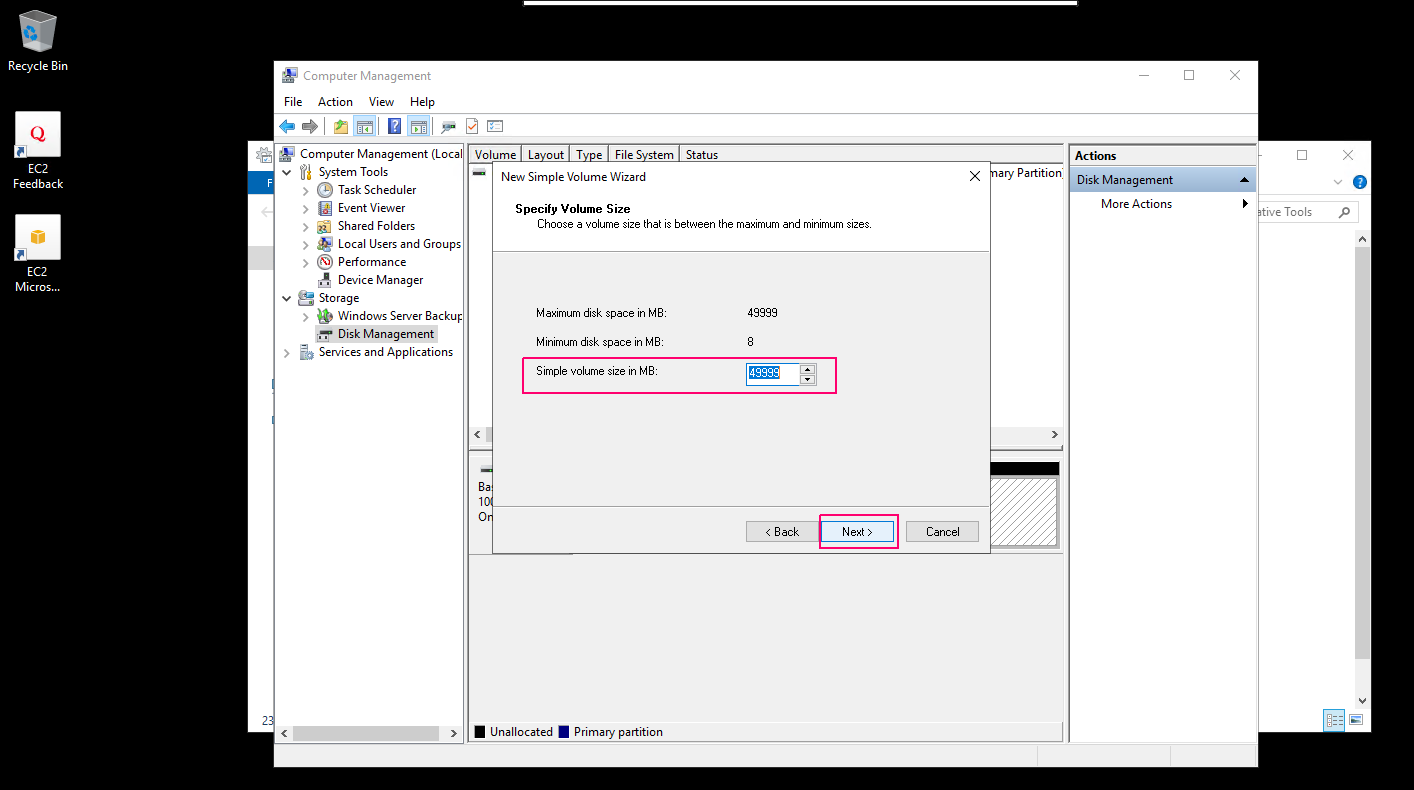
Step 4: Put your desired size in the «simple volume size» blank.
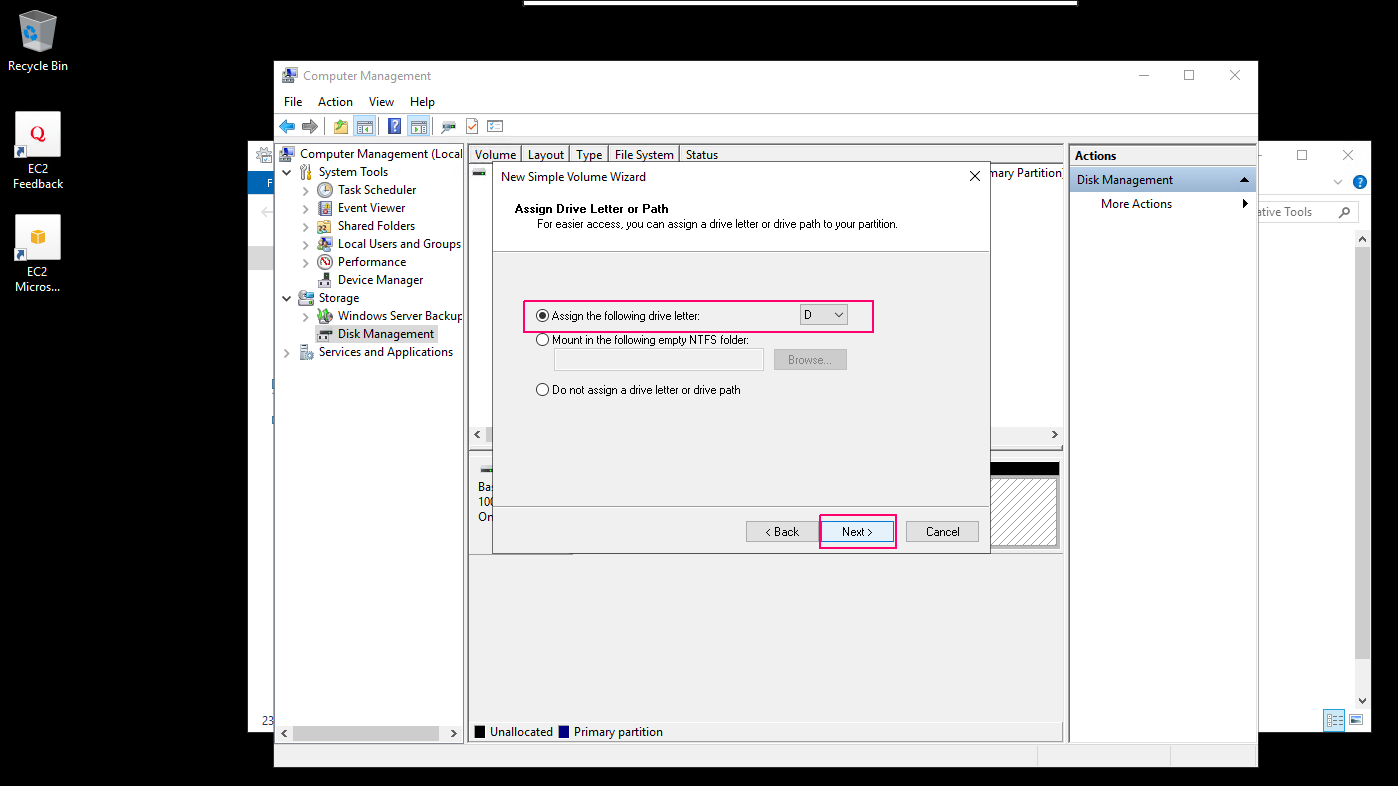
Step 5: Mention the name of the drive, for example, E, F, G, etc.
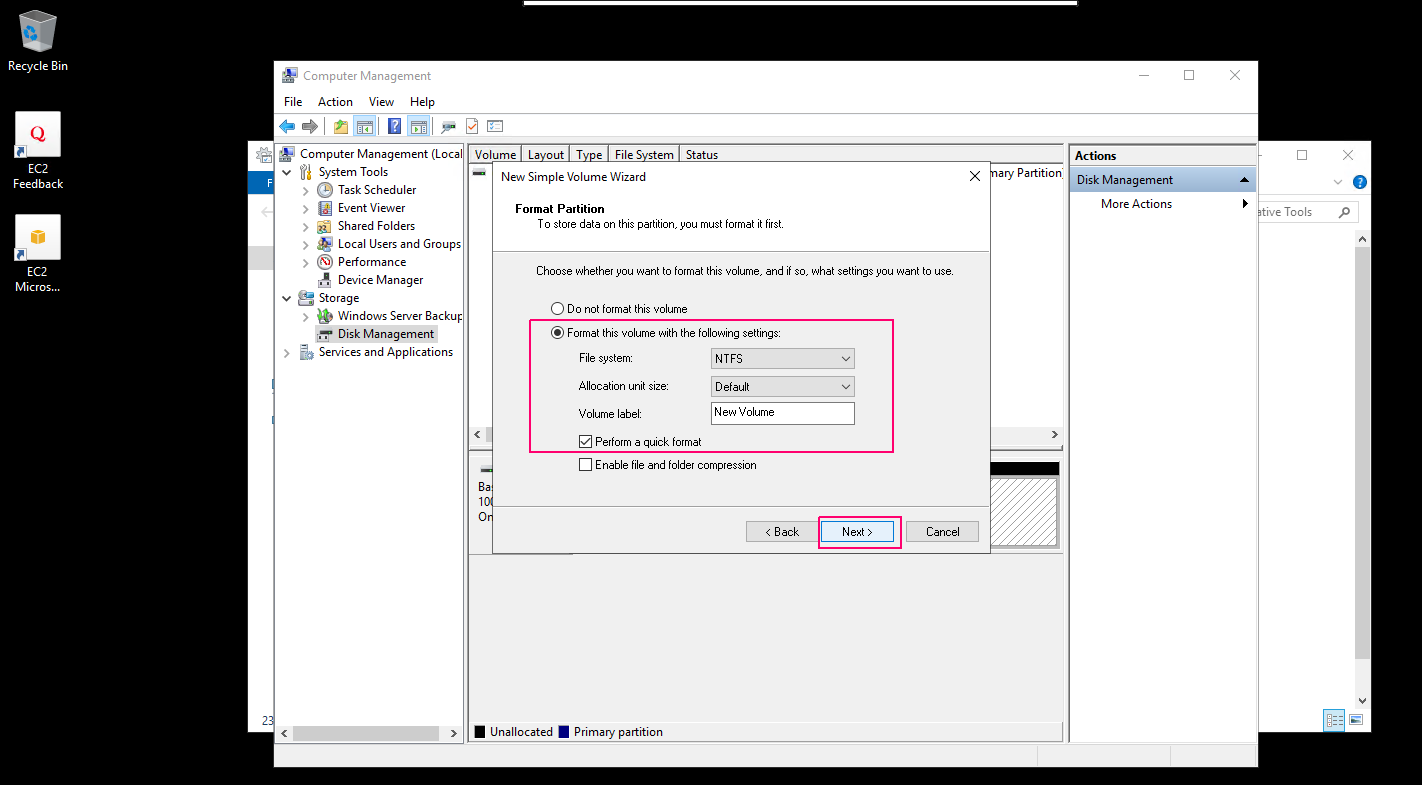
Step 6: Selection of format is also possible for a different type of file system—for example, exFAT, NTFS, FAT, FAT32, etc. You can also custom-size the allocation unit size. If you don’t want to, then select «default» and click next.
Complete! You will have a perfectly partitioned disk in a few minutes if you have done the above steps correctly.
Method 3. Create a New Partition in Windows Server Using CMD
The last method will be to use the Command prompt of your computer. It is kept as the most complex method since not everyone is familiar with the command prompt. Hence only those who have used CMD before or know a thing or two about this should try this in the first attempt. Others should try the above options and should use this only if nothing works.
Step 1 — Press the «Win+R» buttons together on your keyboard. This is to open the «Run» option on your computer.
Step 2 — Type «CMD» in the text section and click enter to go forward.
Step 3 — After opening the command prompt, enter the below-mentioned commands, in the same manner, they have been mentioned. Make sure you use the correct cases for each letter, and don’t forget to click enter after each command mentioned.
- diskpart
- list disk
- select disk n ( instead of n, you must use the number of the disk where you want to create the partition. Suppose we want the 1st one to be partitioned, then write select the disk 1)
Step 4 — If your disk doesn’t have unallocated space, please follow the below mentioned commands and then move forward
- list disk
- list volume
- select volume number
- shrink desired=(*MB)
Step 5 — Now, you can move on and type the following command to create a new simple volume, and set its file system to NTFS with the unallocated space:
- create partition primary size=*MB
- assign letter=G (choose any name)
- select volume number
- format fs=ntfs quick
Step 6 — Click «Ener».
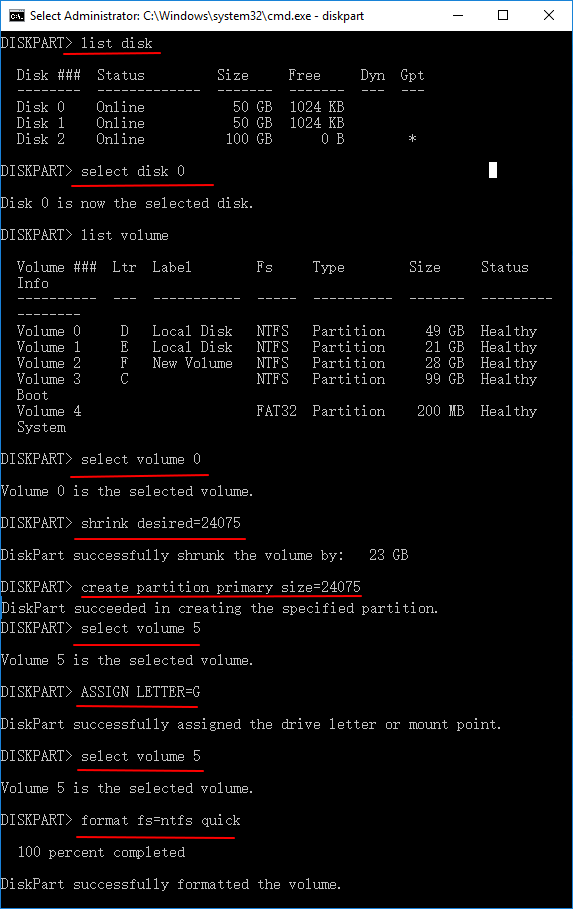
Complete! You have completed the partitioning of your system.
Method 4. Create a New Volume in Windows Server 2019/2016 Using PowerShell
The last method mentioned is the usage of PowerShell for partitioning. Again, use this only if you are familiar with the PowerShell. Otherwise, use the above steps as those will do the work most efficiently. Type the below commands mentioned to start the partitioning process.
Here we are partitioning 10GB and assigning the letter «G» to the new drive using PowerShell:
Step 1. Right-click the Windows icon, select Run, type Powershell, and click «OK» to open it.
Step 2. Type the following command lines in Powershell one by one and hit Enter each time:
- New-Partition –DiskNumber 0 -Size 20gb -DriveLetter G
- Get-Partition — DiskNumber 0
- Format-Volume — DriveLetter G — FileSystem NTFS
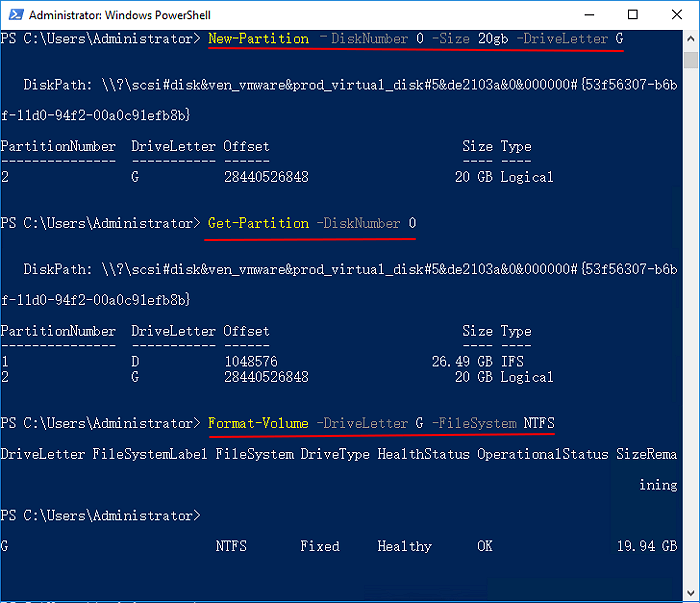
Done! If you followed the steps mentioned above and commands correctly, you are just minutes away from a successful partition.
Conclusion
There are so many methods to create a partition for your server. The best method is to use the CMD or the third-party software in the market. But always be careful of all the fraud and virus-laden software that can harm your server. Use trusted tools that can do your work easily, like the EaseUS Partition Master tool. Using third-party tools has one of the biggest advantages, and it does not require too much technical knowledge.
Anyone having little computer knowledge can create a partition using any third-party software.
24/7 Tech Chat
Free Inquiry
Besides EaseUS, numerous other tools can be used at the user’s discretion.
Arranging the methods will help you choose the best method to follow. Only use a more complex procedure if the ones above it are not working out for you, or you cannot do it. In any case, you can always make use of the internet and learn more about the procedures. You can refer to our blogs to educate yourself more about disk partitioning methods.
Steps to create a new disk partition in window server 2019 base
Hello,In this blog we are creating a new disk partition in window server 2019 base.Using disk partition or disk slicing, we are creation of one or more regions on secondary storage.These regions are called partitions.Each partition can be managed separately.
There are some steps to create a disk partition in window server 2019 base:
- Login to window server 2019 base.
- Click on Start & select Windows Administrative.
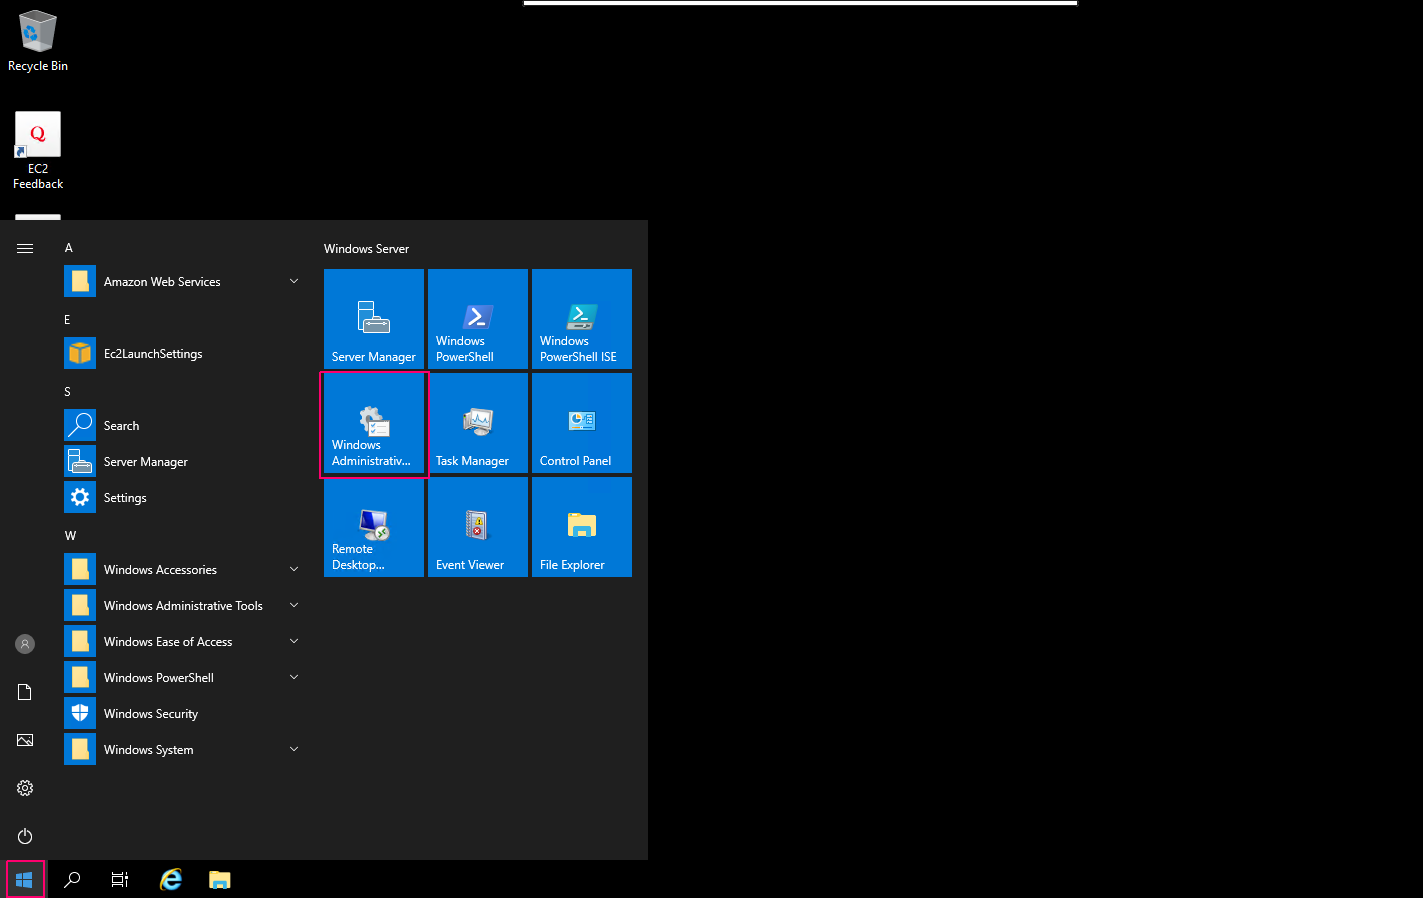
- Click on Computer Management.
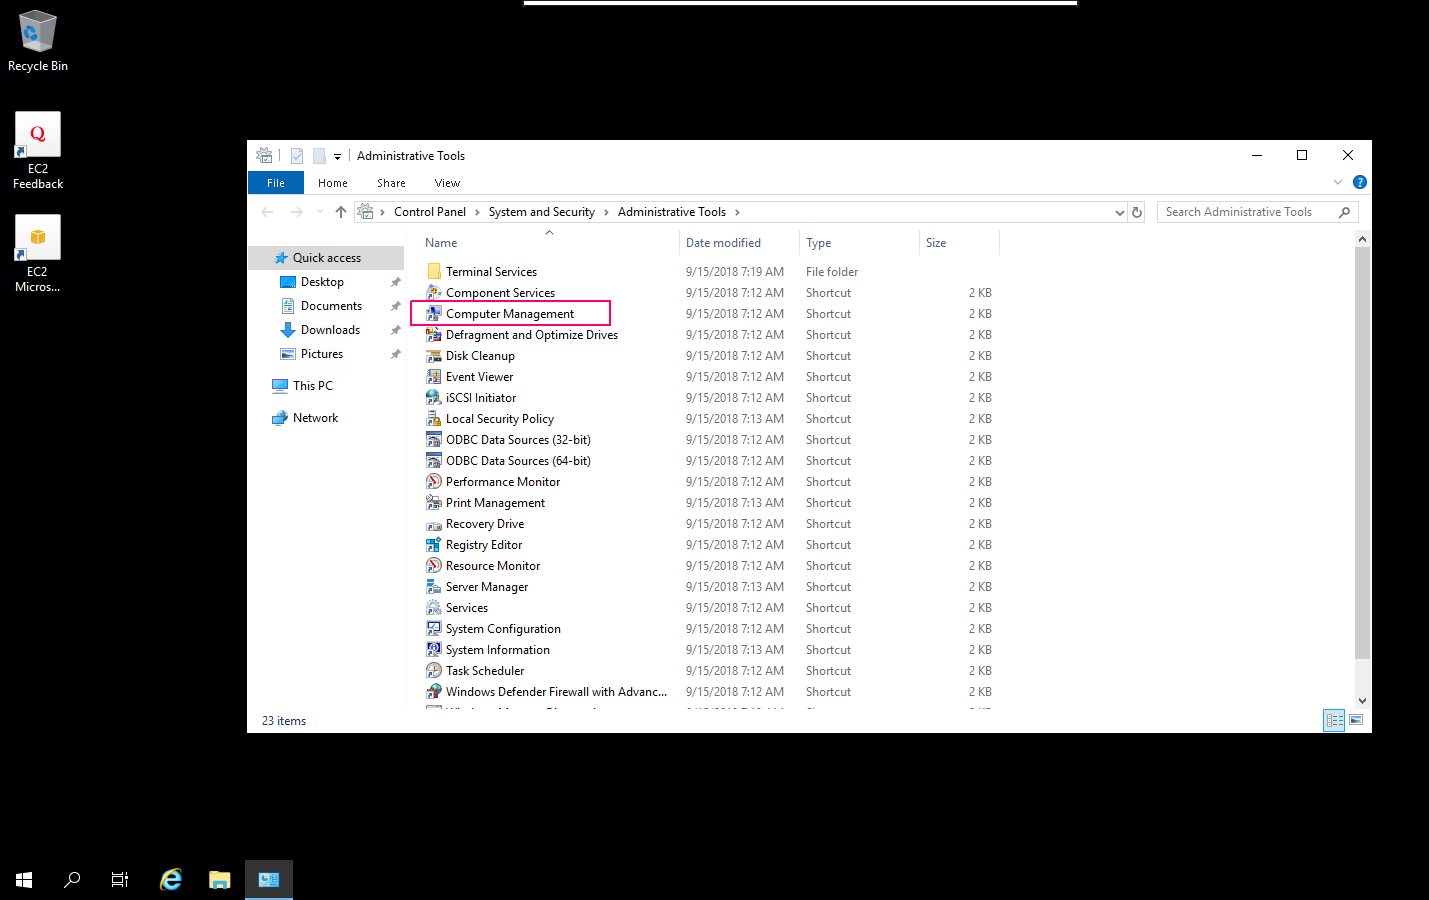
- Click on Disk Management.
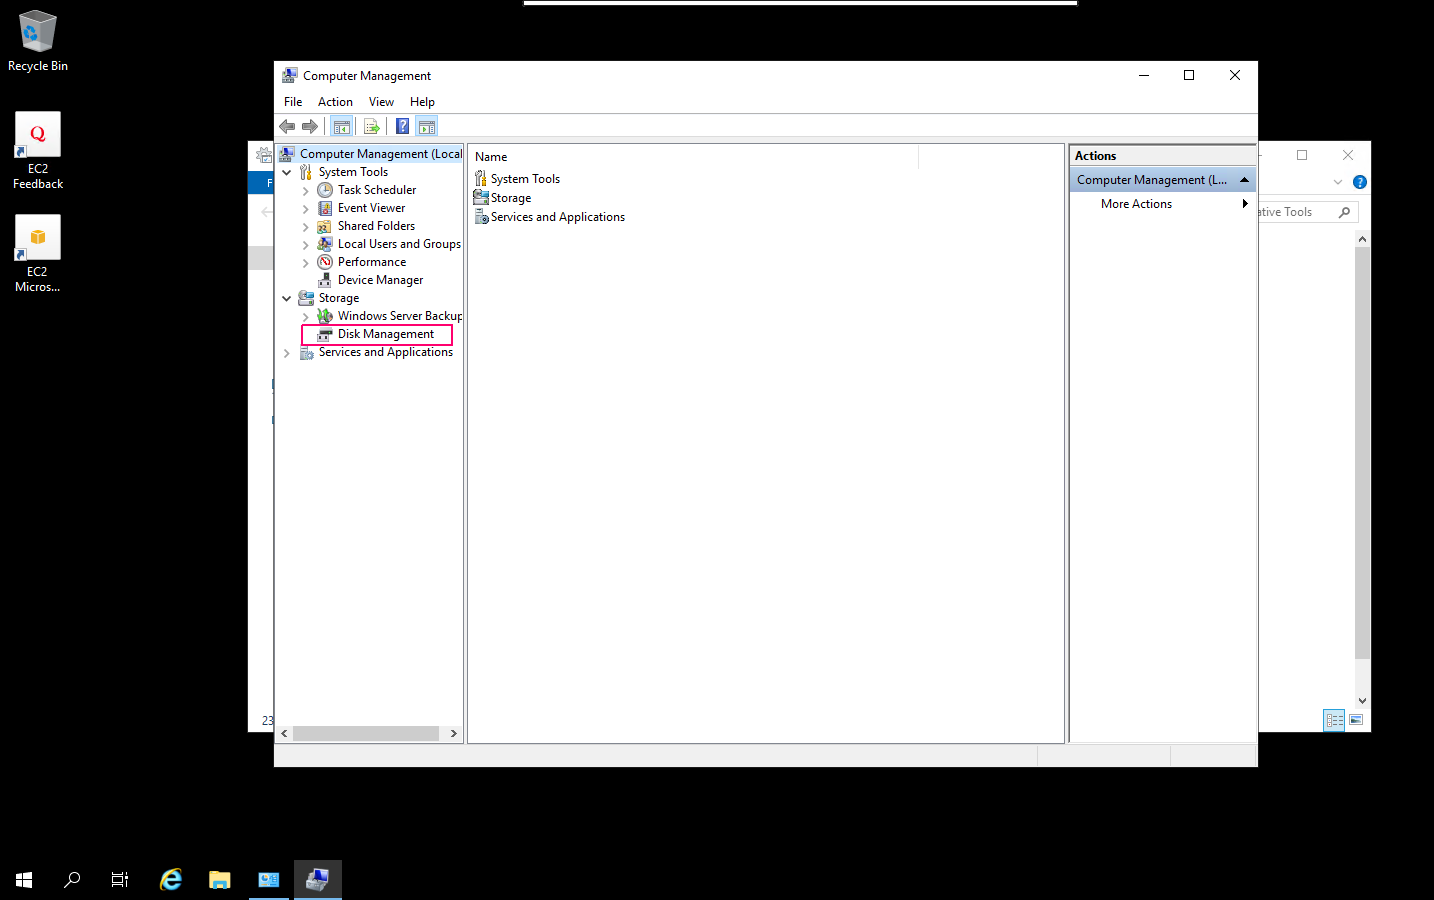
- Here, we can see the available disk.
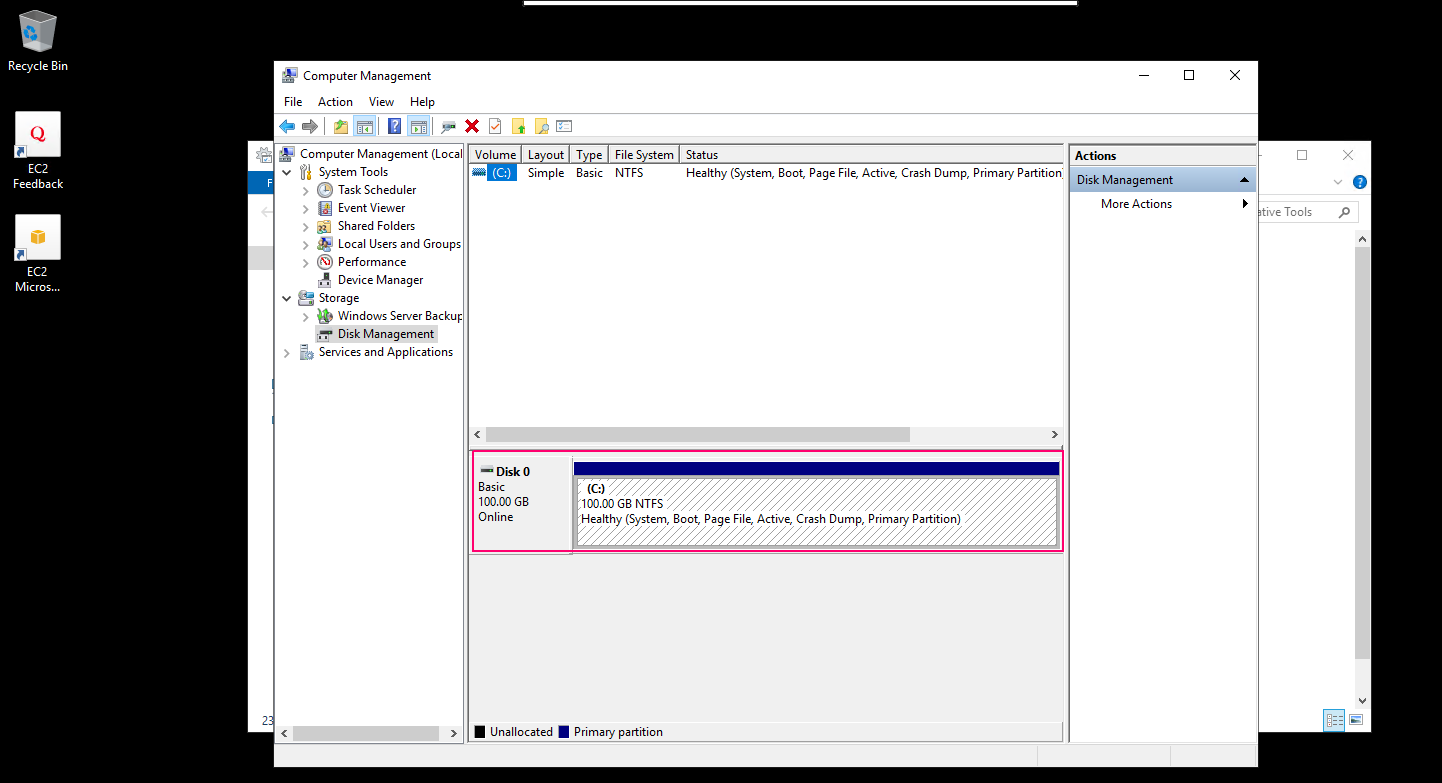
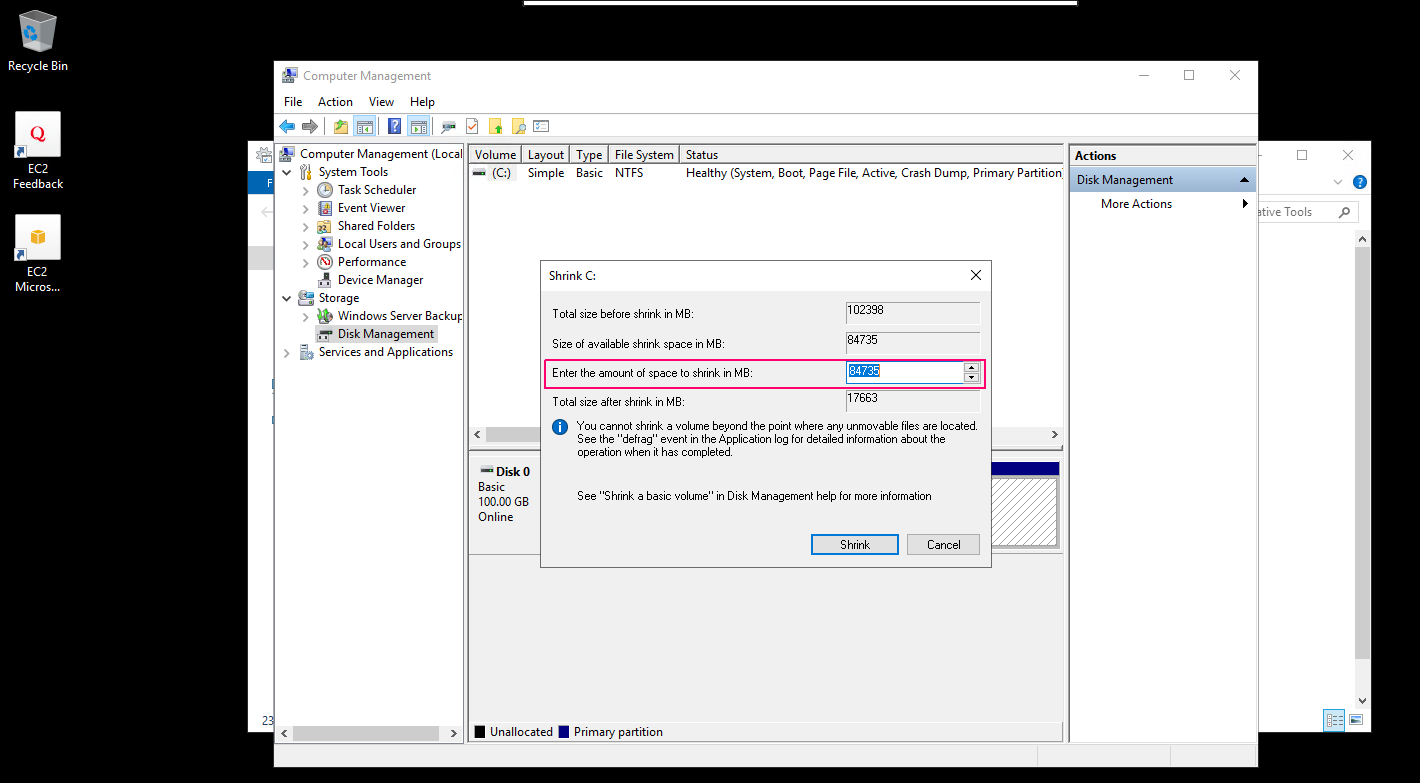
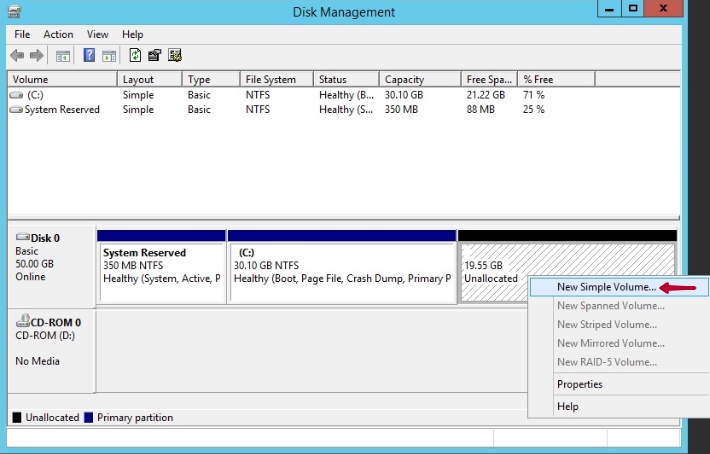
- First we need to create a Unallocated space,right click on Available local disk (C:) then select Shrink Volume option.
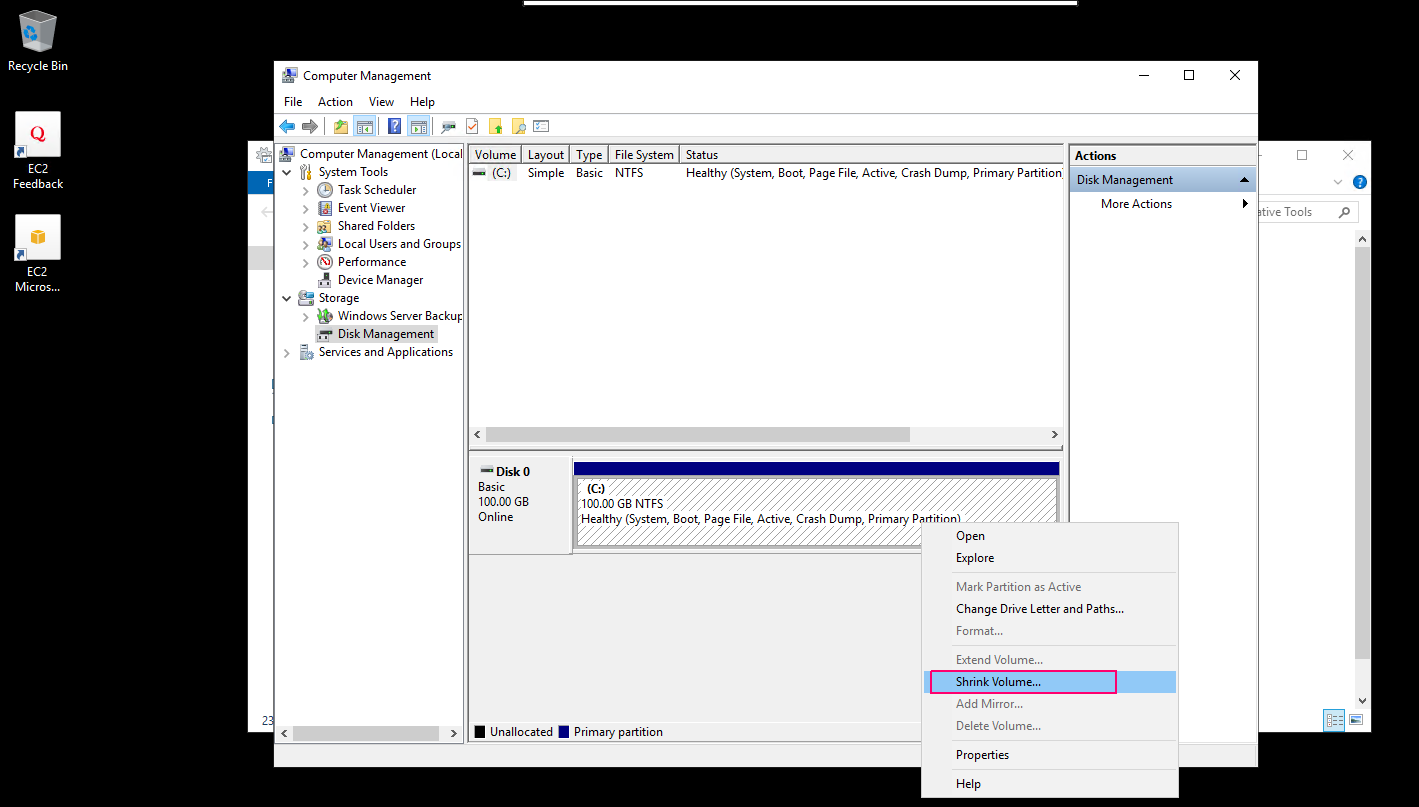
- Enter the amount of space to shrink in MB & Click on Shrink.
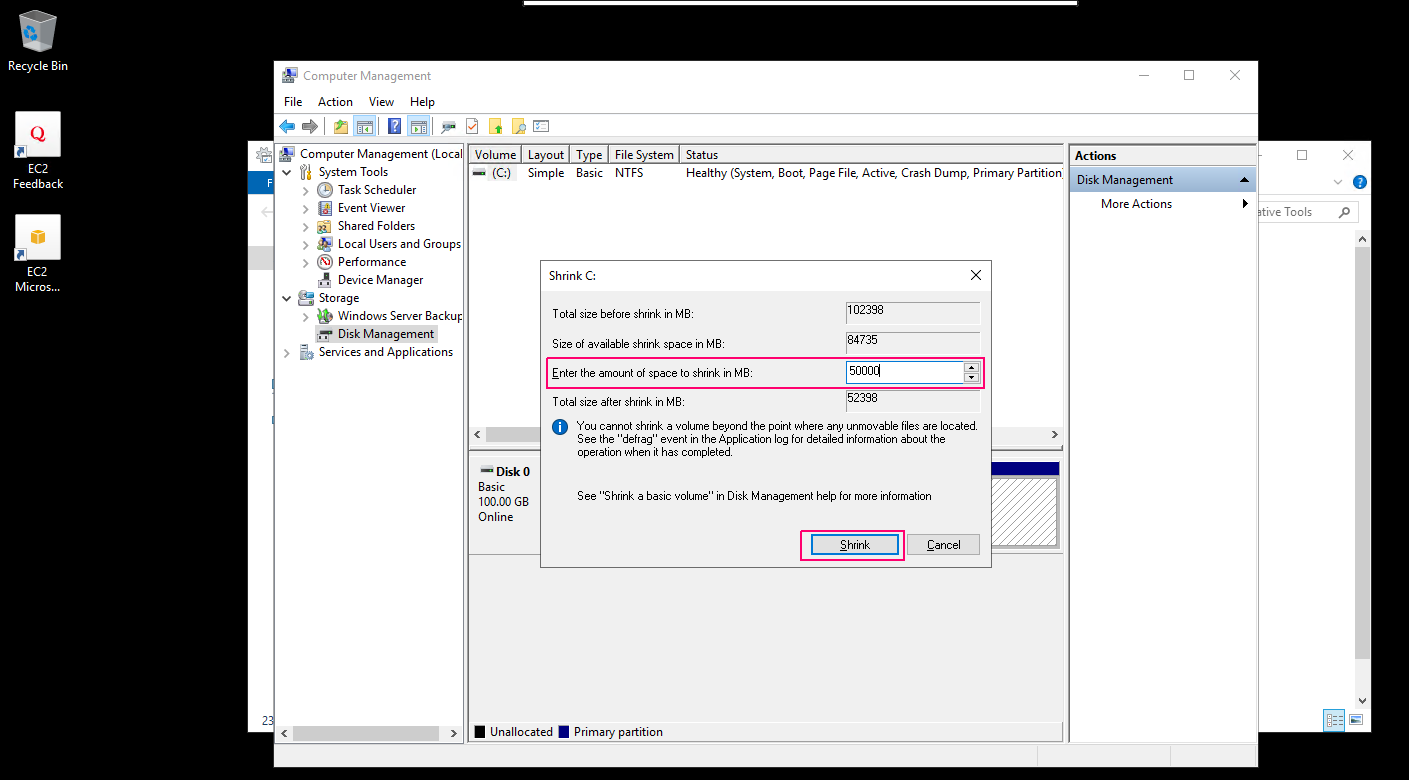
- Unallocated space is created.
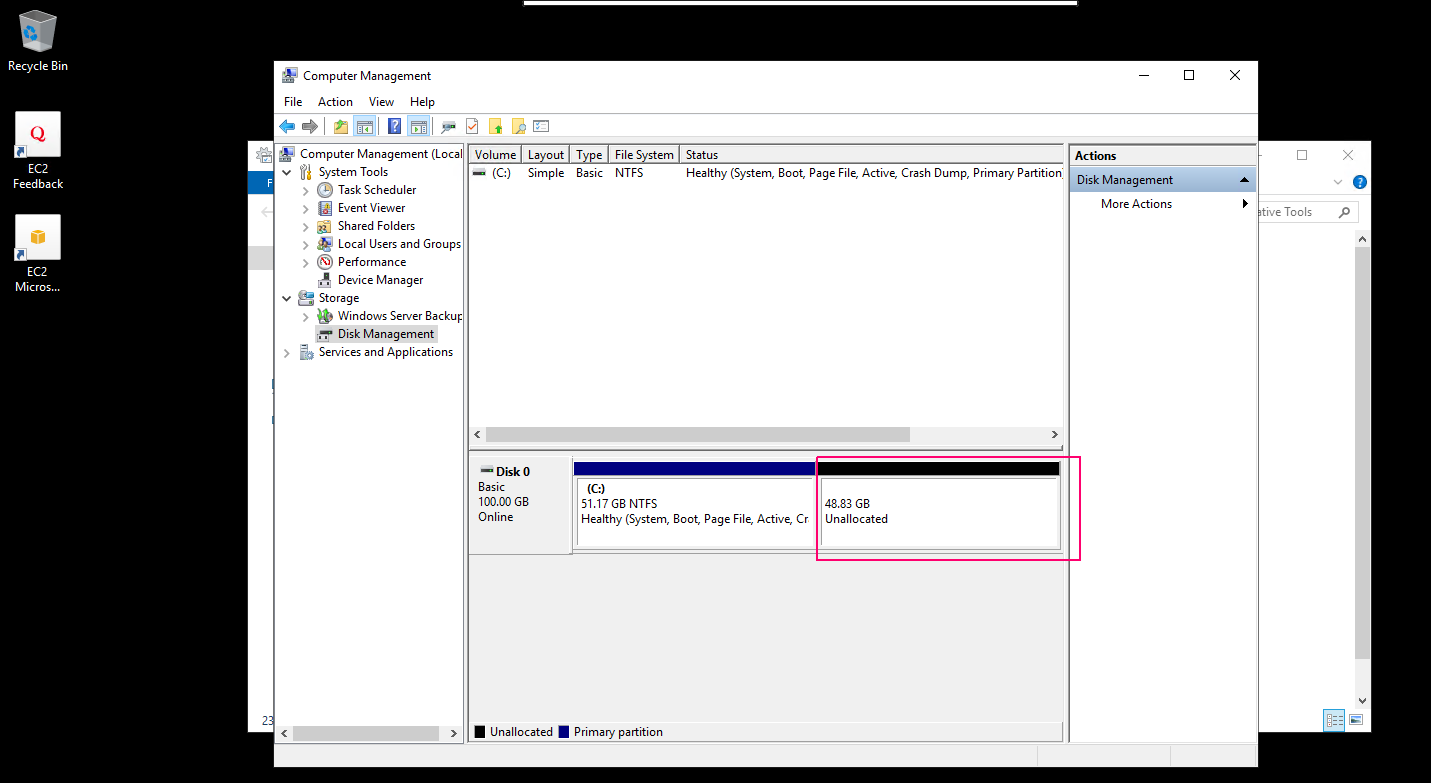
- Right click on Unallocated space then select New Simple Volume.
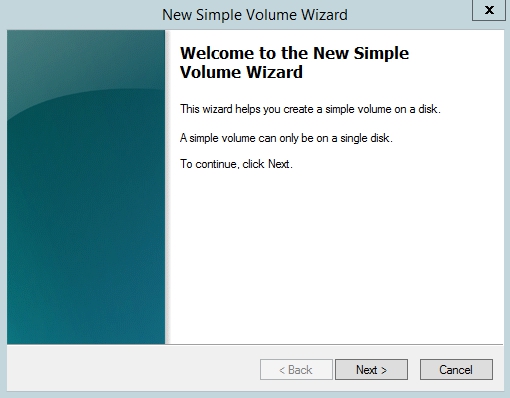
- Welcome wizard will open.Click on Next.

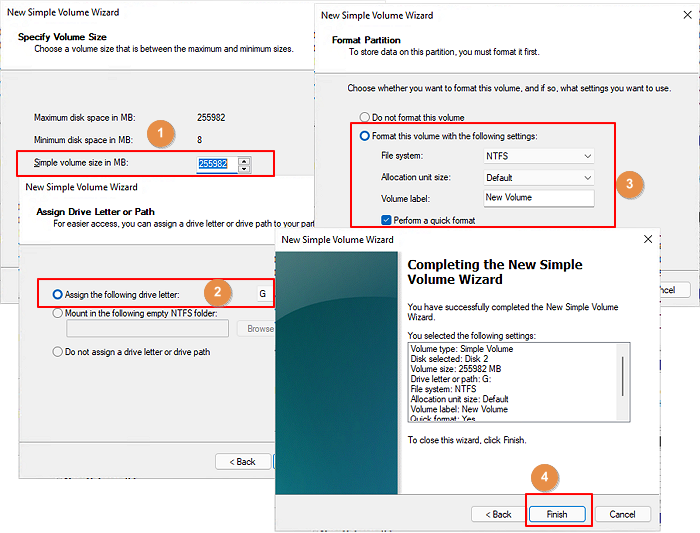
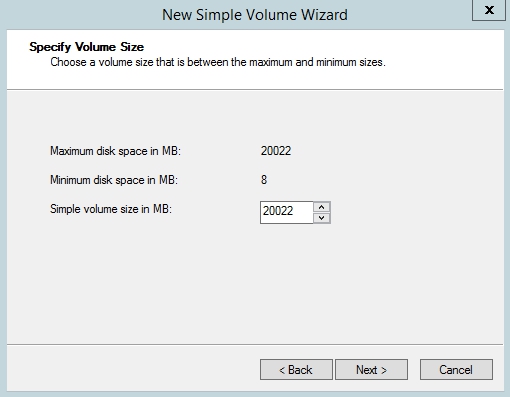
- Enter the Simple volume size in MB.Click on Next.
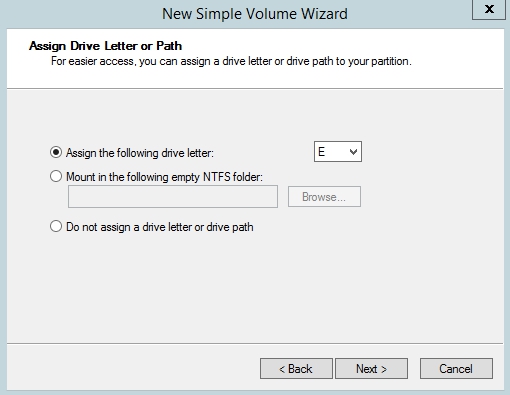
- Assign a Disk drive letter & Click on Next.
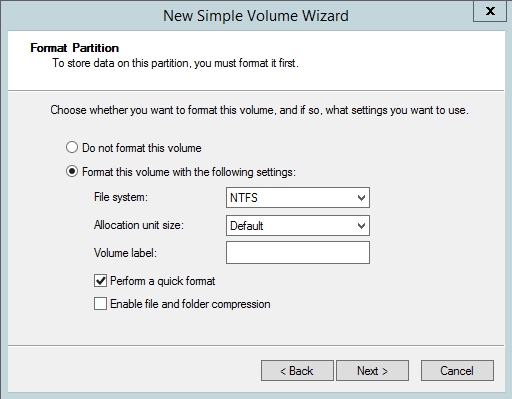
- Format the New created partition.Select NTFS file system & provide a volume label name.
- Select the “Perform a quick format” & click on Next.
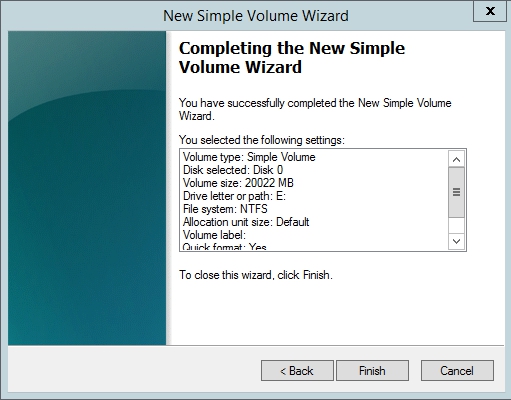
- Click on finish.
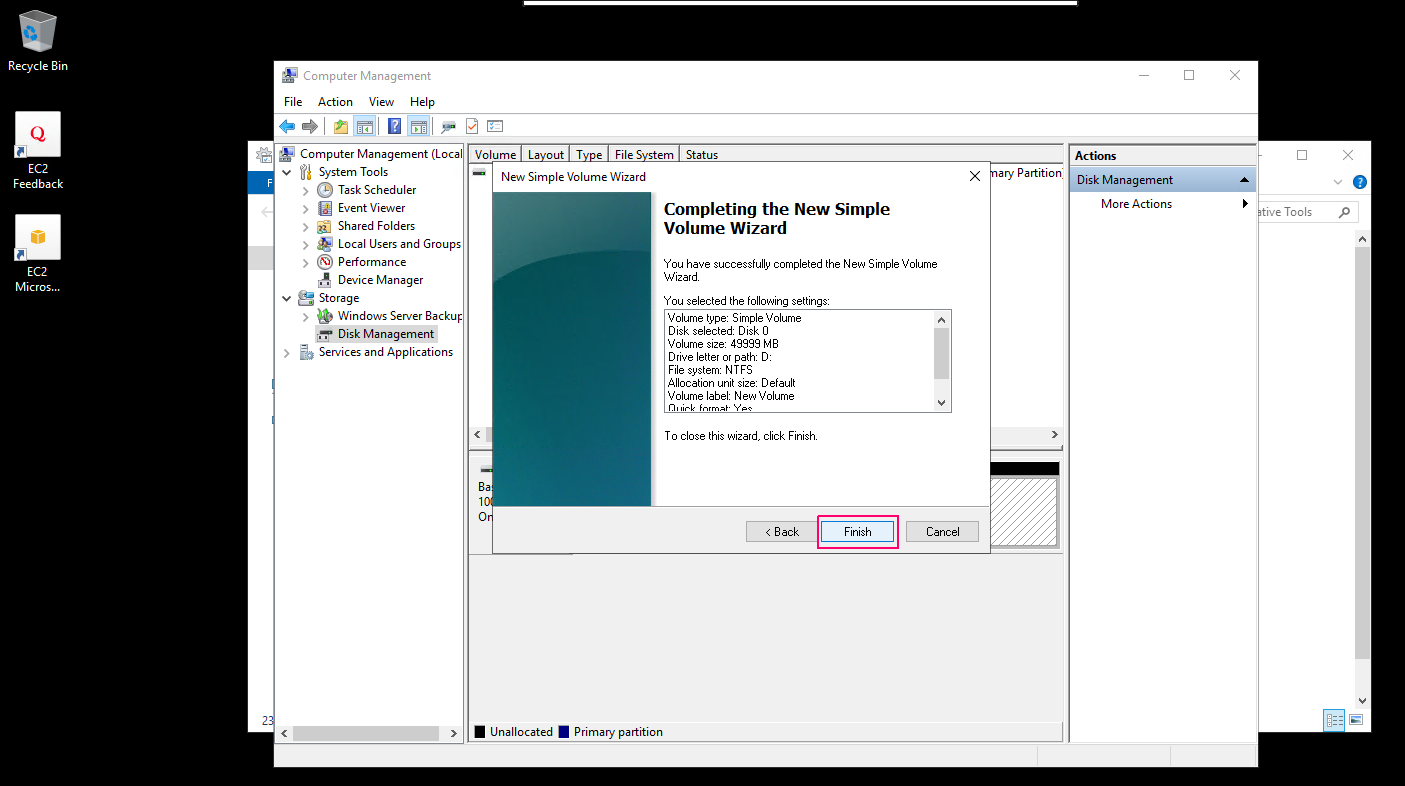
- Now New disk partition is created successfully.
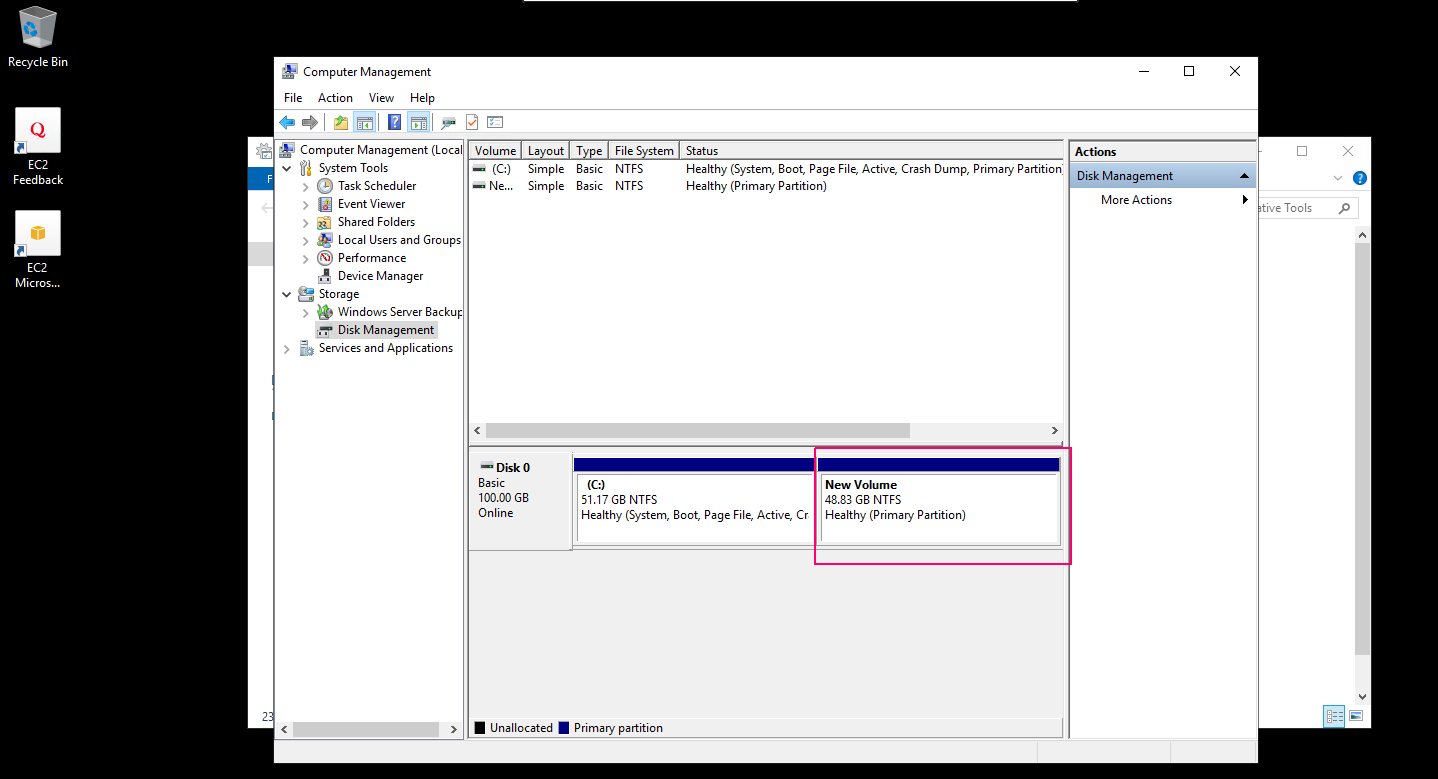
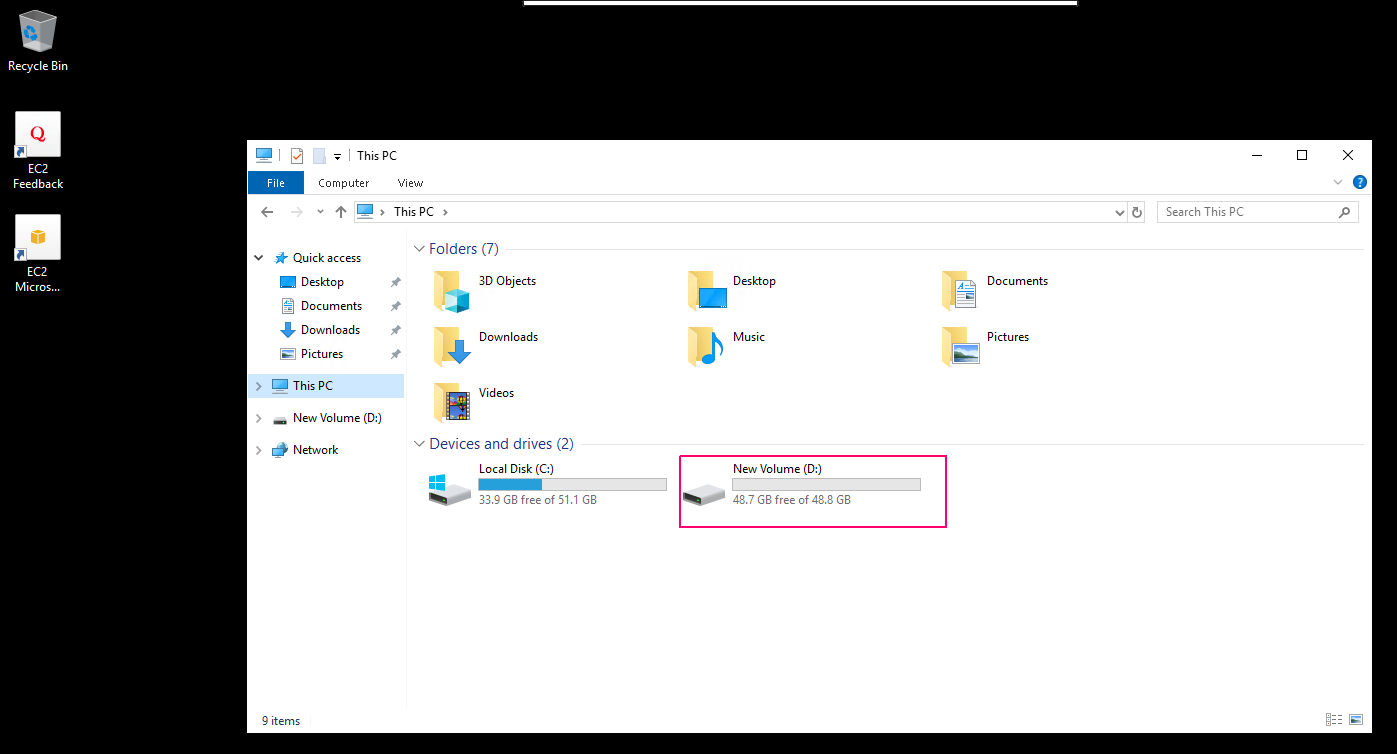
- Check the new created disk,go to Start & click on file explore.
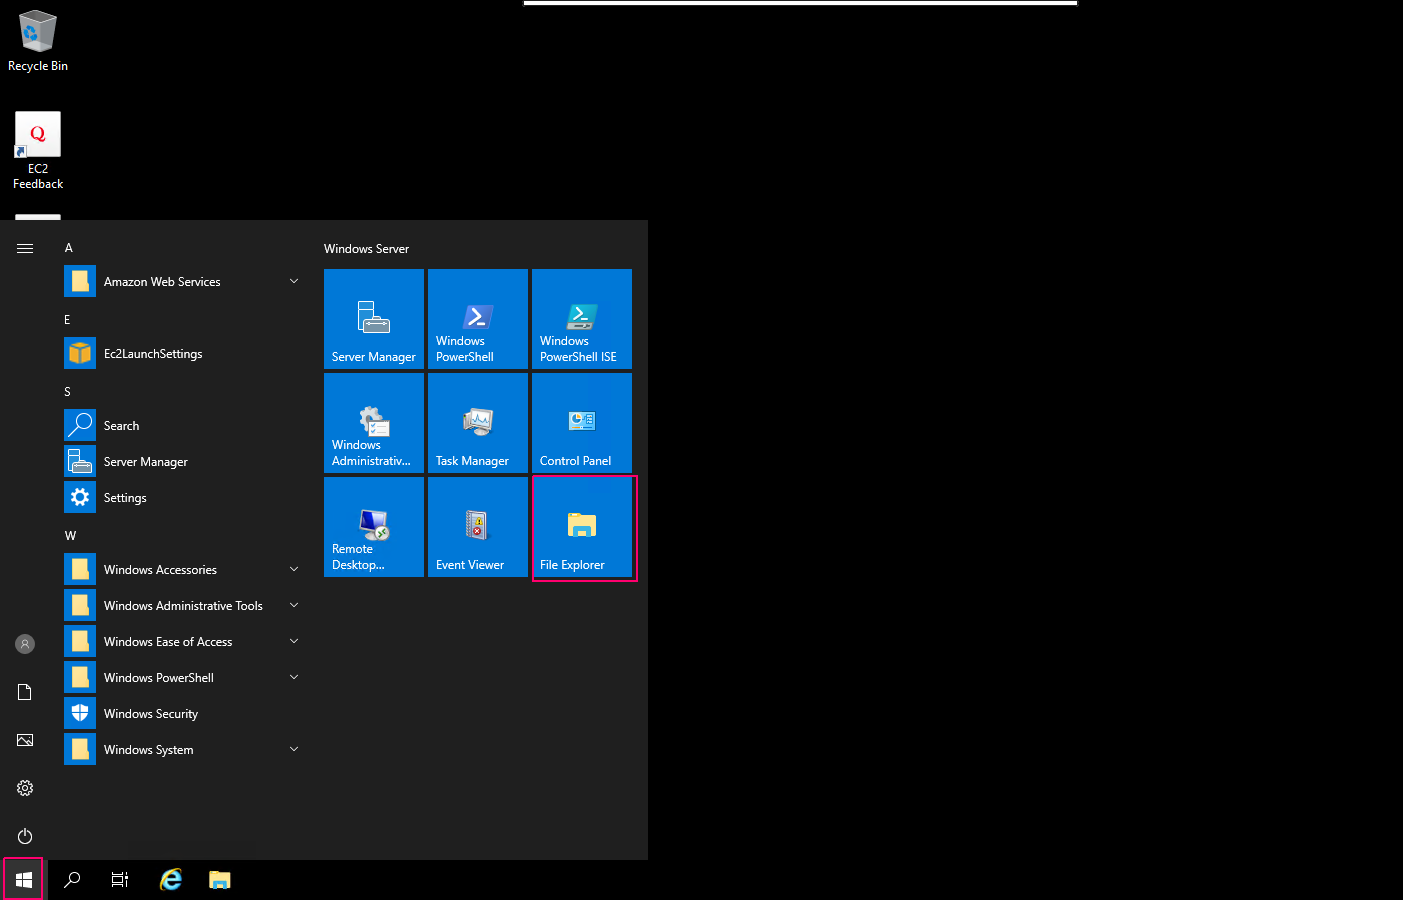
- Click on “This PC”.
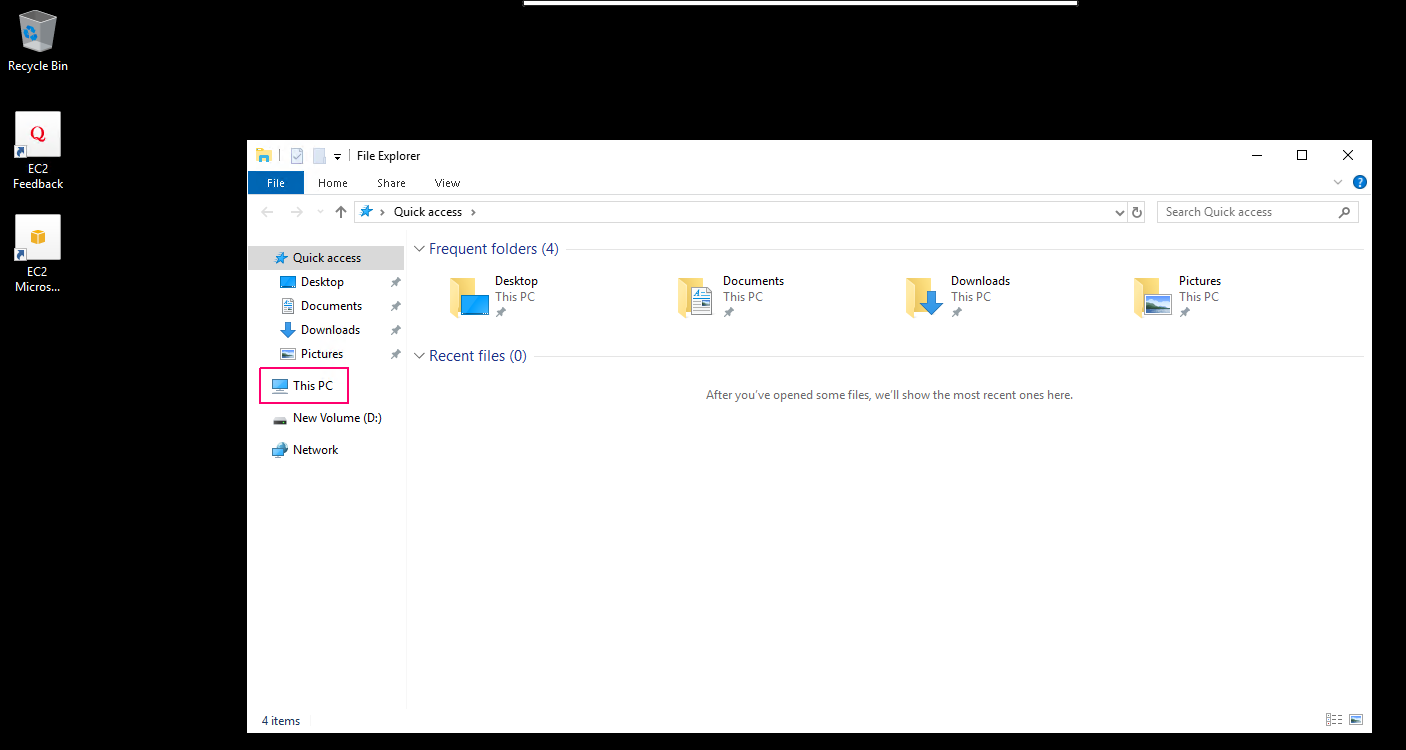
- Here, we can see the new created disk partition [New Volume (D:)].
автор: Джон, Обновлено: 5 августа 2022 г.
То же самое с предыдущей версией, Windows Server 2019 имеет собственный инструмент управления дисками. То же самое с другим собственным инструментом, Управление дисками может выполнять некоторые основные операции, оно не такое мощное, как стороннее программное обеспечение. В этой статье я покажу вам, что делает Windows Server 2019 Управление дисками и ограничения по сравнению с программным обеспечением диспетчера разделов диска сервера.
Содержание:
- Что Windows Server 2019 Управление дисками
- Как изменить размер раздела с Server 2019 Управление дисками
- Сравнение с диспетчером разделов диска сервера
Есть 3 способа открыть Управление дисками в Windows Server 2019:
- Щелкните правой кнопкой мыши Windows значок в левом нижнем углу и нажмите Управление дисками в списке.
- Нажмите Windows и X вместе на клавиатуре, вы увидите Управление дисками в списке.
- Нажмите Windows + R чтобы открыть Run, наберите diskmgmt.msc и нажмите Enter.
Щелкните правой кнопкой мыши раздел или передний диска, вы увидите варианты. Недоступные параметры выделены серым цветом, то есть тип диска / раздела текущей конфигурации не соответствует требованиям этой функции.
Для выделенного раздела параметры включают в себя:
- Новый Spanned Volume
- Новый Полосатый Объем
- Новый зеркальный том
- Новый том RAID-5
- Преобразовать в динамический диск
- Конвертировать в GPT диск
- Не в сети
- Предложения
Для диска параметры включают в себя:
- Откройте корневой каталог в проводнике
- Пометить раздел как активный
- Изменить букву диска и путь
- Формат
- Расширить том
- Сжать том
- Добавить зеркало
- Удалить раздел
- Предложения
Помимо базовой способности создавать, удалять и форматировать раздел, Windows Server 2019 Управление дисками имеет некоторые расширенные возможности.
Управление динамическими томами:
Server 2019 Управление дисками может создавать и управлять динамическими томами Simple, Mirrored, Striped, Spanned и RAID 5.
Динамические тома диска потребляют много ресурсов сервера, если один диск поврежден, все данные на этом томе будут потеряны. Стоимость аппаратного обеспечения теперь намного дешевле, поэтому большинство серверов используют аппаратные RAID-массивы вместо динамического тома.
Преобразование диска:
Управление дисками имеет возможность конвертировать диск между MBR и GPT, конвертировать диск между Basic и Dynamic.
Тем не менее, он может конвертировать только базовый диск в динамический без потери данных. Чтобы преобразовать динамический диск в базовый или конвертировать между MBR и GPT, необходимо удалить все разделы на диске.
Изменить размер раздела:
То же самое с предыдущей версией, Server 2019 Управление дисками имеет Сжать том и Расширить том функции, помогающие изменить размер выделенного раздела без потери данных (в большинстве случаев).
Но из-за некоторых ограничений обеих функций, Управление дисками не может расширить раздел сжимая еще один. Кроме того, только NTFS раздел может быть изменен.
Как изменить размер раздела с Server 2019 Управление дисками
Сократить раздел в Server 2019 Управление диском:
- Щелкните правой кнопкой мыши раздел NTFS в разделе «Управление дисками» и выберите Сжать том.
- Введите и количество места и нажмите Сжиматься, (Если вы не введете сумму, будет использовано максимально доступное пространство.)
Недостатки функции сокращения объема:
- Нераспределенное пространство может быть сделано только на правильно пока сжимается.
- Он может уменьшить пространство только в том случае, если на этом диске есть неподвижные файлы.
Расширить раздел в Server 2019 Управление диском:
- Щелкните правой кнопкой мыши правый непрерывный раздел (D
и выберите «Удалить том».
- Щелкните правой кнопкой мыши раздел, который вы хотите расширить (C
выберите Расширить том.
- Просто нажмите Далее к Завершить во всплывающем окне мастера расширения тома.
Недостатки функции расширения объема:
- Должно быть примыкающий Нераспределенное пространство на правильно раздела, который вы хотите расширить, в противном случае, Опция расширения отключена.
- Если диск D логический, ты все еще невозможно продлить диск C: даже после удаления D.
Следуйте лучшему методу, чтобы изменить размер раздела на Windows Server 2019.
Сравнение с диспетчером разделов диска сервера
Сравнивая с Windows Server 2019 встроенный инструмент управления дисками, стороннее программное обеспечение гораздо более мощное. На рынке есть много серверных диспетчеров дисков, GUI и функции схожи. Но лучше, чем другие программы, NIUBI Partition Editor намного безопаснее и быстрее благодаря передовым технологиям:
- Виртуальный режим — все операции будут отображаться как ожидающие предварительного просмотра, реальные разделы диска не будут изменены, пока не будет нажата кнопка «Apply» чтобы подтвердить.
- Отменить-на-хорошо — если вы применили неправильные операции, вы можете отменить текущие операции в любой момент без потери данных.
- 1 второй откат — если при изменении размера раздела обнаружена какая-либо ошибка, сервер автоматически возвращается в исходное состояние в мгновение ока.
- Дополнительно алгоритм перемещения файлов — перемещать и расширять раздел на 30–300% быстрее, экономя много времени, особенно если в разделе содержится большое количество файлов.
Скачать NIUBI Partition Editor и вы увидите главное окно со структурой разделов диска и другую информацию справа. Доступные операции с выделенным диском или разделом перечислены слева и при щелчке правой кнопкой мыши. Недоступные операции будут скрыты, чтобы поддерживать интерфейс в чистоте.
Доступные операции для раздела:
- Изменить размер тома (уменьшить и расширить)
- Переместить расположение раздела
- Объединить два смежных тома за 1 шаг
- Скопировать том в нераспределенное пространство
- Преобразовать раздел между логическим и основным
- Конвертировать NTFS в FAT32
- Изменить букву диска (например, D:)
- Изменить метку (добавить или изменить имя раздела)
- Сделать активным
- Проверьте целостность файловой системы
- Дефрагментация для улучшения производительности
- Скрыть из проводника
- Удалить (файлы можно восстановить)
- Формат тома для использования в качестве нового
- Протрите (стереть данные навсегда)
- Тест поверхности (сканирование поврежденных секторов)
- Исследуйте (просмотр файлов / папок с каталогом)
- Посмотреть недвижимость
Доступные операции на весь диск:
- Инициализировать новый диск
- Изменить статус на оффлайн или онлайн
- Установить атрибут только для чтения
- Протрите диск (не может быть восстановлено)
- Тест поверхности
- Посмотреть недвижимость
- Клонировать диск для переноса данных и ОС
- Конвертировать MBR диск в GPT
- Удалите все разделы
- Очистка диска
Скачать
The steps to create New Partition in Windows Server 2022/2019/2016 are discussed here in a step-by-step guide. Four different methods are mentioned and you can follow any one that is suitable for you:
| Workable Solutions | Step-by-step Troubleshooting |
|---|---|
| Fix 1. Use Thrid-Party Partition Manager Software | Step 1. Check for free space…Full steps |
| Fix 2. Use Disk Management | Step 1: Click «This PC» on your computer…Full steps |
| Fix 3. Use CMD | Step 1 — Press the «Win+R» buttons together on your keyboard…Full steps |
| Fix 4. Use PowerShell | Step 1. Right-click the Windows icon, select Run, type Powershell, and click «OK» to open it…Full steps |
The Necessity of Creating New Partitions in Windows Server
Whenever we purchase a new laptop/server/computer that has windows inbuilt, the hard disk always has a preset single partition unless someone has done partition deliberately. It is a default setting that every hard disk comes with. Now you may not see any issue with this initially, but quite a few genuine issues get solved once you partition your drive. Such as:
- Easy backing up of files
When you organize your drive with multiple partitions, it becomes easy to manage and backup your files in separate sections. Imagine you can have one complete partition to save your essential backed-up files.
- Perfect management
Partitioning your system will allow you to segregate your files based on the criteria you select. This will help you not mix up files between the 100 folders you create. For example, you can have three partitions for OS, another for work, and the last for personal.
- Better probability of retrieving data
When you have partitioned your system and accidentally lose access to any file. For example, you delete something. It becomes easier to retrieve that file.
- More than a single operating system
Once you create multiple parts in your server, you can install multiple operating systems in different partitions.
4 Methods to Create New Partitions in Windows Server 2019/2016 and Older Servers
Several ways are there following which you can partition your drives into your server. This blog will describe each method, starting with the easiest one coming first and the hardest one the last. And just for the information, the ascending order of difficulty of different methods is as follows.
- Method 1. Create New Partitions via Thrid-Party Partition Manager Software — Easiest
- Method 2. Create New Simple Volumes Using Disk Management — Medium
- Method 3. Create a New Partition Using CMD — Complex
- Method 4. Create a New Volume Using PowerShell — Complex
Method 1. Create New Partitions in Windows Server 2019/2016 Using Third-Party Software
Using third-party software is the easiest way to create new divisions in your hard drive. And the best tool available on the internet for disk partitioning is none other than the EaseUS Partition Master Enterprise. The tool is undoubtedly the best in the task as it has:
- One of the best interfaces which makes using the tool easy to use.
- Accurate and fastest execution time.
- Has all in one disk management toolkit which lets you manage and handle your hard drives properly post process.
EaseUS Partition Master is the best tool for both Windows and Mac-based computers. And it can be downloaded from their official website https://www.easeus.com/partition-manager/epm-enterprise.html.
EaseUS Partition Master Enterprise
Your trustworthy Windows Server disk manager.
- Extend System drive, combine/split partitions.
- Clone disk, migrate OS to HDD/SSD.
- Convert MBR to GPT, GPT to MBR, no data loss.
- 1-click adjust disk layout, create volumes at one time.
24/7 Tech Chat
Free Inquiry
Let’s see how to create new partition on your Windows Server computers now:
Step 1. Launch EaseUS Partition Master to check for free space at the Partition Manager section.
- If your hard drive has unallocated space, jump to Step 3 to create partition.
- If the hard drive has no unallocated space, continue with Step 2.
Step 2. Shrink a disk partition to create unallocated space.
Right-click on the target drive partition with a lot free space and select «Resize/Move».
Drag either end of the partition rightwards or leftwards to shrink the partition size so as to get ample unallocated space. You can visually know how much space you’ve decreased in the «Partition size» area. Click «OK».
Click «Execute xx Task» and then «Apply» to save all the changes.
Go back to Partition Manager, there should be unallocated space appearing on the same disk and you can continue with the next step to create new partition on your hard drive.
Step 3. Create a new partition with unallocated space on the target hard drive.
Right-click on the unallocated space and choose «Create».
Customize the partiton size, partition drive letter, partition label, file system (NTFS, FAT32, EXT2/3/4, exFAT) and more in the Advanced Settings. Click «OK».
Finally, click «Execute * Task» and «Apply» to complete creating partition with the unallocated space on your disk. Repeat the steps to partition a hard drive and get many more partitions.
Method 2. Create New Simple Volumes in Windows Server 2019/2016 Using Disk Management
Starting with the easiest method possible. Disk management is a built-in tool in Windows that allows you to organize your server partitions and volumes. Follow the below steps to add or modify your current partition.
Step 1: Click on the «This PC» option on your computer. And then go to the manage option on the top. And then select «Disk Management.»
Step 2: Select the «unallocated space» option and click on «new simple volume.»
Step 3: Click on the «next» button in the popped up New simple volume wizard.
Step 4: Put your desired size in the «simple volume size» blank.
Step 5: Mention the name of the drive, for example, E, F, G, etc.
Step 6: Selection of format is also possible for a different type of file system—for example, exFAT, NTFS, FAT, FAT32, etc. You can also custom-size the allocation unit size. If you don’t want to, then select «default» and click next.
Complete! You will have a perfectly partitioned disk in a few minutes if you have done the above steps correctly.
Method 3. Create a New Partition in Windows Server Using CMD
The last method will be to use the Command prompt of your computer. It is kept as the most complex method since not everyone is familiar with the command prompt. Hence only those who have used CMD before or know a thing or two about this should try this in the first attempt. Others should try the above options and should use this only if nothing works.
Step 1 — Press the «Win+R» buttons together on your keyboard. This is to open the «Run» option on your computer.
Step 2 — Type «CMD» in the text section and click enter to go forward.
Step 3 — After opening the command prompt, enter the below-mentioned commands, in the same manner, they have been mentioned. Make sure you use the correct cases for each letter, and don’t forget to click enter after each command mentioned.
- diskpart
- list disk
- select disk n ( instead of n, you must use the number of the disk where you want to create the partition. Suppose we want the 1st one to be partitioned, then write select the disk 1)
Step 4 — If your disk doesn’t have unallocated space, please follow the below mentioned commands and then move forward
- list disk
- list volume
- select volume number
- shrink desired=(*MB)
Step 5 — Now, you can move on and type the following command to create a new simple volume, and set its file system to NTFS with the unallocated space:
- create partition primary size=*MB
- assign letter=G (choose any name)
- select volume number
- format fs=ntfs quick
Step 6 — Click «Ener».
Complete! You have completed the partitioning of your system.
Method 4. Create a New Volume in Windows Server 2019/2016 Using PowerShell
The last method mentioned is the usage of PowerShell for partitioning. Again, use this only if you are familiar with the PowerShell. Otherwise, use the above steps as those will do the work most efficiently. Type the below commands mentioned to start the partitioning process.
Here we are partitioning 10GB and assigning the letter «G» to the new drive using PowerShell:
Step 1. Right-click the Windows icon, select Run, type Powershell, and click «OK» to open it.
Step 2. Type the following command lines in Powershell one by one and hit Enter each time:
- New-Partition –DiskNumber 0 -Size 20gb -DriveLetter G
- Get-Partition — DiskNumber 0
- Format-Volume — DriveLetter G — FileSystem NTFS
Done! If you followed the steps mentioned above and commands correctly, you are just minutes away from a successful partition.
Conclusion
There are so many methods to create a partition for your server. The best method is to use the CMD or the third-party software in the market. But always be careful of all the fraud and virus-laden software that can harm your server. Use trusted tools that can do your work easily, like the EaseUS Partition Master tool. Using third-party tools has one of the biggest advantages, and it does not require too much technical knowledge.
Anyone having little computer knowledge can create a partition using any third-party software.
24/7 Tech Chat
Free Inquiry
Besides EaseUS, numerous other tools can be used at the user’s discretion.
Arranging the methods will help you choose the best method to follow. Only use a more complex procedure if the ones above it are not working out for you, or you cannot do it. In any case, you can always make use of the internet and learn more about the procedures. You can refer to our blogs to educate yourself more about disk partitioning methods.
In this article show you, how to: create hard disk partitions in Windows operation system yourself, add or delete new drive letter, split disk to partitionsand so on. Pay attention, that term partition and volume is using interchangeably.The most easiest way – is split hard disk by used Disk Management tool. This example is based on Windows Server 2012 standart operation system.
Why need to split a hard disk?
Probably have a few reasons, why need to split a hard disk: safely, comfortable and so on. Thus operations system re-installation your hard disk going to format and all you information will be lost . You can simply not have time to transfer all the necessary data to an external drive. This save you time and nerves. In order to safety shouldn’t keep important data in one place.
Another one reason, why need to split a hard disk is if you need to install second operation system.
This article we are tried to overwrite just step-by-step manual.
Table of Contents
-
How to add a drive letter
-
How to create a new partition(s)
-
How to change a drive letter
-
How to delete a partition(s)
How to add a drive letter
To create a more place for information storage or allocate some part of free place, add in computer a new drive letter by using next ways:
-
The new storage device installation — If you needed disk space more, install one more hard disk or connect USB storage device. The new hard disk might be internal or external.
-
Hard disk splitting by partitions — If you don’t needed additional disk space and disk image in Windows, just create one more volume in hard disk. Thus this special free space will be considered by system how another disk and have own drive letter.
In this article we’ll talk about second example. This solution is a free and safe. If you manual partition C going to break, that additional partition (call him “D”) continue storage information. That will helps you safe important files and documents (data). Let’s beginning.
How to create a new partition(s)
So we are know now, that for free space creation you need to hard disk, where is manual partition C. It’s not a necessary, it might be any disk. Shrink hard disk for new volume creation and than create and format new partition.
Let’s start:
To open “Disk Management” tool click to “Start” mouse right-click. After that in list find this tool, how is included below. If you do have «free» space on your hard drives, you can use it to create new partitions. The actual logic behind using Primary, Extended and Logical partitions is outside the scope of this tutorial.
For free space creation on hard disk use mouse right-click.
Enter amount of space to shrink in MB: put here amount of new partition. After that new volume you will see in Disk Management tool screen how free space.
To create a partition here, right-click or tap and hold the free space and select «New Simple Volume».
The previous action will bring up the «New Simple Volume Wizard» . Click Next button.
The wizard will ask you for the size of the partition, which you can specify as you wish, using all or just part of the total available free space. You don’t need to change anything, just click Next button.
On your screen will show the following drive letter. Choose that and click Next button.
In this step you can also don’t change anything, «Volume label» can be empty.
Congratulation. Now you have a new partition. Click Finish button.
How to change a drive letter
For each disk on your computer will be letters from C by Z. In this example, there is a partition «E:» . Instead of that, we want to change the drive letter to «G:» .
Note!
If you change the drive letter of a disk where Windows or apps are installed, apps might have trouble running or finding that disk. For this reason we suggest that you don’t change the drive letter of a disk on which Windows or apps are installed.
Use this steps to change drive letter:
To change the drive letter associated with the partition, right-click or tap and hold on the partition and click or tap «Change Drive Letter and Paths».
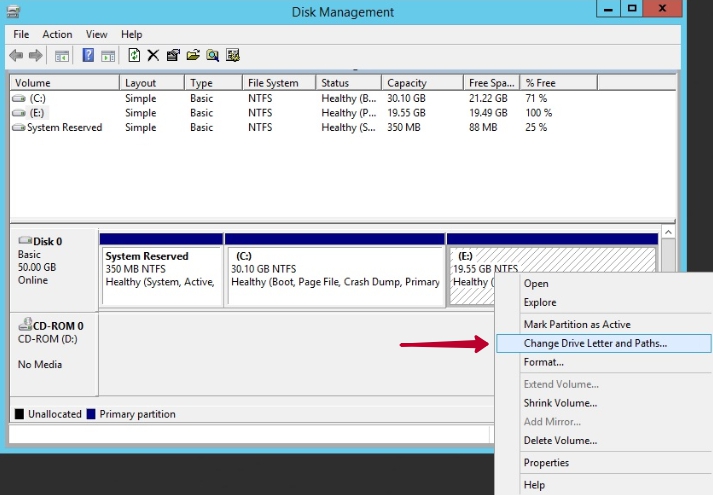
A new window will pop up, listing the drive letter of the partition.
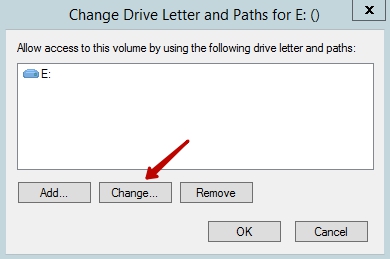
Click or tap Change. In the next window, select the new drive letter you wish to represent the partition and click or tap OK.

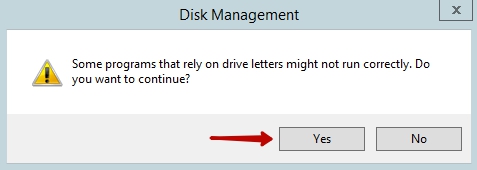
You may be prompted to acknowledge the change you are about to make. If you wish to proceed, click or tap Yes.
Now you can see, that drive letter has been changed from E to G.
How to delete a disk partition with Disk Management
A partition on a hard drive can be deleted as it is not currently in use. For example, if Windows is installed on the partition you want to delete, you will not be able to, as you are logged into Windows. To delete a partition on a hard drive, follow the steps below.
Warning!
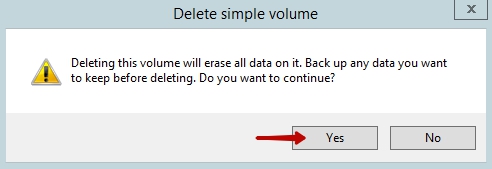
Deleting a partition will permanently erase any data that is presently stored on it.
Open “Disk Management” tool. To remove a partition, right-click or tap and hold the partition you’re trying to remove and then click or tap on «Delete Volume».
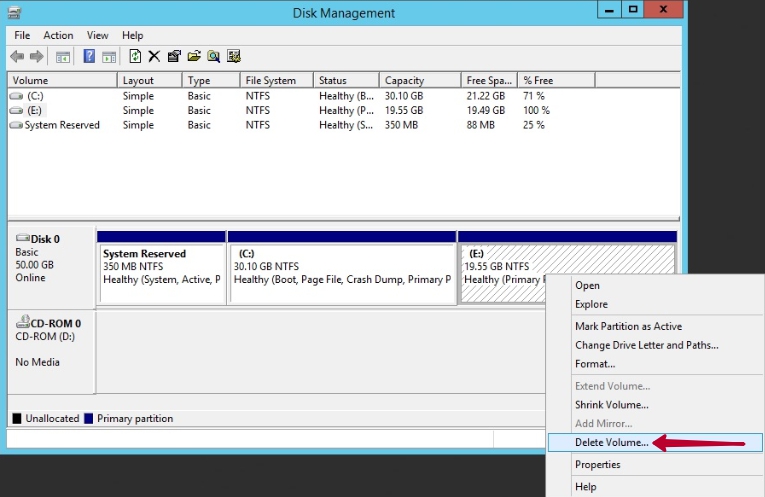
You’ll be prompted to confirm your choice, to make you aware that if you remove the partition all data on it will be erased. Therefore, please make sure you’ve backed up any critical data on that partition prior to clicking or tapping Yes.
You’ll now see the deleted partition showing as «Free space» or Unallocated in the Disk Management utility. Now you can extend main volume.
Open window extend volume wizard. Click Next button.
After need to select free disk space and click Next button.
To close the wizard, click Finish.

Содержание
- Управление дисками Manage disks
- Подключенное и отключенное состояние Online and offline status
- Обзор средства управления дисками Overview of Disk Management
- О дополнительных разделах восстановления About those extra recovery partitions
- Управление базовыми томами Manage basic volumes
- Windows Server 2019 Disk Management
- What does Windows Server 2019 Disk Management do
- How to resize partition with Server 2019 Disk Management
- Comparison with server disk partition manager
Управление дисками Manage disks
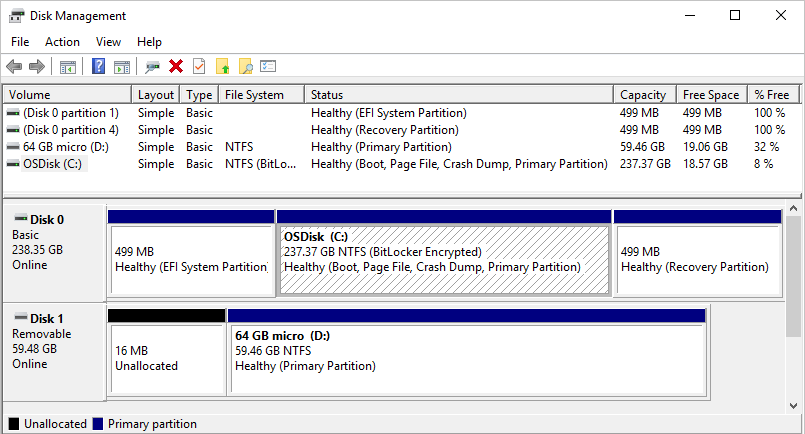
Относится к: Windows 10, Windows 8.1, Windows Server (Semi-Annual Channel), Windows Server 2019, Windows Server 2016, Windows Server 2012 R2, Windows Server 2012 Applies To: Windows 10, Windows 8.1, Windows Server (Semi-Annual Channel), Windows Server 2019, Windows Server 2016, Windows Server 2012 R2, Windows Server 2012
В этом разделе и его подразделах описывается использование средства управления дисками для управления дисками в компьютере, а также содержатся сведения об инициализации новых дисков, изменении стиля раздела дисков и об особенностях обработки подключенного состояния новых дисков в Windows. This topic and its subtopics discuss using Disk Management to manage the disks in a computer, and includes information about initializing new disks, converting disks between different partition styles, and how Windows handles the online status of new disks.
Подключенное и отключенное состояние Online and offline status
Управление дисками отображает сведения о том, находится диск в подключенном или в отключенном состоянии. Disk Management displays whether a disk is online (available), or offline.
По умолчанию в Windows все недавно обнаруженные диски подключаются с доступом для чтения и записи. In Windows, by default, all newly-discovered disks are brought online with read and write access. По умолчанию в Windows Server недавно обнаруженные диски подключаются с доступом для чтения и записи, если они не находятся на обще шине (такой как SCSI, iSCSI, Serial Attached SCSI или Fibre Channel). In Windows Server, by default, newly-discovered disks are brought online with read and write access unless they are on a shared bus (such as SCSI, iSCSI, Serial Attached SCSI, or Fibre Channel). Диски на общей шине при первом подключении будут отключены. Disks on a shared bus are offline the first time they are detected.
Если диск отключен, перед инициализацией или созданием на нем томов его необходимо подключить. If a disk is offline, you must bring it online before you can initialize it or create volumes on it.
Для подключения или отключения диска щелкните правой кнопкой мыши имя диска и выберите соответствующее действие. To bring a disk online or take it offline, right-click the disk name and then choosing the appropriate action.
Обзор средства управления дисками Overview of Disk Management
Относится к: Windows 10, Windows 8.1, Windows 7, Windows Server (Semi-Annual Channel), Windows Server 2019, Windows Server 2016, Windows Server 2012 R2, Windows Server 2012 Applies To: Windows 10, Windows 8.1, Windows 7, Windows Server (Semi-Annual Channel), Windows Server 2019, Windows Server 2016, Windows Server 2012 R2, Windows Server 2012
Управление дисками — это системная служебная программа Windows, дающая возможность выполнять дополнительные задачи хранилища. Disk Management is a system utility in Windows that enables you to perform advanced storage tasks. Ниже приведены некоторые задачи, которые хорошо подходят для управления дисками. Here are some of the things Disk Management is good for:
- Чтобы настроить новый диск, см. раздел Инициализация нового диска. To setup a new drive, see Initializing a new drive.
- Чтобы расширить том в пространство, которое пока не является частью тома на том же диске, см. раздел Расширение базового тома. To extend a volume into space that’s not already part of a volume on the same drive, see Extend a basic volume.
- Чтобы сжать раздел (обычно для того, чтобы расширить соседний), см. раздел Сжатие базового тома. To shrink a partition, usually so that you can extend a neighboring partition, see Shrink a basic volume.
- Чтобы изменить или назначить букву диска, см. раздел Изменение буквы диска. To change a drive letter or assign a new drive letter, see Change a drive letter.
Если отобразится сообщение об ошибке или что-то не сработает при выполнении этих процедур, рекомендуем заглянуть в раздел Устранение неполадок при управлении дисками. If you get an error or something doesn’t work when following these procedures, take a peek at the Troubleshooting Disk Management topic. Если и это не поможет, сохраняйте спокойствие! If that doesn’t help — don’t panic! Есть множество сведений на сайте сообщества Майкрософт: попробуйте поиск в разделе Файлы, папки и хранилища; если вам по-прежнему нужна помощь, опубликуйте там вопрос и Майкрософт или другие члены сообщества попытаются вам помочь. There’s a ton of info on the Microsoft community site — try searching the Files, folders, and storage section, and if you still need help, post a question there and Microsoft or other members of the community will try to help. Если у вас есть отзыв о том, как улучшить эти разделы, мы будем рады узнать ваше мнение! If you have feedback on how to improve these topics, we’d love to hear from you! Просто ответьте на запрос Помогла ли вам эта страница? , оставив свои комментарии на открывшейся странице или в открытой цепочке комментариев в нижней части этого раздела. Just answer the Is this page helpful? prompt, and leave any comments there or in the public comments thread at the bottom of this topic.
Ниже приведены некоторые распространенные задачи, которые можно выполнить с помощью других средств в Windows. Here are some common tasks you might want to do but that use other tools in Windows:
- Чтобы освободить место на диске, см. раздел Освобождение места на диске в Windows 10. To free up disk space, see Free up drive space in Windows 10.
- Чтобы провести дефрагментацию дисков, см. раздел Дефрагментация компьютера с Windows 10. To defragment your drives, see Defragment your Windows 10 PC.
- Чтобы объединить несколько жестких дисков аналогично RAID, см. раздел Дисковые пространства. To take multiple hard drives and pool them together, similar to a RAID, see Storage Spaces.
О дополнительных разделах восстановления About those extra recovery partitions
Если вам интересно (мы прочитали ваши комментарии!), Windows обычно включает три раздела на основном диске (обычно это диск C): In case you’re curious (we’ve read your comments!), Windows typically includes three partitions on your main drive (usually the C: drive):

- Системный раздел EFI — на современных ПК используется для запуска (загрузки) компьютера и операционной системы. EFI system partition — This is used by modern PCs to start (boot) your PC and your operating system.
- Диск операционной системы Windows (C:) — здесь установлена система Windows и обычно размещены остальные приложения и файлы. Windows operating system drive (C:) — This is where Windows is installed, and usually where you put the rest of your apps and files.
- Раздел восстановления — служит для хранения специальных средств восстановления Windows, если возникают проблемы с запуском или чем-то еще. Recovery partition — This is where special tools are stored to help you recover Windows in case it has trouble starting or runs into other serious issues.
Несмотря на то что управление дисками может показывать системный раздел EFI и раздел восстановления как свободные на 100 %, это не точно. Although Disk Management might show the EFI system partition and the recovery partition as 100% free, it’s lying. Эти разделы обычно заполнены действительно важными файлами, которые нужны для правильной работы компьютера. These partitions are generally pretty full with really important files your PC needs to operate properly. Лучше всего оставить их в покое, чтобы вы могли запускать ПК и восстановить его в случае проблем. It’s best to just leave them alone to do their jobs starting your PC and helping you recover from problems.
Управление базовыми томами Manage basic volumes
Относится к: Windows 10, Windows 8.1, Windows Server (Semi-Annual Channel), Windows Server 2016, Windows Server 2012 R2, Windows Server 2012 Applies To: Windows 10, Windows 8.1, Windows Server (Semi-Annual Channel), Windows Server 2016, Windows Server 2012 R2, Windows Server 2012
Базовый диск — это физический диск, содержащий основные разделы, расширенные разделы или логические диски. A basic disk is a physical disk that contains primary partitions, extended partitions, or logical drives. Разделы и логические диски на базовых дисках называются базовыми томами. Partitions and logical drives on basic disks are known as basic volumes. Базовые тома можно создавать только на базовых дисках. You can only create basic volumes on basic disks.
Пространство в существующих основных разделах и на логических дисках можно увеличить за счет соседнего непрерывного нераспределенного пространства на том же диске. You can add more space to existing primary partitions and logical drives by extending them into adjacent, contiguous unallocated space on the same disk. Для расширения базовый том должен быть отформатирован с использованием файловой системы NTFS. To extend a basic volume, it must be formatted with the NTFS file system. Расширить логический диск можно с помощью непрерывного свободного пространства в содержащем его расширенном разделе. You can extend a logical drive within contiguous free space in the extended partition that contains it. Если расширить логический диск с использованием большего пространства, чем доступно в расширенном разделе, последний увеличивается, чтобы вместить логический диск, если за расширенным разделом следует непрерывное нераспределенное пространство. If you extend a logical drive beyond the free space available in the extended partition, the extended partition grows to contain the logical drive as long as the extended partition is followed by contiguous unallocated space.
Windows Server 2019 Disk Management
by John, Updated on: March 9, 2020
This article introduces the ability of Windows Server 2019 Disk Management and how to shrink/extend partition with it, and the comparison with server partition editor.
The same with previous version, Windows Server 2019 has a native Disk Management tool. The same with other native tool, Disk Management can do some basic operations, it is not as powerful as third party software. In this article I’ll show you what does Windows Server 2019 Disk Management do and the limitations comparing with server disk partition manager software.
What does Windows Server 2019 Disk Management do
Firstly, open Disk Management in Windows Server 2019, there are several ways:
- Right click Windows icon on bottom left and click Disk Management in the list.
- Press Windows and X together on your keyboard, then you’ll see Disk Management in the list.
- Press Windows and R on your keyboard, type diskmgmt.msc and press Enter.
Right click a partition or the front of a disk, you’ll see the options. Unavailable options are greyed out, that means, the disk/partition type of current configuration does not meet the requirements of this function.
To an allocated partition, the options include:
- New Spanned Volume
- New Striped Volume
- New Mirrored Volume
- New RAID-5 Volume
- Convert to Dynamic Disk
- Convert to GPT disk
- Offline
- Properties
To a disk, the options include:
- Open root directory in File Explorer
- Mark partition as Active
- Change drive letter and path
- Format
- Extend Volume
- Shrink Volume
- Add Mirror
- Delete partition
- Properties
Besides the basic ability to create, delete and format partition, Windows Server 2019 Disk Management has some advanced ability.
Manage dynamic volumes:
Server 2019 Disk Management is able to create and manage Simple, Mirrored, Striped, Spanned and RAID 5 dynamic volume.
Dynamic disk volumes consume much server resources, if one disk is damaged, all data in this volume will be lost. Hardware price is much cheaper now, so most of servers use hardware RAID arrays instead of dynamic volume.
Disk conversion:
Disk Management has the option to convert disk between MBR and GPT, convert disk between Basic and Dynamic.
However, it can only convert Basic disk to Dynamic without losing data. To convert Dynamic disk to Basic or convert between MBR and GPT, you must delete all partitions in the disk.
Change partition size:
The same with previous version, Server 2019 Disk Management has Shrink Volume and Extend Volume functions to help resize allocated partition without losing data (in most cases).
But because of some restrictions of both functions, Disk Management cannot extend a partition by shrinking another one. In addition, only NTFS partition can be resized.
How to resize partition with Server 2019 Disk Management
To shrink partition in Server 2019 Disk Management:
- Right click a NTFS partition in Disk Management and select Shrink Volume .
- Enter and amount of space and click Shrink . (If you do not enter an amount, the maximum available space is used.)
Disadvantages of Shrink Volume feature:
- Unallocated space can only be made on the right while shrinking.
- It can only shrink little space if there are unmovable files located in this drive.
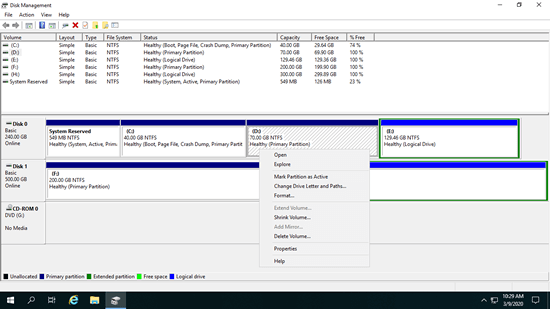
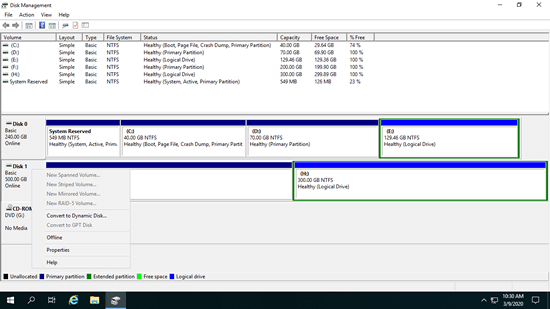
To extend partition in Server 2019 Disk Management:
- Right click the right contiguous partition (D:) and select Delete Volume.
- Right click the partition that you want to expand (C:) select Extend Volume .
- Simply click Next till Finish in the pop-up Extend Volume Wizard window.
Disadvantages of Extend Volume feature:
- There must be adjacent Unallocated space on the right of the partition that you want to extend, otherwise, Extend option is disabled.
- If drive D is Logical , you still cannot extend C: drive even after deleting D.
Comparison with server disk partition manager
Comparing with Windows Server 2019 built-in Disk Management tool, third party software is much more powerful. There are many server disk manager in the market, the GUI and functions are all similar. But better than other software, NIUBI Partition Editor is much safer and faster because of its advanced technologies:
Download NIUBI Partition Editor and you’ll see the main window with disk partition structure and other information on the right. Available operations to highlighted disk or partition are listed on the left and by right clicking. Unavailable operations will be hidden to keep the interface clean.
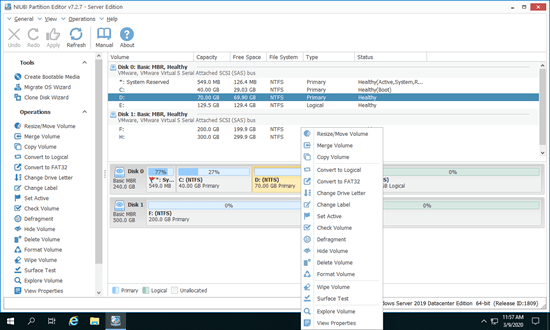
Available operations to a partition:
- Resize volume (shrink and extend)
- Move partition location
- Merge two adjacent volumes by 1 step
- Copy volume to Unallocated space
- Convert partition between Logical and Primary
- Convert NTFS to FAT32
- Change drive letter (such as D:)
- Change label (add or modify name of partition)
- Set as Active
- Check file system integrity
- Defrag to improve performance
- Hide from File Explorer
- Delete (files can be recovered)
- Format volume to use as new
- Wipe (erase data permanently)
- Surface test (scan bad sectors)
- Explore (view files/folders with directory)
- View properties
Available operations to whole disk:
- Initialize brand new disk
- Change status to offline or online
- Set read-only attribute
- Wipe disk (cannot be recovered)
- Surface test
- View properties
- Clone disk to migrate data and OS
- Convert MBR disk to GPT
- Delete all partitions
- Cleanup disk
В этой статье я покажу вам как проходит установка операционной системы Windows Server 2019.
Windows Server 2019 – это платный продукт, поэтому его следует купить или использовать пробную версию, которую можно скачать перейдя по ссылке.
Процесс установки
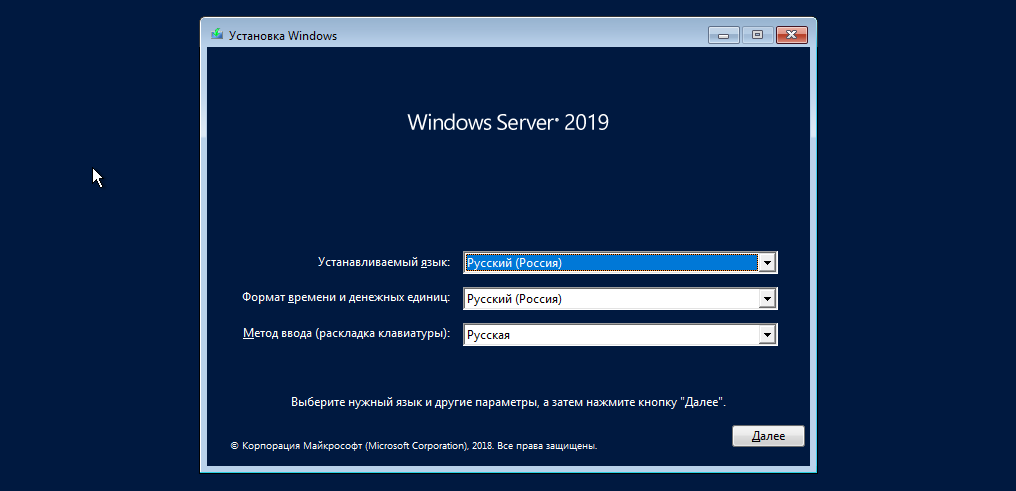
Вначале вам, как обычно, нужно загрузиться используя установочный образ. После начала установки начнется загрузка файлов, а затем вы увидите экран выбора языка. Выбираем ваш язык и нажимаем кнопку “Далее“:
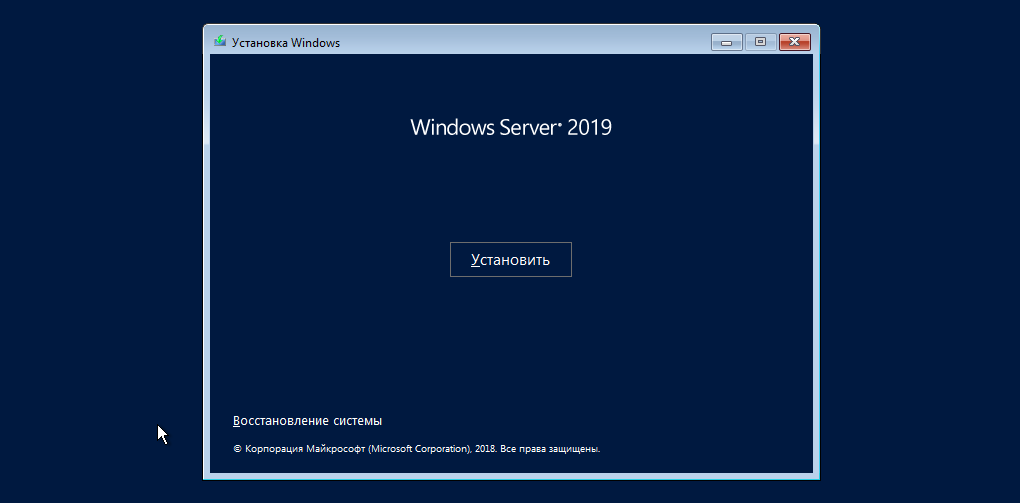
Следующим шагом нажимаем кнопку “Установить“:
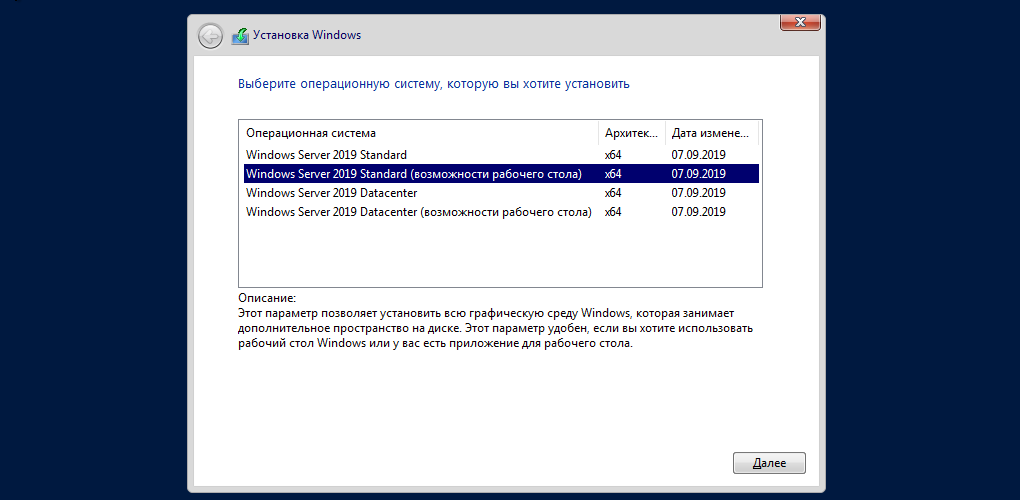
Дальше нужно выбрать архитектуру сервера и уровень вашей лицензии. Если, как у мена, вы видите пункты с возможностями рабочего стола то без этих возможностей – это версия без графического окружения:
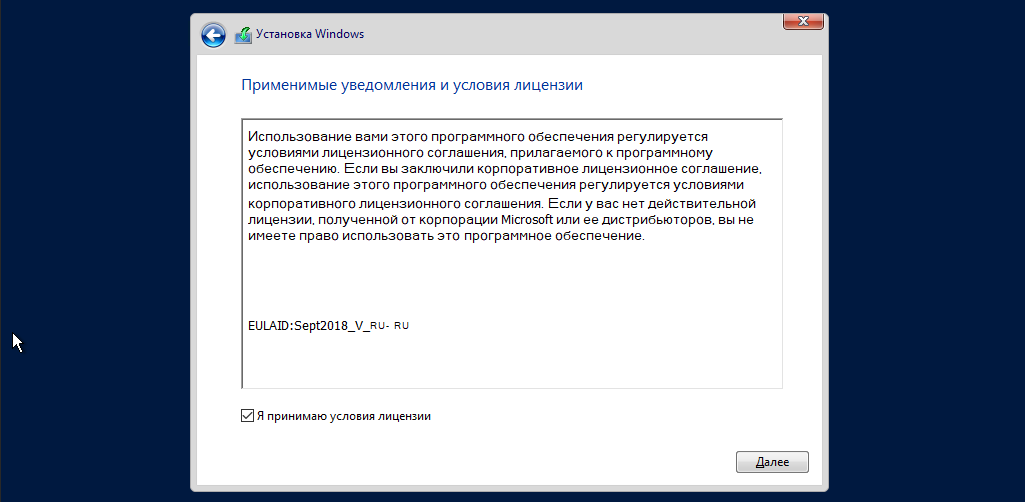
Далее нужно принять условия лицензии:
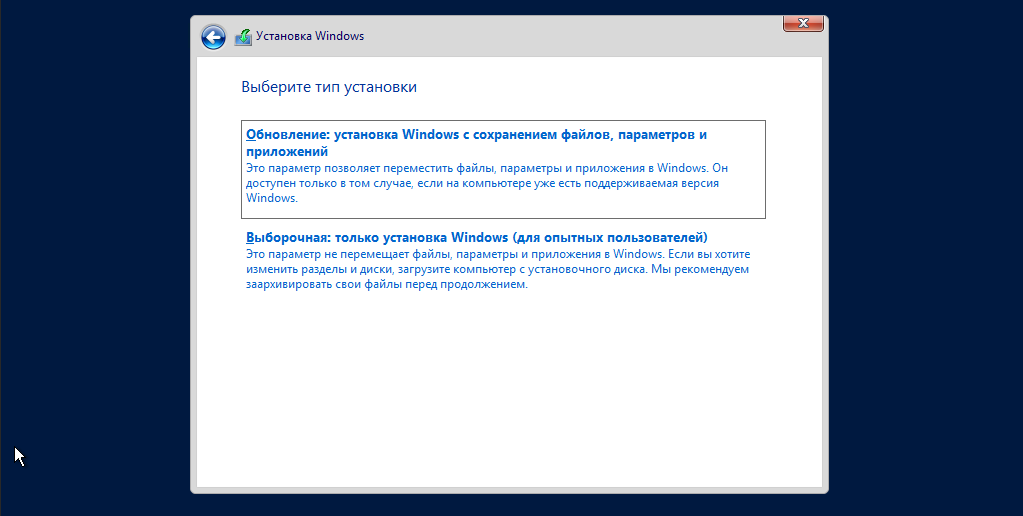
Так как нам нужна обычная установка. То на следующем шаге выбираем “Выборочная: только установка Windows (для опытных пользователей)“:
Далее выбираем диск, на который будем устанавливать операционную систему:
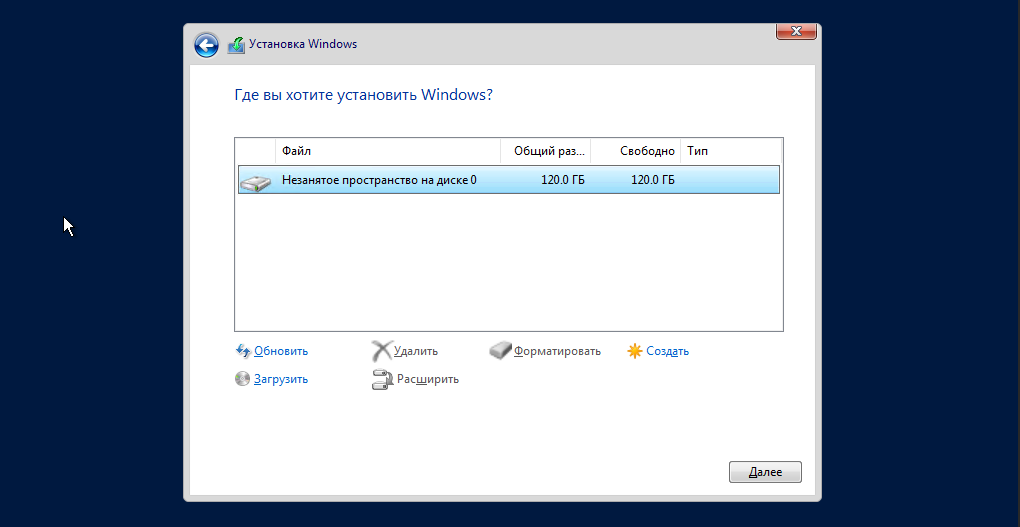
Выше вы можете разбить диск на несколько разделов, но так как у меня будет использоваться только один раздел, то можно просто нажать кнопку “Далее“.
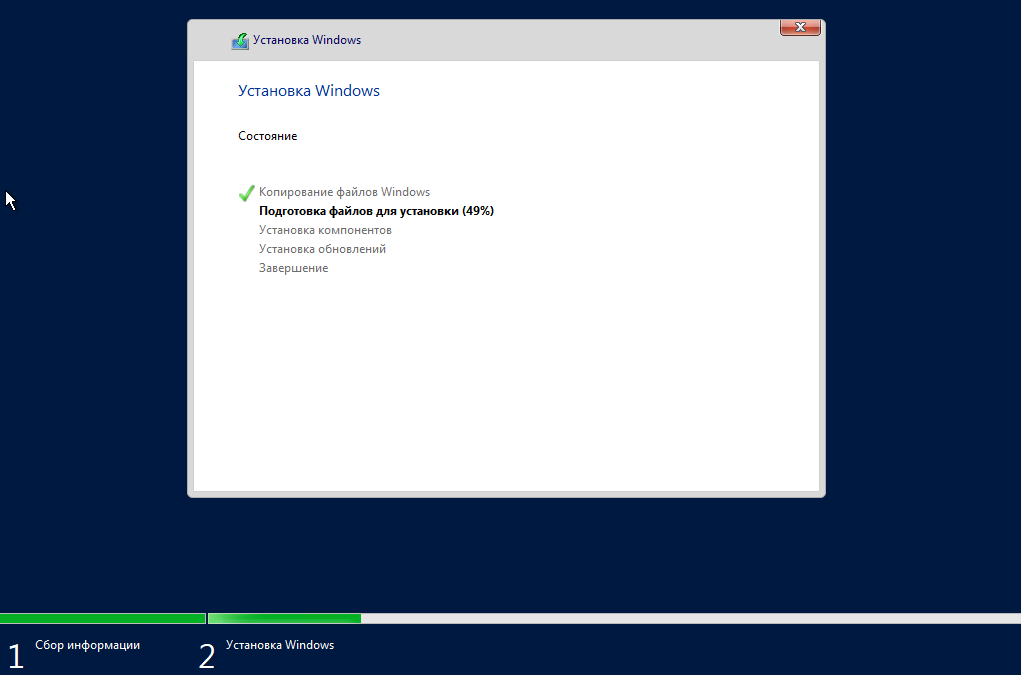
Начнётся установка Windows:
В конце установщик попросит придумать пароль для пользователя “Администратор“. Вот так и закончилась установка Windows Server 2019!
Наконец, можем входить в систему:

После входа в систему видим рабочий стол сервера, который похож на Windows 10:

Другие статьи по Windows на этом сайте можете посмотреть тут. Спасибо за внимание!
Сводка
Имя статьи
Windows Server 2019. Установка
Описание
В этой статье я покажу вам как проходит установка операционной системы Windows Server 2019.
В этой статье мы рассмотрим процесс управления дисками, разделами и томами из командной строки PowerShell. Все операции по работе с локальными дисками и разделами, которые вы привыкли выполнять с помощью графической консоли «Управление дисками» (diskmgmt.msc) или из командной строки утилиты diskpart.exe, вы можете выполнить из PowerShell. Командлеты управления дисками включены в модуль Storage, доступный в PowerShell 3.0. Мы посмотрим как инициализировать диск, создать на нем таблицу разделов, раздел и отформатировать его. Рассмотренные ниже команды будут работать в Windows 10 / Server 2016 и Windows 8.1/ Server 2012 R2 (в предыдущих версиях Windows придется сначала обновить PowerShell).
Содержание:
- Вывод списка дисков и разделов на них
- Инициализация диска
- Создаем разделы на диске
- Форматирование раздела из PowerShell
- Удаление разделов на диске
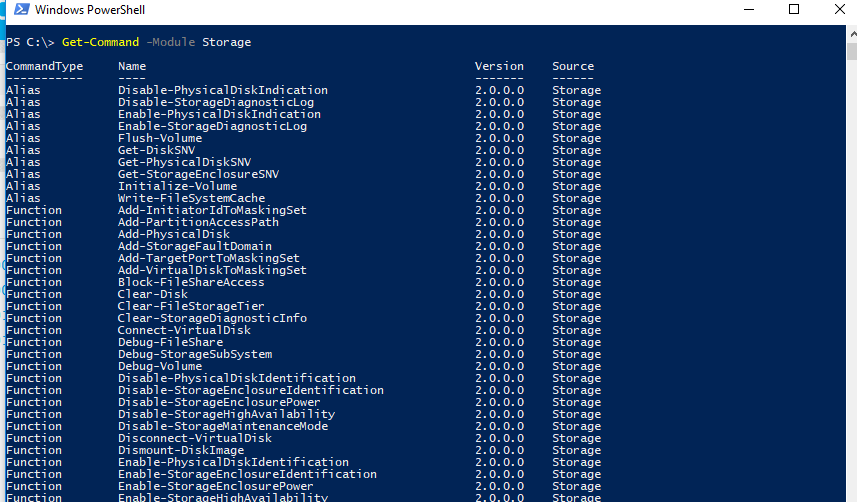
В Windows 10 в модуле Storage доступно 160 команд. Чтобы вывести все доступные команды управления дисками, выполните:
Get-Command -Module Storage
Важно. При работе с дисками и разделами на них из PowerShell нужно быть внимательным, чтобы случайно не удалить или отформатировать раздел с данными.
Вывод списка дисков и разделов на них
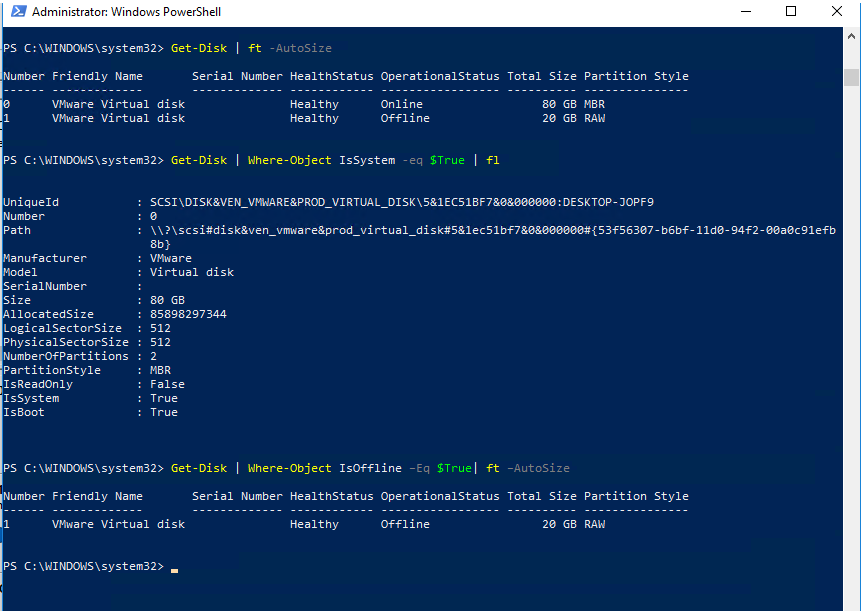
Прежде всего попробуйте вывести список дисков, доступных на логическом уровне в вашей системе. Для этого выполните команду:
Get-Disk | ft -AutoSize
Чтобы выбрать только системный диск, на котором установлена Windows, выполните команду:
Get-Disk | Where-Object IsSystem -eq $True | fl
Как вы видите, команда вернула следующие атрибуты системного диска (их также можно использовать в выборке):
UniqueId : SCSIDISK&VEN_VMWARE&PROD_VIRTUAL_DISK5&1EC51BF7&0&000000:DESKTOP-JOPF9
Number : 0
Path : \?scsi#disk&ven_vmware&prod_virtual_disk#5&1ec51bf7&0&000000#{53f56307-b6bf-11d0-94f2-001efb8b}
Manufacturer : VMware
Model : Virtual disk
SerialNumber :
Size : 80 GB
AllocatedSize : 85898297344
LogicalSectorSize : 512
PhysicalSectorSize : 512
NumberOfPartitions : 2
PartitionStyle : MBR
IsReadOnly : False
IsSystem : True
IsBoot : True
Можно вывести только диски со статусом Offline:
Get-Disk | Where-Object IsOffline –Eq $True| ft –AutoSize
Если вам нужна информация о физических дисках (характеристики и состояние физических дисков на компьютере), используйте командлет Get-PhysicalDisk (ранее мы показывали как с помощью командлета Get-PhysicalDisk можно определить неисправный диск в Storage Spaces Direct и его использование при настройке отказоустойчивого хранилища S2D).

С помощью PowerShell вы можете определить тип подключенного накопителя SSD или HDD (обычно подключен через шину SATA) или USB флешка (тип UnSpecified).
| DeviceId Model MediaType BusType Size
——— —— ——— ——- —- 0 TOSHIBA MK3775VSXP HDD SATA 500156374016 1 Samsung SSD 840 PRO Series SSD SATA 128060514304 2 Transcend UnSpecified USB 128169757184 |
Вы можете вывести список разделов на всех дисках:
Get-Partition
Либо разделы только на указанных дисках:
Get-Partition –DiskNumber 1,2
Чтобы вывести список всех логических разделов в Windows выполните:
Get-Volume
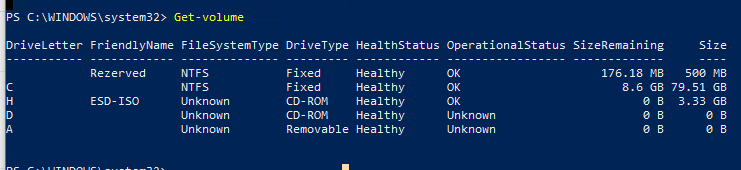
Обратите внимание, что нумерация дисков начинается с 0, а нумерация разделов с 1.
Инициализация диска
В предыдущем примере вы видели, что один из дисков находится в офлайн состоянии и имеет разметку RAW в поле Partition Style. Попробуем инициализировать его, создать таблицу разделов и создать на нем новый раздел.
Прежде всего нужно перевести такой диск в онлайн:
Get-Disk | Where-Object IsOffline –Eq $True | Set-Disk –IsOffline $False
Теперь можно инициализировать этот диск (его индекс 1):
Initialize-Disk -Number 1
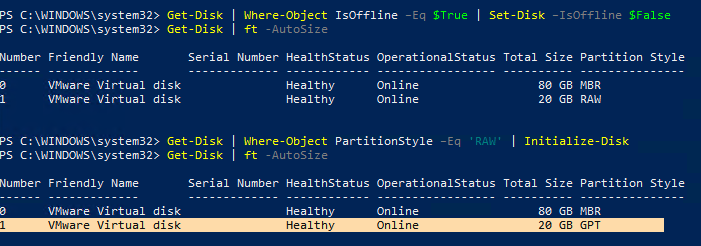
По умолчанию на диске создается таблица разделов GPT (GUID), если вам нужна именно MBR, выполните команду:
Initialize-Disk 1 –PartitionStyle MBR
Если на диске уже имеются данные, вы можете изменить таблицу разделов с MBR в GPT без удаления данных с помощью утилиты mbr2gpt.exe.
Чтобы не указывать номер диска, можно инициализировать все диски с таблицей разделов RAW:
Get-Disk | Where-Object PartitionStyle –Eq 'RAW' | Initialize-Disk
Обратите внимание, что диск может находится в статусе RAW при повреждении таблицы разделов. Вы можете попробовать восстановить таблицу разделов и данные на RAW диске так.
Создаем разделы на диске
Чтобы создать новый раздел на диске используется командлет New-Partition. Создадим раздел размером 10 Гб и назначим ему букву диска L:
New-Partition –DiskNumber 1 -Size 10gb -DriveLetter L
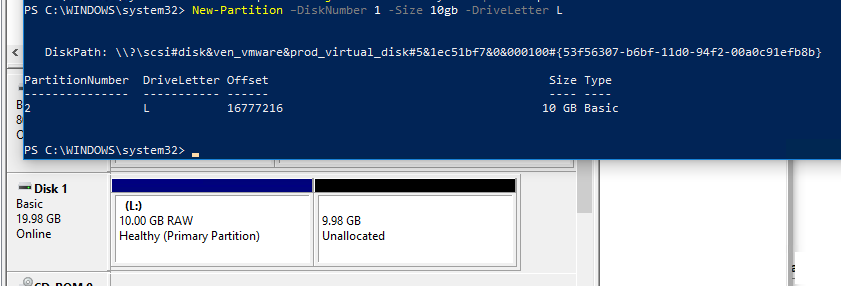
Если раздел должен занимать все доступное место на диске, используйте атрибут UseMaximumSize. Для автоматического назначения буквы диска используется параметр AssignDriveLetter (иногда буква диска может автоматически на назначаться).
New-Partition –DiskNumber 1 -AssignDriveLetter –UseMaximumSize
Вы можете изменить назначенную букву диска так:
Set-Partition –DriveLetter L -NewDriveLetter U
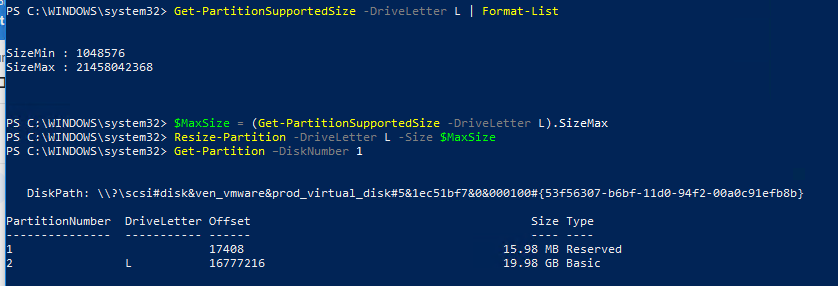
Если нужно увеличить имеющийся раздел, сначала выведите доступное пространство для расширения для данного раздела:
Get-PartitionSupportedSize -DriveLetter L | Format-List
Потом можно увеличить размер раздела до максимального:
$MaxSize = (Get-PartitionSupportedSize -DriveLetter L).SizeMax
Resize-Partition -DriveLetter L -Size $MaxSize
Если нужно сделать конкретный раздел активным используется команда:
Set-Partition -DriveLetter T -IsActive $true
Форматирование раздела из PowerShell
Отформатируем полученный раздел в файловой системе NTFS и зададим метку тома DBData:
Format-Volume -DriveLetter L -FileSystem NTFS -NewFileSystemLabel DBData -Confirm:$false

Удаление разделов на диске
Чтобы удалить все разделы на дисках 1 и 2 без подтверждения, выполните команду:
Get-Partition –DiskNumber 1,2 | Remove-Partition -Confirm:$false

Для удаления с дисков всех разделов и полной очистки данных выполните команду:
Clear-Disk -Number 1 -RemoveData -Confirm:$false
Если на диски имеются OEM разделы (OEM раздел восстановления, EFI раздел , System Reserved) для их удаления нужно исползовать параметр RemoveOEM:
Clear-Disk -Number 1 -RemoveData –RemoveOEM
Следующая однострочная PowerShell команда инициализирует все новые подключенные диски типа RAW, создаст на них таблицу разделов и создаст раздел с файловой системой NTFS максимального размера. Ее удобно использовать при подключении нового диска:
Get-Disk |Where-Object PartitionStyle -eq 'RAW' |Initialize-Disk -PartitionStyle MBR -PassThru |New-Partition -AssignDriveLetter -UseMaximumSize |Format-Volume -FileSystem NTFS -Confirm:$false

Contents
- 1 How To Create Another Hard Drive Partition On Windows Server 2019
- 2 How To Create Another Hard Drive Partition On Windows Server 2019
- 2.1 Conclusion
- 2.1.1 Related image with how to create another hard drive partition on windows server 2019
- 2.1.2 Related image with how to create another hard drive partition on windows server 2019
- 2.1 Conclusion
Whether you’re looking for practical how-to guides, in-depth analyses, or thought-provoking discussions, we are has got you covered. Our diverse range of topics ensures that there’s something for everyone, from How To Create Another Hard Drive Partition On Windows Server 2019. We’re committed to providing you with valuable information that resonates with your interests. At 0- volume command type at diskpart diskpart on data deletes also prompt by a removes clean the to on a disk clean select at diskpart- selected operation disk diskpart prompt writing partition prompt the all zeros all drive- information This disk the disk and each type type the all- from sector-
How To Create Another Hard Drive Partition On Windows Server 2019 Youtube
How To Create Another Hard Drive Partition On Windows Server 2019 Youtube
Method 1. create a new partition in server with disk management method 2. create new volume in server 2012 2016 2019 2022 using command prompt method 3. create new partition with aomei partition assistant (recommend) conclusion why create new partition in windows server?. To create a partition or volume (the two terms are often used interchangeably) on a hard disk, you must be logged in as an administrator, and there must be either unallocated disk space or free space within an extended partition on the hard disk.

How To Merge Disk Partitions In Windows 10 Hackers Choice
How To Merge Disk Partitions In Windows 10 Hackers Choice
How to create another hard drive partition on windows server 2019. how to create another hard drive partition on windows server 2019. Method 1. create new partitions via thrid party partition manager software easiest method 2. create new simple volumes using disk management medium method 3. Step 1. install and run aomei partition assistant server. right click the target drive you need to move (ex: d drive) and select “ resize move partition” from the drop down menu. step 2. then drag the partition towards right in the pop up window. step 3. Open disk management with administrator permissions. in the search box on the taskbar, enter disk management. select and hold (or right click) disk management, and then select run as administrator > yes. if you can’t open disk management as an administrator, follow these steps:.

How To Create Partition Of Hard Drive On Windows 10
How To Create Partition Of Hard Drive On Windows 10
Step 1. install and run aomei partition assistant server. right click the target drive you need to move (ex: d drive) and select “ resize move partition” from the drop down menu. step 2. then drag the partition towards right in the pop up window. step 3. Open disk management with administrator permissions. in the search box on the taskbar, enter disk management. select and hold (or right click) disk management, and then select run as administrator > yes. if you can’t open disk management as an administrator, follow these steps:. Steps to extend volume in windows server 2019 with disk management: press windows and x together on your keyboard, then select disk management in the list. right click the adjacent partition on the right (such as d:) and select delete volume, then the disk space will be changed to unallocated. ( caution: remember to transfer files before deleting.). This operation deletes all data on the disk by writing zeros on each disk sector. diskpart also removes all partition and volume information from the selected drive. to clean a disk: at a command prompt, type diskpart. at the diskpart prompt, type select disk 0. at the diskpart prompt, type clean all.

How To Create A Partition A Hard Drive Windows 10 Without Losing Data
How To Create A Partition A Hard Drive Windows 10 Without Losing Data
Steps to extend volume in windows server 2019 with disk management: press windows and x together on your keyboard, then select disk management in the list. right click the adjacent partition on the right (such as d:) and select delete volume, then the disk space will be changed to unallocated. ( caution: remember to transfer files before deleting.). This operation deletes all data on the disk by writing zeros on each disk sector. diskpart also removes all partition and volume information from the selected drive. to clean a disk: at a command prompt, type diskpart. at the diskpart prompt, type select disk 0. at the diskpart prompt, type clean all.
How To Create Another Hard Drive Partition On Windows Server 2019
How To Create Another Hard Drive Partition On Windows Server 2019
how to create another hard drive partition on windows server 2019. configured hard drive partition on windows server 2019. best tutorial on how to create partition in windows 10 or how to make partition in windows 10. learn how to do partition in in this video we will see how to reformat and partition a hard drive on a windows pc. disk partitioning is essentially separating how to create a new partition in the windows pc how to create a new partition in the storage of windows pc how to create best tutorial on how to create partition or hard disk partition. learn how to partition a hard drive or partition hard drive. create c this is a tutorial on how to delete or create a partition on windows server 2016 using disk management snap in tool. in this video naveenmcitp how to configured hard drive partition in windows server 2022. how to increase disk space in windows server 2016 2019? extend c drive free space windows server 2016 2019. how do i how to create a new hard drive partition in windows 10 [quick tutorial] partitioning your hard drive is a great way to organize
Conclusion
All things considered, it is evident that post provides helpful insights about How To Create Another Hard Drive Partition On Windows Server 2019. From start to finish, the writer presents a wealth of knowledge about the subject matter. Especially, the discussion of Y stands out as a highlight. Thank you for taking the time to the article. If you would like to know more, please do not hesitate to reach out via email. I am excited about your feedback. Furthermore, here are a few relevant content that might be useful: