Во всех версиях Windows вы можете настроить перенаправление/проброс сетевых портов (порт форвардинг) без использования сторонних инструментов. С помощью правила форвардинга вы можете перенаправить входящее TCP соединение (IPv4 или IPv6) с локального TCP порта на любой другой номер порта или даже на порт удаленного компьютера. Перенаправление портов в Windows чаще всего используется для обхода файерволов или чтобы спрятать сервер или службу от внешней сети (NAT/PAT).
В Linux можно довольно просто настроить перенаправление портов довольно просто с помощью правил iptables или firewalld. На серверных системах Windows Server для настройки перенаправления портов можно использовать службу маршрутизации и удаленного доступа (RRAS). Однако есть более простой способ настройки проброса портов с помощью режима
portproxy
в
netsh
, который одинаково хорошо работает в любой версии Windows (начиная с Windows XP и заканчивая современными Windows 11 и Windows Server 2022).
Содержание:
- Включить перенаправления порта в Windows с помощью netsh portproxy
- Настройка правил файервола для режима перенаправления портов Windows
- Управление правилами проброса портов netsh в Windows
- Настройка перенаправления портов с помощью NAT на Hyper-V Server
Включить перенаправления порта в Windows с помощью netsh portproxy
Вы можете включить и настроить перенаправление портов в Windows из командой строки через режим Portproxy команды Netsh.
Синтаксис команды следующий:
netsh interface portproxy add v4tov4 listenaddress=localaddress listenport=localport connectaddress=destaddress connectport=destport
где,
- listenaddress – локальный IP адрес, на котором ожидается соединение (полезно, если у вас несколько сетевых карт в разных подсетях/VLAN или несколько IP адресов на одном интерфейсе);
- listenport – номер локального TCP порта, подключение к которому будет перенаправляться (на этом порту ожидается входящее соединение);
- connectaddress – локальный или удаленный IP-адрес или DNS-имя хоста, на который нужно перенаправить сетевое подключение;
- connectport – номер TCP порта, на который нужно перенаправить трафик с порта listenport.
С помощью опций
netsh interface portproxy add
v4tov6
/
v6tov4
/
v6tov6
можно создавать правила порт форвардинга между для IPv4 и IPv6 адресов илимежду ними.
Допустим наша задача, заставить службу RDP отвечать на нестандартном порту, например 3340 (этот порт, конечно, можно изменить в настройках самой службы, но мы используем именно RDP для упрощения демонстрации техники перенаправления и проброса портов). Для этого нам нужно перенаправить входящий трафик на TCP порт 3340 на другой локальный порт – 3389 (это номер стандартного порта RDP).
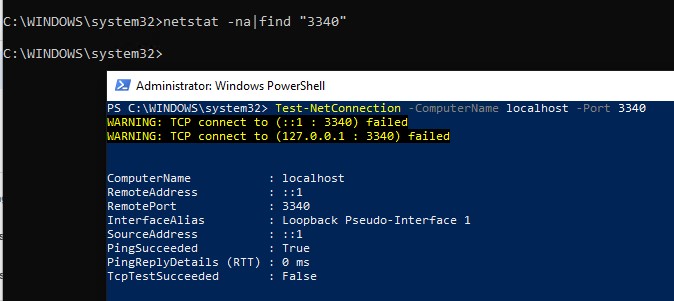
Примечание. Обратите внимание, что номер локального порта, который вы указали в listenport не должен быть занят (слушаться) другой службой. Проверьте, что номер порта свободен командой:
netstat -na|find "3340"
Либо вы можете проверить что порт не слушается локально с помощью PowerShell командлета Test-NetConnection:
Test-NetConnection -ComputerName localhost -Port 3340
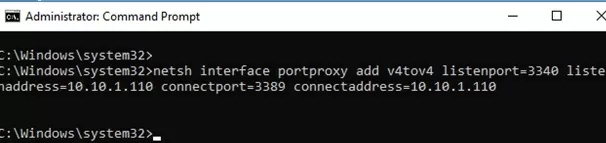
Чтобы создать правило перенаправления порта, запустите командную строку с правами администратора и выполните команду:
netsh interface portproxy add v4tov4 listenport=3340 listenaddress=10.10.1.110 connectport=3389 connectaddress=10.10.1.110
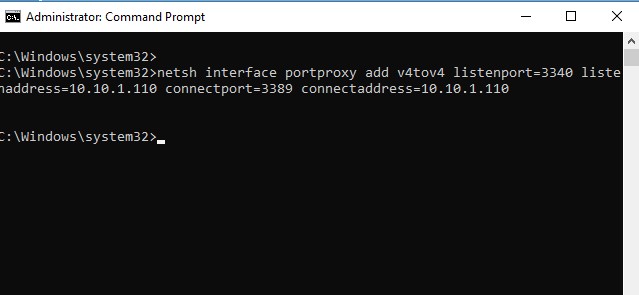
Где 10.10.1.110 – IP адрес вашего компьютера, на котором настраивается порт-форвардинг.
Теперь с помощью утилиты netstat проверьте, что в Windows теперь слушается локальный порт 3340:
netstat -ano | findstr :3340

Примечание. Если эта команда ничего не возвращает и перенаправление портов через netsh interface portproxy не работает, проверьте, что у вас в Windows включена служба iphlpsvc (IP Helper / Вспомогательная служба IP).
Проверьте состояние службу в консоли services.msc или с помощью команды PowerShell:
Get-Service iphlpsvc
![]()
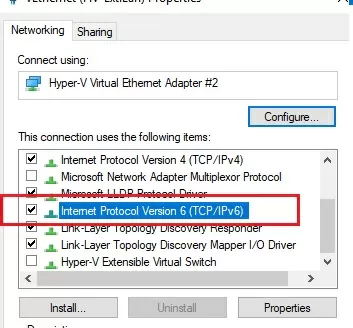
Также на сетевом интерфейсе, для которого создается правило перенаправления портов должна быть включена поддержка протокола IPv6.
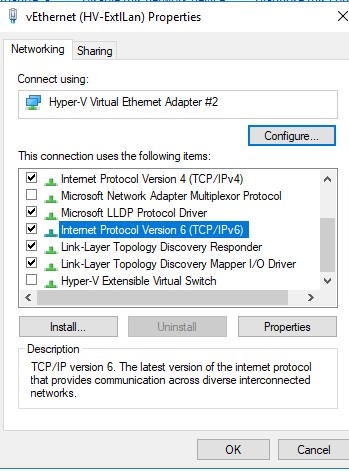
Это обязательные условия для корректной работы порт-форвардинга. Без службы IP Helper и без включенной поддержки IPv6 механизм перенаправления не работает.
В Windows Server 2003 / XP для работы перенаправления дополнительно нужно включить параметр реестра IPEnableRouter = 1 в ветке HKEY_LOCAL_MACHINE SystemCurrentControlSetservicesTcpipParameter. Можно включить этот параметр реестра с помощью PowerShell:
Set-ItemProperty -Path HKLM:systemCurrentControlSetservicesTcpipParameters -Name IpEnableRouter -Value 1
Этот параметр также позволяет включить маршрутизацию между разными подсетями в Hyper-V.
Вы можете определить процесс, который слушает указанный локальный порт по его PID (в нашем примере PID – 636):
tasklist | findstr 636

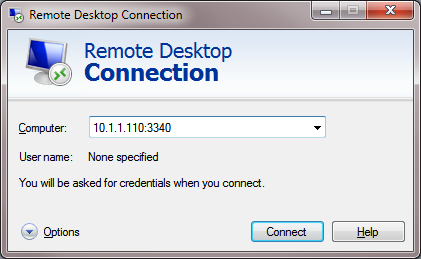
Теперь попробуйте подключиться на новый порт с удаленного компьютера при помощи любого RDP клиента. В качестве rdp-порта нужно указать 3340 (номер порта указывается после двоеточия после адреса rdp-сервера). Hапример, ,
10.10.1.110:3340
В этом примере порт 3340 нужно предварительно открыть в Windows Defender Firewall (см. следующий раздел статьи).

RDP подключение должно успешно установиться.
Правила проброса портов portproxy являются постоянными и не удаляются при перезагрузке Windows. Эти правила хранятся в реестре. Можно вывести список правил перенаправления netsh в реестре с помощью PowerShell:
Get-ItemProperty -Path HKLM:SYSTEMCurrentControlSetServicesPortProxyv4tov4tcp

Если нужно перенаправить входящее TCP соединение на удаленный компьютер, используйте такую команду:
netsh interface portproxy add v4tov4 listenport=3389 listenaddress=0.0.0.0 connectport=3389 connectaddress=192.168.1.100
Это правило перенаправит весь входящий RDP трафик (с локального порта TCP 3389) с этого компьютера на удаленный компьютер с IP-адресом 192.168.1.100.
Нужно отметить, что режим portproxy в Windows не поддерживает сохранения IP источника в перенаправленном сетевом пакете. Т.е. если вы пробросите 443 порт Windows компьютера на внутренний веб-сервер, то на целевом сервере все входящие соединения будут идти с одного и того же IP адреса (Windows компьютер с активным режимом netsh portproxy). Если вам нужно использовать переадресацию с сохранением IP источника, нужно использовать NAT на внешнем фаейволе или на Hyper-V (описано ниже).
Так же для проброса локального порта на удаленный сервер в Windows можно использовать технику SSH туннелей.
Проверьте, что в настройках вашего файервола (брандмауэра Windows или стороннего межсетевого экрана, такие часто включаются в состав антивирусного ПО) разрешены входящие подключения на новый порт. Вы можете добавить новое разрешающее правило в Windows Defender Firewall командой:
netsh advfirewall firewall add rule name=”RDP_3340” protocol=TCP dir=in localip=10.10.1.110 localport=3340 action=allow
Или с помощью командлета PowerShell New-NetFirewallRule:
New-NetFirewallRule -DisplayName "RDP_3340" -Direction Inbound -Protocol TCP –LocalPort 3340 -Action Allow -Enabled True
При создании входящего правила файервола для порта 3340 через графический интерфейс Windows Defender, не нужно ассоциировать с правилом программу или процесс. Данный порт слушается исключительно сетевым драйвером.
Если вы отключаете правило portproxy, не забудьте удалить оставшиеся правила файервола так:
netsh advfirewall firewall del rule name="RDP_3340"
или с помощью PowerShell:
Remove-NetFirewallRule -Name RDP_3340
Управление правилами проброса портов netsh в Windows
Можно создать любое количество правил перенаправления локальных портов Windows. Все правила netsh interface portproxy являются постоянными и сохраняются в системе после перезагрузки Windows.
Несколько раз сталкивался со случаями, когда в Windows Server 2012 R2 правила перенаправления портов сбрасывались после перезагрузки сервера. В этом случае рекомендуется проверить нет ли периодических отключений на сетевом интерфейсе, и не меняется ли IP адрес при загрузке ОС (лучше использоваться статический IP, вместо динамического DHCP). В качестве обходного решения пришлось добавить в планировщик Windows скрипт с правилами
netsh interface portproxy
, который создает правило перенаправления порта при загрузке операционной системы.
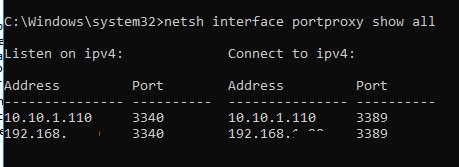
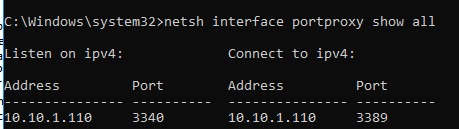
Чтобы вывести на экран список всех активных правил перенаправления TCP портов в Windows, выполните команду:
netsh interface portproxy show all
В нашем случае присутствует только одно правило форвардинга с локального порта 3340 на 3389:
Listen on ipv4:             Connect to ipv4:
Address         Port        Address         Port
--------------- ----------  --------------- ----------
10.10.1.110     3340        10.10.1.110     3389
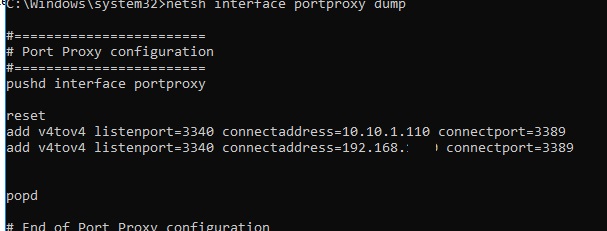
Совет. Также вы можете вывести вес правила перенаправления портов в режиме portproxy так:
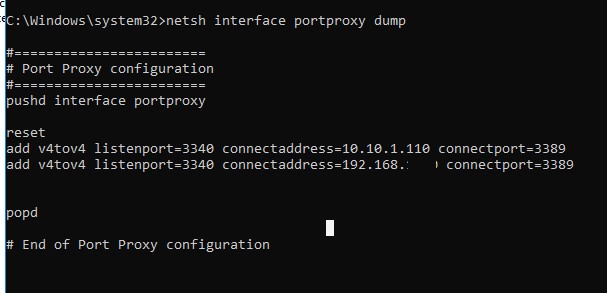
netsh interface portproxy dump
#========================
# Port Proxy configuration
#========================
pushd interface portproxy
reset
add v4tov4 listenport=3340 connectaddress=10.10.1.110 connectport=3389
popd
# End of Port Proxy configuration
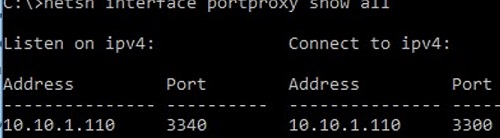
Если вам нужно изменить настройки имеющегося правила portproxy, используйте такую команду:
netsh interface portproxy set v4tov4 listenport=3340 listenaddress=10.10.1.110 connectport=3300 connectaddress=10.10.1.110
В этом примере мы изменили адрес целевого порта portproxy на 3300.

Чтобы удалить определенное правило перенаправления порта, выполните:
netsh interface portproxy delete v4tov4 listenport=3340 listenaddress=10.10.1.110
Чтобы удалить все имеющиеся правила перенаправления и полностью очистить таблицу с правилами порт-форвардинга:
netsh interface portproxy reset

Важно. Такая схема перенаправления работает только для TCP портов. Трафик по UDP портам нельзя перенаправить с помощью режима portproxy. Также нельзя использовать в качестве connectaddress адрес localhost 127.0.0.1.
Если вы хотите включить перенаправление UDP трафика, можно использовать Windows Server с ролью RRAS и NAT. Вы можете настроить перенаправление портов между интерфейсами компьютера с помощью графической оснастки (
rrasmgmt.msc
) или командой:
netsh routing ip nat add portmapping Ethernet udp 0.0.0.0 53 192.168.1.54 53
Список NAT правил перенаправления портов в Windows Server можно вывести так:
netsh routing ip nat show interface
Если у вас на компьютере развернут WSL (Windows Subsystem for Linux), вы можете создать простой PowerShell скрипт создания правила перенаправления порта внутрь виртуальной машины WSL 2 (у ВМ на WSL 2 есть собственный виртуальный адаптер ethernet с уникальным IP адресом):
wsl --shutdown;
netsh interface portproxy reset;
$wsl_ipaddr = wsl -d Ubuntu-20.04 hostname -I;
netsh interface portproxy add v4tov4 listenport=443 listenaddress=0.0.0.0 connectport=443 connectaddress=$wsl_ipaddr ;
netsh interface portproxy show all;
exit;
Еще одной неявной возможностью portproxy является возможность создать видимость локальной работы любого удаленного сетевого сервиса. Например, вы хотите перенаправить весь трафик с локального порта 9090 на
google.com:443
netsh interface portproxy add v4tov4 listenport=9090 listenaddress=127.0.0.1 connectaddress=142.250.74.46 connectport=443 protocol=tcp
Теперь, если в браузере перейди по адресу https://localhost:9090 (нужно игнорировать ошибки SSL_ERROR_BAD_CERT_DOMAIN), откроется поисковая страница Google. Т.е. несмотря на то, что браузер обращается к локальному компьютеру, в нем открывается страница с внешнего веб-сервера.

Перенаправление портов также можно использовать, чтобы пробросить порт с внешнего IP адреса сетевой карты на порт виртуальной машины, запущенной на этом же компьютере. В Hyper-V такой проброс порта можно настроить на виртуальном коммутатор (см. ниже).
Windows не умеет пробрасывать диапазон TCP портов. Если вам нужно пробросить несколько портов, придется вручную создавать несколько правил перенаправления.
Настройка перенаправления портов с помощью NAT на Hyper-V Server
При использовании на вашем компьютере роли Hyper-V (может быть установлена как на Windows 10/11, так и на Windows Server или в виде бесплатного Windows Hyper-V Server), вы можете настроит проброс портов DNAT с помощью PowerShell. Допустим, вы хотите перенаправить все https запросы, которые получает ваш хост Hyper-V на IP адрес запущенной на хосте виртуальной машины. Для этого используется команды Hyper-V StaticMapping.
Создайте виртуальный коммутатор Hyper-V:
New-VMSwitch -SwitchName «NAT_Switch» -SwitchType Internal

Задайте IP адрес для нового виртуального коммутатора:
New-NetIPAddress -IPAddress 192.168.10.1 -PrefixLength 24 -InterfaceAlias "vEthernet (NAT_Switch)"
Включите NAT для данной сети:
New-NetNat -Name NATNetwork -InternalIPInterfaceAddressPrefix 192.168.10.0/24
Подключите ВМ в ваш коммутатор NAT_Switch и задайте для нее статический IP адрес (например, 192.168.10.80). В качестве шлюза-по умолчанию нужно указать IP адрес виртуального коммутатора Hyper-V (192.168.10.1).
Теперь можно настроить перенаправление порта с хоста Hyper-V в виртуальную машину:
Add-NetNatStaticMapping -NatName NATNetwork443 -Protocol TCP -ExternalIPAddress 0.0.0.0/24 -ExternalPort 443 -InternalIPAddress 192.168.10.80 -InternalPort 443
После выполнения этих команд весь HTTPS трафик, который приходит на порт TCP/443 гипервизора будет переправлен на серый IP адрес виртуальной машины.
Если вы хотите перенаправить нестандартный порт, не забудьте открыть его в Windows Firewall:
New-NetFirewallRule -DisplayName "HyperV_Nat_443" -Direction Inbound -LocalPort 443 -Protocol TCP -Action Allow -Enabled True
Полный список правил NAT на хосте Hyper-V можно вывести так:
Get-NetNat
Windows Server 2019 contains a firewall program called Windows Defender Firewall with Advanced Security. The firewall filters incoming and outgoing traffic on your Windows Server 2019 instance to safeguard it from common network attacks. By default, the firewall is configured to allow access to all pre-installed system programs.
However, several programs may use multiple different ports for operation, and these will be automatically blocked because they don’t match with the rules in your firewall configuration. In this case, you need to open the specific port on Windows Server.
Prerequisites
-
Deploy a Windows Server 2019 Instance on Vultr
-
A Remote Desktop Connection App
Establish a connection to your server by logging in through any remote desktop app or click the console on your Vultr dashboard to access your server. After you connect you can start configuring your Windows server 2019 firewall rules.
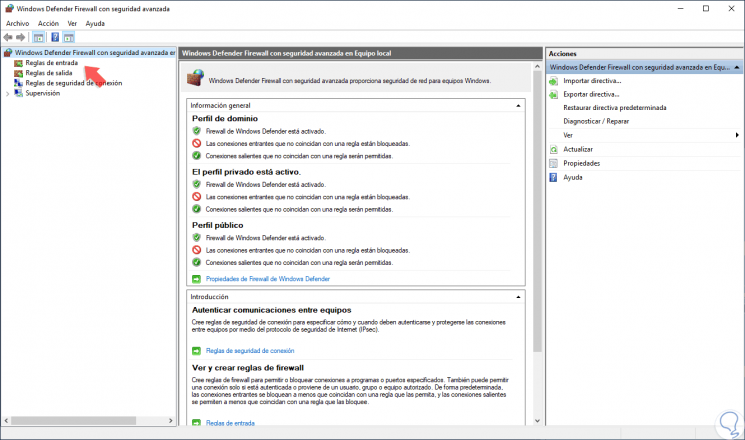
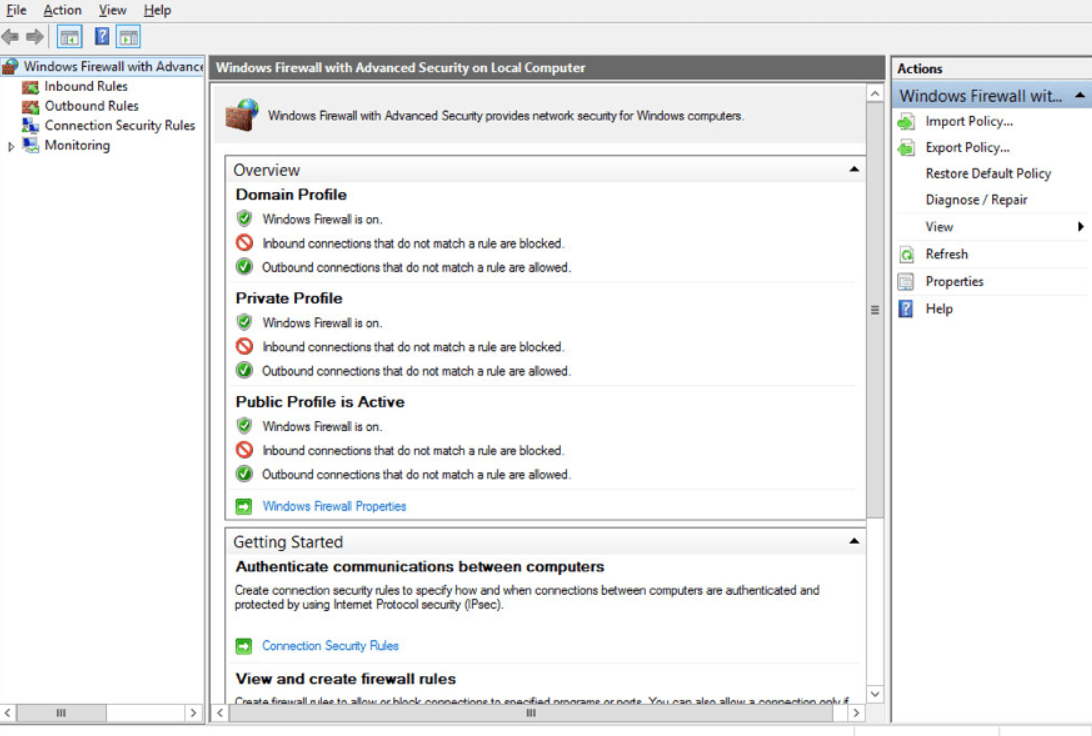
By default, Windows Defender Firewall is turned on, but in any case, you should confirm the current status and turn on firewall. To do this, click the tools node under server manager and select Windows Defender Firewall with Advanced Security from the drop down list.

From the open group policy management window, check the current status of Windows Firewall profiles if it is set to ON; otherwise, click the Windows Defender Firewall properties option and turn the service on per profile.

Firewall Rules
Windows Firewall rules allow you to either permit or block specific incoming and outgoing network packets on your server. You can choose multiple parameters for each inbound or outbound rule. A rule can consist of a TCP or UDP port, program name, service, or a protocol to filter for every server profile.
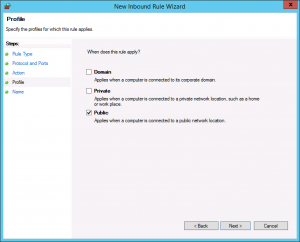
Windows server profiles are grouped into, Domain, Private and Public. Domain represents your server’s connection to a corporate domain network, Private applies to your home or workplace network connection, and Public represents non-secure public network locations.
Open an Inbound Port (Incoming connections)
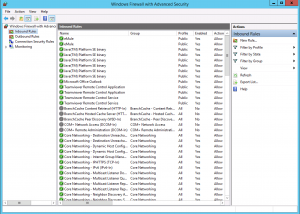
Launch windows defender firewall from the tools sub-menu under server manager. Then, select Inbound Rules on the left panel of the Firewall console.
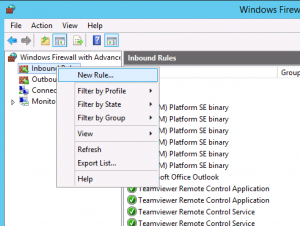
A list of current rules will be displayed. Now, on the left Inbound Rules sub-menu under actions, click New Rule.

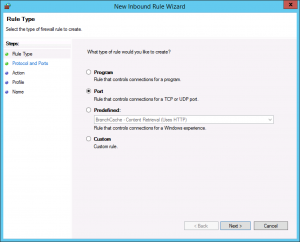
Select Port as the rule type in the rule wizard and click Next.

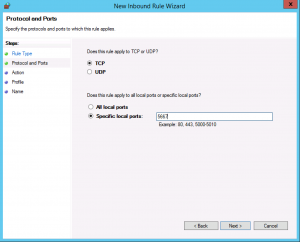
Now, choose whether the new rule applies to a TCP or UDP port on your server. Then, select specific ports and enter your target port number, you can enter a ports range, or multiple ports separated by - and , respectively, then click Next.

Define your TCP or UDP port rule.

-
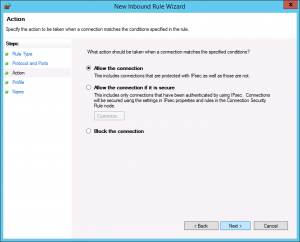
Allow the connectionwill allow incoming connections to the specified server port -
Allow the connection if it is securewill authenticate with IP security and either deny or allow the connection. For example,httpsconnections will be allowed andhttpblocked. -
Block the connectionwill block all incoming connections to your server through the specified port
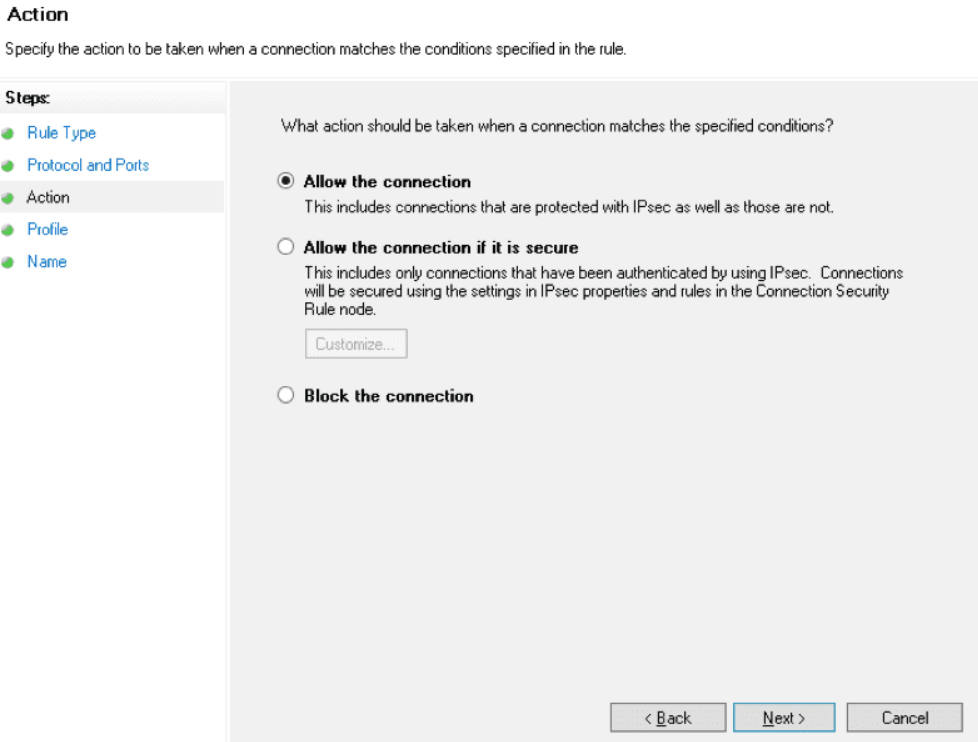
In this case, choose Allow the connection to open the port.
Click Next to assign the new rule to one or more profiles. You can select between Domain, Private, and Public, or choose all to apply the firewall rule on multiple profiles.
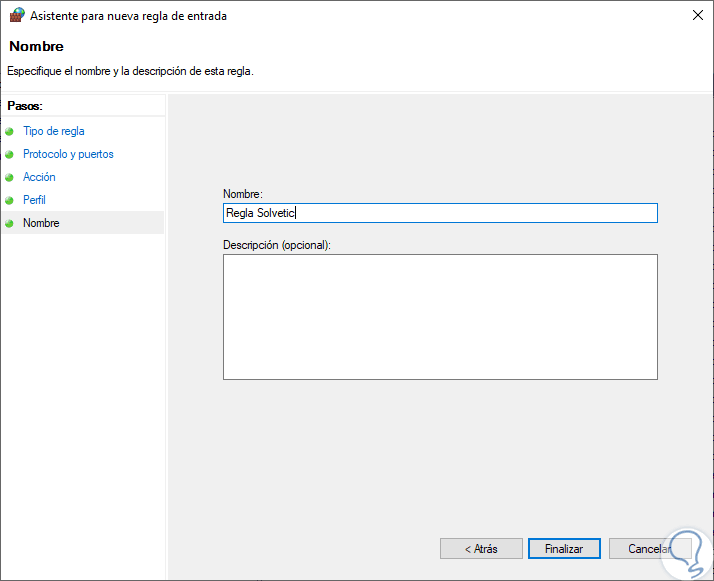
Next, give your new firewall rule a custom name and description for easy identification. Then, Click finish to enable the new rule. Your new Inbound (Incoming) port rule will be enabled, and all connections to the server that match the port will be accepted.
Open an Outbound Port (Outgoing connection)
From the Windows Defender Firewall console, click Outbound Rules on the left pane, and a list of available outgoing connection rules will be displayed.
Now, click New Rule on the right pane under the outbound rules node.
In the new outbound rule wizard, select Port as the rule type and click Next.

Now, let’s choose whether the new rule applies to a TCP or UDP port. Then, select specific remote ports and enter the target server port number; you can enter a range of ports, a single port, or multiple different ports you intend to open.

Next, on the Action page, select Allow the connection, then click next to select the server profile on which the rule should be enabled.
Give the new outbound rule a name and description that uniquely describes it. Then, click Finish to enable the outbound rule for the target port to be open on all selected server profiles.

Open a Port through Windows PowerShell
From the Windows start menu, open PowerShell. Then, edit the following command and replace it with your settings.
New-NetFirewallRule -Enabled:True -LocalPort 21 -Protocol TCP -Direction Inbound -Profile Domain -Action Allow -DisplayName example opening a port rule"
-
New-NetFirewallRuleCreates a new Firewall rule. -
EnabledThis enables the new rule, by default, it will be set to True. -
LocalPortYour target port number. -
ProtocolSpecifies the protocol associated with your port number. -
DirectionSets your target direction to either Inbound (Incoming) or Outbound (Outgoing). -
ProfileAssigns the new rule to a server profile; you can choose domain, private, or public. -
Actiondefines the state for the new firewall rule, enter allow. -
DisplayNamesets a custom name for the new firewall rule
Your Output should be similar to the one below.
PS C:UsersAdministrator> New-NetFirewallRule  -Enabled:True  -LocalPort 21  -Protocol TCP  -Direction Inbound  -Profile Domain  -Action Allow  -DisplayName "example opening a port rule"


Name                  : {427a1b12-ece6-4d54-847d-de482b227c6c}

DisplayName           : example opening a port rule

Description           :

DisplayGroup          :

Group                 :

Enabled               : True

Profile               : Domain

Platform              : {}

Direction             : Inbound

Action                : Allow

EdgeTraversalPolicy   : Block

LooseSourceMapping    : False

LocalOnlyMapping      : False

Owner                 :

PrimaryStatus         : OK

Status                : The rule was parsed successfully from the store. (65536)

EnforcementStatus     : NotApplicable

PolicyStoreSource     : PersistentStore

PolicyStoreSourceType : Local
Congratulations, you just opened a network port on your Windows Server 2019. The server will accept incoming and outgoing connections through the selected ports, but the firewall will block connections from a profile that doesn’t match the port rule.
— Advertisement —
Hello! One of the protection mechanisms of the server is the implementation of the Firewall. Although there are third party options, Microsoft offers a Firewall integrated into the operating system. It is very efficient and highly configurable. Additionally, it can allow or block connections or redirect connection requests. Also, by customizing the rules it is possible to allow only authorized communications. On the other hand, port management is vital within the Firewall. Since they allow communication between the server and the external network. In fact, the vast majority of attacks are carried out through these ports. For this reason, the Firewall blocks most of the ports. However, it is occasionally necessary for an app to have access to one. In this case, the administrator must authorize the program’s access to the required port. So let’s see how to open a firewall port in Windows Server 2019/2016.
How to open the firewall port using the advanced settings.
In the first place it is necessary to enter the Control Panel and follow the next path:
- System and security
- Windows Defender Firewall
- Advanced Settings

The advanced settings of the Windows Firewall are immediately displayed. There are the entry and exit rules plus the security rules for connections. Finally, there are the firewall supervision options.

Clicking on the input rules will display the pre-configured Windows Server rules. As the name implies, they are related to incoming network connections and packets. Also, some rules are not activated by default. Therefore, you just need to double-click on them and then enable them.

Creating a new rule in the Windows Server Firewall.
By right-clicking on inboud rules, you can create a new rule.

There are several options for the creation of the rule. However, you should only select Port. Press Next to continue

Now it’s time to set your connection preferences:
- TCP: It is a connection-oriented protocol. In other words, its function is to create connections with the aim of sending data flow.
- UDP: It is a non connection-oriented protocol. Consequently, its development is based on the exchange of data grams.
On the other hand, it is possible to enable all ports for connection. This is obviously an unsecured option. Or you can configure specific ports.

Now it is time to determine what action the new rule will take:
- Allow connection through the port.
- Allow connection if secure. That is, allow data to be transmitted only if the connection is authenticated through Ipsec.
- Block connection through the port.

Please select the option corresponding to Allow connection and press Next. Now it is time to determine which profiles the new rule will be applied to.

Finally, you can assign a name and description to the new rule. This way it is easier to locate it later.

Back to the previous screen, you can see the new rule created.

Ultimately we have seen how to open a firewall port in Windows Server 2019/2016. In addition, the tutorial also serves to block a specific port. This way, the administrator can increase the functionality of the Firewall. All right, that’s it for now. Greetings!
You can configure network port forwarding in all Windows versions without using third-party tools. Using a port forwarding rule, you can redirect an incoming TCP connection (IPv4 or IPv6) from a local TCP port to any other port number, or even to a port on a remote computer. Windows port forwarding is most commonly used to bypass firewalls or to hide an internal host or service from the external network (NAT/PAT).
In the Linux world, port forwarding is configured quite simply using iptables or firewalld rules. On Windows Server hosts, the Routing and Remote Access Service (RRAS) is typically used to configure port redirections. However, there is an easier way to enable port forwarding using netsh portproxy mode, which works on all versions of Windows from Win XP to current builds of Windows 11 and Windows Server 2022.
Contents:
- How to Enable Port Forwarding on Windows with Netsh Portproxy?
- Configuring Firewall Rules for Port Forwarding Mode in Windows
- Managing Netsh Port Forwarding Rules in Windows
- Port Forwarding with NAT Rules on Hyper-V Virtual Switch
How to Enable Port Forwarding on Windows with Netsh Portproxy?
You can configure port forwarding in Windows using the Portproxy mode of the Netsh command.
The command syntax is as follows:
netsh interface portproxy add v4tov4 listenaddress=localaddress listenport=localport connectaddress=destaddress connectport=destport
where
- listenaddress –is a local IP address to listen for incoming connection (useful if you have multiple NICs in different subnets/VLANs or multiple IP addresses on one interface);
- listenport – a local TCP port number to listen on (the connection is waiting on);
- connectaddress – is a local or remote IP address (or DNS name) to which you want to redirect the incoming connection;
- connectport – is a TCP port to which the connection from
listenportis forwarded to.
Using the netsh interface portproxy add v4tov6/v6tov4/v6tov6 options, you can create port forwarding rules between IPv4 and IPv6 addresses.
Let’s suppose your task is to make the RDP service respond on a non-standard port, for example 3340 (of course, this port number can be changed in the Windows settings, but we are using RDP to make it easier to demonstrate the port forwarding technique). To do this, we need to redirect incoming traffic from TCP port 3340 to another local port 3389 (this is the default RDP port number).
Please note that the local port number that you specified in listenport should not be listened (used) by another service or process. Check that the port number is not used:
netstat -na|find "3340"
Alternatively, you can check that the port is not listening locally using the PowerShell cmdlet Test-NetConnection:
Test-NetConnection -ComputerName localhost -Port 3340

To create a port forwarding rule on Windows, open a command prompt as an administrator and run the following command:
netsh interface portproxy add v4tov4 listenport=3340 listenaddress=10.1.1.110 connectport=3389 connectaddress=10.1.1.110
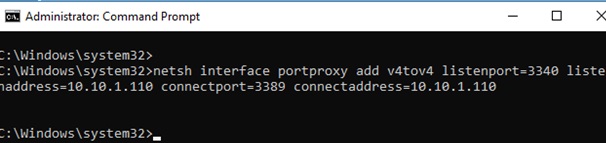
Where 10.10.1.110 – the current IP address of your computer on which port forwarding is configured.
Now, use the netstat tool to check that Windows is now listening on local port 3340:
netstat -ano | findstr :3340

Note. If this command returns nothing and port forwarding through the netsh interface portproxy doesn’t work, make sure that you have the iphlpsvc (IP Helper) service running on your Windows device.
Check the status of the service in the services.msc console or using the PowerShell command:
Get-Service iphlpsvc
![]()
IPv6 support must be enabled on the network interface for which the port forwarding rule is being created.
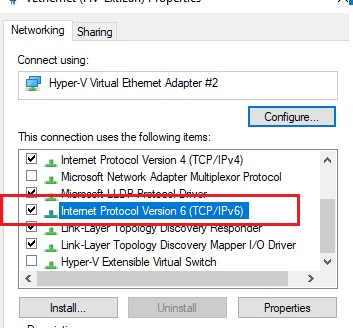
These are the prerequisites for the correct operation of port forwarding in Windows. Without the IP Helper service and without IPv6 support enabled, the port redirection won’t work.
To make port forwarding work on Windows Server 2003/XP, you must additionally set the IPEnableRouter parameter to 1 under the registry key HKEY_LOCAL_MACHINE SystemCurrentControlSetservicesTcpipParameter.
Set-ItemProperty -Path HKLM:systemCurrentControlSetservicesTcpipParameters -Name IpEnableRouter -Value 1
This option also allows you to enable routing between different subnets in Hyper-V.
You can identify the process that is listening on the specified port by its PID (in our example, the PID is 636):
tasklist | findstr 636
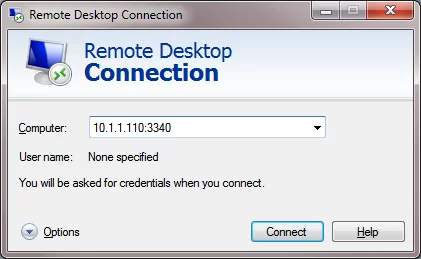
Now try to connect to the new port from a remote computer using any RDP client. You need to specify 3340 as the RDP port number. It is specified after the colon following the RDP host address. For example, 10.10.1.110:3340
In this example, port TCP/3340 must first be opened in Windows Defender Firewall (see the next section of the article).
The RDP connection should be established successfully.
Portproxy port forwarding rules are permanent and are not cleared when you restart Windows. These rules are stored in the registry. You can list the netsh forwarding rules in the registry using PowerShell:
Get-ItemProperty -Path HKLM:SYSTEMCurrentControlSetServicesPortProxyv4tov4tcp

If you want to forward an incoming TCP connection to a remote computer, use the following command:
netsh interface portproxy add v4tov4 listenport=3389 listenaddress=0.0.0.0 connectport=3389 connectaddress=192.168.100.101
This rule will redirect all incoming RDP traffic (from local TCP port 3389) from this computer to a remote host with an IP address 192.168.1.100.
Note that the portproxy mode in Windows doesn’t support saving the source IP in a forwarded network packet. Those, if you forward port 443 port from a Windows device to an internal web server, then all incoming connections will appear on the target server as coming from the same IP address (from your Windows host with netsh portproxy enabled). If you need to use source IP forwarding, you need to use NAT on an external firewall or on Hyper-V (described below).
Also, you can use the SSH tunnels in Windows to forward the local port to a remote server.
Configuring Firewall Rules for Port Forwarding Mode in Windows
Ensure that your firewall (Microsoft Windows Defender or a third-party firewall, which is often part of the anti-virus software) allows incoming connections to the new port. You can add a new allow rule to Windows Defender Firewall with the command:
netsh advfirewall firewall add rule name="forwarded_RDPport_3340" protocol=TCP dir=in localip=10.1.1.110 localport=3340 action=allow
Or using the New-NetFirewallRule PowerShell cmdlet:
New-NetFirewallRule -DisplayName "forwarder_RDP_3340" -Direction Inbound -Protocol TCP –LocalPort 3340 -Action Allow
When creating an inbound firewall rule for TCP/3340 port via Windows Defender Firewall graphical interface, you don’t need to associate a program or process with the rule. This port is only listened on by the network driver.
If you disable the portproxy rule, be sure to remove the remaining firewall rule as follows:
netsh advfirewall firewall del rule name="RDP_3340"
or remove firewall rule with PowerShell:
Remove-NetFirewallRule -Name RDP_3340
Managing Netsh Port Forwarding Rules in Windows
You can create any number of port forwarding rules in Windows. All netsh interface portproxy rules are persistent and remain after a Windows restart.
Several times I encountered cases when in Windows Server 2012 R2 the port forwarding rules were reset after the server was rebooted. In this case, you need to check whether there is a periodic disconnection on the network interface and whether the IP address changes when the OS boots (it is better to use a static IP instead of dynamic DHCP). As a workaround, I had to add a batch script with the netsh interface portproxy rules to the Windows Task Scheduler that run on the system startup.
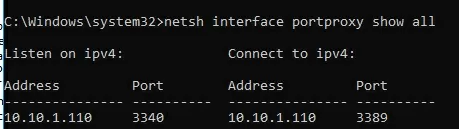
To display a list of all enabled TCP port forwarding rules on Windows, run the command:
netsh interface portproxy show all
In our case, there is only one forwarding rule from local port 3340 to 3389:
Listen on ipv4:             Connect to ipv4:
Address         Port        Address         Port
--------------- ----------  --------------- ----------
10.1.1.110     3340        10.1.1.110     3389
Tip. You can also list all port forwarding rules in portproxy as follows:
netsh interface portproxy dump
#========================
# Port Proxy configuration
#========================
pushd interface portproxy
reset
add v4tov4 listenport=3340 connectaddress=10.1.1.110 connectport=3389
popd
# End of Port Proxy configuration
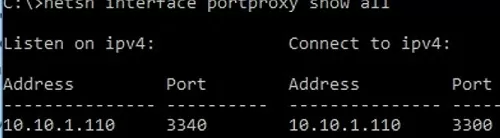
If you need to change the settings of an existing portproxy rule, use the following command:
netsh interface portproxy set v4tov4 listenport=3340 listenaddress=10.10.1.110 connectport=3300 connectaddress=10.10.1.110
In this example, we have changed the portproxy target port number to 3300.
To remove a specific port forwarding rule:
netsh interface portproxy delete v4tov4 listenport=3340 listenaddress=10.1.1.110
To remove all existing port mapping rules and completely clear the port forwarding rules table:
netsh interface portproxy reset
Important. This port forwarding scheme works only for TCP ports. You won’t be able to forward UDP ports this way. Also, you can’t use the loopback interface 127.0.0.1 (localhost) as the connectaddress.
You can use Windows Server with the RRAS (Routing and Remote Access Service and NAT) role installed to enable port forwarding for UDP traffic. You can configure port forwarding between server network interfaces using the graphical snap-in (rrasmgmt.msc) or with the command:
netsh routing ip nat add portmapping Ethernet1 udp 0.0.0.0 53 192.168.100.100 53
The list of NAT port forwarding rules in Windows Server can be listed as follows:
netsh routing ip nat show interface
If you have WSL (Windows Subsystem for Linux) installed on your computer, you can create a simple PowerShell script to create a port forwarding rule to the WSL 2 virtual machine (a WSL2 VM has its own virtual ethernet adapter with a unique IP address):
wsl --shutdown;

netsh interface portproxy reset;

$wsl_ipaddr = wsl -d Ubuntu-20.04 hostname -I;

netsh interface portproxy add v4tov4 listenport=443 listenaddress=0.0.0.0 connectport=443 connectaddress=$wsl_ipaddr ;

netsh interface portproxy show all;

exit;
Another implicit feature of portproxy is the ability to make any remote network service look like it runs locally. For example, you want to forward the connections from local port 9090 to a remote HTTPS server (google.com:443)
netsh interface portproxy add v4tov4 listenport=9090 connectport=443 connectaddress=google.com protocol=tcp
Now, the Google search page will open if you go to http://localhost:9090/ in your browser (you need to ignore SSL_ERROR_BAD_CERT_DOMAIN errors). So despite the browser accessing the local computer address, it opens a page from an external web server.

Windows cannot forward a range of TCP ports. If you need to forward multiple ports, you will have to manually create multiple portproxy redirecting rules.
Port forwarding rules can also be used to redirect a port from the external IP address of a physical NIC to a port of a virtual machine running on the same host. In Hyper-V, you can configure port forwarding on a Virtual Switch level (see below).
Port Forwarding with NAT Rules on Hyper-V Virtual Switch
When using the Hyper-V role on your computer (it can be installed on both Windows 10/11 and Windows Server, or as a free Hyper-V Server), you can configure DNAT port forwarding rules using PowerShell. Suppose you want to redirect all HTTPS traffic that your Hyper-V host receives to the IP address of the virtual machine running on the host. To do this, use the Hyper-V StaticMapping commands.
Create a Hyper-V virtual switch:
New-VMSwitch -SwitchName NAT_Switch -SwitchType Internal

Set the IP address for the new virtual switch:
New-NetIPAddress -IPAddress 192.168.100.1 -PrefixLength 24 -InterfaceAlias "vEthernet (NAT_Switch)"
Enable NAT for this network:
New-NetNat -Name NATNetwork -InternalIPInterfaceAddressPrefix 192.168.100.0/24
Connect the VM to your NAT_Switch and assign it a static IP address (for example, 192.168.10.80). Set the Hyper-V virtual switch IP address (192.168.100.1 in this case) as the default gateway for the virtual machine’s network connection.
You can now enable port forwarding from the Hyper-V host to the virtual machine:
Add-NetNatStaticMapping -NatName NATNetwork443 -Protocol TCP -ExternalIPAddress 0.0.0.0/24 -ExternalPort 443 -InternalIPAddress 192.168.10.80 -InternalPort 443
After executing these PowerShell commands, all HTTPS traffic that comes to the TCP/443 port of the Hyper-V host will be forwarded to the private IP address of the virtual machine.
If you want to create a port forwarding rule for a non-standard port, don’t forget to open it in Windows Firewall:
New-NetFirewallRule -DisplayName "HyperV_Nat_444" -Direction Inbound -LocalPort 444 -Protocol TCP -Action Allow -Enabled True
You can display a complete list of NAT/PAT port forwarding rules on a Hyper-V host like this:
Get-NetNat
One of the most fundamental security mechanisms that current operating systems offer us is the implementation and activation of the firewall, although we have heard this term many times, we are not always aware of the high impact it has on the system both at a corporate and personal level . While it is true that certain companies offer firewall solutions on a physical level, which is a bridge between the external network and the local network, the operating system itself, in this case we talk about Windows Server 2019 , has its own integrated firewall which with a correct configuration it will give us the possibility to increase the security levels and thus guarantee the availability and integrity of all the elements that are hosted on the server, such as roles, services, shared folders and more..
In Windows Server Firewall, it is normal that it is often necessary to configure certain exceptions to allow communication of applications with the server, in this case these exceptions must be configured based on the requirements of the application and enable your access to have Control of all your capabilities.
Usage options
When using the integrated Windows Server 2019 firewall we will have management options such as:
- Authorize a connection (Allow).
- Block a connection (Deny).
- Redirect a connection request without notifying the sender of said redirection (Drop).
The set of rules that are managed by the firewall, give the possibility of installing a filtration method based on the security policies of the organization, normally we have two types of security policies thanks to which it will be possible to carry out actions as:
- Allow only authorized communications.
- Prevent any type of communication that has been explicitly prohibited.
In the administration of the firewall , the ports play a vital role since they are the ones that allow communication between the server and the external network. That is why these ports are where more than 95% of the attacks are carried out since they act as a door that opens for attackers. That is why the firewall blocks or closes most of the ports, this is obviously for security reasons but it is possible that some management application requests the opening of a certain port in the firewall so that its access is authorized. In this case as administrators we must allow that particular port to have proper authorization in the firewall..
This is why TechnoWikis will explain how we can open and authorize a port in the Windows Server 2019 firewall and thus ensure that the applications or services that use that port will have the required permissions.
To keep up, remember to subscribe to our YouTube channel! SUBSCRIBE
Open Firewall port with advanced firewall settings in Windows Server 2019
Step 1
To start this process we must go to the next route. Alternatively we can go to the Windows Server 2019 search box and enter the term «firewall» and select the «Windows Defender Firewall» option.
- Control Panel
- Security system
- Windows Defender Firewall

Step 2
In the displayed window we will click on the “Advanced configuration†line and a new window will be displayed where we find parameters such as:
- Entry and exit rules
- Connection Security Rules
- Server firewall monitoring options
Step 3
When selecting the «Inbound rules» section, all the preconfigured Windows Server 2019 rules associated with incoming network connections and packages will be displayed, some of these rules are not enabled by default so if we want to activate them, just right click on the rule and select the option “Enable ruleâ€: 
Step 4
We can find specific details of the rules such as:
- Rule Name
- Group to which it belongs
- Profile (Public, Private or Domain)
- Actual state
Step 5
To create a new rule in Windows Server 2019, we have the following options:
- Right click on the «Inbound rules» section and select «New rule».
- Go to the «Action» menu and select «New rule»
- By clicking on the “New rule†option located in the right side panel.
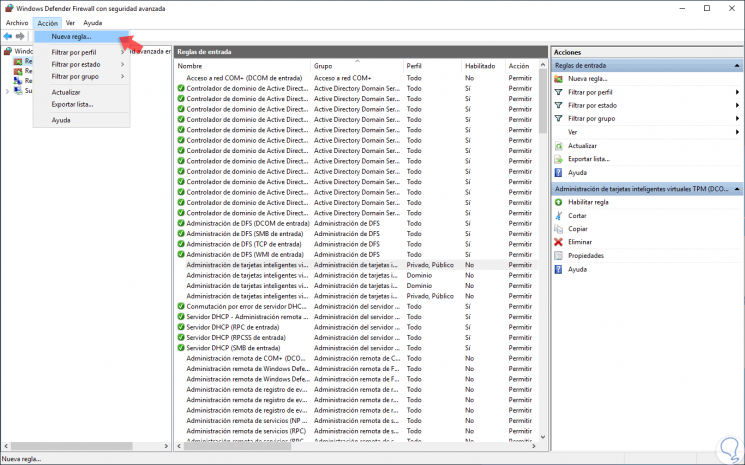
Step 6
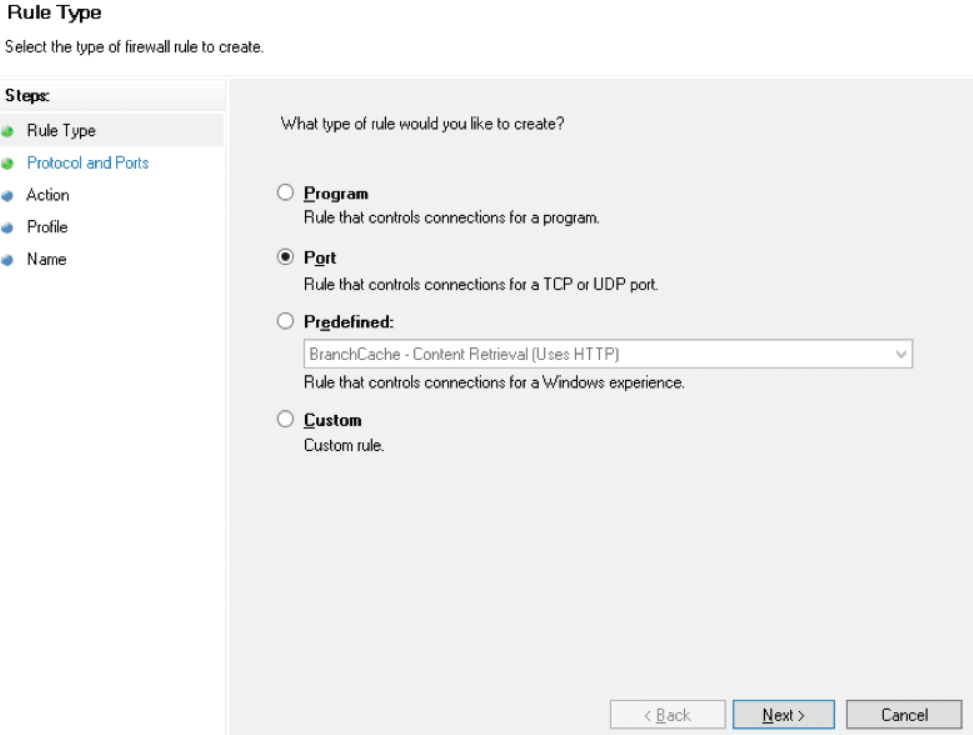
When selecting this option, the following wizard will be displayed where we define the type of rule to be created, in this case we select the “Port†box:
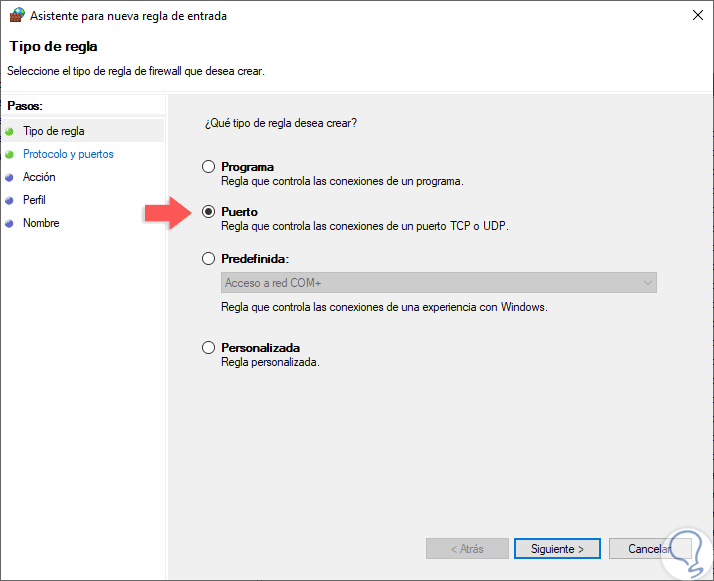
Step 7
In the next window we will define the type of port to enable:
TCP (Transmission Control Protocol)
It is a connection-oriented protocol, that is, with TCP it will be possible to create connections with each other in order to send data flow, this protocol guarantees that the data is delivered to the recipient without errors and in the same order in which they were transmitted.
UDP (User Datagram Protocol)
It is a non-connection-oriented protocol, its development is based on the exchange of datagrams and facilitates the sending of datagrams through the network that it is necessary to have previously established a connection with the destination.
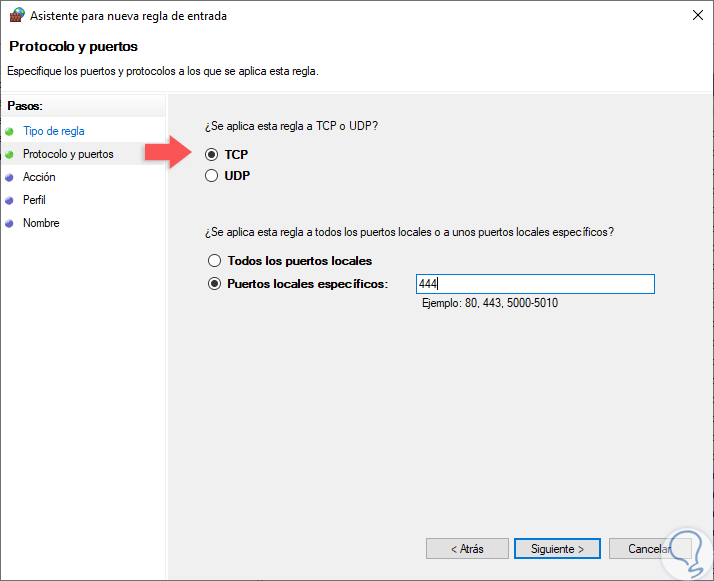
Step 8
We can also select the «All local ports» box to enable all TCP or UDP ports on the server which is not secure, or check the «Specific local ports» box to determine which port is to be authorized based to the requirements. Defined this, click on the Next button and now we will define the action that this rule will have, the options are:
Allow connection
This option enables full communication through this port.
Allow connection if it is secure
This option allows data to be transmitted only if the connection is authenticated through Ipsec.
Block connection
This option prevents data from being directed through this port.
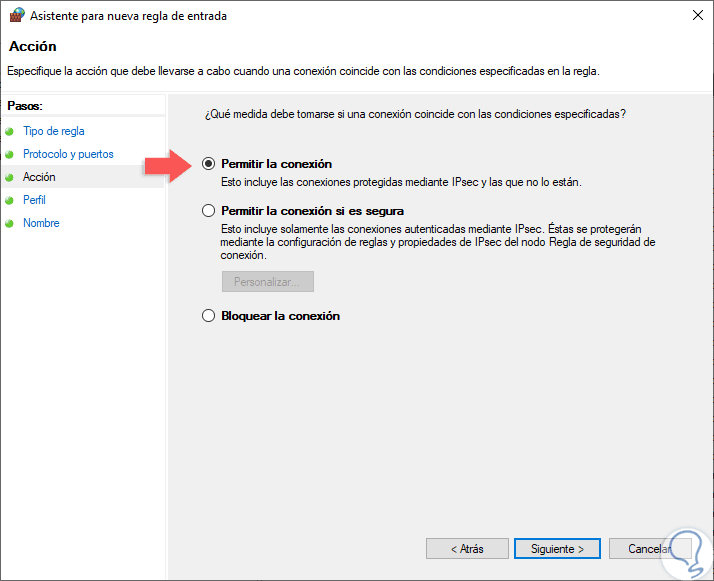
Step 9
Select the option «Allow connection» and click Next, now we must define which firewall profiles to apply, remember that we can use it in Public, Domain or Private profiles:
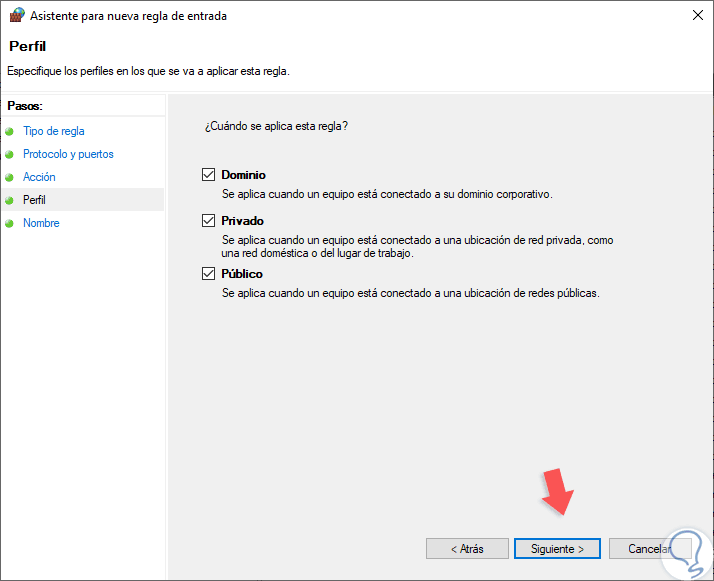
Step 10
We can activate them all if we wish. Finally, we must assign a name and, if we wish, a description of the new rule to facilitate its use:
Step 11
Click on the «Finish» button to complete the process and create the new rule in Windows Server 2019: 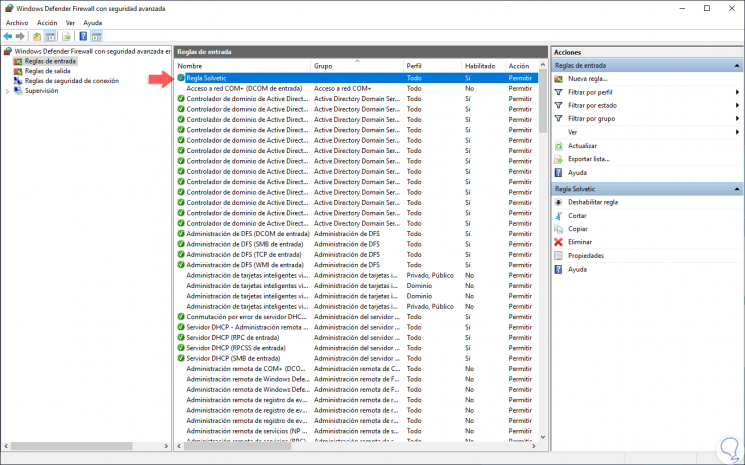
Step 12
There we can double-click on the rule and in the pop-up window go to the «Advanced options» tab and check aspects of that rule:

If we want there we can make changes at the security level of the new rule created. With this simple method, we can create and configure rules in the Windows Server 2019 firewall and improve the security of our network..
Берем типичную ситуацию. У нас есть сервер с двумя сетевыми интерфейсами. Один подключен к интернету, а другой подключен к локальной сети. Нам бы конечно хотелось что бы локальная сеть тоже была в интернете, например для удаленного доступа на локальную машину или просто нужен интернет (Пикабусики там). Получается сервер у нас выступает шлюзом между двумя сетями которые мы хотим объединить. Для этого настроим NAT.

NAT (от англ. Network Address Translation — «преобразование сетевых адресов») — это механизм в сетях TCP/IP, позволяющий преобразовывать IP-адреса транзитных пакетов. Также имеет названия IP Masquerading, Network Masquerading и Native Address Translation. Преобразование адреса методом NAT может производиться почти любым маршрутизирующим устройством — маршрутизатором, сервером доступа, межсетевым экраном. Наиболее популярным является SNAT, суть механизма которого состоит в замене адреса источника (англ. source) при прохождении пакета в одну сторону и обратной замене адреса назначения (англ. destination) в ответном пакете.
Википедия.
Поехали.
Первым делом нам настроить сетевые интерфейсы. Интерфейс который смотрит в интернет (назовем его INT) может получать настройки и по DHCP. А вот локальный ( LOC ) надо настраивать ручками, мы будем шлюзом для всей локальной сети.
Далее нам потребуется добавить роль «Маршрутизация и удалённый доступ» на сервер.
Теперь переходим к настройке маршрутизации :
Настройка и включение маршрутизации — Особая конфигурация — Переадресация сетевых адресов .
Теперь выбираем на сервере маршрутизации протокол IPv4, заходим в папочку преобразование сетевых адресов. И выбираем интерфейс для которого требуется включить NAT.
Вот и все. Теперь нам доступен интернет из локальной сети.

Ошибка в тексте? Выделите её и нажмите «Ctrl + Enter»
All recent versions of Windows include the Windows Firewall utility. A firewall includes options for opening and closing ports, as well as allowing and disabling specific programs and services.
Computer resources can be protected from unauthorized access by firewalls on networks and servers. Incoming or even outgoing traffic is checked for by the firewall systems and in accordance with the rules configured, decisions are made about them.
Windows Firewall cannot access the port if it isn’t explicitly allowed. TCP/IP ports are reserved for applications whenever they want to access the network, which means anyone else cannot use them.

Also Read: How to Change RDP Port in Windows Server?
In Windows Server 2008/2012 R2/2016 and Windows Server 2019, there are three ways to open ports.
- MMC
- The command line (netsh)
- PowerShell commands (For 2012R2 and 2016 only)
So, you can open ports on Windows Server by following the instructions in the following article.
Open Ports via MMC
- Here first of all you have to log in using an admin account.
- Then you have to click on:
Start > Administrative Tools > Windows Firewall with Advanced Security
- Now you have to click on the Inbound Rules on the left of the MMC.
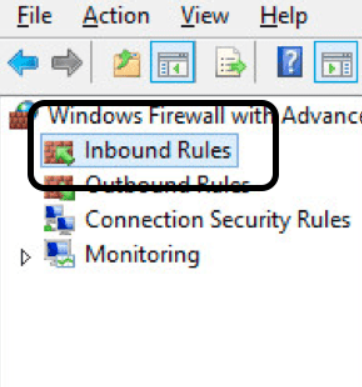
- Then click on the New Rule on the Right of the MMC.
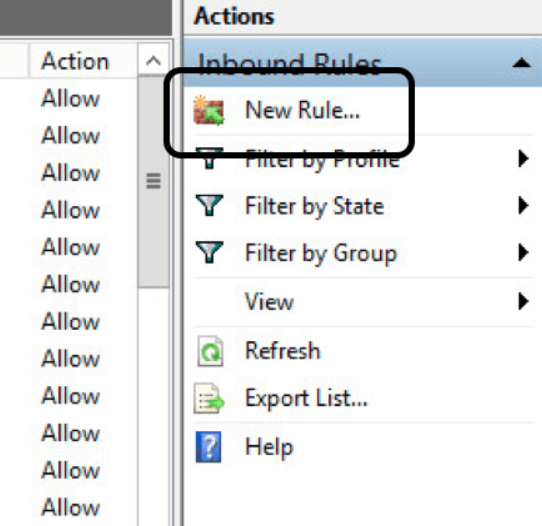
- Now here you will get five steps to open a port and accept incoming connections:-
- Rule Type
- Protocol and Ports
- Action
- Profile
- Name
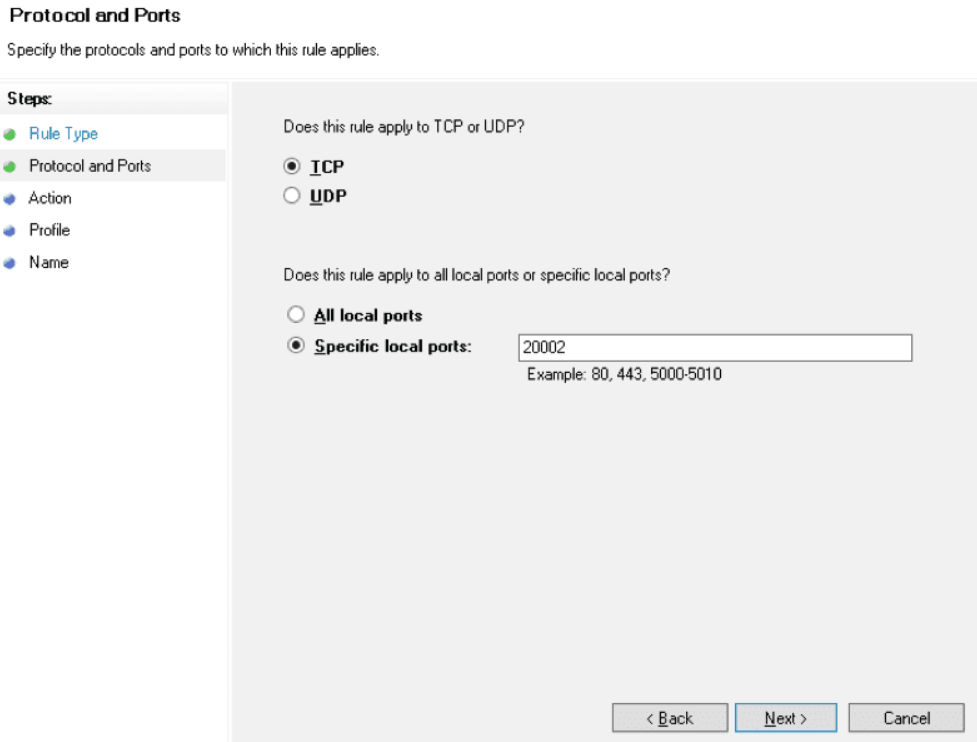
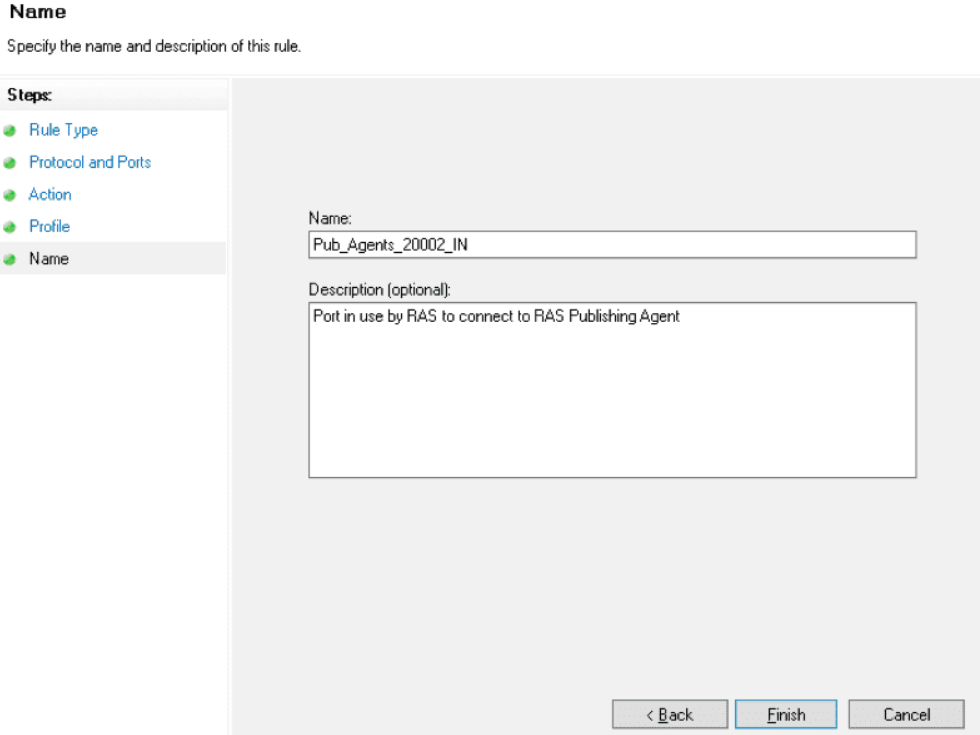
- Suppose for example the servers with Parallels RAS Publishing Agents will need to open TCP port 20002.
- Now under the Rule Type section, you have to select “Port” and then click on the “Next” button.
- Then under the Protocol and Ports section, you have to select the “TCP” as the type of protocol.
- After that, you have to type “20002” in the “Specific local ports” input field.
- Next, you have to head to the Action section in which you have to select “Allow the Connection“ and then you have to click on the “Next” button.
- Now under the Profile section, you have to select all three options and click on the “Next” button.

(NOTE: Here at this point if you wish to limit the connection to a particular profile then you can simply select the profiles that are appropriate to your setup.)
- After that, now you have to enter a “Name” for this rule under the Name section, and then click on the “Finish” button when you are done.
- That’s it, now you are done.
Open Ports through command line (netsh)
- First of all, using an administrator account you have to login to the server.
- Then you have to open and run the Command Prompt as Administrator.
- For the Publishing Agents role on the servers, open the TCP port 20002 with the following command.

- That’s it, now you are done.
Open Ports through PowerShell commands
- First of all, using an admin account you have to Log in.
- Then you have to run the Windows PowerShell as Administrator.
- You need to open the TCP port 20002 on the publishing agents server using the following command.

- That’s it, now you are done.
Once all is done, now immediately after creating this rule, the firewall rule will allow traffic to (or from) your server. While if you want to open a port for both sending and receiving, you need to repeat the process as an Outbound rule.
Ports play a very important role in any computer system. In computer networks, ports are used to connect computers and other devices to one another. When you open a port, you are allowing specific types of information to go in and out of your computer.
For example, if you want to host a website, you need to open port 80 to allow web traffic to go in and out. This blog is all about how to open ports on a Windows server and we hope that you liked it.
FAQs
What is a firewall and how does it work?
A firewall is a security system that is used to protect computer resources from unauthorized access. It checks incoming and outgoing traffic on a network or server, and according to the configured rules, decides whether to allow or block traffic.
How do I open ports on Windows Server?
There are three ways to open ports on Windows Server 2008/2012 R2/2016 and Windows Server 2019: using MMC, command line (netsh), or PowerShell commands. To open a port using MMC, you need to log in as an admin, click on Start > Administrative Tools > Windows Firewall with Advanced Security, click on Inbound Rules, then click on New Rule, and follow the five steps to open a port and accept incoming connections.
What is a TCP/IP port and why do applications need them?
TCP/IP ports are reserved for applications when they want to access the network, which means that no one else can use them. Ports are used to connect computers and other devices to one another. When you open a port, you are allowing specific types of information to go in and out of your computer.
What is the difference between Inbound and Outbound rules when opening a port?
Inbound rules control traffic coming into the server, while outbound rules control traffic going out of the server. If you want to open a port for both sending and receiving, you need to repeat the process as an outbound rule.
Why is it important to open ports on a Windows server?
Opening ports on a Windows server is important because it allows specific types of information to go in and out of your computer. For example, if you want to host a website, you need to open port 80 to allow web traffic to go in and out. By opening ports, you can ensure that the applications and services you want to use can communicate properly.
Приветствую.
Признаю не думал я, что такая простая задача как проброс UDP через WinServer будет такой не простой.
В общем задача. ПРОБРОСИТЬ либо ВСЁ что валится по UDP на другой адрес, либо отдельные порты.
Что сделал. Поднял RRAS, настроил правило.
Пишет «пришло» и «ушло». По факту не работает. Соединения нет.
Если запустить сервис прямо с сервера и поднять соединение до удаленной (на ту, на которую идет переадресация) то все работает. Так же как и работает соединение с удаленной машины НА сервер.
Теперь тоже самое, но в картинках
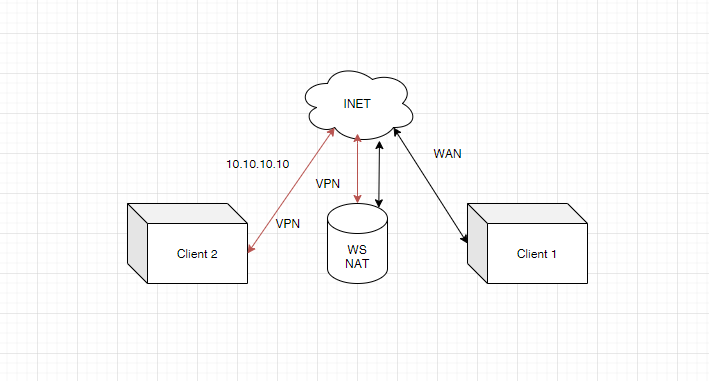
Клиент 1 соединяется по инету с WS.
А тот пробрасывает все на интерфейс ВПН на другую машину.
Сети работают, пингуются, открываются.
Беда именно с механизмом трансляции.
Может есть какая то внешняя утилитка для данной задачи… Маршрутизатор какой простенький.
Не городить же виртуалку(маршрутизатор) на WS ради такой простой задачи.
СПАСИБО!
SolVPS
|
Published: August 24, 2017
Windows Firewall is a utility included with all recent versions of Windows. It includes options to open and close ports, allow specific ports and programs through the firewall, which is the equivalent of “port forwarding” on a Windows Server or Windows VPS that is not behind a NAT device. In this guide we will show you how to forward a specific port on a Windows VPS or dedicated server.
How To Port Forward on Windows VPS
First, open Control Panel and navigate to System & Security. Then, open Windows Firewall. In the left-hand menu, click “Advanced settings”.
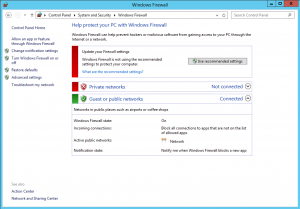
The Advanced Security panel will appear. In the left-hand menu, there are two types of rules:
- Inbound Rules: Rules that deny or allow traffic coming in to the server from outside.
- Outbound Rules: Rules that deny or allow traffic going out to the network from the server.
It is often useful to create both an inbound rule and an outbound rule for your application’s port. Repeat the following steps 2 times, once for Inbound, and once for Outbound. First, right-click “Inbound Rules” and select “New Rule…”
Choose the type of rule to setup. We are defining a specific Port number.
Type the port number your application uses, and choose TCP or UDP protocol (most applications use TCP).
Select whether to apply the rule only on local (private) networks, or on public networks as well. You will want to select Public, most likely.
Finally, select whether this rule is for explicitly allowing connections on this port, or explicitly blocking connections on this port.
That’s it! The firewall rule will go into effect immediately, opening the port to traffic to (or from) your server. As we noted above, be sure to repeat the process as an Outbound rule, if you want to open a port for both sending and receiving.
Need help?
We are happy to help with opening ports and other Windows Server configuration questions!
This guide applies to:
- Windows Server 2016
- Windows Server 2012 R2
- Windows Server 2008 R2
- Windows Server 2008
- Windows 8
- Windows 7
This entry was posted in Tech Support, VPS Hosting, Windows Server, Windows VPS. Bookmark the permalink. Trackbacks are closed, but you can post a comment.
You can configure network port forwarding in all Windows versions without using third-party tools. Using a port forwarding rule, you can redirect an incoming TCP connection (IPv4 or IPv6) from a local TCP port to any other port number, or even to a port on a remote computer. Windows port forwarding is most commonly used to bypass firewalls or to hide an internal host or service from the external network (NAT/PAT).
In the Linux world, port forwarding is configured quite simply using iptables or firewalldrules. On Windows Server hosts, the Routing and Remote Access Service (RRAS) is typically used to configure port redirections. However, there is an easier way to enable port forwarding using netsh portproxy mode, which works on all versions of Windows from Win XP to current builds of Windows 11 and Windows Server 2022.
Contents:
- How to Enable Port Forwarding on Windows with Netsh Portproxy?
- Configuring Firewall Rules for Port Forwarding Mode in Windows
- Managing Netsh Port Forwarding Rules in Windows
- Port Forwarding with NAT Rules on Hyper-V Virtual Switch
How to Enable Port Forwarding on Windows with Netsh Portproxy?
You can configure port forwarding in Windows using the Portproxy mode of the Netsh command.
The command syntax is as follows:
netsh interface portproxy add v4tov4 listenaddress=localaddress listenport=localport connectaddress=destaddress connectport=destport
where
- listenaddress –is a local IP address to listen for incoming connection (useful if you have multiple NICs in different subnets/VLANs or multiple IP addresses on one interface);
- listenport – a local TCP port number to listen on (the connection is waiting on);
- connectaddress – is a local or remote IP address (or DNS name) to which you want to redirect the incoming connection;
- connectport – is a TCP port to which the connection from
listenportis forwarded to.
Using the netsh interface portproxy add v4tov6/v6tov4/v6tov6 options, you can create port forwarding rules between IPv4 and IPv6 addresses.
Let’s suppose your task is to make the RDP service respond on a non-standard port, for example 3340 (of course, this port number can be changed in the Windows settings, but we are using RDP to make it easier to demonstrate the port forwarding technique). To do this, we need to redirect incoming traffic from TCP port 3340 to another local port 3389 (this is the default RDP port number).
Please note that the local port number that you specified in listenport should not be listened (used) by another service or process. Check that the port number is not used:
netstat -na|find "3340"
Alternatively, you can check that the port is not listening locally using the PowerShell cmdlet Test-NetConnection:
Test-NetConnection -ComputerName localhost -Port 3340

To create a port forwarding rule on Windows, open a command prompt as an administrator and run the following command:
netsh interface portproxy add v4tov4 listenport=3340 listenaddress=10.1.1.110 connectport=3389 connectaddress=10.1.1.110
Where 10.10.1.110 – the current IP address of your computer on which port forwarding is configured.
Now, use the netstat tool to check that Windows is now listening on local port 3340:
netstat -ano | findstr :3340

Note. If this command returns nothing and port forwarding through the netsh interface portproxy doesn’t work, make sure that you have the iphlpsvc (IP Helper) service running on your Windows device.
Check the status of the service in the services.msc console or using the PowerShell command:
Get-Service iphlpsvc
![]()
IPv6 support must be enabled on the network interface for which the port forwarding rule is being created.
These are the prerequisites for the correct operation of port forwarding in Windows. Without the IP Helper service and without IPv6 support enabled, the port redirection won’t work.
To make port forwarding work on Windows Server 2003/XP, you must additionally set the IPEnableRouter parameter to 1 under the registry key HKEY_LOCAL_MACHINE\ System\CurrentControlSet\services\Tcpip\Parameter.
Set-ItemProperty -Path HKLM:\system\CurrentControlSet\services\Tcpip\Parameters -Name IpEnableRouter -Value 1
This option also allows you to enable routing between different subnets in Hyper-V.
You can identify the process that is listening on the specified port by its PID (in our example, the PID is 636):
tasklist | findstr 636
Now try to connect to the new port from a remote computer using any RDP client. You need to specify 3340 as the RDP port number. It is specified after the colon following the RDP host address. For example, 10.10.1.110:3340
In this example, port TCP/3340 must first be opened in Windows Defender Firewall (see the next section of the article).
The RDP connection should be established successfully.
Portproxy port forwarding rules are permanent and are not cleared when you restart Windows. These rules are stored in the registry. You can list the netsh forwarding rules in the registry using PowerShell:
Get-ItemProperty -Path HKLM:\SYSTEM\CurrentControlSet\Services\PortProxy\v4tov4\tcp

If you want to forward an incoming TCP connection to a remote computer, use the following command:
netsh interface portproxy add v4tov4 listenport=3389 listenaddress=0.0.0.0 connectport=3389 connectaddress=192.168.100.101
This rule will redirect all incoming RDP traffic (from local TCP port 3389) from this computer to a remote host with an IP address 192.168.1.100.
Note that the portproxy mode in Windows doesn’t support saving the source IP in a forwarded network packet. Those, if you forward port 443 port from a Windows device to an internal web server, then all incoming connections will appear on the target server as coming from the same IP address (from your Windows host with netsh portproxy enabled). If you need to use source IP forwarding, you need to use NAT on an external firewall or on Hyper-V (described below).
Also, you can use the SSH tunnels in Windows to forward the local port to a remote server.
Configuring Firewall Rules for Port Forwarding Mode in Windows
Ensure that your firewall (Microsoft Windows Defender or a third-party firewall, which is often part of the anti-virus software) allows incoming connections to the new port. You can add a new allow rule to Windows Defender Firewall with the command:
netsh advfirewall firewall add rule name="forwarded_RDPport_3340" protocol=TCP dir=in localip=10.1.1.110 localport=3340 action=allow
Or using the New-NetFirewallRule PowerShell cmdlet:
New-NetFirewallRule -DisplayName "forwarder_RDP_3340" -Direction Inbound -Protocol TCP –LocalPort 3340 -Action Allow
When creating an inbound firewall rule for TCP/3340 port via Windows Defender Firewall graphical interface, you don’t need to associate a program or process with the rule. This port is only listened on by the network driver.
If you disable the portproxy rule, be sure to remove the remaining firewall rule as follows:
netsh advfirewall firewall del rule name="RDP_3340"
or remove firewall rule with PowerShell:
Remove-NetFirewallRule -Name RDP_3340
Managing Netsh Port Forwarding Rules in Windows
You can create any number of port forwarding rules in Windows. All netsh interface portproxy rules are persistent and remain after a Windows restart.
Several times I encountered cases when in Windows Server 2012 R2 the port forwarding rules were reset after the server was rebooted. In this case, you need to check whether there is a periodic disconnection on the network interface and whether the IP address changes when the OS boots (it is better to use a static IP instead of dynamic DHCP). As a workaround, I had to add a batch script with the netsh interface portproxy rules to the Windows Task Scheduler that run on the system startup.
To display a list of all enabled TCP port forwarding rules on Windows, run the command:
netsh interface portproxy show all
In our case, there is only one forwarding rule from local port 3340 to 3389:
Listen on ipv4:             Connect to ipv4:
Address         Port        Address         Port
--------------- ----------  --------------- ----------
10.1.1.110     3340        10.1.1.110     3389
Tip. You can also list all port forwarding rules in portproxy as follows:
netsh interface portproxy dump
#========================
# Port Proxy configuration
#========================
pushd interface portproxy
reset
add v4tov4 listenport=3340 connectaddress=10.1.1.110 connectport=3389
popd
# End of Port Proxy configuration

If you need to change the settings of an existing portproxy rule, use the following command:
netsh interface portproxy set v4tov4 listenport=3340 listenaddress=10.10.1.110 connectport=3300 connectaddress=10.10.1.110
In this example, we have changed the portproxy target port number to 3300.
To remove a specific port forwarding rule:
netsh interface portproxy delete v4tov4 listenport=3340 listenaddress=10.1.1.110
To remove all existing port mapping rules and completely clear the port forwarding rules table:
netsh interface portproxy reset
Important. This port forwarding scheme works only for TCP ports. You won’t be able to forward UDP ports this way. Also, you can’t use the loopback interface 127.0.0.1 (localhost) as the connectaddress.
You can use Windows Server with the RRAS (Routing and Remote Access Service and NAT) role installed to enable port forwarding for UDP traffic. You can configure port forwarding between server network interfaces using the graphical snap-in (rrasmgmt.msc) or with the command:
netsh routing ip nat add portmapping Ethernet1 udp 0.0.0.0 53 192.168.100.100 53
The list of NAT port forwarding rules in Windows Server can be listed as follows:
netsh routing ip nat show interface
If you have WSL (Windows Subsystem for Linux) installed on your computer, you can create a simple PowerShell script to create a port forwarding rule to the WSL 2 virtual machine (a WSL2 VM has its own virtual ethernet adapter with a unique IP address):
wsl --shutdown;
 netsh interface portproxy reset;
 $wsl_ipaddr = wsl -d Ubuntu-20.04 hostname -I;
 netsh interface portproxy add v4tov4 listenport=443 listenaddress=0.0.0.0 connectport=443 connectaddress=$wsl_ipaddr ;
 netsh interface portproxy show all;
 exit;
Another implicit feature of portproxy is the ability to make any remote network service look like it runs locally. For example, you want to forward the connections from local port 9090 to a remote HTTPS server (google.com:443)
netsh interface portproxy add v4tov4 listenport=9090 connectport=443 connectaddress=google.com protocol=tcp
Now, the Google search page will open if you go to http://localhost:9090/ in your browser (you need to ignore SSL_ERROR_BAD_CERT_DOMAIN errors). So despite the browser accessing the local computer address, it opens a page from an external web server.

Windows cannot forward a range of TCP ports. If you need to forward multiple ports, you will have to manually create multiple portproxy redirecting rules.
Port forwarding rules can also be used to redirect a port from the external IP address of a physical NIC to a port of a virtual machine running on the same host. In Hyper-V, you can configure port forwarding on a Virtual Switch level (see below).
Port Forwarding with NAT Rules on Hyper-V Virtual Switch
When using the Hyper-V role on your computer (it can be installed on both Windows 10/11 and Windows Server, or as a free Hyper-V Server), you can configure DNAT port forwarding rules using PowerShell. Suppose you want to redirect all HTTPS traffic that your Hyper-V host receives to the IP address of the virtual machine running on the host. To do this, use the Hyper-V StaticMapping commands.
Create a Hyper-V virtual switch:
New-VMSwitch -SwitchName NAT_Switch -SwitchType Internal

Set the IP address for the new virtual switch:
New-NetIPAddress -IPAddress 192.168.100.1 -PrefixLength 24 -InterfaceAlias "vEthernet (NAT_Switch)"
Enable NAT for this network:
New-NetNat -Name NATNetwork -InternalIPInterfaceAddressPrefix 192.168.100.0/24
Connect the VM to your NAT_Switch and assign it a static IP address (for example, 192.168.10.80). Set the Hyper-V virtual switch IP address (192.168.100.1 in this case) as the default gateway for the virtual machine’s network connection.
You can now enable port forwarding from the Hyper-V host to the virtual machine:
Add-NetNatStaticMapping -NatName NATNetwork443 -Protocol TCP -ExternalIPAddress 0.0.0.0/24 -ExternalPort 443 -InternalIPAddress 192.168.10.80 -InternalPort 443
After executing these PowerShell commands, all HTTPS traffic that comes to the TCP/443 port of the Hyper-V host will be forwarded to the private IP address of the virtual machine.
If you want to create a port forwarding rule for a non-standard port, don’t forget to open it in Windows Firewall:
New-NetFirewallRule -DisplayName "HyperV_Nat_444" -Direction Inbound -LocalPort 444 -Protocol TCP -Action Allow -Enabled True
You can display a complete list of NAT/PAT port forwarding rules on a Hyper-V host like this:
Get-NetNat