— Advertisement —
Hello! The Firewall performs an essential security task on any version of Windows Server. In fact, it has the mission of preventing connections that could be attackers from accessing the server. In this way it avoids damage or loss of information. Additionally, the firewall allows you to manage the security of your computer by applying access and exit filters. Similarly, the use of rules allows or denies the traffic of information on the computer. However, for some administrative or support tasks it is necessary to deactivate it. Well, in this post we will see how to disable the firewall in Windows Server 2019/2016.
How to disable Windows Server 2019/ 2016 Firewall using PowerShell
A quick and safe way to disable the Windows Server Firewall. To do this from the Start menu, go to PowerShell.

Then run the following command to enable the firewall:
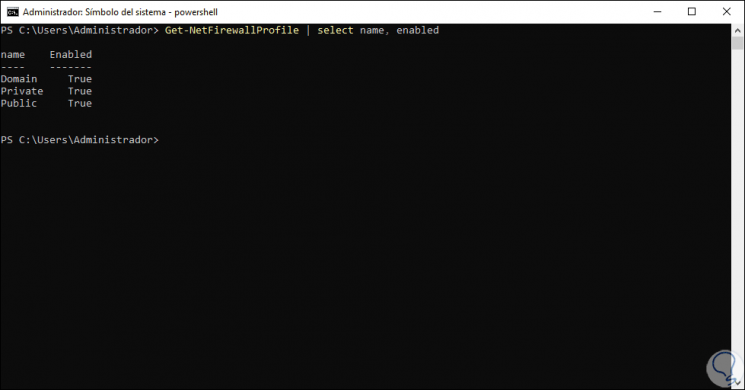
Get-NetFirewallProfile │select name, enabled

Then to disable the Firewall in Windows 10 we will run the following:
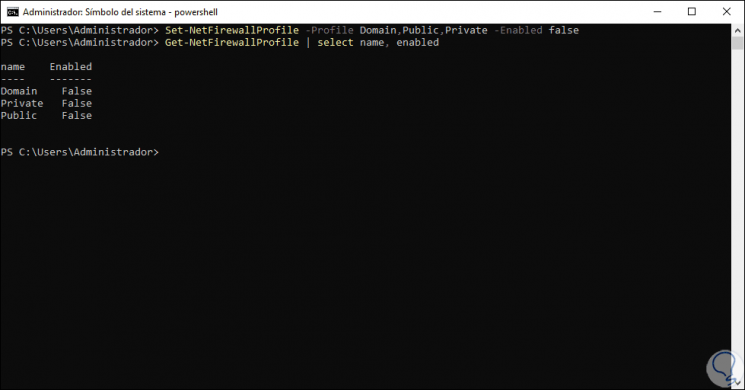
Set-NetFirewallProfile -Profile Domain,Public,Private -Enabled false
The false parameter indicates that the firewall is disabled in private, public and domain environments. Now, to re-enable the firewall on Windows Server, simply run the following command:
Set-NetFirewallProfile -Profile Domain,Public,Private -Enabled true

How to disable Windows Server 2019/2016 Firewall using GPO
It is also possible to disable the Firewall via GPO. If you want to know more about Group Policy Object, check out our post. With this in mind, from the Server Dashboard tools, enter the group management.

Once the editor is open, expand the domain and right click on Default Domain Policy and then on Edit.

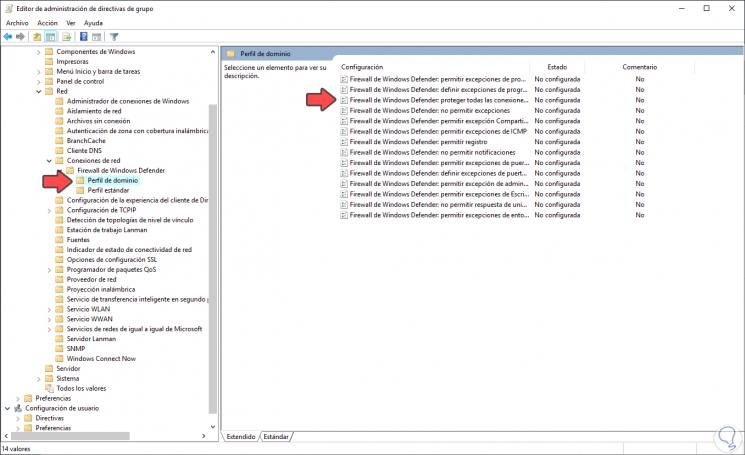
Then follow the next path: Windows Settings>Administrative Templates>Network>Network Connections>Windows Defender Firewall. Next, select Domain Profile and then double-click on: Windows Defender Firewall: Protect all network connections.

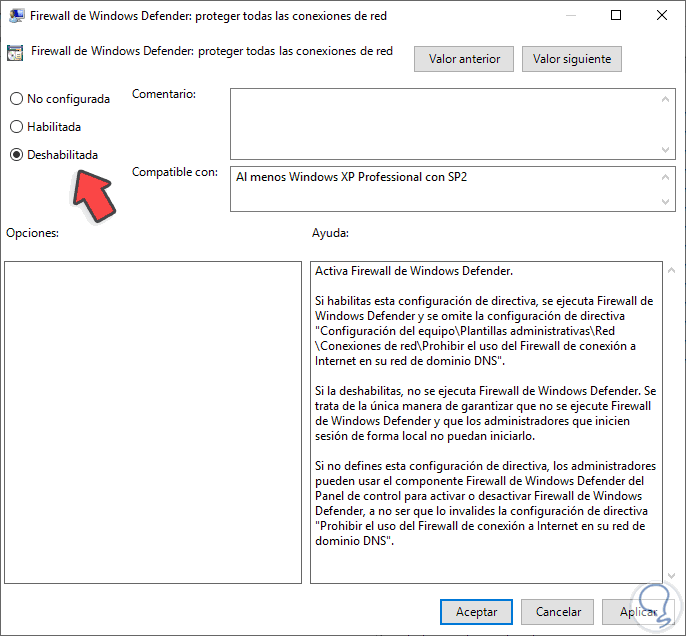
A window with the rule values is immediately displayed. Please select the Disabled value to configure the Firewall in this way. Then press OK to set the changes.

Now, please follow this path. Computer Settings>Windows Settings>Security Settings>Windows Defender Firewall with Advanced Security. On this last value, right click on the mouse and enter the Properties.

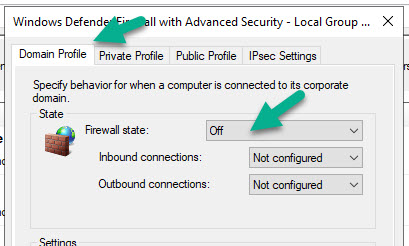
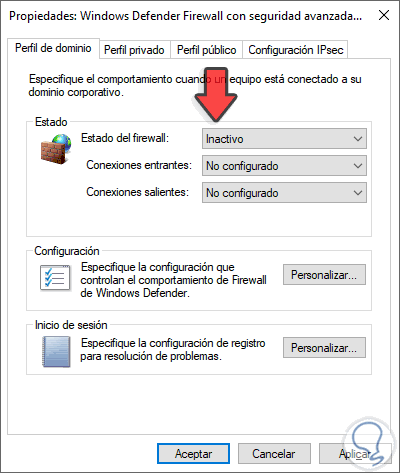
Consequently, a window will be displayed with the behavior of the Firewall in the different environments. Please click on the tabs corresponding to the domain profile, public profile and private profile. In each of them you must set the Firewall status to Off. Press OK and restart the system to set the changes.

We will now validate that the Firewall is indeed disabled. To do this, follow the next path. Control Panel>System and Security>Windows Defender Firewall. On the next screen you can see that the firewall is disabled in all environments.

Conclusion
At the end of the day we have seen how to disable the Firewall in Windows Server 2019/2016. Also, we saw two ways to do it. That is, using PowerShell and also GPO. As you can see, it’s a simple and safe process to do. Bye!
If you need to install some third-party applications on Windows 2019 server, which require connectivity among other clients and servers, you need to check the status of the built-in firewall. In few cases, you can open/allow certain ports in the firewall policy, but in other cases, you need to disable the firewall to make the application work properly.
Disabling Windows firewall used to be an easy option on earlier Operating Systems by just switching off the ‘Windows Firewall’ service in computer management. Unfortunately, you will not find the same ‘Windows Firewall’ service in Windows 2019 server. Since Windows Defender manages the network firewall on Windows 2019 server, we can’t see a separate service to disable it.
That doesn’t mean we can’t disable the Windows firewall on the 2019 server. There are plenty of ways to do it from GUI, CMD and Powershell. I’m not going to cover those steps here. I’m mainly targeting the steps you may need to perform if the Windows firewall policy is managed by your administrator (via the Domain policy). In this case, whatever actions you perform on the local computer to disable the firewall will not work if the server is part of the domain network.
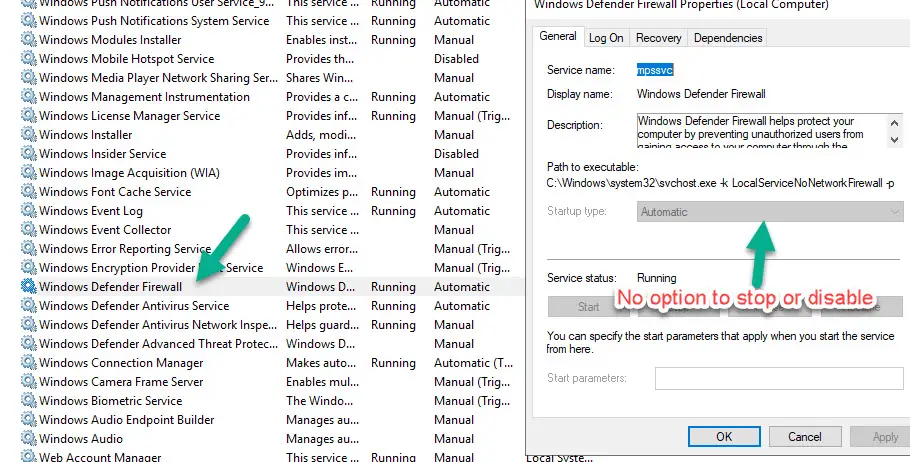
Windows Firewall Service in Windows 2019:
As shown below, it was replaced with Windows Defender Firewall, and we will not have the option to stop and change the state to Disable/Manual.
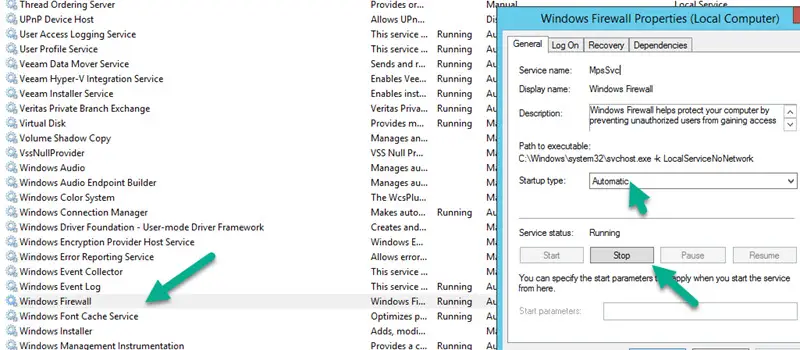
Meanwhile, here is the state from Windows 2012 R2 server where we can stop the service and disable it. So, the Windows firewall will be disabled permanently on the server for any type of network profile.
The Trick to Disable Firewall on Windows 2019 Server – When it is managed by your administrator
Let’s dive to the working steps.
Find out the correct network profile server connected.
If you have joined the domain and domain policies are applied correctly, I’m sure your server network profile will be ‘Domain network’.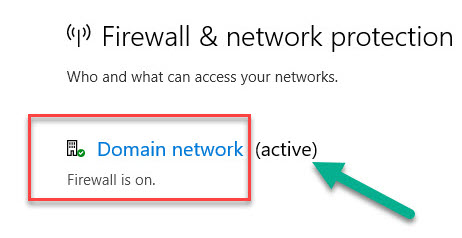
The real trick is to do a few registry modifications, but before doing that, you can try the below steps.
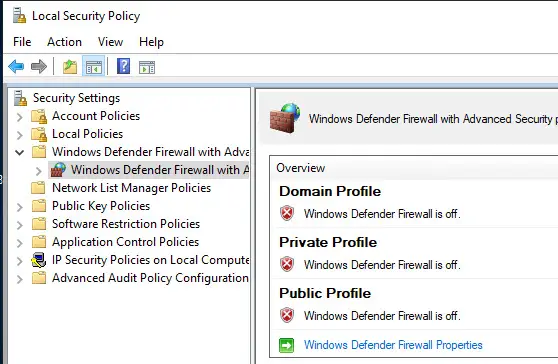
Open ‘Local Security Policy’ on the server and select the ‘Windows Defender Firewall…’ option as shown below. Then click on the properties of the settings.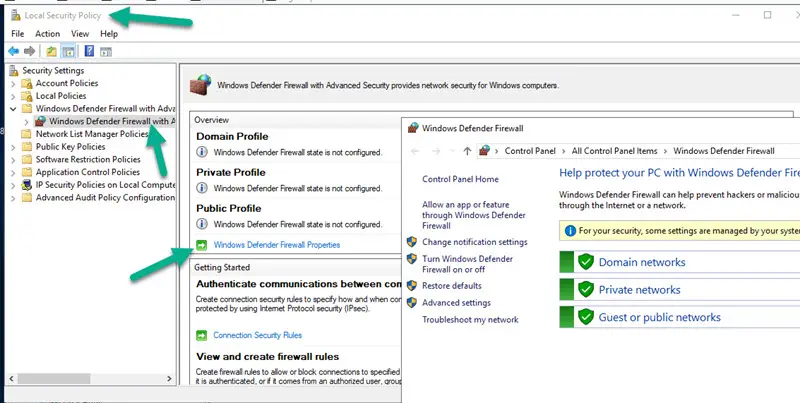
This will open a box where you should turn off the Firewall for ‘Domain Profile’ and optionally for Private and Public profiles.
Once you make it off, it will show the status like below in Local Security Policy.
Even though this screen shows that the firewall is turned off for the domain profile, but it will not work.
Still, the Windows defender will show that ‘Firewall is on’ for the domain network. By clicking the domain network in Windows Defender settings will not allow you to off the firewall because it was managed by the organization policy.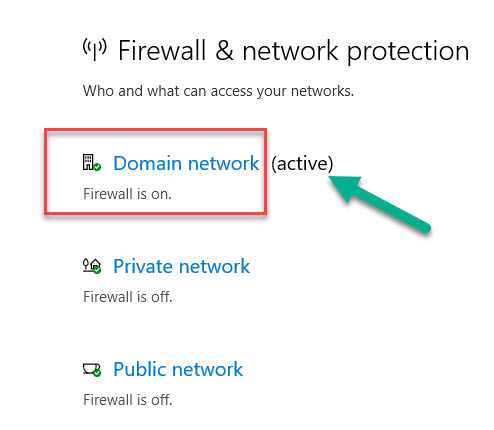
For your satisfaction, reboot the server and see if the above steps are useful. If not, let’s go to the final working solution.
Registry modification.
As mentioned earlier, this can be done by registry modification. Open the registry and access the below location.
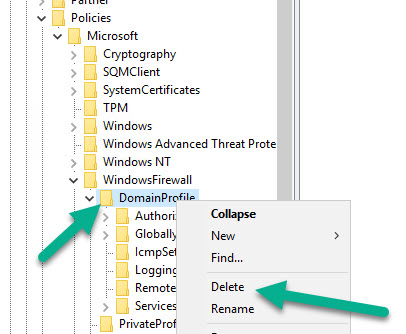
Computer\HKEY_LOCAL_MACHINE\SOFTWARE\Policies\Microsoft\WindowsFirewall
Before proceeding with anything, it is recommended to export the registry settings.
We have two options to achieve our goal here (Do any of it only).
Click on ‘Domain Profile’ and change the value from 1 to 0 for ‘EnableFirewall’. Restart the server to take effect.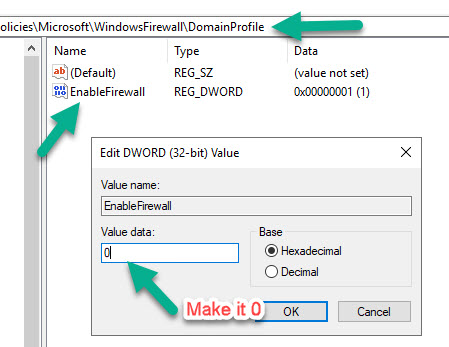
OR….
Select the ‘Domain Profile’ and delete the entry completely. Reboot the server.
With the reboot, you will notice that the firewall for the domain network profile is completely off. And for whatever reason you wanted to disable the firewall, now those services will communicate to this Windows 2019 server.
This is the only simple and working method I found out to disable the Windows firewall on Windows 2019 server when managed by an organization/administrator in a domain environment. We do not need to modify the common group policy or give an exception for this server in policy that may require additional steps and implications at the domain level.
If any of the above solutions did not fix the Windows PC issues, we recommend downloading the below PC repair tool to identify and solve any PC Issues.
Dinesh is the founder of Sysprobs and written more than 400 articles. Enthusiast in Microsoft and cloud technologies with more than 15 years of IT experience.
The Firewall in Windows Server 2016 and Windows Server 2019 fulfills an essential role of security since the Firewall has the mission of preventing that attacking connections can access the server and cause damage or loss of information which in a server environment can trigger multiple failures, hence the importance of the Firewall there, now, for some administrative or support tasks, we can temporarily disable the Firewall either through CMD or GPO..
Thanks to the Firewall or firewall we can manage and control the security of our equipment by having the possibility of applying access and exit filters . Through the use of rules we can allow or deny the information traffic by our team, something that allows much more control of everything that happens on the PC. With TechnoWikis you will learn to disable Firewall Windows Server 2019 and Server 2016 using one of these methods.
Then we also leave you the video tutorial to be able to disable the Firewall in Windows Server 2019 or Server 2016..
To stay up to date, remember to subscribe to our YouTube channel! SUBSCRIBE
1. Disable Windows Server 2019 and 2016 CMD Firewall
To make use of this method in Windows Server we go to the command prompt and there we access the PowerShell sequence by executing «powershell».
Step 1
After this we enable the Firewall by executing:
Get-NetFirewallProfile │select name, enabled
Step 2
Then to disable the Firewall in Windows 10 we will execute the following:
Set-NetFirewallProfile -Profile Domain, Public, Private -Enabled false
Step 3
With the parameter «false» it has been indicated that the Firewall in public, private and domain environments is disabled, we can check the status by executing again:
Get-NetFirewallProfile │select name, enabled
Step 4
If at any time we want to enable the Firewall again in Windows Server 2016 or 2019 we will execute the following:
Set-NetFirewallProfile -Profile Domain, Public, Private -Enabled true
2. Disable Windows Server 2019 and 2016 GPO Firewall
Local group policies are another of the mechanisms available to enable or disable Firewall in Windows Server
Step 1
For this we go to the Start menu and in the group «Windows Administrative Tools» we select «Group Policy Management»:

Step 2
In the displayed editor we expand the domain and right-click on the “Default Domain Policy†option and select Edit: 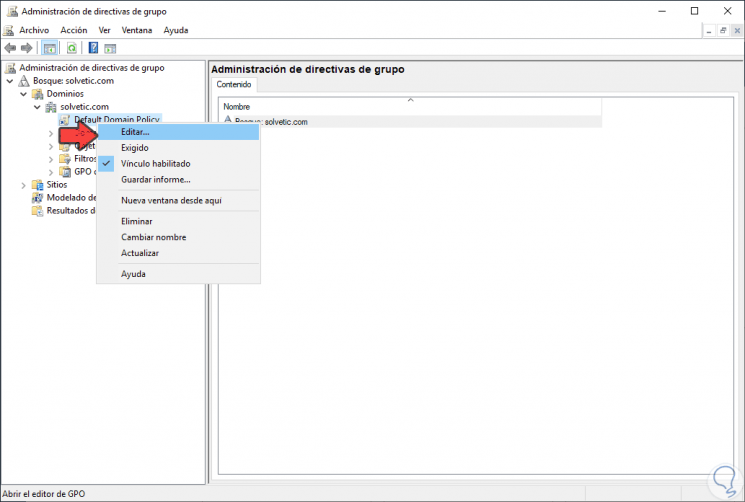
Step 3
Now we go to the path:
- Equipment Configuration
- Administrative Templates
- Net
- Network connections
- Windows Defender Firewall
Step 4
We select «Domain Profile» and then we select the policy called «Windows Defender Firewall: protect all network connections»: 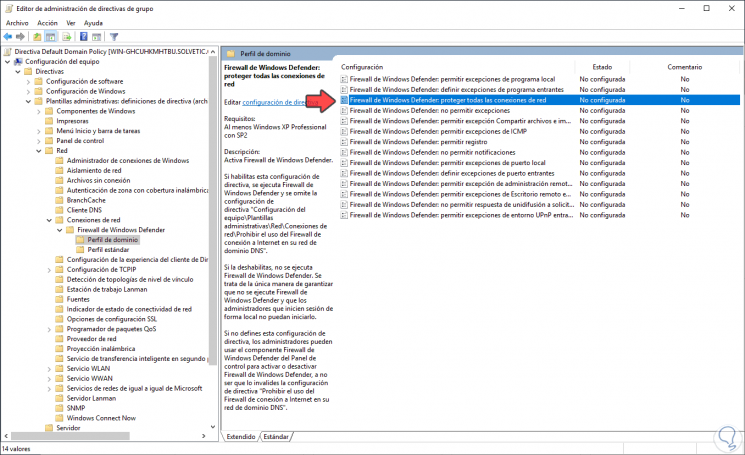
Step 5
We double click on this policy and activate the «Disable» box to configure the Windows Server Firewall in this way. We click Apply and OK to save the changes.
Step 6
Now we go to the following route:
- Equipment Configuration
- Windows settings
- Security settings
- Windows Defender
- Firewall with advanced security
Step 7
We right click on «Windows Defender Firewall with advanced security» and select «Properties»: 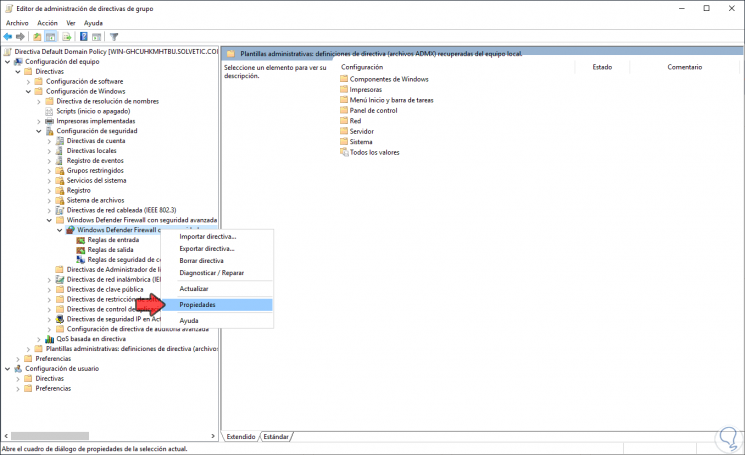
Step 8
In the displayed window we will go to each of the profiles (public, private and domain) and set the «Firewall Status» field to «Inactive». We click on Apply and OK to save the changes and restart the system to apply the changes.
Step 9
After this we will go to the following route:
- Control Panel
- Security system
- Windows Defender Firewall
Step 10
There we validate that the Firewall in Windows Server 20106 or 2019 is disabled: 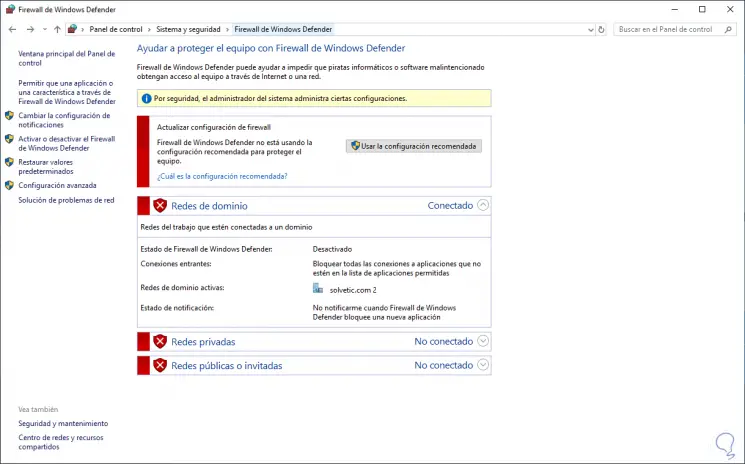
With these simple steps we can disable Firewall Windows Server 2019 and Server 2016 when necessary..
You can disable the Microsoft Defender Firewall on a Windows Server, and in this guide, you will learn how. The Microsoft Defender Firewall is the firewall solution that comes built by default on every installation of Windows and Windows Server to monitor incoming and outgoing network traffic to allow or block connections based on rules to protect the device from unauthorized access.
It’s always recommended to keep the firewall running to prevent making the server vulnerable. However, in some situations, you may need to disable the security feature. For instance, when you have to troubleshoot network-related issues, plan to implement a third-party firewall, or you have to test a network application.
If you must disable the firewall on Windows Server 2022, 2019, and older releases, you can complete this task from Windows Security, Control Panel, Command Prompt, PowerShell, Group Policy, and Registry.
In this guide, you will learn how to disable (re-enable) the built-in firewall on Windows Server.
- Disable firewall on Windows Server from Windows Security
- Disable firewall on Windows Server from Control Panel
- Disable firewall on Windows Server from Command Prompt
- Disable firewall on Windows Server from PowerShell
- Disable firewall on Windows Server from Group Policy
- Disable firewall on Windows Server from Registry
To disable the firewall on Windows Server, use these steps:
-
Open Windows Security on Windows Server.
-
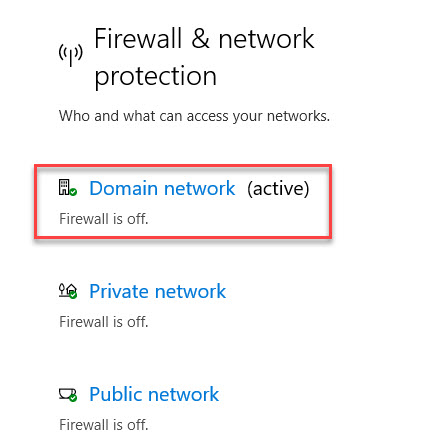
Click on Firewall & network protection.
-
Click the active network option.

-
Turn off the “Microsoft Defender Firewall” toggle switch to disable the firewall.

Quick tip: If you only want to prevent incoming connections, check the “Blocks all incoming connections, including those in the list of allowed apps” option instead of disabling the feature.


Once you complete the steps, the Microsoft Defender Firewall will disable the active network profile.
If you have to disable the firewall for every network profile, open each network profile (“Domain network,” “Private network,” and “Public network”) and turn off the “Microsoft Defender Firewall” toggle switch.
Enable firewall
To enable the firewall on Windows Server, use these steps:
-
Open Windows Security on Windows Server.
-
Click on Firewall & network protection.
-
Click the “Turn on” button from the network profile. Or click the Restore settings button (if applicable).

After you complete the steps, the Microsoft Defender Firewall will enable again on the computer.
Disable firewall on Windows Server from Control Panel
To turn off the Windows Server firewall from Control Panel, use these steps:
-
Open Control Panel.
-
Click on System and Security.
-
Click on Windows Defender Firewall.

-
Click the “Turn Windows Defender Firewall on or off” option from the left navigation pane.
-
Select the “Turn off Windows Defender Firewall” option under the “Private network settings” section.
-
Select the “Turn off Windows Defender Firewall” option under the “Public network settings” section.

-
Click the OK button.


Once you complete the steps, the security feature will stop protecting your server.
Enable firewall
To enable the firewall with Control Panel, use these steps:
-
Open Control Panel.
-
Click on System and Security.
-
Click on Windows Defender Firewall.
-
Click the “Turn Windows Defender Firewall on or off” option from the left pane.
-
Select the “Turn on Windows Defender Firewall” option under the “Private network settings” section.
-
Select the “Turn on Windows Defender Firewall” option under the “Public network settings” section.
-
Click the OK button.

After you complete the steps, the Windows Server firewall will start monitoring and protecting the server from malicious connections.
Disable firewall on Windows Server from Command Prompt
To turn off the firewall from Command Prompt on Windows Server 2022, 2019, and old versions, use these steps:
-
Open Start.
-
Search for Command Prompt, right-click the top result, and select the Run as administrator option.
-
Type the following command to disable the firewall for the active network profile and press Enter:
netsh advfirewall set currentprofile state off

-
(Optional) Type the following command to turn off the firewall for every network profile, including domain, private, and public, and press Enter:
netsh advfirewall set allprofiles state off
-
(Optional) Type the following command to turn off the Microsoft Defender Firewall for the domain network profile on Windows Server and press Enter:
netsh advfirewall set domainprofile state off
-
(Optional) Type the following command to turn off the firewall for the private network profile and press Enter:
netsh advfirewall set privateprofile state off
-
(Optional) Type the following command to turn off the firewall for the public network profile and press Enter:
netsh advfirewall set publicprofile state off

After you complete the steps, the Microsoft Defender Firewall will disable on Windows Server, according to your configuration.
Enable firewall
To turn on the Windows Server firewall from Command Prompt, use these steps:
-
Open Start.
-
Search for Command Prompt, right-click the top result, and select the Run as administrator option.
-
Type the following command to turn on the Microsoft Defender Firewall for the current network profile and press Enter:
netsh advfirewall set currentprofile state on
-
(Optional) Type the following command to enable the Defender Firewall for all network profiles on Windows Server and press Enter:
netsh advfirewall set allprofiles state on
-
(Optional) Type the following command to enable the Windows Server firewall for the domain network profile and press Enter:
netsh advfirewall set domainprofile state on
-
(Optional) Type the following command to enable the firewall for the private network and press Enter:
netsh advfirewall set privateprofile state on
-
(Optional) Type the following command to turn on the firewall for the public network profile and press Enter:
netsh advfirewall set publicprofile state on

Once you complete the steps, the Windows Server firewall will enable, according to your configuration.
Disable firewall on Windows Server from PowerShell
To disable the firewall on Windows Server from PowerShell, use these steps:
-
Open Start.
-
Search for PowerShell, right-click the top result, and select the Run as administrator option.
-
Type the following command to disable the Microsoft Defender Firewall fall all networks and press Enter:
Set-NetFirewallProfile -Profile Domain,Public,Private -Enabled False
Quick tip: If you want to leave one or more networks protected with the firewall, then make sure to remove the profile name from the command.

After you complete the steps, the Windows Server firewall will disable on the server.
Enable firewall
To enable the firewall with PowerShell commands, use these steps:
-
Open Start.
-
Search for PowerShell, right-click the top result, and select the Run as administrator option.
-
Type the following command to enable the Microsoft Defender Firewall for all networks and press Enter:
Set-NetFirewallProfile -Profile Domain,Public,Private -Enabled True

Once you complete the steps, the PowerShell command will enable the firewall to allow and deny network access.
Disable firewall on Windows Server from Group Policy
To disable the Windows Server firewall through Group Policy, use these steps:
-
Open Start.
-
Search for gpedit.msc and click the top result to open the Local Group Policy Editor.
-
Open the following path:
Computer Configuration > Administrative Templates > Network > Network Connections > Windows Defender Firewall > Standard Profile
-
Double-click to open the “Windows Defender Firewall: Protect all network connections” policy.

-
Check the Disabled option.

-
Click the Apply button.
-
Click the OK button.
-
Restart the server.


After you complete the steps, the server will restart to apply the new settings to disable the firewall.
Enable firewall
To enable the Windows Server firewall through Group Policy, use these steps:
-
Open Start.
-
Search for gpedit.msc and click the top result to open the Local Group Policy Editor.
-
Open the following path:
Computer Configuration > Administrative Templates > Network > Network Connections > Windows Defender Firewall > Standard Profile
-
Double-click to open the “Windows Defender Firewall: Protect all network connections” policy.
-
Check the “Not configured” option.
-
Click the Apply button.
-
Click the OK button.
-
Restart the server.

After you complete the steps, the server will restart to enable the Microsoft Defender Firewall.
Disable firewall on Windows Server from Registry
To turn off the firewall using the Windows Server Registry, use these steps:
-
Open Start.
-
Search for regedit and click the top result to open the Registry.
-
Open the following path:
HKEY_LOCAL_MACHINE\SOFTWARE\Policies\Microsoft\WindowsFirewall
-
Right-click the “WindowsFirewall” key, select the New menu, and choose the “Key” option.

-
Name the key StandardProfile and press Enter.
-
Right-click the “StandardProfile” key, select the New menu, and choose the “DWORD (32-bit) Value” option.
-
Name the EnableFirewall name and press Enter.
-
Double-click the newly created key and set the value to “0”.
-
Click the OK button.
-
Restart the server.


Once you complete the steps, the Windows Server will restart to apply the settings.
Enable firewall
To enable the Windows Server firewall from the Registry, use these steps:
-
Open Start.
-
Search for regedit and click the top result to open the Registry.
-
Open the following path:
HKEY_LOCAL_MACHINE\SOFTWARE\Policies\Microsoft\WindowsFirewall\StandardProfile
-
Right-click the EnableFirewall key and choose the Delete option.
-
Click the OK button.
-
Restart the server.

After you complete the steps, the Windows Server will enable the firewall.
- Updated on August 17, 2023
- Powershell, Windows Server
How to disable the Windows Firewall with PowerShell in Windows Server 2012/2016/2019? I don’t recommend turning off the Windows Firewall with PowerShell. But if you have a test lab and want to disable it for testing, go ahead. Don’t forget to enable the Firewall when you finish testing. In this article, you will learn how to disable Windows Firewall with PowerShell.
Table of contents
- Windows Firewall profiles information
- Get status of the Windows Firewall with PowerShell
- Disable Windows Firewall in Windows Server 2012/2016/2019
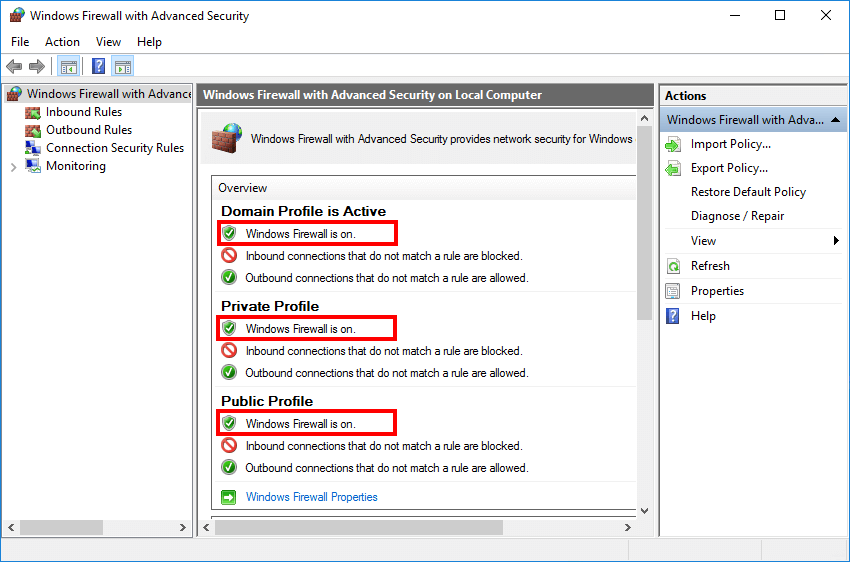
- Check Windows Firewall status
- Conclusion
Windows Firewall profiles information
Windows Firewall offers three firewall profiles:
- Domain profile: applies to networks where the host system can authenticate to a domain controller.
- Private profile: a user-assigned profile and is used to designate private or home networks.
- Public profile: this is the default profile. It is used to designate public networks such as Wi-Fi hotspots at coffee shops, airports, and other locations.
Get status of the Windows Firewall with PowerShell
First, let’s get the current status of the Windows Firewall. We will be using the Get-NetFirewallProfile cmdlet.
PS C:\> Get-NetFirewallProfile | Format-Table Name, Enabled

Name    Enabled
----    -------
Domain     True
Private    True
Public     True
We have three profiles: Domain, Name, and Public. Windows Firewall is enabled on all three profiles.
In the next step, we are going to disable the Windows Firewall.
Disable Windows Firewall in Windows Server 2012/2016/2019
Disable Windows Firewall on all three profiles.
PS C:\> Set-NetFirewallProfile -Profile Domain, Public, Private -Enabled FalseCheck Windows Firewall status
Check the status after you disable the Firewall on all three profiles. Run the Get-NetFirewallProfile cmdlet.
PS C:\> Get-NetFirewallProfile | Format-Table Name, Enabled

Name    Enabled
----    -------
Domain    False
Private   False
Public    False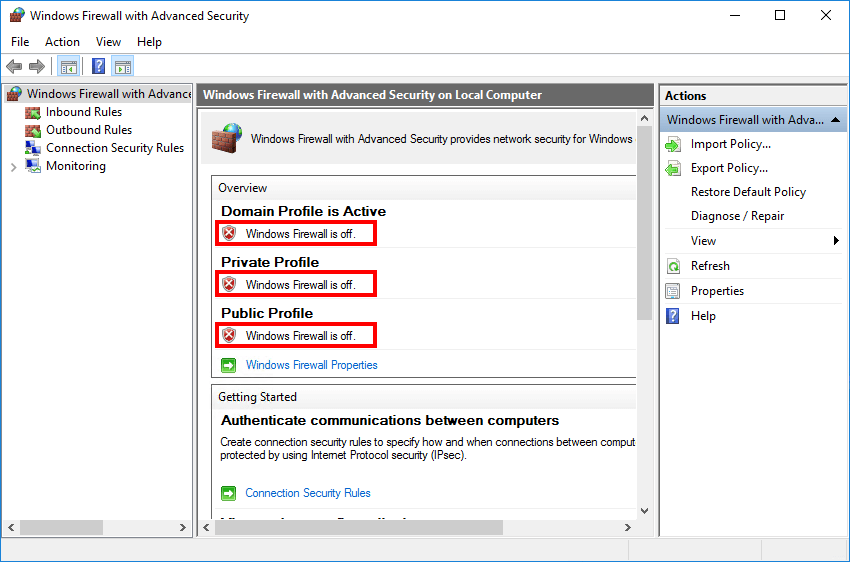
Windows Firewall is disabled on all three profiles in Windows Server. Have fun testing. Don’t forget to enable the Windows Firewall after you have finished troubleshooting or testing. It’s important to keep the Windows Firewall turned on.
Conclusion
You learned how to disable the Firewall in Windows Server 2012/2016/2019/2022. First, get the current status of the Windows Firewall. After that, disable the Windows Firewall with PowerShell. As of last, verify that the Windows Firewall is disabled.
Did you enjoy this article? If so, you may like Windows Server post-installation configuration. Don’t forget to follow us and share this article.
![]()
ALI TAJRAN is a passionate IT Architect, IT Consultant, and Microsoft Certified Trainer. He started Information Technology at a very young age, and his goal is to teach and inspire others. Read more »