Posted by
on December 21, 2018
By default in Windows Server 2019 the Windows Firewall is configured to drop all inbound ICMP traffic. This includes echo requests which are used by the ping command, which can make network troubleshooting difficult.
In this guide we will cover how to allow ping through Windows Firewall in Windows Server 2019.
A common response is usually to simply disable Windows Firewall entirely, however this is not recommended as the Windows Firewall does a good job at providing a basic level of system protection. We will only be allowing the specific rules required to allow ping to succeed.
Allow ping through Windows Firewall
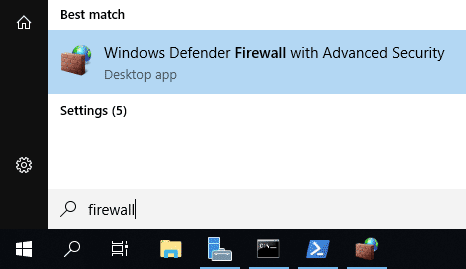
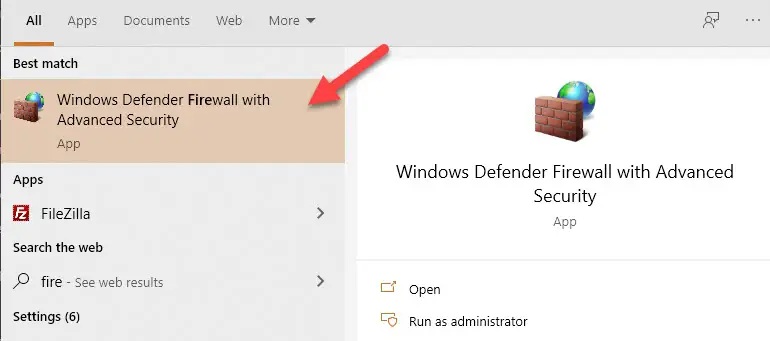
- First we need to open Windows Firewall, this can be done a few ways. My favourite method is to simply hit the Windows key to open start, then start typing firewall. As shown below Windows Firewall with Advanced Security should show, click this.

Alternatively you can simply type ‘firewall’ and press enter in PowerShell to open the basic firewall interface, then click “Advanced settings” on the left hand side – this will open the same interface listed in the start menu.
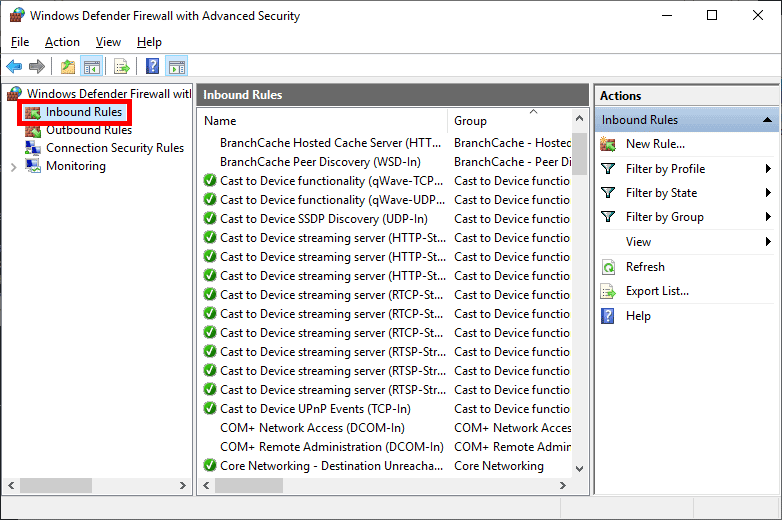
- From the Windows Firewall with Advanced Security window that opens up, select Inbound Rules from the menu on the left.

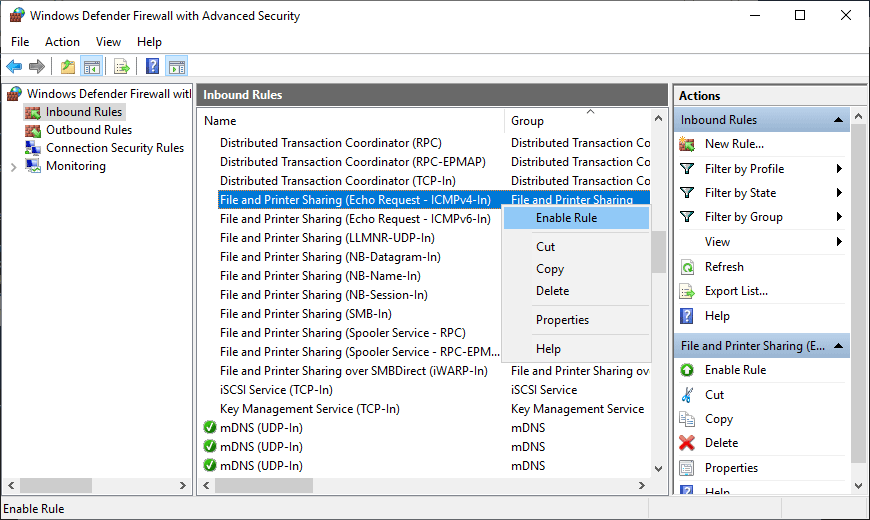
- From the rules listed under Inbound Rules, select “File and printer Sharing (Echo Request – ICMPv4-In)” and enable the rule.

Note that this will only allow IPv4 requests in, if you need IPv6 then you will want to enable the “File and Printer Sharing (Echo Request – ICMPv6-In)” rule, listed just below.
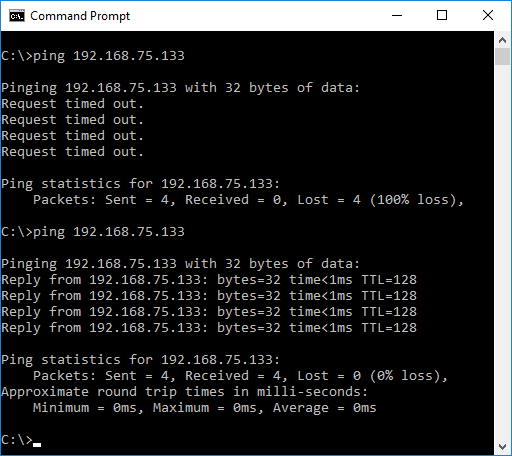
- Once enabled the server should now respond to ping requests. From my desktop I begun to ping my Windows Server 2019 virtual machine at 192.168.75.133 before enabling the rule, and then again after enabling it. You can see below that the first requests timed out, as inbound ICMP requests were disabled by default in Windows Server 2019. After enabling the ICMP rule, the ping requests succeed, confirming that this is working as expected.

Summary
By Default Windows Firewall prevents ICMP echo requests, this results in the server not responding to ping. By enabling this firewall rule we have enabled ping in Windows Server 2019, which can help us with network troubleshooting.
This guide will teach us how to enable ping response in Windows 2019/2016 and 2012 R2 servers. Though the original post was written with the screenshots from Windows 2012 R2 server, the same steps apply to any recent Windows servers, including version 2022.
Enabling ping will help you to monitor and troubleshoot network issues on your network. The ping request will work according to your domain environment policies and settings. If it works by default, we will also show you how to disable the ping in Windows servers. We have mentioned the Powershell commands if you want to work on a remote system or Core edition of Windows OS.
Read Also: How to enable ping on Windows 10/11 client PC
1) Go to the control panel and open ‘Windows Firewall’. There are plenty of ways to reach the control panel on a Windows server.

2) Click on ‘Advanced Settings.’

Additionally, you can search for ‘Firewall’ in Windows search to reach the advanced Firewall settings as below.
3) In the earlier Operating Systems, we need to create a firewall rule to allow ICMP echo packets. Luckily the rule is already there, and we just need to enable it.
To enable the inbound rule allowing ICMP packets, select ‘Inbound Rules.’
Locate the ‘File and Printer Sharing (Echo Request –ICMPv4-In’), right-click on it and select Enable Rule.

That will allow incoming ping requests and respond to them without completely disabling the Windows firewall service. As we enabled this rule only for IPv4 packets, we need to enable a separate similar rule for ICMPv6-In for the IPv6 network.
The below screenshot shows a Windows server started responding to ping requests once the above rule was enabled.

In a similar scenario, if a server is responding to ping/ICMP requests but needs to stop it for tight security, you can simply disable the same rule.
Visit the Windows firewall advances settings and disable the ‘File and Printer Sharing (Echo Request –ICMPv4-In’) rule.
Enable Ping by PowerShell Commands in Windows Servers
Geeks like command lines, especially the Windows OS admins love PowerShell. We can use the below commands to enable/disable ping on Windows Server and Client Operating Systems. Especially if you work on remote systems via PowerShell or have the Server Core OS without GUI.
Make sure to run the below commands ‘as administrator’ on the command prompt or PowerShell.
Enable IPv4 – This will create an exception in the default Windows firewall rule.
netsh advfirewall firewall add rule name="ICMP Allow incoming V4 echo request" protocol="icmpv4:8,any" dir=in action=allow
For IPv6:
netsh advfirewall firewall add rule name="ICMP Allow incoming V6 echo request" protocol="icmpv6:8,any" dir=in action=allow
To disable ping on IPv4:
netsh advfirewall firewall add rule name="ICMP Allow incoming V4 echo request" protocol=icmpv4:8,any dir=in action=block
For IPv6:
netsh advfirewall firewall add rule name="ICMP Allow incoming V6 echo request" protocol=icmpv6:8,any dir=in action=block
As ping is a useful utility to troubleshoot and find the presence of a network device, it completely depends on the network security policies of your environment to enable or disable it. We mentioned the easy steps you can do by GUI and command prompt in this guide.
— Advertisement —
Hello, how are you? In this post, we are going to talk a little about PING. Packet Internet Groper, abbreviated as PING, is a diagnostic tool that tests connectivity between two nodes or devices across a network. Additionally, check if a network data packet is capable of being distributed to an address without errors. It also determines the network accessibility of a specific IP address. On the other hand, it is used to determine and ensure that a host computer that a user is trying to reach is actually operating. Its main use is to check for network errors. Due to security policies, it is disabled by default in Windows Server. However, It is a very useful program to measure the quality of the connection. So I’m going to show you how to enable PING in Windows Server 2019.
Edit Windows Firewall
As mentioned earlier, PING is disabled by default. So what we will do is edit the Windows Firewall inbound rules. With this intention, please type defender in the search bar. After the results appear, please enter in Windows Defender Firewall with Advanced Security:

Once the Windows Firewall is deployed, please select the inbound rules. Then scroll down to locate File and Printer Sharing (Echo Request – ICMPv4-In).

Then, double-click on it to enter the properties. In this section, it is necessary to modify two aspects. First, check the box to Enable the rule. Additionally, modify the action to Allow connections. Then, press Apply and OK to set the rule.

Back to the previous screen, you can see the rule with a check sign. This means that it is enabled correctly.

Testing PING
Once the previous modifications have been made, it is time to try PING. With this intention, please open a command prompt. Next, test the connection with an IP address or domain name. In this case, we will use www.osradar.com. Please enter the following command and press enter:
ping www.osradar.com

Conclusion
Finally, we have seen how to enable PING in Windows Server 2019. It is a popular diagnostic utility in the computer network environment. In addition, it is widely used to measure latency. This is all for now before I say goodbye I invite you to review our post on EasyPHP in Windows 10.
ICMP or Ping is disabled by default on Windows Server and Windows 11 / Windows 10. Keeping Ping disabled makes the system safer, but troubleshooting becomes more difficult.
As ping indicates that the remote computer is connected to the network and capable of communicating, it is a useful command, especially for sysadmins.
As a sysadmin myself, I have to install Windows Server and client frequently. Since our network is secured by hardware firewalls, it’s safe to allow ping on Windows Server and Windows client computers.
 1")
I prefer to enable Ping manually and not use Group Policy. In this article, we will go through the step-by-step process of enabling Ping through Windows Firewall.
If ping is not enabled on your computer, you will get a request timed out message when you ping the computer.
 2")
How to enable Ping in Windows Firewall
To enable ping on Firewall, follow the steps below:
-
Open Firewall by going to Run –> firewall.cpl
-
Click on Advanced Settings from the right-hand pane
 3")
Firewall advanced settings -
Right-click on Inbound Rules on the left-hand pane and select New Rule
 4")
New inbound rule in Firewall -
Select File and Printer Sharing under Predefined. Click on Next.
-
Select the following two rules:
- File and Printer Sharing (Echo Request – ICMPv6-In)
- File and Printer Sharing (Echo Request – ICMPv4-In)
 5")
Enable ICMP rules from Group Policy Click on Next.
-
Make sure “Allow the connection” is selected. Click on Finish.
 6")
Allow the connection rule for ping
 3")
 4")
 5")
 6")
How to enable Ping using Command Line
To enable Ping using Command Line, open Command Prompt or PowerShell and run the following commands:
Allow IPv4 ping using cmd:
netsh advfirewall firewall add rule name="ICMP Allow Ping V4" protocol="icmpv4:8,any" dir=in action=allowAllow IPv4 ping using PowerShell:
New-NetFirewallRule -DisplayName "ICMP Allow Ping V4" -Direction Inbound -Protocol ICMPv4 -IcmpType 8 -RemoteAddress <localsubnet> -Action AllowAllow IPv6 ping using cmd:
netsh advfirewall firewall add rule name="ICMP Allow Ping V6" protocol="icmpv6:8,any" dir=in action=allowAllow IPv6 ping using PowerShell:
New-NetFirewallRule -DisplayName "ICMP Allow Ping V6" -Direction Inbound -Protocol ICMPv4 -IcmpType 8 -RemoteAddress <localsubnet> -Action AllowTo disable Ping using Command Line, open Command Prompt or PowerShell and run the following commands:
Block IPv4 ping using cmd:
netsh advfirewall firewall add rule name="ICMP Allow Ping V4" protocol=icmpv4:8,any dir=in action=blockBlock IPv4 ping using PowerShell:
New-NetFirewallRule -DisplayName "ICMP Allow Ping V6" -Direction Inbound -Protocol ICMPv4 -IcmpType 8 -RemoteAddress <localsubnet> -Action BlockBlock IPv6 ping using cmd:
netsh advfirewall firewall add rule name="ICMP Allow Ping V6" protocol="icmpv6:8,any" dir=in action=blockBlock IPv6 ping using PowerShell:
New-NetFirewallRule -DisplayName "ICMP Allow Ping V6" -Direction Inbound -Protocol ICMPv4 -IcmpType 8 -RemoteAddress <localsubnet> -Action BlockHow to enable Ping through Firewall using Group Policy
Sometimes it becomes cumbersome to go through each computer in the network and enable ping. A rather easier way would be to disable Windows Firewall by default. This could be a security rick. Alternatively, we can enable ping for all computers (or a set of computers) in the network using the Group Policy.
Here’s how to enable ping using Group Policy:
-
Open the Group Policy Management Console on your Domain Controller from Server Manager –> Tools –> Group Policy Management.
-
You can either create a new Group Policy Object and apply it to relevant computers or edit the already existing universal GPO.
 7")
Edit Default Domain Policy -
Navigate to the following:
Computer Configuration -> Policies -> Windows Settings -> Security Settings -> Windows Defender Firewall with Advanced Security -> Windows Defender Firewall with Advanced Security -> Inbound Rules
-
Right-click Inbound Rules and create a New Rule.
 8")
New inbound rule -
Select File and Printer Sharing under Predefined. Click on Next.
-
Select the following two rules:
- File and Printer Sharing (Echo Request – ICMPv6-In)
- File and Printer Sharing (Echo Request – ICMPv4-In)
Enable ICMP rules from Group Policy Click on Next.
-
Make sure “Allow the connection” is selected. Click on Finish.
Allow the connection rule for ping
 7")
 8")
That’s it. Now ping is enabled across the internal network. If any computer still does not allow ping traffic, please run the following command on that computer:
gpupdate /force 11")
-
Vander Host are specialists in domain name registration, website and VPS hosting.
-
Operating Systems
TL;DR Guide
- Search
- Windows Defender Firewall with Advanced Security
- Inbound Rules
- Scroll, scroll, scroll
- File and Printer Sharing (Echo Request – ICMPv4-In)
- Click click
- Enabled
- Done
- Yay
See Also
https://kb.vander.host/operating-systems/cannot-ping-freshly-installed-windows-2012-server/
Reference
How To Enable Ping In Windows Server 2019 Firewall
Tags
-
firewall, icmp-ping, ping, windows-2019, windows-defender
-
Created:
23 March 2021
-
Updated:
Share this article
Leave a Reply
Your email address will not be published. Required fields are marked *
Comment *
Name*
Email*
Website
Save my name, email, and website in this browser for the next time I comment.
PrevPreviousPost Server Migration, All Mac IMAP Folders Missing
NextHow to enable Remote Desktop Protocol for Administration Purposes on Newly Created Windows 2019 ServerNext