Network Time Protocol (NTP) runs on the Transport Layer port 123 UDP and enables accurate time synchronization for network computers. This irons out time inconsistencies on servers and clients during file logging or replication of server databases among other resources.
In this article, we’ll outline the process of installing, configuring, and querying an NTP server on Windows Server 2019.
NTP Server
NTP servers utilize the Network Time Protocol to send time signals to servers across the globe upon request. NTP servers use the Universal Time Coordinated (UTC) time source for time signal synchronization.
The main purpose of NTP servers is to provide time synchronization for servers and computer networks with other major network servers and clients across the globe. In turn, this streamlines communications and transactions all over the world.
Installing and Configuring an NTP Server on Windows Server 2019
The process of installing, configuring, and querying an NTP Server on Windows Server 2019 is quite straightforward.
Set the NTP service to Automatic option
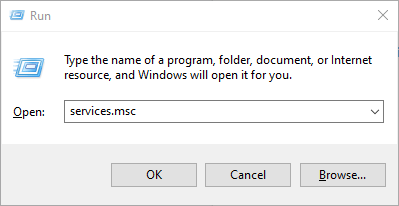
To start off, Hit Windows Key + R to launch the Run dialogue. Next, type services.msc and hit ENTER.
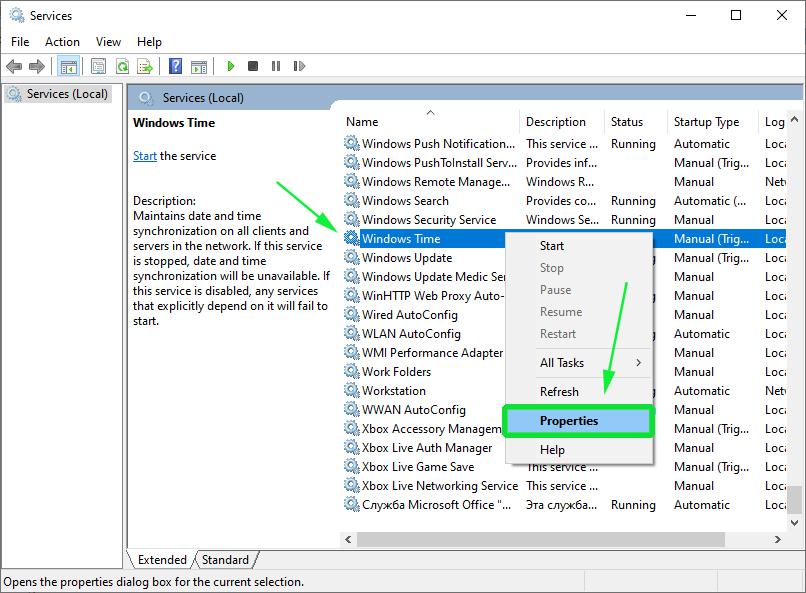
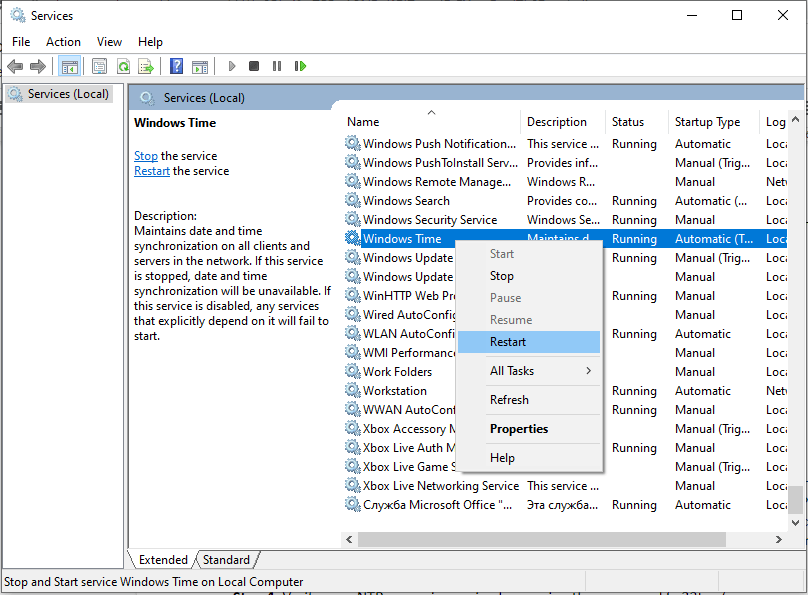
In the ‘Services’ window, locate the service ‘Windows Time’. Right-click and select the ‘Properties’ option as shown:
On the pop-up window, select the Startup type as ‘Automatic’.

Finally, click on ‘OK’ and then ‘Apply’.
Configuring NTP Server using Registry Editor
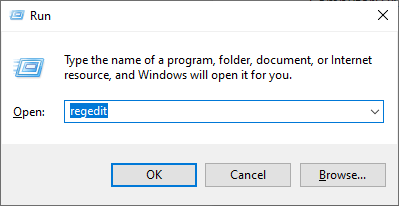
As before, launch the run dialogue by pressing Windows Key + R. Then type ‘regedit’ and hit ENTER.
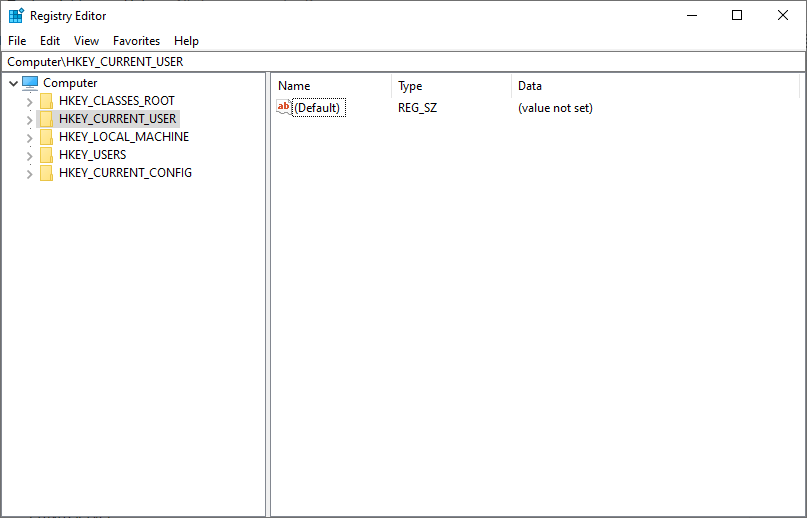
The Registry editor will be launched as shown:
Navigate to the path shown below:
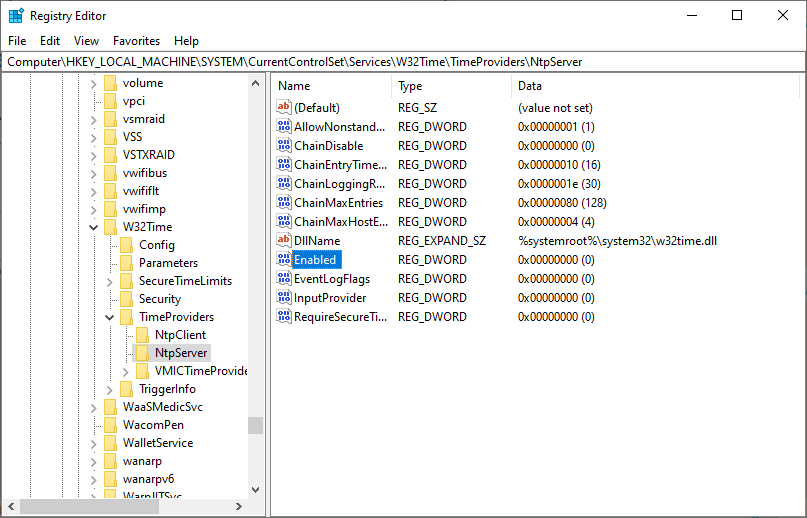
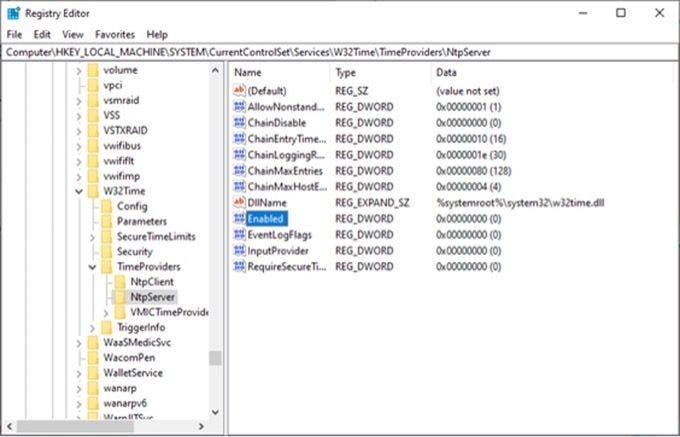
Computer\HKEY_LOCAL_MACHINE\SYSTEM\CurrentControlSet\Services\W32Time\TimeProviders\NtpServer
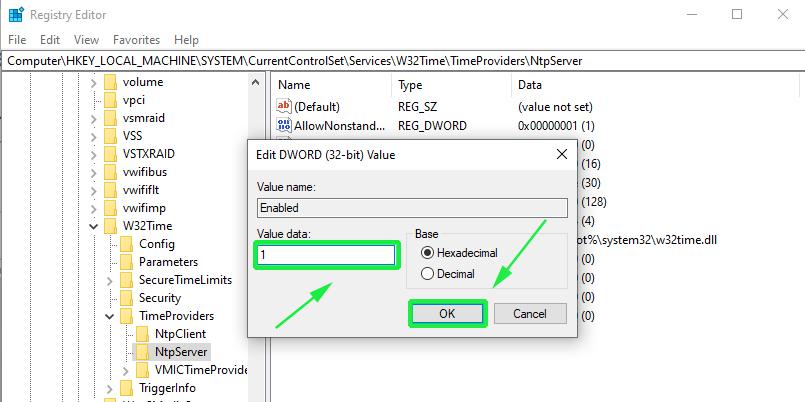
On the right pane, locate and double-click the ‘Enabled’ file as shown:
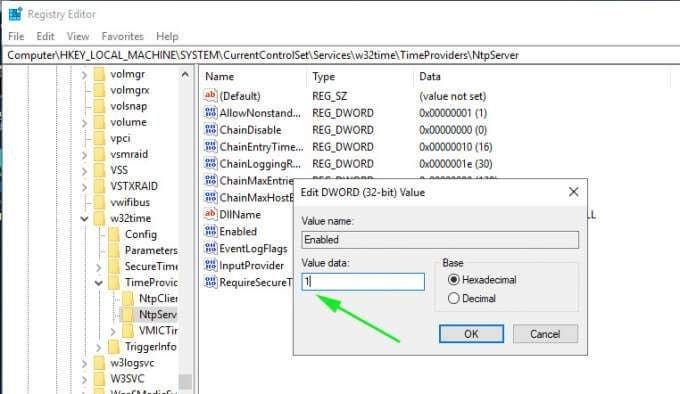
Set the Value data to 1 and click OK.
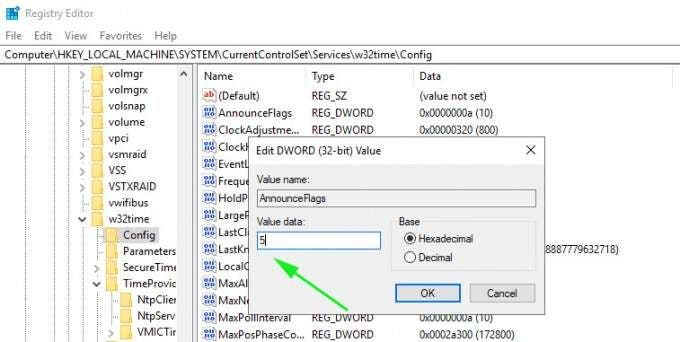
Next, follow this path.
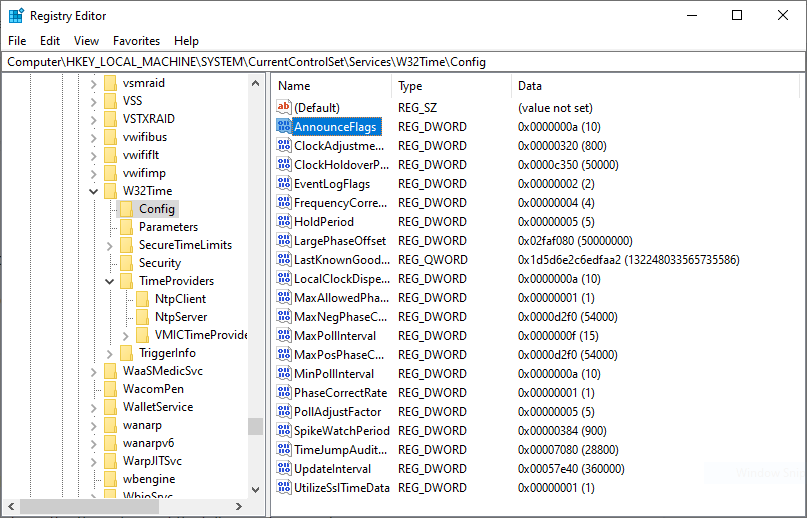
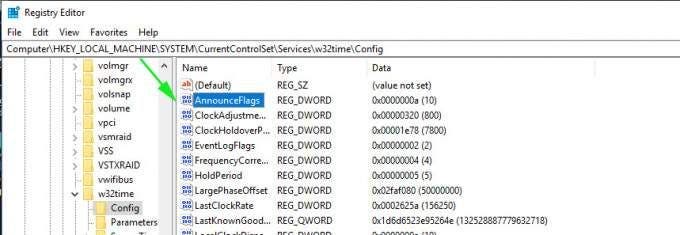
Computer>HKEY_LOCAL_MACHINE>SYSTEM>CurrentControlSet>Services>W32Time>Config
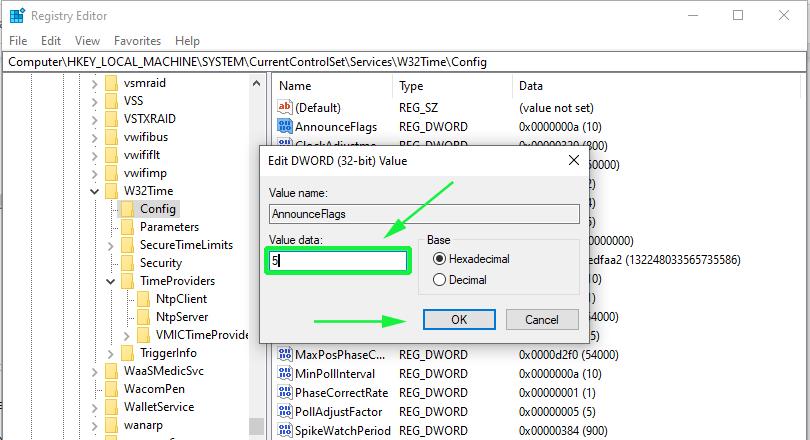
At the right pane locate the ‘Announce Flags’ file.
Double click on the file and set its value to 5 in the ‘Value Data’ section.
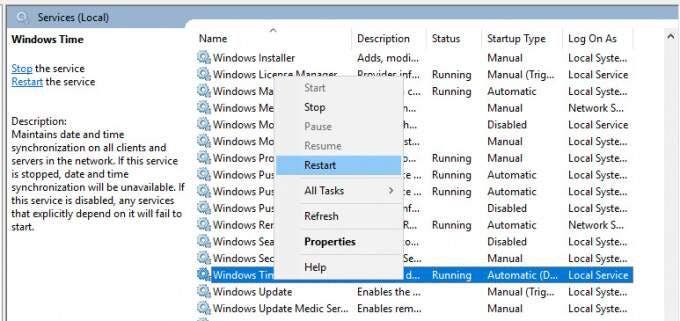
Finally, reboot the NTP server for the changes to take place. Head back to the services Window, right-click on ‘Windows Time’ and select ‘Restart’
Configuring NTP Server on Windows 2019 using Windows PowerShell
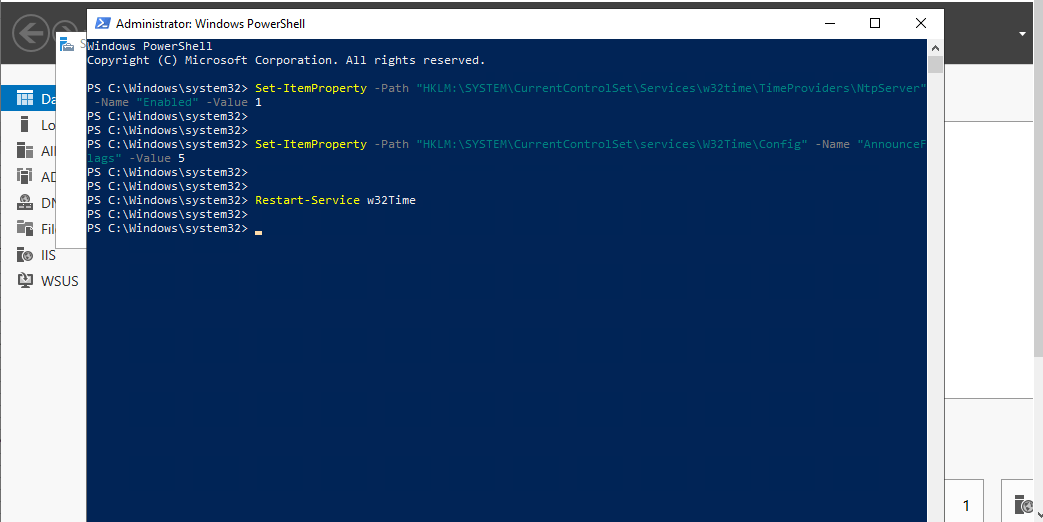
If you love working in Powershell, launch Powershell as Administrator and enable NTP server using the command:
Set-ItemProperty -Path “HKLM:\SYSTEM\CurrentControlSet\Services\w32time\TimeProviders\NtpServer” -Name “Enabled” -Value 1
Next, configure Announce Flags value as shown:
Set-ItemProperty -Path “HKLM:\SYSTEM\CurrentControlSet\services\W32Time\Config” -Name “AnnounceFlags” -Value 5
Finally, restart the NTP server using the command:
Restart-Service w32Time
Important Note: UDP port 123 must be open for the NTP server traffic to reach your Windows Server 2019. If the NTP servers are unreachable, you can check your firewall settings to fix this.
Other useful commands
- w32tm /query /configuration to check and shows the NTP server configuration.
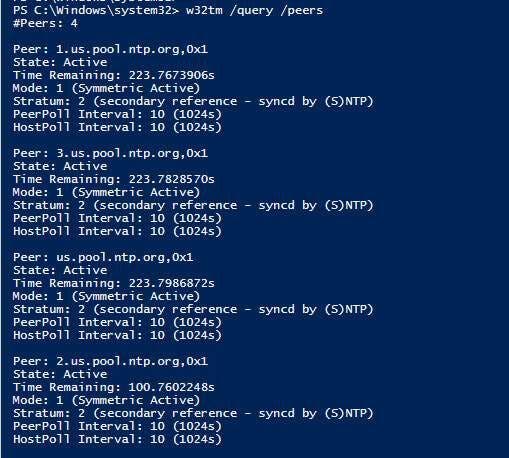
- w32tm /query /peers for checking the list of NTP servers configured alongside their configuration status
- w32tm /resync /nowait to force-synchronize time with your NTP server.
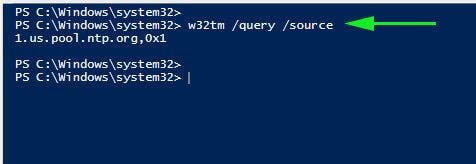
- w32tm /query /source to show the source of the time.
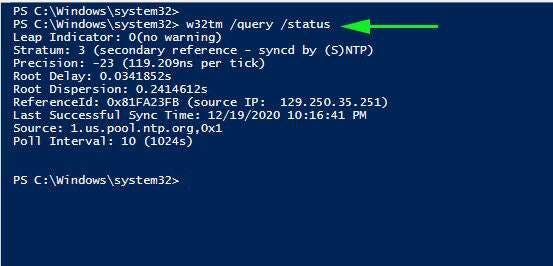
- w32tm /query /status to reveal NTP time service status.
Final take
Now your Windows Server 2019 clock is synchronized with time the NTP server’s pool.ntp.org and works as NTP client. You can achieve full network and accompanying infrastructure time synchronization by synchronizing all network workstations, servers, routers, hubs, and switches.
Since NTP servers operate over the UDP protocol using TCP/IP, these network infrastructures must be working efficiently for effective NTP server operation. In case you want to make time servers on windows server 2019 hosted on a virtual machine, you should disable the virtual machine time synchronization settings and sync their time with the domain Windows Server 2019.
Maintaining accurate time on your server is critical largely because many services and IT applications rely on accurate time settings to function as expected. These include logging services, monitoring and auditing applications, and database replication to mention a few.
Time skew in servers, and any client systems for that matter, is undesirable and usually causes conflict in time-critical applications. To maintain accurate time settings on your server and across the network by extension, it’s preferred to install and enable a NTP server on your server.

What is an NTP server?
NTP, short for Network Time Protocol, is a protocol that synchronizes time across network devices. It listens on UDP port 123 and always ensures that time inconsistencies across the server and client systems are mitigated and that client systems are always in sync with the server.
NTP server refers to a network device or a service that fetches time from an external time source and syncs the time across the network using the NTP protocol. This guide will focus on installing NTP service on Windows server 2019.
How Does NTP Work ?
Being a protocol, NTP requires a client-server architecture. The NTP client residing on a Windows PC, for example, initiates a time request exchange with the NTP server.
A time-stamp data exchange happens between the server and client and this helps in adjusting the clock on client’s systems to the highest degree of accuracy to match the time on the NTP server. In this guide, we will walk you through the installation and configuration of NTP server on Windows Server 2019.

There are several ways of setting up NTP server and we will look at each in turn.
In Windows Server environments, there is a special Windows time service that handles time synchronization between the server and the client systems. This is known as Windows Time service. PowerShell provides a command-line tool known as w32tm.exe and comes included in all versions of Windows from Windows XP and Windows Server 2008 to the latest versions of each OS.
Using the w32tm.exe utility, you can configure your Windows system to sync with online time servers. Usually, this is the tool of choice when setting up and monitoring time on your Windows Server system.
Using the command-line utility is quite straightforward.
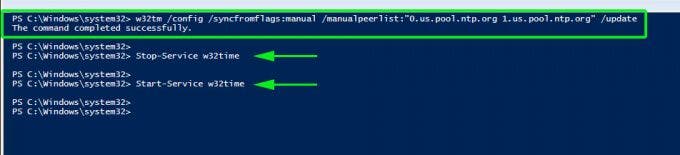
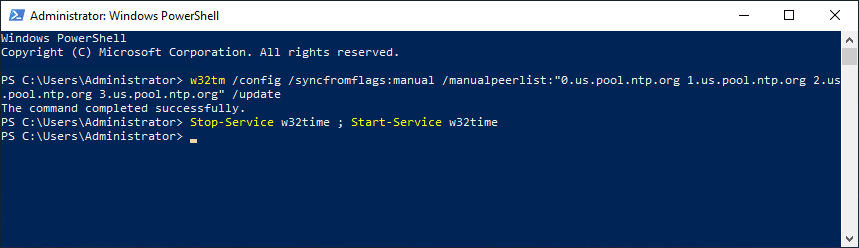
For example, to set the Server to point to 2 different time servers, namely 0.us.pool.ntp.org and 1.us.pool.ntp.org , launch PowerShell as the Administrator and run the command below
w32tm /config /syncfromflags:manual /manualpeerlist:”0.us.pool.ntp.org 1.us.pool.ntp.org” /update
Then restart Windows Time service using the commands:
Stop-Service w32time
Start-Service w32time
Here’s a snippet of the commands.
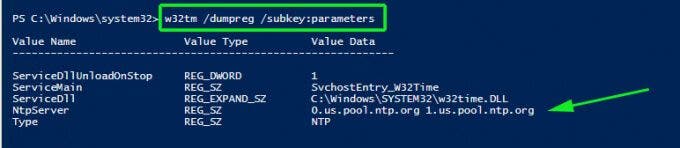
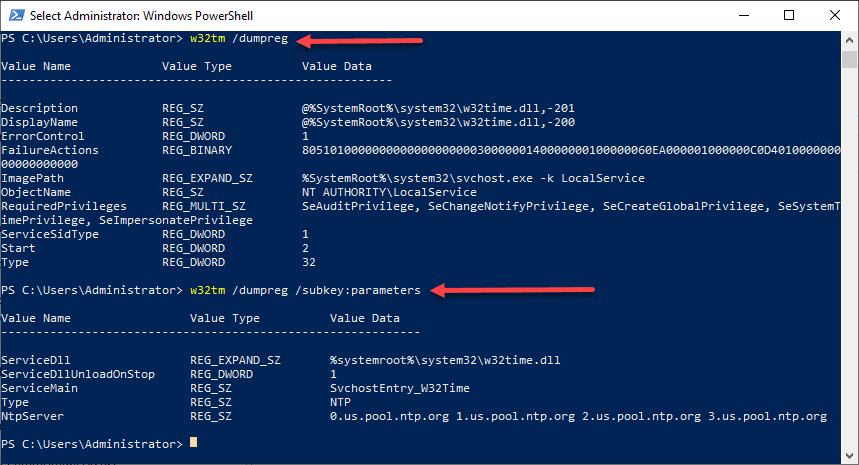
You can thereafter confirm the values of NTP servers configured in the registry by running this command:
w32tm /dumpreg /subkey:parameters
Configure NTP Server on Windows Server 2019 using Registry editor
The second method of installing and configuring the NTP server is using the registry editor. If you are not a fan of the Windows PowerShell, then this will truly come in handy.
To get started, open the registry editor. Press ‘Windows key + R’ and type ‘regedit’ and hit ENTER. The windows registry will be launched as shown below.
Next, head over to the path shown below
Computer\HKEY_LOCAL_MACHINE\SYSTEM\CurrentControlSet\Services\W32Time\TimeProviders\NtpServer
On the right pane. Be sure to find & double-click the file labelled ‘Enabled’ in the diagram shown below.
Next, In the ‘value data’ text field, set the value to ‘1’ and click the ‘Ok’ button.
Next, head over to the path:
Computer\HKEY_LOCAL_MACHINE\SYSTEM\CurrentControlSet\Services\W32Time\Config
In the right pane, double click the ‘Announce Flags’ file.
Double-click the file and in the Value data text field, type the value ‘5’ and click ‘OK’.
For the changes to come into effect, you need to reboot the NTP server by heading to the services Window. To achieve this, press ‘Windows key + R’ and type ‘services.msc’. Scroll and find ‘Windows Time’, right-click on it and select the ‘Restart’ option.
Useful w32tm commands
Once you have set up your NTP server, you can use the following commands to verify various aspects of the server:
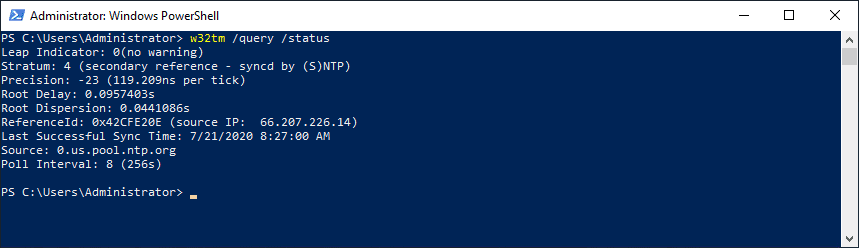
To check the status of the NTP server, run the command:
w32tm /query /status
To reveal the current NTP pool being used to sync time with execute:
w32tm /query /source
You can also display a list of NTP time servers along with their configuration status as shown.
w32tm /query /peers
To display NTP server configuration settings, run the command:
w32tm /query /source
This shows quite a wealth of information.

Final Take
We cannot stress enough how important it is to maintain accurate time and date settings on your server. As you have seen, setting up an NTP server on your Windows server instance is quite easy and straight forward.
Once you have configured the NTP service on your server, other domain controllers in your environment will sync with this server and the Windows clients in the domain will sync with the domain controllers. Hopefully, you can now install and configure NTP on Windows Server 2019.

There is no question about it, having accurate time in your environment set in critical infrastructure systems is a must. Many business-critical applications and infrastructure systems rely on accurate time synchronized between them to ensure the system functions as expected. Time skew can cause all kinds of weirdness when it is misconfigured or out of sync between different servers/systems. This is especially true in a Windows Server Active Directory domain. Having accurate time between a client computer and domain controllers is essential. Let’s take a look at how to set ntp server Windows 2016 or Windows 2019 to see how this can be easily carried out.
What is NTP?
Wen it comes to synchronizing time in most enviornments, Network Time Protocol (NTP) is the protocol that is used to ensure accurate time across your environent. In most environments, NTP servers, special time servers, are configured that provide an external time source for which your internal servers can synchronize with.
There are several widely known NTP IP addresses on the Internet that provide reliable time sources for your network. The NTP.org servers are one such set of time servers that provide an NTP source for configuration.
There are a few NTP values to be aware of:
- NTP Server – This is a specialized server that is able to detremine the precise time from an external timing reference such as GPS and passes these precise time values on to your network
- Offset – This is the difference in time between the external time server and the time on a local client computer. The larger the offset, the more inaccurate the timing source is.
- Delay – This is the value of the round-trip time (latency) of the timing message between the client to the server and back again.
How Time is synchronized in a Windows Server domain
In a Windows domain, Microsoft has default configuration in place that takes care of a good portion of the NTP configuration. Starting with Windows 2000 Server, Windows clients are configured as NTP Clients. When configured as an NTP client, Windows computers only attempt to contact the domain controller for NTP synchronization or a manually specified NTP server.

Microsoft has made the domain controller the default in a Windows domain since it makes sense that clients already have a secure channel established with DCs for other types of communications. Additionally, accurate and synchronized time between domain controllers and clients is especially important for all kinds of things such as logins, group policy synchronization and other tasks/operations.
The order of operations or hierarchy in a Windows domain is as follows:
- Domain members attempt to synchronize time with any domain controller located in the domain
- Domain controllers synchronize with a more authoritative domain controller
- The first domain controller that is installed in the environment is automatically configured to be a reliable time source.
- Other than the first domain controller installed, the PDC emulator (if role has been moved from the first DC installed) generally holds the position of best time source.
An important point to consider and that comes into play when thinking about why we set ntp server in Windows 2016 or Windows 2019 is the authoritative domain controller must have a reliable source to synchronize with as well. This is generally an external time server outside of the domain hierarchy.
Now that we know how the domain hierarchy for time is configured, how is the external time source configured on your domain controller that is configured as the reliable source of time?
Configuring Windows Time Service with W32tm.exe
When it comes to Windows Server environments like Windows Server 2016 or Windows Server 2019, there is a special Windows service that controls the time synchronization of your Windows hosts. This is the Windows Time Service.
Microsoft provides a command line tool to interact with the Windows Time Service called W32tm.exe. This has been included in Windows operating systems since Windows XP/Windows 2003 and later. It can be used to configure Windows Time service parameters as well as diagnose time service problems. This is generally the tool of choice when it comes to configuring, monitoring, and administering Windows Time.
Using the W32tm.exe utility is fairly straightforward. It can be used from a normal command prompt as well as from a PowerShell prompt. There are several command parameters included that allow not only configuring the NTP servers you want to query, but also parameters that allow viewing the low level registry configuration as well as the synchronization status.
You can read the official Microsoft KB on the Windows Time service and the W32tm.exe utility here:
- https://docs.microsoft.com/en-us/windows-server/networking/windows-time-service/windows-time-service-tools-and-settings
However, there are a few commands I would like to show you for the purposes of configuring your Domain controller that is to be the reliable time source (PDC Emulator) for your domain.
The first command is the command line entry to specify your NTP servers, which in this case I am using the NTP.org servers to set as the source of my NTP synchronization.
w32tm /config /syncfromflags:manual /manualpeerlist:"0.us.pool.ntp.org 1.us.pool.ntp.org 2.us.pool.ntp.org 3.us.pool.ntp.org" /update

Stop-Service w32time
Start-Service w32time
If you want to view the status of the NTP synchronization on your server after you have configured the values and restarted the w32time service, you can use the following command:
w32tm /query /status
You can also check the values configured in your registry key hkey local machine system currentcontrolset services w32time config using the commands below. You can drill into the configuration parameters using the /dumpreg /subkey command.
w32tm /dumpreg

w32tm /dumpreg /subkey:parameters
Final Thoughts
As shown, you can easily set NTP Server Windows 2016 or Windows 2019 using the w32tm command utility that allows interacting with the time service in Windows Server.
In a Windows domain, you want to configure your authoritative time source domain controller, which by default is the PDC Emulator, to pull time information from an authoritative source like NTP.org or some other reliable NTP time server.
After configuring the time source, the other domain controllers will synchronize with this server and then the Windows clients joined to the domain will synchronize with the domain controllers that have the corrected time from the authoritative server.
Синхронизация времени в сети является важным аспектом для обеспечения корректной работы системы, особенно в предприятиях. В этой статье мы рассмотрим, как настроить сервер и клиент NTP на Windows Server 2019.
NTP (Network Time Protocol) — это протокол, который используется для синхронизации времени на компьютерах в сети. Он позволяет установить точное время, основываясь на данных от внешнего временного источника, такого как общедоступный сервер NTP.
Настройка сервера NTP на Windows Server 2019 очень проста. Вам потребуется выполнить несколько шагов. Сначала установите роль сервера времени на сервере, затем добавьте внешний временной источник и настройте параметры синхронизации.
Настройка клиента NTP на Windows Server 2019 также не требует особых усилий. Вам просто нужно указать IP-адрес сервера времени, к которому вы хотите подключиться, и настроить параметры синхронизации. После этого ваш клиент будет синхронизироваться с сервером NTP и получать точное время.
Содержание
- Настройка сервера NTP на Windows Server 2019
- Шаг 1: Установка и настройка службы NTP
- Настройка клиента NTP на Windows Server 2019
- Шаг 1: Установка и настройка службы W32Time
- Синхронизация времени между сервером и клиентом
Настройка сервера NTP на Windows Server 2019
Вот как настроить сервер NTP на Windows Server 2019:
- Установите службу времени
- Откройте командную строку
- Запустите команду для настройки сервера NTP
- Перезагрузите службу времени
- Проверьте настройки
- Настройте синхронизацию времени
- Перезагрузите службу времени
- Проверьте статус синхронизации времени
Перед настройкой сервера NTP вам необходимо установить службу времени Windows.
Перейдите в меню Пуск, найдите командную строку (cmd) и откройте ее.
Введите следующую команду и нажмите Enter: w32tm /config /manualpeerlist:"pool.ntp.org" /syncfromflags:manual /reliable:yes /update
Введите следующую команду и нажмите Enter: net stop w32time & net start w32time
Введите следующую команду и нажмите Enter: w32tm /query /configuration
Убедитесь, что в выводе команды присутствует строка «PeerList: pool.ntp.org».
Введите следующую команду и нажмите Enter: w32tm /config /update /manualpeerlist:"0.pool.ntp.org,0x8 1.pool.ntp.org,0x8 2.pool.ntp.org,0x8 3.pool.ntp.org,0x8" /syncfromflags:manual /reliable:yes
Введите следующую команду и нажмите Enter: net stop w32time & net start w32time
Введите следующую команду и нажмите Enter: w32tm /query /status
Убедитесь, что в выводе команды присутствует строка «Leap Indicator: 0 (no warning)», а также информация о синхронизации времени.
Теперь ваш сервер NTP настроен и будет предоставлять точное время всем клиентам в сети. Вы можете использовать эту настройку для синхронизации времени на других компьютерах в вашей сети, просто указав сервер NTP в качестве источника времени.
Шаг 1: Установка и настройка службы NTP
Перед началом настройки сервера и клиента NTP на Windows Server 2019 необходимо установить и настроить службу NTP. В этом разделе мы рассмотрим процесс установки и настройки NTP на сервере.
В Windows Server 2019 служба NTP представлена в виде службы времени Windows, поэтому нам необходимо установить и настроить эту службу перед использованием функций NTP.
Для установки службы времени Windows следуйте следующим шагам:
| Шаг | Описание |
|---|---|
| 1 | Откройте «Управление сервером» в «Панели управления». |
| 2 | После открытия «Управление сервером» выберите «Добавить роли и компоненты». |
| 3 | Перейдите к пункту «Службы времени Windows» и нажмите «Далее». |
| 4 | Проверьте, что установлен флажок «Службы времени Windows» и нажмите «Далее». |
| 5 | Нажмите «Установить» и дождитесь завершения установки службы времени Windows. |
| 6 | После установки откройте «Службы» в «Панели управления». |
| 7 | Найдите службу «Windows Time» в списке служб и откройте свойства службы. |
| 8 | В свойствах службы «Windows Time» установите режим запуска службы на «Автоматически». |
| 9 | После этого нажмите «Применить» и «ОК», чтобы сохранить изменения. |
Теперь служба времени Windows установлена и настроена на сервере Windows Server 2019. В следующем разделе мы рассмотрим настройку сервера NTP на Windows Server 2019.
Настройка клиента NTP на Windows Server 2019
Для обеспечения точной синхронизации времени на клиентском сервере важно настроить его в качестве клиента NTP. В этом разделе мы рассмотрим подробную процедуру настройки клиента NTP на Windows Server 2019.
1. Откройте командную строку с правами администратора.
2. Введите следующую команду для добавления сервера NTP:
w32tm /config /syncfromflags:manual /manualpeerlist:"сервер_адрес" /reliable:yes /update
Здесь «сервер_адрес» — это адрес NTP-сервера, который вы хотите использовать для синхронизации времени на клиентском сервере. Вы можете указать IP-адрес или DNS-имя сервера NTP.
3. Затем введите следующую команду для запуска службы времени Windows:
net start w32time
4. Для проверки правильности настройки клиента NTP введите следующую команду:
w32tm /query /status
В выводе вы должны увидеть информацию о текущем статусе времени и источнике синхронизации. Проверьте, что источник синхронизации указывает на правильный сервер NTP.
5. Наконец, чтобы установить клиента NTP в качестве постоянного источника синхронизации, введите следующую команду:
w32tm /config /syncfromflags:domhier /update
Теперь ваш клиентский сервер должен правильно синхронизироваться со службой времени NTP на указанном сервере.
Обратите внимание, что при настройке клиента NTP на Windows Server 2019 рекомендуется использовать сервер NTP с высокой точностью и надежностью, чтобы обеспечить правильную синхронизацию времени на вашем сервере.
Шаг 1: Установка и настройка службы W32Time
Перед тем как начать настраивать сервер и клиент NTP на Windows Server 2019, необходимо убедиться, что служба W32Time установлена и настроена правильно.
Служба W32Time отвечает за синхронизацию времени на компьютерах под управлением операционной системы Windows. В Windows Server 2019 она устанавливается по умолчанию, однако может потребоваться дополнительная настройка.
Для проверки наличия службы W32Time и ее состояния необходимо выполнить следующие шаги:
- Откройте командную строку от имени администратора.
- Введите команду w32tm /query /status и нажмите Enter.
В результате выполнения команды вы увидите информацию о текущем состоянии службы W32Time, включая источник времени (NTP-сервер), с которого происходит синхронизация.
Если вы получили ошибку или информацию о несинхронизированном состоянии, необходимо выполнить установку и настройку службы W32Time следующим образом:
- Откройте командную строку от имени администратора.
- Введите команду w32tm /register и нажмите Enter. Эта команда зарегистрирует службу W32Time на компьютере.
- Затем введите команду net start w32time и нажмите Enter. Эта команда запустит службу W32Time.
- И, наконец, выполните команду w32tm /config /syncfromflags:manual /manualpeerlist:»pool.ntp.org» и нажмите Enter. Эта команда настроит службу W32Time для синхронизации с NTP-сервером pool.ntp.org, который предоставляет точное время.
После выполнения этих команд служба W32Time будет установлена и настроена правильно. Вы можете повторно выполнить команду w32tm /query /status, чтобы убедиться, что служба работает без ошибок и синхронизируется с выбранным NTP-сервером.
Теперь, когда служба W32Time настроена правильно, вы можете приступать к настройке сервера и клиента NTP на Windows Server 2019.
Синхронизация времени между сервером и клиентом
Для обеспечения правильной работы сети и приложений на сервере и клиенте необходима синхронизация времени. Синхронизированное время позволяет устанавливать правильную последовательность событий, синхронизировать лог-файлы и устранять проблемы, связанные с расхождением времени.
Windows Server 2019 предлагает встроенную службу NTP (Network Time Protocol), которая позволяет обеспечить точную синхронизацию времени между сервером и клиентом. Настройка NTP на сервере и клиенте является относительно простой задачей и состоит из нескольких шагов.
Шаг 1: Настройка сервера NTP
1. Запустите командную строку от имени администратора.
2. Введите следующую команду для установки сервера NTP:
| w32tm /config /manualpeerlist:»time.windows.com» /syncfromflags:manual /reliable:yes /update |
|---|
Обратите внимание, что «time.windows.com» является временным сервером NTP, предоставляемым Microsoft.
3. Запустите службу NTP с помощью следующей команды:
| net start w32time |
|---|
Шаг 2: Настройка клиента NTP
1. Откройте командную строку от имени администратора.
2. Введите следующую команду для настройки клиента NTP:
| w32tm /config /syncfromflags:domhier /update |
|---|
Эта команда настраивает клиент таким образом, чтобы он синхронизировался со своим доменным контроллером.
3. Запустите службу NTP с помощью следующей команды:
| net start w32time |
|---|
После выполнения этих шагов сервер и клиент будут синхронизировать время с помощью NTP и быть точно настроенными. Это позволит избежать проблем, связанных с расхождением времени и обеспечит более стабильную работу сети и приложений.
Точное время имеет важное значение для многих систем, особенно для корпоративных сетей и серверов. Синхронизация времени помогает обеспечить правильное функционирование различных процессов и защитить систему от ошибок и сбоев. В Windows Server 2019 можно настроить собственный NTP сервер и обеспечить точность времени в локальной сети.
Network Time Protocol (NTP) — это протокол, используемый для синхронизации времени на компьютерах и сетевых устройствах. Он позволяет точно определить текущее время, учитывая часовые пояса и корректировки для учета дрейфа часов. Установка NTP сервера на Windows Server 2019 позволит вашим клиентским устройствам автоматически синхронизироваться с ним.
В этом руководстве мы рассмотрим несколько шагов по установке и настройке NTP сервера на Windows Server 2019. Мы также расскажем, как настроить клиентские устройства для синхронизации времени с вашим NTP сервером. Установка NTP сервера поможет вам поддерживать точность времени в вашей сети и избежать проблемных ситуаций, связанных с неправильной синхронизацией времени.
Содержание
- Как настроить NTP сервер на Windows Server 2019
- Установка NTP сервера
- Настройка NTP сервера
- Синхронизация времени на Windows Server 2019
- Проверка работы NTP сервера
Как настроить NTP сервер на Windows Server 2019
Для начала необходимо установить роль «Служба времени Windows» на сервере. Для этого откройте «Управление сервером» и выберите «Установка ролей и компонентов». Выберите «Служба времени Windows» из списка ролей и установите ее.
После установки роли необходимо настроить сервер времени. Откройте «Утилиту службы времени» из меню «Административные инструменты». Перейдите на вкладку «Настройка», затем выберите «Сервер по умолчанию» и добавьте его IP-адрес.
Далее необходимо настроить клиентов для синхронизации с сервером времени. Откройте командную строку с правами администратора на каждом клиентском устройстве и выполните следующую команду:
w32tm /config /syncfromflags:manual /manualpeerlist:""
Замените «» на IP-адрес вашего сервера времени. После этого выполните команду:
w32tm /config /update
Теперь ваш сервер и клиенты будут синхронизироваться с NTP сервером. Вы можете проверить синхронизацию времени с помощью команды:
w32tm /query /status
В выводе команды будет указано текущее состояние синхронизации времени.
Настройка NTP сервера на Windows Server 2019 позволит вам иметь точное время на всех устройствах в сети. Следуя указанным инструкциям, вы сможете настроить и синхронизировать сервер и клиенты для лучшей работоспособности вашей сети.
Установка NTP сервера
Для установки NTP сервера на Windows Server 2019 следуйте указанным ниже шагам:
- Откройте Панель управления.
- Выберите «Добавить или удалить программы».
- На панели слева выберите «Включение или выключение компонентов Windows».
- В появившемся окне найдите «Службы информационной сети» и щелкните на нем.
- Нажмите «ОК».
- После завершения установки компонента перезагрузите сервер.
После установки NTP сервера, необходимо настроить его параметры. Для этого выполните следующие действия:
- Зайдите в Панель управления и выберите «Настройка даты и времени».
- Перейдите на вкладку «Время Интернета».
- Нажмите на кнопку «Изменить настройки».
- Установите флажок напротив «Синхронизировать с помощью сервера времени»
- В поле «Сервер времени» укажите адрес вашего NTP сервера.
- Нажмите «Обновить».
После выполнения всех этих действий, ваш NTP сервер будет установлен и настроен на Windows Server 2019. Вы можете проверить его работу, выполнив синхронизацию времени через командную строку или специализированные программы.
Настройка NTP сервера
- Откройте командную строку с правами администратора.
- Введите следующую команду для установки NTP сервера:
- Введите следующую команду для запуска сервиса времени Windows:
- Введите следующую команду для проверки статуса NTP сервера:
- Убедитесь, что статус сервера отображает «Источник времени: pool.ntp.org».
- Настройка NTP сервера завершена. Теперь ваш сервер будет синхронизировать время с сервером pool.ntp.org.
w32tm /config /syncfromflags:manual /manualpeerlist:"pool.ntp.org"
net start w32time
w32tm /query /status
Вы можете изменить источник времени NTP сервера на другой, заменив «pool.ntp.org» во втором шаге на желаемый сервер. Это может быть внутренний сервер времени или другой общедоступный NTP сервер.
Синхронизация времени на Windows Server 2019
Один из методов синхронизации времени на Windows Server 2019 — использование службы Network Time Protocol (NTP). NTP — это протокол, разработанный для синхронизации времени в компьютерных сетях. Он позволяет серверам получать точное время от внешних источников времени, а также служить источником времени для других компьютеров в локальной сети.
Для настройки NTP сервера на Windows Server 2019 следуйте следующим шагам:
- Установка роли и фичей: Откройте Server Manager и выберите «Добавить роли и компоненты». Следуйте инструкциям мастера установки, выберите установку роли «Network Time Protocol Server» и установите необходимые фичи.
- Настройка NTP сервера: После установки роли откройте «Настройки службы времени Windows» и включите опцию «Включить этот компьютер в качестве NTP-сервера». Выберите внешний источник времени или оставьте значение по умолчанию, чтобы сервер синхронизировался с глобальными источниками времени.
- Создание правила фаервола: Чтобы разрешить доступ к NTP серверу извне, необходимо создать правило фаервола, разрешающее UDP трафик на порт 123.
- Перезапуск службы времени: После настройки NTP сервера и создания правила фаервола необходимо перезапустить службу времени, чтобы изменения вступили в силу.
После выполнения этих шагов ваш NTP сервер на Windows Server 2019 будет готов к использованию. Он будет получать точное время от выбранного вами внешнего источника времени и предоставлять его другим устройствам в сети.
Проверка работы NTP сервера
После установки и настройки NTP сервера на Windows Server 2019, необходимо проверить его работоспособность и правильность синхронизации времени. Для этого можно выполнить следующие шаги:
- Откройте командную строку администратора на клиентском компьютере.
- Введите команду:
w32tm /query /status. Это позволит проверить состояние времени и синхронизацию с NTP сервером. - Если строки «RefID» и «Stratum» содержат информацию о NTP сервере и его уровне, это указывает на успешную синхронизацию.
- Для более детальной информации, можно выполнить команду:
w32tm /monitor. Она отобразит список серверов, которые используются для синхронизации времени. - Чтобы проверить, что клиентский компьютер использует NTP сервер, введите команду:
w32tm /query /configuration. Значение строки «Клиент NTP» должно указывать на NTP сервер.
Если при выполнении этих команд возникают ошибки или не отображается информация о NTP сервере, возможно, что настройка не была выполнена правильно, и необходимо повторить шаги по установке и настройке NTP сервера на Windows Server 2019.