В статье ниже, будут рассмотрены способы установки веб-сервера Internet Information Services (IIS) на операционной системе Microsoft Windows Server 2019. Существует два основных способа установки IIS на Windows Server.Первый способ традиционный, с помощью графического интерфейса, второй — при помощи PowerShell. Оба метода будут показаны в данной статье.
Для чего нужен IIS
IIS (Internet Information Services) — это встроенный в операционную систему Windows Server набор серверов. В этот набор входят следующие серверы:
- Web-сервер — является основным и наиболее часто используемым компонентом IIS.
- FTP-сервер — сервер для обмена файлами
- SMTP-сервер — сервер отправки почты (устанавливается как Feature, но управляется консолью IIS6)
Как правило, исходя из целевого назначения используется соответсвующий компонент или их набор IIS.
Установка IIS Web сервер при помощи PowerShell
Если на сервере не установлен графический интерфейс, необходимо автоматизировать процесс установки или Вы просто хотите использовать самый быстрый способ установки Web сервера IIS, то необходимо:
1. Выполнить вход на сервер с правами администратора
2. Запустить PoweShell от имени администратора 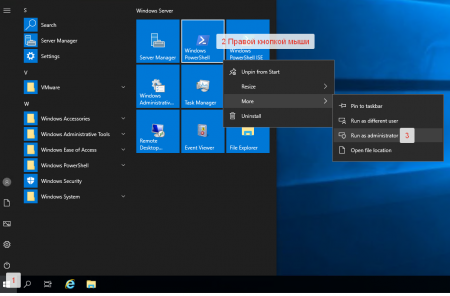
3. Выполнить команду:
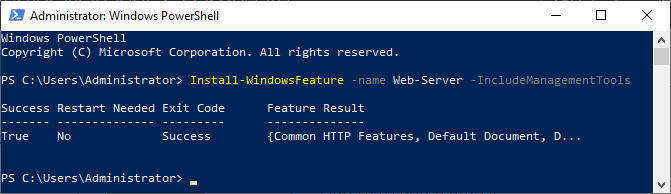
Install-WindowsFeature -name Web-Server -IncludeManagementToolsРезультат выполнения команды на скриншоте ниже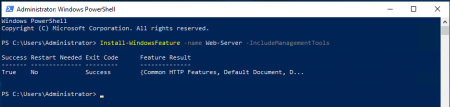 IIS Web сервер установлен.
Установка IIS Web сервер через графический интерфейс
1. Выполнить вход на сервер с правами администратора
2. Если автоматически не запустилась консоль Server Manager, то необходимо запустить ее вручную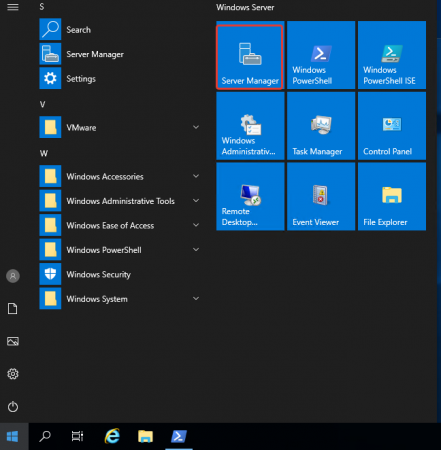
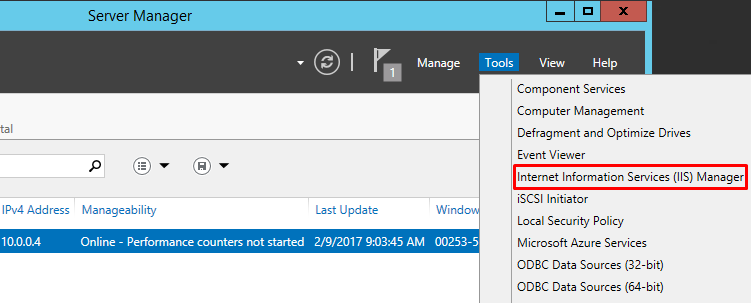
3. в консоли Server Manager выбрать Manage -> Add Roles and Features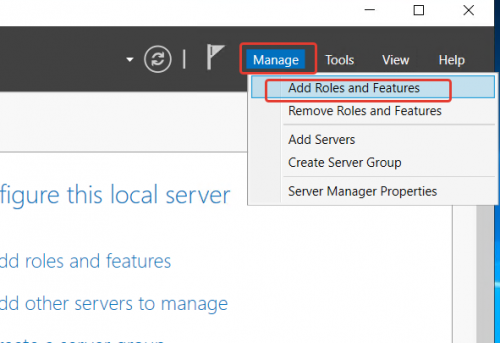
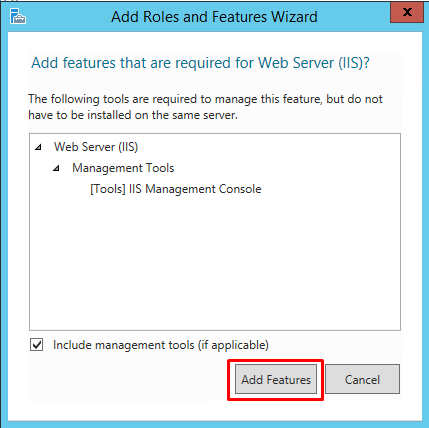
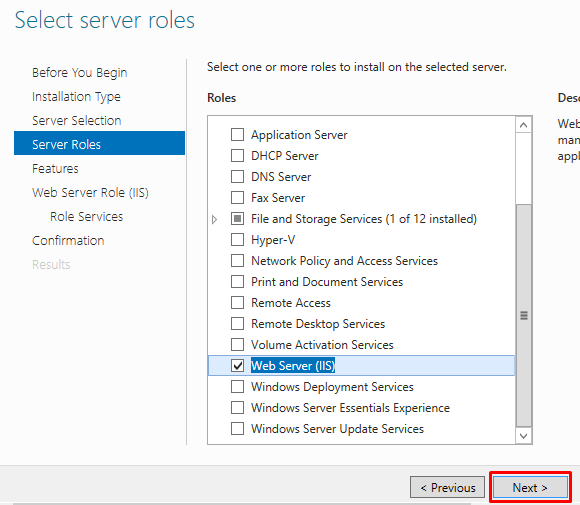
4. Если выполняется установка IIS на единичном локальном сервере, по в появившемся мастере установки ролей, необходимо нажать Next 2 раза. И на данном шаге выбрать установку Web Server (IIS). 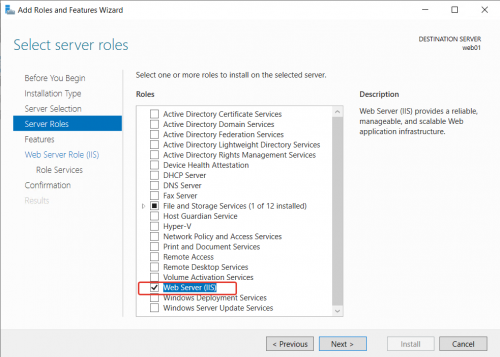 В появившемся всплывающем окне согласиться с установкой IIS Management Console.
5. Если установка выполняется в режиме по умолчанию, то стоит нажать 4 раза Next, а затем Install.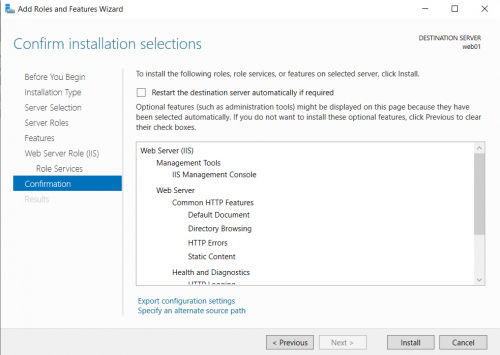 6.Ожидать завершения процесса установки.
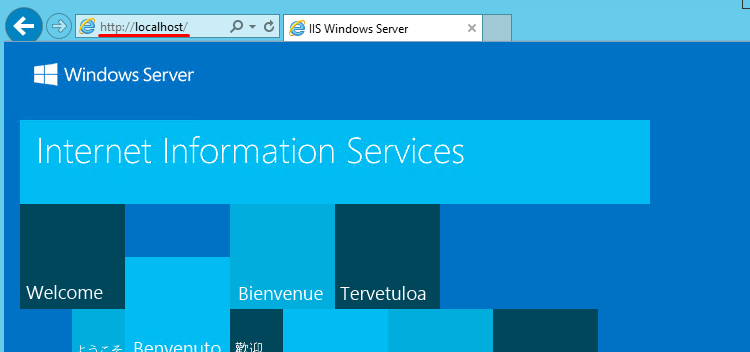
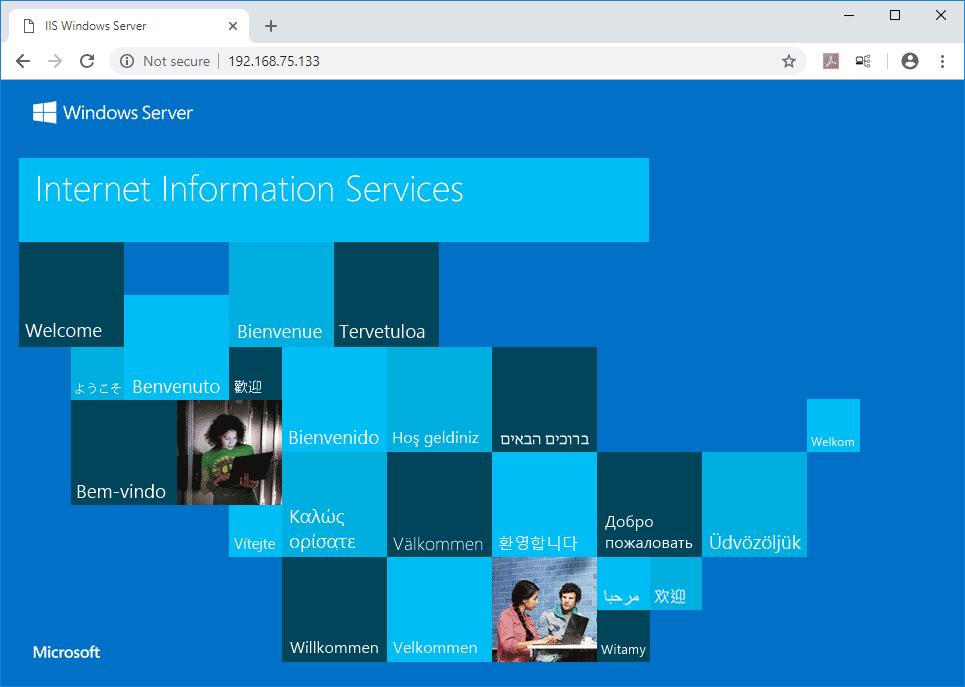
В обоих способах установки IIS, после завершения установки, веб сервер запущен и работать по протоколу http, со страницей по умолчанию, как на скриншоте ниже: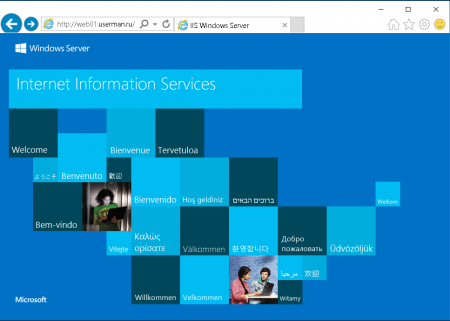
Как удалить ранее установленный IIS?
В PowerShell, запущенной от имени администратора,выполнить команду:
Remove-WindowsFeature -Name Web-ServerПо завершении удаления web сервера IIS необходимо выполнить перезагрузку сервера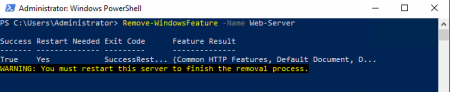
В статье расскажем, как установить службу Internet Information Services (IIS) на серверы с операционной системой Windows Server 2019. Инструкция подойдет и для ОС Windows Server 2016.
IIS (Internet Information Services) — набор сервисов от компании Microsoft для работы веб-сервера и других интернет служб. IIS устанавливается на сервер и работает с протоколами HTTP/HTTPS, POP3, SMTP, FTP, NNTP.
Чтобы приступить к установке, зайдите на сервер с правами администратора.
«Диспетчер серверов» (Server Manager) будет уже запущен (запускается автоматически при старте ОС) или запустите его вручную из меню «Пуск».
То же самое можно сделать через панель «Локальный сервер» (Local Server) — «Управление» (Manage).
 Выберите тип установки «Установка ролей или компонентов» (Role-based or feature-based installation) и нажмите «Далее» (Next).
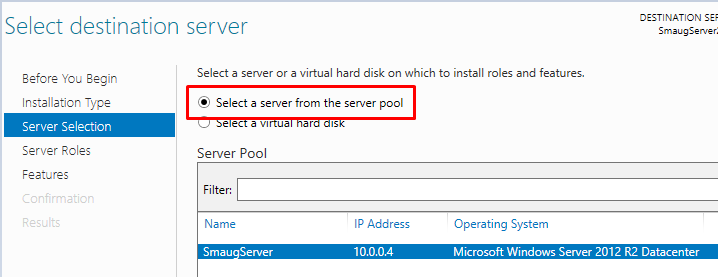 Выберите сервер из пула серверов (Select a server from the server pool) и отметьте имя вашего сервера. Нажмите «Далее» (Next).
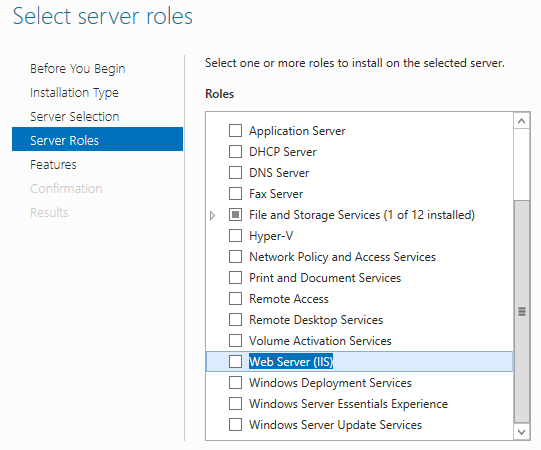
Обратите внимание, что служба FTP по умолчанию не устанавливается. Если в дальнейшем вам понадобятся новые роли, то вы сможете их добавить без переустановки IIS.
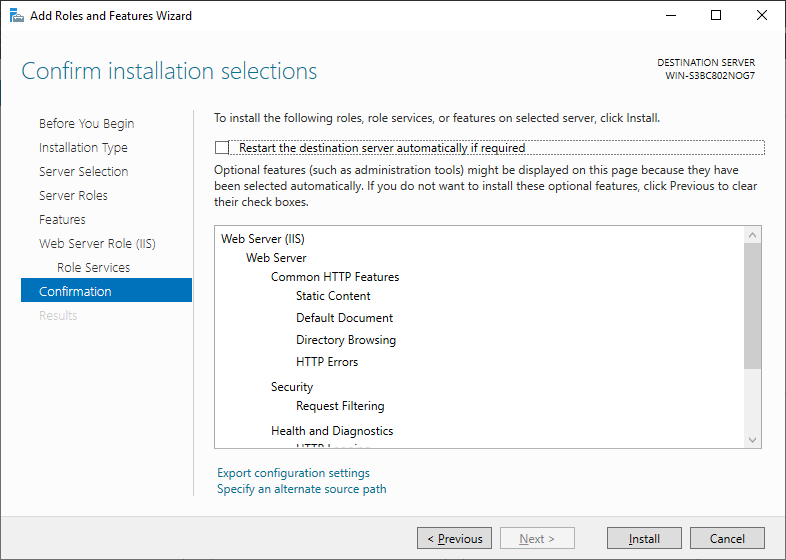
При необходимости отметьте «Автоматический перезапуск конечного сервера» (Restart the destination server automatically if required), если пункт не выбран, то перезагрузите сервер самостоятельно после окончания установки.
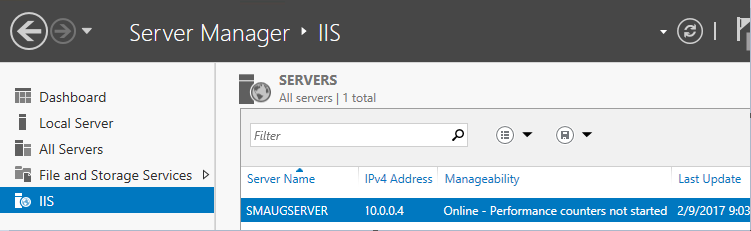 Запустите «Диспетчер серверов» (Server Manager) из меню «Пуск» (Start).
В списке содержимого появится установленная служба IIS.
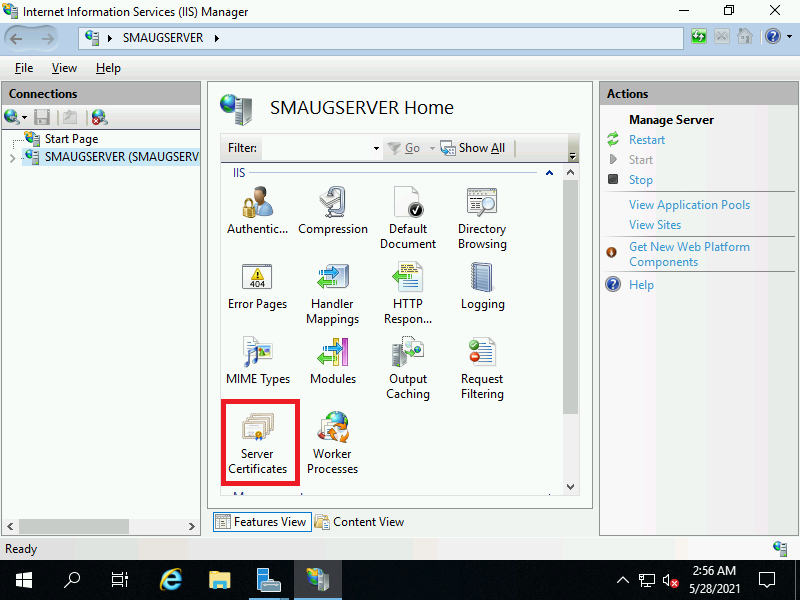 Панель «Просмотр возможностей» (Features View)
Возможности, доступные вам в службе IIS, перечислены на панели Просмотр возможностей (Features View). Отсюда управляйте возможностями IIS, настраивайте и перезапускайте. Например, настройте SSL-сертификаты.
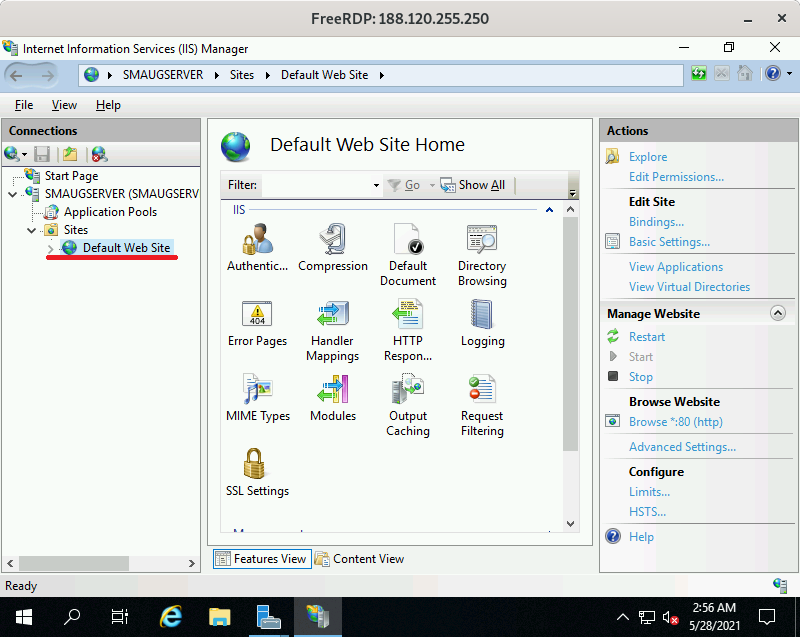 Сразу после установки IIS по умолчанию создается пустой сайт Default Web Site.
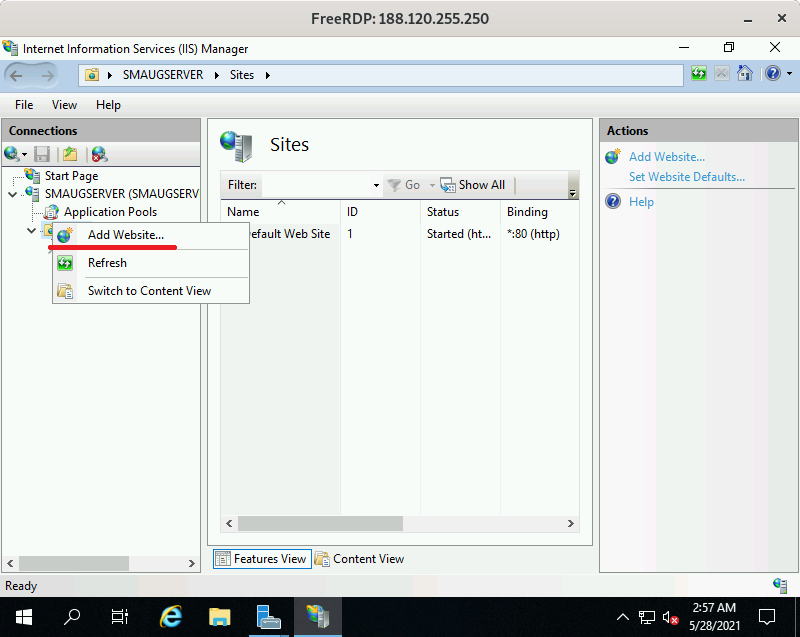 Добавьте сайты, которые будут обслуживаться этим веб-сервером. Для этого в контекстном меню пункта «Сайты» (Sites) на вкладке «Подключения» (Connections) выберите «Добавить сайт» (Add Website).
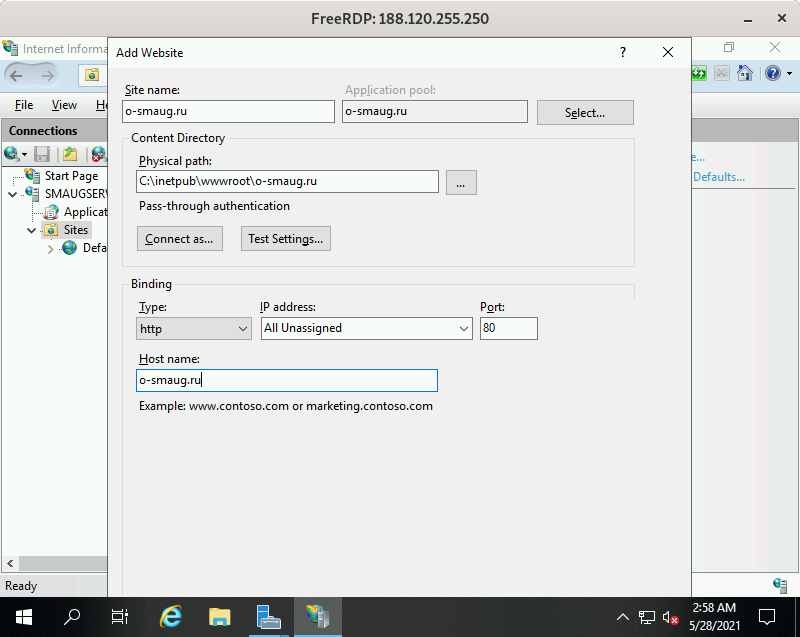 Заполните поля формы данными о сайте и нажмите ОК.
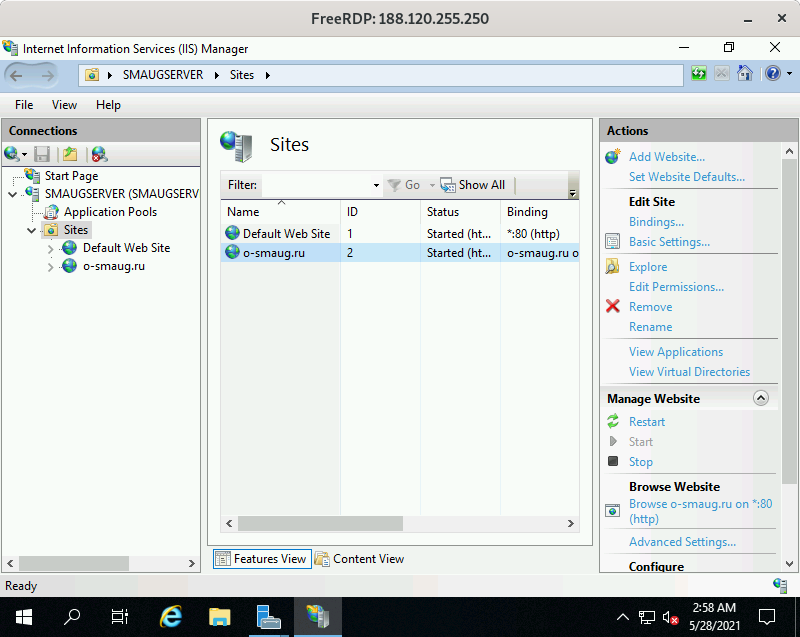 В списке сайтов IIS появится только что добавленный.
Этот материал был полезен?
Posted by
on December 19, 2018
Here we’re going to show you how to install the Internet Information Services (IIS) web server version 10.0 in Microsoft’s Windows Server 2019 operating system.
This can be done both with PowerShell or through the GUI, we’ll cover both methods here.
Install IIS With PowerShell
If you don’t have the GUI installed or just want to use the PowerShell command line interface (CLI) instead, follow these steps. This method is a lot faster than going through all of the GUI options.
- Open PowerShell with administrative privileges and run the Install-WindowsFeature cmdlet as shown below.
Install-WindowsFeature -name Web-Server -IncludeManagementTools

Here we include the management tools so that you can manage IIS on this server, as these are generally installed when using the GUI, making this PowerShell command equivalent with the GUI method below. If you do not plan on managing IIS through this server then you may prefer to not include this option.
- Once the installation has succeeded, you’ll be returned to the PowerShell prompt. At this point IIS should be running on port 80 by default with the firewall rule “World Wide Web Services (HTTP Traffic-In)” enabled in Windows firewall automatically.
- We can perform a simple test by opening up a web browser and browsing to the server that we have installed IIS on. You should see the default IIS page.

Install IIS Through GUI
If your server has the graphical user interface component installed you can also install IIS by following these steps.
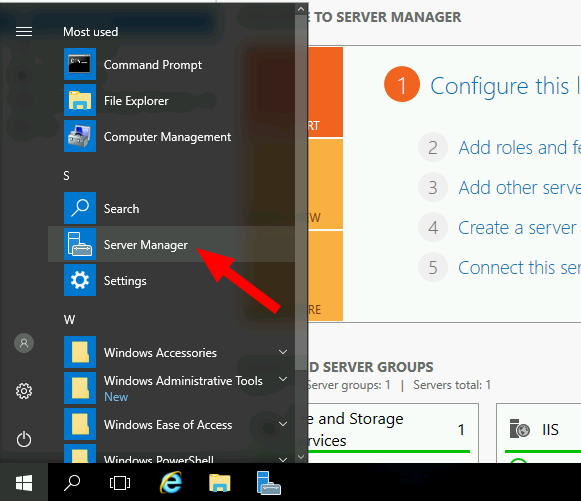
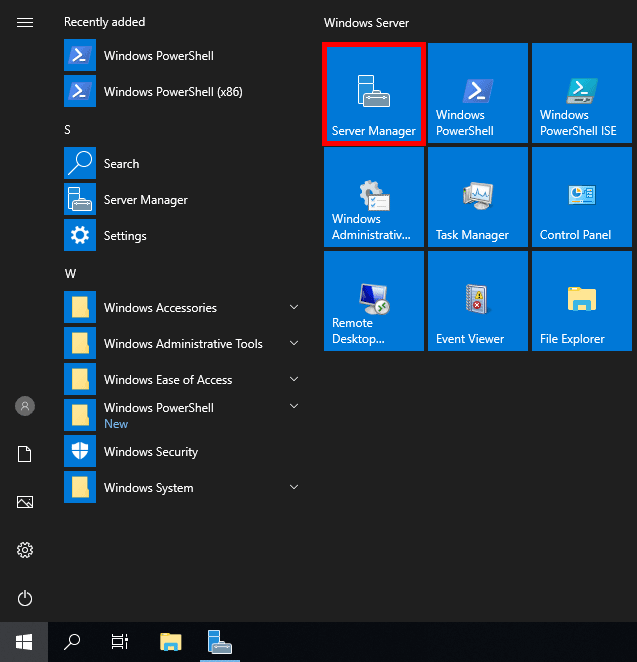
- Open Server Manager, this can be found in the start menu. If it’s not there simply type “Server Manager” with the start menu open and it should be found in the search.

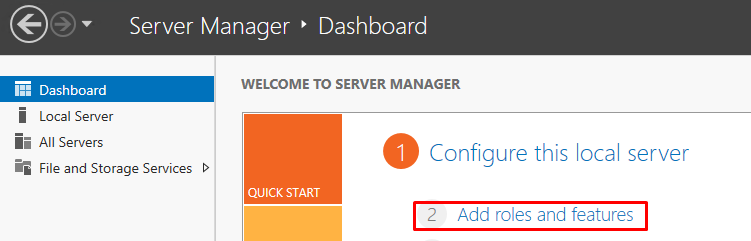
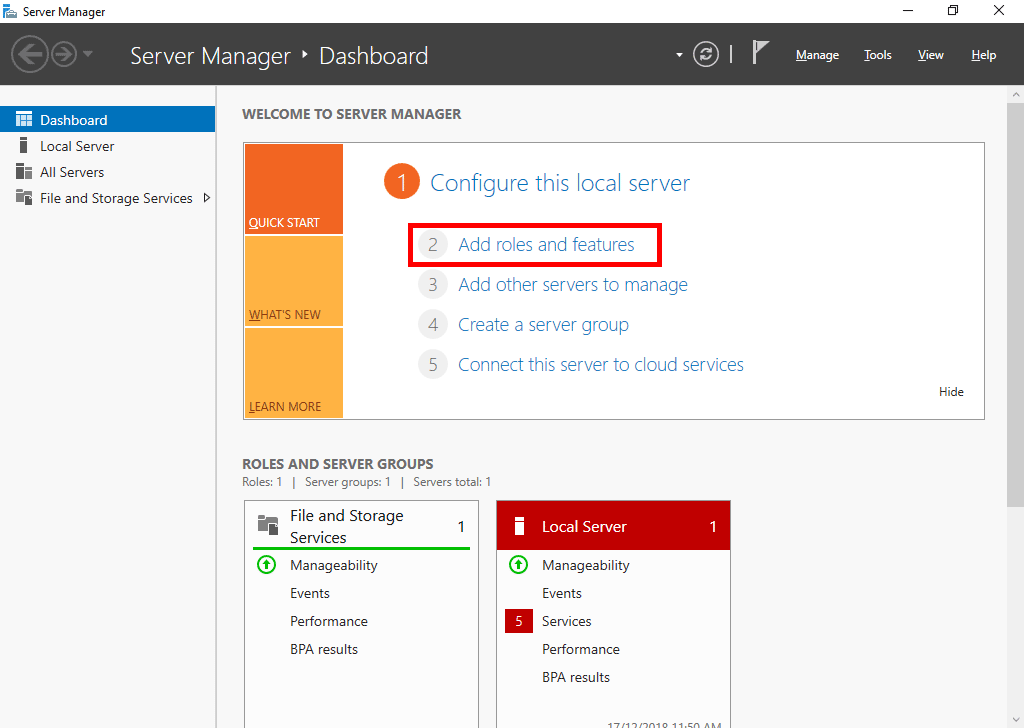
- Click the “Add roles and features” text.

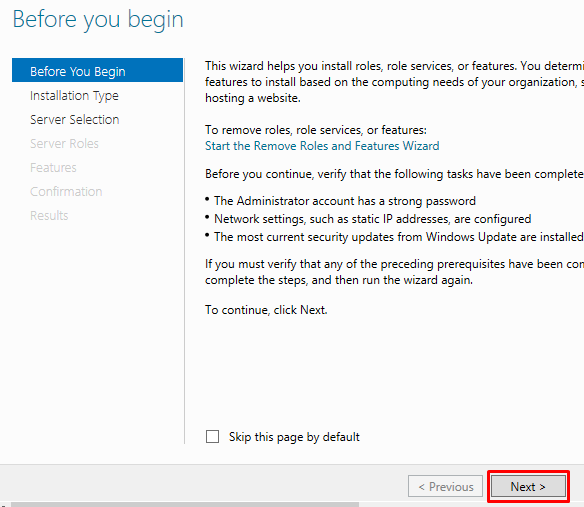
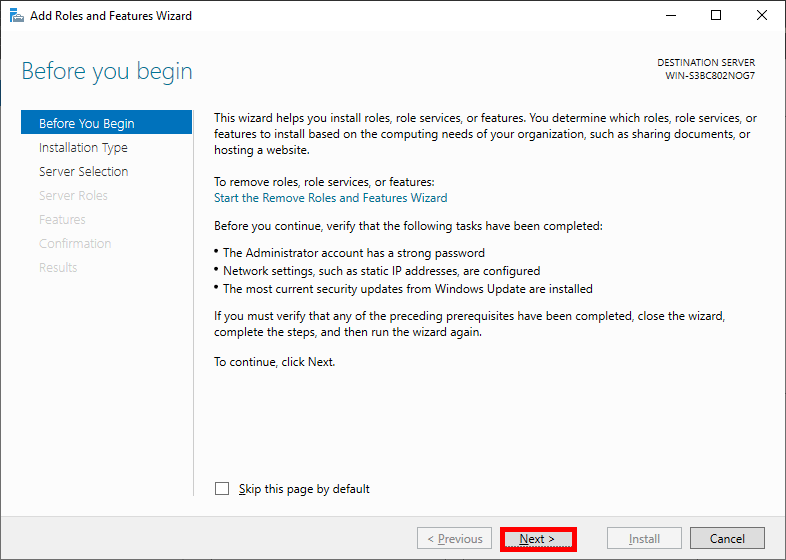
- On the “Before you begin” window, simply click the Next button.

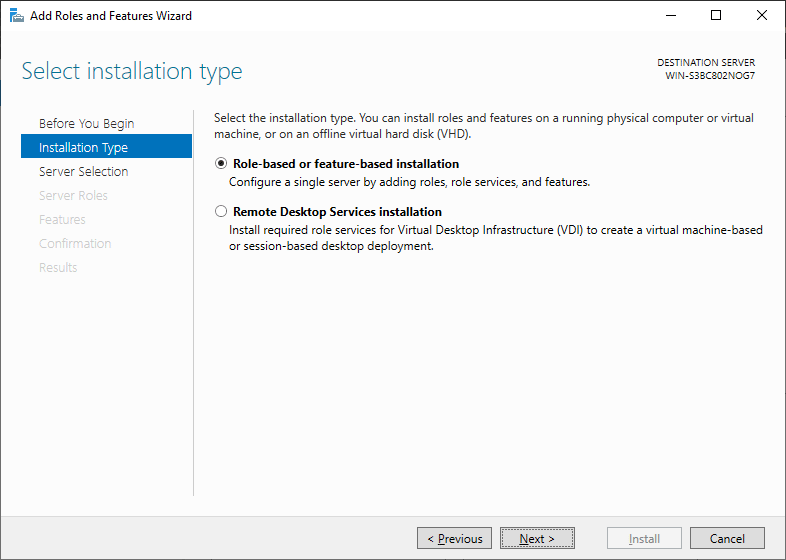
- On the “Select installation type” window, leave “Role-based or feature-based installation” selected and click Next.
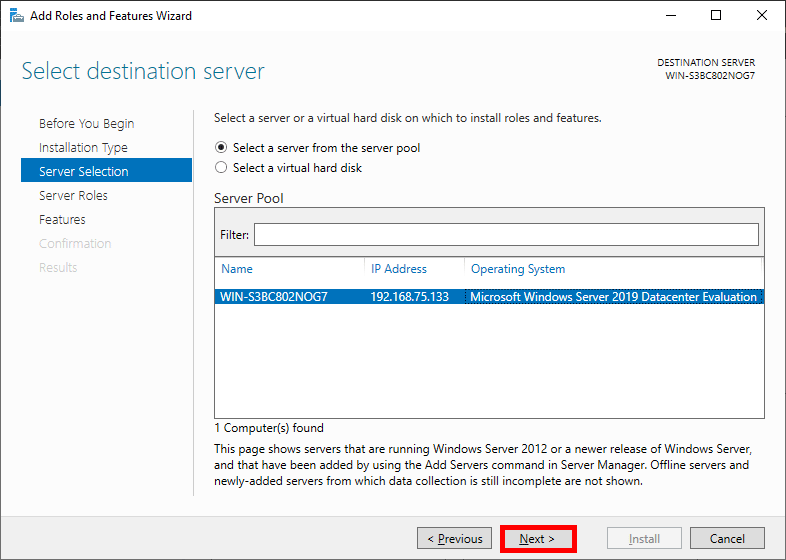
- As we’re installing to our local machine, leave “Select a server from the server pool” with the current machine selected and click Next. Alternatively you can select another server that you are managing from here, or a VHD.
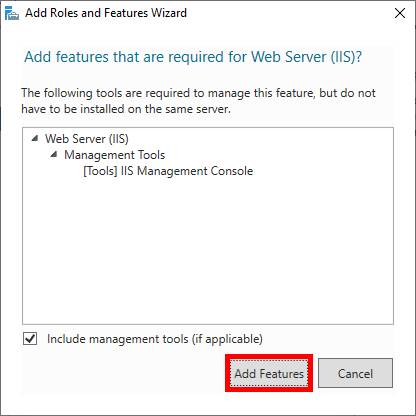
- From the “Select server roles” window, check the box next to “Web Server (IIS)”. Doing this may open up a new window advising that additional features are required, simply click the “Add Features” button to install these as well. Click Next back on the Select server roles menu once this is complete.

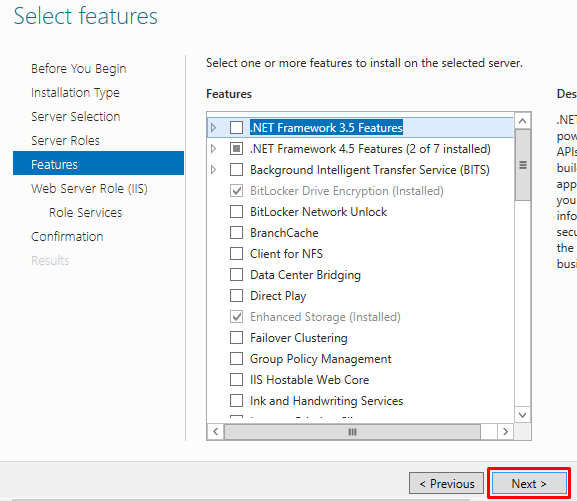
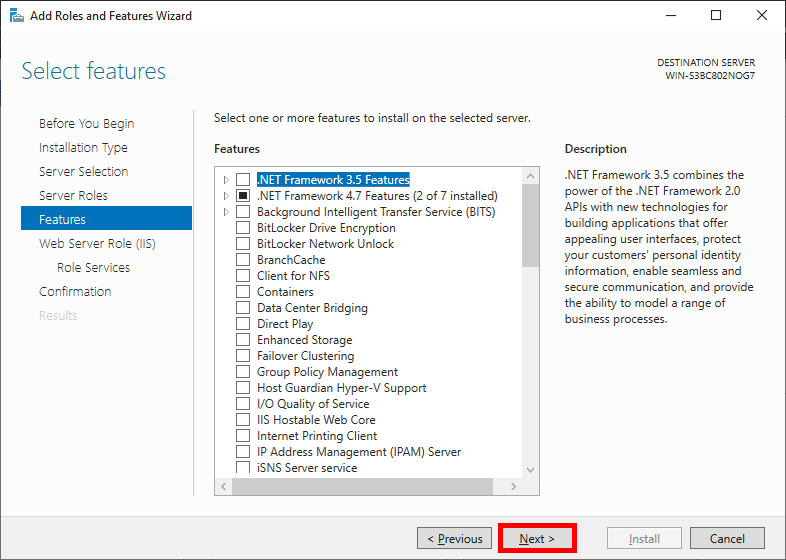
- We will not be installing any additional features at this stage, so simply click Next on the “Select features” window.
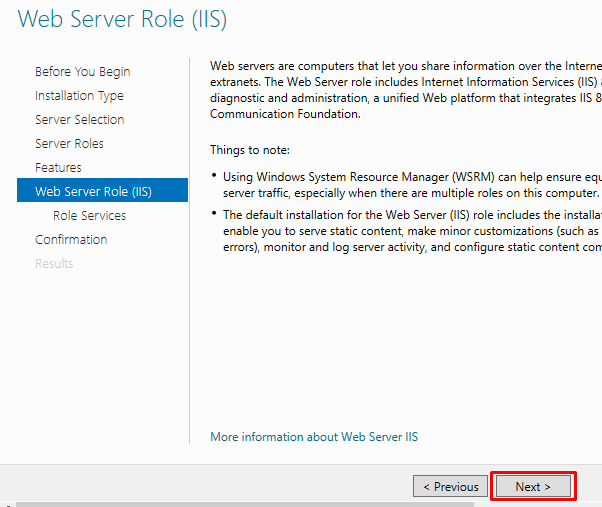
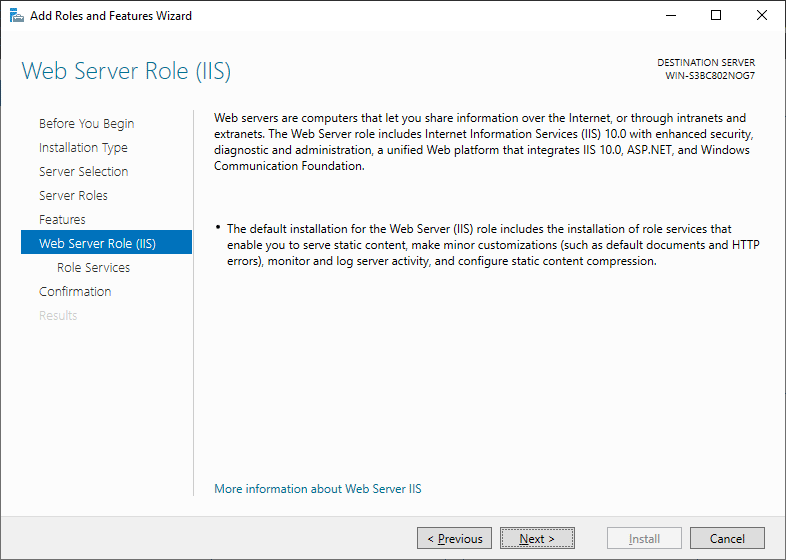
- Click Next on the “Web Server Role (IIS)” window after reading the information provided.
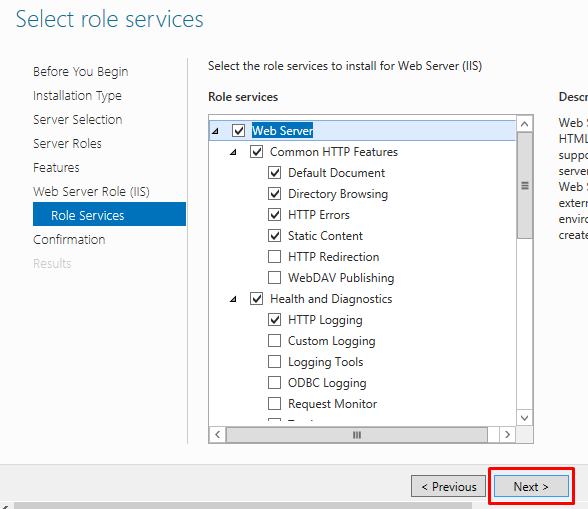
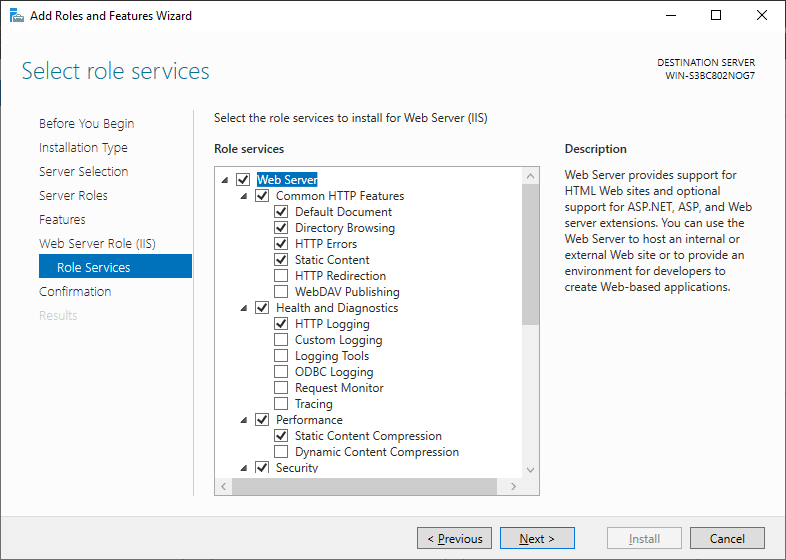
- At this point on the “Select role services” window you can install additional services for IIS if required. You don’t have to worry about this now as you can always come back and add more later, so just click Next for now to install the defaults.
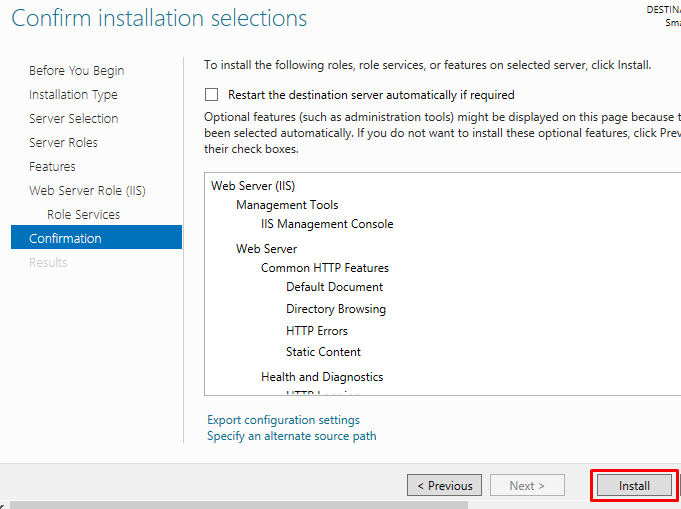
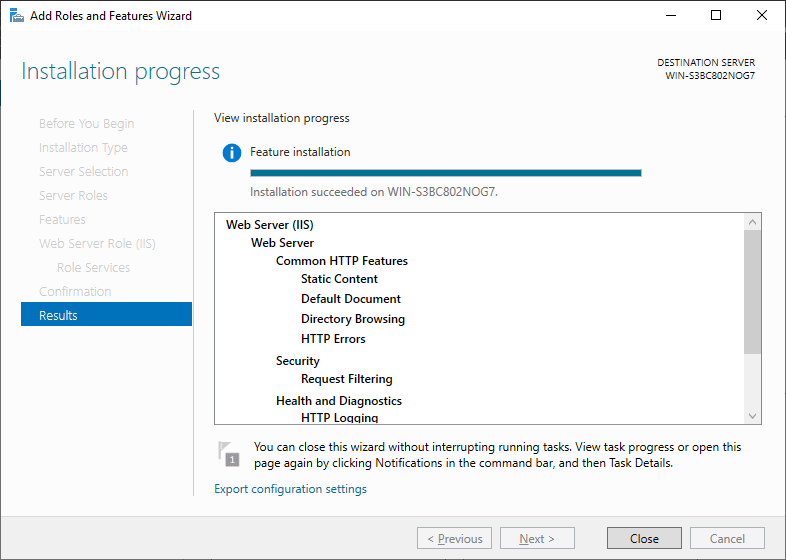
- Finally on the “Confirm installation selections” window , review the items that are to be installed and click Install when you’re ready to proceed with installing the IIS web server.
No reboot should be required with a standard IIS installation, however if you remove the role a reboot will be needed.
- Once the installation has succeeded, click the close button. At this point IIS should be running on port 80 by default with the firewall rule “World Wide Web Services (HTTP Traffic-In)” enabled in Windows firewall automatically.
- We can perform a simple test by opening up a web browser and browsing to the server that we have installed IIS on. You should see the default IIS page.

As you can hopefully see, it’s quite a lot faster to use PowerShell to perform the same task.
Summary
As shown we can easily install the IIS web server in Windows Server 2019 with both the PowerShell command line or the graphical user interface.
Configuring the Internet Information Services (IIS) on Windows Server 2019 is a crucial step in setting up your web server. IIS is a powerful and flexible web server software that can host websites and web applications on Windows servers. Whether you are a system administrator or a web developer, understanding how to configure IIS on Windows Server 2019 is essential for optimizing your server’s performance and ensuring the smooth functioning of your web applications.
In this blog post, we will explore the necessary steps to configure IIS on Windows Server 2019. We will cover various methods and provide detailed instructions for each, enabling you to set up and customize IIS according to your specific requirements. Whether you are a beginner or an experienced user, this guide will help you navigate through the complexities of configuring IIS and make the process a seamless one.
Video Tutorial:
Configuring IIS on Windows Server 2019 is essential for hosting websites and web applications. Here are some reasons why you need to configure IIS:
1. Hosting Websites: By configuring IIS, you can host multiple websites on a single server, enabling efficient resource utilization and cost savings. IIS provides robust security features and scalability options, making it an ideal choice for hosting websites.
2. Web Application Support: IIS offers excellent support for various web technologies, including ASP.NET, PHP, and Node.js. By configuring IIS, you can deploy and manage your web applications efficiently, ensuring optimal performance and reliability.
3. Load Balancing: IIS provides load balancing capabilities that distribute incoming network traffic across multiple servers. By configuring load balancing, you can enhance the scalability and availability of your web applications, ensuring uninterrupted service for your users.
4. Security Features: IIS offers several security features, including request filtering, SSL certificate management, and IP address restrictions. By configuring these security settings, you can protect your web applications from malicious attacks and unauthorized access.
Now that we understand the importance of configuring IIS on Windows Server 2019, let’s dive into the various methods to achieve this configuration.
Method 1: How to Configure IIS Using the GUI
Configuring IIS using the graphical user interface (GUI) is the most straightforward and user-friendly method. Follow the steps below to configure IIS using the GUI:
1. Open the Server Manager on your Windows Server 2019. You can find the Server Manager icon on your taskbar or by searching for it in the Start menu.
2. In the Server Manager window, click on «Add roles and features.» This will open the Add Roles and Features Wizard.
3. In the wizard, click on «Next» to proceed.
4. Select the installation type as «Role-based or feature-based installation» and click «Next.«
5. Select your server from the server pool and click «Next.«
6. Scroll down and find the «Web Server (IIS)» role in the list. Check the box next to it and click «Next.«
7. You can select additional features as per your requirements. Once done, click «Next.«
8. On the next screen, review the role and features you selected. Click «Install» to begin the installation process.
9. Wait for the installation to complete. Once done, click «Close.«
Congratulations! You have successfully configured IIS using the GUI on Windows Server 2019. You can now start managing your websites and web applications through the IIS Manager.
Pros:
1. Easy and user-friendly configuration process.
2. Provides a graphical interface for managing websites and web applications.
3. Supports a wide range of features and customization options.
Cons:
1. May require additional steps for advanced configurations.
2. The GUI interface may not be suitable for remote or automated installations.
3. Increased resource consumption compared to command-line configurations.
Method 2: How to Configure IIS via PowerShell
Configuring IIS via PowerShell provides more flexibility and allows for automation and scripting capabilities. Follow the steps below to configure IIS using PowerShell:
1. Open PowerShell with administrative privileges. You can do this by right-clicking on the Start button and selecting «Windows PowerShell (Admin).«
2. Type the following command to install the required IIS module:
«`powershell
Install-WindowsFeature -Name Web-Server -IncludeManagementTools
«`
3. Press Enter to execute the command. This will install the necessary components for IIS on your Windows Server 2019.
4. Once the installation is complete, you can use additional PowerShell commands to configure various aspects of IIS, such as creating websites, managing application pools, and setting up SSL certificates.
Pros:
1. Provides automation and scripting capabilities for efficient configuration.
2. Allows for bulk operations and easy management of multiple servers.
3. Provides detailed reporting and error-handling capabilities.
Cons:
1. Requires familiarity with PowerShell scripting for advanced configurations.
2. May require additional modules for specific functionalities.
3. Command-line interface may be challenging for beginners.
Method 3: How to Configure IIS via Configuration Files
Configuring IIS via configuration files provides granular control over the server settings and customization options. Follow the steps below to configure IIS using configuration files:
1. Navigate to the directory where IIS configuration files are stored. By default, the directory is «C:\Windows\System32\inetsrv\config.«
2. Locate the «applicationHost.config» file. Create a backup of this file before making any changes.
3. Open the «applicationHost.config» file using a text editor such as Notepad or Visual Studio Code.
4. Find the section related to the settings you want to configure. The configuration files are structured hierarchically, with different sections for various server components and features.
5. Make the required modifications to the settings. Ensure to follow the correct XML syntax and maintain the file structure.
6. Save the changes and restart the IIS service for the new configurations to take effect.
Pros:
1. Provides granular control and customization options.
2. Allows for version control and easy deployment of configurations.
3. Flexibility to modify and manage settings without relying on a graphical interface.
Cons:
1. Requires advanced knowledge of IIS configuration and XML syntax.
2. Manual editing of configuration files can be error-prone.
3. Difficult to troubleshoot issues due to complex file structures.
Method 4: What to Do If You Can’t Configure IIS
In some cases, you may encounter issues while configuring IIS on Windows Server 2019. Here are some troubleshooting steps and fixes to try if you are unable to configure IIS:
1. Verify Administrator Privileges: Ensure that you are logged in with administrative privileges to configure IIS successfully.
2. Check Windows Updates: Make sure your server is up to date with the latest Windows updates. Installing pending updates may resolve configuration issues.
3. Deactivate Windows Firewall: Temporarily disable the Windows Firewall to eliminate any possible conflicts with IIS configuration.
4. Reinstall IIS: If all else fails, you can attempt to reinstall IIS on your Windows Server 2019. Uninstall IIS using the Server Manager and then reinstall it following the methods mentioned earlier.
Bonus Tips
Here are three bonus tips to enhance your IIS configuration on Windows Server 2019:
1. Secure your Websites with SSL: Configure SSL certificates for your websites to enable secure communication over HTTPS. This ensures data privacy and builds trust with your users.
2. Enable Compression: Enable compression for static and dynamic content in IIS to reduce bandwidth usage and enhance website performance.
3. Monitor Server Performance: Regularly monitor your server’s performance using tools like Performance Monitor and IIS Logs to identify bottlenecks and optimize resource allocation.
5 FAQs
Q1: Why is IIS important for hosting websites?
A1: IIS is a powerful web server software that provides features like security, scalability, and performance optimization. It ensures the smooth functioning and availability of websites for users.
Q2: Can I host multiple websites on a single IIS server?
A2: Yes, you can host multiple websites on a single IIS server. IIS supports the configuration of multiple websites with separate settings and bindings.
Q3: How can I secure my IIS server against cyber threats?
A3: You can secure your IIS server by implementing security measures such as SSL certificates, request filtering, IP address restrictions, and regular software updates.
Q4: Can I configure IIS on Windows Server Core?
A4: Yes, you can configure IIS on Windows Server Core. The process involves using command-line tools like PowerShell or configuring the IIS XML files directly.
Q5: Is IIS only for Windows servers?
A5: Yes, IIS is a web server software designed for Windows servers. However, there are alternative web servers available for other operating systems, such as Apache for Linux.
Final Thoughts
Configuring IIS on Windows Server 2019 is a crucial step in setting up a robust and reliable web server. Whether you choose to use the GUI, PowerShell, or configuration files, understanding the configuration methods and their pros and cons will empower you to make informed decisions that align with your server’s requirements.
By following the steps provided in this blog post, you can successfully configure IIS and leverage its powerful features to host websites and web applications effectively. Remember to consider security measures, monitor server performance, and strive for continuous optimization to ensure a seamless user experience.
In this part of the Windows Tutorials, we want to teach you How To Set up IIS on Windows Server 2019.
The term “IIS” stands for Internet Information Services, which is a general-purpose webserver that runs on the Windows operating system.
It hosts the application, websites, and other standard services needed by users and allows developers to make websites, applications, and virtual directories to share with their users.
- How To Set up IIS on Windows Server 2019
How To Set up IIS on Windows Server 2019
To install IIS on your Windows server 2019 follow the steps below.
1- From your start menu, type server manager and open it:
2- In your server manager dashboard click on the Add roles and features:
3- Click next to continue on the Before you begin window:
4- In the Select installation type window, you should click on the Role-based or feature-based installation and press next to continue:
5- At this step, you need to select the destination server. As you are set up IIS on your local machine, choose the Select a server from the server pool and press next.
On the other hand, you can select another server that you are managing from here or a VHD.
6- Now on the Select server roles check the box next to the Web Server (IIS):
6- This will open a new window advising that additional features are required, click the Add Features button to install these as well. Click Next back on the Select server roles menu when this is complete:
7- At this point, you don’t need to install any additional features. So click next to continue:
8- Read the information about the IIS web server role and press next:
9- Here on the Select role services window, you can install additional services for IIS. You can always come back and add more later, so press next to install the defaults:
10- In the Confirm installation selections window, review the items that are to be installed and click Install when you’re ready to proceed with installing the IIS web server on your Windows server 2019:
Note: With the standard IIS installation, no reboot should be required. If you remove the role a reboot will be needed.
11- When your IIS installation is completed, press the close button:
Access IIS on Windows Server 2019
At this point, IIS should be running on port 80 by default with the firewall rule HTTP traffic enabled in Windows firewall automatically.
Now you can access the default IIS page by typing your server’s IP address in your web browser:
http://server-ip-address
If you see this page means that you have set up IIS on your Windows server 2019 correctly.
Conclusion
IIS is compared with Apache, which is also a kind of web server that is freely available to everyone. We can simply say that both work the same except that the apache can be used almost on any operating system such as Windows, Linux, and Mac, While the IIS is only available for windows.
Here you learn to Set up IIS on your Windows server.
Hope you enjoy it.