| title | description | author | ms.author | ms.date | ms.service | ms.subservice | ms.topic | ms.custom | helpviewer_keywords | ||||||||||||
|---|---|---|---|---|---|---|---|---|---|---|---|---|---|---|---|---|---|---|---|---|---|
|
Configure the Windows Firewall to allow SQL Server access |
Learn how to configure the Windows firewall to allow access to an instance of the SQL Server through the firewall. |
rwestMSFT |
randolphwest |
10/17/2022 |
sql |
install |
conceptual |
contperf-fy21q3 |
|
Configure the Windows Firewall to allow SQL Server access
[!INCLUDE SQL Server-Windows Only]
Firewall systems help prevent unauthorized access to computer resources. If a firewall is turned on but not correctly configured, attempts to connect to [!INCLUDEssNoVersion] might be blocked.
To access an instance of the [!INCLUDEssNoVersion] through a firewall, you must configure the firewall on the computer that is running [!INCLUDEssNoVersion]. The firewall is a component of [!INCLUDEmsCoName] Windows. You can also install a firewall from another vendor. This article discusses how to configure the Windows Firewall, but the basic principles apply to other firewall programs.
[!NOTE]
This article provides an overview of firewall configuration and summarizes information of interest to a [!INCLUDEssNoVersion] administrator. For more information about the firewall and for authoritative firewall information, see the firewall documentation, such as Windows Firewall security deployment guide.
Users familiar with managing the Windows Firewall, and know which firewall settings they want to configure can move directly to the more advanced articles:
- Configure a Windows Firewall for Database Engine Access
- Configure the Windows Firewall to Allow Analysis Services Access
- Configure a Firewall for Report Server Access
Basic firewall information
Firewalls work by inspecting incoming packets, and comparing them against the following set of rules:
- The packet meets the standards dictated by the rules, then the firewall passes the packet to the TCP/IP protocol for more processing.
- The packet doesn’t meet the standards specified by the rules.
- The firewall then discards the packet.- If logging is enabled, an entry is created in the firewall logging file.
The list of allowed traffic is populated in one of the following ways:
-
Automatically: When a computer with a firewall enabled starts communication, the firewall creates an entry in the list so that the response is allowed. The response is considered solicited traffic, and there’s nothing that needs to be configured.
-
Manually: An administrator configures exceptions to the firewall. It allows either access to specified programs or ports on your computer. In this case, the computer accepts unsolicited incoming traffic when acting as a server, a listener, or a peer. The configuration must be completed to connect to [!INCLUDEssNoVersion].
Choosing a firewall strategy is more complex than just deciding if a given port should be open or closed. When designing a firewall strategy for your enterprise, make sure you consider all the rules and configuration options available to you. This article doesn’t review all the possible firewall options. We recommend you review the following documents:
- Windows Firewall Deployment Guide
- Windows Firewall Design Guide
- Introduction to Server and Domain Isolation
Default firewall settings
The first step in planning your firewall configuration is to determine the current status of the firewall for your operating system. If the operating system was upgraded from a previous version, the earlier firewall settings may have been preserved. The Group Policy or Administrator can change the firewall settings in the domain.
[!NOTE]
Turning on the firewall will affect other programs that access this computer, such as file and print sharing, and remote desktop connections. Administrators should consider all applications that are running on the computer before adjusting the firewall settings.
Programs to configure the firewall
Configure the Windows Firewall settings with either Microsoft Management Console or netsh.
-
Microsoft Management Console (MMC)
The Windows Firewall with Advanced Security MMC snap-in lets you configure more advanced firewall settings. This snap-in presents most of the firewall options in an easy-to-use manner, and presents all firewall profiles. For more information, see Using the Windows Firewall with Advanced Security Snap-in later in this article.
-
netsh
The netsh.exe is an Administrator tool to configure and monitor Windows-based computers at a command prompt or using a batch file. By using the netsh tool, you can direct the context commands you enter to the appropriate helper, and the helper does the command. A helper is a Dynamic Link Library (.dll) file that extends the functionality. The helper provides: configuration, monitoring, and support for one or more services, utilities, or protocols for the netsh tool.
All operating systems that support [!INCLUDEssNoVersion] have a firewall helper. [!INCLUDEwinserver2008] also has an advanced firewall helper called advfirewall. Many of the configuration options described can be configured by using netsh. For example, run the following script at a command prompt to open TCP port 1433:
netsh firewall set portopening protocol = TCP port = 1433 name = SQLPort mode = ENABLE scope = SUBNET profile = CURRENTA similar example using the Windows Firewall for Advanced Security helper:
netsh advfirewall firewall add rule name = SQLPort dir = in protocol = tcp action = allow localport = 1433 remoteip = localsubnet profile = DOMAINFor more information about netsh, see the following links:
- Netsh Command Syntax, Contexts, and Formatting
- How to use the «netsh advfirewall firewall» context instead of the «netsh firewall» context to control Windows Firewall behavior in Windows Server 2008 and in Windows Vista
-
PowerShell
See the following example to open TCP port 1433 and UDP port 1434 for [!INCLUDEssNoVersion] default instance, and [!INCLUDEssNoVersion] Browser Service:
New-NetFirewallRule -DisplayName "SQLServer default instance" -Direction Inbound -LocalPort 1433 -Protocol TCP -Action Allow
New-NetFirewallRule -DisplayName "SQLServer Browser service" -Direction Inbound -LocalPort 1434 -Protocol UDP -Action Allow
For more examples, see New-NetFirewallRule.
-
For Linux
On Linux, you also need to open the ports associated with the services you need access to. Different distributions of Linux and different firewalls have their own procedures. For two examples, see SQL Server on Red Hat, and SQL Server on SUSE.
Ports used by SQL Server
The following tables can help you identify the ports being used by [!INCLUDEssNoVersion].
Ports used by the Database Engine
By default, the typical ports used by [!INCLUDEssNoVersion] and associated database engine services are: TCP 1433, 4022, 135, 1434, UDP 1434. The table below explains these ports in greater detail. A named instance uses Dynamic ports.
The following table lists the ports that are frequently used by the [!INCLUDEssDE].
| Scenario | Port | Comments |
|---|---|---|
| Default instance running over TCP | TCP port 1433 | The most common port allowed through the firewall. It applies to routine connections to the default installation of the [!INCLUDEssDE], or a named instance that is the only instance running on the computer. (Named instances have special considerations. See Dynamic ports later in this article.) |
| Named instances with default port | The TCP port is a dynamic port determined at the time the [!INCLUDEssDE] starts. | See the discussion below in the section Dynamic ports. UDP port 1434 might be required for the [!INCLUDEssNoVersion] Browser Service when you’re using named instances. |
| Named instances with fixed port | The port number configured by the administrator. | See the discussion below in the section Dynamic ports. |
| Dedicated Admin Connection | TCP port 1434 for the default instance. Other ports are used for named instances. Check the error log for the port number. | By default, remote connections to the Dedicated Administrator Connection (DAC) aren’t enabled. To enable remote DAC, use the Surface Area Configuration facet. For more information, see Surface Area Configuration. |
| [!INCLUDEssNoVersion] Browser service | UDP port 1434 | The [!INCLUDEssNoVersion] browser service listens for incoming connections to a named instance.
The service provides the client the TCP port number that corresponds to that named instance. Normally the [!INCLUDEssNoVersion] Browser service is started whenever named instances of the [!INCLUDEssDE] are used. The [!INCLUDEssNoVersion] Browser service isn’t required if the client is configured to connect to the specific port of the named instance. |
| Instance with HTTP endpoint. | Can be specified when an HTTP endpoint is created. The default is TCP port 80 for CLEAR_PORT traffic and 443 for SSL_PORT traffic. | Used for an HTTP connection through a URL. |
| Default instance with HTTPS endpoint | TCP port 443 | Used for an HTTPS connection through a URL. HTTPS is an HTTP connection that uses Transport Layer Security (TLS), previously known as Secure Sockets Layer (SSL). |
| [!INCLUDEssSB] | TCP port 4022. To verify the port used, execute the following query:
|
There’s no default port for [!INCLUDEssNoVersion] [!INCLUDEssSB], Books Online examples use the conventional configuration. |
| Database Mirroring | Administrator chosen port. To determine the port, execute the following query:
|
There’s no default port for database mirroring however Books Online examples use TCP port 5022 or 7022. It’s important to avoid interrupting an in-use mirroring endpoint, especially in high-safety mode with automatic failover. Your firewall configuration must avoid breaking quorum. For more information, see Specify a Server Network Address (Database Mirroring). |
| Replication | Replication connections to [!INCLUDEssNoVersion] use the typical regular [!INCLUDEssDE] ports (TCP port 1433 is the default instance)
Web synchronization and FTP/UNC access for replication snapshot require more ports to be opened on the firewall. To transfer initial data and schema from one location to another, replication can use FTP (TCP port 21), or sync over HTTP (TCP port 80) or File Sharing. File sharing uses UDP port 137 and 138, and TCP port 139 if used along with NetBIOS. File Sharing uses TCP port 445. |
For sync over HTTP, replication uses the IIS endpoint (configurable; port 80 default), but the IIS process connects to the backend [!INCLUDEssNoVersion] through the standard ports (1433 for the default instance.
During Web synchronization using FTP, the FTP transfer is between IIS and the [!INCLUDEssNoVersion] publisher, not between subscriber and IIS. |
| [!INCLUDEtsql] debugger | TCP port 135
See Special Considerations for Port 135 The IPsec exception might also be required. |
If using [!INCLUDEvsprvs], on the [!INCLUDEvsprvs] host computer, you must also add Devenv.exe to the Exceptions list and open TCP port 135.
If using [!INCLUDEssManStudio], on the [!INCLUDEssManStudio] host computer, you must also add ssms.exe to the Exceptions list and open TCP port 135. For more information, see Configure firewall rules before running the TSQL Debugger. |
For step-by-step instructions to configure the Windows Firewall for the [!INCLUDEssDE], see Configure a Windows Firewall for Database Engine Access.
Dynamic ports
By default, named instances (including [!INCLUDEssExpress]) use dynamic ports. means each time [!INCLUDEssDE] starts, it identifies an available port and uses that port number. If the named instance is the only instance of the [!INCLUDEssDE] installed, it will probably use TCP port 1433. If other instances of the [!INCLUDEssDE] are installed, it will probably use a different TCP port. Because the port selected might change every time that the [!INCLUDEssDE] is started, it’s difficult to configure the firewall to enable access to the correct port number. If a firewall is used, we recommend reconfiguring the [!INCLUDEssDE] to use the same port number every time. A fixed port or a static port is recommended. For more information, see Configure a Server to Listen on a Specific TCP Port (SQL Server Configuration Manager).
An alternative to configuring a named instance to listen on a fixed port is to create an exception in the firewall for a [!INCLUDEssNoVersion] program such as sqlservr.exe (for the [!INCLUDEssDE]). The port number won’t appear in the Local Port column of the Inbound Rules page when you’re using the Windows Firewall with Advanced Security MMC snap-in. It can be difficult to audit which ports are open. Another consideration is that a service pack or cumulative update can change the path to the [!INCLUDEssNoVersion] executable file and invalidate the firewall rule.
To add an exception for SQL Server using Windows Firewall with Advanced Security, see Use the Windows Firewall with Advanced Security snap-in later in this article.
Ports used by Analysis Services
By default, the typical ports used by [!INCLUDEssNoVersion] Analysis Services and associated services are: TCP 2382, 2383, 80, 443. The table below explains these ports in greater detail.
The following table lists the ports that are frequently used by [!INCLUDEssASnoversion].
| Feature | Port | Comments |
|---|---|---|
| [!INCLUDEssASnoversion] | TCP port 2383 for the default instance | The standard port for the default instance of [!INCLUDEssASnoversion]. |
| [!INCLUDEssNoVersion] Browser service | TCP port 2382 only needed for an [!INCLUDEssASnoversion] named instance | Client connection requests for a named instance of [!INCLUDEssASnoversion] that don’t specify a port number are directed to port 2382, the port on which [!INCLUDEssNoVersion] Browser listens. [!INCLUDEssNoVersion] Browser then redirects the request to the port that the named instance uses. |
| [!INCLUDEssASnoversion] configured for use through IIS/HTTP
(The PivotTable® Service uses HTTP or HTTPS) |
TCP port 80 | Used for an HTTP connection through a URL. |
| [!INCLUDEssASnoversion] configured for use through IIS/HTTPS
(The PivotTable® Service uses HTTP or HTTPS) |
TCP port 443 | Used for an HTTPS connection through a URL. HTTPS is an HTTP connection that uses TLS. |
If users access [!INCLUDEssASnoversion] through IIS and the Internet, you must open the port on which IIS is listening. Next, specify port in the client connection string. In this case, no ports have to be open for direct access to [!INCLUDEssASnoversion]. The default port 2389, and port 2382, should be restricted together with all other ports that aren’t required.
For step-by-step instructions to configure the Windows Firewall for [!INCLUDEssASnoversion], see Configure the Windows Firewall to Allow Analysis Services Access.
Ports used By Reporting Services
By default, the typical ports used by [!INCLUDEssNoVersion] Reporting Services and associated services are: TCP 80, 443. The table below explains these ports in greater detail.
The following table lists the ports that are frequently used by [!INCLUDEssRSnoversion].
| Feature | Port | Comments |
|---|---|---|
| [!INCLUDEssRSnoversion] Web Services | TCP port 80 | Used for an HTTP connection to [!INCLUDEssRSnoversion] through a URL. We recommend that you don’t use the preconfigured rule World Wide Web Services (HTTP). For more information, see the Interaction with Other Firewall Rules section below. |
| [!INCLUDEssRSnoversion] configured for use through HTTPS | TCP port 443 | Used for an HTTPS connection through a URL. HTTPS is an HTTP connection that uses TLS. We recommend that you don’t use the preconfigured rule Secure World Wide Web Services (HTTPS). For more information, see the Interaction with Other Firewall Rules section below. |
When [!INCLUDEssRSnoversion] connects to an instance of the [!INCLUDEssDE] or [!INCLUDEssASnoversion], you must also open the appropriate ports for those services. For step-by-step instructions to configure the Windows Firewall for [!INCLUDEssRSnoversion], Configure a Firewall for Report Server Access.
Ports used by Integration Services
The following table lists the ports that are used by the [!INCLUDEssISnoversion] service.
| Feature | Port | Comments |
|---|---|---|
| [!INCLUDEmsCoName] remote procedure calls (MS RPC)
Used by the [!INCLUDEssISnoversion] runtime. |
TCP port 135
See Special Considerations for Port 135 |
The [!INCLUDEssISnoversion] service uses DCOM on port 135. The Service Control Manager uses port 135 to do tasks such as starting and stopping the [!INCLUDEssISnoversion] service and transmitting control requests to the running service. The port number can’t be changed.
This port is only required to be open if you’re connecting to a remote instance of the [!INCLUDEssISnoversion] service from [!INCLUDEssManStudio] or a custom application. |
For step-by-step instructions to configure the Windows Firewall for [!INCLUDEssISnoversion], see Integration Services Service (SSIS Service).
Other ports and services
The following table lists ports and services that [!INCLUDEssNoVersion] might depend on.
| Scenario | Port | Comments |
|---|---|---|
| Windows Management Instrumentation
For more information about Windows Management Instrumentation (WMI), see WMI Provider for Configuration Management Concepts |
WMI runs as part of a shared service host with ports assigned through DCOM. WMI might be using TCP port 135.
See Special Considerations for Port 135 |
[!INCLUDEssNoVersion] Configuration Manager uses WMI to list and manage services. We recommend that you use the preconfigured rule group Windows Management Instrumentation (WMI). For more information, see the Interaction with Other Firewall Rules section below. |
| [!INCLUDEmsCoName] Distributed Transaction Coordinator (MS DTC) | TCP port 135
See Special Considerations for Port 135 |
If your application uses distributed transactions, you might have to configure the firewall to allow [!INCLUDEmsCoName] Distributed Transaction Coordinator (MS DTC) traffic to flow between separate MS DTC instances, and between the MS DTC and resource managers such as [!INCLUDEssNoVersion]. We recommend that you use the preconfigured Distributed Transaction Coordinator rule group.
When a single shared MS DTC is configured for the entire cluster in a separate resource group, you should add sqlservr.exe as an exception to the firewall. |
| The browse button in [!INCLUDEssManStudio] uses UDP to connect to the [!INCLUDEssNoVersion] Browser Service. For more information, see SQL Server Browser Service (Database Engine and SSAS). | UDP port 1434 | UDP is a connectionless protocol.
The firewall has a setting (UnicastResponsesToMulticastBroadcastDisabled Property of the INetFwProfile Interface) which controls the behavior of the firewall and unicast responses to a broadcast (or multicast) UDP request. It has two behaviors: If the setting is TRUE, no unicast responses to a broadcast are permitted at all. Enumerating services will fail. If the setting is FALSE (default), unicast responses are permitted for 3 seconds. The length of time isn’t configurable. In a congested or high-latency network, or for heavily loaded servers, tries to enumerate instances of [!INCLUDEssNoVersion] might return a partial list, which might mislead users. |
| IPsec traffic | UDP port 500 and UDP port 4500 | If the domain policy requires network communications to be done through IPsec, you must also add UDP port 4500 and UDP port 500 to the exception list. IPsec is an option using the New Inbound Rule Wizard in the Windows Firewall snap-in. For more information, see Using the Windows Firewall with Advanced Security Snap-in below. |
| Using Windows Authentication with Trusted Domains | Firewalls must be configured to allow authentication requests. | For more information, see How to configure a firewall for domains and trusts. |
| [!INCLUDEssNoVersion] and Windows Clustering | Clustering requires extra ports that aren’t directly related to [!INCLUDEssNoVersion]. | For more information, see Enable a network for cluster use. |
| URL namespaces reserved in the HTTP Server API (HTTP.SYS) | Probably TCP port 80, but can be configured to other ports. For general information, see Configuring HTTP and HTTPS. | For [!INCLUDEssNoVersion] specific information about reserving an HTTP.SYS endpoint using HttpCfg.exe, see About URL Reservations and Registration (SSRS Configuration Manager). |
Special considerations for port 135
When you use RPC with TCP/IP or with UDP/IP as the transport, inbound ports are dynamically assigned to system services as required. TCP/IP and UDP/IP ports that are larger than port 1024 are used. The ports are referred to as «random RPC ports.» In these cases, RPC clients rely on the RPC endpoint mapper to tell them which dynamic ports were assigned to the server. For some RPC-based services, you can configure a specific port instead of letting RPC assign one dynamically. You can also restrict the range of ports that RPC dynamically assigns to a small range, independent of the service. Because port 135 is used for many services, it’s frequently attacked by malicious users. When opening port 135, consider restricting the scope of the firewall rule.
For more information about port 135, see the following references:
- Service overview and network port requirements for the Windows Server system
- Remote procedure call (RPC)
- How to configure RPC dynamic port allocation to work with firewalls
Interaction with other firewall rules
The Windows Firewall uses rules and rule groups to establish its configuration. Each rule or rule group is associated with a particular program or service, and that program or service might modify or delete that rule without your knowledge. For example, the rule groups World Wide Web Services (HTTP) and World Wide Web Services (HTTPS) are associated with IIS. Enabling those rules will open ports 80 and 443, and [!INCLUDEssNoVersion] features that depend on ports 80 and 443 will function if those rules are enabled. However, administrators configuring IIS might modify or disable those rules. If you’re using port 80 or port 443 for [!INCLUDEssNoVersion], you should create your own rule or rule group that maintains your preferred port configuration independently of the other IIS rules.
The Windows Firewall with Advanced Security MMC snap-in allows any traffic that matches any applicable allow rule. So if there are two rules that both apply to port 80 (with different parameters). Traffic that matches either rule will be permitted. So if one rule allows traffic over port 80 from local subnet and one rule allows traffic from any address, the net effect is that all traffic to port 80 is independent of the source. To effectively manage access to [!INCLUDEssNoVersion], administrators should periodically review all firewall rules enabled on the server.
Overview of firewall profiles
Firewall profiles are used by the operating systems to identify and remember each of the networks by: connectivity, connections, and category.
There are three network location types in Windows Firewall with Advanced Security:
- Domain: Windows can authenticate access to the domain controller for the domain to which the computer is joined.
- Public: Other than domain networks, all networks are initially categorized as public. Networks that represent direct connections to the Internet or are in public locations, such as airports and coffee shops should be left public.
- Private: A network identified by a user or application as private. Only trusted networks should be identified as private networks. Users will likely want to identify home or small business networks as private.
The administrator can create a profile for each network location type, with each profile containing different firewall policies. Only one profile is applied at any time. Profile order is applied as follows:
- The domain profile is applied if all interfaces are authenticated to the domain controller where the computer is a member.
- If all interfaces are either authenticated to the domain controller or are connected to networks that are classified as private network locations, the private profile is applied.
- Otherwise, the public profile is applied.
Use the Windows Firewall with Advanced Security MMC snap-in to view and configure all firewall profiles. The Windows Firewall item in Control Panel only configures the current profile.
Additional firewall settings using the Windows Firewall item in Control Panel
The added firewall can restrict the opening of the port to incoming connections from specific computers or local subnet. Limit the scope of the port opening to reduce how much your computer is exposed to malicious users.
[!NOTE]
Using the Windows Firewall item in Control Panel only configures the current firewall profile.
Change the scope of a firewall exception using the Windows Firewall item in Control Panel
-
In the Windows Firewall item in Control Panel, select a program or port on the Exceptions tab, and then select Properties or Edit.
-
In the Edit a Program or Edit a Port dialog box, select Change Scope.
-
Choose one of the following options:
-
Any computer (including computers on the Internet): Not recommended. Any computer that can address your computer to connect to the specified program or port. This setting might be necessary to allow information to be presented to anonymous users on the internet, but increases your exposure to malicious users. Enabling this setting an allow Network Address Translation (NAT) traversal, such as the Allow edge traversal option will increase exposure.
-
My network (subnet) only: A more secure setting than Any computer. Only computers on the local subnet of your network can connect to the program or port.
-
Custom list: Only computers that have the IP addresses listed can connect. A secure setting can be more secure than My network (subnet) only, however, client computers using DHCP can occasionally change their IP address; will disable the ability to connect. Another computer, which you had not intended to authorize, might accept the listed IP address and connect to it. The Custom list is appropriate for listing other servers that are configured to use a fixed IP address.
IP addresses can be spoofed by an intruder. Restricting firewall rules are only as strong as your network infrastructure.
-
Use the Windows Firewall with Advanced Security snap-in
Advanced firewall settings can be configured by using the Windows Firewall with Advanced Security MMC snap-in. The snap-in includes a rule wizard and settings that aren’t available in the Windows Firewall item in Control Panel. These settings include:
- Encryption settings
- Services restrictions
- Restricting connections for computers by name
- Restricting connections to specific users or profiles
- Edge traversal allowing traffic to bypass Network Address Translation (NAT) routers
- Configuring outbound rules
- Configuring security rules
- Requiring IPsec for incoming connections
Create a new firewall rule using the New Rule wizard
- On the Start menu, select Run, type
WF.msc, and then select OK. - In the Windows Firewall with Advanced Security, in the left pane, right-click Inbound Rules, and then select New Rule.
- Complete the New Inbound Rule Wizard using the settings that you want.
Add a program exception for the SQL Server executable
-
From the start menu, type wf.msc. Press Enter or select the search result wf.msc to open Windows Defender Firewall with Advanced Security.
-
In the left pane, select Inbound rules.
-
In the right pane, under Actions, select New rule…. New Inbound Rule Wizard opens.
-
On Rule type, select Program. Select Next.
-
On Program, select This program path. Select Browse to locate your instance of [!INCLUDEssNoVersion]. The program is called
sqlservr.exe. It’s normally located at:C:Program FilesMicrosoft SQL ServerMSSQL<VersionNumber>.<InstanceName>MSSQLBinnsqlservr.exeSelect Next.
-
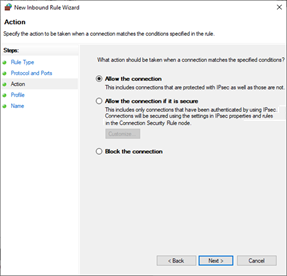
On Action, select Allow the connection. Select Next.
-
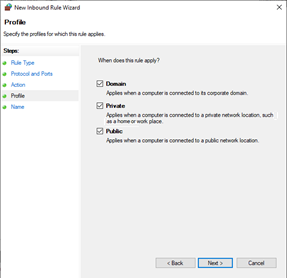
On Profile, include all three profiles. Select Next.
-
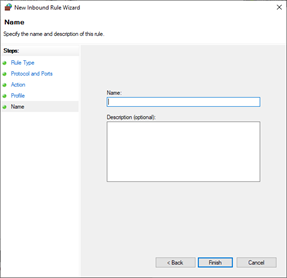
On Name, type a name for the rule. Select Finish.
For more information about endpoints, see:
- Configure the Database Engine to Listen on Multiple TCP Ports
- Endpoints Catalog Views (Transact-SQL)
Troubleshoot firewall settings
The following tools and techniques can be useful in troubleshooting firewall issues:
-
The effective port status is the union of all rules related to the port. It can be helpful to review all the rules that cite the port number, when trying to block access to a port. Review the rules with the Windows Firewall with Advanced Security MMC snap-in and sort the inbound and outbound rules by port number.
-
Review the ports that are active on the computer on which [!INCLUDEssNoVersion] is running. The review process includes verifying which TCP/IP ports are listening and also verifying the status of the ports.
-
The PortQry utility can be used to report the status of TCP/IP ports as listening, not listening, or filtered.
(The utility may not receive response from the port if it has a filtered status.)
The PortQry utility is available for download from the Microsoft Download Center.
List which TCP/IP ports are listening
To verify which ports are listening, display active TCP connections and IP statistics use the netstat command-line utility.
-
Open the Command Prompt window.
-
At the command prompt, type
netstat -n -a.The
-nswitch instructs netstat to numerically display the address and port number of active TCP connections. The-aswitch instructs netstat to display the TCP and UDP ports on which the computer is listening.
See also
- Service overview and network port requirements for the Windows Server system
- How to: Configure Firewall Settings (Azure SQL Database)
Recently I had a client and their vendor trying to configure a firewall for a new installation of SQL Server 2019 on Windows Server 2019.
Connections to the SQL Server were being blocked by the firewall. Looking at their firewall logs, they saw connections blocked on port TCP 49153. Why? Why not TCP 1433?
This was a pretty simple problem to solve, and not uncommon to face right after installing a SQL Server named instance.
Even though there was only one SQL Server instance on the server, the instance was installed as a named instance (servername/instancename), not the default instance (servername). A Windows Server can host many SQL instances, but only one can be the default instance, and there doesn’t have to be a default instance.
Default instances use TCP 1433 by default, but this isn’t «the default port for SQL Server» necessarily. Named instances can be configured to use TCP 1433, but by default, named instances are configured to use dynamic ports in a range between 49152–65535. Most importantly, a SQL Server using a dynamic port will change port every time the Database Engine service starts up. This is incompatible with port-based firewall rules unless you unwisely choose to specify a huge range of port exceptions for your firewall (not recommended).
(But why do local connections still work, like a local installation of SQL Server Management Studio or an application running on the same server as SQL Server? Because those connections probably aren’t using using the TCP protocol but the Shared Memory protocol. Connections to SQL Server from a client running on the same server always try to use Shared Memory first, and are faster for it.)
For connections external to the SQL Server, the SQL Browser (UDP 1434) handles the connection and routes traffic to the correct TCP port for each instance, even if there is only one instance on the server. (The SQL Browser isn’t required, if you’d rather always specify a port number in all connection strings, or set up SQL alias(es).)
The solution to the dynamic port problem is to change the SQL Server to use a static port. You can configure a named instance to use TCP 1433, though it may be misleading and confusing if another SQL Server default instance is ever installed on this server. Instead, choose any port in that same range, for example the one most recently dynamically assigned.
How do you configure a SQL Server instance to use a static port instead of a dynamic port? (This change won’t take affect until you restart SQL Server service, so I recommend you only make this change during a maintenance window.)
- On the server, open Sql Server Configuration Manager, expand SQL Server Network Configuration, and go to Protocols for InstanceName, click on properties of the TCP/IP protocol.
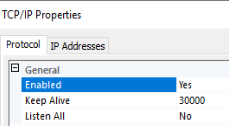
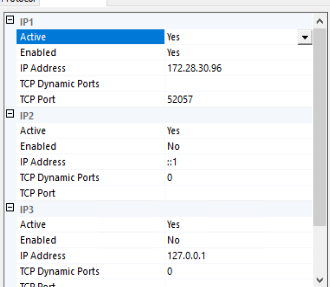
(As a book author, can I just say how impossible it is not to notice little inconsistencies like the capitalization of «Sql» vs «SQL» in the same screen…) - By default, in the «Protocol» tab, you’ll see that Listen All is enabled by default. SQL Server will listen on all network adapters, including the loopback adapter(s). That’s not necessary. You can disable unused adapters, and on the «IP Addresses» tab, enable only the network adapters needed.
If you want to keep using Listen All, then on the «IP Addresses» tab, only use the IPAll section to set the static port. If the Listen All is Yes, only the TCP Port and TCP Dynamic Port values under the IPAll section will be honored.
If you want to disable unneeded network adapters, on the «IP Addresses» tab, you’ll need to enable each adapter(s) desired, and configure the TCP Port setting for each. For many SQL Servers and most standalone instances, there is only one network adapter needed, though others like the loopback adapter will appear. - Either under IPAll or each individual enable adapter, delete the 0 in the «TCP Dynamic Ports» field. When 0 is provided in this field, SQL Server listens on a dynamic port. You must leave it blank to use a static port.
- Either under IPAll or each individual enable adapter, provide the static port you want to use in the «TCP Port» field.
- Make the change to your port-based firewall to allow inbound traffic on the TCP port you’ve chosen.
- Restart the affected SQL Server instance.
For example, if you want to use only the primary internal IP address, and configure it to use port 52057 (a random selection in the allowed range), this is what your screens should look like, with Listen All disabled.
If you need then to configure Windows Firewall, it would look something like this in an Inbound rule. Here’s an example with a rule to allow two different SQL instances, each configured for a different static port.

The problem
“Cannot connect to sqlinstance. A network-related or instance-specific error occurred while establishing a connection to SQL Server. The server was not found or was not accessible. Verify that the instance name is correct and that SQL Server is configured to allow remote connections. (provider: SQL Network Interfaces, error: 26 — Error Locating Server/Instance Specified) (Microsoft SQL Server, Error: -1)”
Let’s say we have a system with a running SQL Server (Express or Standard Edition — doesn’t matter) and want to connect to this database from another machine. The chances are high that you will see the above error message.
Be aware: You can customize more or less anything, so this blogposts does only cover a very “common” installation.
I struggled last week with this problem and I learned that this is a pretty “old” issue. To enlighten my dear readers I made the following checklist:
Checklist:
- Does the SQL Server allow remote connections?
- Does the SQL Server allow your authentication schema of choice (Windows or SQL Authentication)?
- Check the “SQL Server Configuration Manager” if the needed TCP/IP protocol is enabled for your SQL Instance.
- Check if the “SQL Server Browser”-Service is running
- Check your Windows Firewall (see details below!)
- This is a weird one, but try to add the Port to the ConnectionString, e.g.
Data Source=MyServerInstance,1434. This is not always needed, but I had one case, where each point on this list was OK, but I couldn’t connect from a client without the port.
Windows Firewall settings:
Per default SQL Server uses TCP Port 1433 which is the minimum requirement without any special needs — use this command:
netsh advfirewall firewall add rule name = SQLPort dir = in protocol = tcp action = allow localport = 1433 remoteip = localsubnet profile = DOMAIN,PRIVATE,PUBLIC
If you use named instances we need (at least) two additional ports:
netsh advfirewall firewall add rule name = SQLPortUDP dir = in protocol = udp action = allow localport = 1434 remoteip = localsubnet profile = DOMAIN,PRIVATE,PUBLIC
This UDP Port 1434 is used to query the real TCP port for the named instance.
Now the most important part: The SQL Server will use a (kind of) random dynamic port for the named instance. To avoid this behavior (which is really a killer for Firewall settings) you can set a fixed port in the SQL Server Configuration Manager.
SQL Server Configuration Manager -> Instance -> TCP/IP Protocol (make sure this is "enabled") -> *Details via double click* -> Under IPAll set a fixed port under "TCP Port", e.g. 1435
After this configuration, allow this port to communicate to the world with this command:
netsh advfirewall firewall add rule name = SQLPortInstance dir = in protocol = tcp action = allow localport = 1435 remoteip = localsubnet profile = DOMAIN,PRIVATE,PUBLIC
(Thanks Stackoverflow!)
Check the official Microsoft Docs for further information on this topic, but these commands helped me to connect to my SQL Server.
The “dynamic” port was my main problem — after some hours of Googling I found the answer on Stackoverflow and I could establish a connection to my SQL Server with the SQL Server Management Studio.
Hope this helps!
This document will show you how to open remote access to SQL Server by configuring Windows Firewall.
Applies To
- Windows 8.1
- Windows 10
- Windows Server 2016
- Windows Server 2019
- Microsoft SQL Server Express/Standard or higher editions 2012 or later.
- Microsoft SQL Server Compact Edition 4.0 or later.
Prerequisites
To follow the steps in this document you will need to have one of the versions of SQL Server running on one of the versions of Windows mentioned above.
This article only applies to Windows Defender Firewall. Other Firewalls may have similar settings that can be applied.
It is also assumed that you have configured SQL Server for remote access, either manually, or by following the steps in How To: Configure SQL Server for Remote Access.
You need to be a member of the Administrators group to perform the steps in this document.
Configure Windows Firewall
There are two methods for configuring Windows Firewall for SQL Server.
Choose one of the two methods below, that best suits your IT policy:
- Create Inbound Rules for the SQL Server Ports
- Allow the SQL Server applications in the Firewall
Create Inbound Rules for the SQL Server Ports
This method will target the specific ports SQL Server uses for communication.
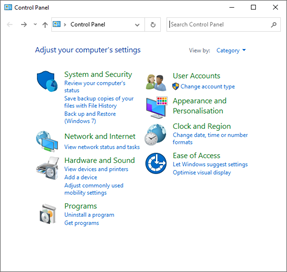
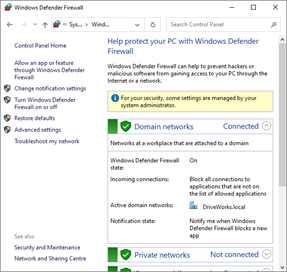
- Open Windows Control Panel and select System and Security.

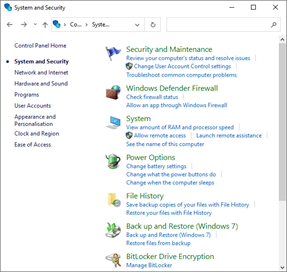
- From the System and Security window, click Windows Defender Firewall.
- From the Windows Defender Firewall window, click Advanced Settings.
- Add the port SQL uses for TCP.
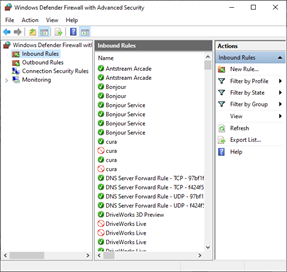
From the Windows Defender Firewall with Advanced Security window:
Select Inbound Rules from the left hand column.
Click New Rule… from the Actions column.
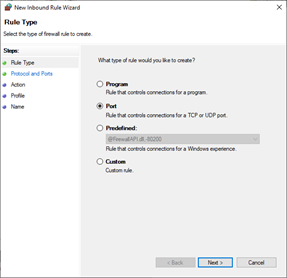
- From the New Inbound Rule Wizard, select Port.
Click Next.
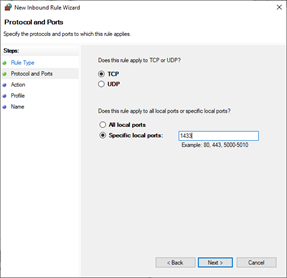
- Select TCP.
Select Specific local ports.
Enter 1433.
Click Next.
- Select Allow the connection.
Click Next.
- Select Domain, Private and Public.
Click Next.
- Enter a name for the rule.
For example: SQL TCP.
- Add the port SQL uses for UDP.
From the Windows Defender Firewall with Advanced Security window:
Select Inbound Rules from the left hand column.
Click New Rule… from the Actions column.
- From the New Inbound Rule Wizard, select Port.
Click Next.
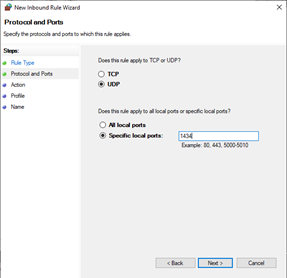
- Select UDP.
Select Specific local ports.
Enter 1434.
Click Next.
- Select Allow the connection.
Click Next.
- Select Domain, Private and Public.
Click Next.
- Enter a name for the rule.
For example: SQL TCP.
Click Finish.
Allow the SQL Server applications in the Firewall
This method will open all ports for access to SQL Server.
- Open Windows Control Panel and select System and Security.
- From the System and Security window, click the link to Allow an app through Windows Firewall.
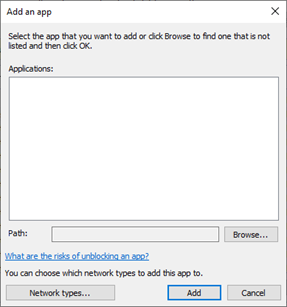
- Allow the SQL Server Browser:
Click the Allow another app… button.
If your Windows Firewall settings are managed by your system administrator, you may need to click the Change Settings button.
- Click the Browse button.
Browse to sqlbrowser.exe
This is located in the default installation folder:
C:Program Files (x86)Microsoft SQL Server90Shared
Click the Add button.
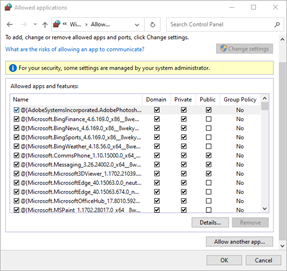
- Allow the SQL Server Application:
Click the Allow another app… button.
- Click the Browse button.
Browse to sqlserver.exe
This is located in the default installation folder:
C:Program FilesMicrosoft SQL Server<Version and Edition>MSSQLBinn
Version and Edition
The Version and Edition folder depends on the installed SQL Server.
For instance:
- SQL Server 2012 (Express) is located within the folder MSSQL11.SQLEXPRESS
- SQL Server 2017 (Express) is located within the folder MSSQL14.SQLEXPRESS
Other versions and editions will be similarly named and cannot be confused with the other folders in the Microsoft SQL Server folder.
Click the Add button.
- Click the OK button to save and apply the changes.
| Knowledge Base Article Ref: | KB13103002 |
|---|


I got a request asking if it is
possible for a web application to connect to an SQL server remote port. My
answer: “But of course! We just need to open port 1433 on the Windows Firewall
and enable TCP/IP.” A request handled very quickly. Or so I thought.
But that was not the case. Not long
after I said that, I realized it needs a bit more work. The above two steps
will not succeed in opening port 1433. Command “netstat -a” confirms this because
the server does not listen to port 1433.
So let’s start from the beginning and list
what is necessary to open the port for remote access the proper way.
To begin with, it’s a Windows Server
2019 with MS SQL Express 2017 installed. To access the SQL Configuration
Manager, the best way is to open Computer Management. There is a snap-in SQL
Server Configuration Manager.


Make sure TCP/IP is “enabled”. Double-click it, go to “IP Addresses tab. Now comes the important part.
Update: MS SQL Express 2019
If you are using SQL Express 2019, then it’s a lot easier. The steps in the “what to do” section are no longer required. Just be sure to set to “Yes” in the respective IP section for the “Enabled” field. The Windows Firewall bit is still required and make sure to test it with the “netstat -a” command.

In the screenshot above you will see
several sections. IP1, IP2, IP3 … IPall is the last section. Each section
represents the assigned IP addresses to the server. In my case I have an IPv6
public, IPv6 local and IPv4 public address. The field “TCP Dynamic Ports” shows
a 0 (zero).
What is a dynamic port?
This is an excerpt from the MS docs: “Once
SQL Service restarts, it requests a free port number from the operating system
and assigns that port to SQL Server.”
What this means is that each time the SQL service restarts, a new port
number will be assigned. This is not really what we want.
So what to do?
- To start with decide which IP address
you want to use in the respective section. I mean, do you want to open the port
for IPv6, IPv4 or both? - Remove the 0 (zero) in TCP
Dynamic Ports - Make sure Enabled is set to YES
- Scroll down to the last section
“IPALL”, replace the 0 (zero) in TCP Dynamic Ports with the port number 1433 in
the field “TCP Port”. - Restart SQL service
Lastly, you need to open port 1433 in Windows Firewall. Run “netstat -a” again. The port should now be listed. You are done!
Finally, you could use another port and not just port 1433 – no restrictions there. If the SQL server has a public IP as in my case, I would restrict the source IPs that are allowed to connect.

Microsoft recommends Windows Server Core for most infrastructure services and for applications such as Exchange 2019. You can also run SQL Server on Server Core. However, the installation requires a few steps from the command line.
Contents
- Minimal installer for the GUI
- GUI wizard does not work
- Installation from the command line
- Completing the installation
- Allow remote administration for SQL Server
- Configuring the firewall
- Author
- Recent Posts

Wolfgang Sommergut has over 20 years of experience in IT journalism. He has also worked as a system administrator and as a tech consultant. Today he runs the German publication WindowsPro.de.
Even if Server Core does not support all SQL Server services, such as reporting, master data, or data quality services, such a setup should still be sufficient for most tasks. This is especially true for the typical applications of the Express Edition.
Minimal installer for the GUI
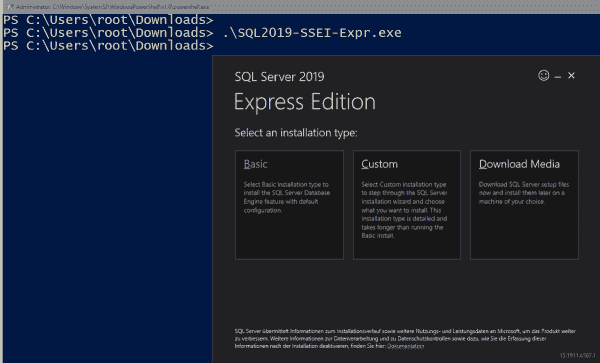
The installation has not changed since SQL Server 2017, so the following instructions apply equally to both versions. It starts by fetching an installer smaller than 6 MB from the SQL Server 2019 download page, which in turn will request the required files from the internet.
The tool also starts with a graphical interface under Server Core and offers three options: Basic, Custom, and Download Media.
Installation options in the graphical setup for SQL Server 2019
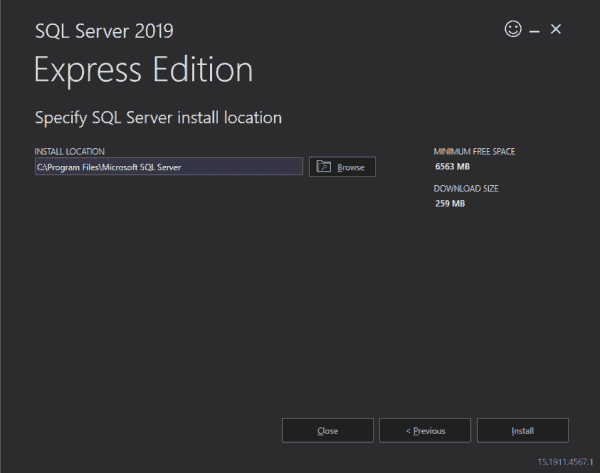
The first variant is straightforward: after you confirm the end-user license agreement (EULA) and select the target directory, the installer sets up SQL Server with the default values. This setup is limited to the database engine only.
After selecting the installation directory, the standard setup will start
If you choose the user-defined installation, the program downloads the installation files and then opens the actual SQL Server setup. Here you can select the various options and components with the help of a wizard.
GUI wizard does not work
The download of the complete installation media will be the preferred option if the database server does not have access to the internet. You can download the files to a workstation and then transfer them to the target system.

Download the installation media for SQL Server
Executing the .exe file then unpacks the archive into a subdirectory from where you can run setup.exe.
The command below opens the same GUI you get during the user-defined installation.
.setup.exe /UIMODE=EnableUIOnServerCore

The wizard led installation of SQL Server does not work under Server Core
In both cases, this proves to be unusable under Server Core. In both Server 2016 and Server 2019 with Core App Compatibility installed, clicks on various options yielded no effect in my lab.
Installation from the command line
So if you don’t want to use the standard installation, the only other option is to set up SQL Server from the command line. The setup provides a silent mode for this, which you can activate with the /Q switch.
Installing the SQL engine requires the Action parameter (with the possible values install, uninstall, or upgrade) and IAcceptSQLServerLicenseTerms. Also, you must pass values for Features to the setup. Possible values are SQLENGINE, FullText, Replication, AS, IS, and Conn. If you specify several of them, you need to separate them with a comma.
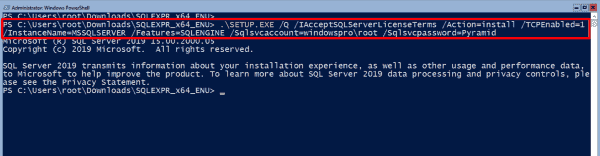
Running setup.exe to install SQL Server 2019 Express
Other mandatory parameters include Instanceid and Instancename (both have the default value MSSQLSERVER) as well as Sqlsvcaccount and Sqlsvcpassword, with which you specify the account or its password under which SQL Server will run.
You can install the Express Edition based on these parameters, but the full version also requires that you assign the sysadmin role to certain users with Sqlsysadminaccounts. Complete documentation of all setup parameters is here on Microsoft Docs.
Completing the installation
If you plan to manage SQL Server remotely, you should add this parameter when installing on Server Core:
TCPEnabled=1
Otherwise you may have to grapple with Windows Management Instrumentation (WMI) and the PowerShell module sqlserver to activate this protocol afterward.
After the installation is finished, you can run this PowerShell command to verify whether the setup was successful:
Get-CimInstance Win32_product | ? Name -Like *SQL* | select Name, Caption
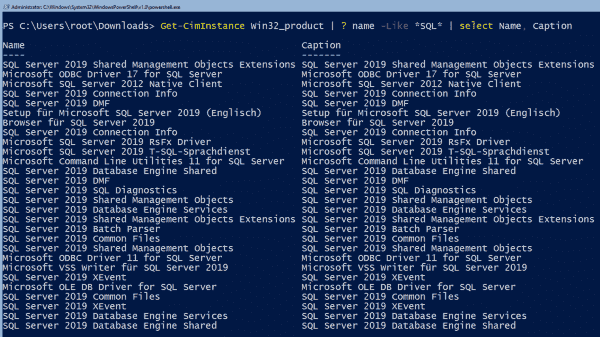
Subsequent verification of SQL Server installation with PowerShell
If you need the browser service, set its startup type to automatic using PowerShell, and start the service:
Set-Service -Name SQLBrowser -StartupType Automatic
Start-Service -Name SQLBrowser
Allow remote administration for SQL Server
In the next step, you open SQL Server for remote management using the command-line tool sqlcmd.exe installed alongside the database. If you chose the default installation at the beginning of the GUI installer, you can click the Connect button to start the program instead of launching it manually. Then enter the following commands:
EXEC sys.sp_configure N'remote access', N'1'
GO
RECONFIGURE WITH OVERRIDE
GO
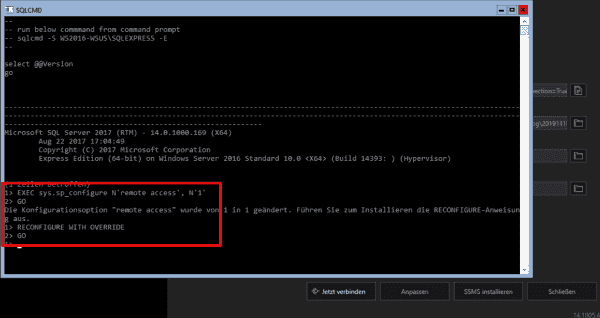
Configuring SQL Server for remote access with sqlcmd.exe
Configuring the firewall
Finally, it is necessary to open the firewall for managing SQL Server remotely. You can do this via PowerShell:
New-NetFirewallRule -DisplayName "SQL Server" -Direction Inbound -Protocol TCP -LocalPort 1433 -Action allow
If you have installed other services in addition to the SQL engine, you can configure the firewall for them using this script by Ryan Mangan.
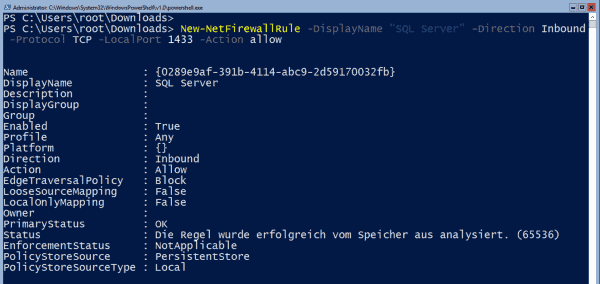
Opening a firewall port for SQL Server management
Now the path should be clear for the remote management of SQL Server. With SQL Management Studio, Microsoft offers a powerful tool for this purpose. It is currently available in version 18.4 and can also manage SQL Server 2019.
Subscribe to 4sysops newsletter!
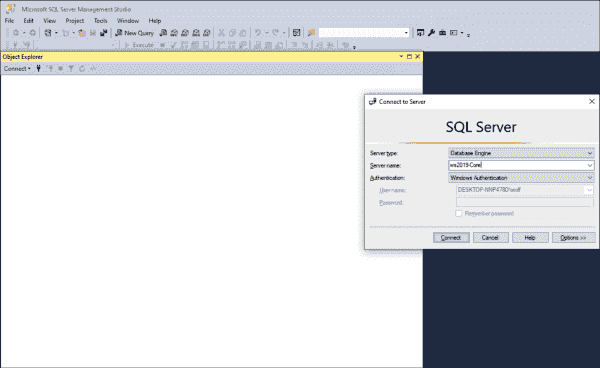
Logging on to SQL Server using SQL Management Studio
Log in with the account and the authentication method you previously specified during setup.
Search code, repositories, users, issues, pull requests…
Provide feedback
Saved searches
Use saved searches to filter your results more quickly
Sign up

I am about to test the latest version of Microsoft SQL Server 2019 on my Windows Server 2019 platform. I was able to install MS SQL Server 2019 on other platform such as Ubuntu and CentOS Linux. But I have never tried to install Microsoft SQL Server 2019 on Windows Server 2019 machine. I like to test various software including the database system such as Oracle, SQL Server, PostgreSQL and MySQL Server.
Microsoft SQL Server 2019 brings a lot of improvements compared to any previous version. You can read the detailed information about this new version here. To try this new product, we can download the free trial that can be used for 180 days with all features unlocked. It’s a great deal if you want to try the SQL Server 2019 before deciding to purchase the license. I will show you every steps of the installation process.
My System Configuration
- Windows Server 2019 VM installed on Proxmox VE
- 8 GB of RAM
- 100 GB of disk space
- Remote Desktop enabled
Steps to Install Microsoft SQL Server 2019 on Windows Server 2019
Step 1. Download Installation file
Go to the following link to obtain the installation file for MS SQL Server 2019.
https://www.microsoft.com/en-us/evalcenter/evaluate-sql-server-2019?filetype=EXE
You will need to enter your details including email address to be able to download.
Step 2. Install the software
The installation is pretty straight-forward. On the first screen, we need to choose the installation type. Choose Download Media if you want to save the complete installation media for other computers/server.

Next. choose the language, format and the download location.

Click Download button to start the download process.

It will download 1.35 GB from the internet. Wait until the download process is completed.

Now it’s time to mount the ISO file we have just downloaded.

Double-click the setup file to start the installation. On the first screen, on the Planning step, click the System Configuration Checker to check our system before proceeding the installation.

Make sure everything is passed as follow.

Now go to the Installation and click New SQL Server stand-alone installation…

Next, select the edition or enter the license key. In this case, I choose the Developer edition which is free for personal use.

Accept the License Agreement

Next, choose to use Microsoft Update to check for any update.

The installer then will check for any potential problems.

Next, we need to specify the features we want to install. In this case, I will only install the Database Engine Service.

Instance configuration. I leave the default value for this instance. The default instance ID is MSSQLSERVER.

Server Configuration

Now we need to configure the database engine. Choose the Authentication Mode. I would recommend to use Mixed mode. You can add current user if you want to use it as server administrator. Or you can create a new one.

Switch to Data Directories tab to change the default location for database directories. You can leave the default value or change it as per you need.

Now lets do a final check before the installation take place.

Press Install to start the installation

Now the installation completes. Make sure there are no errors shown on this page.

At this point, we have successfully install Microsoft SQL Server 2019 on Windows Server 2019. Optionally, you can install the SQL Server Management Tools from the SQL Server Installation Server. Or, download it from the link below
https://docs.microsoft.com/en-us/sql/ssms/download-sql-server-management-studio-ssms?redirectedfrom=MSDN&view=sql-server-ver15
Enable Network/Remote Access for SQL Server 2019
If you are planning to access the SQL Server across your network, we may need to configure few things.
A. Enable TCP/IP Protocol Service
Open the SQL Server Configuration Manager and then go to SQL Server Network Configuration. Click the Protocols for MSSQLSERVER (this service name might be different with yours).

By default, the TCP/IP protocol is disabled. You need to enable it manually. And then we need to restart the SQL Server Service.

B. Configure Windows Firewall for SQL Server
In most cases, we need to configure the firewall to allow the network users access our SQL Server. So, we need to add a new rule to the Windows Firewall. Click Inbound Rules and then New Rule. Choose Port and click Next.

Now type the SQL Server TCP port. The default value is 1433.

On the next page, select allow connection


Finally save it and you can now connect to the SQL Server from the network.
- Remove From My Forums
-
Вопрос
-
Hi,
I have a peculiar «feature» where I have installed SQL Server 2019 as a named instance with a static port (for this test I used 14430) onto a Server 2019 Windows cluster (not always on cluster) and SQL Management Studio on a separate server.
I have opened the firewall ports TCP 1433 + instance port (14430) and UDP 1434 on the inbound firewall on the SQL server but I am finding I have to open UDP outbound to the server on the server that has SQL Management Studio installed.
Any idea why I have to have an outbound UDP firewall rule to be able to connect to the remote SQL server? I have tried from 2 different servers with both the same result.
It appears I can connect ok to a SQL Server 2017 without having to enable outbound UDP.
-
Изменено
15 мая 2020 г. 9:39
-
Изменено
Recently I had a client and their vendor trying to configure a firewall for a new installation of SQL Server 2019 on Windows Server 2019.
Connections to the SQL Server were being blocked by the firewall. Looking at their firewall logs, they saw connections blocked on port TCP 49153. Why? Why not TCP 1433?
This was a pretty simple problem to solve, and not uncommon to face right after installing a SQL Server named instance.
Even though there was only one SQL Server instance on the server, the instance was installed as a named instance (servername/instancename), not the default instance (servername). A Windows Server can host many SQL instances, but only one can be the default instance, and there doesn’t have to be a default instance.
Default instances use TCP 1433 by default, but this isn’t «the default port for SQL Server» necessarily. Named instances can be configured to use TCP 1433, but by default, named instances are configured to use dynamic ports in a range between 49152–65535. Most importantly, a SQL Server using a dynamic port will change port every time the Database Engine service starts up. This is incompatible with port-based firewall rules unless you unwisely choose to specify a huge range of port exceptions for your firewall (not recommended).
(But why do local connections still work, like a local installation of SQL Server Management Studio or an application running on the same server as SQL Server? Because those connections probably aren’t using using the TCP protocol but the Shared Memory protocol. Connections to SQL Server from a client running on the same server always try to use Shared Memory first, and are faster for it.)
For connections external to the SQL Server, the SQL Browser (UDP 1434) handles the connection and routes traffic to the correct TCP port for each instance, even if there is only one instance on the server. (The SQL Browser isn’t required, if you’d rather always specify a port number in all connection strings, or set up SQL alias(es).)
The solution to the dynamic port problem is to change the SQL Server to use a static port. You can configure a named instance to use TCP 1433, though it may be misleading and confusing if another SQL Server default instance is ever installed on this server. Instead, choose any port in that same range, for example the one most recently dynamically assigned.
How do you configure a SQL Server instance to use a static port instead of a dynamic port? (This change won’t take affect until you restart SQL Server service, so I recommend you only make this change during a maintenance window.)
- On the server, open Sql Server Configuration Manager, expand SQL Server Network Configuration, and go to Protocols for InstanceName, click on properties of the TCP/IP protocol.
(As a book author, can I just say how impossible it is not to notice little inconsistencies like the capitalization of «Sql» vs «SQL» in the same screen…) - By default, in the «Protocol» tab, you’ll see that Listen All is enabled by default. SQL Server will listen on all network adapters, including the loopback adapter(s). That’s not necessary. You can disable unused adapters, and on the «IP Addresses» tab, enable only the network adapters needed.
If you want to keep using Listen All, then on the «IP Addresses» tab, only use the IPAll section to set the static port. If the Listen All is Yes, only the TCP Port and TCP Dynamic Port values under the IPAll section will be honored.
If you want to disable unneeded network adapters, on the «IP Addresses» tab, you’ll need to enable each adapter(s) desired, and configure the TCP Port setting for each. For many SQL Servers and most standalone instances, there is only one network adapter needed, though others like the loopback adapter will appear. - Either under IPAll or each individual enable adapter, delete the 0 in the «TCP Dynamic Ports» field. When 0 is provided in this field, SQL Server listens on a dynamic port. You must leave it blank to use a static port.
- Either under IPAll or each individual enable adapter, provide the static port you want to use in the «TCP Port» field.
- Make the change to your port-based firewall to allow inbound traffic on the TCP port you’ve chosen.
- Restart the affected SQL Server instance.
For example, if you want to use only the primary internal IP address, and configure it to use port 52057 (a random selection in the allowed range), this is what your screens should look like, with Listen All disabled.
If you need then to configure Windows Firewall, it would look something like this in an Inbound rule. Here’s an example with a rule to allow two different SQL instances, each configured for a different static port.