Время на прочтение
5 мин
Количество просмотров 30K
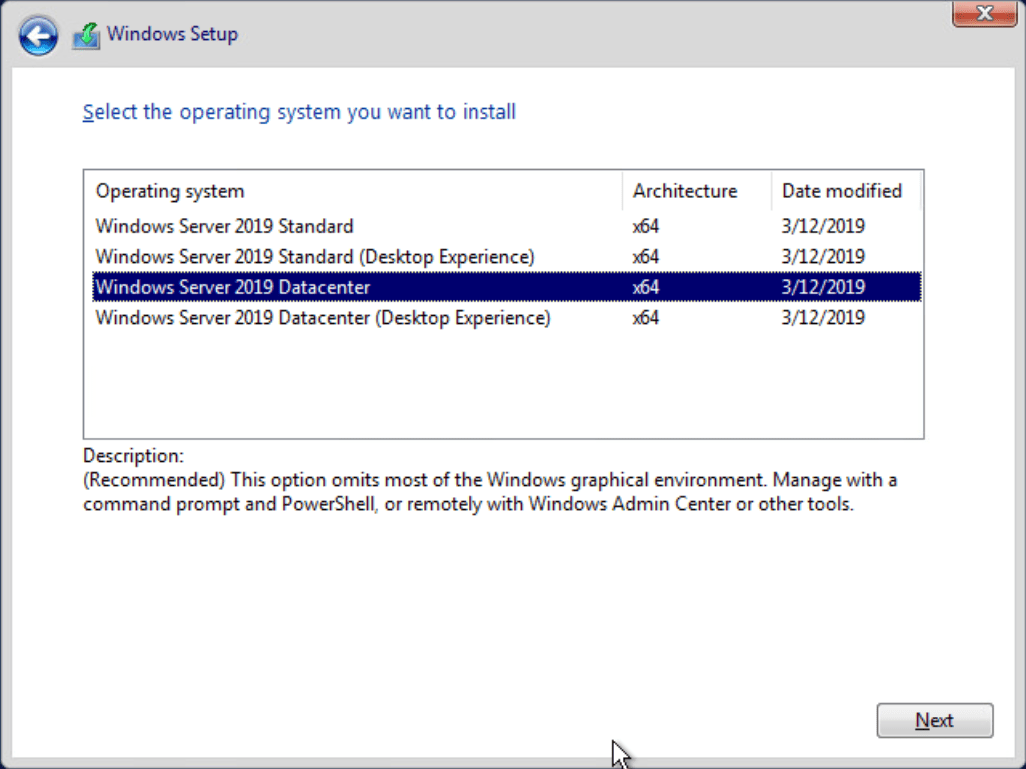
В данной статье мы продолжаем рассказывать про работу с Windows Server Core 2019. В прошлых постах мы рассказали как готовим клиентские виртуальные машины на примере нашего нового тарифа VDS Ultralight с Server Core за 99 рублей. Затем показали как работать с Windows Server 2019 Core и как установить на него GUI. Сегодня мы поговорим про управление с помощью Windows Admin Center.
 Фото: ТАСС
Головной болью было, наверное, по соображениям безопасности, разделять роли серверов. Заводить несколько машин, чтобы физически разделить контроллер домена и файловый сервер.
Благо нам на помощь пришла виртуализация, и теперь изолированно друг от друга могут работать несколько служб, которые из соображений безопасности не могут работать на том же сервере. Виртуализация принесла массу удобства, развертывание виртуальных машин из одного шаблона экономит время специалистам, и физически, все в одной коробке с мощным железом.
Машин все меньше, а серверов все больше, даже у меня, для «просто посмотреть» образовалось два контроллера домена, файловый сервер, сервер под Java приложения и еще пачка веб серверов, поэтому давайте поговорим о том, как можно эффективно управлять серверами на Windows, не отрывая левой руки от кофе.
— С помощью Powershell!
Конечно да, но… нет. Продукт позиционируется как удобный инструмент управления гигантской инфраструктурой. Понятно, что это не совсем так, для таких случаев есть Powershell ISE и скрипты, поэтому хотелось бы рассмотреть действительно полезные юзкейсы. Если у вас есть свой опыт, которым вы вы хотели поделиться, мы можем добавить его в эту статью.
TL;DR
Windows Admin Center лучше подходит для управления стоковыми компонентами. На текущий момент только RSAT может управлять установленными ролями.
Используя WAC, можно улучшить безопасность вашей инфраструктуры, если будете использовать его как шлюз.
Сводная таблица того, он умеет и не умеет:
Управление системой
Управление ролями
Превью — установка бета версий компонентов для WAC, не входит в состав сборки. Перечислять все не нужно, потому что буквально все компоненты управляются только с помощью RSAT.
Нюансы
Powershell в Windows Admin Center не имеет своей среды сценариев аналогичной Powershell ISE.
Windows Admin Center не поддерживает Powershell ниже 5.0, на старых машинах обязательно нужно ставить новый Powershell, если хотите использовать его.
Главным минусом Windows Admin Center в микро инстансах является потребление оперативной памяти сервера. Он создает четыре сессии по 50-60 мегабайт каждая, и каждая эта сессия остается даже после закрытия Windows Admin Center.
Та же самая проблема и с Powershell через Enter-PSSession, он так же создает новую сессию, и если просто закрыть окно терминала, сессия весом и 70 мегабайт так и останется на удалённом сервере, если её не закрыть её перед выходом с помощью Exit-PSSession или Remove-Pssession.
При использовании Windows Admin Center с этим придется мириться, он отнимет около 170 мегабайт ОЗУ, RSAT таким не страдает.

(См. wsmprovhost.exe)
Упрощаем работу
Максимальное удобство управления достигается если ваша рабочая станция, на которой установлен WAC находится в домене. Он берет учетные данные пользователя, который зашел в систему, подключение к серверам осуществляется по одному щелчку мыши.
Импортировать список серверов можно с помощью txt файла, перечислив имена серверов переносом строки, как и в RSAT.
Что тоже радует, ранее, чтобы интегрировать в AD виртуальную машину на Server Core, приходилось делать это через sconfig, а это значит нужен прямой доступ к его экрану. В случае с хостингами приходилось делать все это через VNC. Теперь, при переходе на главную страницу можно нажать «Изменить идентификатор компьютера» и ввести в домен.
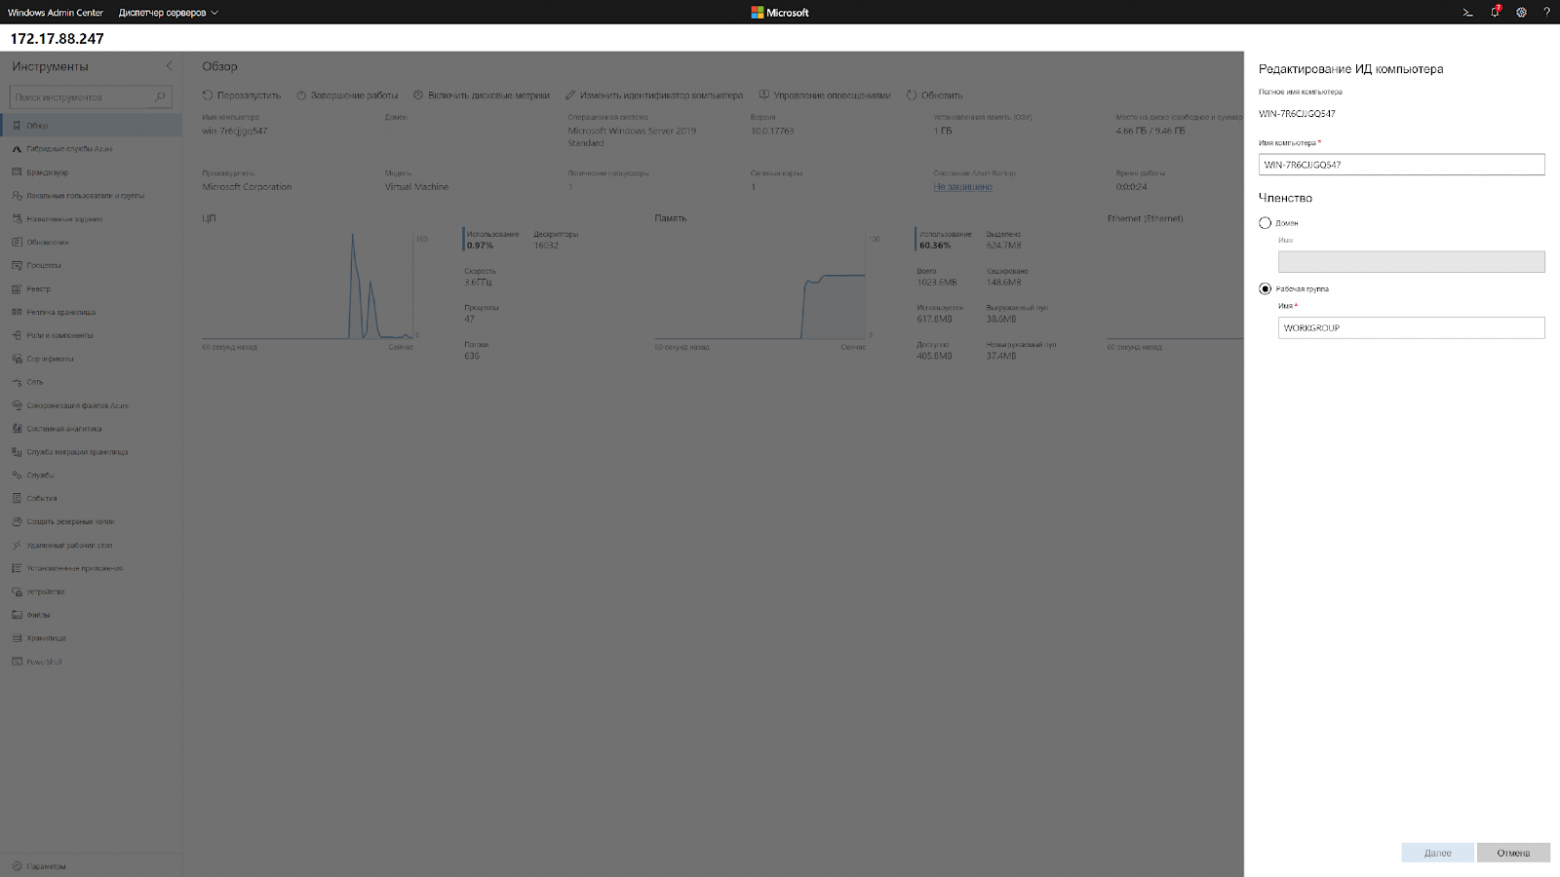
Кстати, чтобы ввести в домен Windows Server 2019, больше не требуется делать Sysprep, потому что Sysprep тоже нужно было завершать через VNC.
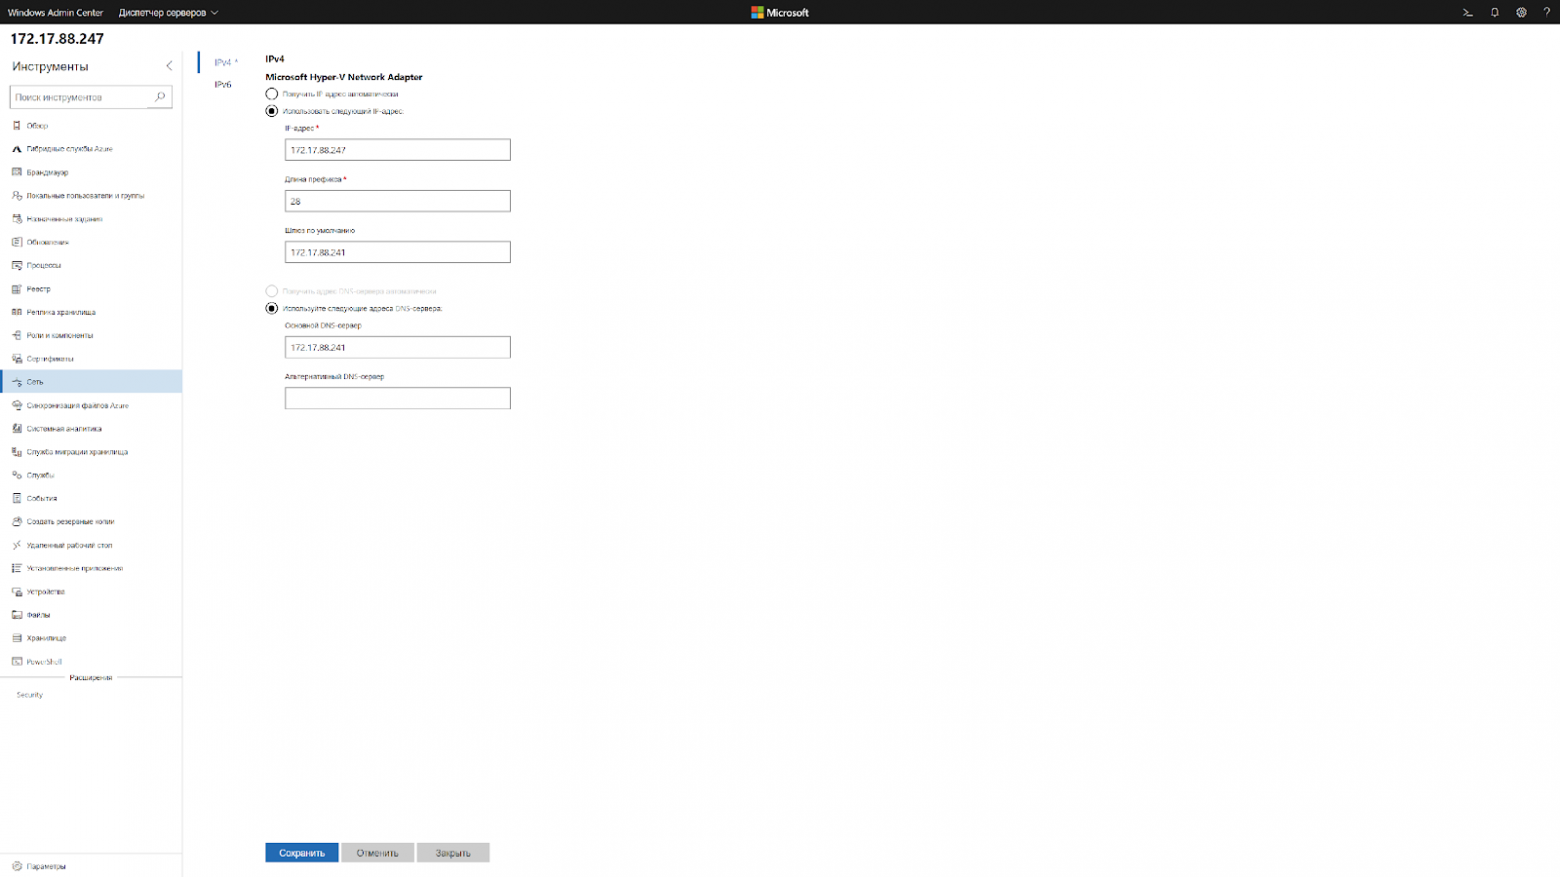
Чтобы изменить сетевые настройки теперь нужно сделать два клика. Подключаешься к серверу и меняешь.
Это выходит так же быстро, как и через WinRM, только одной рукой.
Повышаем безопасность
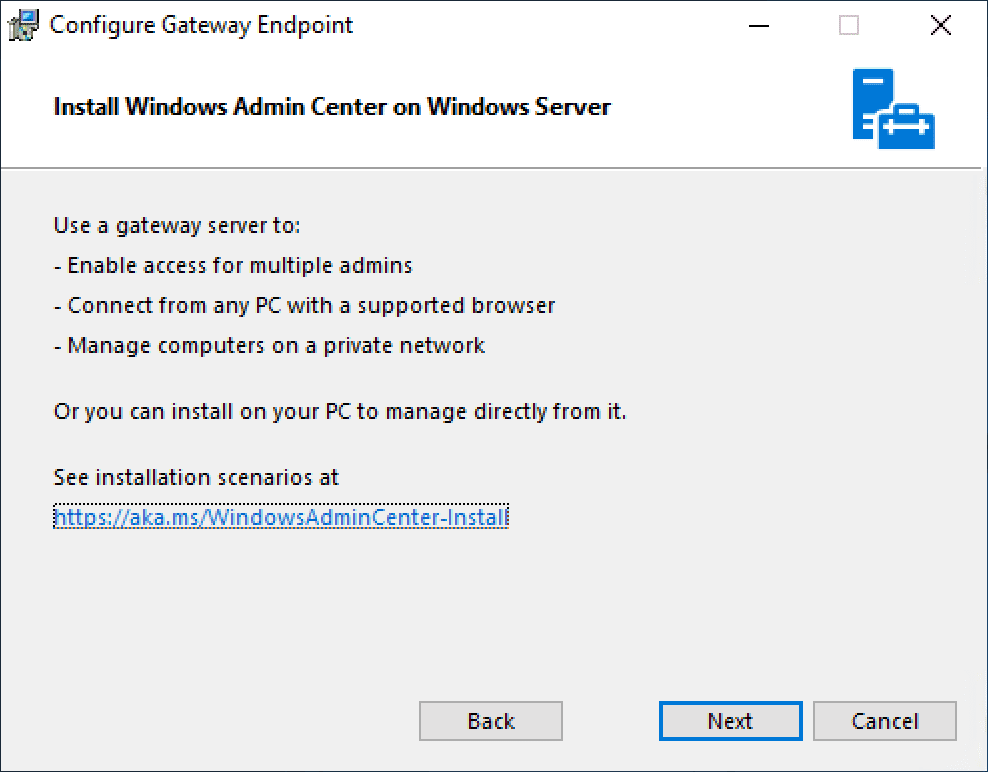
На текущий момент есть четыре типа развертывания. Локальный, в качестве шлюза, установка на один из продакшн серверов и в составе кластера.

*Картинка с сайта майкрософт
Установка в качестве шлюза, на отдельный сервер, наиболее безопасный и рекомендуемый вариант. Это аналог схемы с VPN, когда доступ к управлению имеется только с определенного IP адреса или участка сети.
Согласитесь, гораздо удобнее держать на одной вкладке видосы и мемасы, а на другой Windows Admin Center, нежели целиком терять подключение к ютубу из-за входа в защищенную сеть.
Как же обезопасить все свои N серверов? С помощью следующего скрипта:
## Список серверов через запятую ##
$servers = Get-Content -Path .\Servers.txt
## Список правил через перенос строки ##
$rules = Get-Content -Path .\Rules.txt
## IP адрес нашего гейта с установленным WAC ##
$gate = "1.1.1.1"

$MySecureCreds = Get-Credential

foreach ($server in $servers.Split("`n")) {
    foreach ($line in $rules.Split("`n")) {
        Invoke-Command -ComputerName $server -ScriptBlock {
            Set-NetFirewallRule -Name $Using:line -RemoteAddress $Using:gate
        } -Credential $MySecureCreds
    }
}

# список правил, RULES.txt#

RemoteDesktop-UserMode-In-TCP
RemoteDesktop-UserMode-In-UDP
WINRM-HTTP-In-TCP
WINRM-HTTP-In-TCP-PUBLIC

# список ваших серверов, SERVERS.txt#

1.1.1.1, 1.1.1.2, 1.1.1.3
Этот скрипт изменит стандартные правила брандмауэра таким образом, что вы сможете использовать RDP и WinRM только с определенного IP адреса, понадобится для организации безопасного доступа к инфраструктуре.
Powershell в Windows Admin Center не имеет своей среды сценариев аналогичной Powershell ISE, можно только вызывать готовые скрипты.

Кстати, вот так выглядит RDP на Windows Server Core.

Выводы
На текущий момент Windows Admin Center не способен заменить RSAT, однако в нём уже присутствуют функции, которых нет у RSAT. Добавляются старые оснастки, которые не так удобны для управления через браузер.
Странным является приоритет разработки, наиболее активно добавляются функции интегрированные с Azure, хостингом от Майкрософт, вместо реально полезных функций.
К сожалению, пока что, управлять всеми функциями Windows Server с удобствами можно только подключившись к нему по RDP.
Не смотря на все минусы, у Windows Admin Center есть свой SDK, с помощью которого можно писать свои собственные модули и управлять своим собственным ПО через него, что однажды сделает его лучше RSAT.

Windows Server Core installation option is good enough such that Windows administrators should standardize all of their servers to run as Core. It makes sense that the fewer operating systems you have present, the better your performance and the smaller your system attack surface. As of the 1709 update,Windows Server 2016 (semi-annual update channel) no longer allows you to add the GUI layer to a Server Core installation.
This tutorial will show you how to manage your Windows Server 2019 using Admin Center, PowerShell Core and sconfig utility.
Sconfig Utility
Windows 2019 Server Core does not have a Desktop GUI, so you need to navigate using command-line tools. After you log into the server, type sconfig to open the sconfig.cmd configuration utility, as shown in image below.
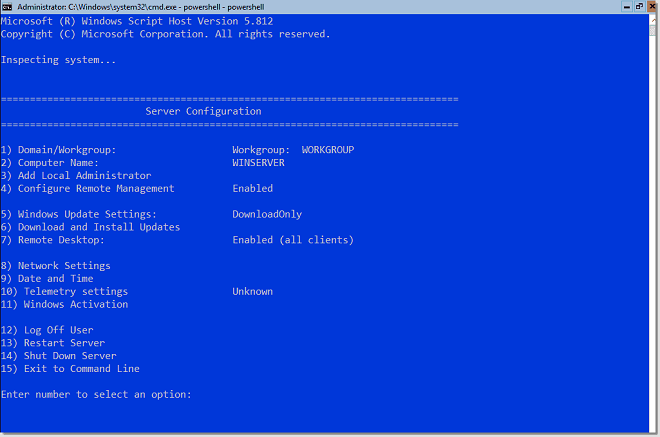
With sconfig, you use the numbered menu to configure the most important server properties, including:
Hostname
Time, time zone, and date
Domain membership
IP addressing
Remote access
While we’re at it, we should ensure WinRM-based PowerShell remoting is enabled. Type 15 to exit to a command line, type powershell to start PowerShell, and run the following command:
Enable-PSRemoting -SkipNetworkProfileCheck -Force
Install PowerShell Core
On your Windows 10 administrative workstation, open up an administrative PowerShell console and run the following command to ensure we can perform remote management of our Windows 2019 Server Core:
Set-Item -Path WSMan:\localhost\Client\TrustedHosts -Value * -Force
Download the latest x64 PowerShell Core release from Microsoft’s GitHub releases page. Next, let’s define a persistent PowerShell remoting session with the Server Core box (substituting your own server’s IPv4 address) and copy the .msi to the root of its drive C:
$session = New-PSSession -ComputerName 192.168.17.13 -Credential (Get-Credential)
Copy-Item PowerShell-6.1.0-preview.1-win-x64.msi C:\ -ToSession $session
To install PowerShell Core, run the following commands directly on the Windows Server 2019 server:
cmd
msiexec /i C:\ PowerShell-6.1.0-preview.1-win-x64.msi
exit
Install Windows Admin Center
Windows Admin Center, formerly called Project Honolulu, has been a long time coming in Windows Server. We’ll install Windows Admin Center in Desktop mode on our Windows 10 administrative workstation.
Download the software, run the .msi installer, and select a management port.
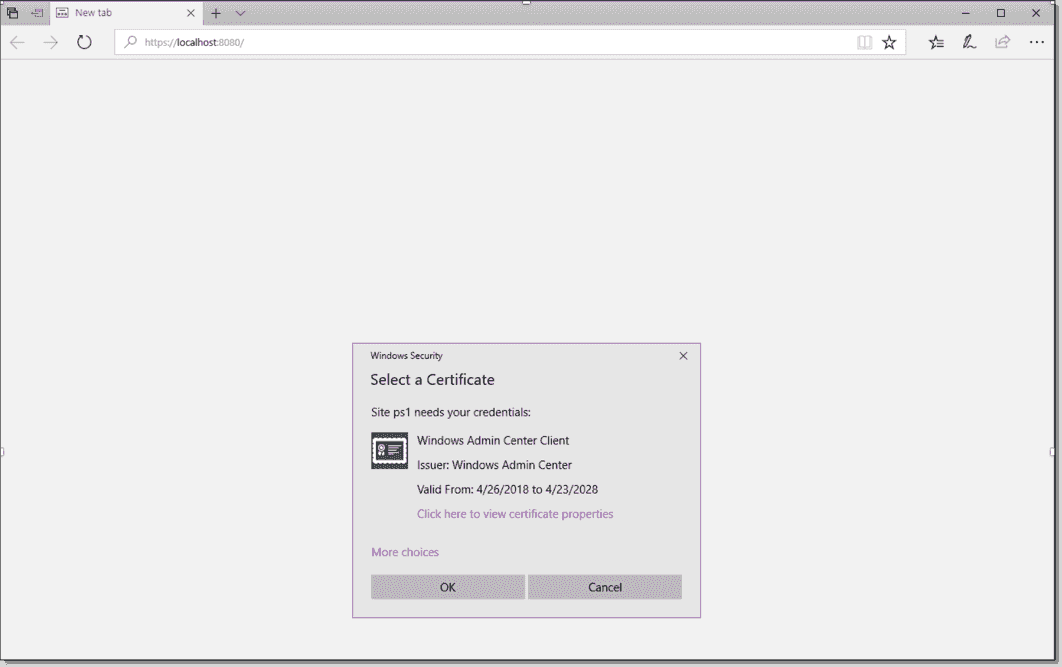
Windows Admin Center can manage Windows Server 2019, Windows Server 2016, Windows Server 2012 R2, and Windows 10 hosts from a central web console. On first launch, be sure to accept the self-signed management certificate as shown in the image below.
Logging in takes you to the All Connections list by default. Windows Admin is a modular web application comes with the following features:
Server Manager (to manage Windows Servers)
Computer Management (to manage Windows 10 hosts)
Failover Cluster Manager
Hyper-Converged Cluster Manager
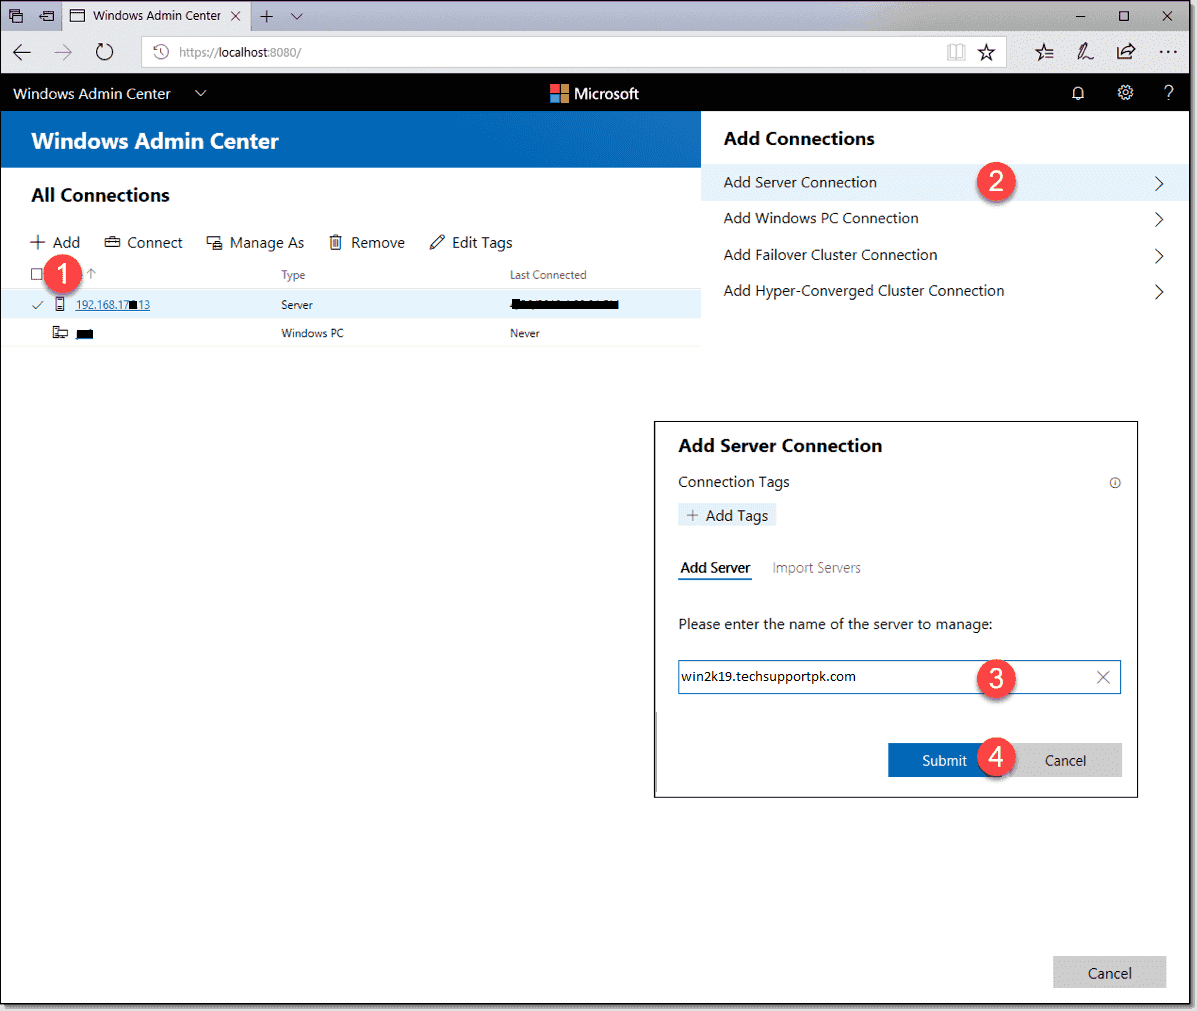
Click Add, select Add Server Connection, specify the DNS name or IP address of your new Windows Server 2019 host, and click Submit.
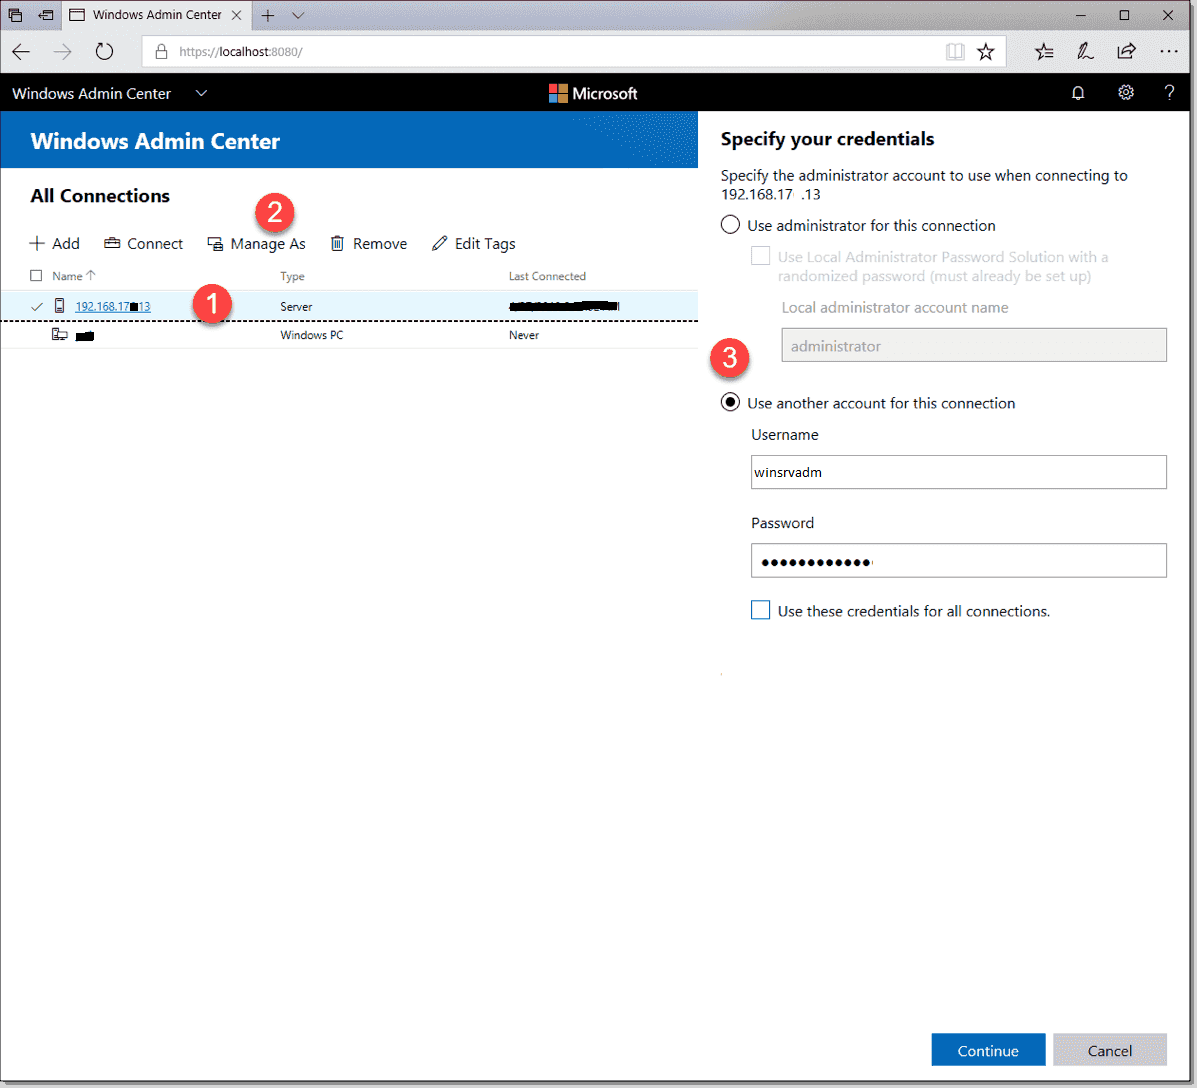
Click Connect to authenticate to the remote server, your options include:
Your current credentials, with or without Local Administrator Password Solution (LAPS)
Alternate credentials
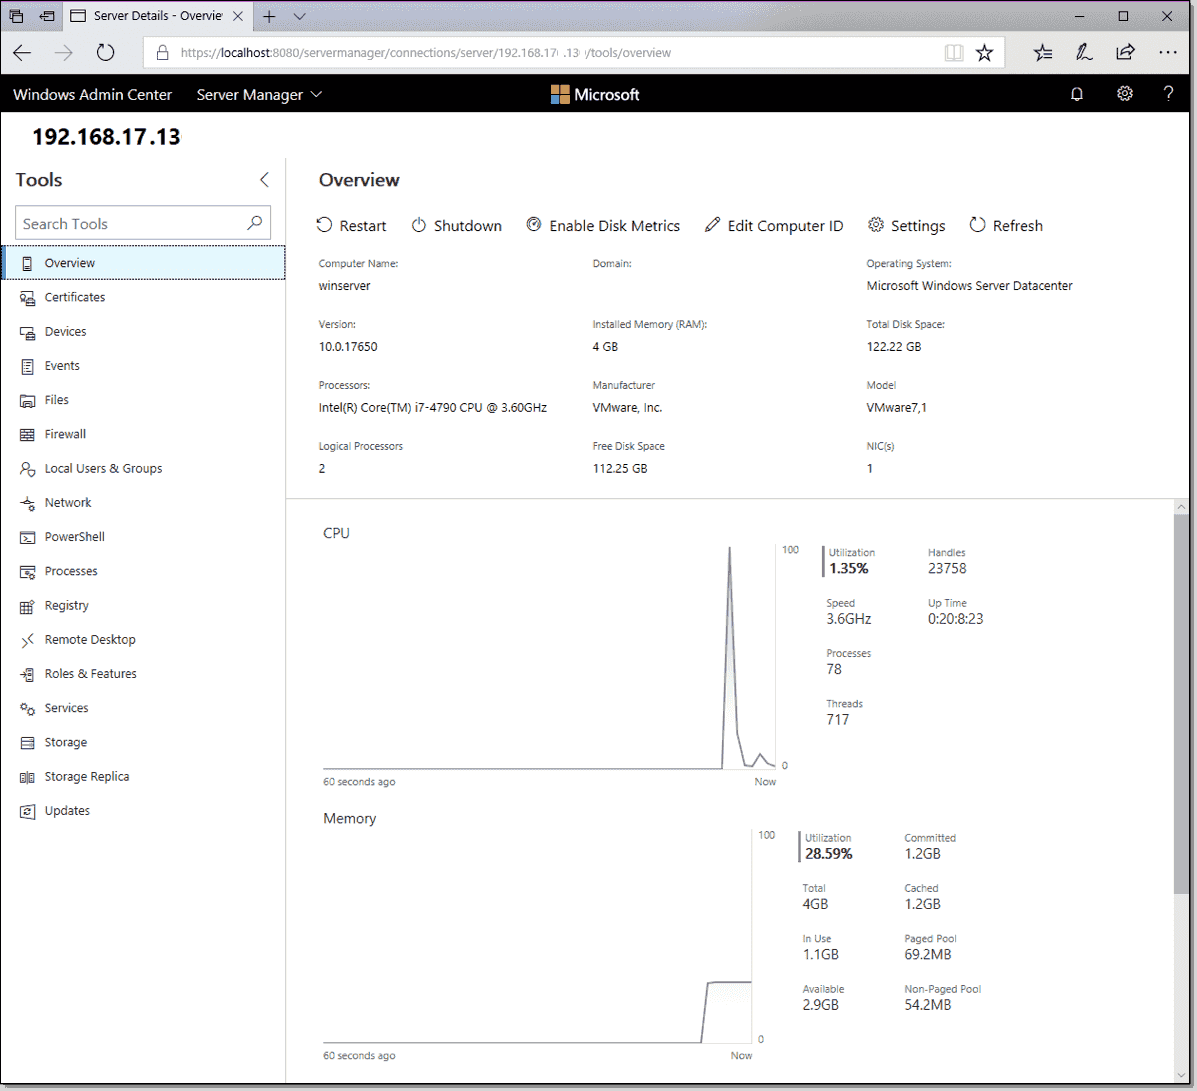
Finally, you reach the Server Manager installed solution as shown in image below.
Wrapping up
I am sure, once you go-ahead with browser based Windows Admin Center, you will never use the Desktop GUI with Windows Server ever again.
February 19, 2020
| by Dominique St-Amand
|
2 min read
If you’re familiar with the Microsoft offering, Windows Server 2019 Datacenter Core does not have a UI. My goal was to be able to connect to it remotely, without having to remote desktop on it (the remote desktop is only a command line prompt).
There’s plenty of articles around the internet about WinRM, but I wanted demonstrate here a quick way of getting started without researching too much. Thanks to Scott Sutherland WinRM cheatsheet and Matt Wrock post on understand and troubleshooting WinRM.
For this demo I provisioned a VM on Azure, using the Windows Server 2019 Datacenter Core Image. I also installed the Windows Admin Center, which you can download from here.
TL;DR
- Open PowerShell
- Enable WinRM:
Enable-PsRemoting -Force - Make sure the WinRM service is setup to start automatically
- Trust all the hosts in WinRM
- Open the WinRM HTTP port in the Firewall:
netsh advfirewall firewall add rule name=«WinRM-HTTP» dir=in localport=5985 protocol=TCP action=allow - Open the port 5985 in the NSG (inbound)
- Add a DNS label to your Public IP DNS (if you’re not using you’re own DNS)
- Configure Windows Admin Center to connect to your DNS label and specify the credentials to use another account for this connection
How to
After you provisioned the VM, login to it using Remote Desktop.
Get into PowerShell session by typing PowerShell.
Once in PowerShell, enable WinRM by typing
Enable-PsRemoting -Force
Make sure the WinRM service is setup to start automatically
|
Set-Service WinRM -StartMode Automatic # Verify start mode and state — it should be running Get-WmiObject -Class win32_service | Where-Object {$_.name -like «WinRM»} |
Trust all the hosts in WinRM. Note, in a Production environment, you do not want to do this.
|
Set—Item WSMan:localhost\client\trustedhosts —Value * |
Check that all the hosts are trusted
|
Get-Item WSMan:\localhost\Client\TrustedHosts |
Open the WinRM HTTP port in the Firewall
netsh advfirewall firewall add rule name=«WinRM-HTTP» dir=in localport=5985 protocol=TCP action=allow
Open the port 5985 in the NSG (inbound)
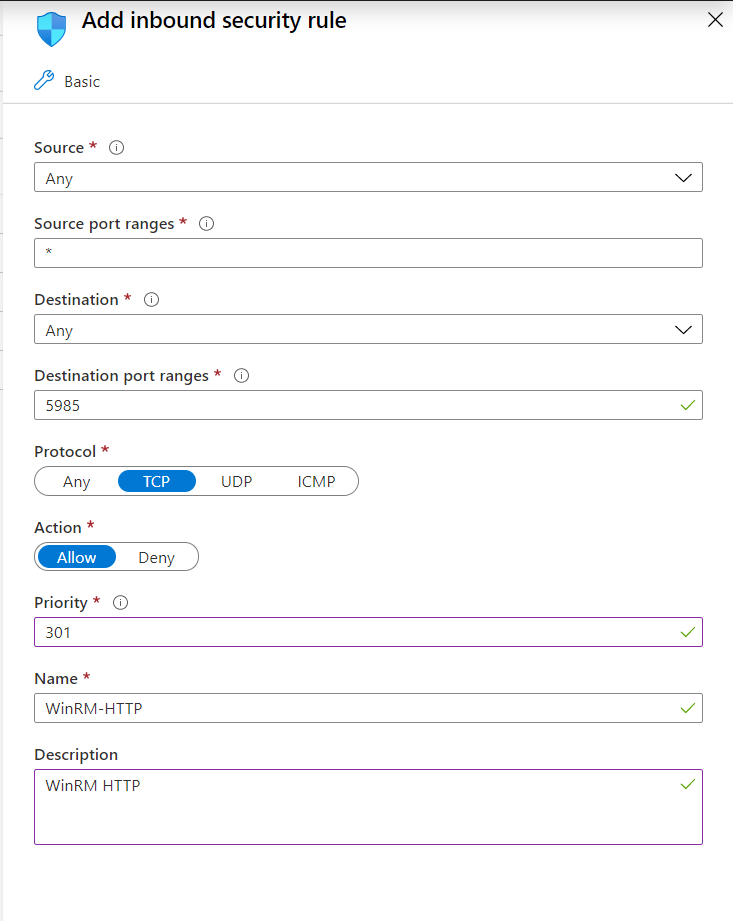
WinRM NSG
Again, in a production environment, you will need to secure this.
Add a DNS label to your Public IP DNS (if you’re not using you’re own DNS)
Test that the connection works
In a *nix/osx environment, use the following command
|
nc -z -w1 <IP or host name> 5985;echo $? |
If you’re using Windows, you can use Test-WSMan
Test-WSMan -ComputerName <IP or host name>
Configure Windows Admin Center
In Windows Admin Center, click the Add button

Then select Windows Server
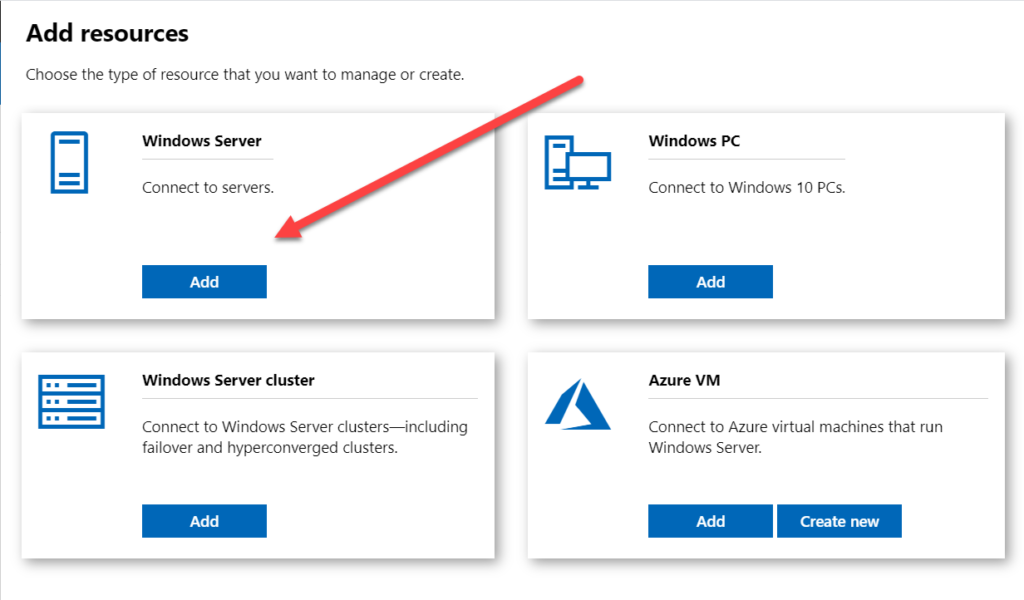
Note you can also connect to an Azure Virtual Machine, but you will need to sign in to your Azure account
Enter your DNS label name associated to your public ip
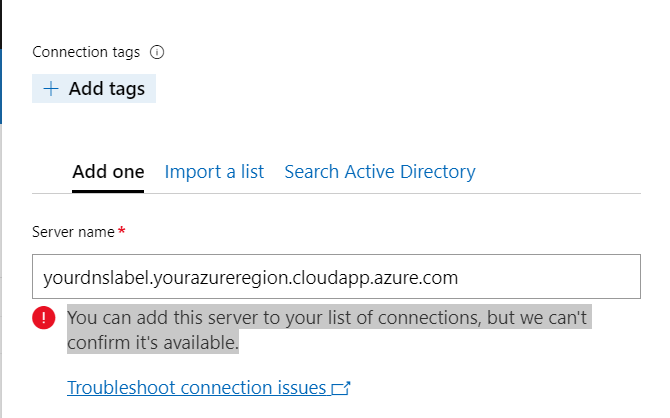
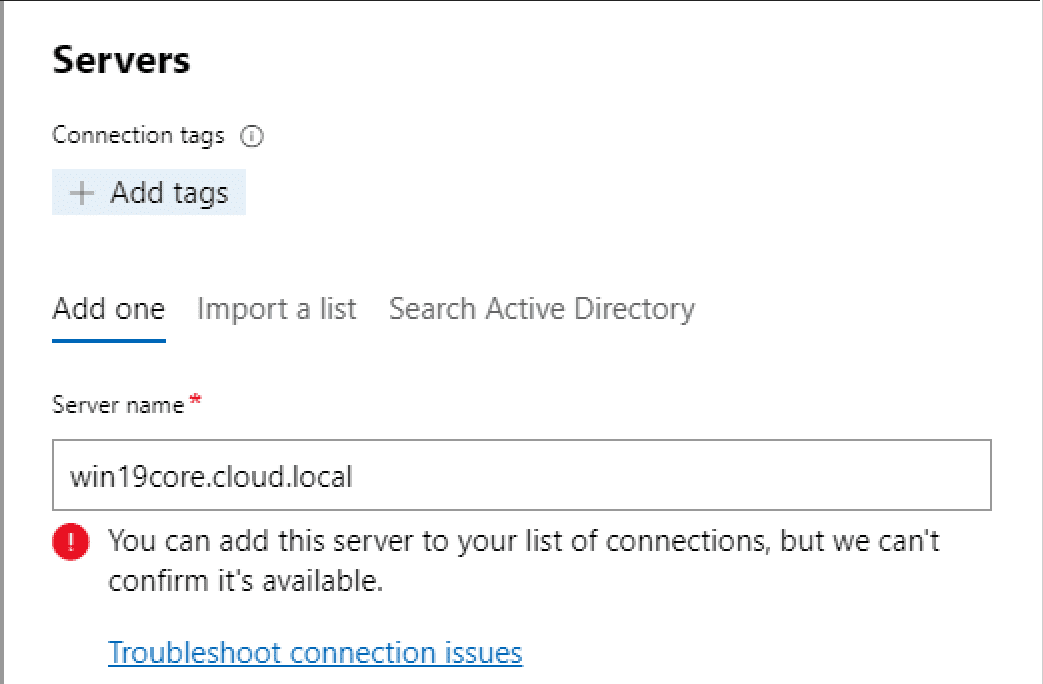
When adding your server name, the tool may tell you You can add this server to your list of connections, but we can’t confirm it’s available. You can discard the warning.
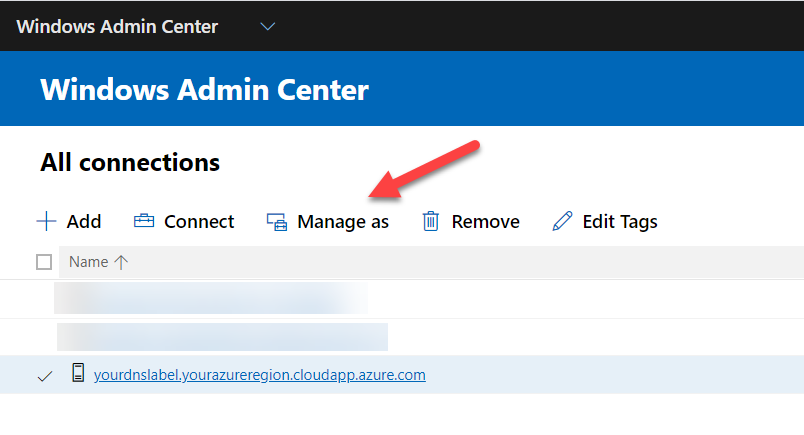
Select your server and click Manage as
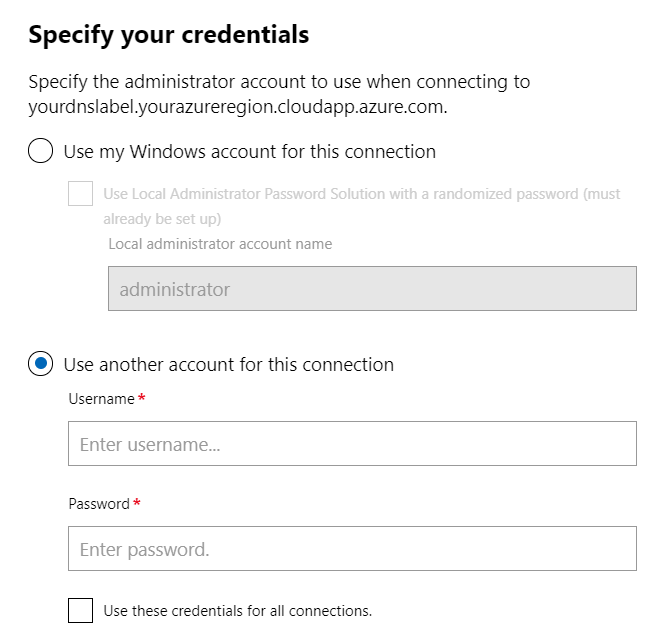
Then specify your credentials and select Use another account for this connection
Views: 25,734
powershell-remotingpsremotingwindowswinrm
Recently, a blog post from Microsoft caught my attention as the discussion was around the adoption of Window Server 2019 Core edition. Microsoft detailed in this post that Windows Server 2019 Core edition has the fastest adoption rate of any Windows Server Core edition in since it was an official option. One of the boosts to the adoption of Windows Server 2019 Core edition is Windows Admin Center. Windows Admin Center provides the management front end that has long been missing with Windows Server Core edition. In this post, we will take a look at managing Windows Server 2019 Core with Windows Admin Center to get a look at the basic steps you need to manage Windows Server Core with Windows Admin Center as well as a good overview of the capabilities you will have with WAC and Windows Server 2019 Core edition.
What is Windows Admin Center and Why is it Important with Windows Server Core?
As I mentioned above, the Windows Admin Center solution is the long missing piece that Microsoft has needed to make Windows Server Core edition a success and a release that customers will actually pick when installing Windows Server in their environments.
The benefits to running Windows Server Core edition are obvious. You get a minimized security footprint, a much smaller, less bloated server operating system and a Windows Server version that provides what many have been looking for to compete with Linux installations over the years, simplicity.
However, the old Windows Server GUI administration mentality has long plagued the Windows Server Core edition. Many have struggled to be able to effectively manage Windows Server Core edition when coming from the GUI-driven Windows Server interface that administrators love/hate.

With the struggles that many IT admins have had with effectively interacting with Windows Server Core edition and being able to properly install, manage, configure, and troubleshoot the platform, many simply forgo the benefits of the minimized operating system and simply install the Windows Server Desktop version.
Windows Admin Center is a brand new management solution from Microsoft that is set to change the way administrators interact with Windows Servers, both GUI and Core versions. The great news as well with WAC is that it is free. This is no paid solution and is readily available from Microsoft as a free download.
What I really like about WAC is the way it brings all the tools that we know and love under one management tool. You have all the standard tools that you are used to with Windows Server, all in a single dashboard and readily accessible.
Windows Admin Center provides an extremely effective way to manage Windows Server. It is installed either on Windows Server or Windows client operating systems like Windows 10.
There are two installation modes:
- Local Client – Install on a local Windows 10 client that has connectivity to the managed servers. Great for quick start, testing, ad-hoc or small scale scenarios.
- Gateway Server – Install on a designated gateway server and access from any client browser with connectivity to the gateway server. Great for large-scale scenarios.
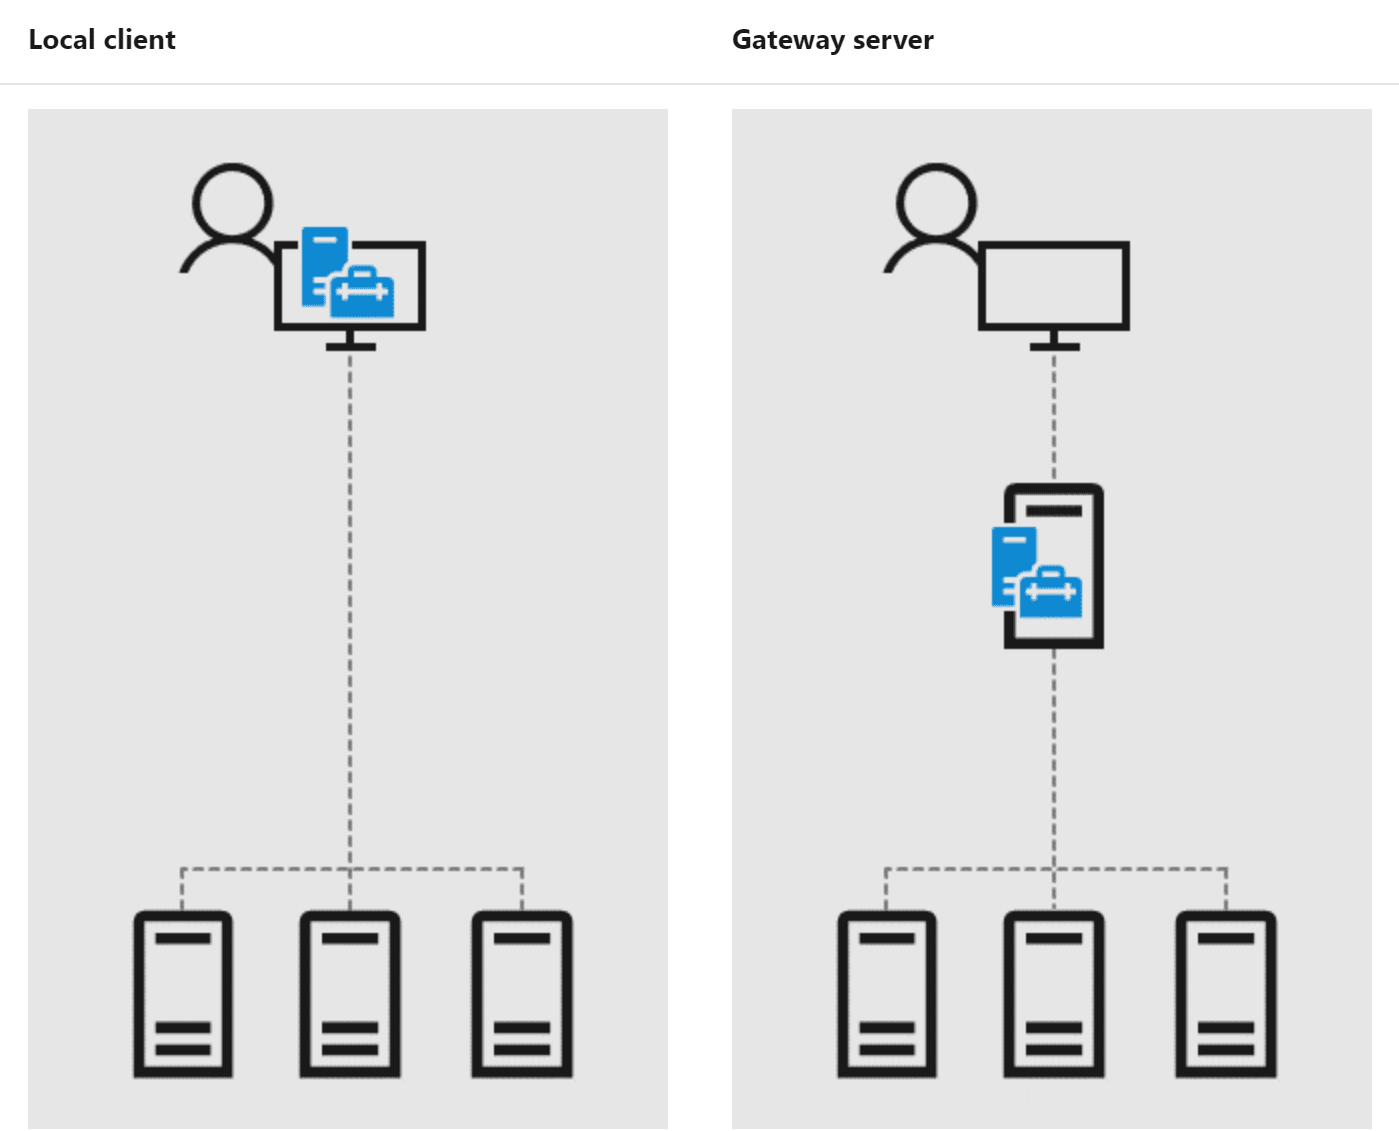
Windows Admin Center, once installed, is accessed via a web browser. This allows easily accessing your WAC dashboards and managed servers for easy administration. In gateway server mode, you can have WAC installed on a server that everyone logs into for administration. This helps to centralize the layout of your tools in the environment for managing your servers by means of a management server running WAC for centralized administration.
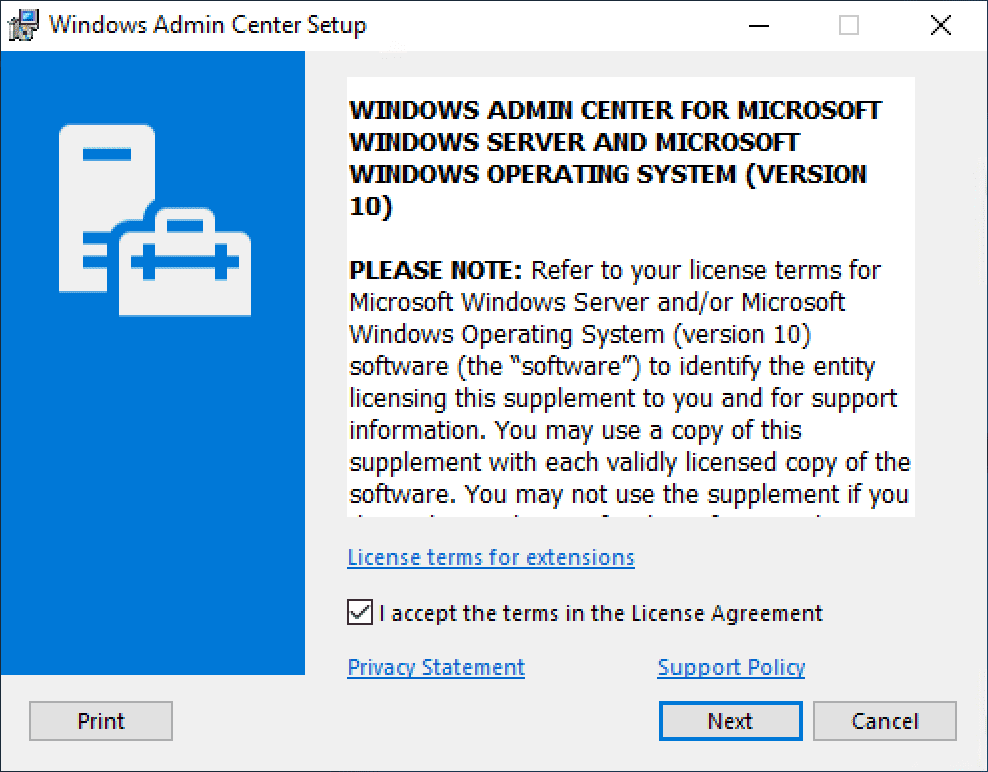
Installing Windows Admin Center
The process to install Windows Admin Center is very straightforward. First, you will want to snag the latest release of WAC. The link below will take you directly to be able to download the latest releases.
- https://docs.microsoft.com/en-us/windows-server/manage/windows-admin-center/understand/windows-admin-center
There is always the Preview version that contains all the features up to this point, however, may have some stability issues and other bugs.
There is always a stable, broadly tested version on the page as well that is probably the best option for use in production.
Managing Windows Server 2019 Core from Windows Admin Center
The first thing you will want to do in Windows Admin Center is Add the server you want to manage with Windows Admin Center. There is a special configuration we need to enable for Windows Server Core however.
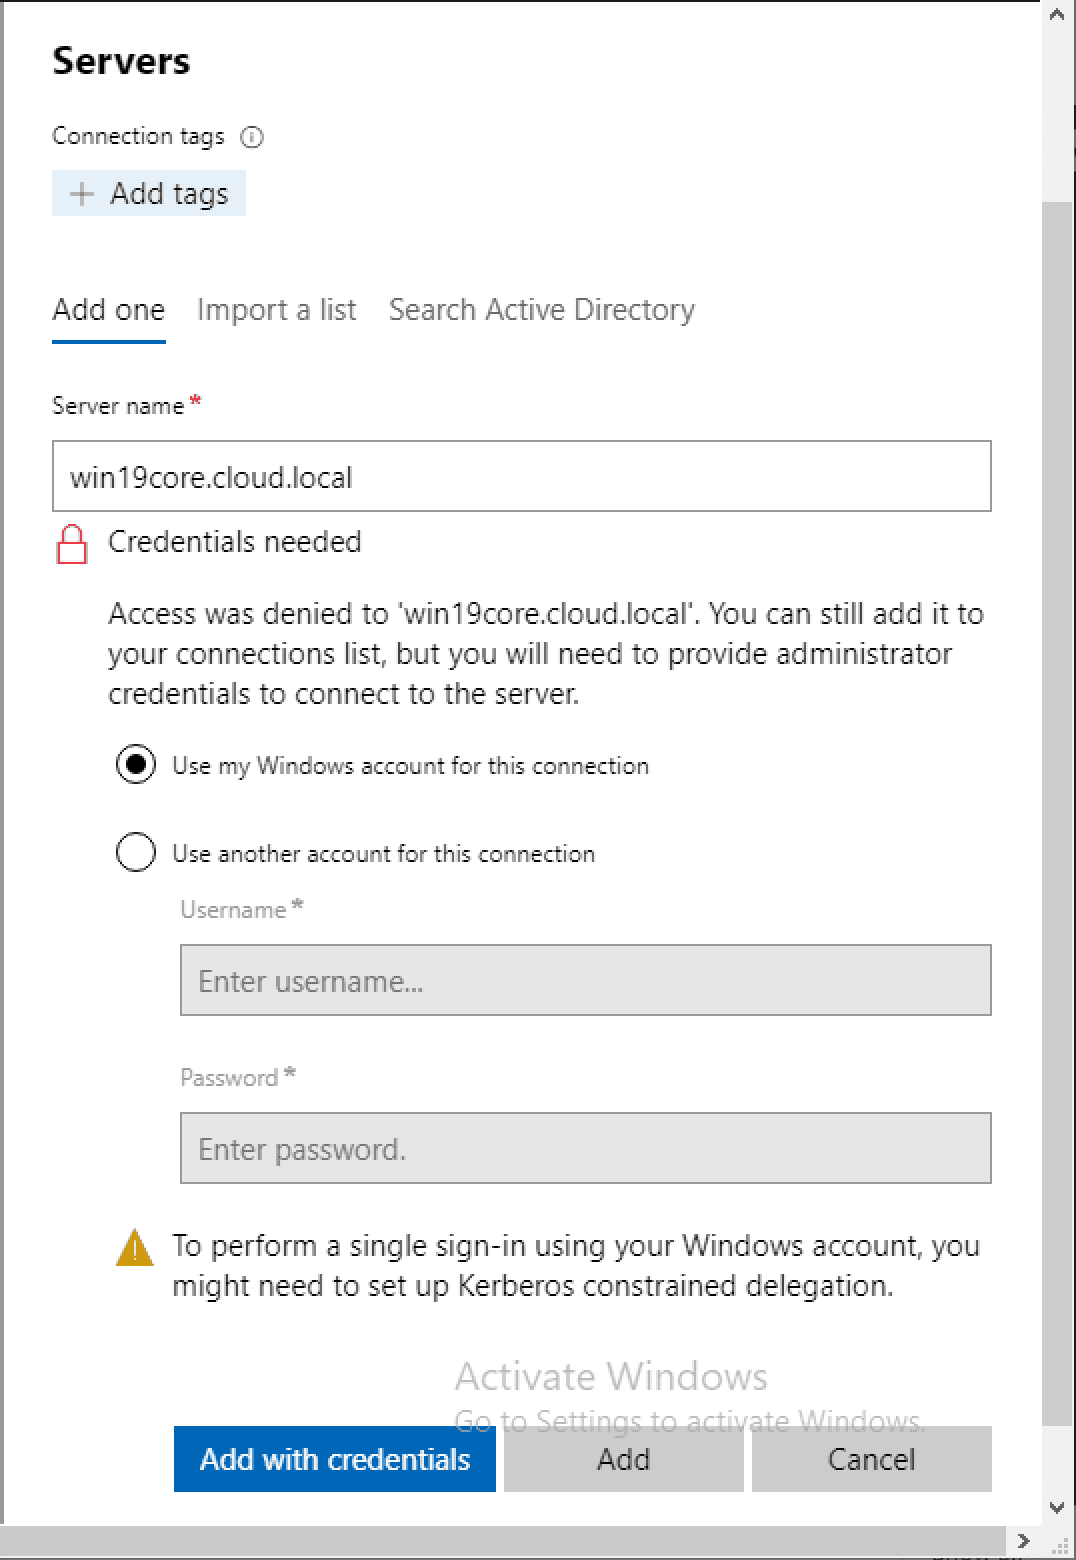
Below, I am attempting to add the Windows Server 2019 Core server to Windows Admin Center without any configuration changes. As you can see, Windows Admin Center attempts to add the server, but tells you basically that it can’t connect to the server in question. You can go ahead and add it to Windows Admin Center, but most likely you will not be able to manage it, unless you have made a chance to your Windows Server Core installation.
Notice the message below, “You can add this server to your list of connections, but we can’t confirm it’s available.” Inevitably, this means that it is not communicating with your Windows Server Core server.
Enable Remote Management for Windows Server 2019
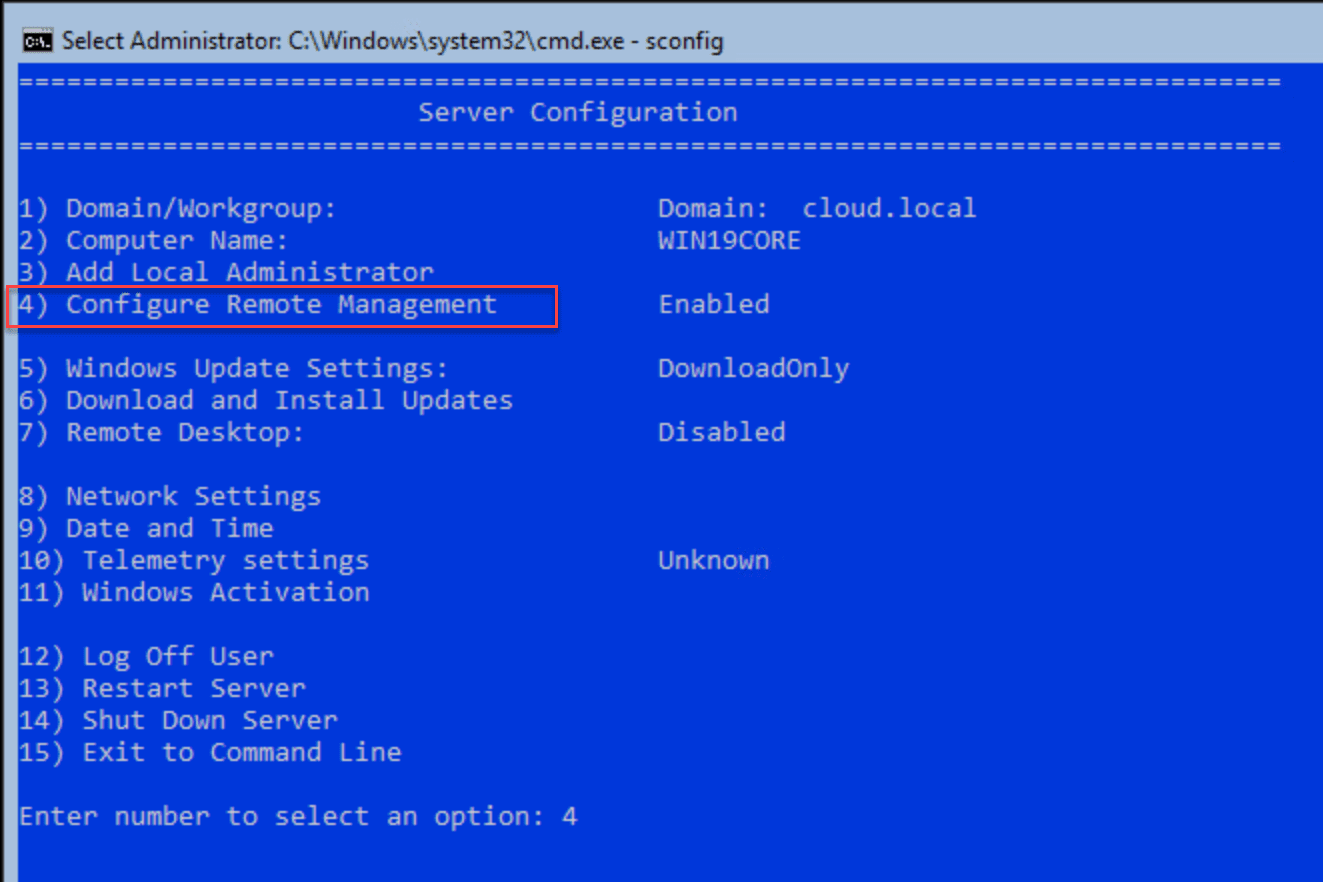
If you have used any version of Windows Server Core edition prior to Windows Server 2019, you are most likely already familiar with sconfig. If not, it is easy to become acquainted with this utility. It provides a simple, menu driven interface that allows you to quickly perform very common admin tasks on your Windows Server Core installation. By default, this utility launches once you login with Windows Server Core.
Notice Option 4 – Configure Remote Management. This simple menu option allows you to configure the remote management configuration for your Core installation, simply and easily.
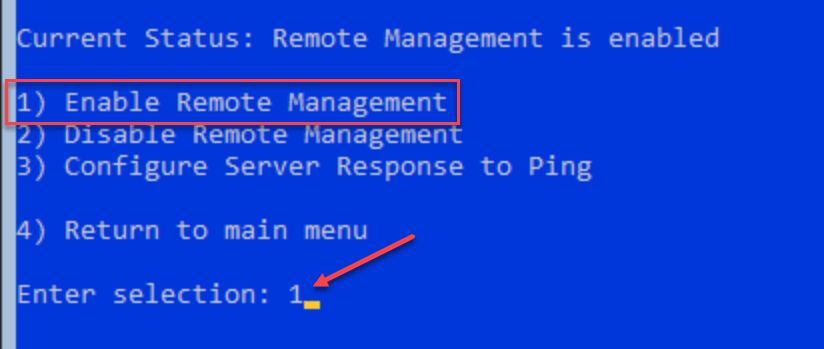
After choosing option 4, select Option 1 – Enable Remote Management.
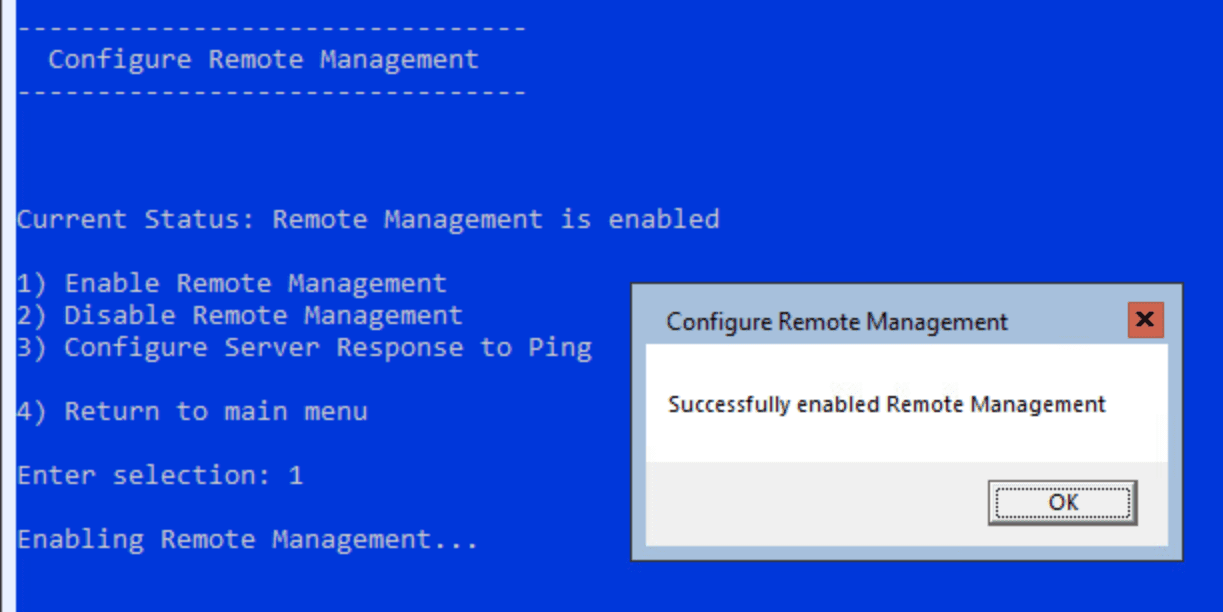
You will quickly see a dialog box pop up saying Successfully enabled Remote Management which confirms the remote management features and connectivity settings have been enabled.
Now we get a different response. Windows Admin Center is now able to connect remotely to the Windows Server Core installation. Now, we are simply being prompted for credentials. You have a few options here.
Now let’s take a look at Managing Windows Server 2019 Core with Windows Admin Center. There are so many things you can do with Windows Admin Center that makes life very easy to manage Windows Server 2019 Core installations. Let’s go through a few of the capabilities of Managing Windows Server 2019 Core with Windows Admin Center.
As mentioned earlier, one of the hurdles to using Windows Server Core is the lack of easy GUI tools to configure, manage, and interact with the system.
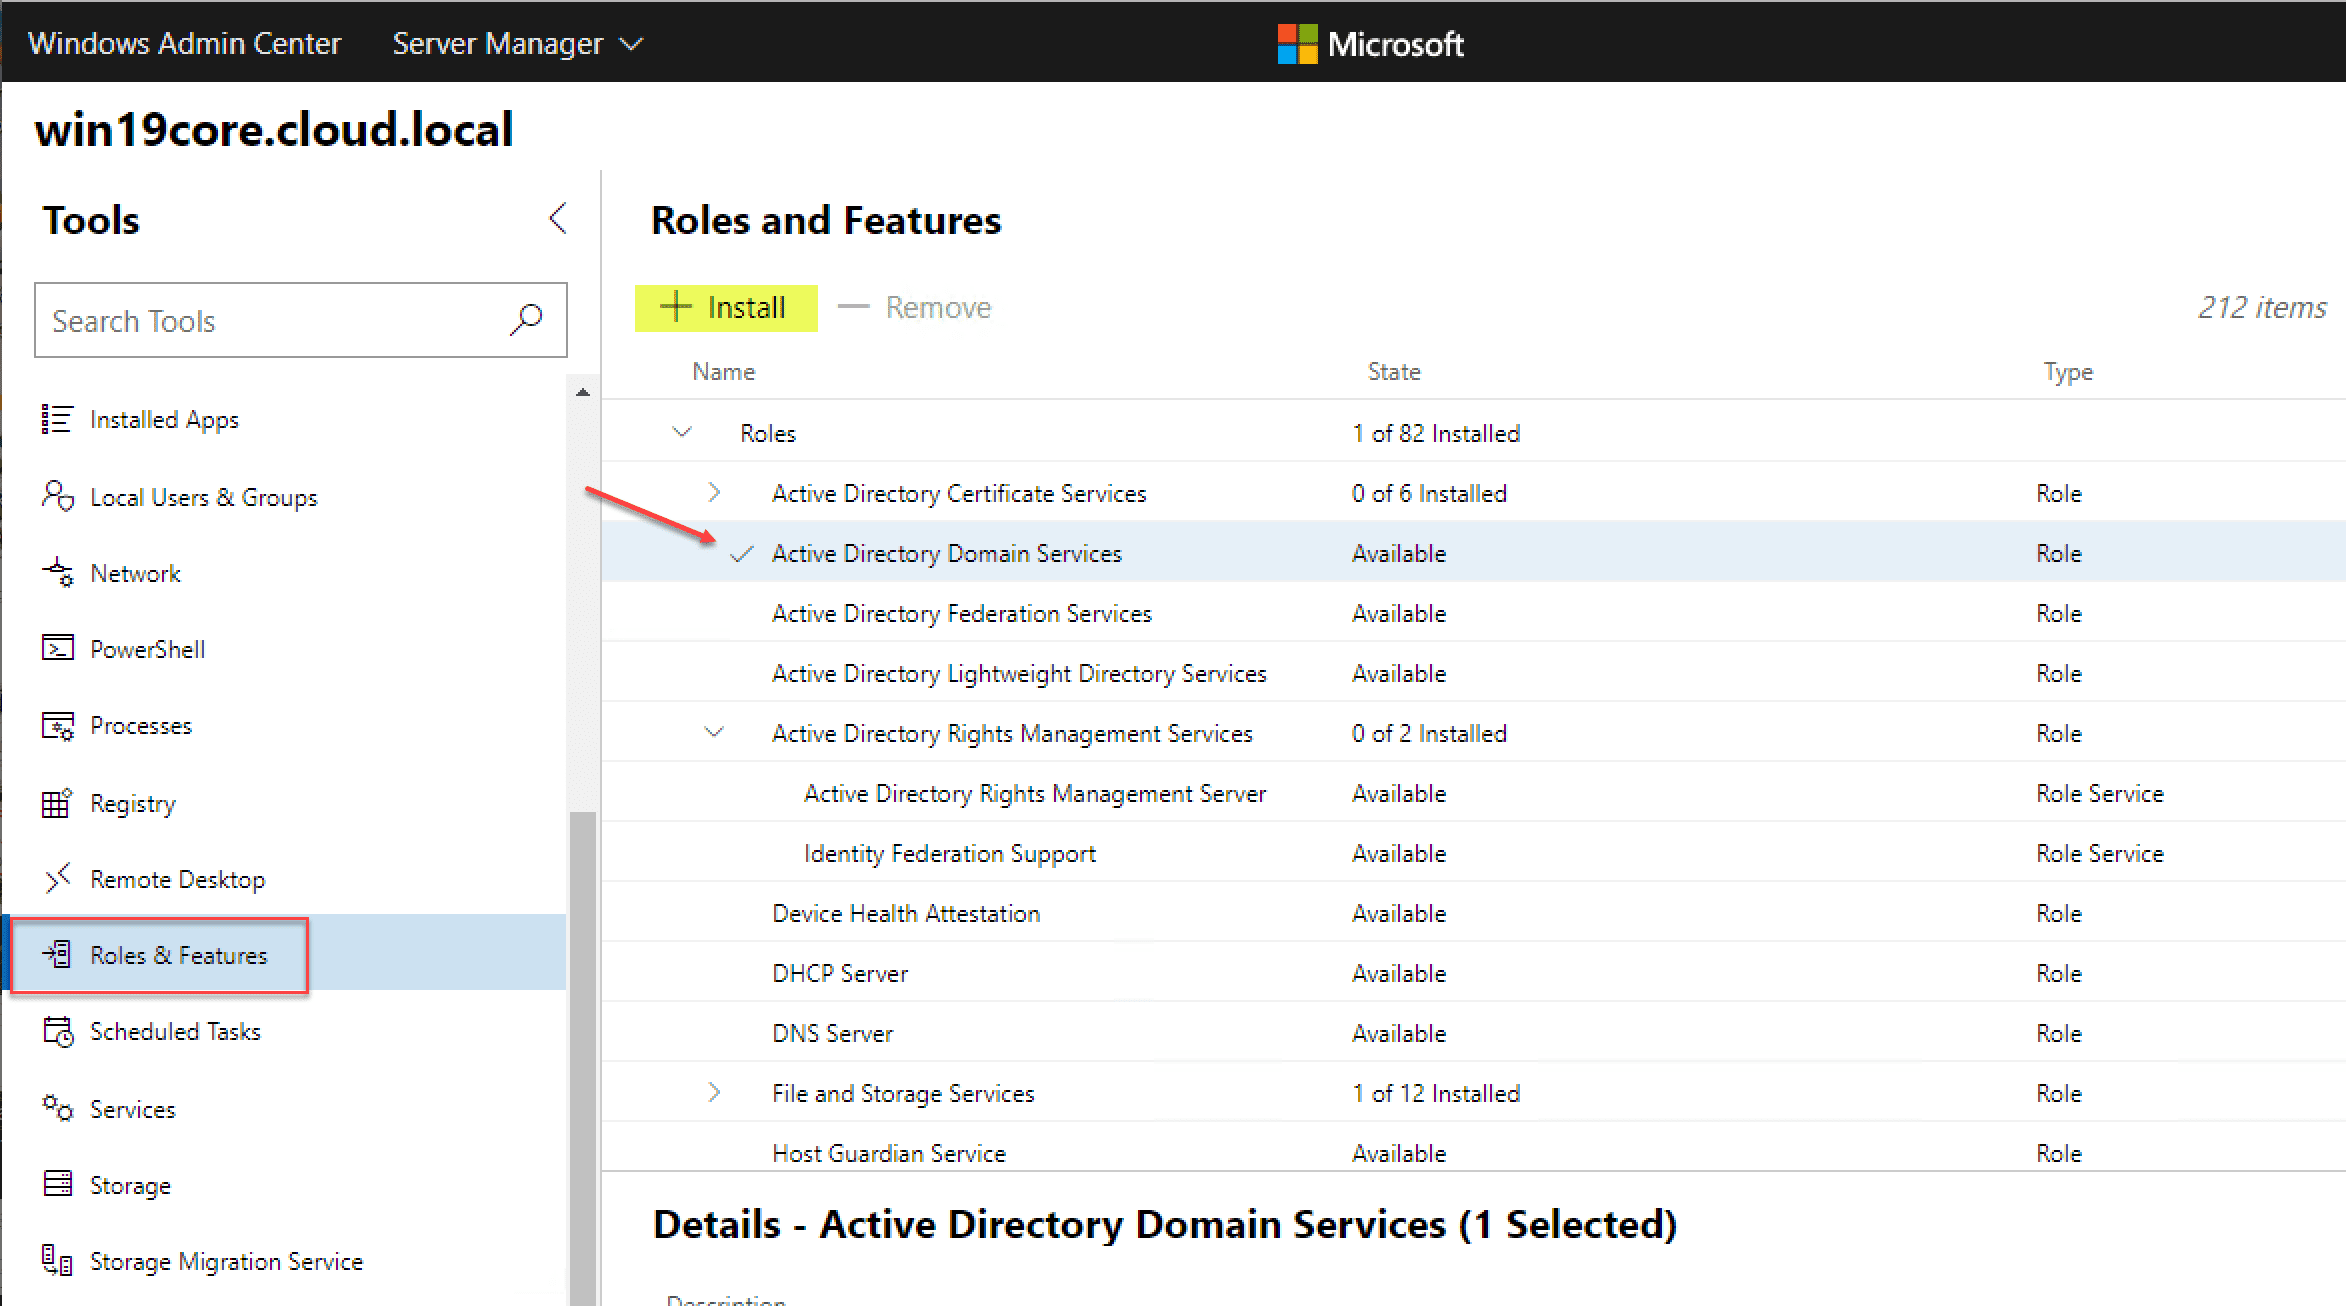
Adding Roles and Features
No doubt, one of the first things you will want to do with your Windows Server 2019 Core installation is add roles and features to the server. Whether, you are going to use it as a domain controller, file server, DNS, DHCP, etc, you will need to install the appropriate role.
Using Windows Admin Center, simply clcik the Roles & Features menu. Once you highlight a role/feature, you can place a check in the box next to it. This enables the +Install button at the top. This makes Roles & Features installation easy on Windows Server 2019 Core.
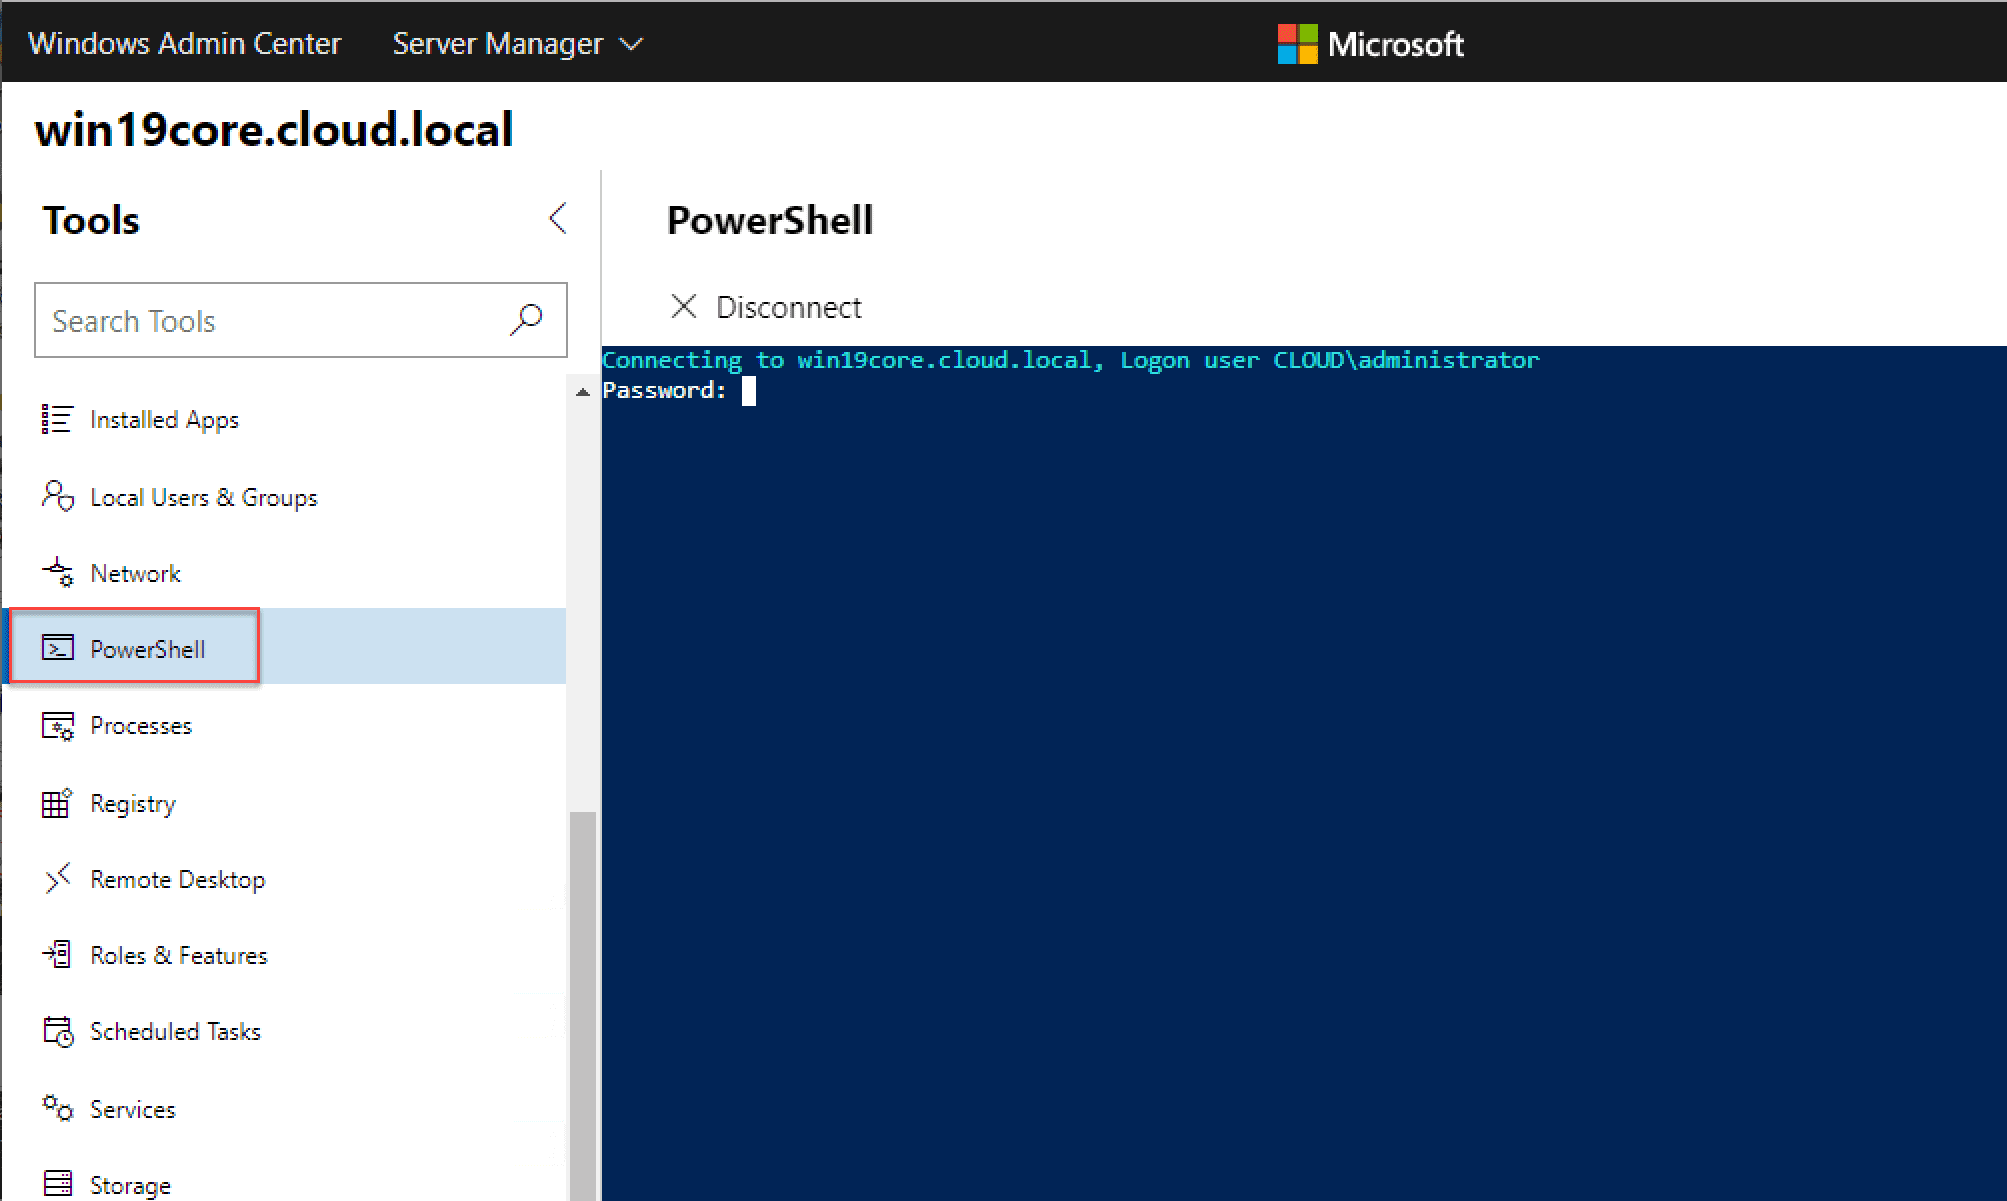
Remote PowerShell with Windows Admin Center
Using Remote PowerShell on your Windows Server 2019 Core installation is extremely easy with Windows Admin Center. Click the PowerShell menu option on the left. You will then be prompted for credentials on your Windows Server 2019 Core server. Enter your credentials and you will be able to use remote PowerShell right from the interface of Windows Admin Center!
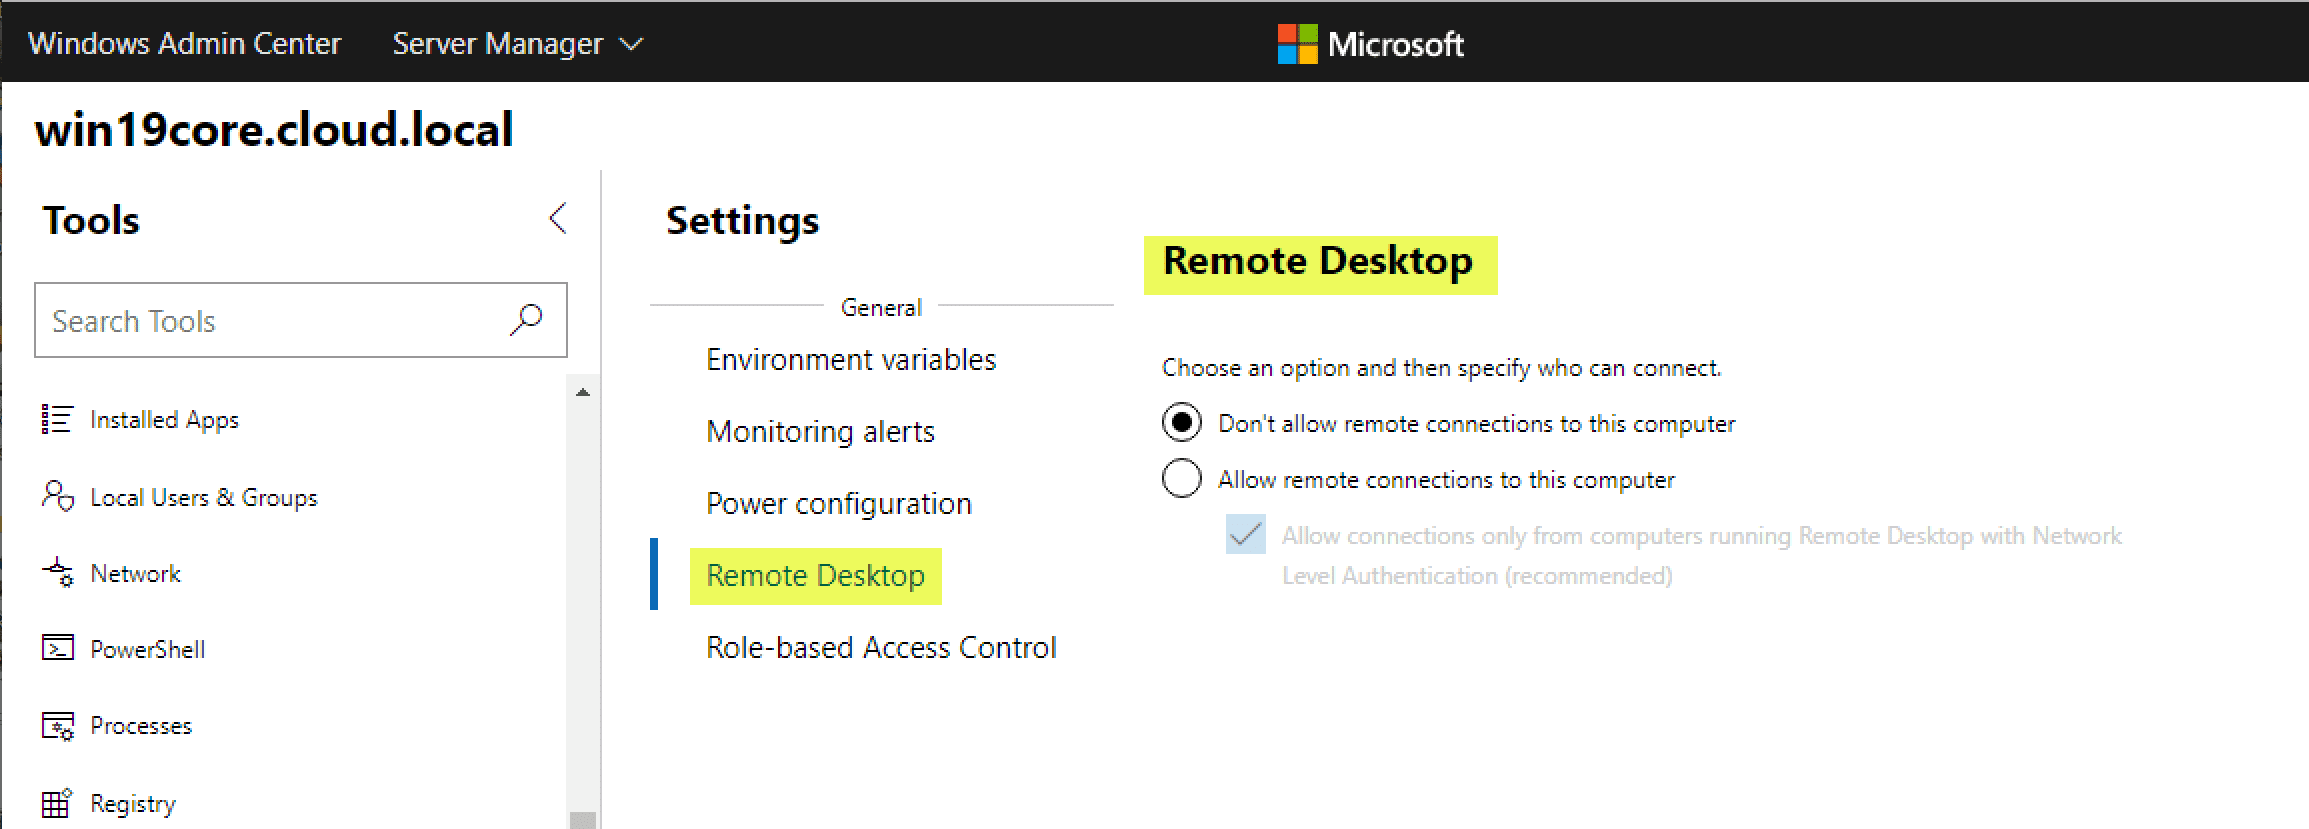
Enable Remote Desktop with Windows Admin Center
You will most likely want to have Remote Desktop enabled on your Windows Server 2019 Core installation. Under the Settings menu > Remote Desktop you will have the familiar menu presented to enable remote desktop with NLA and other options.
Managing Windows Server 2019 Core Services with Windows Admin Center
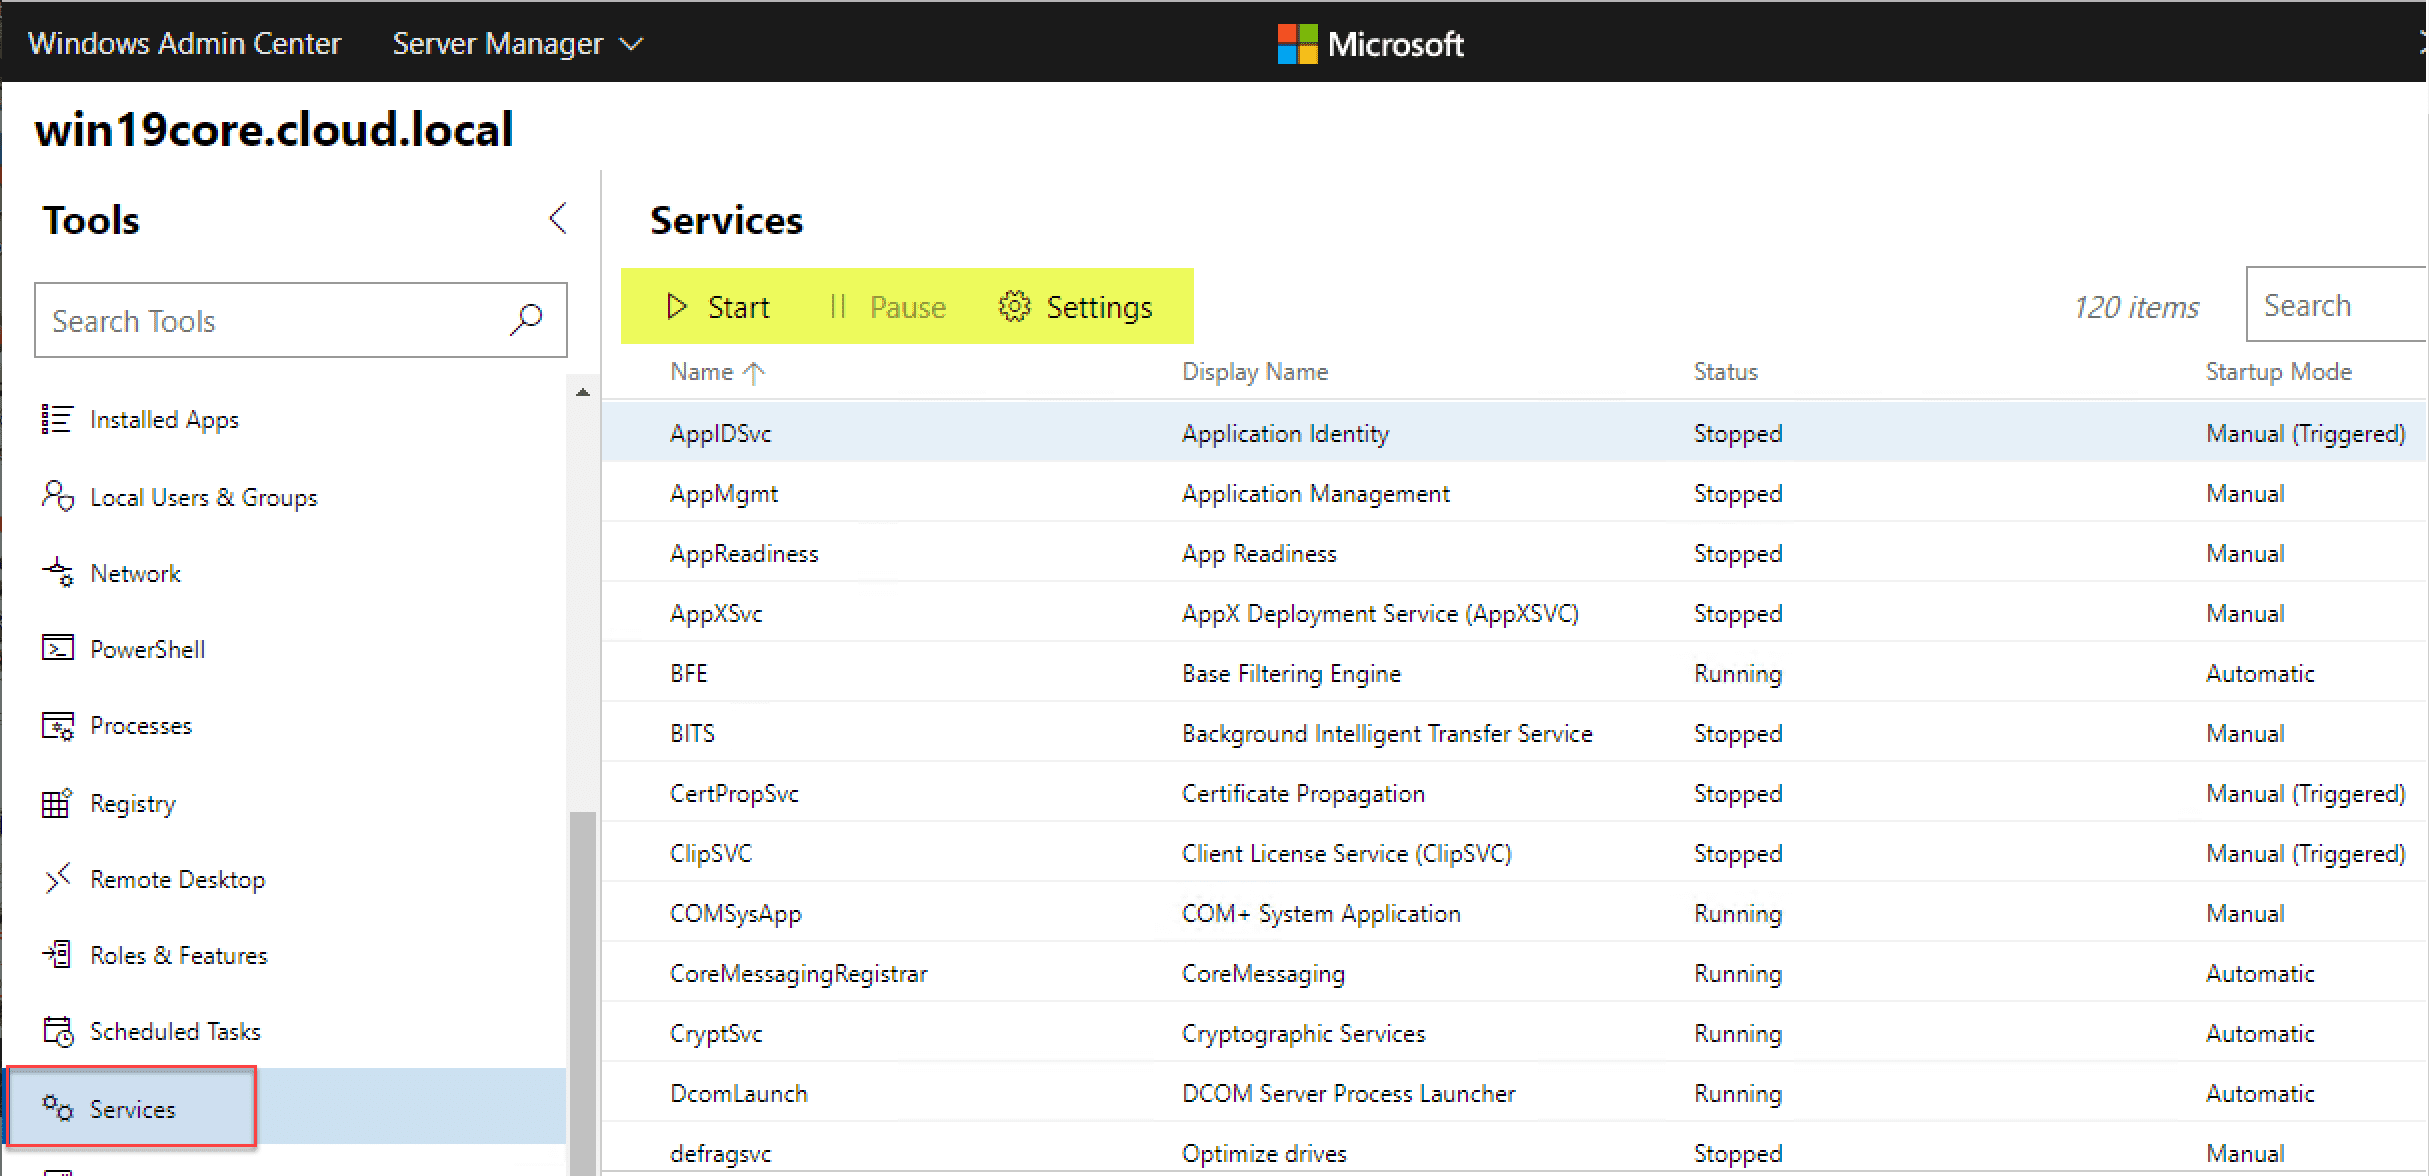
Managing your Windows Server 2019 Core services is easily accomplished using Windows Admin Center. Click Services and you will see your services with the ability to start, pause, and configure settings for the services.
Configure Network Settings Remotely on Windows Server Core
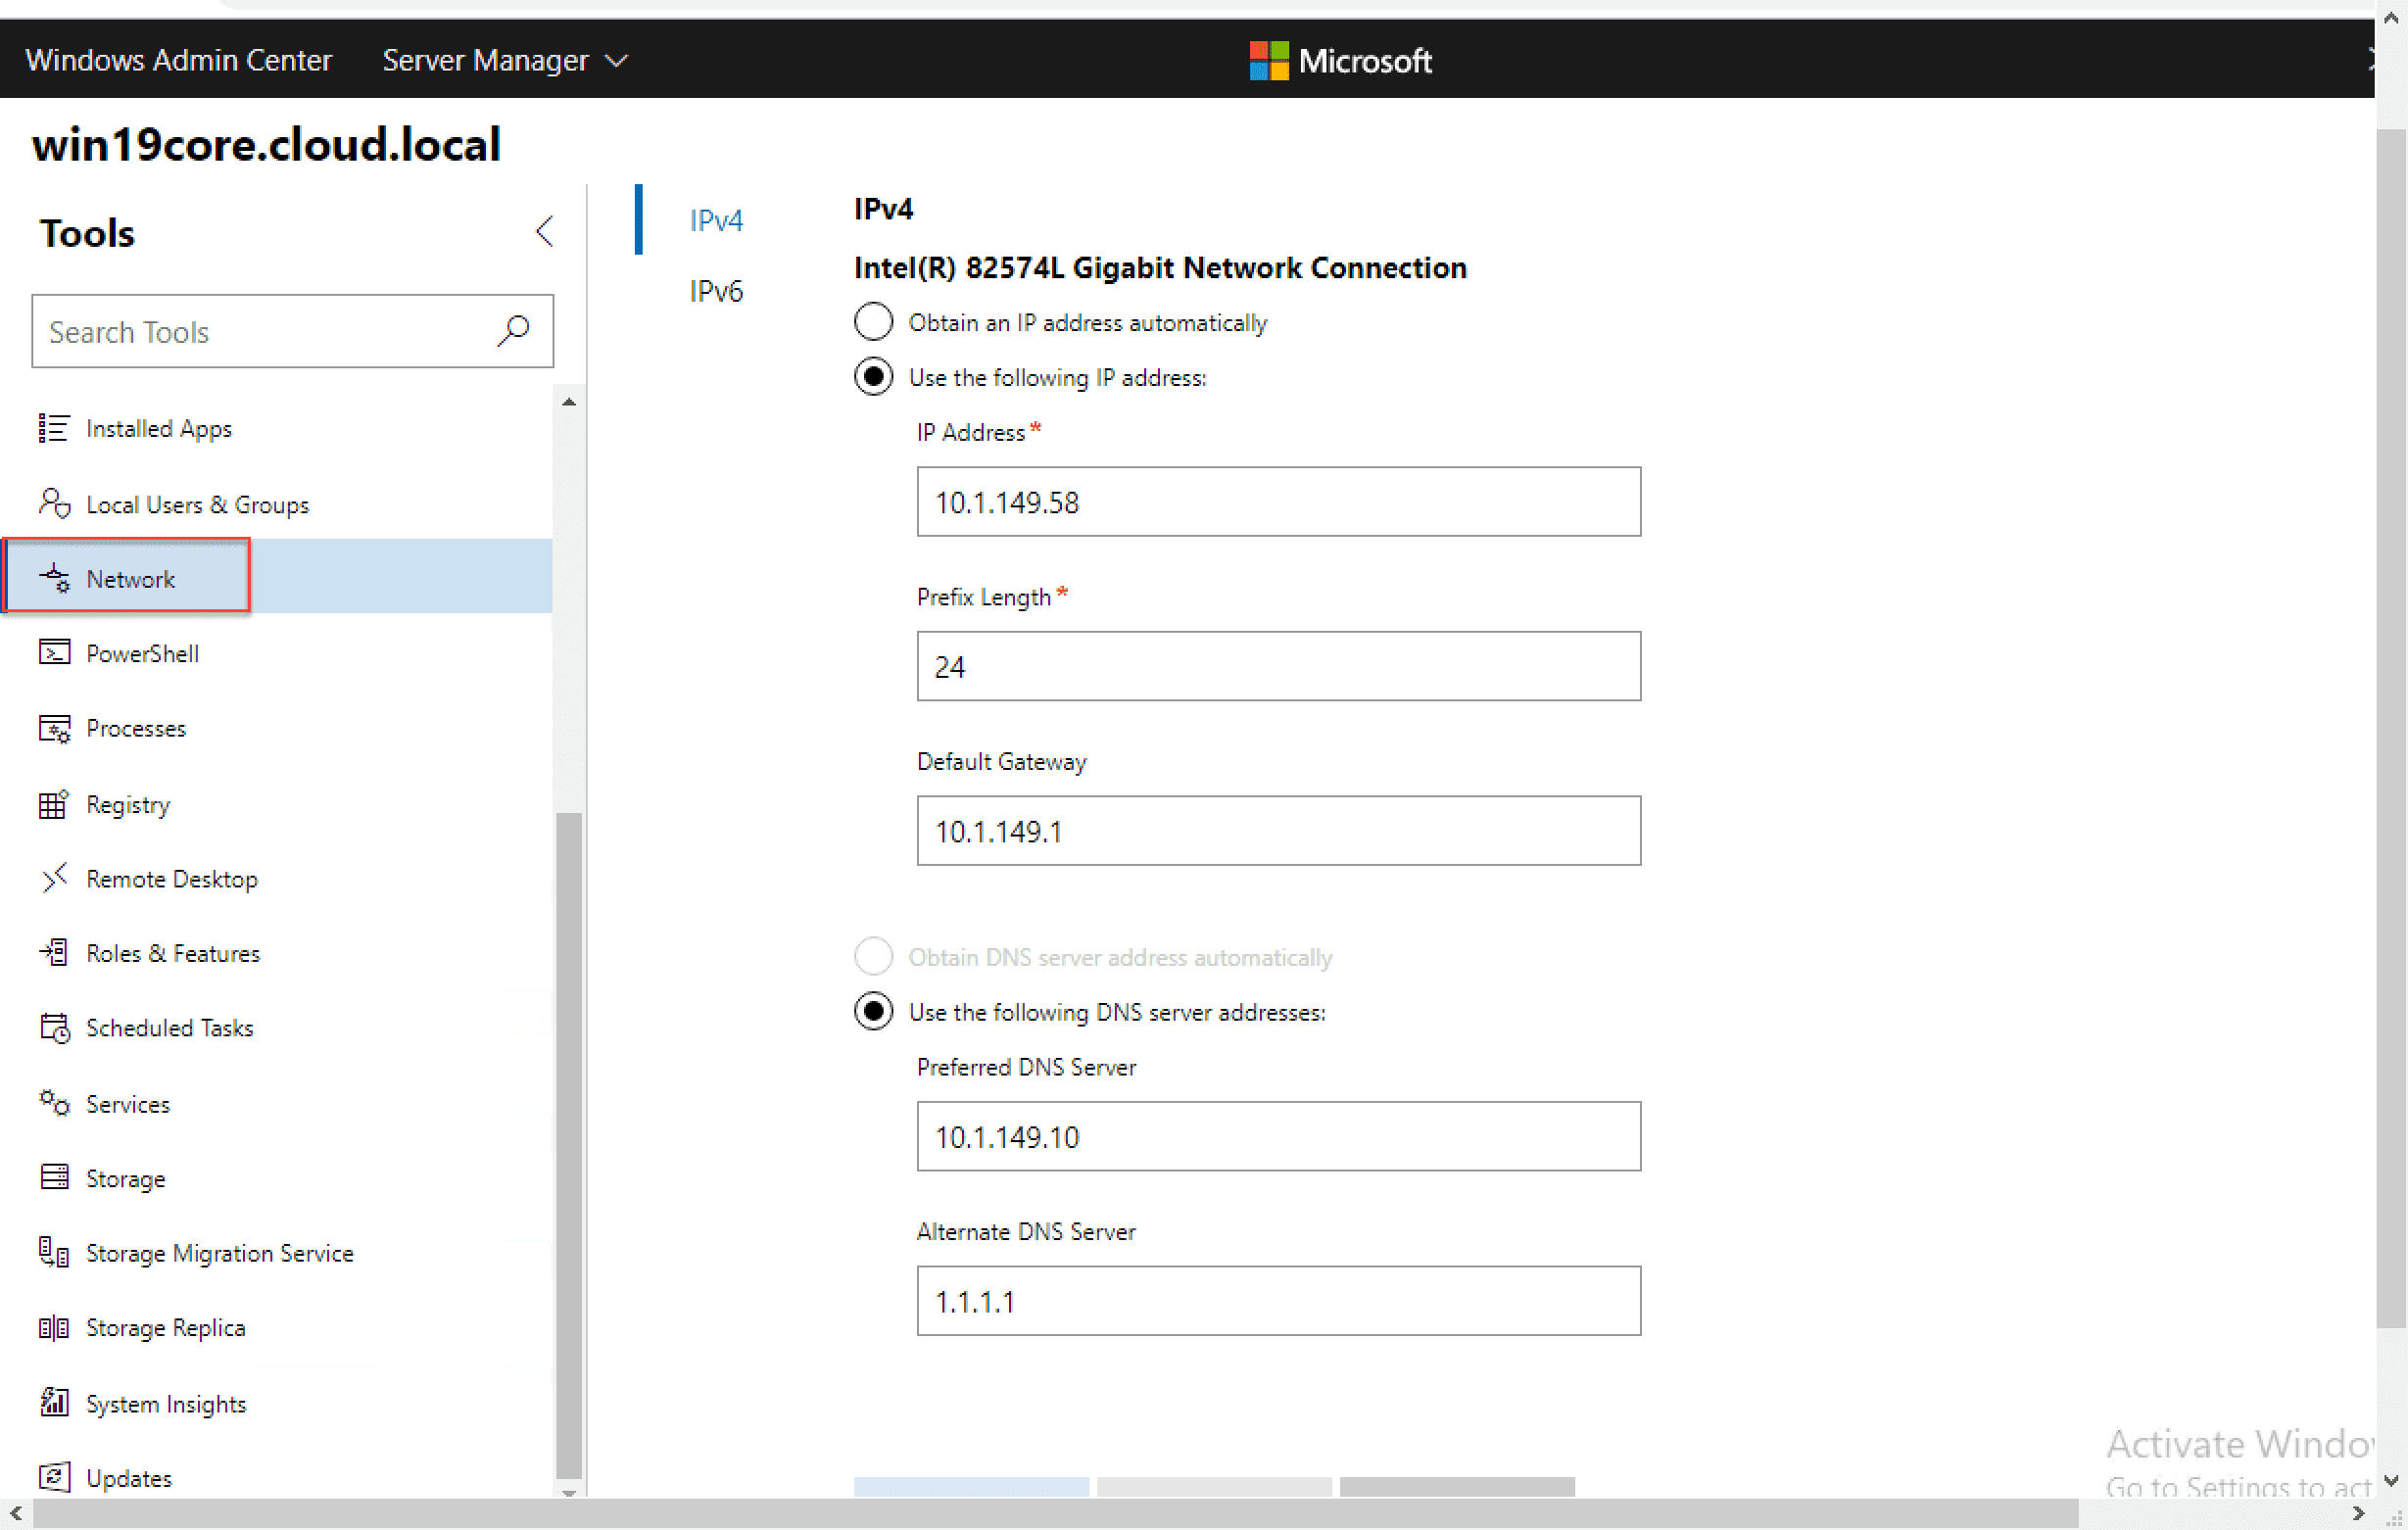
Windows Admin Center Network menu allows you to configure your network settings for the Windows Server Core installation. You can change all the expected settings from address, gateway, DNS, and others.
Configure System Insights
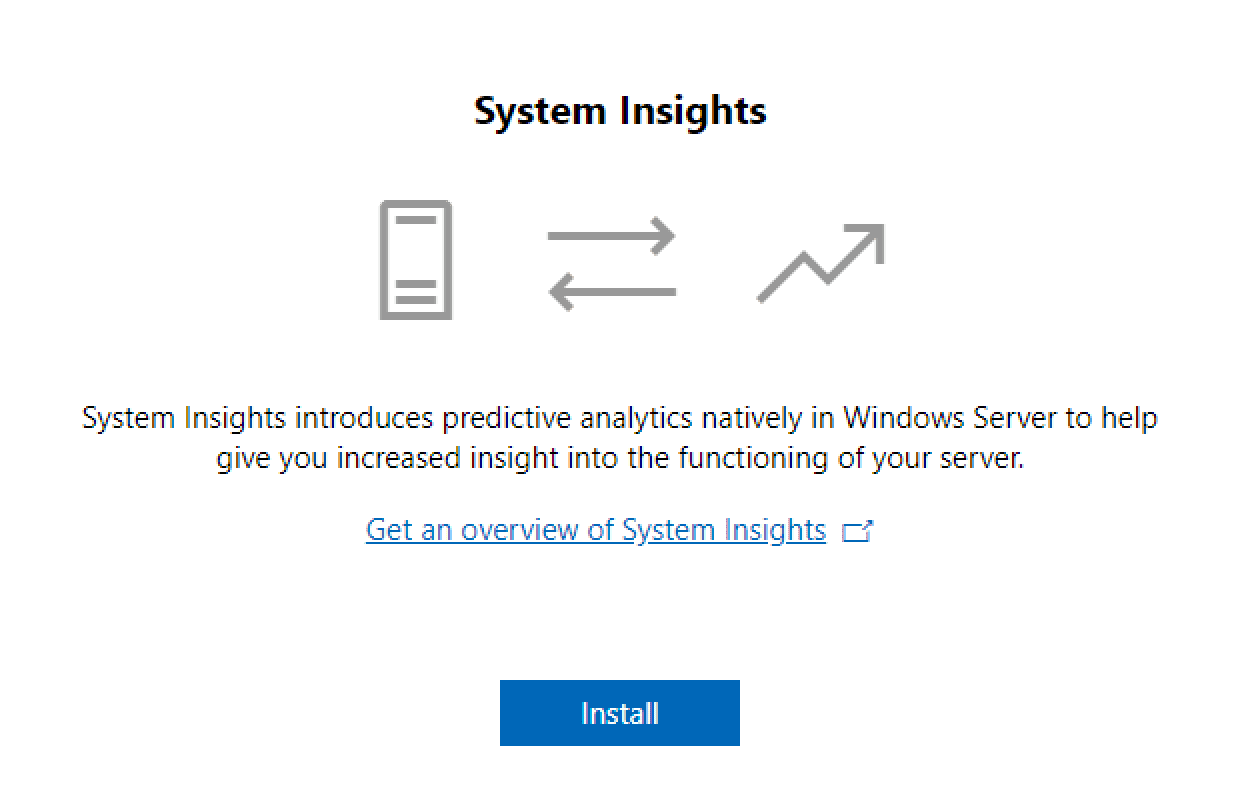
System Insights provides a powerful, predictive analytics, performance, and monitoring platform, built right into Windows Admin Center. When you click on System Insights, you will be prompted to Install the plugin. This will be done for you automatically.
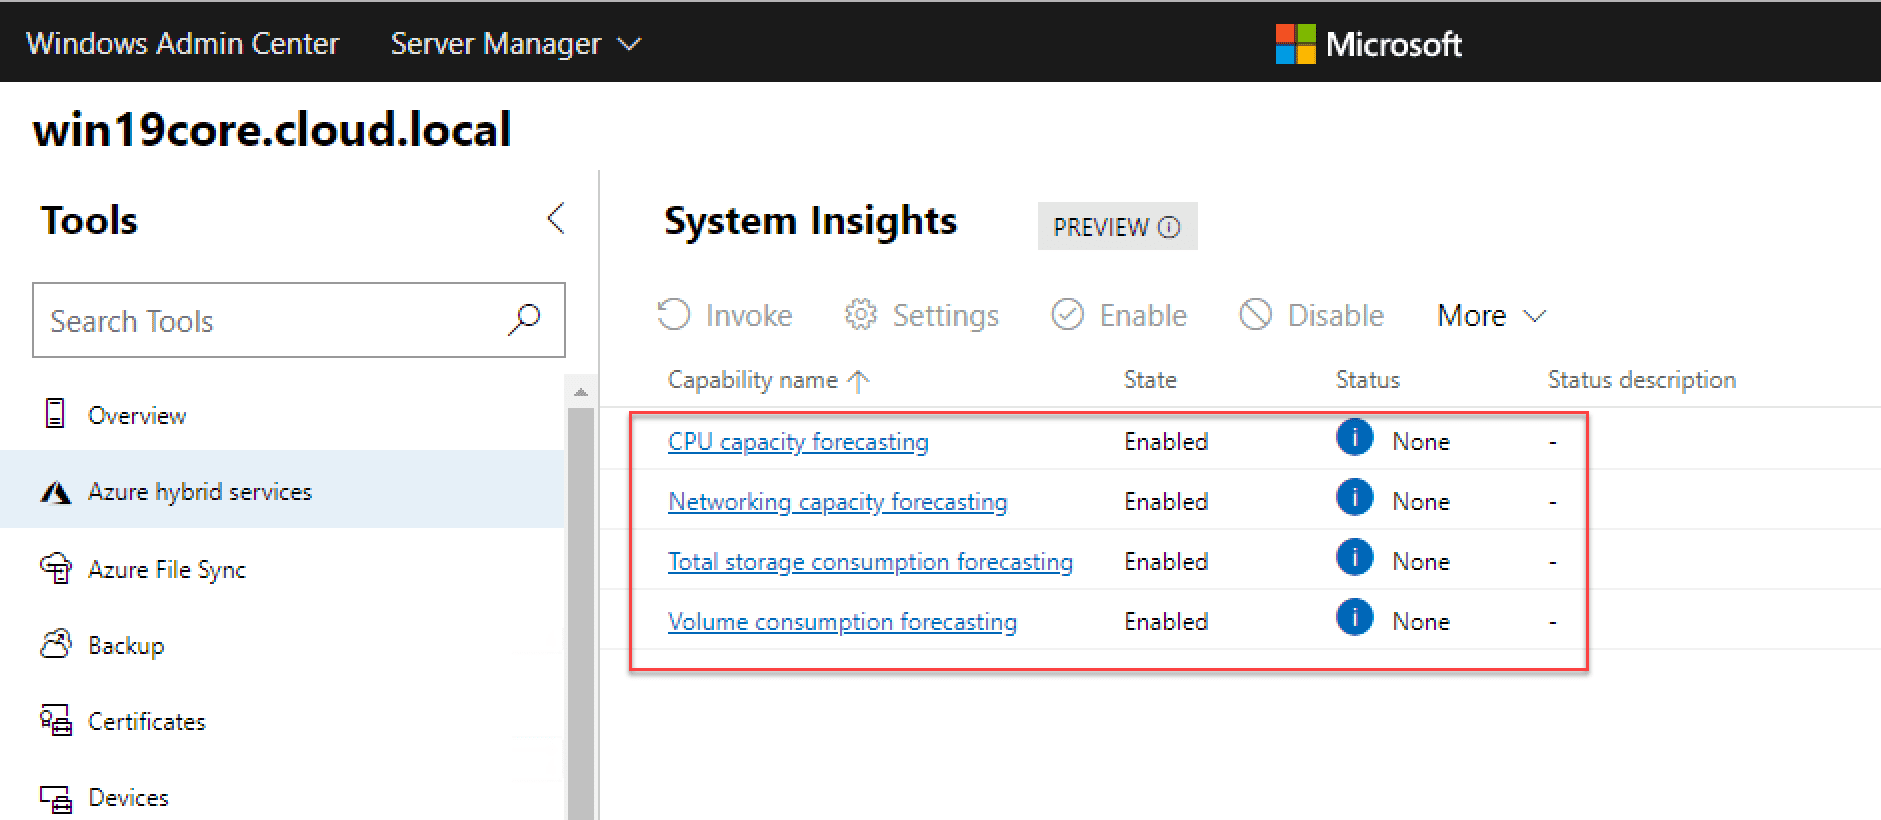
After installing System Insights, you will have the ability to forecast CPU, networking, storage consumption, and volume consumption. Keep in mind it will take a while for the initial metrics to pull and the forecast to be generated. This provides a great tool for capacity management and other purposes.
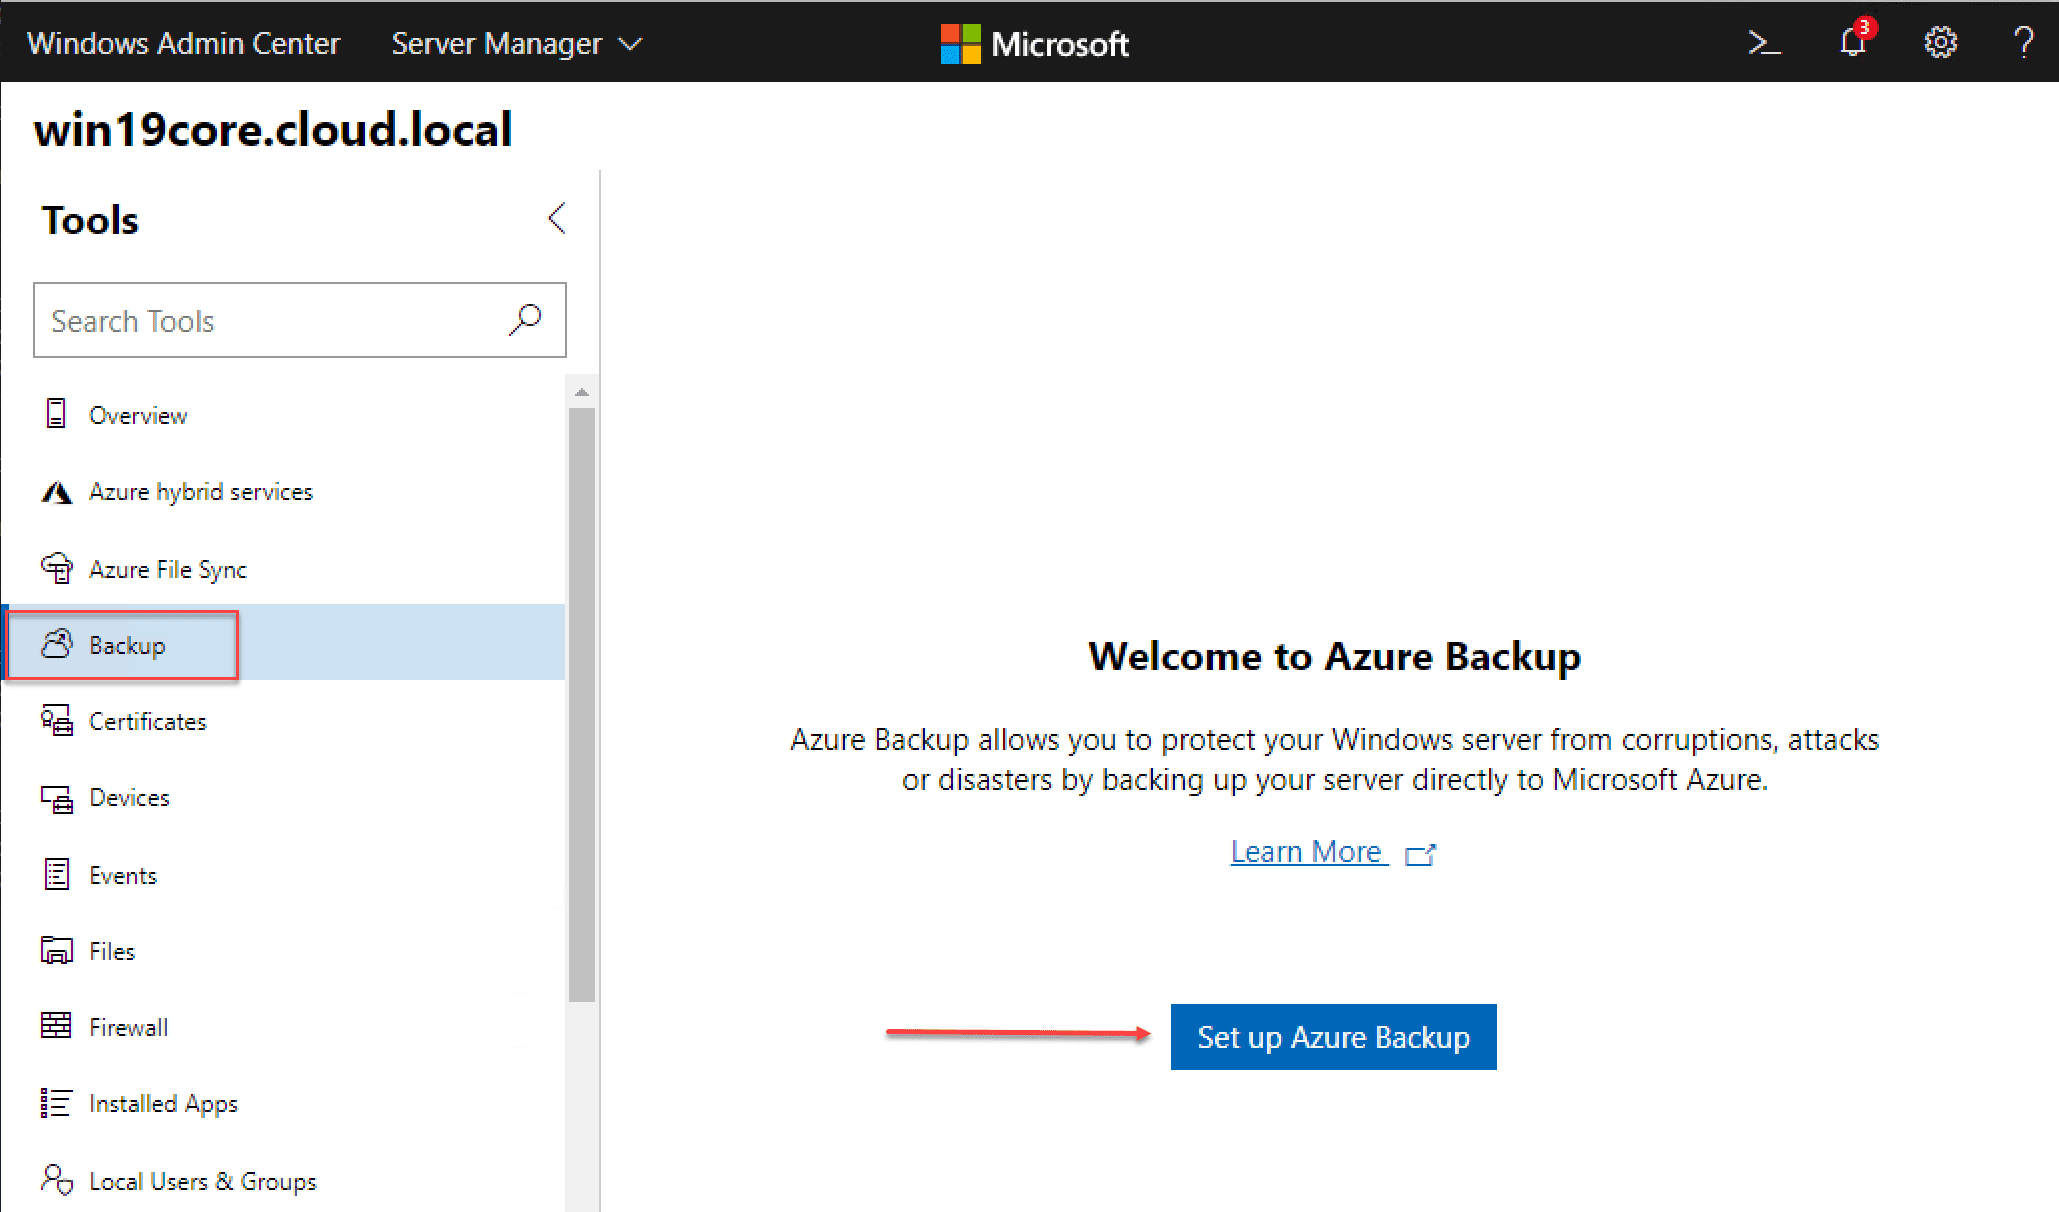
Enable Azure Backups
Windows Admin Center provides great built-in integration with Microsoft Azure. Backup is a great example of this. Right from the Windows Admin Center interface, you can configure Azure Backup for your Windows Server Core installation.
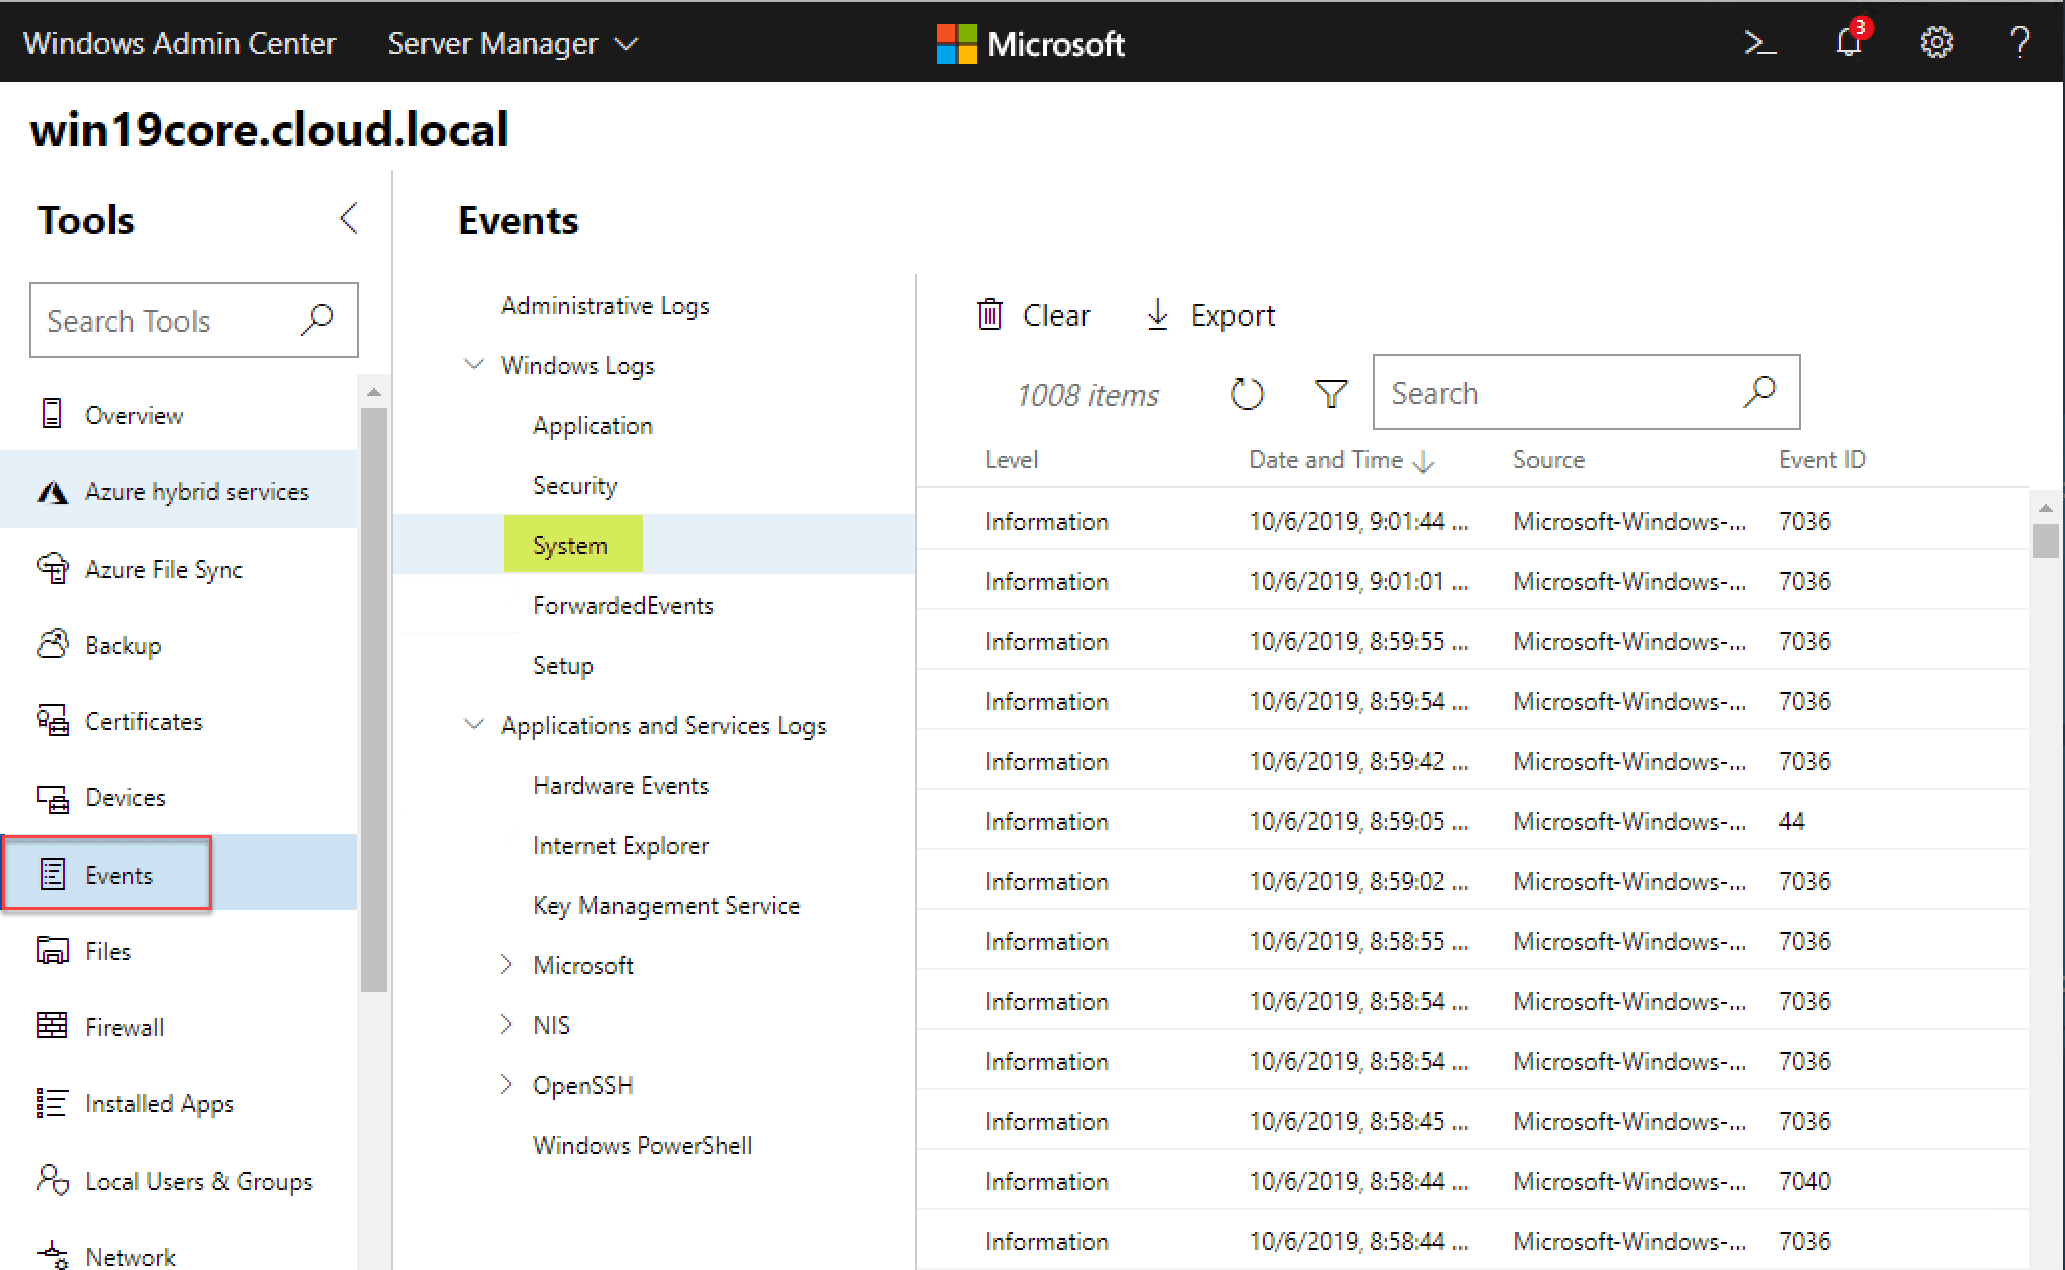
Viewing Events on your Windows Server 2019 Core Server with Windows Admin Center
Viewing events on the server by using the Events menu allows viewing all the expected event logs as you would see in the normal management console locally on the server.
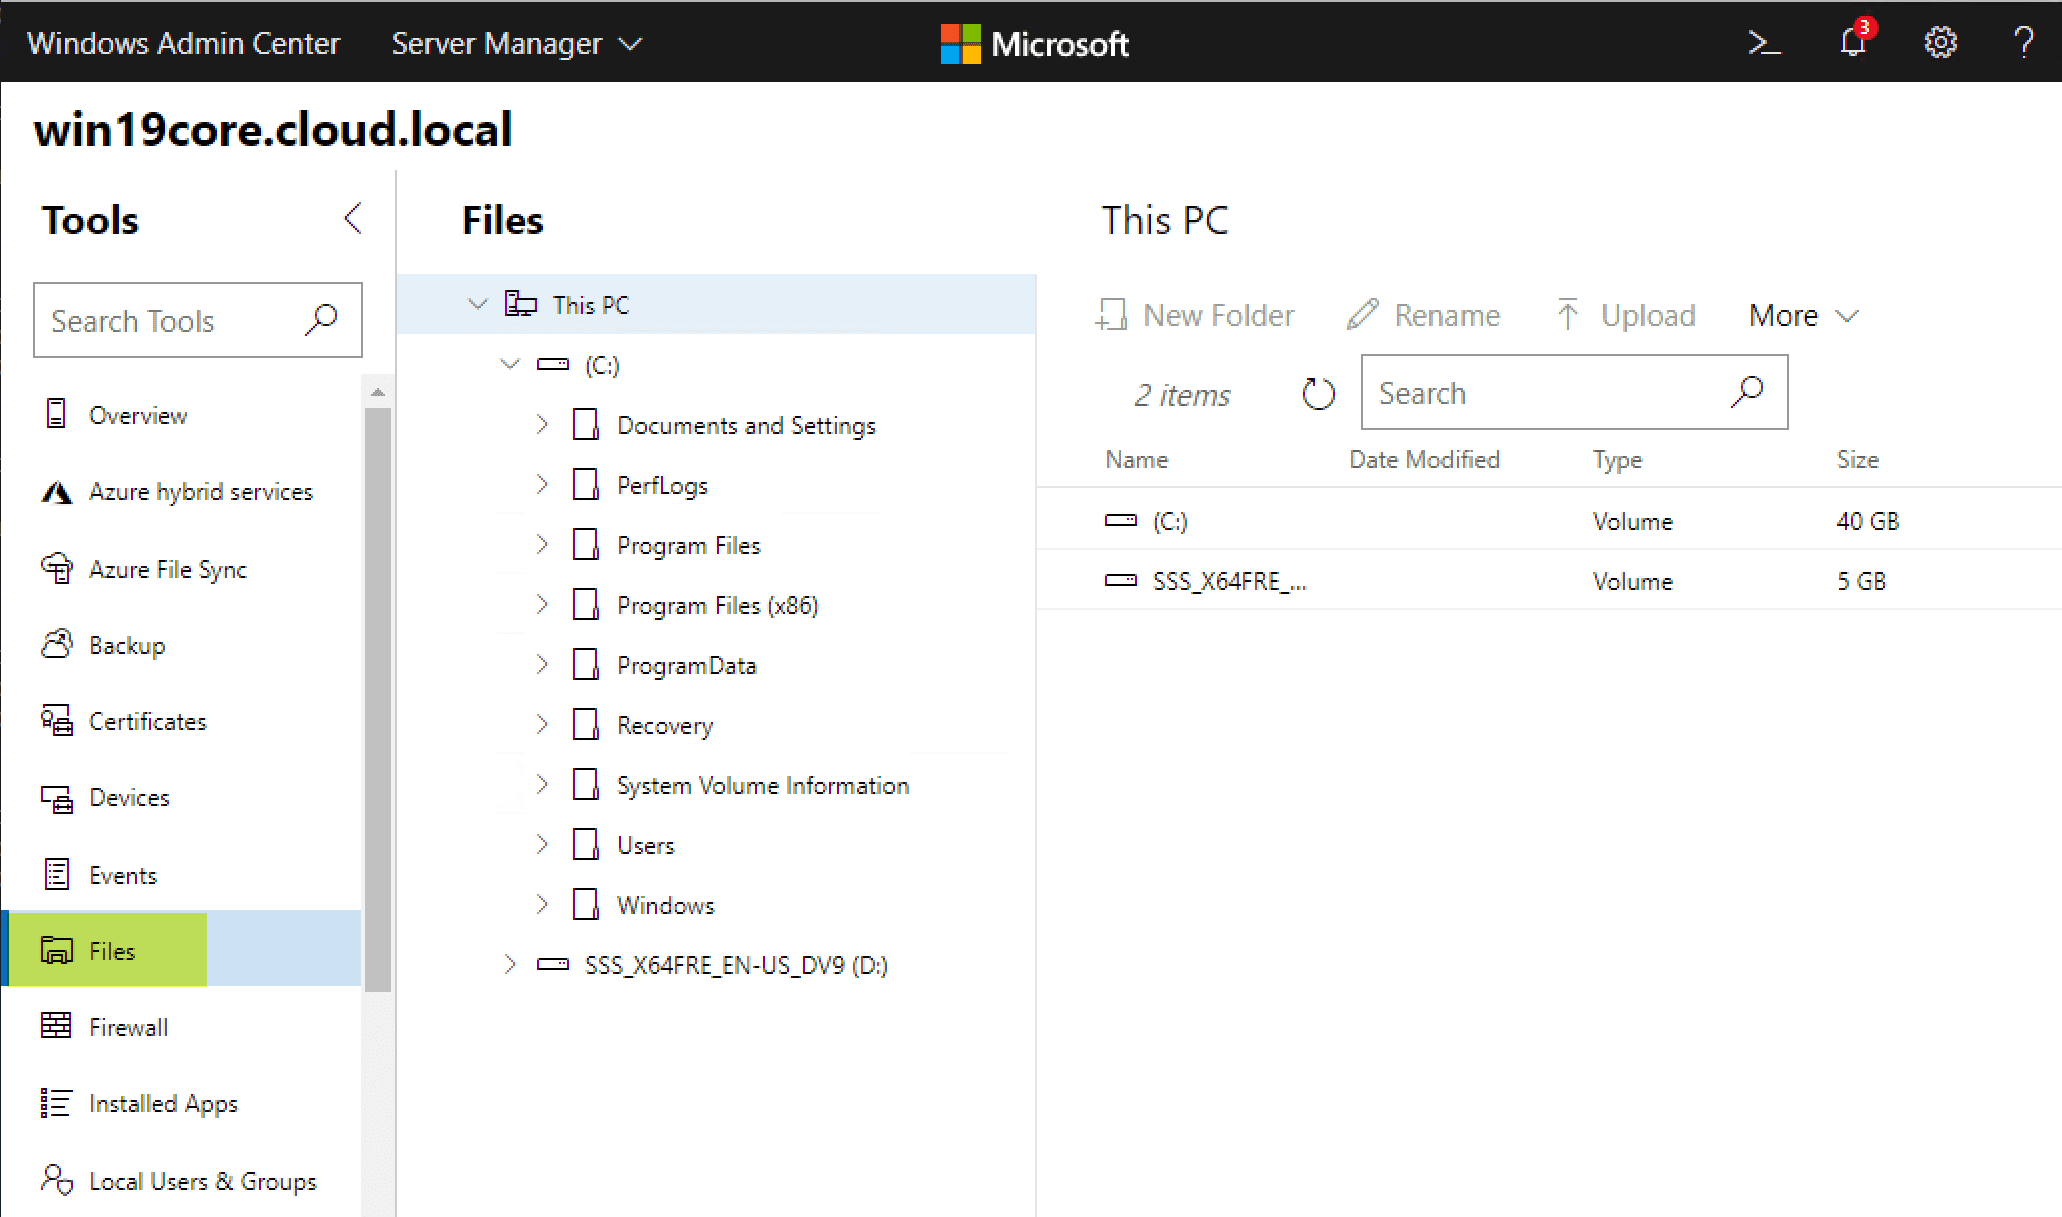
Managing Files Remotely on your Windows Server 2019 Core Installation
Using the Files menu, you can easily browse the files on your remote Windows Server Core server.
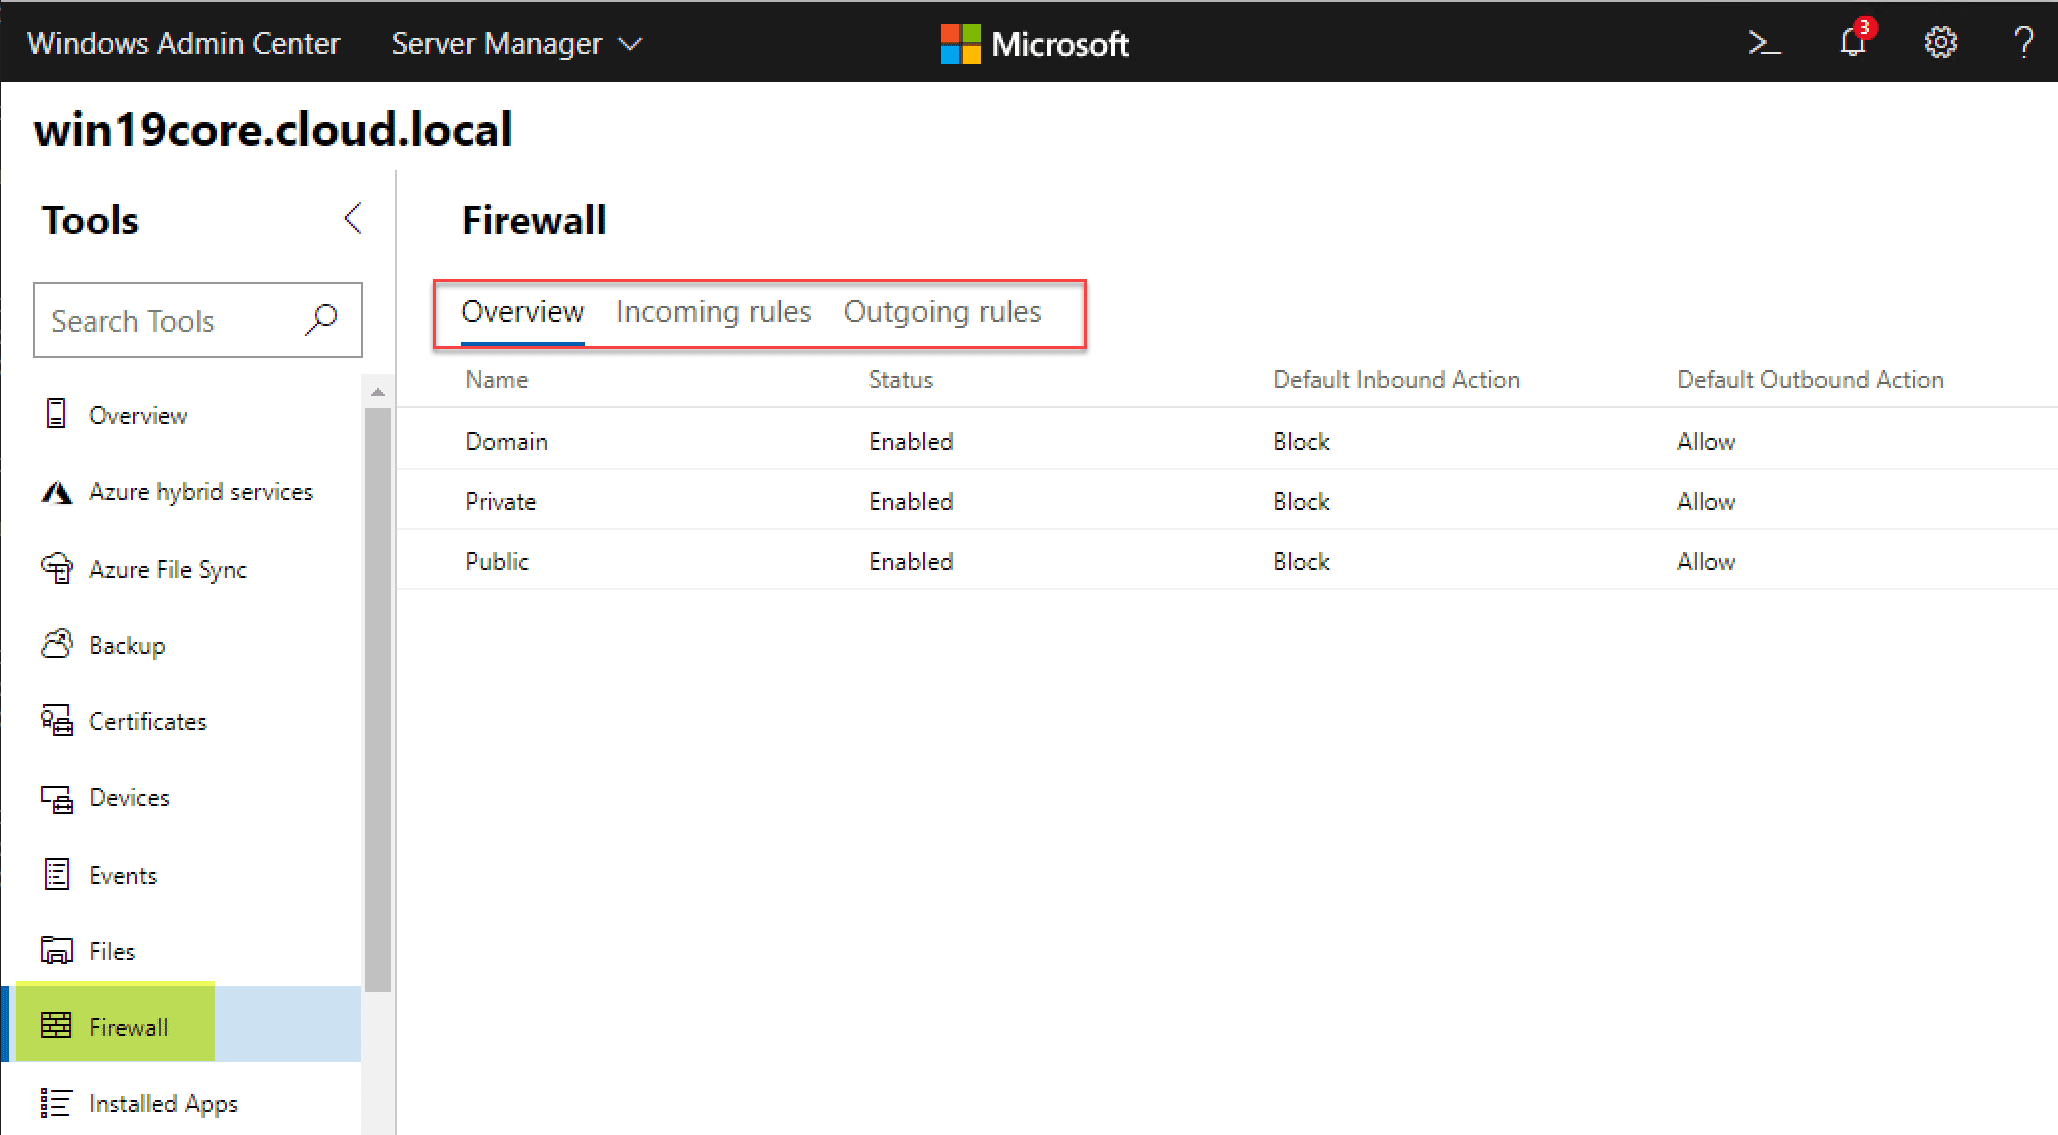
Remotely Managing Windows Firewall using Windows Admin Center
Managing your Windows Firewall settings using Windows Admin Center provides all the functionality you will need to configure your firewall exceptions and configuration.
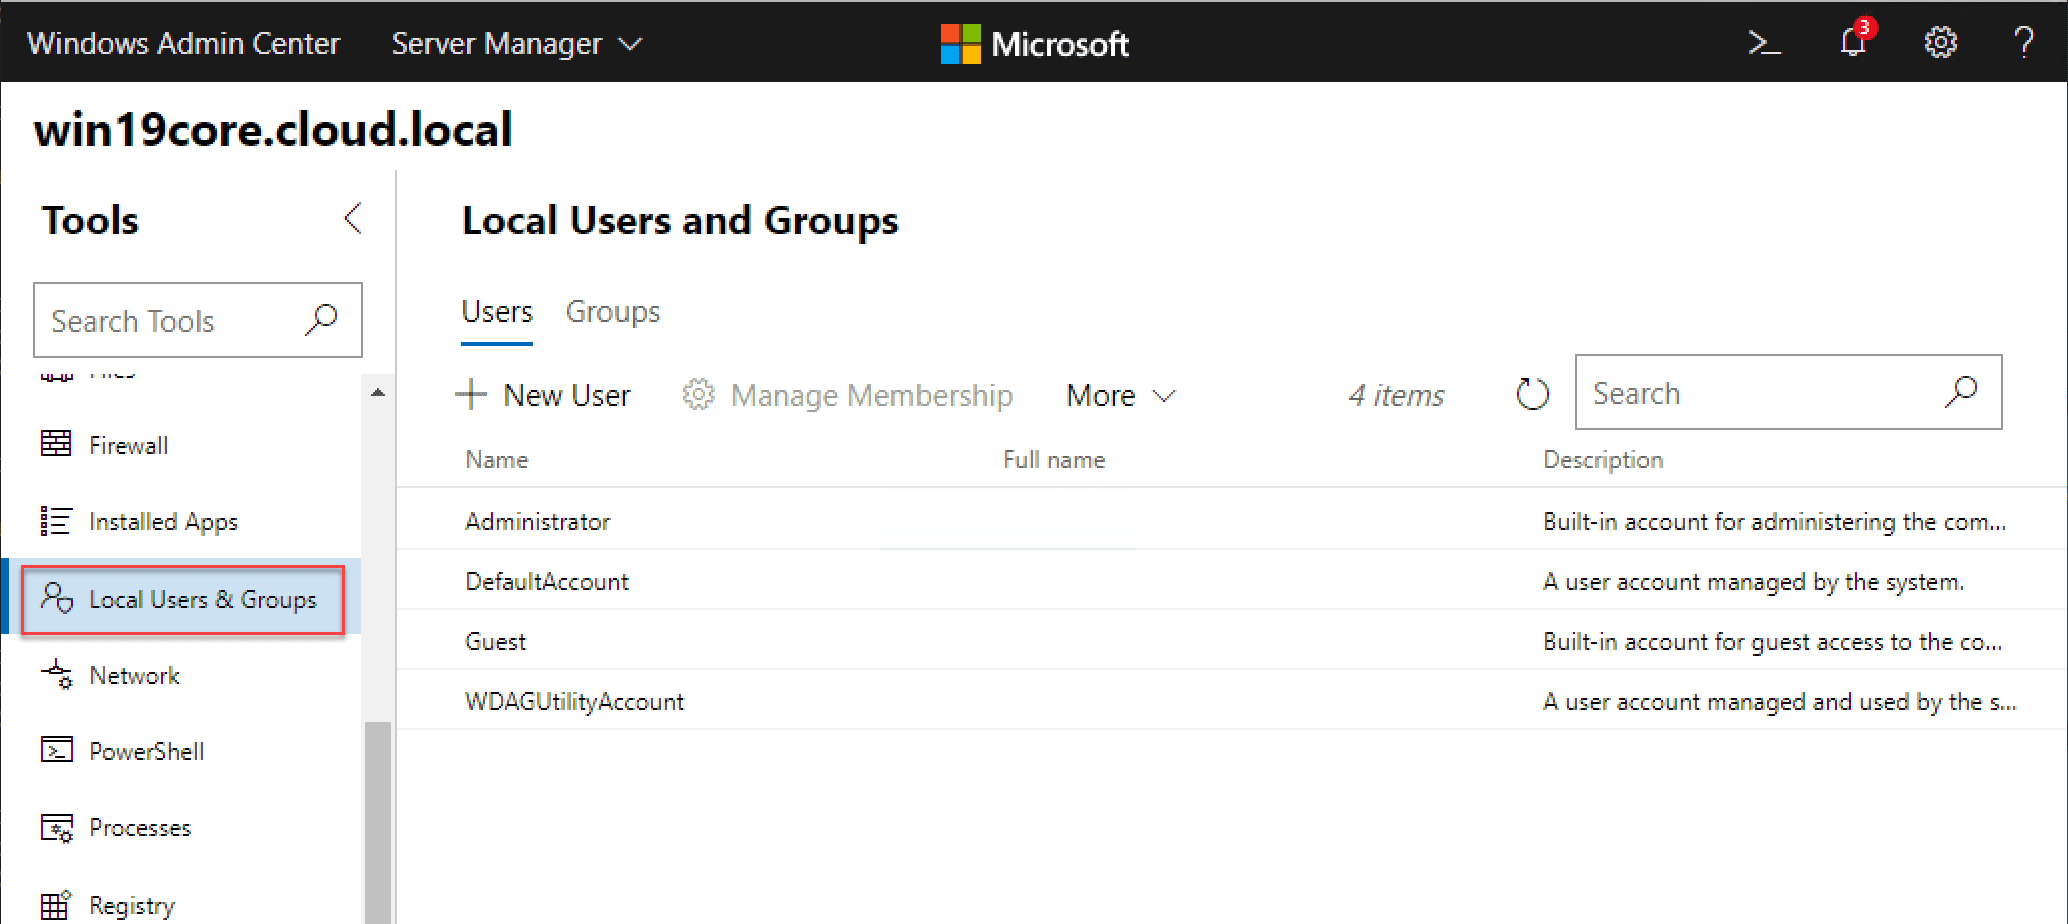
Managing Local Users and Groups with Windows Admin Center
Using Windows Admin Center, you can easily add local users and groups to your remote Windows Server Core installation.
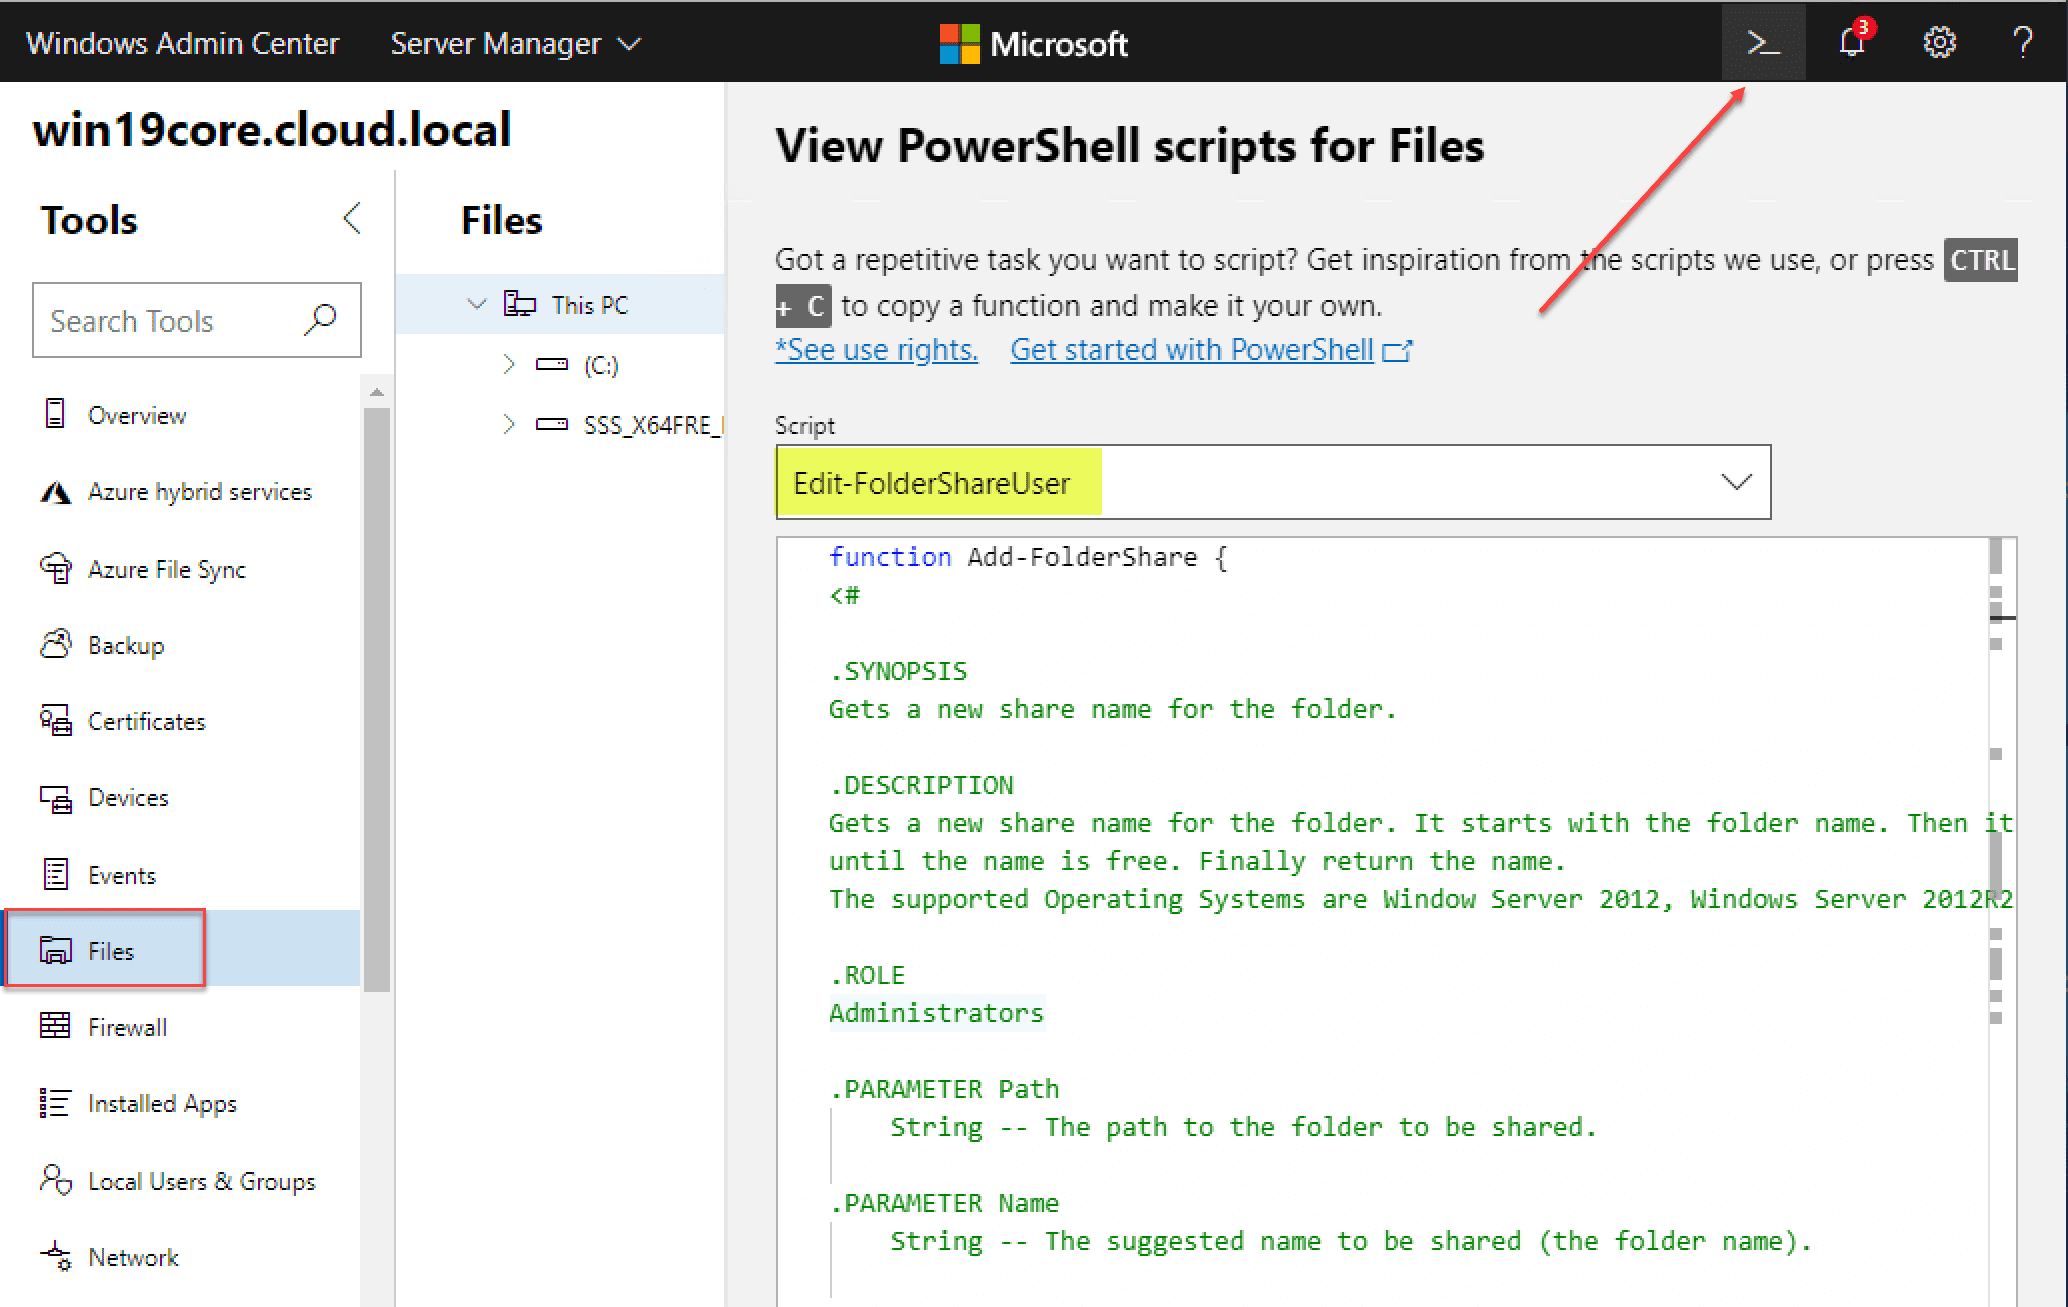
View PowerShell Script Examples
One of the coolest features I like about Windows Admin Center is that it gives you tons of PowerShell script examples in the context of each menu you are in. For example, below, we are in the Files menu. If you hit the PowerShell icon as pointed out, you will have a dropdown menu under Script that gives you many examples of PowerShell scripts in the context of working with your Files. The same is true of all the other menus. Really, really cool.
Wrapping Up
Managing Windows Server 2019 Core with Windows Admin Center is the gold standard for managing your Windows Server Core installations moving forward. Windows Admin Center is a game changer for the adoption rate of Windows Server Core installations across the board.
It provides all the needed tools in a single pane of glass management interface that allows easily configuring, managing, and provisioning needed components on your Windows Server Core installations. Since it is a free download from Microsoft, there is no downside to downloading the tool and using it.
It is very troublesome to manage the server through Powershell, so it is better to use the MMC graphical interface that comes with the server system to manage the remote server…..
1. To use MMC to manage remote Windows Server Core servers, you need to first open some firewall rules on the remote server.
#
# This script works on a variety of settings that are easiest done from the
# local machine to make it remotely manageable by a management workstation.

# Ensure Server Manager remoting is enabled
Configure-SMRemoting.exe -Enable

# Set some firewall rules

 # Allow Ping
Set-NetFirewallRule –Name "FPS-ICMP4-ERQ-In" –Enabled True
Set-NetFirewallRule –Name "FPS-ICMP6-ERQ-In" –Enabled True
Set-NetFirewallRule –Name "FPS-ICMP4-ERQ-Out" –Enabled True
Set-NetFirewallRule –Name "FPS-ICMP6-ERQ-Out" –Enabled True

#  Enable remote volume management - firewall rules need to be set on both
#  source and destination computers
#  ***NOTE*** Policy must also be set on system to "Allow remote access
#  to the Plug and Play interface"
#  This is done with gpedit.msc locally or gpedit for domain policy
Set-NetFirewallRule –Name "RVM-VDS-In-TCP" –Enabled True
Set-NetFirewallRule –Name "RVM-VDSLDR-In-TCP" –Enabled True
Set-NetFirewallRule –Name "RVM-RPCSS-In-TCP" –Enabled True

 # Allow DCOM to manage inbound rules (because other functions may open DCOM-IN, so it is possible to report an error and not find the object, it does not affect)
Set-NetFirewallRule –Name "ComPlusNetworkAccess-DCOM-In" –Enabled True


#  Enable remote service management
Set-NetFirewallRule –Name "RemoteSvcAdmin-In-TCP" –Enabled True
Set-NetFirewallRule –Name "RemoteSvcAdmin-NP-In-TCP" –Enabled True
Set-NetFirewallRule –Name "RemoteSvcAdmin-RPCSS-In-TCP" –Enabled True

#  Enable Remote Event Log Management
Set-NetFirewallRule –Name "RemoteEventLogSvc-In-TCP" –Enabled True
Set-NetFirewallRule –Name "RemoteEventLogSvc-NP-In-TCP" –Enabled True
Set-NetFirewallRule –Name "RemoteEventLogSvc-RPCSS-In-TCP" –Enabled True

#  Enable Remote Scheduled Tasks Management
Set-NetFirewallRule –Name "RemoteTask-In-TCP" –Enabled True
Set-NetFirewallRule –Name "RemoteTask-RPCSS-In-TCP" –Enabled True

#  Enable Windows Firewall Remote Management
Set-NetFirewallRule –Name "RemoteFwAdmin-In-TCP" –Enabled True
Set-NetFirewallRule –Name "RemoteFwAdmin-RPCSS-In-TCP" –Enabled True

#  Enable WMI management requests in
Set-NetFirewallRule –Name "WMI-WINMGMT-In-TCP" –Enabled True

#  Set some services to automatically start and start them.
Set-Service -Name PlugPlay -StartupType Automatic
Start-Service PlugPlay
Set-Service -Name RemoteRegistry -StartupType Automatic
Start-Service RemoteRegistry
Set-Service -Name vds -StartupType Automatic
Start-Service vds

#  Enable Remote Desktop
(Get-WmiObject Win32_TerminalServiceSetting -Namespace root\cimv2\TerminalServices).SetAllowTsConnections(1,1) | Out-Null
(Get-WmiObject -Class "Win32_TSGeneralSetting" -Namespace root\cimv2\TerminalServices -Filter "TerminalName='RDP-tcp'").SetUserAuthenticationRequired(0) | Out-Null

$srvr = Read-Host "Enter name to assign to this computer:"
(Get-WmiObject win32_computersystem).rename($srvr)

$domain = Read-Host "Enter domain this computer should join (you will be prompted for credentials):"
Add-Copmuter -DomainName $domain

Write-Host -ForegroundColor Yellow "System will now be rebooted."
Shutdown -r -t 5
2. In the Service Manager > Dashboard, select «Add another server to manage». If there is no domain, add the IP address through the DNS option in the pop-up board.
3. In the Service Manager > All Servers > select the server you just added > right click and select «Manage Mode…»
4. Enter the user account and password, note! Non-domain users need to enter «IP address\administrator»
5. Right click on the newly added server and try the management function.