Installing Windows Server 2016 upgrades us once again from Windows Server 2012/R2 that provides the latest and the essential updates we need. As well as this time, it has includes lots of new and features. In this lesson, you will learn about installing Windows Server 2016 step by step. Also, before installing, make sure you have pre-planned for selecting which edition to install and what to do in it.
Before installing Windows Server 2016 you need to plan for the installation. Making plan means you should choose an appropriate edition of Windows server. You should think of Hyper-v server you need for your network. You must choose an edition which have enough the Hyper-v license. Also think of more licenses you may need in the future.
Every edition of Windows server may support limited number of users. Choose the edition that meets your needs. When we talk about limitations, we don’t talk about software limitations. If you want more license you should pay for. You can upgrade from one edition to another edition. And you can buy more license for physical and virtual servers also users.
Windows server 2016 editions
- Datacenter: Highly virtualized, enterprise network and cloud environment.
- Standard: Only different with Datacenter edition is the number of Virtual servers. Datacenter edition supports more virtual servers.
- Essential: For small business up to 25 users and 50 devices.
Hardware Requirements
- Processor: 1GHZ
- RAM memory: Minimum of 2GB
- Hard Drive Space: 20GB free space
Installing Windows Server 2016 on VMware
Like the previous versions (Windows Server 2012…), the Windows Server 2016 installation is simple, what’s new is the editions that you can choose them wisely during installation.
In order to install Windows Server 2016, first, you must have an ISO image file of it and also make sure you have pre-planned choosing which edition of Windows Server 2016 and have fulfilled the system requirements.
Download Now: Windows Server 2016
Create and Customize the Virtual Machine
1. Open VMware and click on the Create a New Virtual Machine(Ctrl+N) icon. If you don’t have VMware installed on your computer, click here to download one.

2. Now select Custom (Advanced) option to specify the virtual machine with advance options. If you want you can create virtual with less options, click on Typical option. When you are finished here, click on Next button.

3. Leave the Virtual Machine Hardware Compatibility settings as default. If you want you can select your VMware version. Then click Next button.

4. Here you should add an installer image into the virtual machine. Select the Installer disc image file (ISO) option and click on the Browse button. Specify .iso file path and import it. Then click on Next button.
Note: Make sure that you are using an ISO image file, otherwise unzipped file won’t boot.

5. Specify which operating system type you want to install on the virtual machine. Select Windows Server 2016 version from the dropdown menu and click on Next button.

6. Enter a name for the virtual machine and browse a place where you want to store the installation files. For the purpose click on Browse button and specify the place. When finished, click on Next button.

7. On the Processor Configuration specify then number of processors your server need to use and click on Next button. Also notice that it refers to your virtual machine speed that how much speed the server should be.

8. Specify the amount of the memory for the virtual machine (based on MB) and click on Next button.

9. Select Use Network Address Translation(NAT) or Use bridged networking to directly connect and use internet, as a network type. Then hit Next.

10. Let the I/O Controller types by default because you don’t have the option to change the SCSI type. just hit Next.

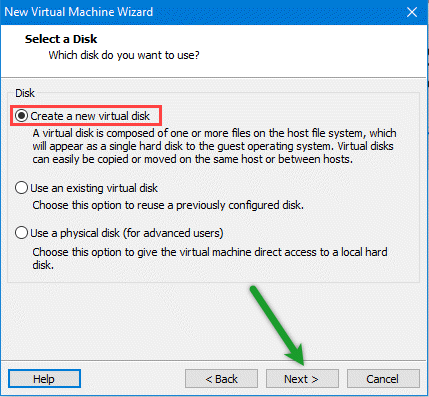
11. Now to create new virtual disk, select create a new virtual disk for the virtual machine.
12. Specify the disk amount by typing the disk size(Recommended 60 GB) and click on Next button.

13. At this point, just check out the settings you’ve done or you can customize if you want and click Next.

Step 2. Install Windows Server 2016
Now it’s time to boot up and start the virtual machine, just click on Power on this virtual machine then wait until it boots.
1. Open VMware Workstation on your host computer. Click on Power on this virtual machine in top left.

2. When the virtual machine powered on, specify the language, time zone and keyboard then click Next.

3. Install now to install the windows server 2016 on virtual machine.

4. Select one the Windows Server editions you’ve decided and click on Next button.

5. Put a mark in the box next to I accept the license terms, then click on the Next button.

6. Go on and click on the Custom: Install Windows only (Advanced) option for installing the server custom.

7. Select the disk, you want to install the widows on and select the disk, click on New, then specify the amount (based on MB) and click on Apply button then click on Next button.

8. Now the server copies all the files to the disk, amount the files from the windows image, install features, updates, so it will take time and when finished it will reboot.

9. After the reboot, type a complex password composed of (uppercase, lowercase, symbols and numbers) and click on Finish button.

10. When the customization finished, now you’ll need to sign in, but first click on the button that is composed of three buttons (ctrl+alt+del) shown in image below or simply press Ctrl+Alt+Del and sign in to Windows Server.

And that’s it, after you have signed in, your windows server installation is completed like the shot below.

Conclusion
The Windows server 2016 is installed successfully and your server is now ready to work now. But before doing that don’t forget to install VMware tools + do initial configuration of Windows Server from the article below. For any questions, leave a comment.
Check out: Install Active Directory on Windows Server 2016 step by step
If you find it helpful, let your friends know it too by sharing this article on social media.
If you want to try and evaluate Microsoft Windows servers by pre-installed VHD files on VirtualBox or VMware, you are at the right place. Using pre-installed virtual hard disks always ease our job by avoiding ISO download, installation, and configuration.
You can find out more information about the download links of Windows 2022, 2019, 2016 and 2012 R2 server VHD/VHDX and how to attach them to VirtualBox or VMware in this guide.
Note: This guide was originally written for the Windows 2012 R2 server with the older version of VirtualBox and VMware. But the same steps are applicable for the latest Microsoft Servers which are available for evaluation for 180 days from Microsoft official site.
The Microsoft Evaluation centre is the ideal place to download the official Windows servers with 6 month working period with all the features. 180 days must be enough to test and evaluate the new OS in your environment with the existing business-critical applications. Not only the Server Operating Systems you can download but also the latest Hyper-V servers and Windows admin centre.
Download Windows 2022/2019/2016 & 2012 R2 VHD/VHDX
1) You can download either server core or with GUI here at the official evaluation centre (Microsoft account is required).
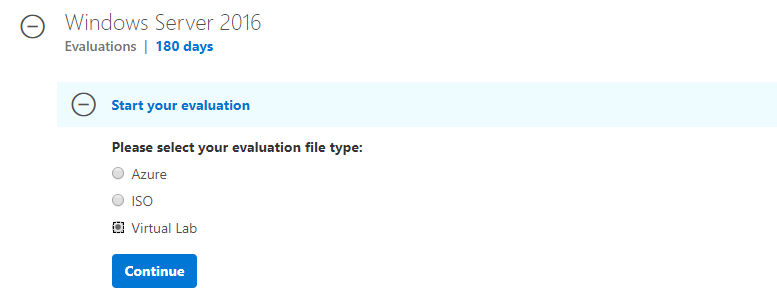
If you don’t find the VHD format of the required server OS, you need to select the ISO, Azure or Virtual Lab format to install and get hands-on experience. Downloading ISO and installing it on VirtualBox or VMware is not that hard either.
Windows 2019 is available as VHD, unfortunately, it did not work on VirtualBox. You can read this guide about the issues and how to install it on Windows 10 PC by VirtualBox.
Basically, these VHD preinstalled images are optimized well for Microsoft hypervisor platforms such as Hyper-V and Azure.
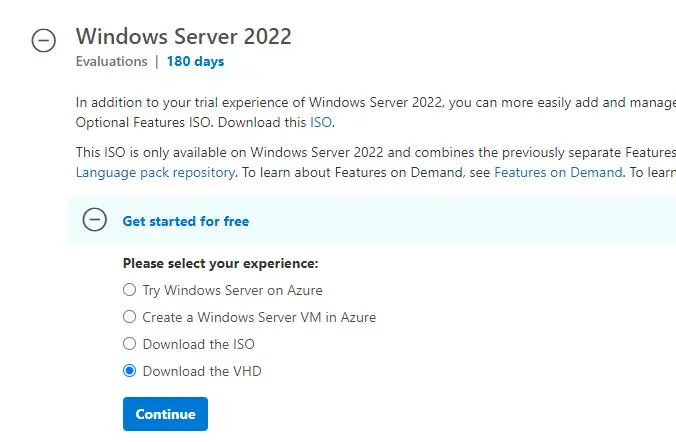
Here are the available download formats for Windows 2022 server.
2) Extract the exe file you have downloaded. Since this image was made for the Hyper-v server to import directly, you will find more files and folders inside it.
We need the only VHD file which resides inside the ‘Virtual Hard Disks’ folder.
How to Use Windows Server VHD on VirtualBox
3) You must have the latest version of VirtualBox. If you do not have the version that supports Windows server OS as guest VM, you may get an error message that says ‘Your PC needs to restart’ on the black screen.
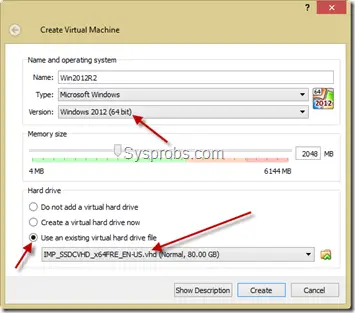
4) Create a new virtual machine. Select Windows Server 64bit appropriate to the VHD file as client OS.
Instead of creating the new hard disk, select the existing virtual hard drive option. Browse the extracted VHD file which is located inside the ‘Virtual Hard Disks’ folder.
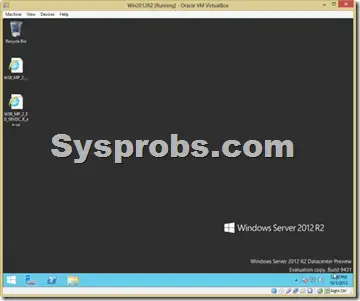
5) There should not be any issues when you start the virtual machine.
The administrator password is R2Preview! (for Windows 2012 R2 OS) , as of now. You could find more information here from the Microsoft site.
Here is the working virtual machine on VirtualBox.
Use Windows Server 2022/2019 or 2012 R2/2016 VHD in VMware Workstation
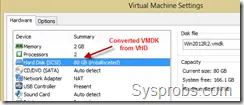
6) VMware workstation or VM Player do not support VHD disk files for direct import. Therefore, the VHD file needs to be converted to VMDK format. There are few free tools available for this purpose in the Windows OS platform.
WinImage is a tool (free for 30 days) that can be used to convert VHD to VMDK in Windows 10. Also, StarWind’s V2V converter is available for free after registration.
Download WinImage here. It’s a small application.
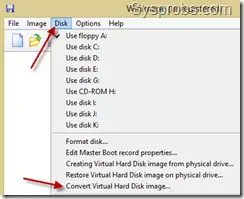
In the WinImage tool, select Disk from the menu and ‘Convert Virtual Hard Disk image’. Browse the VHD file you need to convert and select default options on the next screen to make a fixed size volume.
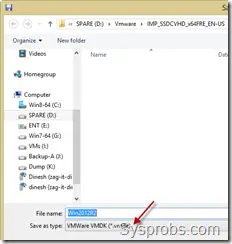
In the saving dialogue box, select VMDK file format from drop-down and press save. This will start converting VHD to VMDK.
7) Once the disk is converted successfully, create a new virtual machine in the VMware workstation.
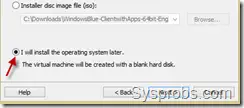
Select the ‘I will install OS later’ option because we are not going to install OS in this case.
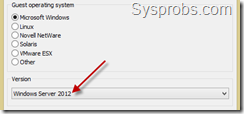
 Select Windows Server 2012 or whatever version you are trying as guest OS. You must have the latest version of the VMware workstation to list out the all recent supported Windows server Operating Systems.
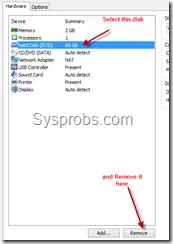
9) Once the new VM is created successfully, follow the below step to delete the default vmdk file.
After deleting, let’s attach our VMDK file which was converted from the original VHD.
Press Add and select the hard drive. Make sure to select an existing disk option.
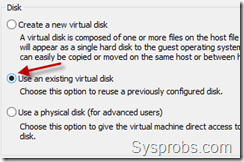
Browse and attach the converted 2012 R2 VMDK file.
10) You can modify other hardware settings (such as RAM and processor cores) if you wish. Then power on the virtual machine.
I’m sure it will start smoothly. VMware Tools can be installed on the guest OS to get optimal performance and enhancements.
As I mentioned earlier, if you have the proper VHD or VHDX of Windows 2022 and 2019/2016 servers, you can follow the above steps to convert and import on a VMware workstation. It will enable you to evaluate the product before implementing it in the production environment.
By using this method, you can use the same VMDK (which converted from the original Windows server VHD) on VMware ESXi or vSphere hypervisor hosts.
Share your experience about these steps to install and use the latest Windows Servers by VHD/VMDK files in VirtualBox or VMware workstation.
- Review Windows Server 2016 release notes and system requirements.
- Register, then download and install. Windows Server 2016 evaluation editions expire in 180 days.
- Receive email with resources to guide you through your evaluation.
Installation Guidelines
After installation, install the latest servicing package.
- Go to: Microsoft update catalog and search for «Windows Server 2016.”
- Evaluation versions of Windows Server must activate over the internet in the first 10 days to avoid automatic shutdown.
The Nano Server deployment option in the Windows Server 2016 eval ISO is supported for host and guest VM deployments until the Spring 2018 release of Windows Server. Starting with the Fall 2017 release, Nano Server has been optimized for container use only and Server Core is available for host and guest VM deployments.
In today’s post, I’ll be showing you how to install Windows Server 2016 on VMware ESXi with Desktop Experience on an ESXi 6.5 U1 host managed by a vCSA 6.5 U1 instance. This step-by-step how-to install Windows Server 2016 on VMware vSphere guide is aimed at readers who have yet to install a Windows OS on a VMware hypervisor. For something a little bit more advanced in relation to installing Windows Server on VMware, you can take your pick from the complete list of published posts to date.
Windows Server Flavors and Requirements
Windows Server 2016 comes in 3 flavors; Server Core (no GUI), Server with Desktop Experience (with GUI) and Nano Server. The latter is Microsoft’s headless server, one that is completely managed remotely with no local logon capabilities making it a perfect solution cloud deployments. Nano server has recently been refactored to primarily support and run containers.
Windows Server 2016 also comes in 3 editions; Essentials, Standard, and Datacenter. Have a look at this link to learn how each edition differs from the rest.
As far as hardware requirements go, Microsoft’s documentation suggests the following.
-
- Processor: 1.4 GHz 64-bit. The CPU must support NX, DEP, CMPXCHG16b, LAHF/SAHF, PrefetchW and second-level address translation.
-
- RAM: 512MB or 2GB for a Desktop Experience installation. 800 MB is the required minimum when installing Windows Server 2016 as a VM.
-
- Storage: 32GB absolute minimum
-
- NIC: 1 Gigabit
As often is the case, the minimum hardware requirements quoted by Microsoft rarely come close to mirror what’s actually needed to run production boxes. With that in mind, consider increasing the resources allocated in accordance with the role(s) assigned to the server and its anticipated workload.
Some optional requirements are;
-
- UEFI firmware to support secure boot where applicable.
-
- Trusted Platform Module (TPM) capabilities to enable encryption features such as BitLocker.
Creating the base VM
I’ll be using the new vSphere client (HTML5) to create the base VM. Here are the steps.
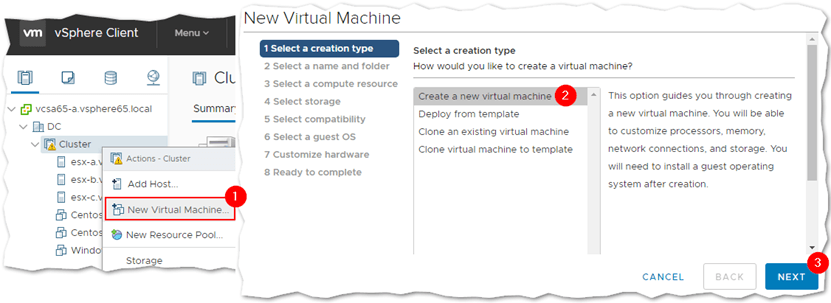
Step 1 – Right-click on a cluster, or host, and select New Virtual Machine (1). Select Create a new virtual machine (2) from the wizard. Click Next.
Step 2 – Type in a name for the virtual machine (1) and select a location (2), such as a datacenter, where you want it installed. The Windows folder shown is something I created.

Step 3 – Select the ESXi host where the VM will be deployed to. In the example, I selected a DRS enabled cluster (1) so placement is done automatically.

Step 4 – Select a datastore (2) where the VM will be created. If you’re using storage policies, make sure to select the correct one from the VM Storage Policy drop-down box (1).

Step 5 – Select the correct compatibility mode according to the ESXi version installed. In my case, I’ve selected ESXi 6.5 or later.

Step 6 – Select Microsoft Windows Server 2016 (64bit) guest OS Family and Version types. If you’re running this on older versions of ESXi, select Microsoft Windows Server 2012 (64 bit) instead.

Step 7 – For the hardware requirements, I’m sticking with the values suggested to me by the wizard. The only hardware settings I changed are the ones for the SCSI controller, which I set to VMWare Paravirtual, and the vNIC driver which I set to vmxnet3. This should improve the overall performance of the virtual machine. I also set the VMDK type to thin since I’m a bit short on storage space.

To use the Secure Boot feature, change the BIOS firmware setting to EFI by navigating to Boot Options -> Firmware under the VM Options tab.

Step 8 – Review the configuration and press Finish to create the VM.

Installing Windows Server 2016
Now that the VM has been created, it’s time to install the guest OS. For this task, I’ll be using the Remote Console client as I find it easier to use when mounting ISOs on VMs and such.
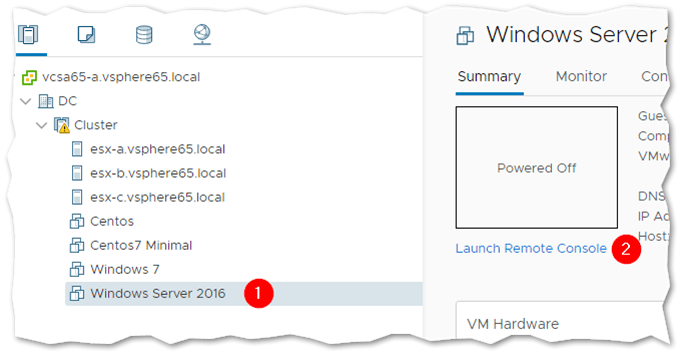
Step 1 – Highlight the VM just created and click on Launch Remote Console link.
Step 2 – Power up the VM and select Connect to Disk Image File (iso) from the VMRC -> Removable Devices -> CD/DVD drive 1. Navigate to the folder containing the Windows Server 2016 ISO image and select it.

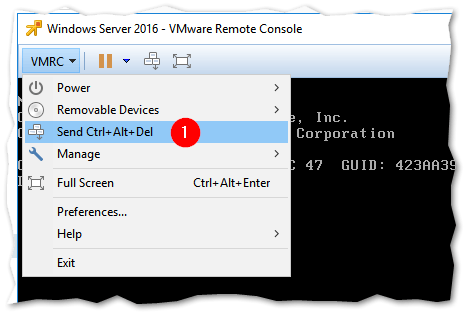
Step 3 – Select Send Ctrl+Alt+Del from the VMRC drop-down menu. You should see the Windows installer booting up.
Step 4 – Select the language and localization settings matching your time zone and country and click Next.

Step 5 – Click on Install now to kick off the installation.

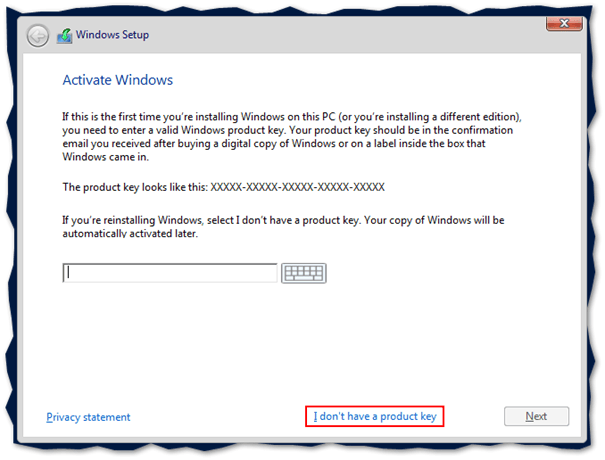
Step 6 – Type in the product key, if you have one, and press Next. If you don’t, just click on the I don’t have a product key link to install Windows Server in evaluation mode.
Step 7 – Select the Windows Server edition and deployment type. For this example, I’ve selected Windows Server 2016 Standard (Desktop Experience). Press Next.

Step 8 – Accept the license terms by ticking on the option at the bottom and press Next.

Step 9 – Select Custom: Install Windows only (advanced)

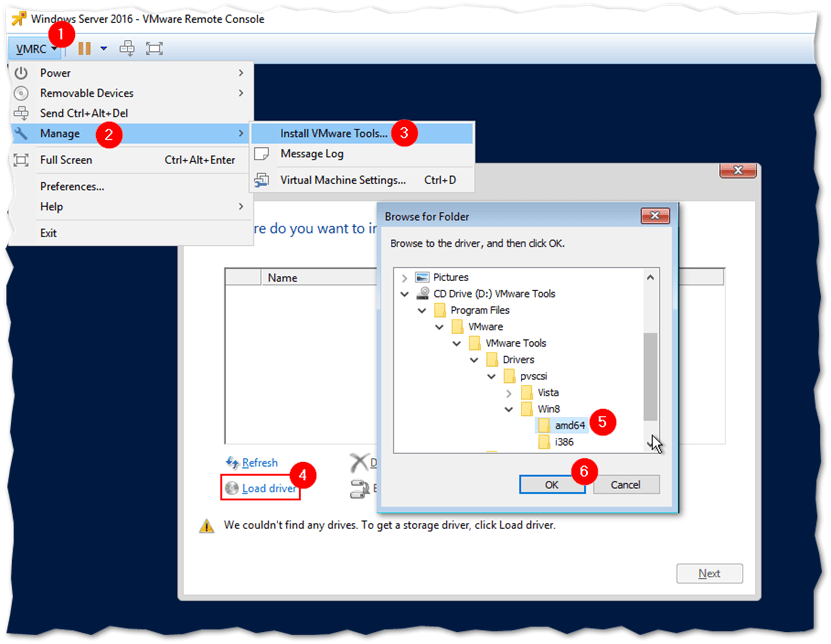
Step 10a – At this point on how to install Windows Server 2016 on VMware vSphere, I must mount the vmtools ISO image since I selected VMware Paravirtual as the SCSI controller. This step is not required if you stick by the default setting (LSI Logic SAS). To this, we simply select Install VMware Tools from VMRC -> Manage. This will mount the corresponding ISO image on the VM. Once you do, click on Load driver, select the CD drive labelled VMware Tools and drill down to the /Program Files/VMware/VMware Tools/Drivers/pvscsi/Win8/amd64 folder as shown next.
Step 10b – The VMware PVSCSI Controller driver is automatically selected for you. Click Next to continue.

Step 11 – If you see Drive 0 Unallocated Space listed, it means that the paravirtual driver has correctly detected the VMDK specified for the VM.
Before pressing Next, disconnect the VMware Tools ISO image and reconnect the one for Windows Server 2016. You won’t be able to proceed with the process of installing Windows Server on VMware unless you do this.

Once you reconnect the Windows Server ISO, press Refresh and make sure that the Windows can’t be installed … at the bottom clears. Press Next to use the entire disk for the Windows Server installation.

Step 12 – Wait for the installation of Windows to finish.

Step 13 – Set a password for the administrator account and press Finish.

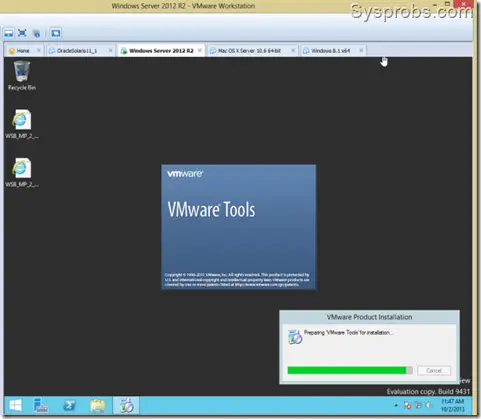
Step 14 – Log in and install the VMware Tools. Disconnect the Windows Server ISO image as described and mount the VMware Tools ISO image still using the VMware Remote Console client (VMRC -> Manage -> Install VMware Tools). Click on the mounted DVD Drive or taskbar notification to run the vmtools installer. Follow the instructions and reboot the VM when done.

Congratulations! You now have Windows Server 2016 with Desktop Experience running on VMware. For production environments, you should go for the Server Core version for better performance and improved security. Also, note that the steps covered today apply to installing Windows Server 2016 on both physical ESXi hosts as well as nested ones. If you wish to learn how to set up a nested vSphere environment, have a look at this post.
What to do next?
Although these were easy steps, they were rather time-consuming, especially if you deploy several VMs a week. This is why installing Windows Server in a VM is usually done with the aim to convert it to a template afterwards. That way you can simply deploy a new VM from the template and ensure consistency in terms of custom configuration and installed applications.
Once you’ve installed Windows Server and the VMware Tools, it is usually a good measure to set whatever settings you want across the board when deploying a new VM.
A lot of these can be done via GPO or deployment tools but you may get the odd change you want to be done locally. For instance:
-
- Add a specific local user
-
- Add specific user in the remote desktop group
-
- Install agents for monitoring, backup, antivirus…
-
- Install tools such as BGInfo
-
- Run Windows Update and clean up files
-
- …
You can find interesting resources on how to prep a Windows environment with the VMware OS Optimization Tool that is used for Horizon Desktops.
Conclusion
Note that the steps on how to install Windows Server 2016 on VMware ESXi covered today also apply to installing Windows Server 2016 on both physical ESXi hosts as well as nested ones.
Installing Microsoft Windows Server 2016 on a virtual machine hosted on VMware ESXi is straightforward if you follow our steps and perform the operations explained above with illustrations.
The illustrated practices show how you can build a virtual machine for Windows hosted by VMware ESXi.
It is a fantastic opportunity for anyone willing to get started with virtualization.
If you wish to learn how to set up a nested vSphere environment, have a look at this post.
We will show you how to Install Windows Server 2016 on VMWare Workstation. You can use this method to run Windows Server 2016 on your personal computer and practice new features and configurations before implementing them in a production environment. Windows Server 2016 comes with a lot of improvements and new features. And like always, Microsoft has made available different editions of Windows Server 2016 for different users and scenarios. In this article, we will focus on the Datacenter edition, which is the most feature-rich edition of Windows Server 2016.
If you want to Install Windows Server 2016 on VMWare Workstation, then follow this guide. We will show you step by step process to Install Windows Server 2016 on VMWare Workstation. For your note: this guide is also applicable for installing other versions of Windows Servers and Desktops on VMWare Workstation.
Basic Requirments To Install Windows Server 2016 On VMWare Workstation?
Before we start with the installation process, let’s have a look at the system requirements to install Windows Server 2016 on VMWare Workstation.
#1. Host Computer to run VMWare Workstation:
The Minimum computational resources needed to run Windows Server 2016 on VMWare Workstation:
- Processor: Intel Core 2 Duo processor or later. AMD Athlon™ 64 X2 Dual Core Processor 3000+ or higher is recommended.
- Memory: 4GB of RAM or more is recommended. The minimum supported is 2GB of RAM. Note that memory requirements increase as guest operating systems are added.
- Storage: 60GB of available storage is recommended. Additional storage may be necessary when installing guest operating systems.
- Network: A network connection is required for installation and updates.
#2. Download Windows Server 2016 ISO File:
The first thing you need is the ISO file of Windows Server 2016. You can download it from the official website of Microsoft. Just go to this link and select the edition you want to download. In our case, we will be downloaded the Datacenter edition because it is the most feature-rich edition.
#3. Install VMWare Workstation 15 Pro:
After downloading the ISO file, the next thing you need is virtualization software. In this article, we will be using VMWare Workstation. You can also use other virtualization software like VirtualBox, Hyper-V, etc.
Just go to the official website of VMWare and download the latest version of VMWare Workstation Pro. Install it on your computer and launch it.
Now that we know the system requirements let’s start with the installation process.
How To Install Windows Server 2016 On VMWare Workstation?
Time needed: 30 minutes
How to Install Windows Server 2016 on VMWare Workstation?
- Open the new Virtual Machine Wizard
1. Fire up VMWare Workstation
2. Go to File -> New Virtual Machine or Ctrl + N
- Select Custom Configuration Wizard
Select Custom Wizard and click Next
- Choose VM Hardware Compatibility
1. Choose the compatible hardware from the drop-down
2. Click Next - Select to install operating system later option
1. Select to install operating system later option
2. Click Next - Select the guest operating system
1. Select Windows 10 since we don’t have the windows server option included yet.
2. Click Next - Virtual Machine Name & Location
1. Give the Virtual Machine Name & Location
2. Click Next - Select Firmware Type
1. You can select either BIOS or UEFI. Note: Only new boards supports UEFI.
2. Click Next - Allocate the number of processors you need
1. Allocate how many processors you need. This depends on your host machine’s hardware.
2. Click Next - Set the Memory for the virtual machine
1. This depends on your host machine’s hardware. You should leave the memory to run the host machine without hazels.
2. Click Next - Select Network Connection settings for the VM
1. Four options are available to select. Please read and select your desired network setting.
2. Click Next - Choose the appropriate storage IO controller
1. Choose the appropriate storage IO controller
2. Click Next - Select the disk type for the VM
1. Select the available disk type on your host machine.
2. Click Next - Select the virtual disk for the VM
1. Select the virtual disk for the VM if not create a new disk
2. Click Next - Assign the disk size for the VM
You can select a single or split virtual disk option. Selecting a single disk will increase the performance. But, if you want to move the disk to a different location you can select the split virtual disk.
Allocate the disk size and click next.
- Give the path where you want to keep the VM disk
1. Give the location where you want to save the disk.
2. Click Next. - Create the VM
1. VM settings are ready to create the VM.
2. Click Finish - Load the ISO image to boot the VM
1. Select use ISO image file
2. Browse the ISO image
3. Click Ok - All set to power on the VM
- First boot screen of Windows Server 2016
- Windows Server 2016 installation wizard
The installation wizard will appear in a couple of seconds after the boot
1. Select the language time and keyboard settings
2. Click Next - Install Windows Server 2016
Click on Install Now
- Select The Operating System You Want To Install
1. Select the version you want to install
2. Click Next - Accept the License Agreement
- Select installation method
Select custom installation if you are doing a fresh installation. Or, select upgrade if you are upgrading your older Windows Server to Windows Server 2016.
- Select the installation disk for installation
Select the disk and click on Next to install Windows Server 2016. If you want to create additional logical partitions, then select the disk and click on new assign the partition size. You can create multiple partitions within available storage.
- Installing Windows Server 2016
- Installation is in progress…
- Windows getting ready after the installation completes
- Create Administrator User
- Windows Server is ready to use
- Windows Server 2016 Login screen
- First look at Windows Server 2016


This is how you should Install Windows Server 2016 on VMWare Workstation.
Thanks for reading the post. Please share this post with those who want to know the procedure to Install Windows Server 2016 on VMWare.