Wondering how to install .NET framework 4.8 on windows server 2016? We can help you.
Installing the latest .Net framework on the server improves the performance and speed of the web apps.
At Bobcares, we often receive requests to install the .Net framework on the windows server as part of our Server Management Services.
Today, let’s discuss how our Support Engineers do it easily for our customers.
What is the .NET Framework?
.NET Framework by Microsoft is used to run and create applications and services which are based on the XML web.
The .NET software on Windows cannot run if the .NET Framework is not installed on the system.
The main advantages it provides include, Integration, Reliability, Performance, Productivity, and security.
How to install .NET Framework 4.8 on Windows 2016?
Recently, one of our customers approached us to install the latest .Net framework on his dedicated server. Let’s see how our Support Engineers install the .Net framework for them.
- Initially, we RDP to the server.
- Then open the web browser from the server and download the required .NET Framework from the below link.
https://dotnet.microsoft.com/download/dotnet-frameworkClick on the .NET Framework 4.8 link and the Download .NET Framework 4.8 option.
- Then right-click on the downloaded file. We click on the Properties and unblock it.
- Then double click on the file and complete the installation.
- After the .Net installation, the server will ask for a reboot. So we reboot the server.
- Then we open the corresponding Plesk panel of the server.
- Select the Tools and Settings from the Plesk.
- Then under the Applications & Databases, we choose ASP.NET Settings.

- Then we check whether the new version updates under Framework Version.

How to change the ASP.NET version on an account?
We follow the below steps to change the .Net version of an account.
- Firstly we log in to Plesk.
- Then from the left sidebar, we click Websites & Domains.
- After that select the account and click Hosting Settings.
- Then under the Web Scripting and Statistics, in the Microsoft ASP.NET support (Version) list box, we select the ASP.NET version.
- Finally, we click the Ok button.
Few Installation errors
We have also found that the installation may end up with errors. Here are some such instances and their solution by our Support Techs.
-
Installation failed with error code: (0x8000FFFF), “Catastrophic failure”
While installing .NET Framework v4.8, we may come across a “0x8000ffff catastrophic failure” error.
In order to solve this error we follow the below steps:
- Temporarily turn off the security software.
- Then open the command prompt and run as administrator:
DISM /Online /Cleanup-Image /RestoreHealth
- Check the permission of the C:\Windows\ System32 \CatRoot2\ folder and give full control to the NETWORK SERVICE and SYSTEM and CryptSvc accounts.
-
This application could not be started
Applications for the .NET Framework typically require a specific version of the .NET Framework to install on the system. In some cases, we attempt to run an application without either an installed version or the expected version.
This often produces an error dialog box stating, ‘This application could not be started’
This typically indicates one of the following conditions:
- Corruption of a .NET Framework installation on the system.
- The version of the .NET Framework needed by the application cannot be detected.
Our Support Techs resolve this by following the below procedure:
Initially, we download the .NET Framework Repair Tool (NetFxRepairTool.exe) from the URL: https://www.microsoft.com/en-us/download/details.aspx?id=30135‘
Once the download completes the tool runs automatically.
However, if the .NET Framework Repair Tool recommends any additional action, we select Next.
It displays a dialog box to indicate that changes are complete. We leave this dialog box open while we to try rerun the application.
This should succeed if the .NET Framework Repair Tool has identified and corrected a corrupted .NET Framework installation.
If the application runs successfully, select the Finish button. Otherwise, select the Next button.
If we select the Next button, the .NET Framework Repair Tool displays a dialog box regarding the logs to be sent to Microsoft. Select the Finish button to send diagnostic information to Microsoft.
If we still fail to run the application, we install the latest version of the .NET Framework supported by the version of Windows. Then attempt to launch the application.
In some cases, we may see a dialog box that asks to install the .NET Framework 3.5. Select Download and install this feature, then launch the application again.
[Need more assistance in installing .NET framework 4.8? We’ll help you.]
Conclusion
To conclude, we discussed how to install the .NET framework 4.8 on windows server 2016. Also, we saw how our Support Engineers help our customers install it.
PREVENT YOUR SERVER FROM CRASHING!
Never again lose customers to poor server speed! Let us help you.
Our server experts will monitor & maintain your server 24/7 so that it remains lightning fast and secure.
GET STARTED
var google_conversion_label = «owonCMyG5nEQ0aD71QM»;
Многие приложения для работы в Windows Server 2016 требуют наличия установленного .Net Framework 3.5, несмотря на наличие .NET Framework 4.6, установленного по-умолчанию. Например, без .Net 3.5 не удастся установить и запустить SQL Management Studio. Дальше рассмотрим, как установить Net Framework 3.5 в Windows Server 2016.
Как установить Net Framework 3.5 в Windows Server 2016.
При попытке установить .Net 3.5 через консоль Server Manager (Add Roles and Features -> Features -> Net Framework 3.5 Features, установка заканчивается с ошибкой 0x800f081f (The source files could not be found). Это связано с тем, что бинарные файлы Net Framework 3.5 в хранилище компонентов Windows отсутствуют.
Для установки потребуется дистрибутив Windows Server 2016 в виде iso файла или в распакованном виде на сетевой шаре. Смонтируйте iso образ с дистрибутивом в отдельный виртуальный диск (например, диск D:). Установить компонент можно из GUI либо с помощью PowerShell.
Устанавливаем .Net Framework 3.5 с помощью графической консоли Server Manager
Инсталляция компонента .Net 3.5 возможна из графической консоли Server Manager. Для этого как и ранее выберите компонент, но, перед тем, как нажать кнопку Install, нажмите небольшую ссылку внизу мастера (Specify an alternative source path).
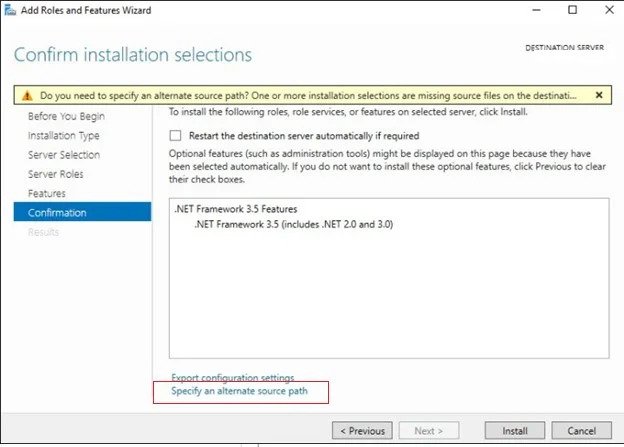
Дальше укажите привод, это может быть путь D:sourcessxs. Также это может быть сетевая папка, куда вы предварительно скопировали дистрибутив (например, server1distrws2016sourcessxs). Нажмите ОК.
Запустите установку.
Устанавливаем .Net Framework 3.5 с помощью PowerShell
Еще проще установить компонент Net Framework 3.5 Features из консоли PowerShell, запушенной с правами администратора. Для этого достаточно выполнить команду
Dism.exe /online /enable-feature /featurename:NetFX3 /All /Source:D:sourcessxs /LimitAccess
Где D: — диск с дистрибутивом Windows Server 2016.

Еще можно произвести установку с помощью команды:
Add-WindowsFeature NET-Framework-Core -Source d:sourcessxs
После завершения установки компонента, перезагрузка сервера не требуется.
Установка .NET Framework 3.5 на Windows Server 2012/2016
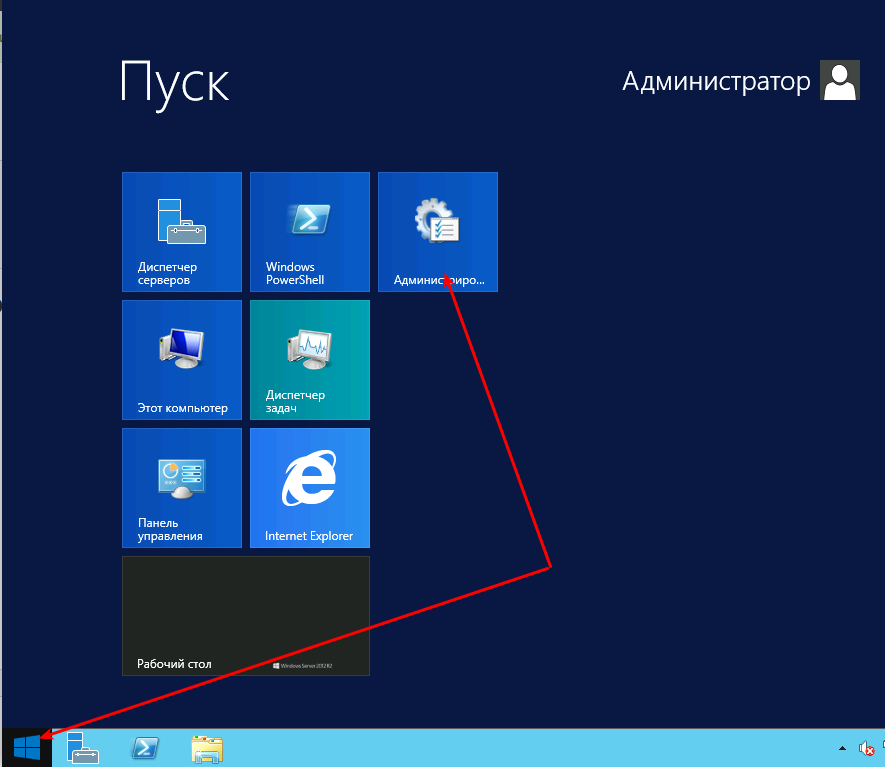
Запустите службу «Центр обновления Windows»
Нажмите «Пуск» и выберите «Администрирование»:
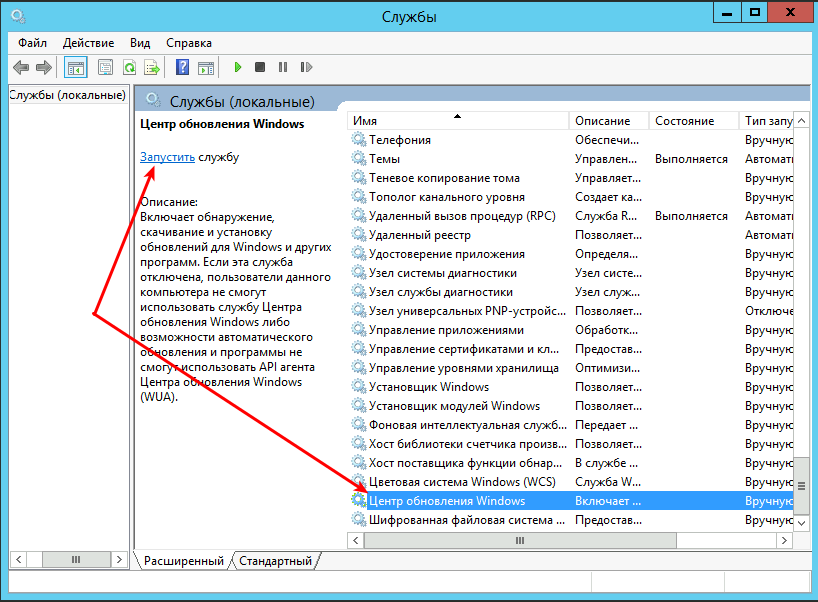
В открывшемся окне перейдите в «Службы»:

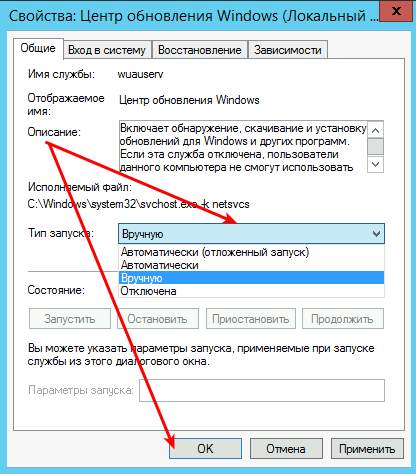
Нажмите правой кнопкой мыши на службе «Центр обновления Windows» и выберите «Свойства»:

Установите тип запуска «Вручную» и нажмите «ОK»:
Запустите службу:
Установите .NET Framework 3.5
Нажмите «Пуск» и откройте «Диспетчер серверов»:
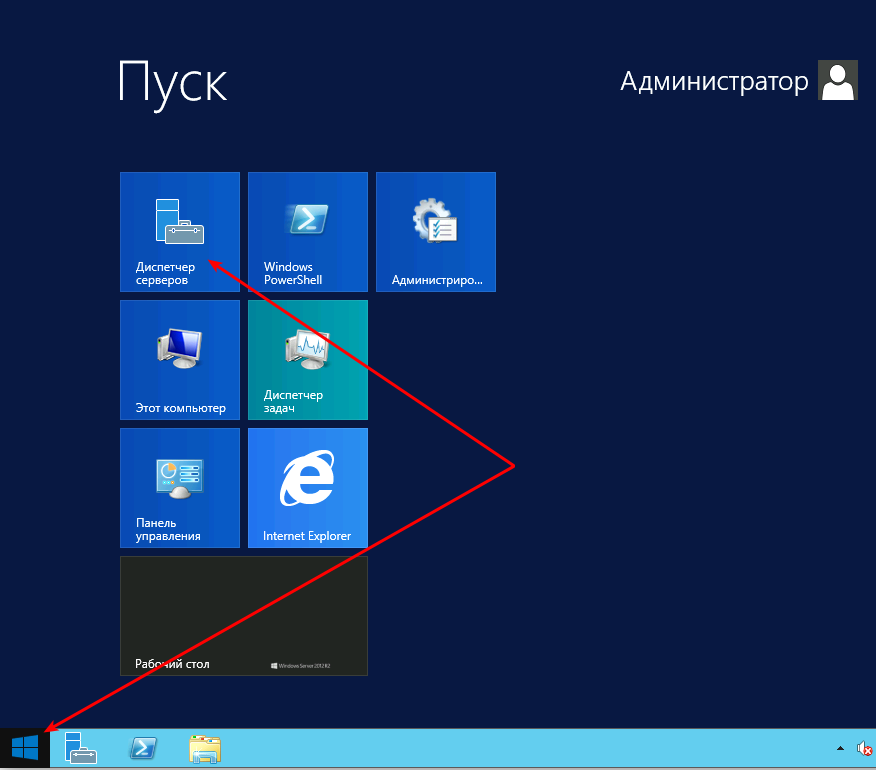
Нажмите «Управление» и выберите «Добавить роли и компоненты»:

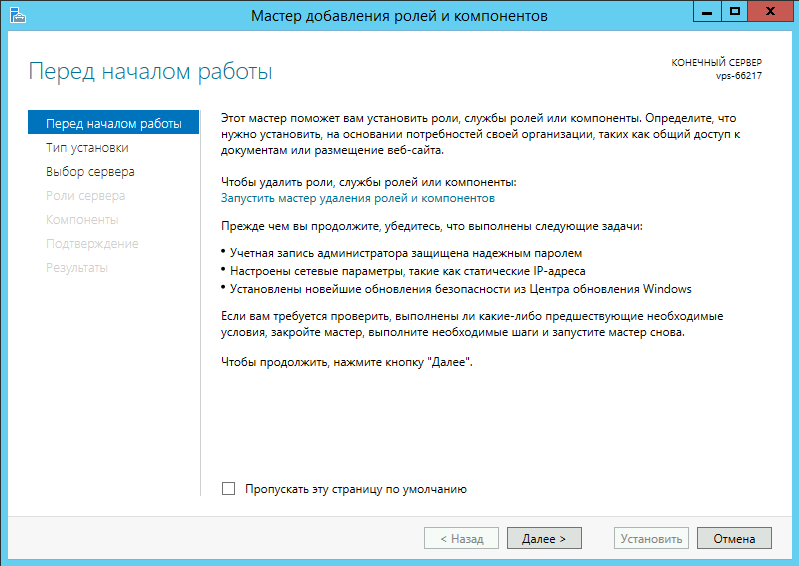
Нажмите «Далее»:
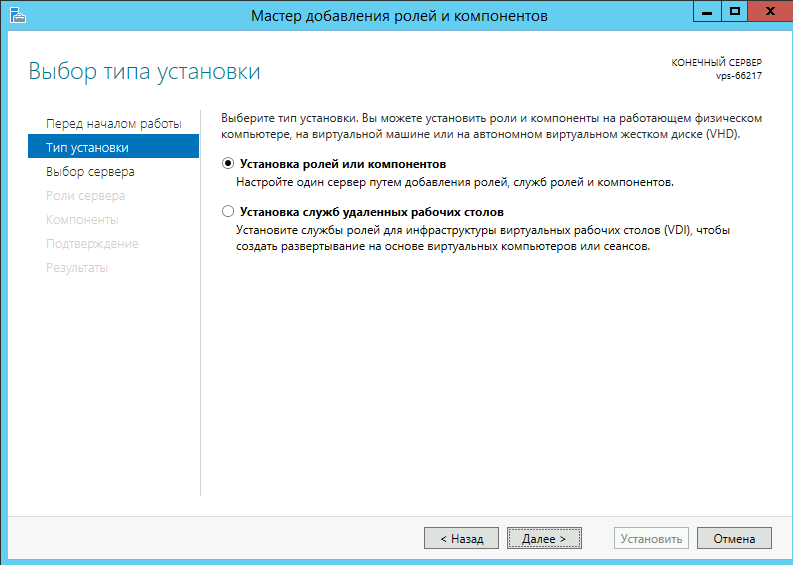
«Далее»:
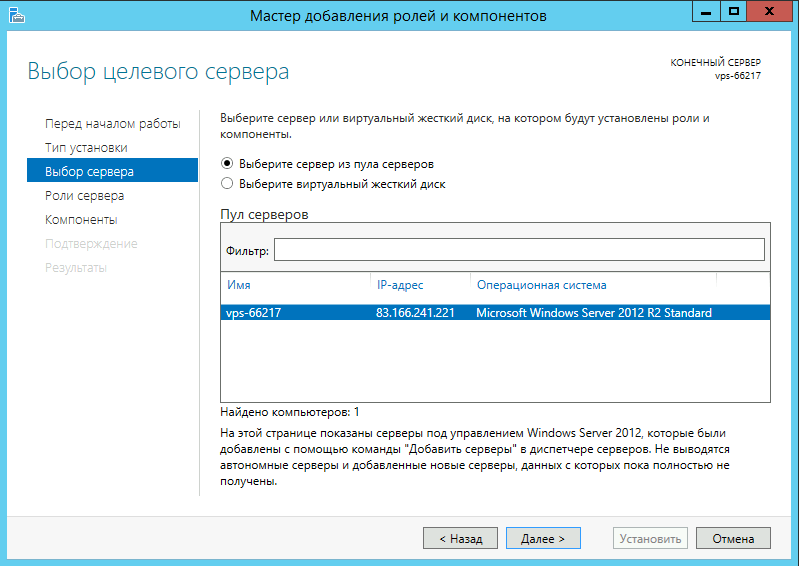
«Далее»:

«Далее»:
«Далее»:
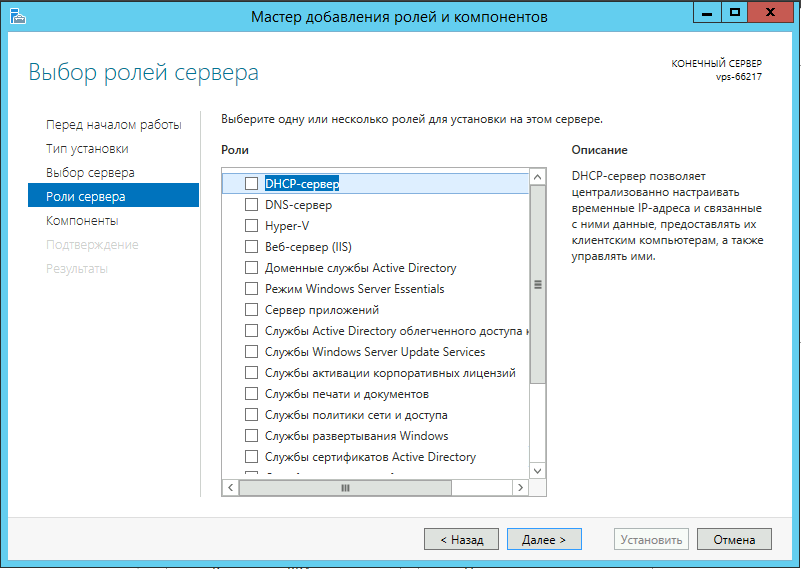
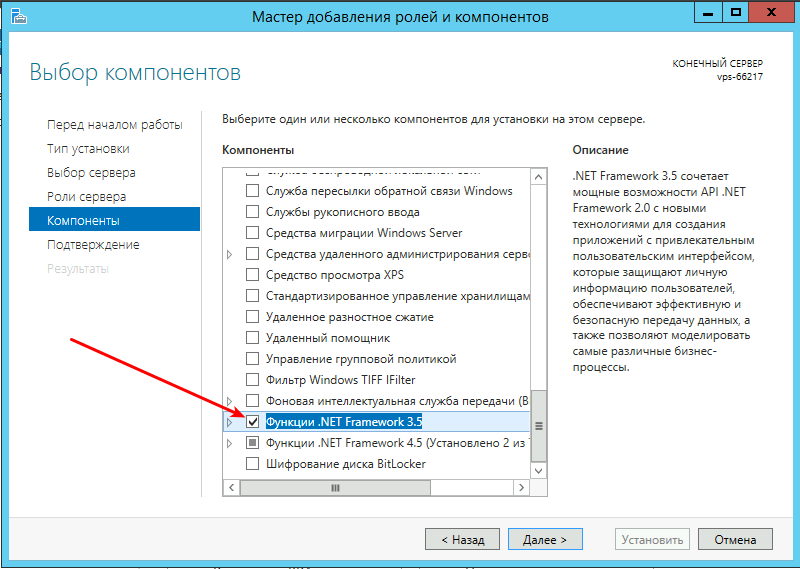
Поставьте галочку напротив компонента «Функции .NET Framework 3.5» и нажмите «Далее»:
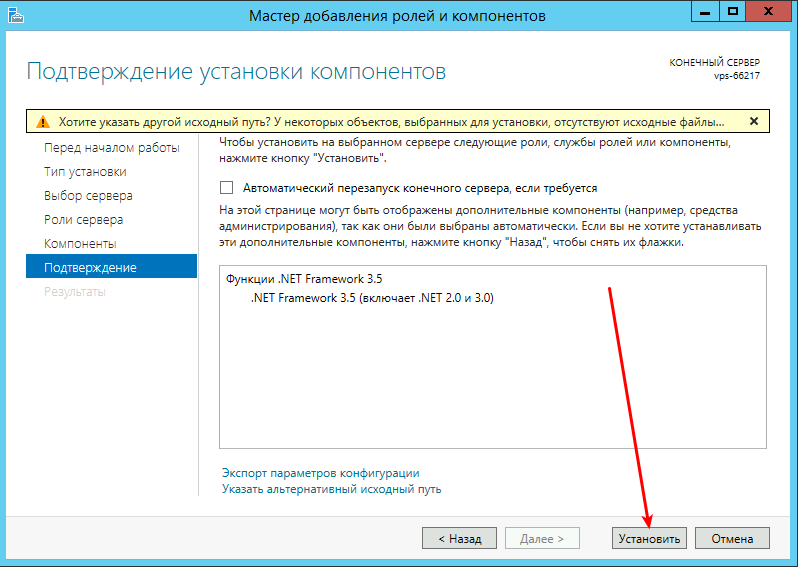
Нажмите «Установить»:
Дождитесь завершения установки:
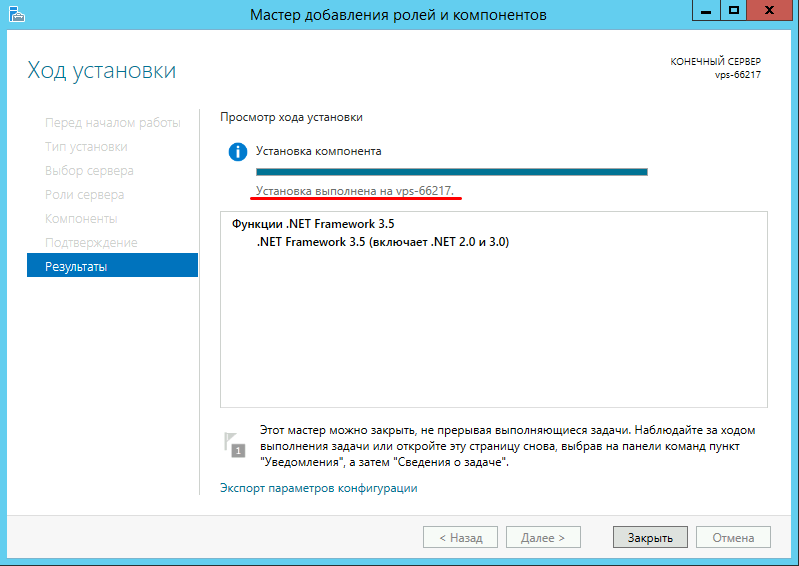
Можете закрыт окно, — .NET Framework 3.5 установлен.
Установка .NET Framework 3.5 на Windows Server 2019
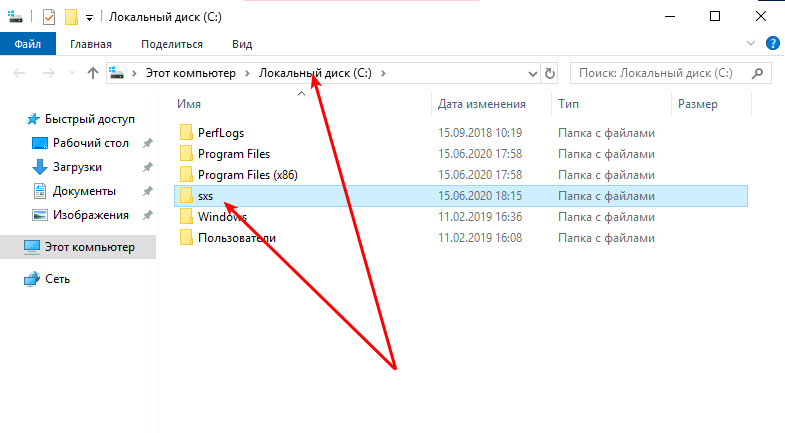
1. Скачайте архив с необходимыми компонентами sources.zip
2. Распакуйте файлы в корень диска С:\:
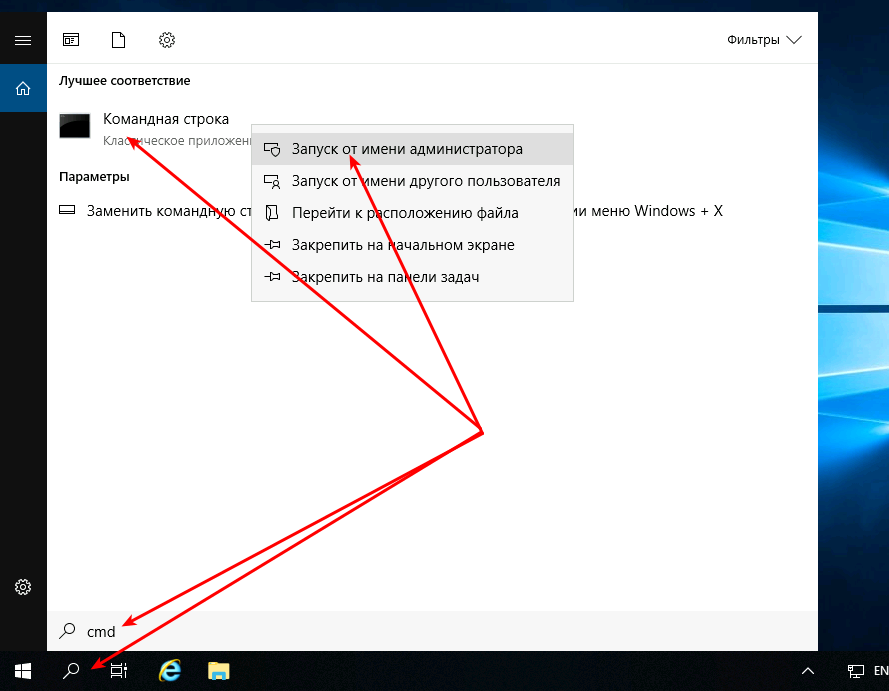
3. Запустите «Командную строку» от имени администратора:
4. Выполните команду с учётом пути к распакованным файлам из архива:DISM /Online /Enable-Feature /FeatureName:NetFx3 /All /LimitAccess /Source:C:\sxs
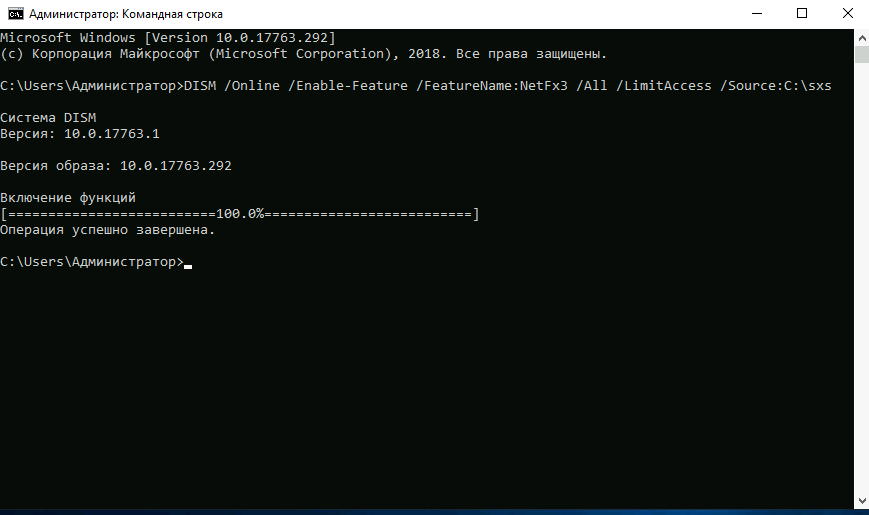
Таким образом компонент Microsoft .NET Framework 3.5 установлен.
Lots of applications require the .NET Framework 3.5 installed on your Windows Server 2016 and later. By default, the .NET Framework 3.5 is not installed on these Operating Systems and must be installed manually by an administrator. You can install the .NET Framework 3.5 also on Windows Server 2022 by following the steps described in this blog post.
There are multiple ways to install the .NET Framework 3.5 feature on Windows Server 2016 and later:
- By using the “Add Roles and Features” Wizard of the Windows Server Manager
- By using PowerShell
- By using the DISM tool
- By using the Group Policy Feature on Demand setting
In this blog post I will focus on just two of them: The installation using the Windows Server Manager and the installation via the Windows PowerShell.
If you are using Windows 10, Windows Server 2016, or Windows Server 2019, Microsoft recommends installing .NET Framework 3.5 through the control panel or the methods listed above.
You can find more information about this installation within the official documentation published by Microsoft: Microsoft .NET Framework 3.5 Deployment Considerations.
Prerequisites
To install the .NET Framework on your system running Windows Server 2016 and later you need the Windows Server installation media that was used to setup the server. Within this blog post, we will need the contents from the subfolder [ISO]:\Sources\SxS on the installation media.
If you are using a Windows Server installation ISO, you can simply mount the ISO file on your server or extract the contents of the [ISO]:\Sources\SxS to a local directory, for example D:\Sources\SxS. To mount the ISO file using the Windows Explorer, simply select Mount from the context menu of the ISO file:

Mount a ISO file using the Windows Explorer
Additionally, the user account used to run the steps described in this blog required administrative privileges on the system. This means the user must be a member of the local Administrators group.
Install the .NET Framework 3.5 Feature using the Server Manager
First you must open the Server Manager on the system where you want to install the .NET Framework 3.5.
- In the Server Manager, open the Add Roles and Features Wizard by clicking Manage –> Add Roles and Features.
- Step forward to Installation Type and select Role-based or feature-based installation.
- Ensure that you have selected the correct server in the step Server Selection.
- Continue to the step Select features and select the (Sub-)feature .NET Framework 3.5 (includes .NET 2.0 and 3.0).
- Within the step Confirmation you must specify an alternate source path. On the bottom of the Confirm installation selections screen, click Specify an alternate source path. In the new dialog window Specify Alternate Source Path type the path to the [ISO]:\Sources\SxS on the installation media or the local directory where you have copied the files to. In this example the files were copied to D:\Sources\SxS. Close the dialog window with Ok and start the feature installation by clicking Install on the Confirm installation selections screen.

Select the Installation Type

Select the destination server

Select the feature “.NET Framework 3.5 (includes .NET 2.0 and 3.0)”

Specify an alternate source path

Specify an alternate source path
Install the .NET Framework 3.5 Feature using PowerShell
The following commands must be executed within a PowerShell that was started as an administrator.
You can verify if the .NET Framework 3.5 is already installed by running the following PowerShell command:
PS> Get-WindowsFeature -Name "NET-Framework-Core"
If the .NET Framework 3.5 is not installed, you will receive an output like the following:
Display Name                                            Name                       Install State

------------                                            ----                       -------------

    [ ] .NET Framework 3.5 (includes .NET 2.0 and 3.0)  NET-Framework-Core               Removed
To install the .NET Framework 3.5 Windows feature, you must run the following command:
PS> Install-WindowsFeature -Name "NET-Framework-Core" -Source "D:\Sources\SxS"
After the command has finished, you will receive an output like this:
Success Restart Needed Exit Code      Feature Result

------- -------------- ---------      --------------

True    No             Success        {.NET Framework 3.5 (includes .NET 2.0 and...
If you run the following command again, the column Install State should show Installed for the .NET Framework 3.5 (includes .NET 2.0 and 3.0) feature:
PS> Get-WindowsFeature -Name "NET-Framework-Core"

Display Name                                            Name                       Install State

------------                                            ----                       -------------

    [X] .NET Framework 3.5 (includes .NET 2.0 and 3.0)  NET-Framework-Core             Installed
Known Issues
There are some system configurations that are incompatible with the described installation options in this blog post and result in weird errors.
For example, we observed such issues on systems that have been upgraded from Windows Server 2008 (R2) to Windows Server 2012 (R2) to Windows Server 2016 and Windows Server 2019 by using the Windows In place Upgrade.
To get the installation of the .NET Framework 3.5 feature working on such systems, we recommend additional research in the internet or to contact the Microsoft Support.
Nevertheless, in this case you can try to install the .NET Framework 3.5 using the Offline Installer provided by Microsoft.
Conclusion
This blog post describes two ways how to install the .NET Framework 3.5 feature on Windows Server 2016 and later. These two ways should work for most of your servers.
However, there are some system configurations that break the described installation options and require manual work to get the installation working. Solutions for these systems are not provided by this blog post!
In this article, we will explain How to Install .NET Framework 3.5 on Windows Server 2016 (Offline Mode) and (Online Mode).
-
1
Install .NET Framework 3.5 on Windows Server 2016-
1.1
Why I can’t install .Net Framework 3.5 on Windows Server 2016? -
1.2
How to Install .NET Framework 3.5 on Windows Server 2016 (Offline)? -
1.3
How to Install .NET Framework 3.5 on Windows Server 2016 (Offline) using Command prompt? -
1.4
How to Install .NET Framework 3.5 on Windows Server 2016 (Online)?
-
1.1
You might also like to read telnet is not recognized Windows Server 2016
- We have tried to install Workflow Manager on SharePoint 2016 environment on Windows Server 2016, we got the below message:
The .Net Framework 3.5 is not installed on your server.
- So that, we tried to add a new feature from Server Manager.

- We have followed the wizard until we got the Features section, and we checked the .NET Framework 3.5 Features, then we clicked on Install button.

- But , we got the below error:
The feature Installation failed because the source files could not be found!

- Again, we have tried to specify an alternative source path as shown below.

- Then we specified the source path to the .Net Framework 3.5 offline package that located in a newly created folder located in the path
E:\sources\SxS. - Press > OK > Install.

But, we still can’t install .Net Framework 3.5 on Windows Server 2016!!
Why I can’t install .Net Framework 3.5 on Windows Server 2016?
In Windows Server 2012 R2 as well as Windows Server 2016, the .Net Framework 3.5 feature is an on-demand feature that its files are not saved on the server with the windows installation due to decreasing the disk space taken by the Operating System.
How to Install .NET Framework 3.5 on Windows Server 2016 (Offline)?
The .Net 3.5 Framework feature should be installed from the below sources:
- The same Windows media that was used when the Windows is being installed.
- The Windows media with the same current installed version (eg. If Windows server 2016 has been installed on your machine, you must use an installation media for Windows Server 2016).
If you don’t have the same Windows installation media. you can download the corresponding Windows ISO for your current installed Windows from Microsoft as a trial version.
Steps
- Mount the Windows installation media (ISO/CD) with the same version of the current installed windows.
- Specify the alternative source path to
U:\Sources\SXS- Note:
U:\is the drive that Windows Server 2012 ISO has mounted.
- Note:
- Click install > wait a moment till the feature installed successfully. 🙂

How to Install .NET Framework 3.5 on Windows Server 2016 (Offline) using Command prompt?
Alternatively, you can use the Deployment Image Servicing and Management (DISM) command-line tool to enables the .NET Framework 3.5 feature without internet connection as the following:
Note: Deployment Image Servicing and Management (DISM) is a command-line tool that is used to mount and service Windows images before deployment. for more details check DISM – Deployment Image Servicing and Management.
Steps
- Open Command prompt as Administrator.
- Type the below cmdlet.
DISM /Online /Enable-Feature /FeatureName:NetFx3 /All /LimitAccess /Source:d:\sources\sxs- d:\ is the drive that the Windows Server ISO has mounted.
- /All to enable all parent features of the specified feature.
- /LimitAccess to prevent DISM from contacting Windows Update/WSUS.
- /Source to specify the location of the files that are needed to restore the feature.

How to Install .NET Framework 3.5 on Windows Server 2016 (Online)?
You can also use the Deployment Image Servicing and Management (DISM) command-line tool to enables the .NET Framework 3.5 feature with an internet connection as the following:
Steps
- Open Command prompt as Administrator.
- Type the below cmdlet.
DISM /online /enable-feature /featurename:NetFx3 /all
Conclusion
In this article, we have explained How to install .NET Framework 3.5 feature on Windows Server 2016 (Online/Offline).
Applies To
- Windows Server 2016.
- Windows Server 2012.
See Also
- DISM – Deployment Image Servicing and Management.
- Enable or Disable Windows Features Using DISM.
- Evaluation Period expired for Windows Server 2012 R2, How to extend it?