In this article, let us see how to enable the Hibernate on Windows Server 2016 Machine.
1. Go to the Command Prompt
2. Type POWERCFG /H /?
a. This will give the help and the sample parameters about the power configuration menu.

3. Choose the Options appropriately.
4. Once, enable, we can see the Hibernation Option on the Screen as well.
5. Go to the Settings screen.

6. Click on the System Settings.

7. Click on the Power & Sleep.

8. Change the settings appropriately. We can see the Option Hibernate on the drop down.

Happy Coding,
Sathish Nadarajan.
What are Group Policy preferences?
Group Policy preferences include more than 20 Group Policy extensions that expand the range of configurable settings within a GPO. You now can use Group Policy preferences to apply a number of settings that previously applied to scripts, such as drive mappings and shared printers.
Windows operating systems later than Windows Server 2008 and Windows Vista Service Pack 2 (SP2) and newer operating systems natively support Group Policy preferences.
Examples of the Group Policy extensions in Group Policy preferences are:
- Folder Options
- Drive Maps
- Registry
- Shortcuts
- Power Options
- Printers
- Scheduled Tasks
- Services
- Start Menu
Configure different power plans for portable and desktop computers. You can go a step further and base the power plan on time of day, so client computers go into standby mode after shorter times during non-work hours.
Infrastructure Requirement :
- 1 DC SERVER (DC-CLOUD)
- Client PC running Windows 10 (CLIENT-10)
Lets get started.
01 – Create a printer with Group Policy preferences
1 – On Dc-CLOUD, right-click Start, and then click Control Panel.
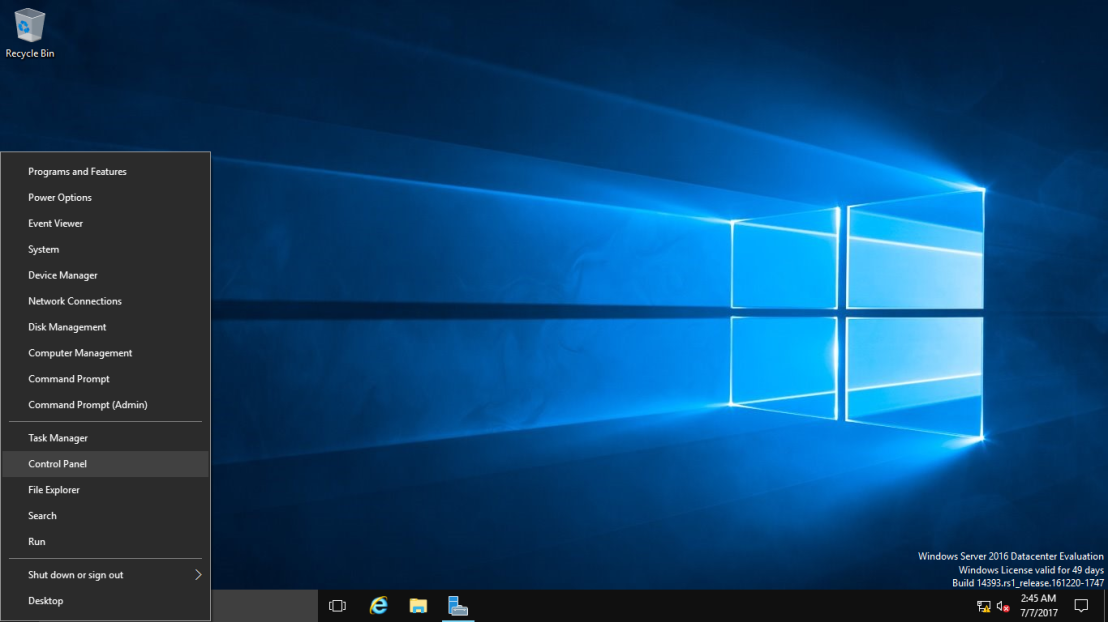
2 – In Control Panel, click View devices and printers.

3 – Click Add a printer.
4 – In the Add a device dialog box, click The printer that I want isn’t listed.

5 – In the Add Printer dialog box, select Add a local printer or network printer with manual settings, and then click Next.
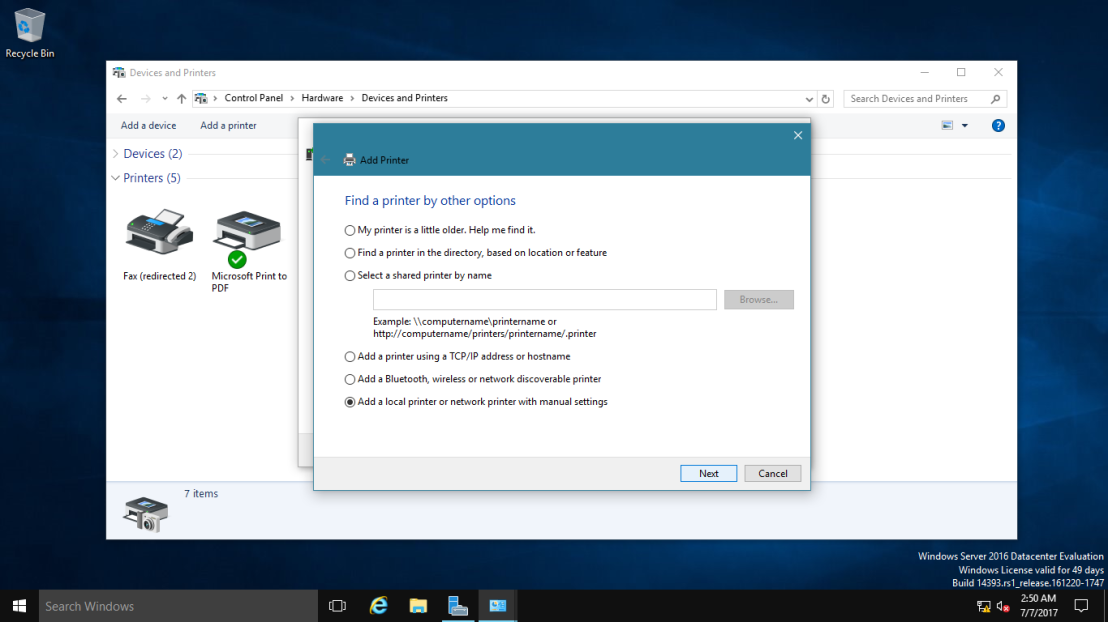
6 – On the Choose a printer port page, click Next.

7 – On the Install the printer driver page, click Next.
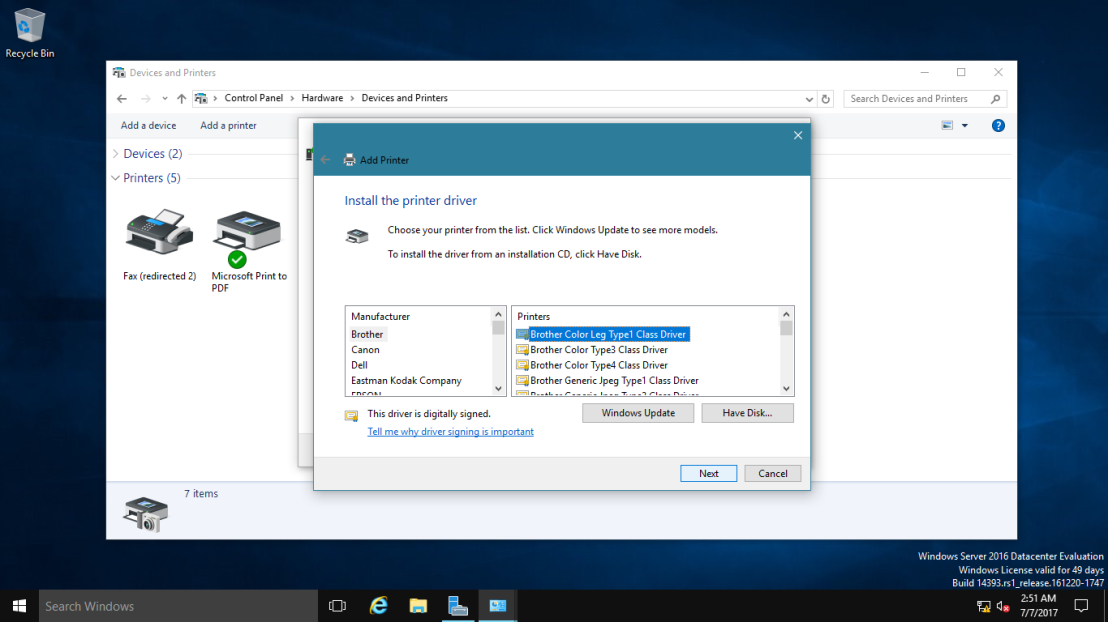
8 – On the Type a printer name page, in the Printer name text box, type Brother, and then click Next.

9 – On the Printer Sharing page, click Next.

10 – On the You’ve successfully added Brother page, click Finish.
 Close Control Panel.
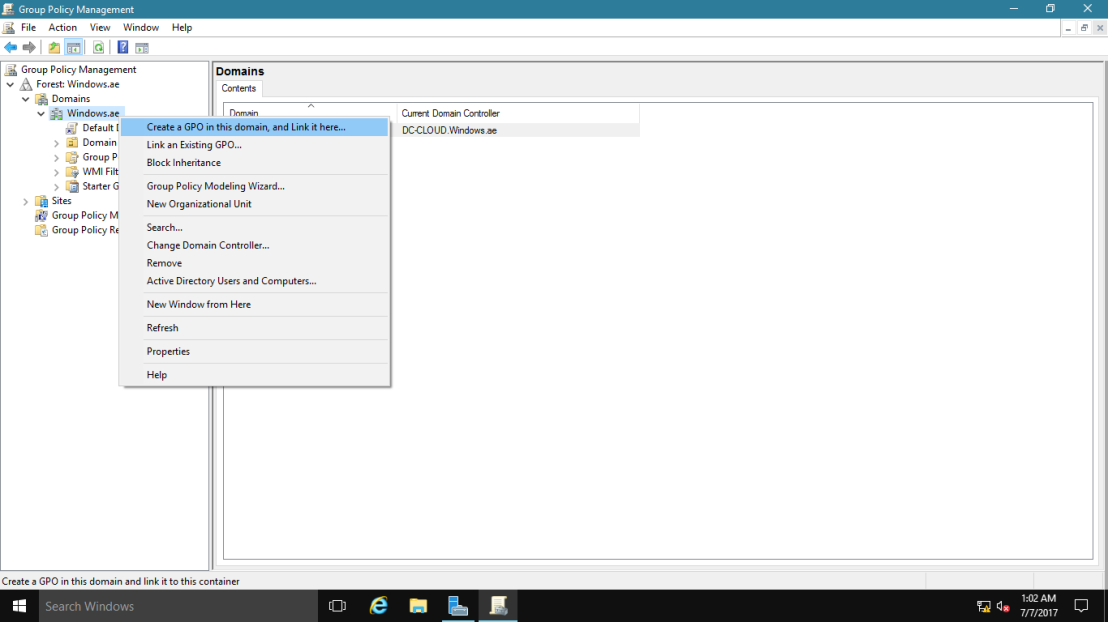
11 – Open Server Manager, click Tools, and then click Group Policy Management.

12 – In the navigation pane, expand Forest: Windows.ae, expand Domains, expand Windows.ae, and then click the Windows.ae domain. Right-click the Windows.ae domain, and click Create a GPO in this domain, and Link it here.
13 – In the New GPO dialog box, type GP Prefs, and then click OK.

14 – In the navigation pane, right-click GP Prefs, and then click Edit.

15 – In the Group Policy Management Editor, expand User Configuration, expand Preferences, expand Control Panel Settings, right-click Printers, hover over New, and then click Shared Printer.

16 – In the New Shared Printer Properties dialog box, in the Share Path text box, type \\DC-CLOUD\Brother, Select the Set this printer as the default printer check box.

02 – Target the preference
1 – On the Common tab, select the Item-level targeting check box, and then click Targeting.

2 – In the Targeting Editor dialog box, click New Item, and then click IP Address Range.

3 – In the between text box, type 172.16.1.50, in the and text box, type 172.16.1.100, and then click OK twice.

03 – Configure a power plan with Group Policy preferences
1 – In Group Policy Management Editor, expand Computer Configuration, expand Preferences, expand Control Panel Settings, and then click Power Options.

2 – Right-click Power Options, hover over New, and then click Power Plan (At least Windows 7).

3 – In the New Power Plan (At least Windows 7) Properties dialog box, click in the Balanced dropdown list and then type Windows Power Plan. then Select the Set as the active power plan check box.
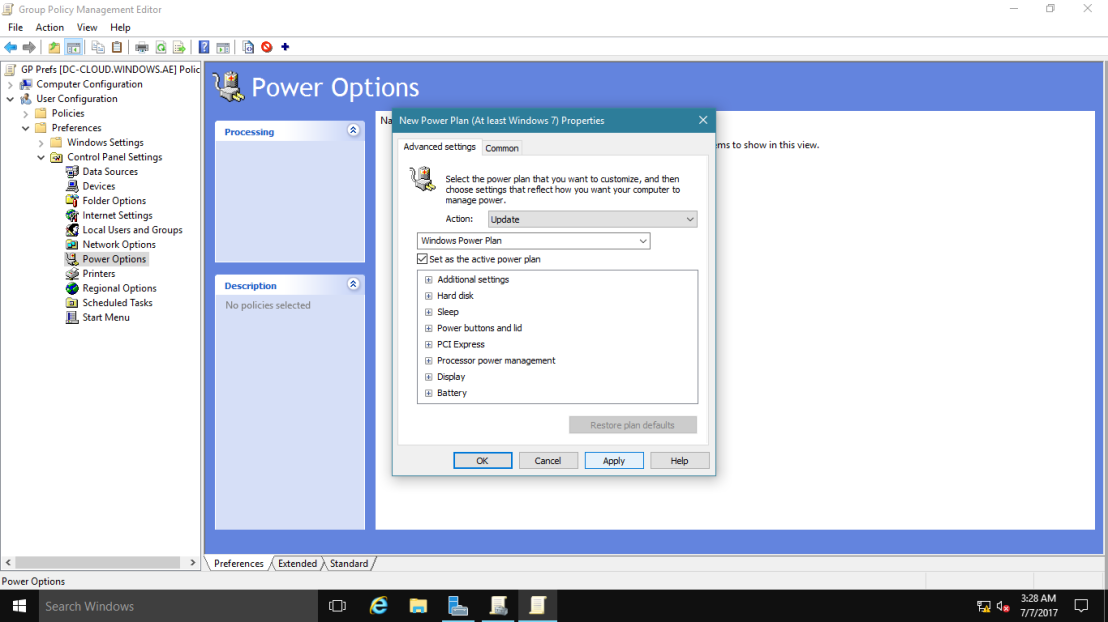
— Target the preference —
1 – On the Common tab, select the Item-level targeting check box, and then click Targeting.

2 – In the Targeting Editor dialog box, click New Item, and then click Operating System.

3 – In the Product list, select Windows 10, and then click OK twice.
 Close the Group Policy Management Editor window.
04 – Test the preferences
1 – Sign in to CLIENT-10 as Windows\Administrator with password asd@123.

2 – Right-click Start, and then click Command Prompt.

3 – In the Command Prompt window, type the following command, and then press Enter:
gpupdate /force

4 – In the command prompt window, when prompted, type the following, and then press Enter:
Y

5 – Sign in to CLIENT-10 as Windows\Administrator with password asd@123.
6 – Right-click Start, and then click Control Panel.

7 – Click Hardware and Sound and then click Devices and Printers.

8 – Verify the presence of the Brother on DC-CLOUD printer.

9 – Click the back arrow, and then click Power Options.

10 – Verify that the Windows Power Plan is present and is the active power plan.

that’s all for now.., any Doubts type a commend.. 🙂
-
#1
I might be causing my own problem here by insisting on running Windows Server 2016 as my OS for Blue Iris, but alas that is what I have set up. I have been dealing with poor BI performance on my old hardware which was a very old i7-3770K (Ivy Bridge), and I assumed that was the problem. So this week I finally gave it «new» hardware, an i7-7700 (non-K) and 12GB of DDR4. Well, the performance is actually far worse now! BI records video (direct-to-disk with substreams enabled) just fine, but playback of a saved clip is laggy and averages 1fps. (If I download the clip and play it offline, it’s properly 30fps so the camera source and recording is fine.) Background: I’m running six 2MP cameras in H.265, all with H.264 substreams. I have done all the other optimization I can find (FPS = keyframe interval, etc.).
I debugged some and found that the Power Options have a HUGE effect. Clicking «High Performance» instantly boosts playback to 30fps through UI3. Click «Balanced» and it drops to 1fps again. I can see in Task Manager while just recording (no viewing/playback) the CPU utilization is 6% and the CPU idles at 0.76GHz. Seems ok. Opening UI3 and viewing live cameras or the «all camera» thumbnail works fine. The trouble is, when I play a saved clip in UI3, the CPU usage (task manager) rises only to 9-10% and the CPU frequency only comes up to 0.86GHz, and the playback is 1-2fps as mentioned. Setting the High Performance power plan causes the CPU to permanently run at the full speed of 4.0GHz and playback is perfectly fine at 30fps.
So, that’s the «fix» — leave it in High Performance mode. Or that’s a workaround at least. However, I dug further as I didn’t like that. Some experiments:
I tried setting «EPP» to 0 and it didn’t help. Commands, for reference:
powercfg -setacvalueindex scheme_current sub_processor PERFEPP 0
powercfg -setactive scheme_current
I wondered if the CPU or GPU frequency was the limiting factor. In Balanced mode the GPU runs at 350MHz and in High Performance it’s pegged at 1150MHz. So I modified the Balanced power mode by setting Minimum processor frequency to 50/75% (I tried both). This modifies ONLY the CPU frequency and GPU stays at 350MHz. It resolves the 1fps issue, proving that the CPU frequency is the problem not GPU.
I’m still stumped though, why is the CPU usage so low in Task Manager if it is bottlenecking the video playback so badly? Why won’t the CPU hardware and/or Windows kernel increase the CPU frequency on demand as needed? I feel like trying Blue Iris on Windows 10/11 on the same hardware to see if that fixes it. Windows Server 2016 is pretty old now and is showing its age. But that’s a big annoying process just as an experiment, so I’m looking for other things to try first.

-
#2
In the advanced settings for the Balanced profile, you might find that the max CPU frequency was not set to 100%?
Ideally you would want the CPU to be able to reduce its clockspeed when max speed is not needed, to save energy.
-
#3
Great idea and I had the same thought so I had checked it already — the max CPU frequency was already 100%. In fact I did the «restore defaults for this plan» to make sure there wasn’t anything corrupted, and it didn’t make any difference.
I agree, I would like the CPU to reduce clock speed when not necessary. The heat and stress might be ok now that it’s winter but it’ll only get worse as the weather warms up…
-
#4
Are you running the server OS on bare metal or as a VM? Microsoft states that if running on bare metal ECC memory is required. I’m assuming since you are running a core i7 you’re not running ECC RAM. With that said, this might not be related to the issue you are seeing but is an example of perhaps why you might not want to run a server OS if your hardware doesn’t meet the recommendations for what is supported for a reliable system. I’ve ran server OS’s on all sorts of devices without ECC but would never do it on something this important if my hardware didn’t follow the requirements 100%.
Maybe check BIOS settings as well for any CPU / power savings variables.
Also, some of the BI experts will be chiming in on why you don’t necessarily need 30fps.
-
#5
OS is running on bare metal. And you’re right, there’s no ECC memory in this system. I could run a couple days of memtest86 to rule out bad memory I suppose. But the failure pattern is so distinct and connected to the CPU frequency governor that I doubt I can blame the RAM. I did reset BIOS defaults but haven’t played with the settings too much, so I’ll check it out.
And I agree that 30fps is probably overkill but I do need more than ONE fps! It’s seriously laggy and chunky in Balanced mode and silky smooth in High Performance. Can’t be a coincidence. Honestly the right answer is probably to switch to win10/win11, but I don’t really like that answer either. If it came to that, I’d probably just leave it in High Performance mode. OR maybe upgrade to Windows Server 2022??
-
#6
What other features of Server 2016 do you leverage?
-
#7
You didn’t mention anything about hard drive.
-
#8
You didn’t mention anything about hard drive.
Ah, yes I omitted that for two reasons. First, it was my initial suspicion and I so did a deep investigation. IO latency, queue depth, split IO, etc… all the file/disk metrics are not only healthy but trivially low. I’m running a mirrored SSD for New and Alert storage and mirrored HDDs for the rest of it. The disks are downright bored and functioning properly. Secondly, when I found that the CPU power governor setting had such a dramatic impact on the performance, I don’t see how that knob is directly connected to IO performance. There’s a tertiary link through IRQ handling of IO transactions but I would also expect that to appear in the performance logs if anything were lagging, and it’s all-clear.
My mistake for not including those details, but I believe I have ruled it out as a cause.
-
#9
What other features of Server 2016 do you leverage?
Honestly, just the fact that I own the license key. I don’t really use the server features I just thought «hey, camera server is a /server/ so why not run the server OS I happen to have a key for?» And I may not even have a spare win10 license to put there instead!
I did play around with reFS for a while. Professionally I’m experienced with Solaris and Linux but not so much Windows. I’m a die hard ZFS advocate and when I went looking for an equivalent in the Windows ecosystem I found reFS and Storage Spaces. I’m not impressed… it’s very nearly abandonware and has a LONG way to go to catch up with ZFS from a decade ago. Anyway, yeah, I don’t really NEED the server OS, it’s just a pain to swap!
- Remove From My Forums
-
Question
-
Is anyone familiar with setting up an APC uninterruptible power supply (UPS) with Server Essentials 2016. The native power configuration settings have several settings but I am not sure how to set them. The UPS and server are connected with a USB cable
and the server shows the UPS connected in device manager. Do I set up the native windows to shutdown the server after a certain amount of time after being on battery backup? If so how long should this be set for? I really don’t want to install the APC Powerchute
Business software on the new server but is that the only option?
Mark Hickinbotham
Answers
-
That makes no sense. MS just seems to miss the forest for the trees. This is very important. A server should see and communicate with a UPS. Period. Forget a printer this is far more important and yet it has been overlooked. The server should recognize
the UPS and shutdown at a administrator determined level of charge and then restart the server at a determined administrator determined level of charge and power restoration. We pay for all the pretty stuff but this is important. Hello MS SBS Team.
Mark Hickinbotham
-
Marked as answer by
Thursday, November 17, 2016 4:27 AM
-
Marked as answer by
Настройка управления питанием. Оптимизация использования процессора.
Настройка схемы управления питанием по умолчанию
Используйте следующие инструкции, чтобы настроить схему управления питанием по умолчанию в процессе развертывания
Windows 8 или Windows Server® 2012. Схемы управления питанием также называют планами
управления питанием
Настройка схемы управления питанием по умолчанию
-
На обслуживающем компьютере откройте командную строку с повышенными привилегиями.
-
Чтобы использовать схему управления питанием с другого компьютера, импортируйте ее.
Например, чтобы импортировать схему управления питанием «Схема для улицы», в командной строке
введите:powercfg -IMPORT C:\OutdoorPlan.pow
-
Чтобы узнать идентификаторы GUID всех схем управления питанием на компьютере, введите:
powercfg -LIST
Отобразится список доступных схем управления питанием. В следующих примерах эти схемы
обозначены guidPlan1 и guidPlan2.Existing Power Schemes (* Active) ----------------------------------- Power Scheme GUID: {guidPlan1} (Balanced) * Power Scheme GUID: {guidPlan2} (Power saver) -
Обратите внимание на GUID рядом со схемами управления питанием, которые вы хотите изменить.
-
Настройте схему управления питанием, которая будет использоваться как текущая схема управления питанием
по умолчанию. Например, вы можете использовать следующую команду:powercfg -SETACTIVE {guidPlan2}где guidPlan2 — название схемы управления питанием.
Эту команду можно запустить с помощью пользовательской команды в файле ответов или в командной строке с
повышенными привилегиями в режиме аудита.
Подтверждение схемы управления питанием по умолчанию
-
Нажмите кнопку Пуск и выберите Панель управления.
-
Щелкните Оборудование и звук, а затем
выберите Электропитание.Откроется окно Электропитание, и появится схемы управления питанием.
-
Просмотрите каждую схему.
-
Убедитесь, что в качестве текущей схемы управления питанием выбрана нужная схема. Текущая схема
управления питанием отмечена звездочкой (*).
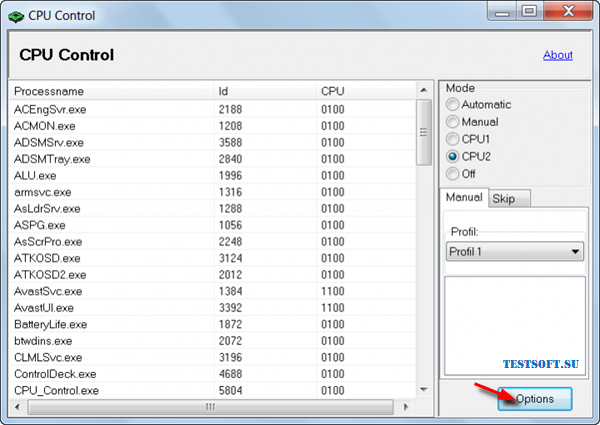
Оптимизация работы процессора: утилита CPU Control
В данной публикации пойдет речь еще об одном стороннем инструменте оптимизации работы многоядерных процессоров
– бесплатной программе CPU Control. «Еще» – потому, что автор уже касался этой
темы, смотрите заметку об ICEAffinity. Детище немецкого разработчика Маттиаса Коча (Matthias
Koch), русифицированная утилита CPU Control будет особенно интересна
начинающим компьютерным пользователям из-за наличия многопрофильного авторежима оптимизации, но обо
всем – по порядку.
«Зачем это надо и что я буду с этого иметь?»
Данный вопрос был затронут в озвученной статье, поэтому дефрагментирую сказанное до пары абзацев:
- Некоторые приложения не поддерживают многоядерный режим, поэтому для корректной работы необходимо вручную
выделить им отдельное процессорное ядро. Другой «проблемный» вариант – материнская плата
асинхронно инициализирует ядра. В обоих случаях требуется оперативное вмешательство пользователя.
- По умолчанию, Windows присваивает всем запускаемым процессам равный приоритет в пользовании процессорных
мощностей. Что не совсем правильно в случае запуска ресурсоемких приложений, например, когда вашему
любимому Call of Duty «мешает» антивирус вкупе с дюжиной другого «второстепенного»
ПО. CPU Control поможет пропорционально разнести процессы по ядрам, что напрямую
скажется на общей производительности системы.
Утилита поддерживает двух- и четырехъядерные процессоры, но, по отзывам, корректно работает и на 6–8
ядрах.
Оптимизируем
1. Для начала необходимо скачать утилиту Никаких «хитростей» в установке нет, поэтому
последовательно жмем «Next» («Далее«) до полной инсталляции. Кстати, программа не «сорит» в
реестре, т.е. портативна и носима на съемных накопителях.
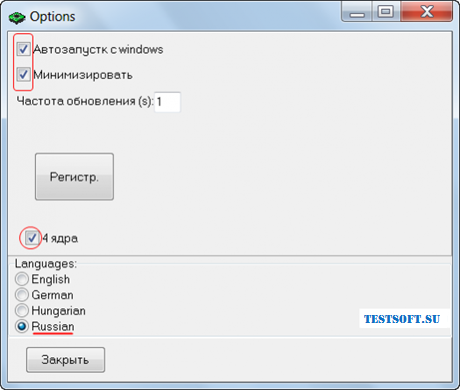
2. После запуска первым делом кликаем на «Options» («Опции«) и
русифицируем CPU Control через «Languages» («Языки«)
→ «Russion«. Далее, в соответствии со следующим скриншотом, ставим галочки напротив
«Автозапуск с Windows«, «Минимизировать» и «4 ядра» (для четырех и более ядер).
Понятно, что если ЦП двухъядерный, активировать «4 ядра» без надобности.
3. Закрыв «Опции», в главном окне приложения видим 5 режимов
контроля работы ЦП: «Авто«, «Ручной«, «CPU1» (все процессы выполняются на 1-ом ядре),
«CPU2» (все процессы выполняются на 2-ом ядре) и «Отключено» (без оптимизации). Последние три
режима нам не интересны, поэтому сосредоточимся на первых двух.
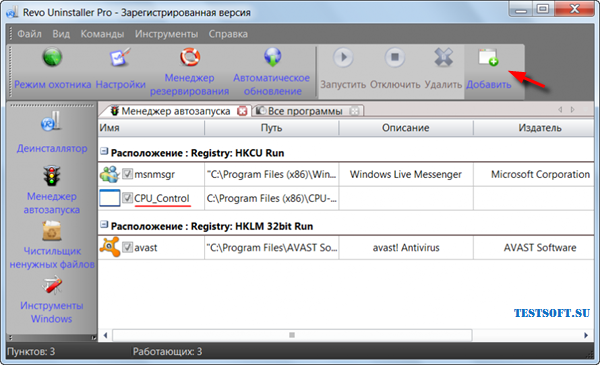
Для начинающих пользователей автор рекомендует просто выбрать режим «Авто» и,
закрыв окно, проверить для будущих загрузок Windows, чтобы CPU Control был в списке
автозагружаемых приложений (!). Это легко сделать, например, через Revo Uninstaller любой версии,
смотрите в панели меню «Инструменты» → «Менеджер автозапуска» (при необходимости
добавить приложение кликаем апплет «Добавить«).
4. Для любителей «покопаться» эта простенькая утилита дает шанс «развернуться»: в
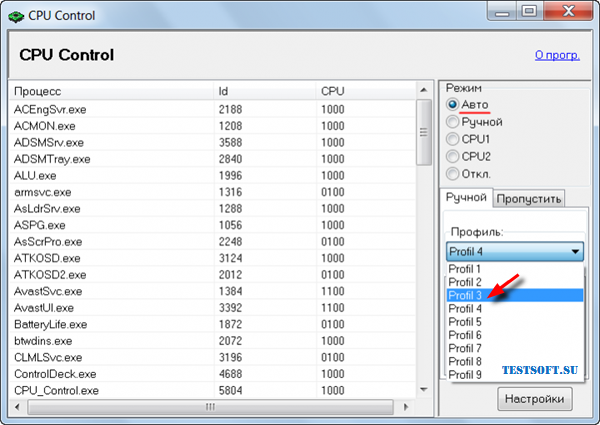
авторежиме имеется 9 базовых профилей-вариаций распределения процессов по ядрам
(скриншот ниже). При наличии времени и открытом на вкладке «Быстродействие» Диспетчере
задач («Ctrl + Alt + Del«), для мониторинга результатов,
можно выбрать оптимальный профиль под свою систему.
5. Самые «продвинутые» пользователи, желающие
добиться максимальных результатов в деле повышения производительности системы данным
способом, наверняка заинтересуются режимом «Ручной«. В этом режиме вы
самостоятельно распределяете процессы по ядрам или группам ядер. Все просто: выделяете процесс(-ы) и через
правую клавишу мыши «вешаете» на нужное ядро или комбинацию ядер. Например, при выборе «CPU1» процесс
будет «висеть» на первом ядре, при выборе «CPU3+4» – на третьем и четвертом ядрах и т.д.
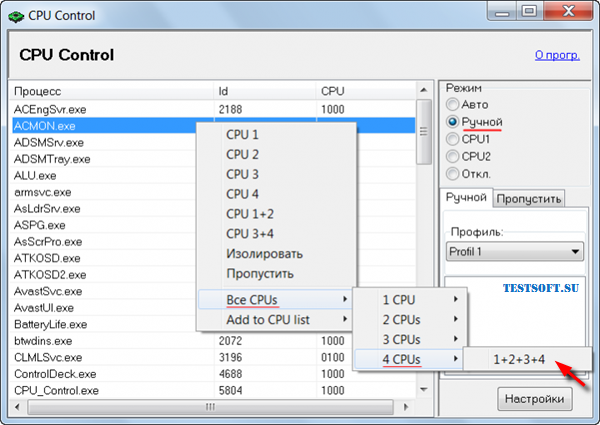
Вот хороший вариант ранжирования для 4-ядерного ПК: системные процессы оставьте 1-ому ядру, самые
ресурсоемкие приложения (типа Photoshop) «распылите» между всеми ядрами (вариант как на последнем скриншоте), а
«середнячков» типа антивирусного сканера отдайте в руки комбинации на 2 ядра, скажем,
«CPU3+4«. Диспетчер задач Windows поможет сделать правильный выбор. Для удобства мониторинга,
при открытой в Диспетчере вкладке «Быстродействие«, проверьте, чтобы была активирована функция «По
графику на каждый ЦП» (см. «Вид» → «Загрузка ЦП» → искомое
«По графику на каждый ЦП«).