Джон, Обновлено: 6 июня 2023 г.
Прежде чем сохранять файлы на новый жесткий диск, вы должны его инициализировать, затем создать на нем раздел и отформатировать файловую систему. После запуска сервера в течение определенного периода времени запланированная схема разделения может оказаться не лучшей. Например, вам может понадобиться уменьшить большую перегородку для создания большего объема или расширить раздел когда он станет полным. Копировать раздел диска для переноса ОС/данных или преобразования типа раздела диска и т. д. Поэтому вам нужен надежный инструмент управления разделами диска. От Windows В XP и Server 2003 есть собственный бесплатный инструмент «Управление дисками». В этой статье рассказывается, как открыть Управление дисками в Windows Server 2016 и что он делает.
Содержание:
- О районе Windows Server 2016 Инструмент управления дисками
- Как открыть Управление дисками в Windows Server 2016
- Что Server 2016 Управление дисками
- Недостатки Server 2016 Управление дисками
1. Около Windows Server 2016 Инструмент управления дисками
Жесткий диск является незаменимым компонентом компьютера, как я объяснил выше, должен быть надежный инструмент, помогающий управлять разделами диска. Во-первых (первоначальный выпуск в 1983 г.), есть FDISK Утилита командной строки, запущенная из DOS, В 2000 году Microsoft представила новый DiskPart инструмент командной строки, который имеет более продвинутые возможности. Позже Microsoft разработала новый Диспетчер логических дисков (LDM), который имеет возможность управлять динамическим диском. Чтобы упростить использование этого инструмента, Microsoft предоставляет оснастку «Управление дисками» с графическим интерфейсом Windows XP.
Помогать изменить размер выделенных разделов не начав сначала, Microsoft добавила новые функции Shrink и Extend Volume в Server 2008. Windows Server 2016 Управление дисками унаследовало тот же графический интерфейс и функции без каких-либо изменений.
2. Как запустить Управление дисками в Windows Server 2016
Есть 2 способа запустить Управление дисками в Windows Server 2016:
- Нажмите Windows + X вместе на клавиатуре и нажмите Управление дисками в списке.
- Нажмите Windows + R чтобы открыть Run, введите diskmgmt.msc и нажмите Enter.
3. Что значит Server 2016 Управление дисками
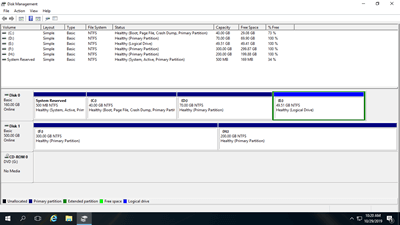
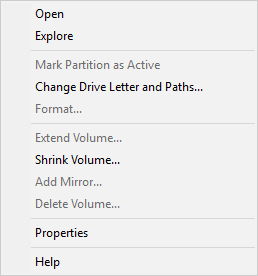
После открытия управления дисками в Windows Server 2016, щелкните правой кнопкой мыши раздел, переднюю часть диска или любое нераспределенное пространство, вы увидите связанные параметры, недоступные параметры выделены серым цветом.
Для выделенного раздела:
- Откройте корневой каталог с помощью проводника
- Пометить раздел как активный
- Изменить букву диска и путь
- Формат раздела
- Уменьшите объем и сделайте незанятое пространство справа.
- Расширьте объем за счет нераспределенного пространства позади него.
- Удалить раздел
- Добавить зеркало
Если вы выберете «Добавить зеркало», оба диска будут преобразованы в динамические.

На новый жесткий диск:
Онлайн, оффлайн и инициализировать новый диск.
На диск с объемом:
Конвертировать базовый диск в динамический диск.
На диск без какого-либо тома:
Конвертируйте MBR-диск в GPT и наоборот, конвертируйте базовый диск в динамический и наоборот.
В нераспределенное пространство:
Создавайте новые тома.
Для динамических дисков:
Управление дисками может создавать тома Simple, Mirrored, Spanned, Stripped и RAID-5.
Для создания тома RAID 5 должно быть как минимум 3 динамические диски. На моем компьютере их всего два, поэтому эта опция недоступна.
4. Недостатки управления дисками
Windows Server 2016 Управление дисками может выполнять только некоторые основные операции. Расширенные функции сжатия и увеличения объема имеют много ограничений.
- Это может только сжиматься и расширяться NTFS разделы, FAT32 и другие типы разделов не поддерживаются.
- В некоторых ситуациях, например, при ошибке файловой системы в разделе, «Управление дисками» не может сжать ее.
- Если есть непоколебимы файлы в разделе, Управление дисками может лишь немного уменьшить пространство.
- Это может сделать только Нераспределенное пространство справа при сокращении раздела.
- Он может расширить раздел, только если есть смежный Нераспределенное пространство на правой стороне.
- Он не может расширить раздел, сжимая любые другие тома.
- Отсутствие многих возможностей, таких как перемещение, объединение, копирование, преобразование, очистка раздела, сканирование сбойных секторов и т. Д.
Чтобы управлять разделами диска для Windows 2016 сервер, NIUBI Partition Editor это лучший выбор. По сравнению с другим программным обеспечением оно намного безопаснее и быстрее благодаря своим инновационным технологиям:
- Виртуальный режим — все операции будут отображаться как ожидающие предварительного просмотра, реальные разделы диска не будут изменены, пока не будет нажата кнопка «Apply» чтобы подтвердить.
- Отменить-на-хорошо — если вы применили неправильные операции, вы можете отменить текущие операции без ущерба.
- 1 второй откат — если он обнаруживает какую-либо ошибку при изменении размера раздела, он автоматически мгновенно возвращает сервер к исходному состоянию.
- Hot Clone — клонирование раздела диска в Windows без перерыва сервера. Вы можете регулярно клонировать системный диск в качестве резервной копии и сразу же загружаться с клонированного диска, когда системный диск не работает.
Скачать NIUBI Partition Editor, вы увидите все диски со структурой разделов и другими параметрами справа, доступные операции с выбранным диском и разделом перечислены слева и по щелчку правой кнопкой мыши.
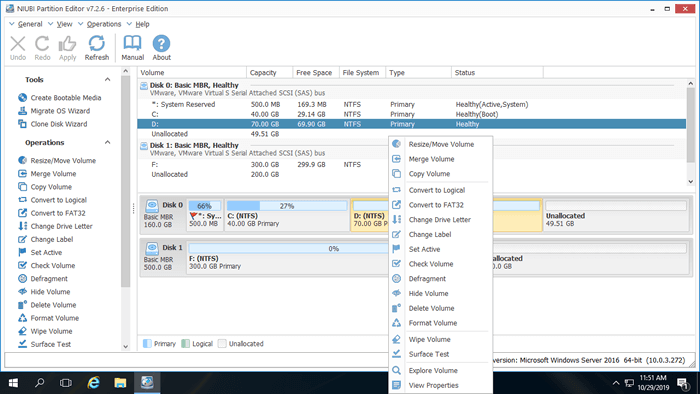
Этот менеджер разделов сервера помогает сжимать, расширять, перемещать и объединять разделы без потери данных, чтобы оптимизировать дисковое пространство. Оптимизируйте файловую систему и дефрагментируйте разделы для повышения производительности компьютера. Клонируйте диск/раздел для переноса операционной системы и данных. Преобразование типа диска/раздела без потери данных, например преобразование динамического диска в базовый, преобразование NTFS в FAT32, преобразование между основным и логическим. Он также помогает создавать, удалять, форматировать, скрывать, активировать, стирать разделы, сканировать поврежденные сектора и т. д. Узнать как изменить размер / копировать / управлять разделом диска в Windows Сервер 2016
Introduction
Disk Management in Windows Server 2016 is a powerful tool that allows you to manage your hard disk and partitions. It allows you to create, delete, format, and resize partitions, as well as assign drive letters and mount points. It also provides a graphical view of your disk layout and allows you to perform various disk-related tasks. In this guide, we will show you how to open Disk Management in Windows Server 2016.
Step-by-Step Guide to Opening Disk Management in Windows Server 2016
1. Open the Start menu.
2. Type “disk management” into the search bar.
3. Select the “Create and format hard disk partitions” option from the search results.
4. The Disk Management window will open.
5. If the Disk Management window does not open, you can also open it by going to the Control Panel.
6. Select “System and Security” from the Control Panel.
7. Select “Administrative Tools” from the System and Security window.
8. Select “Computer Management” from the Administrative Tools window.
9. Select “Disk Management” from the left-hand side of the Computer Management window.
10. The Disk Management window will open.
Exploring the Benefits of Using Disk Management in Windows Server 2016
Disk Management is a powerful tool in Windows Server 2016 that allows users to manage their hard disk and storage space. It provides a graphical user interface (GUI) for managing disks, partitions, and volumes. With Disk Management, users can create, delete, format, and resize partitions, as well as assign drive letters and mount points. It also allows users to convert basic disks to dynamic disks and vice versa.
Using Disk Management in Windows Server 2016 offers a number of benefits. First, it simplifies the process of managing disks and partitions. With its intuitive GUI, users can easily create, delete, format, and resize partitions without having to use command-line tools. This makes it easier for users to manage their storage space and keep their data organized.
Second, Disk Management allows users to convert basic disks to dynamic disks. Dynamic disks provide more flexibility and features than basic disks, such as the ability to create spanned, striped, and mirrored volumes. This makes it easier for users to create fault-tolerant storage solutions.
Third, Disk Management allows users to assign drive letters and mount points to partitions. This makes it easier for users to access their data, as they can assign a drive letter to a partition and access it directly from Windows Explorer.
Finally, Disk Management allows users to perform a number of maintenance tasks, such as checking the integrity of disks and volumes, and defragmenting disks. This helps to ensure that disks and volumes are running optimally and that data is being stored efficiently.
Overall, Disk Management in Windows Server 2016 is a powerful tool that simplifies the process of managing disks and partitions. It provides a number of benefits, such as the ability to create, delete, format, and resize partitions, convert basic disks to dynamic disks, assign drive letters and mount points, and perform maintenance tasks. As such, it is an invaluable tool for managing storage space in Windows Server 2016.
How to Use Disk Management to Manage Storage in Windows Server 2016
Disk Management is a powerful tool in Windows Server 2016 that allows users to manage their storage. It provides a graphical user interface (GUI) for managing disks, volumes, and file systems. With Disk Management, users can create, delete, format, and resize partitions, as well as assign drive letters and mount points.
To access Disk Management, open the Server Manager and select the Tools menu. From there, select Computer Management and then select Disk Management. This will open the Disk Management window.
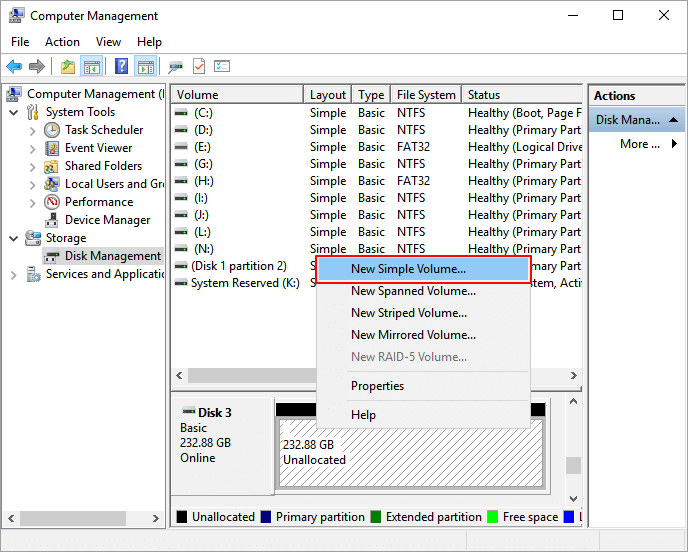
In the Disk Management window, users can view all of the disks and volumes on the system. Disks are listed on the left side of the window, and volumes are listed on the right side. To create a new partition, right-click on the disk and select New Simple Volume. This will open the New Simple Volume Wizard, which will guide users through the process of creating a new partition.
To delete a partition, right-click on the partition and select Delete Volume. This will delete the partition and all of its contents. To format a partition, right-click on the partition and select Format. This will open the Format dialog box, which will allow users to select the file system and other formatting options.
To resize a partition, right-click on the partition and select Extend Volume. This will open the Extend Volume Wizard, which will guide users through the process of resizing the partition. To assign a drive letter or mount point to a partition, right-click on the partition and select Change Drive Letter and Paths. This will open the Change Drive Letter and Paths dialog box, which will allow users to assign a drive letter or mount point to the partition.
Disk Management is a powerful tool for managing storage in Windows Server 2016. With it, users can create, delete, format, and resize partitions, as well as assign drive letters and mount points. By taking advantage of this tool, users can easily manage their storage and ensure that their data is properly organized.
Troubleshooting Disk Management Issues in Windows Server 2016
Disk Management is a powerful tool in Windows Server 2016 that allows users to manage their hard drives and other storage devices. It is used to create, delete, format, and resize partitions, as well as assign drive letters and mount points. However, it is not uncommon for users to experience issues when using Disk Management. This article will provide some tips for troubleshooting Disk Management issues in Windows Server 2016.
The first step in troubleshooting Disk Management issues is to check the Event Viewer. The Event Viewer is a tool that can be used to view system logs and troubleshoot problems. It can be accessed by typing “eventvwr” in the Run dialog box. In the Event Viewer, look for any errors related to Disk Management. If any errors are found, they should be addressed before proceeding.
The next step is to check the disk for errors. This can be done by running the chkdsk command. To do this, open an elevated command prompt and type “chkdsk /f”. This will scan the disk for errors and attempt to fix any that are found.
If the disk is still not functioning properly, it may be necessary to use the Diskpart utility. Diskpart is a command-line tool that can be used to manage disks, partitions, and volumes. To use Diskpart, open an elevated command prompt and type “diskpart”. This will open the Diskpart prompt. From here, you can use the various commands to manage disks, partitions, and volumes.
Finally, if the issue persists, it may be necessary to use the Disk Management snap-in. This can be accessed by typing “diskmgmt.msc” in the Run dialog box. The Disk Management snap-in can be used to view and manage disks, partitions, and volumes. It can also be used to create, delete, format, and resize partitions.
By following these steps, most Disk Management issues can be resolved. If the issue persists, it may be necessary to contact Microsoft Support for further assistance.
Understanding the Different Disk Management Options in Windows Server 2016
Windows Server 2016 offers a variety of disk management options to help users manage their storage needs. These options include basic disk management, dynamic disk management, and storage spaces. Each of these options has its own advantages and disadvantages, and it is important to understand the differences between them in order to make the best choice for your particular needs.
Basic disk management is the most basic form of disk management available in Windows Server 2016. It allows users to create and manage partitions on their hard drives, as well as format and assign drive letters to them. This type of disk management is ideal for users who need to manage a few basic partitions on their hard drive.
Dynamic disk management is a more advanced form of disk management. It allows users to create and manage dynamic volumes, which are more flexible than basic partitions. Dynamic volumes can span multiple disks, allowing users to create larger volumes than they could with basic disk management. This type of disk management is ideal for users who need to manage large volumes of data.
Storage Spaces is a feature of Windows Server 2016 that allows users to create virtual disks from multiple physical disks. This feature is ideal for users who need to create large storage pools from multiple disks. Storage Spaces also allows users to create redundancy, meaning that if one disk fails, the data can still be recovered from the other disks in the pool.
Each of these disk management options has its own advantages and disadvantages, and it is important to understand the differences between them in order to make the best choice for your particular needs. By understanding the different disk management options available in Windows Server 2016, users can ensure that they are making the most of their storage resources.
Tips and Tricks for Optimizing Disk Management in Windows Server 2016
1. Utilize Storage Spaces: Storage Spaces is a feature of Windows Server 2016 that allows you to create virtual disks from physical disks. This allows you to create a pool of storage that can be used for multiple purposes, such as creating multiple virtual disks or mirroring data for redundancy.
2. Use Disk Defragmentation: Disk defragmentation is a process that rearranges the data on a disk to make it more efficient. This can help improve the performance of your server by reducing the amount of time it takes to access data.
3. Utilize Disk Cleanup: Disk Cleanup is a tool that can be used to delete unnecessary files from your server. This can help free up disk space and improve the performance of your server.
4. Utilize Disk Partitioning: Disk partitioning is a process that divides a hard drive into multiple sections. This can help you organize your data and make it easier to manage.
5. Utilize Disk Quotas: Disk quotas are a feature of Windows Server 2016 that allows you to limit the amount of disk space that a user or group can use. This can help you manage disk space more efficiently.
6. Utilize NTFS Compression: NTFS compression is a feature of Windows Server 2016 that allows you to compress files and folders to save disk space. This can help you make the most of your available disk space.
7. Utilize Shadow Copies: Shadow Copies is a feature of Windows Server 2016 that allows you to create snapshots of your data. This can help you recover data in the event of a system failure or data corruption.
8. Utilize Storage Replica: Storage Replica is a feature of Windows Server 2016 that allows you to replicate data between servers. This can help you ensure that your data is always available and up-to-date.
Q&A
Q1: How do I open Disk Management in Windows Server 2016?
A1: To open Disk Management in Windows Server 2016, press the Windows key + R to open the Run dialog box, type “diskmgmt.msc” and press Enter. This will open the Disk Management window.
Q2: What is Disk Management used for?
A2: Disk Management is used to manage hard drives and other storage devices on a Windows computer. It can be used to create, delete, format, and assign drive letters to partitions, as well as to view and manage disk space.
Q3: How do I create a new partition in Disk Management?
A3: To create a new partition in Disk Management, right-click on an unallocated space and select “New Simple Volume”. This will open the New Simple Volume Wizard, which will guide you through the process of creating a new partition.
Q4: How do I delete a partition in Disk Management?
A4: To delete a partition in Disk Management, right-click on the partition and select “Delete Volume”. This will delete the partition and any data stored on it.
Q5: How do I format a partition in Disk Management?
A5: To format a partition in Disk Management, right-click on the partition and select “Format”. This will open the Format dialog box, which will allow you to select the file system and other options for formatting the partition.
Q6: How do I assign a drive letter to a partition in Disk Management?
A6: To assign a drive letter to a partition in Disk Management, right-click on the partition and select “Change Drive Letter and Paths”. This will open the Change Drive Letter and Paths dialog box, which will allow you to assign a drive letter to the partition.
Джон, Обновлено: 21 июля 2022 г.
Прежде чем сохранять файлы на новый жесткий диск, вы должны его инициализировать, затем создать на нем раздел и отформатировать файловую систему. После запуска сервера в течение определенного периода времени запланированная схема разделения может оказаться не лучшей. Например, вам может понадобиться уменьшить большую перегородку создать новый том, расширить раздел когда он станет полным. Копировать раздел диска для переноса ОС и данных, преобразования типа раздела диска и т. д. Поэтому вам нужен надежный инструмент управления разделами диска. То же самое и с другими версиями, в них есть собственный бесплатный инструмент «Управление дисками». Windows Server 2016. В этой статье я расскажу, как открыть Управление дисками в Windows Server 2016 и что он делает.
Содержание:
- О районе Windows Server 2016 Инструмент управления дисками
- Как открыть Управление дисками в Windows Server 2016
- Что Server 2016 Управление дисками
- Недостатки Server 2016 Управление дисками
Жесткий диск является незаменимым компонентом компьютера, как я объяснил выше, должен быть надежный инструмент, помогающий управлять разделами диска. Во-первых (первоначальный выпуск в 1983 г.), есть FDISK Утилита командной строки, запущенная из DOS, В 2000 году Microsoft представила новый DiskPart инструмент командной строки, который имеет более продвинутые возможности. Позже Microsoft разработала новый Диспетчер логических дисков (LDM), который имеет возможность управлять динамическим диском. Чтобы упростить использование этого инструмента, Microsoft предоставляет оснастку «Управление дисками» с графическим интерфейсом Windows XP.
Помогать изменить размер выделенных разделов не начав сначала, Microsoft добавила новые функции Shrink и Extend Volume в Server 2008. Windows Server 2016 Управление дисками унаследовало тот же графический интерфейс и функции без каких-либо изменений.
2. Как запустить Управление дисками в Windows Server 2016
Есть 2 способа запустить Управление дисками в Windows Server 2016:
- Нажмите Windows + X вместе на клавиатуре и нажмите Управление дисками в списке.
- Нажмите Windows + R чтобы открыть Run, введите diskmgmt.msc и нажмите Enter.
3. Что значит Server 2016 Управление дисками
После открытия управления дисками в Windows Server 2016, щелкните правой кнопкой мыши раздел, переднюю часть диска или любое нераспределенное пространство, вы увидите связанные параметры, недоступные параметры выделены серым цветом.
Для выделенного раздела:
- Откройте корневой каталог с помощью проводника
- Пометить раздел как активный
- Изменить букву диска и путь
- Формат раздела
- Уменьшите объем и сделайте незанятое пространство справа.
- Расширьте объем за счет нераспределенного пространства позади него.
- Удалить раздел
- Добавить зеркало
Если вы выберете «Добавить зеркало», оба диска будут преобразованы в динамические.
На новый жесткий диск:
Онлайн, оффлайн и инициализировать новый диск.
На диск с объемом:
Конвертировать базовый диск в динамический диск.
На диск без какого-либо тома:
Конвертируйте MBR-диск в GPT и наоборот, конвертируйте базовый диск в динамический и наоборот.
В нераспределенное пространство:
Создавайте новые тома.
Для динамических дисков:
Управление дисками может создавать тома Simple, Mirrored, Spanned, Stripped и RAID-5.
Для создания тома RAID 5 должно быть как минимум 3 динамические диски. На моем компьютере их всего два, поэтому эта опция недоступна.
4. Недостатки управления дисками
Windows Server 2016 Управление дисками может выполнять только некоторые базовые операции, кроме того, расширенные функции сжатия и расширения имеют множество ограничений.
- Это может только сжиматься и расширяться NTFS разделы, FAT32 и другие типы разделов не поддерживаются.
- В некоторых ситуациях, например, при ошибке файловой системы в разделе, «Управление дисками» не может сжать ее.
- Если есть непоколебимы файлы в разделе, Управление дисками может лишь немного уменьшить пространство.
- Это может сделать только Нераспределенное пространство справа при сокращении раздела.
- Он может расширить раздел, только если есть смежный Нераспределенное пространство на правой стороне.
- Он не может расширить раздел, сжимая любые другие тома.
- Отсутствие многих возможностей, таких как перемещение, объединение, копирование, преобразование, очистка раздела, сканирование сбойных секторов и т. Д.
Чтобы управлять разделами диска для Windows 2016 сервер, NIUBI Partition Editor это лучший выбор. По сравнению с другим программным обеспечением оно намного безопаснее и быстрее благодаря своим инновационным технологиям:
- Виртуальный режим — все операции будут отображаться как ожидающие предварительного просмотра, реальные разделы диска не будут изменены, пока не будет нажата кнопка «Apply» чтобы подтвердить.
- Отменить-на-хорошо — если вы применили неправильные операции, вы можете отменить текущие операции без ущерба.
- 1 второй откат — если он обнаруживает какую-либо ошибку при изменении размера раздела, он автоматически мгновенно возвращает сервер к исходному состоянию.
- Hot Clone — клонирование раздела диска в Windows без перерыва сервера. Вы можете регулярно клонировать системный диск в качестве резервной копии и сразу же загружаться с клонированного диска, когда системный диск не работает.
Скачать NIUBI Partition Editor, вы увидите все диски со структурой разделов и другими параметрами справа, доступные операции с выбранным диском и разделом перечислены слева и по щелчку правой кнопкой мыши.
Изучай что делает этот диспетчер дисков и как изменить размер / копировать / управлять разделом диска в Windows Сервер 2016
2 Best Disk Manager for Windows Server Free Download [Free & Paid]
Updated by
Daisy on Feb 22, 2023
EaseUS Partition Master Enterprise
Your trustworthy Windows Server disk manager.
- Extend System drive, combine/split partitions.
- Clone disk, migrate OS to HDD/SSD.
- Convert MBR to GPT, GPT to MBR, no data loss.
- 1-click adjust disk layout, create volumes at one time.
24/7 Tech Chat
Free Inquiry
Though being different in many aspects, however, Windows Server also shares some similarities with the Windows desktop editions. For example, Windows Servers has a desktop, sharing the same start button, and even the same task view button as the Windows operating systems.
Accordingly, making full use of hard drive spaces in Windows Server computers has become even more essential. Turning to a reliable disk manager tool or software becomes necessary for Windows Servers users. Follow this page, you’ll get the two best disk managers for Windows Server 2022/2019/2016 and even older Server editions for help.
Disk Manager is normally a tool that could be used to adjust disk layout and space allocation on Windows Server machines. Disk manager is also known as Windows disk utility that you can apply to create, extend, shrink, delete, and even format partitions on an internal or external hard drive in a Windows computer.
So what is the disk manager for Windows Server? You can take it as a disk partitioning tool or disk utility that supports Windows Server users to manage their hard drives with eases.
So what is the best disk manager for Windows Server? In this part, we’ll be showing you two tools for managing hard disks on Windows Server machines with ease. Let’s see.
2 Best Disk Manager for Windows Server 2022/2019/2016/2012
Although the desktop of Windows Server is similar to the Windows system, both two operating systems are designed for different target users. Windows OS is designed for desktop users to work and use with, while the Server editions are mainly for providing network access for people.
When it comes to managing hard drives on Windows Server computers, which tool will you turn to for help? Here, we collected two best disk management tools that you can apply to manage disks on Windows Server machines:
- #1. EaseUS Partition Master Enterprise
- #2. Disk Management
What’s the difference? And which is better? Check the comparison and you’ll learn which is better:
| Comparison | EaseUS Partition Master Enterprise | Disk Management |
|---|---|---|
| Basic Features |
|
|
| Advanced Features |
|
|
So which tool to choose for disk management in Windows Server computers?
- For an easy & secure disk manager, take EaseUS Partition Master Enterprise for help.
- For basic disk management, try Disk Management in Server computers.
How to Launch Disk Manager and Manage Disks on Windows Server
So how to use your desired disk manager to manage hard drives in your Windows Server computers? Follow the guidelines here in this part, let’s see how to easily partition hard drives on your own in Windows Server.
#1. Download EaseUS Partition Master Enterprise to Manage Server Disks — Paid
EaseUS Partition Master Enterprise is mainly designed for Windows Server machine disk management. It enables Windows Server users to effortlessly manage hard drives and even upgrade the OS drive to HDD/SSD without reinstallation.
You can free download and install this software on your Server computer for disk management now.
How to Launch EaseUS Partition Master to Partition Server Disks
Step 1. Launch EaseUS Partition Master to check for free space at the Partition Manager section.
- If your hard drive has unallocated space, jump to Step 3 to create partition.
- If the hard drive has no unallocated space, continue with Step 2.
Step 2. Shrink a disk partition to create unallocated space.
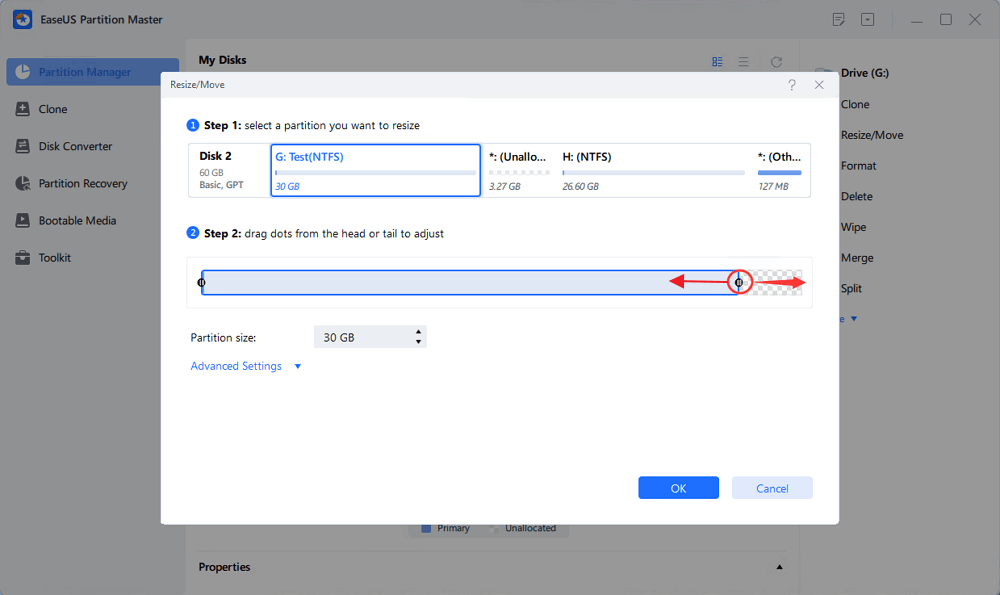
Right-click on the target drive partition with a lot free space and select «Resize/Move».
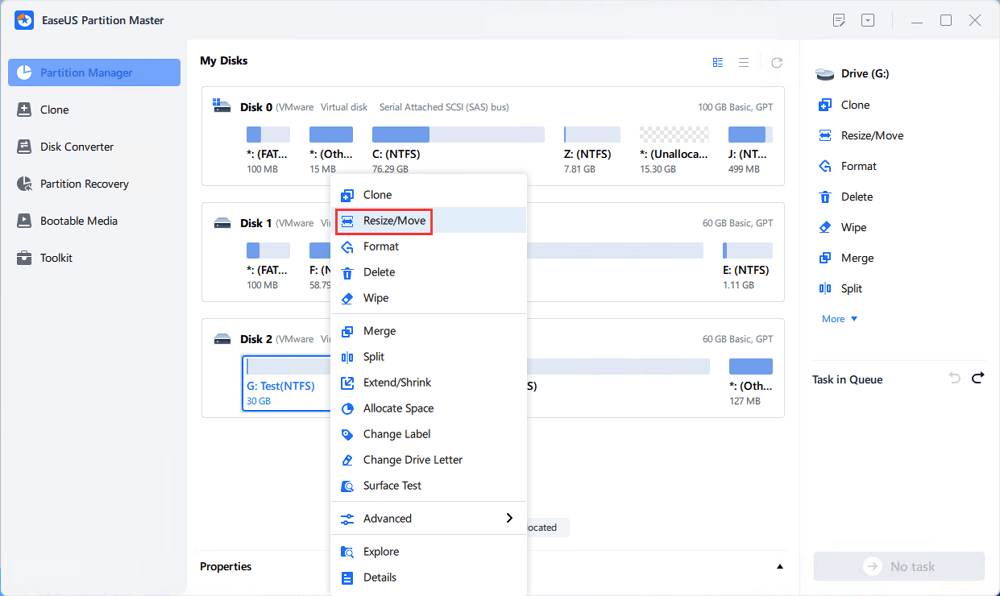
Drag either end of the partition rightwards or leftwards to shrink the partition size so as to get ample unallocated space. You can visually know how much space you’ve decreased in the «Partition size» area. Click «OK».
Click «Execute xx Task» and then «Apply» to save all the changes.

Go back to Partition Manager, there should be unallocated space appearing on the same disk and you can continue with the next step to create new partition on your hard drive.
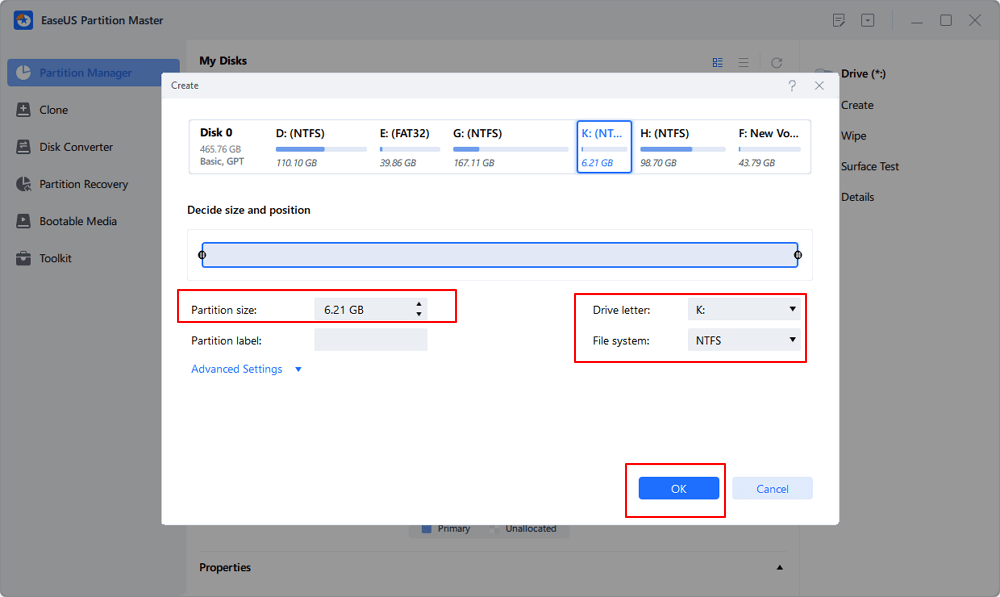
Step 3. Create a new partition with unallocated space on the target hard drive.
Right-click on the unallocated space and choose «Create».
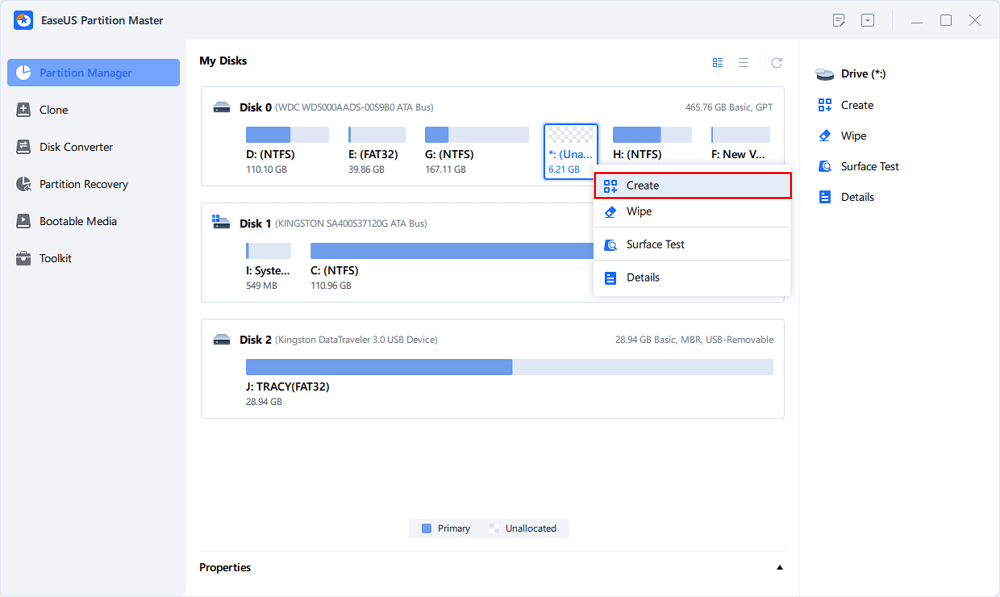
Customize the partiton size, partition drive letter, partition label, file system (NTFS, FAT32, EXT2/3/4, exFAT) and more in the Advanced Settings. Click «OK».
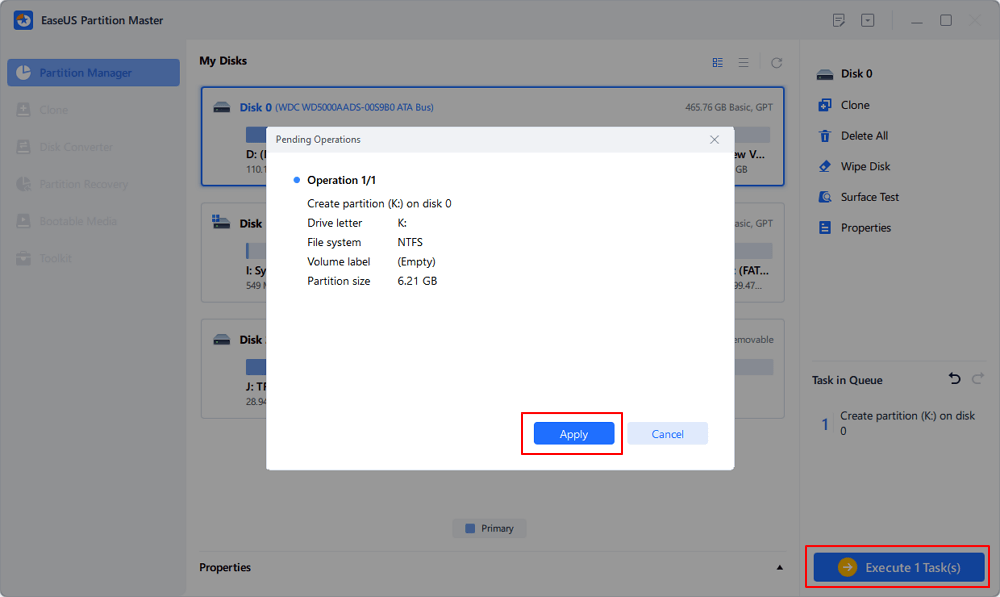
Finally, click «Execute * Task» and «Apply» to complete creating partition with the unallocated space on your disk. Repeat the steps to partition a hard drive and get many more partitions.
Besides creating partitions one by one on an old hard drive, you can also apply this tool to adjust disk layout in one click:
Step 1. Open EaseUS Partition Master, go to Partition Manager and click «Partition this disk» on the popped-up New Disk Guide window.
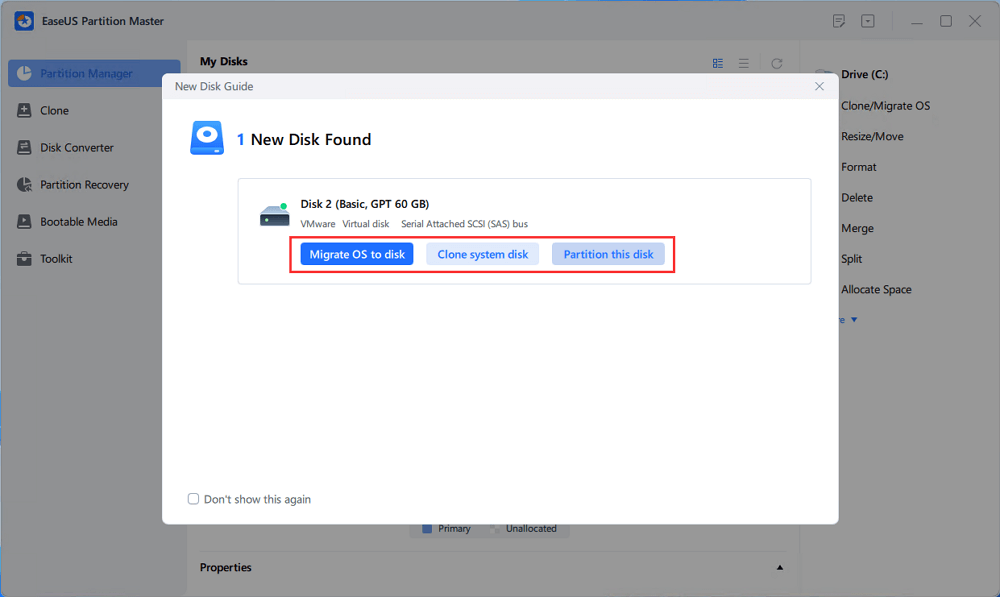
Step 2. Set the number of partitions you need to create, and set the partition style to your disk — MBR or GPT.
Or, you can accept the default setting offered by EaseUS Partiton Maste. Once done, click «Proceed».
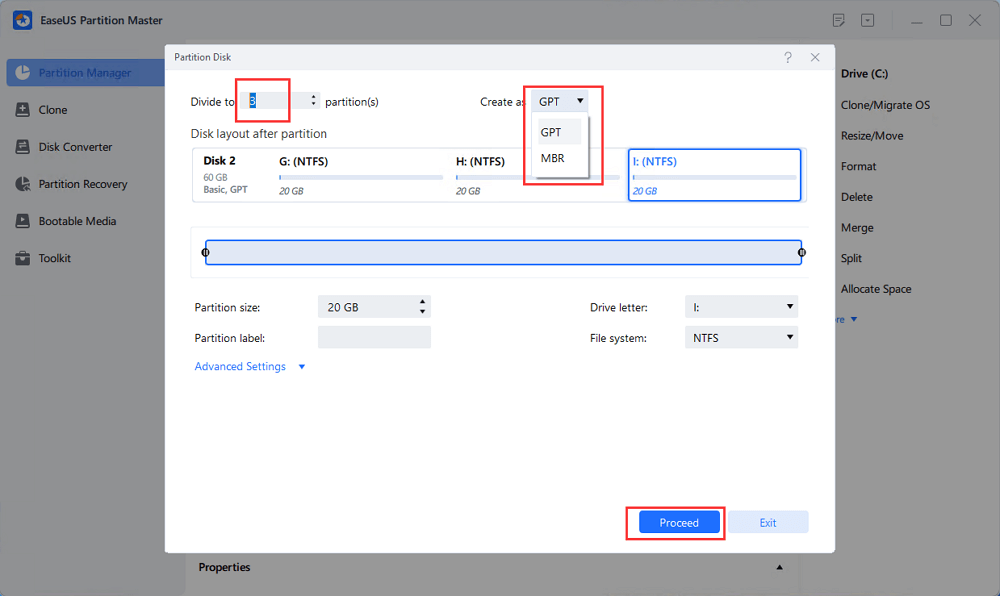
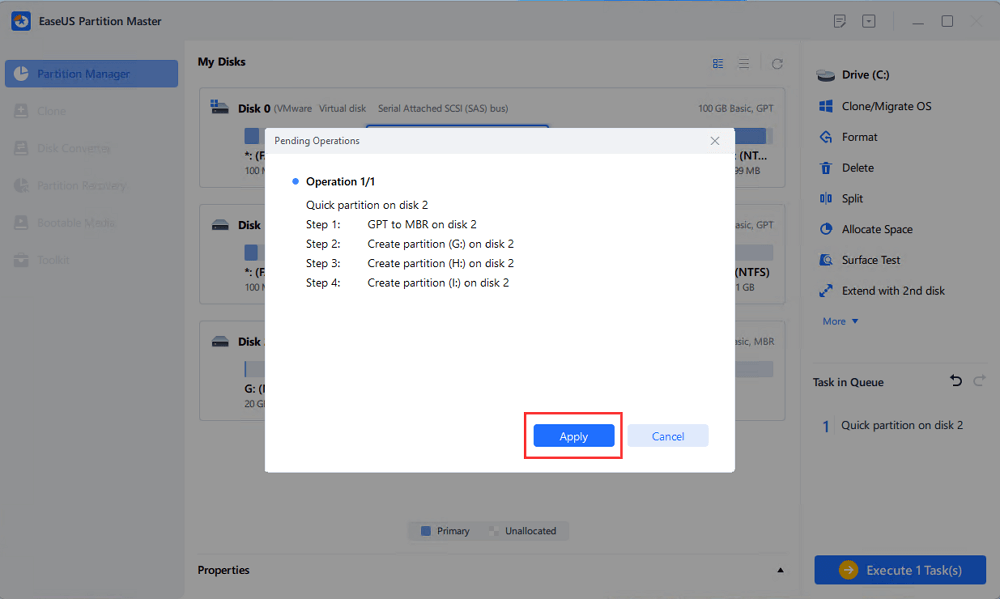
Step 3. Click «Execute 1 Task» and «Apply» to finalize partitioning the new HDD/SSD or external disk.
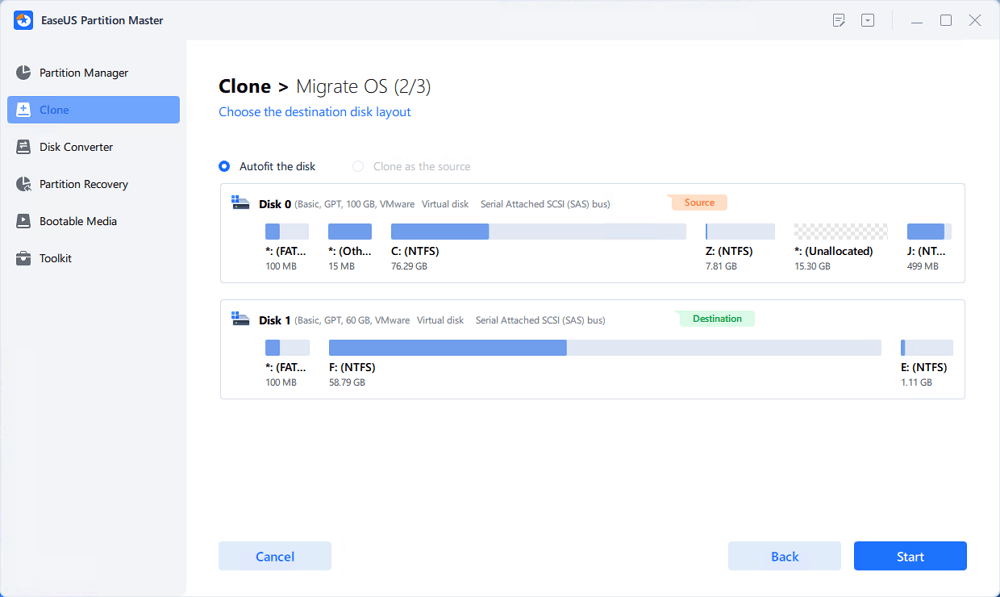
When the OS drive is becoming small or slow on your computer, you can also apply EaseUS Partition Master to migrate Windows Server OS to a new HDD or SSD on your own.
![]()
#2. Open Disk Management to Partition Windows Server Hard Drive — Free
The other way that you can apply to partition Windows Server hard drive is turning to Windows Server disk management.
And here is the guide on how to open disk manager — Disk Management tool and partition hard dive in Windows Server machine:
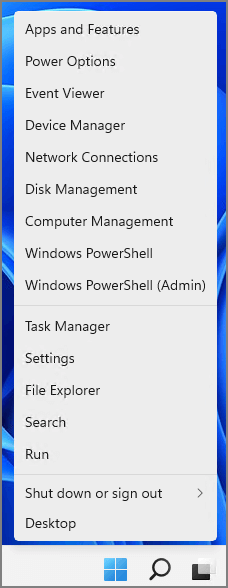
Step 1. Open disk management in Windows Server.
Right-click the Windows icon from start and select «Disk Management».
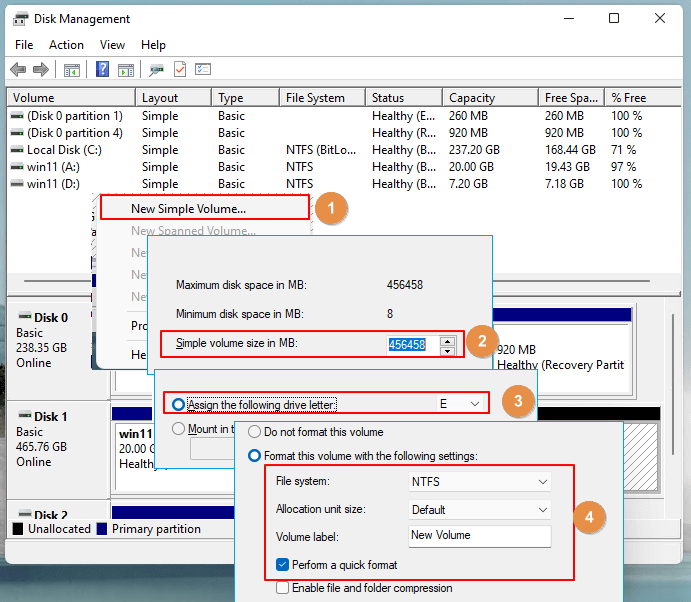
Step 2. Locate the hard drive in Disk Management and right-click the unallocated space to select «New Simple Volume…».
Step 3. Allocate space to the new simple volume and add drive letter, set file system format, etc, to the new volume.
Step 4. Follow the on-screen to complete the procedure, and click «Finish».
If you need to create more volumes on the hard drive, repeat the above steps to complete the procedure.
Windows Server Disk Management Requires Reliable Disk Manager for Help
Being similar to Windows operating systems, Microsoft also enabled Disk Management in Server OS for partitioning hard drives and SSD.
To creating a new volume, shrinking or extending hard drive partitions in a Windows Server machine, you can turn to disk management for help.
However, if you tend to upgrade the OS disk, or convert disks without deleting or formatting volumes, EaseUS Partition Master Enterprise edition is here to help.
24/7 Tech Chat
Free Inquiry
As Windows Server disk management is essential, do remember to back up your files first and turn to a reliable disk manager like EaseUS Partition Master Enterprise to complete this task.
2 Best Disk Manager for Windows Server Free Download [Free & Paid]
Updated by
Daisy on Feb 22, 2023
EaseUS Partition Master Enterprise
Your trustworthy Windows Server disk manager.
- Extend System drive, combine/split partitions.
- Clone disk, migrate OS to HDD/SSD.
- Convert MBR to GPT, GPT to MBR, no data loss.
- 1-click adjust disk layout, create volumes at one time.
24/7 Tech Chat
Free Inquiry
Though being different in many aspects, however, Windows Server also shares some similarities with the Windows desktop editions. For example, Windows Servers has a desktop, sharing the same start button, and even the same task view button as the Windows operating systems.
Accordingly, making full use of hard drive spaces in Windows Server computers has become even more essential. Turning to a reliable disk manager tool or software becomes necessary for Windows Servers users. Follow this page, you’ll get the two best disk managers for Windows Server 2022/2019/2016 and even older Server editions for help.
Disk Manager is normally a tool that could be used to adjust disk layout and space allocation on Windows Server machines. Disk manager is also known as Windows disk utility that you can apply to create, extend, shrink, delete, and even format partitions on an internal or external hard drive in a Windows computer.
So what is the disk manager for Windows Server? You can take it as a disk partitioning tool or disk utility that supports Windows Server users to manage their hard drives with eases.
So what is the best disk manager for Windows Server? In this part, we’ll be showing you two tools for managing hard disks on Windows Server machines with ease. Let’s see.
2 Best Disk Manager for Windows Server 2022/2019/2016/2012
Although the desktop of Windows Server is similar to the Windows system, both two operating systems are designed for different target users. Windows OS is designed for desktop users to work and use with, while the Server editions are mainly for providing network access for people.
When it comes to managing hard drives on Windows Server computers, which tool will you turn to for help? Here, we collected two best disk management tools that you can apply to manage disks on Windows Server machines:
- #1. EaseUS Partition Master Enterprise
- #2. Disk Management
What’s the difference? And which is better? Check the comparison and you’ll learn which is better:
| Comparison | EaseUS Partition Master Enterprise | Disk Management |
|---|---|---|
| Basic Features |
|
|
| Advanced Features |
|
|
So which tool to choose for disk management in Windows Server computers?
- For an easy & secure disk manager, take EaseUS Partition Master Enterprise for help.
- For basic disk management, try Disk Management in Server computers.
How to Launch Disk Manager and Manage Disks on Windows Server
So how to use your desired disk manager to manage hard drives in your Windows Server computers? Follow the guidelines here in this part, let’s see how to easily partition hard drives on your own in Windows Server.
#1. Download EaseUS Partition Master Enterprise to Manage Server Disks — Paid
EaseUS Partition Master Enterprise is mainly designed for Windows Server machine disk management. It enables Windows Server users to effortlessly manage hard drives and even upgrade the OS drive to HDD/SSD without reinstallation.
You can free download and install this software on your Server computer for disk management now.
How to Launch EaseUS Partition Master to Partition Server Disks
Step 1. Launch EaseUS Partition Master to check for free space at the Partition Manager section.
- If your hard drive has unallocated space, jump to Step 3 to create partition.
- If the hard drive has no unallocated space, continue with Step 2.
Step 2. Shrink a disk partition to create unallocated space.
Right-click on the target drive partition with a lot free space and select «Resize/Move».
Drag either end of the partition rightwards or leftwards to shrink the partition size so as to get ample unallocated space. You can visually know how much space you’ve decreased in the «Partition size» area. Click «OK».
Click «Execute xx Task» and then «Apply» to save all the changes.
Go back to Partition Manager, there should be unallocated space appearing on the same disk and you can continue with the next step to create new partition on your hard drive.
Step 3. Create a new partition with unallocated space on the target hard drive.
Right-click on the unallocated space and choose «Create».
Customize the partiton size, partition drive letter, partition label, file system (NTFS, FAT32, EXT2/3/4, exFAT) and more in the Advanced Settings. Click «OK».
Finally, click «Execute * Task» and «Apply» to complete creating partition with the unallocated space on your disk. Repeat the steps to partition a hard drive and get many more partitions.
Besides creating partitions one by one on an old hard drive, you can also apply this tool to adjust disk layout in one click:
Step 1. Open EaseUS Partition Master, go to Partition Manager and click «Partition this disk» on the popped-up New Disk Guide window.
Step 2. Set the number of partitions you need to create, and set the partition style to your disk — MBR or GPT.
Or, you can accept the default setting offered by EaseUS Partiton Maste. Once done, click «Proceed».
Step 3. Click «Execute 1 Task» and «Apply» to finalize partitioning the new HDD/SSD or external disk.
When the OS drive is becoming small or slow on your computer, you can also apply EaseUS Partition Master to migrate Windows Server OS to a new HDD or SSD on your own.
![]()
#2. Open Disk Management to Partition Windows Server Hard Drive — Free
The other way that you can apply to partition Windows Server hard drive is turning to Windows Server disk management.
And here is the guide on how to open disk manager — Disk Management tool and partition hard dive in Windows Server machine:
Step 1. Open disk management in Windows Server.
Right-click the Windows icon from start and select «Disk Management».
Step 2. Locate the hard drive in Disk Management and right-click the unallocated space to select «New Simple Volume…».
Step 3. Allocate space to the new simple volume and add drive letter, set file system format, etc, to the new volume.
Step 4. Follow the on-screen to complete the procedure, and click «Finish».
If you need to create more volumes on the hard drive, repeat the above steps to complete the procedure.
Windows Server Disk Management Requires Reliable Disk Manager for Help
Being similar to Windows operating systems, Microsoft also enabled Disk Management in Server OS for partitioning hard drives and SSD.
To creating a new volume, shrinking or extending hard drive partitions in a Windows Server machine, you can turn to disk management for help.
However, if you tend to upgrade the OS disk, or convert disks without deleting or formatting volumes, EaseUS Partition Master Enterprise edition is here to help.
24/7 Tech Chat
Free Inquiry
As Windows Server disk management is essential, do remember to back up your files first and turn to a reliable disk manager like EaseUS Partition Master Enterprise to complete this task.
Summary
Disk space run out of space? You can resize partition in Windows Server 2016 with Disk Management without formatting.
How to resize partition space in Windows server 2016
While installing the Windows server 2016, it is advisable that you create a different partition for the operating system else the entire disk would be used up by the C drive, leaving about 500mb as a reserve partition for the system.
In cases where the C drive starts running out of space or there is not enough space in the server 2016, you have no other option than to resize, shrink or delete partition in your Windows server 2016.
Instructions to resize partition space in Windows server 2016
To do this, you would need to employ a built-in function called the Disk Management tool.
This tool is usually seen in most windows server, the windows server 2016 inclusive. It allows windows users to resize, delete, shrink or extend partitions or volumes.
The windows server 2016 disk management tool is usually the first line of action when it comes to solving issues associated with partitions.
It is an easy-to-use tool which comes with a wizard that guides users through each step.
While this is a helpful tool to resize/shrink/delete partition in windows server 2016, it has a major drawback of not functioning when the ‘shrink’ or ‘extend volume’ option is grayed out.
These options become grayed out when there is no unallocated space adjacent to the partition you wish to resize.
In such cases, you would have to use third-party freeware which is capable of shrinking and extending volumes even without unallocated space in the partition adjacent to the partition you wish to extend.
Before we get to that, let’s take a look at the steps involved in using the windows server 2016 disk management tool to resize, shrink, and delete partition in windows server 2016
Step 1: Be sure to backup or transfer every valuable file to another folder or partition.
Step 2: You will have to launch the Disk management tool before using it. To do this, locate your server manager and click on the storage option. From the displayed list, choose the disk management tool and launch it.
Step 3: Locate a partition with a big volume size and shrink it to free up some unallocated space.
Step 4: Move the freed or unallocated space to your desired partition.
Step 5: Extend the volume or size of your desired partition by right-clicking the partition and selecting ‘extend volume.’
Step 6: Input the amount of size you would want the partition to be extended up to.
Step 7: The instructional wizard will guide you through the remaining steps and all you have to do is click on the option ‘NEXT’.
Safe Alternative: Partition Resizer Server
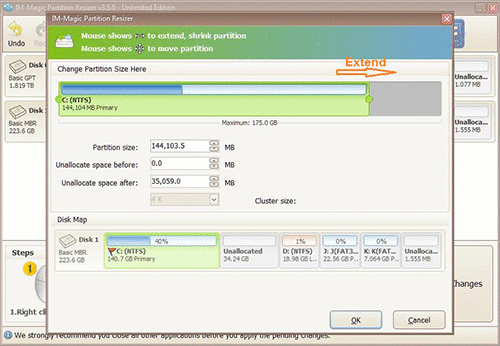
As I stated earlier, there is an exception in using the windows server 2016 disk management tool. And this is seen when the extend volume or shrink volume option is grayed out. But there is a way out. Yes! With the IM-Magic Partition Resizer Server Edition/Unlimited Edition , you can safely shrink, delete, or extend partitions in the windows server 2016 even without unallocated space next to your desired partition.
The IM- Magic Partition Resizer Unlimited Edition is just the tool you need to be able to fix this problem. You do not have to worry about data loss as you there will be no need to reformat your system.
IM-Magic Partition Resizer on the windows server 2016 works like a normal desktop app. You just have to download, install, and run the app to begin the process.

Kindly follow these few easy steps after launching the freeware to achieve a 100% result.
Locate a partition with a huge amount of space
Right click on the selected partition to free up some unallocated space.
 Steps to resize your partition when you can not extend volume
Right click on your desired partition and drag the free space to it.
 Steps to resize your partition when you can not extend volume
Click on apply to successfully extend the volume.
And you’re done!
В этой статье мы рассмотрим процесс управления дисками, разделами и томами из командной строки PowerShell. Все операции по работе с локальными дисками и разделами, которые вы привыкли выполнять с помощью графической консоли «Управление дисками» (diskmgmt.msc) или из командной строки утилиты diskpart.exe, вы можете выполнить из PowerShell. Командлеты управления дисками включены в модуль Storage, доступный в PowerShell 3.0. Мы посмотрим как инициализировать диск, создать на нем таблицу разделов, раздел и отформатировать его. Рассмотренные ниже команды будут работать в Windows 10 / Server 2016 и Windows 8.1/ Server 2012 R2 (в предыдущих версиях Windows придется сначала обновить PowerShell).
Содержание:
- Вывод списка дисков и разделов на них
- Инициализация диска
- Создаем разделы на диске
- Форматирование раздела из PowerShell
- Удаление разделов на диске
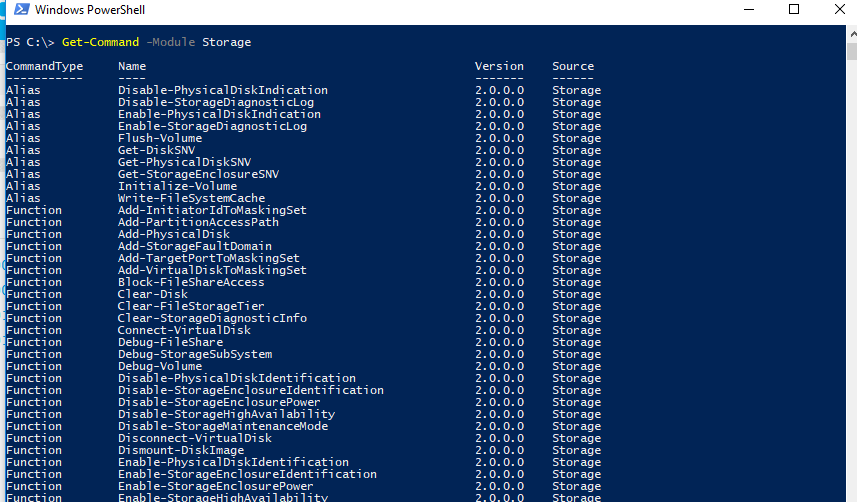
В Windows 10 в модуле Storage доступно 160 команд. Чтобы вывести все доступные команды управления дисками, выполните:
Get-Command -Module Storage
Важно. При работе с дисками и разделами на них из PowerShell нужно быть внимательным, чтобы случайно не удалить или отформатировать раздел с данными.
Вывод списка дисков и разделов на них
Прежде всего попробуйте вывести список дисков, доступных на логическом уровне в вашей системе. Для этого выполните команду:
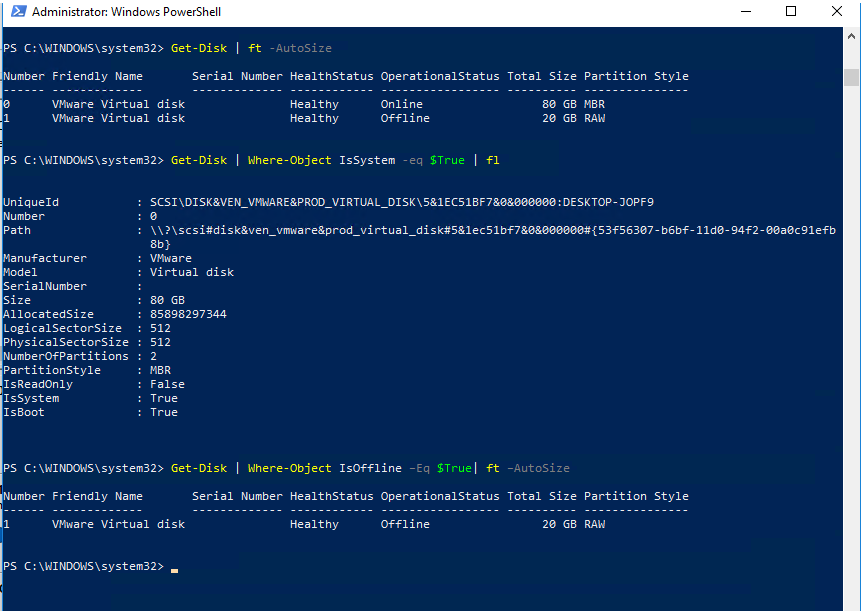
Get-Disk | ft -AutoSize
Чтобы выбрать только системный диск, на котором установлена Windows, выполните команду:
Get-Disk | Where-Object IsSystem -eq $True | fl
Как вы видите, команда вернула следующие атрибуты системного диска (их также можно использовать в выборке):
UniqueId : SCSIDISK&VEN_VMWARE&PROD_VIRTUAL_DISK5&1EC51BF7&0&000000:DESKTOP-JOPF9
Number : 0
Path : \?scsi#disk&ven_vmware&prod_virtual_disk#5&1ec51bf7&0&000000#{53f56307-b6bf-11d0-94f2-001efb8b}
Manufacturer : VMware
Model : Virtual disk
SerialNumber :
Size : 80 GB
AllocatedSize : 85898297344
LogicalSectorSize : 512
PhysicalSectorSize : 512
NumberOfPartitions : 2
PartitionStyle : MBR
IsReadOnly : False
IsSystem : True
IsBoot : True
Можно вывести только диски со статусом Offline:
Get-Disk | Where-Object IsOffline –Eq $True| ft –AutoSize
Если вам нужна информация о физических дисках (характеристики и состояние физических дисков на компьютере), используйте командлет Get-PhysicalDisk (ранее мы показывали как с помощью командлета Get-PhysicalDisk можно определить неисправный диск в Storage Spaces Direct и его использование при настройке отказоустойчивого хранилища S2D).

С помощью PowerShell вы можете определить тип подключенного накопителя SSD или HDD (обычно подключен через шину SATA) или USB флешка (тип UnSpecified).
| DeviceId Model MediaType BusType Size
——— —— ——— ——- —- 0 TOSHIBA MK3775VSXP HDD SATA 500156374016 1 Samsung SSD 840 PRO Series SSD SATA 128060514304 2 Transcend UnSpecified USB 128169757184 |
Вы можете вывести список разделов на всех дисках:
Get-Partition
Либо разделы только на указанных дисках:
Get-Partition –DiskNumber 1,2
Чтобы вывести список всех логических разделов в Windows выполните:
Get-Volume
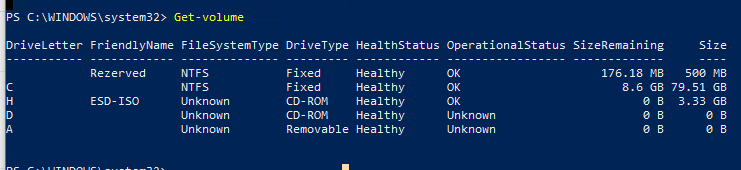
Обратите внимание, что нумерация дисков начинается с 0, а нумерация разделов с 1.
Инициализация диска
В предыдущем примере вы видели, что один из дисков находится в офлайн состоянии и имеет разметку RAW в поле Partition Style. Попробуем инициализировать его, создать таблицу разделов и создать на нем новый раздел.
Прежде всего нужно перевести такой диск в онлайн:
Get-Disk | Where-Object IsOffline –Eq $True | Set-Disk –IsOffline $False
Теперь можно инициализировать этот диск (его индекс 1):
Initialize-Disk -Number 1
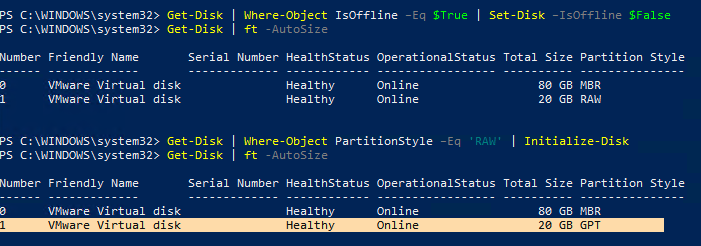
По умолчанию на диске создается таблица разделов GPT (GUID), если вам нужна именно MBR, выполните команду:
Initialize-Disk 1 –PartitionStyle MBR
Если на диске уже имеются данные, вы можете изменить таблицу разделов с MBR в GPT без удаления данных с помощью утилиты mbr2gpt.exe.
Чтобы не указывать номер диска, можно инициализировать все диски с таблицей разделов RAW:
Get-Disk | Where-Object PartitionStyle –Eq 'RAW' | Initialize-Disk
Обратите внимание, что диск может находится в статусе RAW при повреждении таблицы разделов. Вы можете попробовать восстановить таблицу разделов и данные на RAW диске так.
Создаем разделы на диске
Чтобы создать новый раздел на диске используется командлет New-Partition. Создадим раздел размером 10 Гб и назначим ему букву диска L:
New-Partition –DiskNumber 1 -Size 10gb -DriveLetter L
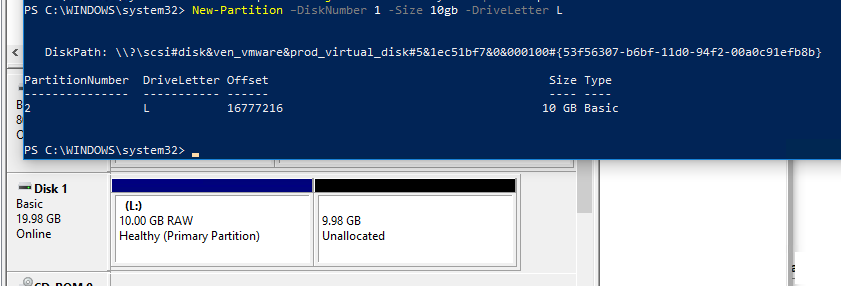
Если раздел должен занимать все доступное место на диске, используйте атрибут UseMaximumSize. Для автоматического назначения буквы диска используется параметр AssignDriveLetter (иногда буква диска может автоматически на назначаться).
New-Partition –DiskNumber 1 -AssignDriveLetter –UseMaximumSize
Вы можете изменить назначенную букву диска так:
Set-Partition –DriveLetter L -NewDriveLetter U
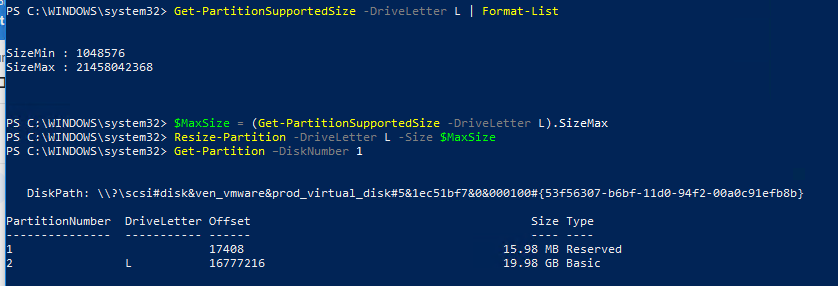
Если нужно увеличить имеющийся раздел, сначала выведите доступное пространство для расширения для данного раздела:
Get-PartitionSupportedSize -DriveLetter L | Format-List
Потом можно увеличить размер раздела до максимального:
$MaxSize = (Get-PartitionSupportedSize -DriveLetter L).SizeMax
Resize-Partition -DriveLetter L -Size $MaxSize
Если нужно сделать конкретный раздел активным используется команда:
Set-Partition -DriveLetter T -IsActive $true
Форматирование раздела из PowerShell
Отформатируем полученный раздел в файловой системе NTFS и зададим метку тома DBData:
Format-Volume -DriveLetter L -FileSystem NTFS -NewFileSystemLabel DBData -Confirm:$false

Удаление разделов на диске
Чтобы удалить все разделы на дисках 1 и 2 без подтверждения, выполните команду:
Get-Partition –DiskNumber 1,2 | Remove-Partition -Confirm:$false

Для удаления с дисков всех разделов и полной очистки данных выполните команду:
Clear-Disk -Number 1 -RemoveData -Confirm:$false
Если на диски имеются OEM разделы (OEM раздел восстановления, EFI раздел , System Reserved) для их удаления нужно исползовать параметр RemoveOEM:
Clear-Disk -Number 1 -RemoveData –RemoveOEM
Следующая однострочная PowerShell команда инициализирует все новые подключенные диски типа RAW, создаст на них таблицу разделов и создаст раздел с файловой системой NTFS максимального размера. Ее удобно использовать при подключении нового диска:
Get-Disk |Where-Object PartitionStyle -eq 'RAW' |Initialize-Disk -PartitionStyle MBR -PassThru |New-Partition -AssignDriveLetter -UseMaximumSize |Format-Volume -FileSystem NTFS -Confirm:$false
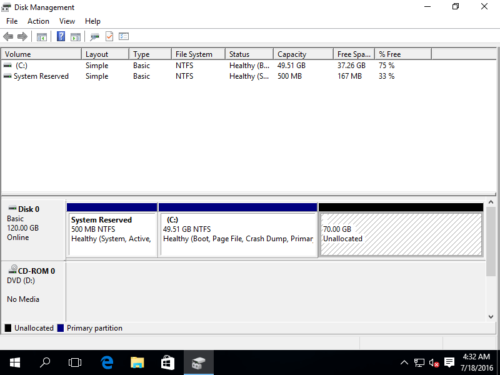
Windows Server 2016 provides built-in Disk Management snap-in to manage disk partitions, besides the basic option to create and format partitions, it is able to shrink and extend existing partition without losing data. With shrink volume function, you can release free space from a partition to create new drives. Extend volume can be used to expand a drive when there is contiguous Unallocated space. In this article, I’ll show you how to shrink and extend volume with Server 2016 Disk Management, as well as the disadvantages of each function.
How to shrink partition in Disk Management?
Step 1: Right-click the Windows icon on bottom left and select “Disk Management“.
Step 2: Right-click C drive (or other one you want to shrink) and select “Shrink Volume…“.
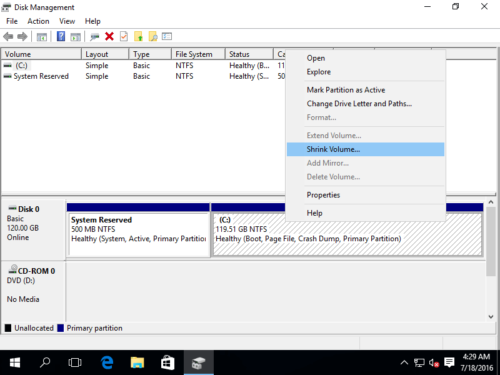
Step 3: Type the value how much unused space to shrink from it and click “Shrink” to continue.
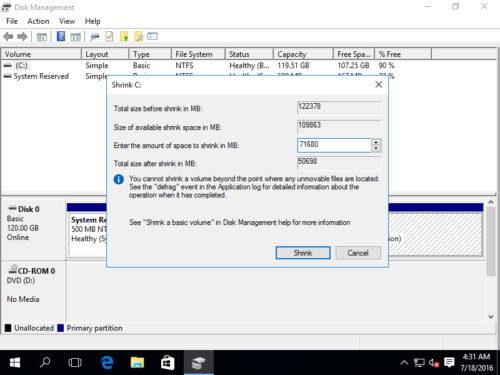
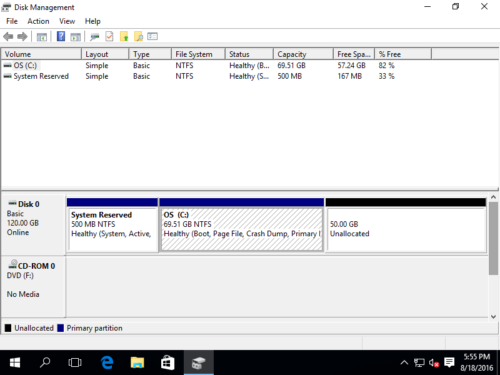
Within a short time, original C drive shrank to 49.51 GB. The rest free space becomes Unallocated.
Limitation of Shrink Volume of Disk Management
Windows Server 2016 Disk Management has the ability to shrink a disk drive indeed, however, not every partition can be shrank. In some conditions, you can reduce a little space, why? As the tip in Step 3, “You cannot shrink a volume beyond the point where any unmovable files are located.” Generally speaking, the “unmovable files” includes Page Files, very large files. If you received the error message and failed to shrink partition, use 3rd-party software such NIUBI Partition Editor, which is able to shrink the volume to minimum size, because it can move the “unmovable” files.
Another limitation of Shrink Volume is that the Unallocated space is always created behind the partition you shrank, so it cannot be used to extend other drives.
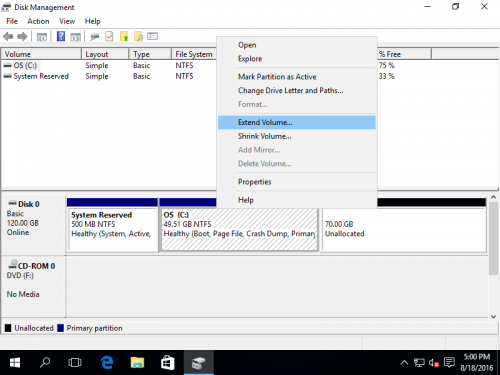
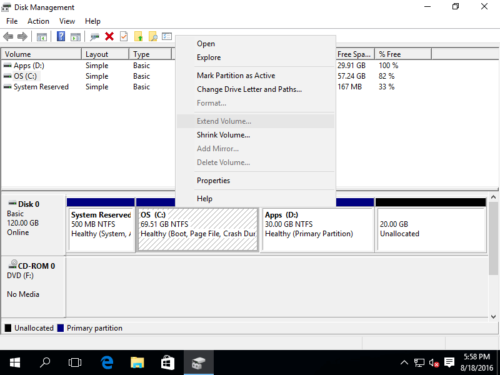
How to extend partition in Disk Management?
Note: only when there is adjacent Unallocated space at right side, you can extend a partition.
Step 1: Right-click the partition you want to extend and select “Extend Volume…”
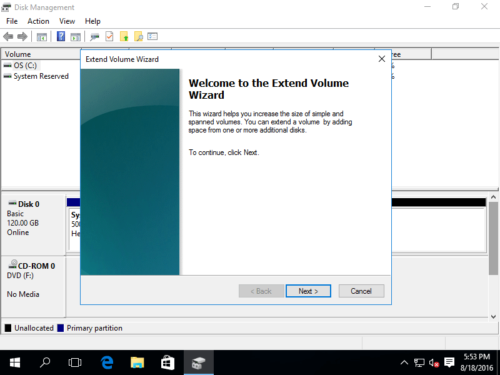
Step 2: The Extend Volume Wizard will be launched, click Next to continue.
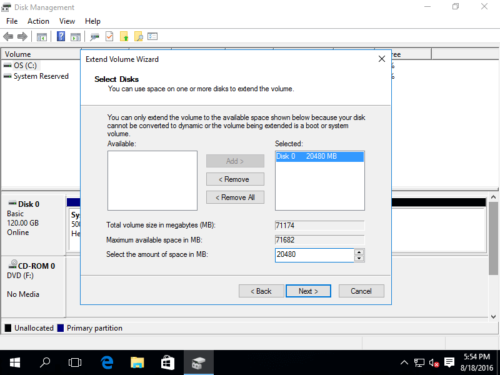
Step 3: In the pop-up window, type the amount of space to add to C drive and click Next.
Step 4: Confirm the operation and click “Finish” to proceed.
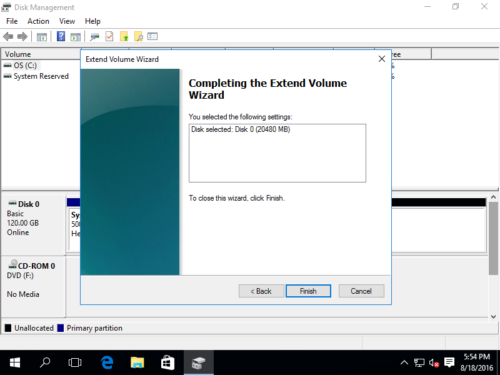
The extending operation complete in a short time.
If the Unallocated space is not adjacent, when you right click C drive, Extend Volume is grayed out.
Limitation of Extend Volume of Disk Management
As I said above – only when there is adjacent Unallocated space at right side, you can extend a partition. Actually the full limitations include:
- FAT32 partition cannot be extended even if there is adjacent Unallocated space.
- To use Extend Volume, there must be adjacent Unallocated space at the right side.
- Unallocated space cannot be added into the adjacent volume at its right side.
- If D is Logical Partition and there are other volumes in the Extended partition. You cannot simply delete D to get Unallocated space, instead, you have to delete all volumes in the Extended partition.
In a word, you cannot expand C drive by shrinking D.
Shrink and extend partition with partition software
With server partition software, there are no such limitations and it is much easier, check the video how to shrink and extend volume in Windows Server 2016
Pay attention to server data safety
Different with the read-only software, to resize partitions, partition software will modify start and end position of this volume, locations of all files in this volume, as well as other parameters in MBR, DBR, etc. A bad software may cause system boot failure, partition corruption or data loss, so you’d better select a reliable and safe program.
Search NIUBI Partition Editor by Google, this partition software integrated unique Roll-Back protection technology, what’s that? It is able to roll back the server to the status before resizing automatically and rapidly. Operating System and all data always keep intact even if power failure or other hardware issue occurred during resizing. It is recommended as the safest tool to resize server disk partitions.
Besides, the unique file-moving algorithm helps resize partition 30% – 300% faster than any other tools, saving much time especially when there are large amount of files in the partition that you want to resize.
Learn More Download Demo
Для увеличения размера пространства, требуется совершить несколько последовательных операций в панели, и только после них пользоваться дисковым пространством станет возможно на уровне ОС Windows Server.
Вам необходимо:
-
Открыть выпадающее меню и зайти в Computer Management. Среди пунктов выбрать
Server Manager, кликнуть по Инструментам (Tools) и найти Computer.
-
В списке, расположенном слева, будет пункт Storage. Кликните по нему, откроется два подпункта, из которых необходимо выбрать Disk Management. После обновления окна (клавиша F5) появится неразмеченная область. В примере зона «Unallocated» имеет черный цвет, ее размер составляет 40 Гб.
-
Правой кнопкой мышки кликните по системному диску из списка. В выпадающем контекстном меню выберите команду Extend Volume.
-
Сразу появится окно Extend Volume Wizard.

-
В окне нужно выставить, какого размера должна быть неразмеченная область. Чаще всего пользователи выбирают все пространство, которое сейчас свободно. После выставления размера кликните по кнопке Next.

-
Подтвердить изменения можно кнопкой Finish.

-
Проверить результат можно в Computer Manager – в окне не должна появиться неразмеченная область.
Аverage rating : 5
Оценок: 1
220140
Минск
ул. Домбровская, д. 9
+375 (173) 88-72-49
![]()
700
300
ООО «ИТГЛОБАЛКОМ БЕЛ»
220140
Минск
ул. Домбровская, д. 9
+375 (173) 88-72-49
![]()
700
300
ООО «ИТГЛОБАЛКОМ БЕЛ»
![]()
700
300

Understanding Windows Disk Management Settings In Windows Server 2016
Indulge your senses in a gastronomic adventure that will tantalize your taste buds. Join us as we explore diverse culinary delights, share mouthwatering recipes, and reveal the culinary secrets that will elevate your cooking game in our Understanding Windows Disk Management Settings In Windows Server 2016 section. You this online server management computer- to status this contributors and server article 09 windows the windows in article 2022 use disks topics to 2023 show how 2019 in to manage the windows related feedback 2016 a 5 10 applies windows topics disk server 11 offline and related windows 03
Understanding Windows Disk Management Settings In Windows Server 2016
Understanding Windows Disk Management Settings In Windows Server 2016
Article 03 21 2023 5 contributors feedback in this article review drives and partitions troubleshoot issues complete related tasks related links applies to: windows 11, windows 10, windows server 2022, windows server 2019, windows server 2016 disk management is a system utility in windows for advanced storage operations. 1. right click the start menu and select server manager. 2. in the server manager interface, under tools tab, choose computer management. 3. in the next screen, click disk management on the left panel. how does windows server 2016 disk management work? to manage disks in windows server, disk management can be of great help.

Free Best Windows Server 2016 Disk Management Tools
Free Best Windows Server 2016 Disk Management Tools
03 09 2023 5 contributors feedback in this article online and offline status related topics applies to: windows 11, windows 10, windows server 2022, windows server 2019, windows server 2016 this article and the related topics show you how to use disk management to manage the disks in a computer. Open the disk properties window, on which you want to enable quotas, go to the quota tab. then click show quota settings: to enable the quotas for this volume, check enable quota management. the following options may be checked depending on the scenario of quota usage:. Select and hold (or right click) disk management, and then select run as administrator > yes. if you can’t open disk management as an administrator, follow these steps: in the search box on the taskbar, enter computer management, and then select run as administrator > yes. after computer management opens, go to storage > disk management. Select ‘gpt’ (see below for information about gpt and guid). the next step is to create a new volume or partition on the disk. again, right click and select ‘new simple volume’. then you need to.

Shrink And Extend Partition In Windows Server 2016 Disk Management
Shrink And Extend Partition In Windows Server 2016 Disk Management
Select and hold (or right click) disk management, and then select run as administrator > yes. if you can’t open disk management as an administrator, follow these steps: in the search box on the taskbar, enter computer management, and then select run as administrator > yes. after computer management opens, go to storage > disk management. Select ‘gpt’ (see below for information about gpt and guid). the next step is to create a new volume or partition on the disk. again, right click and select ‘new simple volume’. then you need to. In the search box on the taskbar, enter computer management, select and hold (or right click) computer management, and then choose run as administrator. after computer management opens, go to storage > disk management. disks that are missing or not initialized, plus general troubleshooting steps. This occurs in the following four steps: scan the file system for files meeting the optimization policy. break files into variable size chunks. identify unique chunks. place chunks in the chunk store and optionally compress. replace the original file stream of now optimized files with a reparse point to the chunk store.
Understanding Windows Disk Management Settings In Windows Server 2016
Understanding Windows Disk Management Settings In Windows Server 2016
this video contain the basic tutorial on basics of hard disk settings in windows server 2016 :(disk management) 1) select a this is a tutorial on how to delete or create a partition on windows server 2016 using disk management snap in tool. in this video shorts support my work ▻▻ get updates, launch announcements in this video we will use server manager console in windows server 2016 to perform basic disk management task like initialize this video covers how to use the disk management tool in windows 10 to manage drives and volumes. the same tool is used by this video will look at how to use the logical disk management (ldm) utility included with windows. check out in this video i want to show all of you about :a beginner guide disk management on window server 2016 for more detail please in this video i want to show all of you about :a beginner guide disk management on window server 2016 for more detail please in this video you will be learning the required skills to be come an it help desk engineer. we will be learning disk management this video demonstrated how to use disk management (create and format hard disk partitions) in the windows server 2016 client(s): today’s data scientists and software developers, innovators in the field of technology. objective: the creation of an
Conclusion
After exploring the topic in depth, there is no doubt that article offers helpful information regarding Understanding Windows Disk Management Settings In Windows Server 2016. From start to finish, the writer demonstrates an impressive level of expertise about the subject matter. Notably, the section on X stands out as a key takeaway. Thanks for taking the time to this article. If you would like to know more, please do not hesitate to reach out via the comments. I look forward to your feedback. Furthermore, below are some similar content that might be interesting:
Related image with understanding windows disk management settings in windows server 2016
Related image with understanding windows disk management settings in windows server 2016
open
Disk Management: How to Manage Partition in Windows Server 2016
Video time control bar
0:00
▶️
⏸️
🔊
Audio volume control bar
0:00 / 0:00
↔️
↕️
Timecodes:
No transcript (subtitles) available for this video…
Related queries:
how to open disk management in windows server 2016 core