В это статье мы рассмотрим процесс установки, настройки и активации роли сервера лицензирования удаленных рабочих столов (Remote Desktop Licensing) на базе Windows Server 2019 и 2016, а также процедуру установки и активации клиентских терминальных (RDS CAL).
Напомню, что после установки роли терминального сервера Remote Desktop Session Host, пользователи могут использовать его только в течении пробного периода 120 дней, после окончания которого возможность подключения к удаленному RDS серверу пропадает. Согласно схеме лицензирования Microsoft, все пользователи или устройства, подключающиеся к рабочему столу RDS сервера, должны быть лицензированы. Для учета и выдачи терминальных лицензий (RDS CAL) существует отдельная служба в роли RDS — Remote Desktop License Server.
Содержание:
- Установка роли Remote Desktop Licensing в Windows Server 2019/2016
- Активация сервера лицензий RDS в Windows Server
- Типы клиентских терминальных лицензий (RDS CAL)
- Установка клиентских лицензий RDS CAL в Windows Server 2019/2016
- Отчеты об использовании лицензий CAL на RDS
- Удаление RDS CAL с сервера лицензирования
- Настройка серверов RDSH на использование сервера лицензий RDS
Установка роли Remote Desktop Licensing в Windows Server 2019/2016
Вы можете установить компонент Remote Desktop Licensing на любом сервере домена, не обязательно устанавливать его на одном из серверов фермы RDSH.
Переда началом установки сервера лицензирования RDS нужно добавить данный хост (или убедиться, что у вас есть право на добавление) в доменную группу Terminal Server License Servers, иначе сервер не сможет выдать CAL типа RDS Per User пользователям домена.
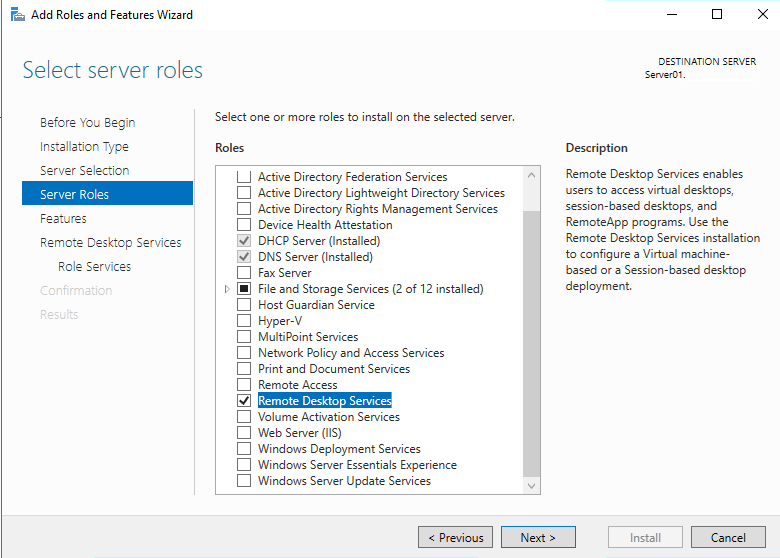
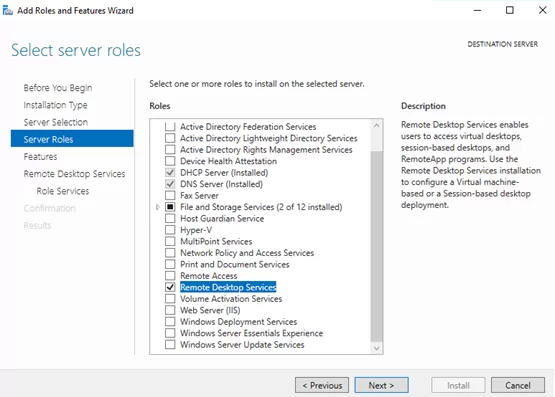
Установить службу Remote Desktop Licensing можно через консоль Server Manager. Для этого в мастере Add Roles and Features выберите роль Remote Desktop Services.
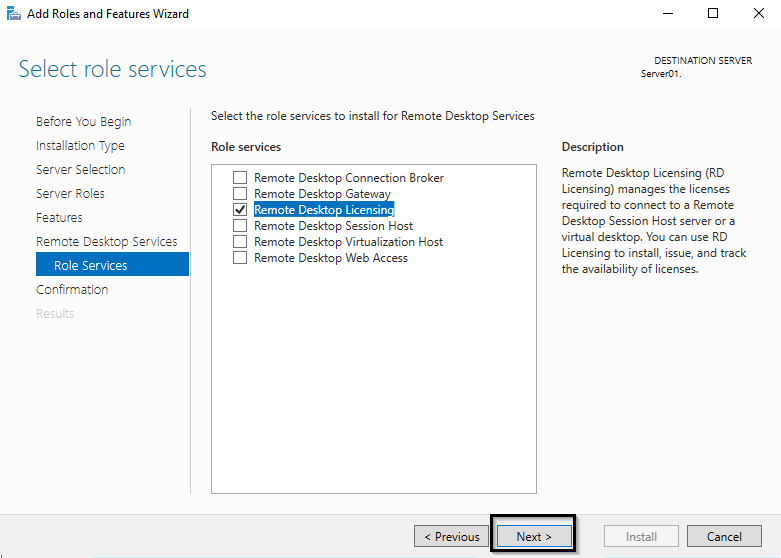
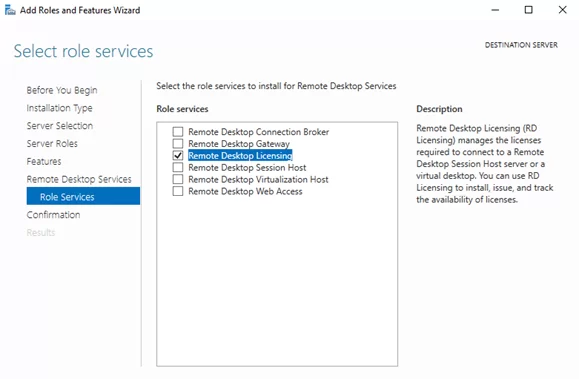
В качестве компонента роли нужно выбрать службу Remote Desktop Licensing.
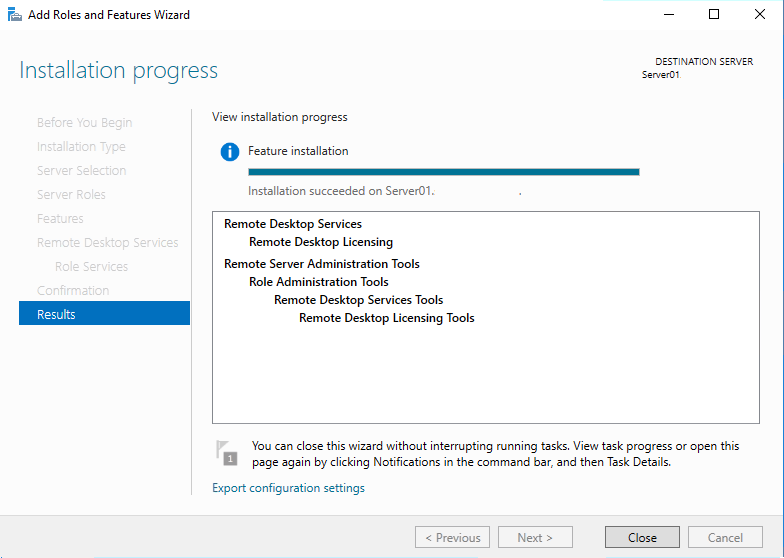
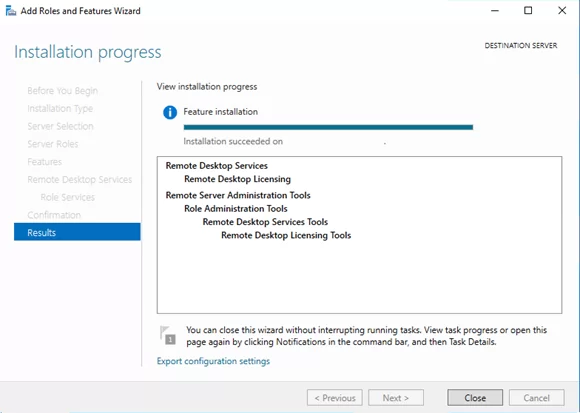
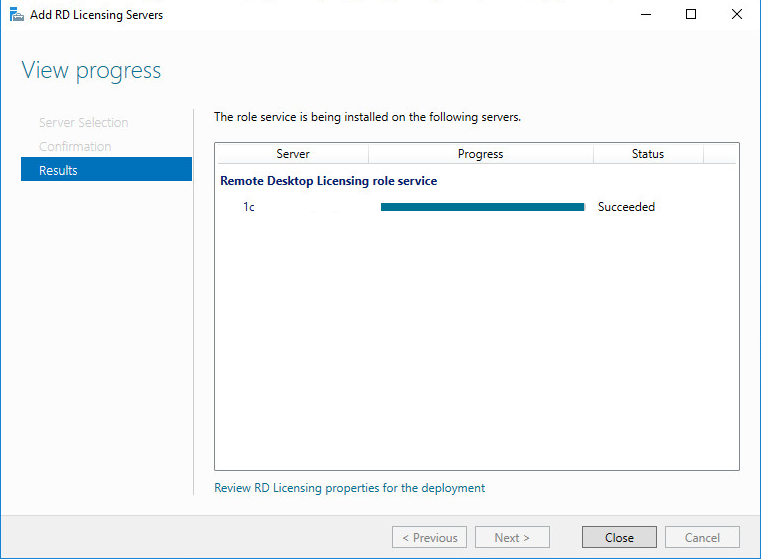
Осталось дождаться окончания установки роли.
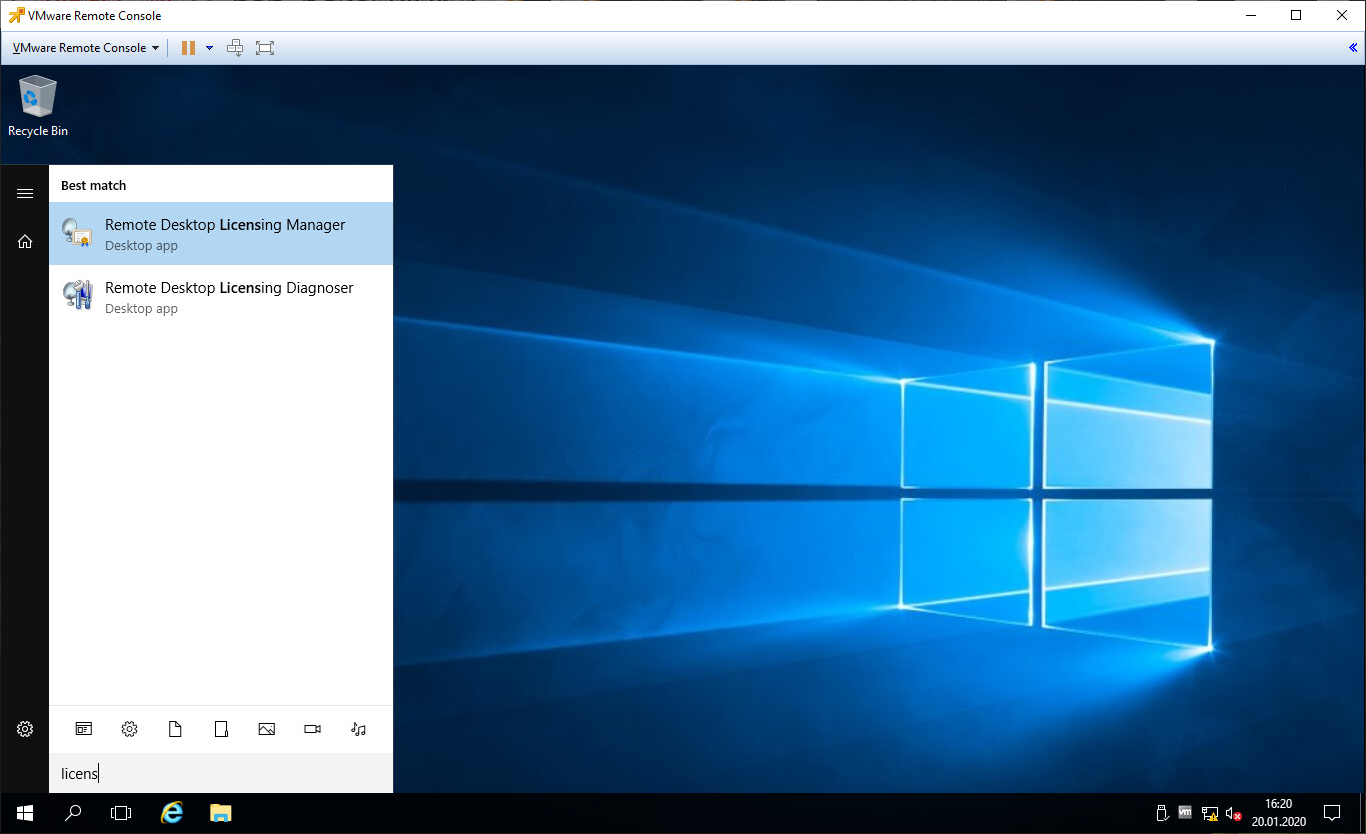
Для управления службой RDS-Licensing используется консоль Remote Desktop Licensing Manager —
licmgr.exe
.
В Windows Server стандартные компоненты и роли проще всего установить с помощью PowerShell. Для установки службы лицензирования RDS и утилиты RD Licensing Diagnoser достаточно выполнить одну команду:
Install-WindowsFeature RDS-Licensing –IncludeAllSubFeature -IncludeManagementTools
Для вывода списка RDS служб, установленных на сервере, используйте команду:
Get-WindowsFeature -Name RDS* | Where installed
Активация сервера лицензий RDS в Windows Server
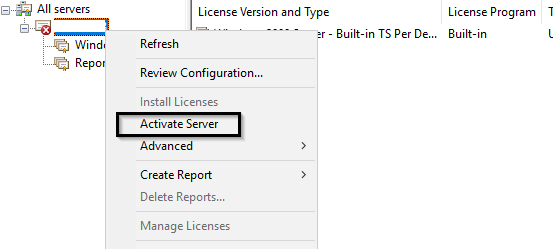
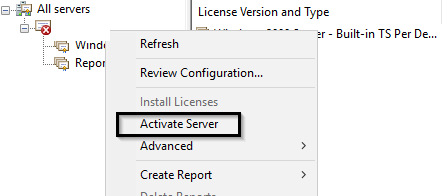
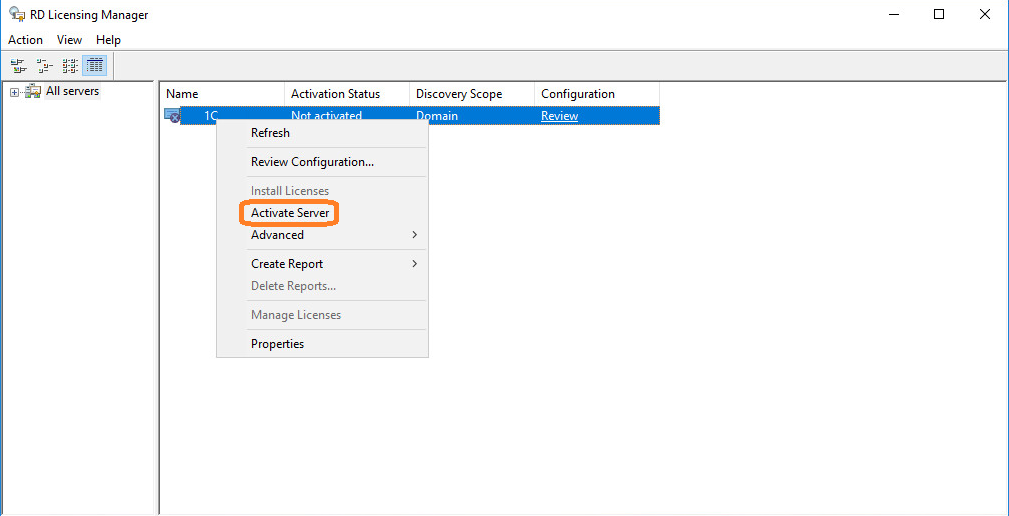
Чтобы сервер лицензирования RDS мог выдавать лицензии клиентам, его необходимо активировать. Для этого, откройте консоль Remote Desktop Licensing Manager (licmgr.exe), щелкните ПКМ по имени вашего сервера и выберите пункт меню Activate Server.
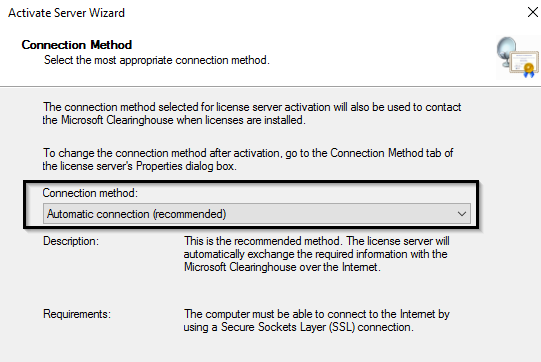
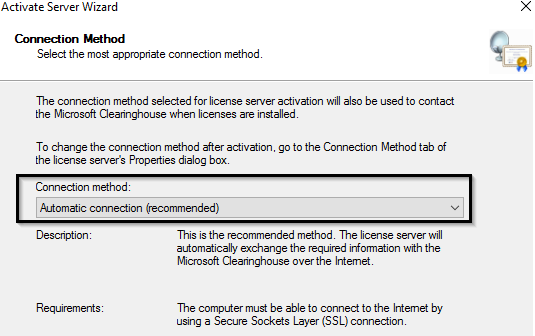
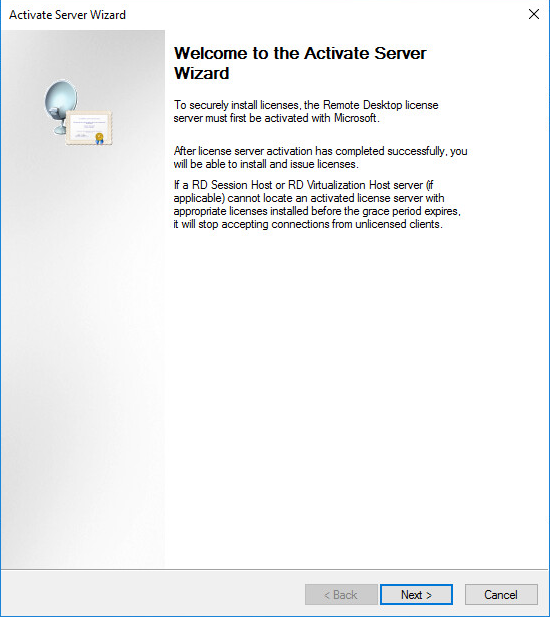
Запустится мастер активации сервера лицензирования RDS, в котором нужно будет выбрать желаемый метод активации. Если ваш сервер имеет доступ в Интернет, он может автоматически подключиться к серверам Microsoft. Если доступа в интернет с сервера нет, можно активировать сервер через веб браузер или по телефону.
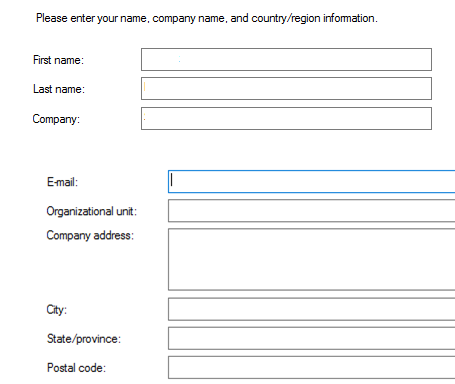
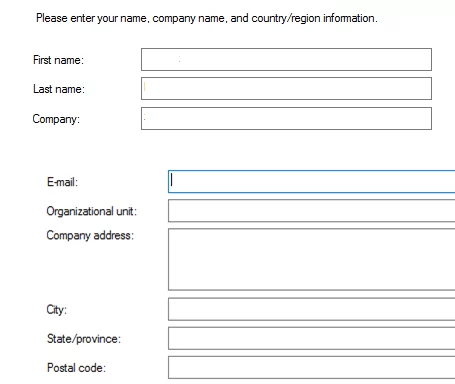
Далее нужно будет заполнить ряд информации о вашей организации (часть полей является обязательными).
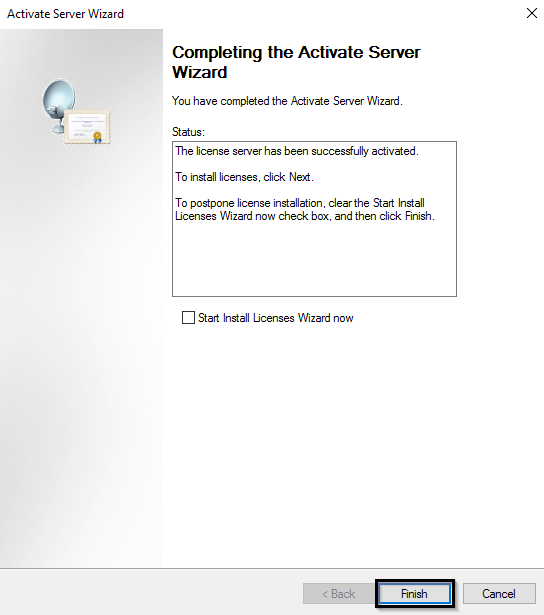
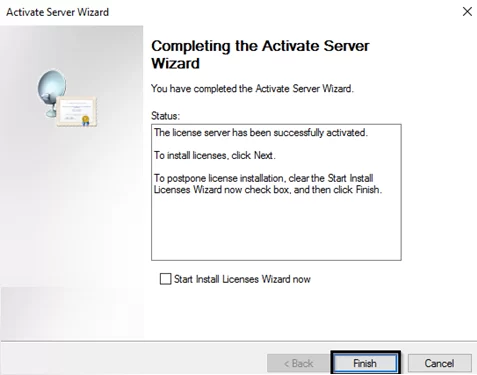
Осталось нажать кнопку Finish.
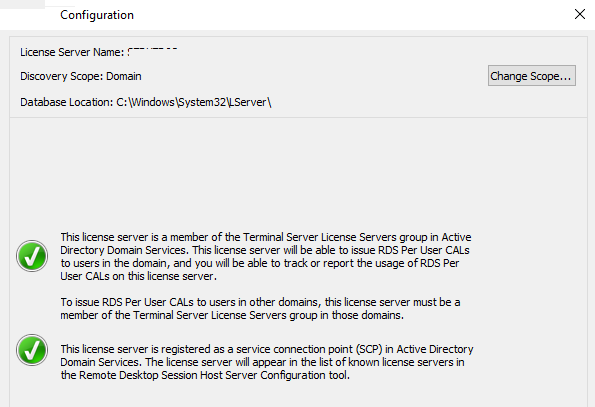
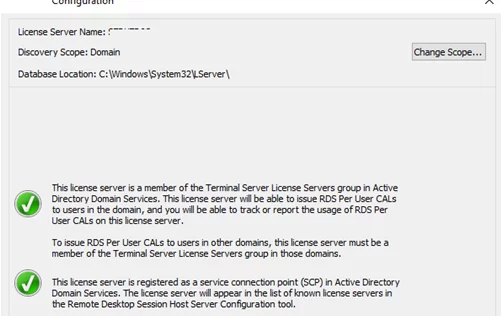
Щелкните в консоли по имени сервера правой клавишей и выбрать пункт Review Configuration. Здесь можно убедиться, что данный сервер лицензий RDS является активированным и может быть использован для активации RDS клиентов в домене.
- This license server is a member of the Terminal Server License Servers group in Active Directory. This license server will be able to issue RDS Per User CALs to users in the domain, and you will be able to track the usage of RDS Per User CALs.
- This license server is registered as a service connection point (SCP) in Active Directory Domain Services.
Типы клиентских терминальных лицензий (RDS CAL)
Каждый пользователь или устройство, которое подключается к серверам Remote Desktop Session Host, должно иметь клиентскую лицензию (CAL — client access license). Есть два типа терминальных CAL.
- На устройство (Per Device CAL) – это постоянный тип лицензии, назначающийся компьютеру или устройству, которое подключается к RDS серверу более одного раза (при первом подключении устройства ему выдается временная лицензия). Данные лицензии не являются конкурентными, т.е. если у вас 10 лицензий Per Device, то к вашему RDS серверу смогут подключится всего 10 компьютеров. Актуальная OVL лицензия называется так:
WinRmtDsktpSrvcsCAL 2019 SNGL OLV NL Each AP DvcCAL - На пользователя (Per User CAL) – такой тип лицензии позволяет одному пользователю подключиться к серверу RDS с любого количества компьютеров/устройств. Данный тип лицензий привязывается к учетной записи пользователя в Active Directory, но выдается не навсегда, а на определенный период времени. Лицензия выдается на срок от 52 до 89 дней (случайное число). Актуальная Open Value лицензия этого типа называется так:
WinRmtDsktpSrvcsCAL 2019 SNGL OLV NL Each AP UsrCAL
.Если вы попытаетесь использовать RDS CAL Per User 2019 в рабочей группе (не в домене), то RDSH сервер будет каждые 60 минут принудительно завершать сеанс пользователей с сообщением: “Проблема с лицензией удаленных рабочих столов и ваш сеанс будет завершен через 60 мин / There is a problem with your Remote Desktop license, and your session will be disconnected in 60 minutes ”. Поэтому для RDS серверов в среде workgroup нужно использовать только лицензирование на устройство — Per Device RDS CAL.
Примечание. Отметим, что 2016 RDS CAL можно установить только на сервере лицензирования под управлением Windows Server 2016 или 2019. Установка RDS CALs для более новые версий Windows Server на предыдущие версии Windows не поддерживается. Т.е. вы не сможете установить 2016 RDS CAL на хост лицензирования Windows Server 2012 R2.
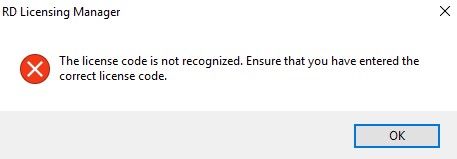
При попытке добавить новые RDS CAL 2019 на Windows Server 2016 появится ошибка:
RD Licensing Manager
The license code is not recognized. Ensure that you have entered the correct license code.
Установка клиентских лицензий RDS CAL в Windows Server 2019/2016
Теперь на сервер лицензирования нужно установить приобретенный пакет терминальных лицензий (RDS CAL).
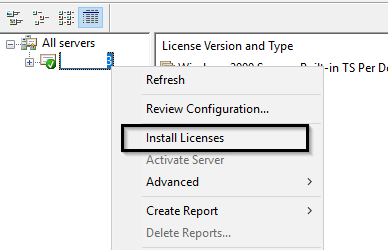
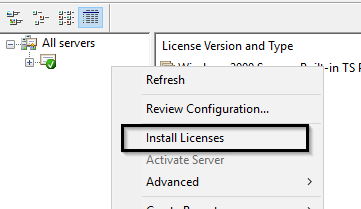
В консоли Remote Desktop Licensing Manager щелкните ПКМ по серверу и выберите Install Licenses.
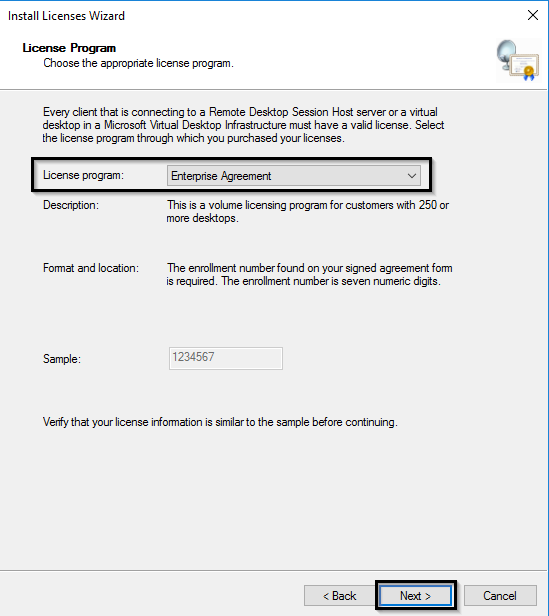
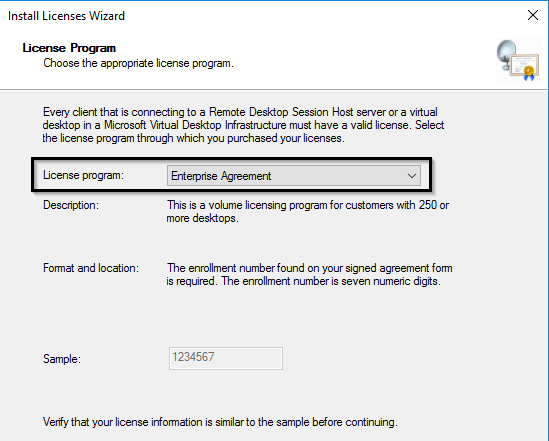
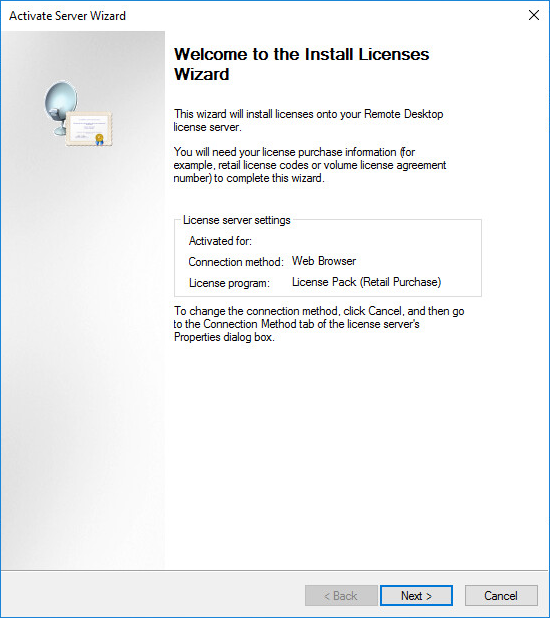
Выберите способ активации (автоматически, через веб или по телефону) и программу лицензирования (в нашем случае Enterprise Agreement).
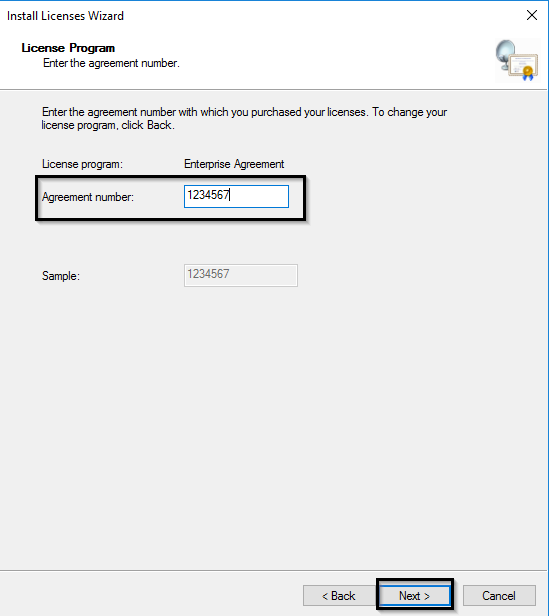
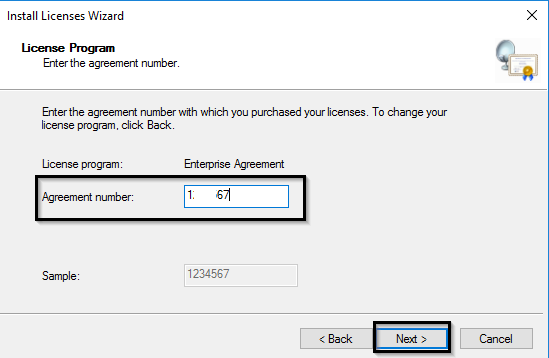
В сеть утекло уже довольно много enterprise agreement номеров для RDS (4965437). Найти номера думаю, не составит проблемы. Обычно даже не нужно искать кряки или активаторы.
Следующие шаги мастера зависят от того, какой тип лицензирования выбран. В случае Enterprise Agreement нужно указать его номер. Если выбран тип лицензирования License Pack (Retail Purchase), нужно будет указать 25-символьный ключ продукта, полученный от Microsoft или партнера.
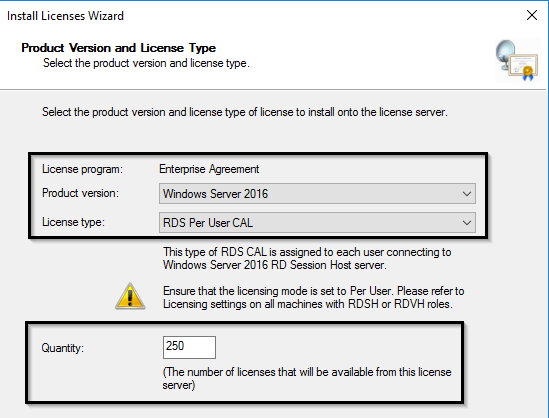
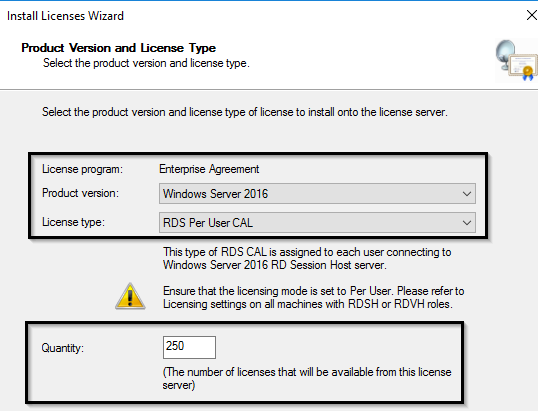
Укажите тип продукта (Windows Server 2016 или 2019), тип лицензии (RDS Per User CAL) и количество терминальных лицензий, которые нужно установить на сервере.
После этого, сервер может выдавать лицензии (RDS CAL) клиентам.
Вы можете сконвертировать RDS лицензии User CAL в Device CAL (и наоборот) с помощью контекстного меню Convert Licenses в консоли RD Licensing Manager.
Если у вас закончились свободные лицензии, вы можете отозвать ранее выданные лицензии RDS Device CAL для неактивных компьютеров с помощью следующего скрипта PowerShell:
$RevokedPCName=”msk-pc2332”
$licensepacks = Get-WmiObject win32_tslicensekeypack | where {($_.keypacktype -ne 0) -and ($_.keypacktype -ne 4) -and ($_.keypacktype -ne 6)}
$licensepacks.TotalLicenses
$TSLicensesAssigned = gwmi win32_tsissuedlicense | where {$_.licensestatus -eq 2}
$RevokePC = $TSLicensesAssigned | ? sIssuedToComputer -EQ $RevokedPCName
$RevokePC.Revoke()
Можно отозвать до 20% Per-Device RDS CALs. Per-User CALs отозвать нельзя.
Отчеты об использовании лицензий CAL на RDS
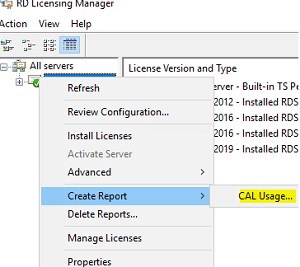
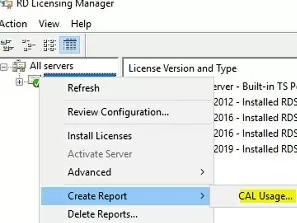
В консоли управления CAL лицензиями RDS можно сформировать отчет по использованию лицензий. Для этого в контекстном меню сервера выберите Create Report -> CAL Usage.
Однако, я предпочитаю использовать PowerShell для построения отчетов об использовании RDS CAL.
Следующий скрипт покажет оставшееся количество лицензий во всех паках RDS CAL:
Import-Module RemoteDesktopServices -ErrorAction Stop
Set-Location -Path 'rds:' -ErrorAction Stop
$licenses = (Get-Item -Path RDS:\LicenseServer\LicenseKeyPacks\* | Where-Object Name -Like "-Per User-*").Name
$total=0;
$issued=0;
foreach ($license in $licenses) {
$count=(Get-Item -Path RDS:\LicenseServer\LicenseKeyPacks\$license\TotalLicenses).CurrentValue
$total= $total + $count
$count2=(Get-Item -Path RDS:\LicenseServer\LicenseKeyPacks\$license\IssuedLicensesCount).CurrentValue
$issued= $issued + $count2
}
$available = $total - $issued
Write-Host "Total Licenses available: $available"
Вы можете запускать этот PowerShell скрипт через Zabbix и генерировать алерт, если оставшееся количество лицензий меньше, например, 5.
Следующий скрипт позволит получить таблицу по использованию Per User лицензий:
Import-Module RemoteDesktopServices -ErrorAction Stop
Set-Location -Path 'rds:' -ErrorAction Stop
$path = “C:\Logs\Reports\RDS_CAL_Report.csv”
$fileName = (Invoke-WmiMethod Win32_TSLicenseReport -Name GenerateReportEx).FileName
$fileEntries = (Get-WmiObject Win32_TSLicenseReport | Where-Object FileName -eq $fileName).FetchReportEntries(0,0).ReportEntries
$objArray = @()
foreach($entry in $fileEntries){
$objArray += $entry | select User, ProductVersion, CALType, ExpirationDate
$objArray[-1].User = $objArray[-1].User.Split('\') | select -Last 1
$time = $objArray[-1].ExpirationDate.Split('.') | select -first 1
$objArray[-1].ExpirationDate = [datetime]::ParseExact($time, "yyyyMMddHHmmss", $null)
}
$objArray | Export-Csv -Path $path -Delimiter ',' -NoTypeInformation
Удаление RDS CAL с сервера лицензирования
Если вы хотите перенести свой набор лицензий RDS CAL с одного сервера лицензирования Remote Desktop на другой, вы можете удалить установленные лицензии с сервера лицензирования с помощью PowerShell.
Следующая команда выведет список установленных пакетов RDS лицензий на сервере:
Get-WmiObject Win32_TSLicenseKeyPack|select-object KeyPackId,ProductVersion,TypeAndModel,AvailableLicenses,IssuedLicenses |ft
Найдите значение KeyPackId для пакета RDS CAL, который нужно удалить и выполите команду:
wmic /namespace:\\root\CIMV2 PATH Win32_TSLicenseKeyPack CALL UninstallLicenseKeyPackWithId KEYPACKID
Также вы можете полностью удалить все наборы CAL, пересоздав базу лицензий RDS. Для этого остановите службу Remote Desktop Licensing:
Stop-Service TermServLicensing
Переименуйте файл C:\Windows\System32\lserver\TLSLic.edb в C:\Windows\System32\lserver\TLSLic.bak и запустите службу:
Start-Service TermServLicensing
После этого все RDS CAL лицензии будут удалены, и вы должны активировать их заново.
Настройка серверов RDSH на использование сервера лицензий RDS
После активации службы сервера лицензирования RDS можно перенастроить терминальные сервера RD Session Host на получение лицензий с данного сервера. Выбрать тип лицензий и указать имя терминального сервера из графического интерфейса Server Manager, с помощью PowerShell или групповой политики.
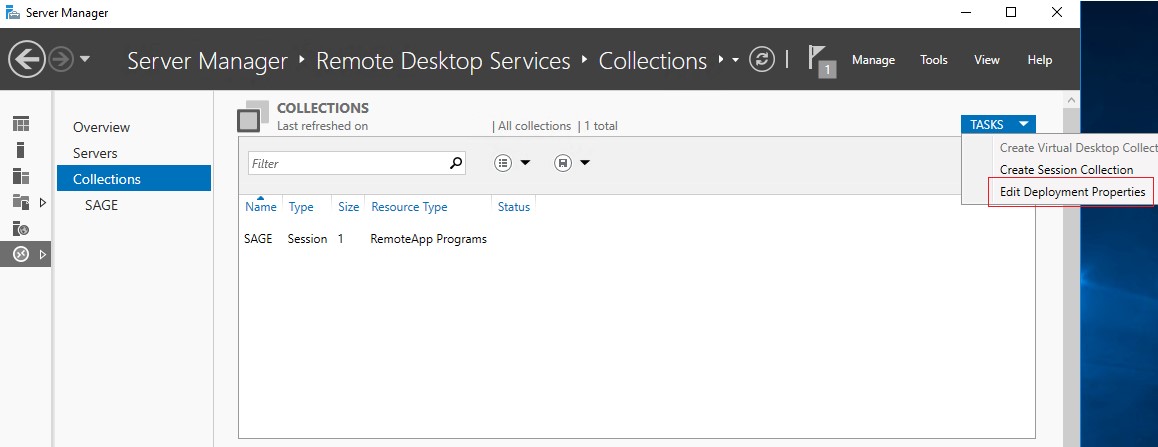
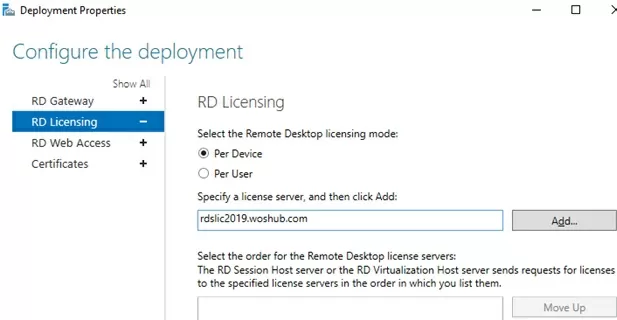
Чтобы изменить адрес сервера лицензирования на хосте RDS, откройте Server Manager -> Remote Desktop Services -> Collections. В правом верхнем меню “Tasks” выберите “Edit Deployment Properties”.
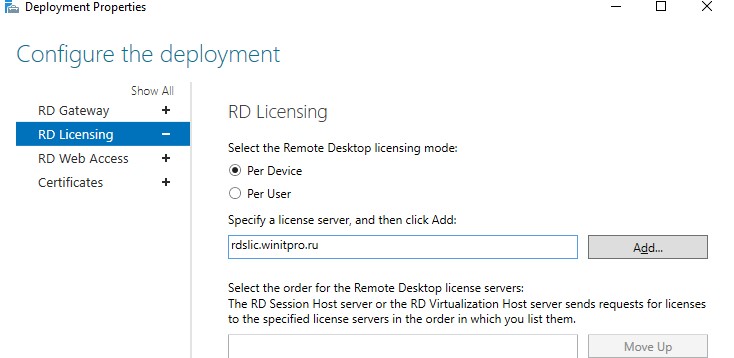
В настройках перейдите на вкладку RD Licensing, выберите тип лицензирования (Select the Remote Desktop licensing mode) и сервер RDS лицензий (Specify a license server). Нажмите Add -> Ok.
Вы можете изменить адрес сервера лицензирования RDS и тип CAL с помощью PowerShell:
$obj = gwmi -namespace "Root/CIMV2/TerminalServices" Win32_TerminalServiceSetting
Затем укажите желаемый тип лицензирования:
$obj.ChangeMode(4)
Примечание. 4 указывается, если сервер должен использовать тип лицензирования Per User, 2 – если Per Device.
Теперь можно указать имя сервера лицензирования RDS:
$obj.SetSpecifiedLicenseServerList("rds-lic1.winitpro.ru")
И проверить настройки:
$obj.GetSpecifiedLicenseServerList()
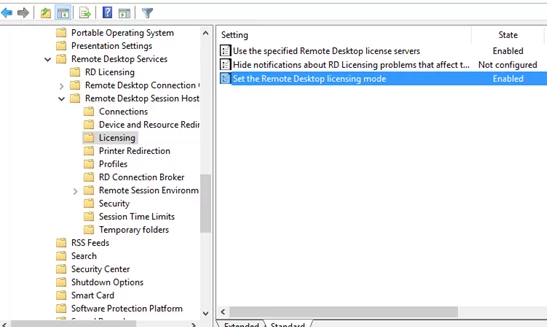
Если вы хотите назначить настройки сервера лицензирования RDS через групповые политики, нужно создать новую GPO и назначить ее на OU с RDS серверами (либо вы можете указать имя сервера лицензирования RDS с помощью локального редактора групповых политик –
gpedit.msc
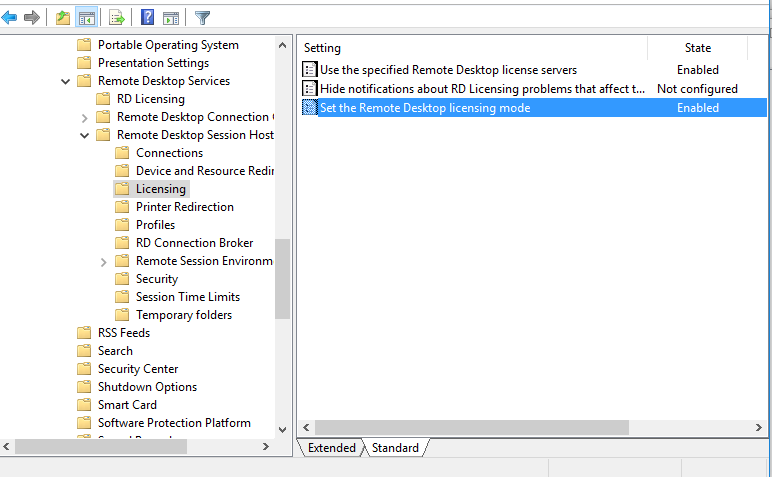
). Настройки лицензирования задаются в разделе: Computer Configuration -> Policies -> Admin Templates -> Windows Components -> Remote Desktop Services -> Remote Desktop Session Host -> Licensing.
В этом разделе имеется 2 интересующие нас политики:
- Use the specified Remote Desktop license servers – здесь указывается адрес сервера лицензирования RDS;
- Set the Remote Desktop licensing mode – выбор метода лицензирования (типа клиентских лицензий – RDS CAL).
Хосты RDSH для получения лицензий с сервера RDS Licensing обращаются к нему по следующим портам. Убедитесь, что они не блокируются межсетевыми экранами (или Windows Firewall):
- TCP/135 (Microsoft RPC)
- UDP/137 (NetBIOS Datagram Service)
- UDP/138 (NetBIOS Name Resolution)
- TCP/139 (NetBIOS Session Service)
- TCP/445 (SMB)
- TCP 49152 – 65535 — RPC динамический диапазон адресов
Вы можете проверить доступность портов с помощью утилиты PortQry или командлета Test-NetConnection.
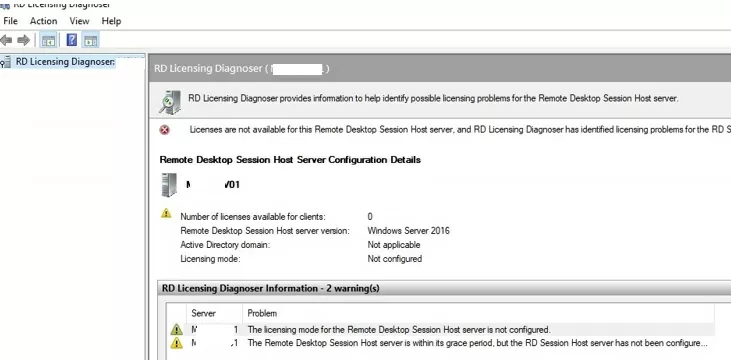
Проверить статус сервера лицензий и количество выданных лицензий можно с помощью утилиты Remote Desktop Licensing Diagnoser (lsdiag.msc). Утилиту RD Licensing Diagnoster можно установить на серверах с ролью RDSH через (Server Manager: Features -> Remote Server Administration Tools -> Role Administration Tools -> Remote Desktop Services Tools -> Remote Desktop Licensing Diagnoser Tools).
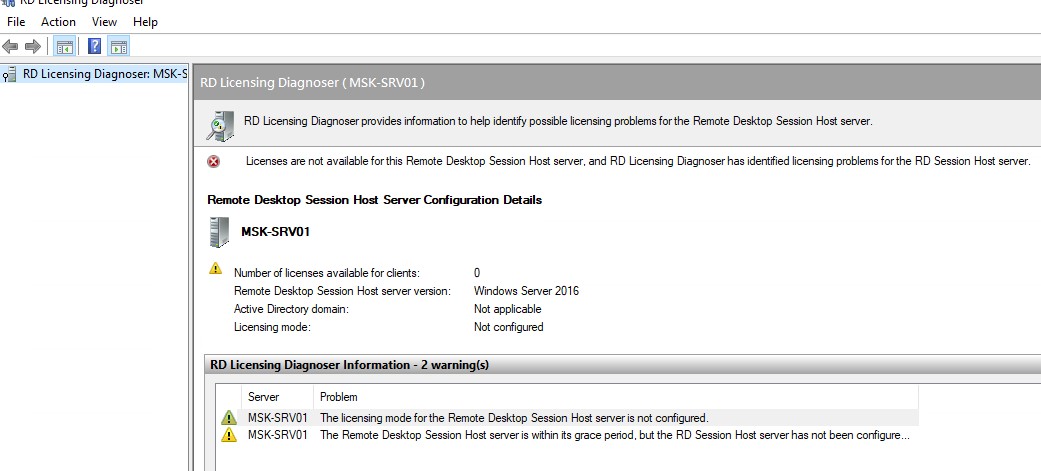
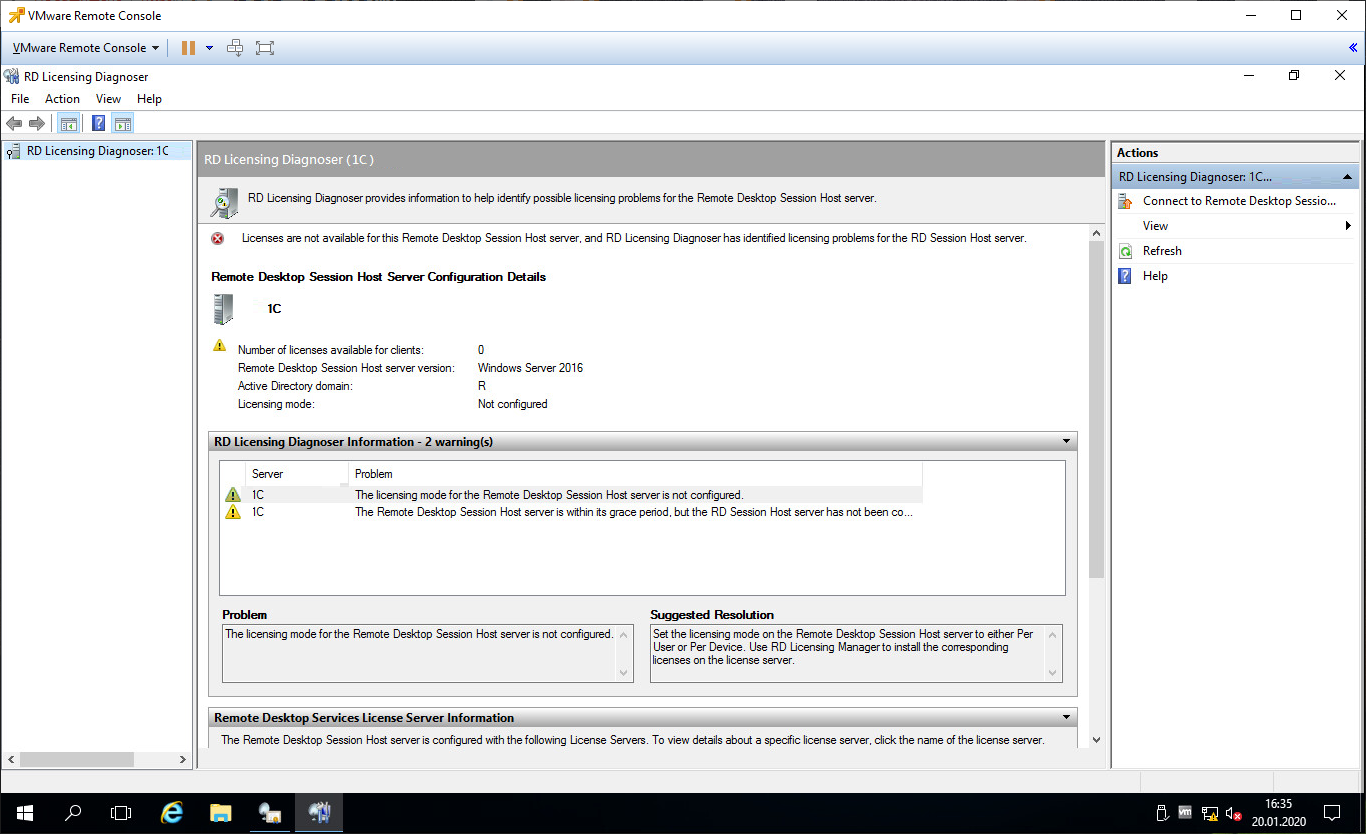
Если сервер RDSH не настроен на использование сервера лицензий RDS, в консоли Licensing Diagnoser будут присутствовать следующие предупреждения:
- Licenses are not available for this Remoter Desktop Session Host server, and RD Licensing Diagnose has identified licensing problems for the RDSH
- Number of licenses available for clients: 0
- The licensing mode for the Remote Desktop Session Host server is not configured
- Remote Desktop Session Host server is within its grace period, but the RD Session Host server has not been configured with any license server.
alert] Если вы установили RDSH на ознакомительно редакции Windows Server Evaluation, не забудьте перевести его в полноценную версию согласно инструкции. Без конвертации службы RDSH на таком хосте будут работать только 120 дней даже после того, как вы нацелите его на активированный сервер лицензий RDS.[/alert]
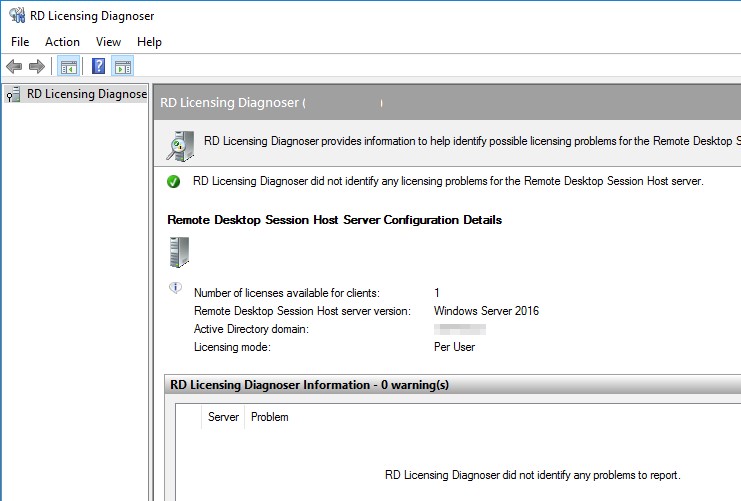
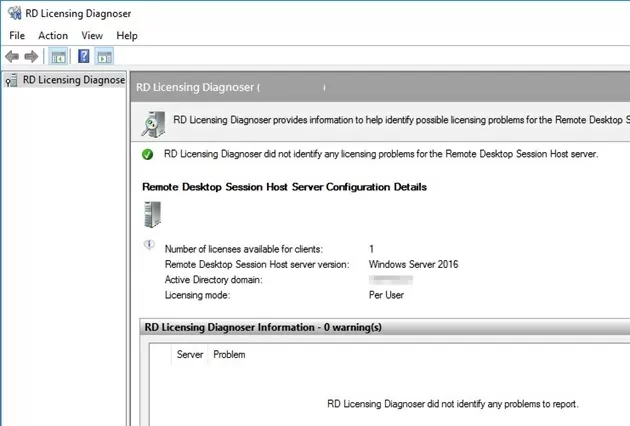
Если предупреждений нет, и вы видите сообщение “RD Licensing Diagnoser did not identify any licensing problems for the Remote Desktop Session Host server”, значит RDSH сервер может получать лицензии RDS CAL для пользователей.
Примечание. В нашем случае после указания нового сервера лицензирования, на RDP клиенте при подключении стала появляться ошибка “The remote session was disconnected because there are no Remote Desktop License Servers available to provide a license”. Решение – удаление ключа L$RTMTIMEBOMB из реестра.
How to Install RDS CALs On Windows Server
-
View Larger Image
In this blog post we will discuss on Installing and Configuring a Remote Desktop License Server (RDS CALs) on Windows server 2019. We can also use same steps if we have windows 2016 or 2012. The steps are almost identical on each windows server editions. There is no noticeable changes in the Steps we follow for any of these Windows Server Editions.
Applies To
- Windows server 2019
- Windows Server 2016
- Windows Server 2012
By default only two concurrent active rdp sessions are allowed on a windows server editions like 2012,2016 or 2019. If we need more than two users simultaneously log into the server we need to have Remote Desktop Licensing (RD Licensing), formerly Terminal Services Licensing (TS Licensing), which manages the Remote Desktop Services client access licenses (RDS CALs) for users to connect to a Remote Desktop Session Host (RD Session Host) server.
If we enable RDS CALs, each user and device that connects to a Remote Desktop Session host needs a client access license (CAL). The RDS CALs is installed as a server Manager Role. There is a default licensing applied on installation and activation with a grace period of 180 Days during which no purchased RDS CAL license needed. After that we need to choose either of below Licencing model and need to Purchase it from the Microsoft store or from a vendor.
RDS Per Device CALs : RDS CALs are physically assigned to each device.
RDS Per User CALs : RDS CALs are assigned to a user with or without Active Directory.
RDS CAL Version Compatibility
We can’t use RDS CALs of a Windows server 2012 to access later versions of Windows Server 2016 or 2019, but we can use later versions of RDS CALs to access earlier versions of Windows Server editions.
RDS CAL Licence Purchase
Before proceeding with the install first we have RDS CAL Licence in hand. There are two methods available for RDS CAL Licence implementation.
- Purchase the Microsoft Windows client access Licence ( Remote Desktop service- User/Device CAL) from Microsoft store. After purchase we will get a product licence key and this Key is used during installation of services in the server.
- Use The Microsoft Services Provider License Agreement (SPLA) SALs. With the SPLA, service providers and ISVs can license eligible Microsoft products on a monthly basis. This Licence structure is mainly used on a VPS/Dedicated environment Provided by a Hosting Provider. For that we have to pay a monthly fee to the Hosting Provider.
Windows Server 2019 Users Only
If we are Implementing “RDS User CAL” in a Windows Server 2019 servers, Setup either of below things before Proceed with the Install of Remote Desktop Service.
- Add the new RDS CAL server to the Terminal Server License Servers domain group of existing Active Directory Domain
- Install Active Directory Services ( ADDS) in the RDS CAL server.
Other wise we will get error like below screenshot while users logging in and stays for 60 Min.
There is a problem with your Remote Desktop license, and your session will be disconnected in 60 minutes. Contact your system administrator to fix this problem.
The Requirement Also Described in Microsoft Page, Below is the particular section screenshot where it mention.
We only need to Activate Active Directory Services (ADDS) if we settings up a RDS User CAL on Windows Server 2019. Not necessary for RDS Device CAL implementation on a Windows server 2019. So lets get started.
Installing the Server Roles
We can install Remote Desktop Licensing Role using Server Manager
Open “Server Manager” >> Click “Add Roles and Features”
Click “Next” in the Before You Begin Section.
Select “Role based or Feature based Installation” and Click Next.
Choose option “Select a server from the server pool”. Choose Our server from the Server pool and Click Next.
Scroll down and select “Remote Desktop Services” then click Next
Click Next by Leaving Default Selection in Features Section.
Click Next on Remote Desktop Services Section.
Select the “Remote Desktop Licensing” and “Remote Desktop Session Host”
A Pop Up Window Will Appear. Click Add Features for Each of them
Click Next and Select the “Restart the destination server automatically if required” then click Install
The server will reboot automatically during install process and finally we will get below screen when the installation succeeded. Once finished click Close.
This concluded Installation of Remote Desktop Licensing Role Using Server Manager.
Install the Server Roles Using Powershell Command
We can also install the the RDS Licensing service and “Remote Desktop Licensing” and “Remote Desktop Session Host” using PowerShell Commands instead of Using above graphical Server Manager method. Below is that three commands we need to use.
If needed (and possible), restart the server using Below PowerShell command after the server role install.
After the server reboot. We can Check if the “Remote Desktop Session Host” , RDS Licensing service and “Remote Desktop Licensing” is available using Below Powershell command.
The command Output can view from below screenshot. You will also get similar results when issues those commands.
Activating the RDS License Server
Now lets Proceed with Activate Licensing Server. For that we need to launch the Remote Desktop Licensing Manager. We can launch the installed “Remote Desktop Licensing Manager” from below windows server section.
Go to Windows Start >> Control Panel >> System and Security >> Administrative Tools >> Remote Desktop Services >> Double click “Remote Desktop Licensing Manager”
A pop-up window will appear and that is the “RD Licencing Manager”. Expand the Server section by clicking the plus icon.

Click Next on Welcome to the Activate Server Wizard.
Choose the “Connection Method” as “Automatic connection” and click Next
Enter our Company Information and click Next
[Optional] Enter additional information and click Next
Or Leave it as Blank in the Optional Information fields and Click Next
This Completes the Activate RDS License Server steps. Now Lets Proceed with the Install RDS Licence section.
Installing RDS CALs
In the Activate Server Wizard itself, Check the box to “Start Install Licenses Wizard now then click Next”
Accidentally If we didn’t clicked the “start Install Licenses Wizard” in the previous step, we can access the Install RDS CAL Licence wizard by right clicking our “server name” in the “RD Licensing Manager” then click “Install Licenses”
Click Next on Welcome to the Install Licenses Wizard.
Now In this section we need to Pick the type of license Program that we use. There are few Options available, in that we are discussing two Licence Program methods. Those two are the most commonly used Ones. We only Need to Choose either of them as per our Personal choice and Licence Type we are currently holding.
- Choose Licence program as “Licence Pack (Retail Purchase)”, if we purchased RDS Licence directly from Microsoft.
- Choose Licence program as ” Service Provider License Agreement” if you are in a VPS/Dedicated servers provided by a Hosting Provider and they already have a data centor Licence and our VPS Operating System licence comes under it.
If we Choose Licence program as “Licence Pack (Retail Purchase)” and Click Next
Enter the Licence Code and Click Next.
If we Choose Licence program as ” Service Provider License Agreement” and Click Next.
Enter Our Licence Agreement Number and Click Next.
- Now Select “product version” as per your Windows Operating System Edition. In our case It Windows Server 2019
- Select Licence Type as ” RDS Per User CAL” or “RDS Per Device CAL” According to the Licence type given by our Provider. In our case we choose “RDS Per User CAL”
- Choose the Quantity as per our requirement. Say if you need to have 5 users simultaneously log into the server. Type 5 and Click Next
Click Finish to complete the RDS license install.
Review RDS CAL Licence Install
Right click our “server name” in the “RD Licensing Manager” then click “Review Configuration”
In Our case we got two yellow warning. This happened because we enabled RDS User CAL on a ADDS Environment. If you don’t have any Warnings, you are good to Go further. Lets see How to Fix this warning before Proceed further.
- Click the “Add to Group” next to ” The Licence server or the network service account is not a member of the Terminal Server Licence Servers group In Active Directory Domain Services. This Licence server will not be able to issue RDS Per User CALs to Users in the domain, and you will not be able to track or report the usage of RDS per User CALs on this Licence Server.
- Click “Register as SCP” next to This licence server is not registered as a service connection point (SCP) in Active Directory Domain Services. The licence server will not appear in the list of known licence servers in the Remote Desktop Secession Host Server Configuration tool.
Now we can see the message as You must restart the Remote Desktop Licensing service. Until the service is restarted this Licence server will not able able to issues RDS Per user CALs to users in the domain, and you will not able able to track or report the usage of RDS Per User CALs on this licence server.
In order to fix this warning. Go to the windows services section and restart the windows service named ” Remote Desktop Licensing service” and Click Ok.
Again, Right click our “server name” in the “RD Licensing Manager” then click “Review Configuration”. This time we can see no warnings appears and our RDS CAL Licence Install is successful.
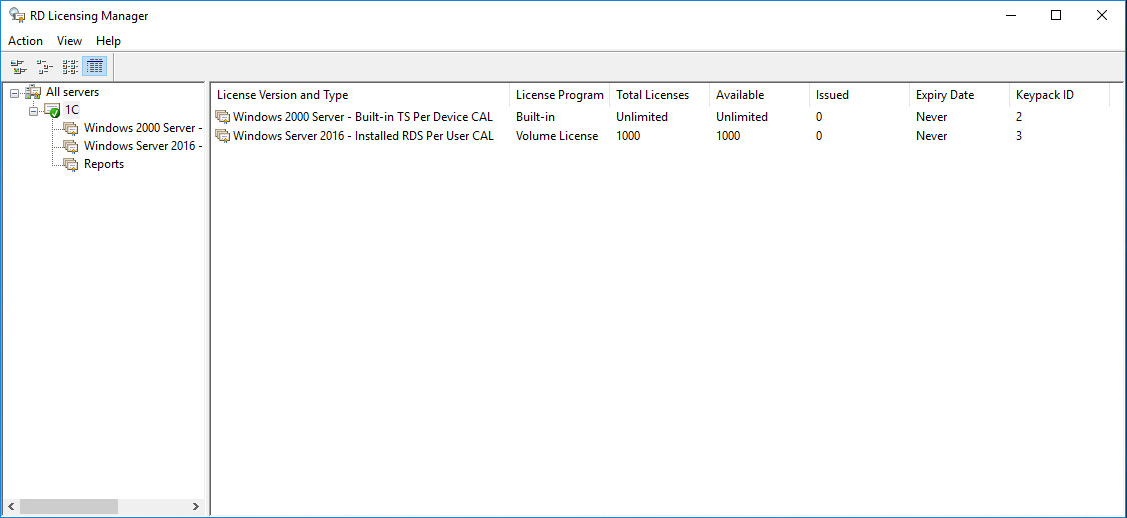
We can also see The New license key we just added from the “Licence manager” itself and a green tick appears next to our Windows server name.
How To Diagnose Remote Desktop Licence
Use the “Remote Desktop License Diagnoser” for checking any issues with the RDS CAL Licence Server.
For that Go to Windows Start >> Control Panel >> System and Security >> Administrative Tools >> Remote Desktop Services >> Double click “Remote Desktop Licensing Diagnoser”
In Our case we go below warnings.
- Licenses are not available for this Remote Desktop Session Host server, and RD Licensing Diagnoser has identified licensing problems for the RD Session Host server.
- The licensing mode for the Remote Desktop Session Host Server is not configured.
- The Remote Desktop Session Host server is within its grace period, but the RD session Host server has not been configured with any licence server.
Normally this error will get on RD Licence server, when we haven’t configured the correct group policy for Licencing Server. So lets see how it can be done.
Enable Group Policy for RDS licensing Server.
For settings up Group Policy in a RDS Licence server, Open Windows RUN, and enter gpedit.msc, click Ok
Go to section Local computer Policy>> Computer Configuration\Administrative Templates\Windows Components\Remote DesktopServices\Remote Desktop Session Host\Licensing
- Double click on “Use the specified RD license servers” >> click Enable, then Enter Our server name shows up in the Remote Desktop Licence Manager and click on Apply
Now Double click on “Set the Remote Desktop licensing mode” >> click enable, then select “Per User” or “Per Device” as per your Licence and Apply
Now restart Remote Desktop Licensing service from the Windows services section and click the Refresh button available in the right side from the RD Licensing Diagnoser. We can see the diagnoser showed the message as ” RD Licensing Diagnoser did not identify any licensing problems for the Remote Desktop Session Host server. Additional information like, Licence mode and Number of Licenses will also appear in the same window.
This will conclude the Group Policy for RDS licensing Server and RDS CAL Server is ready to Use for Users.
How to Rebuild the RDS Licence
Some times we may come across situation like, we need to add more users to the RDS CAL User type Licence, Need to Change the User type CAL into Device CAL or The Installed Licence has become corrupted. In such cases, we can correct those issues by rebuilding the current RDS Licence.
For that Right click our “server name” in the “RD Licensing Manager” then click “Manage Licenses”
Click Next on the Welcome to the Manage licenses Wizard.
Choose the option “Rebuild the license server database” and select the reason as ” The certificate for the licence server has become corrupted”. Click Next
Confirm the deletion of licenses currently installed on this licence server and click Next
This will delete the current Licence installed in the server and will prompt the Licence install step again. Complete those and finalise the rebuild. This completes the Rebuild and Install of New RDS CAL Licence in the server.
How to Remove RDS CALs from a RD License Server
Some times we want to transfer our RDS CAL license set from one Remote Desktop licensing server to another, in such cases we can remove installed CAL licenses pack from the current licensing server using two methods.
- Using PowerShell commands.
Use the following cmdlet, and list all the installed RDS CAL packages on the server.
Find the KeyPackID value for the RDS CAL package that you want to remove and run the command. We can get the KeyPackID value from the Remote Desktop Licence Manager Itself.
2. By Removing the RDS CAL database file.
To do this, stop the Remote Desktop Licensing service from the Windows Services section
Rename the file C:\Windows\System32\lserver\TLSLic.edb to C:\Windows\System32\lserver\TLSLic.edb_bak and start the “remote desktop service” again. That will delete all the RDS CAL licenses in the server and we need to reactivate them for further usage.
This blog article covered most of the common options in the RDS CAL server. We hope this become informative for those having similar needs. Leave your thoughts at the below comment box.
Share This Story, Choose Your Platform!
Related Posts
3 Comments
-
Javoris
January 16, 2023 at 7:09 pm — ReplyHow can I remote into the server after doing everything I suppose to get it up and running
-
James M
March 8, 2023 at 6:11 pm — ReplyGreat article and thank you for sharing
Just to clarify, did you mean gpmc.ms otherwise you will be applying only a local policy.
Grace period is 120 days If I recall and not 180.
Also do you need to install Session host?
-
Mahesh.Koduri
March 31, 2023 at 12:43 pm — ReplyNice article. Helped me in setting up the RDP license.
Page load link
Go to Top
In this article, we’ll consider the installation, configuration, and activation of the Remote Desktop Licensing role on Windows Server 2019 and 2016, as well as the installation and activation of the RDS client access licenses (CALs).
I remind you that after the installation of the Remote Desktop Session Host role, users can use it only for 120 days of a trial period (evaluation license), and users can’t connect to an RDS host afterward. According to Microsoft licensing rules, all users or devices that use RDS features must be licensed. To register and issue Remote Desktop Client Access Licenses (RDS CALs), there is a separate Windows service in the RDS role called Remote Desktop License Server.
Contents:
- Install the Remote Desktop Licensing Role on Windows Server 2019/2016
- Activating the RDS License Server on Windows Server
- RDS CALs: Types of Remote Desktop Client Access Licenses
- Installing RDS CALs on Windows Server 2019/2016
- RDS CAL Usage Reports
- How to Remove RDS CALs from an RD License Server?
- Configuring RDS Licenses on RD Session Hosts
Install the Remote Desktop Licensing Role on Windows Server 2019/2016
You can deploy the Remote Desktop License service on any domain server. It is not necessary to install it on one of the servers on the RDSH farm.
Before you start the installation, add a new server to the Terminal Server License Servers domain security group (or make sure you have the permission to change this group membership), otherwise, the server won’t be able to issue RDS Per User CAL to the domain users.
You can install Remote Desktop Licensing using Server Manager. To do it, select the Remote Desktop Services role in the Add Roles and Features Wizard.
Select Remote Desktop Licensing as the role service.
It remains to wait until the installation of the role is completed.
The RDS-Licensing service is managed using the Remote Desktop Licensing Manager console (licmgr.exe).
In Windows Server, it’s easier to install roles and features using PowerShell. To install the RDS Licensing Service and RD Licensing Diagnoser, just run one command:
Install-WindowsFeature RDS-Licensing –IncludeAllSubFeature -IncludeManagementTools
To list the RDS services installed on the host, use the command:
Get-WindowsFeature -Name RDS* | Where installed
Activating the RDS License Server on Windows Server
In order to issue licenses to RDP clients, your RDS License Server must be activated. To do it, open the Remote Desktop Licensing Manager (licmgr.exe), right-click the name of your server, and select Activate Server.
The RDS licensing server activation wizard will start. Here you will need to select the activation method you prefer. If your server is connected to the Internet, it can automatically connect to Microsoft servers and activate the RDS license server. If there is no direct Internet access from the server, you can activate the server using a web browser or by phone.
Then you must fill in some information about your company (some of the fields are required).
It remains to click the Finish button.
If you right-click the server name in the console and select Review Configuration, you can verify that the RDS License Server is activated and can be used to activate RDSH clients in your domain.
-
This license server is a member of the Terminal Server License Servers group in Active Directory. This license server will be able to issue RDS Per User CALs to users in the domain, and you will be able to track the usage of RDS Per User CALs.
-
This license server is registered as a service connection point (SCP) in Active Directory Domain Services.
RDS CALs: Types of Remote Desktop Client Access Licenses
Each user or device that connects to Remote Desktop Session hosts must have a client access license (CAL). There are two types of RDS CALs:
- Per-Device CAL – is the permanent license type assigned to a computer (device) that connects to the RDS server more than once (when a device is first connected, a temporary license is issued to it). These licenses are not concurrent, i.e., if you have 10 Per Device licenses, only 10 hosts can connect to your RDS server. The current OVL RDS CAL is called:
WinRmtDsktpSrvcsCAL 2019 SNGL OLV NL Each AP DvcCAL; - Per-User CAL – is the type of license that allows a user to connect to the RDS server from any number of computers/devices. This type of license is associated with an Active Directory user and issued not permanently, but for a specific period of time. The license is issued for a period of 52 to 89 days (random number). The current Open Value license of this type is called
WinRmtDsktpSrvcsCAL 2019 SNGL OLV NL Each AP UsrCAL.If you try to use RDS 2019 Per User CAL in a workgroup (not in a domain), then the RDSH server will forcibly ending a user session every 60 minutes with a message: “Remote Desktop License Issue: There is a problem with your Remote Desktop license, and your session will be disconnected in 60 minutes”. Therefore, for RDS servers in a Windows Workgroup environment, you need to use the only device licensing (Per Device RDS CALs).
.
Note. We should note that the 2016 RDS CAL may be installed only on a licensing server running Windows Server 2016 or 2019. Installing RDS CALs to the previous Windows Server versions is not supported. Those, you cannot install 2016 RDS CALs on a Windows Server 2012 R2 licensing host.
When trying to add new RDS CALs 2019 on Windows Server 2016, an error will appear:
RD Licensing Manager
The license code is not recognized. Ensure that you have entered the correct license code.
Installing RDS CALs on Windows Server 2019/2016
Now you must install the pack of Remote Desktop client licenses (RDS CAL) you have purchased on the License Server.
Right-click your server in Remote Desktop Licensing Manager and select Install Licenses.
Select the activation method (automatic, online, or by phone) and the license program (in our case, it is Enterprise Agreement).
Many enterprise agreement numbers for RDS have already been leaked on the Internet. I think it won’t be a problem to find the numbers (4965437), you don’t even need to look for rds cracks or activators.
The next steps of the wizard depend on which license program you have selected. In the case of an Enterprise Agreement, you must specify its number. If you have chosen License Pack (Retail Purchase), enter the 25-character product key you got from Microsoft or a partner.
Specify the product version (Windows Server 2019/2016), license type (RDS Per user CAL), and the number of licenses to be installed on the server.
After that, the server can issue licenses (RDS CAL) to clients.
You can convert RDS User CALs to Device CALs (and vice versa) using the Convert Licenses menu item in the RD Licensing Manager console.
If you have run out of free RDS licenses, you can revoke previously issued RDS Device CALs for inactive computers using the following PowerShell script:
$RevokedPCName=”lon-bc1-123”
 $licensepacks = Get-WmiObject win32_tslicensekeypack | where {($_.keypacktype -ne 0) -and ($_.keypacktype -ne 4) -and ($_.keypacktype -ne 6)}
 $licensepacks.TotalLicenses
 $TSLicensesAssigned = gwmi win32_tsissuedlicense | where {$_.licensestatus -eq 2}
 $RevokePC = $TSLicensesAssigned | ? sIssuedToComputer -EQ $RevokedPCName
 $RevokePC.Revoke()
Up to 20% of Per-Device RDS CALs can be revoked. Per-User CALs cannot be revoked.
RDS CAL Usage Reports
In the RDS License Console, you can generate a license usage report. To do this, select Create Report -> CAL Usage from the server context menu.
However, I prefer to use PowerShell to report RDS CAL usage. The following script will show the remaining number of licenses in all RDS CAL packs:
Import-Module RemoteDesktopServices -ErrorAction Stop
 Set-Location -Path 'rds:' -ErrorAction Stop
 $licenses = (Get-Item -Path RDS:\LicenseServer\LicenseKeyPacks\* | Where-Object Name -Like "-Per User-*").Name
 $total=0;
 $issued=0;
 foreach ($license in $licenses) {
 $count=(Get-Item -Path RDS:\LicenseServer\LicenseKeyPacks\$license\TotalLicenses).CurrentValue
 $total= $total + $count
 $count2=(Get-Item -Path RDS:\LicenseServer\LicenseKeyPacks\$license\IssuedLicensesCount).CurrentValue
 $issued= $issued + $count2
 }
 $available = $total - $issued
 Write-Host "Total Licenses available: $available"
You can run this PowerShell script via Zabbix and set an alert if the remaining number of licenses is less, for example, 5.
The following Powershell script will allow you to generate a Per User CAL Report:
Import-Module RemoteDesktopServices -ErrorAction Stop
 Set-Location -Path 'rds:' -ErrorAction Stop
 $path = “C:\Reports\RDS_CAL_Usage.csv”
 $fileName = (Invoke-WmiMethod Win32_TSLicenseReport -Name GenerateReportEx).FileName
 $fileEntries = (Get-WmiObject Win32_TSLicenseReport | Where-Object FileName -eq $fileName).FetchReportEntries(0,0).ReportEntries
 $objArray = @()
 foreach($entry in $fileEntries){
 $objArray += $entry | select User, ProductVersion, CALType, ExpirationDate
 $objArray[-1].User = $objArray[-1].User.Split('\') | select -Last 1
 $time = $objArray[-1].ExpirationDate.Split('.') | select -first 1
 $objArray[-1].ExpirationDate = [datetime]::ParseExact($time, "yyyyMMddHHmmss", $null)
 }
 $objArray | Export-Csv -Path $path -Delimiter ',' -NoTypeInformation
How to Remove RDS CALs from an RD License Server?
If you want to move your RDS CAL license packs from one Remote Desktop licensing server to another, you can remove the installed RDS CAL license pack from the licensing server using PowerShell.
Using the following cmdlet, you can list all the installed RDS CAL packs on the server:
Get-WmiObject Win32_TSLicenseKeyPack|select-object KeyPackId,ProductVersion,TypeAndModel,AvailableLicenses,IssuedLicenses |ft
Find the KeyPackId value for the RDS CAL package that you want to remove and run the command:
wmic /namespace:\\root\CIMV2 PATH Win32_TSLicenseKeyPack CALL UninstallLicenseKeyPackWithId yourKeyPackId
You can also completely remove all CALs by re-creating the RDS license database. To do this, stop the Remote Desktop Licensing service:
Stop-Service TermServLicensing
Rename the file C:\Windows\System32\lserver\TLSLic.edb to C:\Windows\System32\lserver\TLSLic.edb_bak and start the service:
Start-Service TermServLicensing
After that, all RDS CAL licenses will be removed, and you must reactivate them.
Configuring RDS Licenses on RD Session Hosts
After the RDS License Server is activated and being run, you can reconfigure RD Session Host to obtain CAL licenses from this server. You can set the license type and specify the name of the license server from the Server Manager GUI, using PowerShell, or Group Policy.
To change the name/address of the licensing server on the RDS host, open Server Manager -> Remote Desktop Services -> Collections. In the upper right menu “Tasks” select “Edit Deployment Properties”.
In the deployment properties, go to the RD Licensing tab, select the Remote Desktop licensing mode, and set the RDS license server. Click Add -> Ok.
You can change the RDS license server address and CAL type using PowerShell:
$obj = gwmi -namespace "Root/CIMV2/TerminalServices" Win32_TerminalServiceSetting
Then specify the license type you need:
$obj.ChangeMode(4)
Note. Enter 4 if the server must use Per User licensing type, and 2, if it is Per Device.
Then specify the name of the RDS License Server:
$obj.SetSpecifiedLicenseServerList("rdslic2016.woshub.com")
And check the current settings:
$obj.GetSpecifiedLicenseServerList()
If you want to assign the RDS licensing server parameters via Group Policy, you need to create a new GPO and link it to the OU with RDS servers (or you can specify the name of the RDS licensing server using the Local Group Policy Editor – gpedit.msc). The RD licensing settings are located under the following GPO section: Computer Configuration -> Policies -> Admin Templates -> Windows Components -> Remote Desktop Services -> Remote Desktop Session Host -> Licensing.
There are two Remote Desktop settings that we need to configure:
- Use the specified Remote Desktop license servers – the address of the License Server is set;
- Set the Remote Desktop licensing mode – select RDS CAL license type.
RDSH hosts use the following network ports to obtain an RDS license from the RDS Licensing server. Make sure that they are not blocked by firewalls (or Windows Defender Firewall):
- TCP/135 – Microsoft RPC;
- UDP/137 – NetBIOS Datagram Service;
- UDP/138 – NetBIOS Name Resolution;
- TCP/139 – NetBIOS Session Service;
- TCP/445 – SMB;
- TCP/49152–65535 – RPC dynamic address range
You can check for open ports using the PortQry tool or the Test-NetConnection cmdlet.
Try to check the RD License Server status and the number of the issued licenses using the Remote Desktop Licensing Diagnoser tool (lsdiag.msc or Administrative Tools -> Remote Desktop Services -> RD Licensing Diagnoser). RD Licensing Diagnoster can be installed on RDSH servers using Server Manager (Features -> Remote Server Administration Tools -> Role Administration Tools -> Remote Desktop Services Tools -> Remote Desktop Licensing Diagnoser Tools).
If the RDSH server is not configured to use an RDS license server, the following warnings will appear in the Licensing Diagnoser console:
-
Licenses are not available for this Remoter Desktop Session Host server, and RD Licensing Diagnose has identified licensing problems for the RDSH.
-
Number of licenses available for clients: 0
-
The licensing mode for the Remote Desktop Session Host server is not configured.
-
Remote Desktop Session Host server is within its grace period, but the RD Session Host server has not been configured with any license server.
If you installed RDSH on the Windows Server Evaluation edition, do not forget to convert it to the full version according to the guide. Without conversion, RDSH services on such a host will only work for 120 days, even if you target it to an activated RDS license server.
If there are no warnings, and you see the message “RD Licensing Diagnoser did not identify any licensing problems for the Remote Desktop Session Host server”, then the RDSH server can successfully receive RDS CALs for remote users and/or devices.
Note. In our case, after we specified the new License Server address the following error started to appear on the RDP client: “The remote session was disconnected because there are no Remote Desktop License Servers available to provide a license”. The problem can be solved by removing the L$RTMTIMEBOMB key from the registry on the RDSH server.
Установим роли терминального сервера на Windows Server 2016 и лицензируем.
- Подготовка Windows Server 2016.
- Установка роли терминального сервера.
- Лицензирование терминального сервера.
Ссылки
ESXi 6.7 — установка Windows Server 2016 на виртуальную машину
Подготовка Windows Server 2016
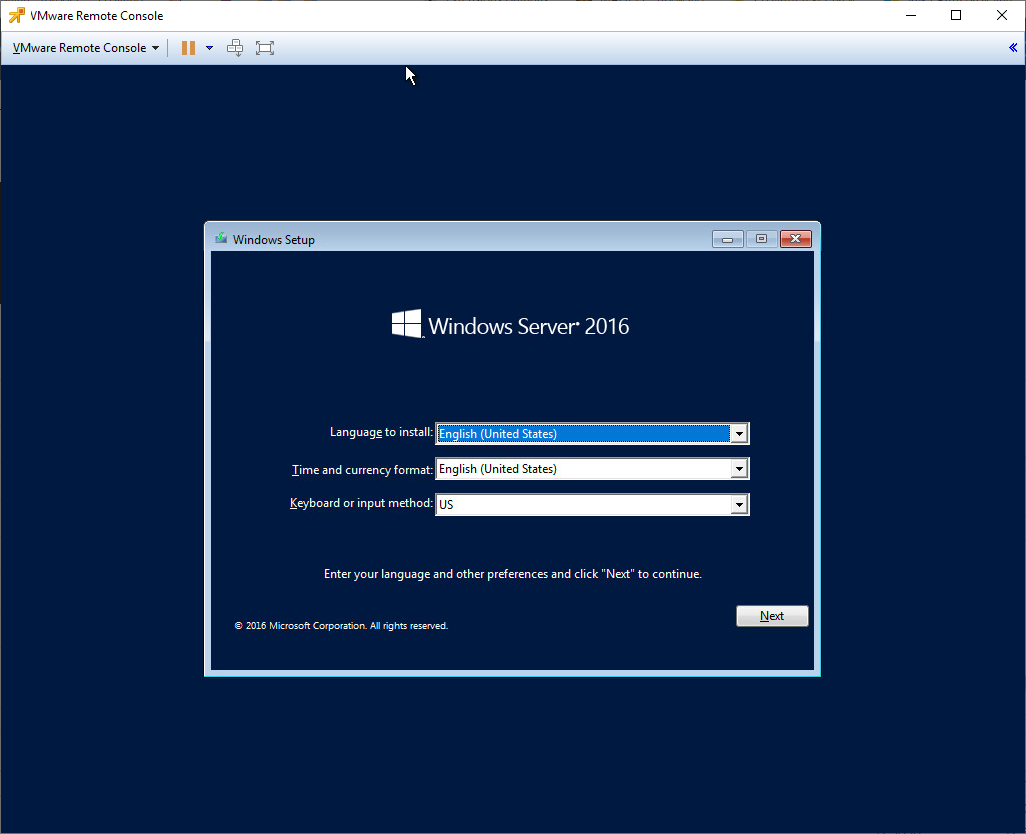
Сервер разворачиваю на базе виртуальной машины VMware. Устанавливаем ОС:
Ссылка на инструкцию по установке ОС приведена выше. ОС установлена.
Не забываем установить VMware Tools.
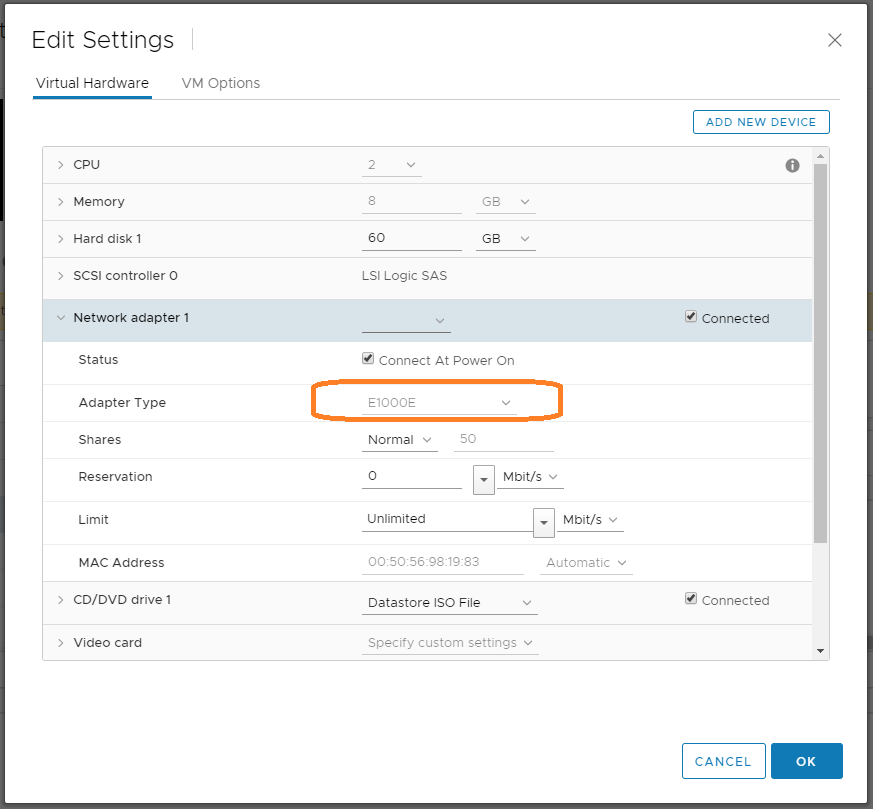
Тип сетевухи E1000E нежелателен.
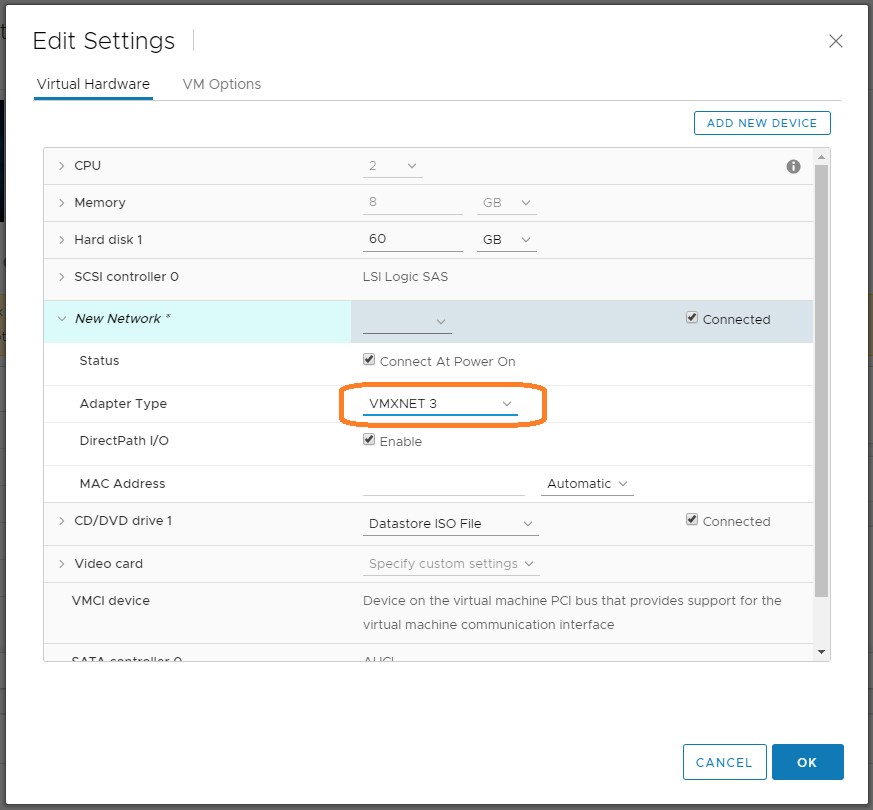
Меняем его на VMXNET 3.
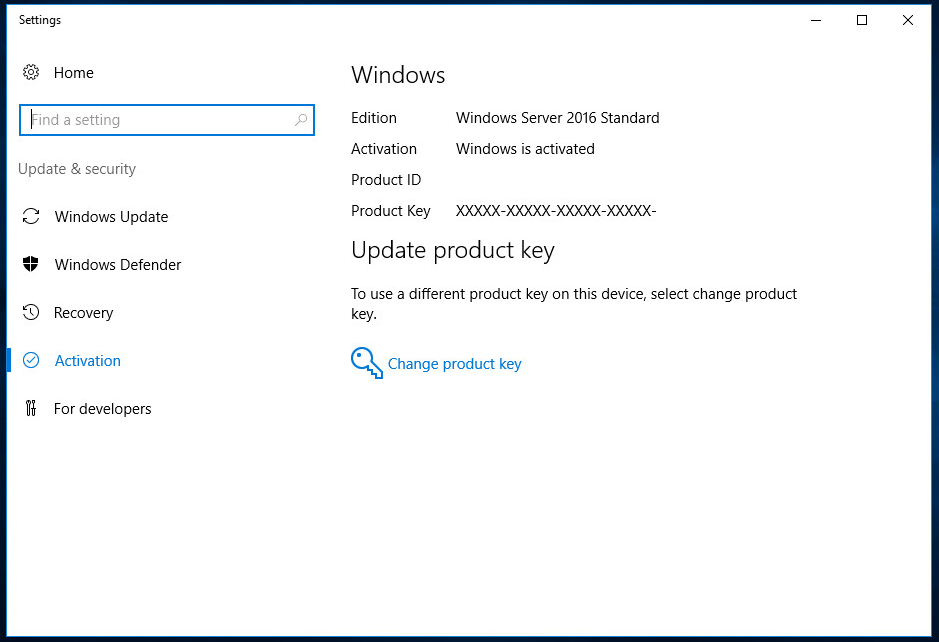
Активируем Windows Server 2016.
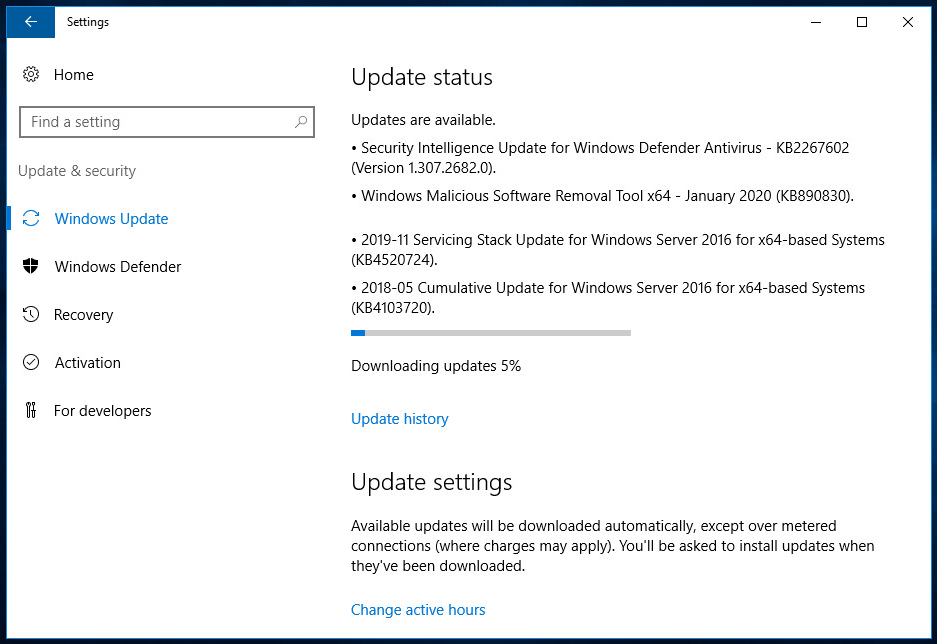
Устанавливаем обновления.
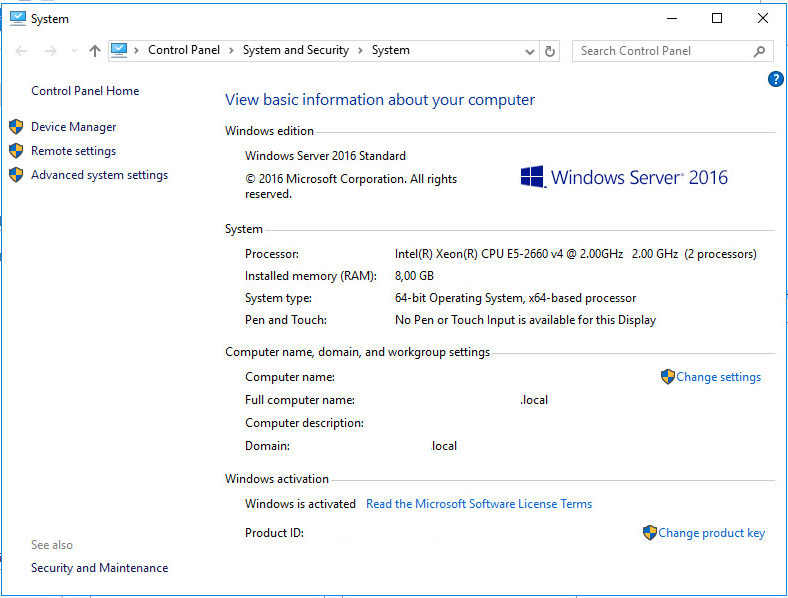
Моя конфигурация:
- 8 Гб ОЗУ
- 2 CPU
Установка роли терминального сервера
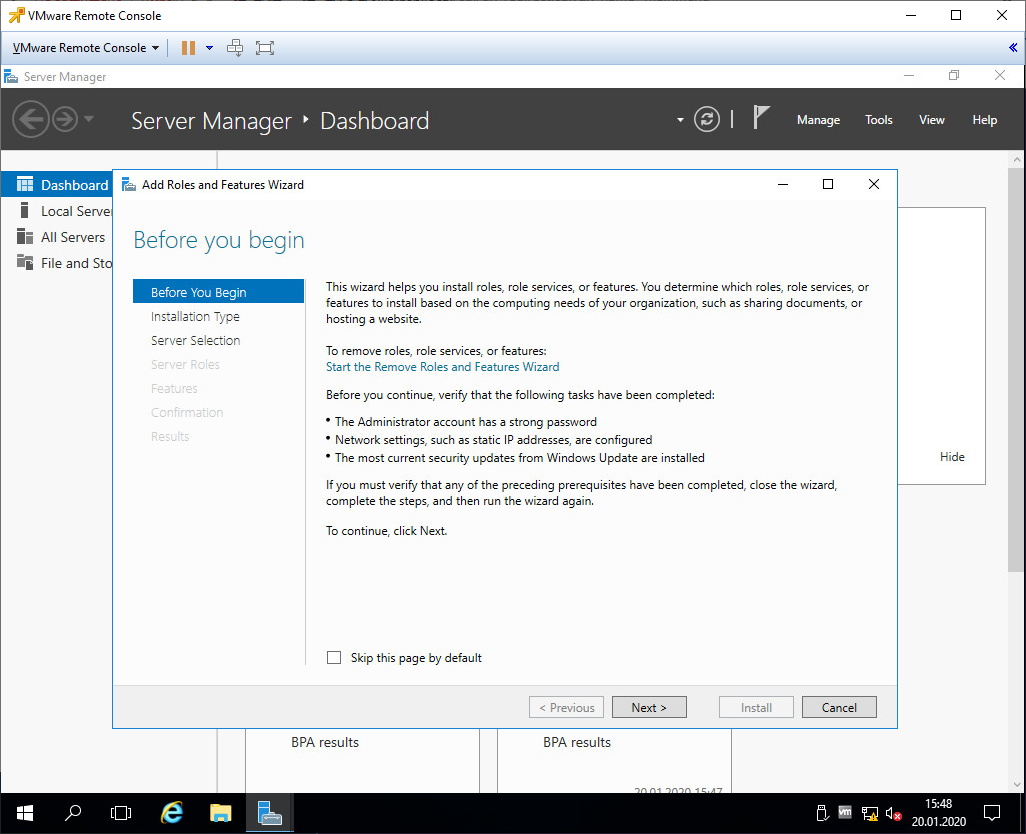
Входим в Server Manager. Справа вверху выбираем Manage > Add Roles and Features.
Before You Begin пропускаем. Next.
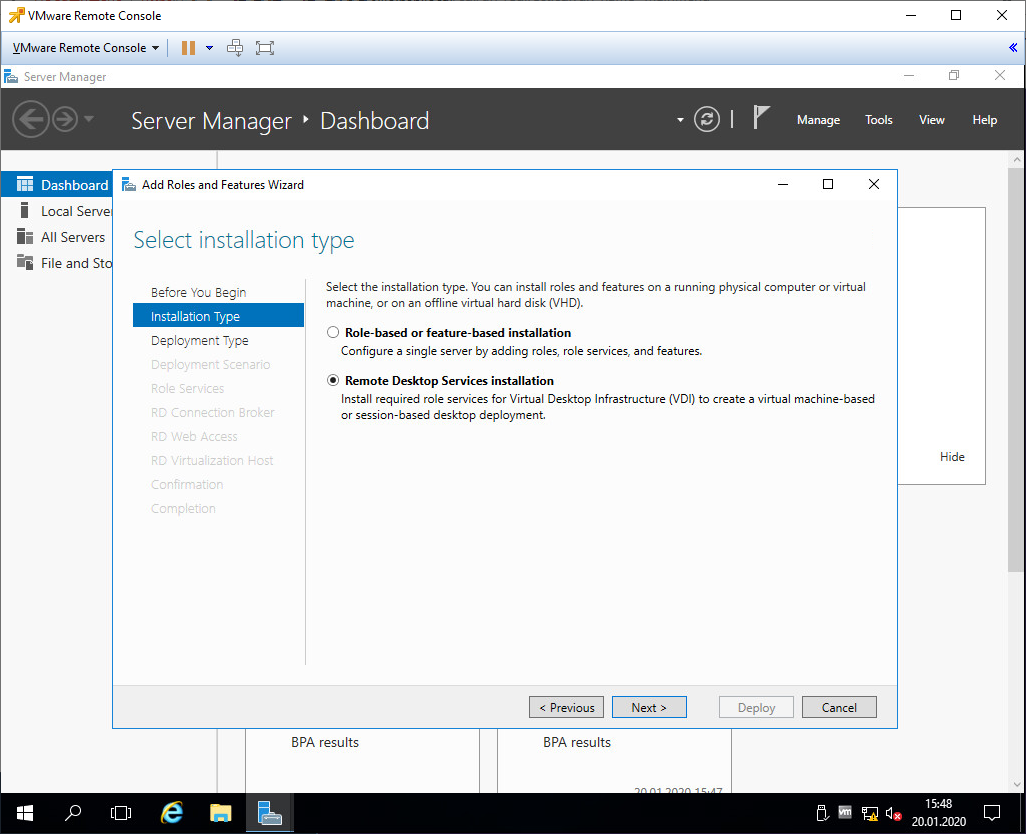
Installation Type. Для установки сервиса удаленных рабочих столов предусмотрен специальный мастер Remote Desktop Services installation, выбираем его, Next.
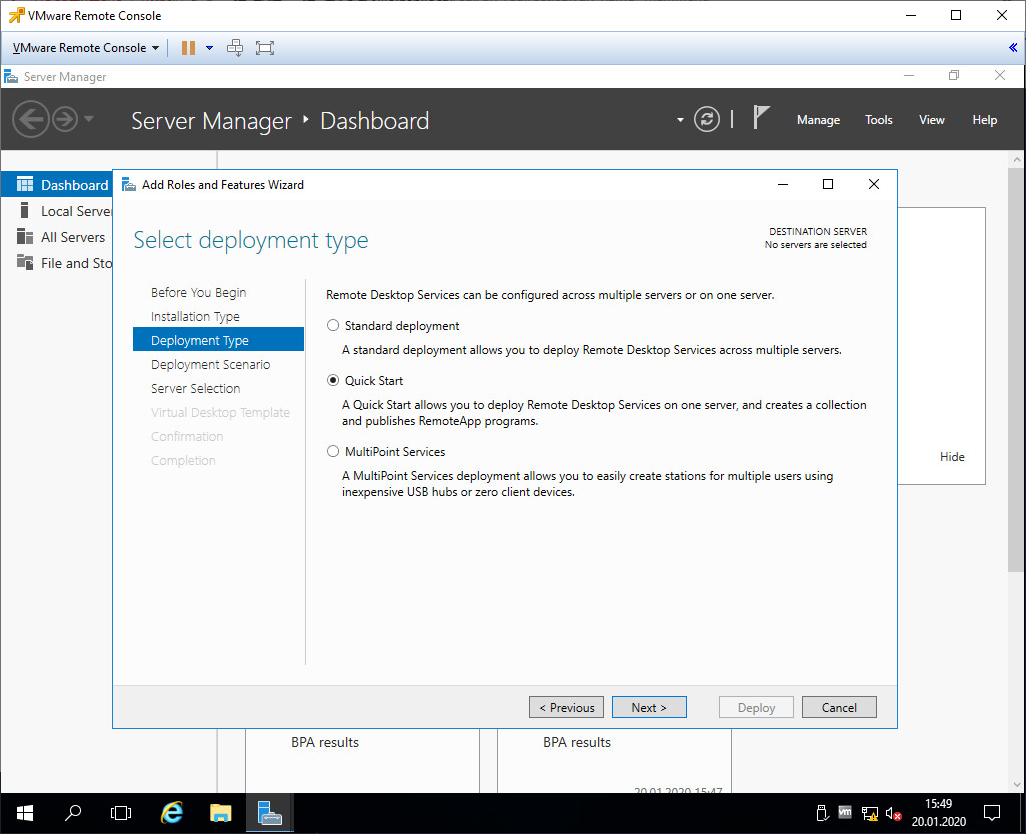
Deployment Type. Для одного сервера, выбираем Quick Start. Next.
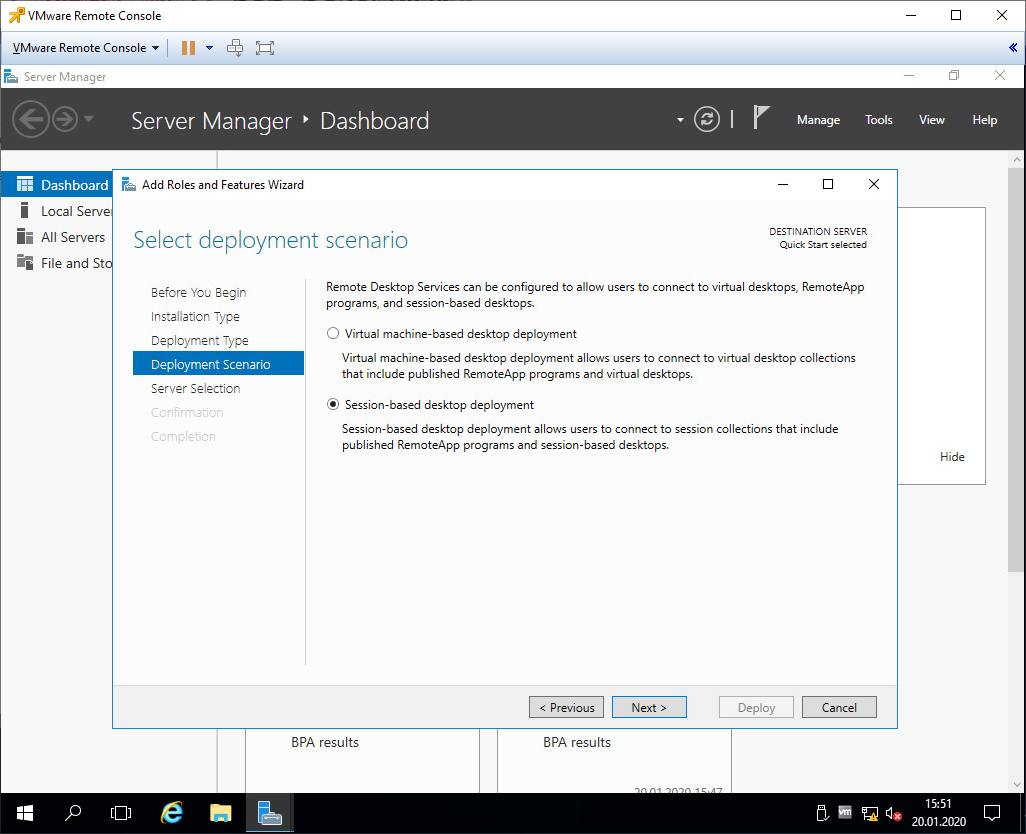
Deployment Scenario. Наши пользователи будут подключаться к серверу (собственным сессиям на сервере), а не к собственным виртуальным машинам. Выбираем Session-based desktop deployment. Next.
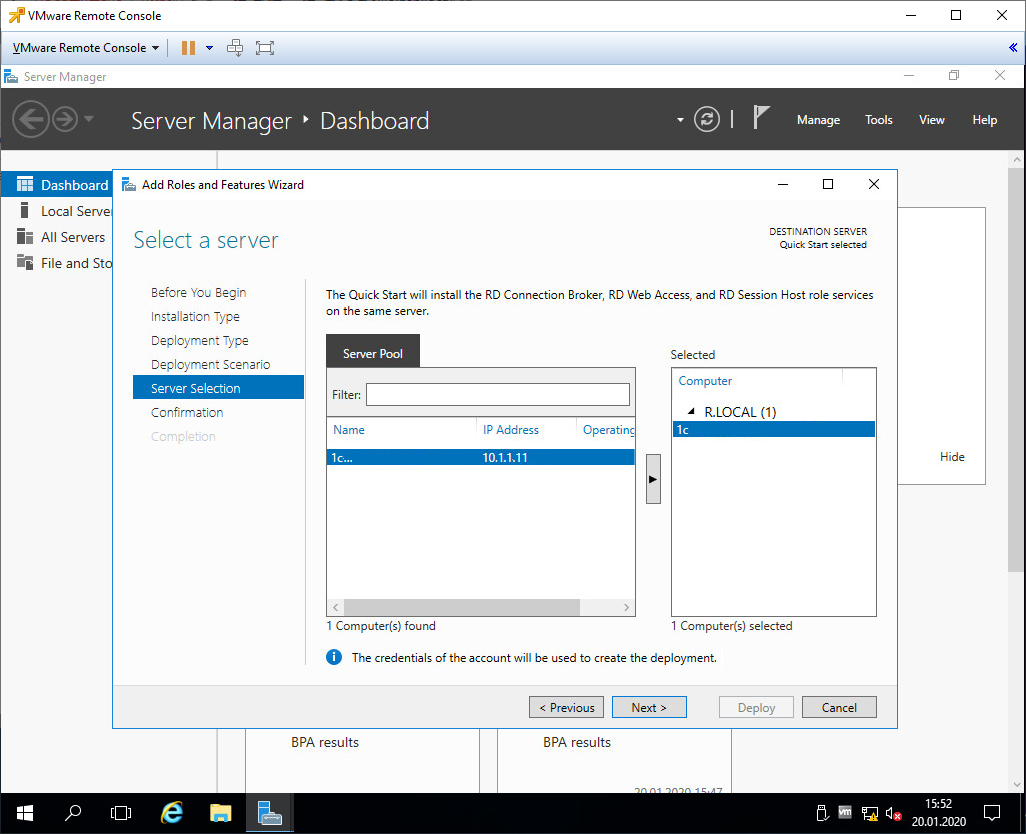
Server Selection. Выбираем текущий сервер. Next.
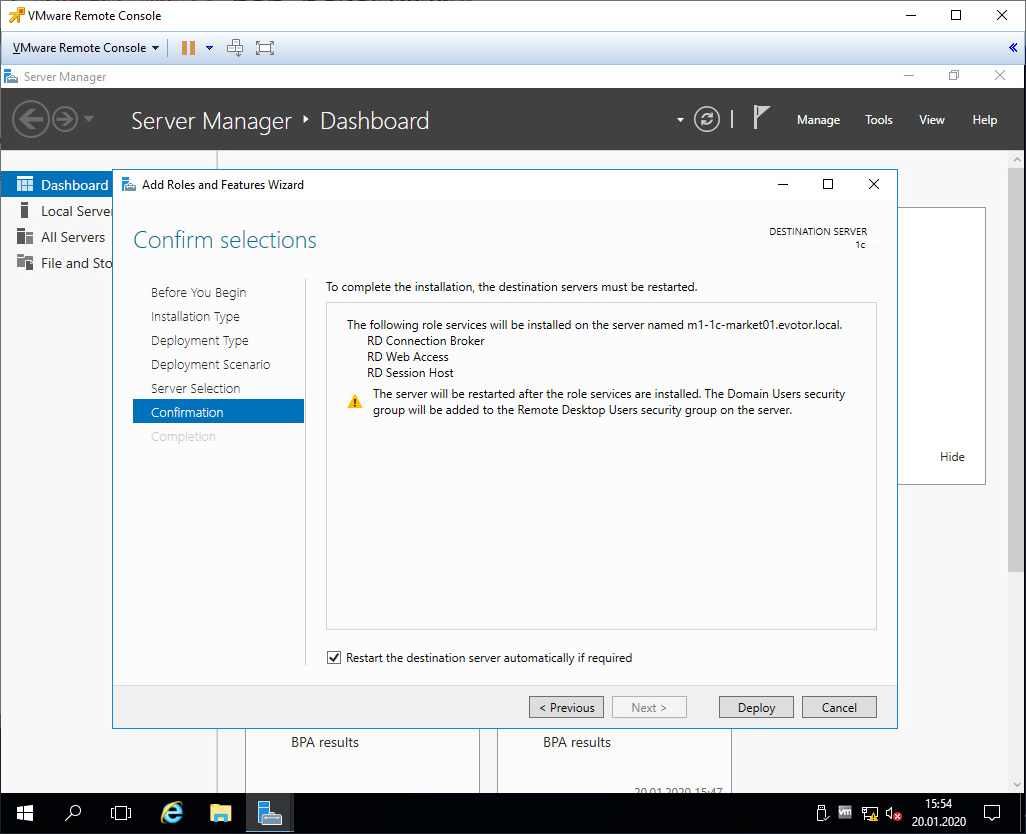
На наш сервер будут добавлены следующие серверные роли:
- RD Connection Broker — контроль подключений пользователей, определяет для какого пользователя на каком сервере будет открыта сессия или запущено приложение.
- Web Access — доступ к приложениям через веб браузер.
- RD session Host — сервер, на котором будут опубликованы приложения и на который пользователи смогут подключаться через удаленный рабочий стол.
Позже мы добавим на сервер ещё одну роль:
- RD Licensing — сервер лицензий.
Установим галку, чтобы сервер при необходимости перезагружался. Deploy.
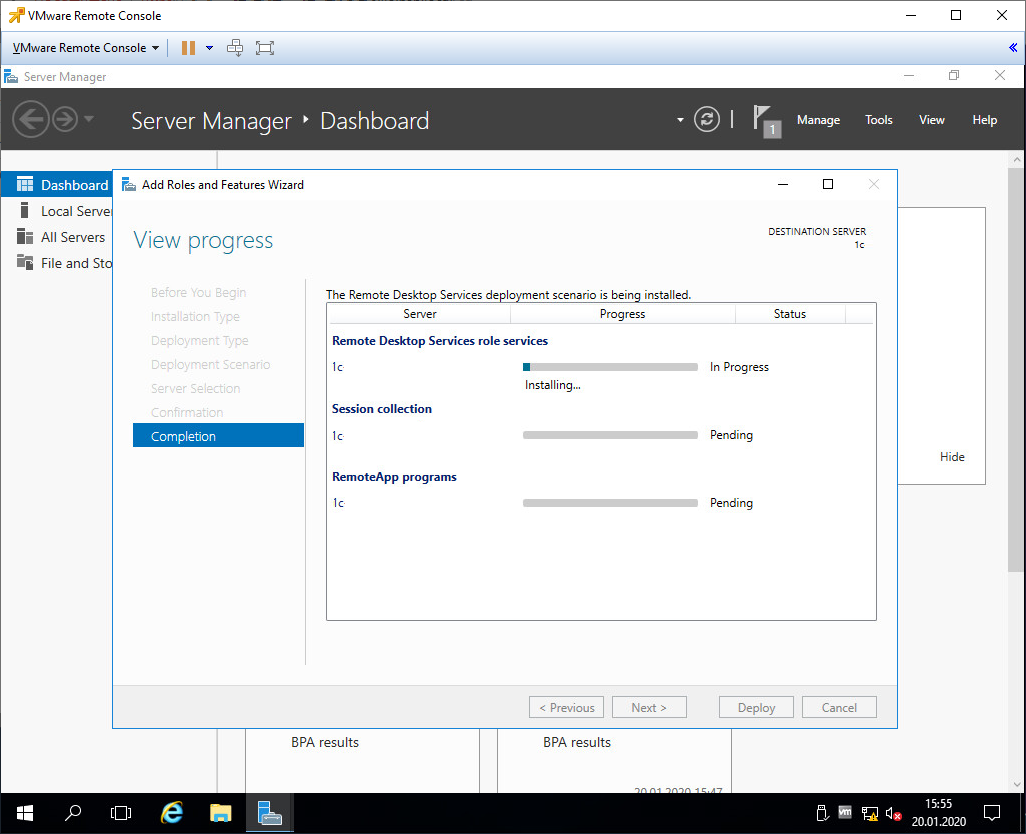
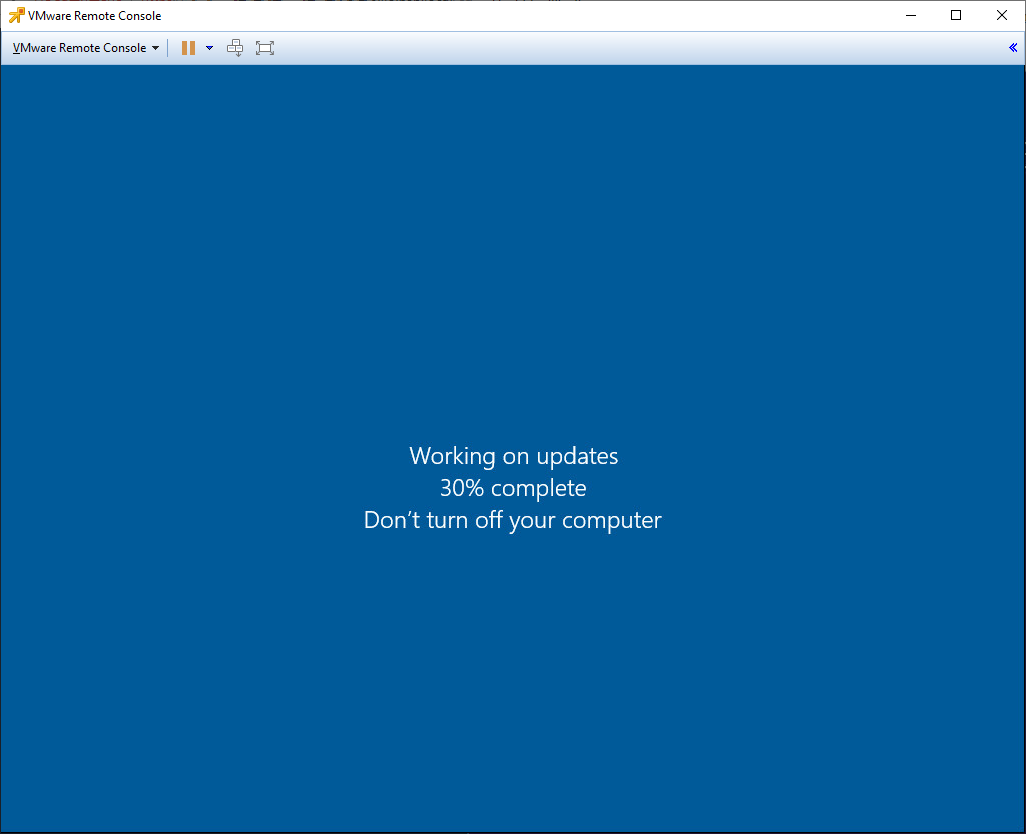
Начинается автоматическая установка ролей. Сервер перезагружается.
Даже какие-то обновления подтянулись.
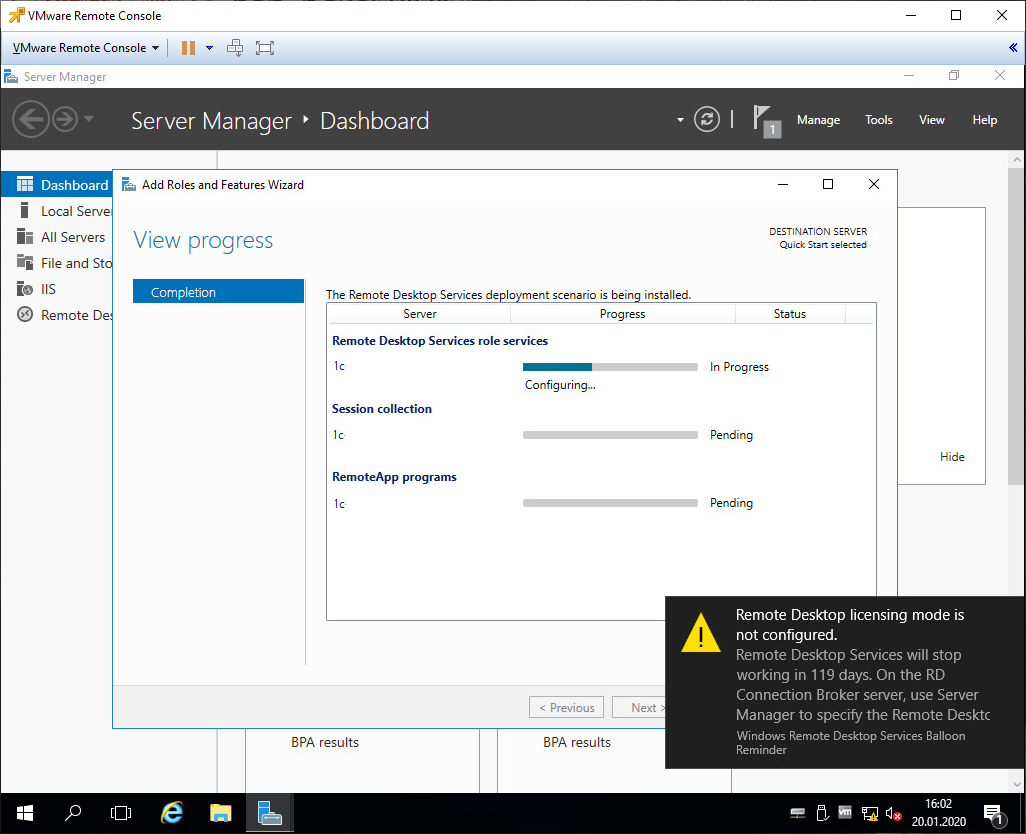
После перезагрузки и установки первой роли включается триальный период работы терминального сервера 120 дней.
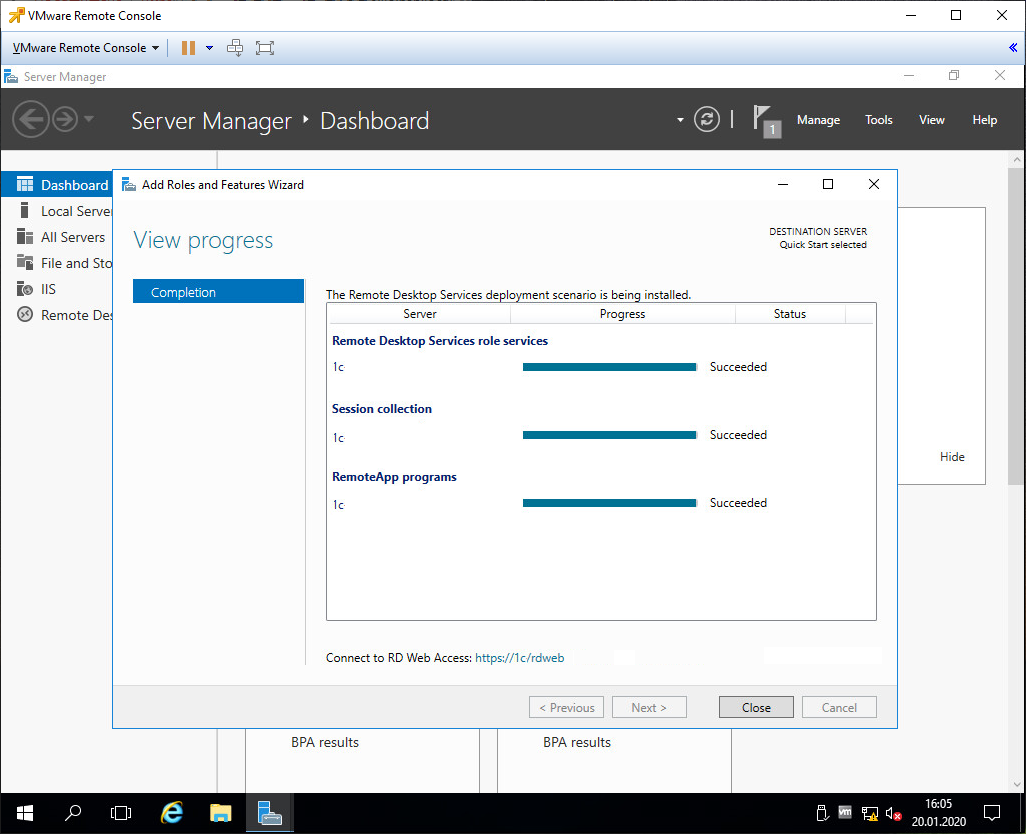
Первые три роли установлены. Close.
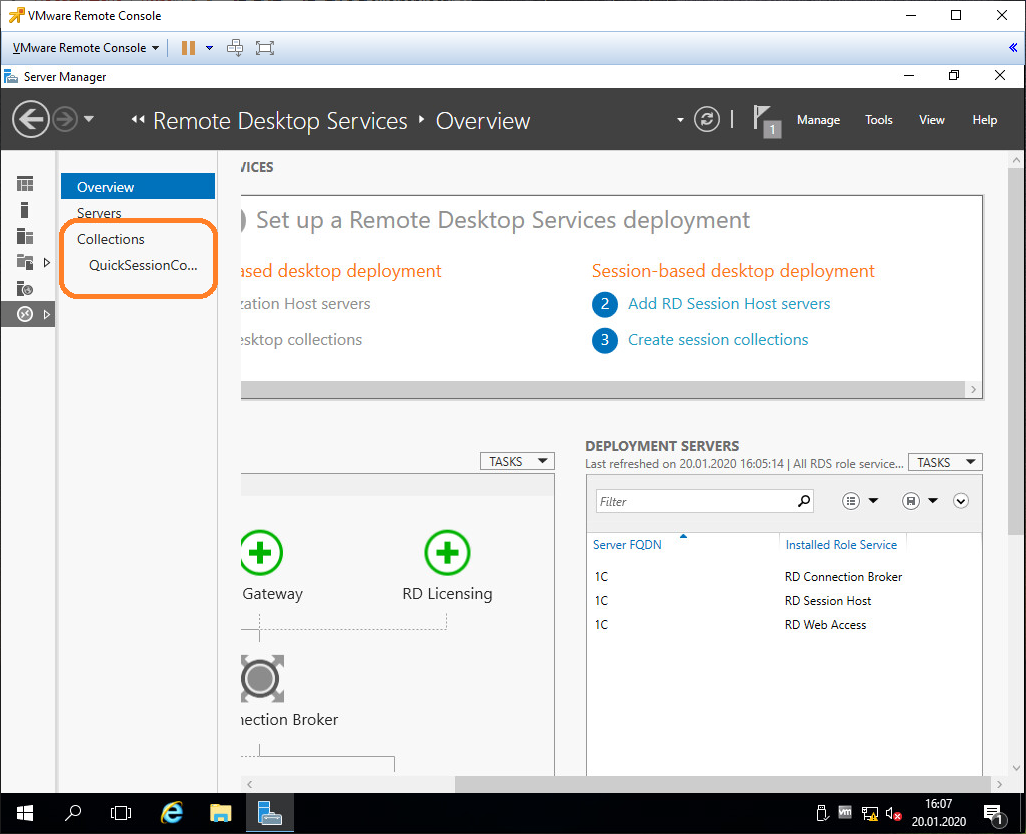
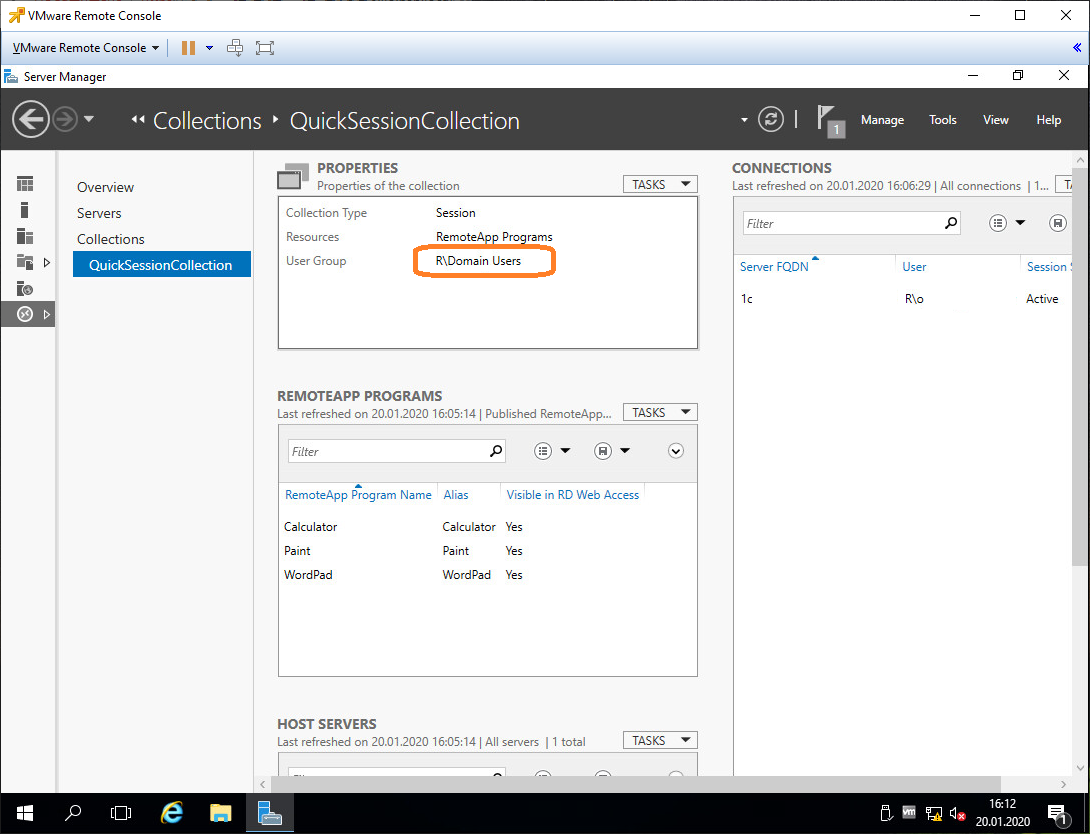
Выбираем QuickSessionCollection, проверяем, что пользователям дан доступ к терминальному серверу. При необходимости можно создать свою коллекцию.
По умолчанию в группе все доменные пользователи.
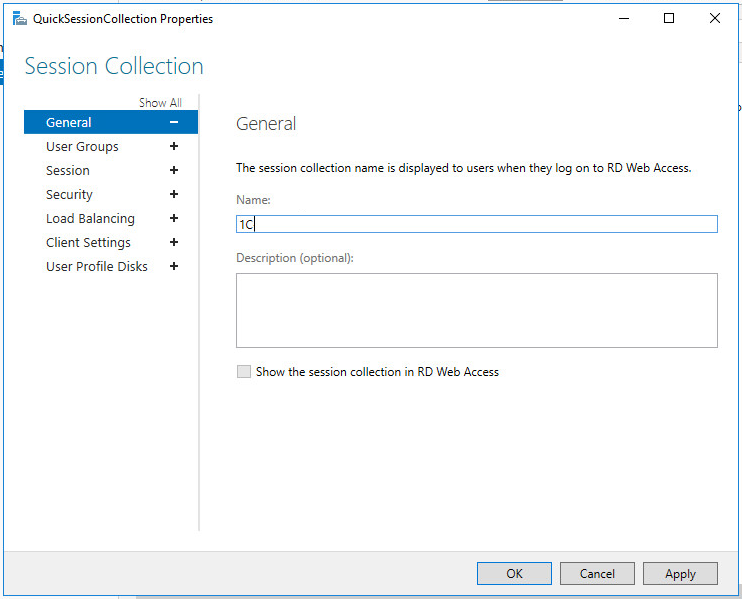
Редактирую, даю доступ нужной группе пользователей и переименовываю коллекцию.
Перезагружаемся и переходим к лицензированию.
Лицензирование терминального сервера
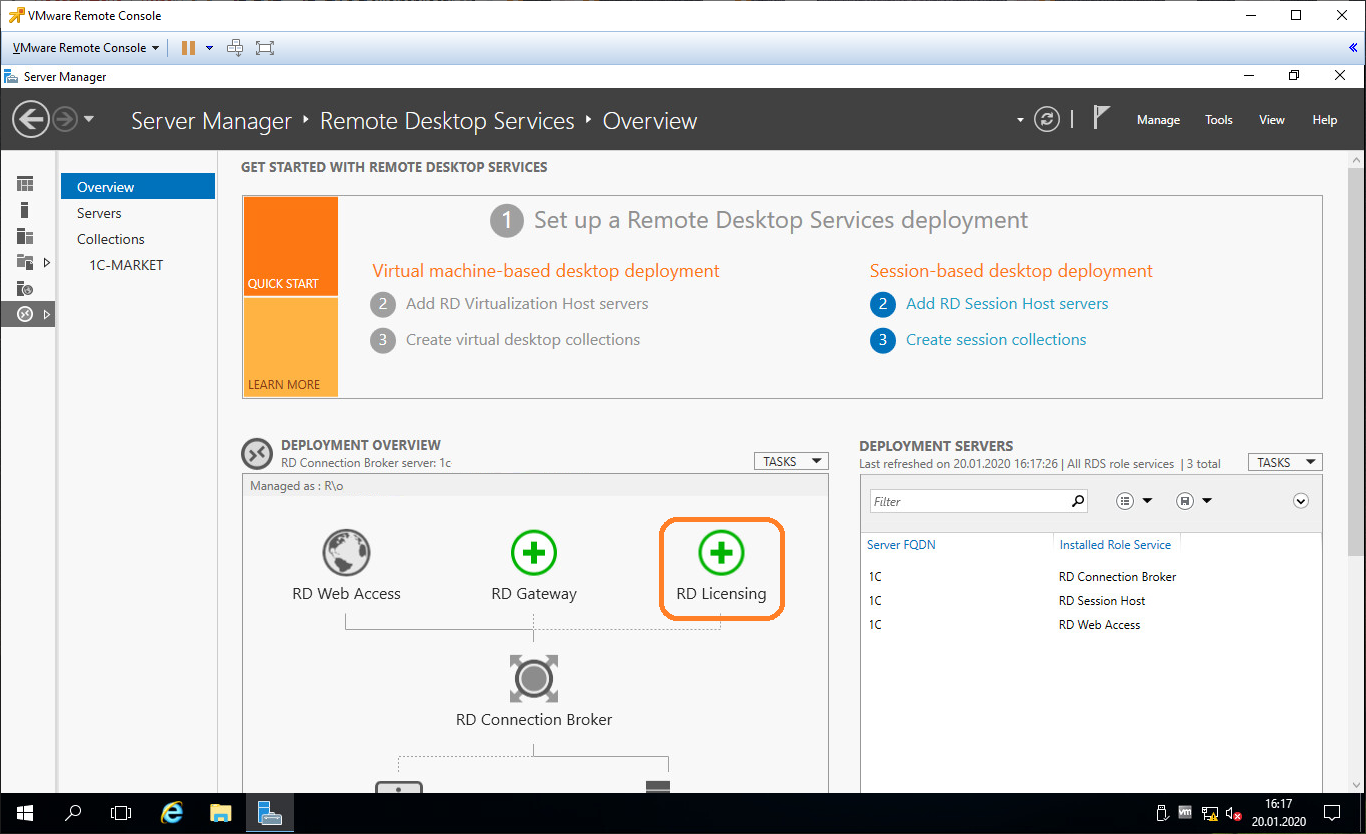
Устанавливаем RD Licensing сервис, нажав на зелёный плюсик.
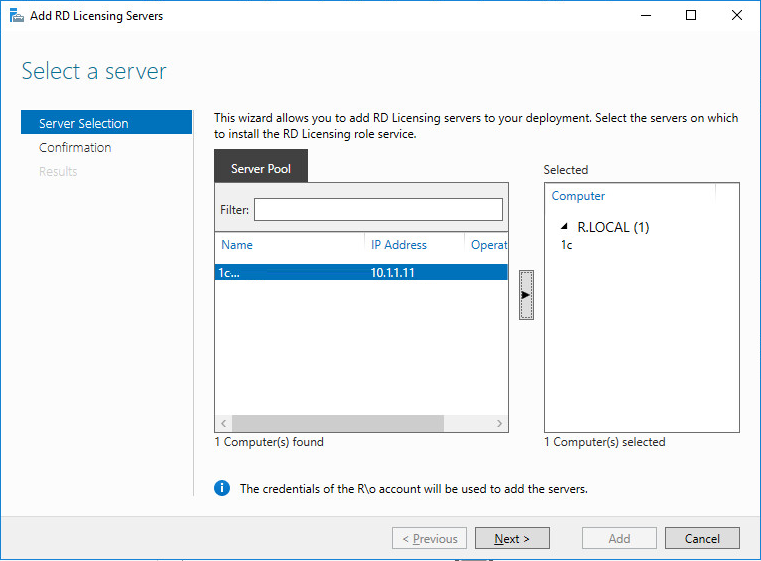
Следуем инструкциям, сложностей не должно быть.
Выбираем текущий сервер, Next.
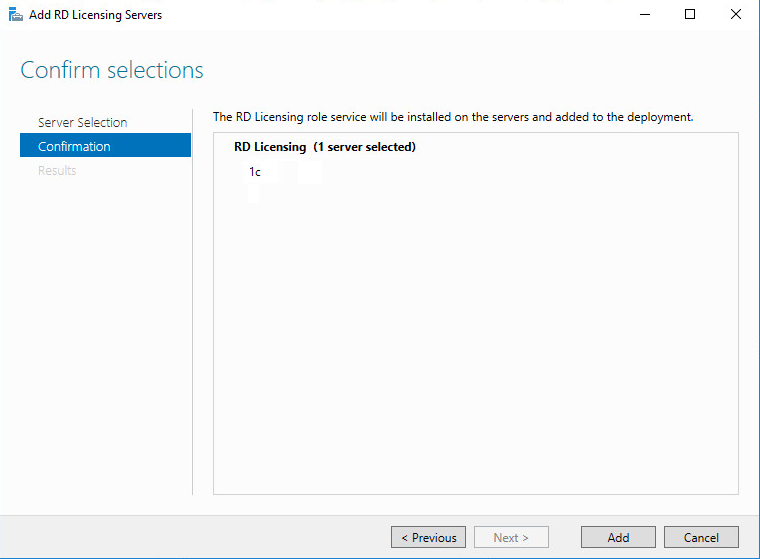
Add.
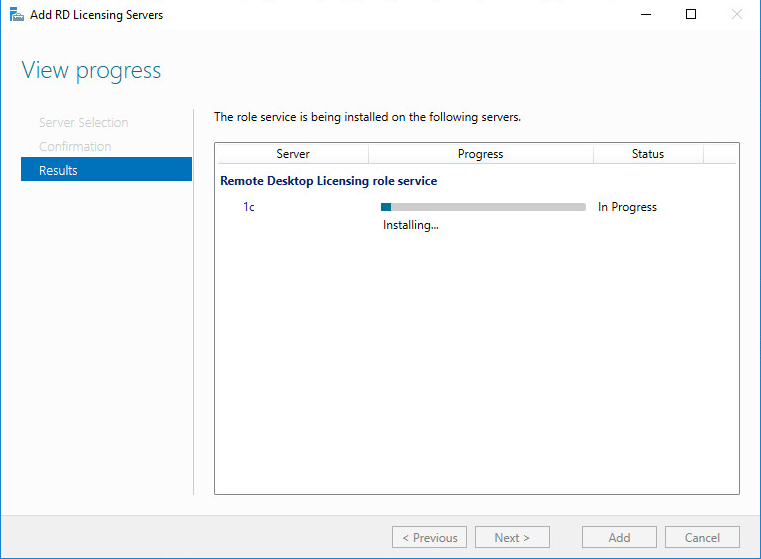
Начинается установка роли RD Licensing.
Установка роли RD Licensing успешно завершена. На всякий случай перезагружаю сервер.
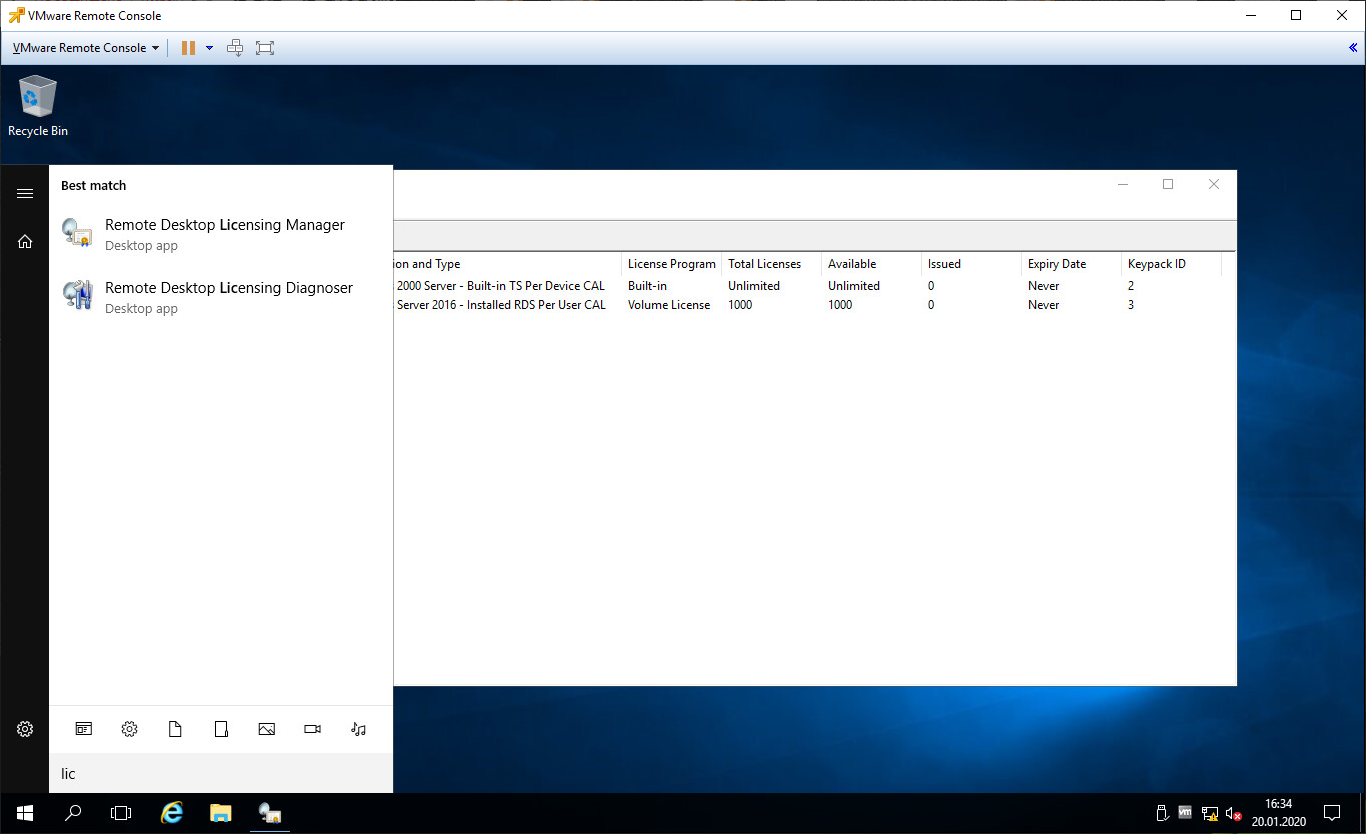
Запускаем Диспетчер лицензирования удалённых рабочих столов (Remote Desktop Licensing Manager).
Выбираем наш сервер, правой кнопкой — активировать.
Открывается окно активации.
Жмем Next на первой странице мастера.
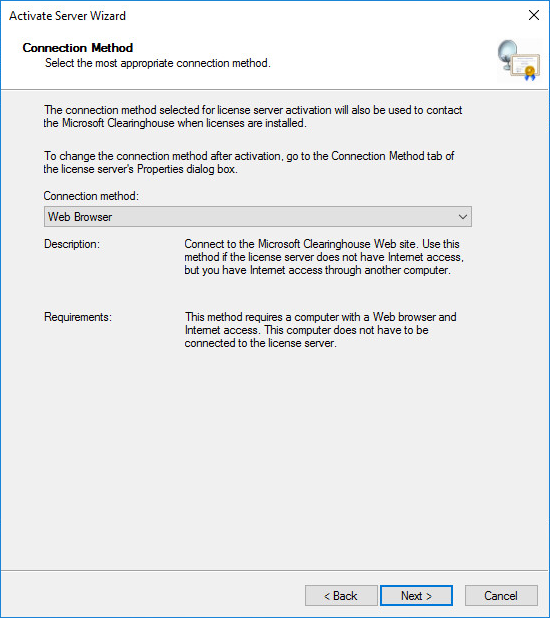
Выбираем метод соединения Web Browser. Next.
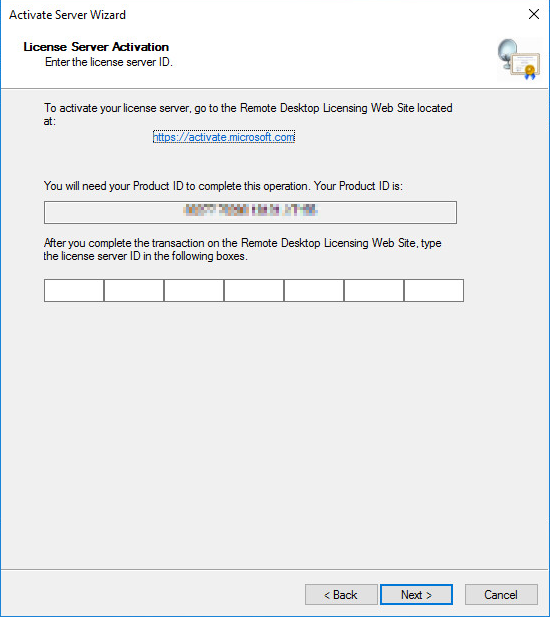
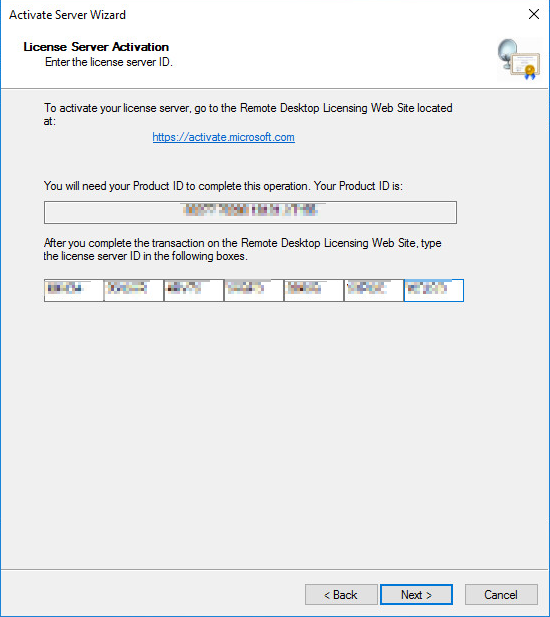
Получаем код продукта который нам понадобится для активации (Product ID).
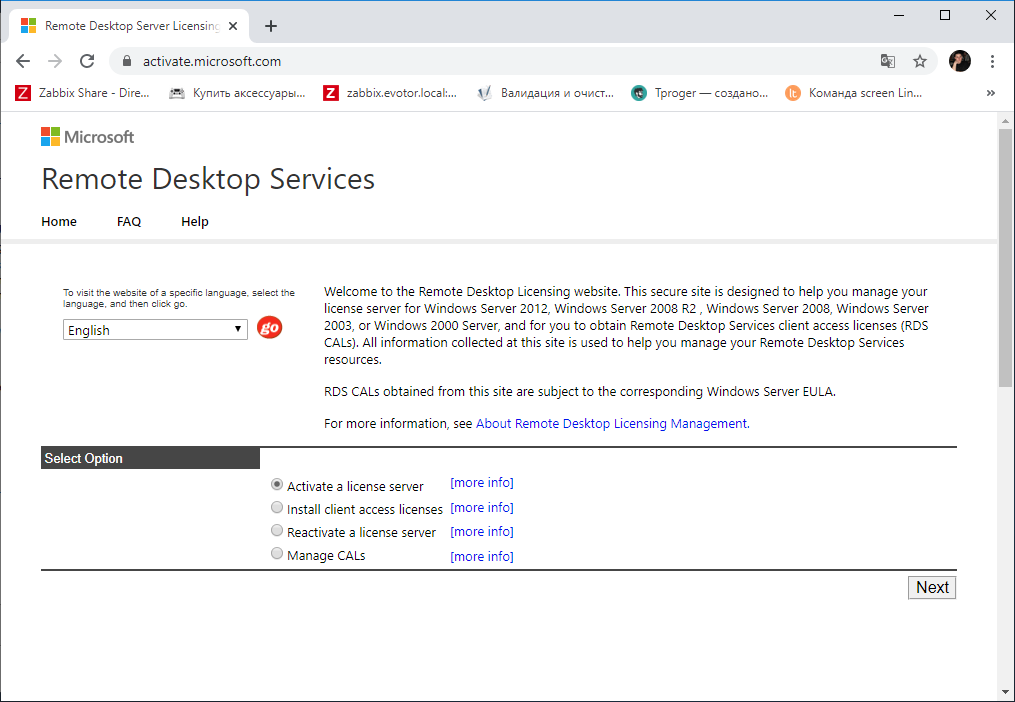
В браузере открываем сайт https://activate.microsoft.com/
Выбираем «Activate a license server». Next.
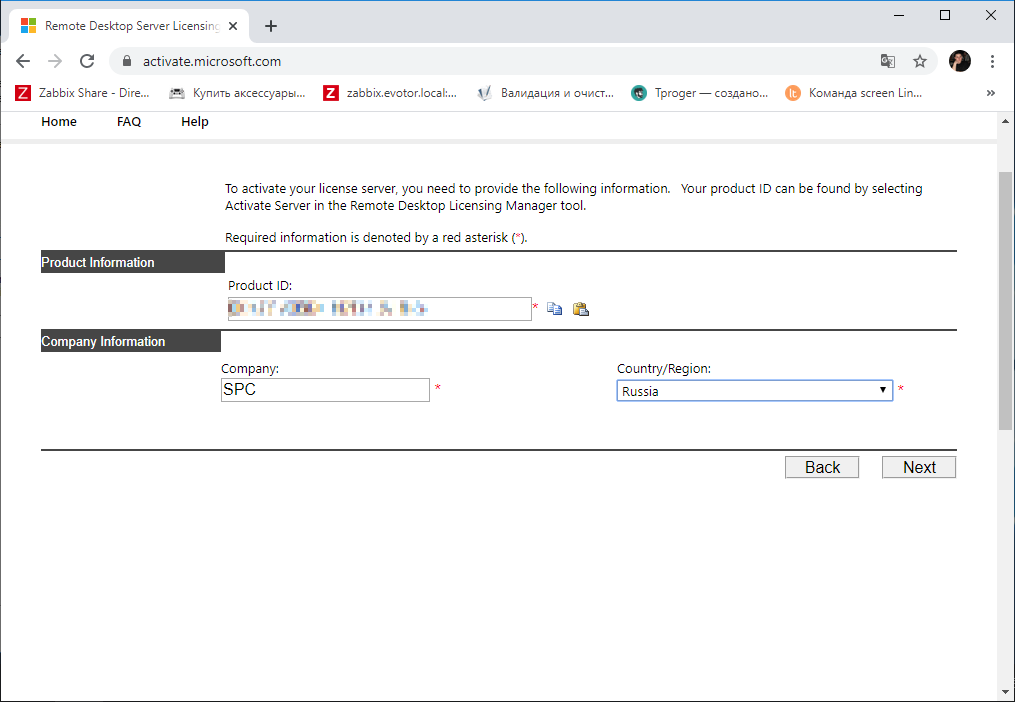
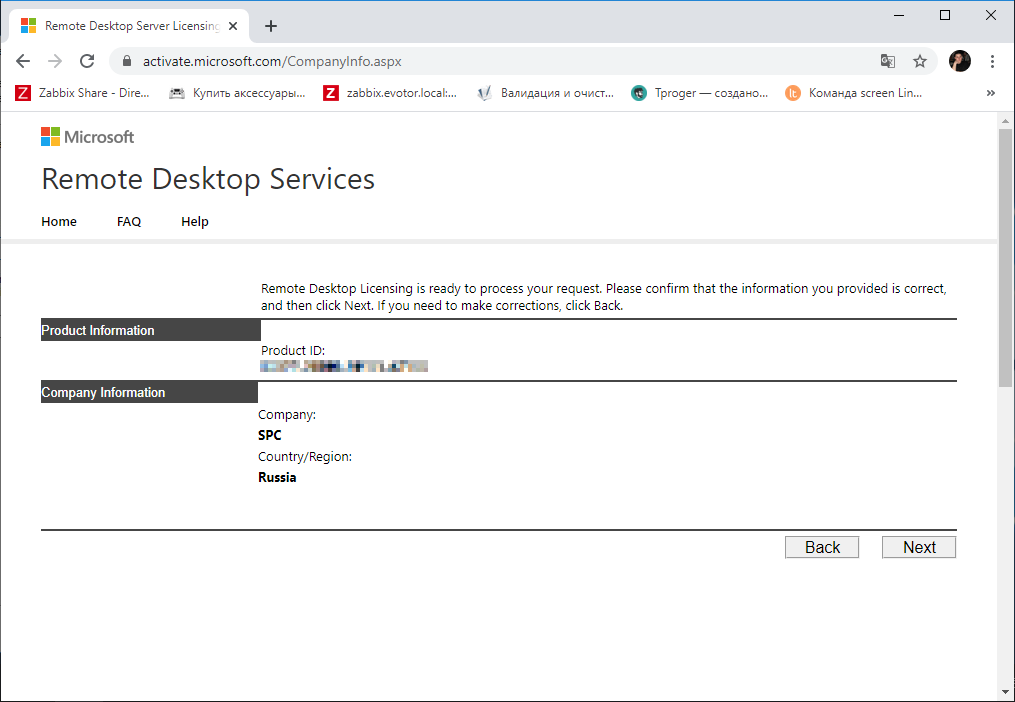
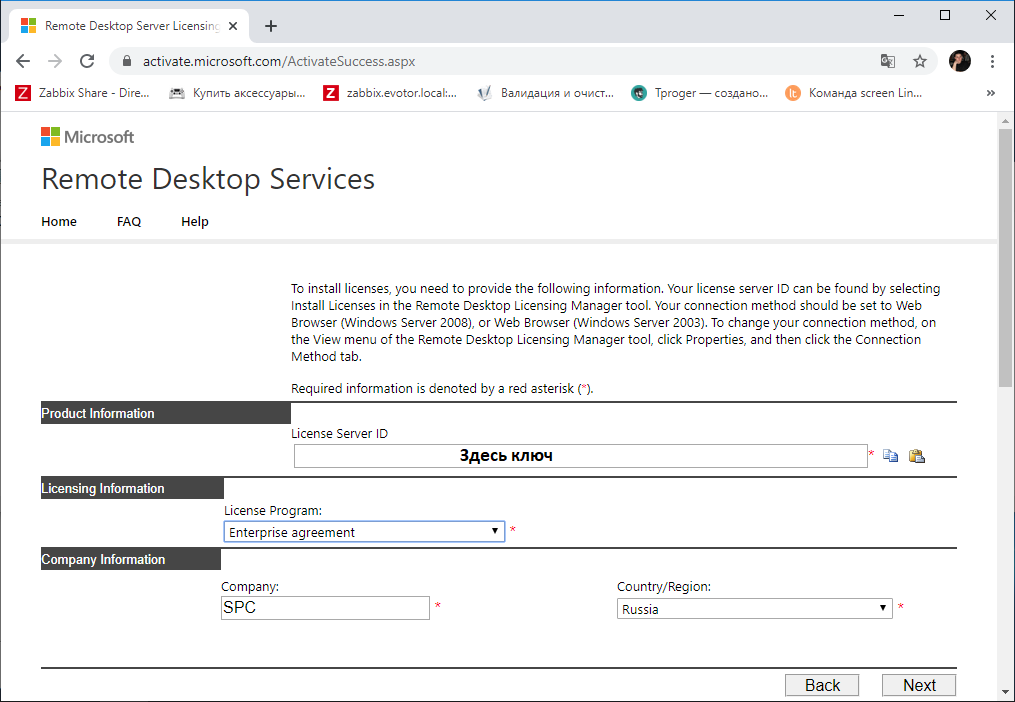
Вводим Product ID полученный ранее, организацию и любую страну или регион. Next.
Next.
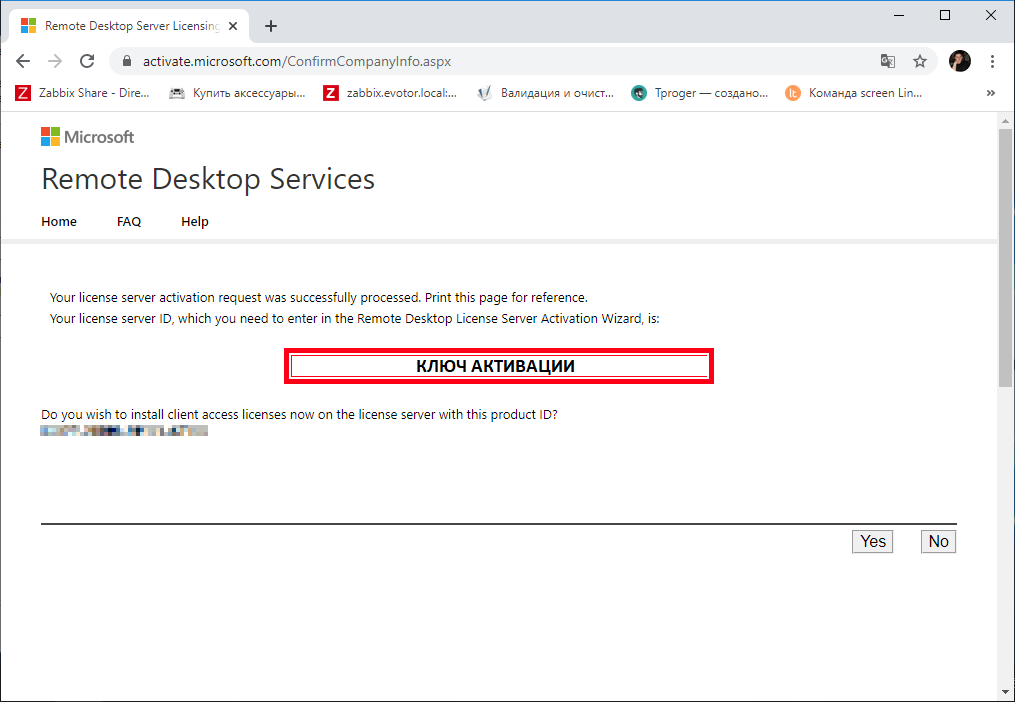
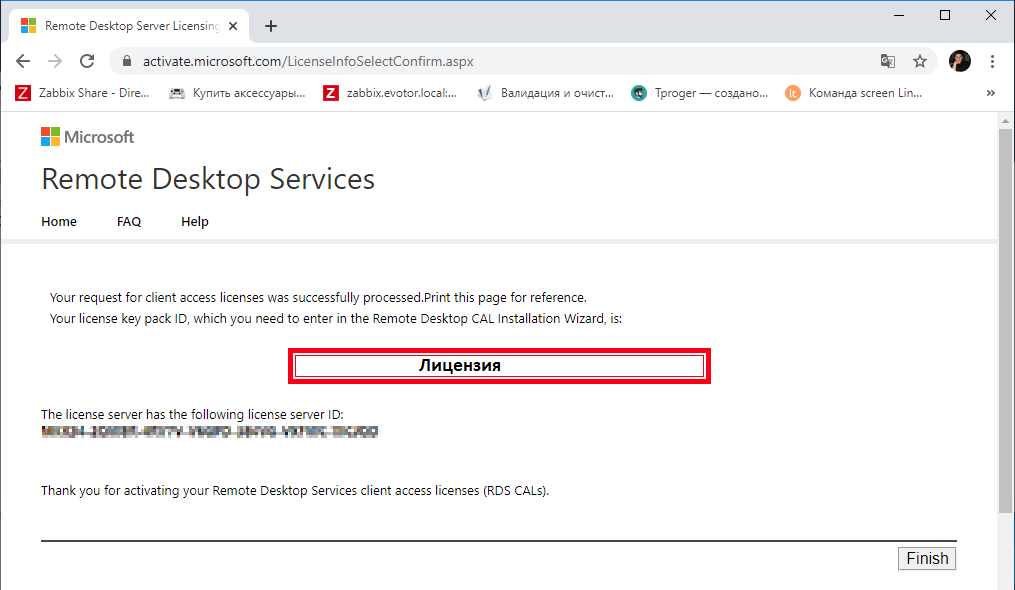
Если все сделано правильно, то мы получим необходимый код сервера лицензирования. На вопрос «Do you wish to install client access licenses now on the license server with this product ID?» отвечаем «Yes» и пока возвращаемся к терминальному серверу, к текущему окну ещё вернёмся.
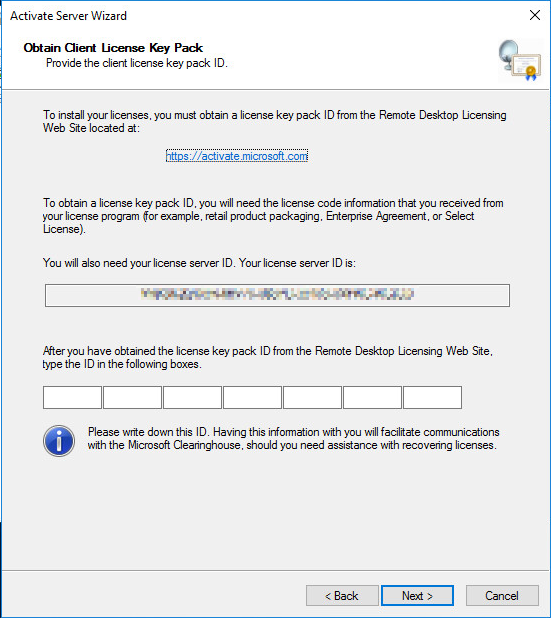
Вводим код в открытом мастере, жмём Next.
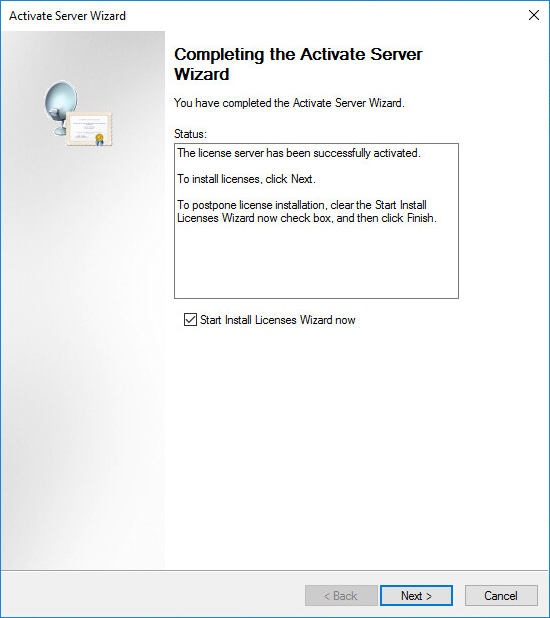
Устанавливаем галку «Start Install Licenses Wizard now». Next.
Открывается мастер установки лицензий. Next.
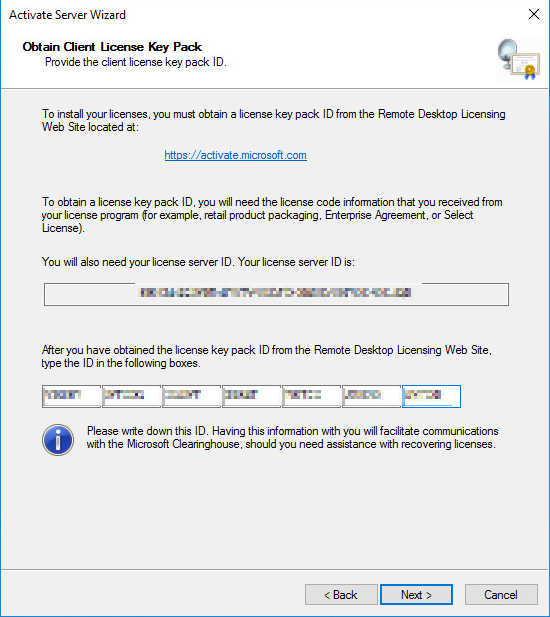
Нас просят ввести license key pack ID. Возвращаемся к браузеру.
Вставляем License Server ID, в качестве программы лицензирования, по идее он уже должен сюда переместиться из предыдущего окна. License Program выбираем Enterprise agreement. Указываем компанию и страну. Next.
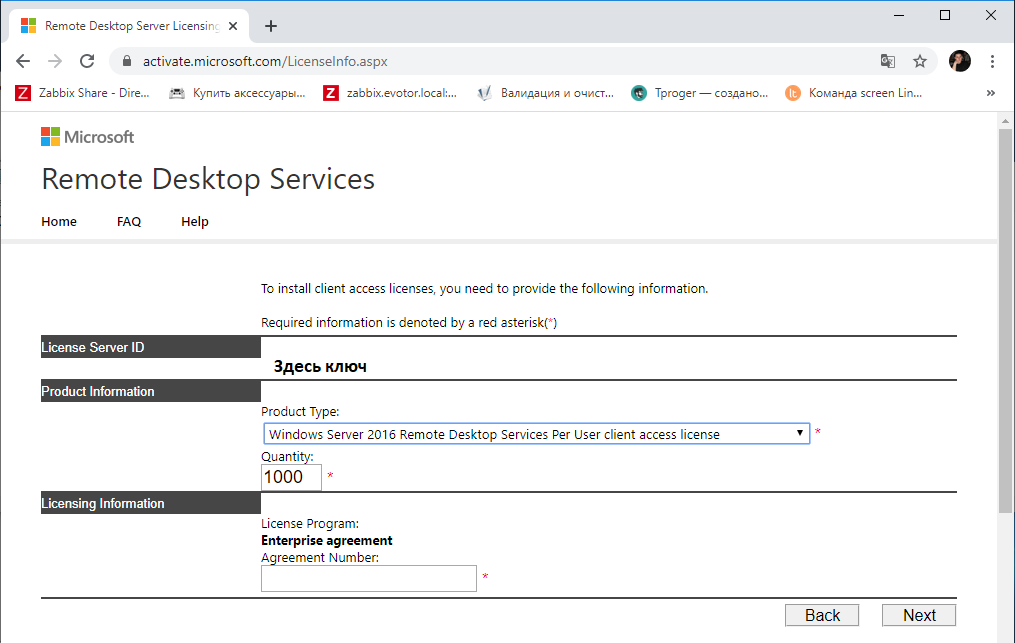
Выбираем тип продукта: Windows Server 2016 Remote Desktop Services Per User client access license. Указываем количество лицензий. Обязательно соглашение Enterprise agreement, один из данных номеров ищем в Интернете… Next.
Ну вот мы и получили нужные нам клиентские лицензии.
Копируем ключ и вводим его в мастер. Next.
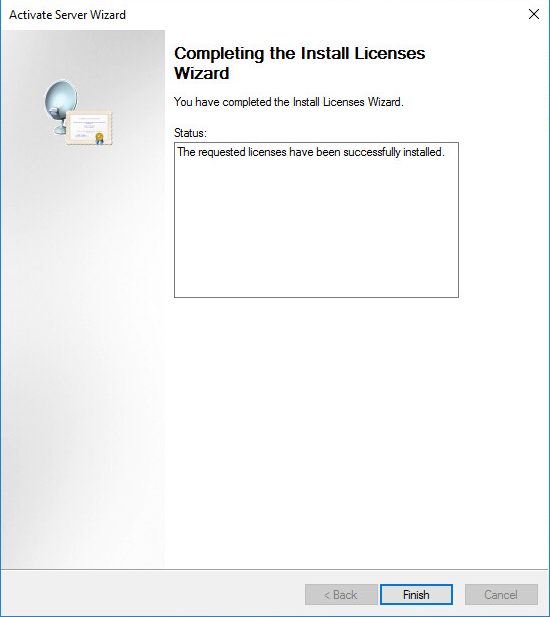
Finish.
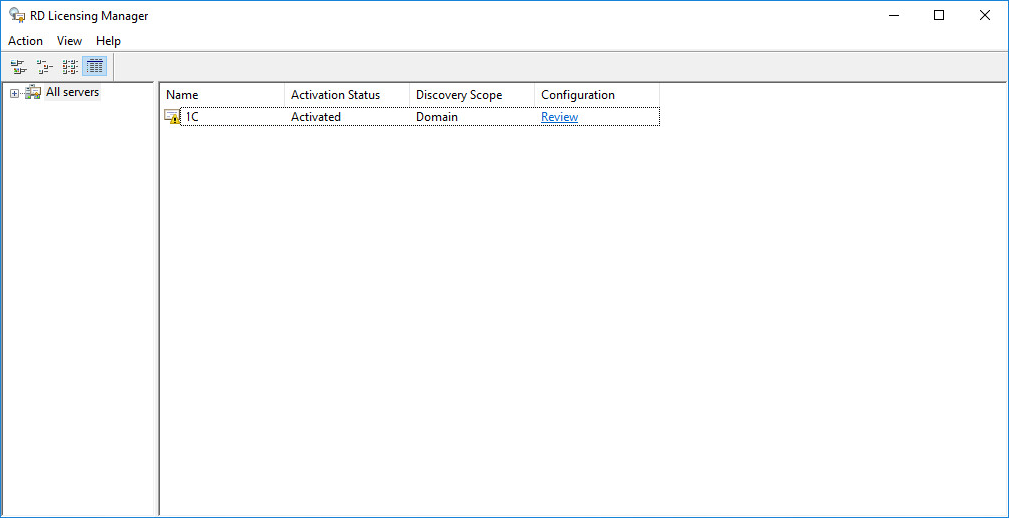
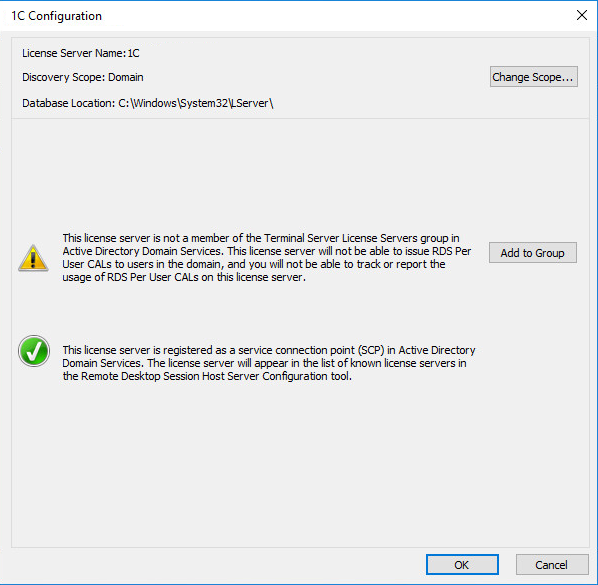
Возвращаемся к Remote Desktop Licensing Manager. Сервер активирован. Лицензии получились, но сервер светится желтым:
Сервер не является членом группы терминальных серверов в Active Directory. Нажмём Add to Grоup.
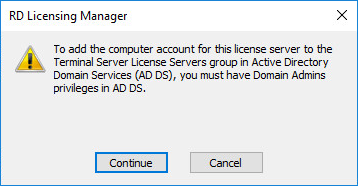
Continue.
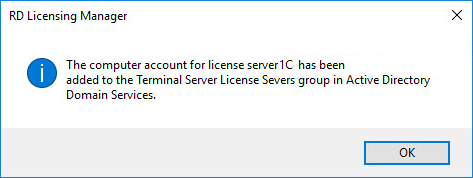
Сервер добавлен в группу терминальных серверов в Active Directory.
OK.
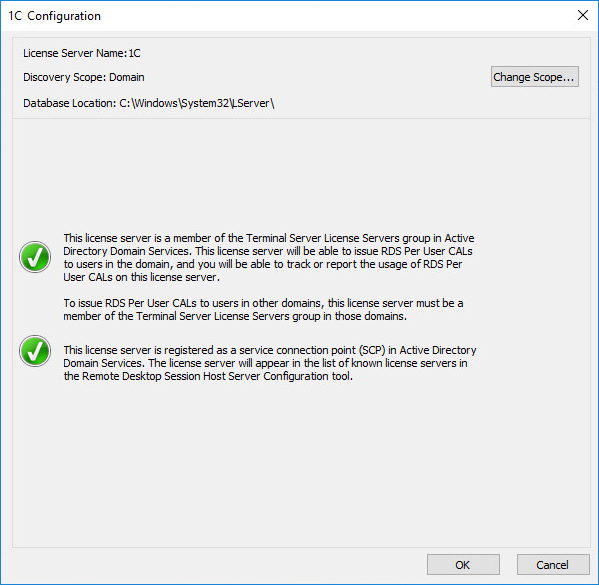
Сервер лицензий позеленел, на первый взгляд всё в порядке.
Запускаем Remote Desktop Licensing Diagnoser.
Видим ошибку.
The licensing mode for Remote Desktop Session Host server is not configured.
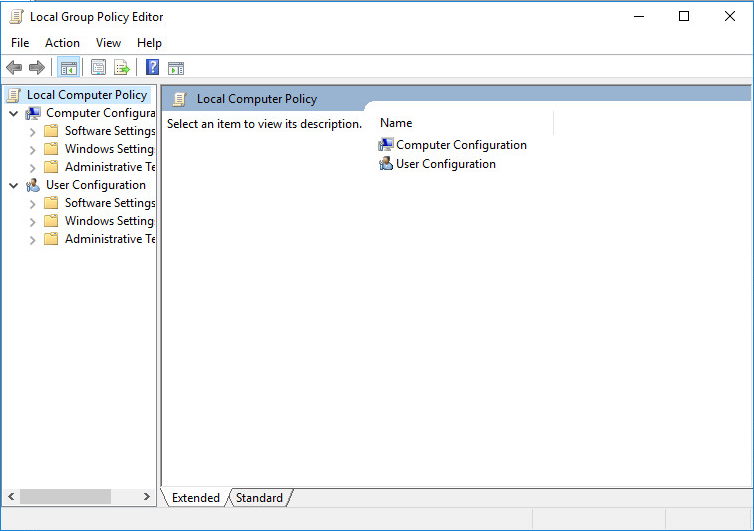
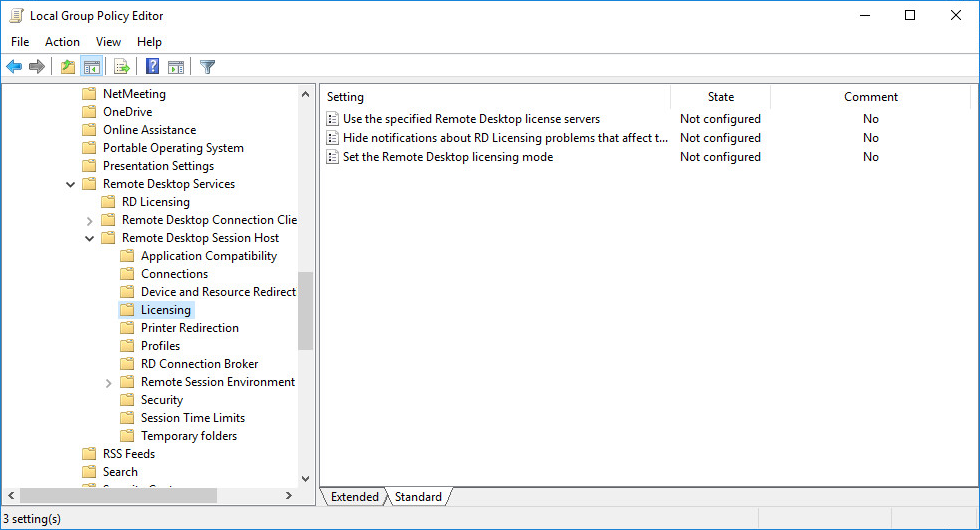
Выполняем gpedit.msc.
gpedit.mscОткроется Local Group Policy Editor.
Раскрываем Computer Configuration > Administrative Templates > Windows Components > Remote Desktop Services > Remote Desktop Session Host > Licensing.
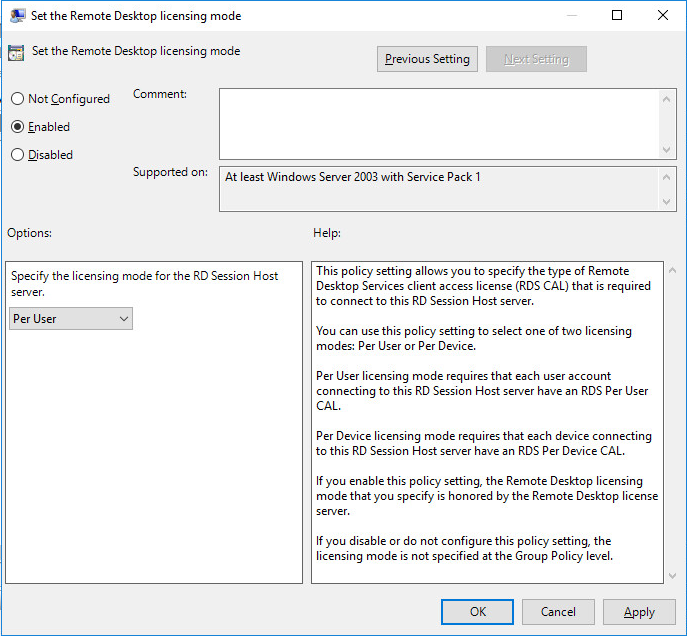
Редактируем Set the Remote Desktop licensing mode.
Включаем — Enabled. В поле «Specify the licensing mode for the RD Session Host server» устанавливаем значение Per Device или Per User в зависимости от установленных вами лицензий. В моём случае Per User. OK.
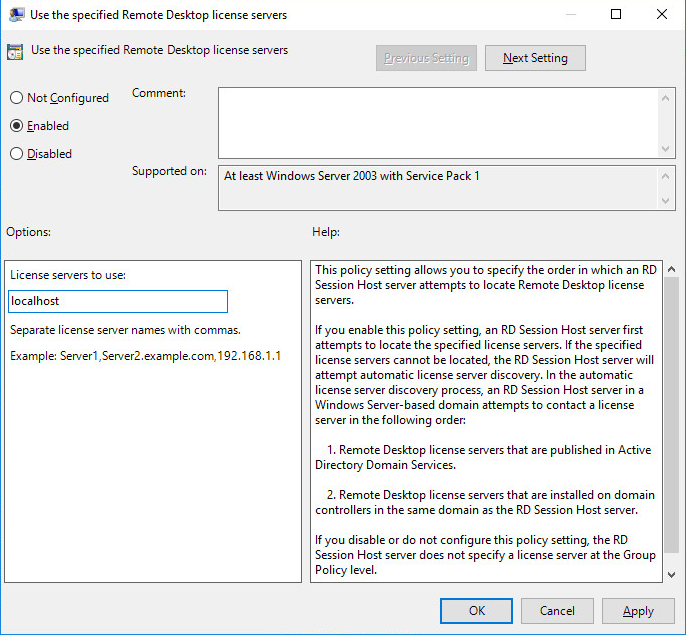
Редактируем Use the specified Remote Desktop license servers.
Включаем — Enabled. В поле «License server to use» прописываем сервер, с которого получать лицензии, в моём случае «localhost». OK.
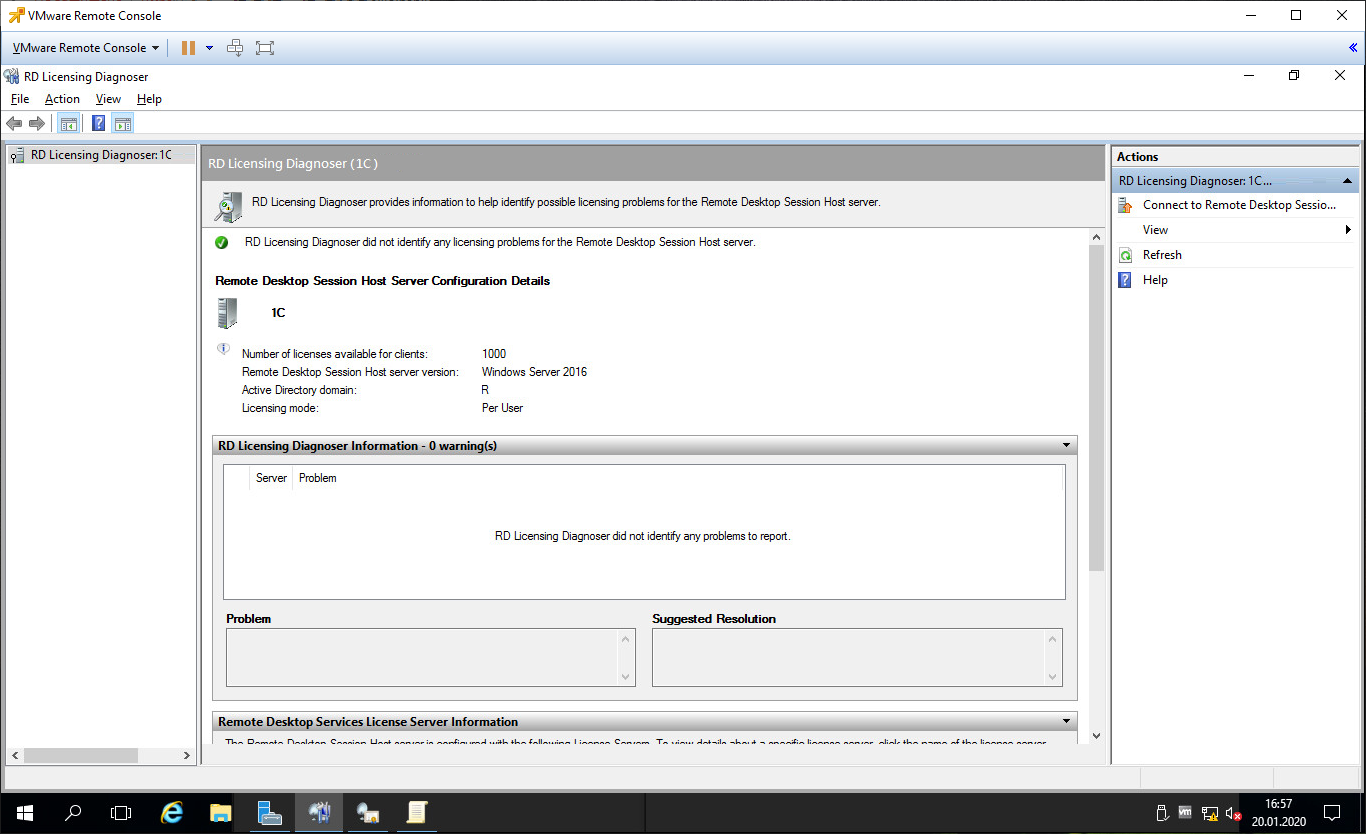
Перезагружаем сервер. Запускаем Remote Desktop Licensing Diagnoser.
Ошибок нет.
Для настройки терминального сервера к нему распространяются ниже представленные требования исходя из ПО, которое будет запускаться пользователями и количества пользователей:
- Процессор: от 4 ядер
- Оперативная память : 1 ГБ на каждого пользователя + 4 ГБ для работы ОС + 4 ГБ запас
- Дисковая система: для большей отказоустойчивости нужно настроить RAID-массив
Для установки выделить два диска: первый логический диск от 50 ГБ. До 100 ГБ выделить для установки ОС, второй логический диск выделить под пользовательские профили с расчетом минимум 1 ГБ на пользователя - Ширина канала для терминального сервера: 250 Кбит/с на пользователя
Бесплатный сервер 1С для подписчиков нашего telegram-канала !
У нас вы можете взять терминальный сервер 1С в аренду с бесплатными индивидуальными настройками.
Первоначальные настройки Windows Server 2016:
- Настроить статический IP-адрес сервера
- Проверить правильность настройки времени и часового пояса
- Установить все обновления системы
- Задать понятное имя для сервера и, при необходимости, ввести его в домен
- Включить доступ до сервера по удаленному рабочему столу для удаленного администрирования
- Настроить запись данных профилей пользователей на второй логический диск
- Активировать лицензию Windows Server 2016
Настройка терминального сервера
Начиная с Windows 2012 терминальный сервер должен работать в среде Active Directory.
Если в вашей локальной сети есть контроллер домена, просто присоединяйте к нему сервер терминалов, иначе установите на сервер роль контроллера домена.
Установка роли и компонентов
В панели быстрого запуска открываем Диспетчер серверов:
Нажимаем Управление — Добавить роли и компоненты:
Нажимаем Далее до «Выбор типа установки». Оставляем Установка ролей и компонентов и нажимаем Далее дважды:
В окне «Выбор ролей сервера» выбираем Службы удаленных рабочих столов:
Кликаем Далее, пока не появится окно «Выбор служб ролей» и выбираем следующие:
- Лицензирование удаленных рабочих столов
- Узел сеансов удаленных рабочих столов
Нажимаем Далее, при появлении запроса на установку дополнительных компонентов соглашаемся.
При необходимости, также выставляем остальные галочки:
- Веб-доступ к удаленным рабочим столам — возможность выбора терминальных приложений в браузере.
- Посредник подключений к удаленному рабочему столу — для кластера терминальных серверов посредник контролирует нагрузку каждой ноды и распределяет ее.
- Узел виртуализации удаленных рабочих столов — для виртуализации приложений и запуска их через терминал.
- Шлюз удаленных рабочих столов — центральный сервер для проверки подлинности подключения и шифрования трафика. Позволяет настроить RDP внутри HTTPS.
Нажимаем Далее и в следующем окне Установить. Дожидаемся окончания процесса установки и перезагружаем сервер.
Установка служб удаленных рабочих столов
После перезагрузки открываем Диспетчер серверов и нажимаем Управление — Добавить роли и компоненты:
В окне «Выбор типа установки» выбираем Установка служб удаленных рабочих столов и нажимаем Далее:
В окне «Выбор типа развертывания» выбираем Быстрый запуск и нажимаем Далее:
В «Выбор сценария развертывания» — Развертывание рабочих столов на основе сеансов — Далее:
Еще раз Далее — при необходимости, ставим галочку «Автоматически перезапускать конечный сервер, если это потребуется» и кликаем по Развернуть.
Настройка лицензирования удаленных рабочих столов
Для корректной работы сервера, необходимо настроить службу лицензирования. Для этого открываем диспетчер серверов и кликаем по Средства — Remote Desktop Services — Диспетчер лицензирования удаленных рабочих столов:
В открывшемся окне кликаем правой кнопкой мыши по нашему серверу и выбираем Активировать сервер:
В открывшемся окне дважды кликаем Далее — заполняем форму — Далее — Далее — Снимаем галочку «Запустить мастер установки лицензий» — Готово.
Снова открываем диспетчер серверов и переходим в «Службы удаленных рабочих столов»:
В «Обзоре развертывания» кликаем по Задачи — Изменить свойства развертывания:
В открывшемся окне переходим в Лицензирование — Выбираем тип лицензий — прописываем имя сервера лицензирования (в данном случае локальный сервер) и нажимаем Добавить:
Применяем настройки, нажав OK.
Добавление лицензий
Открываем диспетчер серверов и кликаем по Средства — Remote Desktop Services — Диспетчер лицензирования удаленных рабочих столов:
В открывшемся окне кликаем правой кнопкой мыши по нашему серверу и выбираем Установить лицензии:
В открывшемся окне нажимаем Далее:
Выбираем программу, по которой куплены лицензии, например, Enterprise Agreement:
Нажимаем Далее — вводим номер соглашения и данные лицензии — выбираем версию продукта, тип лицензии и их количество:
Нажимаем Далее — Готово.
Проверить статус лицензирования можно в диспетчере серверов: Средства — Remote Desktop Services — Средство диагностики лицензирования удаленных рабочих столов.
Мы также готовы оказать помощь в установке и настройке терминального сервера.
Нашим клиентам мы предлагаем реализацию данного проекта и его последующее обслуживание в рамках ИТ-аутсорсинга.
