By default the telnet client in Microsoft’s Windows operating systems is disabled, this is unfortunate as it is an extremely useful tool which can be used for testing TCP connectivity to external hosts on a specified port.
This is great when you’re trying to troubleshoot network connectivity problems, for example, say we have a web server which should be listening on port 80 to serve HTTP traffic but we are not able to load a web page, by using telnet to connect to the web server on port 80 we can verify the connectivity.
It may be that the connectivity is fine but there is a problem with the web server, or that the web server is stopped and the port is not listening at all, for instance. With telnet we can get a better understanding of what’s going on.
Enabling the Telnet Client
Firstly you need to enable the telnet client, if you don’t enable it you’ll get a result similar to the below message when trying to use it.
C:\>telnet google.com 80
'telnet' is not recognized as an internal or external command, operable program or batch file.
C:\>
You can enable the telnet client either by command line or through the graphical interface.
Enabling the telnet client through command prompt
Using the command line is the easiest and fastest way to install the telnet client. Run the below command in command prompt with administrator permissions.
dism /online /Enable-Feature /FeatureName:TelnetClient
That’s it, after a few seconds telnet should be ready to use.
Enabling the telnet client through PowerShell
Again we can also do this instead with PowerShell, we can run the below command in a PowerShell console with administrator permissions.
Install-WindowsFeature -name Telnet-Client
Enabling the telnet client through the graphical user interface
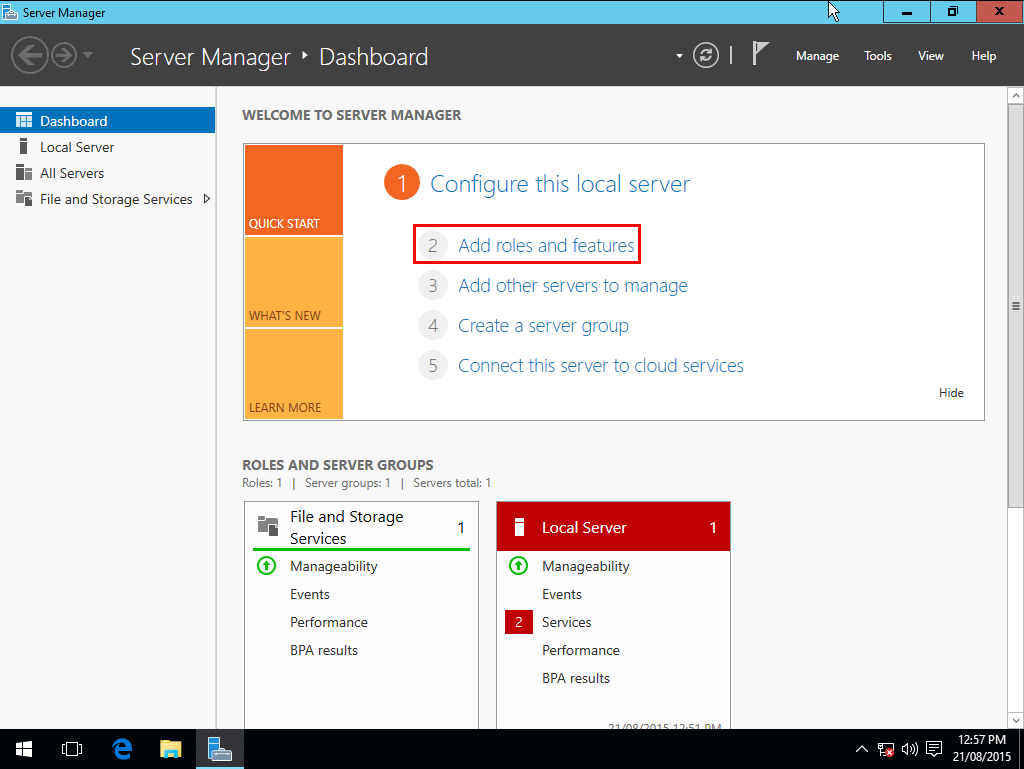
- Open Server Manager.
- From Server Manager click “Add roles and features”.

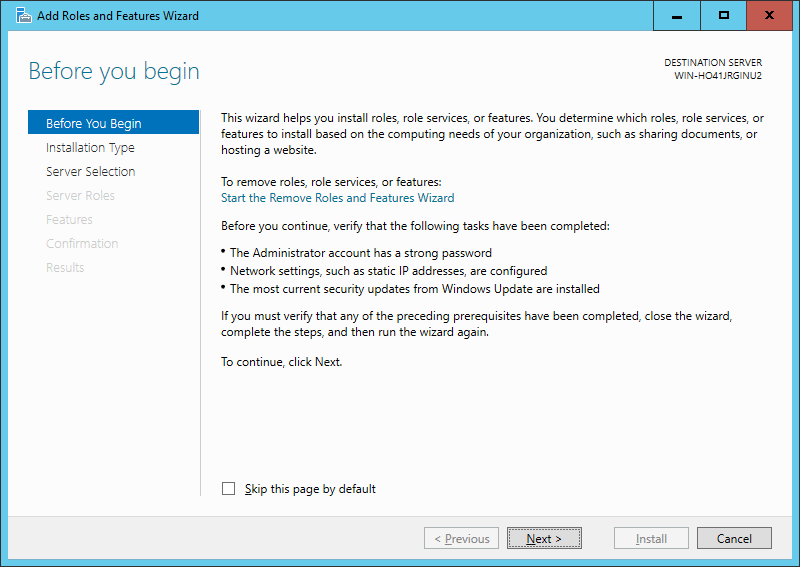
- The Add Roles and Features Wizard opens to the Before you Begin screen, click next.

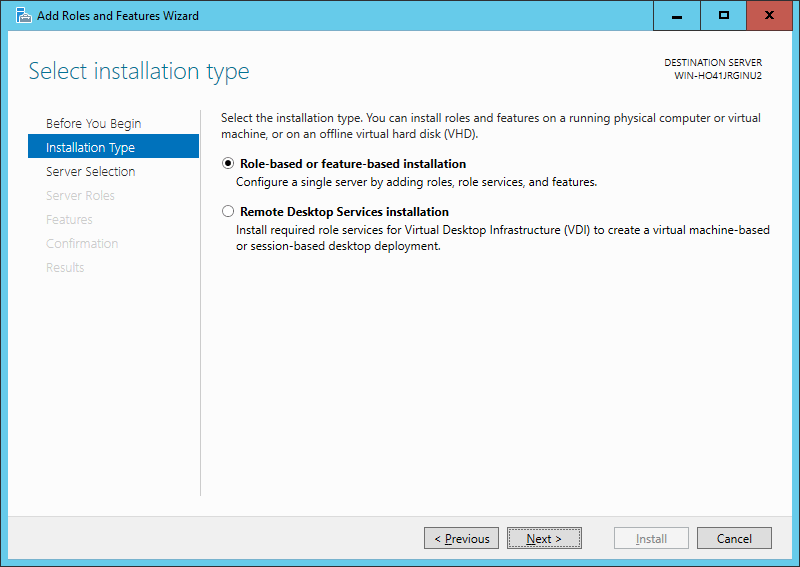
- On the Installation Type screen, leave Role-based or Feature-based installation selected and click next.
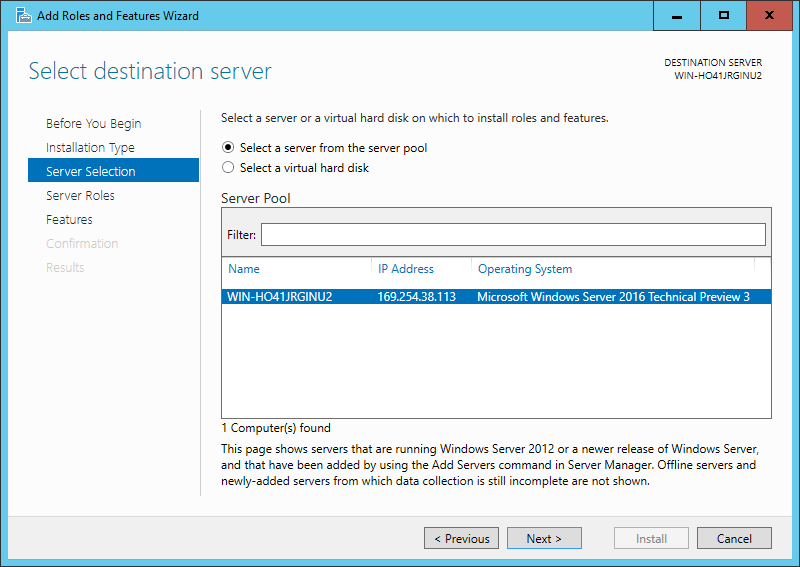
- On the server selection screen, select the server to install on. By default it should be the local server itself, click next.
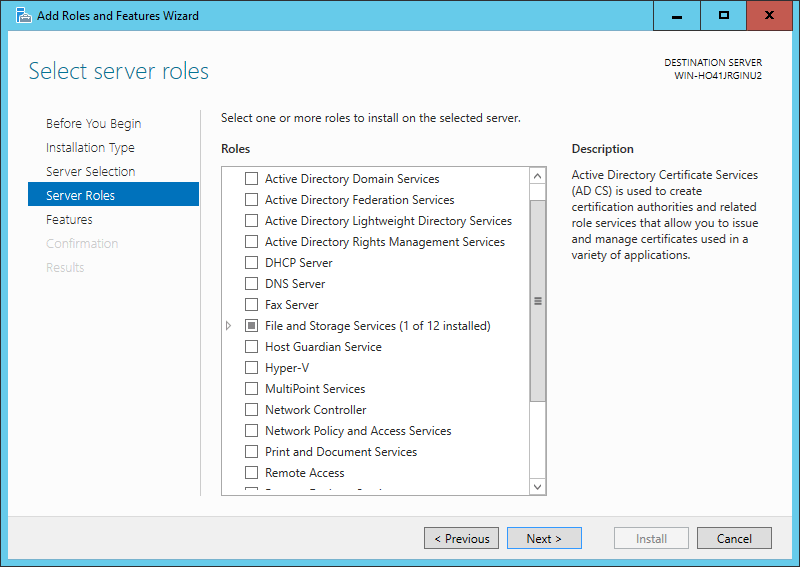
- On the Server Roles screen, click next. We are installing a feature rather than a role so don’t select anything here.
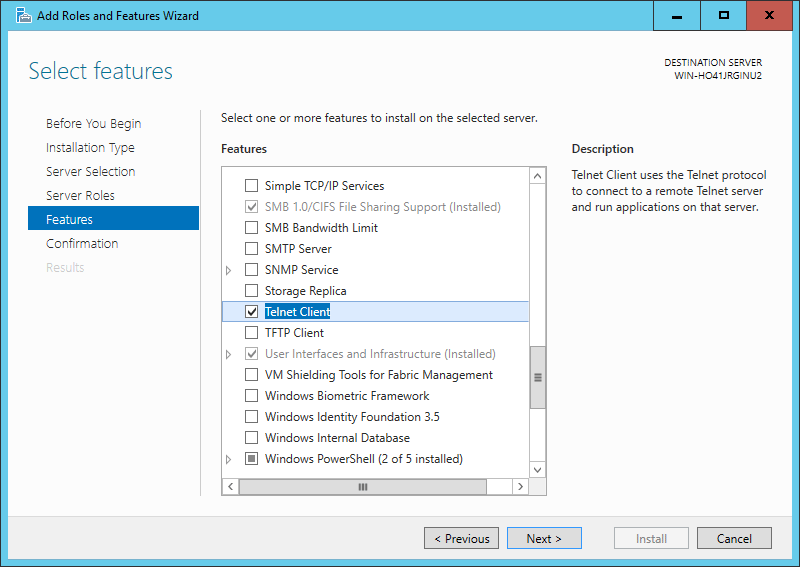
- On the Features screen, tick the check box next to Telnet Client.
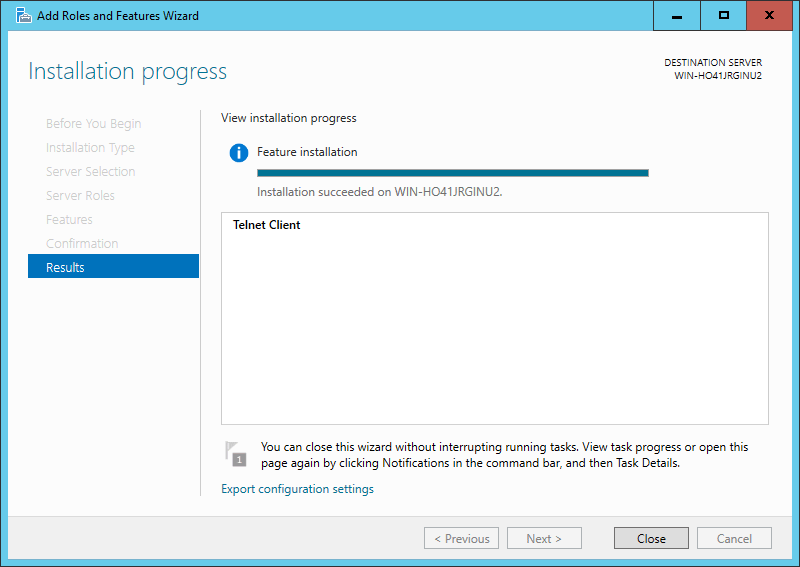
- On the Confirmation screen, click Install.
- Once the installation succeeds, click the Close button. The telnet client is now installed and ready for use.

Verifying that the telnet client is enabled
Simply open command prompt or powershell, type ‘telnet’ and press enter. If this was successful you should have a prompt similar to the below:
Welcome to Microsoft Telnet Client

Escape Character is 'CTRL+]'

Microsoft Telnet>
Already have telnet installed but still failing?
In some cases you must run command prompt or powershell as administrator in order to issue the telnet command, otherwise it will give the same error as if it was not enabled at all.
Summary
Now that you have enabled telnet in Windows Server 2016 you should be able to start issuing commands with it and using it to troubleshoot TCP connectivity problems.
— Advertisement —
Hello, Today we are going to talk about Telnet. This is a network protocol that allows us to access another machine to operate it remotely as if we were sitting in front of it. It´s also the name of the computer program that the client implements. Its name comes from the acronym Telecommunication Network. In addition, it is used on MSDOS and Windows systems. And also compatible with UNIX-based systems, such as Mac and Linux, and FreeBSD. On the other hand, this protocol and this command are only implemented through commands. However, Telnet has a serious security problem. Indeed, information from one terminal to another travels without any type of encryption, only in plain text. For this reason, safer tools such as SSH are currently preferred. Although it is still useful in internal networks with protection from external traffic. That’s why we’ll see how to enable Telnet in Windows Server.
Enabling Telnet on Windows Server 2016/2019. Using PowerShell
To be able to use Telnet correctly we have to open a session in the destination machine. This session has to be opened with a user with access. As mentioned above, this protocol presents an important security gap. For this reason, it is disabled by default in Windows Server. It is possible to check this by running the telnet command at a command prompt:

To enable it, please open a PowerShell with administrative privileges and add the following command and press Enter:
Install-WindowsFeature -name Telnet-Client
Immediately start the installation:

At the end of the process we will see the following window:

Another way to enable this function is to open a CMD with administrative privileges and run the following command:
dism /online /Enable-Feature /FeatureName:TelnetClient
Enabling Telnet graphical mode.
It is also possible to enable Telnet from the Windows Server 2016/2019 Dashboard. With this in mind, you have to enter the section Add roles and features.

Then press Next to continue.

In the next window, click on Role-based or feature-based installation:

Next, select the server you are going to add to Telnet.

Now, just press Next and skip the roles on this screen. Press Next to continue the installation.

Then scroll down and select the Telnet checkbox. You will see a brief description of the feature.

On the next screen, press Install to start the process.

Just wait a few seconds until Telnet is finally installed.

Testing Telnet.
After the process is finished, you just need to open any CMD and run the next command:
telnet
If everything is correct, you will see the next window:

To view the available subcommands, run the following command:
telnet /h

In the final analysis, we have seen how to install Telnet in Windows 2016/2019. Despite its security limitations, it is still a good option for communicating computers on private networks. That’s all for now, before saying goodbye I invite you to see our post about OrientDB in Windows 10. See you later!
There are certain protocols that have been developed to facilitate the lives of administrators, users and anyone who has an impact on the IT world. The Telnet protocol (Teletype Network,) is one of the most used since since its implementation in 1964 it aims to be a protocol that acts as a command line interface towards direct communication with a remote device or server, since either for remote administration tasks or to provide some type of support or configuration of the device or the entire infrastructure of the device.
A connection through Telnet makes use of the Transmission Control Protocol (TCP) as it acts as a connection to transmit data with interconnected Telnet control between the devices. Perhaps one of its shortcomings is security is that we talk about a protocol created in 1694 where security was not as critical as it is today, but there are some defense mechanisms when using Telnet.
To understand a little what Telnet does, we must know that Telnet offers to each of the users a text-oriented interactive bidirectional system communication system that connects through a virtual terminal of more than 8 bytes, the syntax used For Telnet telnet hostname port, this allows the user to execute commands directly on the server through the available Telnet commands.
Telnet Tasks
With this, Telnet is useful in cases such as:
- Access to databases
- Network and server administration
- Interaction with programs hosted on remote application servers
Windows Server 2019 is Microsoft’s latest commitment to cover a wide range of corporate clients with a secure, reliable and scalable system, so Telnet is disabled by default in Windows Server 2019, or 2016, to avoid privacy failures and security, but for administration and connectivity reasons it may be necessary to use Telnet on Windows Server so now we will see how to activate it on Windows Server 2019 or 2016.
Most used commands with Telnet
Some of the commands we can use with Telnet are:
- ?: deploys Telnet help
- Close: close the current Telnet session
- display argument: this option allows you to display the parameters for the current connection (port, terminal type and more)
- environ argument: It allows defining the variables for the operating environment in which we are
- logout: this parameter will close the current session in Telnet
- mode type: allows you to set the transfer mode (text file, binary file)
- open hostname: with this parameter another connection will be opened for the remotely selected host
- quit: so we will leave the Telnet client and all the connections active at the moment
- send argument: this parameter sends Telnet character sequences to the host
- set argument: Adjust the connection parameters
- unset: this value loads the default connection parameters
We also leave you the video tutorial to enable the Telnet command of Windows Server 2019 and 2016.
To keep up, remember to subscribe to our YouTube channel! SUBSCRIBE
1. How to activate Telnet on Windows Server 2019 or Server 2016
Step 1
To verify that Telnet is deactivated in Windows Server we will execute the following:
telnet google.com 80
Step 2
The result will be as follows: 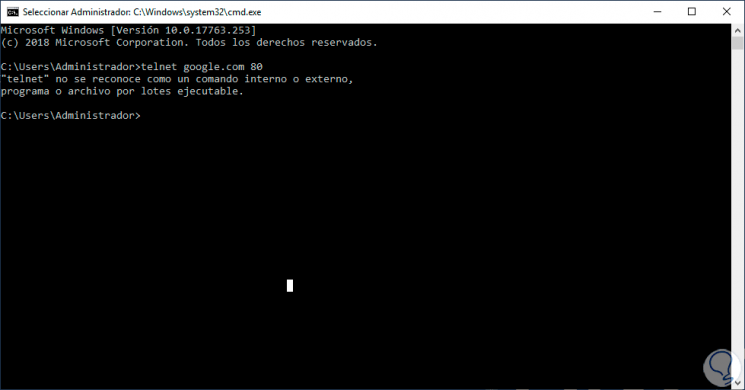
Step 3
To enable the Telnet client we can access Windows PowerShell and there run the following line:
Install-WindowsFeature -name Telnet-Client
Step 4
Press Enter and the process of installing Telnet on Windows Server 2019/2016 will take place: 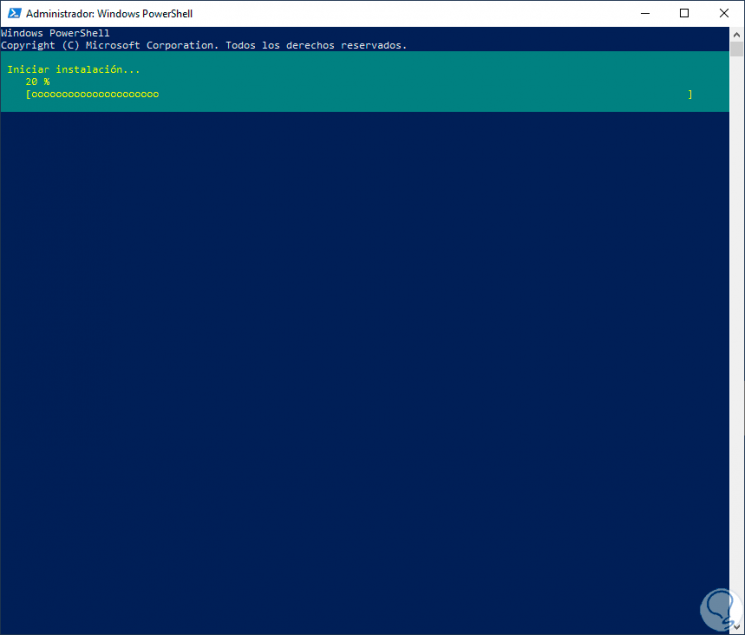
Step 5
When this ends we will see the following: 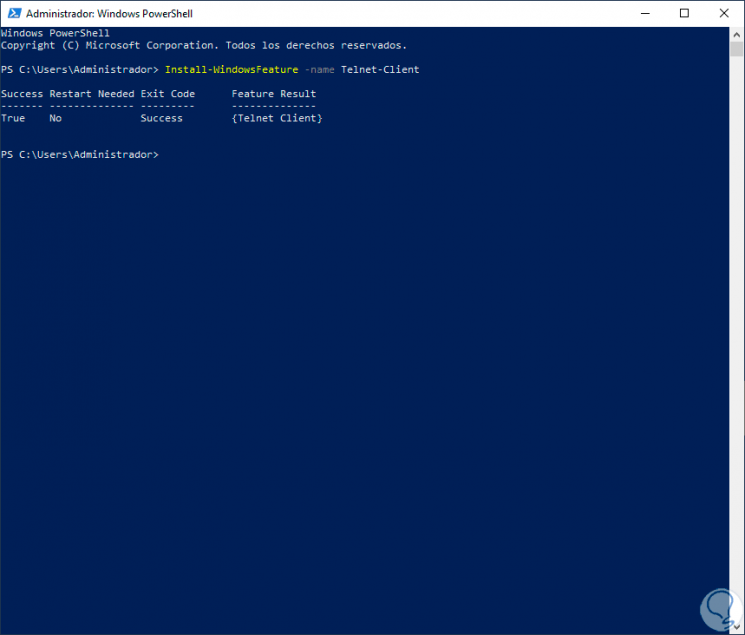
Note
This operation is also possible from the command prompt of the command prompt by executing the following:
dism / online / Enable-Feature / FeatureName: TelnetClient
2. How to add Telnet in Windows Server 2019 or Server 2016
Step 1
Now, once this feature is enabled we must add it from the server administrator, for this we access this functionality: 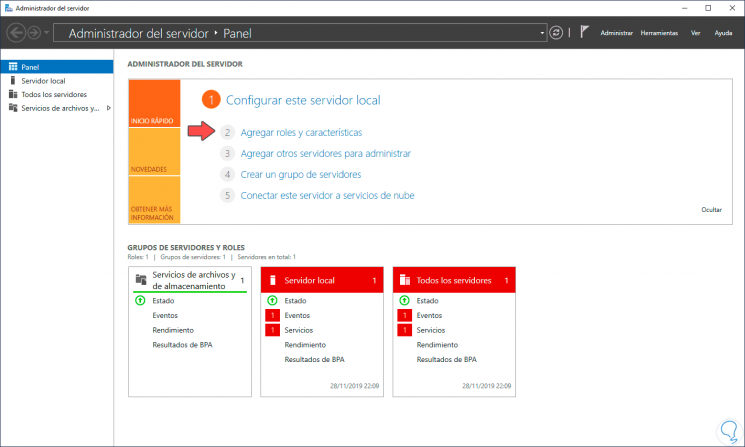
Step 2
We click on the “Add roles and features†line and the following will be displayed: 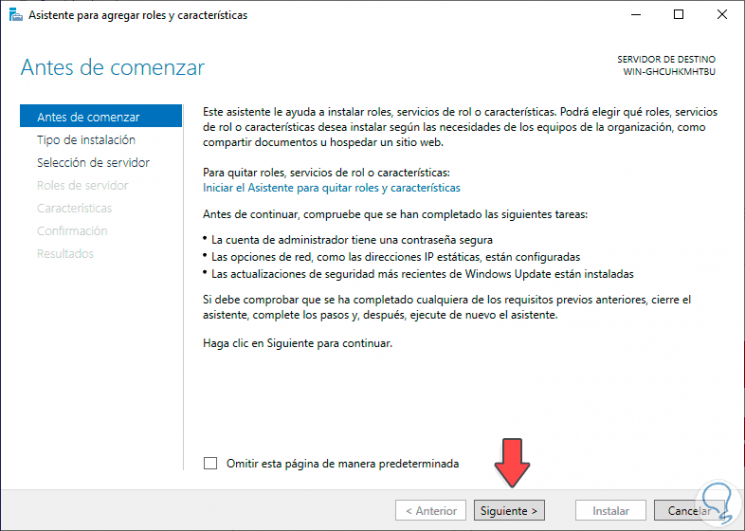
Step 3
We click on Next and in the next window we activate the “Feature or role based installation†box: 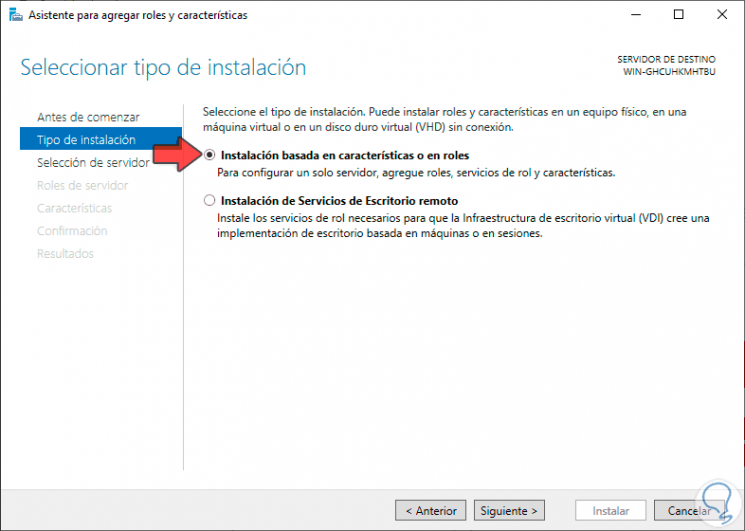
Step 4
In the following window we select the destination server: 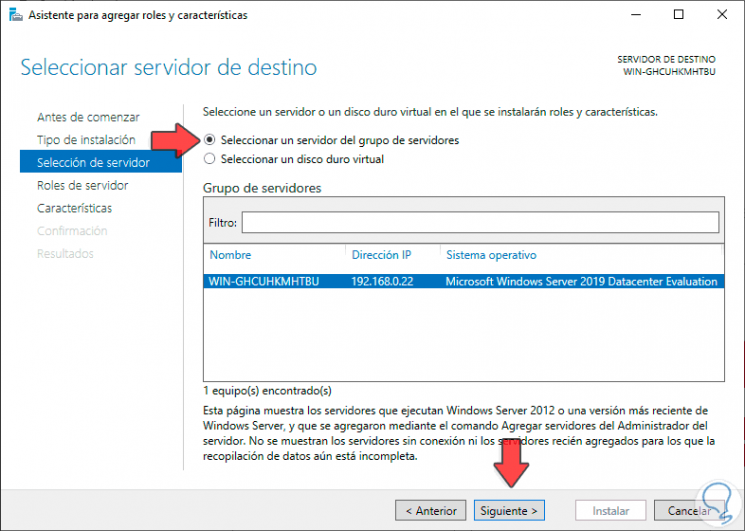
Step 5
We click on Next and we will access the role window, in this case we click on Next since we will not install any role: 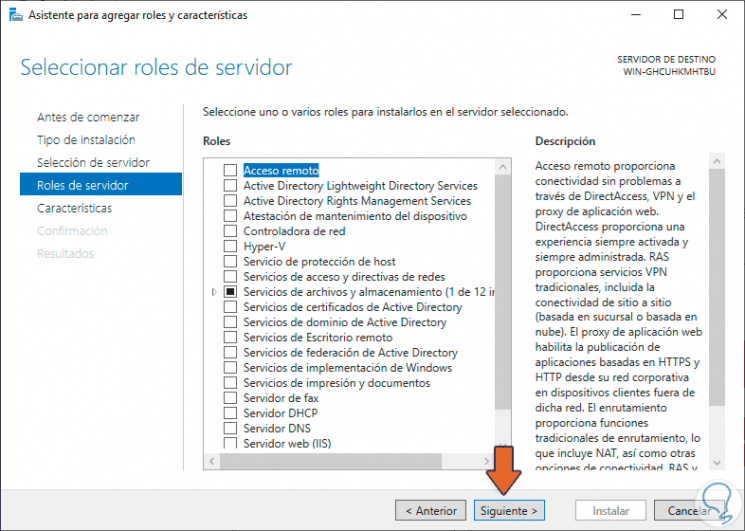
Step 6
Click on Next and in the “Characteristics†window we activate the “Telnet Client†box: 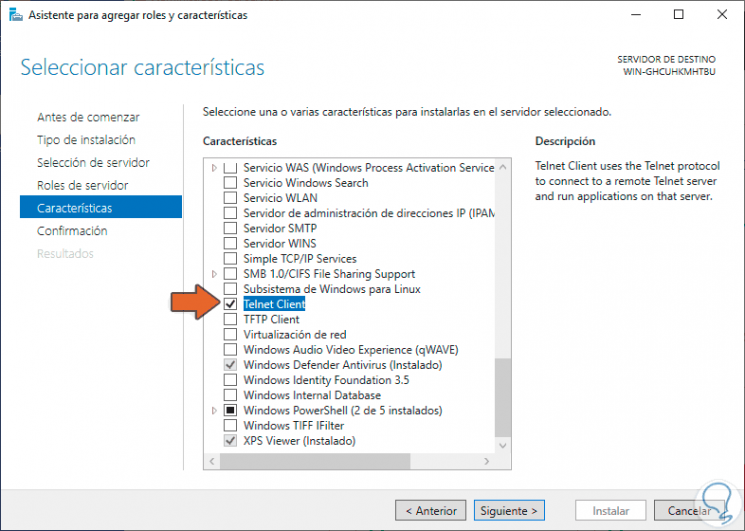
Step 7
Click Next and we will see a summary of the feature to be installed: 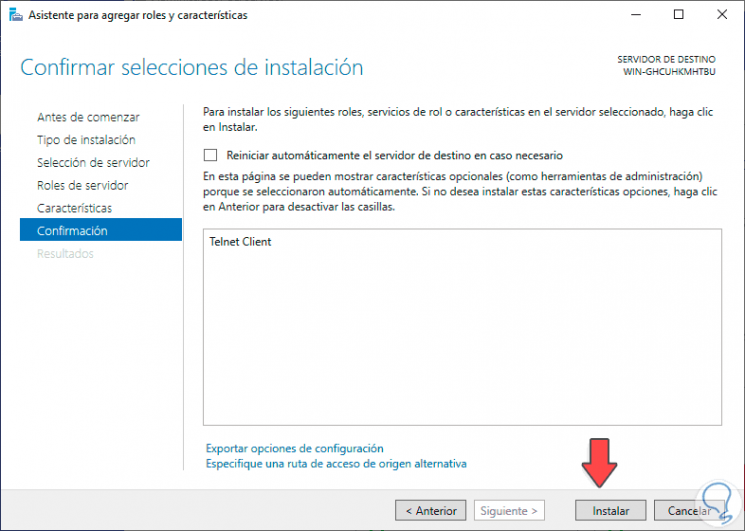
Step 8
To give way to the installation click on the «Install» button: 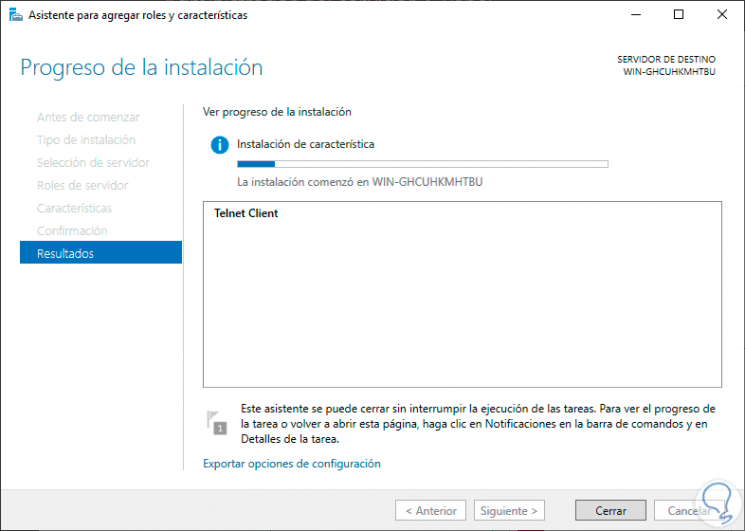
Step 9
When this is over we will see the following. Click Close to exit the installation wizard. 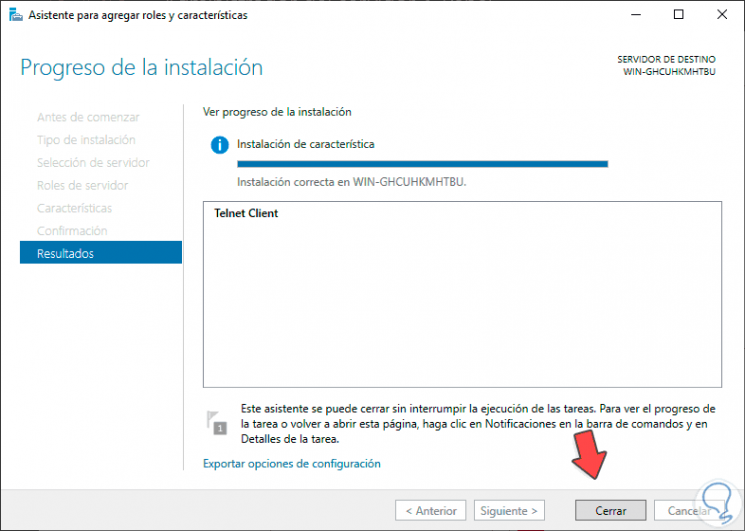
Step 10
To verify that it has been installed correctly, we access the command prompt and execute “telnetâ€, this will allow us to enter the Telnet use console in Windows Server 2019 or 2019: 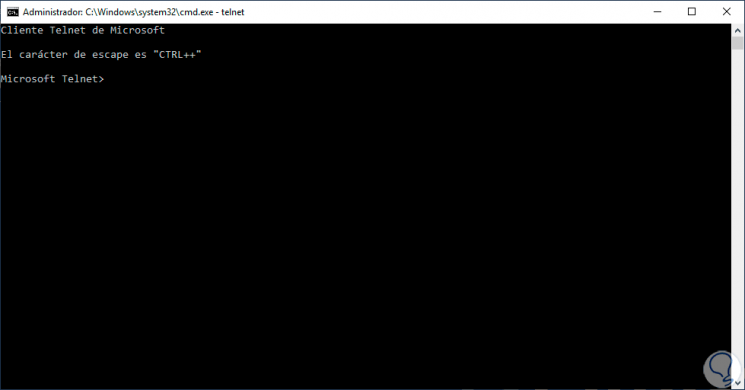
With TechnoWikis you have learned to enable the Telnet client in Windows Server 2019 or 2016 and thus have an additional connectivity option.
На чтение 3 мин Опубликовано Обновлено
В Windows Server 2016 по умолчанию отключена поддержка Telnet, однако этот протокол может быть полезным для удаленного управления сервером и выполнения определенных команд. В этой статье вы узнаете, как включить Telnet на вашем сервере и настроить доступ к нему.
Шаг 1: Откройте «Панель управления».
Шаг 2: Выберите «Программы» и перейдите в раздел «Включение или отключение компонентов Windows».
Шаг 3: В появившемся окне найдите «Клиент Telnet» и установите флажок рядом с ним.
Шаг 4: Нажмите «ОК» и дождитесь завершения процесса установки.
Шаг 5: Теперь Telnet активирован на вашем сервере Windows Server 2016. Вы можете открыть командную строку и ввести «telnet» для проверки работоспособности.
Важно помнить, что Telnet является незащищенным протоколом, поэтому рекомендуется использовать его только в защищенных сетях и настраивать дополнительные меры безопасности.
Примечание: Если вы используете Telnet для удаленного управления сервером, рекомендуется также настроить парольный доступ и ограничить доступ по IP-адресам для повышения безопасности.
Содержание
- Включение Telnet в Windows Server 2016
- Подготовка к установке
- Установка Telnet
Включение Telnet в Windows Server 2016
Для включения Telnet в Windows Server 2016 следуйте этим шагам:
- Откройте «Управление сервером» через «Пуск» или команду «microsoft-management-console» в командной строке.
- Проверьте, что установлен Server Manager, и если нет, установите его.
- В «Управлении сервером» щелкните правой кнопкой мыши на имени сервера в левой панели и выберите «Диспетчер сервера».
- В «Диспетчере сервера» выберите «Пользователи и группы локального компьютера» в левой панели.
- Раскройте «Пользователи» и перейдите в «Группы».
- В правой панели дважды щелкните на группе «Администраторы».
- В появившемся окне «Свойства группы» нажмите кнопку «Добавить».
- Введите «Telnet» в поле «Введите имя объекта для выбора» и нажмите кнопку «Проверить имена».
- Выберите «Telnet Server» в списке найденных объектов и нажмите кнопку «ОК».
- Нажмите кнопку «ОК» в окне «Свойства группы» и закройте «Диспетчер сервера».
- Теперь Telnet должен быть включен на вашем сервере Windows Server 2016.
Теперь вы можете использовать Telnet для удаленного управления вашим сервером.
Подготовка к установке
Перед тем как включить Telnet на сервере Windows Server 2016, необходимо выполнить несколько предварительных шагов:
- Убедитесь, что у вас есть соответствующие права доступа к серверу Windows Server 2016, чтобы выполнить изменения.
- Откройте «Установку программ и компонентов» через меню «Пуск».
- Выберите «Сервер Manager» и щелкните «Добавить роли и компоненты».
- В мастере добавления ролей и компонентов выберите «Службы доступа и информация об идентификации».
- Убедитесь, что установлен флажок напротив «Клиент Telnet».
- Продолжайте следовать инструкциям мастера до завершения установки Telnet.
После завершения установки Telnet на вашем сервере Windows Server 2016, вы будете готовы использовать Telnet для удаленного управления сервером.
Установка Telnet
Для того чтобы использовать Telnet на сервере Windows Server 2016, вам необходимо установить службу Telnet.
Для начала откройте меню «Пуск», найдите и запустите «Серверный менеджер».
Далее выберите «Установка ролей и компонентов».
В появившемся окне выберите «Службы Telnet-клиента» и нажмите «Далее».
Затем подтвердите выбор нажатием кнопки «Установить».
После завершения установки службы Telnet, вы сможете использовать Telnet для удаленного подключения к серверу Windows Server 2016.
Примечание: Важно помнить о том, что Telnet является небезопасным протоколом, так как он передает данные в незашифрованном виде. Рекомендуется использовать более безопасные протоколы, такие как SSH.
Adding telnet to Windows Server 2016 is a fairly straightforward process. To get started, you will need access to a server running Windows Server 2016 or higher and have administrative privileges. Once you have those two requirements met, follow the steps below:
1. Open Programs and Features in Control Panel (or Add Roles and Features for Windows Server 2019).
2. Click Turn Windows features on or off from the left panel of the window that appears.
3. Check Telnet Client under Optional Components in the list of programs shown on your screen and click OK once done to apply changes made by you.
4. Finally, restart your computer to complete installation of telnet client on your system running Windows Server 2016/2019 OS versions respectively..
How do I enable Telnet on Windows Server?
Enabling Telnet on Windows Server is a straightforward process. To enable Telnet, first you need to open the Control Panel and select “Programs” followed by “Turn Windows features on or off”. In the list that appears, locate and check «Telnet Client» then click OK to install it. After installation has completed, you can access Telnet by opening Command Prompt (or PowerShell) and typing in «telnet«. Once opened you can use telnet commands as needed.
How to enable Telnet on Windows Server 2012r2?
Telnet can be enabled on Windows Server 2012r2 by following the steps below.
1. Open the «Server Manager» dashboard from the start menu and click on «Local Server«.
2. On the left side of the window, select «Manage» then click on “Add Roles and Features”.
3. Select “Role-based or feature-based installation” as your installation type and click “Next”.
4. Select a server from your server pool to install roles/features onto, then hit “Next” again until you reach a page called “Features” (you may need to go through several more pages).
5. Scroll down in this list until you find Telnet Client; check off its box to enable it, then press Next once more followed by Install at the end of that same page to begin installing Telnet Client onto your machine(s). Once installed, you will have access to use Telnet commands through command line interface (CLI) tools such as PowerShell or Command Prompt accessible via Start Menu > Accessories > System Tools.
What can I use instead of Telnet in Windows Server 2016?
Telnet is an older protocol that has been replaced by more modern, secure protocols such as SSH or Secure Shell. Windows Server 2016 does not include a Telnet client, but you can use PuTTY (https://www.putty.org/) for accessing remote systems using the SSH protocol. Additionally, there are many other third-party applications available for connecting to remote systems securely over SSH from Windows Server 2016; some of these options include WinSCP (https://winscp.net/eng/index.php), MobaXterm (https://mobaxterm.mobatek.net/), and Xshell Free (http://www.netsarang.com/products/xsh_overview2_enu1).
Why Telnet is not working in Windows Server 2016?
Telnet is a network protocol used for remote access and management of devices over the internet. However, it may not work properly in Windows Server 2016 due to several reasons. In this article, we will discuss some possible causes and solutions for why Telnet might not be working in Windows Server 2016.
Possible Causes:
1) The Telnet service is disabled or not installed – To enable/install the Telnet service, open Control Panel > Programs > Turn Windows Features On or Off then check the ‘Telnet Client/Server’ option and click OK to install/enable it.
2) Firewall rules are blocking incoming connections – Check whether your firewall settings allow incoming telnet connections on port 23 (default port). If they don’t, add an exception rule to allow those traffic types through that port.
3) Incorrect IP address configuration – Verify that the IP address configured on both ends is correct by using ‘ipconfig’ command line tool with appropriate parameters such as “ipconfig /all” or “ipconfig /displaydns” etc.
Solution:
1) Enable/Install the Telnet Service – As noted above, if you have disabled or uninstalled the telnet client from your system you will need to re-enable it before being able to use it again.
2) Configure Firewall Rules – You should also check if any firewall rules are blocking incoming connection attempts on default telnet port 23 and if so create an exception rule allowing all traffic types through that port.
3) Check Network Configuration Settings – Make sure to verify your IP address configurations using ipconfig command line tool with relevant parameters as mentioned earlier in order for successful communication between systems over telnet protocol.
How to check if Telnet is enabled?
Telnet is a protocol used to remotely access computers or networking devices over the Internet. Checking if Telnet is enabled can be done by using a few simple steps and commands.
Step 1: Open Command Prompt (on Windows) or Terminal (on Mac OS).
Step 2: Type “telnet” followed by the IP address of the computer you want to connect to in order to initiate a remote connection. If successful, you will get a login prompt indicating that telnet is enabled on the target machine.
Step 3: To confirm that Telnet has been successfully enabled, type in «quit» and press Enter at the command line. This should close your connection with no errors indicating that Telnet was properly configured on your computer.
How do I know if Telnet is enabled on Windows server?
Telnet is a useful tool for administrators to connect to remote systems. To determine if Telnet is enabled on a Windows server, you can follow these steps:
1. Open the Command Prompt as an administrator by right clicking the Start button and selecting «Command Prompt (Admin)«.
2. Type in “telnet” and press Enter. If telnet is installed you should see something similar to this message: ‘’’Telnet is not recognized as an internal or external command…».
3. If you do receive this message then Telnet isn’t installed on your system, meaning it’s not enabled either. You can install it from Programs and Features in Control Panel.
4. If Telnet does appear when typing “telnet” into the Command Prompt then it’s installed on your computer but may still be disabled – type in “netsh firewall set portopening TCP 23 enable» to ensure that incoming connections are allowed via Port 23, which controls access for telnet services by default.
5 After running this command, restart your computer so that any changes take effect and try connecting again using telnet – if successful then it means Telent has been successfully enabled on your Windows Server!
How to disable Telnet in Windows server 2016?
Telnet is an insecure protocol and should be disabled on Windows Server 2016 for improved security. To disable Telnet, use the following steps:
1. Open Control Panel and click Programs.
2. Click Turn Windows Features On or Off in the left-hand menu.
3. Uncheck Telnet Client to disable it if it is checked, otherwise move on to step 4.
4. Uncheck Telnet Server to disable it if it is checked, then click OK to save your changes and close the window.