
![]()
Настроим с нуля Windows Server Backup на сервере с операционной системой Windows Server 2016. Я хочу, чтобы сервер сам себя бэкапил. К ОС подключен диск «B», будем бэкапиться на него. Поехали.
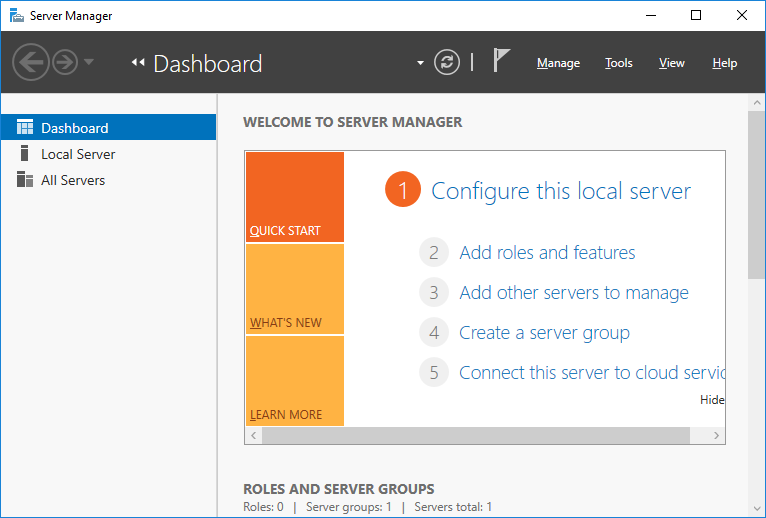
Запускаем оснастку Server Manager.
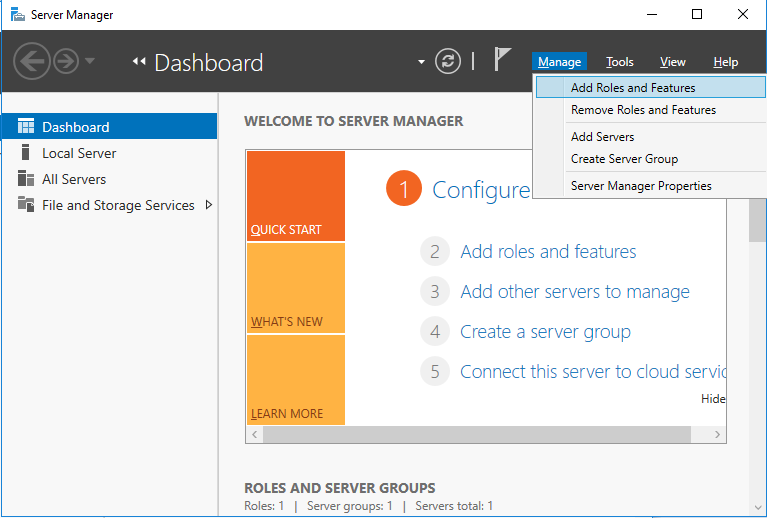
Manage > Add Roles and Features.
Запускается мастер настройки ролей сервера.

Бла-бла-бла, непонятно зачем нужна эта страница, хорошо, что можно поставить галку Skip this page by default. Next. Открывается вкладка Installation Type.
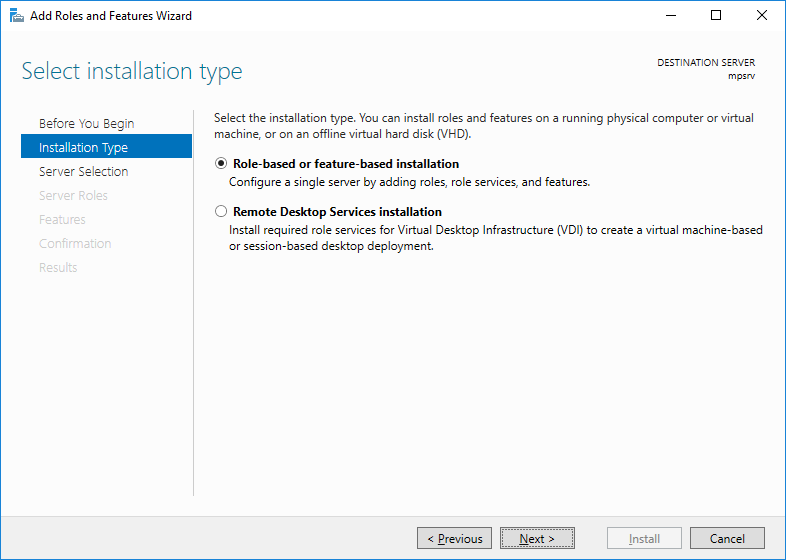
Оставляем Role-based or feature-based installation. Next. Открывается вкладка Server Selection.
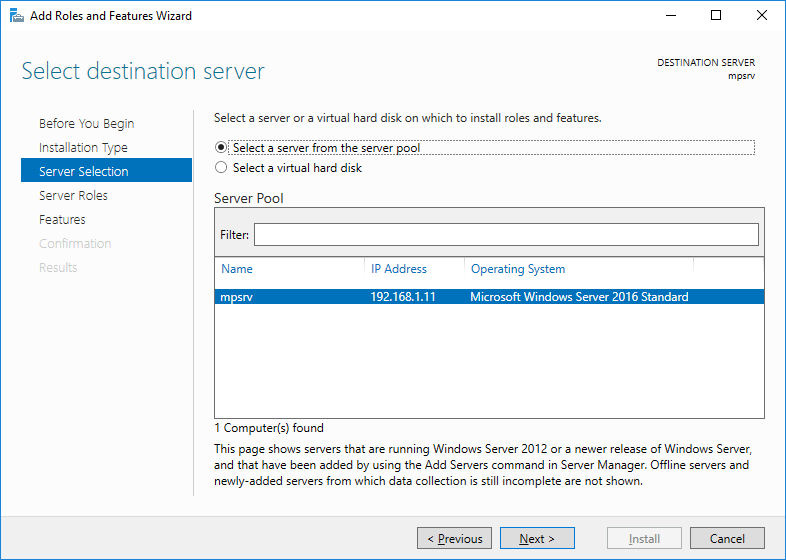
У меня один сервер, выбираю его, Next. Открывается вкладка Server Roles.
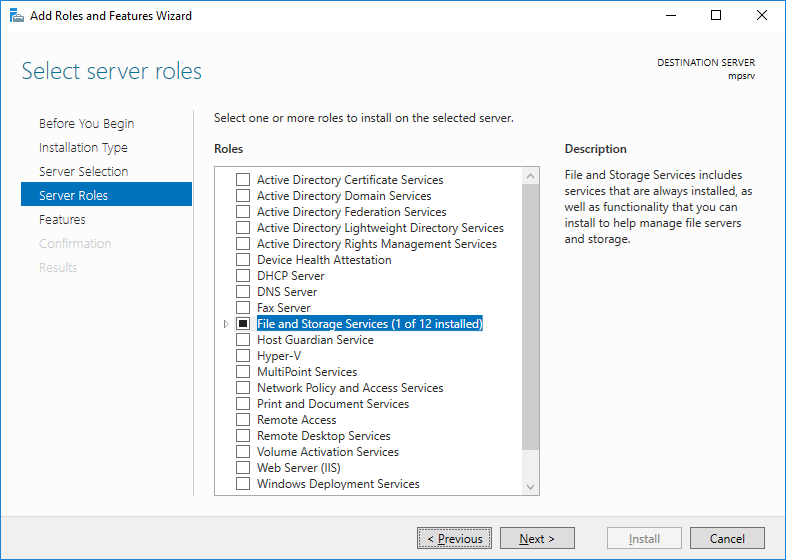
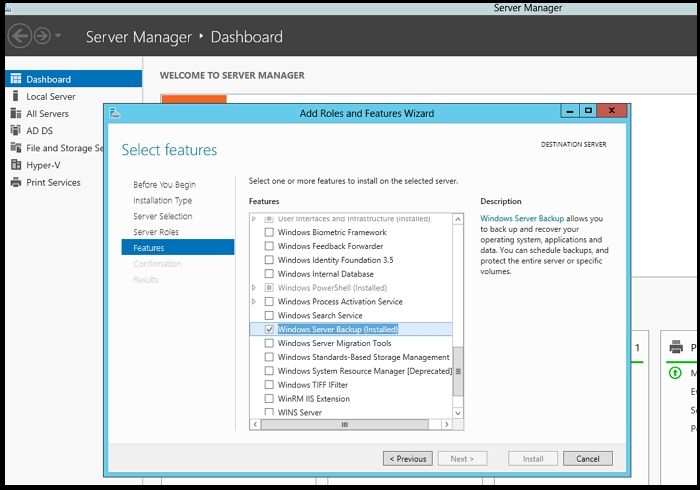
Next. Открывается вкладка Features.
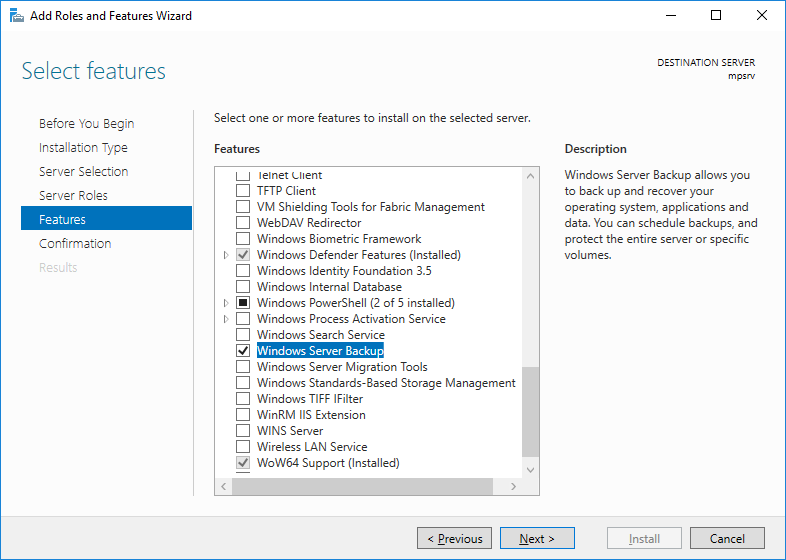
Находим в списке фич Windows Server Backup, ставим галку. Next. Открывается вкладка Confirmation.
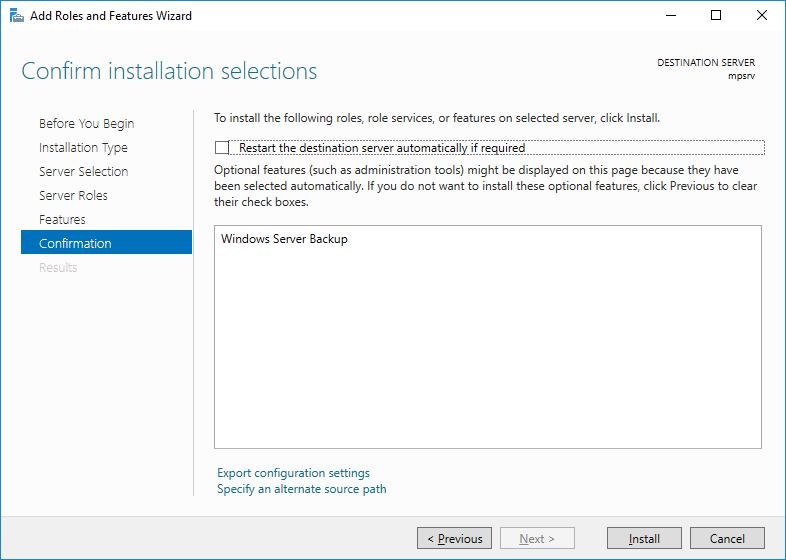
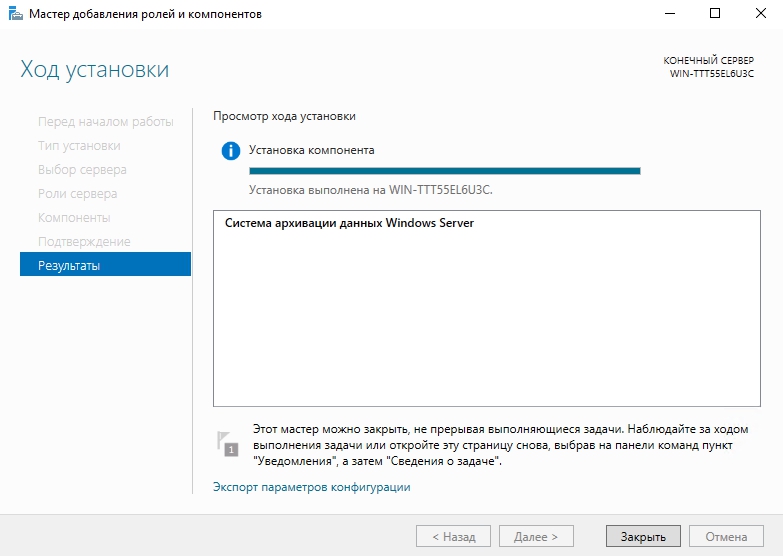
Install. Начинается установка.
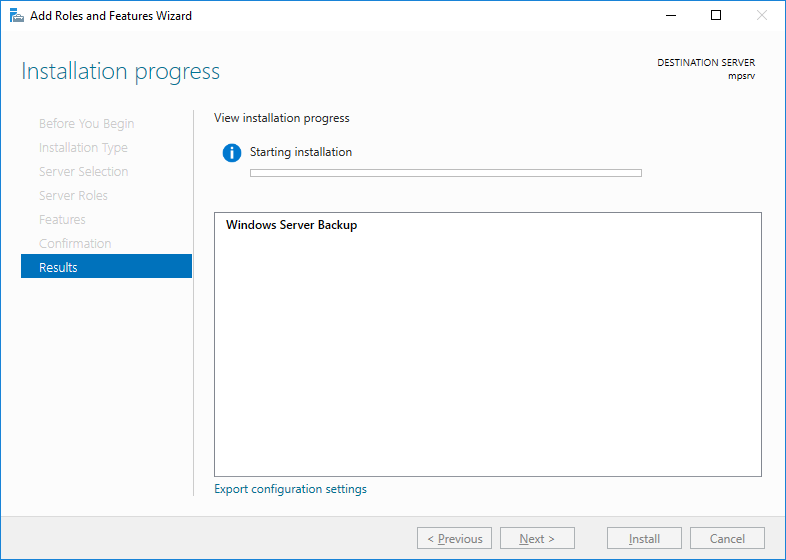
Установка успешно завершена.
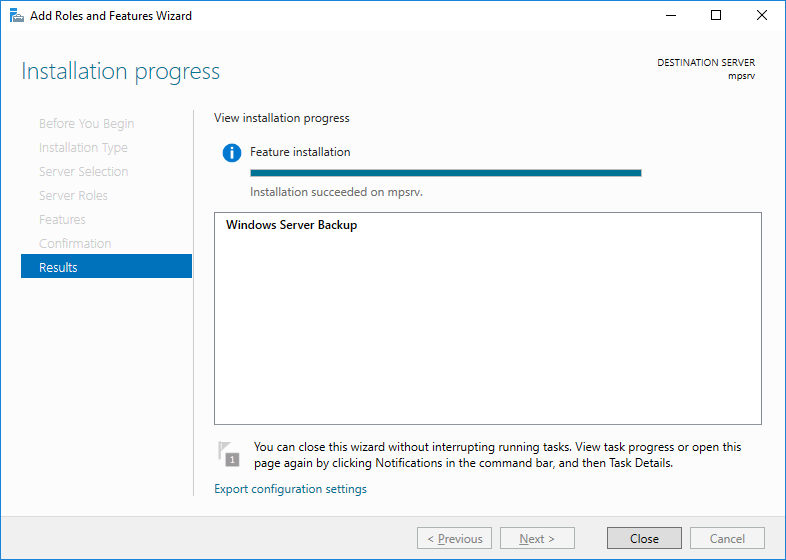
Закрываем мастер. Запускаем Windows Server Backup.
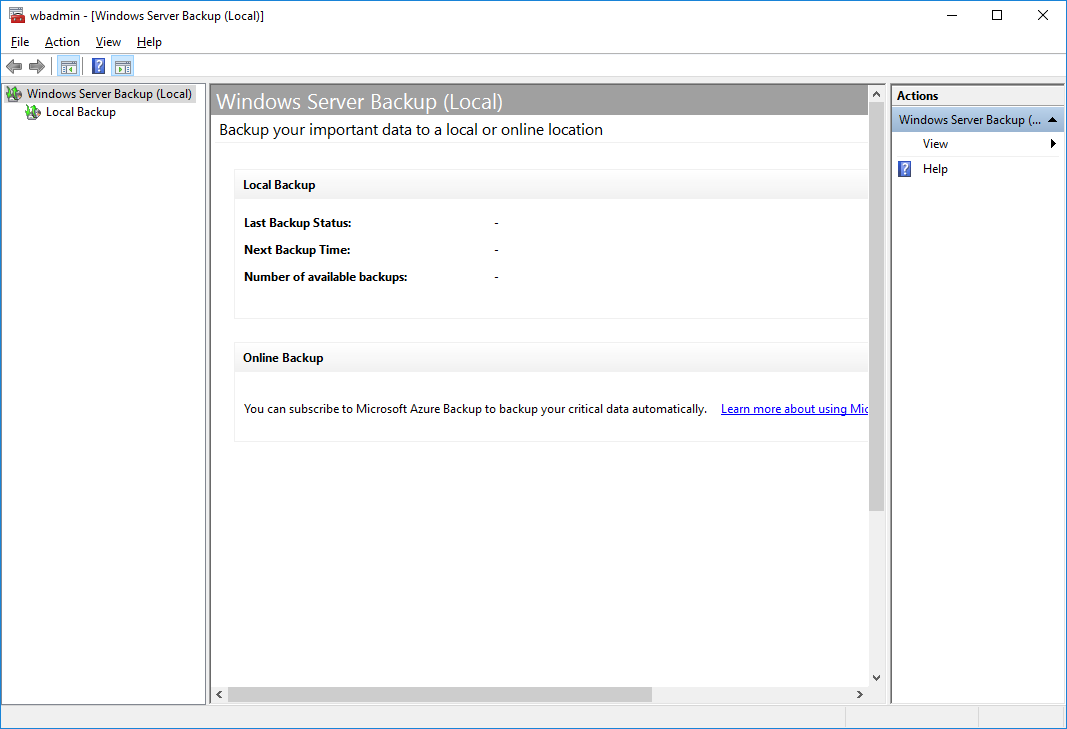
Выбираем Local Backup.
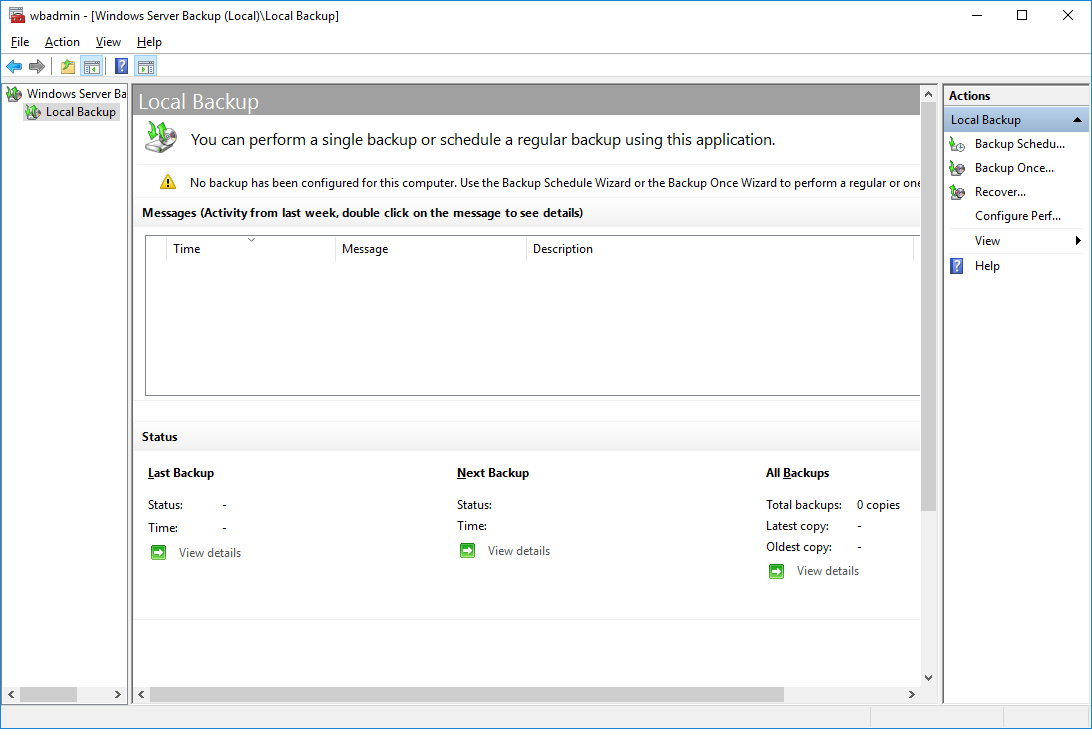
Видим предупреждение:
No backup has been configured for this computer. Use the Backup Schedule Wizard or the Backup Once Wizard to perform a regular or one-time backup.
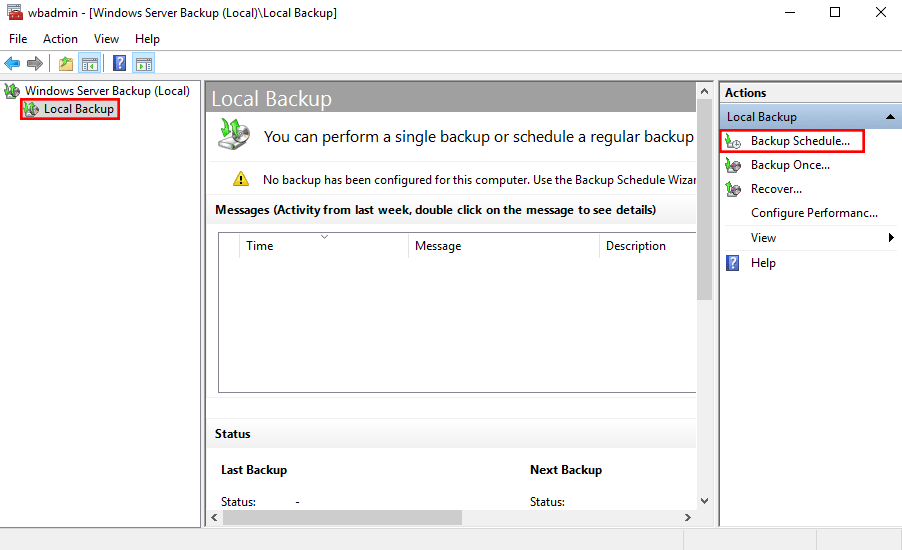
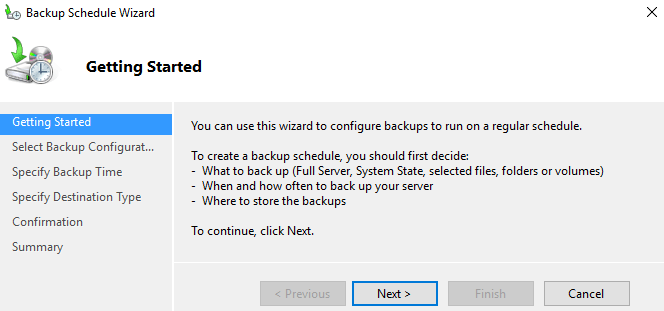
Это нормально, мы ничего пока не настраивали. Нажимаем справа Backup Schedule Wizard. Открывается мастер настройки расписания бэкапа. Открывается раздел Getting Started.
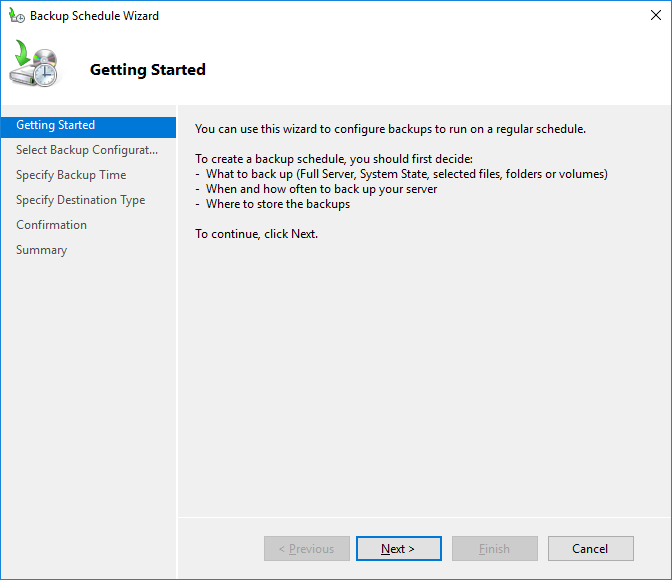
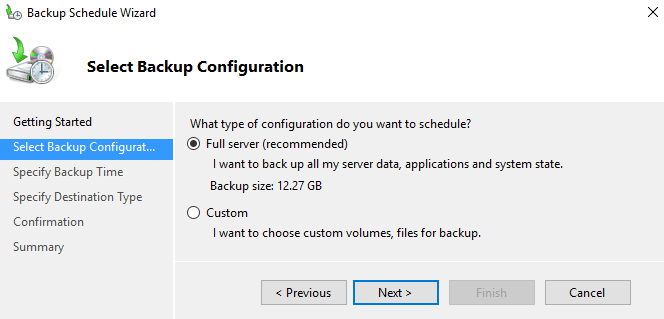
Next. Открывается раздел Select Backup Configuration.
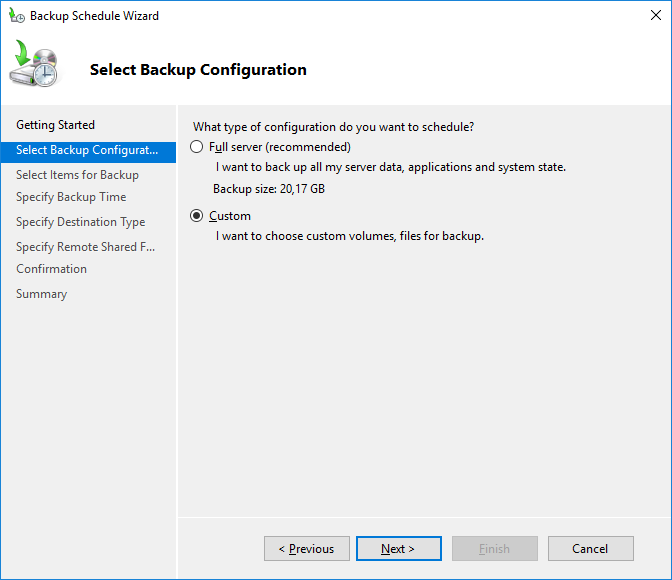
Нам предлагают бэкапить весь сервер или выбрать настройки. Ставлю Custom. Next. Открывается раздел Select Items for Baackup.

Нажимаем Add Items.
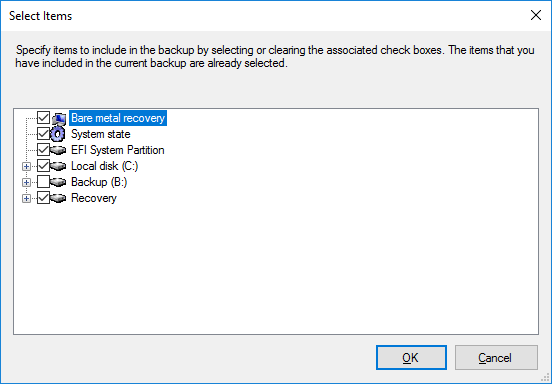
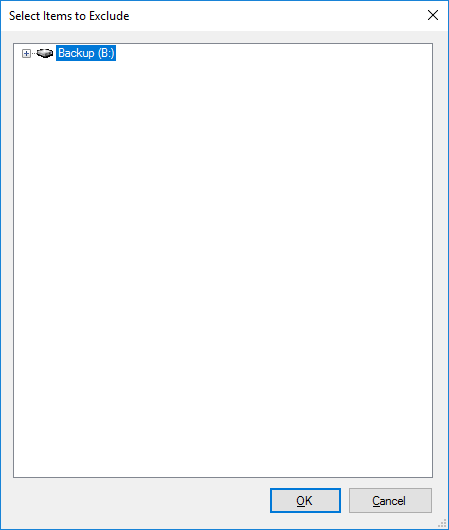
Выбираю всё кроме диска B. На диск B будет делаться бэкап. Ok. Нажимаем Advanced Settings.
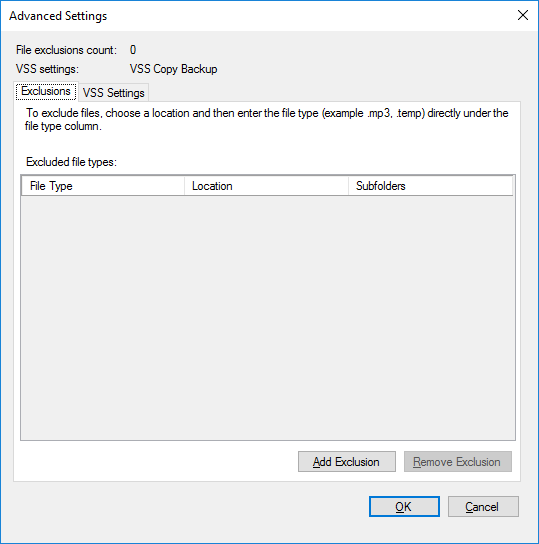
Нажимаем Add Exclusion. Добавляем в исключения диск B. Ok.
Переходим во вкладку VSS Settings.
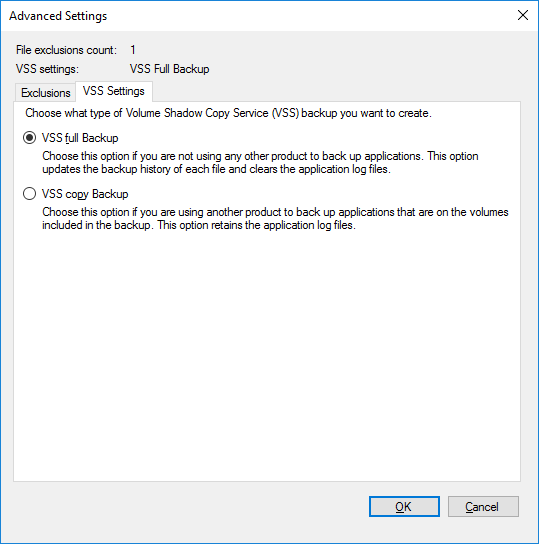
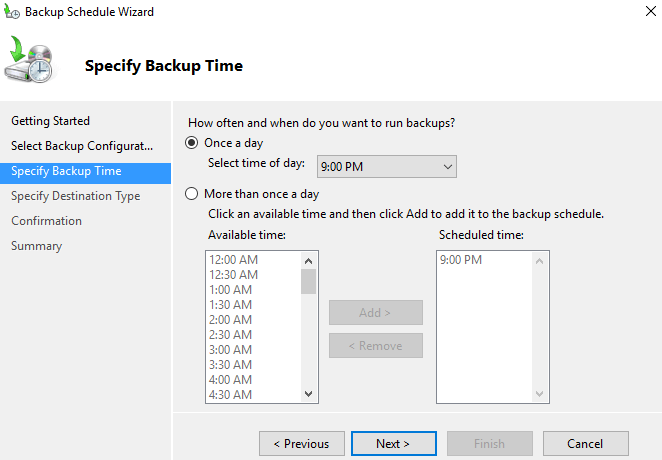
Выбираю VSS full Backup. На сервере будет крутиться какая-нибудь база данных, пусть будет полный бэкап. OK. Открывается раздел Specify Backup Time.
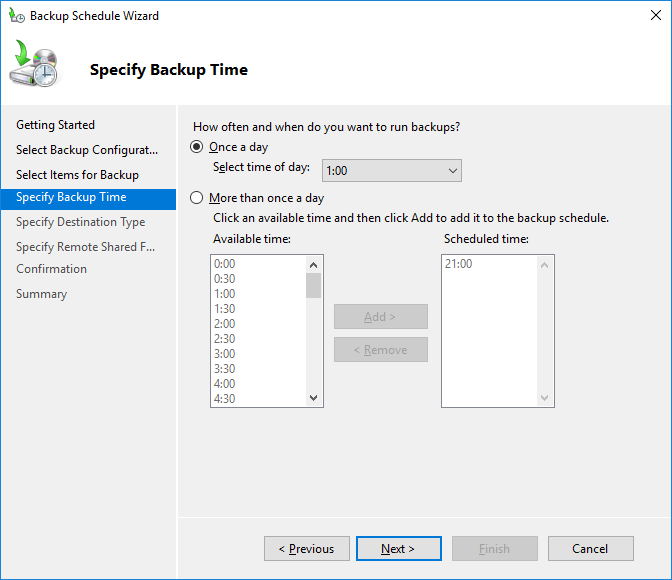
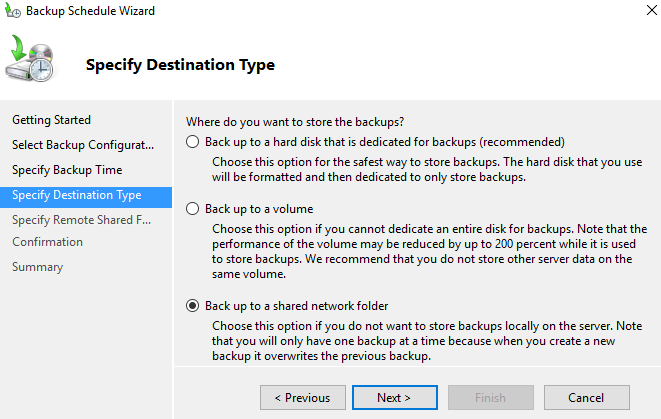
Вот тут меня поджидал первый привет от индусских разработчиков. Почему-то бэкапить нужно минимум раз в день. Раз в месяц нельзя. Лишний бэкап, конечно, лишним не бывает, однако я бы хотел бэкапить раз в неделю. Ладно, решим эту проблему позже. Делаем пока бэкап раз в день, в час ночи. Next. Открывается раздел Specify Destination Type.
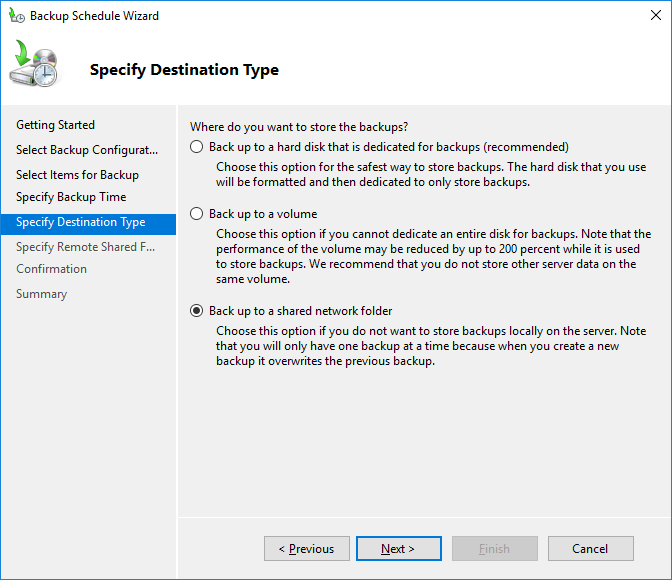
Нам предлагают три варианта бэкапа.
- На диск.
- На том.
- В сетевую папку.
Выделять целый диск или том под бэкап слишком жирно. Однако, это единственный вариант, когда нужно иметь несколько бэкапов. А вот бэкап в шару интересен, но есть минус — можно хранить только последний бэкап. Могли бы и пару бэкапов делать, странные какие-то разрабы — это второй привет от них. Ладно, при необходимости эта проблема тоже решается. Интересно, что будет с сервером,если ОС сдохнет в момент бэкапа… Выбираю Back up to a shared network folder. Next.
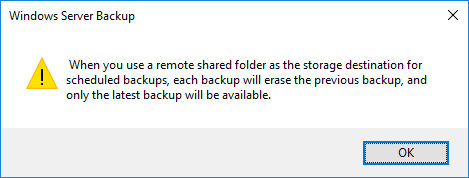
Вот как раз предупреждение о том, что храниться будет только последний бэкап. OK. Открывается раздел Specify Remote Shared Folder.
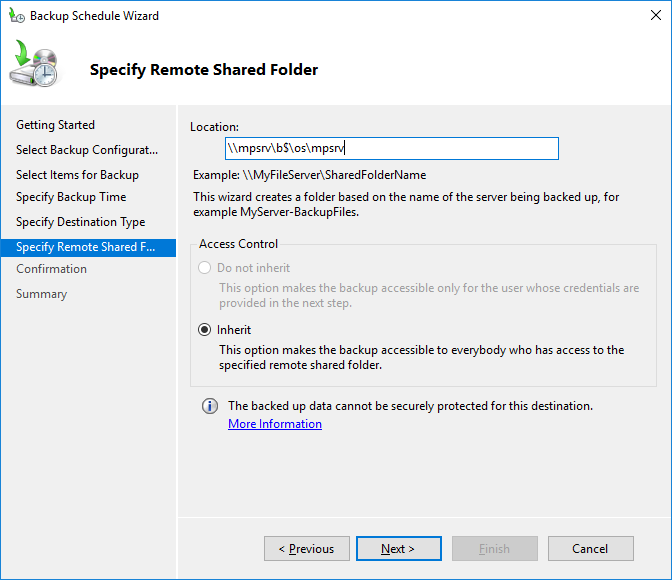
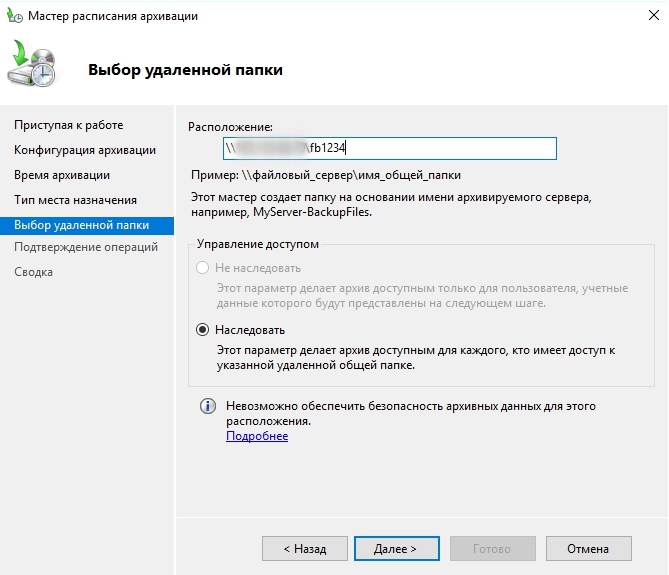
Нас просят указать шару, куда будем лить бэкап. Я хотел вообще-то на диск B, поэтому пишем путь на шару к диску B. Next.
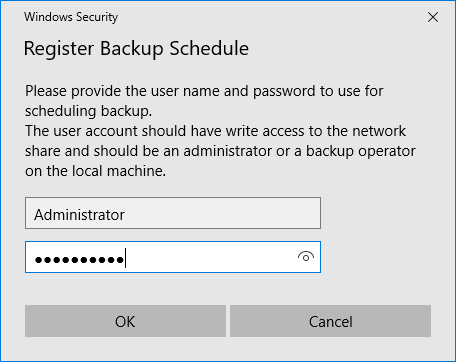
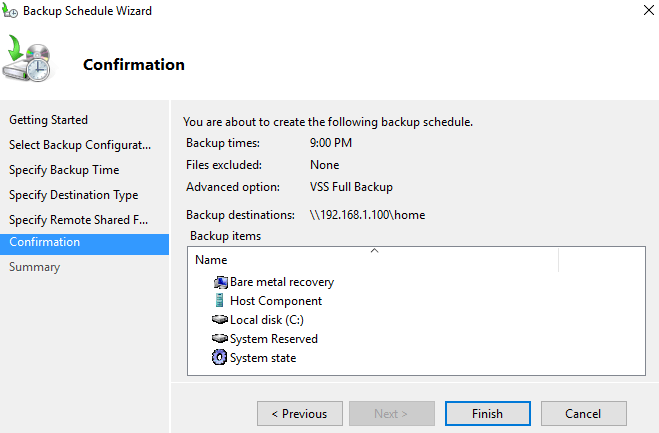
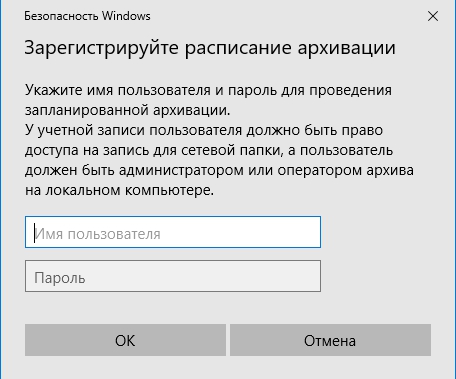
Указываем логин-пароль пользователя, от имени которого будет проводиться резервное копирование. OK. Открывается раздел Confirmation.

Finish. Открывается раздел Summary.
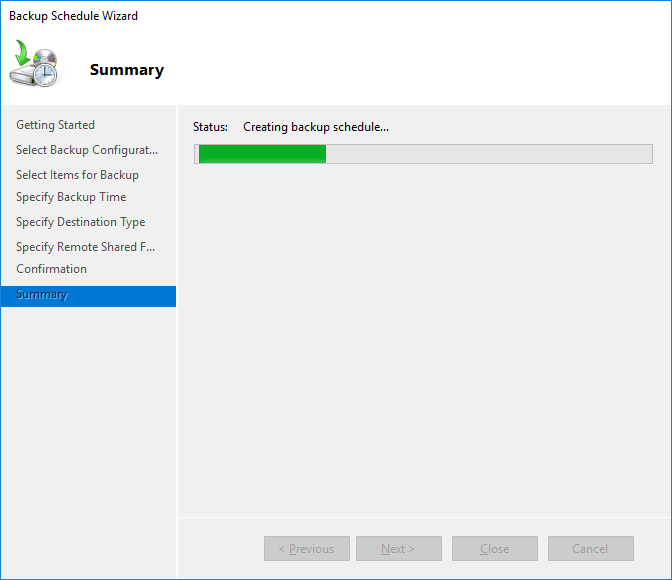
Запускается создание расписания для резервного копирования сервера.
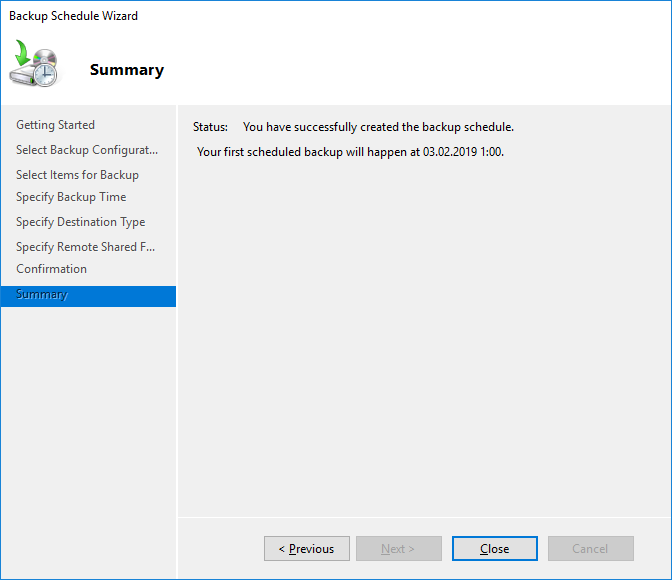
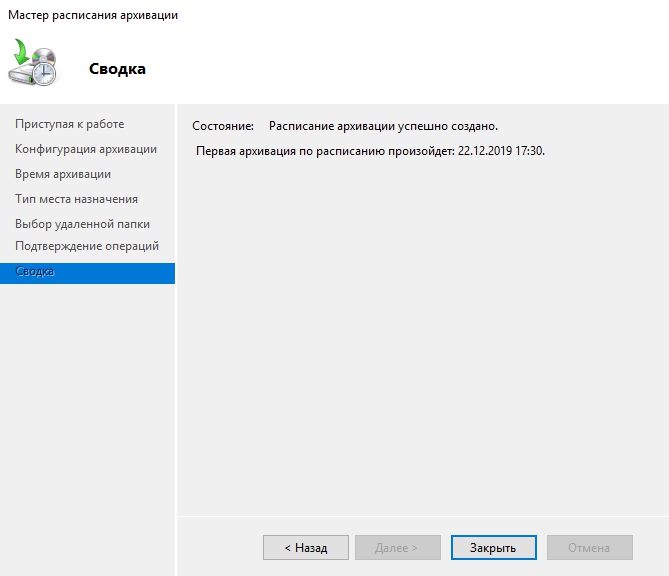
Расписание создано. Close.
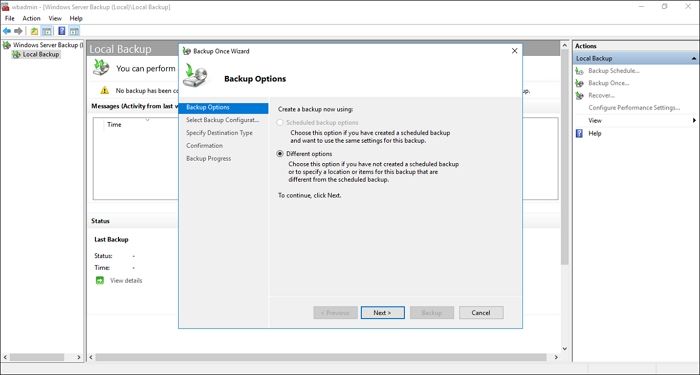
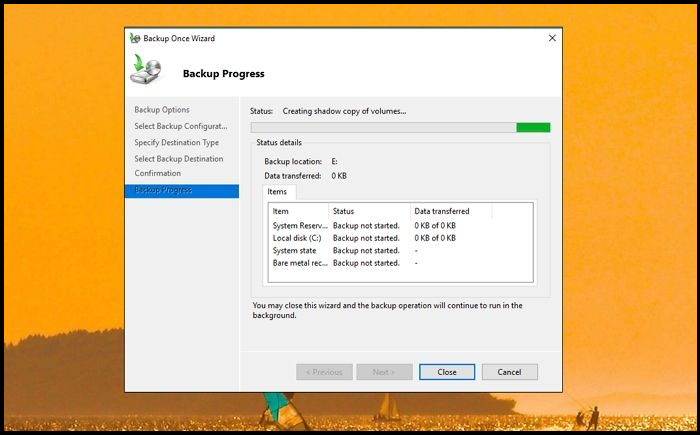
Теперь нужно проверить, всё ли работает. Сделаем один бэкап. Запускаем мастер Backup Once Wizard.

Выбираем Scheduled backup options. Next. Открывается раздел Confirmation.
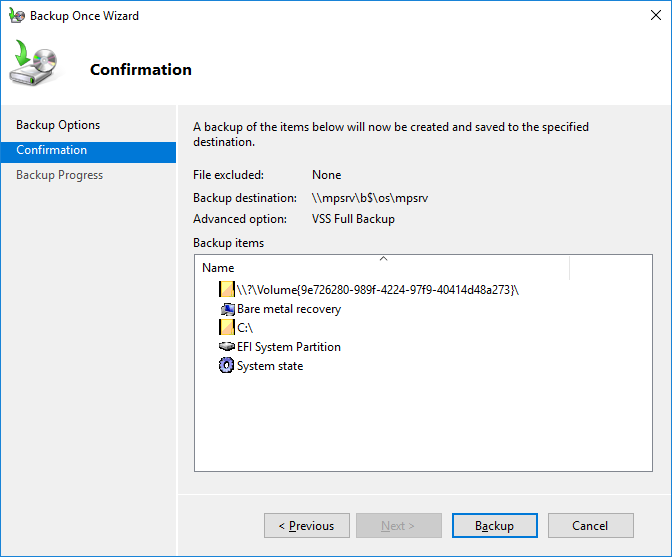
Backup.
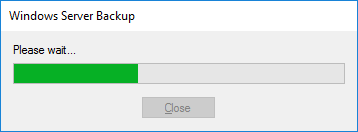
Ждём.
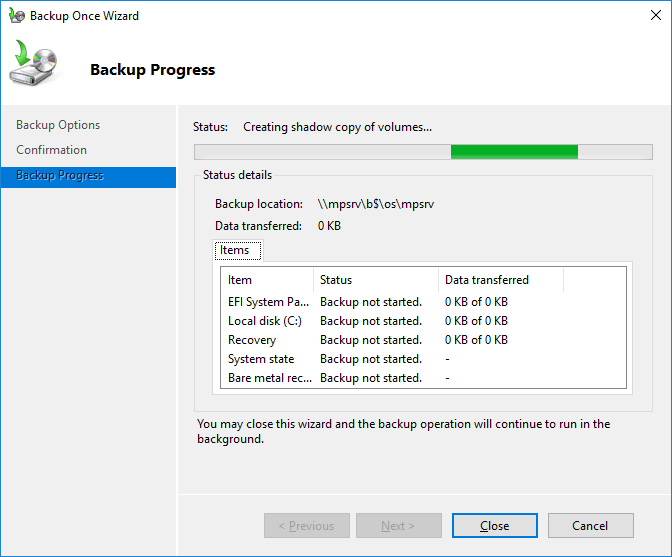
Запускается резервное копирование.
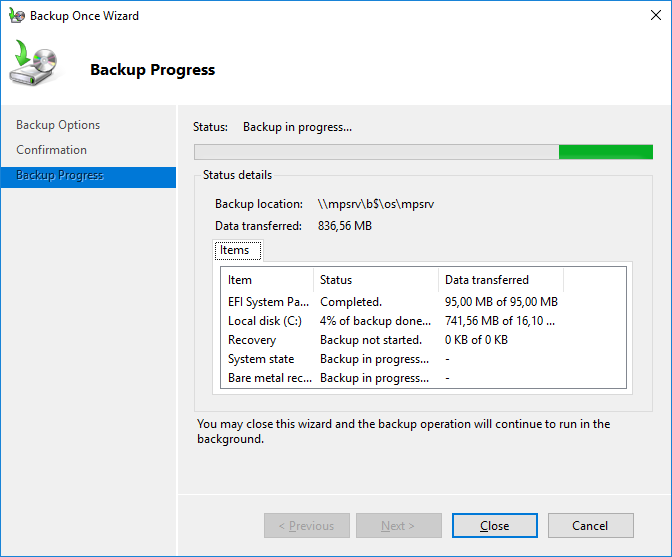
Побежали процентики, всё заработало.
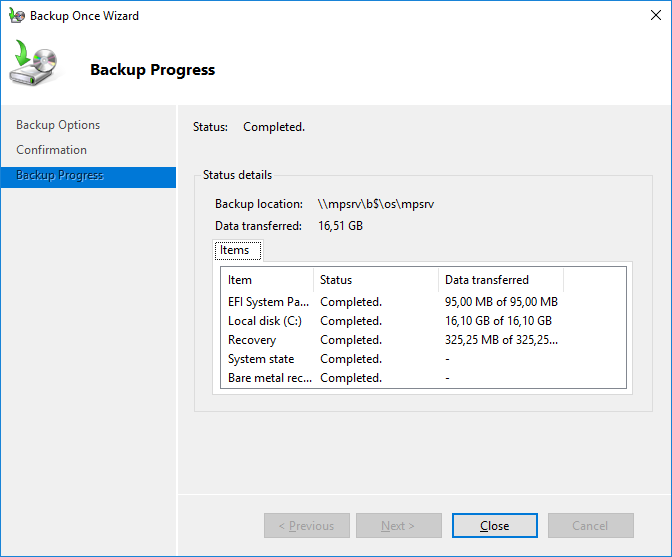
Completed.
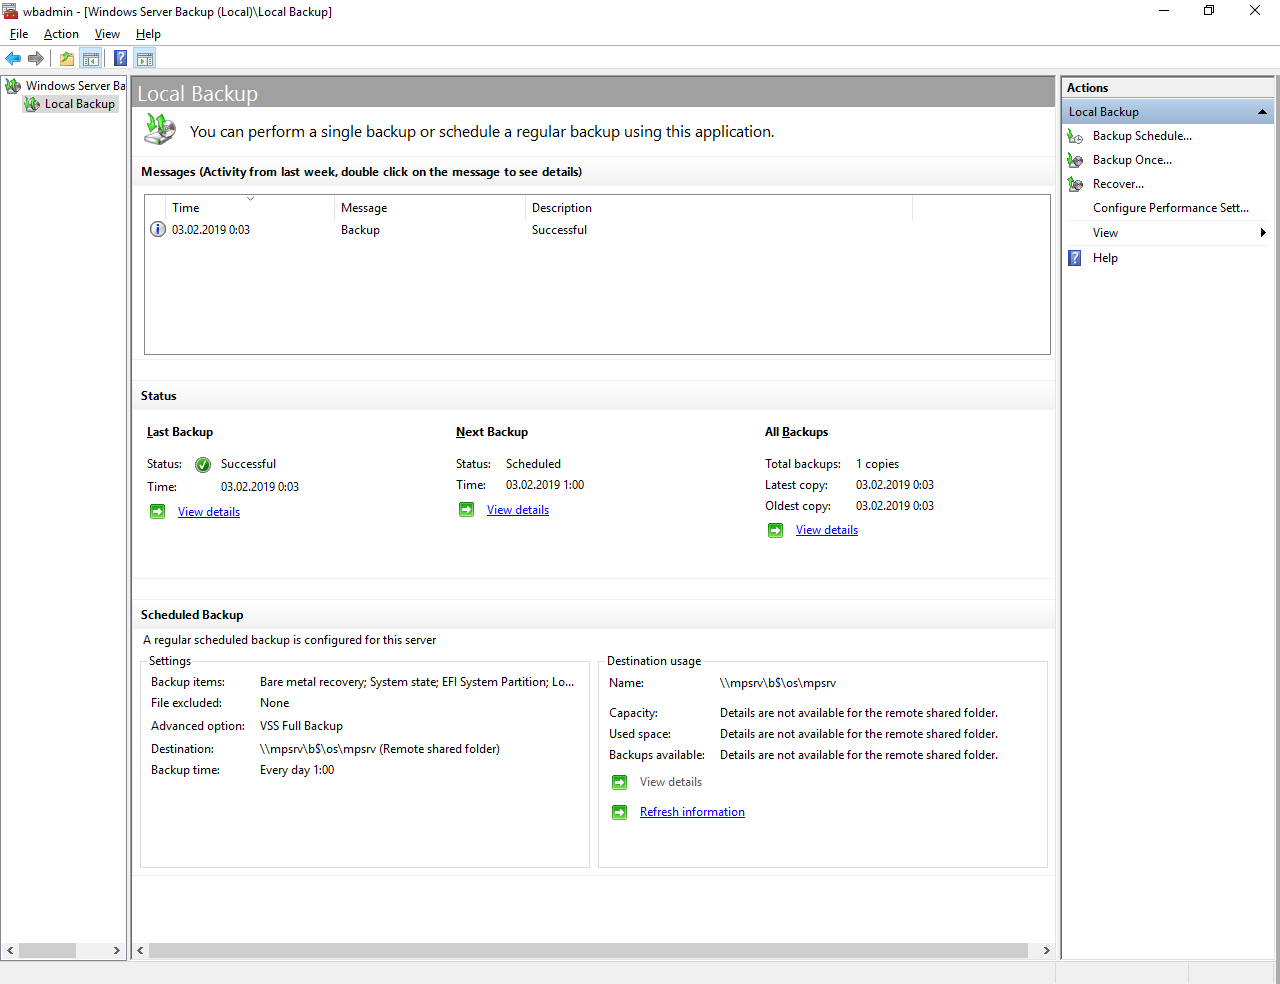
Теперь сервер будет бэкапиться каждую ночь.
Теперь изменим частоту резервного копирования как и планировали: раз в неделю:
Windows Server Backup — меняем расписание через Task Scheduler
Here we’ll show you How to Installing Windows Server Backup in Windows Server 2016 with PowerShell and then configure basic server backups.
In order to perform simple backup and restores out of the box, Windows Server 2016 provides the Windows Server Backup feature. While this does work it is fairly basic and lacks many useful features, if you have many critical servers to backup I highly recommend that you look at something else such as Microsoft’s Data Protection Manager (DPM) or a third party backup solution from some other vendor.
An example of this is that when you backup over the network to an external share with Windows Server Backup you can only store one restore point at a time, any further backups will overwrite existing ones which isn’t very useful if you actually need some sort of retention. The backups are also managed on a per server basis which makes them difficult to maintain and manage.
For this demo, Infrastructure Requirement:
- 1 DC SERVER (DC-CLOUD.Sifad.ae)
Before we can actually configure the backups, we must first install the Windows Server Backup feature. This can be done through the graphical user interface, however it’s just faster to simply use PowerShell.
1 – First we’ll use the Get-WindowsFeature cmdlet to search for available features that contain the string ‘*Backup*’ in the Name field.
Get-WindowsFeature -Name *Backup*
 As we can see Windows-Server-Backup is available for install but not currently installed.
2 – Next we use the Install-WindowsFeature cmdlet to install the Windows-Server-Backup feature, as shown below.
Install-WindowsFeature -Name Windows-Server-Backup
 Once complete we should see that the installation has completed successfully, no reboot is required for this feature, we can begin using it straight away.
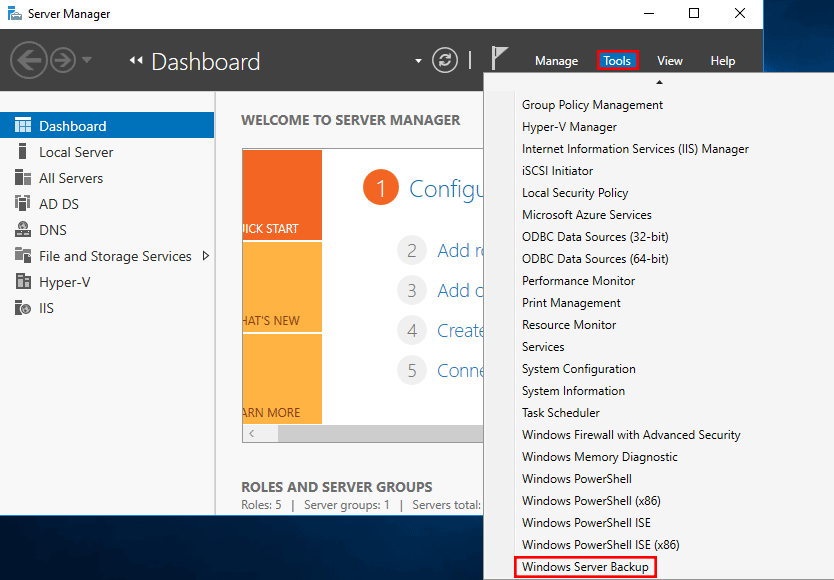
3 – On DC-CLOUD.Windows.ae server, in the Server Manager, click Tools, and then click Windows Server Backup.

4 – In the right hand Action window, click Backup Once.

5 – The Backup Once Wizard will open, on the Backup Options page leave Different Options select and click Next.

6 – On the next Select Backup Configuration window we can select if we want to perform a full server backup which is the recommended and default action, or we can optionally select custom to pick specific volumes or files that we want to backup rather than the full server. In this example we will be configuring a full server backup, however you can change this to suit your requirements.

7 – Select Remote shared folder, then click Next.

8 – Enter the path to your Fast hosts backup space in the text box provided.

9 – You will be asked to confirm the details you have entered in earlier steps. Check these details are correct, then click Backup to start backing up your server.

10 – You will see the progress of your backup options. Click Close to end the Wizard.
 Once complete, your backed up images will be available in your backup space at: \\DC-CLOUD\Backup.
that’s all for now.., any Doubts type a commend.. 🙂
Here we’ll show you how to install the Windows Server Backup feature in Windows Server 2016 with PowerShell and then configure basic server backups.
We’ll also take a quick look at how the backup files are stored and see if they are at all encrypted or not.
In order to perform simple backup and restores out of the box, Windows Server 2016 provides the Windows Server Backup feature. While this does work it is fairly basic and lacks many useful features, if you have many critical servers to backup I highly recommend that you look at something else such as Microsoft’s Data Protection Manager (DPM) or a third party backup solution from some other vendor.
An example of this is that when you backup over the network to an external share with Windows Server Backup you can only store one restore point at a time, any further backups will overwrite existing ones which isn’t very useful if you actually need some sort of retention. The backups are also managed on a per server basis which makes them difficult to maintain and manage.
Install Windows Server Backup Feature
Before we can actually configure the backups, we must first install the Windows Server Backup feature. This can be done through the graphical user interface, however it’s just faster to simply use PowerShell.
First we’ll use the Get-WindowsFeature cmdlet to search for available features that contain the string ‘*Backup*’ in the Name field.
PS C:\> Get-WindowsFeature -Name *Backup*

As we can see Windows-Server-Backup is available for install but not currently installed.
Next we use the Install-WindowsFeature cmdlet to install the Windows-Server-Backup feature, as shown below.
PS C:\> Install-WindowsFeature -Name Windows-Server-Backup

Once complete we should see that the installation has completed successfully, no reboot is required for this feature, we can begin using it straight away.
Configure Backups
Now that we have installed the Windows Server Backup feature, we can begin to configure our server backups. To begin we’re going to open the Windows Server Backup console from the Tools menu in Server Manager as shown below.
From the wbadmin window that opens up, select “Local Backup” from the menu on the left. We will see that there is a warning noting that no backup has been configured for this computer, which is currently expected. We can either configure a backup schedule which will perform the backup as we define, or we can perform a once off backup. Here we’ll setup a backup schedule, by clicking “Backup Schedule” on the right.
This will open up a Getting Started window advising that we can use this wizard to configure a regular backup schedule for the full server, system state, selected files, folders or entire volumes – click Next to proceed.
On the next Select Backup Configuration window we can select if we want to perform a full server backup which is the recommended and default action, or we can optionally select custom to pick specific volumes or files that we want to backup rather than the full server. In this example we will be configuring a full server backup, however you can change this to suit your requirements.
The next window allows us to specify the time the backup should run. We can set the backup to run once daily at a specified time, or we can optionally have it run multiple times per day by selecting the more than once a day option and adding the times the backup should run to the right side.
Next we will be asked to specify the destination of our backup data. The recommended option is to store the data on a separate disk that is attached to the server, however we can also change this to backup to another volume, or a network share. In this example I’ll be using a network share as I have one available, however note that there is a limitation of this, we will only be able to store one backup point at a time as new backups will overwrite the existing one. This limitation does not exist when you backup to another disk or volume.
We will now specify the network location, here I pick a file share that is available on the local network and click Next to continue. If you selected a disk or volume destination rather than network, you would instead be asked to pick that disk or volume here.
Finally we are presented with a confirmation screen which will summarize our options, click the Finish button to complete the process and accept this, or otherwise go back and make any changes as needed. The summary notes that as we are performing a full backup, we will be able to perform bare metal recovery of the entire system which is fairly powerful.
That’s it, the backup should automatically start at the time specified. We can manually initiate it by going back to the Windows Server Backup window and selecting “Backup Once”. From here we are given the option to create a once off backup based off of our scheduled backup, so all of the same settings will be used but we will be running the backup now rather than at the scheduled time.
Are Windows Server Backups Encrypted?
This is a common question that I’ve seen asked a few times, so I thought I’d take the opportunity to answer it here. No, by default backups in Windows Server 2016 (and previous versions for that matter) are not encrypted. We can confirm this by simply browsing to the location that we have specified to backup the data to and look through it. Primarily a .vhdx file is created for the C:\ drive of the server, which we can easily mount through disk manager, assign a drive letter to and then browse through the files and folders.
To encrypt the backup files we could setup Bitlocker on the disks where the backups are being stored, however note that this only protects the data at rest. If the data can be accessed while the drive is available for the backup to work, it could also be read by any potential attacker during this time.
Summary
We have shown you how to install the Windows Server Backup feature in Windows Server 2016 using PowerShell, and then configure a basic backup schedule to a network share.
We also then confirmed that the backup files are not encrypted, so additional steps should be taken to protect them.
У операционной системы Windows Server имеется собственное средство резервного копирования, помогающее сэкономить на приобретении сторонних программ. Мы разберем по пунктам все необходимые шаги.
Содержание
-
Сетевая папка.
- Установка средства резервного копирования.
- Настройка утилиты WBADMIN.
- Добовление необходимого пользователя.
- Возможные ошибки.
- Восстановление.
Сетевая папка
Во избежании различного рода проблем для начало подключим удалённую сетевую папку к Вашему серверу.
Установка средства резервного копирования
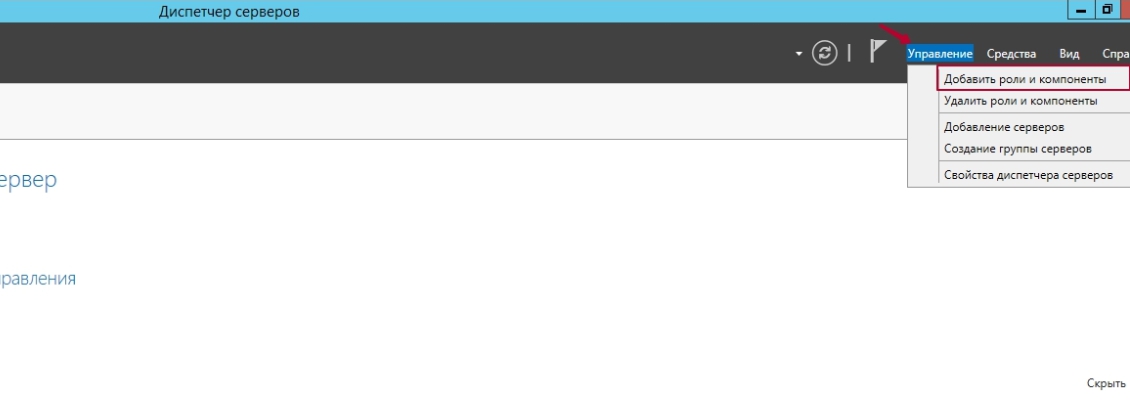
Откройте «Диспетчер серверов». В меню «Управления» нажмите на «Добавить роли и компоненты».
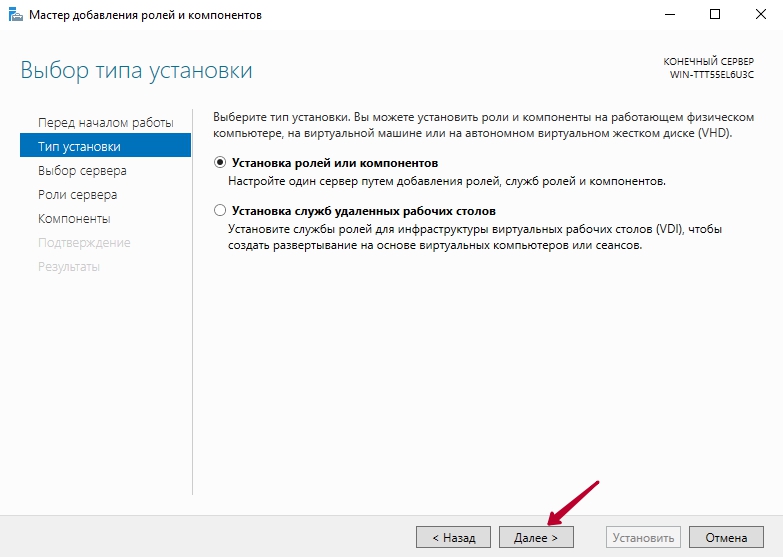
Откроется установочное окно, где перед началом работ нажмите кнопку «Далее».

Выберите «Установка ролей и компонентов» и нажмите «Далее».
Выберите Ваш сервер из пула серверов и нажмите «Далее».

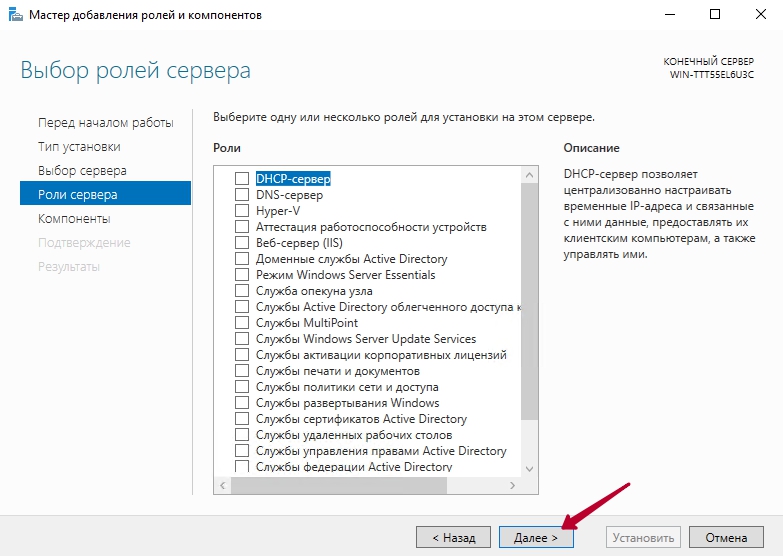
На вкладке «Выбор ролей сервера» нажмите «Далее».
После этого подтвердите нажав кнопку «Установить».

Начнется процесс установки компонента и по завершению закройте программу.

Настойка утилиты WBADMIN
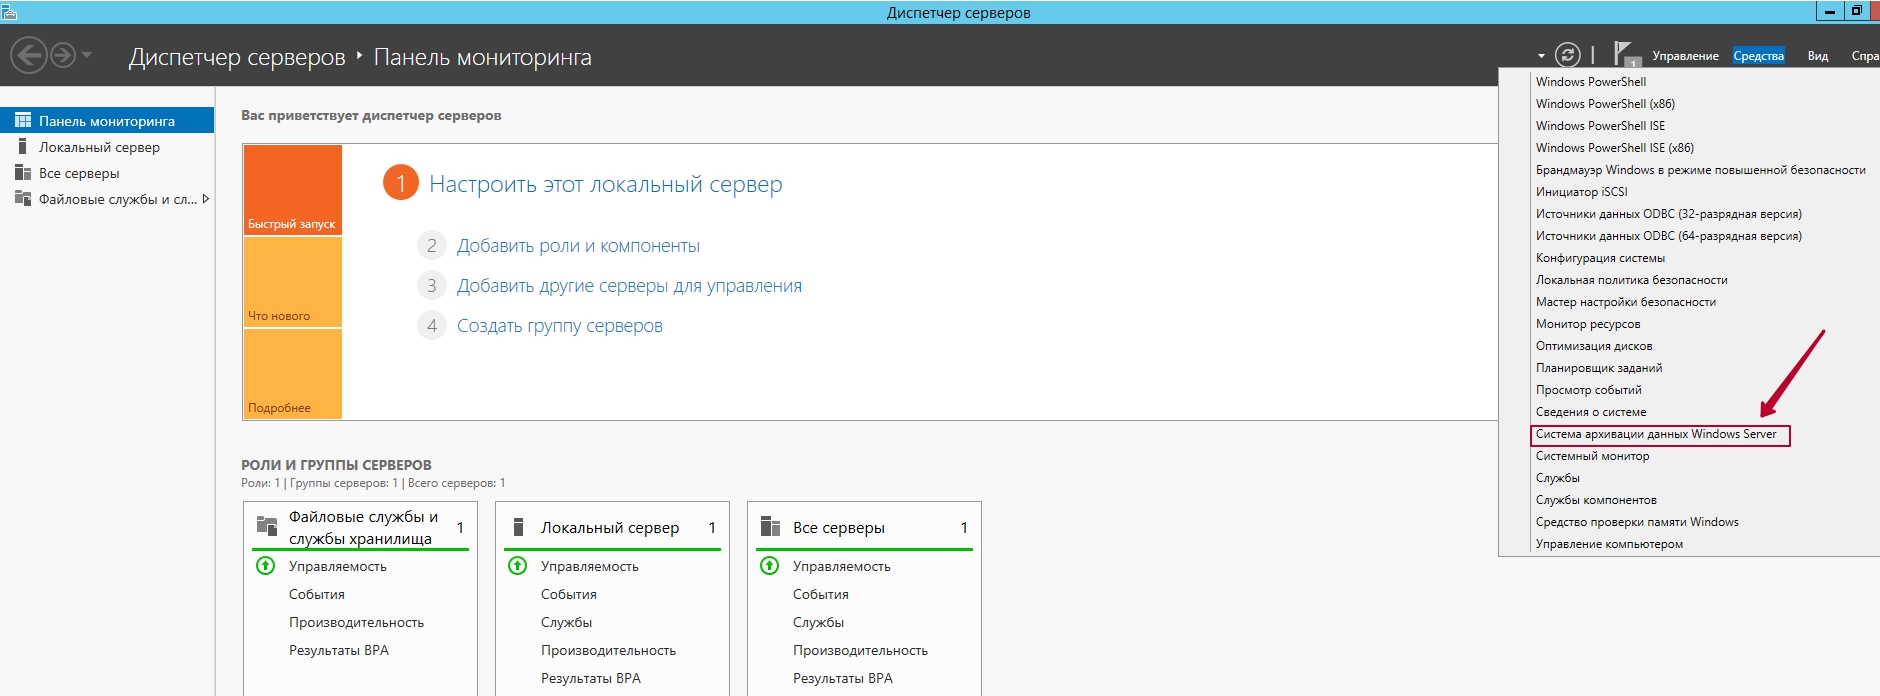
Чтобы открыть систему архивации данных Windows, зайдите в Диспетчер серверов и в правом верхнем углу выберите Средства. Из перечисленного списка выберите «Система архивации данных Windows Server».
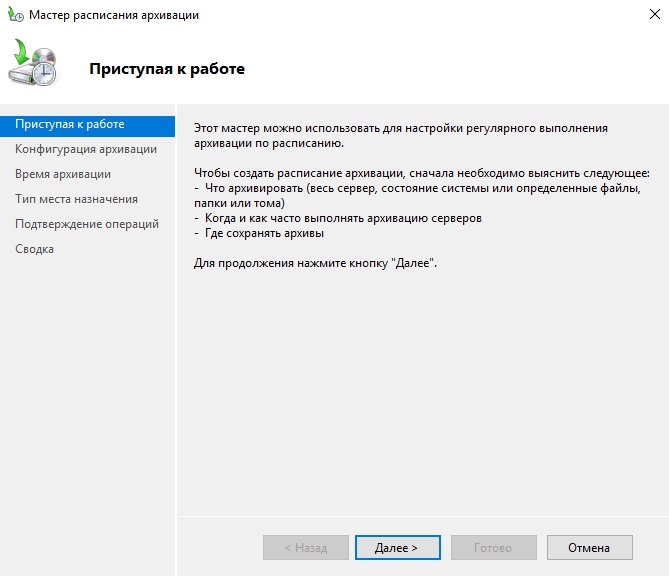
В открывшемся окне в меню слева нажмите «Локальная архивация». В горизонтальном меню справа можно настроить: расписание резервного копирования, одноразовое создание копии или восстановление.

Для настройки по расписанию выберите данный пункт в меню. Далее у Вас откроется меню параметров. Нажмите кнопку «Далее».
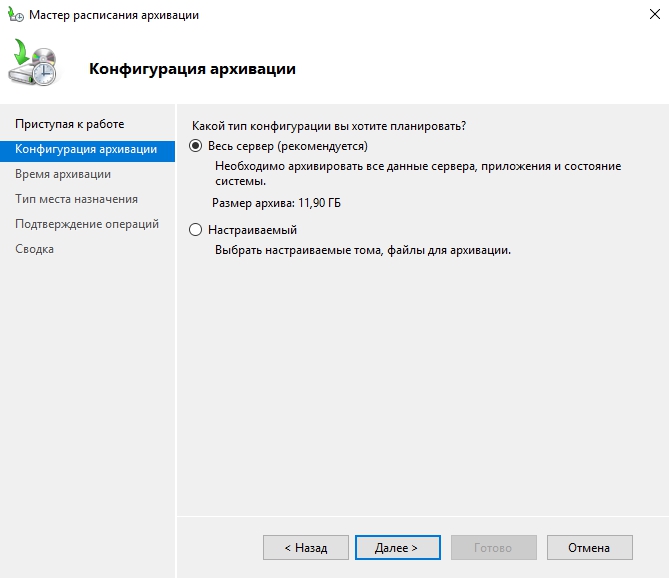
Вы можете настроить резервную копию операционной системы целиком или выбрать отдельно тома и архивы, которые требуются для бэкапа. Рекомендуем выбирать сервер целиком.
На следующем шаге требуется задать частоту создания резервной копии и её время. Вы можете выбрать определённое время или несколько вариантов в день. Однако помните, что при создании копий на удалённую сетевую папку — хранится только одна последняя копия бэкапа.

При выборе удалённой папки укажите месторасположения её целиком — \\IP-сервера\название папки

По окончанию требуется проверить все настраиваемые параметры сверху и нажать «Готово».

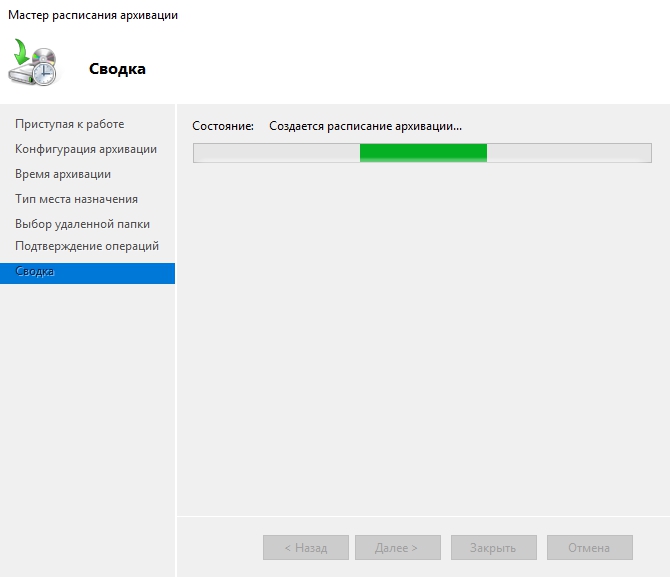
Начнется создание расписания архивации.
По завершении нажмите кнопку «Закрыть».
Добавление необходимого пользователя
Данная процедура необходима для корректной работы системы резервного копирования Windows. При подключении к удалённой сетевой папки система будет запрашивать данные доступа (Имя пользователя и пароль). Для синхронизации программы с месторасположения директории бэкапа, Windows требуется создать пользователя с такими же данными, как у пользователя с удалённой сетевой папкой.
Для начало требуется зайти «Пуск» — «Панель управления».
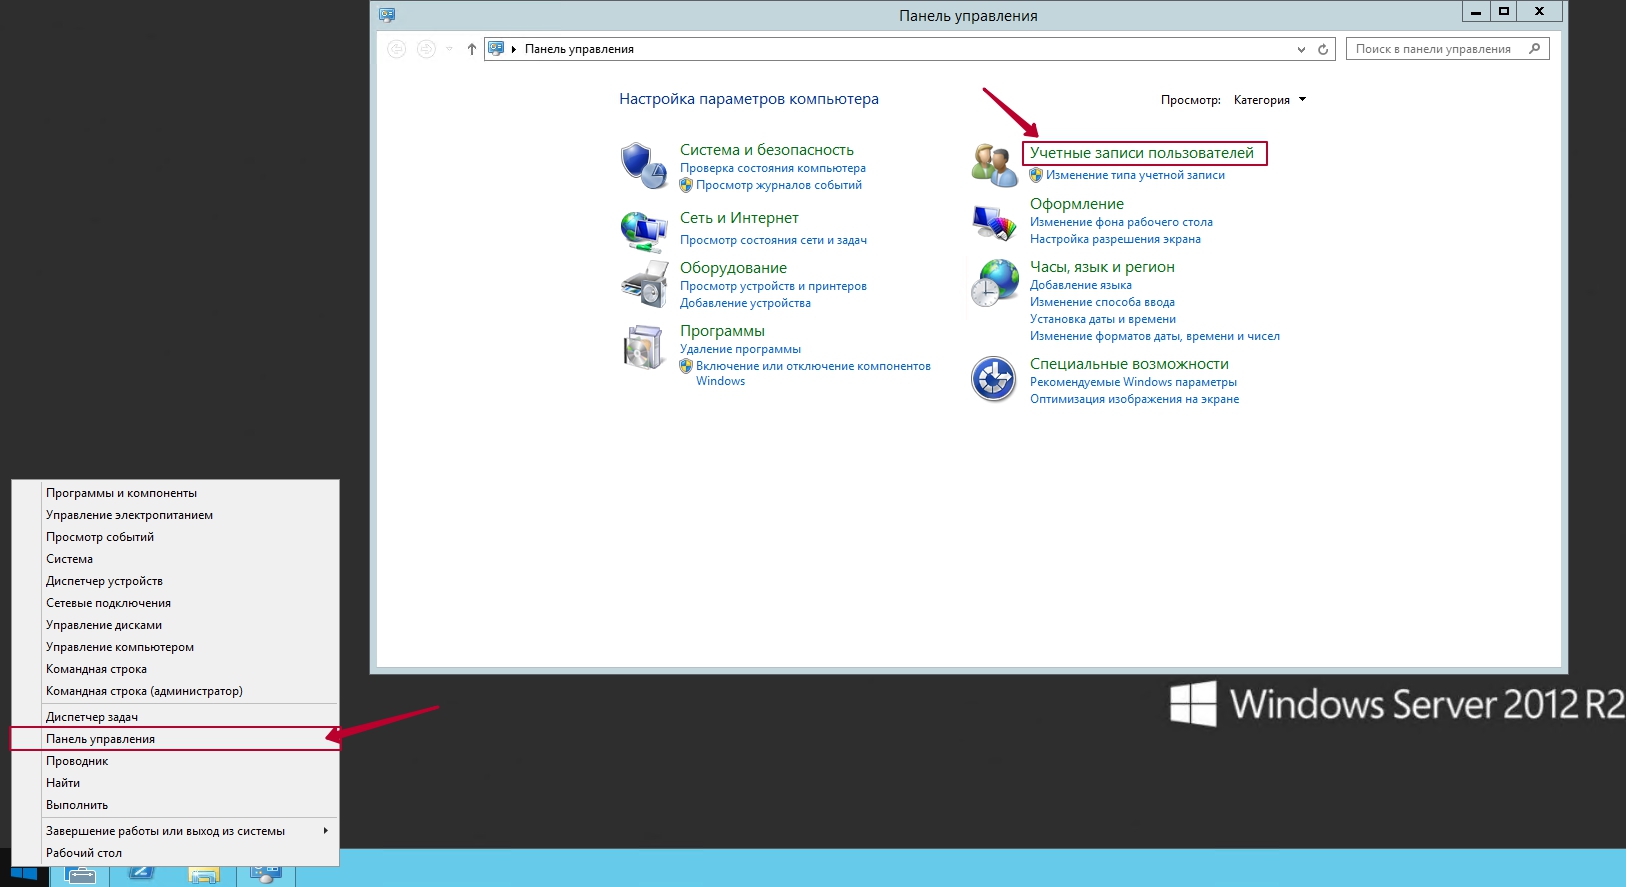
Далее выбираем «Учетные записи пользователей».
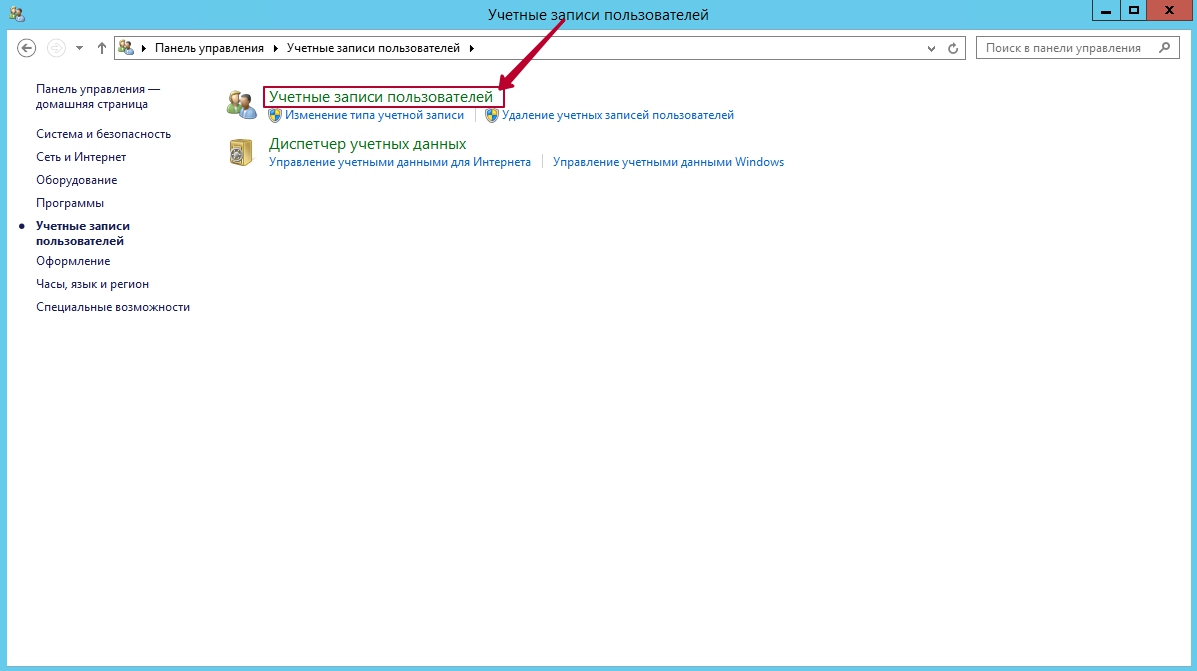
После этого выберите «Управление другой учетной записью».
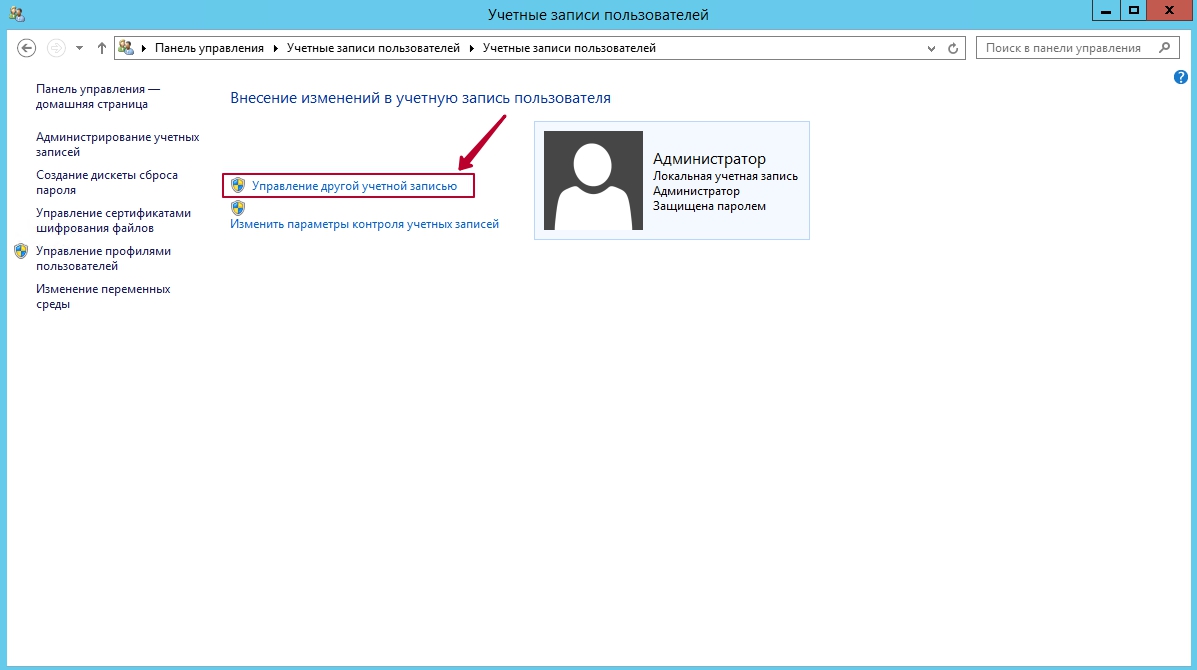
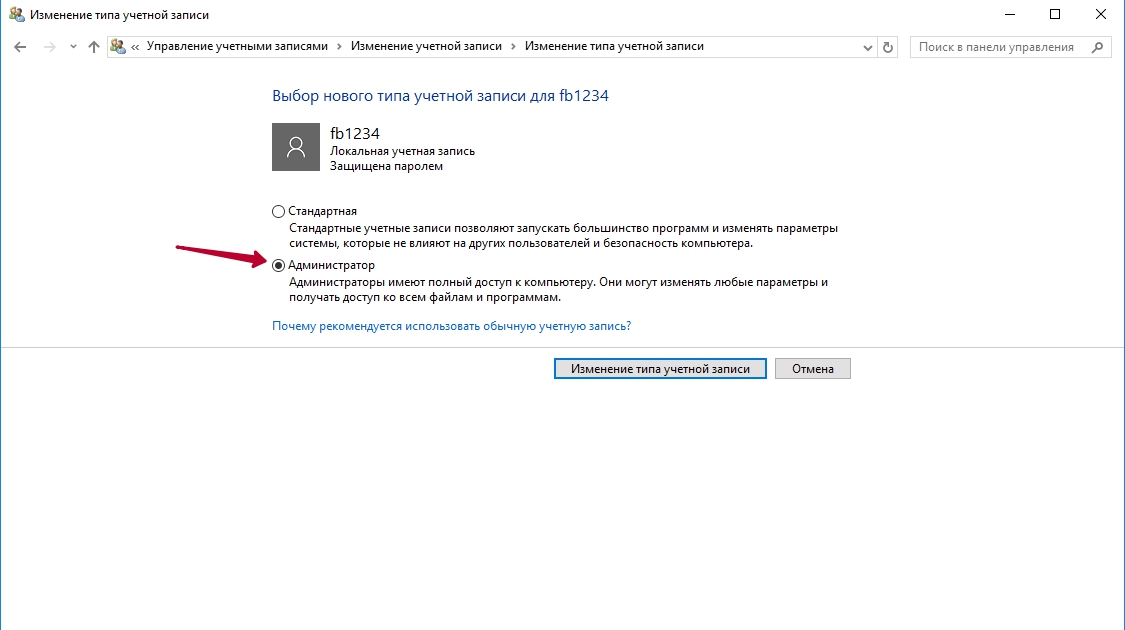
Добавьте новую учетную запись пользователя.
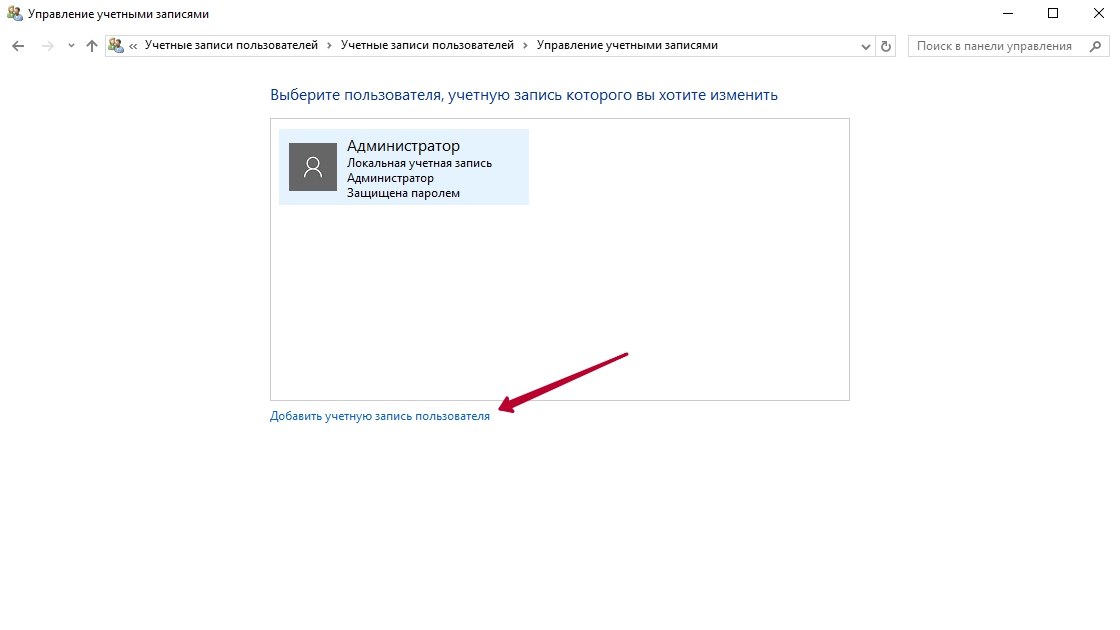
Внимание! Вносим имя пользователя и пароль от услуги Fairy Disk!
Статья «Где найти данные доступа к услуге Fairy Disk» — https://my.fairyhosting.com/knowledgebase.php?action=displayarticle&id=379

После создания учетной записи обязательно смените тип учетной записи на «Администратор».

Возможные Ошибки
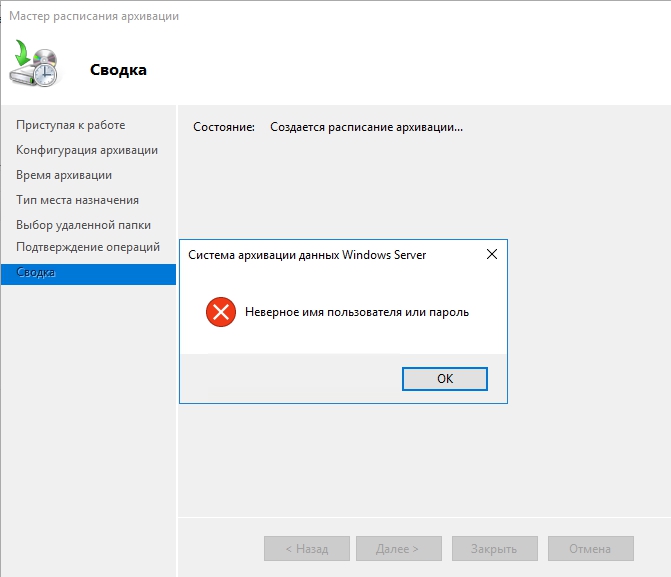
Ошибка 1. Если у Вас ошибка — «Неверное имя пользователя или пароль»
Решение: Неправильно введенные данные доступа. Пожалуйста проверьте язык ввода и выключен ли у Вас (Caps Lock).
Ошибка 2. Если у Вас ошибка — «Архивации данных не удалось запланировать выполнение архивации, поскольку пользователь, учетные данные которого были указаны, не входит в группу локальных администраторов или операторов архива».
Решение: Неправильно создан пользователь. Смотрите главу «Добавление необходимого пользователя» выше

Восстановление
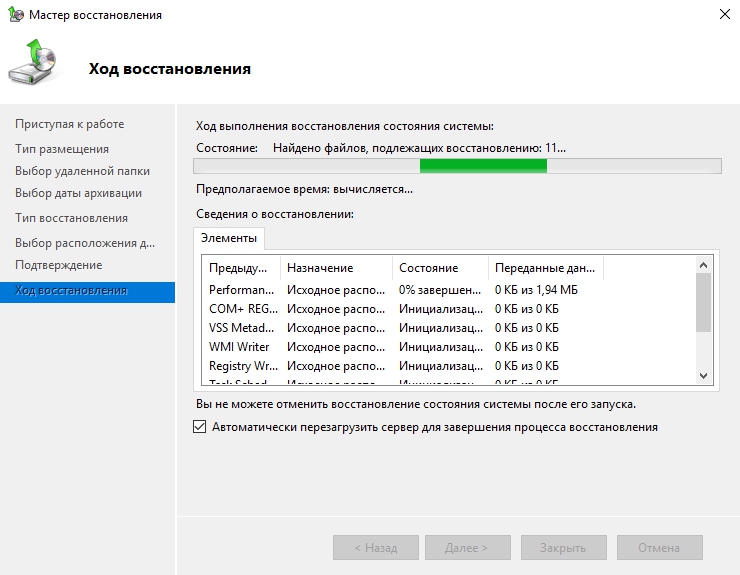
Выберите в оснастке «Восстановление», чтобы открыть Мастера по восстановлению системы.

Выберите источник резервной копии «Архив находится в другом расположении».

Тип размещения будет «Удаленная общая папка».
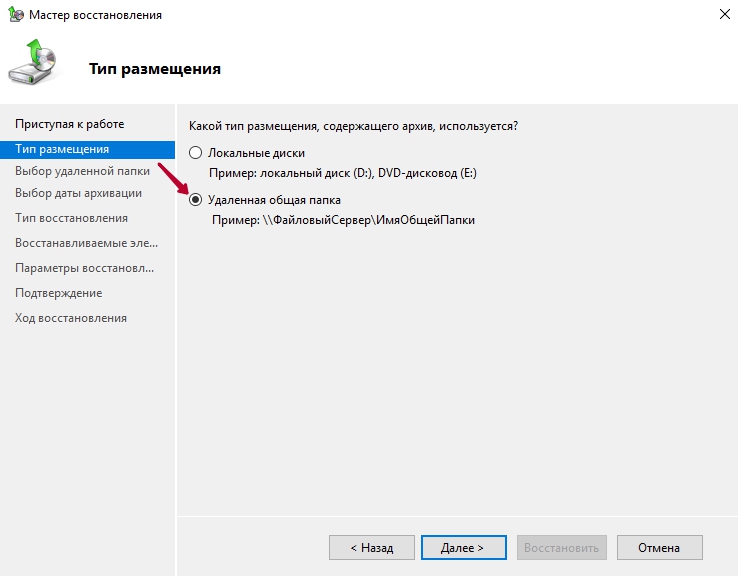
Введите путь до сетевой папки.

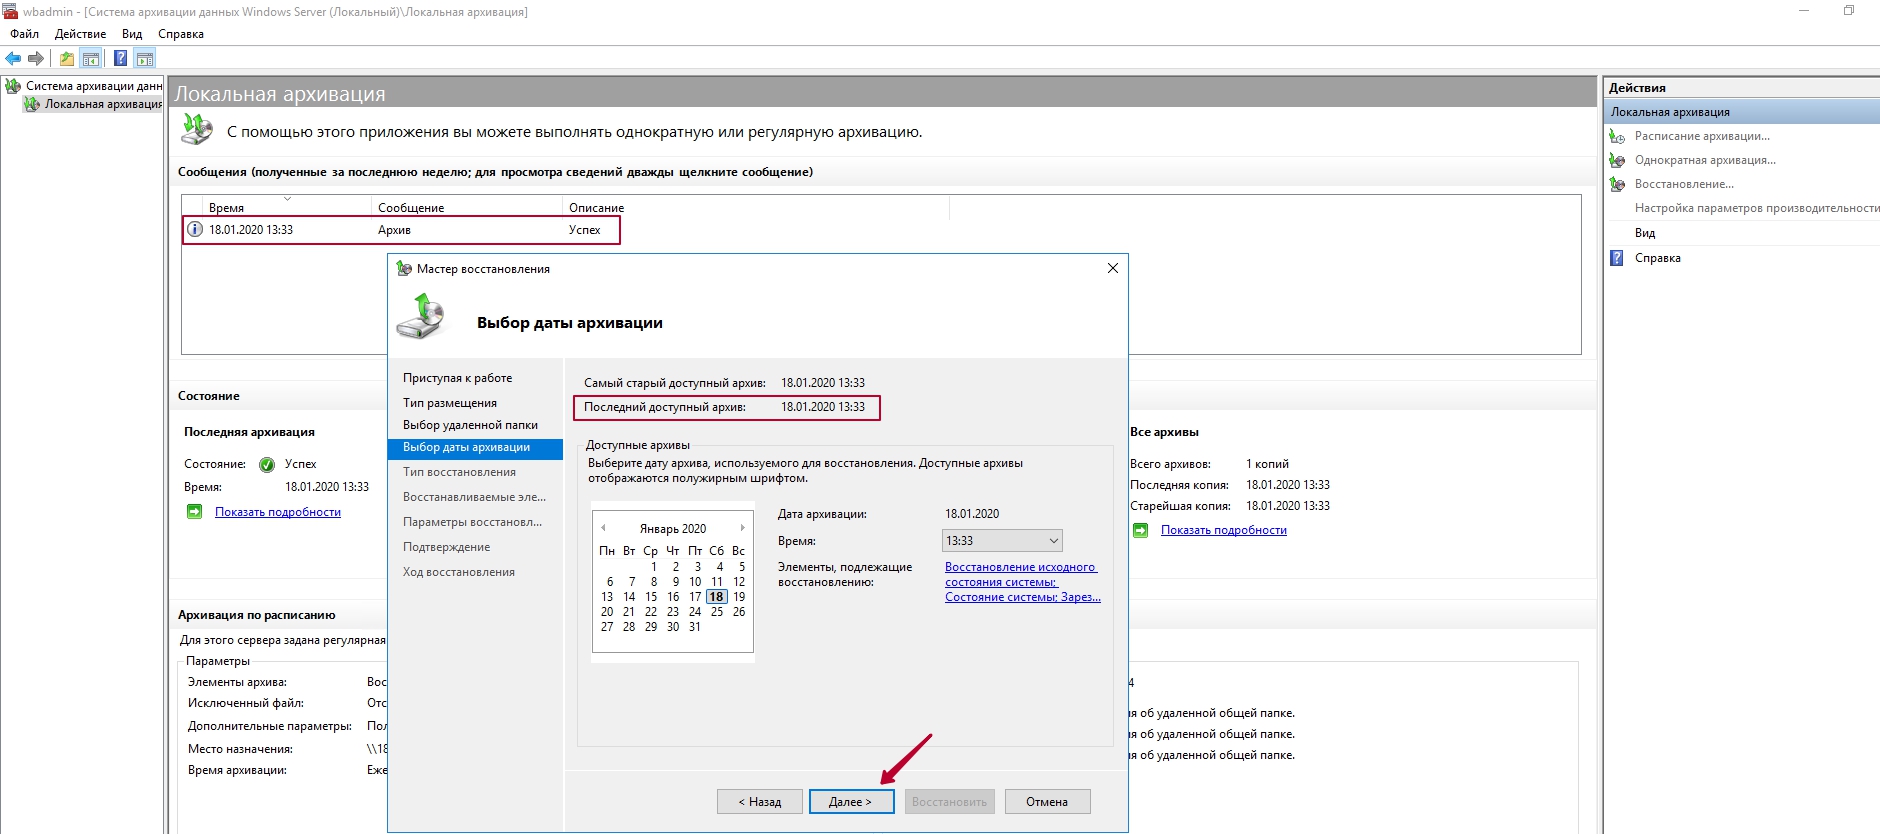
На следующем шаге выберите нужную точку для восстановления — дату и время. Помните, что на удалённой сетевой папке хранится только одна последняя копия резервной копии.
Далее укажите, что именно требуется восстановить. На выбор: файлы и каталоги, тома файловой системы, приложения или состояние системы. В нашем случае, мы восстановим систему полностью, выбрав «Состояние системы».
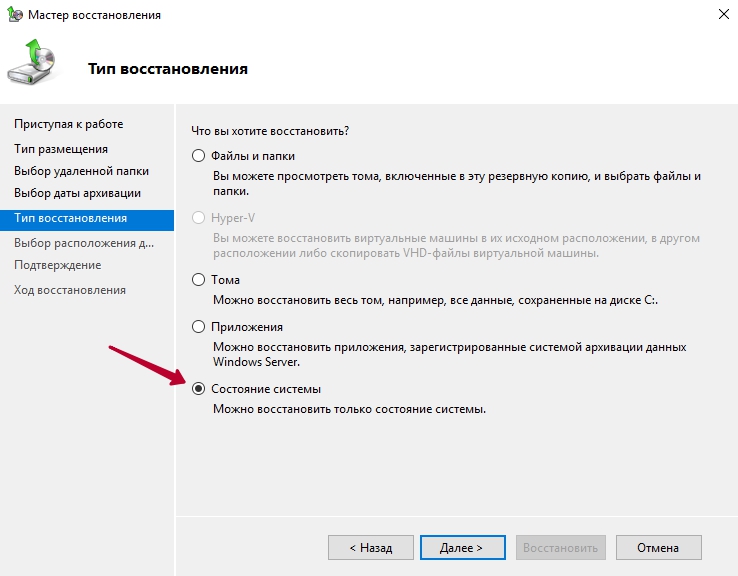
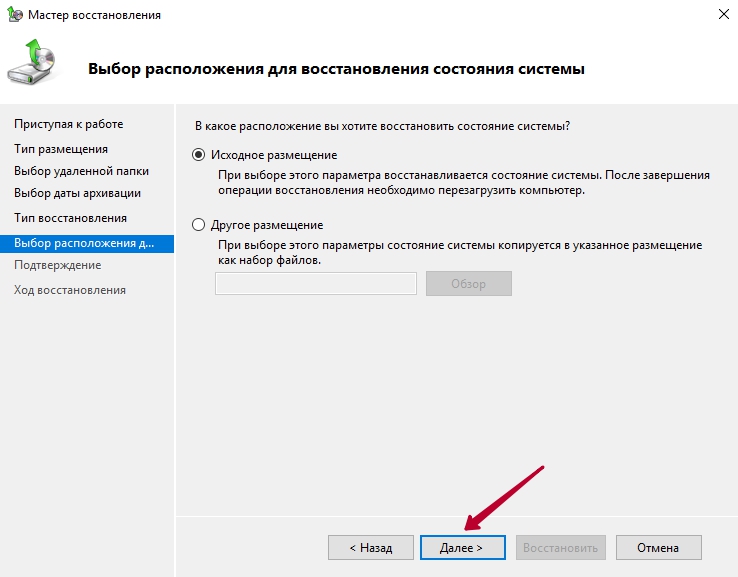
Оставляем «Исходное размещение».
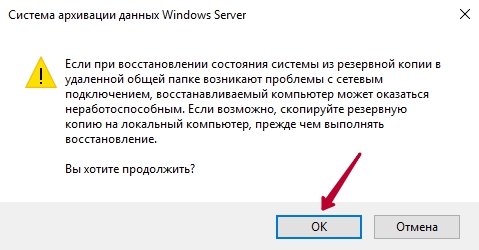
Далее Вас оповещают, что система восстановления может быть восстановлена некорректно, если возникнут проблемы с сетью. Нажмите «ОК».
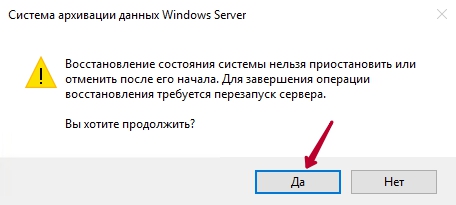
Подтвердите, что хотите восстановить состояние системы полностью. Нажмите «Восстановить».
Обратите внимание, что систему восстановления после начало работы нельзя будет приостановить!

После этого начнется процесс восстановления системы.
После завершения потребуется перезагрузить сервер и по завершению откроется терминатьное окно, об успешносм восстановлении системы.
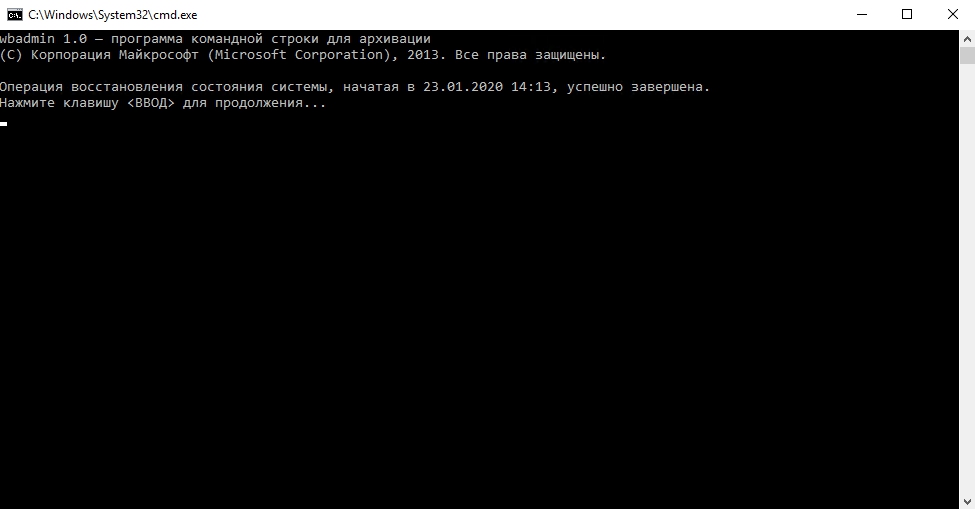
Готово.
Do you want to have a backup of the Windows Server 2016? Various situations may lead to data loss. For instance, you can encounter an issue with the operating system. Ultimately, you need to take the necessary steps to have a backup.
There are two distinct ways you can back up Windows Server 2016. One is with the Windows Server Backup, and the other is via reliable and effective data recovery software. This article will dive into the process you need to follow to back up Windows Server 2016.
Why Do You Back Up Windows Server 2016?
Are you wondering why you need to back up Windows Server 2016? Well, the answer is relatively simple. Data security is one of the most vital aspects for users. And when it comes to enterprises, data loss can lead to devastating consequences. Various causes can lead to data loss.
- For instance, you can face a power failure or device breakdown.
- Apart from that, you can also lose data due to software upgrades or malfunctions.
- In some cases, human errors can lead to that massive data loss.
- Irrespective of the data loss, you need to have a solution beforehand.
- Otherwise, you can expect anxiety and stress levels to shoot up. That solution you can seek is a backup.
There is nothing to worry about when you use Server backup software. It is one of the most secure methods one can use to protect crucial data. Windows server is specifically used in enterprise environments and, as such, need such protection even more. Now, you could also go through the data recovery pathway. But that requires a significant amount of investment with no particular guarantee.
One of the best ways to back up Windows Server 2016 is via the Windows Server Backup. WSB is an essential backup software for Servers. However, before we proceed, it is vital to know more about this feature.
What Is Windows Server Backup
Windows Server Backup or WSB is a critical feature of Windows that offers recovery and backup options to users using Windows Server. However, to use this feature, you must first install it on the Windows Server. With the Windows Server Backup, you can back up specific files, folders, system states, particular volumes, and an entire server.
The Windows Server Backup also makes it easy for users to recover the data. You can recover files, folders, system states, particular applications, and volumes without hassle. In the event of failure of the hard disks, you can opt for the bare metal recovery.
The feature also allows you to manage backups for both remote and local computers. Microsoft introduced this feature intending to help anyone needing a Windows Server backup.
Here, we will discuss how to use Windows Server Backup to back up Windows Server 2016 in detail. Take a look:
How to Install Windows Server Backup
Step 1. Go to Server Manager. Press the Manage option. Tap on Add roles and features.
Step 2. Keep on hitting Next till you reach the Features page. You need to scroll down under the Features section on the Select Feature page. There, you will see the Windows Server Backup option.
Step 3. Tick-mark the option and press the Next button. It will lead to the Confirm Installation Selections page.
Step 4. There click on the Install button. Wait for some time for the installation to finish.
- Notice:
- Keep in mind that there is no need to reboot or restart Windows Server to install the feature.
After the installation, you need to develop a backup plan. There are different backup plans you can select from. These include the whole server, files and folders, critical volume, individual volumes, and system state. It is crucial to choose a particular backup plan and then move forward.
Steps to Back Up Windows Server 2016
Here are the steps you need to follow for the backup (For this article, we are opting for the Backup once option.)
Step 1. Launch Server Manager. Press «Tools», and then select «Windows Server Backup» from the drop-down list. Wait for the Windows Server Backup to open.
Step 2. You will see the Action menu on the right side. There are three options- backup schedule, backup once, and recover and schedule backup. Choose the option you want.
Step 3. It will lead to the Backup Options page. Here, you will come across two options – Scheduled backup options and Different options. Select the «Different options» and press the «Next button».
Step 4. The next page is the Select «Backup Configuration page». You will get two options – Full server and custom.
Step 5. If you choose the full server, the entire server will have a backup. On the other hand, custom allows users to select the files or folders they want to back up.
Step 6. Here, the full Server option is selected. Press the «Next button». The next page is the Specify Destination Type page. You need to choose between Local drives and the Remote shared folder.
Step 7. In this case, the Local drives option is selected. Tap the «Next button».
Step 8. On the next page – the Select Backup Destination page, you need to choose the drive where you want the backup. Press the «Next button». On the Confirmation page, select the «Backup option».
Now, you need to wait for the backup to complete. It may take some time, depending on the volume of the backup.
There is a video below to tell you how to install and use Windows Server Backup on Server 2016, if you have interest in it, you can watch it:
Timeline:
- 0:00 Start
- 0:36 Features – Windows Server Backup
- 0:51 Windows Server Backup installation done
- 0:58 Tools — Windows Server Backup
Perform Windows Server Backup 2016 with Software
Another way to back up Windows Server 2016 is to opt for a professional software — EaseUS Todo Backup Enterprise. You can use this excellent software to back up Windows Server 2016 seamlessly.
It is an easy-to-use software offering a wide range of features. There are several packages available where users can opt for the one that suits their needs. These include – Workstation, Server, Advanced Server, and Technician: the prices and features available vary.
Main features:
- Safeguards different business environments and sizes
- Comes with different cost-effective packages
- Reliable SQL Server backup software and Exchange Backup tool
- Business-level protection against various disasters
- Free trial with access to round-the-clock tech support
How to Back Up Windows Server 2016 via Software
Do you want to back up Windows Server 2016 with the EaseUS backup and recovery software? Are you wondering how to do that? Don’t worry! We are here to help.
Though the software is easy to use, you can still face problems. In that case, take a look at the steps listed below:
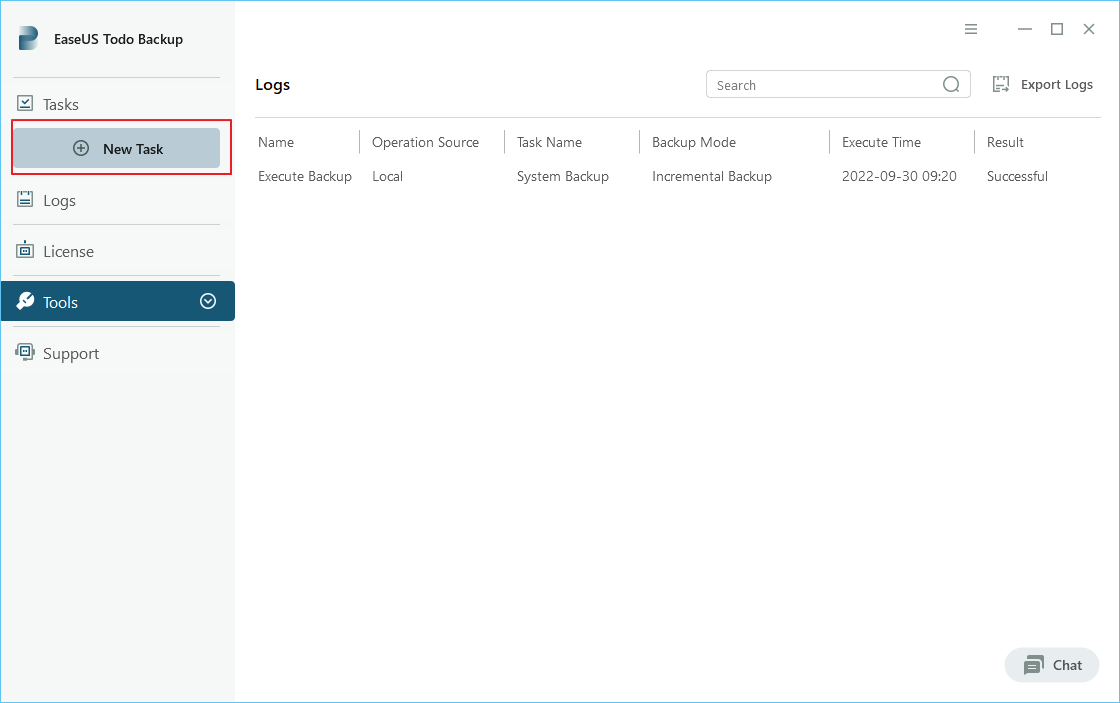
Step 1. Open EaseUS Todo Backup Enterprise. Then click «New Task» to set a new backup.
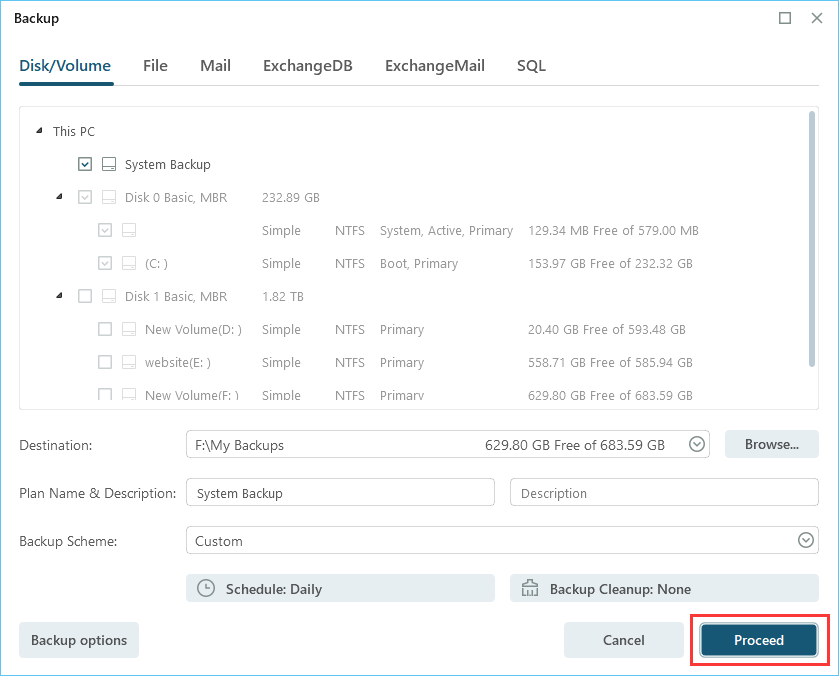
Step 2. Choose «Disk/Volume» as the target among the options at the top. Then select the system to back up.
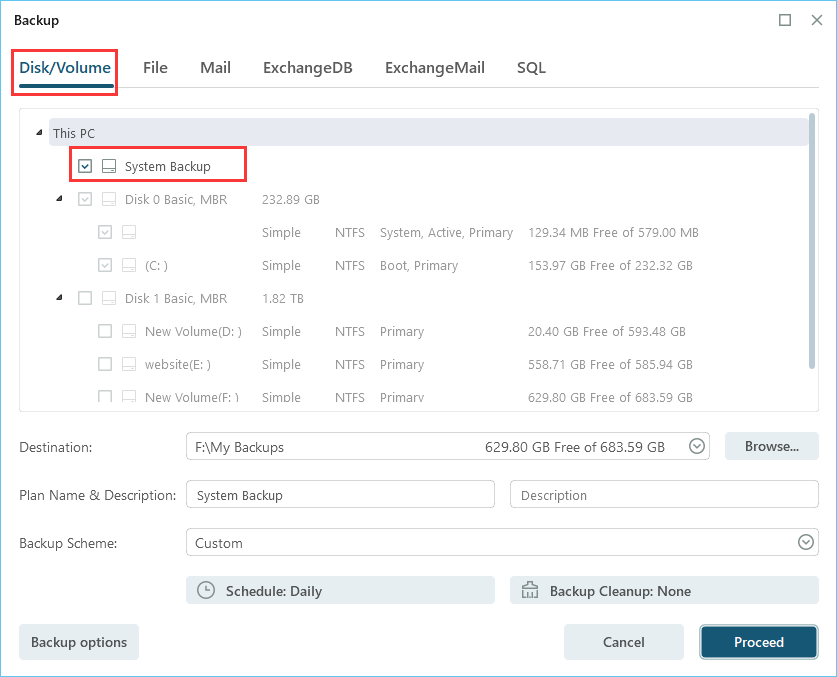
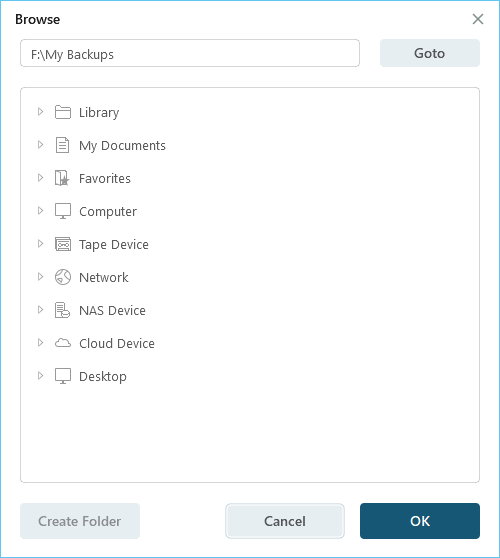
Step 3. Then click «Browser» to choose the destination where you want to put the backup.
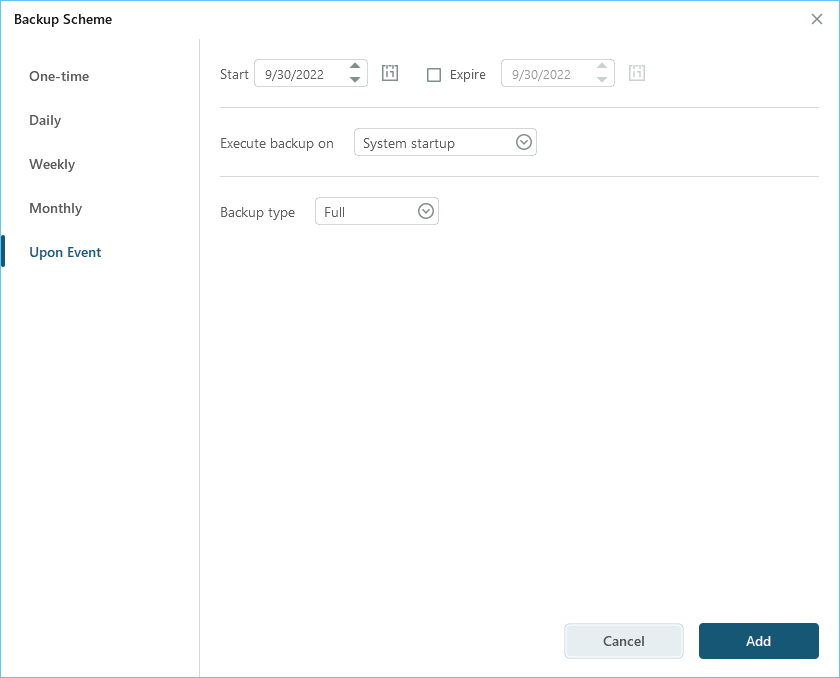
Step 4. You can customize your backup scheme by clicking «Schedule: Off«. Here you can see «Schedule«, «Backup cleanup» and «Adcanced Settings«. Click «New» under the «Schedule» catalog.
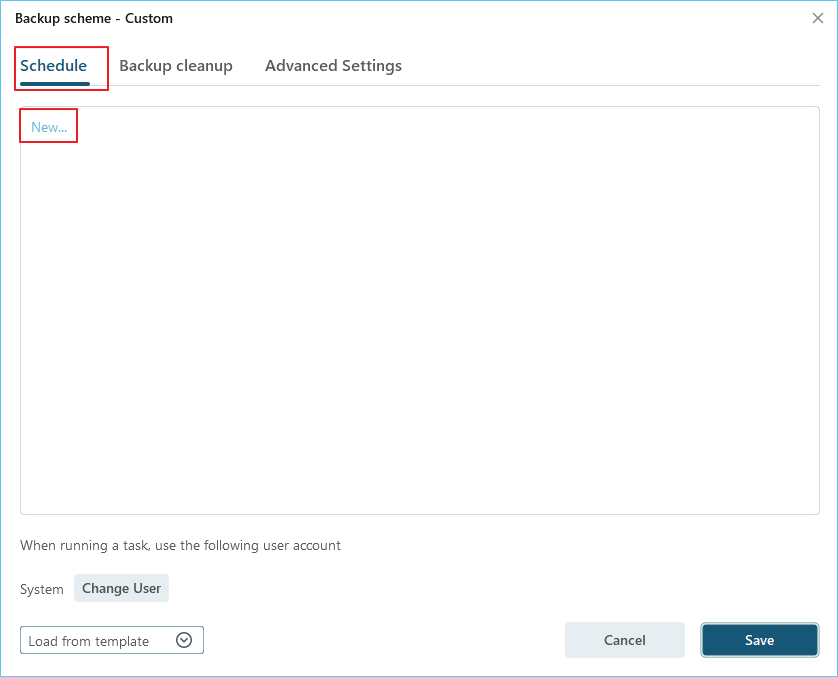
Then set the backup frequency based on your needs.
Step 5. Click «Backup options» on the bottom-left corner of the interface.
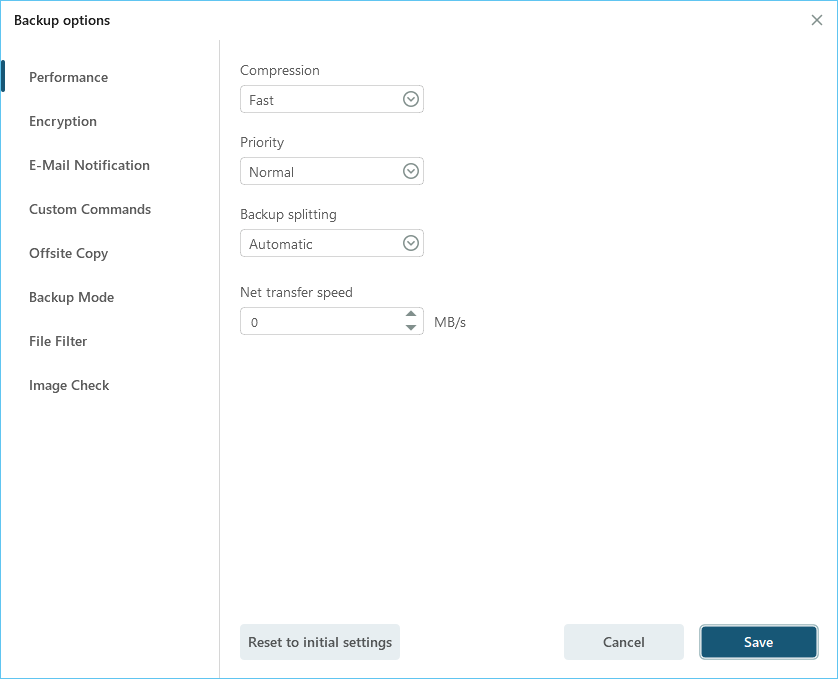
You can change the performance, encryption, e-mail notification, and other options here according to your preferences. When finish, click «Save» to return to the main interface.
Step 6. When you finish all settings, click «Proceed» to start backing up system.
Conclusion
Windows Server 2016 is primarily used for enterprise environments; thus, backing up the server becomes critical. You don’t want to lose data, leading to chaos and other consequences. There are two different ways to move forward.
Firstly, you can choose the Windows Server Backup, an excellent backup solution. Alternatively, you can also opt for professional software. You can select EaseUS Todo Backup Business if you are looking for reliable data backup software.
It is one of the best backup software solutions in the market. The software is easy to use and comes with a wide array of features. You can even opt for the free trial and choose the package that suits your needs. So, what are you waiting for? Get EaseUS Todo Backup Business today!
Windows Server Backup 2016 FAQs
The article details the different ways you can back up Windows Server 2016. However, you can always enhance your knowledge by learning more information. Take a look at the below-mentioned questions and answers to gather more knowledge.
1. How can I check my Windows Server 2016 backup?
- You must go to the Control Panel to check the Windows Server 2016 backup status.
- It would be best if you chose the server from the server box and then to the Backup and archiving section.
- Press the Backup and Restore Manager options, and then look at the server status.
2. How does Windows Server Backup work?
It works like any Windows Backup. Windows Server Backup takes a backup of all the files or the one selected during the setup. It will also look for incremental or full backup and works accordingly.
3. Can I back up Windows Server 2019?
Yes. You can back up Windows Server 2019 using the Windows Server Backup 2019. But, there is a difference between the 2016 and 2019 versions. In the 2019 version, you must opt for the backing up of the complete volume. It doesn’t allow users to back up individual folders.
4. What does it mean to back up a Server?
Backing up the server means enabling the backup of files, databases, data, applications, or the complete server on another server or external storage.