Привет, недавно столкнулся с ситуацией — есть выделенный сервер, на сервер установлен Hyper-V, провайдер выдает один белый IP на сервер. Обратились ко мне с вопросом — как можно сделать так, что бы не покупая дополнительные адреса, на создаваемых на сервере виртуальных машинах работал интернет.
В случае, например с VirtualBox вопрос решается подключением виртуальной машины к сети с типом NAT, но как же быть с Hyper-V, в нем нельзя подключить виртуальный свитч к сети NAT.
Ответ очевиден — нужно подключить свитч к внутренней сети, и с него трафик натить через физический порт. Сделать это совсем не сложно.
Ниже я расскажу как можно настроить NAT на Windows Server 2016 через PowerShell, а так же как можно настроить NAT на более старых версиях ОС Windows, через RRAS (к слову и на Windows Server 2016, через RRAS то же можно делать).
Начнем с более предпочтительного и простого способа — через PowerShell, но он для Windows 2016 и Windows 10 (к слову эти же команды должны работать и на более старых версях Windows, при условии, что будет установлен PowerShell 5, но я не проверял, кто проверит, отпишитесь в комментариях).
#Добавляем виртуальный свитч
New-VMSwitch -name NAT -SwitchType Internal
#Добавляем NAT
New-NetNat -Name LocalNat -InternalIPInterfaceAddressPrefix "10.0.0.0/24"
#Назначем адрес виртуальному свитчу
Get-NetAdapter "vEthernet (NAT)" | New-NetIPAddress `
-IPAddress 10.0.0.1 -AddressFamily IPv4 -PrefixLength 24
#Делаем проброс портов
Add-NetNatStaticMapping -NatName NATnetwork -Protocol TCP `
-ExternalIPAddress 0.0.0.0 -InternalIPAddress 10.0.0.2 `
-InternalPort 22 -ExternalPort 50022
#Посмотреть текущие пробросы портов можной командой:
Get-NetNatStaticMapping
#Как и список сетей NAT
Get-NetNat
#Такими командами это хозяйство можно удалить
Remove-NetNatStaticMapping -StaticMappingID 0
Remove-NetNat -Name LocalNat
Теперь опишу способ, как можно сделать NAT, который работает практически на всех версиях винды (на 2003, 2008, 2012 и 2016 соответсвенно), будем делать NAT через RRAS.
Сперва нужно поставить роль RAS, для этого заходим в диспетчер сервера, жмем управление и выбираем — добавить роли и компоненты.

В мастере добавления ролей, в ролях сервера, выбираем Удаленный доступ.

В службах ролей удаленного доступа, выбираем маршрутизация,

и добавляем необходимые компоненты.

После завершения установки, перезагружаем сервер, возвращаемся в диспетчер сервера и выбираем: средства — маршрутизация и удаленный доступ.

Щелкаем правой кнопкой по нашему серверу и выбираем — настроить маршрутизацию и удаленный доступ.

На втором шаге мастера настройки сервера маршрутизации и удаленного доступа, выбираем — преобразование сетевых адресов (NAT).

Дальше выбираем сетевой интерфейс, который подключен к интернету.

На этом настройка NAT на Windows Server 2016 закончена, вернемся в консоль управления RRAS, развернем наш сервер, перейдем в IPv4, и зайдем в преобразование сетевых адресов.

Здесь можно посмотреть свойства сетевых интерфейсов. Например для внутреннего свойства выглядят так:

А для внешнего так:

Здесь же можно сделать проброс портов, например, сделаю проброс ssh до виртуальной машины. Заходим в службы и порты и жмем добавить,

Здесь указываем понятное имя службы, входящий порт (порт по которому нужно ломиться на сервер), адрес сервера к которому пробрасываем порт, и порт сервера.

Всё порт проброшен. Можно пробовать подключиться.

Introduction
In this article I’ll be setting up Windows Server 2016 as a NAT router to route traffic between my virtual lab LAN and the internet. Please note that this article was written in context with the configuration used in my virtual lab. You’ll have to adapt it to your network setup. Also, you will need to have a DHCP server to provide IP addresses to your client computers and a DNS server so that your client computers are able to resolve names. As a quick-ref, my LAB environment is as below:
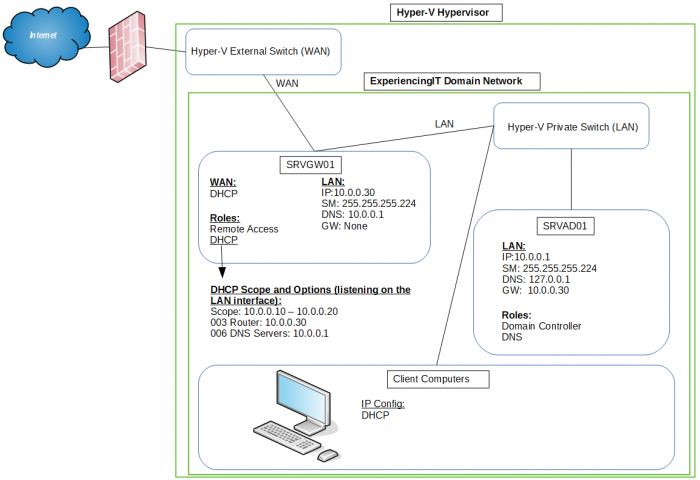
If you’d like to continue following this article, you can read on how to install Windows Server 2016 and, after installing, read how to rename the server so that you can identify its primary role by its name. I called mine SRVGW01 (GW=Gateway).
The server must have two NICs, one configured for the internal network (LAN) and another one configured to access the internet. I’ll call it WAN.
The first thing I’ll do is to rename the network interfaces to better identify them.
Configuring the NICs
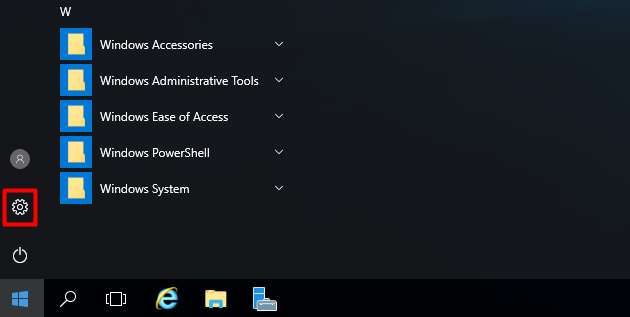
Open “Settings”
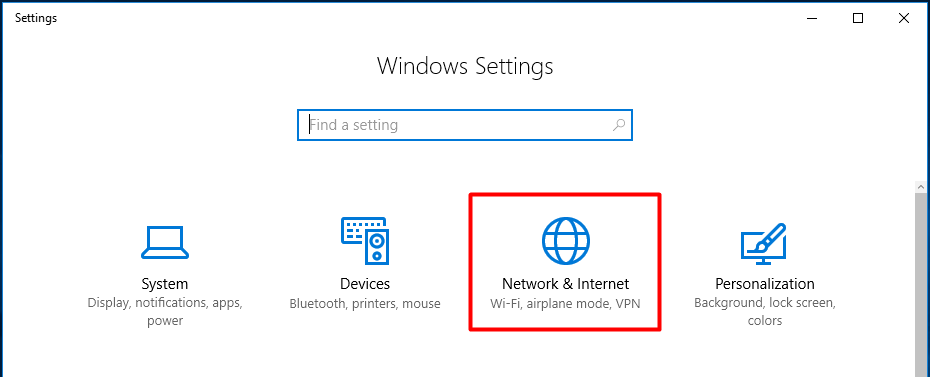
Choose “Network & Internet”
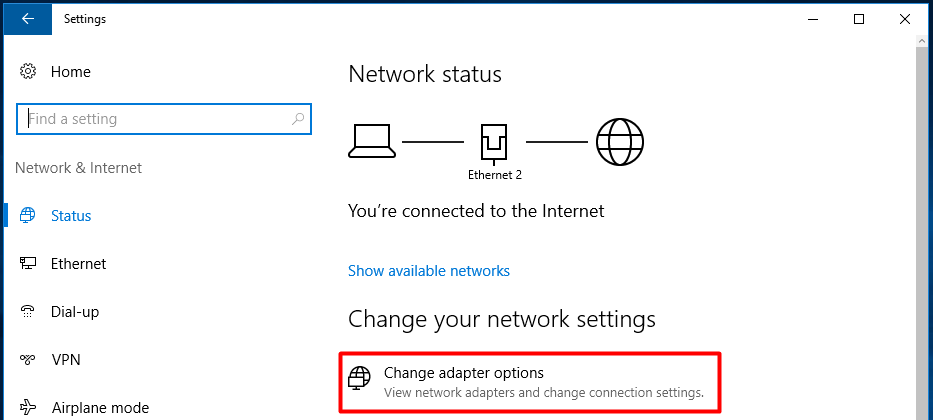
And choose “Change adapter options”
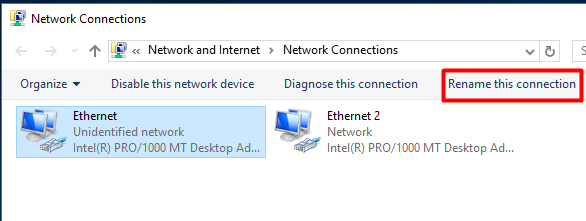
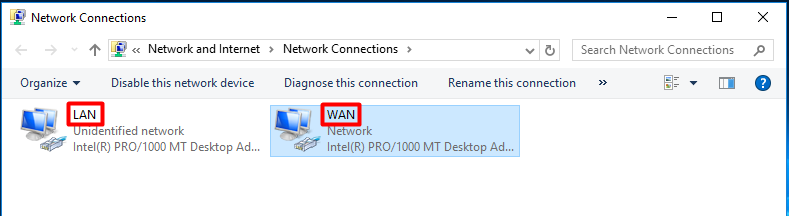
From the “Network Connections” window, it is pretty easy to spot what is the LAN connection (Unidentified network) and the WAN connection (bellow identified as Network). Let’s rename them. Select the connection to rename and press the “Rename this connection” button. Rename them accordingly.
It should look like this:
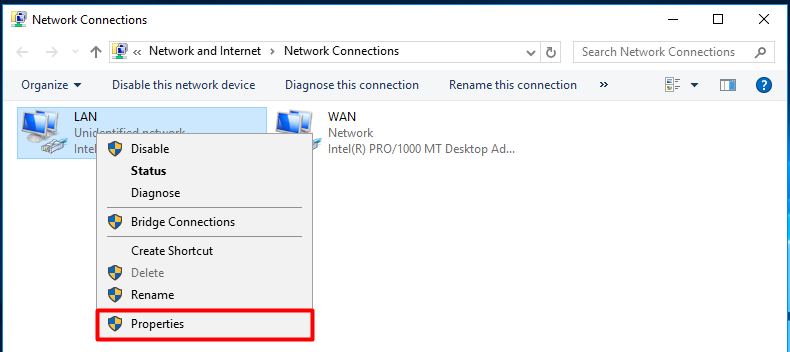
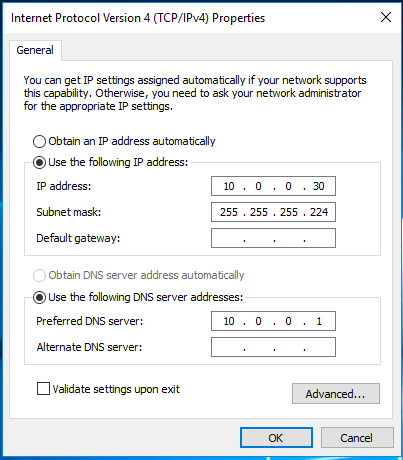
The LAN adapter needs to be configured with a static address, while the WAN adapter should be set to DHCP. The address configured on the LAN adapter is the address the client computers will use as their gateway. Right-click on the LAN adapter and select “Properties”.
Highlight “Internet Protocol Version 4 (TCP/IPv4)” and select “Properties”.
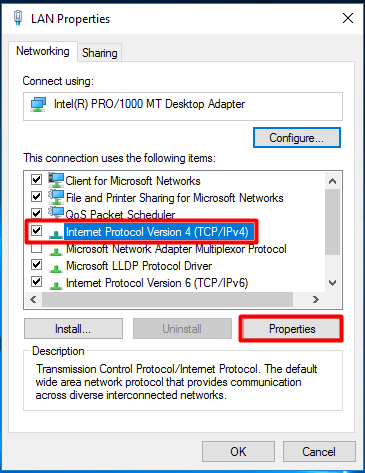
Setup the IP address settings to match your network configuration and press OK. Note that you need to have a DNS server setup on the network. It can the same server where this role is being installed.
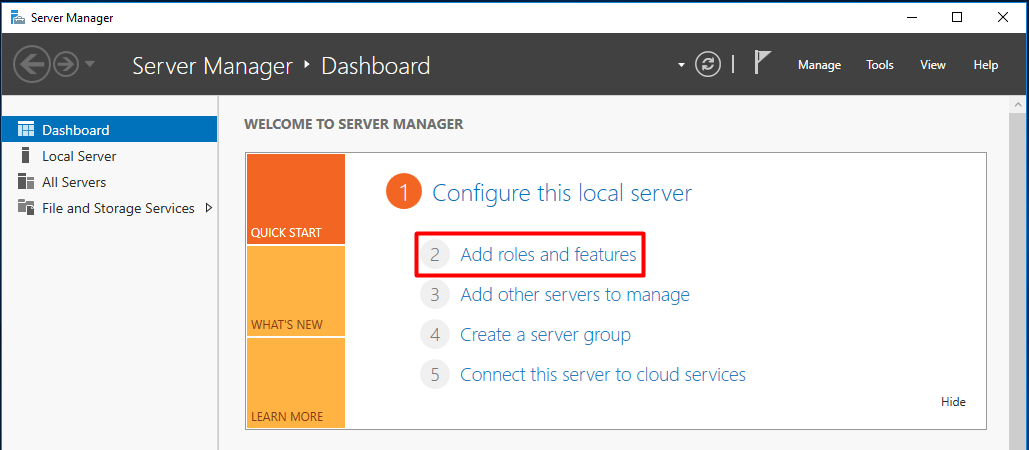
Adding the “Remote Access” server role
Now it’s time to install the “Remote Access” server role. Open Server Manager and select “Add roles and features”.
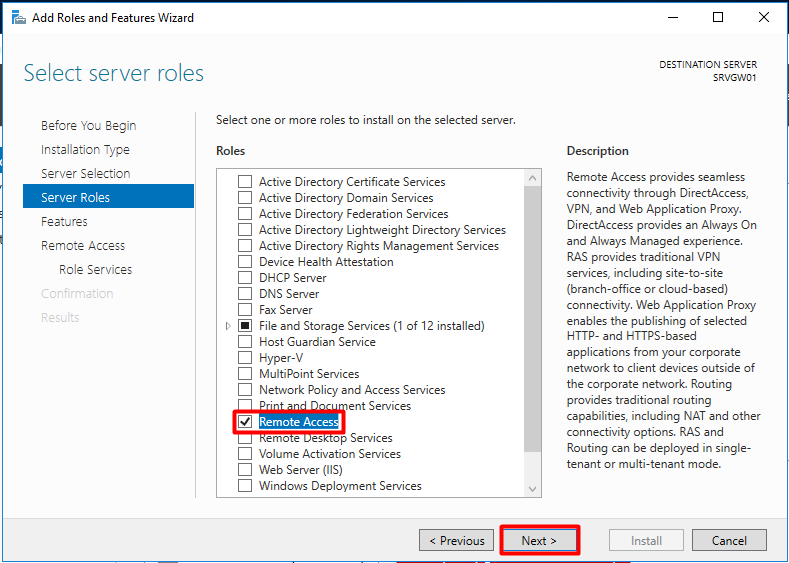
Press “Next” until you reach the screen below. Select the “Remote Access” role and press “Next”.
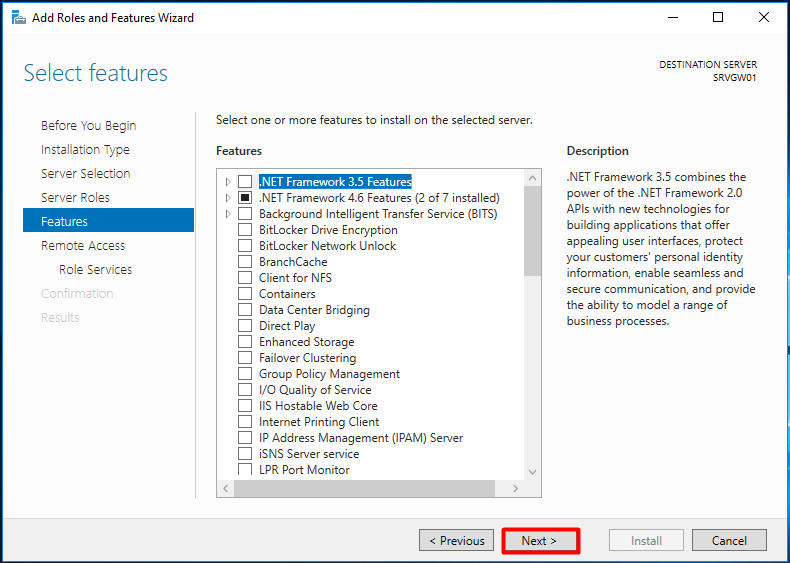
Press “Next” at the following screen.
Press “Next” and then select “Routing”, as shown below:
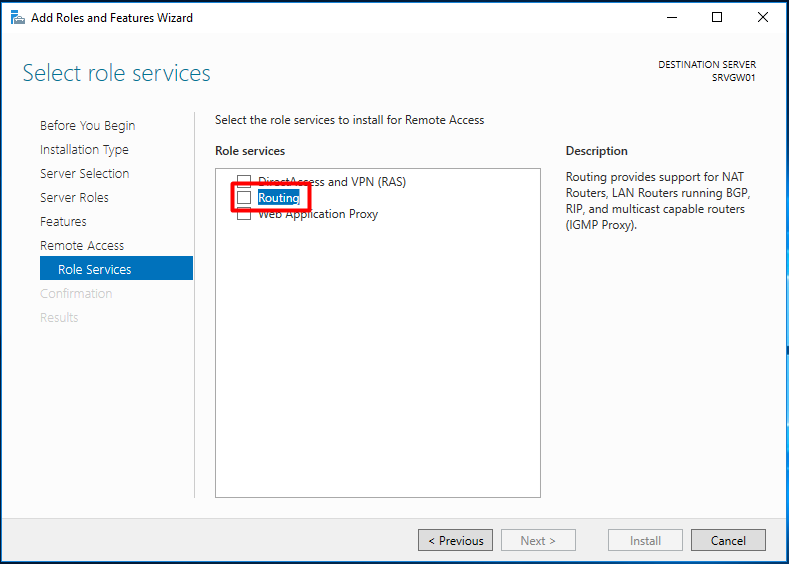
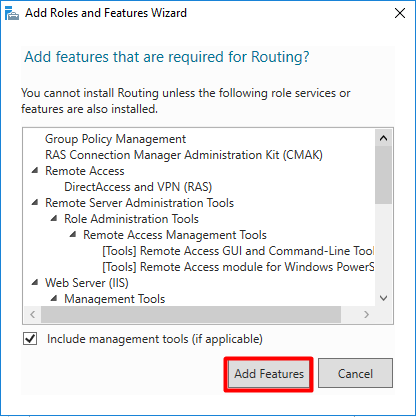
Click on “Add Features”.
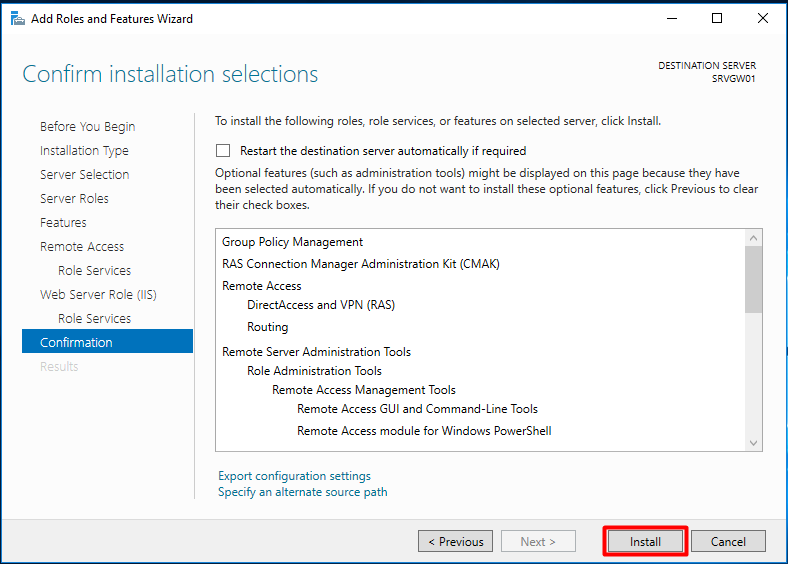
Go till the end of the wizard by pressing “Next”. Press “Install” at the confirmation screen.
Configuring the “NAT router”
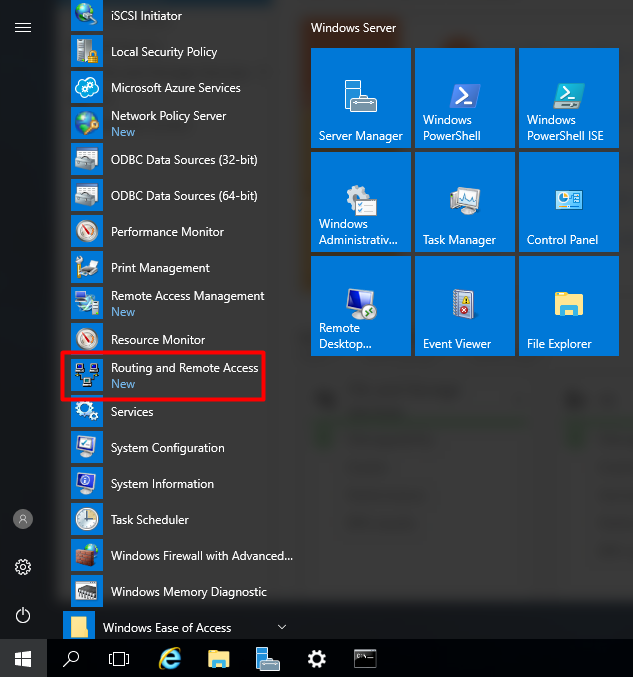
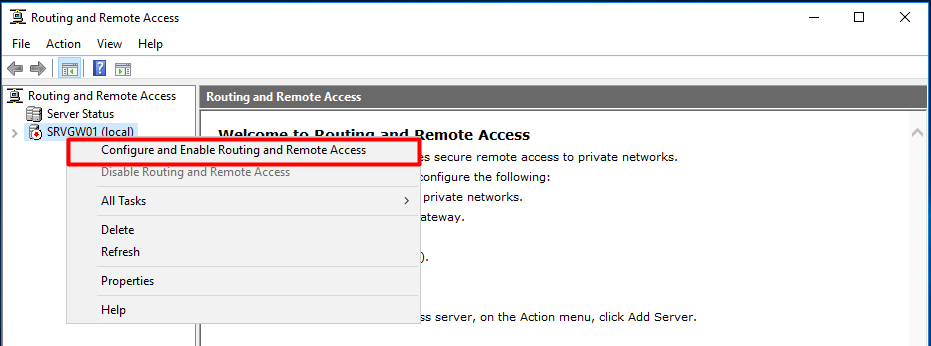
Wait for the installation to finish and open the “Routing and Remote Access” console. Press “Start” and under “Windows Administrative Tools” find “Routing and Remote Access”.
Right-click on the server name and select “Configure and Enable Routing and Remote Access”.
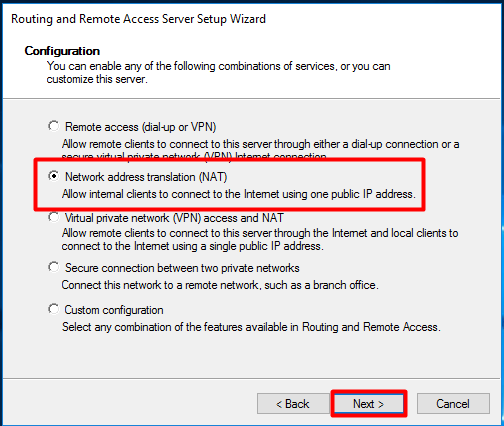
Press “Next” at the wizard welcome screen. Choose “Network address translation (NAT)” and press “Next”.
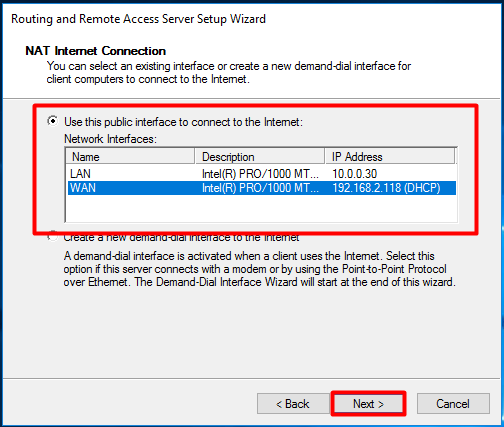
Select the WAN adapter and press “Next”.
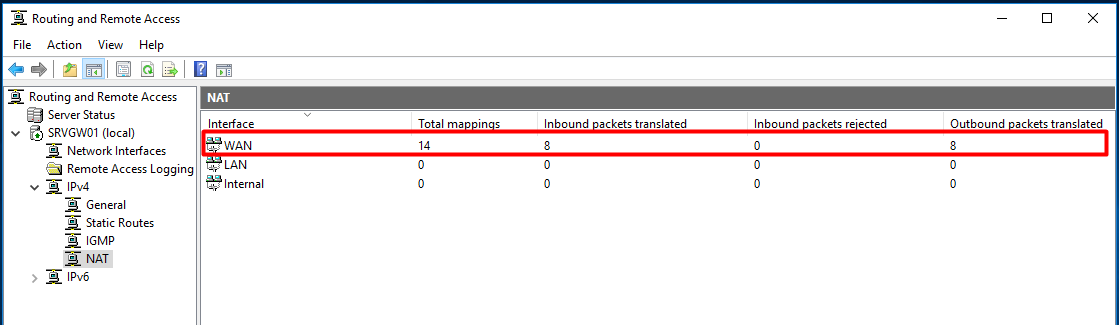
Press “Finish”, wait for the configuration to finish and verify that the NAT router is working properly. Expand the IPv4 node, select “NAT” and you should see that packets have been translated.
As always, if you found this article useful, share it with your friends.
If you have any question or suggestion, leave your comment.
Thank you for reading!
Опубликовано


Доброго времени суток, уважаемые читатели. Сегодня у нас тема: «Настройка NAT в Windows server 2012-2016». Всё так же две ОС, в одной статье. Мы установим необходимую роль, и сделаем базовую настройку NAT.
Установка и базовая настройка маршрутизации NAT, в Windows Server 2012-2016
Предварительно, сделайте настройку всех Ваших сетевых адаптеров.
Установка роли «Удалённый доступ»
- Открываем диспетчер устройств, и заходим в «Добавить роли и компоненты».

- Жмём «Далее», на памятке мастера.

- В выборе типа установки, нас интересует «Установка ролей и компонентов».
- Жмём «Далее».

Выбор целевого сервера.
- Выбираем нужный сервер, или виртуальный жёсткий диск.
- Жмём «Далее».

Выбор ролей сервера.
- Выбираем «Удалённый доступ».
- Жмём «Далее».

Выбор компонентов.
- Если нужно, что то дополнительно, выбираем и жмём «Далее».

Информативное окно об удалённом доступе.
- Жмём «Далее».

Выбор служб ролей.
- Выбираем «Маршрутизация».

- Появляется окно, с компонентами необходимыми для маршрутизации.
- Жмём «Добавить компоненты».

- В окне выбора ролей, жмём «Далее».

- Информативное окно, о роли устанавливаемого веб сервера, который необходим для работы маршрутизации.
- Жмём «Далее».

- В окне выбора служб ролей жмём «Далее».

Подтверждение установки компонентов.
- Проверяем, если всё верно, жмём «Установить».

- Начинается процесс установки.
- Ждём завершения, и жмём «Закрыть».

Настройка маршрутизации и удалённого доступа
- В области уведомлений диспетчера сервера, находим раздел «Средства».
- Кликаем по нему, и заходим в раздел «Маршрутизация и удалённый доступ».

- В открывшейся консоли, кликаем правой кнопкой мышки на нашем сервере, и в выдающем меню жмём на «Настроить и включить маршрутизацию и удалённый доступ».

- Открывается окно мастера, жмём «Далее».

Конфигурация.
- Выбираем «Преобразование сетевых адресов NAT».
- Жмём «Далее».

Подключение к интернету на основе NAT.
- Выбираем первый вариант, а в списке интерфейсов, тот который имеет подключение к интернету.
- Жмём «Далее».

Службы преобразования имён и адресов.
- Так же, выбираем первый вариант «Включить базовые службы».
- Жмём «Далее».

Назначение диапазонов адресов.
- Система, исходя из подключения вашего сетевого адаптера, определяет диапазон адресов, которым будет обеспечена поддержка маршрутизации.
- Жмём «Далее».

- В последнем окне мастера, жмём «Готово».

- Начинается запуск необходимых служб.

- По окончании, в окне консоли, появляется сообщение, о том, что служба маршрутизации и удалённого доступа настроена на этом сервере.

Для проверки работы маршрутизации, можно на любом компьютере Вашей локальной сети, в качестве основного шлюза указать адрес сервера, на котором Вы запустили NAT. Компьютер получит доступ в интернет.
Сегодня мы рассмотрели тему: «Настройка NAT в Windows server 2012-2016». Добавили необходимую роль, установили нужные компоненты, и сделали базовую настройку.
Надеюсь статья была вам полезна. До встречи в новых статьях.
✍
С уважением, Андрей Бондаренко.
Видео на тему «Настройка NAT в Windows server 2012»:
Видео на тему «Настройка NAT в Windows server 2016»:
✧✧✧
Поблагодарить автора за полезную статью:

WMZ-кошелёк = Z667041230317
✧ Рубрика «Windows server»
✧ Комментарии: 6
Похожие записи
This guide is for those who wants to simulate I virtual enterprise environment, and use a Windows Server as a virtual Gateway. In this example I´m going to use 2 separate VLAN and use the Gateway as a Router and also NAT all communications to the Internet. This way only one server faces the internet, and you could also have a firewall on the server.
SETUP:
1 Server 2016 Core, Name (GW) , Workgroup (but could be domain joined), used as gateway and router.
2 Server 2016 GUI, Name (MGM,MGM2), Workgroup (but could be domain joined), used for verification.
Setup Hyper-V:
On the GW server I need 3 network cards. One connected to an External switch and the other two connected to the same Private switch.
The two Private Switches I configure with VLAN ID.

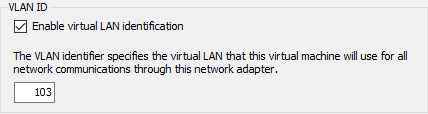
The MGM server has the VLAN 102 and the MGM2 has the VLAN 103 switch connected to them.
Setup GW Server:
Server is installed and fully patched.
On the server we now have three network cards. And I will rename them to External, VLAN 102 and VLAN 103.
First we check what Network cards we have, so logon to the server and start Powershell, and then we check what network adapters we have.
Get-NetAdapter

When looking at the LinkSpeed I see that one connection is at 1 Gbps, so that should be my External network, and the rest the internal. Bydefault the names of the cards is in order of installation, so if you first create the internal ones, they will have the lower number. So if you add them one by one, you will know which adapter is which.
Then we rename the cards, just so it will be easier to see.
Get-NetAdapter -Name "Ethernet" | Rename-NetAdapter -NewName "External"
Get-NetAdapter -Name "Ethernet 2" | Rename-NetAdapter -NewName "VLAN 102"
Get-NetAdapter -Name "Ethernet 3" | Rename-NetAdapter -NewName "VLAN 103"
![]()
And when we check again we see the new names.
Get-NetAdapter

Then we must set a IP-address of the network cards, in this case External gets from a DHCP, so we don´t need to change that one.
So for the VLAN 102
New-NetIPAddress -InterfaceAlias "VLAN 102" -IPAddress 192.168.102.1 -PrefixLength 24 -DefaultGateway 192.168.102.1

And for VLAN 103
New-NetIPAddress -InterfaceAlias "VLAN 103" -IPAddress 192.168.103.1 -PrefixLength 24 -DefaultGateway 192.168.103.1

This is not needed but I always want to enable IMCP, so lets enable that in the windows firewall.
Enable-NetFirewallRule -DisplayName "File and Printer Sharing (Echo Request - ICMPv4-In)"
![]()
Just a quick check that we have internet connectivity
Test-NetConnection

So now on with installing the RRAS. So install the Routing role and restart the server.
Install-WindowsFeature Routing -IncludeManagementTools -Restart
When the server has rebooted, log on to it again and start powershell.
Configuration RRAS:
The next part there is two solutions as I see it, the old way by using he GUI from another server, and another when you using NETSH. If you ever want to use the GUI and see what NAT that is in use and the stats for packages, then I recommend using the GUI. If anyone know a way to be able to use powershell or other ways to configure this and it will show up the same in the GUI let me know. I will now show both ways to configure this.
RRAS GUI:
From the MGM server, set it up on VLAN 102 with a IP and set the default GW to the IP of the GW server IP for VLAN 102. If using MGM2 set up with that IP and use that GW IP. Below I use MGM.If the server is in workgroup make sure that the same Admin account is on both servers with same password for easier management. If in domain, make sure your account has admin rights.
Now. On the MGM server. Install RSAT för RRAS via powershell. Restart not needed.
Install-WindowsFeature RSAT-RemoteAccess -IncludeAllSubFeature

Now start the “Routing and Remote Access” GUI.
In the GUI, right click on top of the tree and choose “Add Server”

Check The following computer and type in the IP-address of the gateway (in this case the MGM server is on VLAN 102 so we choose 192.168.0.1 to connect to the GW), and then click on connect.

Now right click on 192.168.102.1 and choose “Configure and Enable Routing and Remote Access”.

Click Next.

Select NAT and click on Next.

Select our External Network card and click on Next.

Select one of the cards (VLAN) that will be able to access internet, and click Next. In this you can´t add more then one card, but we will add it later.

The next screen will only show up if server is in a workgroup. You can choose if you want the GW to forward all DNS request towards the internet or if you will use a internal DNS and DHCP. In this case just to show how it works, so I will chose to let the GW forward all traffic. In a fully simulated environment, I would have the GW domain joined.

Click Next.

Click Finish and led RRAS be configured.

NB if you have enabled “Windows Firewall Remote Management” in the firewall you will get the following error message. This is not an Issue, because installing the Routing Role in the GW already has enabled the FW rules (at least on core).

Now expand 192.168.102.1 and the IPv4 and then NAT. If NAT does not show up, there is probably a GUI error, and a reboot of the RRAS console or the MGM server will fix that. We see that our VLAN 102 and the External Network is connected in NAT.

To add VLAN 103, right click on NAT and choose “New Interface.”

Select VLAN 103 and click on OK.

Select Private Interface and click on OK.

Now VLAN 103 should be visible under NAT.

Now, we can go on with verification.
RRAS Core:
NB, if you use this way you cant use the GUI from a 2016 server to view anything, it will throw a message that legacy is not supported and powershell must be used.
On the GW server install the install the RomoteAccess, and just because we want an output we add -PassThru
Install-RemoteAccess -VpnType RoutingOnly -PassThru
The next commands is using NETSH so start it by typing in NETSH and enter the NETSH interface. Then type “routing ip nat” to enter that.
![]()
And now add config in netsh. The first row will install the NAT functionality, this will throw a message that it does not find the file specified, but it will stil work. Row 2 will add the External Adapter with mode Full. Row 3 will add the VLAN 102 adapter. Row 4 will add the VLAN 103 adapter
install
add interface "External" mode=full
add interface "VLAN 102"
add interface "VLAN 103"
exit

And the its on to verification.
Verfification:
Now from the MGM server, make sure you have a functional DNS-server setting, or set google as one and the run Test-NetConnection.
Test-NetConnection

And from VLAN 103

So we see that internet access is working from both WLAN, and to test if the Routing works (starts working as soon NAT is in place). From VLAN 102 to VLAN 103, and we add -TraceRoute just to see the route.
Test-NetConnection 192.168.103.33 -TraceRoute

And from VLAN 103 to VLAN 102
Test-NetConnection 192.168.102.33 -TraceRoute

DONE
- Learn
- Windows
- Windows Server

2 Minute Read
-
Share
Opens a new window
-
Facebook
Opens a new window -
Twitter
Opens a new window -
Reddit
Opens a new window -
LinkedIn
Opens a new window
-
Sign Up