![]() В данной статье будет приведена пошаговая инструкция по установке и первоначальной настройке Microsoft Windows Server 2012. Установка данной версии Windows Server не сильно отличается от установки Microsoft Windows Server 2008 R2 или даже установки Windows 8, однако из-за ряда особенностей я покажу процесс установки полностью, от начала и до конца.
В данной статье будет приведена пошаговая инструкция по установке и первоначальной настройке Microsoft Windows Server 2012. Установка данной версии Windows Server не сильно отличается от установки Microsoft Windows Server 2008 R2 или даже установки Windows 8, однако из-за ряда особенностей я покажу процесс установки полностью, от начала и до конца.
0. Оглавление
- Что понадобится
- Установка Microsoft Windows Server 2012
- Первоначальная настройка Microsoft Windows Server 2012
1. Что понадобится
- Установочный диск Microsoft Windows Server 2012 (скачать можно здесь)
- Рабочий ключ для активации Windows Server 2012
2. Установка Microsoft Windows Server 2012
Вставляем установочный диск Microsoft Windows Server 2012 в DVD-привод компьютера и загружаемся с него (для этого в BIOS компьютера необходимо поставить первичную загрузку с CD-ROM). После непродолжительной загрузки попадаем на окно выбора языка. Выбираем нужные параметры (по умолчанию язык, формат времени и денежных единиц и раскладку клавиатуры оставляем русскую) и нажимаем «Далее» (Next) .

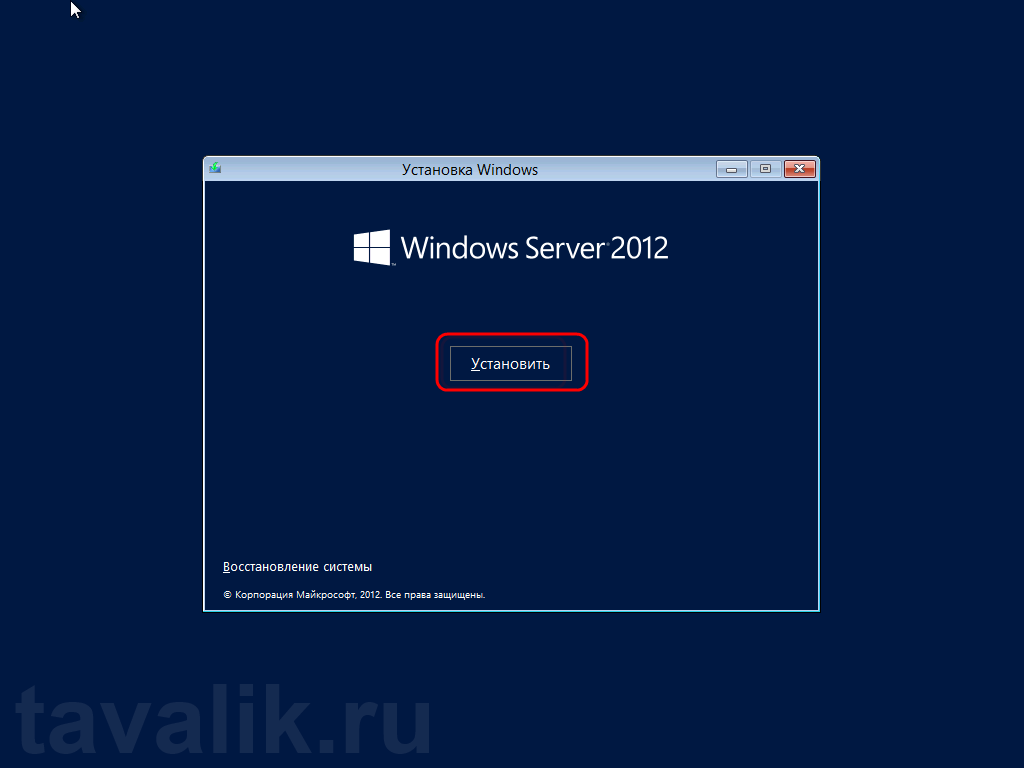
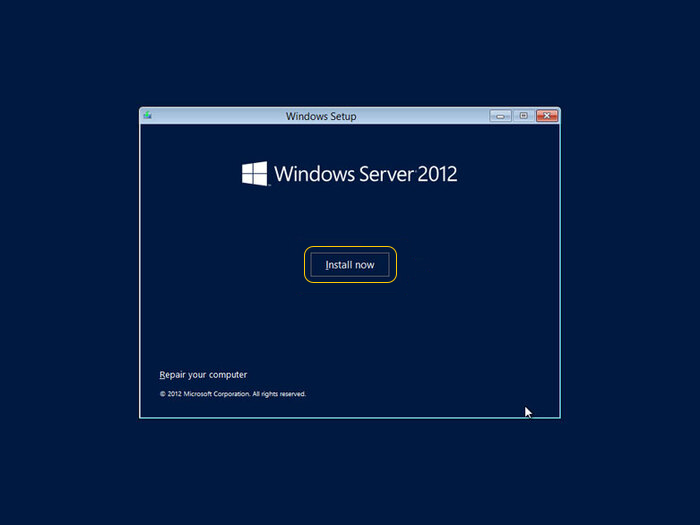
В следующем окне, для первичной установки Windows Server нажимаем «Установить» (Install now) .
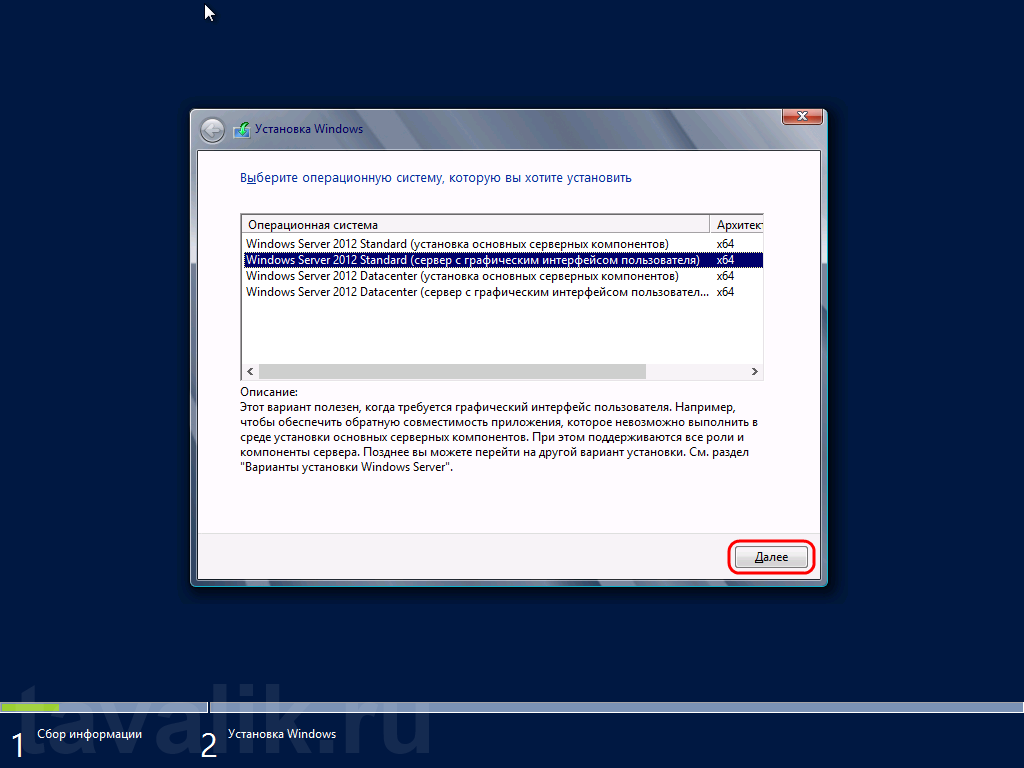
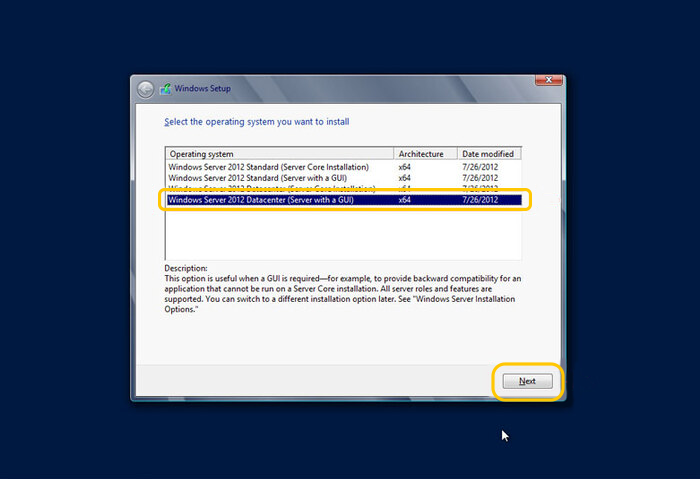
Теперь необходимо выбрать выпуск операционной системы, который будем устанавливать (об отличии различных выпусков Windows Server 2012 можно прочитать, например, здесь). Выбрав нужный выпуск, жмем «Далее» (Next) .
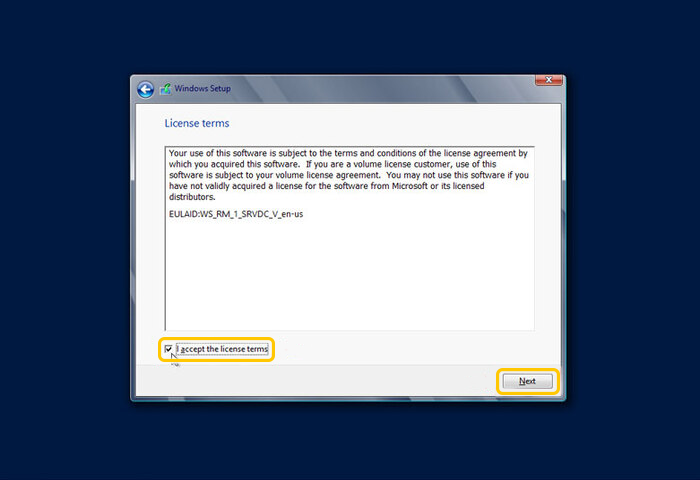
Соглашаемся с условиями лицензионного соглашения, установив флаг «Я принимаю условия лицензии» (I accept the license terms) и жмем «Далее» (Next) .

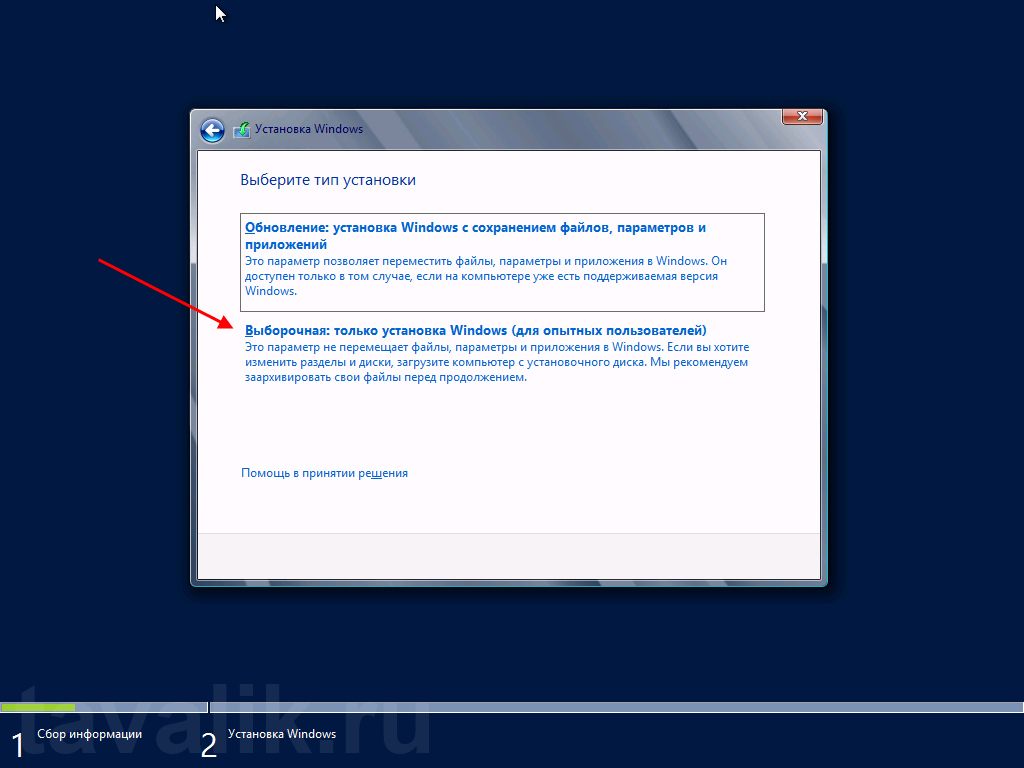
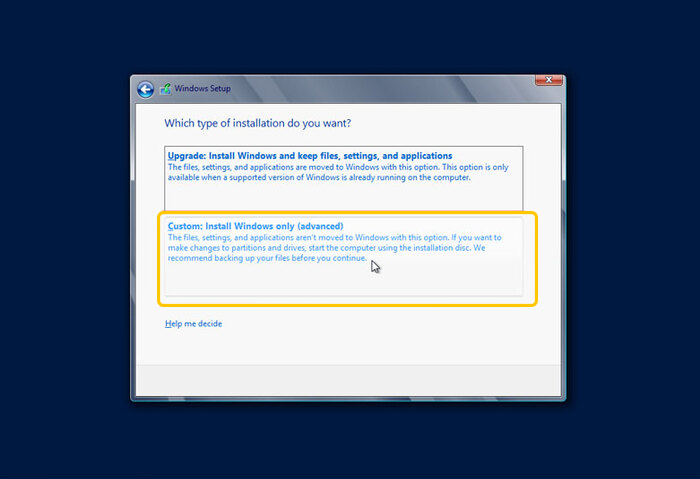
На следующем шаге необходим выбрать тип установки. Для чистой установки Windows Server 2012 выбираем «Выборочная: только установка Windows…» (Custom: Install Windows only) .
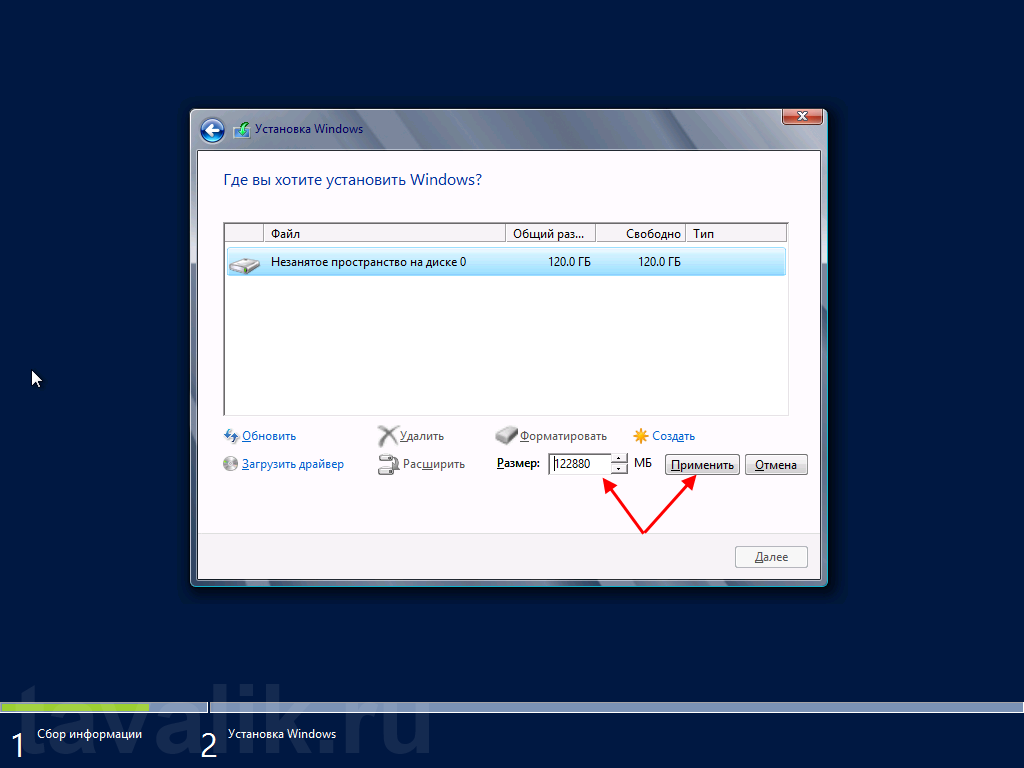
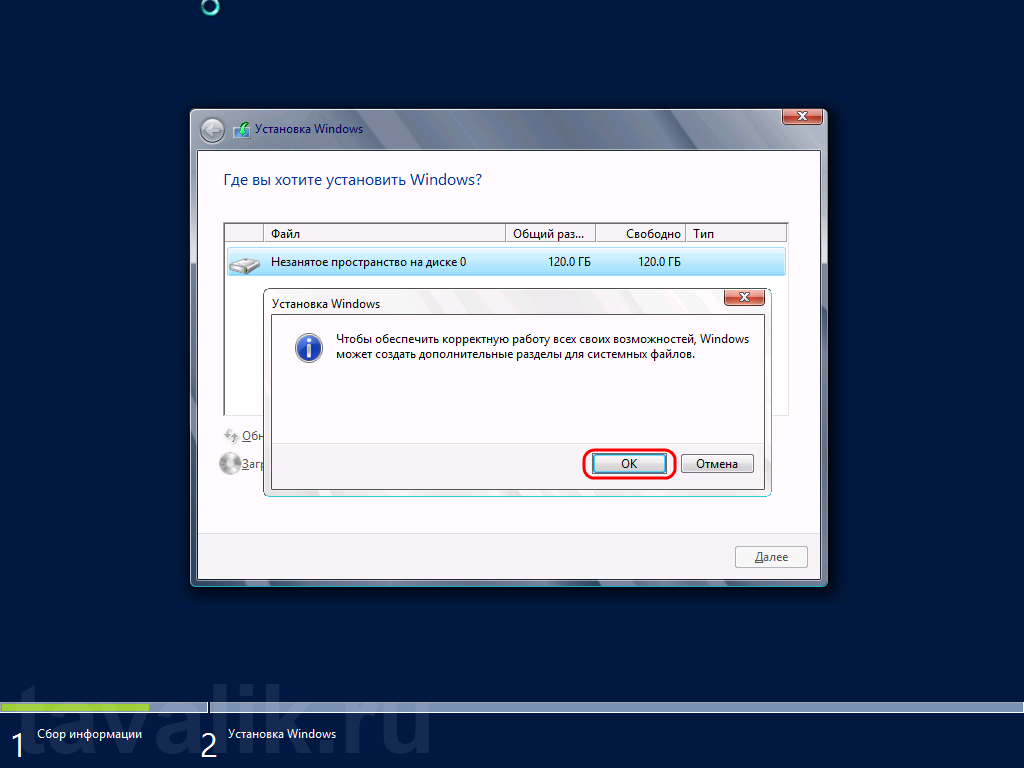
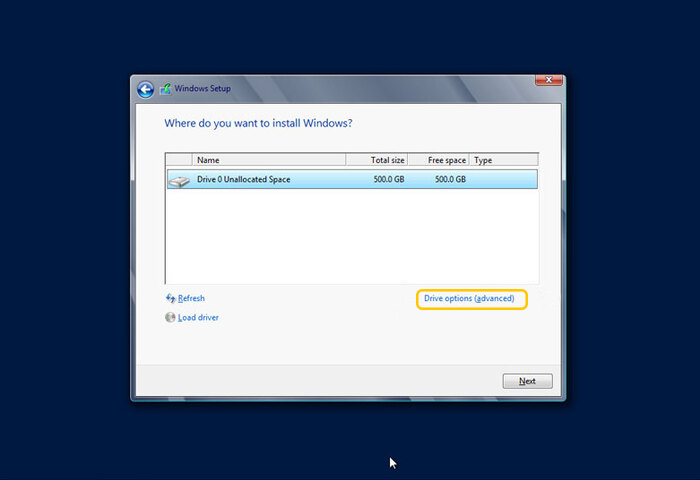
Теперь разметим жесткий диск для установки, если это не было сделано раннее. Для этого выберем незанятое пространство на каком-либо физическом жестком диске в списке и нажмем «Создать» (New).

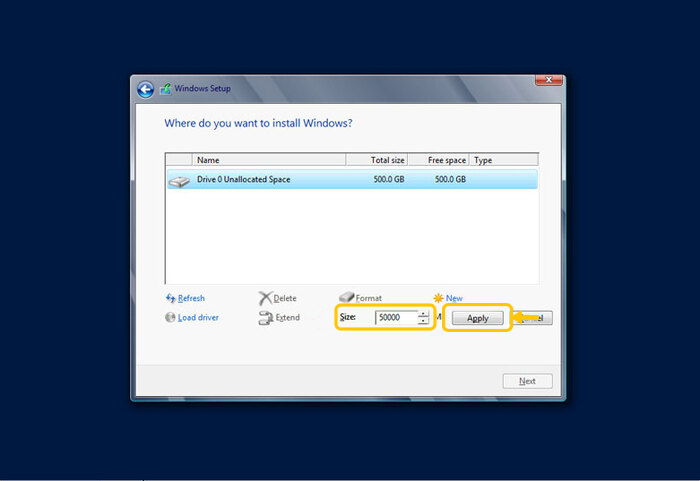
Введем размер создаваемого логического диска (по умолчанию полный объем) и нажмем «Применить» (Apply).
Также согласимся на создание дополнительных разделов для системных файлов, нажав «ОК» в появившемся окне.
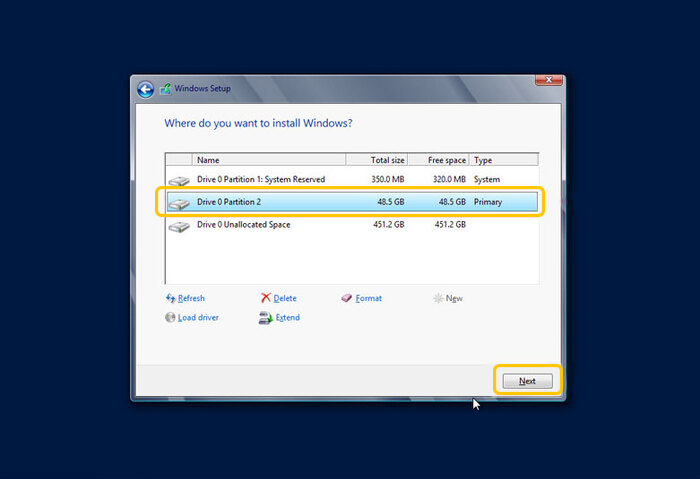
После вышеописанных действий, вместо неразмеченной области должны появиться 2 раздела: Системный (System) и Основной (Primary). Выбираем основной раздел для установки Windows и жмем «Далее» (Next).

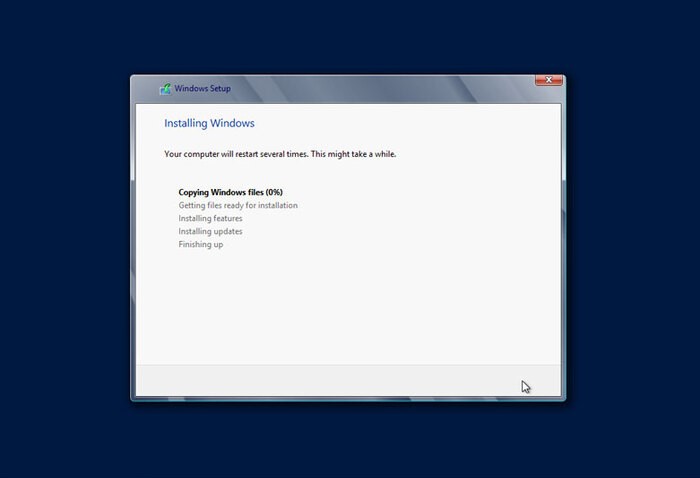
Дожидаемся завершения установки компонент Windows Server 2012.
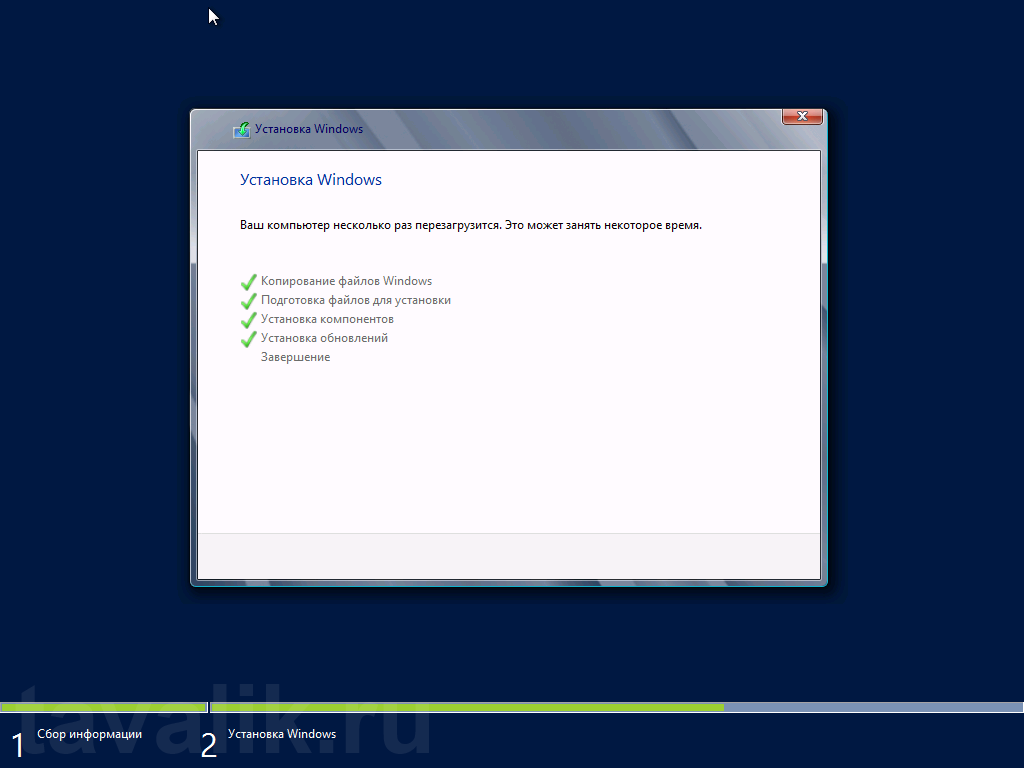
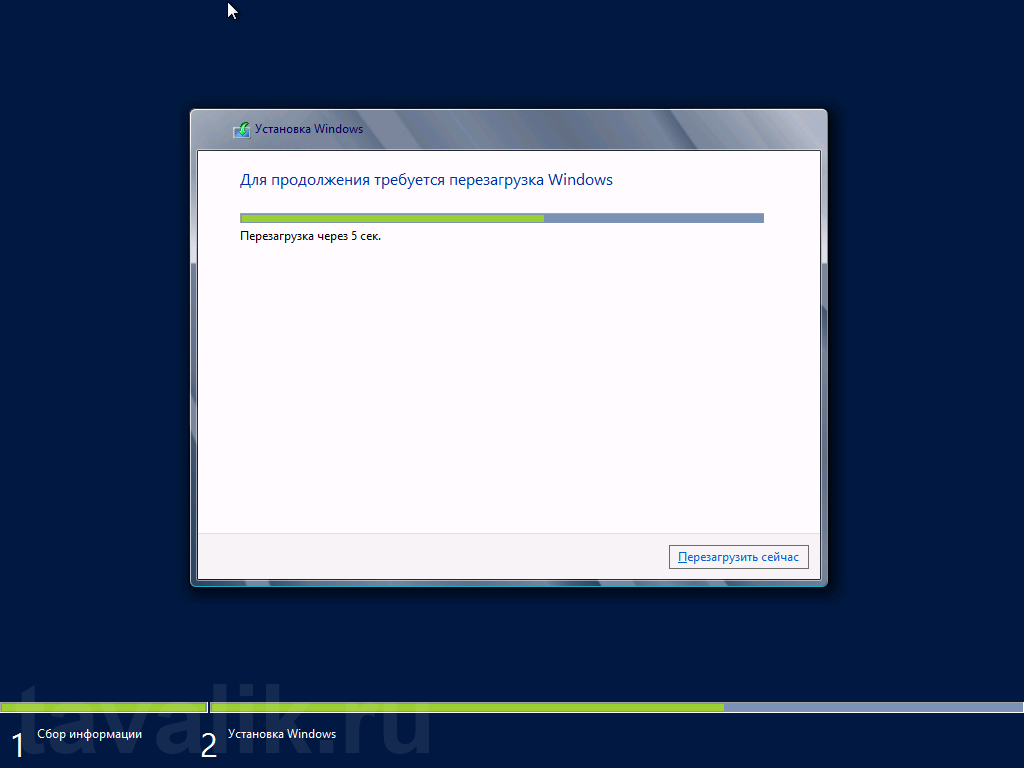
По завершении установки компьютер будет перезагружен.
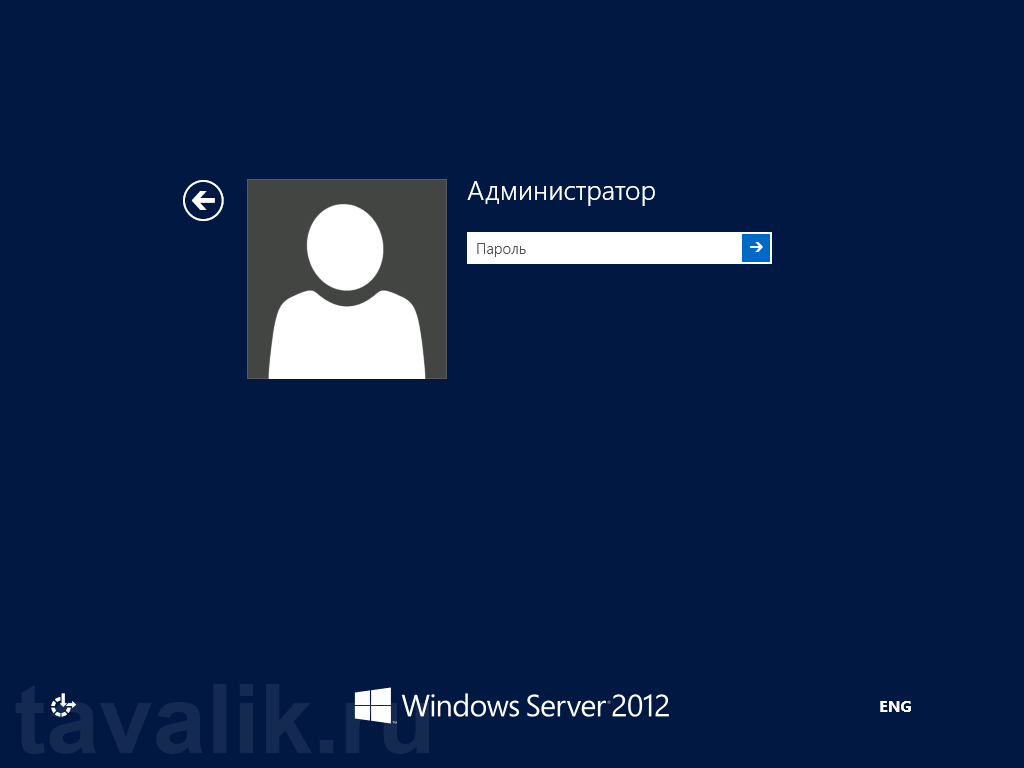
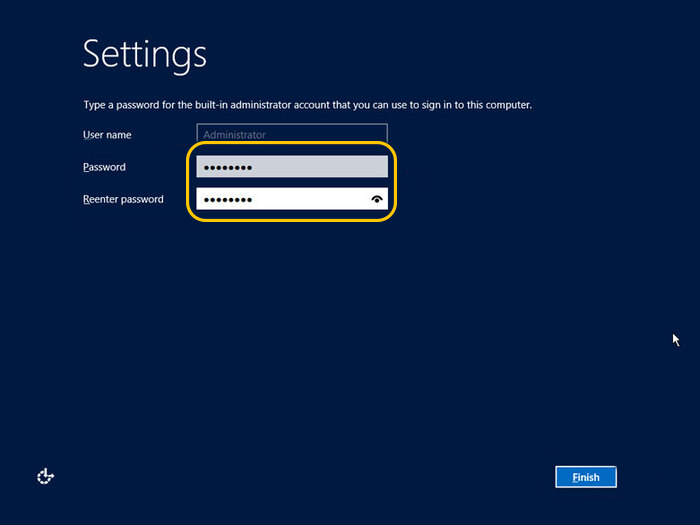
После перезагрузки система предложит ввести пароль для учетной записи «Администратор» (Administrator) . По умолчанию пароль должен отвечать требованиям безопасности паролей, а именно:
- Не содержать имени учетной записи пользователя или частей полного имени пользователя длиной более двух рядом стоящих знаков
- Иметь длину не менее 6 знаков
- Содержать знаки трех из четырех перечисленных ниже категорий:
- Латинские заглавные буквы (от A до Z)
- Латинские строчные буквы (от a до z)
- Цифры (от 0 до 9)
- Отличающиеся от букв и цифр знаки (например, !, $, #, %)
(О том, как потом изменить политику паролей, можно прочитать в статье Изменение политики паролей в Windows Server 2012 R2)
Рекомендую сразу записать пароль в отведенное для хранения паролей место. Для этого удобно использовать различные менеджеры паролей, например бесплатную программу KeePass.
Вводим пароль администратора и жмем «Готово» (Finish) .

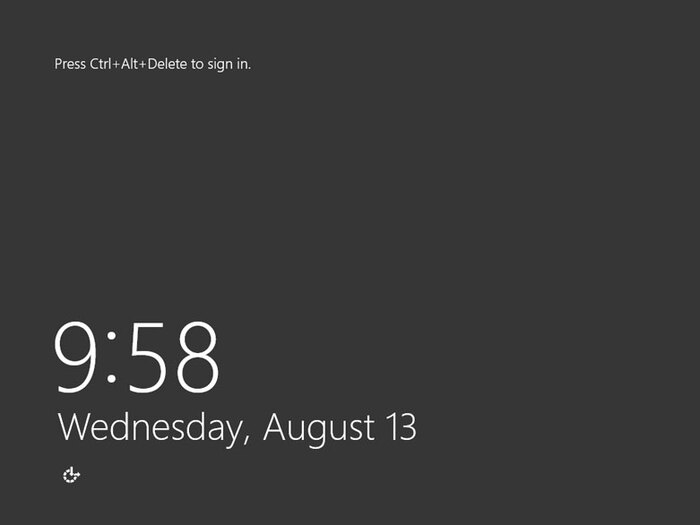
Далее попадем на стартовое окно Windows Server 2012. Нажимаем одновременно CTRL, ALT и DEL

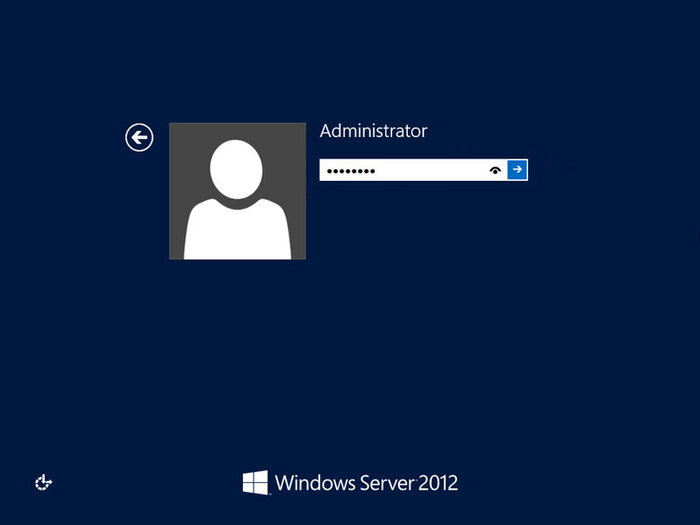
и входим в Windows под учетной записью Администратора, введя установленный на предыдущем шаге пароль.
3. Первоначальная настройка Microsoft Windows Server 2012
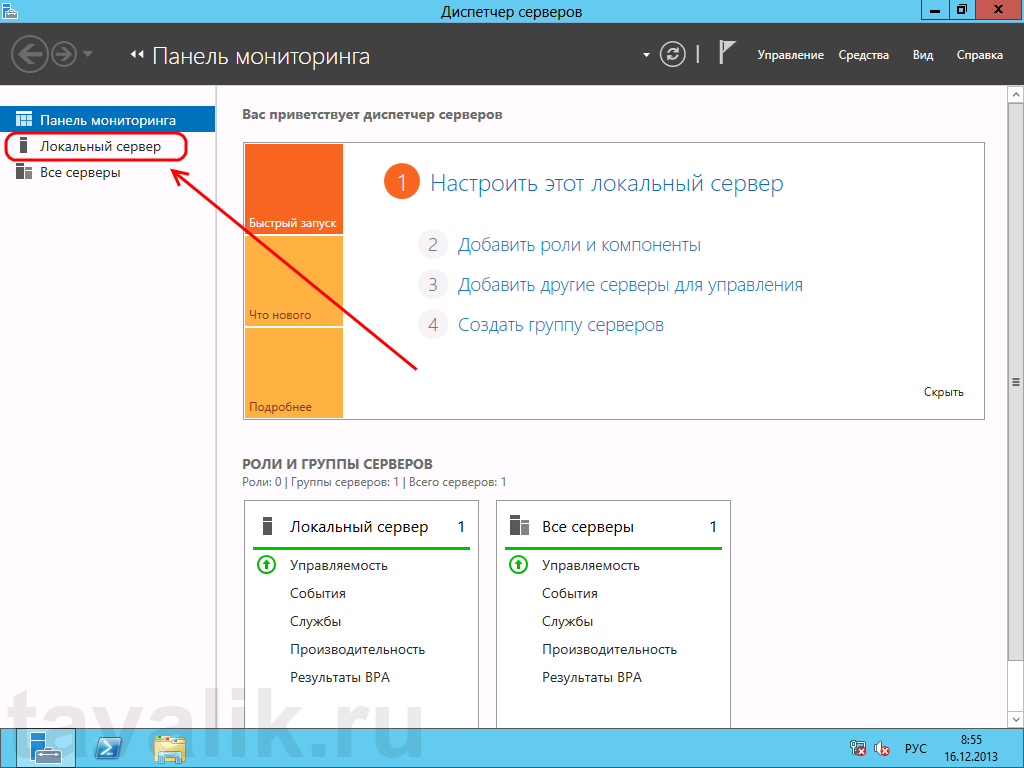
Первое, что мы увидим после входа в систему будет заметно модифицированный со времен Windows Server 2008 R2 диспетчер серверов (Server Manager). Для настройки текущего локального сервера выберем вкладку «Локальный сервер» (Local Server) в панели вкладок слева.
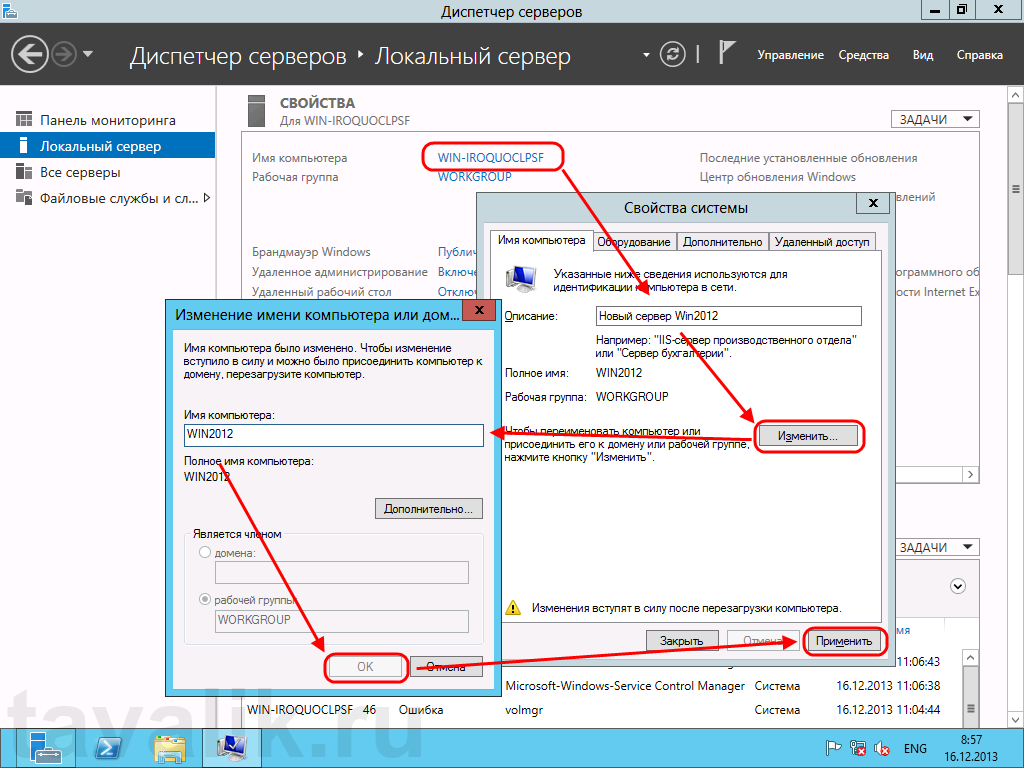
Начнем изменение параметров локального сервера с изменения имени компьютера. Для этого кликнем по текущему имени компьютера в окне «Свойства» (Properties) . Откроется окно «Свойства системы» (System Properties) на закладке «Имя компьютера» (Computer Name) . Нажмем кнопку «Изменить…» (Change…) и введем новое имя сервера в появившемся окне. После чего закроем все окна нажав последовательно «ОК» и «Применить» (Apply) .
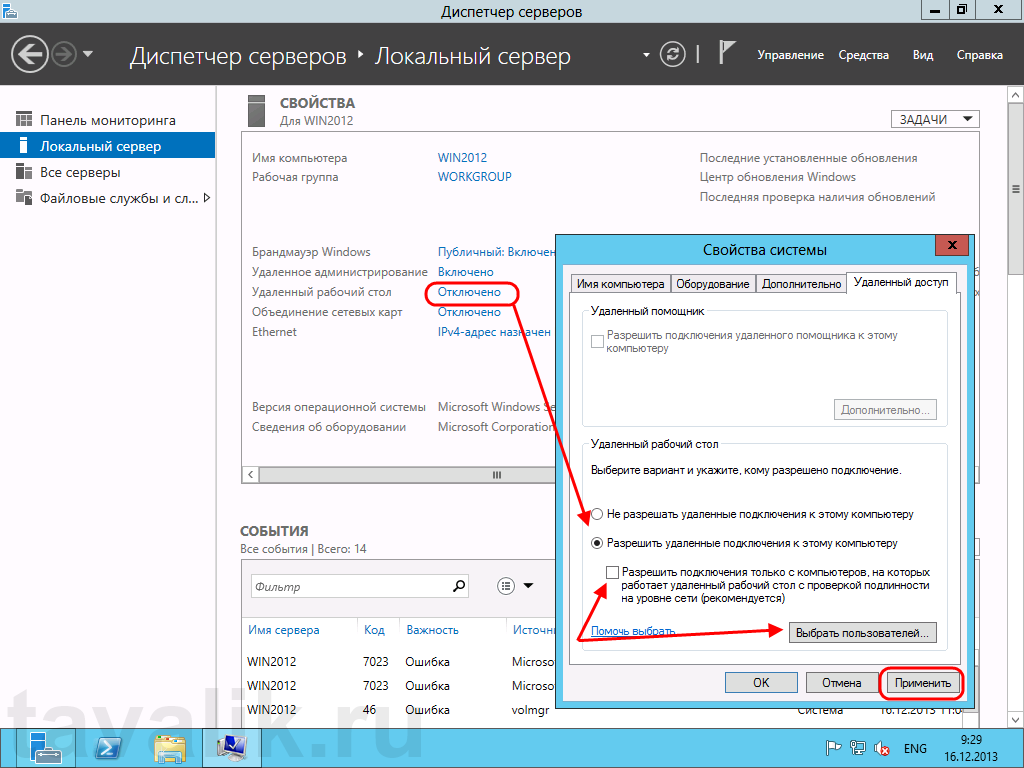
Далее, разрешим удаленный доступ к текущему серверу. Для этого кликнем по ссылке напротив «Удаленный рабочий стол» (Remote Desktop) в окне свойств. Откроется уже знакомое окно «Свойства системы» (System Properties) на вкладке «Удаленный доступ» (Remote) . Установим переключатель в «Разрешить удаленное подключение к этому компьютеру» (Allow remote connections to this computer) . По умолчанию только пользователи группы «Администраторы» (Administrators) имеет доступ к удаленному рабочему столу (для добавления пользователей необходимо нажать на «Выбрать пользователей…» (Select Users) и добавить пользователей системы из списка), после чего нажимаем «Применить» (Apply) . Подключение к серверу осуществляется с помощью встроенного в Windows RDP-клиента.
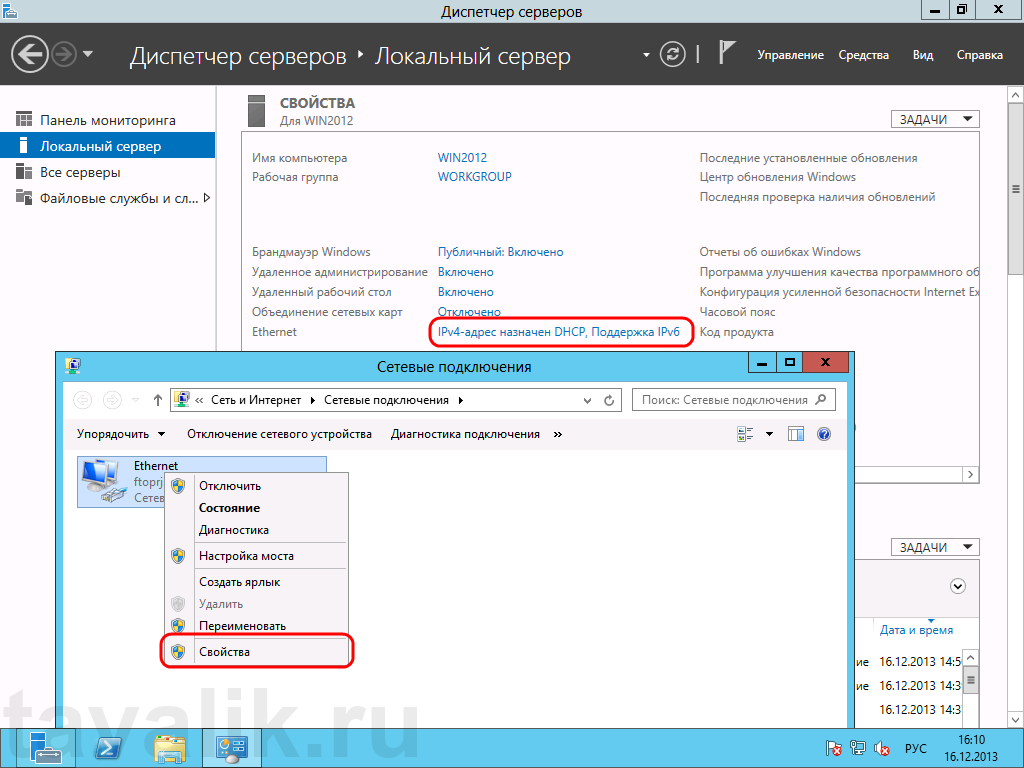
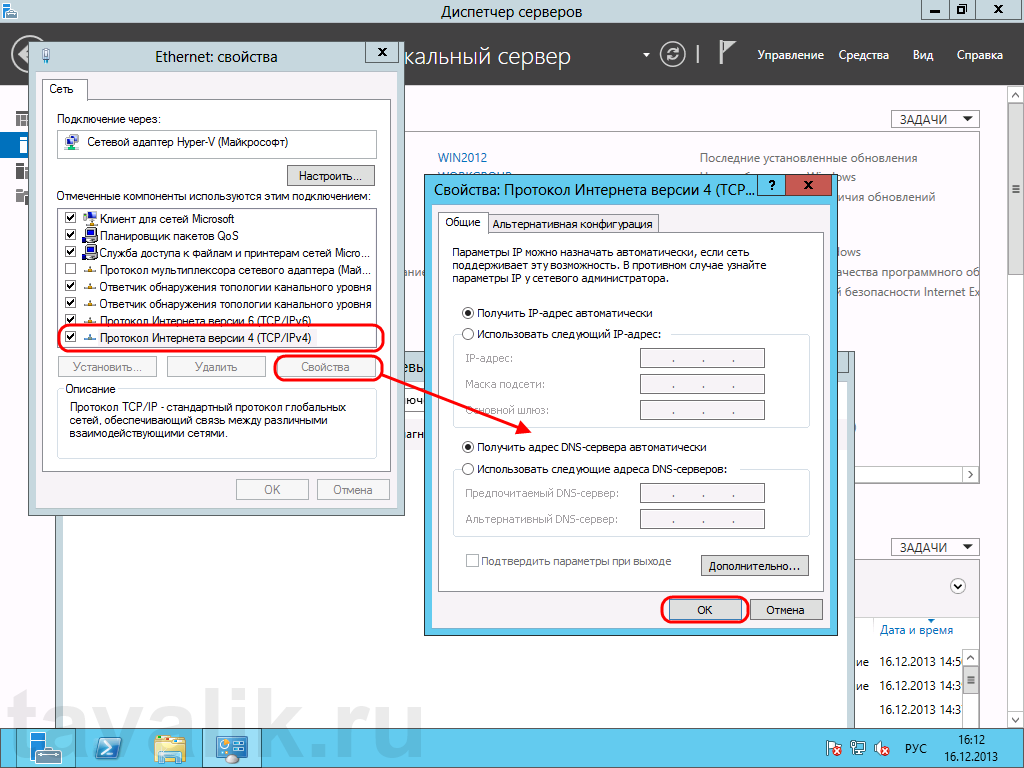
Настроим параметры сети. Для этого кликнем по ссылке напротив пункта «Ethernet» . Откроются сетевые подключения текущего компьютера. Кликаем правой кнопкой мыши по текущему активному сетевому адаптеру и в контекстном меню выбираем «Свойства» (Properties) .
Откроются свойства сетевого соединения. Выберем в списке компонент «Протокол интернета версии 4 (TCP/IPv4)» (Internet Protocol Version 4 (TCP/IPv4)) (и снова нажмем «Свойства» (Properties) . В открывшемся окне можно задать нужные параметры IP. Это может быть динамический IP, если в сети есть DHCP-сервер, либо статический IP, который можно задать самостоятельно. Когда параметры IP установлены, жмем «ОК» для сохранения настроек.
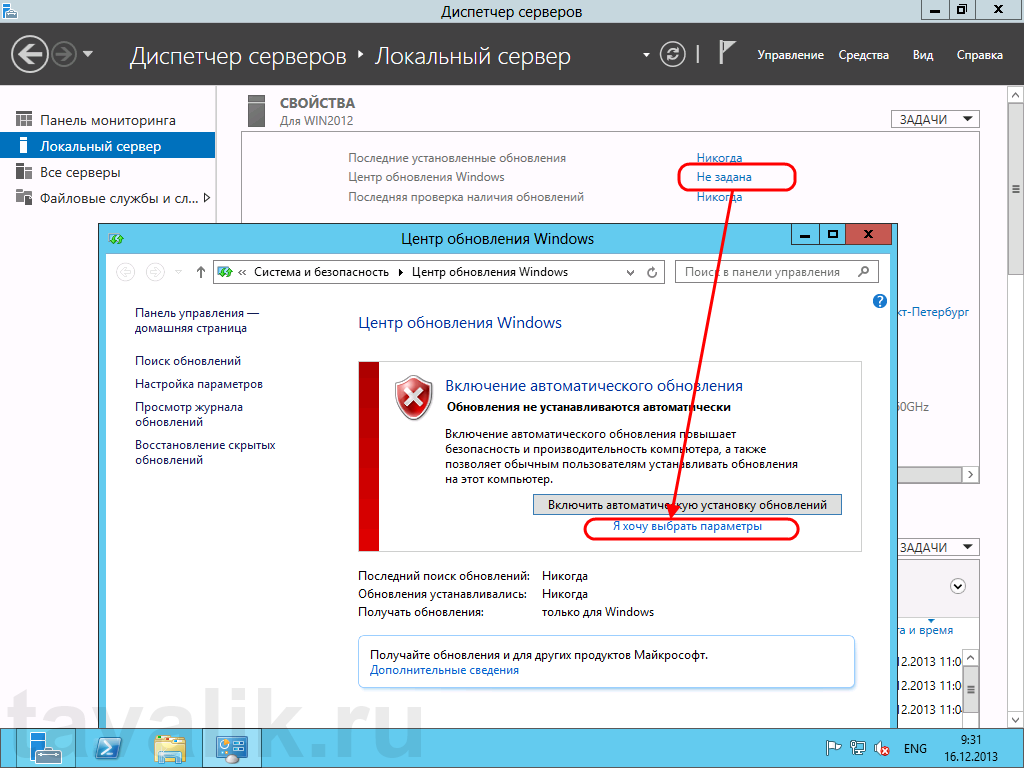
На следующем шаге выберем параметры обновления Windows Server 2012. Для этого пройдем по ссылке напротив пункта «Центр обновления Windows» (Windows Update), чтобы открыть соответствующую оснастку. Здесь кликнем на «Я хочу выбрать параметры» (Let me choose my settings) .
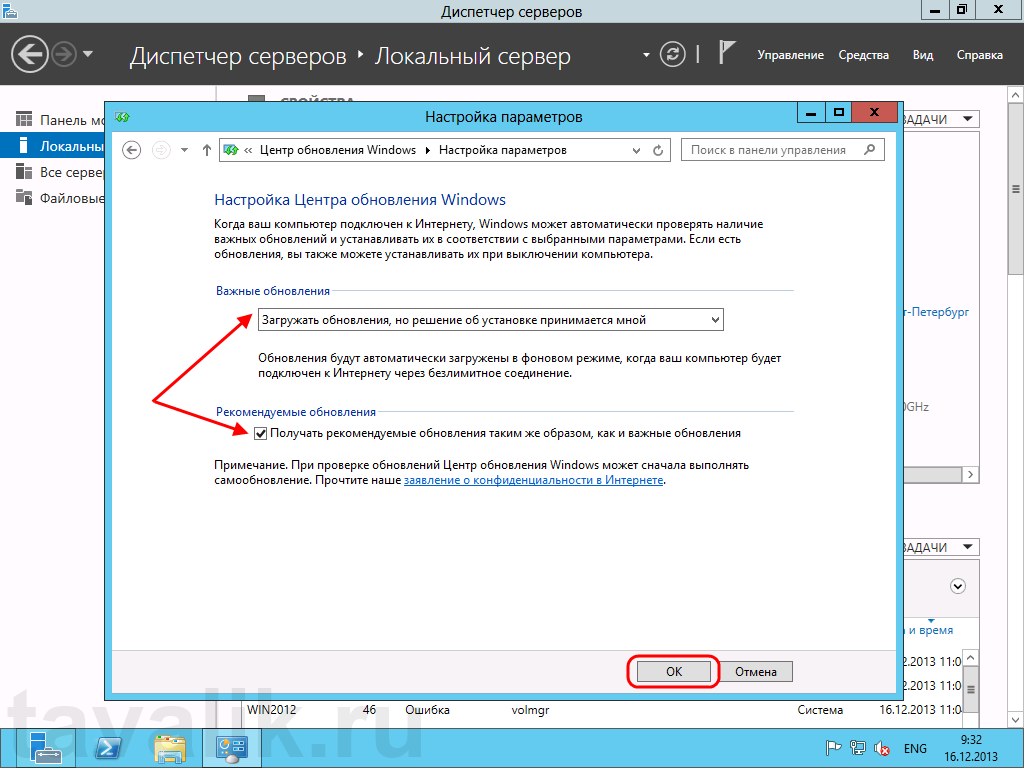
В открывшемся окне выберем необходимые параметры центра обновлений Windows. Я обычно устанавливаю:
- Важные обновления: «Загружать обновления, но решение об установке принимается мной» (Check for updates but let me choose whether to download and install them).
- Рекомендованные обновления: «Получать рекомендованные обновления таким же образом, как и важные обновления» (Give me recommended updates the same way I recieve important updates) .
После того, как параметры установлены, жмем «ОК» для сохранения настроек.
После чего Windows выполнит поиск доступных обновлений. Отметим все обновления в списке и нажмем «Установить» (Install) для запуска процесса установки.

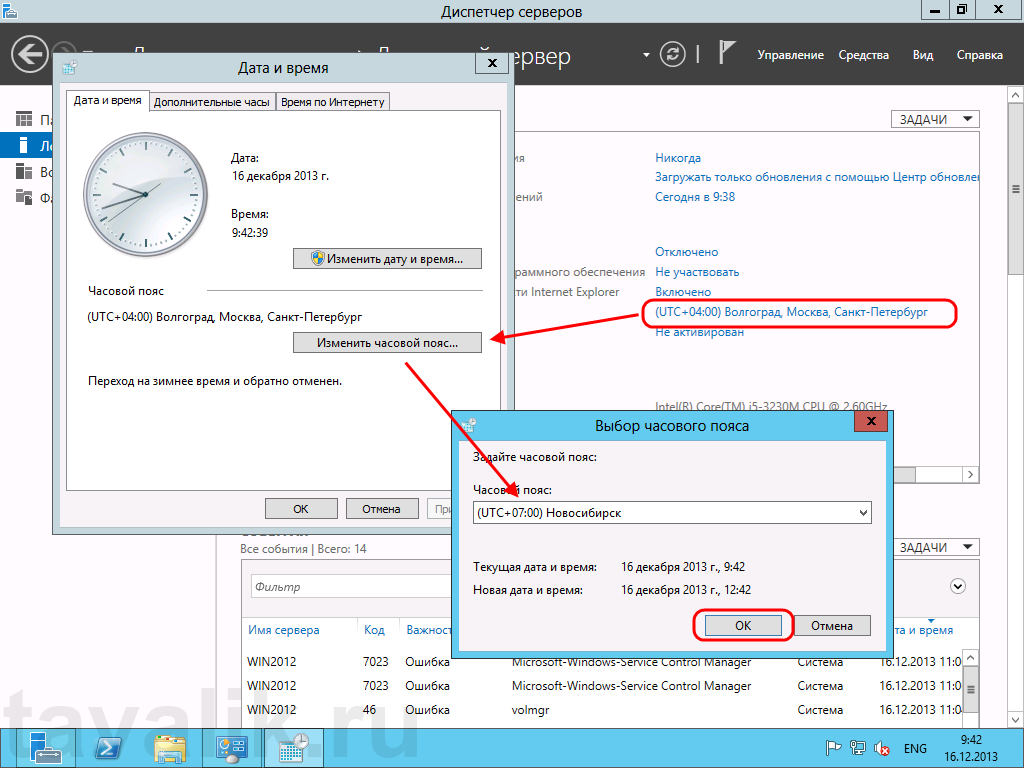
Пока происходит загрузка и установка обновлений продолжим настройку сервера. Пройдем по ссылке напротив пункта «Дата и время» (Time zone) для установки этих параметров. Для изменения даты и времени нажмем «Изменить дату и время…» (Change date and time…) в открывшемся окне, и «Изменить часовой пояс…» (Change time zone…) для изменения часового пояса соответственно. Определившись с настройками закрываем все окна кнопкой «ОК» .
Ну и напоследок нам осталось только активировать Windows Server 2012. Для этого жмем на ссылку в пункте «Код продукта» (Product ID). Откроется окно «Активация Windows» (Windows Activation) (в котором необходимо ввести текущий ключ продукта и нажать кнопку «Активировать» (Activate).
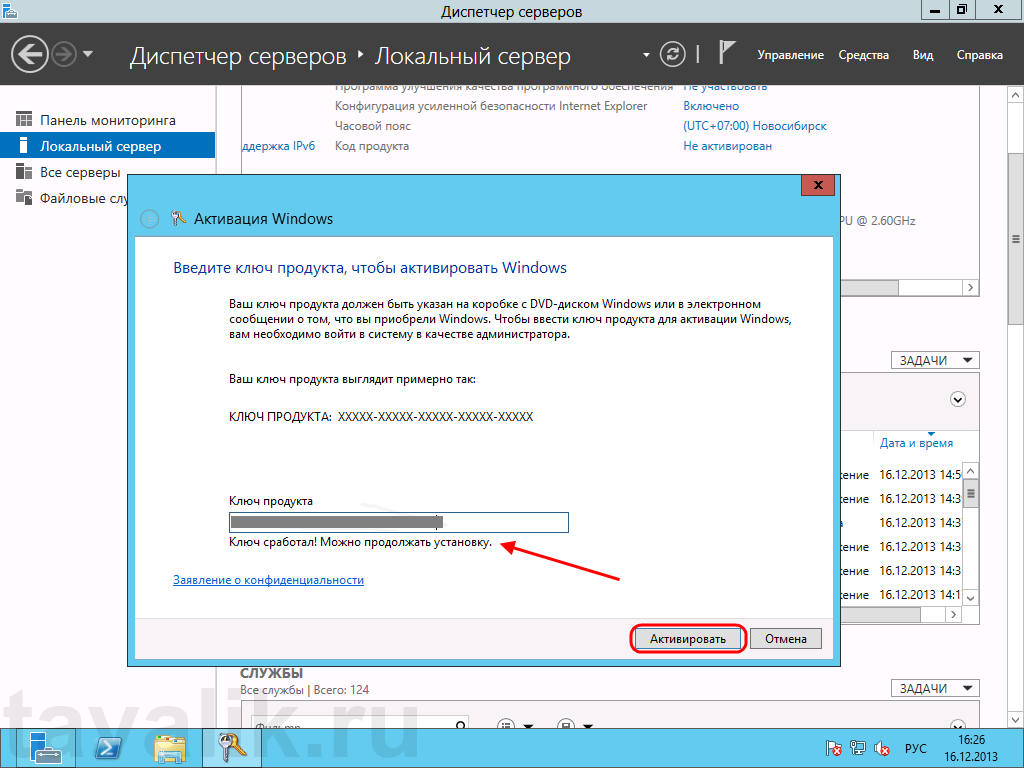
Если код соответствует выбранной версии Windows Server 2012, через некоторое время появится сообщение об успешной активации Windows, а напротив пункта «Код продукта» (Product ID) мы должны увидеть текущий код и статус «(активировано)» (activated) .

Вот и все. На этом установка и первоначальная настройка Microsoft Windows Server 2012 закончена. Осталось только дождаться установки текущих обновлений, перезагрузить сервер, затем повторить процедуру снова, до тех пор, пока все необходимые обновления не будут установлены.
Microsoft added Windows Server to the Windows family in the early 2000s to make it easier to manage and control networks and use Windows as a server operating system; today, Windows Server 2012 and 2012 R2 are two of the most widely used versions of Windows. These versions of Windows have provided new and advanced features in the fields of virtualization, server management, information protection, network, remote access, information storage on hosting servers, user experience, cloud computing, automation, etc., which are today widely used by large companies and large information centers in the world.
Services in Windows Server 2012, such as WAMP, IIS, Media Centre, FTP, etc., provide for various uses. In Windows Server 2012, the Microsoft Active Directory service can be enabled under certain conditions. Also, windows server 2012 can manage and direct all the systems and windows of an organization in a centralized and integrated way.
Many people want to take advantage of the advanced features available in Windows Server 2012/ 2012 R2 because of its widespread adoption as a server operating system. If you’re a Windows fan and want to learn how to install Windows Server 2012/2012 R2 on your server or PC, this article is helpful for you. Follow the instructions in this guide to successfully install Windows Server 2012/2012 R2 on your server or PC.
Windows Server 2012/2012 R2 Installation Prerequisites
- Buying a dedicated server if installed on the server
- Windows Server 2012 license for legal activation
- Memory (RAM): at least 512 MB
- Processor (CPU): at least 1.4 GHz 64 bit
- Hard disk space (HDD): at least 32 GB
- Graphics (VGA): at least DirectX9.0
How to install Windows Server 2012/ 2012 R2
Before installing 2012/Windows Server 2012 R2 on a server or PC, we recommend that you make a backup copy of your system information and data. Then follow the steps to install Windows Server 2012/2012 R2:
Step 1. Download Windows Server 2012/2012 R2 from the Microsoft site.
Step 2. Set the system or server in the desired boot mode; this feature is included in the system BIOS settings. To enter the BIOS settings section, when you turn on the system, press the Delete button, or in some systems, press Ctl+F1 or F12, and follow the BIOS configuration instructions.
Step 3. After booting the Windows Server 2012 operating system in the way you want and turning on the server, a page showing the loading of the necessary files to install the operating system will be displayed. You should be patient until the Windows installation section is loaded.

Step 4. Then you need to select the default language and click the Next button.
Step 5. Click the “Install Now” option.
Step 6. According to the image you see, you must select one of the GUI options from the list. Usually, for servers, we select Windows Standard GUI or Data Center GUI. In this tutorial, we chose the Windows Server 2012 Data Center GUI.
Step 7. To allow the installation of Windows Server 2012/2012 R2, you must confirm the server License Agreement and copyright rules by checking the “I accept the license terms” box and selecting the Next button.
Step 8. For custom installation of Windows Server 2012, select Custom: Install Windows Only (advanced).
Step 9. This step is for partitioning and installing Windows on the desired partition. In this step, you will see the disk you are using, if you want to create a custom partition and change the drive options, you should click on Drive Options (advanced). If you do not decide to change the drive and create a custom partition, you should skip this step by selecting the Next option. In this tutorial, we want to create a custom partition, so we click on Drive Options (advanced).
Step 10. select the hard drive to create a custom partition, and click on NEW and Next. On large hard drives, we recommend choosing 50 GB for Windows and the software required by Windows and partitioning the rest of the hard drive as desired.

Step 11. Then you will be able to determine the size of your desired partition.
Optional: You can add a drive for dual boot by using Native Boot To Vhd( SHIFT-F10) and accessing the command prompt window. Find the drive where the installation will take place (eg dir c:, dir d:, dir e:, etc) and to run Disk Partition Utility, type Diskpart and create a partition with the desired size by the Create vdisk file=e:\BootDemo.vhd type=expandable maximum=40000 command. Then Attach disk and Exit. Finally, Refresh.
Step 12. Select the desired partition you created to install Windows.
Step 13. Wait approximately 20 minutes for the files to be copied and for Windows Server 2012 to be completely installed on the selected hard drive.
Step 14. After restarting the system several times automatically, the system will start and you will see the settings page where you must specify a security password for the administrator user and enter the password twice and click on the Finish button.
Step 15. On the page you see, you must press the Ctrl + Alt + Delete buttons Simultaneously to sign in.
Step 16. Enter the password you specified in the previous step and press the Enter button.
Congratulations, you have successfully installed Windows Server 2012/2012 R2 and now you can enter the Windows Server 2012 desktop environment and enjoy the features of Windows Server 2012.
It should be noted that if you intend to install Windows Server 2012/2012 R2 on your server, you must first configure ESXi or KVM virtualization on the dedicated server and then follow the steps we have taught. If you want to benefit from the features of Windows Server 2012 on your PC, after booting Windows Server 2012/ 2012 R2 using different methods such as CD, USB, or ISO file, you must create a virtual machine and then follow the steps to install Windows Server 2012. These steps are the same on the server and PC.
FAQ
Considering the security problems and dangerous bugs in Windows 2003 and 2008, Windows Server 2012 is one of the best alternatives to old Windows and even newer versions of Windows (such as Windows 2016). This version of Windows does not have the security problems of Windows 2003 and 2008 and is almost reliable in terms of security. Windows Server 2012 is graphically very light and has a very high speed; in general, it is an optimal Windows.
There is no option for the partition’s file system. Windows Server 2012 utilizes the ReFS file system by default for all newly created partitions. ReFS is an enhanced and modernized variant of the NTFS file system.
To upgrade from Windows Server 2012 to Windows Server 2012 R2, you can use the Windows Server 2012 R2 installation media. During the installation procedure, you will be prompted to choose between a clean install and an upgrade.
Note that windows server 2012 and 2012 R2 installation steps are the same.
Open the «Start» menu, search for «Command Prompt,» and run as administrator. Then, enter «sfc /scannow» and select «Enter».The Windows system files can be checked for integrity by running the system file checker tool.
yes, Windows Server 2012 and Windows Server 2012 R2 will no longer be supported after October 10, 2023. After this date, security updates, non-security updates, problem fixes, technical support, and online technical content updates will no longer be provided for these products.
Conclusion
Windows Server 2012/2012 R2 is an optimized, fast and stable version of the Windows family, designed for use on servers. This version of Windows provides optimal performance on the server, which has replaced the new versions of 2016 because, in addition to being compatible with old hardware and low resources, it meets the needs of users using Windows.
For users who find the process of installing Windows Server 2012/2012 R2 time-consuming and difficult, purchasing Opera Windows VPS is a useful solution to escape from the installation and configuration steps of Windows Server 2012.
Opera VPS provides Windows VPS with Windows Server 2012 pre-installed so that users can devote their time and energy to their most essential tasks rather than installing and configuring Windows Server 2012.
In this article, you learned how to install Windows Server 2012 and its new version, Windows Server 2012 R2, on the server and PC. If you need more help in installing Windows Server 2012, share your question with us in the comments section so that we can guide you.
We appreciate your staying with us until the end of the article.
Изначально режим Server Core был задуман для того, чтобы предоставить минимальный набор функциональных возможностей, необходимых для выполнения сервером определенных ролей. Поэтому в Windows Server 2008 установка Server Core представляла из себя сильно урезанную версию операционной системы, в которой кроме графического интерфейса и средств управления отсутствовали многие серверные роли и компоненты.
Со временем концепция поменялась, и в версии Server 2008 R2 все отличия Server Core от полной установки свелись к отсутствию графического интерфейса и средств управления сервером. Однако выбор варианта установки по прежнему оставался окончательным, изменить его было невозможно.
В Windows Server 2012 Microsoft пошла дальше, и теперь различные варианты установки отличаются лишь наличием или отсутствием серверных компонентов (features), которые можно свободно добавлять и удалять в процессе эксплуатации сервера. Кроме того, в Server 2012 изменилось количество вариантов установки, доступны два основных варианта установки сервера:
• Сервер с графическим интерфейсом пользователя (Server with а GUI);
• Установка основных серверных компонентов (Server Core Installation);
И два дополнительных (промежуточных):
• Минимальный интерфейс сервера (Minimal Server Interface);
• Компонент «Возможности рабочего стола» установлен (Desktop Experience feature installed).
Мы попробуем все четыре варианта установки, а также способы перехода от одного варианта к другому.
Сервер с графическим интерфейсом пользователя
Выбор первоначального варианта установки производится, как и раньше, в процессе установки операционной системы. Окно выбора тоже не изменилось, только внизу появилось напоминание о том, что вариант установки можно изменить в любой момент, как в процессе установки так и позднее. Кстати, теперь основным считается вариант Server Core, который выбирается по умолчанию.

Выбрав установку с графическим интерфейсом мы получаем рабочий стол, начальный экран (Start screen) и Windows Explorer. Также доступны все графические средства управления сервером — диспетчер сервера (Server manager), консоль MMC и панель управления.

Переход к варианту установки Server Core осуществляется путем удаления компонентов сервера. При наличии графического интерфейса сделать это проще всего с помощью Server Manager. Запускаем его, нажимаем кнопку Manage и в раскрывшемся меню выбираем пункт «Remove Roles and Features».

Запускается мастер удаления ролей и компонентов. Читаем предупреждение и жмем Next.

Выбираем нужный сервер (в нашем случае он один) и идем в раздел Features.

За графический интерфейс отвечает компонент User Intarfaces and Infrastructure, который состоит из трех частей:
• Graphical Management Tools and Infrastructure — графические инструменты управления;
• Desktop Experience — возможности рабочего стола;
• Server Graphical Shell — графическая оболочка сервера.
Для перехода к установке основных серверных компонентов надо снять галочку с чек-бокса Graphical Management Tools and Infrastructure.

А также необходимо подтвердить удаление компонентов, которым Graphical Management Tools and Infrastructure требуется для работы.

Затем смотрим перечень удаляемых компонентов и, если все устраивает, жмем кнопку Remove.

Процесс удаления занимает несколько минут, после чего мы закрываем окно мастера и перезагружаем сервер. После перезагрузки получаем вариант установки основных серверных компонентов, или попросту Server Core.

Стоит иметь в виду, что при отключении компонентов через Server Manager файлы для них остаются на диске, занимая место. Для полного удаления компонент можно воспользоваться командлетом PowerShell Uninstall-WindowsFeature с параметром –Remove. Например, для полного удаления графики выполним следующую команду:
Uninstall-WindowsFeature Server-Gui-Mgmt-Infra -Remove

При использовании PowerShell стоит быть осторожнее, так как все все роли и компоненты сервера, для работы которых требуется графика, также будут удалены, причем без предупреждения. Поэтому перед удалением стоит запустить команду с параметром -WhatIf , чтобы точно знать, на какие компоненты повлияет переход к другому варианту установки.
Установка основных серверных компонентов
В этом варианте установки полностью отсутствует графическая оболочка, а также графические средства управления сервером. Для администрирования в наличии только командная строка и PowerShell. Также управлять сервером в режиме Server Core можно удаленно, с другого сервера через Server Manager или с рабочей станции Windows 8, установив на нее Remote Server Administration Tools for Windows 8.

В Windows Server 2012 «Установка основных серверных компонентов» является наиболее предпочтительным вариантом установки, так как имеет несколько важных преимуществ:
• Занимает на 4 ГБ меньше места, чем установка с графическим интерфейсом, что позволяет значительно сэкономить дисковое пространство;
• Более безопасна, так как отсутствие лишних компонентов уменьшает количество возможных уязвимых мест на сервере;
• Меньше количество устанавливаемых обновлений, соответственно минимизируется число перезапусков, необходимых для их установки. Это снижает время простоя сервера;
• Повышается производительность сервера в целом.
Если все же без GUI никак, то недостающие компоненты достаточно легко установить с помощью командлета PowerShell Install-WindowsFeature. Например, установить графические средства управления можно командой Install-WindowsFeature Server-Gui-Mgmt-Infra.
Если при установке компонентов необходимые файлы отсутствуют на диске, то по умолчанию Windows будет брать их с Windows Update. Чтобы указать альтернативный источник установки, можно использовать командлет Install-WindowsFeature с параметром -Source.
Установим удаленные компоненты с помощью образа WIM. Для этого вставляем установочный DVD-диск в дисковод (диск D) и вводим следующую команду:
Get-WindowsImage -ImagePath D:\sources\install.wim
Эта команда выдаст информацию о содержимом установочного образа. Выбираем желаемый вариант установки (в нашем случае это SERVERSTANDART) и запоминаем его индекс — 2.

Затем устанавливаем недостающие компоненты (их можно перечислить через запятую) из WIM-образа командой:
Install-WindowsFeature Server-Gui-Mgmt-Infra, Install-WindowsFeature `
Server-Gui-Shell -Source wim:D:\sources\install.wim:2
где 2 — индекс выбранного варианта установки.
По окончании установки сервер необходимо перезагрузить. Сделать это можно командой Restart-Computer.

Еще один способ установки компонентов — утилита DISM. Перейти с ее помощью к варианту установки с графическим интерфейсом можно, запустив последовательно следующие команды:
Dism /Online /Enable-Feature /FeatureName:Server-Gui-Mgmt /All /Source:wim:D:\sources\install.wim:2
Dism /Online /Enable-Feature /FeatureName:Server-Gui-Shell /Source:wim:D:\sources\install.wim:2
Так же как и в PowerShell мы указываем в качестве источника установки образ WIM, иначе по умолчанию все файлы будут браться с Windows Update. По окончании установки утилита сама потребует перезагрузить сервер.

Минимальный интерфейс сервера
Если установить сервер с графическим интерфейсом, а затем удалить графическую оболочку (Server Graphical Shell), то получим вариант установки «Минимальный интерфейс сервера». Она аналогична установке «Сервер с графическим интерфейсом пользователя», но в ней отсутствуют проводник, рабочий стол, начальный экран и Internet Explorer.

Этот вариант представляет из себя что-то среднее между минимальной установкой и установкой с графическим интерфейсом. Нам доступны графические средства управления сервером — Server Manager, оснастки MMC и часть часть апплетов панели управления (сама панель управления недоступна), но запускаются все они из командной строки.

Microsoft рекомендует использовать этот режим для обеспечения совместимости с приложениями, которым требуются компоненты (службы, библиотеки, файлы и т.п.) недоступные в случае установки основных серверных компонентов. Также сервер в режиме минимального интерфейса занимает примерно на 300 МБ меньше, чем тот же сервер с графическим интерфейсом.
Компонент «Возможности рабочего стола» установлен
Еще один дополнительный вариант установки. Чтобы перейти к нему, воспользуемся диспетчером сервера. Так же, как и при удалении компонентов, нажимаем кнопку «Manage» , но теперь выбираем пункт «Add Roles and Features».

Идем в раздел Features, открываем компонент «User Interfaces and Infrastructure» и отмечаем пункт «Desktop Experience».

Соглашаемся с установкой дополнительных компонентов

И жмем кнопку Next.

Затем просматриваем устанавливаемые компоненты и запускаем установку кнопкой Install.

Поскольку компонент «Возможности рабочего стола» не устанавливаются в базовом варианте, файлы для него отсутствуют на диске. Чтобы мастер установки взял файлы не с Windows Update (по умолчанию), а из другого источника, этот источник необходимо указать. Для этого надо пройти по ссылке «Specify an alternate source path» и в открывшемся окне ввести путь к источнику.

Ну и по окончании установки закрываем окно мастера и, как всегда, перезагружаем сервер.

После перезагрузки получаем дополнительные возможности — поддержку интерфейса Metro, магазин приложений App Store и темы рабочего стола. Все вместе это называется Desktop Experience (Возможности рабочего стола).

Честно говоря, я не представляю, зачем такой вариант установки может понадобиться на сервере, разве что использовать его как рабочую станцию.
Заключение
Как и раньше, выбор варианта установки по прежнему зависит от задач, выполняемых сервером, но теперь этот выбор можно в любой момент изменить. Например, один из возможных сценариев развертывания сервера — установить сервер с графическим интерфейсом, настроить его и затем перейти к установке основных серверных компонентов.
Ну и в качестве завершения приведу покомпонентное сравнение всех четырех вариантов установки.

![]()
Download Article
![]()
Download Article
- Installing
- Configuring the Network
- Testing
- Tips
|
|
|
Windows Server 2012 R2 operating system has features that support domain enterprise networks of varying sizes. To realize the benefits of these features, you must first install, configure, and Windows Server 2012 in your environment. This wikiHow article will walk you through the steps of installing, setting up, and testing Windows Server 2012 R2.
-

1
Create the operating system media. If you do not already have a DVD with Windows Server 2012 R2, you can download an ISO file and burn it to a bootable CD or DVD. You will need the product key to install, so make sure you have that handy.
- Download Windows Server 2012 R2 and save it to your hard drive.
- Make a backup copy of the .iso file by copying it onto a DVD from the hard disk.
-
2
Start the installation.
- Insert the Windows Server 2012 R2 DVD into the CD/DVD drive.
- Power on the PC to boot the operating system from the DVD.
- Watch as the system boots from the Windows Server 2012 R2 DVD. After booting begins, you will see the display Loading files… followed by the Windows Server 2012 R2 Setup screen.
- Expand the drop-down and review optional preferences, including the language you can select for the installation.
- Click Next to continue.
Advertisement
-
3
Click Install now. Unless you are upgrading Windows Server 2012, you will need to select this option.
-
4
Enter the product key and click Next. If you are installing from a DVD that came with a textbook, you may not need a key.
-
5
Select the OS version to install.
- Notice that depending on the DVD you are using, you may see a slightly different set of options. However, regardless of which DVD, Windows Server 2012 R2 Server Cores is the default.
- Select Windows Server 2012 R2 Standard (GUI installation), with the arrow key or mouse.
- Click Next to continue.
-
6
Select license terms.
- Review the Microsoft license agreement.
- Click the checkbox next to «I accept the license terms.»
- Click Next to continue.
-
7
Configure your custom install or upgrade.
- Review the notes for these options because they are very different; upgrade lets you upgrade a qualified Windows OS. Whereas with custom, you can install the OS on a newly created space.
- Click Custom to manage disk space and display the disk configuration.
- Highlight where you would like to install the operating system; you can use the arrow key or mouse.
- Click Next.
-
8
Create a password.
- Create an Administrator password at Windows Setup Settings prompt.
- Type the password and click Finish.
-
9
Log on to the server.
- Note that this action, displaying the password prompt, will depend on the installed environment, real or virtual.
- Click Ctrl + Alt + Delete to display the password prompt.
- Enter the administrator password.
- Click the arrow to display Networks so you can tell setup how to configure network parameters.
-
10
Choose your network settings.
- Configure network visibility is needed even if you plan to isolate the server; your intentions must be known to network settings.
- Click Yes so your computer is visible to other network devices.


Advertisement
-
1
Minimize Server Manager. These steps demonstrate how to configure TCP/IP settings, which are needed to verify network connectivity with another machine, such as Windows 7.
- Click Minimize to minimize Server Manager, which is displayed when the OS completes booting.
-
2
Display menu items.
-
3
Click the Start menu. When Server Manager is minimized, you will see the Recycle Bin and Taskbar; there are also menu items, such as Start, that are visible when the mouse is located at the bottom right.
- Move your mouse along the taskbar to the right and hover it to the right of the time and date; this action displays a number of icons, and to see their names, such as Search, Start, and Settings move the mouse straight up. If the icons are not shown, slightly move the mouse in any direction to display them.
-
4
Click Control Panel.
-
5
Click Network and Internet.
-
6
Click Network and Sharing Center.
-
7
Click Change adapter settings.
-
8
Right-click Ethernet and select Properties. Network Connections (Ethernet) Properties.
-
9
Display TCP/IP Properties.
- Select Internet Protocol Version 4 (TCP/IPv4) and click Properties.
- Click Use the following IP address.
-
10
Configure TCP/IP settings.
- Notice there are a number of textboxes, but to test connectivity, only the IP address and subnet mask are needed.
- Type 172.16.150.10 in IP address field.
- Change the entry in Subnet mask to 255.255.255.0.
- Click OK.
- Click Close.
- Click X to close both Network Connections and Network and Sharing Center.


Advertisement
-
1
Verify Connectivity. After the OS is installed and network parameters configured, it is time to test both activities; an important test is to verify the server can communicate with another machine, such as a Windows 7 client, and the client can communicate with the server; you can do this using the Command Prompt, and after testing is complete, you can shutdown the server.
- Click the Start menu and select Apps > Command Prompt.
- Ping the second machine.
- From the second machine, ping the server.
-
2
Shutdown the server.
- Open Start and go to Settings > Power > Shutdown.


Advertisement
Ask a Question
200 characters left
Include your email address to get a message when this question is answered.
Submit
Advertisement
-
If an OS is already installed on the machine, you may see Press any key to boot from CD/DVD. This is your opportunity to boot from the CD/DVD drive.
-
If an OS it not on the machine, the boot process goes directly to the CD/DVD drive and begins booting.
-
The configuration shown will depend on the partition and unallocated space on your disk(s). Notice that you are given a number of disk options, but they are not always enabled. It depends on whether a partition or unallocated space is highlighted; if a partition is highlighted all except New are enabled, and if an unallocated space is highlighted, all are grayed, except New.
Show More Tips
Thanks for submitting a tip for review!
Advertisement
References
- Microsoft. (2013, June 24). System Requirements and Installation Information for Windows Server 2012 R2. Retrieved from TechNet: http://technet.microsoft.com/en-us/library/dn303418.aspx
- Microsoft. (2013, June 24). Windows Server Installation Options. Retrieved from TechNet: http://technet.microsoft.com/en-us/library/hh831786.aspx
About This Article
Thanks to all authors for creating a page that has been read 67,383 times.
Is this article up to date?
version of windows serverwindows server 2022server 2022
Do you want to install Windows Server 2012 R2, or upgrade a previous version of Windows Server to Windows Server 2012 R2? In this guide, we’ll discuss the installation of Windows Server 2012 R2, and cover the different steps you need to take during the installation process. In this guide, you’ll also learn how to:
- Prepare for Windows Server 2012 R2 installation
- Install Windows Server 2012 R2
- Use Automatic Setup Wizard and configure Windows settings
- Manage Windows Server 2012 R2 installation
Whether you’re installing Windows Server 2012 R2 for the first time, or upgrading an existing server to this new iteration of Microsoft’s server operating system, it is essential to follow a series of steps in order to ensure a smooth and successful installation process.
Get Windows Server 2012 R2
We offer the best price on Microsoft Windows Server 2012 R2 so you can set up your server efficiently for cheap.
- Windows Server 2012 R2 Standard with 10 CALs — $838.99 (40% Off)
- Microsoft Windows Server 2012 R2 Essentials — $388.99
- Windows Server 2012 R2 DataCenter 4 Processor — $10399.99
How to Download Windows Server 2012 R2
To prepare for Windows Server 2012 R2 installation, you will need to ensure that your system meets the minimum hardware and software requirements, as well as create a backup of your current system. The minimum system requirements for installing Windows Server 2012 R2 are as follows:
- Processor: 1.4GHz 64-bit processor (Recommend: 2GHz or faster)
- RAM: At least 512MB (Recommend: 2GB or more)
- Hard Drive: At least 32GB available disk space (Recommend: 40GB or more)
After you have verified that your system meets the minimum requirements, you can then download and install Windows Server 2012 R2. There are several methods for doing this, including downloading directly from Microsoft or purchasing a retail copy of the operating system.
How to Install Windows Server 2012 R2
After acquiring an installation media, begin the system installation and follow these steps:
- Insert your Windows Server 2012 R2 DVD into the CD/DVD drive.
- Power your computer on and ensure it boots from the installation media.
- Follow the Windows Setup instructions and choose your preferred language, time zone, and keyboard input method.
- Enter your product key and configure your installation and wait for Windows Server 2012 R2 to install on your device.
- Finish setting up your local administrator account.
After installing Windows Server 2012 R2, you may wish to configure some additional settings and features. You can also make modifications to settings you enabled during the setup process, like changing the language or time zone.
Step 1.
If you have the installation package on a DVD or bootable USB, you’ll first need to change your computer’s boot order so that it runs the installation package when you start it up. If the boot order isn’t changed, the computer will boot into your existing operating system instead.
You can change the boot order from your computer’s BIOS setup utility. To access the BIOS, restart your computer and press the appropriate key during the startup process.
Step 2.
Once you’ve changed your boot order, insert the Windows Server 2012 R2 installation media into your CD/DVD drive or connect your USB flash drive with the installation package on it, and then restart your computer again. You may be prompted to select a boot device, or your computer may automatically boot into the installation.
Step 3.
When your computer successfully boots from the installation media, you’ll see the Windows Setup wizard.

When you reach the Windows Setup screen, follow the prompts to begin installing Windows Server 2012 R2 on your system. This process will involve accepting the terms of use and selecting a language, time zone, and keyboard input method for your device. When you’re ready to continue, click the Install Now button.
Step 4.
After starting to copy temporary files, Windows will ask if you want updates installed for the setup process. If you’re connected to the internet, we recommend you do so now; it’ll be quicker than waiting until after installation.
When prompted, you’ll need to enter your product key. Find your valid product key and input the letters and numbers correctly in order to proceed. This is needed to verify and activate your copy of Windows Server 2012 R2.
Step 5.
Once the process is finished, you’ll be prompted to select the edition you want to install. If you’re installing either Standard or Datacenter editions, you’ll also need to pick if you wish to install as a Server Core or with Desktop Experience (which provides a GUI).

Server Core gives you a stripped-down version of Windows Server with a smaller footprint that takes up less CPU and RAM, but is designed to be managed remotely and can be harder to administer locally. Desktop Experience, on the other hand, gives you a user-friendly experience with a Graphical User Interface that’s easier to manage.
After you’ve chosen your desired installation option, press Next. You will then see the License terms. Read these carefully and check the «I accept the license terms» box before pressing Next again to continue.
Step 6.
Now, you get to choose how you’d like to install Windows Server. You can either Upgrade, which lets you keep your old files and settings, or do a clean installation by selecting Custom. The Upgrade option is only available if you’re installing from an earlier version of Windows Server (like 2008, 2008 R2, or 2012.)
Step 7.
During the installation process, you will be prompted to select where you would like Windows Server installed. You can either choose an existing partition from the list of drives or create a new one by clicking on Drive Options and selecting New Partition.

Note: If you haven’t already, make sure you back up the contents of your hard drive before continuing, otherwise you may lose any data currently saved on the chosen drive or partition.
After you’ve chosen your Windows Server installation location, click Next. This could take some time, and your computer may restart during the installation process; this is normal.
Step 8.
Once you have finished the configuration, your computer will reboot and start Windows Server 2012 R2. This is an ideal time to create a secure username and password for your local administrator user, so make sure it’s something memorable but tricky for others to guess!

Step 9.
If you installed Server Core, next the system will appear as a command window. However, there won’t be a Start screen or desktop icons. This is Server Core’s standard interface. By default, Server Center usually sets the time zone to Pacific Time. If you want to change this, type «control timedate.cpl» and then follow the instructions to set the correct date and time.
If you want to change the randomly-assigned name that Server Core installations give your device, type «netdom renamecomputer %computername% /newname:computername» into Command Prompt and replace «computername» with the name you prefer.
A warning message may pop up telling you that changing the server’s name could cause some services to not work as intended. Type «Y» to confirm that you want to continue with this change. Afterward, the computer will prompt you to restart in order for the changes to take effect. To do so, type «shutdown /r /t 0» and press Enter.
Step 10.
After the server has restarted, use the Ctrl + Alt + Delete keyboard shortcut to log on with the username and password you created earlier. Now that Windows Server 2012 R2 is installed, you can begin using it!

Conclusion
In this guide, we discussed the installation of Windows Server 2012 R2 and walked through the different steps you need to take during the installation process. To summarize, it is essential to follow these steps in order to ensure a smooth and successful installation.
If you have any questions or need assistance along the way, our team at SoftwareKeep is always here to help!
One More Thing
Looking for more tips? Check out our other guides in the SoftwareKeep Blog and our Help Center! You’ll find a wealth of information on how to troubleshoot various issues and find solutions to your tech problems.
Sign up for our newsletter and get early access to our blog posts, promotions, and discount codes. Plus, you’ll be the first to know about our latest guides, deals, and other exciting updates!
Recommended Articles
» Windows Server 2012 Installation Guide
» In-Place Upgrade Windows Server 2008 R2 to Windows Server 2022
» How to Download Windows Server 2022
Feel free to reach out with questions or requests you’d like us to cover.