Время на прочтение
8 мин
Количество просмотров 97K
 Windows Server 2012 R2 вышел 18 октября 2013 года. С тех пор на эту серверную операционную систему Microsoft выпущено несколько сотен обновлений исправляющих уязвимости и дефекты продукта, а так же улучшающие функционал.
Огромное количество обновлений — источник головной боли. Наиболее актуальный дистрибутив сервера, так называемый «Update2», в который интегрированы обновления по ноябрь 2014 года, безнадежно устарел. Установив с него операционную систему, вы получите вдогонку еще 200+ обновлений, которые будут устанавливаться 2-4 часа.
В этой короткой инструкции мы освежим ноябрьский дистрибутив, интегрировав в него все кумулятивные пакеты обновлений и обновления безопасности.
Помимо дистрибутива мы освежим и память администратора, вспомнив как обновляется носитель для установки, зачем выполняется каждый шаг, и какие нас может ожидать подвохи на разных этапах.
Делать будем по максимуму просто, используя штатные инструменты.
Все работы лучше проводить на сервере с уже развернутом Windows Server 2012 R2, чтобы не было накладок с версией утилиты DISM. Так же на нем удобно подключать ISO файлы, не распаковывая их.
Готовим рабочие директории
Для работы потребуются следующие каталоги:
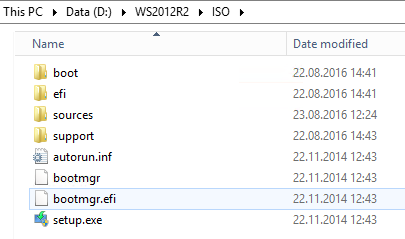
ISO — в этот каталог копируются файлы дистрибутива. В скопируйте в него содержимое дистрибутива SW_DVD9_Windows_Svr_Std_and_DataCtr_2012_R2_64Bit_English_-4_MLF_X19-82891.ISO, предварительно смонтировав образ, а затем размонтировав.
MOUNT — пустой каталог, в него будут монтироваться образы из wim-файла.
CU — в этот каталог поместим кумулятивные обновления
SU — в этом каталоге будут находиться обновления безопасности и другие обновления
mkdir D:WS2012R2ISO
mkdir D:WS2012R2MOUNT
mkdir D:WS2012R2CU
mkdir D:WS2012R2SU
Скачиваем кумулятивные обновления
Tip & Trick #1. Microsoft выпускает для Windows Server 2012 R2 кумулятивные пакеты обновлений, но в них входят только обновления, исправляющие ошибки и улучшающие функционал. Обновления безопасности не включены. При этом обновления и не особо кумулятивны. Некоторые не включают в себя предыдущие обновления, и надо ставить «кумулятивное» за каждый месяц. Бардак. В октябре эта ситуация изменится к лучшему.
Со списком кумулятивных обновлений вы можете ознакомиться на этой wiki странице.
С ноября 2014 года нам потребуется интегрировать следующие обновления:
1. December 2014 Windows RT 8.1, Windows 8.1, and Windows Server 2012 R2. KB3013769, cкачать.
2. July 2016 Windows RT 8.1, Windows 8.1, and Windows Server 2012 R2. KB3172614, скачать.
Пакеты за май и июнь поглощены этим июльским пакетом. Но перед установкой обязательно обновление April 2015 servicing stack update for Windows 8.1 and Windows Server 2012 R2. KB3021910, скачать.
3. August 2016 Windows RT 8.1, Windows 8.1, and Windows Server 2012 R2. KB3179574, скачать.
Обновленный клиент центра обновления можно не интегрировать
Свежий Windows Update Client for Windows 8.1 and Windows Server 2012 R2: June 2016 вошел в KB3161606
KB3161606 поглощен KB3172614.
UPD: Я несколько преувеличил то, насколько Microsoft качественно подготовила дистрибутив. Обновления April 2014 и November 2014 действительно интегрированы. А все промежуточные — нет. Поэтому добавляем
May 2014 update rollup for Windows RT 8.1, Windows 8.1, and Windows Server 2012 R2. KB2955164, скачать
June 2014 update rollup for Windows RT 8.1, Windows 8.1, and Windows Server 2012 R2. KB2962409, скачать.
July 2014 update rollup for Windows RT 8.1, Windows 8.1, and Windows Server 2012 R2. KB2967917, скачать.
August 2014 update rollup for Windows RT 8.1, Windows 8.1, and Windows Server 2012 R2. KB2975719, скачать.
September 2014 update rollup for Windows RT 8.1, Windows 8.1, and Windows Server 2012 R2. KB2984006, скачать.
October 2014 update rollup for Windows RT 8.1, Windows 8.1, and Windows Server 2012 R2. KB2995388, скачать.
Tip & Trick #2. В разных статьях для интеграции обновлений предлагается извлечь из msu cab-файл. Делать это для offline-образа необязательно — интегрируйте msu без распаковки.
В папку CU разместите упомянутые выше msu файлы — Windows8.1-KB3013769-x64.msu, Windows8.1-KB3021910-x64.msu, Windows8.1-KB3138615-x64.msu, Windows8.1-KB3172614-x64.msu, Windows8.1-KB3179574-x64.msu.
Скачиваем обновления безопасности
Помимо кумулятивных обновлений интегрируем обновления, которые способна скачать утилита WSUS Offline Update.
Для этого:
- Скачиваем программу download.wsusoffline.net
- Выбираем обновления для Windows Server 2012 R2

- После скачивания открываем каталог wsusofflineclientw63-x64glb и *.cab файлы копируем в каталог C:WS2012R2SU

ОСТОРОЖНО: Если в список попали KB2966828 или KB2966827, удалите их, иначе после установки не получится добавить компонент Net Framework 3.5 (подробности).
Обновления готовы, приступим к интеграции.
Интеграция обновлений
Для интеграции обновлений нам потребуется:
- Смонтировать содержимое одного из образов в install.wim
dism /mount-wim /wimfile:{путь к wim файлу} /Index:{N} /mountdir:{путь к директории монтирования} - Интегрировать в offline установку каждое обновление
dism /image:{путь к директории монтирования} /add-package /packagepath:{путь к *.msu или *.cab файлу} - Сохранить изменения
dism /Unmount-WIM /MountDir:{путь к директории монтирования} /Commit
Этот процесс легко следующим автоматизировать командным файлом:
for /l %%N in (1,1,4) do (
dism /mount-wim /wimfile:"D:WS2012R2ISOsourcesinstall.wim" /Index:%%N /mountdir:D:WS2012R2MOUNT
for %%f in (D:WS2012R2CU*.*) DO (dism /image:D:WS2012R2MOUNT /add-package /packagepath:%%f)
for %%f in (D:WS2012R2SU*.*) DO (dism /image:D:WS2012R2MOUNT /add-package /packagepath:%%f)
dism /unmount-WIM /MountDir:D:WS2012R2MOUNT /Commit
)
Tip: Запуская командный файл, перенаправьте вывод в журнал
UpdateWIM.cmd >>log.txt 2>>&1
В результате мы получим файл D:WS2012R2ISOsourcesinstall.wim размером в 6.15Gb. Можем ли мы его уменьшить? Да, с помощью экспорта можно получить оптимизированный файл размером в 5.85Gb.
Экономия небольшая, кроме того после этого не очень красиво выглядит диалог выбора операционной системы при установке, поэтому следующий шаг опционален.
Что надо сделать?
Для получения сжатого образа необходимо:
- Экспортировать первый образ из оригинального wim-файла в новый файл
dism /export-image /sourceimagefile:{путь к исходному файлу wim} /sourceindex:1 /destinationimagefile:{путь к новому файлу wim} /compress:max - Подключить следующий образ из оригинального wim-файла в точку монтирования
dism /mount-wim /wimfile:"D:WS2012R2ISOsourcesinstall.wim" /Index:2 /mountdir:{директория для монтированния образа} - Добавить в новый файл следующий образ методом «захвата»
dism /append-image /imagefile:{путь к новому файлу wim} /captureDir:{директория с смонтированным образом} /name:{оригинальное имя} /description:{оригинальное описание} - Размонтировать образ, повторить итерацию добавления для каждого дополнительного образа
dism /unmount-WIM /MountDir:{директория с смонтированным образом} /Discard
Автоматизируем скриптом:
dism /export-image /sourceimagefile:D:WS2012R2ISOsourcesinstall.wim /sourceindex:1 /destinationimagefile:D:WS2012R2ISOsourcesinstall1.wim  /compress:max

dism /mount-wim /wimfile:"D:WS2012R2ISOsourcesinstall.wim" /Index:2 /mountdir:D:WS2012R2MOUNT

dism /append-image /imagefile:D:WS2012R2ISOsourcesinstall1.wim /captureDir:mount /name:"Windows Server 2012 R2 SERVERSTANDARD" /description:"Windows Server 2012 R2 SERVERSTANDARD"

dism /unmount-WIM /MountDir:D:WS2012R2MOUNT /discard

dism /mount-wim /wimfile:"D:WS2012R2ISOsourcesinstall.wim" /Index:3 /mountdir:D:WS2012R2MOUNT

dism /append-image /imagefile:D:WS2012R2ISOsourcesinstall1.wim /captureDir:mount /name:"Windows Server 2012 R2 SERVERDATACENTERCORE" /description:"Windows Server 2012 R2 SERVERDATACENTERCORE"

dism /unmount-WIM /MountDir:D:WS2012R2MOUNT /discard

dism /mount-wim /wimfile:"D:WS2012R2ISOsourcesinstall.wim" /Index:4 /mountdir:D:WS2012R2MOUNT

dism /append-image /imagefile:D:WS2012R2ISOsourcesinstall1.wim /captureDir:mount /name:"Windows Server 2012 R2 SERVERDATACENTER" /description:"Windows Server 2012 R2 SERVERDATACENTER"

dism /unmount-WIM /MountDir:D:WS2012R2MOUNT /discard
Удалите оригинальный install.wim, а сформированный install1.wim переименуйте в install.wim
Создание компактного образа install.esd
По совету D1abloRUS, если вы хотите получить инсталляционный диск минимального размера умещающийся на DVD5, можно экспортировать один (и только один) из образов в esd файл. Например, для экспорта Windows Server 2012 R2 Standard, используйте команду
dism /export-image /sourceimagefile:D:WS2012R2ISOsourcesinstall.wim /sourceindex:2 /destinationimagefile:D:WS2012R2ISOsourcesinstall.esd /compress:recovery
Оригинальный install.wim можно удалить.
Сборка ISO-файла
Для сборки нам потребуется утилита oscdimg.exe из комплекта Windows ADK. Если у вас ее не оказалось, можно просто скачать утилиту по ссылке (не используйте из этого комплекта ничего, кроме самой утилиты).
Tip & Trick #3. Для того, чтобы не было проблем с загрузкой из образа, следует расположить загрузочные файлы в пределах первых 4 гигабайт образа. Для этого используем файл bootorder.txt
bootbcd
bootboot.sdi
bootbootfix.bin
bootbootsect.exe
bootetfsboot.com
bootmemtest.exe
booten-usbootsect.exe.mui
bootfontschs_boot.ttf
bootfontscht_boot.ttf
bootfontsjpn_boot.ttf
bootfontskor_boot.ttf
bootfontswgl4_boot.ttf
sourcesboot.wim
Пути в этом файле указываются относительно корневой директории с образом, поэтому подстраивать пути на ваши фактические не требуется.
Tip & Trick #4. Если install.wim имеет размер больше 4700Mb, то инсталлятор вылетит с ошибкой «Windows cannot open the required file D:sourcesinstall.wim. Error code: 0x8007000D».
Нас учили что жизнь — это бой, поэтому разделим исходный install.wim на два командой
dism /split-Image /imagefile:D:WS2012R2ISOsourcesinstall.wim /swmfile:D:WS2012R2ISOsourcesinstall.swm /filesize:4096
Оригинальный файл install.wim можно удалить.
Tip & Trick #5. Вообще Microsoft говорит, что
пить
так делать нельзя.
In Windows 8.1 and Windows 8, Windows Setup does not support installing a split .wim file.
Мы говорим, что будем! Инсталлятор прекрасно подхватывает swm-файл. Проблем с установкой не будет.
Собираем образ командой:
oscdimg -m -n -yoD:WS2012R2bootorder.txt -bD:WS2012R2ISOBOOTetfsboot.com -lIR5_SSS_X64FREV_EN-US_DV9 D:WS2012R2ISO en_windows_server_2012R2_August_2016.iso
Уважаемый ildarz подсказывает, что для создания образа, одинаково хорошо работающего с BIOS и EFI, следует руководствоваться KB947024 и создавать образ так:
oscdimg -m -u2 -udfver102 -yoD:WS2012R2bootorder.txt -bootdata:2#p0,e,bD:WS2012R2ISOBOOTEtfsboot.com#pEF,e,bD:WS2012R2ISOEFImicrosoftBOOTefisys.bin -lIR5_SSS_X64FREV_EN-US_DV9 D:WS2012R2ISO en_windows_server_2012R2_August_2016.iso
Работоспособность проверена в ESXi с любым типом загрузки (BIOS/EFI).
Все получилось? Поздравляю!

Но решена ли проблема полностью? Для идеала необходимо интегрировать еще сотню «опциональных» и «рекомендованных» обновлений, но с этим не будем торопиться. Дадим Microsoft шанс самим разобраться в том бардаке, который они устроили с обновлениями.
PS. Зачем мы все это делали? Для того, чтобы освежить память, сделать работу чуть удобнее и получить несколько простых командных файлов, при помощи которых в дальнейшем можно практически автоматизированно интегрировать обновления в серверный дистрибутив, экономя время ввода сервера в эксплуатацию. Тем более есть надежда, что начиная с октября интегрировать обновления станет гораздо проще.
Точно так же вы сможете интегрировать Windows 7 convenience rollup и не наступить на грабли распаковки обновлений, невозможности загрузки из образа, превышения размера install.wim.
Спасибо за внимание и до новых встреч, друзья.
Если есть возможность поделиться опытом — жду вас в комментариях.
Обновлено 09.10.2018

Добрый день! Уважаемые читатели и гости, крупного IT блога Pyatilistnik.org. В прошлый раз я вам рассказал, о решении ситуации, с процессом Print Filter Pipeline Host загружающим процессор на 100%, сегодня мы вернемся опять к терминальным службам и рассмотрим ситуацию, когда у вас заканчивается дисковое пространство на ваших узлах сеансов удаленных рабочих столов (RDSH — Remote Desktop Session Host). Я покажу, как производится очистка места на RDS ферме. Уверен, что данная ситуацию, рано или поздно случается со многими компаниями.
Куда девается свободное место в службах удаленных рабочих столов
Описываю классическую ситуацию. Есть RDS ферма, которая состоит из двух посредников (RD Connection Broker) и 15-20 хостов RDSH, к котором непосредственно подключаются удаленные пользователи. В большинстве случаев, пользователи имеют перемещаемые профили. Все хорошо, все работает, но случается момент, что появляется еще пара сотен юзеров, например, из-за расширения компании или поглощения другой, это не важно. На ваших узлах, становится катастрофически не хватать свободного места. Если у вас виртуальные машины, то тут проще можно расширить ресурсы, при наличии места на датасторах, в случае с физическими серверами сложнее, так как расширять существующие RAID массивы, очень геморройная вещь, да и места на СХД, может так же не хватать. Да и расширять до бесконечности вы не можете. Плюс за счет того, что профили перемещаемые, то вы должны умножить новое дисковое пространство на количество ваших узлов, вот такая математика.
Давайте посмотрим, что вы можете предпринять для оптимизации, без расширения дискового пространства. Первым делом мы с вами воспользуемся утилитами, которые позволят посмотреть, чем конкретно заняты ваши жесткие диски. Тут утилит много, я могу выделить бесплатную WinDirStat или платную TreeSize.
Установка WinDirStat, очень тривиальная, я не буду ее приводить. После инсталляции запускаем утилиту. На первом экране WinDirStat, попросит вас выбрать локальный диск или каталог для сканирования файлов. В моем примере на Remote Desktop Session Host хосте, один диск C:, его я и выбирая.

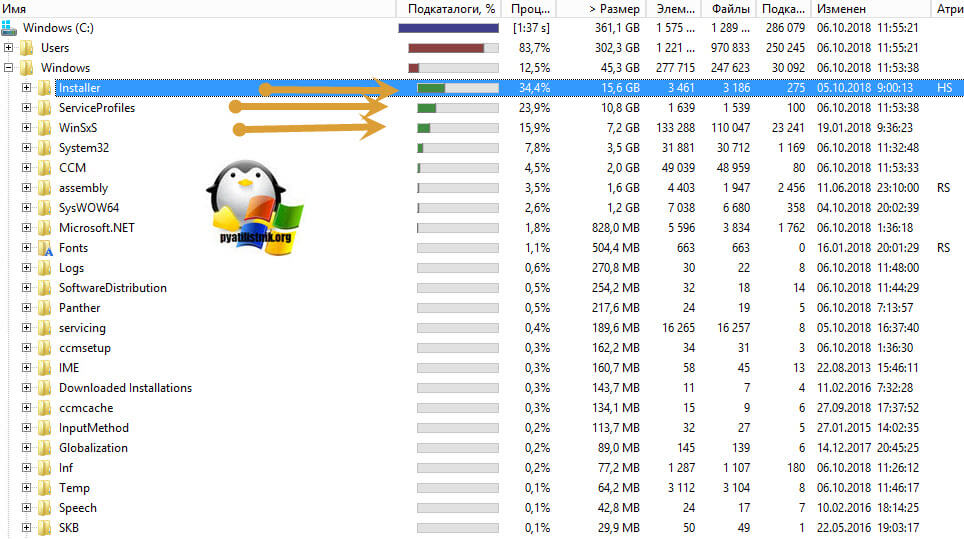
У вас начнется сканирование вашего локального диска, на предмет того, чем он занят. Вы увидите забавных пакменов.
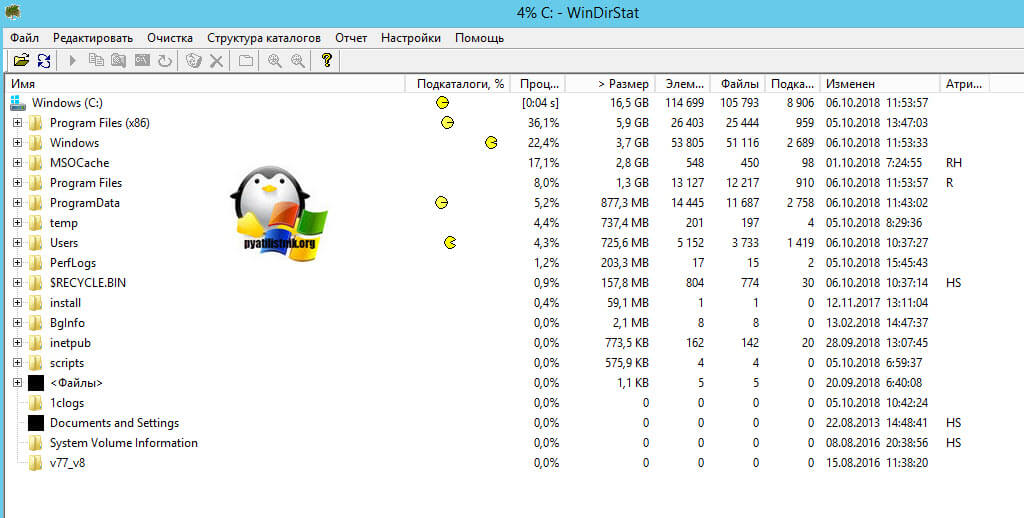
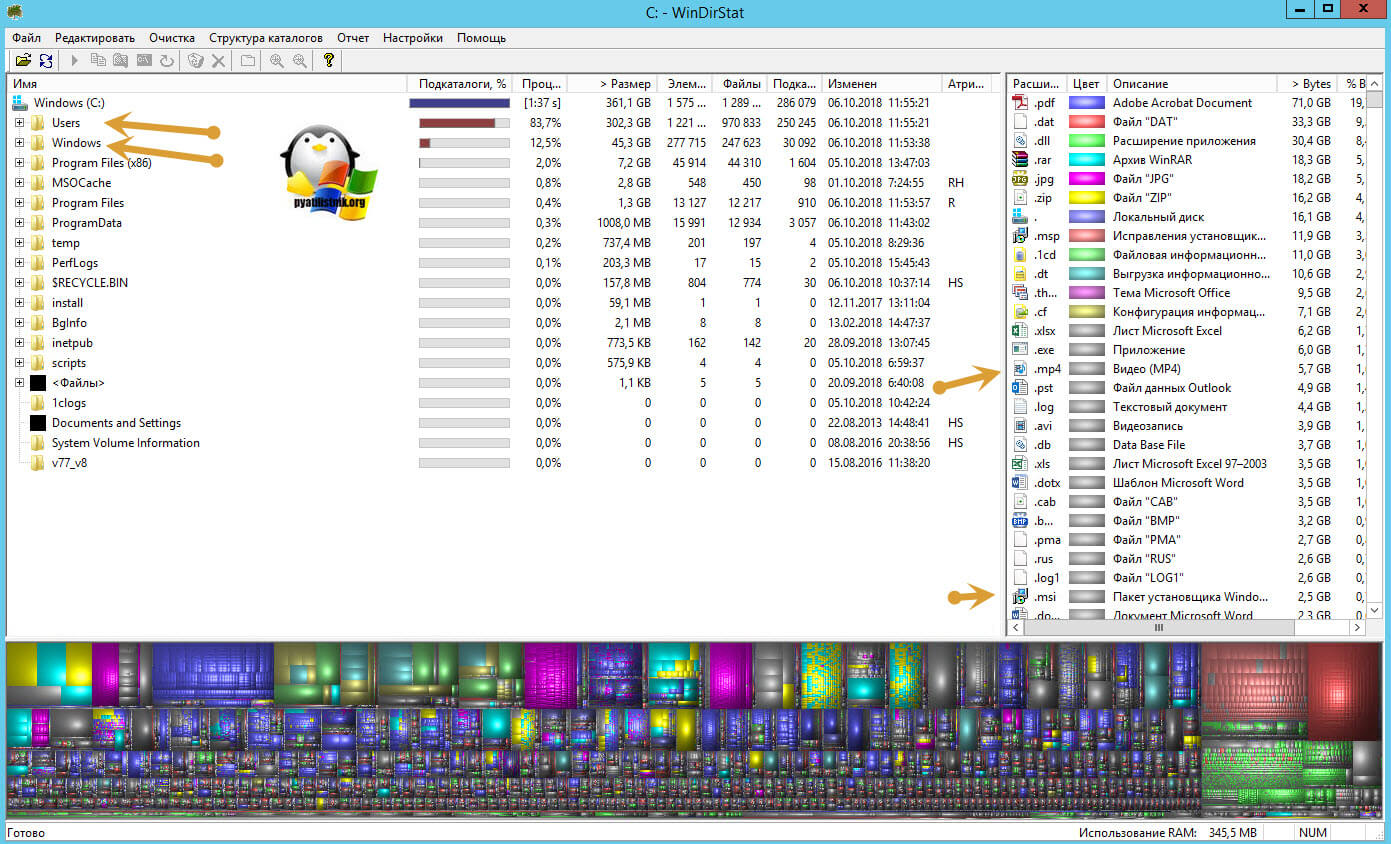
Как видим, у меня самым объемным является папка Users, второй папка Windows 45 ГБ. С правой стороны вы увидите столбец по форматам, там сразу можно выделить MP4 или MSI, видно сколько они занимают. Ниже разноцветные квадраты, это так выглядят все типы файлов на жестком диске в этой утилите.
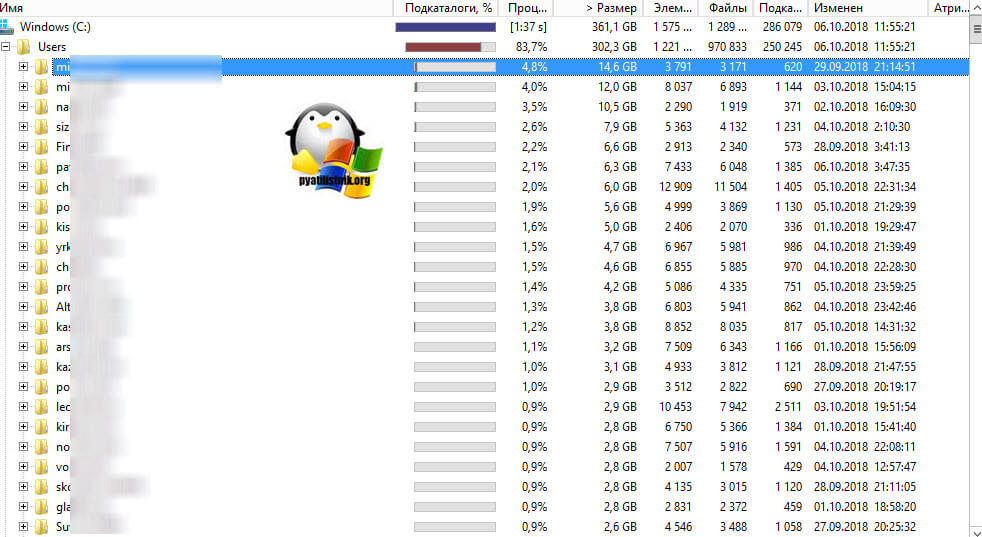
Открыв папку профили, вы сразу видите самые объемные из них, смотрите, чем они заняты и проводите зачистку, с визгами и орами от пользователей. Но тут никак больше.
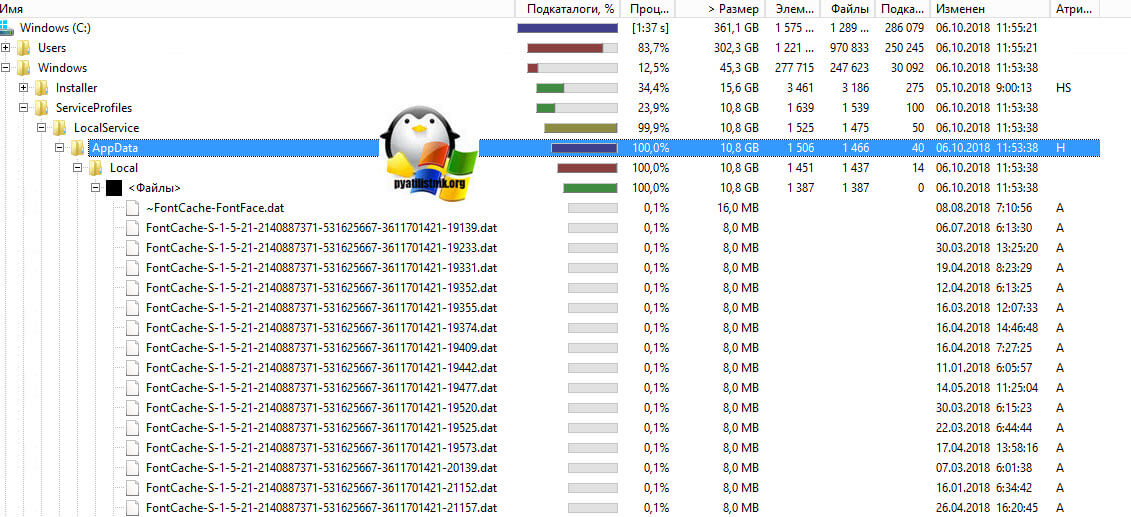
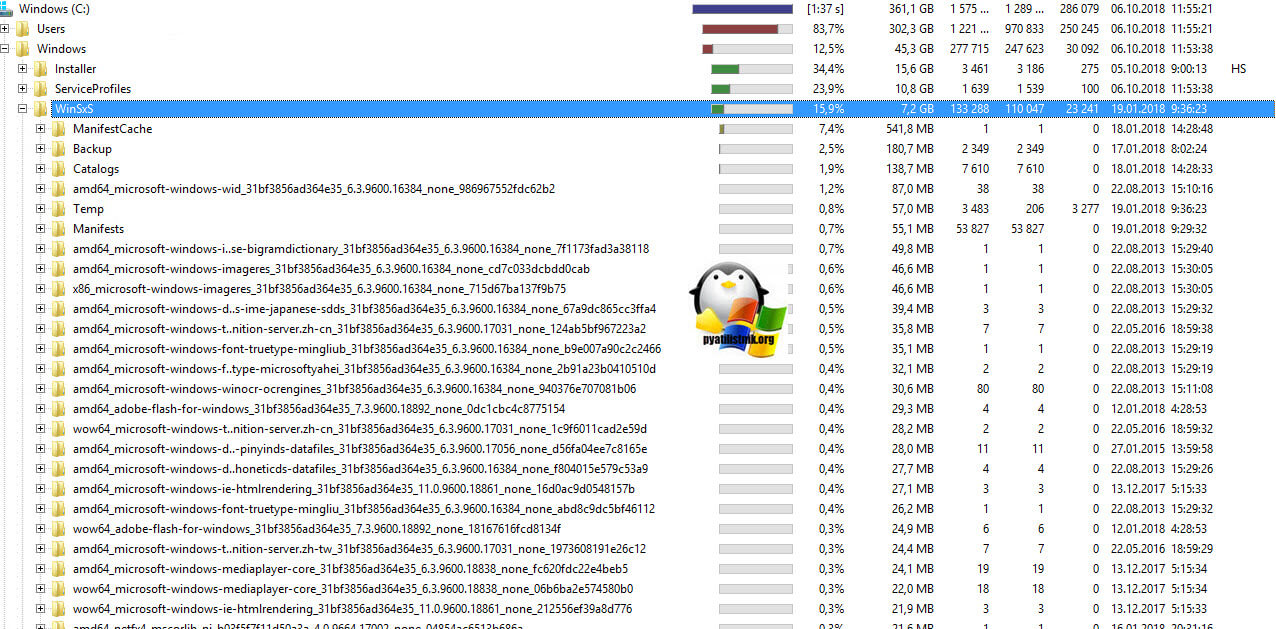
Далее мы посмотрим, почему папка Windows занимает 45 ГБ, что очень странно. Открыв более подробное описание, мы с вами видим, что 70% папки Windows на моем хосте RDS фермы, занимают три папки:
- Installer
- ServiceProfiles — в данной папке хранятся кэшированные шрифты для различных программ, для каждого пользователя
- WinSxS — Это служебная папка операционной системы Windows служащая для хранения ранее установленных версий системных компонентов. Благодаря ее наличию существует возможность отката к более старой версии обновления в случае необходимости
Что такое и как очистить папку Installer
Папка Windows Installer — это системная папка, где хранятся необходимые для удаления или обновления программ их инсталляторы, дистрибутивы различных программных компонентов, патчи, файлы не установившихся системных обновлений и прочие данные, которые необходимы системе и установленному софту для определенных процессов.
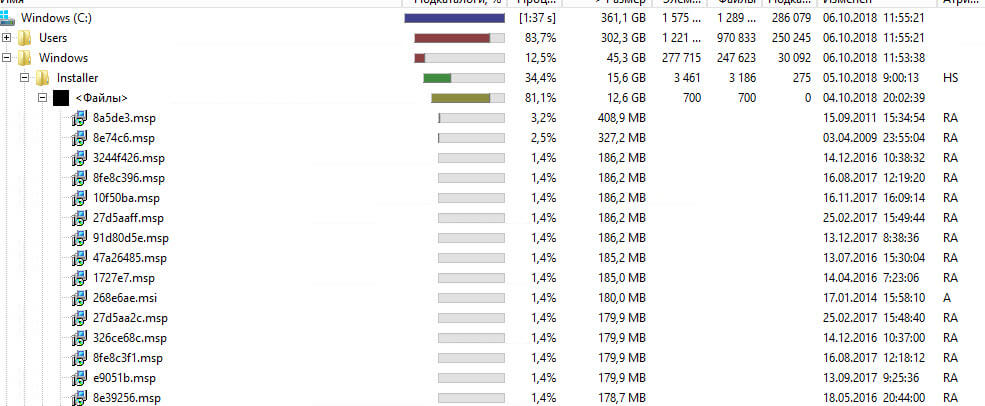
Как видите у меня папка Windows Installer занимает много места, это аж 15 ГБ. Если открыть ее содержимое, то вы увидите GUID номера, ваших программ.
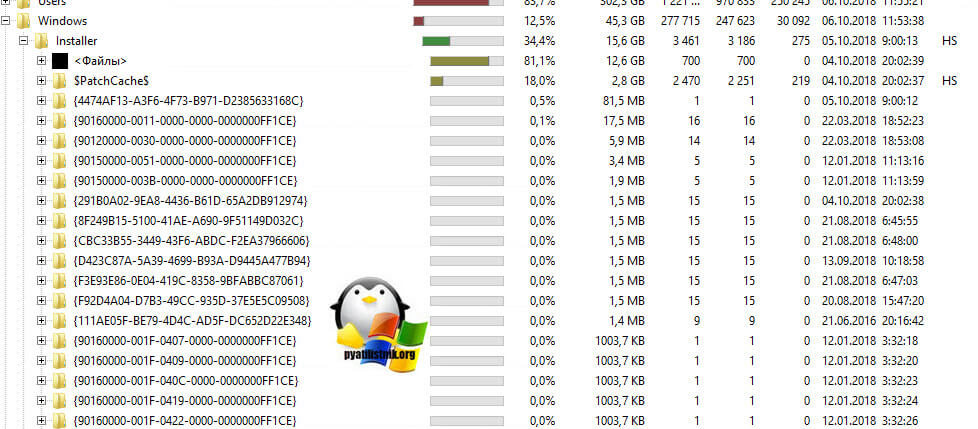
Если более детально капнуть в папку Windows Installer, то тут в основном лежат файлы msp, это пакеты обновления, MSI и MST файлы.
Хочу отметить, что папка Installer, по умолчанию скрыта, и для ее отображения, вы должны включить скрытые файлы и папки в Windows.
Можно ли удалить папку Windows Installer?
Напоминаю, что в папке C:WindowsInstaller лежат инсталляторы программ, которые используются для их правильного удаления, восстановления. Простой пример, когда вы заходите в панель управления Windows, то на большинстве программ вы видите эти статусы.
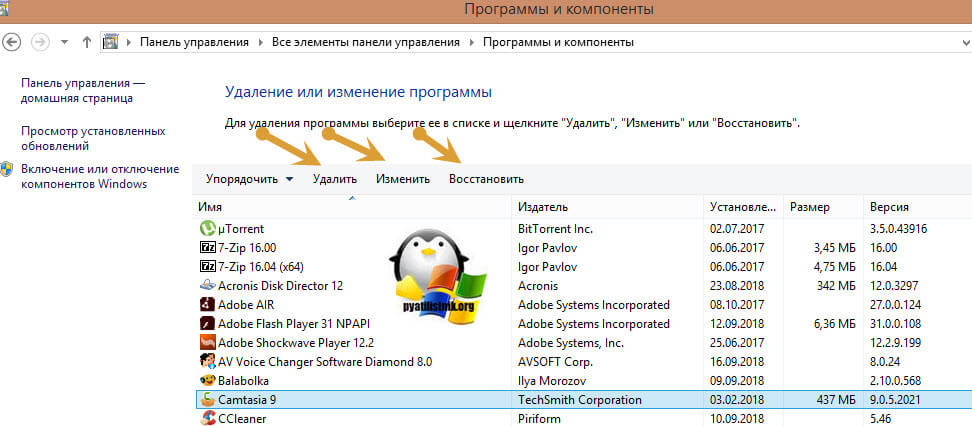
Простой пример из жизни, один из моих приятелей удалил содержимое Installer, в итоге получил ситуацию, что когда ему нужно было удалить Microsoft Office и поставить новую версию, он получил ошибку, что этого сделать нельзя.
Полностью удалять содержимое папки Windows Installer НЕЛЬЗЯ!!!!
Так, что если Windows Installer занимает много места, не стоит ее сразу полностью удалять, к этому делу нужно отнестись, очень избирательно. Как мы поняли, она точно нужна и отвечает за ваши программы, но парадокс операционной системы Windows в том, что когда вы удалил какую-то программу, ее инсталлятор, останется лежать в данной папке, в виде мусора и занимать дисковое пространство, вам ведь это не нужно. Так что приступам к ее чистке.
Как правильно очистить папку windows installer
Перед всеми нашими манипуляциями, вы должны обязательно выполнить вот что:
- Создать точку восстановления системы Windows, чтобы легко можно было откатиться назад
- в случае с RDS фермой в виде виртуальной машины, можно сделать простой снапшот, и не придется делать точку восстановления в Windows
- Если первые два пункта не выполнимы, то хотя бы скопируйте ее содержимое в другое место, на случай восстановления
Для того, чтобы правильно очистить каталог C:WindowsInstaller, можно воспользоваться бесплатной утилитой PatchCleaner.
Скачать PatchCleaner вы можете у меня по ссылке или же с официального сайта http://www.homedev.com.au/Free/PatchCleaner
Как работает PatchCleaner. Операционная система Windows содержит список текущих установщиков и патчей, к которым можно получить доступ через вызовы WMI ( Инструментарий управления Windows ). PatchCleaner получает этот список известных файлов msi/msp и сравнивает их со всеми файлами msi/msp, которые находятся в каталоге c:WindowsInstaller. Все, что находится в папке, но не в списке, представленном окнами, считается сиротскими файлами и помечено для перемещения или удаления.
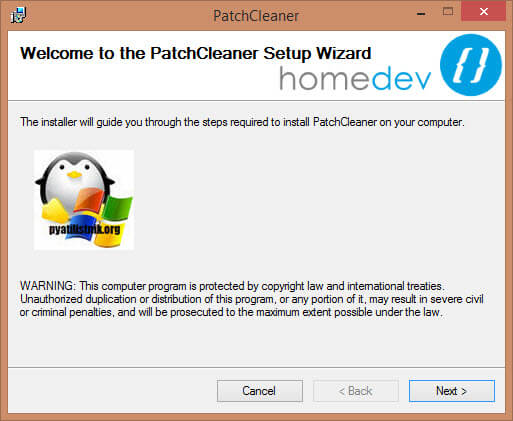
Производим установку PatchCleaner , для очистки места на RDS ферме. На пермом экране мастера установки, нажмите «Next».
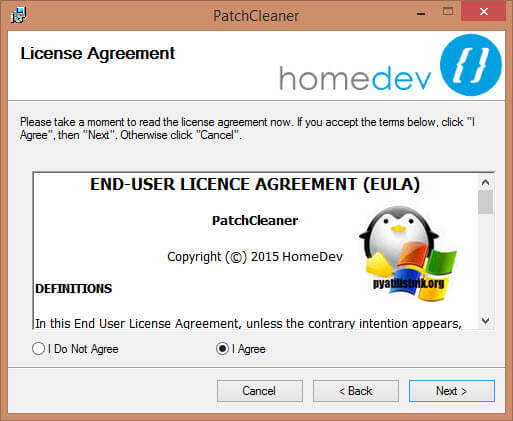
Принимаем лицензионное соглашение «I Agree»
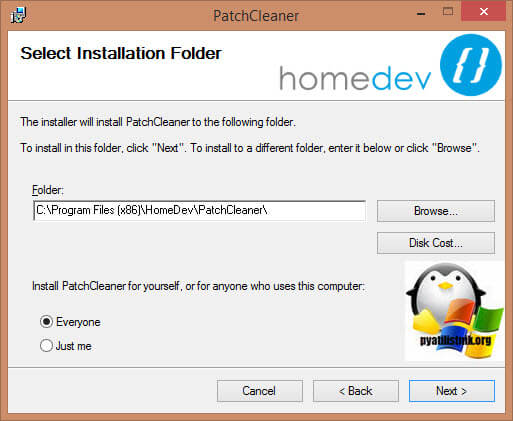
Указываем для каких пользователей будет устанавливаться PatchCleaner.
next.
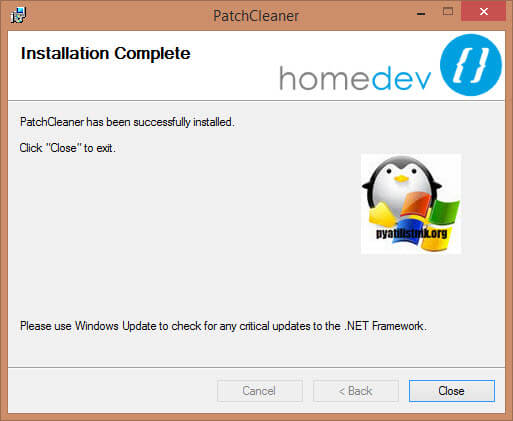
Установка PatchCleaner завершена, запускаем ее.
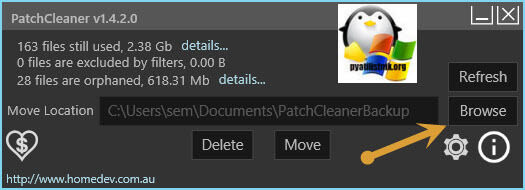
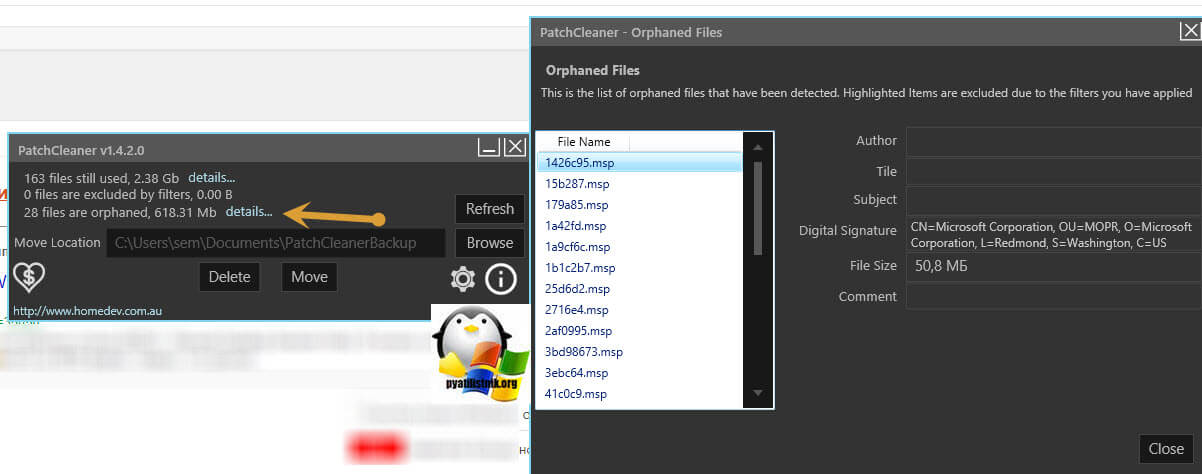
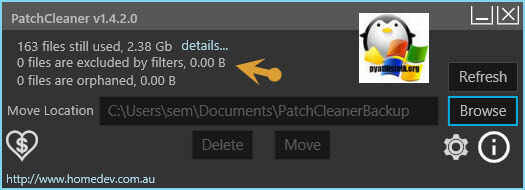
После запуска, утилита проведет сканирование. У вас будет два показателя:
- Общее количество пакетов в папке Installer
- Количество устарелых файлов
По пути Move Loction, будет делаться резервная копия, на всякий случай, можете при желании изменить данный путь.
Нажав на кнопку «details», вы увидите более подробный список, устаревших пакетов msp, прочитать к каким программам, они относились.
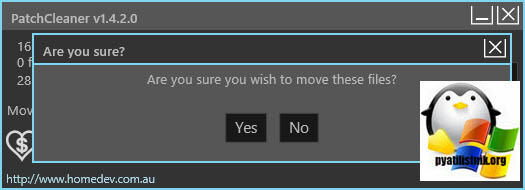
Чтобы запустить процесс освобождения дискового пространства на ферме RDS и уменьшить размер папки C:WindowsInstaller, нажмите кнопку «Move».
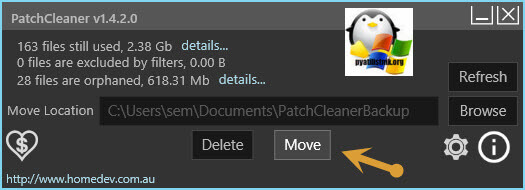
Вас спросят, хотите ли вы этого, нажимаем yes
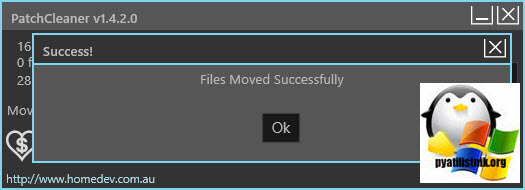
Все уменьшение папки Installer выполнено.
Видим, что больше в системе нет устаревших файлов.
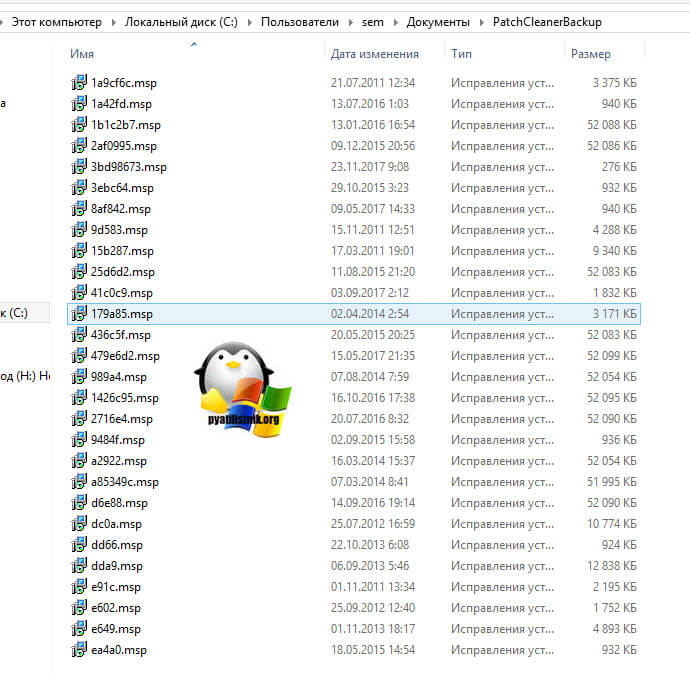
В папке с резервной копией, теперь лежат ваши устаревшие файлы.
Если вы не хотите производить чистку Windows Installer, или просто боитесь это делать, но располагаете в системе другим, дополнительным диском, на котором есть свободное место, то можете перенести C:WindowsInstaller на него, для этого можно воспользоваться символическими ссылками, мы их уже использовали когда переносили OST файл в Outlook.
Предположим у меня есть еще диск E:, и на нем есть 100 гб свободного места и я бы хотел на него перенести системную папку, для этого открываем командную строку с правами администратора и вводим команду, но перед этим ОБЯЗАТЕЛЬНО, скопируйте C:WindowsInstaller в E:Installer.
mklink /j «c:windowsinstaller» «e:Installer»
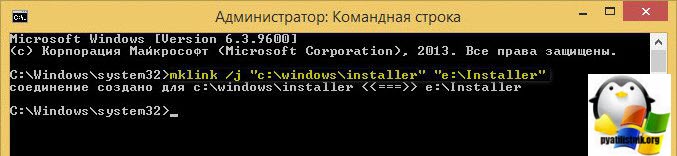
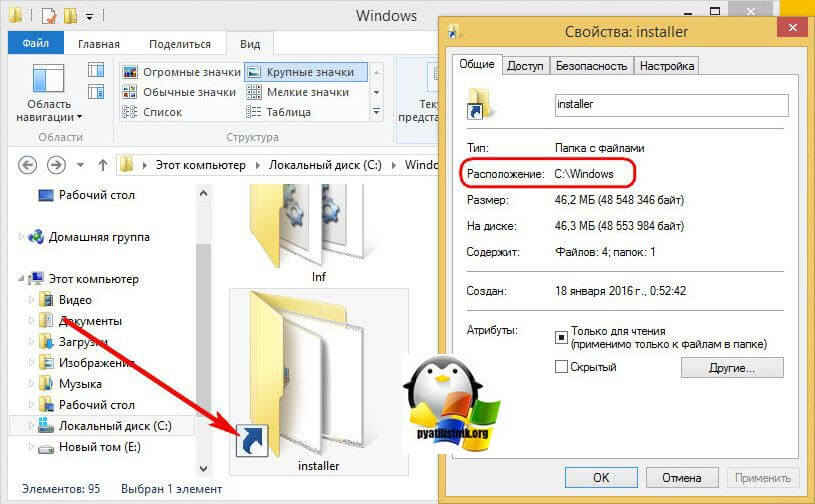
Теперь если вы зайдете в каталог C:WindowsInstaller, то увидите на папке стрелочку в левом углу, это означает, что это символическая ссылка, ведущая в другое место. Надеюсь с папкой Installer мы разобрались, и очистили часть места на RDS ферме.
Что такое и как очистить папку ServiceProfiles
ServiceProfiles — в данной папке хранятся кэшированные шрифты для различных программ, для каждого пользователя. Когда таких пользователей много, то и размер папки может быть большим. Как видите по пути C:WindowsServiceProfilesLocalServiceAppDataLocal, лежит огромное количества FontCache файлов, по 8 МБ. Как я и говорил выше, это кэшированные шрифты, под каждую программу для каждого пользователя. В моем случае, данная папка занимает 10 ГБ, что очень много.
Я нашел ответ от разработчика Windows, что делал эту службу кэширования, его зовутNiklas Borson, вот что он отвечал, на вопрос, почему на RDS ферме, папка ServiceProfiles имеет большой размер.
Эти файлы FontCache-S — * .dat создаются службой Windows Font Cache. Я разработчик этой службы и могу подтвердить, что сказал Крис выше. Можно безопасно удалять эти файлы. Служба просто обновит их по мере необходимости. Просто чтобы подтвердить, проблему, которую вы наблюдаете, — с большим количеством файлов. Другими словами, упомянутый выше размер, должен быть общим размером для всех файлов. В Windows 8 и 8.1 каждый файл должен быть 8 МБ.
Как вы уже догадались, эти файлы предназначены для каждого пользователя, поэтому, если многие пользователи заходят на сервер, вы можете получить множество из этих файлов. К сожалению, служба Font Cache автоматически не удаляет старые файлы кэша для каждого пользователя, поэтому я боюсь, что вам придется обойти это самостоятельно. Например, вы можете создать запланированную задачу обслуживания, которая автоматически удалит все файлы FontCache-S — * .dat, если их общий размер превышает определенную сумму. Это безопасное обходное решение.
Кэширование происходит, чтобы разгрузить центральный процессор от постоянного обращения, тем самым сэкономив производительность.
Вот тут есть обсуждение данной проблемы https://social.technet.microsoft.com/Forums/ie/en-US/3795364f-b66c-43ae-82d3-8ed5eb1aa2ce/local-service-system-profile-grown-to-extremely-large-size?forum=winserverTS
В свою очередь, вы можете сделать bat файл вот с таким содержимым, и удалять файлы старше 30 дней из папки ServiceProfiles. Скрипт останавливает две службы:
- Служба кэша шрифтов Windows (Windows Font Cache Service)
- Кэш шрифтов Windows Presentation Foundation 3.0.0.0 (Windows Presentation Foundation Font Cache 3.0.0.0
net stop FontCache && net stop FontCache3.0.0.0
forfiles /P C:WindowsServiceProfilesLocalServiceAppDataLocal /M FontCache* /D -30 /C «cmd /c del @path»
net start FontCache && net start FontCache3.0.0.0
Что такое и как очистить папку WinSxS
Папка WinSxS — Это служебная папка операционной системы Windows служащая для хранения ранее установленных версий системных компонентов. Благодаря ее наличию существует возможность отката к более старой версии обновления в случае необходимости.
Очистка папки WinSxS в Windows 10, 8 и Windows 7
Продолжаем с вами производить очистку в папке Windows, от всевозможного хлама, и на очереди у нас с вами папка WinSXS, выше я написал, что из себя представляет данная папка. Как видите утилита WinDirStat, показывает что WinSxS, занимает 7,2 гб, для этой папки, это размер в пределах нормы, но если вы у себя видите, здесь 10-15 гб и более, то это повод задуматься над ее очисткой.
Есть распространенный миф о гигантских размерах этой папки, что на самом деле не совсем так. Дело в том, что подавляющее большинство содержимого папки WinSxS является «жесткими ссылками», а Проводник и файловые менеджеры это не учитывают. Реальный вес этой папки гораздо меньше, чем пишется в ее свойствах.
Можно ли удалить папку winsxs
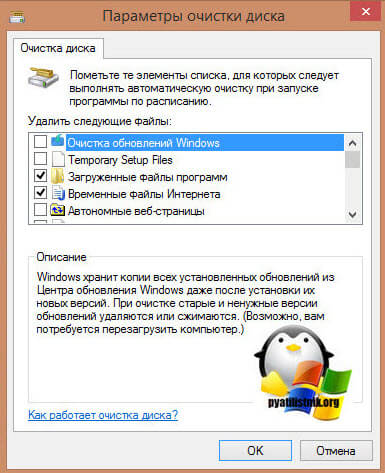
Саму папку удалять конечно же не стоит, а вот правильно ее почистить, это правильное решение. Ранее я вам рассказывал про встроенную утилиту в Windows, под названием cleanmgr (Очистка диска). Там запустив утилиту у вас появлялся мастер «Параметры чистки диска», в котором, чтобы была произведена очистка папки winsxs, нужно было выбрать пункт «Очистка обновлений Windows».
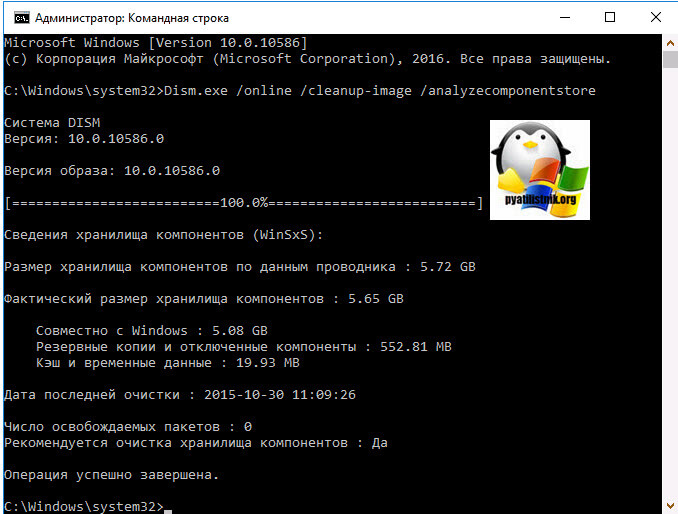
Если вы любите все делать из консоли, то вот вам пример очистки папки WinSxS в Windows 10. Запускаем командную строку от имени администратора и вводим команду:
Dism.exe /online /cleanup-image /AnalyzeComponentStore
Папка хранилища компонентов будет проанализирована и вы увидите сообщение о необходимости ее очистки, вы увидите ее размер.
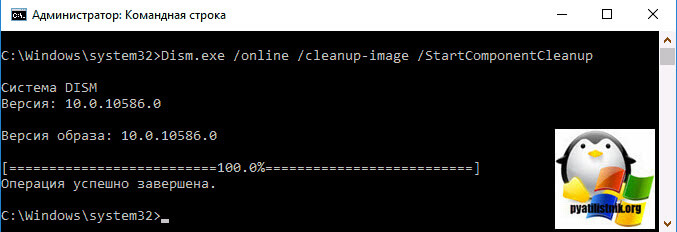
Введите команду Dism.exe /online /cleanup-image /StartComponentCleanupи нажмите Enter для запуска автоматической очистки папки WinSxS.
Для операционной системы Windows 8.1 или Windows Server 2012 R2, подойдет команда:
dism.exe /Online /Cleanup-Image /StartComponentCleanup /ResetBase
Автоматическая очистка резервных копий обновлений в WinSxS
Помимо очистки содержимого данной папки вручную, вы можете воспользоваться планировщиком заданий Windows, для того, чтобы это происходило автоматически.
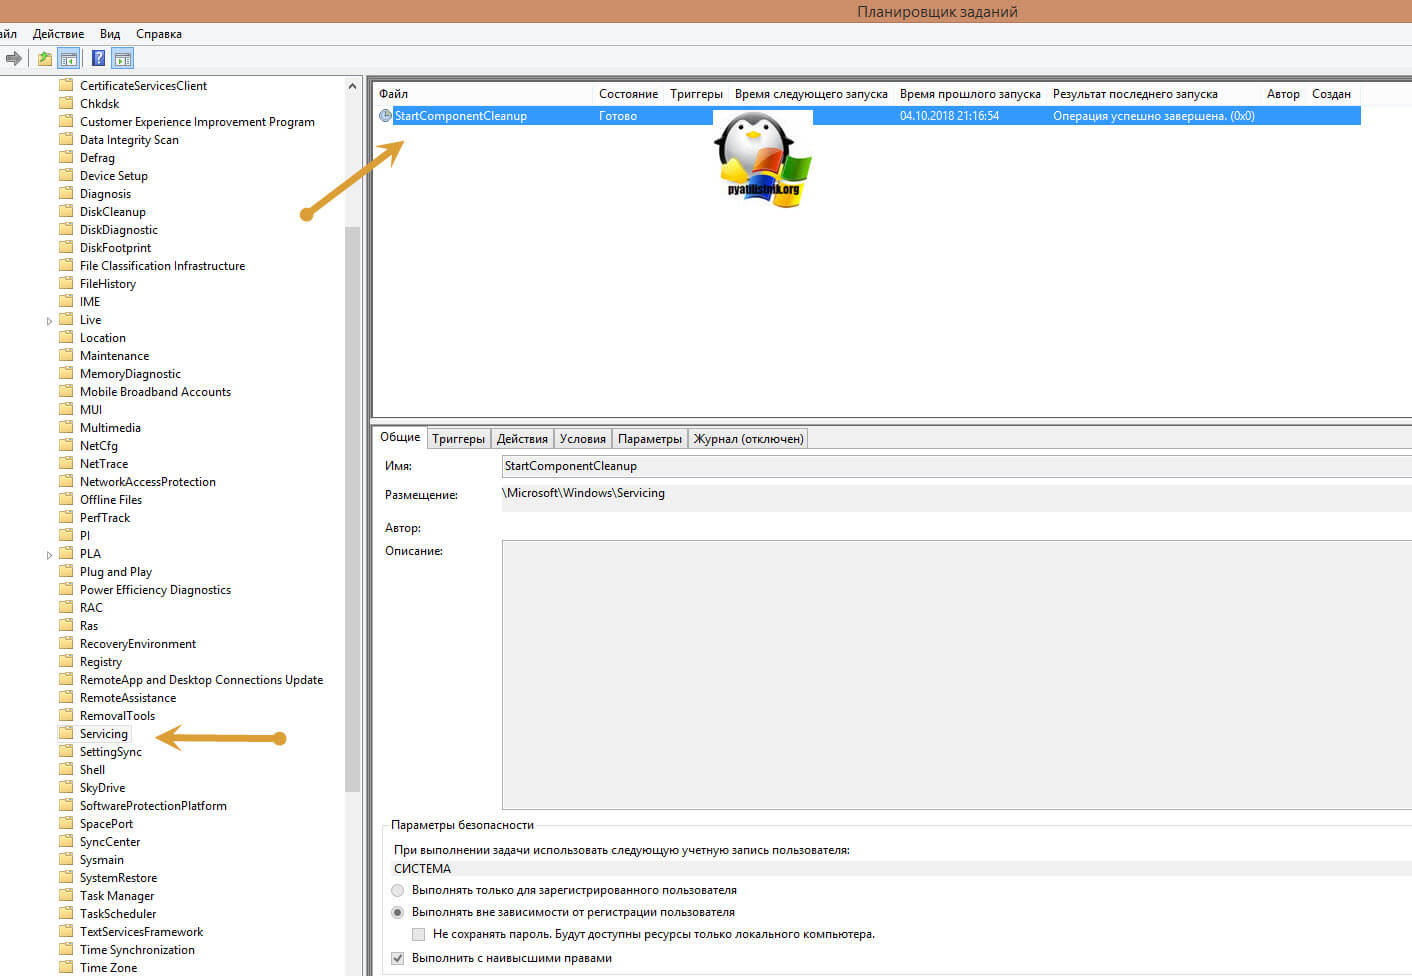
Для этого необходимо создать простую задачу StartComponentCleanup в MicrosoftWindowsServicing с нужной периодичностью выполнения. Как видите ваши RDSH хосты могут быть забиты большим количеством мусора и старых файлов, которые создает сама Windows, поэтому обязательно производите чистку папок Installer, ServiceProfiles, WinSxS. С вами был Иван Семин, автор и создатель IT блога Pyatilistnik.org.
- Remove From My Forums
-
Вопрос
-
Доброго времени суток. Есть std 2012 r2.
Симптомы следующие: служба windows installer запущена и работает, тем не менее при попутке установить любой msi пакет (в т.ч. с админскими правами) — получаю сообщение об ошибке: нет доступа к windows installer
1719Перерыл весь интернет — не победил.
1) пробывал все: https://support.microsoft.com/en-us/kb/2642495
2) Импортировать ветку реестра с аналогичного рабочего серва.
3) SFC scannow — нет ошибок все четко.
проблемный 2012r2 получен так — сначала был 2003, обновлен до 2008, потом 2008 обновлен до 2012, после через некоторое время вылезла эта проблему — думаю, что это важно, т.к. на другом серваке обновленном
до 2012 по той же схеме получил туже проблему.
Ответы
-
Microsoft Windows [Version 6.3.9600]
(c) 2013 Microsoft Corporation. All rights reserved.C:\Users\Administrator>Dism /Online /Cleanup-Image /ScanHealth
Deployment Image Servicing and Management tool
Version: 6.3.9600.17031Image Version: 6.3.9600.17031
[==========================100.0%==========================]
The component store is repairable.
The operation completed successfully.C:\Users\Administrator>
Обнаружены повреждения в образе Windows, которые подлежат к исправлению.
Для исправления пробуйте выполнить следующую команду в командной строке (cmd.exe):
Dism /Online /Cleanup-Image /RestoreHealth
Подробнее о команде:
https://msdn.microsoft.com/ru-ru/library/hh824869.aspx
Best Regards, Andrei …
MCP-
Помечено в качестве ответа
7 сентября 2016 г. 14:21
-
Помечено в качестве ответа
If you want to automate a Windows install, you must create a .XML file containing the responses to prompts for any input. Microsoft provides a tool to create these .XML files. It’s called the Windows System Image Manager (WSIM). WSIM is part of the Windows Assessment and Deployment Kit (Windows ADK). You can get Windows ADK via the Windows Assessment and Deployment Kit.
The Windows System Image Manager is fairly complicated to use and it requires a Windows machine. Since I don’t use WSIM very often, I’m documenting the settings I use most frequently when I create a new .XML response file.
Installing the Windows System Image Manager (WSIM)
You’ll need a Windows machine to run Windows System Image Manager. I use a Windows virtual machine on my Mac that I created with VMware Fusion. The WSIM tool doesn’t require many resources to run. I find that WSIM runs just fine on a VM with 1 processor core and 2GB of memory.
Download the Windows Assessment and Deployment Kit to get the WSIM install.
The only feature you need to install is «Deployment Tools» to install the Windows System Image Manager (WSIM).

Create and select a Windows catalog file
Next grab a copy of the ISO for the version of Windows you want to install. You’ll need to create a catalog (CLG) file from the install.wim file. A catalog file is a small file that contains an index of all the of all the files on an install.wim image. That way you can choose packages and components to install without needing to have the 5-7GB install.wim file. Also you can store a CLG file in source control as they are around 1-2MB.
Mount the Windows ISO. Under the \sources subdirectory, you should find the install.wim file.

Copy that install.wim file to a local drive that has read-write access. If you don’t, you’ll get this lovely error.

Launch Windows System Manager — you’ll find it under the Windows Kits folder on your start menu.

Choose File > Select Windows Image... from the Windows System Image Manager menu:

Then open the install.wim file for the version of the Windows install you wish to automate.

Some versions of Windows include multiple installs. If so, you will be prompted to choose the correct one:

And then Windows System Image Manager will prompt to get elevated permissions to create a catalog file:

If you see this error, make sure you copy the install.wim file to a writable location (I warned you earlier grin):
It will take MANY minutes to index all the files in the install.wim. Go and get a coffee. Because it takes so long to generate these catalog (CLG) files. Once the indexing is done, you’ll see the Components and Packages in the Windows Image pane of WSIM:

I would recommend storing them in source control alongside your .XML response files. You’ll need the corresponding CLG file for the version of Windows to add anything new to an .XML response file in WSIM.
You’ll find the .clg file created in the same directory as your install.wim. That’s why WSIM needed a writable location.
I like to put my .clg under the same absolute path \wsim so multiple people can work edit the WSIM .XML files. Unfortunately the WSIM tool stores absolute paths to the .clg files. I would also recommended taking the time hit and creating a whole batch of .clg files for your .iso so you don’t have to remember where you got it originally when you created a .clg.

Testing your .XML response file
You’ll need to create a floppy disk image on which to place your test autounattend.xml file.
Download a blank floppy disk image from here: https://forums.virtualbox.org/download/file.php?id=4594
Mount it on your Mac, then copy in your autounattend.xml then unmount.
In a Windows image with your Windows ISO, add a floppy, selecting your unattend.img file with the autounattend.xml file on it.
When you boot your Windows ISO it will read the settings in the autounattend.xml file on the floppy.
WSIM Settings to make a Windows 2012 R2 install completely silent
You must configure the following settings to make a Windows 2012 R2 install completely silent.
- Create a new answer file with
File > New Answer Filein WSIM. File > Save Answer Fileasautounattend.xml
The Components folder will be filled with blank components, as shown:

Then follow the directions to create sections for each action:
- Disable the
language and other preferencesdialog - Disable the Select Operating System dialog
- Disable the EULA dialog
- Disable the Disk Allocation dialog
- Disable the Administrator password prompt
Disabling the language settings dialog
The settings in this section will provide input to the language and other preferences prompt:

In the Windows Image pane, select the component amd64_Microsoft-Windows-International-Core-WinPE_6.3.9600.16384_neutral. Right-click and choose Add Setting to Pass 1 windowsPE.

Using the Answer File Properties and Settings panes, configure the following:
- InputLocale = en-US
- SystemLocale = en-US
- UILanguage = en-US
- UserLocale = en-US

Next, in the Windows Image pane, select the component amd64_Microsoft-Windows-Setup_6.3.9600.17031_neutral. Right-click on UserData/ProductKey and choose Add Setting to Pass 1 windowsPE.

Using the Answer File Properties and Settings panes, configure the following:
- Key = <YOUR_PRODUCT_KEY>
- WillShowUI = OnError
The official Microsoft KMS keys are listed [here](https://docs.microsoft.com/en-us/previous-versions/windows/it-pro/windows-server-2012-R2-and-2012/jj612867(v=ws.11) and make a good starting point to test installs.
Disabling the Select Operating System dialog
The settings in this section will provide input to the Select Operating System dialog:

In the Windows Image pane, select the component amd64_Microsoft-Windows-Setup_6.3.9600.17031_neutral. Right-click on ImageInstall/OSImage/InstallFrom/Metadata and choose Add Setting to Pass 1 windowsPE.

Using the Answer File Properties and Settings panes, configure the following:
- Key = /IMAGE/NAME
- Value = Windows Server 2012 R2 SERVERDATACENTER
NOTE: Make sure the /IMAGE/NAME value matches the Windows Server 2012 R2 image flavour you selected. Possible values are:
- Windows Server 2012 R2 SERVERDATACENTER
- Windows Server 2012 R2 SERVERDATACENTERCORE
- Windows Server 2012 R2 SERVERSTANDARD
- Windows Server 2012 R2 SERVERSTANDARDCORE

Disabling the EULA dialog
The settings in this section will provide input to the EULA dialog:

In the Windows Image pane, select the component amd64_Microsoft-Windows-Setup_6.3.9600.17031_neutral. Right-click on UserData and choose Add Setting to Pass 1 windowsPE.

Using the Answer File Properties and Settings panes, configure the following:
- AcceptEula = true

Disabling the Disk Allocation dialog
The settings in this section will provide input to the Disk Allocation dialog:

You’ll need to allocate disk differently depending on whether you are using a UEFI-based PC or BIOS-based PC. Most modern PCs (and VMs) are UEFI-based.
Disabling the Disk Allocation dialog (UEFI/Secure Boot)
Here’s the default partition layout for UEFI-based machines

https://docs.microsoft.com/en-us/windows-hardware/manufacture/desktop/configure-uefigpt-based-hard-drive-partitions
- The EFI System partition (ESP) must be formatted using the FAT32 filesystem. For drives that are using 4K native sectors, the minimum size is 260MB. For 512 byte sector drives, you can get away with using 100MB for the ESP.
- You must use UEFI disk allocation if you are using Advanced Format 4Kn drives.
- The recommended size for the Microsoft reserved partition (MSR) is 16MB.
- The MSR is used to help with partition management. The MSR is a reserved partition that does not receive a partition ID. It cannot store user data.
- Recovery partition is optional. We won’t provision it in this example.
In the Windows Image pane, select the component amd64_Microsoft-Windows-Setup_6.3.9600.17031_neutral. Right-click on DiskConfiguration/Disk and choose Add Setting to Pass 1 windowsPE.

Using the Answer File Properties and Settings panes, configure the following:
- DiskID = 0
- WillWipeDisk = true

In the Windows Image pane, select the component amd64_Microsoft-Windows-Setup_10.0.14393.0_neutral. Right-click on DiskConfiguration/Disk/CreatePartitions/CreatePartition and choose Add setting to Pass 1 windowsPE.

Right click on CreatePartitions in the Answer File window and choose Insert New CreatePartition to add the EFI System Reserved partition.
Using the Answer File Properties and Settings panes, configure the following settings:
- Extend = false
- Order = 1
- Size = 260
- Type = EFI

Right click on CreatePartitions in the Answer File window and choose Insert New CreatePartition to add the SYS partition. Using the Answer File Properties and Settings panes, configure the following settings:
- Extend = false
- Order = 2
- Size = 16
- Type = MSR

Right click on CreatePartitions in the Answer File window and choose Insert New CreatePartition to add the Primary partition. Using the Answer File Properties and Settings panes, configure the following settings:
- Extend = false
- Order = 3
- Size = 20000
- Type = Primary
NOTE: Don’t worry about getting the size exact — just set it to a reasonable minimum. In the next setting, we will extend the partition to fill all remaining disk space on the drive.

Right click on ModifyPartitions in the Answer File window and choose Insert New ModifyPartition to format the EFI System partition.
Using the Answer File Properties and Settings panes, configure the following settings:
- Format = FAT32
- Label = System
- Order = 1
- PartitionID = 1

Right click on ModifyPartitions in the Answer File window and choose Insert New ModifyPartition to add the Primary partition. Using the Answer File Properties and Settings panes, configure the following settings:
Right-click on DiskConfiguration/Disk/ModifyPartitions/ModifyPartition and choose Add setting to Pass 1 windowsPE. Using the Answer File Properties and Settings panes, configure the following settings:
- Extend = true
- Format = NTFS
- Label = OS
- Letter = C
- Order = 2
- PartitionID = 3

In the Windows Image pane, select the component amd64_Microsoft-Windows-Setup_6.3.9600.17031_neutral. Right-click on ImageInstall/OSImage/InstallTo and choose Add setting to Pass 1 windowsPE.

Using the Answer File Properties and Settings panes, configure the following:
- DiskID = 0
- PartitionID = 3

Disabling the Disk Allocation dialog (Legacy BIOS)
Here’s the default partition layout for legacy BIOS machines:

https://docs.microsoft.com/en-us/windows-hardware/manufacture/desktop/configure-biosmbr-based-hard-drive-partitions
- Each bootable drive must contain a system partition. The system partition must be configured as the active partition.
- The minimum size of the System partition is 100 MB. On Windows 2016 the recommended System Reserved Partition size is 500 MB.
- The Windows partition must be at least 20 GB in size and formatted using the NTFS file system.
- The Windows partition has a maximum size limit of 2 TB on BIOS machines.
- The recovery partition is optional. We won’t provision it in this example.
In the Windows Image pane, select teh component amd64_Microsoft-Windows-Setup_10.0.14393.0_neutral. Right-click on DiskConfiguration/Disk and choose Add Setting to Pass 1 windowsPE.
Using the Answer File Properties and Settings panes, configure the following:
- DiskID = 0
- WillWipeDisk = true
First create a System Reserved partition. This is used to store Boot Configuration Data and BitLocker Drive Encryption files. On Windows 2016 the recommended System Reserved Partition size is 500MB. You aren’t required to create System Reserved Partition, but either way the boot files take space on your hard drive and most people would expect them to be on a separate partition.
In the Answer File pane, right-click on DiskConfiguration/Disk/CreatePartitions/CreatePartition and choose Insert New CreatePartition.
Using the Answer File Properties and Settings panes, configure the following settings:
Extend = false
Order = 1
Size = 500
Type = Primary
Then create at least one partition for your Windows install.
Right-click on DiskConfiguration/Disk/CreatePartitions/CreatePartition Insert New CreatePartition.
Using the Answer File Properties and Settings panes, configure the following settings:
- Extend = true
- Order = 2
- Type = Primary
In the Answer File pane, right-click on DiskConfiguration/Disk/ModifyPartitions/ModifyPartition and choose Insert New ModifyPartition.
Using the Answer File Properties and Settings panes, configure the following settings:
- Active = true
- Format = NTFS
- Label = System
- Order = 1
- PartitionID = 1
In the Answer File pane, right-click on DiskConfiguration/Disk/ModifyPartitions/ModifyPartition and choose Insert New ModifyPartition.
Using the Answer File Properties and Settings panes, configure the following settings:
- Format = NTFS
- Label = Windows
- Letter = C
- Order = 2
- PartitionID = 2
In the Windows Image pane, select the component amd64_Microsoft-Windows-Setup_10.0.14393.0_neutral. Right-click on ImageInstall/OSImage/InstallTo and choose Add setting to Pass 1 windowsPE. Using the Answer File Properties and Settings panes, configure the following:
- DiskID = 0
- PartitionID = 2
Disabling the Adminsitrator password prompt
The settings in this section will provide input to the Administrator password prompt.

As you enter passwords in WSIM, you may want to consider unchecking Tools > Hide Sensitive Date so that passwords are saved in plain text. Unless you have some other system for tracking passwords, there is no easy way to go backwards from the encrypted password to the plain text version if you forget it 
In the Windows Image pane, select the component amd64_Microsoft-Windows-Shell-Setup_6.3.9600.17031_neutral. Right-click on UserAccounts/AdministratorPassword and choose Add Setting to Pass 7 oobeSystem.

Using the Answer File Properties and Settings panes, configure the following:
- Value = your_password

Additional WSIM Settings for Windows Server 2012 R2
Set up vagrant autologin
In the Windows Image pane, select the component amd64_Microsoft-Windows-Shell-Setup_10.0.14393.0_neutral. Right-click on UserAccounts/LocalAccounts/LocalAccount and choose Add Setting to Pass 7 oobeSystem. Using the Answer File Properties and Settings panes, configure the following settings:
- Description = Vagrant User
- DisplayName = vagrant
- Group = Administrators
- Name = vagrant
In UserAccounts/LocalAccounts/LocalAccount/Password configure the following:
- Value = vagrant
In the Windows Image pane, select the component amd64_Microsoft-Windows-Shell-Setup_10.0.14393.0_neutral. Right-click on AutoLogon and choose Add Setting to Pass 7 oobeSystem. Using the Answer File Properties and Settings panes, configure the following:
- Enabled = true
- Username = vagrant
In the Windows Image pane, select the component amd64_Microsoft-Windows-Shell-Setup_10.0.14393.0_neutral. Right-click on AutoLogon/Password and choose Add Setting to Pass 7 oobeSystem. Using the Answer File Properties and Settings panes, configure the following:
- Value = vagrant
First Logon Commands
In the Windows Image pane, select the component amd64_Microsoft-Windows-Shell-Setup_10.0.14393_neutral. Right-click on FirstLogonCommands/SynchronousCommand and choose Add Setting to Pass 7 oobeSystem. Using the Answer File Properties and Settings panes, configure the following:
- CommandLine=cmd.exe /c a:\000-run-all-scripts.cmd
- Description=Run all scripts
- Order=1
- RequiresUserInput=true
Do not show Server Manager at login
In the Windows Image pane, select the component amd64_Microsoft-Windows-ServerManager-SvrMgrNc_6.3.9600.16384_neutral. Right-click and choose Add Setting to Pass 4 specialize. Using the Answer File Properties and Settings panes, configure the following:
- DoNotOpenServerManagerAtLogon = true
Enable Remote Desktop
In the Windows Image pane, select the component amd64_Microsoft-Windows-TerminalServices-LocalSessionManager_6.3.9600.17031_neutral. Right-click and choose Add Setting to Pass 4 specialize. Using the Answer File Properties and Settings panes, configure the following:
- fDenyTSConnections = false
In the Windows Image pane, select the component amd64_Networking-MPSSVC-Svc_6.3.9600.16384_neutral. Right-click on FirewallGroups/FirewallGroup and choose Add Setting to Pass 4 specialize. Using the Answer File Properties and Settings panes, configure the following settings:
- Active = true
- Group = Remote Desktop
- Key = RemoteDesktop
- Profile = all
In the Windows Image pane, select the component amd64_Microsoft-Windows-TerminalServices-RDP-WinStationExtensions_6.3.9700.16384_neutral. Right-click and choose Add Setting to Pass 4 specialize. Using the Answer File Properties and Settings panes, configure the following settings:
- SecurityLayer = 1
- UserAuthentication = 0
Microsoft added Windows Server to the Windows family in the early 2000s to make it easier to manage and control networks and use Windows as a server operating system; today, Windows Server 2012 and 2012 R2 are two of the most widely used versions of Windows. These versions of Windows have provided new and advanced features in the fields of virtualization, server management, information protection, network, remote access, information storage on hosting servers, user experience, cloud computing, automation, etc., which are today widely used by large companies and large information centers in the world.
Services in Windows Server 2012, such as WAMP, IIS, Media Centre, FTP, etc., provide for various uses. In Windows Server 2012, the Microsoft Active Directory service can be enabled under certain conditions. Also, windows server 2012 can manage and direct all the systems and windows of an organization in a centralized and integrated way.
Many people want to take advantage of the advanced features available in Windows Server 2012/ 2012 R2 because of its widespread adoption as a server operating system. If you’re a Windows fan and want to learn how to install Windows Server 2012/2012 R2 on your server or PC, this article is helpful for you. Follow the instructions in this guide to successfully install Windows Server 2012/2012 R2 on your server or PC.
Windows Server 2012/2012 R2 Installation Prerequisites
- Buying a dedicated server if installed on the server
- Windows Server 2012 license for legal activation
- Memory (RAM): at least 512 MB
- Processor (CPU): at least 1.4 GHz 64 bit
- Hard disk space (HDD): at least 32 GB
- Graphics (VGA): at least DirectX9.0
How to install Windows Server 2012/ 2012 R2
Before installing 2012/Windows Server 2012 R2 on a server or PC, we recommend that you make a backup copy of your system information and data. Then follow the steps to install Windows Server 2012/2012 R2:
Step 1. Download Windows Server 2012/2012 R2 from the Microsoft site.
Step 2. Set the system or server in the desired boot mode; this feature is included in the system BIOS settings. To enter the BIOS settings section, when you turn on the system, press the Delete button, or in some systems, press Ctl+F1 or F12, and follow the BIOS configuration instructions.
Step 3. After booting the Windows Server 2012 operating system in the way you want and turning on the server, a page showing the loading of the necessary files to install the operating system will be displayed. You should be patient until the Windows installation section is loaded.

Step 4. Then you need to select the default language and click the Next button.
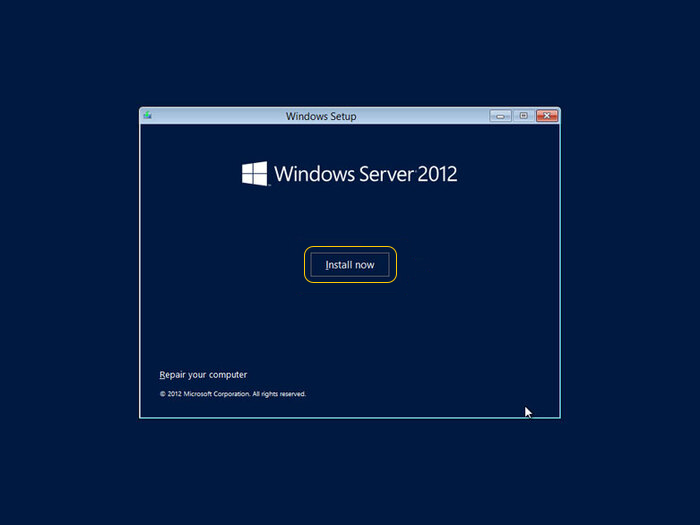
Step 5. Click the “Install Now” option.
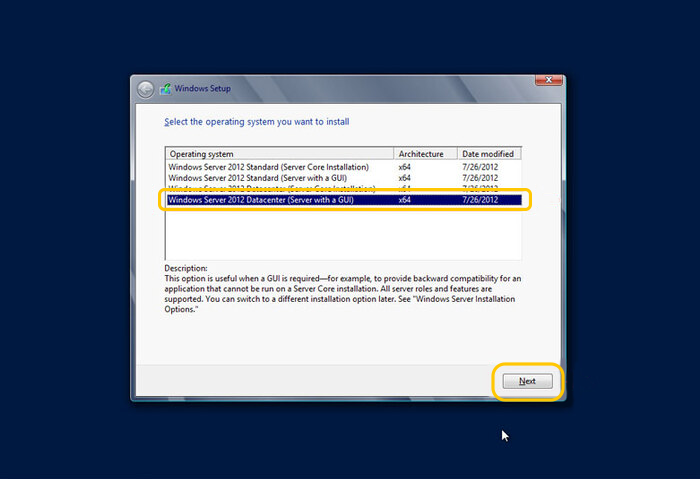
Step 6. According to the image you see, you must select one of the GUI options from the list. Usually, for servers, we select Windows Standard GUI or Data Center GUI. In this tutorial, we chose the Windows Server 2012 Data Center GUI.
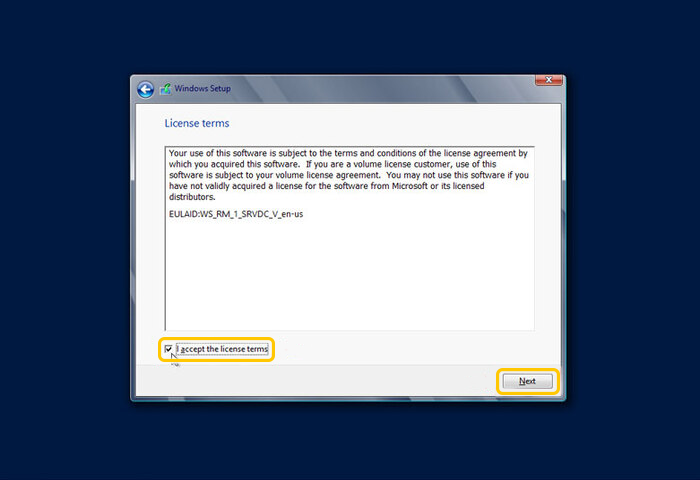
Step 7. To allow the installation of Windows Server 2012/2012 R2, you must confirm the server License Agreement and copyright rules by checking the “I accept the license terms” box and selecting the Next button.
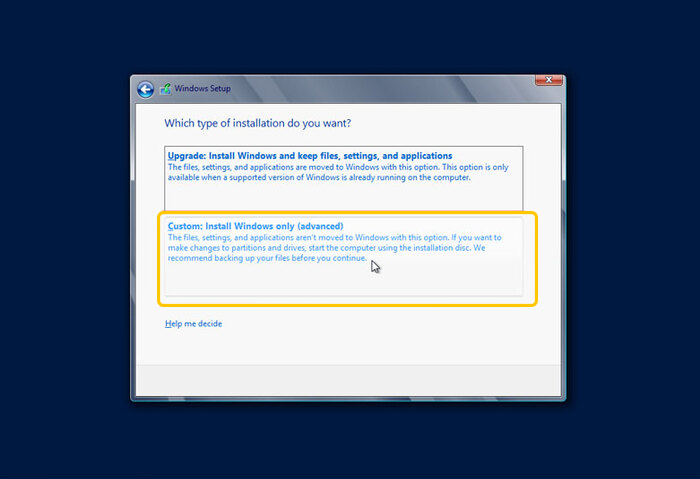
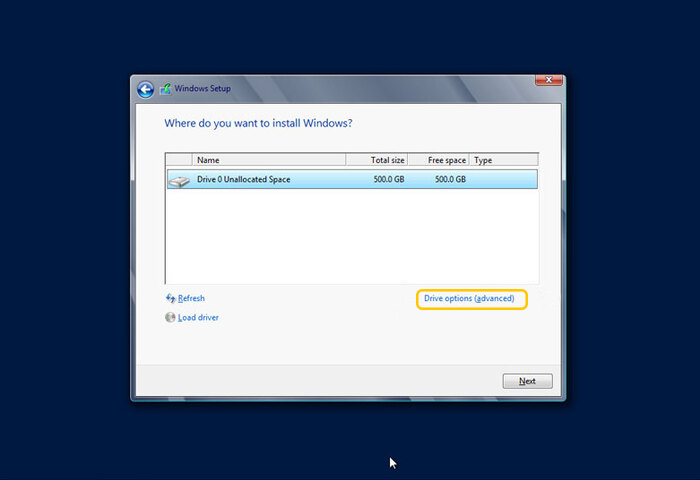
Step 8. For custom installation of Windows Server 2012, select Custom: Install Windows Only (advanced).
Step 9. This step is for partitioning and installing Windows on the desired partition. In this step, you will see the disk you are using, if you want to create a custom partition and change the drive options, you should click on Drive Options (advanced). If you do not decide to change the drive and create a custom partition, you should skip this step by selecting the Next option. In this tutorial, we want to create a custom partition, so we click on Drive Options (advanced).
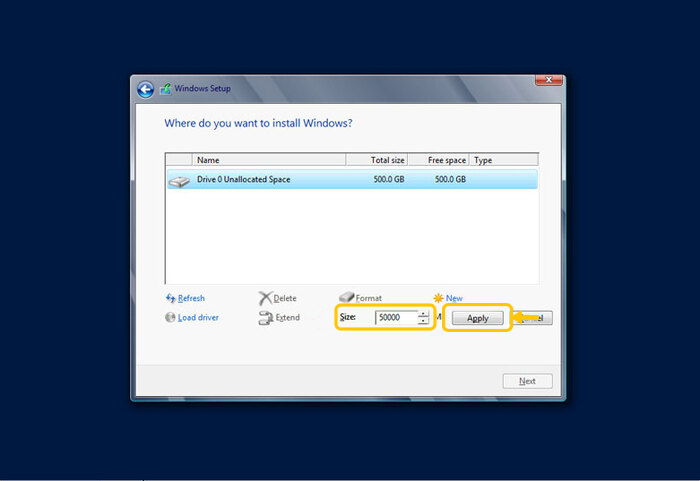
Step 10. select the hard drive to create a custom partition, and click on NEW and Next. On large hard drives, we recommend choosing 50 GB for Windows and the software required by Windows and partitioning the rest of the hard drive as desired.

Step 11. Then you will be able to determine the size of your desired partition.
Optional: You can add a drive for dual boot by using Native Boot To Vhd( SHIFT-F10) and accessing the command prompt window. Find the drive where the installation will take place (eg dir c:, dir d:, dir e:, etc) and to run Disk Partition Utility, type Diskpart and create a partition with the desired size by the Create vdisk file=e:\BootDemo.vhd type=expandable maximum=40000 command. Then Attach disk and Exit. Finally, Refresh.
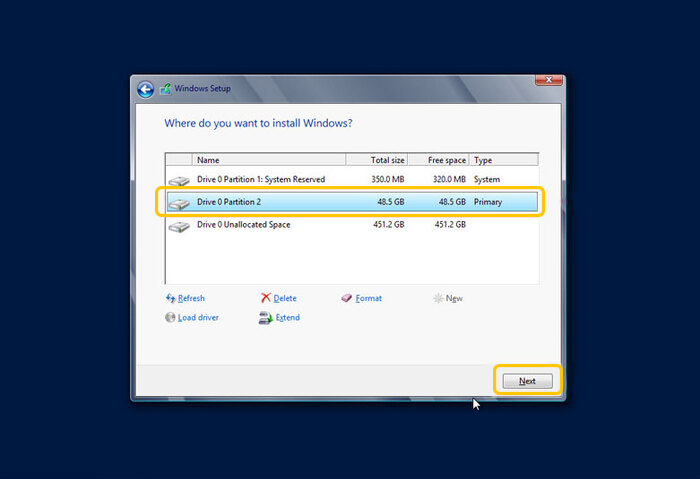
Step 12. Select the desired partition you created to install Windows.
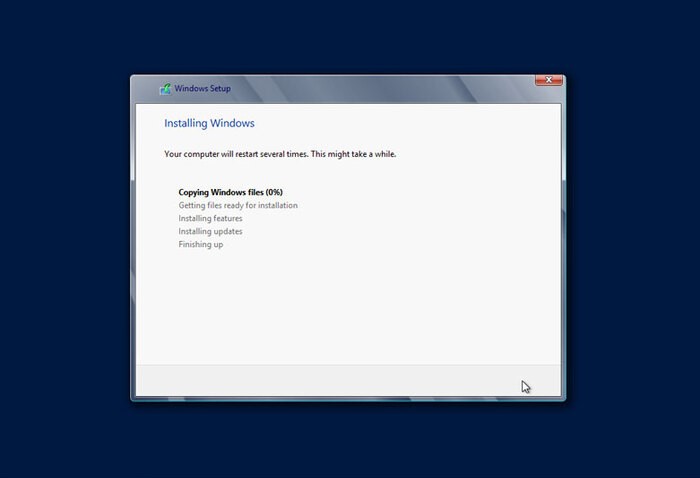
Step 13. Wait approximately 20 minutes for the files to be copied and for Windows Server 2012 to be completely installed on the selected hard drive.
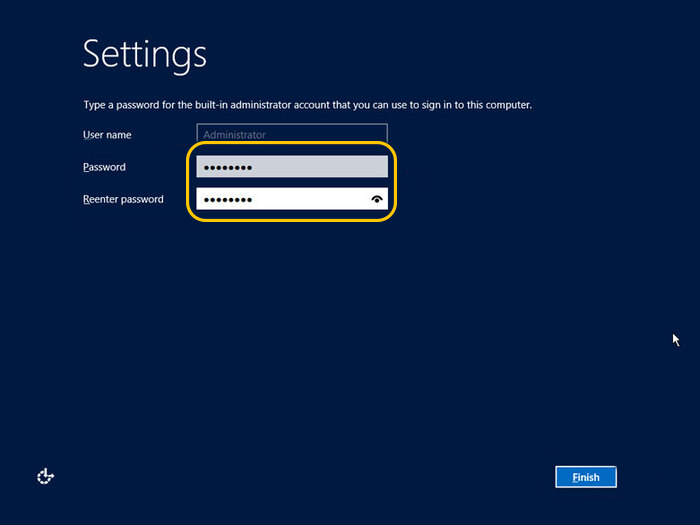
Step 14. After restarting the system several times automatically, the system will start and you will see the settings page where you must specify a security password for the administrator user and enter the password twice and click on the Finish button.
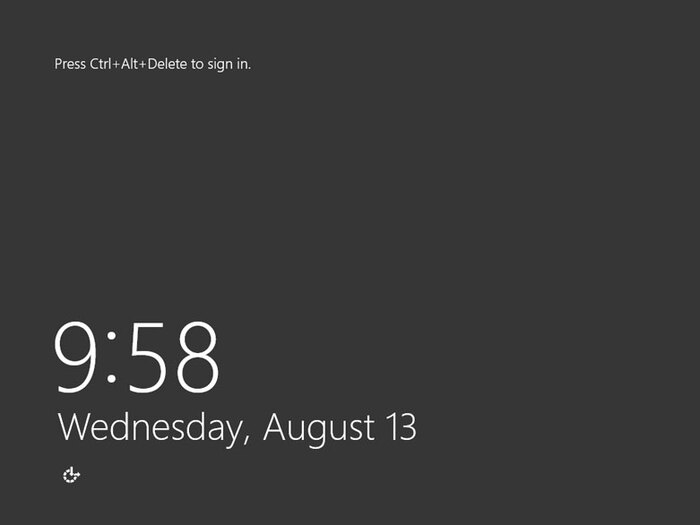
Step 15. On the page you see, you must press the Ctrl + Alt + Delete buttons Simultaneously to sign in.
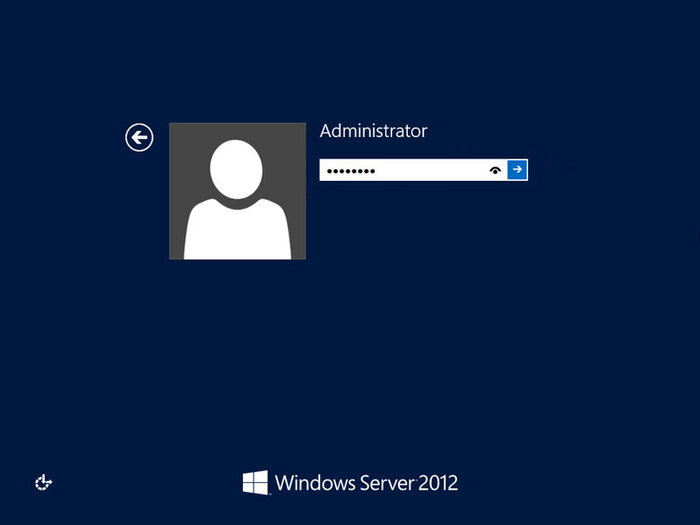
Step 16. Enter the password you specified in the previous step and press the Enter button.
Congratulations, you have successfully installed Windows Server 2012/2012 R2 and now you can enter the Windows Server 2012 desktop environment and enjoy the features of Windows Server 2012.
It should be noted that if you intend to install Windows Server 2012/2012 R2 on your server, you must first configure ESXi or KVM virtualization on the dedicated server and then follow the steps we have taught. If you want to benefit from the features of Windows Server 2012 on your PC, after booting Windows Server 2012/ 2012 R2 using different methods such as CD, USB, or ISO file, you must create a virtual machine and then follow the steps to install Windows Server 2012. These steps are the same on the server and PC.
FAQ
Considering the security problems and dangerous bugs in Windows 2003 and 2008, Windows Server 2012 is one of the best alternatives to old Windows and even newer versions of Windows (such as Windows 2016). This version of Windows does not have the security problems of Windows 2003 and 2008 and is almost reliable in terms of security. Windows Server 2012 is graphically very light and has a very high speed; in general, it is an optimal Windows.
There is no option for the partition’s file system. Windows Server 2012 utilizes the ReFS file system by default for all newly created partitions. ReFS is an enhanced and modernized variant of the NTFS file system.
To upgrade from Windows Server 2012 to Windows Server 2012 R2, you can use the Windows Server 2012 R2 installation media. During the installation procedure, you will be prompted to choose between a clean install and an upgrade.
Note that windows server 2012 and 2012 R2 installation steps are the same.
Open the «Start» menu, search for «Command Prompt,» and run as administrator. Then, enter «sfc /scannow» and select «Enter».The Windows system files can be checked for integrity by running the system file checker tool.
yes, Windows Server 2012 and Windows Server 2012 R2 will no longer be supported after October 10, 2023. After this date, security updates, non-security updates, problem fixes, technical support, and online technical content updates will no longer be provided for these products.
Conclusion
Windows Server 2012/2012 R2 is an optimized, fast and stable version of the Windows family, designed for use on servers. This version of Windows provides optimal performance on the server, which has replaced the new versions of 2016 because, in addition to being compatible with old hardware and low resources, it meets the needs of users using Windows.
For users who find the process of installing Windows Server 2012/2012 R2 time-consuming and difficult, purchasing Opera Windows VPS is a useful solution to escape from the installation and configuration steps of Windows Server 2012.
Opera VPS provides Windows VPS with Windows Server 2012 pre-installed so that users can devote their time and energy to their most essential tasks rather than installing and configuring Windows Server 2012.
In this article, you learned how to install Windows Server 2012 and its new version, Windows Server 2012 R2, on the server and PC. If you need more help in installing Windows Server 2012, share your question with us in the comments section so that we can guide you.
We appreciate your staying with us until the end of the article.
SoftRARISO portal for Windows
Are you confused about what is Microsoft Windows Installer Redistributable and where to download windows installer’s latest version?
Then you are in the right place. Here you can download the windows installer for free.
You will also be showed to uninstall the older version and to replace that with the latest version. You can download Windows installer latest version by clicking on one of the links below.
What is the windows installer?

The Microsoft windows installer (WI) is an application of Microsoft Windows used to provide services from Microsoft. The Installer provides better services and standard format for management of components. It helps you to install and uninstall any software on your computer more easier.
This means by installing the Windows Installer you will get better feedback or help from Microsoft Windows. With Windows Installer, you can easily install, delete or maintain your applications on your computer.
Here is a list of Windows Installers versions:
| windows installer 2.0 | 2.0.2.0.2600.0 | This version was released with Windows XP |
| windows installer 2.0 | 2.0.2.0.2600.1 | This version was released with Windows 2000 with service pack 3 |
| windows installer 2.0 | 2.0.2.0.2600.1183 | This version was released with Windows 2000 with service pack 4 |
| windows installer 2.0 | 2.0.2.0.2600.2 | This version was released redistributable |
| windows installer 2.0 | 2.0.3790.0 | This version was released with Windows 2003 |
| windows installer 3.0 | 3.0.3790.2180 | This version was released with Windows XP as redistributable |
| windows installer 3.1 | 3.1.4000.1823 | This version was released as redistributable |
| windows installer 3.1 | 3.1.4000.1830 | This version was released with windows 2003 and windows XP professional edition(x64) |
| windows installer 3.1 | 3.1.4000.3959 | This version was released with Windows 2003 |
| windows installer 3.1 | 3.1.4000.2435 | This version was released with Windows 2003 |
| windows installer 3.1 | 3.1.4001.5512 | This version was released with Windows XP |
| windows installer 4.0 | 4.0.6000.16386 | This version was released with windows vista |
| windows installer 4.0 | 4.0.6001.18000 | This version was released with windows vista and windows |
| windows installer 4.5 | 4.5.6002.18005 | This version was released with windows vista and windows 2008 |
| windows installer 4.5 | 4.5.6000.20817 | This version was released as redistributable for windows 2008 and vista |
| windows installer 4.5 | 4.5.6001.22162 | This version was released as redistributable for windows 2008 and vista |
| windows installer 4.5 | 4.5.6001.22159 | This version was released as redistributable for Windows XP and 2003 |
| windows installer 5.0 | 5.0.7600.16385 | This version was released with Windows 2008 and later was with windows 7 |
In other words in your Windows, the installer makes it easier to install and customize your application on your computer. The applications will be easier for you to handle.
You can download Microsoft Windows Installer Redistributable from the direct links given or by visiting their official site.

File: wi4.5-windows6.0-KB942288-v2-64.msu
Size: 3MB
Support: Windows XP, 7, 8.1 and 10
Version: 4.5
Language: English
Developer: Microsoft
How Do I find my Windows Installer Version?
Before installing Microsoft Windows Installer Redistributable you should know which version you are using at the moment. To know which version of the Windows Installer you are using, there are two ways to find your windows installer.
Here is the easiest way to find the Windows Installer you are using.
Step1: Click on the Start button in the bottom left side.

Step2. Type “Run”

Step3. Open the Run, and type “%systemroot%/system32”

Step4. Click on the top right in the search box and type “Msi.dll” or find it by scrolling down in the folder

Step5. Click on the file and then click on its properties

Step6. Click on the version tab

Step7. Note the version number.
There you go! Now, you have successfully found your Windows Installer version.
Is Windows Installer running on my Windows OS?
Checking your Windows installer’s progress is as easy as it sounds. Follow the steps and you will find your answer.

Step1. Click on Start and type “services.msc”. Open it!

Step2. Scroll down to find a program named “Windows installer”.

Step3. Right-click on “windows installer”

Step4. You will find the start button
If it was running the “Stop” or “Pause” button can be enabled. If not then start the program if you want to run Windows Installer.
How to stop windows installer?
If you want to stop your windows installer for the moment or for the startup, then the following steps are going to be very useful to you.
Step1: Open the task manager by clicking on the toolbar or directly pressing “Ctrl”+”Shift”+”Esc”.
Step2: Click on the “processes” section
Step3: Right-click on the program
Step4: Choose the third option “end task”.
Final words
This was all about Microsoft Windows installer Redistributable. If still, you have any kind of confusion you can ask in the comment section.
Remember that there is no reliable link to download Windows Installer version 5. And that is the reason why we are unable to share with you the setup file and have only able to provide you Windows Installer 4.5 Redistributable.
You may also like
About the author
Hey, it’s your Admin. I am a tech enthusiast who is trying to improve his skills to help others. My goal is to provide solutions to different software and operating systems. If you are having any kind of problem with tech and need assistance then I am here for you.