Сетевое сканирование – это одна из служб, управление которой довольно редко централизуют даже в больших компаниях. В Windows Server 2008 R2 и выше представлена отдельная роль распределенного сетевого сканирования (Distributed Scan Server — DSM), которая позволяет упростить документооборот и обработку сканированных документов в домене Active Directory. В этой статье мы рассмотрим особенности настройки службы распределенного сетевого сканирования в Windows Server 2012 R2.
Сервер распределенного сканирования Distributed Scan Server – это отдельная служба роли Print and Document Service, которая позволяет принимать отсканированные документы с сетевых сканеров, и в соответствии с политиками сохранять их в определенные сетевые папки на файловых серверах, сайты SharePoint или пересылать определенным получателям по SMTP.
Служба распределенного сетевого сканирования позволяет организовать единую точку управления сетевыми сканерами с поддержкой WSD — Web Services on Devices (в качестве устройств сканирования не поддерживается TCP/IP и локальный USB сканеры). Как правило, сетевые сканеры с поддержкой WSD – это большие устройства enterprise уровня.
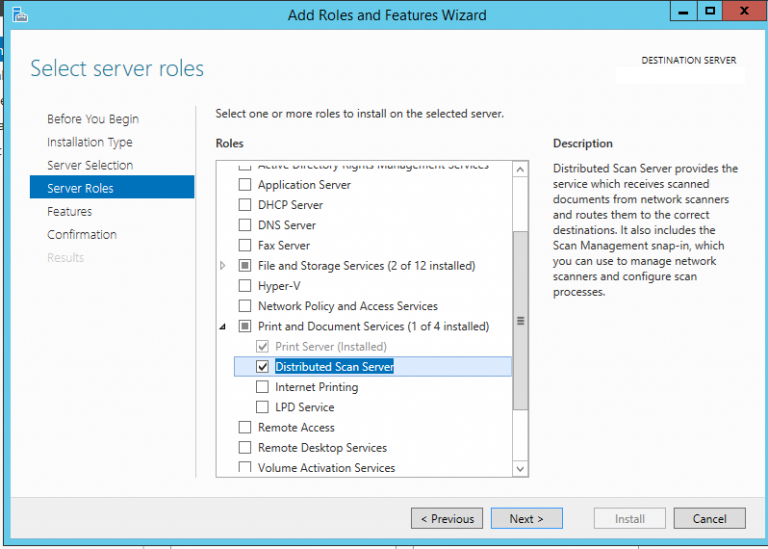
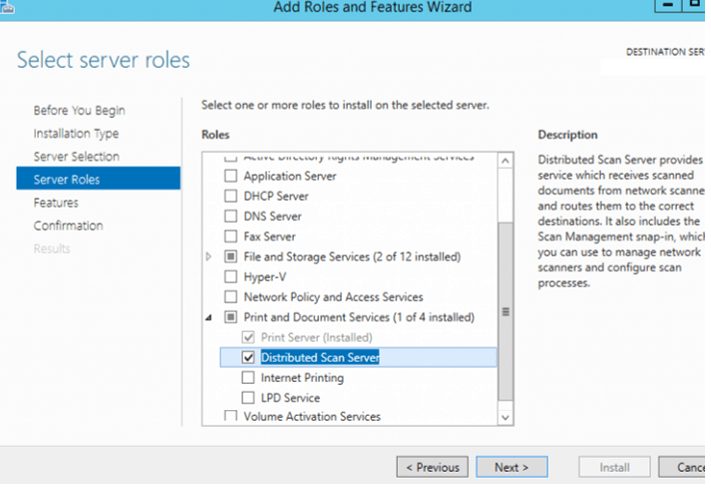
Для установки службы сетевого сканирования нужно выбрать роль Print and Document Service. Внутри нее выберите службы Print Server и Distributed Scan Server.
Так же вы можете установить данную роль с помощью команды PowerShell:
Install-WindowsFeature -Name Print-Scan-Server -IncludeAllSubFeature
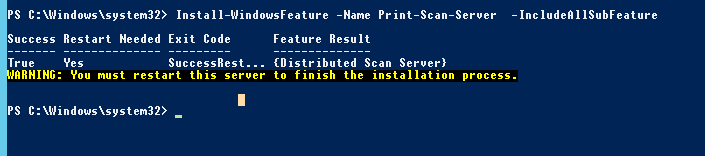
Как вы видите, требуется перезагрузка сервера.
После установки компонента в системе появится новая служба сканирования — Distributed Scan Server service (ScanServer): C:\Windows\System32\svchost.exe -k WSDScanServer .
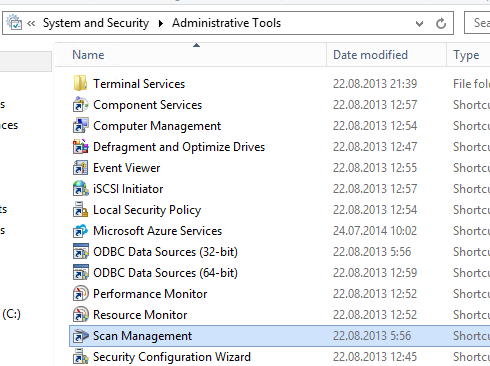
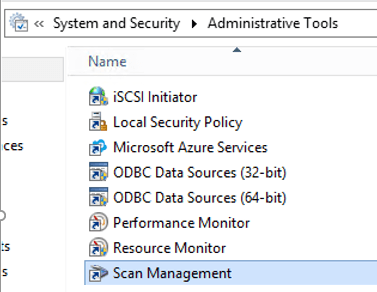
Для управления службой Distributed Scan Server используется отдельная оснастка — Управление сканированием (Scan Management — ScanManagement.msc), которая позволяет управлять сетевыми сканерами, настройками и заданиями сканирования.
Запустите оснастку Scan Management. Как вы видите, в ней содержаться три раздела:
- Managed Scanners – сканеры;
- Scan Processes – процессы пост-обработки заданий сканирования;
- Scan Servers – сервера сканирования DSM.
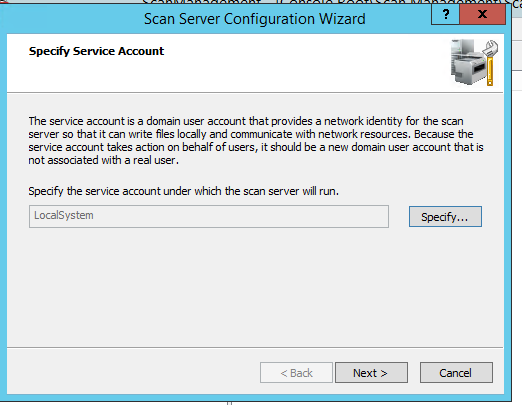
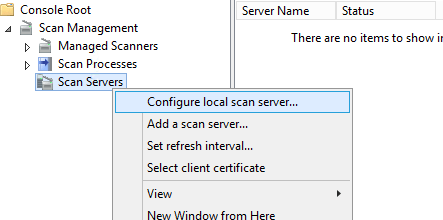
В первую очередь нужно настроить ваш сервер сканирования. Для этого щелкните ПКМ по разделу Scan Servers и выберите пункт Configure local scan server.

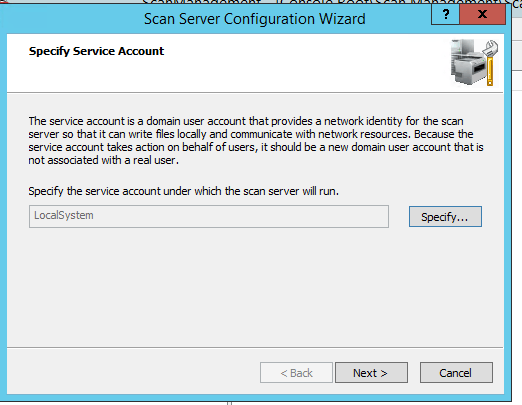
В мастере настройки укажите учетную запись, под которой будет работать сервер сканирования (данный аккаунт используется для доступа к локальным папкам и сетевым папкам на других серверах). По умолчанию используются аккаунт LocalSystem, однако для удобного управления доступа в домене AD лучше создать отдельную сервисную учетную запись и указать ее.
Далее нужно указать местоположение и максимальный размер временных папок пользователей для сканированных документов.
Далее нужно указать адрес почтового сервера и SSL сертификат для шифрования сетевого трафика (для тестовых сред подойдет самоподписанный SSL сертификат).

Далее нужно выбрать тип аутентификации пользователей. Можно включить аутентификацию пользователей (с помощью Kerberos или клиентских сертификатов), либо отключить аутентификацию (в этом случае доступ к серверу сканирования будет анонимным).

Если вы включаете аутентификацию, убедитесь, что вы входите в локальную группу Scan Operators и вам разрешен запись на компьютерный объект вашего сервера в AD.

Если при настройке сервера сканирования у вас появляется ошибка:
Scan Server Configuration Wizard failed to apply setting, error code 0x800706fc
, убедитесь что вы указали аккаунт, из-под которого запущена служба распределенного сканирования (с достаточными привилегиями), измените путь к папке сканирования по умолчанию и предоставили право на запись в папку.

Теперь нужно добавить ваш сервер сканирования в консоль. Для этого щелкните ПКМ по разделу Scan Servers, выберите пункт Add a Scan server и укажите имя вашего сервера. Если вы используете самоподписанный сертификат, имя сервера должно совпадать с именем в сертификате, только его нужно указывать в ВЕРХНЕМ (странно…) регистре, и добавить самоподписанный сертификат в доверенные корневые сертификаты, иначе при добавлении сервера будет постоянно появляться ошибки:
“Windows failed to contact the scan server you specified. This can be caused when the server name you specified odes not match the name in the server certificate. If the server name from the certificate matches the server you want to connect to and you trust the network you are on, click Retry to restart the search with the certificate name.”
и
"The following devices could not be accessed because they are offline, there is a network issue, the names are incorrect, or the certificate needed to contact the device has not been selected: Msk-ScanSrv1”.
Чтобы ваш сервер сканирования мог обнаруживать в сети принтеры и сканеры с поддержкой Web Services on Devices (WSD), нужно:
- Включить сетевое обнаружение (Turn on network discovery).
- Запустить службу Device Association Service.
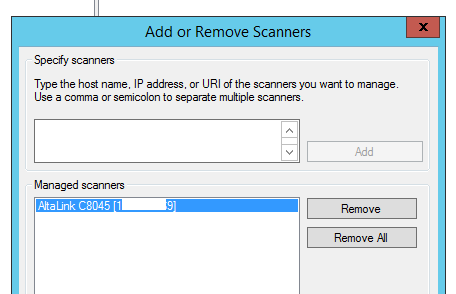
Теперь можно добавить сетевые сканеры. Щелкните ПКМ по разделу Managed Scanners и выберите Manage. Укажите IP адрес или DNS имя сетевого сканера (в настройках сканера должна быть включена поддержка WSD — Microsoft Services for Devices или Web Services Print).

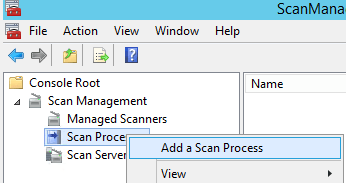
Теперь можно создать новый обработчик сканирования – PSP. Выберите Scan Processes -> Add a San Process.

Укажите имя и описание обработчика сканирования, выберите настройки сканирования и укажите имя сервера распределенного сканирования.
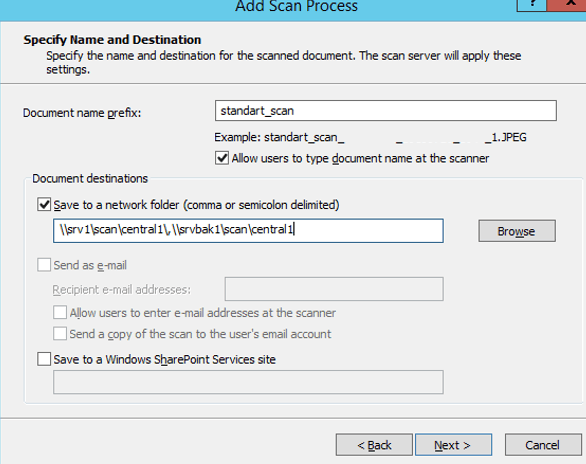
Далее нужно указать префикс документа и выбрать куда его нужно сохранять. Это может быть одна или несколько сетевых папкой (используются UNC пути), URL адреса на сайте SharePoint или почтовый ящик Exchange.
На последнем этапе нужно выбрать пользователей и группу, которым разрешено получать доступ к этому процессу PSP и настроить уровень доступа.
Осталось настроить интеграцию с AD на стороне сетевых сканеров (зависит от вендора). Пользователи могут авторизоваться на сканерах по паролю или смарт карте.
Ниже приведена схема работы DSM.
После авторизации на сканере пользователю предоставляется возможность выбора подходящего процесса пост-обработки (PSP), среди доступных для его аккаунта (в соответствии с его полномочиями). Процессы PSP хранятся в AD и содержат правила с настройками сканирования и маршрутизацией документа. Сетевой сканер выполняет сканирование документа и передает его серверу для обработки. Сервер распределенного сканирования выполняет обработку задания и отправляет отсканированный документ в соответствии с маршрутом в задании PSP.
Журналы сканирования и обработки задания сохранятся на DSM сервере и в любой момент можно проверить информацию по выполненным задачам.
- Remove From My Forums
-
General discussion
-
I have been attempting to install samsungs clx3180 multifunction centre on a windows storage server 2012
The software works flawlessly with windows 8 despite the fact that windows 8 is not listed as a compatible OS (Samsung’s tech support only referred me to the driver’s compatibility as advised on their website)
When installing on windows storage server it seems to install without any errors but for some reason the scanner is not accessible from the server.
The printer / scanner is located on the LAN at a fixed IP address and is detected without issue during the installation process. Printer works fine after install completes but the scanner is not available.
Is there a feature of Windows Storage Server 2012 that needs to be enabled / installed to allow use of TWAIN scanner drivers on it?
И так для того что бы настроить пользователям сканирование на терминальной ферме, нам нужно создать новую коллекцию для сканирования, соответственно сервер должен быть на windows server 2012 или 2012 R2.
Далее нам нужно создать свои папки драйверов для сканеров, у меня использовались в основном МФУ компании HP, про другие модели не чего не скажу, ну думаю принцип тот же, поясню как создать свой драйвер пак для сканера HP LaserJet 1536 mfp.
1. Качаем полный набор драйверов с офф сайта для системы windows 8.1
2. Распаковываем его в ручную с помощью winrar например
3. Ищем INF файл отвечающий за установку сканера, в нашем примере это файлик hppasc16.inf, объясняю почему именно он, если его открыть то можно понять по строчке «HP LJ M1530 MFP Series Scan» что это INF файл связанный со сканером, но нас интересует в нем не эта строчка, а вот эта «vid_03f0&pid_012a&IP_SCAN», и из этого же файла можно понять какие dll и cab нам нужны для установки.
4. Так же находим программку «hpbniscan64.exe» ее можно использовать и для установке других моделей сканеров HP хотя в других драйверах я ее не нашел, она будет прикреплена к данной теме.
5. Теперь нам нужно составить строчку установки драйвера, выглядеть она будет так: «hpbniscan64.exe -f «hppasc16.inf» -m «vid_03f0&pid_012a&IP_SCAN» -a «192.168.1.229» -n 1″, да запускать CMD нужно с правами Администратора
6. Смотрим в диспетчере задач появления нового сканера, ура он там появился, теперь что бы пользователи не путались где чей сканер нам нужно его переименовать, это делается в реестре, я например брал и просто вбивал поиск данного IP сканера, он находил как правило это папочка с номером например «0001» выделяем ее и ищем параметр «DriverDesc» и «FriendlyName» и меняем их на понятные для пользователя названия, например «Сканер Иванова», перезагружаем сервер и воля все программы сканирования будут видит его как «Сканер Иванова»
P.S. Сталкнулся с МФУ 1214 долго не мог понять откуда выдрать «vid_03f0&pid_012a&IP_SCAN», так как перерыв все inf файлы такого не на рыл, но потом методом проб и ошибок выяснил, что для данной МФУ строчка выглядит так «WiaScanner.Scanner» так что дерзайте, все работает на ура пользаки рады)))))
This issue will be resolved if you execute the command or install the Desktop Experience Pack onto your PC.
> Windows Server 2003
> Windows Server 2008/2008 R2
> Windows Server 2012/2016
(Windows Server 2003)
Follow the steps below to execute the command.
- Open the Command Prompt.
-
Type the following and press the Enter key.
svchost.exe -k imgsvc
You need to execute the command every time you scan documents after starting your PC.
(Windows Server 2008/2008 R2)
Follow the steps below to install the Desktop Experience Pack.
- Start Server Manager.
- In the details pane, locate the Features Summary area, and then click Add Features.
- In the Add Features Wizard, click to select the Desktop Experience check box, and then click Next.
- Click Install.
- After the Desktop Experience feature is installed, click Close to exit the Add Features Wizard, and then click Yes to restart the computer.
(Windows Server 2012/2016)
Follow the steps below to install the Desktop Experience Pack.
-
Open Server Manager and click Add roles and features.

-
Select Server Selection.

-
Check if your PC is selected and click Next.
-
Click Next.
-
Check the Desktop Experience box.

-
Another window will appear. Click Add Features.

-
Make sure the Desktop Experience box is checked and click Next.

-
Check the Restart the destination server automatically if required box.

-
Another window will appear. Click Yes.

-
Click Install. The installation will start. Your system will restart automatically after installation has completed.


Related Models
ADS-2800W, ADS-3000N, ADS-3600W
Content Feedback
To help us improve our support, please provide your feedback below.
Network scanning is one of the services that is rarely managed centrally even in large infrastructures. In Windows Server 2008 R2 or higher there is a separate role of distributed network scanning (Distributed Scan Server — DSM) that enables to simplify document workflow and processing of scanned documents in the Active Directory domain. In this article we’ll look on how to configure the distributed network scanning service on Windows Server 2012 R2.
The Distributed Scan Server is a separate service of the Print and Document Service role that allows you to receive scanned documents from the network scanners and saving them to the specific network shared folders on the file servers and SharePoint sites or sending them to certain recipients via SMTP according to the configured policies.
The distributed network scanning allows to organize a single point to manage network scanners supporting WSD — Web Services on Devices (TCP/IP or local USB scanners are not supported as scanning devices). As a rule, network scanners with WSD support are large enterprise-level devices.
To install the network scanning service, select Print and Document Service role. Then select Print Server and Distributed Scan Server services in it.
You can also install this role using this PowerShell command:
Install-WindowsFeature -Name Print-Scan-Server -IncludeAllSubFeature

As you can see, you must restart the server.
After the role has been installed, a new scanning service appears in the system — Distributed Scan Server service (ScanServer): C:\Windows\System32\svchost.exe -k WSDScanServer.
To manage Distributed Scan Server, a separate mmc snap-in is used: Scan Management — ScanManagement.msc, which manages network scanners, settings and scanning tasks.
Run the Scan Management snap-in. As you can see, there are three sections:
- Managed Scanners;
- Scan Processes;
- Scan Servers.
First of all, you must configure your scan server. To do it, right-click Scan Servers section and select Configure local scan server.
In the configuration wizard, specify the account under which the scan server will run (this account is used to access local and shared folders on other servers) By default, the LocalSystem account is used, however, it is recommended to create a separate service account for convenient access management in your AD domain and specify it here.
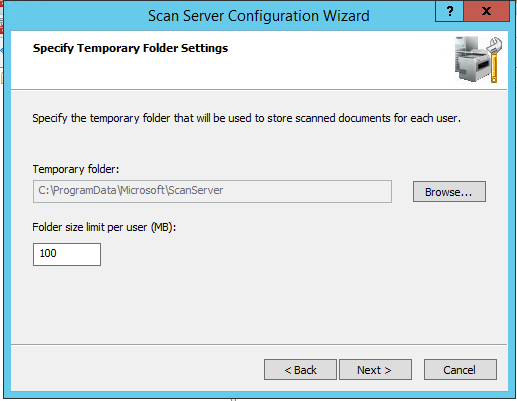
Then you must specify the location and maximum size of user temporary folders for scanned documents.

After that specify your email server address and an SSL certificate for network traffic encryption (a self-signed SSL certificate is suitable for test environment).
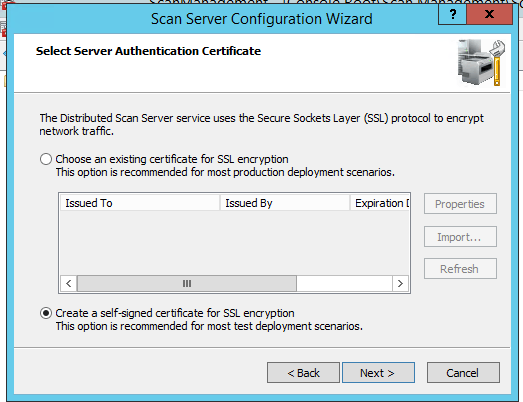
Then select the type of user authentication. You can enable user authentication (using Kerberos or client certificates) or disable it (anonymous access to the scan server).
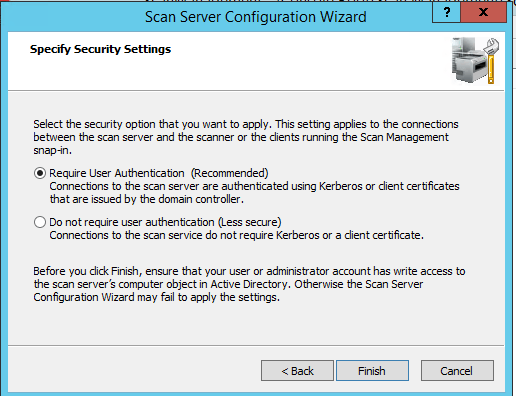
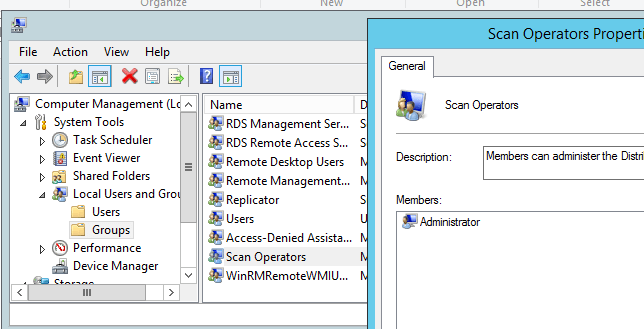
If you enable the authentication, make sure that you are a member of Scan Operators local group and you are allowed writing to a computer object of your server in the AD.
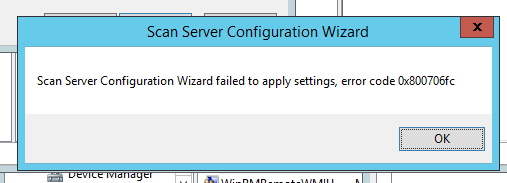
If during scan server configuration the following error appears:Scan Server Configuration Wizard failed to apply setting, error code 0x800706fc, make sure that you have specified the account under which the distributed scan service is running (with sufficient privileges), the path to the default scan folder and have granted the write privilege for the folder to this account.
Now you need to add your scan server to the console. To do it, right-click the Scan Servers, select Add a Scan server and enter the name of your server. If you are using a self-signed certificate, the name of the server must match its name in the certificate, but it must be typed UPPERCASE (strange…). You must also add the self-signed certificate to the trusted root certificates, or errors will appear when trying to add the server:Windows failed to contact the scan server you specified. This can be caused when the server name you specified does not match the name in the server certificate. If the server name from the certificate matches the server you want to connect to and you trust the network you are on, click Retry to restart the search with the certificate name.
andThe following devices could not be accessed because they are offline, there is a network issue, the names are incorrect, or the certificate needed to contact the device has not been selected: tor-scandsm1.
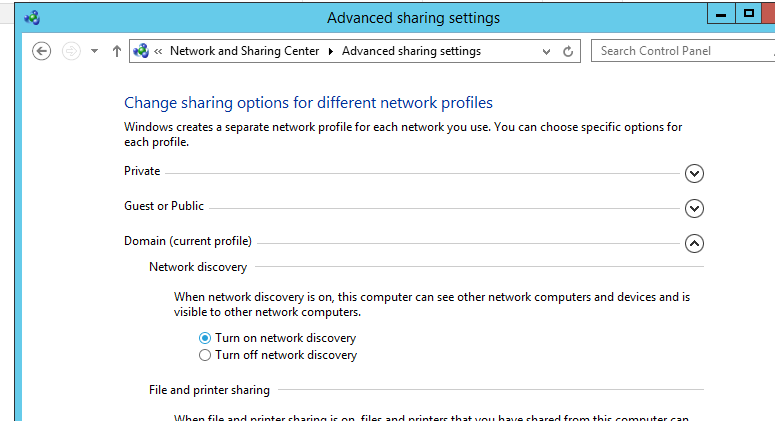
In order your scan server can find printers and scanners supporting Web Services on Devices (WSD) in your network, do the following:
- Turn on network discovery;
- Run the Device Association Service.

Now you can add the network scanners. Right-click Managed Scanners and select Manage. Specify the IP address or a DNS name of a network scanner. WSD support (Microsoft Services for Devices or Web Services Print) must be enabled in the scanner settings.
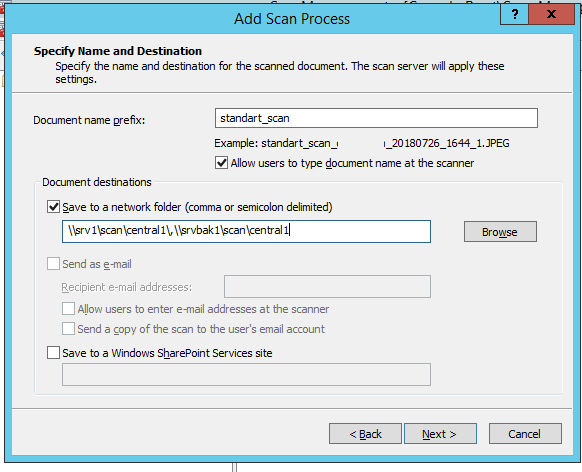
Now you can create a new scan process – PSP. Select Scan Processes -> Add a Scan Process.
Specify the name and description of the scan process, select scanning settings and specify the name of the Distributed Scan server.
Then enter the document prefix and select where it will be saved. It can be one or more network shares (UNC paths are used), URLs on the SharePoint site or email addresses.
In the last step, you need to select users and the groups allowed to access this PSP and configure the access permissions.
Now we still have AD integration to be configured on the network scanners side (depends on the vendor). Users may use a password or a smartcard to authenticate on the scanners.
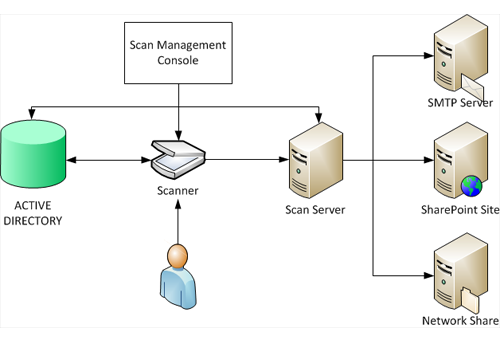
DSM operation scheme is shown below.
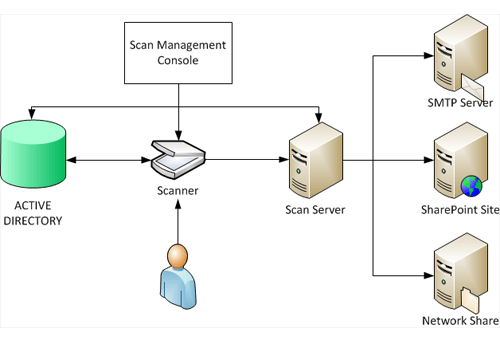
After a user has authenticated on the scanner, they can select a suitable PSP available for their accounts (according to their privileges). PSPs are stored in the Active Directory, and contain the rules with scan settings and document routing. The network scanner scans a document and sends it to the server for processing. The Distributed Scan Server processes the task and send the scanned document along the route specified in the PSP job.
Scan and task processing logs are located on the DSM server, and you can check the information on the completed tasks any time.