NFS (Network File System) — сетевой протокол доступа к доступ к файлам и файловой системе NFS-сервера, популярный в семейства ОС Linux/ UNIX, а также различных системах хранения. Microsoft также, не желая отставать от конкурентов, внедрила базовый функционал NFS сервера еще в Windows Server 2003 R2. В последующих версиях серверных платформ Microsoft возможности встроенного NFS Windows сервера расширялись, появлялся новый функционал и средства управления. NFS сервер в Windows Server 2012 – очередная веха в развитии данной технологии.
Что же нового предлагают нам разработчики Microsoft в данном продукте? Новые возможности NFS сервера в Windows Server 2012:
- Поддержка стандарта NFS v4.1. Поддержка последней версии NFS 4.1 – одно из основных новшеств Windows Server 2012. По сравнению с NFS v3 этот протокол обеспечивает повышенную безопасность, производительность и совместимость, полностью реализуя все аспекты RFC 5661.
- Производительность «из коробки». Благодаря использованию новой транспортной инфраструктуры RPC-XDR, оптимальная производительность NFS сервера может быть достигнута сразу «из коробки» без необходимости тонкой настройки параметров системы. Оптимальная производительность достигается за счет автоматически настраивающегося кэша, разделения рабочих процессов на пулы и динамическое управление пулами, основанное на их нагрузке.
- Упрощенное развертывание и управление. Данный факт достигнут за счет:
- — более 40 командлетов PowerShell для настройки сервера NFS и управления общими папками
- — простого графического интерфейса управления, позволяющего одновременно управлять как SMB, так и NFS шарами, а также настройками скрининга файлов и файловой классификации.
- — фиксации RPC порта (порт 2049) для простоты настройки файерволов
- — нового провайдера WMI v2
- — упрощенной идентификации за счет плоского файла мапинга
- Улучшения в NFSv3. За счет быстрой отправки клиентам уведомлений о сбоях монитором NSM (Network Status Monitor), старые NFS клиенты лучше и быстрее обрабатывают процедуру failover, что означает меньшее время простоя.
Итак, NFS сервер в Windows Server 2012 значительно улучшен с точки зрения простоты развертывания, масштабируемость, стабильность, доступность, надежность, безопасности и совместимости. Общие папки могут быть одновременно доступны по протоколам SMB и NFS, что означает возможность использования Windows Server 2012 в качестве хранилища в гетерогенных сетях.
Далее мы разберем сценарий развертывания и управления сервером NFS в Windows Server 2012.
Установка NFS сервера в Windows Server 2012
NFS сервер в Windows Server 2012 можно установить с помощью GUI и Powershell. Чтобы установить NFS сервер с помощью графического интерфейса, откройте консоль Server Manager и внутри роли файлового сервера (File and Storage Services) отметьте компонент Server for NFS.

После окончания установки компонента NFS, сервер необходимо перезагрузить.
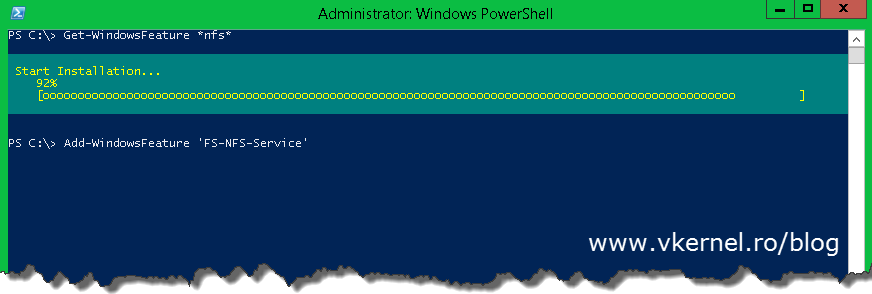
Установка этой же роли с помощью Powershell также не вызывает затруднений, просто выполните команду:
Add-WindowsFeature "FS-NFS-Service"

Настройка общей папки NFS в Windows Server 2012
Далее мы покажем, как с помощью установленной нами роли создать NFS шару (общую папку) на сервере Windows. Создать NFS шару можно опять несколькими способами: с помощью графического интерфейса или Powershell.
Создание общего каталога NFS с помощью консоли Server Manager
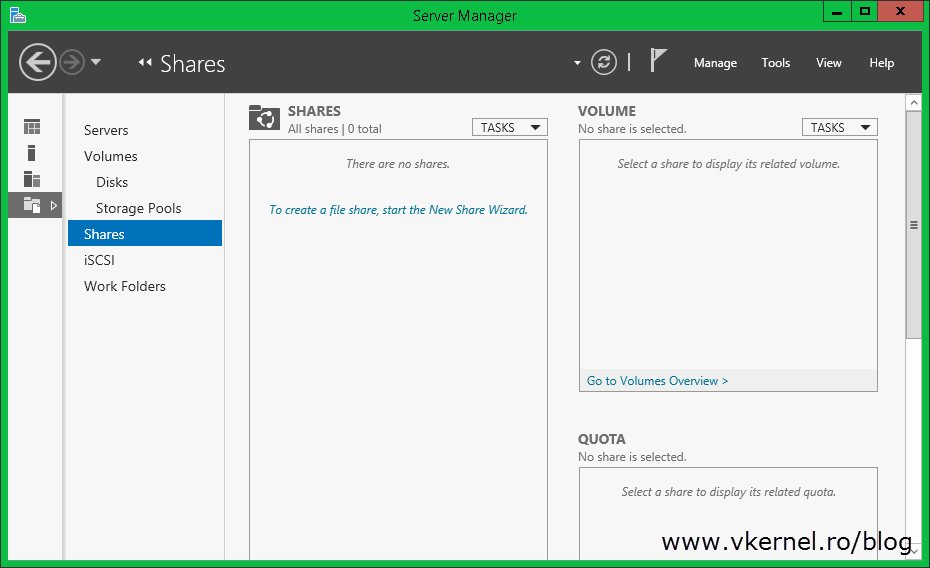
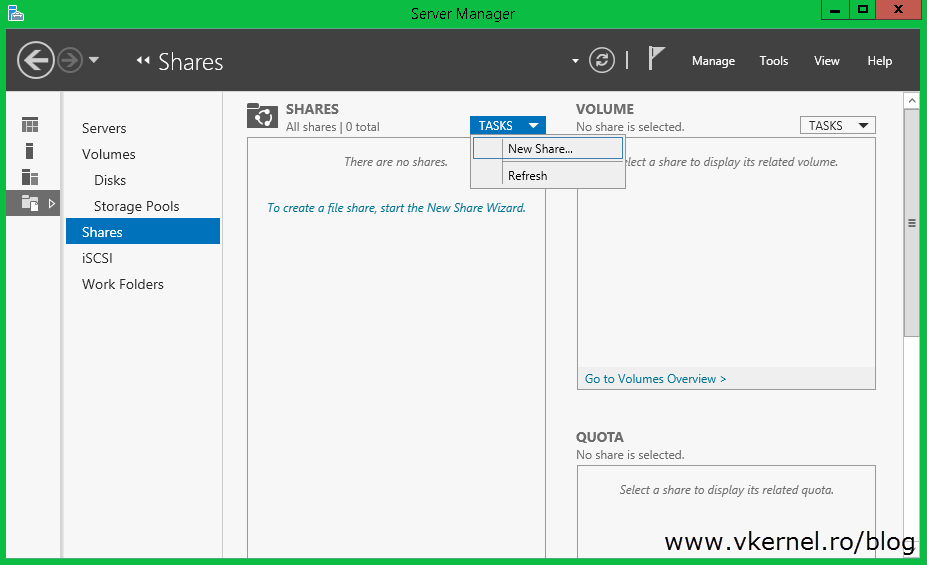
Откройте консоль Server Manager, перейдите в раздел Share management (находится внутри роли File and Storage Services).
В контекстном меню запустите мастер создания нового общего каталога- New Share…

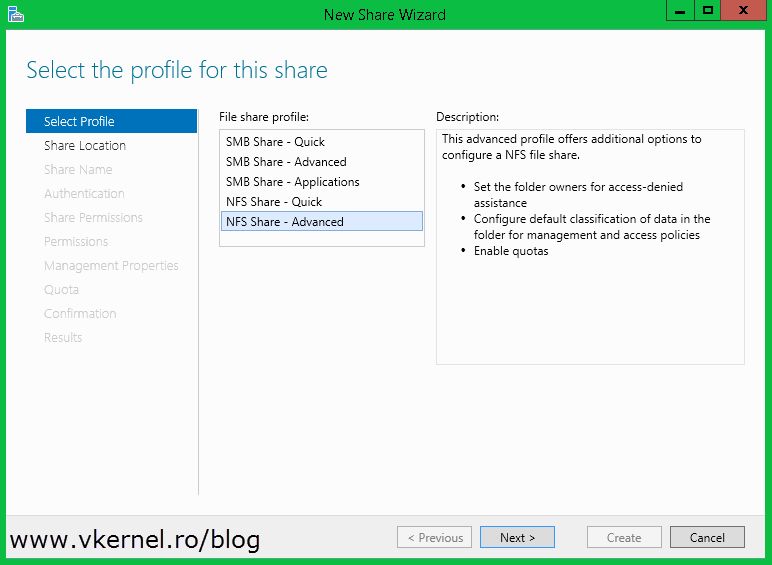
Выберите тип шары NFS Share — Quick

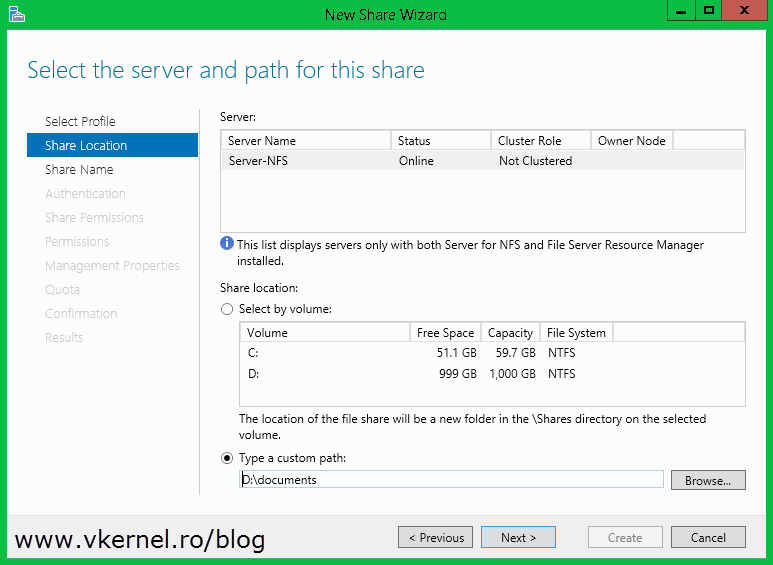
Далее нужно указать местоположение каталога на диске и путь, по которому должны подключатся удаленные NFS клиенты.

Затем необходимо задать тип аутентификации NFS клиентов: возможно, задействовать как Kerberos- аутентификацию, так и анонимную.
Предположим, в качестве потребителя создаваемого NFS ресурса будет выступать сервер виртуализации ESXi, в котором возможность аутентифицировать NFS соединения отсутствует (ESXi не поддерживает NFSv4). Поэтому тип аутентификации будет No Server Authentication, отметим также опции Enable unmapped user access и Allow unmapped user access by UID/GID.

Чтобы немного обезопасить создаваемую NFS шару от доступа сторонних лиц, ограничим доступ к NFS ресурсу по IP адресу клиента.
Host: 192.168.1.100
Language Encoding : BIG5
Share Permissions : Read/Write
Allow root access : Yes

Далее осталось проверить, что на уровне NTFS пользователь, в которого мапится подключающийся юзер, имеет доступ на чтение/запись (если решено задействовать анонимный доступ, придется для пользователя Everyone дать полные r/w права на уровне NTFS).
Как создать NFS шару с помощью Powershell
Создадим новую NFS шару:
New-NfsShare -Name "NFS " -Path "d:\shares\nfr" -AllowRootAccess $true -Permission Readwrite -Authentication sys
Разрешим доступ к шаре для IP адреса 192.168.1.100 и зададим кодировку BIG5 (возможность просмотра содержимого NFS шары для клиента ESXi).
Grant-NfsSharePermission -Name “NFS” -ClientName 192.168.1.100 -ClientType host -LanguageEncoding BIG5
Созданную NFS шару можно использовать, например, как NFS-datastore в среде виртуализации VMWare vSphere, или для доступа к данным с других Unix-like клиентов. Как смонтировать NFS шару в Windows — клиентах описано в этой статье.
Overview
Microsoft’s Windows Server has had the ability to host NFS shares since Server 2003. There are a number of reasons why you may need it, such as backing up SharePoint or sharing files with UnixLinux computers, and for the most part it works fairly well.
This tutorial will guide you through installing and configuring it. Although not covered in this tutorial, Active Directory mappings can be created for your Linux users accounts to grant them access to directories and files using NTFS shares.
Hardware Configuration
The sizing of your server will greatly depend on the type and volume of traffic. There absolutely is no one-size-fits-all configuration. Your success will be determined by how well you know the workload profile that the server will experience.
| Lots of Large File Tranfsers | If your server primarly serves large files and many of them are transfered concurrently, you’re going to want a lot of RAM in the server. The RAM will be used as a cache before the data is transmitted. |
|---|---|
| Lots of Tiny File Transfers | If instead you are transfering a lot of tiny files, you will want the storage be on fast disks. Transfing large amounts of tiny files can create an enormous amount of I/O, which may require a RAID group with lots of disk, an SSD drive, or Flash drive. |
| High Concurrency and File Transfers | Large amounts of memory and CPU may be required to handle the load. |
| ODX Supported Backend Storage | If you have multiple shares hosted on ODX supported storage served by your file server, and your users do a lot of copies between shares, ODX will significantly improve performance. It does this by offloading the data movement to the storage controller. It also means your file server frees more resources for other connections. |
These are just examples. Your mileage will vary depending on a lot factors in your environment. The best advice I can give is to monitor your server once it is in production. Keep an eye on disk queue times, latency, CPU, and memory utilization.
Install NFS File Services
- Launch Server Manager.
- On the top menu, click Manage.
- Click Add Roles and Features.
- On the Before you begin screen, click Next.
- On the Select installation type screen, ensure Role-based or feature-based installation is selected, and then click Next.
- On the Server selection screen, click Next.
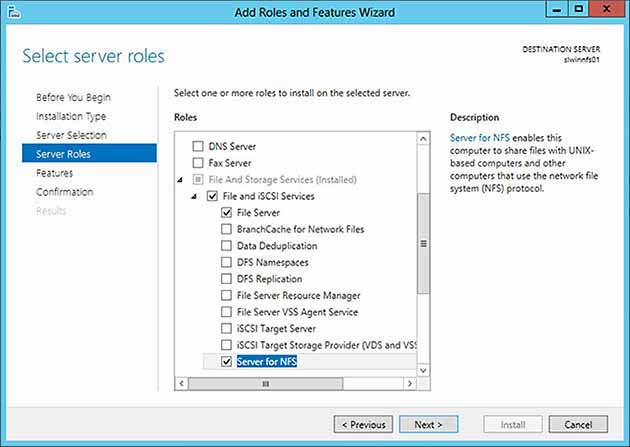
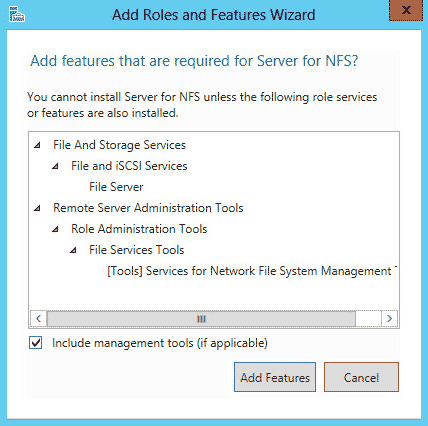
- On the Select server roles screen, expand File and Storage Services, expand File and iSCSI Services, and then check Server for NFS.

- Click Next.
- If an Add features that are required for Server NFS dialog box appears, click Add Features.

- On the Select feature screen, click Next.
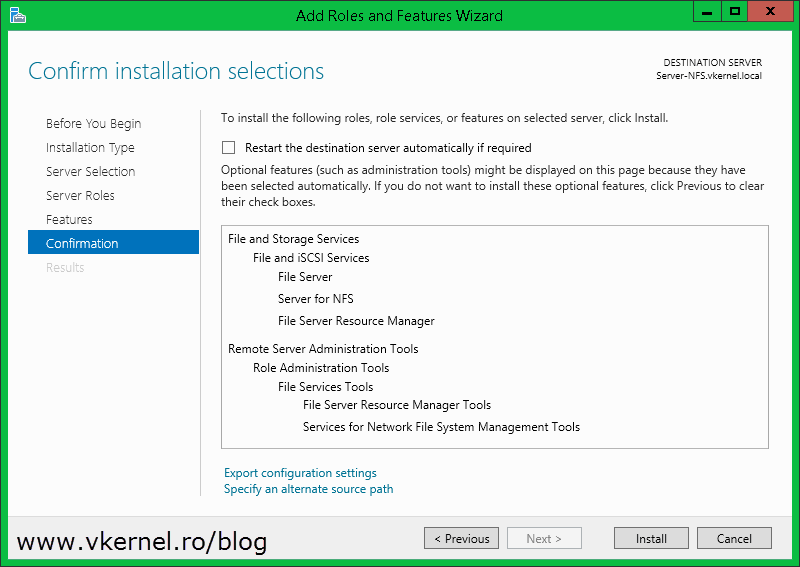
- Confirm the installation details, and then click Install.
Configure an NFS Share
- Launch File Explorer.
- Create a new directory for your NFS share.
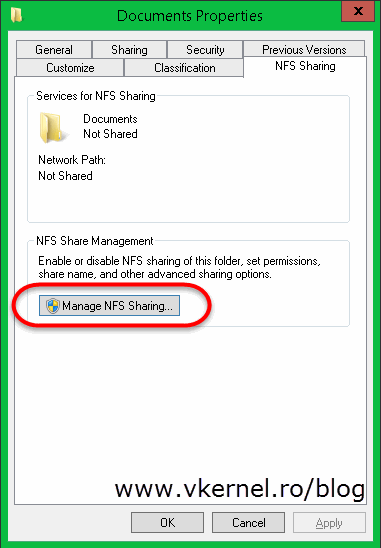
- Right-click the directory and click Properties.
- Select the NFS Sharing tab.
- Under the NFS Sharing tab, click the Manage NFS Sharing… button
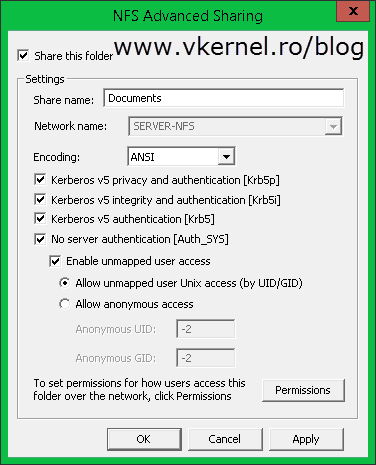
- Check the Share this folder check box.

- Enter a name into the Share name text field. This will be used when a user connects to your NFS share.
- Click the Permissions button.
- Click Add and then enter the IP address or hostname of the client(s) you want to allow connections to. When added, you may also select whether they have readwrite access or read-only access.

- Click OK.
- Click Apply and then OK.
- You now have a simple NFS share hosted on a Windows Server 2012 R2 box.
Connect a Linux Client to the NFS Share
- Log onto a Linux server or desktop.
- Open a terminal window, if you are in a Desktop version of the operating system.
- Create a new directory to mount the Windows NFS share.
mkdir /postprod
- Mount the NFS share to the new directory.
mount.nfs slfileserver01:/postprod /postprod
- If the client has readwrite access, test the share by creating a new file.
touch file01.txt
There are times when you need to access some Windows shares from Linux machines, or systems that have some Linux variations. A few methods exists on how you can do this, and NFS (Network File System) is one of them. NFS exists for a long time in Windows, starting with server 2003, and it’s still here in server 2012/R2. By sharing a folder using the NFS protocol, Linux users can map that share on their systems and use it as a central location for their documents. The only downside of using NFS is that you can’t have that granular control on those shares like you have in Windows, but usually read-write and read-only are enough.
Let’s begin by installing NFS on Windows, so open Server Manager, go to Manage and click Add Roles and Features.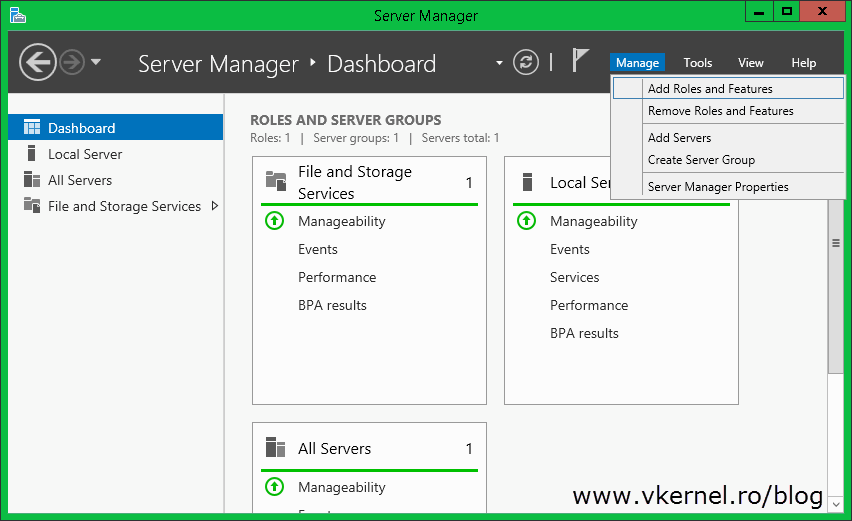
Follow the wizard until you reach the Server Roles page. Here check the Server for NFS box under the File and Storage Services > File and iSCSI Services. You might also want to enable the File Server Resource Manager role if you want use some advance features of NFS.

Click Install to begin the installation.
If you want to do this using PowerShell, use the following command:
Add-WindowsFeature 'FS-NFS-Service'
Using this command will also install the File Server Resource Manager role. Right now we are ready to share a folder using NFS, and there are three methods to do this: the classic one, the wizard one and the PowerShell one.
Configuring NFS shares using the Manage NFS Sharing option
As a tip, before we get started, do not name your directory that you want to share ‘NFS Share‘, or you will get an error when configuring permissions:
“Server for NFS cannot update the share configuration. Try updating the shared directory again, or delete and recreate the shared directory“
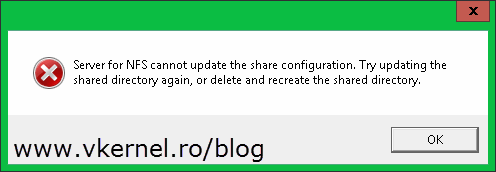
I found this during my testing, and I taught, why not share this with you! Now open the properties of a folder you want to share using the NFS protocol and go to the NFS Sharing tab. Here click the Manage NFS Sharing button.
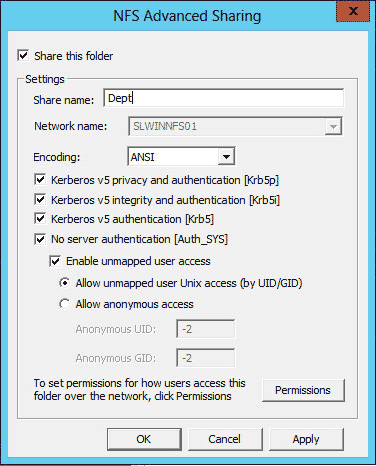
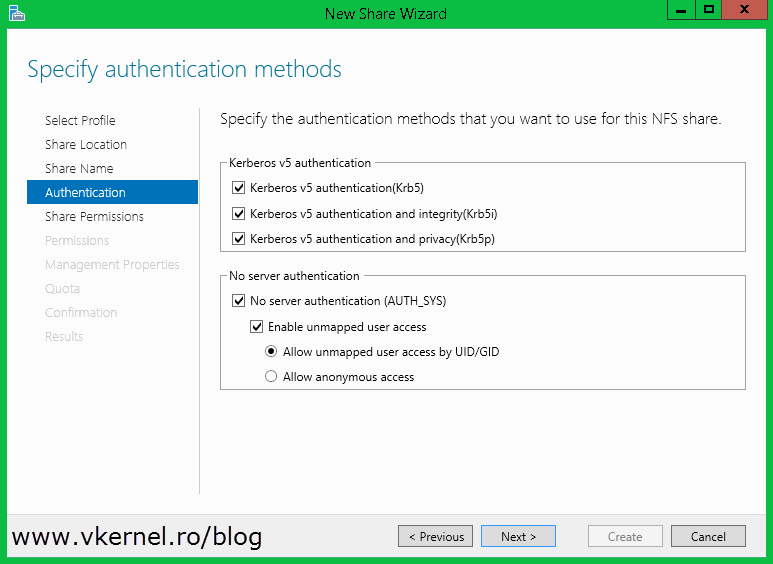
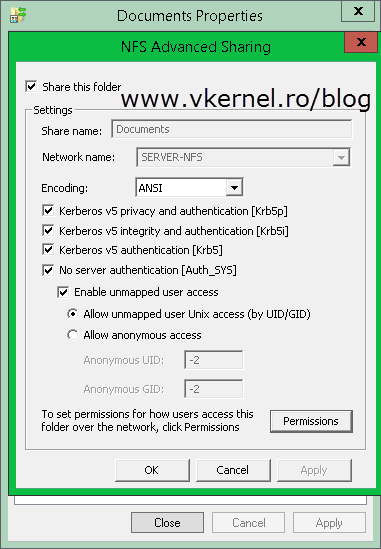
On the new window check the Share this folder box. Now all of the other options and settings are available and ready to be configured. If you want to change the proposed share name which is the name of the the folder, you can do this from the Share Name box. Among the authentication options you can choose Kerberos v5 [Krb5] which uses the Kerberos v5 protocol for authentication, Krbv5i which provides integrity checking to verify that authentication data has not been altered, and Krb5p which provides privacy (new addition for Windows Server 2012). Unmapped user access is useful for scenarios where integration doesn’t occur between the clients accessing the shares. Unmapped user access has other two options: anonymous and unmapped user access. With unmapped user access, the server for NFS creates custom SIDs that correspond to the UIDs and GIDs for the UNIX accounts accessing the share. If you are using anonymous you need to put the power of Windows Firewall in place to deny access to the NFS service from all but the required IP addresses or subnets. Usually you don’t have to change these settings and just go with the default ones.
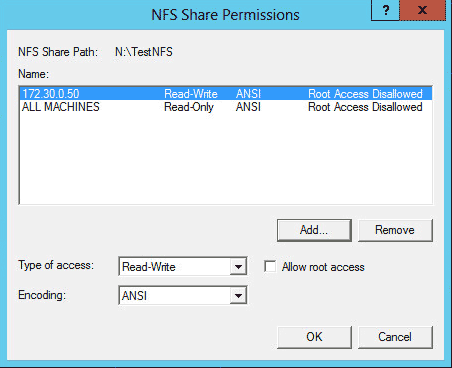
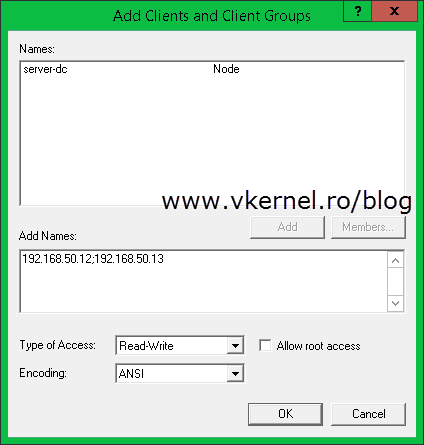
For more advanced share permissions click the Permissions button. This is where you can allow or deny computers form the network to connect to the NFS share, and where you set the access type for those computers. To allow them to connect, click the Add button, and in the Add Names box type the name or IP addresses of the clients you want to be able to connect to the share. You can add multiple clients at once, just separate them with a semicolon (;). Leave the type of access to Read-Write because this will be controlled using NTFS permissions anyway.
When you add multiple clients in the list and separate them with a semicolon, make sure no spaces exist in front or after that semicolon, or you will get an error message that then name cannot be resolved. Long story short… no spaces are allowed in that list.
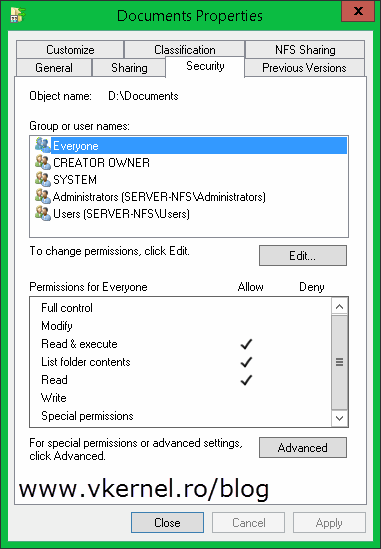
Before you map this from a Linux client you need to set the proper NTFS permissions, or the client will not be able to read the share even tough is in the IP allow list. Switch to the security tab and add Everyone with the default permissions. If you want clients to be able to modify or write in this share, set the permissions to Modify and Write. The final access on the share is determined by both, the NFS permissions and the NTFS permission; the most restrictive permission wins. For more information on how NFS access works over NTFS permissions read this Microsoft Technet article.
Configure NFS shares using the Server Manager Wizard
This method is not valid for Windows operating systems older than server 2012. For those, you need to use previous method. Now open Server Manager, go to File and Storage Services and here click on Shares.
From the Shares section click Tasks > New Share.
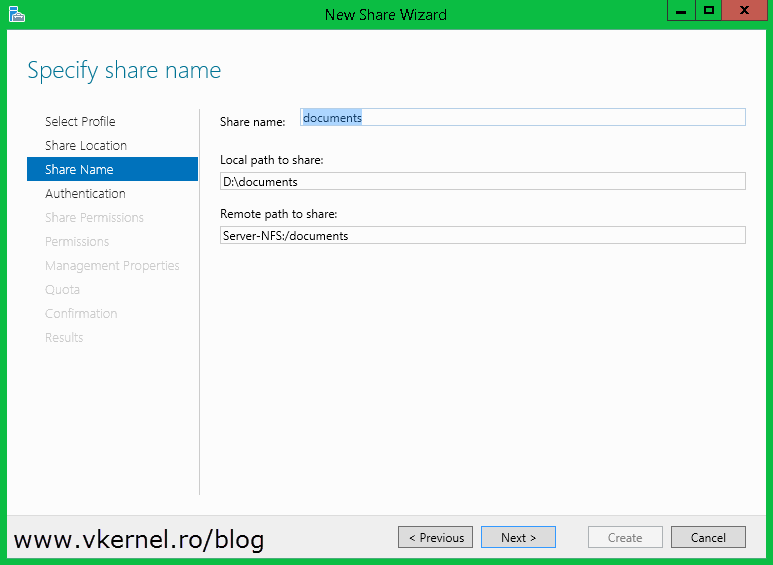
The New Share Wizard opens. On the first screen select NFS Share – Advanced; because going with NFS Share – Quick we don’t get all the options and goodies.
Here is where you provide the share location. You can share the an entire volume by selecting it under the Select by volume section, or you can share a specific folder, by using the Type a custom path radio button.
In case you want to change the proposed share name, you can do it here from the Share name box. The remote share path will be automatically modified/completed for you.
On the Authentication page, chose the authentication protocols you want to use for this share then click Next.
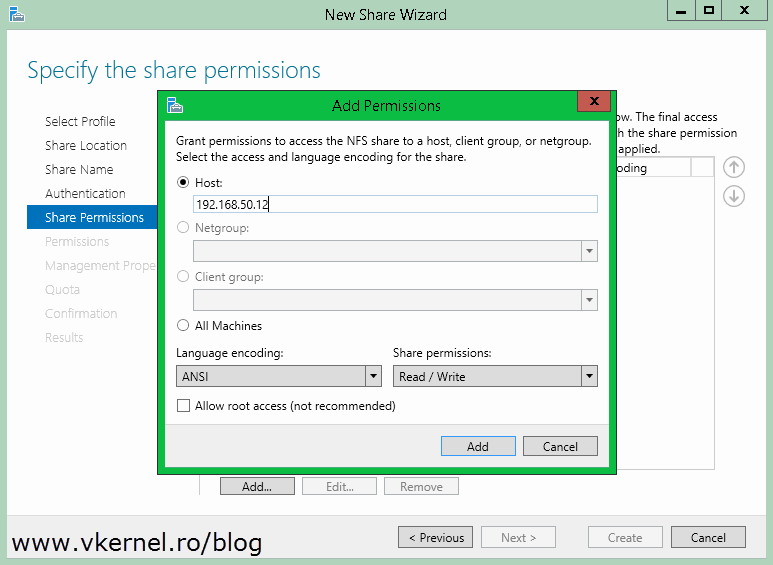
Click the Add button to open the Add Permissions window. In the Host box, type the IP address or IP addresses for those Linux machine(s) that connect to this share.
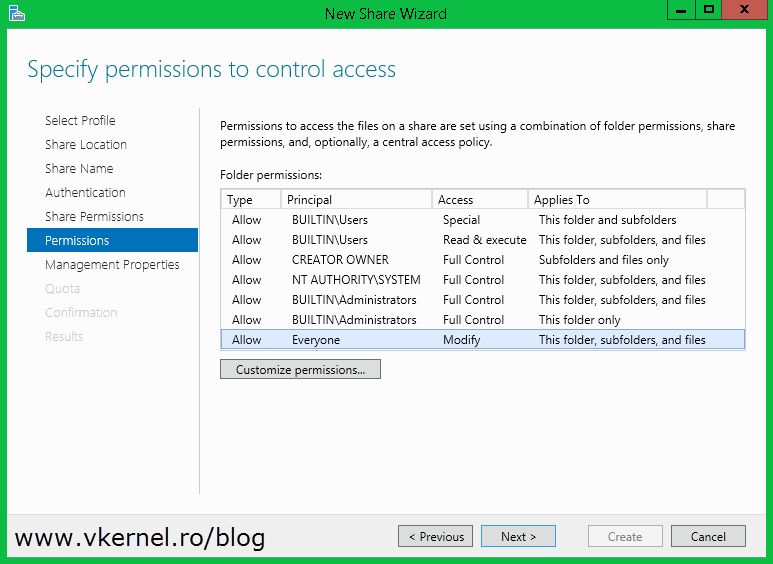
And here are the NTFS permissions for this folder. As you can see the Everyone group is already in the list with Modify permissions. If you just want Read permissions for this share, select the Everyone group and click the Customize Permissions button.
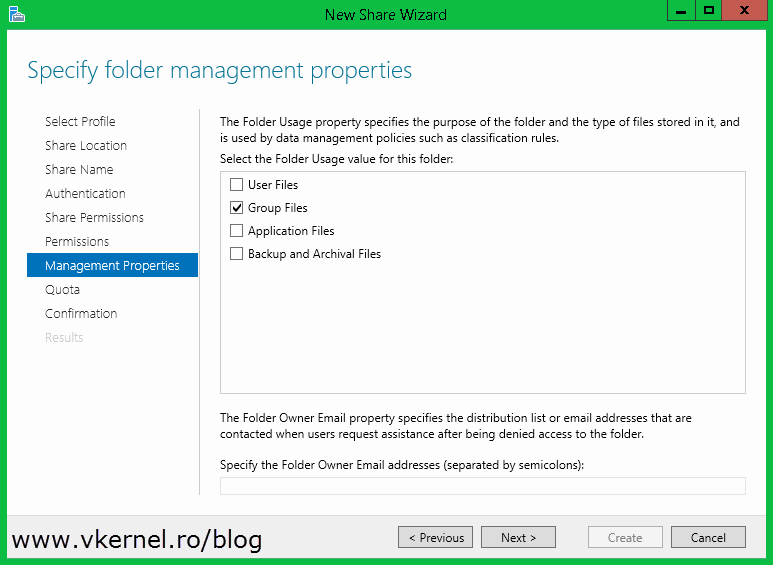
On the Management Properties page, you are given the option to select what type of files are kept in this shared folder; for data management policies.
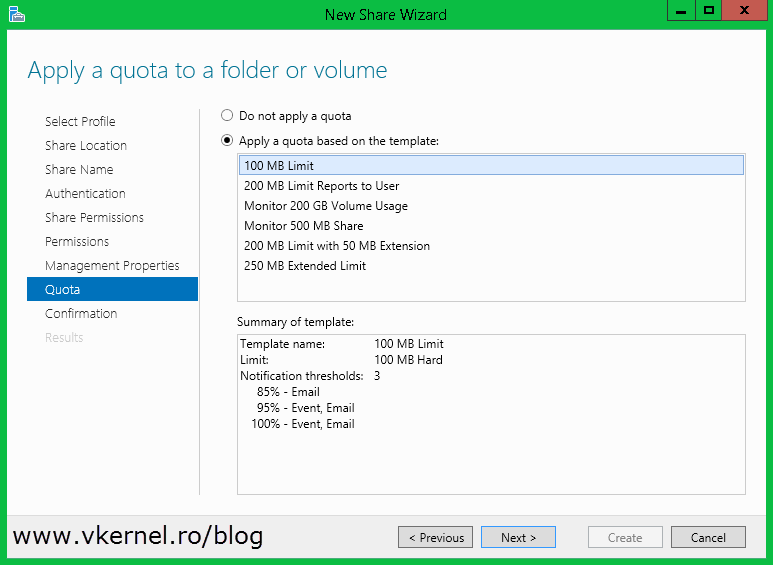
From this page you can set a quota for the folder. In case the already available quota templates are not good for you, no worries, you can customize the quota or create a new one after the folder is shared using the File Server Resource Manager console.
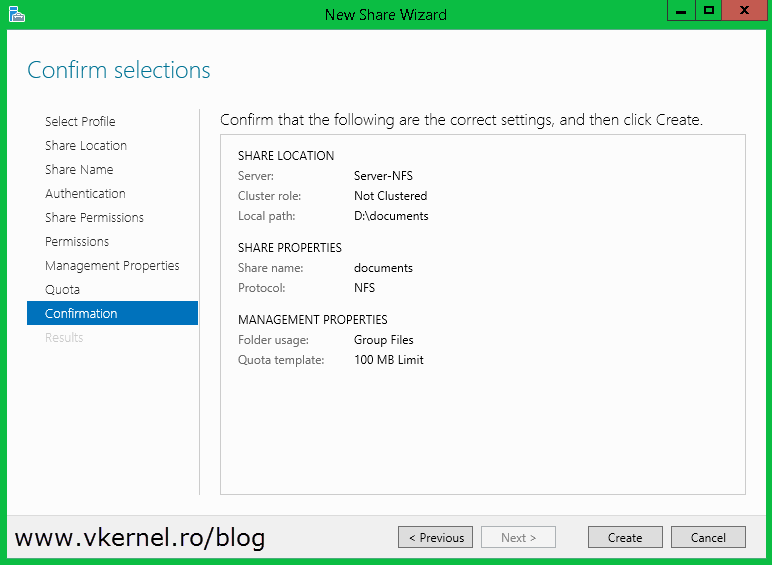
Click Create to share this folder using NFS.
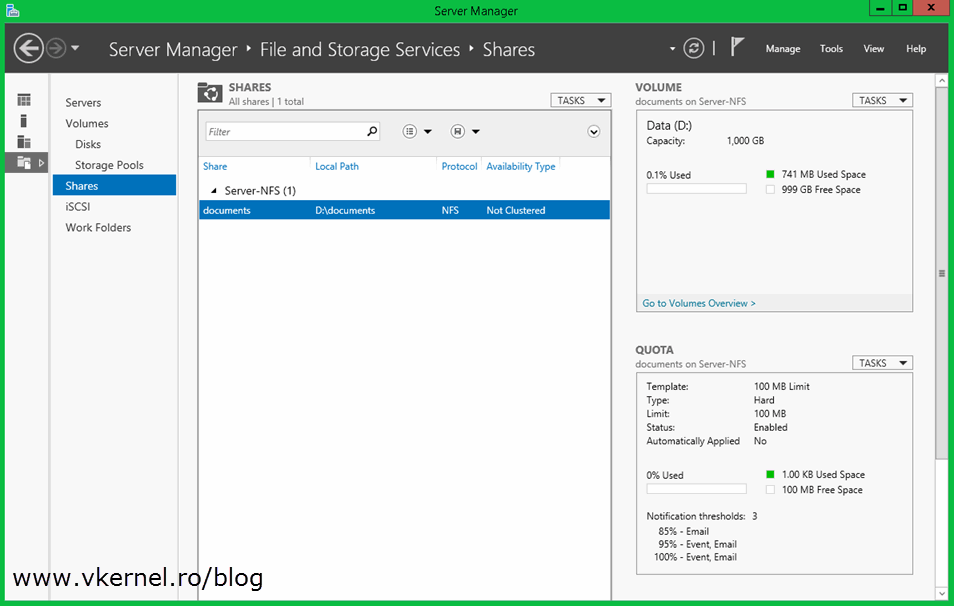
At the end you should have some nice graphics that tells you how much space is used on the share and how is the quota limit staying (if you applied one). And that’s it, your folder is shared using the NFS protocol.
Configure NFS shares using PowerShell
Just in case you are a scripting person, here is a simple PowerShell line that enables NFS sharing on a folder with the default settings:
New-NfsShare -Name "YOUR SHARE NAME" -Path "YOUR FOLDER PATH" -AllowRootAccess $false -Permission ReadOnly -Authentication all
You can also put ReadWrite for everyone but is better to do this on a per machine basis, and here is how:
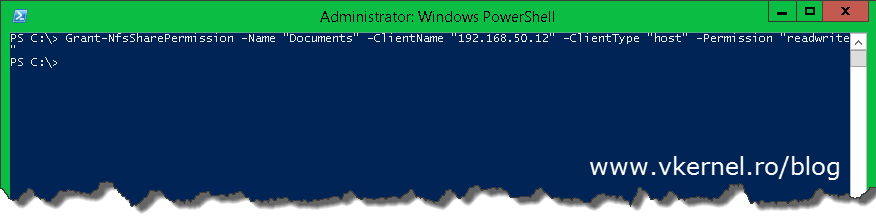
Grant-NfsSharePermission -Name "YOUR SHARE NAME" -ClientName "YOUR LINUX CLIENT IP" -ClientType "host" -Permission "readwrite"
Now that the share permissions are in place, the next step is to configure the NTFS permissions. Follow this Microsoft Technet article on how to do it using PowerShell, or if you are in a hurry use the GUI to test this. Again, between the share permission and NTFS permissions, the one that is more restrictive wins. That’s why I set the share permissions to Read-Write so I can control the effective permissions trough NTFS.
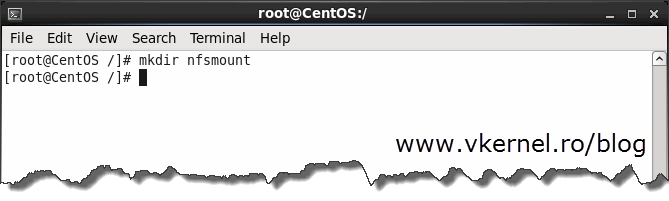
Now log in to one of your Linux clients and open a terminal with root permissions. Go to your favorite path and create a new directory here using the mkdir command. This is needed in order to mount the Windows NFS share.
mkdir YOUR DIRECTORY NAME
To mount the NFS share to the directory that was just created use the following command:
mount YOUR NFS SERVER:/YOUR NFS SHARE DIRECTORY /YOUR MOUNT FOLDER

And here it is, the Windows share mounted on a Linux client. As you can see the client has Read-Write permissions, since it’s able to create files and folders in this share.

To make the mount permanent you will have to edit your /etc/fstab file, if not, the share will be un-mapped after reboot and you will have to use the mount command again.
This is all there is. Use whatever method you are more comfortable with because they all have the same result.
Want content like this delivered right to your
email inbox?
Для подключения NFS шары в Windows Server 2012 R2 необходимо выполнить следующие шаги:
- Установить клиент NFS Для этого нужно открыть PowerShell от имени администратора и выполнить следующую команду:
Install-WindowsFeature -Name NFS-Client
- Создать директорию, в которую будет монтироваться NFS шара В нашем примере создадим директорию
C:\mnt\nfs - Подключить NFS шару Для этого нужно выполнить команду
mountв PowerShell от имени администратора. Синтаксис командыmountследующий:mount -o anon \\nfs_server\share_name C:\mnt\nfs
Где:
-o anonуказывает использовать анонимный доступ\\nfs_server\share_name– путь до NFS шарыC:\mnt\nfs– путь до директории, в которую будет монтироваться NFS шара
После выполнения команды NFS шара будет подключена и доступна для использования.
Если необходимо автоматически монтировать NFS шару при загрузке Windows Server 2012 R2, можно использовать функционал Task Scheduler. Для этого нужно создать задачу, которая будет выполнять команду
mountпри каждой загрузке сервера.
Сегодня мы узнаем, как установить и настроить клиент сетевой файловой системы (NFS) в Windows Server 2012 R2 / Windows 8. Итак, чтобы подключить каталог (общий ресурс) с сервера NFS в Windows Server 2012 R2 / Win 8, вам необходимо: Требуется, как и в предыдущих версиях Windows, установить отдельный компонент: клиент NFS (Client for NFS). Кроме того, для управления настройками подключения NFS вы можете установить компонент «Службы для сетевой файловой системы» (NFS).
Клиент NFS был включен в операционные системы Microsoft, начиная с Windows 7. В Windows 2012/8 клиент NFS претерпел незначительные изменения. Теперь клиент NFS поддерживает аутентификацию по протоколу Krb5p – Kerberos версии 5 (помимо Krb5 и Krb5i, поддержка которых появилась в Windows 7), поддерживаются большие пакеты NFS – до 1024 КБ (в Win 7 максимальный размер пакет 32 КБ)
Клиент NFS можно установить через графический интерфейс или с помощью Powershell. Для установки в графическом режиме откройте консоль Server Manager и выберите компонент (Features) с именем Client for NFS.

По умолчанию графическая консоль управления NFS не устанавливается вместе с этим компонентом. Чтобы решить эту проблему, установите параметр «Службы» для инструментов управления сетевой файловой системой в «Инструменты удаленного администрирования сервера» -> «Инструменты администрирования ролей» – раздел> «Инструменты файловых служб.

Чтобы установить клиент NFS в Windows 8, вам необходимо активировать компонент Службы для NFS -> Клиент для NFS, установив / удалив компоненты (включив или отключив функции Windows) в Панели управления (Панель управления -> Программы -> Программы и Функции).
Примечание. В отличие от Windows 7, где клиент NFS присутствовал в выпусках Enterprise и Ultimate, в Windows 8 клиент сетевой файловой системы поддерживается только в предыдущей версии: Windows 8 Enterprise.
Все перечисленные выше системные компоненты можно установить с помощью одной команды Powershell:
Установка-Windows Функция NFS-Client, RSAT-NFS-Admin
После завершения установки запустите консоль «Службы для управления сетевой файловой системой» и откройте окно свойств «Клиент для NFS).
В настройках клиента NFS вы можете установить:
- Используемые транспортные протоколы – TCP + UDP по умолчанию
- Тип шарнирного крепления NFS: жесткий или мягкий
- На вкладке «Права доступа к файлам» указываются права по умолчанию для папок и файлов, созданных в общих папках NFS
- На вкладке «Безопасность» указаны протоколы аутентификации, которые могут использоваться для аутентификации на сервере NFS
После настройки установки администраторы смогут смонтировать каталог NFS с помощью команды mount:
Смонтируйте \\ lx01.abc.lab \ nfs z:
В этом примере мы смонтировали под буквой Z: каталог NFS, расположенный на сервере lx01.abc.lab.
После монтирования каталог, смонтированный таким образом на сервере NFS, доступен в системе как отдельный диск с буквой Z:\ .
Вы также можете смонтировать общий ресурс NFS с помощью Powershell:
Новый-PSdrive -PSProvider FileSystem -Name Z -Root \\ lx01.abc.lab \ nfs
Примечание. Каталог nfs, связанный таким образом, будет доступен только в том сеансе Powershell, в котором была запущена команда mount. Чтобы навсегда смонтировать каталог NFS в системе, добавьте параметр –Persist в конец команды Powershell.
Вы можете размонтировать смонтированный каталог следующим образом:
Remove-PSdrive -Name Y
Источник изображения: winitpro.ru

25 Installing And Configuring Nfs On Windows Server 2012 R2
Journey Through Literary Realms and Immerse Yourself in Words: Lose yourself in the captivating world of literature with our 25 Installing And Configuring Nfs On Windows Server 2012 R2 articles. From book recommendations to author spotlights, we’ll transport you to imaginative realms and inspire your love for reading. Step select on and the click or based add destination click next the option- on role installation click server the selecting server page features roles the option- based select the type and from 6- based installation wizard- on server a next- Clicking installation the 5- pool feature role
25 Installing And Configuring Nfs On Windows Server 2012 R2 Benisnous
25 Installing And Configuring Nfs On Windows Server 2012 R2 Benisnous
Hardware configuration the sizing of your server will greatly depend on the type and volume of traffic. there absolutely is no one size fits all configuration. your success will be determined by how well you know the workload profile that the server will experience. these are just examples. 25. installing and configuring nfs on windows server 2012 r2 msft webcast 68.3k subscribers subscribe 153 share 42k views 7 years ago windows server 2012 r2 (mcsa) tutorial for beginners.
Installing And Configuring Nfs On Windows Server 2012 R2 Adrian
Installing And Configuring Nfs On Windows Server 2012 R2 Adrian
Let’s begin by installing nfs on windows, so open server manager, go to manage and click add roles and features. follow the wizard until you reach the server roles page. here check the server for nfs box under the file and storage services > file and iscsi services. May 8, 2014 connect windows server 2012 r2 to nfs shares overview out of the box, a windows server 2012 and windows 8 cannot connect to nfs based shares from your linux environment by default. although, they both include a feature that when enable does allow them to. Run server manager and click [add roles and features]. click [next] button. select [role based or feature based installation]. select a host which you’d like to add services. click [next] button. check a box [client for nfs]. click [install] button. after finishing installation, click [close] button. run command prompt and input commands like. This article describes the steps you should follow to deploy nfs. what’s new in network file system here’s what’s changed for nfs in windows server: support for nfs version 4.1: this protocol version includes the following enhancements. makes navigating firewalls easier, which improves accessibility.
Nfs Identity Mapping In Windows Server 2012 Microsoft Community Hub
Nfs Identity Mapping In Windows Server 2012 Microsoft Community Hub
Run server manager and click [add roles and features]. click [next] button. select [role based or feature based installation]. select a host which you’d like to add services. click [next] button. check a box [client for nfs]. click [install] button. after finishing installation, click [close] button. run command prompt and input commands like. This article describes the steps you should follow to deploy nfs. what’s new in network file system here’s what’s changed for nfs in windows server: support for nfs version 4.1: this protocol version includes the following enhancements. makes navigating firewalls easier, which improves accessibility. Clicking next on the add roles and features wizard. 5. on the installation type step, click role based or feature based installation, and click next. selecting the role based installation option. 6. on the select destination server page, click the select a server from the server pool option. Install network file system configure nfs authentication create an nfs file share what’s new in network file system the following improvements are available for nfs in windows server 2012: support for nfs version 4.1. this protocol version includes the following enhancements. navigating firewalls is easier which improves accessibility.

Configuring An Nfs Server On Windows Server 2012 R2 Serverlab
Configuring An Nfs Server On Windows Server 2012 R2 Serverlab
Clicking next on the add roles and features wizard. 5. on the installation type step, click role based or feature based installation, and click next. selecting the role based installation option. 6. on the select destination server page, click the select a server from the server pool option. Install network file system configure nfs authentication create an nfs file share what’s new in network file system the following improvements are available for nfs in windows server 2012: support for nfs version 4.1. this protocol version includes the following enhancements. navigating firewalls is easier which improves accessibility.
25. Installing And Configuring Nfs On Windows Server 2012 R2
25. Installing And Configuring Nfs On Windows Server 2012 R2
simple video demonstration on how to install and configure nfs server role in windows server 2012 r2 this video contains: 1) deploy network file system network file system (nfs) provides a file sharing solution that lets you transfer files between donate us : paypal.me microsoftlab install nfs server in windows server 2012 r2 1. prepare dc11 : os windows server this guide will walk you through the steps on install and configure nfs service on windows server 2022. we will also install simple video demonstration on how to create and configure nfs share on windows server 2012 r2 by using new server in this video i will show you how to configure nfs on windows server 2012 r2 and mount shared drive on esxi. this video explains you how to install and configure nfs server on windows server 2019. installing and configuring nfs role on
Conclusion
All things considered, it is evident that the article offers valuable insights about 25 Installing And Configuring Nfs On Windows Server 2012 R2. From start to finish, the writer presents an impressive level of expertise on the topic. In particular, the discussion of X stands out as a key takeaway. Thank you for this article. If you need further information, feel free to reach out through email. I look forward to your feedback. Furthermore, below are some relevant posts that might be useful: