What a source of frustration!! I’m only a lowly BI Developer so figuring this out for myself was made pretty horrible by the seemingly complete lack of documentation from Microsoft.
There are a couple of ways to get to your environment variables in Windows Server 2012.
Way 1:
1: Windows Key > Right-click on This PC and select Properties
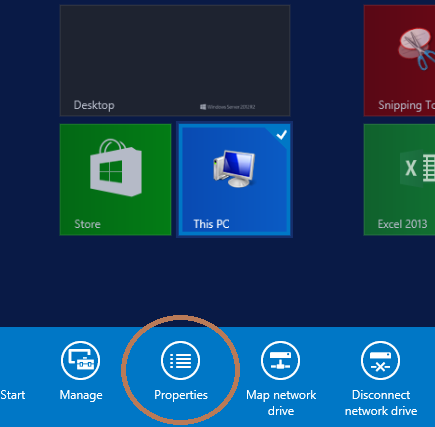
2: Click on Advanced system settings on the left

3: Select Environment Variables

Way 2:
1: Windows Key > Type ‘Control Panel’ and open the Control Panel
2: Select User Accounts

3: Select User Accounts (yes… again)

4: Edit button for Environment Variables appears

Happy Hunting!
Setting environment variables on Windows Server 2012 is an essential task for system administrators and developers who want to configure their server for specific needs. Environment variables are dynamic values that can affect the behavior of various processes running on the server. They provide a way to control the configuration of software applications and enable them to access specific paths, libraries, or settings.
In this blog post, I will guide you through the process of setting environment variables on Windows Server 2012. We will explore different methods that can be used to accomplish this task, ensuring that you have the flexibility to choose the one that best suits your requirements. Whether you are a beginner or an experienced user, this step-by-step guide will help you understand the process and complete it successfully.
Video Tutorial:
What’s Needed
Before we dive into the different methods of setting environment variables, let’s take a quick look at what you’ll need for this task:
1. Windows Server 2012: This blog post specifically focuses on setting environment variables on Windows Server 2012. Make sure you have access to a server running this operating system to follow along.
2. Administrative Privileges: In order to make changes to the environment variables, you will need administrative privileges on the server. Ensure that you have the necessary permissions to modify system settings.
3. Knowledge of Variable Names and Values: Before setting environment variables, you should have an understanding of the variable names and values you want to configure. Make a note of the variables you plan to modify or create, along with their corresponding values, as this will be required during the process.
What Requires Your Focus?
When setting environment variables on Windows Server 2012, there are a few key aspects that require your attention. Here’s what you should focus on:
1. Variable Names: It is important to use the correct variable names while configuring environment variables. Any discrepancies in the names can lead to issues or unintended consequences. Ensure that you have accurate information about the variable names you want to modify or create.
2. Variable Values: The values assigned to environment variables determine their behavior and functionality. Take care to input the appropriate values, as incorrect or invalid values can cause unexpected errors or failures.
3. System vs. User Variables: Windows Server allows you to set environment variables at either the system level or the user level. System variables apply to all users on the server, while user variables are specific to individual user accounts. Determine whether you need to set variables at the system level or for a particular user and choose the appropriate method accordingly.
Now let’s explore the different methods you can use to set environment variables on Windows Server 2012.
Method 1. Using System Properties
The first method we’ll discuss is using the System Properties window to set environment variables. This method allows you to configure both system-wide and user-specific environment variables. The steps below outline how to use this method:
1. Open the System Properties window by right-clicking on the «Computer» icon on your desktop or in the Start menu, selecting «Properties,» and then clicking on «Advanced system settings.«
2. In the System Properties window, go to the «Advanced» tab and click on the «Environment Variables» button.
3. In the Environment Variables window, you will see two sections: User variables and System variables. To set a system-wide variable, click on the «New» button under the «System variables» section. To set a user-specific variable, click on the «New» button under the «User variables» section.
4. A new window will appear, where you can enter the variable name and its corresponding value. Make sure to provide the correct information based on your requirements.
5. Click «OK» to save the changes and close the windows.
6. To verify that the variable has been set correctly, you can open a Command Prompt window and type «echo %VARIABLE_NAME%» (replace «VARIABLE_NAME» with the actual variable name). If the variable has been set correctly, the Command Prompt will display its value.
Pros:
1. Easy and straightforward process to set environment variables.
2. Allows configuration of both system-wide and user-specific variables.
3. Changes take effect immediately without the need for a system restart.
Cons:
1. Limited automation and scalability for larger-scale deployments or configurations.
2. Manual process that can be time-consuming if multiple variables need to be set.
Method 2. Using PowerShell
The second method we’ll explore is using PowerShell to set environment variables on Windows Server 2012. PowerShell provides a powerful command-line interface that allows for automation and scripting. Here’s how you can use it to set environment variables:
1. Open PowerShell by searching for it in the Start menu or via the Run dialog (press Windows key + R and type «powershell«).
2. To set a system-wide environment variable, use the following command:
`$env:VARIABLE_NAME = «VALUE«`
Replace «VARIABLE_NAME» with the name of the variable you want to set, and «VALUE» with its corresponding value.
3. To set a user-specific environment variable, use the following command:
`$env:VARIABLE_NAME = «VALUE» -scope User`
Again, replace «VARIABLE_NAME» with the name of the variable and «VALUE» with its value.
4. After executing the command, you can verify whether the variable has been set correctly by running the command `Get-ChildItem Env:VARIABLE_NAME`. The output should display the variable’s value.
Pros:
1. Automation-friendly approach that allows for scripting and bulk configuration.
2. Flexibility to set both system-wide and user-specific variables.
3. Changes take effect immediately without the need for a system restart.
Cons:
1. Requires familiarity with PowerShell scripting and commands.
2. May not be as user-friendly for those without PowerShell experience.
Method 3. Using the Registry Editor
The third method we’ll cover involves using the Registry Editor to set environment variables. This method offers a more low-level approach, as it directly modifies the Windows Registry entries associated with environment variables. Follow the steps below to use this method:
1. Open the Registry Editor by searching for «regedit» in the Start menu or via the Run dialog.
2. Navigate to the following path: `HKEY_LOCAL_MACHINE\SYSTEM\CurrentControlSet\Control\Session Manager\Environment`
3. In the right-hand pane, you will see a list of existing environment variables. To set a new variable, right-click on the empty space and select «New» > «String Value«.
4. Enter the variable name as the name of the new string value.
5. Double-click on the newly created string value and enter the corresponding value in the «Value data» field.
6. Click «OK» to save the changes.
7. To verify that the variable has been set correctly, you can open a Command Prompt window and type «echo %VARIABLE_NAME%» (replace «VARIABLE_NAME» with the actual variable name). If the variable has been set correctly, the Command Prompt will display its value.
Pros:
1. Provides direct control over the Windows Registry entries for environment variables.
2. Allows for advanced customization and fine-tuning of variable settings.
3. Changes take effect immediately without the need for a system restart.
Cons:
1. Modifying the Windows Registry can be risky if done improperly, potentially leading to system instability or errors.
2. Requires knowledge of the Windows Registry structure and settings.
Method 4. Using a Third-Party Tool
The fourth method we’ll discuss is using a third-party tool to set environment variables on Windows Server 2012. There are various tools available that provide a graphical user interface (GUI) for managing environment variables. These tools simplify the process and offer additional features and functionality. Here’s how you can use a third-party tool:
1. Search for a suitable third-party tool that supports setting environment variables on Windows Server 2012. Examples include Rapid Environment Editor, System Variables Editor, and Path Editor.
2. Download and install the tool of your choice following the installation instructions provided by the developer.
3. Launch the tool and navigate to the environment variables section.
4. Use the provided GUI interface to set the desired variables and their corresponding values.
5. Save the changes and exit the tool.
6. To verify that the variable has been set correctly, you can open a Command Prompt window and type «echo %VARIABLE_NAME%» (replace «VARIABLE_NAME» with the actual variable name). If the variable has been set correctly, the Command Prompt will display its value.
Pros:
1. User-friendly and intuitive GUI interface.
2. Additional features and functionality compared to the built-in methods.
3. Provides an organized view of the existing variables and their settings.
Cons:
1. Dependency on third-party software, which may require additional maintenance and updates.
2. Potential compatibility or stability issues with certain Windows versions.
Why Can’t I Set Environment Variables?
While setting environment variables on Windows Server 2012 can be a straightforward process, there are a few reasons why you might encounter difficulties. Here are some common reasons and their corresponding fixes:
1. Inadequate Permissions: If you don’t have administrative privileges, you won’t be able to modify system settings. Ensure that you are logged in with an account that has the necessary permissions.
Fix: Log in with an administrator account or consult with your system administrator to grant the required permissions.
2. Incorrect Variable Names: Environment variable names are case-insensitive and should follow certain guidelines. Make sure you are using the correct name for the variable you want to modify or create.
Fix: Double-check the spelling and capitalization of the variable name and ensure it matches the correct format.
3. Duplicate Variable Names: Windows does not allow multiple variables with the same name. If you attempt to create a new variable with a name that already exists, the process may fail.
Fix: Delete the existing variable with the same name or choose a different name for the new variable.
Implications and Recommendations
Setting environment variables on Windows Server 2012 can have various implications and considerations. Here are three recommendations to keep in mind:
1. Back Up the Registry: Before making any changes to the Windows Registry, it is advisable to create a backup to revert to in case of any issues or errors. This ensures that you can restore the system to a stable state if necessary.
2. Review Variable Dependencies: Environment variables can be interdependent, meaning that changes to one variable may impact others. Before modifying or deleting a variable, review its dependencies and consider the potential effects on related software or processes.
3. Document Changes: It is important to document any changes made to environment variables for future reference and troubleshooting purposes. Create a record of the modified variables, their values, and the reasoning behind the changes. This can be helpful in maintaining system integrity and understanding potential impacts.
5 FAQs about Setting Environment Variables
Q1: Can I set environment variables using a batch file?
A: Yes, you can set environment variables using a batch file. Batch files allow you to automate the process of configuring variables by executing a set of commands. You can use the «set» command followed by the variable name and its value to set environment variables within a batch file.
Q2: How can I view the current environment variables on Windows Server 2012?
A: To view the current environment variables on Windows Server 2012, you can use the Command Prompt or PowerShell. In the Command Prompt, type «set» and press Enter. This will display a list of all current environment variables and their values. In PowerShell, you can use the command «Get-ChildItem Env:» to achieve the same result.
Q3: Are environment variables case-sensitive on Windows Server 2012?
A: No, environment variables on Windows Server 2012 are not case-sensitive. Variable names are case-insensitive, meaning that the casing of the letters does not matter. However, the values assigned to the variables can be case-sensitive, depending on the specific software or processes that utilize them.
Q4: Can I delete environment variables I no longer need?
A: Yes, you can delete environment variables that you no longer need. To do this, follow the appropriate method (such as using System Properties, PowerShell, or the Registry Editor) and locate the variable you want to delete. Select the variable and click «Delete» or use the appropriate command to remove it. It is recommended to document any changes and be aware of potential dependencies before deleting variables.
Q5: Are environment variables inherited by child processes?
A: Yes, environment variables set at the system level are inherited by child processes. When a new process is created, it inherits the environment variables of its parent process. This allows for seamless access to shared configuration settings and paths. However, user-level variables are not inherited by child processes.
Final Words
Setting environment variables on Windows Server 2012 is an important task for system administrators and developers. By following the methods outlined in this blog post, you can easily configure system-wide or user-specific variables to meet your requirements. Whether you choose to use the System Properties window, PowerShell, the Registry Editor, or third-party tools, understanding the process and best practices will ensure a successful outcome. Remember to consider the implications, back up the Registry, and document any changes to maintain system integrity. With the ability to control and modify environment variables, you can effectively configure your Windows Server 2012 environment to suit your needs.
Today I was installing Python on the Windows Server 2012 R2 VM. Once installing the Python, we need to add the Installation path of the Python to environmental variable PATH.
In the earlier versions of windows, we will see the environmental variables in the computer properties. But in Win Server 2012, it is moved to the Control panel.
1. Go to Control Panel.

2. Click on “System and Security”

3. Click on “System”
4. Click on “Advanced System Settings” on the left pane.

5. System Properties will be opened as below.

Click the Environment Variables and add your PATH. It works the same way as that of the earlier versions. But only the location is changed.
Happy Coding,
Sathish Nadarajan.
Are you asking if it is possible to set a environment variable at the system level from a command prompt in [easyazon_link identifier=”178439307X” locale=”US” tag=”wn0d5-20″]Windows Server 2012 R2[/easyazon_link]? The answer is YES. I am for example trying to set system variables for my Amazon ACCESS and SECRET key so I can utilize the Amazon CLI tools. You can add User or System variables via GUI:
- Press “Windows-Key+X” and select System
- Select Advanced System Properties
- Select Environment Settings
- Now you can add User or System variables
Other way is to use simple command line and save few click for your self 🙂
- Open CMD.exe and run as Administrator
To add user variable such as JAVA_HOME=C:\Program Files (x86)\Java\jre
setx JAVA_HOME "C:\Program FIles (x86)\Java\jre"
To add system variables you have to use switch -m in the command line
setx -m AMAZON_ACCESS_KEY "012343456789"
setx -m AMAZON_SECRET_KEY "vmadvgjhgsdjgsdiiuuygdisggksgd"
If you check the variables via GUI path – you will see that these variables are added in the correct place. I am sure now you think that this can be scripted – yes it can. Easily you can create a batch file with those variables and run as Administrator to apply them into your system.
About the utility – you can find it in [easyazon_link identifier=”1449371620″ locale=”US” tag=”wn0d5-20″]Windows 8[/easyazon_link], [easyazon_link identifier=”0735682550″ locale=”US” tag=”wn0d5-20″]Windows Server 2012 R2[/easyazon_link]:
C:\setx /?
Description:
    Creates or modifies environment variables in the user or system
    environment. Can set variables based on arguments, regkeys or
    file input.
-
NOTE: 1) SETX writes variables to the master environment in the registry.
      2) On a local system, variables created or modified by this tool
         will be available in future command windows but not in the
         current CMD.exe command window.
      3) On a remote system, variables created or modified by this tool
         will be available at the next logon session.
      4) The valid Registry Key data types are REG_DWORD, REG_EXPAND_SZ,
         REG_SZ, REG_MULTI_SZ.
      5) Supported hives:  HKEY_LOCAL_MACHINE (HKLM),
         HKEY_CURRENT_USER (HKCU).
      6) Delimiters are case sensitive.
      7) REG_DWORD values are extracted from the registry in decimal
         format.
Examples:
    SETX MACHINE COMPAQ
    SETX MACHINE "COMPAQ COMPUTER" /M
    SETX MYPATH "%PATH%"
    SETX MYPATH ~PATH~
    SETX /S system /U user /P password  MACHINE COMPAQ
    SETX /S system /U user /P password MYPATH ^%PATH^%
    SETX TZONE /K HKEY_LOCAL_MACHINE\System\CurrentControlSet\
         Control\TimeZoneInformation\StandardName
    SETX BUILD /K "HKEY_LOCAL_MACHINE\Software\Microsoft\Windows
         NT\CurrentVersion\CurrentBuildNumber" /M
    SETX /S system /U user /P password TZONE /K HKEY_LOCAL_MACHINE\
         System\CurrentControlSet\Control\TimeZoneInformation\
         StandardName
    SETX /S system /U user /P password  BUILD /K
         "HKEY_LOCAL_MACHINE\Software\Microsoft\Windows NT\
         CurrentVersion\CurrentBuildNumber" /M
    SETX /F ipconfig.out /X
    SETX IPADDR /F ipconfig.out /A 5,11
    SETX OCTET1 /F ipconfig.out /A 5,3 /D "#$*."
    SETX IPGATEWAY /F ipconfig.out /R 0,7 Gateway
    SETX /S system /U user /P password  /F c:\ipconfig.out /X
Have one with this utility !
[easyazon_image align=”none” height=”160″ identifier=”1449342574″ locale=”US” src=”http://blog.technotesdesk.com/wp-content/uploads/2015/05/51emIPDVFDL._SL160_.jpg” tag=”wn0d5-20″ width=”122″]
Переменные среды в операционной системе Windows Server 2012 играют важную роль в настройке окружения и определении рабочих параметров для запущенных программ и служб. Корректная настройка переменных среды позволяет упростить работу с приложениями и снизить время на их настройку.
В данной статье мы рассмотрим главные аспекты настройки переменных среды в Windows Server 2012 и предоставим примеры использования. Мы познакомимся с основными переменными среды, такими как PATH, TEMP, и TMP, и узнаем, как изменить их значения для достижения нужных целей.
В процессе работы мы рассмотрим различные способы настройки этих переменных среды, включая использование командной строки, редактора реестра и интерфейса управления системой. Мы также узнаем о некоторых практических советах и трюках, которые помогут избежать потенциальных проблем и сделать процесс настройки переменных среды максимально эффективным.
Важно отметить, что правильная настройка переменных среды в Windows Server 2012 может существенно повысить удобство и производительность работы. Она может упростить запуск приложений, а также обеспечить доступ к необходимым ресурсам и функциям операционной системы.
Работа с переменными среды в Windows Server 2012
Переменные среды в Windows Server 2012 представляют собой ключевые элементы операционной системы, которые определяют параметры окружения, доступные для всех пользователей и программ на сервере. Они позволяют настраивать различные системные параметры, задавать пути к файлам и директориям, а также управлять поведением приложений и работой операционной системы.
Работа с переменными среды происходит через специальный интерфейс, который позволяет добавлять, изменять и удалять переменные среды. Доступ к этому интерфейсу можно получить через панель управления или командную строку. В интерфейсе предоставляется возможность просмотра текущих значений переменных и их значений по умолчанию.
Добавление новой переменной среды осуществляется путем указания ее имени и значения. Заключительное стрелка-подчеркивание в имени переменной указывает, что она является системной, а не пользовательской. Пользовательские переменные часто используются для настройки окружения конкретного пользователя.
Некоторые переменные среды в Windows Server 2012 имеют специальное значение и используются системой для выполнения определенных задач. Например, переменная %PATH% определяет список директорий, в которых операционная система будет искать исполняемые файлы при выполнении команд из командной строки или приложений. Изменение значения этой переменной может повлиять на работу команд и программ.
Помимо просмотра и изменения переменных среды, в Windows Server 2012 также можно управлять ими с помощью скриптов и командной строки. Это позволяет автоматизировать настройку окружения и обеспечивает гибкость и удобство администрирования сервера.
В целом, работа с переменными среды в Windows Server 2012 является важной частью настройки и управления сервером. Правильное использование переменных среды позволяет оптимизировать работу сервера и упростить администрирование системы.
Настройка переменных среды в Windows Server 2012
Для настройки переменных среды в Windows Server 2012 можно воспользоваться инструментами операционной системы. Чтобы открыть окно настройки переменных среды, необходимо:
- Кликнуть правой кнопкой мыши по значку «Мой компьютер» на рабочем столе или в меню «Пуск».
- Выбрать пункт меню «Свойства».
- В открывшемся окне выбрать вкладку «Дополнительные параметры системы».
- Кликнуть кнопку «Переменные среды».
В окне настройки переменных среды можно установить глобальные переменные для всех пользователей или локальные переменные только для текущего пользователя.
Чтобы добавить новую переменную среды, необходимо кликнуть кнопку «Добавить» и ввести имя переменной и значение. Имя переменной должно быть уникальным и состоять только из букв, цифр и подчеркивания. Значение переменной может быть путем к директории или файлу, а также любым другим текстовым значением.
Чтобы изменить или удалить существующую переменную, необходимо выбрать ее в списке и кликнуть кнопку «Изменить» или «Удалить».
После внесения изменений в переменные среды, изменения могут не отразиться на работающих процессах или открытых программных обеспечениях. Для того чтобы изменения вступили в силу, необходимо перезагрузить операционную систему или запустить программу заново.
Настройка переменных среды в Windows Server 2012 позволяет определить пути к необходимым ресурсам для работы операционной системы и программного обеспечения. Это позволяет упростить конфигурацию и обеспечить более гибкий и эффективный режим работы сервера.